muscle gaining secrets 2 - dragon door suspension gym...muscle gaining secrets 2.0
TRANSCRIPT


© 2011 Mike Gillette. All Rights Reserved http ://www.cr it icalbench.com /gains/savage-strength
This publication is fully copyrighted and does not come with giveaway or resale rights.You may not sell or redistribute this report. It is reserved solely for paying customers ofCriticalBench.com. Copyright and illegal distribution violations will be prosecuted. Thisdocument has been watermarked with a digital GPS identification tag.
NOTICEThe information presented is not intended for the treatment or prevention of disease,nor a substitute for medical treatment, nor as an alternative to medical advice.This publication is presented for information purposes, to increase the public knowledgeof developments in the field of strength and conditioning. The program outlined hereinshould not be adopted without a consultation with your health professional.Use of the information provided is at the sole choice and risk of the reader. You mustget your physician’s approval before beginning this or any other exercise program..Use of the information provided is at the sole choice and risk of the reader. You must get yourphysician’s approval before beginning this or any other exercise program.
LEGAL STUFF© 2011 Mike Gillette
Published by CriticalBench.comAll Rights Reserved. International Copyright

© 2011 Mike Gillette. All Rights Reserved http ://www.cr it icalbench.com /gains/savage-strength
If you’re reading this, congratulations! That means you’re the proud owner of theSavage Strength Training System. So now that you have both the Savage StrengthManual and the Savage Strength Workouts, you should be ready to go.
But wait… Did you already read Special Report #1? Where I show you how to set upyour own home gym for practically nothing? Okay good.
But I know that some of you still like to train at a commercial gym… or the ‘Y’… or someother place that is definitely a gym.
Hey that’s great. But if this is you, then you’ve also been wondering how you can do allof those cool exercises that I showed you at your gym. Because you’ve already figuredout that no gym is going to let you bring in your own chains and start attaching them toall of that gym’s pretty equipment!
So what you need is a cheap, portable, lightweight and soft (so it doesn’t scratchequipment) version of the chain rig I showed you. But you still need it to be completelyadjustable and strong enough to train on.
Don’t worry, I have you covered. First things first, here’s your next list…• two 9’ lengths of nylon rope (minimum breaking strength 1,500 lbs)• two 4’ lengths of nylon rope (minimum breaking strength 1,000 lbs)• two 4” x 1.25” sections of plastic pipe
Note: Putting this all together will require tying several knots. Now I have provided youwith a ton of photos to show you exactly how to do this. And the easiest way for you todo all this is to simply follow along with the photos. It will actually be faster than readingthrough the instructions. And if you do get stuck, you can always go back and doublecheckthe instructions too. But since I know you’d rather just get this thing rigged upand start your workout, I suggest you try it the ‘fast way’ first.
BY MIKE GILLETTE
HOW TO CONSTRUCT YOUR OWN PORTABLE, ADJUSTABLESUSPENSION GYM FOR LESS THAN $20!
© 2011 Mike Gillette. All Rights Reserved http ://www.cr it icalbench.com /gains/savage-strength
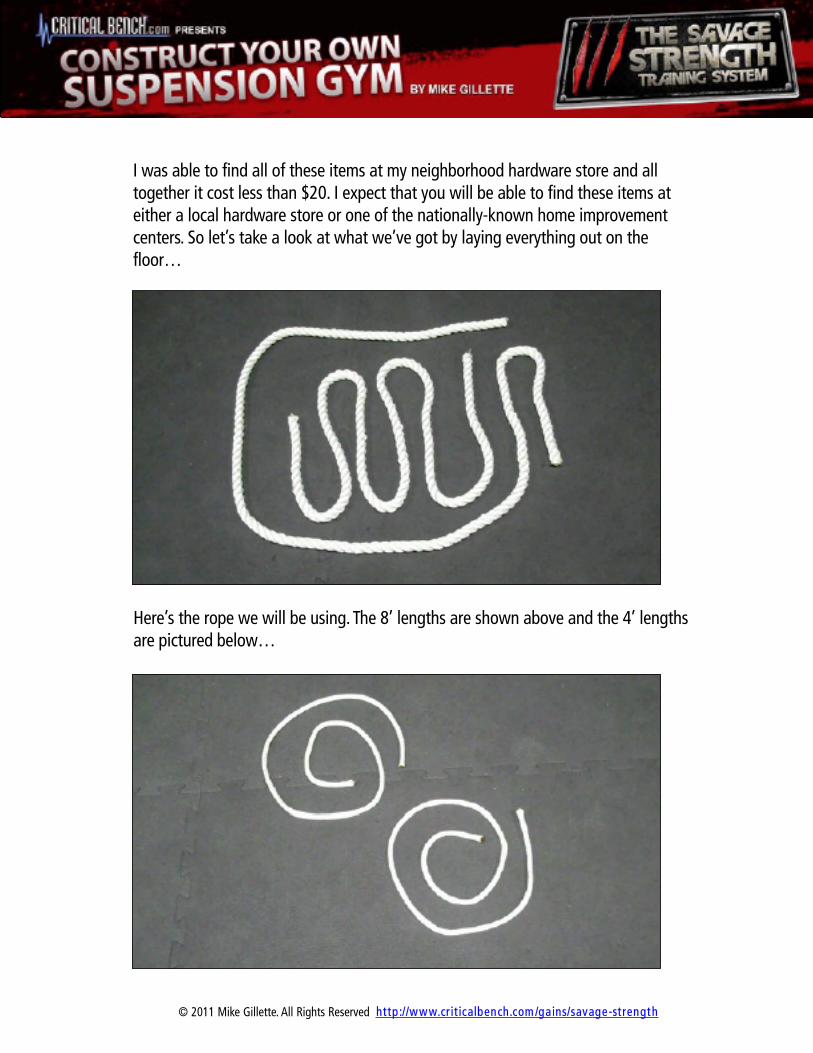
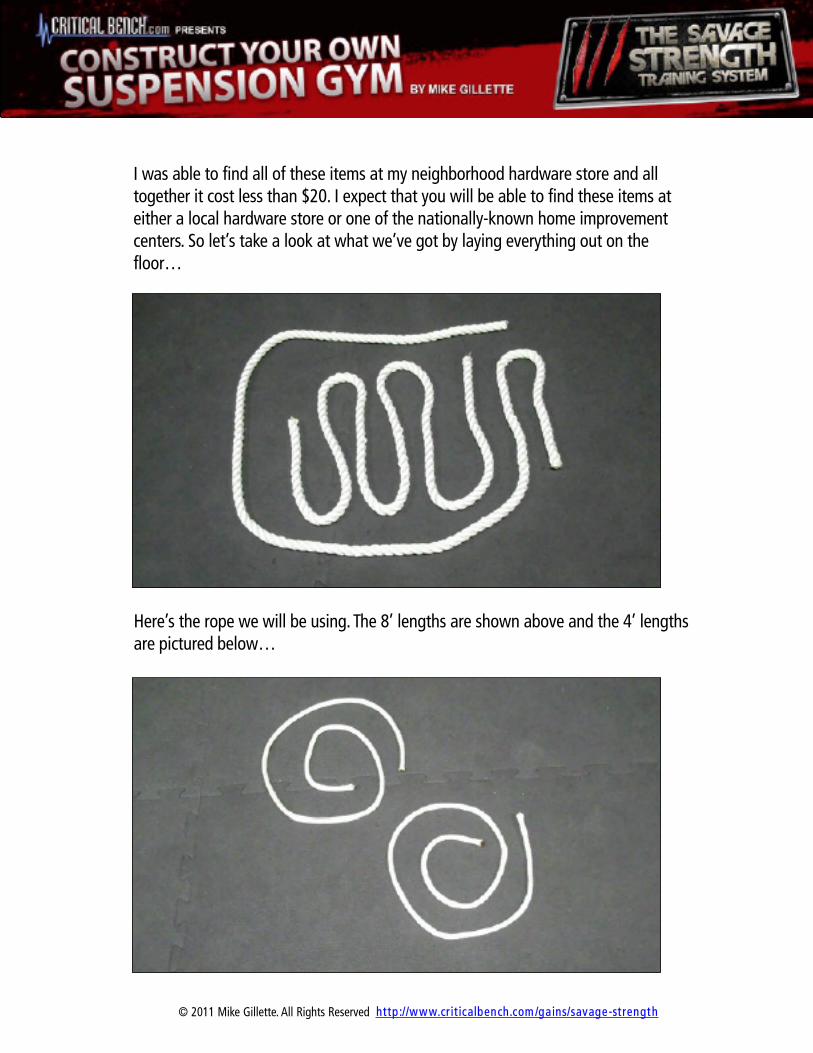
I was able to find all of these items at my neighborhood hardware store and alltogether it cost less than $20. I expect that you will be able to find these items ateither a local hardware store or one of the nationally-known home improvementcenters. So let’s take a look at what we’ve got by laying everything out on thefloor…
Here’s the rope we will be using. The 8’ lengths are shown above and the 4’ lengthsare pictured below…

© 2011 Mike Gillette. All Rights Reserved http ://www.cr it icalbench.com /gains/savage-strength
Above you can see the two pieces of plastic pipe. Look for these in the plumbingsection. Don’t go longer than a length of 4” but look for a diameter that fits yourhands comfortably. For example, I prefer a diameter of 1.25 to 1.5 inches.
Now it’s time to start putting this all together. We are going to be tying a lot of knotsso stay with me. We are going to begin by making a permanent loop on one end ofeach of the 9’ lengths of rope. Follow along with the photographs and you’ll be fine.
© 2011 Mike Gillette. All Rights Reserved http ://www.cr it icalbench.com /gains/savage-strength
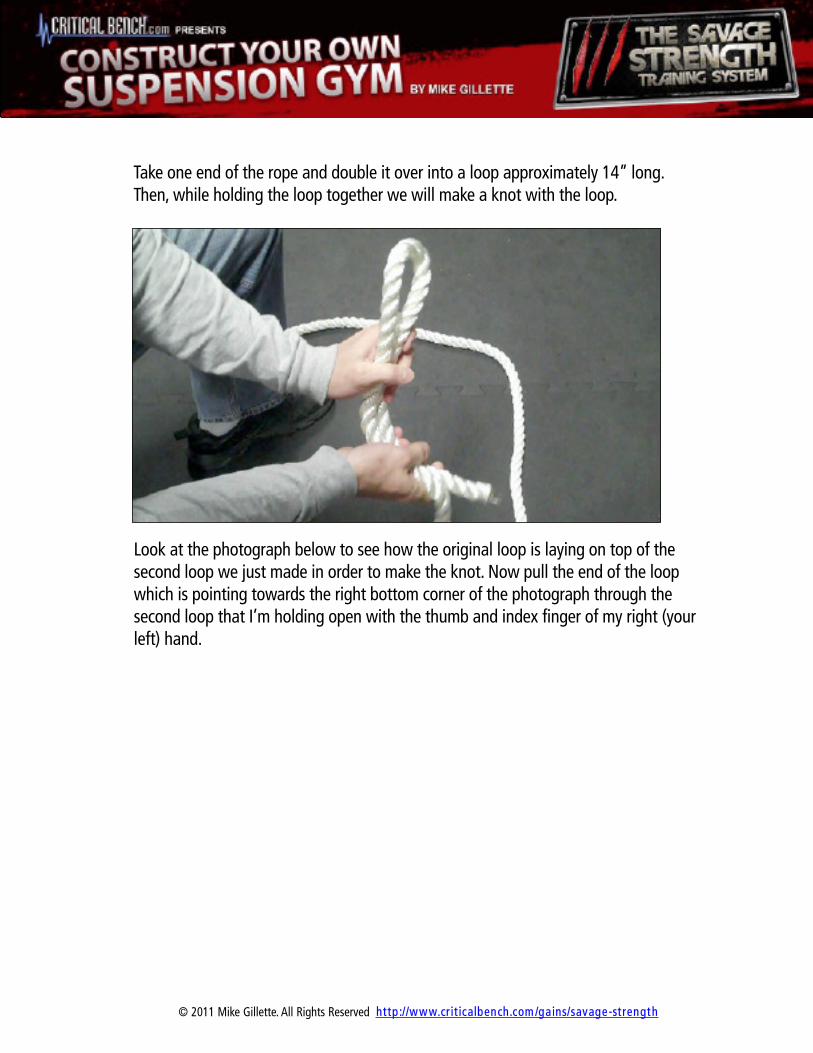
Take one end of the rope and double it over into a loop approximately 14” long.Then, while holding the loop together we will make a knot with the loop.
Look at the photograph below to see how the original loop is laying on top of thesecond loop we just made in order to make the knot. Now pull the end of the loopwhich is pointing towards the right bottom corner of the photograph through thesecond loop that I’m holding open with the thumb and index finger of my right (yourleft) hand.

© 2011 Mike Gillette. All Rights Reserved http ://www.cr it icalbench.com /gains/savage-strength
Here is the final stage of making the knot. The end of the loop is pulled firmlythrough the second loop. It doesn’t need to be a big loop, just large enough to passthe other end of the rope through it.

© 2011 Mike Gillette. All Rights Reserved http ://www.cr it icalbench.com /gains/savage-strength
This is what the knot should look like after you’ve finished. Nothing fancy, just asimple loop knot. Give it one more strong pull to make sure it’s really tight andyou’re done. Now do the same thing with the other 9’ foot rope so that both ropesend up with one loop on one end.
Each of these two 9’ ropes will serve the same purpose as the chains that you sawin the Special Report #1. They are the ‘uprights’ which will support the exercisehandles that we will be rigging up next.
In order to correctly mount these long ropes, you must first look around your gymand select an appropriate horizontal support. This could be a chinning bar, the topcrossbar of a power rack, Smith Machine or cable crossover machine.

© 2011 Mike Gillette. All Rights Reserved http ://www.cr it icalbench.com /gains/savage-strength
Regardless of which kind of horizontal structure you choose to attach your ropes to,you will mount the ropes the same way. This is accomplished by dropping theknotted end over the top of your horizontal support, and threading the other endthrough the loop as shown above. (Note: only the ‘threading’ process is illustrated inthe photo, thus rope has not yet been hung over a horizontal support.
Once you have pulled the untied end through the loop, continue to pull the rest ofthe rope through until the loop end is tight up against your horizontal bar. This isshown in greater detail in the next photograph.
© 2011 Mike Gillette. All Rights Reserved http ://www.cr it icalbench.com /gains/savage-strength
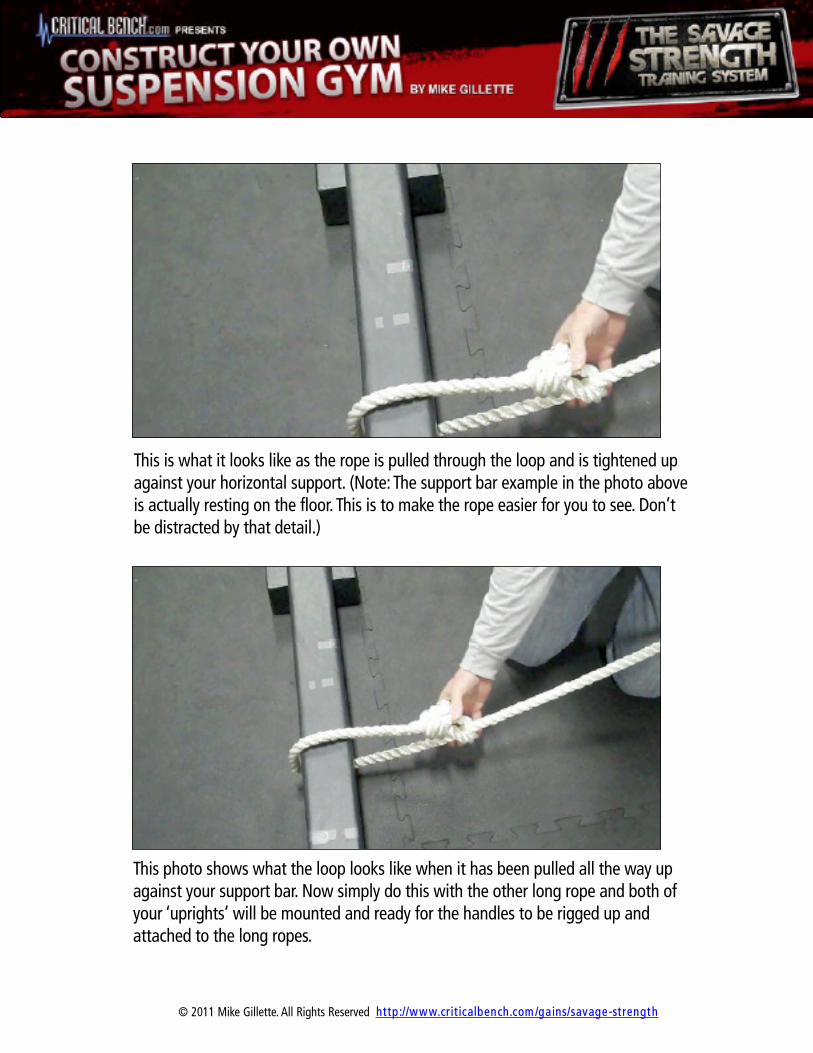
This is what it looks like as the rope is pulled through the loop and is tightened upagainst your horizontal support. (Note: The support bar example in the photo aboveis actually resting on the floor. This is to make the rope easier for you to see. Don’tbe distracted by that detail.)
This photo shows what the loop looks like when it has been pulled all the way upagainst your support bar. Now simply do this with the other long rope and both ofyour ‘uprights’ will be mounted and ready for the handles to be rigged up andattached to the long ropes.

© 2011 Mike Gillette. All Rights Reserved http ://www.cr it icalbench.com /gains/savage-strength
We are now ready to assemble our handles. Begin by taking one of the 4’ lengths ofrope and threading it through one of the sections of plastic pipe.
Run the rope completely through the pipe and pull it through until the section of pipeis as close to the center of the rope as you can make it.

© 2011 Mike Gillette. All Rights Reserved http ://www.cr it icalbench.com /gains/savage-strength
With the section of the pipe centered in the rope, set everything on floor beforeproceeding any further. This will make it much easier to follow along with the photosas we tie off each of the handles. I will start out by tying a simple know at the end ofthe rope on the right side.
In this photo the first knot at the end of the rope on the right is finished. Notice thatthe knot has not been pulled completely tight; you can still see a small opening orloop. Next I will taking the end of the rope on the left and prepare to thread it throughthe loop of the knot on the right.
© 2011 Mike Gillette. All Rights Reserved http ://www.cr it icalbench.com /gains/savage-strength
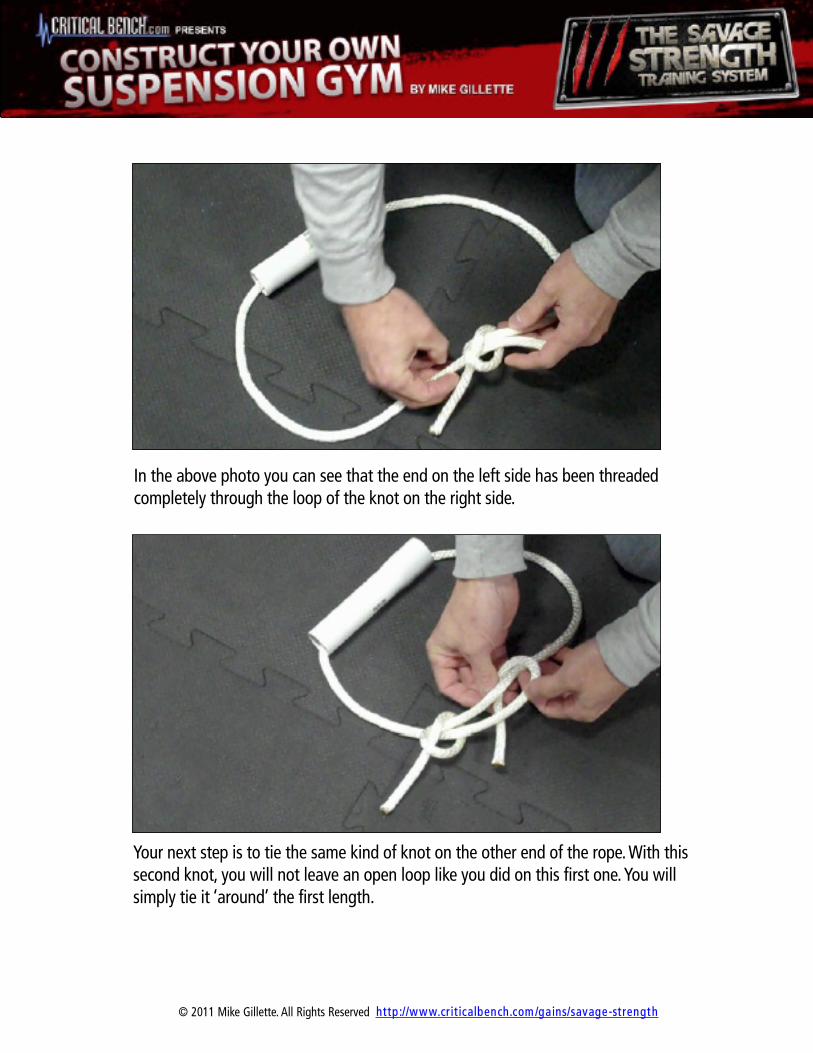
In the above photo you can see that the end on the left side has been threadedcompletely through the loop of the knot on the right side.
Your next step is to tie the same kind of knot on the other end of the rope. With thissecond knot, you will not leave an open loop like you did on this first one. You willsimply tie it ‘around’ the first length.
© 2011 Mike Gillette. All Rights Reserved http ://www.cr it icalbench.com /gains/savage-strength
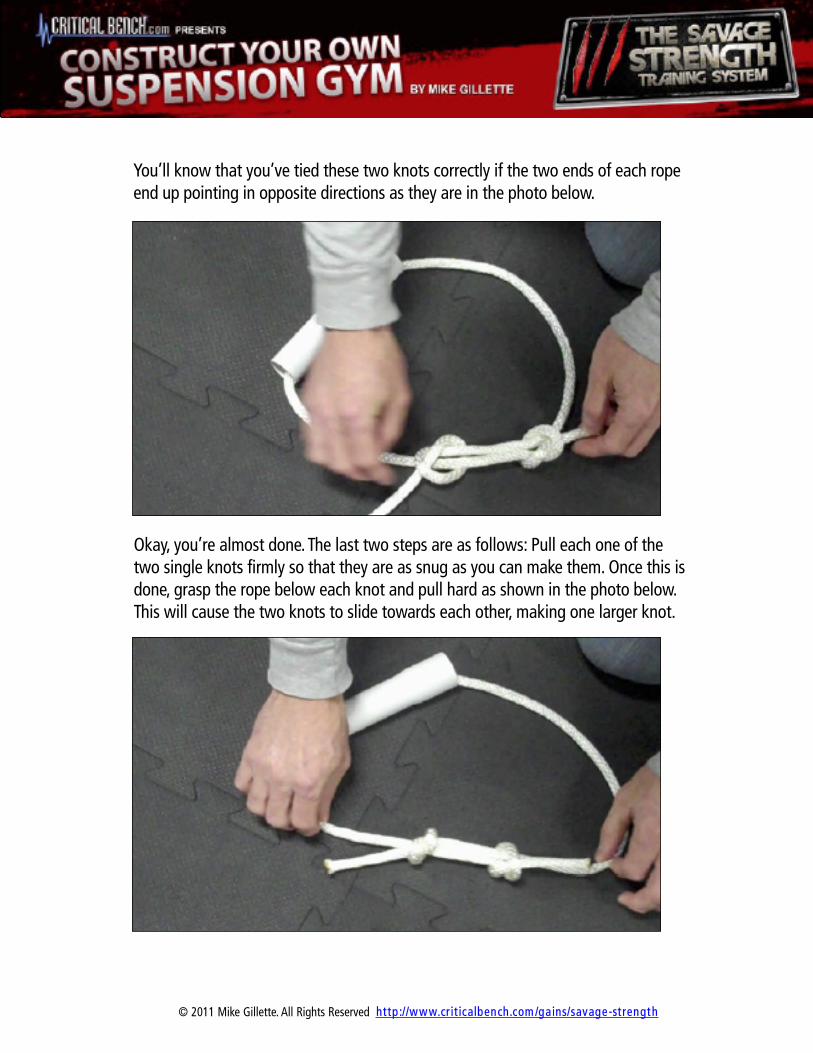
You’ll know that you’ve tied these two knots correctly if the two ends of each ropeend up pointing in opposite directions as they are in the photo below.
Okay, you’re almost done. The last two steps are as follows: Pull each one of thetwo single knots firmly so that they are as snug as you can make them. Once this isdone, grasp the rope below each knot and pull hard as shown in the photo below.This will cause the two knots to slide towards each other, making one larger knot.
© 2011 Mike Gillette. All Rights Reserved http ://www.cr it icalbench.com /gains/savage-strength
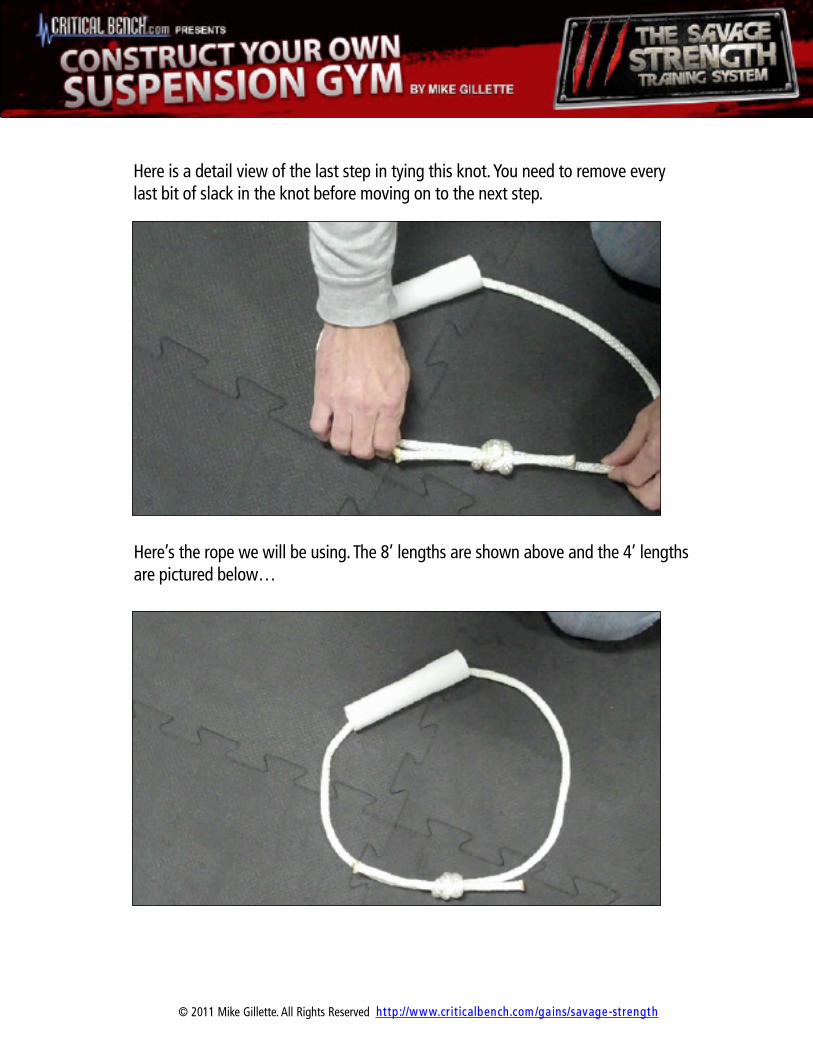
Here is a detail view of the last step in tying this knot. You need to remove everylast bit of slack in the knot before moving on to the next step.
Here’s the rope we will be using. The 8’ lengths are shown above and the 4’ lengthsare pictured below…

© 2011 Mike Gillette. All Rights Reserved http ://www.cr it icalbench.com /gains/savage-strength
In this photo I am rotating the rope around through the plastic tube. This way theknot ends up out of your way and remains concealed in the handle.
This is how the handle should appear when you are finished. Now repeat thesesame steps with the other length of rope and plastic pipe to make your secondhandle.

© 2011 Mike Gillette. All Rights Reserved http ://www.cr it icalbench.com /gains/savage-strength
You are now going to learn how to attach the handles to the long-rope ‘uprights’.(Note: in the following photos, the long ropes are shown laid out on the floor. This isdone so that it is easier to see how the knots are tied).
Start out by positioning the rope loop with the pipe portion closest to you as shownabove.
Then take the ‘pipe-side’ of the loop underneath the main rope and pull it on throughthe other side of the loop.
© 2011 Mike Gillette. All Rights Reserved http ://www.cr it icalbench.com /gains/savage-strength
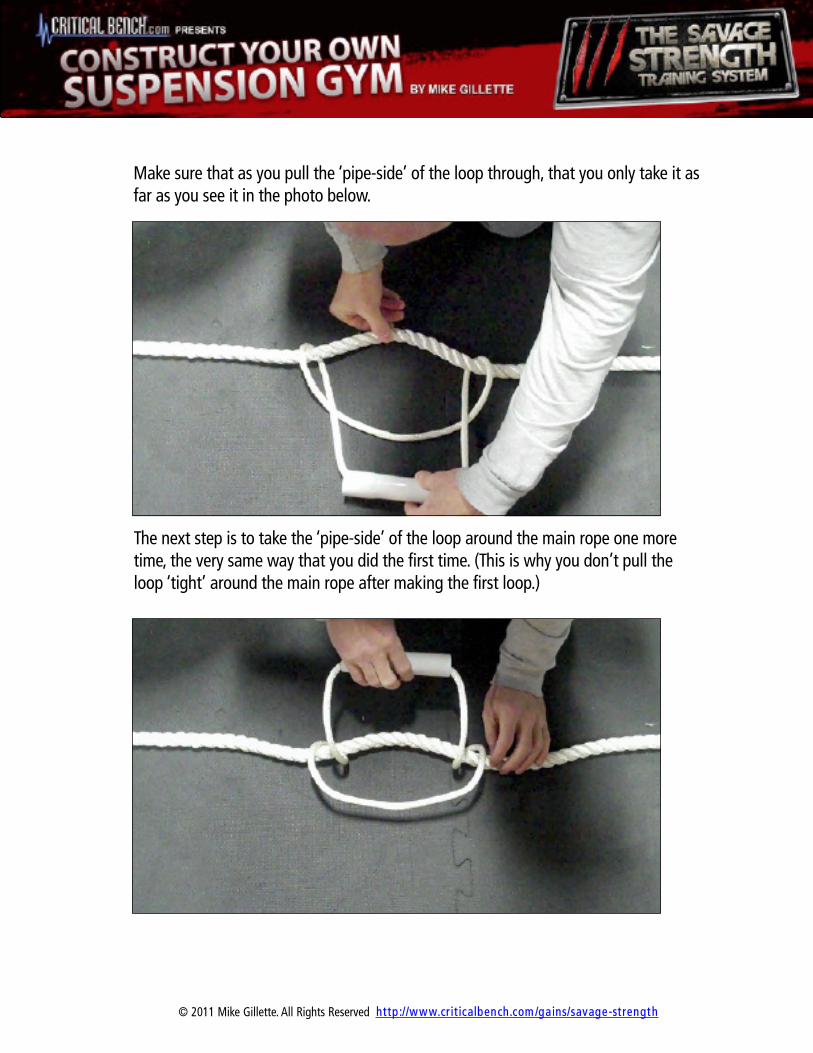
Make sure that as you pull the ‘pipe-side’ of the loop through, that you only take it asfar as you see it in the photo below.
The next step is to take the ‘pipe-side’ of the loop around the main rope one moretime, the very same way that you did the first time. (This is why you don’t pull theloop ‘tight’ around the main rope after making the first loop.)

© 2011 Mike Gillette. All Rights Reserved http ://www.cr it icalbench.com /gains/savage-strength
In this photo the ‘pipe’-side’ of the loop is shown being pulled through the secondand final time.
You are now ready to begin pulling the loop tight in order to form the finished knot.As you begin pulling on the loop, use your other hand to start sliding the outsideends of the knot together as shown in the photo below.
© 2011 Mike Gillette. All Rights Reserved http ://www.cr it icalbench.com /gains/savage-strength
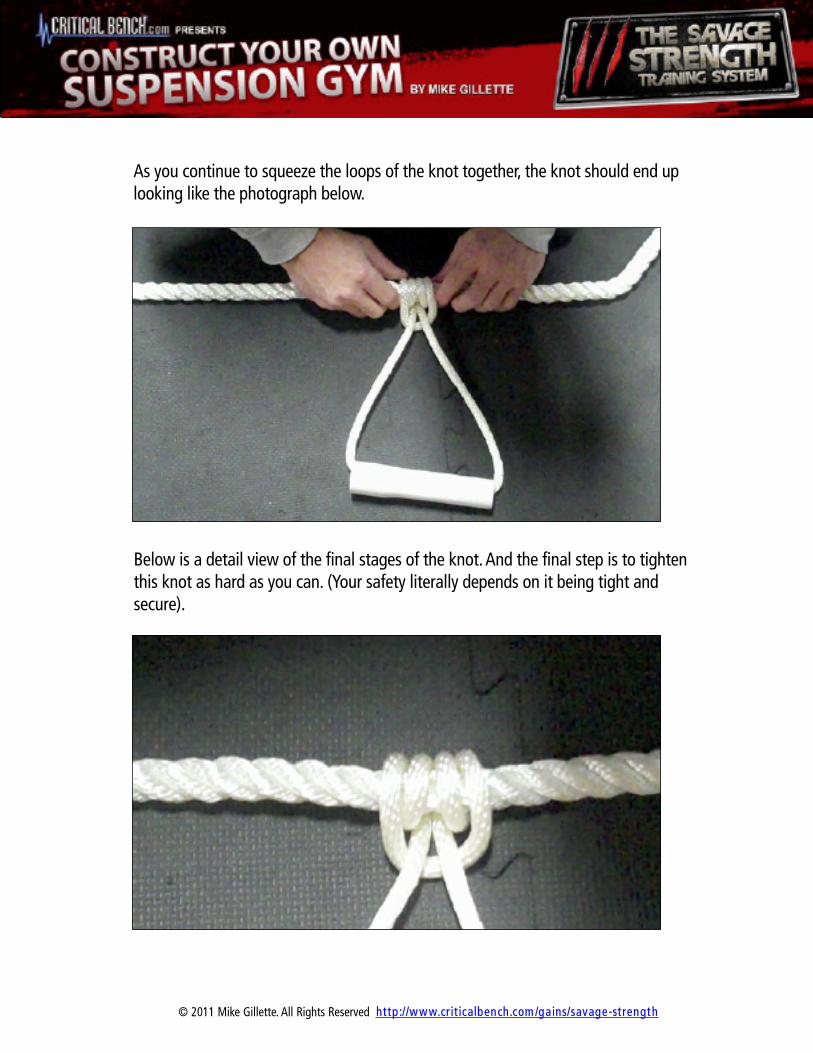
As you continue to squeeze the loops of the knot together, the knot should end uplooking like the photograph below.
Below is a detail view of the final stages of the knot. And the final step is to tightenthis knot as hard as you can. (Your safety literally depends on it being tight andsecure).

© 2011 Mike Gillette. All Rights Reserved http ://www.cr it icalbench.com /gains/savage-strength
The photo below depicts the finished knot. This knot has been correctly made andis also tight enough on the main rope for you to use.
And here is the final product... Two suspended ropes supporting two rope handleswhich are capable of holding you in place while you exercise.

© 2011 Mike Gillette. All Rights Reserved http ://www.cr it icalbench.com /gains/savage-strength
This final group of four photographs will show how to loosen the knot to raise thehandles up or down depending on what exercise you want to perform next. The firststep is to grasp the main rope with one hand to stabilize it. Then, with your otherhand, pinch the loop together and press it into the knot to loosen it.
In the photo below you can see the result of loosening up the knot. From here, yousimply slide the knot up or down the rope to the next position of your choice.

© 2011 Mike Gillette. All Rights Reserved http ://www.cr it icalbench.com /gains/savage-strength
In this photo the knot has been re-positioned so it is time to pull it tight in order to setit securely in its new position.
And here the final step is shown; pulling the loop as hard as possible in order tosecure the knot firmly.
© 2011 Mike Gillette. All Rights Reserved http ://www.cr it icalbench.com /gains/savage-strength
I was able to find all of these items at my neighborhood hardware store and alltogether it cost less than $20. I expect that you will be able to find these items ateither a local hardware store or one of the nationally-known home improvementcenters. So let’s take a look at what we’ve got by laying everything out on thefloor…
Here’s the rope we will be using. The 8’ lengths are shown above and the 4’ lengthsare pictured below…
© 2011 Mike Gillette. All Rights Reserved http ://www.cr it icalbench.com /gains/savage-strength
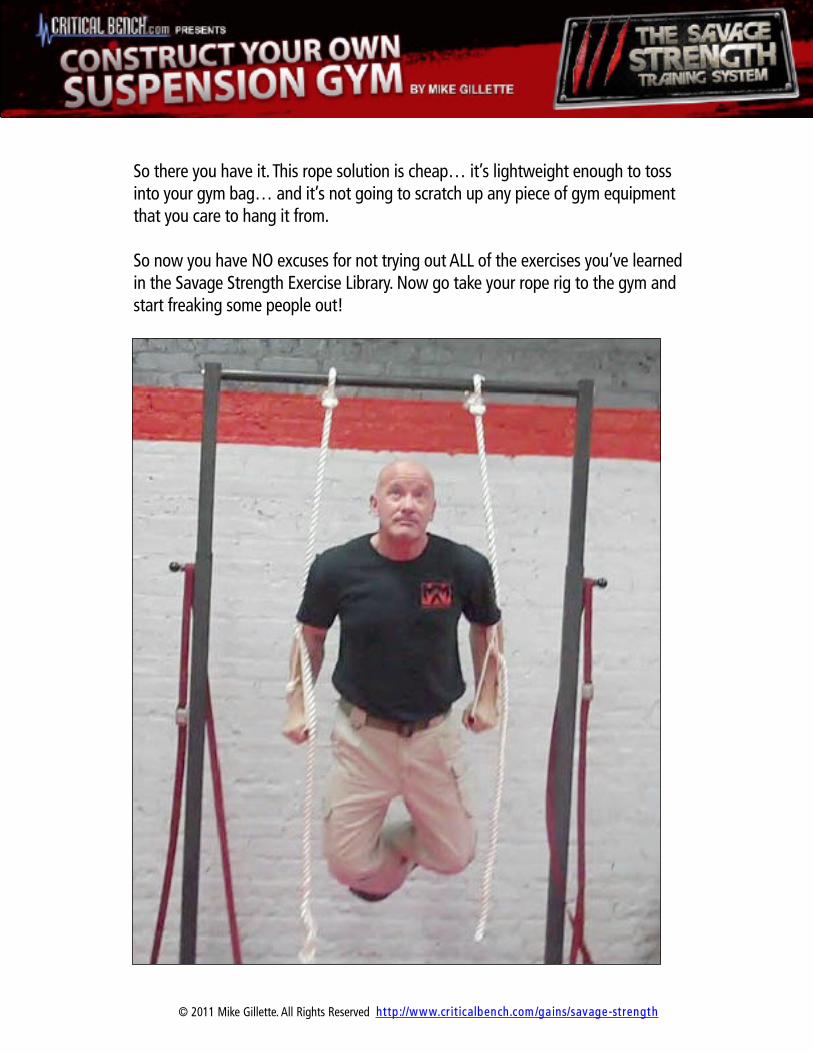
So there you have it. This rope solution is cheap… it’s lightweight enough to tossinto your gym bag… and it’s not going to scratch up any piece of gym equipmentthat you care to hang it from.
So now you have NO excuses for not trying out ALL of the exercises you’ve learnedin the Savage Strength Exercise Library. Now go take your rope rig to the gym andstart freaking some people out!