multilingual version overview quick setup (wired model ... · multilingual version overview quick...
TRANSCRIPT

Multilingual Version
Overview
Quick Setup (Wired Model)
Quick Setup (Wireless Model)
525Z
701_702_702a_801_EZ_setup_V1.0
Package Content Insert Micro SD Card
PRODUCT OVERVIEW
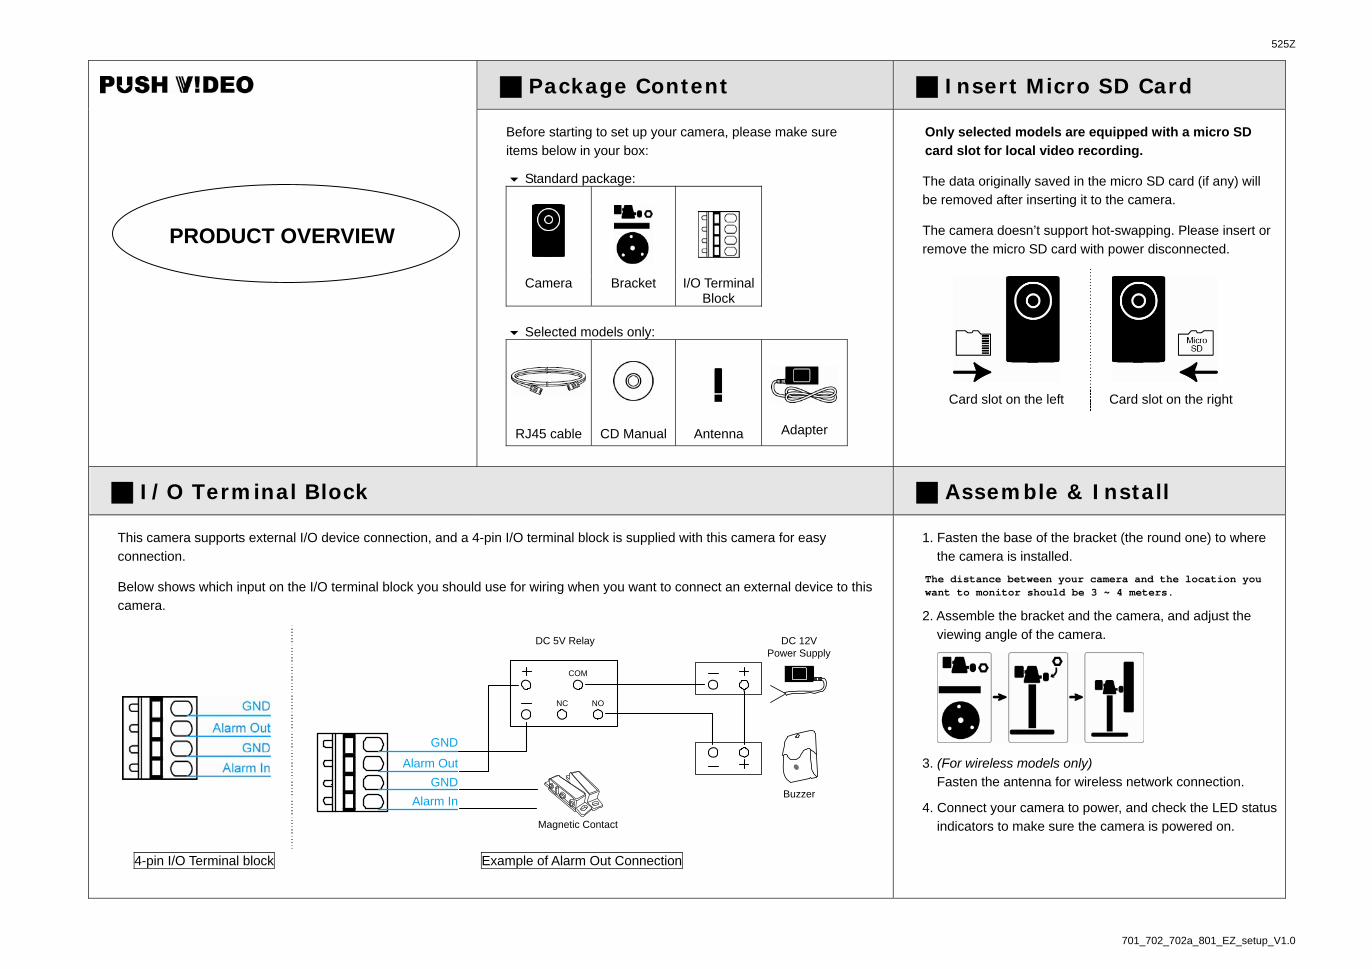
Before starting to set up your camera, please make sure items below in your box:
Standard package:
Camera Bracket I/O Terminal Block
Selected models only:
RJ45 cable CD Manual Antenna Adapter
Only selected models are equipped with a micro SD card slot for local video recording.
The data originally saved in the micro SD card (if any) will be removed after inserting it to the camera.
The camera doesn’t support hot-swapping. Please insert or remove the micro SD card with power disconnected.
Card slot on the left Card slot on the right
I/O Terminal Block Assemble & Install
This camera supports external I/O device connection, and a 4-pin I/O terminal block is supplied with this camera for easy connection.
Below shows which input on the I/O terminal block you should use for wiring when you want to connect an external device to this camera.
Alarm Out
GND
Alarm InGND
DC 5V Relay DC 12VPower Supply
Buzzer
COM
NC NO
Magnetic Contact
4-pin I/O Terminal block Example of Alarm Out Connection
d
1. Fasten the base of the bracket (the round one) to where the camera is installed.
The distance between your camera and the location you want to monitor should be 3 ~ 4 meters.
2. Assemble the bracket and the camera, and adjust the viewing angle of the camera.
3. (For wireless models only) Fasten the antenna for wireless network connection.
4. Connect your camera to power, and check the LED status indicators to make sure the camera is powered on.

Hardware Overview Type 1: Type 2:
Focus Adjustment LED Status Indicators
When you’ve accessed the camera successfully for the first time, it’s recommended to adjust the clearness of the video by rotating the camera lens, as illustrated below.
ICON LAN Internet System Status During powering on Always on Always off
Reset default Blinking (on 250 ms, off 250 ms) Always off
Upgrade Blinking (on 250 ms, off 250 ms)
Blinking (on 250 ms, off 250 ms)
Connection Status LAN connected Always on --
LAN disconnected Blinking (on 100 ms, off 500 ms) --
Internet connected -- Always on
Internet disconnected -- Blinking (on 100 ms, off 500 ms)
Micro SD Card Status Micro SD Card Error Keep current status for 20 sec
Blinking for 3 sec Return to current status Other Connection Status
<EaZy Networking> Failed to Connect to EagleEyes Cloud Server
Always on Blinking
(on 5 sec off 0.5 sec on 0.5 sec off 0.5 sec on 5 sec)

585Z
701_702_702a_801_EZ_setup_V1.4
Free EaZy Networking Connection Environment Checking Device Checking QUICK SETUP
With
Cloud Account Management
a).The device access right is managed by Owner, and the registered devices cannot be registered again unless the machine has restored the default settings.
b).Owner can share the access right with other users through the function, Buddy Share. For further information on Buddy Share, please refer to the video: www.youtube.com/watch?v=1N8EPiCKnOs
EaZy Networking is a free P2P cloud service to connect AVTECH devices to the Internet automatically by plug-and-play, enabling you to check the live view via your mobile device or laptop at anytime (in 64 kbps). Should you feel the live view is not fluent enough and would like to speed it up, AVTECH provides several data plans for you to subscribe. We've also offered 2GB data allowance as a gift on each device for you to experience. When 2GB is up, the network transmission speed will restore to what it should be.
In most cases, the device is connected via P2P. Connection via the relay server is only applied to some complex environments such as the private IP-based network environment used by a large enterprise.
a) Do you use a router or wireless router to connect to Internet?
b) You know where the router is located, and the
DHCP function of your router is on.
a) Your camera is powered on, and connected to the wireless router with a RJ45 network cable.
b) Check the LED status indicators, and make sure (LAN) and (Internet) are always on.
If (Internet) is not on, make sure the DHCP function of your router is enabled, or refer to Q&A section to fix your problem.
c) You have an iPhone / iPad / Android mobile
device, and it’s connected to Internet by 3G networks or wireless networks.
d) You have installed our mobile app, EagleEyes Lite / EagleEyes Plus on your iPhone, EagleEyesHD Lite / EagleEyesHD Plus on iPad, or EagleEyes Lite+ / EagleEyes Plus+ on your Android device.
【Note】If no, please download from App Store or Google Play. As for Android devices, Lite doesn’t support EaZy Networking.
Cloud Service Login EaZy Networking Setup a) Open EagleEyes. b) Create an account for the EagleEyes cloud service. c) Select the wired
device. d) Confirm your camera
connection. e) Check both LED
indicators. f) Scan or Enter the
MAC address. g) Preview and name
your camera.
Select “+”, and choose “EaZy”.
If you already have a cloud service account, please sign in.
For initial use, select “Register” to create an account for the cloud service. Fill in the information needed, and select “Register” to continue.
This account is necessary for EaZy Networking to take effect.
For the wired type, choose the upper one.
Make sure your camera setup is the same as the animation shown in this page, and choose “Next” to continue.
Make sure both indicators are always on, and select “Yes” to continue.
To fill in MAC, which is on the rear of the cam, you can either type it, or tap the code button and scan in the address by scanning the QR code on the back. Tap “Apply” to continue.
Check if the preview is what you need. Then, give a name to your camera if needed, or simply keep the default name, “IPCAM”.
Choose “Apply” to continue.
EaZy Networking Setup (Continued) Account for Cloud Service h) Complete the setup. i) Return to the address book. Check your account. Check your account
information. Buy our data plan online.
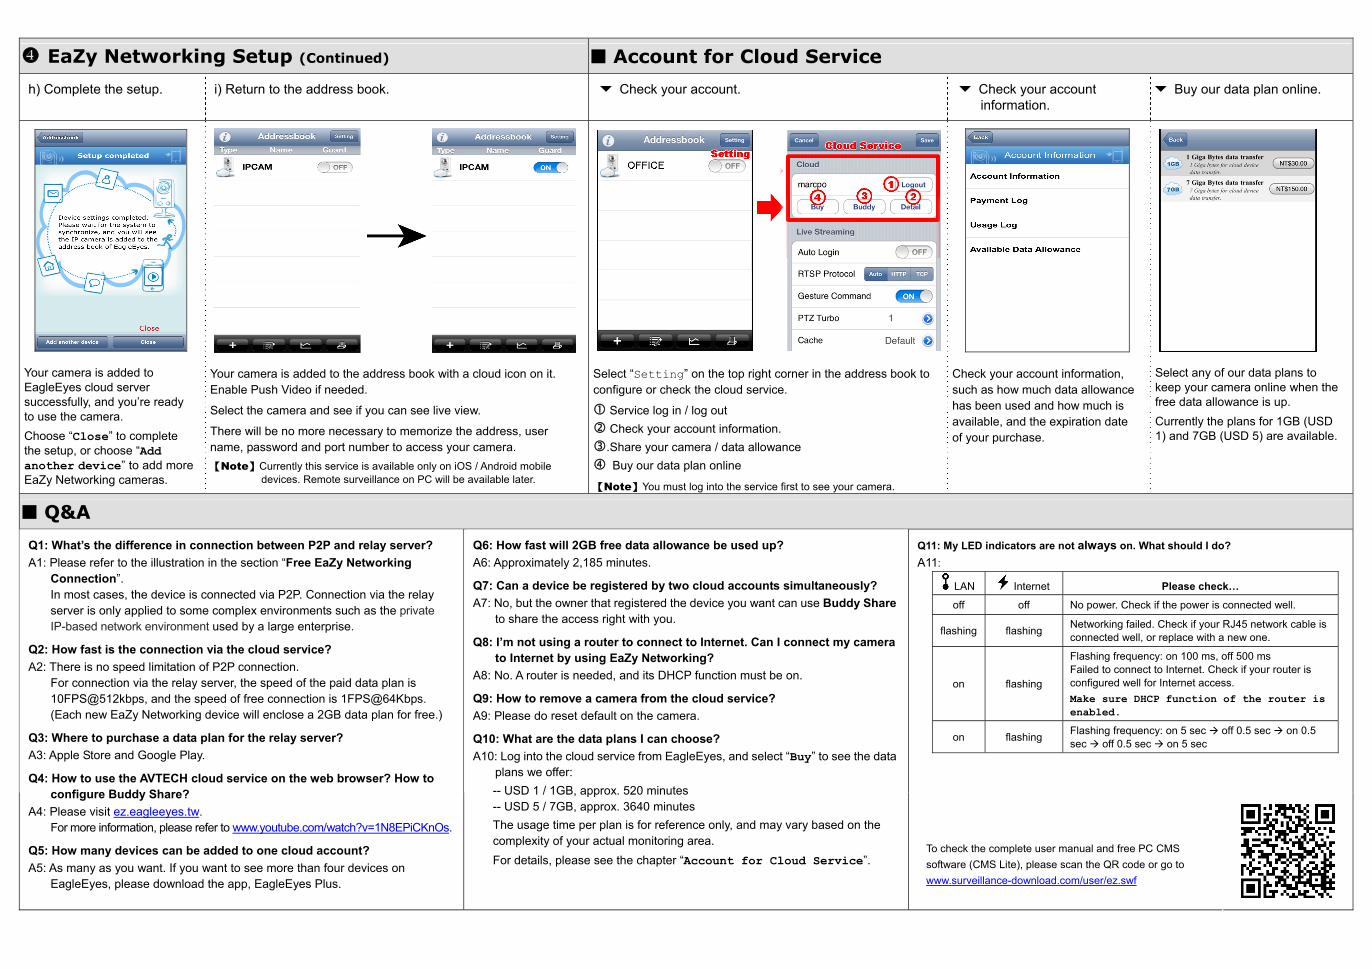
Your camera is added to EagleEyes cloud server successfully, and you’re ready to use the camera. Choose “Close” to complete the setup, or choose “Add another device” to add more EaZy Networking cameras.
Your camera is added to the address book with a cloud icon on it. Enable Push Video if needed.
Select the camera and see if you can see live view.
There will be no more necessary to memorize the address, user name, password and port number to access your camera. 【Note】Currently this service is available only on iOS / Android mobile
devices. Remote surveillance on PC will be available later.
Select “Setting” on the top right corner in the address book to configure or check the cloud service.
Service log in / log out Check your account information. .Share your camera / data allowance Buy our data plan online
【Note】You must log into the service first to see your camera.
Check your account information, such as how much data allowance has been used and how much is available, and the expiration date of your purchase.
Select any of our data plans to keep your camera online when the free data allowance is up. Currently the plans for 1GB (USD 1) and 7GB (USD 5) are available.
Q&A Q11: My LED indicators are not always on. What should I do? A11:
LAN Internet Please check…
off off No power. Check if the power is connected well.
flashing flashing Networking failed. Check if your RJ45 network cable is connected well, or replace with a new one.
on flashing
Flashing frequency: on 100 ms, off 500 ms Failed to connect to Internet. Check if your router is configured well for Internet access. Make sure DHCP function of the router is enabled.
on flashing Flashing frequency: on 5 sec off 0.5 sec on 0.5 sec off 0.5 sec on 5 sec
Q1: What’s the difference in connection between P2P and relay server? A1: Please refer to the illustration in the section “Free EaZy Networking
Connection”. In most cases, the device is connected via P2P. Connection via the relay server is only applied to some complex environments such as the private IP-based network environment used by a large enterprise.
Q2: How fast is the connection via the cloud service? A2: There is no speed limitation of P2P connection.
For connection via the relay server, the speed of the paid data plan is 10FPS@512kbps, and the speed of free connection is 1FPS@64Kbps. (Each new EaZy Networking device will enclose a 2GB data plan for free.)
Q3: Where to purchase a data plan for the relay server? A3: Apple Store and Google Play.
Q4: How to use the AVTECH cloud service on the web browser? How to configure Buddy Share?
A4: Please visit ez.eagleeyes.tw. For more information, please refer to www.youtube.com/watch?v=1N8EPiCKnOs.
Q5: How many devices can be added to one cloud account? A5: As many as you want. If you want to see more than four devices on
EagleEyes, please download the app, EagleEyes Plus.
Q6: How fast will 2GB free data allowance be used up? A6: Approximately 2,185 minutes.
Q7: Can a device be registered by two cloud accounts simultaneously? A7: No, but the owner that registered the device you want can use Buddy Share
to share the access right with you.
Q8: I’m not using a router to connect to Internet. Can I connect my camera to Internet by using EaZy Networking?
A8: No. A router is needed, and its DHCP function must be on.
Q9: How to remove a camera from the cloud service? A9: Please do reset default on the camera.
Q10: What are the data plans I can choose? A10: Log into the cloud service from EagleEyes, and select “Buy” to see the data
plans we offer: -- USD 1 / 1GB, approx. 520 minutes -- USD 5 / 7GB, approx. 3640 minutes The usage time per plan is for reference only, and may vary based on the complexity of your actual monitoring area. For details, please see the chapter “Account for Cloud Service”.
To check the complete user manual and free PC CMS software (CMS Lite), please scan the QR code or go to www.surveillance-download.com/user/ez.swf

584Z
814_815_ez_setup_V1.2
Free EaZy Networking Connection START Setup Device Checking QUICK SETUP
With
Cloud Account Management
a).The device access right is managed by Owner, and the
registered devices cannot be registered again unless the machine has restored the default settings.
b).Owner can share the access right with other users through the function, Buddy Share. For further information on Buddy Share, please refer to the video: www.youtube.com/watch?v=1N8EPiCKnOs
EaZy Networking is a free P2P cloud service to connect AVTECH devices to the Internet automatically by plug-and-play, enabling you to check the live view via your mobile device or laptop at anytime (in 64 kbps). Should you feel the live view is not fluent enough and would like to speed it up, AVTECH provides several data plans for you to subscribe. We've also offered 2GB data allowance as a gift on each device for you to experience. When 2GB is up, the network transmission speed will restore to what it should be.
In most cases, the device is connected via P2P. Connection via the relay server is only applied to some complex environments such as the private IP-based network environment used by a large enterprise.
a) Do you use a router or wireless router to connect to Internet?
b) You know where the router is located, and the DHCP function of your router is on.
a) Your camera is powered on, and connected to the wireless router.
b) Check the LED status indicators, and make sure (LAN) and (Internet) are always on.
If (Internet) is not on, make sure the DHCP function of your router is enabled, or refer to Q&A section to fix your problem.
c) You have an iPhone / iPad / Android mobile device,
and it’s connected to Internet by 3G networks or wireless networks.
d) You have installed our mobile app, EagleEyes Lite / EagleEyes Plus on your iPhone, EagleEyesHD Lite / EagleEyesHD Plus on iPad, or EagleEyes Lite+ / EagleEyes Plus+ on your Android device.
【Note】If no, please download from App Store or Google Play. As for Android devices, Lite doesn’t support EaZy Networking.
Cloud Service Login EaZy Networking Setup a) Open EagleEyes. b) Create an account for the EagleEyes cloud service. c) Select the wireless
device. d) Check if your router supports WPS e) Check both LED
indicators. f) Scan or Enter the
MAC address.
Select “+”, and choose “EaZy”.
If you already have a cloud service account, please sign in.
For initial use, select “Register” to create an account for the cloud service. Fill in the information needed, and select “Register” to continue.
This account is necessary for EaZy Networking to take effect.
For the wireless type, choose the one below.
Make sure the internet is up and running, and turn on WPS on your router, and then, choose “Yes” to continue. Besides, ensure that camera setup is the same as the animation shown in this page, and then choose “Next”.
Make sure both indicators are always on, and select “Yes” to continue.
To fill in MAC, which is on the rear of the cam, you can either type it, or tap the code button and scan in the address by scanning the QR code on the back. Tap “Apply” to continue.
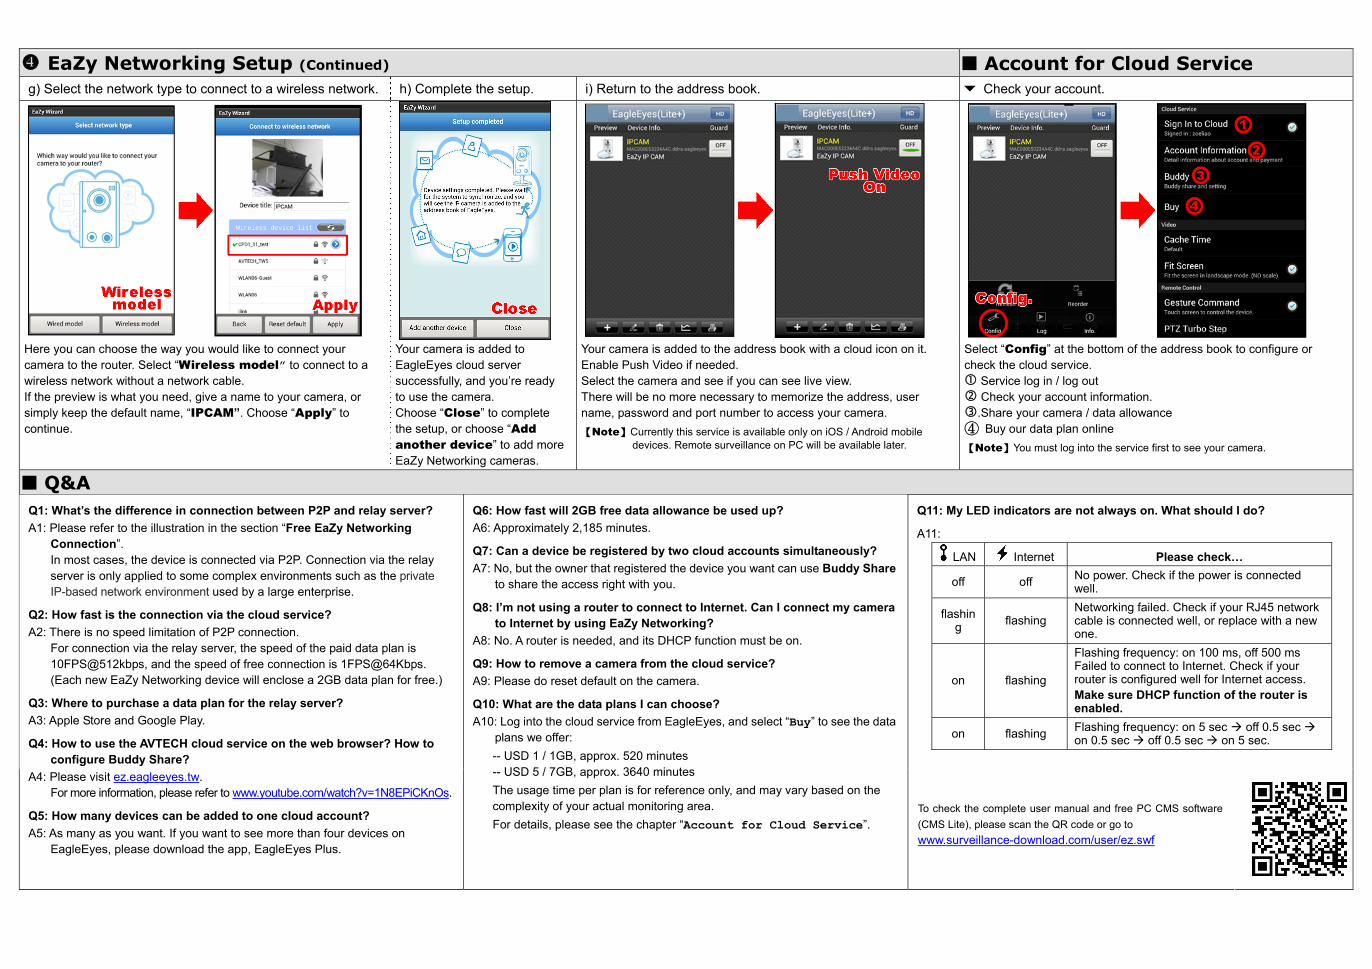
EaZy Networking Setup (Continued) Account for Cloud Service g) Select the network type to connect to a wireless network. h) Complete the setup. i) Return to the address book. Check your account.
Here you can choose the way you would like to connect your camera to the router. Select “Wireless model” to connect to a wireless network without a network cable. If the preview is what you need, give a name to your camera, or simply keep the default name, “IPCAM”. Choose “Apply” to continue.
Your camera is added to EagleEyes cloud server successfully, and you’re ready to use the camera. Choose “Close” to complete the setup, or choose “Add another device” to add more EaZy Networking cameras.
Your camera is added to the address book with a cloud icon on it. Enable Push Video if needed. Select the camera and see if you can see live view. There will be no more necessary to memorize the address, user name, password and port number to access your camera. 【Note】Currently this service is available only on iOS / Android mobile
devices. Remote surveillance on PC will be available later.
Select “Config” at the bottom of the address book to configure or check the cloud service. Service log in / log out Check your account information. .Share your camera / data allowance ④ Buy our data plan online 【Note】You must log into the service first to see your camera.
Q&A Q11: My LED indicators are not always on. What should I do?
A11:
LAN Internet Please check…
off off No power. Check if the power is connected well.
flashing flashing
Networking failed. Check if your RJ45 network cable is connected well, or replace with a new one.
on flashing
Flashing frequency: on 100 ms, off 500 ms Failed to connect to Internet. Check if your router is configured well for Internet access. Make sure DHCP function of the router is enabled.
on flashing Flashing frequency: on 5 sec off 0.5 sec on 0.5 sec off 0.5 sec on 5 sec.
Q1: What’s the difference in connection between P2P and relay server? A1: Please refer to the illustration in the section “Free EaZy Networking
Connection”. In most cases, the device is connected via P2P. Connection via the relay server is only applied to some complex environments such as the private IP-based network environment used by a large enterprise.
Q2: How fast is the connection via the cloud service? A2: There is no speed limitation of P2P connection.
For connection via the relay server, the speed of the paid data plan is 10FPS@512kbps, and the speed of free connection is 1FPS@64Kbps. (Each new EaZy Networking device will enclose a 2GB data plan for free.)
Q3: Where to purchase a data plan for the relay server? A3: Apple Store and Google Play.
Q4: How to use the AVTECH cloud service on the web browser? How to configure Buddy Share?
A4: Please visit ez.eagleeyes.tw. For more information, please refer to www.youtube.com/watch?v=1N8EPiCKnOs.
Q5: How many devices can be added to one cloud account? A5: As many as you want. If you want to see more than four devices on
EagleEyes, please download the app, EagleEyes Plus.
Q6: How fast will 2GB free data allowance be used up? A6: Approximately 2,185 minutes.
Q7: Can a device be registered by two cloud accounts simultaneously? A7: No, but the owner that registered the device you want can use Buddy Share
to share the access right with you.
Q8: I’m not using a router to connect to Internet. Can I connect my camera to Internet by using EaZy Networking?
A8: No. A router is needed, and its DHCP function must be on.
Q9: How to remove a camera from the cloud service? A9: Please do reset default on the camera.
Q10: What are the data plans I can choose? A10: Log into the cloud service from EagleEyes, and select “Buy” to see the data
plans we offer: -- USD 1 / 1GB, approx. 520 minutes -- USD 5 / 7GB, approx. 3640 minutes The usage time per plan is for reference only, and may vary based on the complexity of your actual monitoring area. For details, please see the chapter “Account for Cloud Service”.
To check the complete user manual and free PC CMS software (CMS Lite), please scan the QR code or go to www.surveillance-download.com/user/ez.swf