multi vendor dropshipping - configuration fileat the admin panel you can access the main...
TRANSCRIPT

/
ConfigurationBack to User Guides
(//creativeminds.helpscoutdocs.com/category/1092-dropship-m1)
Multi VendorDropShipping -Configuration

At the Admin Panel you can access the main configurationscreen by clicking, System → Configuration, and on theleft menu: DROPSHIP FRONTEND PRODUCT UPLOADER→ Configuration.
General
Module enabled: Admin chooses to enable or disablethe module. Default is disabled.
Allow auto approval of products: Admin chooses to letthe suppliers add/edit their products with or without anapproval of admin. Default is No.

Supplier needs to be approved: Admin chooses if newsuppliers need to be approved by admin or not. Ifapproval of admin is required suppliers can't login until get approval. Admin get the email notification aboutnew suppliers - Supplier also get the notification that heor she needs to be approved.
Presentation Settings

Link label in customer account panel: Determines thelabel of the link to the supplier panel in the customeraccount dashboard on the front-end. Default is “VendorPortal”.
Header in Supplier Panel: Shows the header in thesupplier panel. You can determine what header youwant to show. Options:
1. Don’t Show – Doesn’t show any header
2. Show Custom – Show custom header created inextension template
3. Show Default – Show default header of the templateused in the store
Footer in Supplier Panel1. Don’t Show – Doesn’t show any footer
2. Show Custom – Show custom footer created inextension template
3. Show Default – Show default footer of the templateused in the store

Include jQuery - if you use a custom theme and youinclude jQuery by default, please select 'No' to preventerrors.
Supplier Configuration
Allow suppliers to upload images: Determines ifSuppliers can upload images to products.
Assigning attribute set to Supplier: this option allowsthe admin to assign attributes sets to specific suppliers.
Suppliers Group

Supplier group: Group of customers which will haveaccess to the supplier panel. This group of supplierscan add products. Default is Supplier.
Supplier group which can edit own products: Groupof customers that will have access to the supplier panel.Customers can add products and have access to edittheir products. Default is Supplier Pro.
Supplier Notifications

Notify supplier when product was approved: Definesif supplier will be notified if his or her product wasapproved by admin.
Notify supplier when product was ordered - Defines ifsupplier will be notified if his or her product wasordered.
Finally, remember to Save the Configuration!

/
Product SettingsBack to User Guides
(//creativeminds.helpscoutdocs.com/category/1092-
dropship-m1)
Multi VendorDropShipping - ProductSettings

At the Admin Panel you can access the main Product
Settings configuration screen by clicking
System → Configuration, and on the left
menu: DROPSHIP FRONTEND PRODUCT UPLOADER →Product Settings.
Adding Products

Attributes set: Determines what set of the attributes will
be used in 'Adding Product F orm'. Default is
dropship_product_attributes.
Suppliers can create virtual products: Determines if
Suppliers can create a virtual product.
Suppliers can create downloadableproducts: Determines if Suppliers can create a
downloadable products.
Maximum allowed images: Determines how many
images can be added per product by each supplier.
Product tax class: Determines default tax class for
products added by suppliers.
Supplier can define SKU: This option allows suppliers
to define the SKU of the suppliers product.
Auto increment SKU number: If suppliers can’t define
a SKU, this option will define auto increment value of the
product. The number showed in this field is the last SKU
used for a product. Default is 10001.
Downloadable Product Settings

/
Add and Manage Supplier
Products
Back to User Guides(//creativeminds.helpscoutdocs.com/category/1092-
dropship-m1)
Multi Vendor
DropShipping - Add and
Manage Supplier Products

Suppliers can easily create and manage their Products inthe Vendor Panel, available under the 'My Account' menu.
To add a new product, click “ Add a Product” in thenavigation bar of the Supplier Panel.
Once Supplier clicks on this button, he will see the formwhere he can choose the Attribute Set and Product Type
for the new product.

After defining your product's attribute set and type, you willsee the form ' Add Product' that allows suppliers todescribe and characterize their new product.

Basic requirements
Some fields are mandatory in order to properly publish yournew product. These fields are:
Product Name
Short Description
Detailed Description
Price

Quantity Available in stock
Product Weight
Special Offers
Suppliers can also define a special offer or deal for aproduct, and limit the period of time for which that specialoffer will be available for customers.
Adding Images

Suppliers can also add one or more product images on theright side of the form.
To set any picture as the main picture for the product, justclick on the house icon and the thumbnail of the selectedimage will have a green border around it.


Defining categories
The next step is to select the product categories, which is arequired operation.
If the product is not assigned to any category, customers willnot be able to find it in the store catalog.

After filling out all required field in the "Add a Product" form,remember to click on the Save Product button.
Product List
On the Product List tab is possible to see the List of AllProducts, their status and details.
Here the supplier can also easily manage all products.

/
General Configuration
Back to User Guides(//creativeminds.helpscoutdocs.com/category/1092-
dropship-m1)
Multi Vendor
DropShipping - Manage
Supplier Shipping
Methods

First step is to configure your shipping methods going to System Configuration, and then SALES → Shipping
Methods.
There, you will find "MultiShipping" section where differentsupplier Shipping Methods can be enabled.
Manage Shipping Methods (Vendor
Panel)

Suppliers can define their own shipping methods by clickingon 'Shipment Methods', under Settings, on the SupplierPanel.
When managing the shipping list, the supplier can modify anexistent method, remove it or add a new one.
The suppliers can choose from Flat Rate, Table Rate or FreeShipping options. Flat Rate and Table Rate require ahandling fee.
If suppliers choose the Table Rate option, they will have toupload the CSV file, like it is used in Magento table rates, sothat shipping costs can be calculated automatically.
If no choice is made by the supplier, the shipping rate will beset as the default shipping rate.

Manage Shipping Methods (Admin
Panel)
Admin has access to manage Supplier Shipping Methodswhen editing a specific supplier profile, under "ShippingCosts" tab.


/
Supplier Shipping Methods
Usage
Back to User Guides(//creativeminds.helpscoutdocs.com/category/1092-
dropship-m1)
Multi Vendor
DropShipping - Supplier
Shipping Methods Usage

Once customers adds to cart supplier's products, differentShipping Methods will be available in checkout page.
Shipping Methods in Checkout are separated by Suppliers,the example is on the screen below (we have 4 productsand three of them was created by Supplier with "ShippingMethod 1" method, first product was created by anotherSupplier with "Supplier Shipping Method" method. BothSuppliers configured one Shipping Method).
So finally, shipment will be create separated: one productwill arrive with Supplier Shipping Method and last three willarrive to customer by Shipping Method 1.

Order Details:
Admin Panel - Go to Sales Order and click on aspecific order.

Vendor Panel - Go to Orders where you will find anorder list and click on view

You will see the order details with Shipping Costs

/
Creating Partial Order Shipments
Back to User Guides(//creativeminds.helpscoutdocs.com/category/1092-
dropship-m1)
Multi Vendor
DropShipping - Creating
Partial Order Shipments

When creating a shipment, it's not necessary to send allitems at once. Instead, the admin can create as manyshipments as necessary.
This tutorial will go through each step of this process.
1) Find and access the order
First, find your order in Sales → Order.
2) Create shipment
Then, create a shipment action by clicking the highlightedShip button.

You will be directed to the New Shipment page. Note that inthis screen you can also add a Tracking Number andcomments for this specific shipment. Both panels arehighlighted below:

3) Set items and quantity to be
shipped
When configuring the shipment, you can set the quantity toship for each item of the order. This is done in the "Items toShip" panel. After setting this, click Submit Shipment.

The image below shows in detail the Qty to Ship field:
Now the order is partially shipped!

Reviewing shipments
In the order information page, you can monitor which itemshave been shipped already. You can find this in the "ItemsOrdered' panel.

Below, you will find an image of the panel in detail. Take noteof the "Qty" column, where each item has an "Ordered"amount. Shipped items also have a "Shipped" value. In thiscase, 5 out of the 9 ordered items were shipped.
Get more information about the Multi Vendor
DropShipping Extension
(https://www.cminds.com/ecommerce-extensions-store/dropship-and-multi-vendor-dropshipping-extension-for-magento-1-by-creativeminds) for Magento. Find other Magento products at theCreativeMinds Magento Store
(https://www.cminds.com/ecommerce-extensions-store/)

/
Translating to other Languages
Back to User Guides(//creativeminds.helpscoutdocs.com/category/1092-
dropship-m1)
Multi Vendor
DropShipping -
Translating to Other
Languages and Changing
Front-end labels

In order to reach out to customers from all over the world, it'spossible to localize your CreativeMinds Magento extensionto as many languages as you want. To do this, follow thefollowing steps:
Method 1 - Modifying the module
terms CSV
1) Find the file which contains the
plugin text
This file is named Cminds_ Dropship.csv. It's located in thisdirectory:
/app/locale/en_US/Cminds_ Dropship.csv
2) Open the file as a table (optional)
Cminds_ Dropship.csv is a CSV file, which stands forComma Separated Values. This kind of format can be readby many common softwares, such as Notepad, Microsoft
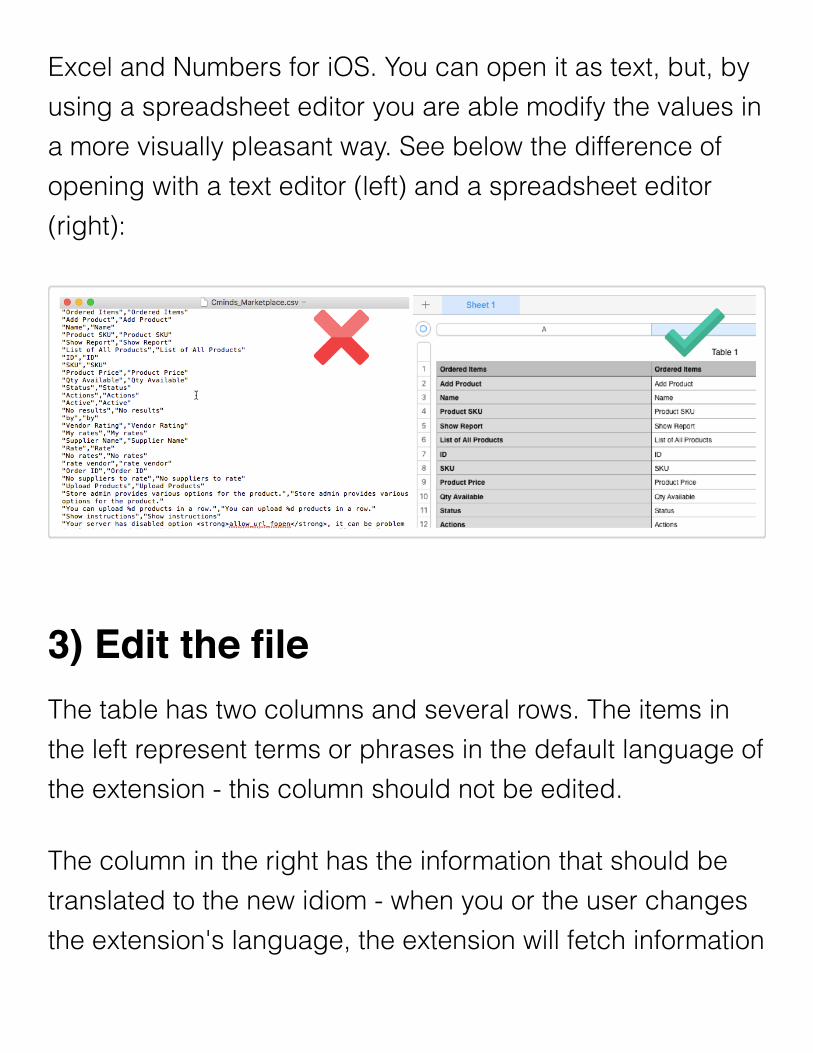
Excel and Numbers for iOS. You can open it as text, but, byusing a spreadsheet editor you are able modify the values ina more visually pleasant way. See below the difference ofopening with a text editor (left) and a spreadsheet editor(right):
3) Edit the file
The table has two columns and several rows. The items inthe left represent terms or phrases in the default language ofthe extension - this column should not be edited.
The column in the right has the information that should betranslated to the new idiom - when you or the user changesthe extension's language, the extension will fetch information

from these lines. The following example shows a sample of aPortuguese edition:
4) Save the file in the right folder
Once the editing is complete, save the new Cminds_Dropship.CSV file in the following path:
app/locale/xx_YY
You must replace "xx" with the code for the language and"YY" with the country code. Examples: en_US, en_UK,pt_BR, pt_PT, es_ES, fr_FR, it_IT. If that folder doesn't exist,you can create it. You can find a complete list of

the language codes (standard ISO 639-1) here(https://en.wikipedia.org/wiki/List_of_ISO_639-1_codes) andthe country codes (ISO 3166-1) here(https://en.wikipedia.org/wiki/ISO_3166-1).
One thing to keep in mind: many softwares will, by default,save the file in a different format, such as .txt, .xls or.number. Be sure that a .CSV was generated by using saveas or export options.
5) Create a store view for the new
language
Magento makes it easy to manage multiple language settingwith the Store View feature. Different Store Views share mostof the settings, such as catalog of products and customergroups, bur can have unique visuals, like the language thatit's displayed for the user. Learn more about the differentStore features by referring to the official guide(http://docs.magento.com/m1/ce/user_guide/store-operations/store-hierarchy.html).

To create a Store View with your new language, head to yourdashboard and click System Manage Stores. Then,click Create Store View.
Input values that will help you organizing the store.
6) Configure the new Store View to Display the TranslatedLanguage
Now, head over to System Configuration and chooseyour new Store View in the box on the Current ConfigurationScope field:

Now that you are editing the Store View, you can select itstranslations by headingto System Configuration General Design The
mes and then writing the desired codes. If there are multipletranslations, they should be separated by commas, as in"enUS, pt_BR".
Return to the Front-end to check the changes have comeinto effect, you will need to clear your cache first.

For additional tips, you can check the article BestTranslation Practices (https://magecom.net/magento-multi-language-websites-best-localization-practices/) by Magento.
Method 2 - Using the in built Magento
Translate Inline tool
Magento in fact comes with a tool in the Developer toolssection of the configuration settings that allows for front-endmodification of the terms that appear on the store's front-end. This can be a simpler way for some site admins tomake changes. These changes can of course be applied toour module front-end labels to change language or style ofthe defaults.
Navigate to System → Configuration → Advanced →Developer.
Open the first section ( Developer Client Restrictions)andenter your public IP address to ensure that your front-endchanges are only possible for you and not for any user ofyour site.

Click Save Config to save your changes.
Now proceed to open the section labeled Translate
Inline to enable the translation tool. Locate the optionlabeled Enable for Frontend and set it to Yes then clickSave Config again.

Return to the front-end. You should now notice that there arefeint red boxes around elements of text that are generatedby magento or modules that have been installed.
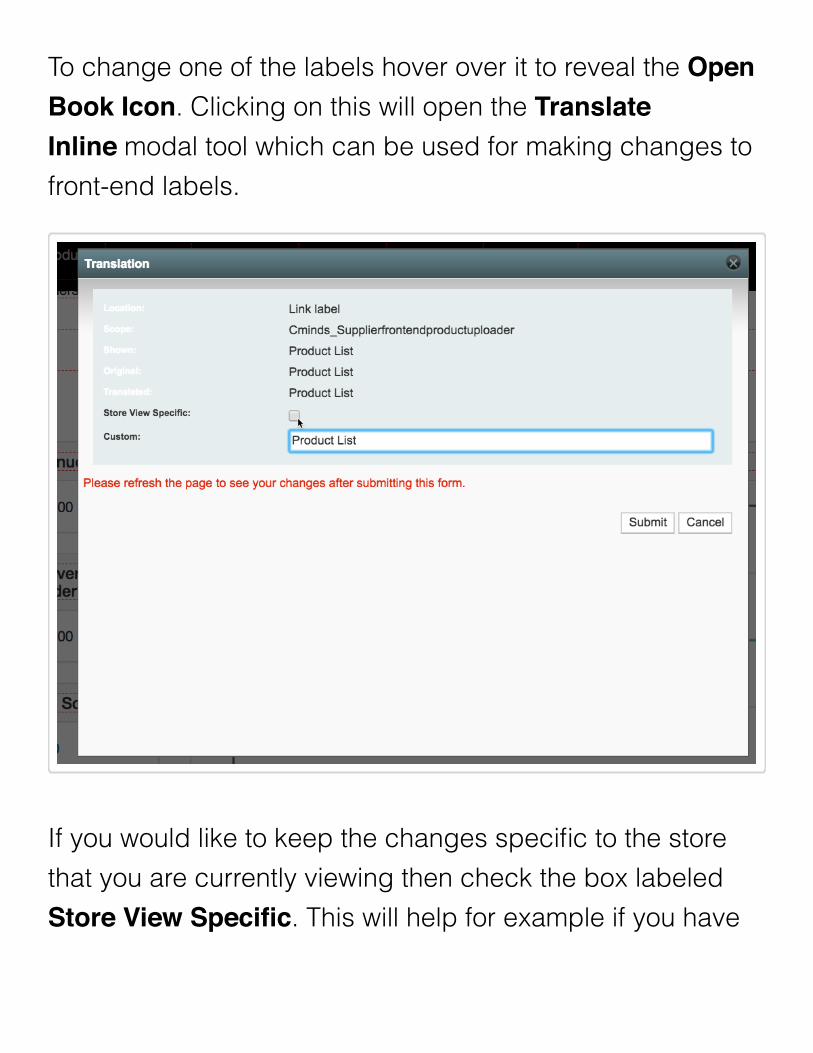
To change one of the labels hover over it to reveal the Open
Book Icon. Clicking on this will open the Translate
Inline modal tool which can be used for making changes tofront-end labels.
If you would like to keep the changes specific to the storethat you are currently viewing then check the box labeledStore View Specific. This will help for example if you have

installed the module on a store that will be your Spanish orFrench or Italian version of the site and are changing thefront-end labels to the given language.
In the input field labeled Custom: enter the text that youwould prefer to display here rather than what is included bydefault. Then click the Submit button.

Clear the Magento Cache.
Then return to the page with the label or labels that youwished to change and refresh the page. You should see thechanges have taken effect.

Remember to go back to your Configuration settings anddisable the Inline Translate tool and your IP address fromthe Developer Client Restrictions field.