multi-protocol on-board print/scan server network user… · multi-protocol on-board print/scan...
TRANSCRIPT

Version 0
Multi-Protocol On-board Print/Scan Server
NETWORK USER’S GUIDENETWORK USER’S GUIDE
MFC-7225NMFC-7820N
Please read this manual thoroughly before using this device on your network. You can print or view this manual from the CD-ROM at any time, please keep the CD-ROM in a convenient place for quick and easy reference at all times.
The Brother Solutions Center (http://solutions.brother.com) is your one stop resource for all your printing needs. Download the latest drivers and utilities for your machine, read the FAQs and troubleshooting tips or learn about special printing solutions in the Solutions and Customer Education sections.
NETWORK USER’S GUIDE

i
Definitions of warnings, cautions, and notesWe use the following icon throughout this User’s Guide:
TrademarksBrother and the Brother logo are registered trademarks and BRAdmin Professional is a trademark of Brother Industries, Ltd.
UNIX is a registered trademark of The Open Group.
Apple, Macintosh, Quick Draw and LaserWriter are registered trademarks of Apple Computer, Inc.
HP, Hewlett-Packard, Jetdirect and PCL are registered trademarks of Hewlett-Packard Company.
Microsoft, Windows and Windows NT are registered trademarks of Microsoft Corporation.
All other terms, brand and product names mentioned in this User’s Guide are registered trademarks or trademarks of their respective companies.
Compilation and publication noticeUnder the supervision of Brother Industries Ltd., this manual has been compiled and published, covering the latest product’s descriptions and specifications.
The contents of this manual and the specifications of this product are subject to change without notice.
Brother reserves the right to make changes without notice in the specifications and materials contained herein and shall not be responsible for any damages (including consequential) caused by reliance on the materials presented, including but not limited to typographical and other errors relating to the publication.
©2005 Brother Industries Ltd.
Notes tell you how you should respond to a situation that may arise or give tips about how the operation works with other features.

ii
IMPORTANT NOTE: For technical and operational assistance, you must call the country where you purchased the machine.Calls must be made from within that country.
In USA 1-800-276-7746
In Canada 1-877-BROTHER
In Europe Visit http://www.brother.com for contact information on your local Brother office.
If you have any comments or suggestions, please write to us at:
In Europe European Technical Services
1 Tame Street
Audenshaw
Manchester, M34 5JE
UK
In USA Printer Customer Support
Brother International Corporation
15 Musick
Irvine CA 92618
In Canada Brother International Corporation (Canada), Ltd.
- Marketing Dept.
1, rue Hôtel de Ville
Dollard-des-Ormeaux, PQ, Canada H9B 3H6
Brother fax-back system (USA)
Brother has set up an easy-to-use fax-back system so you can get instant answers to common technical questions and information about all our products. This is available 24 hours a day, seven days a week. You can use the system to send the information to any fax machine.
Call the number below and follow the recorded instructions to receive a fax about how to use the system and an Index of the subjects you can get information about.

iii
In USA only 1-800-521-2846
Service center locator (USA)
For the location of a Brother authorized service center, call 1-800-284-4357.
Service center locations (Canada)
For the location of a Brother authorized service center, call 1-877-BROTHER.
Internet addresses
Brother Global Web Site: http://www.brother.com
For Frequently Asked Questions (FAQs), Product Support and Technical Questions, and Driver Updates and Utilities: http://solutions.brother.com
(In USA Only) For Brother Accessories & Supplies: http://www.brothermall.com
iv
Table of contents
1 Introduction ................................................................................................................1-1
Overview............................................................................................................................................ 1-1Types of network connection ............................................................................................................. 1-2
Network connection example ...................................................................................................... 1-2Peer-to-Peer printing using TCP/IP......................................................................................... 1-2Network shared printing........................................................................................................... 1-3
Protocols............................................................................................................................................ 1-4TCP/IP protocols and functionalities............................................................................................ 1-4
DHCP/BOOTP/RARP.............................................................................................................. 1-4APIPA...................................................................................................................................... 1-4DNS client................................................................................................................................ 1-4LPR/LPD ................................................................................................................................. 1-4Port9100.................................................................................................................................. 1-4SMTP client ............................................................................................................................. 1-5IPP........................................................................................................................................... 1-5mDNS...................................................................................................................................... 1-5TELNET................................................................................................................................... 1-5SNMP ...................................................................................................................................... 1-5Web server (HTTP) ................................................................................................................. 1-5
2 Configuring your network printer ............................................................................2-1
Overview............................................................................................................................................ 2-1IP addresses, subnet masks and gateways ...................................................................................... 2-1
IP address ................................................................................................................................... 2-1How the IP address is assigned to your print/scan server:...................................................... 2-1
Subnet mask................................................................................................................................ 2-2Gateway (and router)................................................................................................................... 2-2
Setting the IP address and subnet mask ........................................................................................... 2-3Using the BRAdmin Professional utility and the TCP/IP protocol to configure your network printer (for Windows® only) ................................................................ 2-3
BRAdmin Professional utility ................................................................................................... 2-3How to configure your machine using the BRAdmin Professional utility ................................. 2-3
Using other methods to configure your network printer............................................................... 2-4Changing the print/scan server settings ............................................................................................ 2-4
Using the BRAdmin Professional utility and the TCP/IP protocol to change the print/scan server settings (for Windows® only)............................................................................................. 2-4Using the HTTP (web browser) and the TCP/IP protocol to change the print/scan server settings ........................................................................................................................................ 2-5

v
3 Front Panel Setup ......................................................................................................3-1
LAN Main Setup Menu....................................................................................................................... 3-1Setup TCP/IP............................................................................................................................... 3-1
BOOT Method ......................................................................................................................... 3-1IP Address............................................................................................................................... 3-3Subnet Mask ........................................................................................................................... 3-4Gateway .................................................................................................................................. 3-4Host Name............................................................................................................................... 3-4WINS Config............................................................................................................................ 3-5WINS Server............................................................................................................................ 3-5DNS Server ............................................................................................................................. 3-6APIPA...................................................................................................................................... 3-6
Setup Misc................................................................................................................................... 3-7Ethernet ................................................................................................................................... 3-7
Printing the Network Configuration Page .................................................................................... 3-7Restoring the network settings to factory default......................................................................... 3-8
4 Network printing from Windows®:basic TCP/IP Peer-to-Peer printing ..........................................................................4-1
Overview............................................................................................................................................ 4-1For Windows® 2000/XP users ........................................................................................................... 4-1
Configuring the standard TCP/IP port ......................................................................................... 4-1Printer driver not yet installed .................................................................................................. 4-1Printer driver already installed................................................................................................. 4-2
For Windows NT® 4.0 users .............................................................................................................. 4-3Installing the TCP/IP protocol ...................................................................................................... 4-3Installing the Brother Peer-to-Peer software ............................................................................... 4-3Associating to the printer ............................................................................................................. 4-4Adding a second Brother LPR port.............................................................................................. 4-5
For Windows® 95/98/Me users .......................................................................................................... 4-5Installing the Brother Peer-to-Peer software ............................................................................... 4-5Associating to the printer ............................................................................................................. 4-6Adding a second Brother LPR port.............................................................................................. 4-7
Other sources of information ............................................................................................................. 4-7
5 Internet printing for Windows® ................................................................................5-1
Overview............................................................................................................................................ 5-1Windows® 2000/XP IPP printing........................................................................................................ 5-1
Specifying a different URL........................................................................................................... 5-3Other sources of information ............................................................................................................. 5-3
6 Network printing from Macintosh® ..........................................................................6-1
Overview............................................................................................................................................ 6-1How to select the printer server (TCP/IP) (Mac OS® 9.1 - 9.2).................................................... 6-1How to select the printer server (TCP/IP) (Mac OS X® 10.2.4 or greater) ................................... 6-3
Changing the configuration using a web browser.............................................................................. 6-4Other sources of information ............................................................................................................. 6-4

vi
7 Web Based Management ..........................................................................................7-1
How to use a Web Browser to manage your Device ......................................................................... 7-1Overview...................................................................................................................................... 7-1How to connect to your machine using a Browser ...................................................................... 7-1Password Information.................................................................................................................. 7-1
8 Troubleshooting ........................................................................................................8-1
Overview............................................................................................................................................ 8-1General problems .............................................................................................................................. 8-1
CD-ROM is inserted, but does not start automatically............................................................. 8-1How to reset the Brother print/scan server to factory default .................................................. 8-1
Installation problems.......................................................................................................................... 8-1The Brother print/scan server is not found during setup of the network print software installation or from the printer driver of the Brother machine in Windows®. ............................ 8-1The Brother print/scan server is not found using the Simple Network Configuration capabilities of Mac OS® X. ...................................................................................................... 8-1
Printing problems............................................................................................................................... 8-3Print job is not printed.............................................................................................................. 8-3Error during printing................................................................................................................. 8-5
Protocol-specific troubleshooting....................................................................................................... 8-5Windows® 98/98SE/Me and Windows NT®4.0 Peer-to-Peer print (LPR) troubleshooting........... 8-5Windows® 2000/XP IPP troubleshooting ..................................................................................... 8-6
Want to use a different Port number other than 631. .............................................................. 8-6Get More Info option in Windows® 2000 not working .............................................................. 8-6
Web browser troubleshooting (TCP/IP)....................................................................................... 8-7
A Appendix A ................................................................................................................ A-1
Using services ...................................................................................................................................A-1Other ways to set the IP address (for advanced users and administrators) ......................................A-1
Using DHCP to configure the IP address ....................................................................................A-1Using BOOTP to configure the IP address..................................................................................A-2Using RARP to configure the IP address ....................................................................................A-2Using APIPA to configure the IP address....................................................................................A-3Using ARP to configure the IP address .......................................................................................A-3
Windows® systems .................................................................................................................A-3UNIX®/Linux systems .............................................................................................................A-4
Using the TELNET console to configure the IP address .............................................................A-4Using the Brother Web BRAdmin server software for IIS* to configure the IP address ..............A-5
Print/Scan Server specifications ........................................................................................................A-6Function Table and Default Factory Settings.....................................................................................A-7
Index ............................................................................................................................I-1

1
1 - 1
1 Introduction
Overview
The Brother print/scan server allows your Brother machine to be shared on a 10/100MB Ethernet Network and provides printing services for Windows® 98/98SE/Me, Windows NT® 4.0, Windows® 2000/XP supporting the TCP/IP protocols and Mac OS® 9.1-9.2 / Mac OS X® 10.2.4 or greater supporting TCP/IP.
To use the Brother machine through a network, you need to configure the print/scan server, and set up the computers you use.
In this chapter, you will learn the basic concept of the network connection and protocols, and in Chapter 2 and 3, you will read information on network configuration. Chapter 4 through Chapter 6 describes how to configure your print/scan server along with your operating system as follows:
Chapter 4: Network printing from Windows®: basic TCP/IP Peer-to-Peer printing
Chapter 5: Internet printing for Windows®
Chapter 6: Network printing from Macintosh®

Introduction
1 - 2
1
Types of network connection
Generally speaking, there are two types of network connection: Peer-to-Peer environment and a Network Shared environment.
Network connection example
Peer-to-Peer printing using TCP/IP
In a Peer-to-Peer environment, each computer directly sends and receives data to and from the Brother machine.
■ In a smaller network of 2 or 3 computers, we recommend the Peer-to-Peer printing method as it is easier to configure than the Network Shared Printing method described on the following page. See Network shared printing on page 1-3.
■ Each computer must use the TCP/IP Protocol.
■ The Brother machine needs to have an appropriate IP address configuration.
■ If you are using routers, computers can access the Brother machine through the routers. (In this case, the Gateway address must be configured to both computers and the Brother machine.)
Router
Windows® Windows®
TCP/IP TCP/IP
Windows®
Network printer (your machine)

Introduction
1 - 3
1
Network shared printing
In a Network Shared environment, each computer sends and receives data to and from the Brother machine via a centrally controlled computer. This type of computer is often called a “Server” or a “Print Server”. Its job is to access print jobs from other computers and then control the printing of these jobs.
■ In a larger network, we recommend a Network Shared printing environment.
■ The “Server” or the “Print Server” needs the TCP/IP Print Protocol configured.
■ The Brother machine needs to have an appropriate IP address configuration unless the machine is shared via the parallel or USB interface at the server.
Network printer (your machine)
Windows®
Windows®
TCP/IP
Windows®
Windows®
Network Shared
Also known as “Server” or “Print Server”
Introduction
1 - 4
1
Protocols
TCP/IP protocols and functionalities
Protocols are the standardized sets of rules for transmitting data on a network. Protocols allow the users to gain access to network-connected resources.
The print/scan server used on this Brother product supports the TCP/IP (Transmission Control Protocol/Internet Protocol) protocol.
TCP/IP is the most popular set of protocols used for communication such as Internet and E-mail. This protocol can be used in almost all operating systems such as Windows®, Macintosh® and Linux.
The following TCP/IP protocols are available on this Brother product.
DHCP/BOOTP/RARP
By using the DHCP/BOOTP/RARP protocols, the IP address can be automatically configured.
NoteTo use the DHCP/BOOTP/RARP protocols, please contact your network administrator.
APIPA
If you do not assign an IP address manually (using the BRAdmin software) or automatically (using a DHCP/BOOTP/RARP server), the Automatic Private IP Addressing (APIPA) protocol will automatically assign an IP address from the range 169.254.1.0 to 169.254.254.255.
DNS client
The Brother print/scan server supports the Domain Name Service (DNS) client function. This function allows the print/scan server to communicate with other devices by using its DNS name.
LPR/LPD
One of the standard printing protocols in a TCP/IP network.
Port9100
HP network printer compatible port.

Introduction
1 - 5
1
SMTP client
Simple Mail Transfer Protocol (SMTP) client is used to send e-mails via Internet or Intranet.
IPP
Internet Printing Protocol (IPP Version 1.0) allows you to print documents directly to any accessible printer via the internet.
mDNS
mDNS allows the Brother print/scan server to automatically configure itself to work in a Mac OS® X Simple Network Configured system. (Mac OS® X 10.2.4 or greater).
TELNET
The Brother print/scan server supports TELNET server for command line configuration.
SNMP
Simple Network Management Protocol (SNMP) is used to manage and monitor all sorts of equipments including computers, routers and terminals in a TCP/IP network.
Web server (HTTP)
The Brother print/scan server is equipped with a built in web server that allows you to monitor its status or change some of its configuration settings.
NoteWe recommend Internet Explorer 6.0 (or higher) or Netscape Navigator 7.1 (or higher). If a different web browser is used, make sure it is compatible with HTTP 1.0 and HTTP 2.0.

2
2 - 1
2 Configuring your network printer
Overview
You need to configure the TCP/IP information to your Brother network printer before you use it on your network. In this chapter, you will learn what TCP/IP configuration items you need and how you configure your network printer using these TCP/IP configuration items.
NoteYou can configure them using the machine’s control panel settings. For the details, please see Front Panel Setup in Chapter 3.
We recommend that you use the automatic installer application in the CD-ROM we have provided with the machine. By using this application, you can easily connect your machine to your network and install the network software and printer driver which you need to complete the configuration of your network printer. You will be guided by the on-screen instructions until you are able to use your Brother network printer. Please follow the instructions in the supplied Quick Setup Guide.
If you want to configure your machine without using the automatic installer application, please read this chapter and learn how to configure the TCP/IP information. Then, in Chapter 3 through Chapter 6, you will learn how to install the network software and the printer driver into the operating system running on your computer.
IP addresses, subnet masks and gateways
To use the machine in a networked TCP/IP environment, you need to configure the IP address and subnet mask. The IP address you assign to the print/scan server must be on the same logical network as your host computers. If it is not, you must properly configure the subnet mask and the gateway address.
IP address
An IP address is a series of numbers that identifies each computer connected to a network. An IP address consists of four numbers separated by dots. Each number is between 0 and 255.
Example: In a small network, set the IP addresses by changing the final number.
192.168.1.1, 192.168.1.2, 192.168.1.3
How the IP address is assigned to your print/scan server:
If you have a DHCP/BOOTP/RARP server in your network (typically a UNIX®/Linux or Windows® 2000/XP network) the print/scan server will automatically obtain its IP address from the DHCP server and register its name with any RFC 1001 and 1002-compliant dynamic name services.
Configuring your network printer
2 - 2
2
For more information on DHCP, BOOTP and RARP, see Using DHCP to configure the IP address on page A-1, Using BOOTP to configure the IP address on page A-2 and Using RARP to configure the IP address on page A-2.
If you do not have a DHCP/BOOTP/RARP server, the Automatic Private IP Addressing (APIPA) protocol will automatically assign an IP address from the range 169.254.1.0 to 169.254.254.255. For more information on APIPA, see Using APIPA to configure the IP address on page A-3.
If the APIPA protocol is disabled, the default IP address of a Brother print/scan server is 192.0.0.192. However, you can easily change this IP address number to match with the IP address details of your network. For information on how to change the IP address, see Setting the IP address and subnet mask on page 2-3.
Subnet mask
Subnet masks restrict network communication.
Example: PC1 can talk to PC2
PC1 IP Address:192.168.1.2Subnet Mask: 255.255.255.0
PC2 IP Address:192.168.1.3Subnet Mask: 255.255.255.0
Note0 denotes that there is no limit to communication at this part of the address.
In the above example, we can communicate with anything that has an IP address that begins with 192.168.1.X
Gateway (and router)
A gateway is a network point that acts as an entrance to another network and sends data transmitted via the network to an exact destination. The router knows where to direct data that arrives at the gateway. If a destination is located at an external network, the router transmits data to the external network. If your network communicates with other networks, you may need to configure the Gateway IP address. If you do not know the Gateway IP address then contact your Network Administrator.

Configuring your network printer
2 - 3
2
Setting the IP address and subnet mask
Using the BRAdmin Professional utility and the TCP/IP protocol to configure your network printer (for Windows® only)
BRAdmin Professional utility
The BRAdmin Professional utility is designed to allow you to manage your network connected Brother machines in a TCP/IP environment.
How to configure your machine using the BRAdmin Professional utility
Note• Please use the BRAdmin Professional utility version that was supplied on the CD-ROM with your
Brother product. You can also download the latest Brother BRAdmin Professional utility version from http://solutions.brother.com. This utility is only available for Windows® users.
• If you are using Personal Firewall software (e.g. the Internet Connection Firewall available in Windows® XP), disable it. Once you are sure that you can print, re-start your Personal Firewall software.
• Node name: Node name appears in current BRAdmin Professional window. The default Node name is "BRN_xxxxxx" ("xxxxxx" is the last six digits of Ethernet address.).
• The default password for Brother print/scan servers is access.
1 Start the BRAdmin Professional utility (from Windows® 98/98SE/Me, Windows NT® 4.0 and Windows® 2000/XP), by clicking Start / Programs / Brother Administrator Utilities / Brother BRAdmin Professional Utilities / BRAdmin Professional.
2 Select TCP/IP in the left frame of the main BRAdmin window.
3 Select Search Active Devices from the Devices menu. BRAdmin Professional will search for new devices automatically.

Configuring your network printer
2 - 4
2
Note• If the print/scan server is set to its factory default settings without using a DHCP/BOOTP/RARP server,
the device will appear as APIPA in the BRAdmin Professional utility screen.
• You can find the node name and Ethernet address (Node Address above) by printing out the Network Configuration Page. See Printing the Network Configuration Page on page 3-7 for information on how to print the Network Configuration Page on your print/scan server.
4 Double-click the unconfigured device you want to configure.
5 Enter the IP address, Subnet Mask and Gateway (if needed) of your print/scan server.
6 Click OK.
7 With the correctly programmed IP address, you will see the Brother print/scan server in the device list.
Using other methods to configure your network printer
You can configure your network printer using other methods. See Other ways to set the IP address (for advanced users and administrators) on page A-1.
Changing the print/scan server settings
Using the BRAdmin Professional utility and the TCP/IP protocol to change the print/scan server settings (for Windows® only)
1 Start the BRAdmin Professional utility (from Windows® 98/98SE/Me, Windows NT® 4.0 and Windows® 2000/XP), by clicking Start / Programs / Brother Administrator Utilities / Brother BRAdmin Professional Utilities / BRAdmin Professional.
2 Select TCP/IP in the left frame of the main BRAdmin window.
3 Select the print/scan server which you want to configure, in the right frame of the main BRAdmin window.
4 Select Configure print server from the Control menu.
5 Enter a password. The default Password is access.
6 You can now change the print/scan server settings.

Configuring your network printer
2 - 5
2
Using the HTTP (web browser) and the TCP/IP protocol to change the print/scan server settings
A standard web browser (we recommend Microsoft Internet Explorer® version 6.0 or later, or Netscape Navigator® version 7.1 or later) can be used to change your print/scan server settings using the HTTP (Hyper Text Transfer Protocol). To use a web browser, you must have assigned an IP address to the print/scan server.
1 Type http://printer_ip_address/ into your browser. (Where printer_ip_address is the IP address or the print/scan server name)
For example: http://192.168.1.2/ (if the printer’s IP address is 192.168.1.2.)
NoteIf you have edited the hosts file on your computer or are using Domain Name System, you can also enter the DNS name of the print/scan server. As the print/scan server supports TCP/IP and NetBIOS names, you can also enter the NetBIOS name of the print/scan server. The NetBIOS name can be seen in the Network Configuration page. The NetBIOS name assigned is the first 15 characters of the node name and by default it will appear as BRN_xxxxxx where xxxxxx is the last six digits of the Ethernet address.
2 Click Network Configuration.
3 Enter a user name and a password. The User Name is admin and the default Password is access.
4 Click OK.
5 Click Configure TCP/IP.
6 You can now change the printer server settings.

3
3 - 1
3 Front Panel Setup
LAN Main Setup Menu
You can connect your machine into the network to use the Network Printer and Network Scanner.
To use all the network functions, you can set up your machine using the control panel LAN menu.
The LAN menu selections allow you to set up the Brother machine for your network configuration. Press Menu/Set, then press the appropriate number, 5 for LAN for example. Proceed to the menu selection you wish to configure.
Please note that the machine is supplied with the BRAdmin Professional Windows® software, which also can be used to configure many aspects of the network.
Setup TCP/IP
This menu has nine sections: Boot Method, IP Address, Subnet Mask, Gateway, Node Name, WINS Config, WINS Server, DNS Server and APIPA.
BOOT Method
1 Press Menu/Set, 5, 1, 1.
2 Press ▲ or ▼ to select Auto, Static, RARP, BOOTP or DHCP.
3 Press Menu/Set.
4 Press Stop/Exit.
Static mode
In this mode the machine’s IP address must be manually assigned. Once entered the IP address is locked to the assigned address.
Auto mode
In this mode, the machine will scan the network for a DHCP server, if it can find one, and if the DHCP server is configured to allocate an IP address to the machine, then the IP address supplied by the DHCP server will used. If no DHCP server is available, then the machine will scan for a BOOTP server. If a BOOTP server is available, and it is configured correctly, the machine will take its IP address from the BOOTP server. If a BOOTP server is not available, the machine will scan for a RARP server. If a RARP server also does not answer, the IP Address is scanned through APIPA facility, see page A-3. After it is initially powered ON, it may take a few minutes for the machine to scan the network for a server.
Front Panel Setup
3 - 2
3
RARP mode
Brother print/scan server IP address can be configured using the Reverse ARP (RARP) facility on your host computer. This is done by editing the /etc/ethers file (if this file does not exist, you can create it) with an entry similar to the following:
00:80:77:31:01:07 BRN_310107
Where the first entry is the Ethernet address of the print/scan server and the second entry is the name of the print/scan server (the name must be the same as the one you put in the /etc/hosts file).
If the rarp daemon is not already running, start it (depending on the system the command can be rarpd, rarpd -a, in.rarpd -a or something else; type man rarpd or refer to your system documentation for additional information). To verify that the rarp daemon is running on a Berkeley UNIX-based system, type the following command:
ps -ax | grep -v grep | grep rarpd
For AT&T UNIX-based systems, type:
ps -ef | grep -v grep | grep rarpd
The Brother print/scan server will get the IP address from the rarp daemon when it is powered on.
BOOTP mode
BOOTP is an alternative to rarp that has the advantage of allowing configuration of the subnet mask and gateway. In order to use BOOTP to configure the IP address make sure that BOOTP is installed and running on your host computer (it should appear in the /etc/services file on your host as a real service; type man bootpd or refer to your system documentation for information). BOOTP is usually started up via the /etc/inetd.conf file, so you may need to enable it by removing the “#” in front of the bootp entry in that file. For example, a typical bootp entry in the /etc/inetd.conf file would be:
#bootp dgram udp wait /usr/etc/bootpd bootpd -i
NoteDepending on the system, this entry might be called “bootps” instead of “bootp”.
In order to enable BOOTP, simply use an editor to delete the “#” (if there is no “#”, then BOOTP is already enabled). Then edit the BOOTP configuration file (usually /etc/bootptab) and enter the name, network type (1 for Ethernet), Ethernet address and the IP address, subnet mask and gateway of the print/scan server. Unfortunately, the exact format for doing this is not standardized, so you will need to refer to your system documentation to determine how to enter this information (many UNIX systems also have template examples in the bootptab file that you can use for reference). Some examples of typical /etc/bootptab entries include:
BRN_310107 1 00:80:77:31:01:07 192.189.207.3
and:
BRN_310107:ht=ethernet:ha=008077310107:\ip=192.189.207.3:
Front Panel Setup
3 - 3
3
Certain BOOTP host software implementations will not respond to BOOTP requests if you have not included a download filename in the configuration file; if this is the case, simply create a null file on the host and specify the name of this file and its path in the configuration file.
As with rarp, the print/scan server will load its IP address from the BOOTP server when the printer is powered on.
DHCP mode
Dynamic Host Configuration Protocol (DHCP) is one of several automated mechanisms for IP address allocation. If you have DHCP server in your network (typically a Unix, Windows® 2000/XP network) the print/scan server will automatically obtains its IP address from DHCP server and register its name with any RFC 1001 and 1002-compliant dynamic name services.
NoteIf you do not want your print/scan server configured via DHCP, BOOTP or RARP, you must set the BOOT METHOD to static, this will prevent the print/scan server from trying to obtain an IP address from any of these systems. To change the BOOT METHOD, use the front panel, Web browser or by using the BRAdmin application.
IP Address
This field displays the current IP address of the machine. If you have selected a BOOT Method of Static, enter the IP address that you wish to assign to the machine (check with your network manager for the IP address to use). If you have selected a method other than Static, the machine will attempt to determine its IP address using the DHCP or BOOTP protocols. The default IP address of your machine will probably be incompatible with the IP address numbering scheme of your network. We recommend that you contact your network manager for an IP address for the network the unit will be connected on.
1 Press Menu/Set, 5, 1, 2.
2 Select 1 to change. Enter the IP address.
3 Press Menu/Set.
4 Press Stop/Exit.
NoteWhen the BOOT METHOD is set to “Auto”, the machine cannot receive IP address from a BOOTP server in Windows® 2000. So please ensure that you use DHCP for Windows® 2000 server.

Front Panel Setup
3 - 4
3
Subnet Mask
This field displays the current subnet mask used by the machine. If you are not using DHCP or BOOTP to obtain the subnet mask, enter the desired subnet mask. Check with your network manager for the subnet mask to use.
1 Press Menu/Set, 5, 1, 3.
2 Select 1 to change. Enter the Subnet Mask address.
3 Press Menu/Set.
4 Press Stop/Exit.
Gateway
This field displays the current gateway or router address used by the machine. If you are not using DHCP or BOOTP to obtain the gateway or router address, enter the address you wish to assign. If you do not have a gateway or router, leave this field blank. Check with your network manager if you are unsure.
1 Press Menu/Set, 5, 1, 4.
2 Enter the Gateway address.
3 Press Menu/Set.
4 Press Stop/Exit.
Node Name
You can register the machine name on the Network. This name is often referred to as a NetBIOS name; it will be the name that is registered by the WINS server on your network. Brother recommends the name BRN_XXXXXX (where XXXXXX is the last six digits of the Ethernet address) (up to 15 characters).
1 Press Menu/Set, 5, 1, 5.
2 Select 1 to change. Enter the Node Name.
3 Press Menu/Set.
4 Press Stop/Exit.

Front Panel Setup
3 - 5
3
WINS Config
This selection controls how the machine obtains the IP address for the WINS server.
1 Press Menu/Set, 5, 1, 6.
2 Press ▲ or ▼ to select Auto or Static.
3 Press Menu/Set.
4 Press Stop/Exit.
Auto
Automatically uses a DHCP request to determine the IP addresses for the primary and secondary WINS servers. You must set the BOOT Method to Auto for this feature to work.
Static
Uses a specified IP address for the primary and secondary WINS servers.
WINS Server
1 Press Menu/Set, 5, 1, 7.
2 Press ▲ or ▼ to select Primary or secondary.
3 Press Menu/Set.
4 Enter the WINS Server address.
5 Press Menu/Set.
6 Press Stop/Exit.
Primary WINS Server IP Address
This field specifies the IP address of the primary WINS (Windows® Internet Naming Service) server. If set to a non-zero value, the machine will contact this server to register its name with the Windows® Internet Name Service.
Secondary WINS Server IP Address
This field specifies the IP address of the secondary WINS server. It is used as a backup to the Primary WINS server address. If the Primary server is unavailable, the machine still can register itself with a secondary server. If set to a non-zero value, the machine will contact this server to register its name with the Windows® Internet Name Service. If you have a primary WINS server, but no secondary WINS server, simply leave this field blank.

Front Panel Setup
3 - 6
3
DNS Server
1 Press Menu/Set, 5, 1, 8.
2 Press ▲ or ▼ to select Primary or Secondary.
3 Press Menu/Set.
4 Enter the DNS Server address.
5 Press Menu/Set.
6 Press Stop/Exit.
Primary DNS Server IP Address
This field specifies the IP address of the primary DNS (Domain Name Service) server.
Secondary DNS Server IP Address
This field specifies the IP address of the secondary DNS server. It is used as a backup to the Primary DNS server address. If the Primary server is unavailable, the machine will contact the Secondary DNS server.
APIPA
The setting of On will cause the print/scan server to automatically allocate a Link-Local IP address in the range (169.254.1.0 - 169.254.254.255) when the print/scan server cannot obtain an IP address through the BOOT Method you have set (Menu/Set, 5, 1, 1). Selecting Off means the IP address doesn’t change, when the print/scan server cannot obtain an IP address through the BOOT Method you have set.
1 Press Menu/Set, 5, 1, 9.
2 Press ▲ or ▼ to select On or Off.
3 Press Menu/Set.
4 Press Stop/Exit.

Front Panel Setup
3 - 7
3
Setup Misc.
Ethernet
Ethernet link mode. Auto allows the print/scan server to operate in 100BaseTX full or half duplex, or in 10BaseT full or half duplex mode by auto negotiation.
100BaseTX Full Duplex (100B-FD) or Half Duplex (100B-HD) and 10BaseT Full Duplex (10B-FD) or Half Duplex (10B-HD) fix the print/scan server link mode. This change is valid after the print/scan server has been reset (default is Auto).
NoteIf you incorrectly set this value, you may not be able to communicate with your print/scan server.
1 Press Menu/Set, 5, 2, 1.
2 Press ▲ or ▼ to select Auto/100B-FD/100B-HD/10B-FD/10B-HD.
3 Press Menu/Set.
4 Press Stop/Exit.
Printing the Network Configuration Page
NoteNode name: Node name appears in the Network Configuration Page. The default Node name is "BRN_xxxxxx" ("xxxxxx" is the last six digits of Ethernet address.).
The Network Configuration Page prints a report listing all the current network configuration including the network print/scan server settings.
1 Press Reports.
2 Press ▲ or ▼ to select Network Config.
3 Press Menu/Set.

Front Panel Setup
3 - 8
3
Restoring the network settings to factory default
If you wish to reset the print/scan server back to its default factory settings (resetting all information such as the password and IP address information), please follow these steps:
1 Make sure the machine is not operating, then disconnect all the cables from the machine (except power cable).
2 Press Menu/Set, 5, 0.
3 Press 1 to select Reset.
4 Press 1 to select Yes.
5 The machine will re-start, re-connect cables once this is complete.

4
4 - 1
4 Network printing from Windows®:basic TCP/IP Peer-to-Peer printing
Overview
If you are a Windows® user and want to print using the TCP/IP protocol in a Peer-to-Peer environment, please follow the instructions in this chapter. This chapter explains how to install the network software and the printer driver which you will need to be able to print using your network printer.
Note• You must configure the IP address on your machine before you proceed with this chapter. If you
haven’t done yet, see Chapter 2 first.
• Verify the host computer and print/scan server are either on the same subnet, or that the router is properly configured to pass data between the two devices.
• The default password for Brother print/scan servers is access.
For Windows® 2000/XP users
By default, Windows® 2000/XP systems install with all the necessary software required for you to be able to print. This section describes the most commonly used configuration, Standard TCP/IP Port printing. Windows® 2000/XP users can also print via Internet using the IPP protocol. For more information, see Internet printing for Windows® on page 5-1.
If you have already installed the printer driver, jump to Printer driver already installed on page 4-2.
Configuring the standard TCP/IP port
Printer driver not yet installed
1 For Windows® 2000: Go to the Start button, select Settings and then Printers.For Windows® XP: Go to the Start button and select Printers and Faxes.
2 For Windows® 2000: Double click the Add Printer icon to get the Add Printer Wizard.For Windows® XP: Duble-click Add a printer to get the Add Printer Wizard.
3 Click Next when you see the Welcome to the Add Printer Wizard screen.
4 Select Local printer and deselect the Automatically detect and install my Plug and Play printer option.
5 Click Next.
6 You must now select the correct Network printing port. Select Create a new port and select Standard TCP/IP Port port from the pull-down window.
4 - 2
4
7 Click Next.
8 The Add Standard TCP/IP Printer Port Wizard will now appear. Click Next.
9 Enter the IP address, or the print/scan server name you wish to configure. The Wizard will automatically enter the Port name information for you.
10 Click Next.
11 Windows® 2000/XP will now contact the printer that you specified. If you did not specify the correct IP address or name then you will receive an error message.
12 Click Finish to complete the Wizard.
13 Now that you have configured the port, you must specify which printer driver you wish to use. Select the appropriate driver from the list of supported printers. If you are using a driver supplied with the machine on CD-ROM then select the Have Disk option to browse to the CD-ROM.
14 For example, select the “X:\your language\W2K\Addprt” folder (where X is your drive letter). Click Open, and then OK. Select your printer, then click Next.
15 Specify a name and select Yes or No if you want this driver to be default printer, and then click Next.
16 Now specify if you wish to share the printer, enter the share name and click Next.
17 Select Yes and Next to print a test page.
18 Continue through the Wizard clicking Finish when complete.
Printer driver already installed
If you have already installed the printer driver and wish to configure it for network printing, follow these steps:
1 Select the printer driver you wish to configure.
2 Select File and then Properties.
3 Click the Ports tab of the driver and click Add Port.
4 Select the port that you wish to use. Typically this would be Standard TCP/IP Port. Then click the New Port... button.
5 The Standard TCP/IP Port Wizard will start. Follow steps 8 to 12 of Printer driver not yet installed on page 4-1.

4 - 3
4
For Windows NT® 4.0 users
Windows NT® 4.0 users can send print job using Brother Peer-to-Peer Print software provided on the Brother CD-ROM supplied with the machine.
Installing the TCP/IP protocol
If you did not install the TCP/IP protocol during the installation of your Windows NT®4.0 system (either workstation or server) follow these steps. If you have already installed the TCP/IP protocol, proceed to the next section, Installing the Brother Peer-to-Peer software on page 4-3.
1 Go to the Start button, select Settings, and then Control Panel.
2 Run the Network applet by double clicking the Network icon and then click the Protocols tab.
3 Select Add, and double click TCP/IP Protocol.
4 Insert the requested disk(s), or CD-ROM, to copy the required files.
5 Click Close. The Windows NT®4.0 system will review protocol bindings and then you will see the TCP/IP Properties dialog.
6 Configure the host IP address, subnet mask, and gateway address in that dialog. Consult your system manager for these addresses.
7 Click OK to exit (your Windows NT®4.0 workstation or server will need to be re-booted).
Installing the Brother Peer-to-Peer software
1 Start the CD-ROM installation menu program according to the Quick Setup Guide.
2 Select the model name and your language (if necessary), and then click Install Optional Applications.
3 Click Network Print Software.
4 Click Next in response to the Welcome message. Follow the on-screen instructions.
5 Select Brother Peer-to-Peer Print (LPR).
6 Select the desired directory to install the Brother Peer-to-Peer Print (LPR) files and click Next. The installation program will create the directory for you if it does not already exist on your disk.
7 Enter the Port name that you wish to use and click OK. The default port name is BLP1. Whichever name you choose, it must be unique and it MUST begin with BLP.

4 - 4
4
8 You must now enter the actual IP address of the print/scan server and the print/scan server name. If you have edited the hosts file on your computer or are using Domain Name System, you can also enter the DNS name of the print/scan server. As the print/scan server supports TCP/IP and NetBIOS names, you can also enter the NetBIOS name of the print/scan server. The NetBIOS name can be seen in the network configuration page. The NetBIOS name assigned is the first 15 characters of the node name and by default it will appear as BRN_xxxxxx where xxxxxx is the last six digits of the Ethernet address.
Note• The node name and the NetBIOS name is printed on the network configuration page. To learn how to
print the Network Configuration Page, see Printing the Network Configuration Page on page 3-7.
• If you search for the device using the search function in Step 8 above, disable the Personal Firewall software if you are using it. Once you are sure that you can print, re-start your Personal Firewall software.
9 Click OK. When prompted you must re-boot your computer.
Associating to the printer
You must now create a printer on your Windows® system using the standard Windows® printer setup procedure.
1 To do this, go to the Start button, select Settings and then Printers.
2 Double click the Add Printer icon to get the Add Printer Wizard.
3 Select My Computer (not Network Printer) and click Next.
4 Select the Brother LPR Port (the port name you assigned in step 7 of the “Installing Brother Peer-to-Peer Software” section in this chapter) and click Next.
5 Select the desired printer model. If the correct model is not displayed, click the Have Disk option and insert the CD-ROM supplied with your machine.
6 If the driver already exists, select Keep Existing Driver (if it does not exist, this step will be skipped), and then click Next.
7 If desired, change the name of the printer and select Yes or No if you want this driver to be default printer, and then click Next.
8 If desired, make the printer shared (so other user can access it), and select the operating system(s) that these other computers will be running. Click Next.
9 Select Yes when you asked Would you like to print a test page?. Click Finish to complete the installation. You may now print to the printer as if it were a local printer.

4 - 5
4
Adding a second Brother LPR port
You do not need to re-run the install program to add a new Brother LPR port. Instead, go to the Start button, select Settings, and open the Printers window. Click the icon of the printer that you wish to configure, select File from the menu bar, and then Properties. Click the Ports tab and then the Add Port button. In the Printer Ports dialog, highlight Brother LPR Port. Click the New Port button and enter the port name. The default port name is BLP1. If you have already used this name, you will get an error message if you try to use it again, in which case use BLP2, etc... Once you have specified the port name, click OK. You will then see the Port Settings dialog.
Enter the IP address of the printer that you wish to print to and click OK. And then click Close in the Printer Ports dialog. You should now see the port that you have just created in the Print to the following port(s) setting of the printer driver.
For Windows® 95/98/Me users
Windows® 95/98/Me users can send print job using Brother Peer-to-Peer Print software provided by the CD-ROM which we have supplied with the machine.
Installing the Brother Peer-to-Peer software
NoteIf you already installed the driver from the supplied CD-ROM with the machine Installer and you selected “Brother Peer-to-Peer Network Printer” during the installation then you do not need to install the Brother Network Print Software again.
1 Start the CD-ROM installation menu program according to the Quick Setup Guide.
2 Select the model name and your language (if necessary), and then click Install Optional Applications.
3 Click Network Print Software.
4 Click Next in response to the Welcome message. Follow the on-screen instructions.
5 Select Brother Peer-to-Peer Print (LPR).
6 Select the desired directory to install the Brother Peer-to-Peer Print (LPR) files and push Next. The installation program will create the directory for you if it does not already exist on your disk.
7 Enter the Port name that you wish to use and click OK. The default port name is BLP1. Whichever name you choose, it must be unique and it MUST begin with BLP.

4 - 6
4
8 You must now enter the actual IP address of the print/scan server and the print/scan server name. If you have edited the hosts file on your computer or are using Domain Name System, you can also enter the DNS name of the print/scan server. As the print/scan server supports TCP/IP and NetBIOS names, you can also enter the NetBIOS name of the print/scan server. The NetBIOS name can be seen in the network configuration page. The NetBIOS name assigned is the first 15 characters of the node name and by default it will appear as BRN_xxxxxx where xxxxxx is the last six digits of the Ethernet address.
Note• The node name and the NetBIOS name is printed on the Network Configuration Page. To learn how
to print the Network Configuration Page, see Printing the Network Configuration Page on page 3-7.
• If you search for the device using the search function in Step 8 above, disable the Personal Firewall software if you are using it. Once you are sure that you can print, re-start your Personal Firewall software.
9 Click OK. When prompted you must re-boot your computer.
Associating to the printer
You must now create a printer on your Windows® system using the standard Windows® printer setup procedure.
1 To do this, go the Start button, select Settings and then Printers.
2 Double click the Add Printer icon to get the Add Printer Wizard.
3 Click Next when you get the Add Printer Wizard window.
4 Select Local Printer when you are asked how the printers are connected to your computer, and then click Next.
5 Select the desired printer model. If the correct model is not displayed, click the Have Disk option and insert the CD-ROM supplied with your machine.
6 If you have selected a printer driver that is already being used, you have the option of either keeping the existing driver (recommended) or replacing it. Select the desired option and click Next.
7 Select the Brother LPR port (the port name you assigned in step 7 of the Installing the Brother Peer-to-Peer software on page 4-5) and click Next.
8 Enter any desired name for the Brother printer. For example, you could call the printer “Networked Brother Printer”. Select Yes or No if you want this driver to be default printer, and then click Next.
9 Windows® will now ask you if you wish to print out a test page, select Yes and then select Finish. You have now finished installing the Peer-to-Peer Print (LPR) software.

4 - 7
4
Adding a second Brother LPR port
You do not re-run the install program to add a new Brother LPR port. Instead, go to the Start button, select Settings, and open the Printers window. Click the icon of the printer that you wish to configure, select File from the menu bar, and then Properties. Click the Details tab and then the Add Port button. In the Add Port dialog, select the Other radio button and then highlight Brother LPR port. Click OK and enter the port name. The default port name is BLP1. If you have already used this name, you will get an error message if you try to use it again, in which case use BLP2, etc... Once you have specified the port name, click OK. You will then see the Port Properties dialog.
Enter the IP address of the printer that you wish to print to and click OK. You should now see the port that you have just created in the Print to the following port setting of the printer driver.
Other sources of information
See Chapter 2 of this User’s Guide to learn how to configure the IP address of the printer.

5
5 - 1
5 Internet printing for Windows®
Overview
Windows® 2000/XP users can print using TCP/IP using the standard Network Printing software and IPP protocol software built into any Windows® 2000/XP installation.
Note• You must configure the IP address on your machine before you proceed with this chapter. If you
haven’t done yet, see Chapter 2 first.
• Verify the host computer and print/scan server are either on the same subnet, or that the router is properly configured to pass data between the two devices.
• The default password for Brother print/scan servers is access.
Windows® 2000/XP IPP printing
Use the following instructions if you wish to use the IPP printing capabilities of Windows® 2000/XP.
1 For Windows® 2000: Go to the Start button, select Settings and then Printers.For Windows® XP: Go to the Start button and select Printers and Faxes.
2 For Windows® 2000: Double click the Add Printer icon to get the Add Printer Wizard.For Windows® XP: Double-click Add a printer to get the Add Printer Wizard.
3 Click Next when you see the Welcome to the Add Printer Wizard screen.
4 Select Local printer or Network printer. For Windows® 2000: Make sure that you select Network Printer.For Windows® XP: Make sure that you select A network printer, or a printer attached to another computer.
5 Click Next.
6 For Windows® 2000: Select Connect to a printer on the Internet or on your intranet and then enter the following in the URL field: http://printer_ip_address:631/ipp (Where printer_ip_address is the IP address or the print/scan server name).
For Windows® XP: Select Connect to a printer on the Internet or on a home or office network and then enter the following in the URL field: http://printer_ip_address:631/ipp (Where printer_ip_address is the IP address or the print/scan server name).

Internet printing for Windows®
5 - 2
5
NoteIf you have edited the hosts file on your computer or are using Domain Name System, you can also enter the DNS name of the print/scan server. As the print/scan server supports TCP/IP and NetBIOS names, you can also enter the NetBIOS name of the print/scan server. The NetBIOS name can be seen in the network configuration page. The NetBIOS name assigned is the first 15 characters of the node name and by default it will appear as BRN_xxxxxx where xxxxxx is the last six digits of the Ethernet address.
7 When you click Next, Windows® 2000/XP will make a connection with the URL that you specified.
If the printer driver has already been installed:
If the appropriate printer driver is already installed on your PC, Windows® 2000/XP will automatically use that driver for use. In this case, you will simply be asked if you wish to make the driver the default driver, after which the Driver installation Wizard will complete. You are now ready to print.
If the printer driver has NOT been installed:
One of the benefits of the IPP printing protocol is that it establishes the model name of the printer when you communicate with it. After successful communication you will see the model name of the printer automatically. This means that you do not need to inform Windows® 2000 the type of printer driver to be used.
8 Click OK. You will then see the printer selection screen in the Add Printer Wizard.
9 If your printer is not in the list of supported printers, click Have Disk. You will then be asked to insert the driver disk.
10 Click Browse and select the CD-ROM or network share that contains the appropriate Brother printer driver.
11 Now specify the model name of the printer.
12 If the printer driver that you are installing does not have a Digital Certificate you will see a warning message. Click Yes to continue with the installation. The Add Printer Wizard will then complete.
13 Click the Finish button and the printer is now configured and ready to print. To test the printer connection, print a test page.
Internet printing for Windows®
5 - 3
5
Specifying a different URL
Please note that there are several possible entries that you can enter for the URL field.
http://printer_ip_address:631/ipp
This is the default URL and we recommend that you use this URL. Please note the Get More Info option will not display any printer data.
http://printer_ip_address:631/ipp/port1
This is for HP® Jetdirect® compatibility. Please note the Get More Info option will not display any printer data.
http://printer_ip_address:631/
If you forget the URL details, you can simply enter the above text and the printer will still receive and process data. please note the Get More Info option will not display any printer data.
If you are using the built in service names that the Brother print/scan server supports, you can also use the following: (However, please note the Get More Info option will not display any printer data).
http://printer_ip_address:631/brn_xxxxxx_p1
http://printer_ip_address:631/binary_p1
http://printer_ip_address:631/text_p1
http://printer_ip_address:631/pcl_p1
http://printer_ip_address:631/postscript_p1
http://printer_ip_address:631/brn_xxxxxx_p1_at
Where printer_ip_address is the IP address or the print/scan server name.
Other sources of information
See Chapter 2 of this User’s Guide to learn how to configure the IP address of the printer.

6
6 - 1
6 Network printing from Macintosh®
Overview
This chapter explains how to configure the PostScript driver on a Network. For more information on how to configure the default Quick Draw driver on a Network. see the Quick Setup Guide included with the machine.
How to select the print server (TCP/IP) (Mac OS® 9.1 - 9.2)
1 Open the Applications (Mac OS® 9) folder.
2 Open the Utilities folder.
3 Open the Desktop Printer Utility icon.
4 Select the Printer (LPR) option and click OK.
5 At this point we must select the correct PPD file for the machine and also configure the correct LPR information. Click Change in the PostScript Printer Description (PPD) File section and select the appropriate PPD file for your model.

Network printing from Macintosh®
6 - 2
6
6 At this point we must select the correct PPD file for the machine and also configure the correct LPR information. Click Change in the PostScript Printer Description (PPD) File section and select the appropriate PPD file for your model.
7 Now select the Change button below the LPR Printer Selection text.
8 You must then enter the IP address and service name details of the machine. When specifying the Queue, use the value brn_xxxxxx_p1_at where xxxxxx are the last 6 digits of the Ethernet address.
NoteIf you do not specify the correct value the machine may not print, or it may not print the data correctly. Please ensure that the value you enter here matches with the Service name of the machine.
9 Click OK to go back to the previous screen.
10 You are now ready to create the printer for use. To do that, click Create and you will see the following:
11 Enter the name of the printer in the Save desktop printer As: option and click Save.
12 We must now make this our default printer by clicking the printer name once and then select Printing and Set Default Printer.
Whenever you send a print job, the printer that you just created will be used.

Network printing from Macintosh®
6 - 3
6
How to select the print server (TCP/IP) (Mac OS® X 10.2.4 or greater)
1 Turn the power of the machine ON.
2 Open the Applications folder.
3 Open the Utilities folder.
4 Open the Printer Setup Utility Icon. (Mac OS® X 10.2.x users, open the Print Center icon.)
5 Click Add.
6 Select IP Printing.
7 Enter the TCP/IP address of the printer into the Printer Address box.
The network configuration page will allow you to confirm the TCP/IP address. For information on how to print the configuration page, See Printing the Network Configuration Page on page 3-7.
8 When specifying the Queue Name, use the value brn_xxxxxx_p1_at where xxxxxx are the last 6 digits of the Ethernet address.
9 From the Printer Model pull-down list select your model. For example, select Brother MFC-XXXXX BR-Script3.
10 Click Add and the printer will be available from the Printer List.

Network printing from Macintosh®
6 - 4
6
Changing the configuration using a web browser
From a Macintosh®, the easiest way to change the printer or print/scan server parameters is to use a web browser.
Simply connect to the printer using the format: http://ip_address where ip_address is the address of the printer.
See Using the HTTP (web browser) and the TCP/IP protocol to change the print/scan server settings on page 2-5.
Other sources of information
1 Visit http://solutions.brother.com for more information on network printing.
2 See Chapter 2 of this User’s Guide to learn how to configure the IP address of the printer.
7
7 - 1
7 Web Based Management
How to use a Web Browser to manage your Device
Overview
A standard Web Browser (we recommend Microsoft Internet Explorer® version 6.0 or later, or Netscape Navigator® version 7.1 or later) can be used to manage your machine using the HTTP (Hyper Text Transfer Protocol). You can get the following information from a printer on your network using a web browser:
■ Printer status information.
■ Change Fax configuration items, such as General Setup. Quick-Dial settings and Remote Fax.
■ You can also change network settings such as TCP/IP information.
■ Software version information of the machine and print/scan server.
■ Change network and machine configuration details.
You must use the TCP/IP protocol on your network and have a valid IP address programmed into the print/scan server and your computer.
1 To learn how to configure the IP address on your machine, see Chapter 2 Configuring your network printer.
2 The default password for Brother print/scan servers is access.
3 You can use a web browser on most computing platforms, for example, Macintosh and Unix users are also able to connect to the machine and manage it.
4 You can also use the BRAdmin Professional utility to manage the printer and its network configuration.
How to connect to your machine using a Browser
Type http://printer’s IP Address / into your browser (you can also use the NetBIOS name of the print/scan server, if you are in a Microsoft Windows domain/Workgroup environment). Enter the DNS name of the machine if connecting to a network that uses the DNS protocol.
Password Information
Web Based Management offers two levels of password access. Users are able to access to the General Setup, Fax settings and Lists and Reports. The default user name for Users is user (case sensitive) and the default password is access.
Administrators are able to access all settings. The login name for the Administrator is admin (case sensitive) and the default password is access.
8
8 - 1
8 Troubleshooting
Overview
This chapter describes procedures for troubleshooting problems you may encounter with a Brother print/scan server, it is divided into the following sections:
■ General problems
■ Network print software installation problems
■ Printing problems
■ Protocol-specific troubleshooting
General problems
CD-ROM is inserted, but does not start automatically
If your computer does not support Autorun, the menu will not start automatically after inserting the CD-ROM. In this case, execute setup.exe in the root directory of the CD-ROM.
How to reset the Brother print/scan server to factory default
You can reset the print/scan server back to its default factory settings (resetting all information such as the password and IP address information). See Restoring the network settings to factory default on page 3-8.
Network print software installation problems
The Brother print/scan server is not found during setup of the network print software installation or from the printer driver of the Brother machine in Windows®.
The Brother print/scan server is not found using the Simple Network Configuration capabilities of Mac OS® X.
Make sure you have completed the IP address setting of the Brother print/scan server according to Chapter 2 or Chapter 3 of this User’s Guide before installing the network print software or printer driver. Check the following:
1 Make sure that the machine is powered on, is on-line and ready to print.

Troubleshooting
8 - 2
8
2 Check to see if there is any LED activity. Brother print/scan servers have two LEDs on the back panel of the machine. The upper side LED shows Link status. The lower side LED shows Activity (Receive/Transmit) status.
No light: If both LEDs are off, then the print/scan server is not connected to the network.
Link LED is green: The Link LED will be green if the print/scan server is connected to a Ethernet network.
3 Print the Network Configuration Page and check if the settings such as IP address settings are correct for your network. The problem may be the result of mismatched or duplicate IP address. Verify that the IP address is correctly loaded into the print/scan server. And make sure that no other nodes on the network have this IP address. For information on how to print the Network Configuration Page, see Printing the Network Configuration Page on page 3-7.
4 Verify that the print/scan server is on your network as follows:
For Windows®
Try pinging the print/scan server from the host operating system command prompt with the command:
ping ipaddress
Where ipaddress is the print/scan server IP address (note that in some instances it can take up to two minutes for the print/scan server to load its IP address after setting the IP address).
For Macintosh®
For Mac OS® 9.1 to 9.2
(1) From the Apple menu, open the Chooser.
(2) Click the Brother Laser (IP) icon, and make sure that your print/scan server name appears in the right frame. If it is visible, then the connection is good. Otherwise, go to Step 5.
For Mac OS® X 10.2.4 or greater
(1) From the Go menu, select Applications.
(2) Open the Utilities folder.
(3) Double-click the Printer Setup Utility icon.
(4) Click Add.

Troubleshooting
8 - 3
8
(5) Make the following selection. Make sure that your print/scan server appears. If it is visible, then the connection is good. Otherwise, go to Step 5.
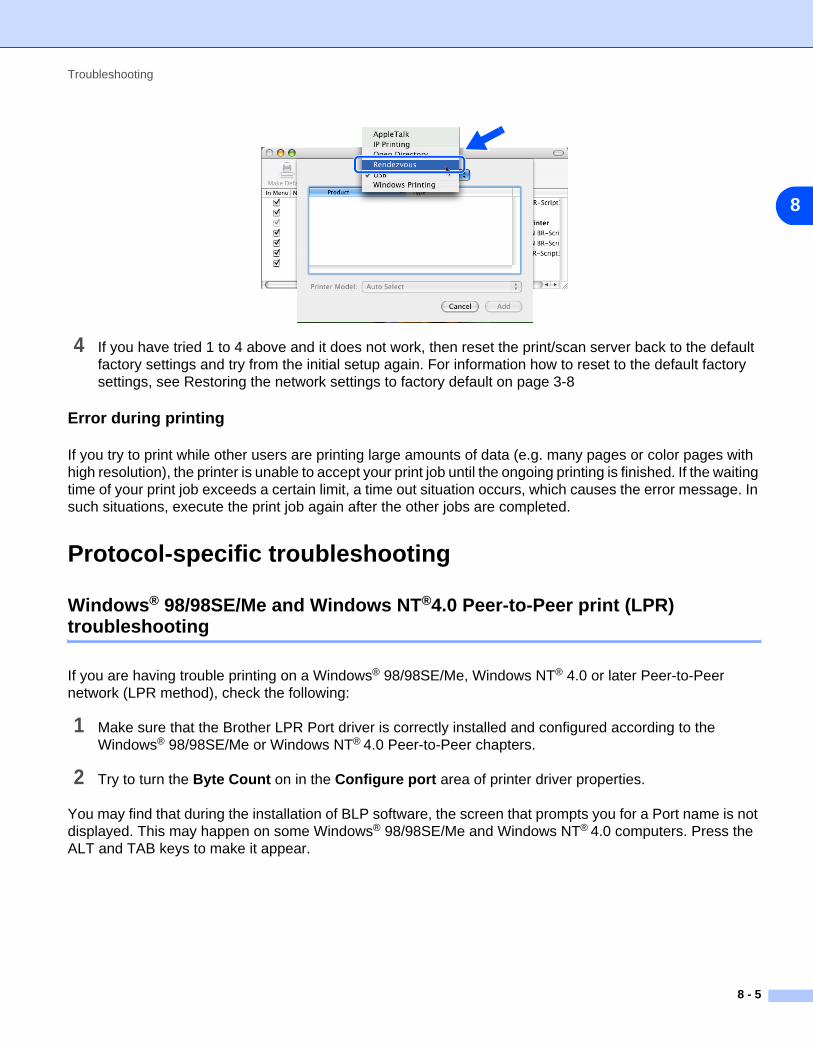
5 If you have tried 1 to 4 above and it does not work, then reset the print/scan server back to the default factory settings and try from the initial setup again. For information how to reset to the default factory settings, see Restoring the network settings to factory default on page 3-8.
6 Check if a personal firewall such as ICF (Internet Connecting Firewall) for Windows XP is running on your computer. If it is running, temporarily turn it off and try again.
NoteIf none of the above steps are successful, there is almost certainly a hardware or network problem!
Printing problems
Print job is not printed
Make sure the status and configuration of the print/scan server. Check following:
1 Make sure that the machine is powered on, is on-line and ready to print.
2 Print the Network Configuration Page of the machine and check if the settings such as IP address settings are correct for your network. The problem may be the result of mismatched or duplicate IP address. Verify that the IP address is correctly loaded into the print/scan server. And make sure that no other nodes on the network have this IP address.

Troubleshooting
8 - 4
8
3 Verify that the print/scan server is on your network as follows:
For Windows®
(1) Try pinging the print/scan server from the host operating system command prompt with the command:
ping ipaddress
Where ipaddress is the print/scan server IP address (note that in some instances it can take up to two minutes for the print/scan server to load its IP address after setting the IP address).
(2) If a successful response is received, then proceed to Windows® 98/98SE/Me and Windows NT®4.0 Peer-to-Peer print (LPR) troubleshooting, and Windows® 2000/XP IPP troubleshooting. Otherwise, proceed to Step 4.
For Macintosh®
For Mac OS® 9.1 to 9.2
(1) From the Apple menu, open the Chooser.
(2) Click the Brother Laser (IP) icon, and make sure that your print/scan server name appears in the right frame. If it is visible, then the connection is good. Otherwise, go to Step 4.
For Mac OS® X 10.2.4 or greater
(1) From the Go menu, select Applications.
(2) Open the Utilities folder.
(3) Double-click the Printer Setup Utility icon.
(4) Click Add.
(5) Make the following selection. Make sure that your print/scan server appears. If it is visible, then the connection is good.
Troubleshooting
8 - 5
8
4 If you have tried 1 to 4 above and it does not work, then reset the print/scan server back to the default factory settings and try from the initial setup again. For information how to reset to the default factory settings, see Restoring the network settings to factory default on page 3-8
Error during printing
If you try to print while other users are printing large amounts of data (e.g. many pages or color pages with high resolution), the printer is unable to accept your print job until the ongoing printing is finished. If the waiting time of your print job exceeds a certain limit, a time out situation occurs, which causes the error message. In such situations, execute the print job again after the other jobs are completed.
Protocol-specific troubleshooting
Windows® 98/98SE/Me and Windows NT®4.0 Peer-to-Peer print (LPR) troubleshooting
If you are having trouble printing on a Windows® 98/98SE/Me, Windows NT® 4.0 or later Peer-to-Peer network (LPR method), check the following:
1 Make sure that the Brother LPR Port driver is correctly installed and configured according to the Windows® 98/98SE/Me or Windows NT® 4.0 Peer-to-Peer chapters.
2 Try to turn the Byte Count on in the Configure port area of printer driver properties.
You may find that during the installation of BLP software, the screen that prompts you for a Port name is not displayed. This may happen on some Windows® 98/98SE/Me and Windows NT® 4.0 computers. Press the ALT and TAB keys to make it appear.

Troubleshooting
8 - 6
8
Windows® 2000/XP IPP troubleshooting
Want to use a different Port number other than 631.
If you are using Port 631 for IPP printing, you may find that your firewall may not let the print data through. If this is the case, use a different port number (port 80), or configure your Firewall to allow Port 631 data through.
To send a print job using IPP to a printer using Port 80 (the standard HTTP port) enter the following when configuring your Windows® 2000/XP system.
http://ip_address/ipp
Get More Info option in Windows® 2000 not working
If you are using a URL of:
http://ip_address:631 or http://ip_address:631/ipp,
the Get More Info option in Windows® 2000 will not function. If you wish to use the Get More Info option, use the following URL:
http://ip_address
This will then force Windows® 2000/XP to use Port 80 to communicate with the Brother print/scan server.

Troubleshooting
8 - 7
8
Web browser troubleshooting (TCP/IP)
1 If you can not connect to the print/scan server using your web browser it may be worth checking the Proxy Settings of your browser. Look in the Exceptions setting and if necessary, type in the IP address of the print/scan server. This will stop your PC from trying to connect to your ISP or proxy server every time you wish to look at the printer server.
2 Make sure that you are using the proper web browser, we recommend Netscape Navigator® version 7.1 or later/ Microsoft Internet Explorer® version 6.0 or later.

A
A - 1
A Appendix A
Using services
A service is a resource that can be accessed by computers that wish to print to the Brother print/scan server. The Brother print/scan server provides the following predefined services (do a SHOW SERVICE command in the Brother print/scan server remote console to see a list of available services): Enter HELP at the command prompt for a list of supported commands.
Where xxxxxx is the last six digits of the Ethernet address (for example, BRN_310107_P1).
Other ways to set the IP address (for advanced users and administrators)
For information on how to configure your network printer using the BRAdmin Professional utility or a web browser, see Setting the IP address and subnet mask on page 2-3.
Using DHCP to configure the IP address
The Dynamic Host Configuration Protocol (DHCP) is one of several automated mechanisms for IP address allocation. If you have a DHCP server in your network, the print/scan server will automatically obtain its IP address from DHCP server and register its name with any RFC 1001 and 1002-compliant dynamic name services.
NoteIf you do not want your print/scan server configured via DHCP, BOOTP or RARP, you must set the BOOT METHOD to static so that the print/scan server has a static IP address. This will prevent the print/scan server from trying to obtain an IP address from any of these systems. To change the BOOT METHOD, use the BRAdmin Professional utility.
Service (Example) Definition
BINARY_P1 TCP/IP binary, NetBIOS service
TEXT_P1 TCP/IP text service (adds carriage return after each line feed)
PCL_P1 PCL® service (switches PJL-compatible printer to PCL® mode)
BRN_xxxxxx_P1 TCP/IP binary
Appendix A
A - 2
A
Using BOOTP to configure the IP address
BOOTP is an alternative to rarp that has the advantage of allowing configuration of the subnet mask and gateway. In order to use BOOTP to configure the IP address make sure that BOOTP is installed and running on your host computer (it should appear in the /etc/services file on your host as a real service; type man bootpd or refer to your system documentation for information). BOOTP is usually started up via the /etc/inetd.conf file, so you may need to enable it by removing the “#” in front of the bootp entry in that file. For example, a typical bootp entry in the /etc/inetd.conf file would be:
#bootp dgram udp wait /usr/etc/bootpd bootpd -i
Depending on the system, this entry might be called “bootps” instead of “bootp”.
NoteIn order to enable BOOTP, simply use an editor to delete the “#” (if there is no “#”, then BOOTP is already enabled). Then edit the BOOTP configuration file (usually /etc/bootptab) and enter the name, network type (1 for Ethernet), Ethernet address and the IP address, subnet mask and gateway of the print/scan server. Unfortunately, the exact format for doing this is not standardized, so you will need to refer to your system documentation to determine how to enter this information (many UNIX® systems also have template examples in the bootptab file that you can use for reference). Some examples of typical /etc/bootptab entries include:
BRN_310107 1 00:80:77:31:01:07 192.168.1.2and:
BRN_310107:ht=ethernet:ha=008077310107:\ip=192.168.1.2:
Certain BOOTP host software implementations will not respond to BOOTP requests if you have not included a download filename in the configuration file; if this is the case, simply create a null file on the host and specify the name of this file and its path in the configuration file.
As with rarp, the print/scan server will load its IP address from the BOOTP server when the printer is powered on.
Using RARP to configure the IP address
The Brother print/scan server’s IP address can be configured using the Reverse ARP (RARP) facility on your host computer. This is done by editing the /etc/ethers file (if this file does not exist, you can create it) with an entry similar to the following:
00:80:77:31:01:07 BRN_310107
Where the first entry is the Ethernet address of the print/scan server and the second entry is the name of the print/scan server (the name must be the same as the one you put in the /etc/hosts file).

Appendix A
A - 3
A
If the rarp daemon is not already running, start it (depending on the system the command can be rarpd, rarpd -a, in.rarpd -a or something else; type man rarpd or refer to your system documentation for additional information). To verify that the rarp daemon is running on a Berkeley UNIX®-based system, type the following command:
ps -ax | grep -v grep | grep rarpd
For AT&T UNIX®-based systems, type:
ps -ef | grep -v grep | grep rarpd
The Brother print/scan server will get the IP address from the rarp daemon when the printer is powered on.
Using APIPA to configure the IP address
The Brother print/scan server supports the Automatic Private IP Addressing (APIPA) protocol. With APIPA, DHCP clients automatically configure an IP address and subnet mask when a DHCP server is not available. The device chooses it's own IP address in the range 169.254.1.0 through to 169.254.254.255. The subnet mask is automatically set to 255.255.0.0 and the gateway address is set to 0.0.0.0.
By default, the APIPA protocol is enabled. If you want to disable the APIPA protocol, you can disable it using control panel of the machine. For more information, see APIPA on page 3-6.
If the APIPA protocol is disabled, the default IP address of a Brother print/scan server is 192.0.0.192. However, you can easily change this IP address number to match with the IP address details of your network.
Using ARP to configure the IP address
If you are unable to use the BRAdmin application and your network does not use a DHCP server, you can also use the ARP command. The ARP command is available on Windows® systems that have TCP/IP installed as well as UNIX® systems. To use arp enter the following command at the command prompt:
arp -s ipaddress ethernetaddress
Where ethernetaddress is the Ethernet address (MAC address) of the print/scan server and ipaddress is the IP address of the print/scan server. For example:
Windows® systems
Windows® systems require the hash "-" character between each digit of the Ethernet address.
arp -s 192.168.1.2 00-80-77-31-01-07

Appendix A
A - 4
A
UNIX®/Linux systems
Typically, UNIX® and Linux systems require the colon ":" character between each digit of the Ethernet address.
arp -s 192.168.1.2 00:80:77:31:01:07
NoteYou must be on the same Ethernet segment (that is, there cannot be a router between the print/scan server and operating system) to use the arp -s command. If there is a router, you may use BOOTP or other methods described in this chapter to enter the IP address.If your Administrator has configured the system to deliver IP addresses using BOOTP, DHCP or RARP your Brother print/scan server can receive an IP address from any one of these IP address allocation systems. In which case, you will not need to use the ARP command. The ARP command only works once. For security reasons, once you have successfully configured the IP address of a Brother print/scan server using the ARP command, you cannot use the ARP command again to change the address. The print/scan server will ignore any attempts to do this. If you wish to change the IP address again, use a web browser, TELNET (using the SET IP ADDRESS command) or factory reset the print/scan server (which will then allow you to use the ARP command again).
To configure the print/scan server and to verify the connection, enter the following command ping ipaddress where ipaddress is the IP address of the print/scan server. For example, ping 192.189.207.2.
Using the TELNET console to configure the IP address
You can also use the TELNET command to change the IP address.
Using TELNET is effective way, when you change the IP address. But a valid IP address must already be programmed into the print/scan server.
Type TELNET ipaddress at the command prompt of the system prompt, where ipaddress is the IP address of the print/scan server. When you are connected, push the Return or Enter key to get the “#” prompt, enter the password access (the password will not appear on the screen).
You will be prompted for a user name. Enter anything in response to this prompt.
You will then get the Local> prompt. Type SET IP ADDRESS ipaddress, where ipaddress is the desired IP address you wish to assign to the print/scan server (check with your network manager for the IP address to use). For example:
Local> SET IP ADDRESS 192.168.1.3
You will now need to set the subnet mask by typing SET IP SUBNET subnet mask, where subnet mask is the desired subnet mask you wish to assign to the print/scan server (check with your network manager for

Appendix A
A - 5
A
the subnet mask to use). For example:
Local> SET IP SUBNET 255.255.255.0
If you do not have any subnets, use one of the following default subnet masks:
255.0.0.0 for class A networks
255.255.0.0 for class B networks
255.255.255.0 for class C networks
The leftmost group of digits in your IP address can identify the type of network you have. The value of this group ranges from 1 through 127 for Class A networks (e.g., 13.27.7.1), 128 through 191 for Class B networks (e.g.,128.10.1.30), and 192 through 255 for Class C networks (e.g., 192.168.1.4).
If you have a gateway (router), enter its address with the command SET IP ROUTER routeraddress, where routeraddress is the desired IP address of the gateway you wish to assign to the print/scan server. For example:
Local> SET IP ROUTER 192.168.1.4
Type SET IP METHOD STATIC to set the method of IP access configuration to static.
To verify that you have entered the IP information correctly, type SHOW IP.
Type EXIT or Ctrl-D (i.e., hold down the control key and type "D") to end the remote console session.
Using the Brother Web BRAdmin server software for IIS* to configure the IP address
The Web BRAdmin server software is designed to manage all LAN/WAN Brother network connected devices. By installing the Web BRAdmin server software on a computer running IIS*, Administrators with a web browser can connect to the Web BRAdmin server, which then communicates with the device itself. Unlike the BRAdmin Professional utility - which is designed for Windows® systems only - the Web BRAdmin server software can be accessed from any client computer with a web browser that supports Java.
Please note this software is not included on the CD-ROM that was supplied with your Brother product.
Please visit http://solutions.brother.com/webbradmin to learn more about this software and to download it.
IIS* = Internet Information Server 4.0, 5.0 or 5.1

Appendix A
A - 6
A
Print/Scan Server specifications
Operating system support Windows® 98/98SE/Me, Windows NT® 4.0, Windows® 2000/XPMac OS® 9.1 to 9.2, Mac OS® X 10.2.4 or greater
Protocol support TCP/IP ARP, RARP, BOOTP, DHCP, APIPA (Auto IP), NetBIOS Name Resolution, WINS, DNS Resolver, LPR/LPD, Custom Raw Port/Port9100, SMTP Client, IPP, FTP Server, mDNS, TELNET, SNMP, HTTP
Network type 10/100BASE-TX Ethernet network
Network printing Windows® 98/98SE/Me Peer-to-Peer printingWindows NT® 4.0 and Windows® 2000/XP TCP/IP printingMacintosh® printing (Mac OS® 9.1-9.2 and Mac OS® 10.2.4 or greater supporting TCP/IP)
Computer requirements(for drivers, BRAdmin Professional, Peer-to-Peer software, etc.)
Processor Minimum Speed
Pentium® II or eguivalent for Windows® 98/98SE/Me/2000 Professional/XP and Windows NT® 4.0
Minimum RAM 32MB for Windows® 98/98SE/Me64MB for Windows® 2000 Professional and Windows NT® 4.0128MB recommended Windows® XP
Recommended RAM
64MB for Windows® 98/98SE/Me128MB for Windows® 2000 Professional and Windows NT® 4.0256MB recommended Windows® XP
Macintosh connection Computer Ethernet ready Power Macintosh®
Processor Minimum Speed
All base models meet minimum requirements
Minimum RAM 32MB for Mac OS® 9.1 to 9.2128MB for Mac OS® X 10.2.4 or greater
Recommended RAM
64MB for Mac OS® 9.1 to 9.2160MB for Mac OS® X 10.2.4 or greater
Management utilities BRAdmin Professional utility
Windows® 98/98SE/Me, Windows NT® 4.0, Windows® 2000/XP
Web BRAdmin Windows® 2000 Professional / Server / Advanced Server,Windows® XP Professional
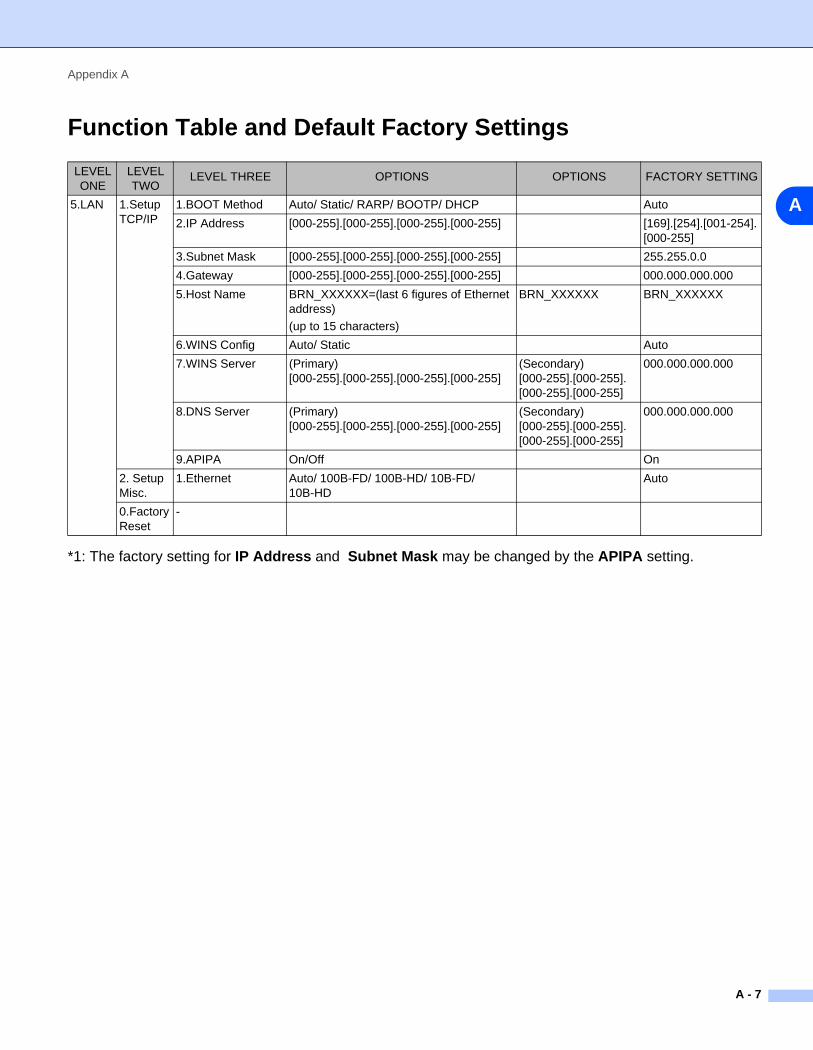
Appendix A
A - 7
A
Function Table and Default Factory Settings
*1: The factory setting for IP Address and Subnet Mask may be changed by the APIPA setting.
LEVEL ONE
LEVEL TWO
LEVEL THREE OPTIONS OPTIONS FACTORY SETTING
5.LAN 1.Setup TCP/IP
1.BOOT Method Auto/ Static/ RARP/ BOOTP/ DHCP Auto
2.IP Address [000-255].[000-255].[000-255].[000-255] [169].[254].[001-254].[000-255]
3.Subnet Mask [000-255].[000-255].[000-255].[000-255] 255.255.0.0
4.Gateway [000-255].[000-255].[000-255].[000-255] 000.000.000.000
5.Host Name BRN_XXXXXX=(last 6 figures of Ethernet address)
(up to 15 characters)
BRN_XXXXXX BRN_XXXXXX
6.WINS Config Auto/ Static Auto
7.WINS Server (Primary) [000-255].[000-255].[000-255].[000-255]
(Secondary) [000-255].[000-255].[000-255].[000-255]
000.000.000.000
8.DNS Server (Primary) [000-255].[000-255].[000-255].[000-255]
(Secondary) [000-255].[000-255].[000-255].[000-255]
000.000.000.000
9.APIPA On/Off On
2. Setup Misc.
1.Ethernet Auto/ 100B-FD/ 100B-HD/ 10B-FD/ 10B-HD
Auto
0.Factory Reset
-

I
I - 1
I Index
A
APIPA ....................................... 1-4, 3-6, A-3ARP .........................................................A-3
B
BINARY_P1 ............................................A-1BOOTP ..................................... 1-4, 3-2, A-2BRAdmin Professional .....................2-3, 2-4BRN_xxxxxx_P1 .....................................A-1Brother LPR Port ..............................4-5, 4-7Brother Peer to Peer Software ................ 4-5Brother Solutions Center ......................... 2-3Browser ................................................... 7-1
C
Configuration Page ................................. 3-7
D
DHCP ....................................... 1-4, 3-3, A-1DNS ......................................................... 7-1DNS Client .............................................. 1-4DNS Server ............................................. 3-6Domain .............................. 2-5, 4-4, 4-6, 5-2
E
Ethernet ................................................... 3-7
F
Factory Default ........................................ 3-8
G
Gateway ...........................................2-2, 3-4
H
HTTP .........................................1-5, 2-5, 7-1Hyper Text Transfer Protocol ...........2-5, 7-1
I
IIS ............................................................A-5Internet Printing ....................................... 5-1IP Address ........................................2-1, 3-3IPP ............................................1-5, 5-1, 8-6
L
LAN menu ............................................... 3-1LED (Print Server) ................................... 8-2LPR/LPD ................................................. 1-4
M
Macintosh Printing ................................... 6-1mDNS ...................................................... 1-5
N
Network Configuration Page ................... 3-7Network Printing ...................................... 4-1Network Shared Printing ......................... 1-3Node Name ............................................. 3-4
P
Password .........................................4-1, 5-1PCL_P1 ...................................................A-1Peer-to-Peer ............................................ 1-2Ping ..................................................8-2, 8-4Port9100 .................................................. 1-4Print Server Setting ................................. 2-4Protocol ................................................... 1-4
R
RARP ....................................... 1-4, 3-2, A-2Restoring the network settings ................ 3-8RFC 1001 ........................................ 2-1, A-1Router ..................................................... 2-2
S
Service ....................................................A-1Simple Network Configuration ................. 8-1SMTP Client ............................................ 1-5SNMP ...................................................... 1-5Specifications ..........................................A-6Subnet Mask ....................................2-2, 3-4
Index
I - 2
I
T
TCP/IP ..............................................1-4, 3-1TCP/IP Printing ....................................... 4-1TELNET .......................................... 1-5, A-4TEXT_P1 .................................................A-1Trademarks ............................................... -0
W
Web Based Management ........................ 7-1Web BRAdmin .........................................A-5Web Browser .............................2-5, 6-4, 7-1Web Server ............................................. 1-5Windows 2000 ...........................4-1, 5-1, 8-6Windows 2000/XP Printing ...................... 4-1Windows 95/98/Me .................................. 8-5Windows 95/98/Me Printing .................... 4-5Windows NT 4.0 Printing ......................... 4-3Windows XP ..............................4-1, 5-1, 8-6WINS Config ........................................... 3-5WINS Server ........................................... 3-5