multi-game adapter harness for jrok multi-williams game … · multi-game adapter harness for jrok...
TRANSCRIPT

Multi-Game Adapter Harness for
Jrok Multi-Williams Game PCB's.
Fits Version 1.1 Board
Thank You for your purchase of our Multi-Game Adapter Harness for the Jrok Multi-Williams Game Version 1.1.
For more Information on his fantastic Game Board Visit his site at : www.jrok.com/
This adapter allows you to install one of his boards into your Classic Williams Arcade Game (Defender/Stargate/Robotron/Joust/Bubbles/Blaster and Sinistar) without hacking up your original
wiring harness.
To install into a Different Cabinet just change the end adapter over to the one for that game and away you go.
Your Harness will Look like this one:

Installation
Connection of this Harness and Jrok Multi-WMS PCB are fairly easy to follow. (Please first refer to the Manual that came with your Jrok Board.)
The following I hope will help in the installation of the Game Board and My Harness.Pictures are of the boards and stock harness in my Duramold Sinistar. Your board layout and harness
may vary depending on your game.
1) Mount your Board into your cabinet in your desired Location.
2) Connect Jamma Edge Connector of Harness.
Here is a picture of the Main Boards to show locations of hookup points to your stock harness.

3) Connecting the Power Wires to your stock Harness

4) Connecting the Video Connections. This requires two separate Connections.
1st Connect to the Stock Harness Video Connection
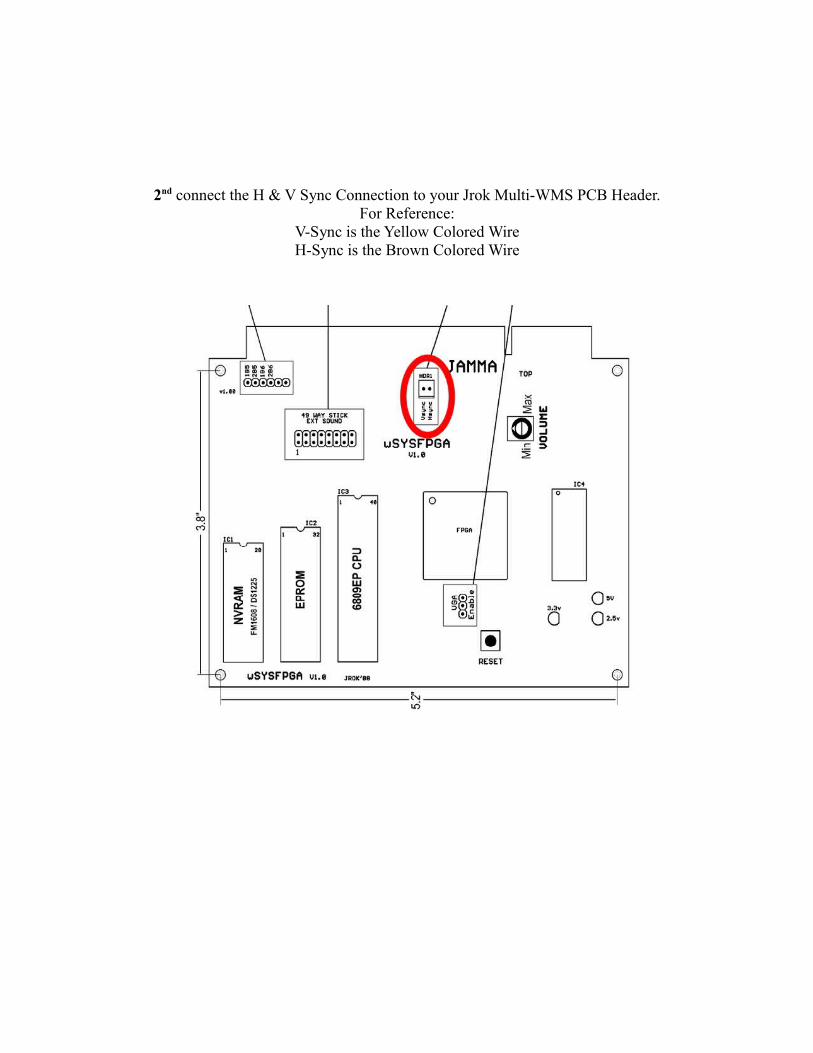
2nd connect the H & V Sync Connection to your Jrok Multi-WMS PCB Header.For Reference:
V-Sync is the Yellow Colored WireH-Sync is the Brown Colored Wire

5) Connecting the Coin Door


6) Connecting the Speaker
\

7) Connecting the PCB Header Connection.
Now on my PCB Header connector there are the following colorsOrange - Player 1 - Button 6Brown - Player 2 - Button 6Yellow - Menu/Center Coin
Gray - High Score Reset
8) Connecting your Controls
On the ends of the Main Controls Part of the Harness you will find 3 Headers .Header1 – 10 PinHeader 2 – 10 PinHeader 3 – 4 Pin
Every Adapter is a little different in the wiring and amount of connections needed. So for some adapters you will use only the two 10 pin headers Housing 1 and 2. And on some you will need to
connect the 4 Pin Header up also. All connections are labeled Housing/Header 1, 2 and 3.
You connect your games Adapter Harness to the end connections of the Control Panel Harness like this:


Next Connect the 3j2 and 3J3 Headers to your Control Panel Harness.

For People with a Sinistar or Blaster with a 49 Way Joystick your adapter harness has an additionalharness part that adapts the stock connections from the joystick down to the header connection to hook
to the Main PCB.Pin 1 on the PCB Header is the Red Wire
I hope that this Installation Manual has helped answer any questions you may have. If you have any questions or need any additional help please feel free to drop me a

Email at:[email protected]
And I will do my best to Help you.
Additional Adapter Heads are Available Upon Request.
Thank you again for purchasing this Adapter Harness from Us.
Take CareKen and Noreena Falta
www.goldenagearcadeparts.com