mris marketing centerdevweb.mris.com/sites/default/files/pdfs/mris marketing center...the...
TRANSCRIPT

MRIS Marketing Center Powered by Imprev
Quick Start Guide Real Estate in Real TimeTM

The information contained in this manual may be copyrighted and/or confidential. All rights reserved. Copyright 2013 – MRIS, Inc. – Revised 12.02.13
Contents
1. Introduction & Accessing the MRIS Marketing Center ......................................................... 1
2. Business Info & Personal Profile ........................................................................................... 2
3. Creating Projects ................................................................................................................... 3
4. The Project Wizard ................................................................................................................ 4
5. Distribution Options / Contacts ............................................................................................ 5
6. Campaigns (Pre-existing)....................................................................................................... 6
7. Campaigns (Custom) ............................................................................................................. 7
8. Account Balance / Storage Used / Imprev PRO .................................................................... 8
The information contained in this manual may be copyrighted and/or confidential. All rights reserved. 1 Copyright 2013 – MRIS, Inc. – Revised 12.02.13 – MRIS Marketing Center
Introduction Welcome to MRIS Marketing Center. This new MRIS Core product will allow you to create quick marketing materials using your listing information and photos from Keystone. These marketing materials are great for both printing and online distribution. Enjoy using the MRIS Marketing Center through Keystone once you are logged into MRIS.com!
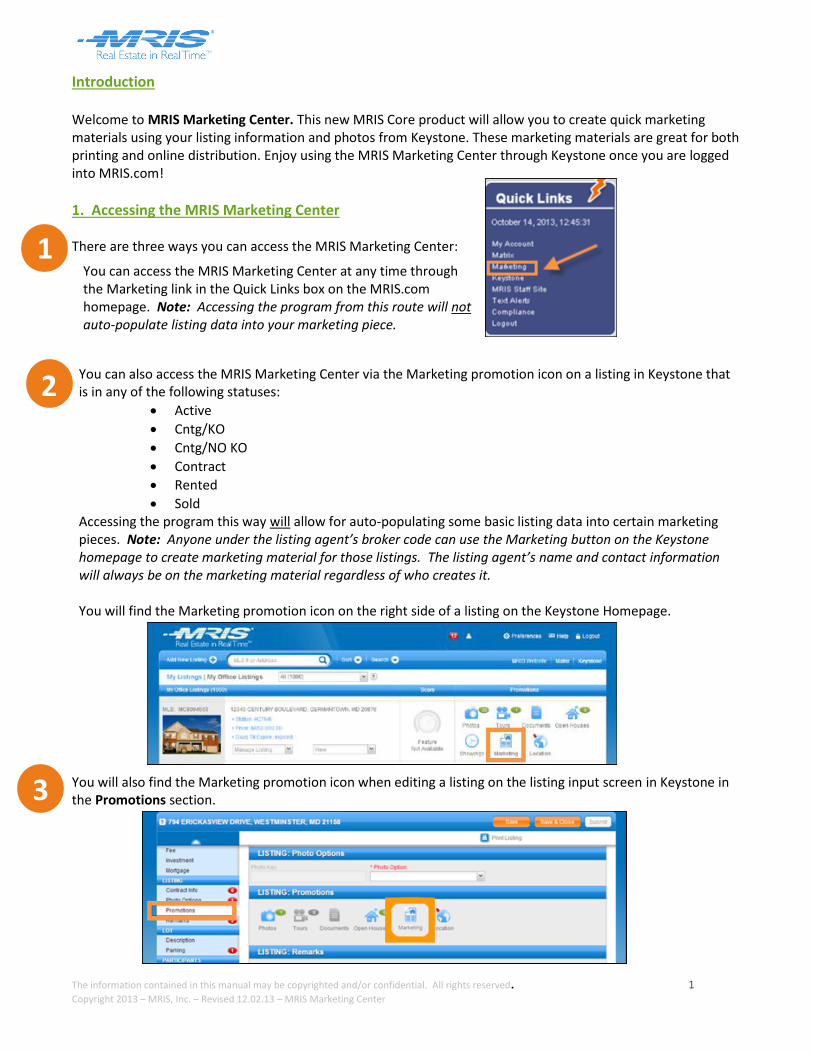
1. Accessing the MRIS Marketing Center There are three ways you can access the MRIS Marketing Center: You will also find the Marketing promotion icon when editing a listing on the listing input screen in Keystone in the Promotions section.
You can access the MRIS Marketing Center at any time through the Marketing link in the Quick Links box on the MRIS.com homepage. Note: Accessing the program from this route will not auto-populate listing data into your marketing piece.
1
You can also access the MRIS Marketing Center via the Marketing promotion icon on a listing in Keystone that is in any of the following statuses:
Active
Cntg/KO
Cntg/NO KO
Contract
Rented
Sold Accessing the program this way will allow for auto-populating some basic listing data into certain marketing pieces. Note: Anyone under the listing agent’s broker code can use the Marketing button on the Keystone homepage to create marketing material for those listings. The listing agent’s name and contact information will always be on the marketing material regardless of who creates it. You will find the Marketing promotion icon on the right side of a listing on the Keystone Homepage.
2
3
The information contained in this manual may be copyrighted and/or confidential. All rights reserved. 2 Copyright 2013 – MRIS, Inc. – Revised 12.02.13 – MRIS Marketing Center
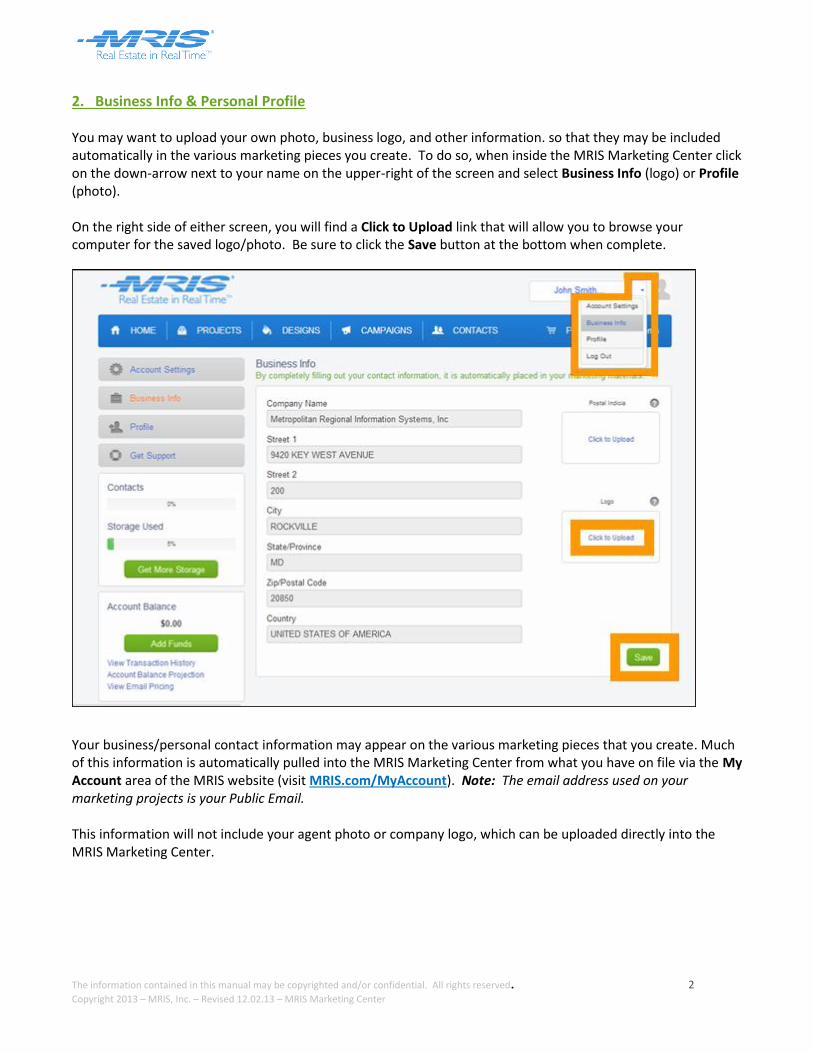
2. Business Info & Personal Profile You may want to upload your own photo, business logo, and other information. so that they may be included automatically in the various marketing pieces you create. To do so, when inside the MRIS Marketing Center click on the down-arrow next to your name on the upper-right of the screen and select Business Info (logo) or Profile (photo). On the right side of either screen, you will find a Click to Upload link that will allow you to browse your computer for the saved logo/photo. Be sure to click the Save button at the bottom when complete.
Your business/personal contact information may appear on the various marketing pieces that you create. Much of this information is automatically pulled into the MRIS Marketing Center from what you have on file via the My Account area of the MRIS website (visit MRIS.com/MyAccount). Note: The email address used on your marketing projects is your Public Email. This information will not include your agent photo or company logo, which can be uploaded directly into the MRIS Marketing Center.

The information contained in this manual may be copyrighted and/or confidential. All rights reserved. 3 Copyright 2013 – MRIS, Inc. – Revised 12.02.13 – MRIS Marketing Center
3. Creating Projects The MRIS Marketing Center allows you to create a variety of marketing projects and automatically includes the following designs as part of your core MRIS subscription:
Brochures (5 designs)
Flyers (7 designs)
Postcards (7 designs)
Virtual Tours (1 design) Drip email campaigns include:
Time Change (date-based)
Rent vs. Own (time-based)
Buyer Prospect (time-based)
Emergency Preparedness (time-based)
To send these email campaigns to your contacts, there is a 3 cent cost per email sent. For this cost, you get the benefit of tracking how many people viewed your email, how many people unsubscribe from your email list (if any), and the number of bounced emails (emails that fail to send as a result of a bad email address). Sending through the MRIS Marketing Center offers you the benefit of the built-in CAN SPAM compliance (the option for your recipient to unsubscribe) through the MRIS Marketing Center service. Note: Additional design options may be acquired by upgrading to Imprev PRO (see section 8). These main four project types are displayed at the bottom of the screen. For your convenience, Recent, Favorite, Popular, and Featured designs may also be displayed at the top of the screen. Click the project type you would like to create. The available design options will then appear. Click your desired design.
Note: When creating projects where you would prefer listing data to autofill, it may be helpful to first click the Show All link on the upper-right to filter down to those specific types of projects that allow this. After clicking Show All, use the drop-down menus to filter the Content to Listing Data.

The information contained in this manual may be copyrighted and/or confidential. All rights reserved. 4 Copyright 2013 – MRIS, Inc. – Revised 12.02.13 – MRIS Marketing Center
4. The Project Wizard The simple new project wizard at the top of the screen will guide you though the process as you build your marketing project. Fill in any applicable data (or edit auto-filled data) as needed. Click the Save and Continue button at the bottom to advance to the next step of the wizard. At any time you may click on a previous step of the wizard to return to a prior screen.
To upload photos to your project, on the Photos step of the wizard, click the Add New Photos button on the upper-right of the screen and browse your computer to select the desired files. When uploading photos to your project, you may find that they need to be adjusted for optimization in the event the resolution is too small and/or needs cropping. In these situations, your uploaded photo will have a yellow exclamation mark triangle icon on the upper-right as shown below. Click the crop (or delete) button to make the adjustments.
Note: Though high-resolution photos and cropping is recommended when indicated, you may click the Continue without cropping link on the bottom-right if desired. In these instances, the photos on your finished project may appear blurry and/or off-center.
The recommended photo resolution is at least 75 dots per inch (dpi) for Multimedia Designs and at least 150 dots per inch (dpi) for Print Designs.
We suggest using high quality photos for your projects. Learn more: http://mrisblog.com/blog/high-resolutionhd-photos/.

The information contained in this manual may be copyrighted and/or confidential. All rights reserved. 5 Copyright 2013 – MRIS, Inc. – Revised 12.02.13 – MRIS Marketing Center
5. Distribution Options / Contacts The final step of the wizard will provide a Preview button that will display in your finished project in an embedded pop-up window. From there you will have a variety of distribution options as shown below. A simple Print it Yourself link is found on the right side of the screen for convenient one-click printing. Note: You will incur costs when sending print jobs to external vendors. When it comes to digital distribution, you have the ability to email your marketing project yourself or have the MRIS Marketing Center handle the emailing (see Section 8). For either situation, you will likely find it more convenient to have your desired recipients entered into the MRIS Marketing Center as official Contacts. Note: Emails may take up to 30 minutes to be received. To enter Contacts, click on the Contacts main menu option at the top of the screen. Click the Create New Contact button on the left to manually enter an individual contact. You may also import contacts or contact lists from other programs (via .csv files) by clicking the Import Contacts button. From there, contacts may also be organized into groups for more efficient project and campaign distribution. Note: Contacts added to Matrix do not automatically get added into the MRIS Marketing Center.
Note: Want to export your contacts from Matrix, but don’t know how? Watch the Exporting from Matrix tutorial on mrisTV.com!
Link: http://www.mristv.com/2012/01/exporting-from-matrix/

The information contained in this manual may be copyrighted and/or confidential. All rights reserved. 6 Copyright 2013 – MRIS, Inc. – Revised 12.02.13 – MRIS Marketing Center
6. Campaigns (Pre-existing) The MRIS Marketing Center also allows you to send email drip campaigns. To access these, click on the pre-existing Campaigns main menu option at the top of the screen. From there, you may either select one of the preexisting campaigns at the bottom of the screen or you may create your own original campaign from scratch by clicking the New Campaign button on the upper-left (see Section 7). Additional charges will apply for the actual emailing of the campaigns post-creation. See Section 8 for more details.
Once you have selected your desired campaign from the list, you will be able to view the various emails that are included in the campaign (“Touch 1”, “Touch 2”, etc.) and adjust all the settings as needed.
Click Start (Pause) to officially activate (deactivate) a campaign for the contact(s).
Click Manage Contacts to select which of your pre-existing Contacts you would like to receive this campaign.
Click Preview to view an individual email.
Click any individual email to access administrative options including email editing, adjustment of delivery date/time, and editing of the email messaging.
Click the On/Off button to activate/deactivate (respectively) any email. Green indicates the currently selected option.

The information contained in this manual may be copyrighted and/or confidential. All rights reserved. 7 Copyright 2013 – MRIS, Inc. – Revised 12.02.13 – MRIS Marketing Center
7. Campaigns (Custom) When in the Campaigns area of the MRIS Marketing Center, to create a custom campaign from scratch, click on the New Campaign button on the left. Then click the click here to create a custom campaign link at the top of the screen. Additional charges will apply for the actual emailing of the campaigns post-creation. See Section 8 for more details.
You have the ability to create the following types of custom campaigns:
Date Based – You select the exact calendar dates the emails are sent
Time Based – You select the number of days after a contact is added to the campaign that each email is sent Click the Create Event button to begin adding events (emails and/or notifications) to this campaign. You may add your own or pull from pre-existing campaigns. These emails can also be customized as desired. Note: Options differ depending on the type of campaign you are creating (date or time based). Date based is shown below.
The Event wizard will guide you through the event creation process.
Fill out all required settings and click the Next button to advance to the next step.
On the Select a Design step, select a Project to use. You may select from pre-existing Projects or create new ones (immediately or upon campaign completion). Note: See Section 3 for details.
On the Email Options step, select a size for your Design and enter your email subject. Click the Save button to save the Event.
Note: You will still have the standard administrative options for events post-creation.

The information contained in this manual may be copyrighted and/or confidential. All rights reserved. 8 Copyright 2013 – MRIS, Inc. – Revised 12.02.13 – MRIS Marketing Center
8. Account Balance / Storage Used / Imprev PRO Though campaigns automatically come with the MRIS Marketing Center, in order to actually email these campaigns from the MRIS Marketing Center to your Contacts, additional charges will apply. The charge is $0.03 per email sent and covers the cost of CAN-SPAM compliance, tracking and click throughs, open rates, and bounces. MRIS customers will need to pay this fee directly to Imprev through the Imprev dashboard. Because of this fee, it may be helpful for you to keep a stable balance of funds within the MRIS Marketing Center in order to avoid the inhibitions of email distribution. To add monetary credits to your MRIS Marketing Center account, click the Add Funds button.
As you create (and save) marketing projects and campaigns within the MRIS Marketing Center the Storage Used bar on the left column of the MRIS Marketing Center will indicate how much storage you have remaining. Click the Get More Storage button to purchase additional storage space, if desired. You also have the ability to upgrade your MRIS Marketing Center to what is called Imprev PRO. By upgrading you will be able to access everything previously discussed as well as two premium packages: MRIS Virtual Ad Agency and Campaigns. Click the Premium Enhancements link on the upper-right of the screen when in the MRIS Marketing Center for more information on what is currently provided with Imprev PRO. Note: For more information on Imprev PRO features, please visit MRIS.com/ImprevPro.