moxa smartio & industrio family installation guide · moxa smartio & industio family...
TRANSCRIPT

MOXA Smartio & Industio Family Installation Guide
1
MOXA Smartio & Industio Family
Windows 2000 Driver Installation Guide
MOXA Smartio & Industio Family Installation Guide
2
Contents
1. Introduction
2. PCI board’s driver installation under Windows 2000
3. ISA board’s driver installation under Windows 2000
4. Changing the Multiport board properties
5. Check the Installation Result
6. Uninstall

MOXA Smartio & Industio Family Installation Guide
3
1. Introduction
The Installation Guide provides the procedure about MOXA multiport boards driver
installation under Windows 2000 for all users.
The Windows 2000 driver for MOXA Smartio & Industio family multiport boards support
following products.
• PCI Boards : C168H/PCI, C104H/PCI, CP -114, CT-114I, CP -132
• ISA Boards : C104 series, C168 series, CI-104J, C102, C114HI, CI -132, CI-134
For latest driver update, please refer to our web site at following address.
http://www.moxa.com or http://www.moxa.com.tw
MOXA Smartio & Industio Family Installation Guide
4
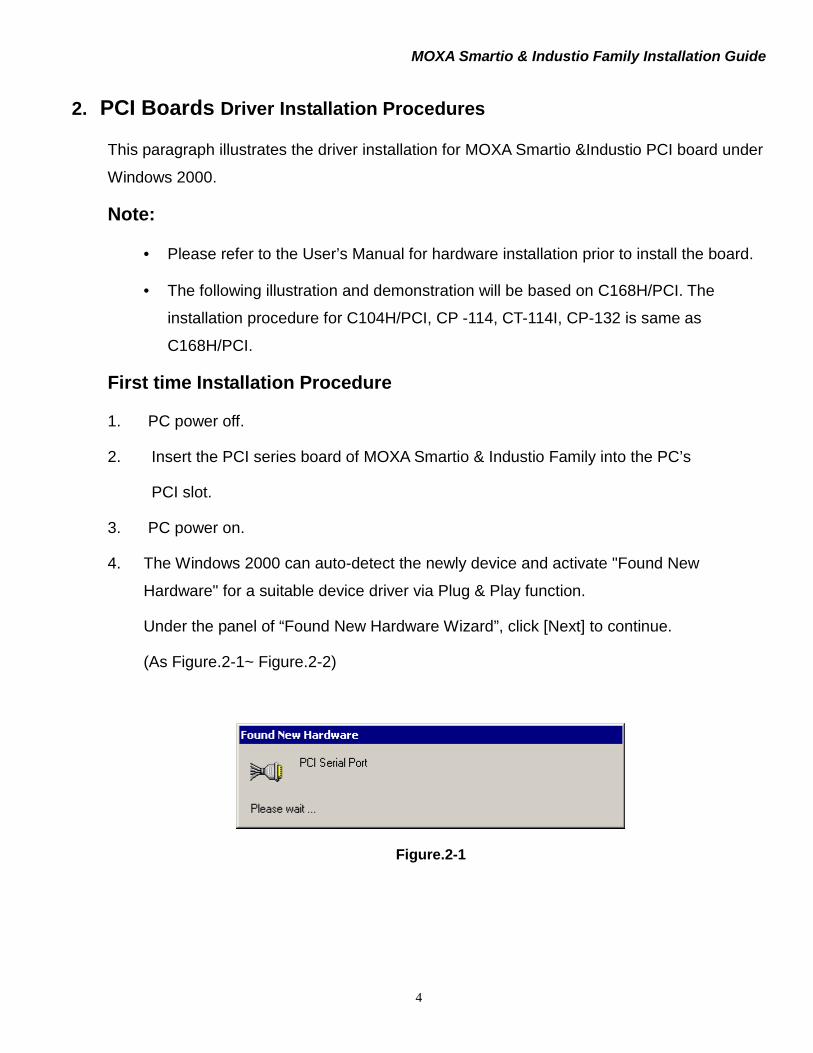
2. PCI Boards Driver Installation Procedures
This paragraph illustrates the driver installation for MOXA Smartio &Industio PCI board under
Windows 2000.
Note:
• Please refer to the User’s Manual for hardware installation prior to install the board.
• The following illustration and demonstration will be based on C168H/PCI. The
installation procedure for C104H/PCI, CP -114, CT-114I, CP-132 is same as
C168H/PCI.
First time Installation Procedure
1. PC power off.
2. Insert the PCI series board of MOXA Smartio & Industio Family into the PC’s
PCI slot.
3. PC power on.
4. The Windows 2000 can auto-detect the newly device and activate "Found New
Hardware" for a suitable device driver via Plug & Play function.
Under the panel of “Found New Hardware Wizard”, click [Next] to continue.
(As Figure.2-1~ Figure.2-2)
Figure.2-1

MOXA Smartio & Industio Family Installation Guide
5
Figure.2-2
5. Choose "Search for a suitable driver..." and click [Next] to continue. (As Figure.2-3)
Figure.2-3

MOXA Smartio & Industio Family Installation Guide
6
6. Choose "Specify a location" and [Next] to install the board’s driver. (As Figure.2-4)
Figure.2-4
7. Insert the MOXA Driver CD-ROM and specify driver location for the Wizard. Assume that
the CD-ROM driver letter is “F:”, enter the driver location in the Windows. Then press
[OK] to continue. (As Figure.2-5)
Figure.2-5
MOXA Smartio & Industio Family Installation Guide
7
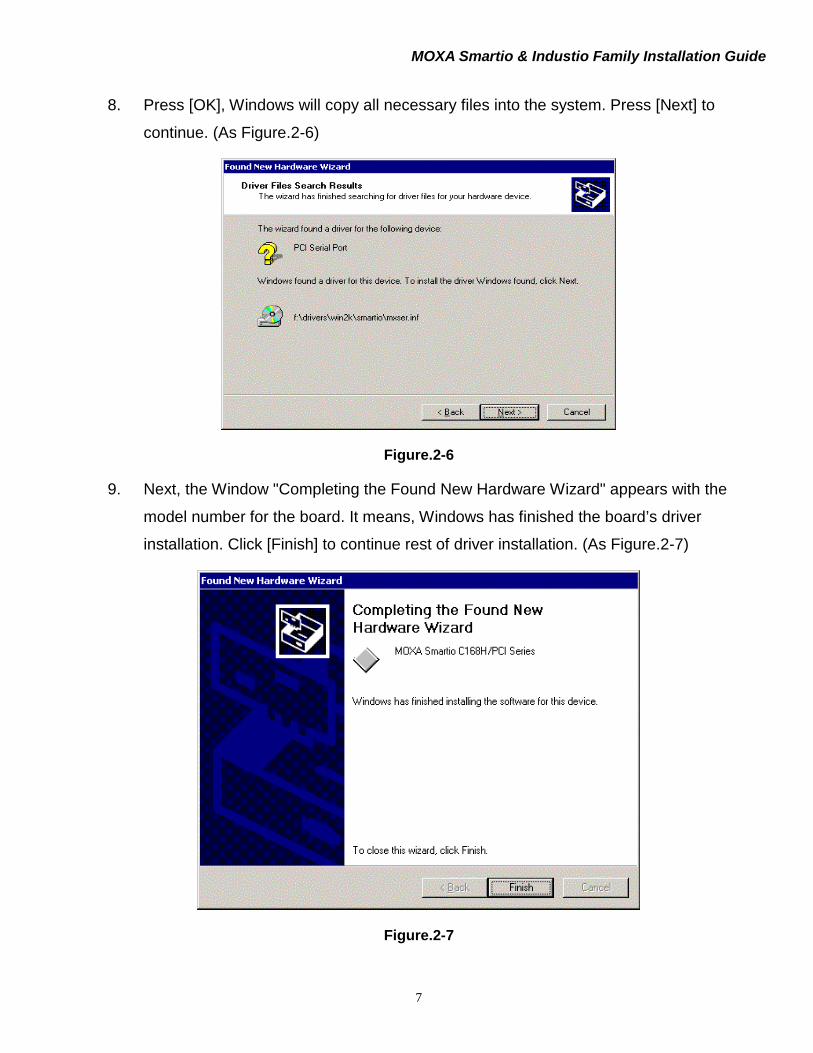
8. Press [OK], Windows will copy all necessary files into the system. Press [Next] to
continue. (As Figure.2-6)
Figure.2-6
9. Next, the Window "Completing the Found New Hardware Wizard" appears with the
model number for the board. It means, Windows has finished the board’s driver
installation. Click [Finish] to continue rest of driver installation. (As Figure.2-7)
Figure.2-7

MOXA Smartio & Industio Family Installation Guide
8
10. The screen pops up “ Found New Hardware Wizard “ window to continue the rest of
procedures. Click [Next], when the “Found New Hardware Wizard” appears.
(As Figure.2-8 ~ Figure.2-9)
Figure.2-8
Figure.2-9

MOXA Smartio & Industio Family Installation Guide
9
11. Choose “Search for a suitable driver..." and click [Next]. (As Figure.2-10)
Figure.2-10
12. Choose " Specify a location " and [Next] to install the driver. (As Figure.2-11)
Figure.2 -11

MOXA Smartio & Industio Family Installation Guide
10
13. Insert the MOXA Driver CD-ROM and specify driver location for the Wizard. Assume that
the CD-ROM driver letter is “F:”, enter the driver location in the Windows. Press [OK],
Windows will copy all necessary files into system. Then press [Next] to continue.
(As Figure.2-12)
Figure.2-12
14. Next, the Windows appears the message for driver search result with MOXA
communication port to inform you that Windows found a driver for your device. Click
[Next] to start installation. (As Figure.2-13)
Figure.2-13
MOXA Smartio & Industio Family Installation Guide
11
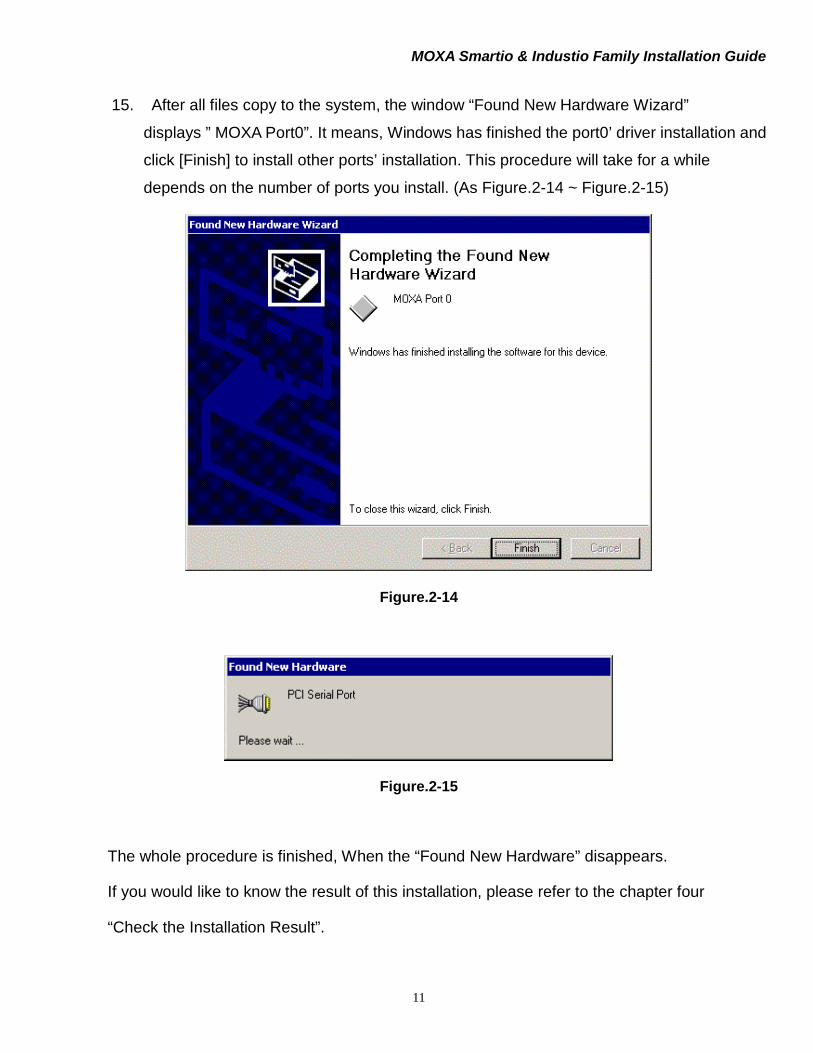
15. After all files copy to the system, the window “Found New Hardware Wizard”
displays ” MOXA Port0”. It means, Windows has finished the port0’ driver installation and
click [Finish] to install other ports’ installation. This procedure will take for a while
depends on the number of ports you install. (As Figure.2-14 ~ Figure.2-15)
Figure.2-14
Figure.2-15
The whole procedure is finished, When the “Found New Hardware” disappears.
If you would like to know the result of this installation, please refer to the chapter four
“Check the Installation Result”.

MOXA Smartio & Industio Family Installation Guide
12
3. ISA Boards Driver Installation Procedure
This driver installation supports the MOXA Smartio and Industio ISA Boards, which include
C104 series, C168 series, CI -104J, C102, C114HI, CI-132, CI-134 under Windows 2000.
The ISA boards have to adjust the I/O address and IRQ by running the io-irq.exe under pure
DOS for the I/O address and IRQ configuration first. The I/O address and IRQ should avoid
conflicting with other devices, or Windows will ask you to reboot the PC, it means you have to
verify all available devices’ I/O address and IRQ. Please refer to the chapter regarding H/W
Installation of MOXA User’s Manual for more information.
The following procedure will base on our factory default settings.
• I/O Address : 180
• Interrupt Vector : 1C0
• IRQ : 10
First Time Installation Procedure
1. PC power off.
2. Insert the ISA series boards of MOXA Smartio or Industio Family into the PC's ISA slot.
3. PC power on.
4. Select “Start”�”Settings”� “Control Panel”�”System”� “Hardware” �
“Hardware Wizard“. Under the panel of "System Properties", click "Hardware Wizard" to
enter the procedure of "Add/Remove Hardware Wizard". Click [Next] to continue.
(As Figure.3-1~ Figure.3-2)

MOXA Smartio & Industio Family Installation Guide
13
Figure.3-1
Figure.3-2

MOXA Smartio & Industio Family Installation Guide
14
5. In the Window of "Add/ Remove Hardware Wizard", choose the " Add/Troubleshoot a
device..." and click [Next] to enter the procedure of devices selected. (As Figure.3-3)
Figure.3-3
6. The next procedure is for users to choose a hardware device from devices list box.
Select “Add a new device” and click [Next]. (As Figure.3-4)
Figure.3-4

MOXA Smartio & Industio Family Installation Guide
15
7. Select " No, I want to ..." and click [Next]. (As Figure.3-5)
Figure.3-5
8. In the “Hardware Type”, select “ Multi-port series adapters” and click [Next] to enter the
Manufacturers/ Models list box. (As Figure.3-6)
Figure.3-6

MOXA Smartio & Industio Family Installation Guide
16
9. Press [Have Disk…] to enter the Window of “ Install From Disk “ and insert the CD-ROM
contained the driver of MOXA Smartio and Industio Family.
10. Insert the MOXA driver CD-ROM and specify for the Wizard. Assume that the CD-ROM
driver letter is “F:”, enter the driver location into the Windows. Press [OK] to continue.
(As Figure.3-8)
Figure.3-8
11. Next, select the proper model number for your MOXA board. Click “Next” to continue
1
Figure.3-9

MOXA Smartio & Industio Family Installation Guide
17
12. Next, the screen appears the message “Driver Files Search Results” with the model
number of MOXA Smartio or Industio Family to inform users that Windows found a driver
for this board. Click [Next] to continue.
Figure.3-10
13. Click [Finish] to continue the rest of ports’ driver installation. And then, click [Next] to
continue. (As Figure.3-11 ~ Figure.3-12)
Figure.3-11

MOXA Smartio & Industio Family Installation Guide
18
Figure.3-12
14. Choose the "Search for a suitable driver..." and click [Next] to search for the suitable driver.
(As Figure.3-13)
Figure.3-13

MOXA Smartio & Industio Family Installation Guide
19
15. Select " Specify a location " and [Next] to install the driver. (As Figure.3-14)
Figure.3-14
16. Insert the MOXA driver CD-ROM and specify for the Wizard. Assume that the CD-ROM
driver letter is “F:”, enter the driver location into the Windows. Press [OK] to continue.
(As Figure.3-15)
Figure.3-15

MOXA Smartio & Industio Family Installation Guide
20
17. The window appears the message "Driver Files Search Results" with the name of MOXA
communication port to inform you that Windows found a driver for your device. Click [Next] to
continue. (As Figure.3-16)
Figure.3-16

MOXA Smartio & Industio Family Installation Guide
21
16. After all files copy to the system, the window “Found New Hardware Wizard” displays”
MOXA Port0”. It means, Windows has finished the port0’ driver installation and click
[Finish] to install other ports’ installation.
(As Figure.3-17 ~ Figure.3-18)
Figure.3-17
Figure.3-18

MOXA Smartio & Industio Family Installation Guide
22
4. Change the Multi-port Board Properties
If your ISA board configuration is not set as default, you’ll need to change the driver’s settings
to match hardware configuration.
4.1 Select “Start” �“Settings” �“Control Panel”� “System”� “Hardware”�” Device
Manager”.
4.2 Expand the “Multi-port Serial Adapters”, you will see the MOXA board model number.
Double click on the model number. Select “Resources” tab in MOXA board property
window.
Figure 4.1

MOXA Smartio & Industio Family Installation Guide
23
4.3 Select “Basic configuration 0000” in setting based on:” option.
4.4 Highlight “Input / Output range” and click “Change Setting…”. You may change I/O
address settings in “Edit Input / Output Range” window. Click [OK] to back to board
properties window. (As Figure 4.2)
Figure.4-2
4.5 Highlight “Input / Output Range”’ and click “Change Setting…”.You may change Interrupt
Vector settings in “Edit Interrupt Request” window. Click [OK] back to board properties
window. (As Figure 4-3)
Figure. 4-3

MOXA Smartio & Industio Family Installation Guide
24
4.6 Highlight “Interrupt Request”’ and click “Change Setting…”. You may change IRQ setting
in “Edit Interrupt Request” window. Click [OK] back to board properties window.
(Figure. 4-4)
Figure4-4
4.7 In board properties window, click [OK] to finish the configuration. Then click [Yes] in “System
Setting Change” WINDOW TO RESTART Windows system. (Figure. 4-5)
Figure.4-5

MOXA Smartio & Industio Family Installation Guide
25
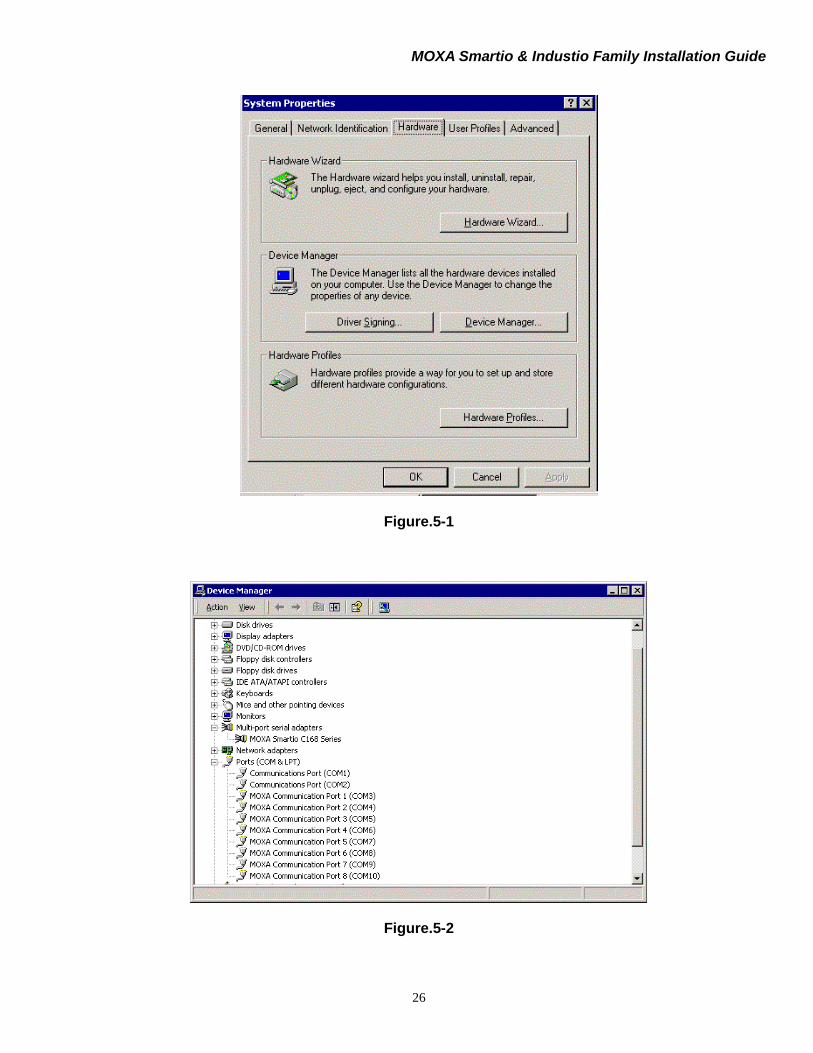
5. Check the Installation Result
Note: The following procedures are based on MOXA C168H series.
To check the Installation Result, there are three approaches as following.
5.1 Device Manager:
a. You can diagnose the installation result by selecting “Start” � “Settings” �
“Control Panel”� “System”� “Hardware”�” Device Manager”. If the driver
installation for new added device is successful, you can see the model number
of the Moxa board.
b. Click “Device Manager” to enter the devices’ list box.
Select the “Mutiu-port serial adapter” and “Ports(COM&LPT)” folder and expend
them.
c. In Device Manager you can see the model number of MOXA boards after
expanded the “Multi-port series adapters”. (As Figure.5-1~ Figure.5-2)
d. You may expand the “Ports (COM<P)” to check the status of COM ports. All
illustrated in figure2, the illustration is successful. If there’s any mark on the icon,
the installation may have problem.
e. You may refer to Even Log for detail reason.
MOXA Smartio & Industio Family Installation Guide
26
Figure.5-1
Figure.5-2

MOXA Smartio & Industio Family Installation Guide
27
5.2 PComm Diagnostic, which is a convenient diagnostic program for MOXA boards only,
provides internal and external testing as IRQ, TxD/RxD, UART, CTS/RTS, DTR/DSR,
DTR/DCD test and so on. This program can verify correct operation of both the H/W
and S/W for all MOXA boards and ports.
To run diagnostic, click on “Start” ���� “Programs”���� “PComm Lite 2000 Ver.1.0"����”PComm Diagnostic”.
Please refer to on-line help of PComm Lite 2000 for more information.
5.3 Even Log: To check the Even Log for MOXA boards, click “Start”g“Settings”
g“Control Panel” g“Administrative Tools” g “Event Viewer” to enter Event Viewer
program. in system category, find latest warring message relevant to MOXA driver.

MOXA Smartio & Industio Family Installation Guide
28
6. Uninstall
1. Select "My computer"� "Control Panel"� "System" then enter the picture of "System
Properties".
Under the panel of "System Properties", select "Hardware" then click "Device Manager" into
the devices selected list. (As Figure.6-1)
Figure.6-1

MOXA Smartio & Industio Family Installation Guide
29
2. Select "Multiport serial adapters" and expend it, you can see the model number of the board.
Select it and click right-hand key of mouse, you can see selected list. And then select
"uninstall" to remove the device you have installed from your system. (As Figure 6.2)
Figure.6-2
3. Click [OK] return to the default status. (As Figure.6-3)
. Figure.6-3
4.

MOXA Smartio & Industio Family Installation Guide
30
4. Click [Finish] to close this wizard. (As Figure.6-4)
Figure.6-4