mounting instructions...• stor perde • rullakaihtimen mounting instructions roller instructions...
TRANSCRIPT

Designed by Luxaflex®. Inspired by you.
• Roller Blinds
• Rolgordijnen
• Stores Rouleaux
• Rollos
• Estores Enrollables
• Rullegardiner
• Rullo
• Rullegardiner
• Estores de Rolo
• Rullgardiner
• Stor Perde
• Rullakaihtimen
Mounting Instructions
Roller Instructions 8-16.qxp_Layout 1 09/11/2016 08:58 Page 1
2
Mounting Instructions
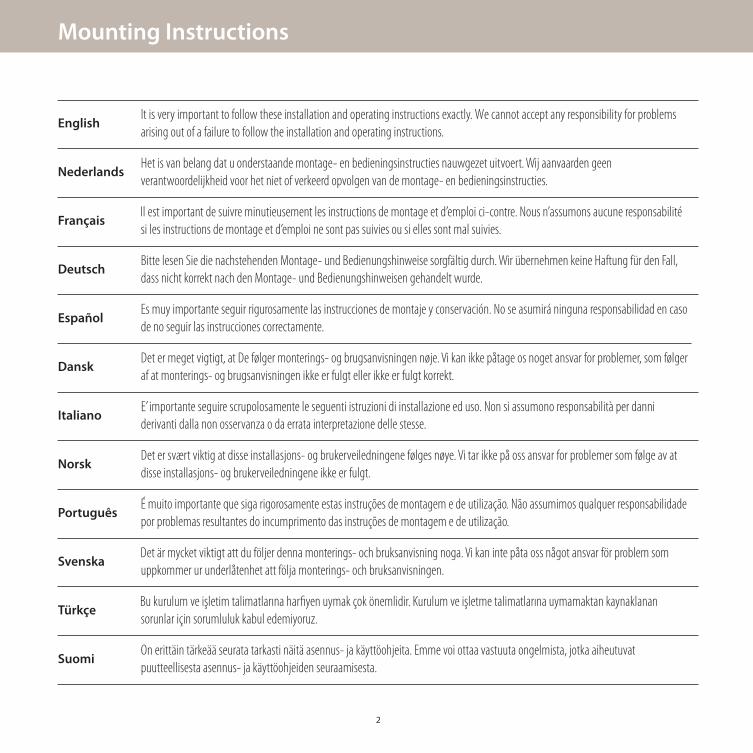
EnglishIt is very important to follow these installation and operating instructions exactly. We cannot accept any responsibility for problems arising out of a failure to follow the installation and operating instructions.
NederlandsHet is van belang dat u onderstaande montage- en bedieningsinstructies nauwgezet uitvoert. Wij aanvaarden geen verantwoordelijkheid voor het niet of verkeerd opvolgen van de montage- en bedieningsinstructies.
FrançaisIl est important de suivre minutieusement les instructions de montage et d’emploi ci-contre. Nous n’assumons aucune responsabilité si les instructions de montage et d’emploi ne sont pas suivies ou si elles sont mal suivies.
DeutschBitte lesen Sie die nachstehenden Montage- und Bedienungshinweise sorgfältig durch. Wir übernehmen keine Haftung für den Fall, dass nicht korrekt nach den Montage- und Bedienungshinweisen gehandelt wurde.
EspañolEs muy importante seguir rigurosamente las instrucciones de montaje y conservación. No se asumirá ninguna responsabilidad en caso de no seguir las instrucciones correctamente.
DanskDet er meget vigtigt, at De følger monterings- og brugsanvisningen nøje. Vi kan ikke påtage os noget ansvar for problemer, som følger af at monterings- og brugsanvisningen ikke er fulgt eller ikke er fulgt korrekt.
ItalianoE’ importante seguire scrupolosamente le seguenti istruzioni di installazione ed uso. Non si assumono responsabilità per danni derivanti dalla non osservanza o da errata interpretazione delle stesse.
NorskDet er svært viktig at disse installasjons- og brukerveiledningene følges nøye. Vi tar ikke på oss ansvar for problemer som følge av at disse installasjons- og brukerveiledningene ikke er fulgt.
PortuguêsÉ muito importante que siga rigorosamente estas instruções de montagem e de utilização. Não assumimos qualquer responsabilidade por problemas resultantes do incumprimento das instruções de montagem e de utilização.
SvenskaDet är mycket viktigt att du följer denna monterings- och bruksanvisning noga. Vi kan inte påta oss något ansvar för problem som uppkommer ur underlåtenhet att följa monterings- och bruksanvisningen.
TürkçeBu kurulum ve işletim talimatlarına harfiyen uymak çok önemlidir. Kurulum ve işletme talimatlarına uymamaktan kaynaklanan sorunlar için sorumluluk kabul edemiyoruz.
SuomiOn erittäin tärkeää seurata tarkasti näitä asennus- ja käyttöohjeita. Emme voi ottaa vastuuta ongelmista, jotka aiheutuvat puutteellisesta asennus- ja käyttöohjeiden seuraamisesta.
Roller Instructions 8-16.qxp_Layout 1 09/11/2016 08:58 Page 2

3
Guarantee
Dear Customer,
We thank you for choosing Luxaflex® products.
In the unlikely event that the Luxaflex® product guarantee service is needed, please contact thedealer from whom the product was purchased. Alternatively you may contact a member of ourauthorised Luxaflex® service network. In order to minimise any unnecessary inconvenience, wesuggest that the product installation instructions are read carefully before contacting the dealeron our service network.
GUARANTEE
Luxaflex® guarantees that all Luxaflex® window covering products are free from material and assembly defects, provided that such products were properly installed in a domestic situation.
For non-domestic installations, refer to the Luxaflex® general sales conditions. The obligation ofLuxaflex® is limited to repair or replacement of the defective materials or components.
Repairs will be made with like or similar parts. The guarantee is limited to the original purchaser.
Scope of warranty Year since date of purchase 1 yr 2 yrs 3 yrs 4 yrs 5 yrsRemoval of product from end user's window � � � � �
Carriage (to - from factory) � � � � �
Labour (assembly / repair) � � � � �
Re-installation of product at end users window � � � � �
Components (with like or similar parts) � � � � �
Cords � � � � �
Fabric (with like or similar fabric) � � � � �
Consequential loss � � � � �
This guarantee is invalid if the damage or failure is caused by:
• Accident • Misuse/Abuse • Alteration • Motorised devices • Exposure to elements • Normal wear and tear • Blinds that are not fitted in a domestic situation • Failure to follow measurement,installation, cleaning and maintenance instructions
The guarantee is exclusive and in lieu of all other obligations, liabilities or warranties. In no eventshall Luxaflex® be liable or responsible for incidental or consequential damages or for any otherdirect or indirect damage, loss, cost, expense or fee.
The guarantee does not affect the consumers statutory rights under applicable national laws inforce, nor the consumers rights against the dealer arising from their sales/purchase contract.
Roller Instructions 8-16.qxp_Layout 1 09/11/2016 08:58 Page 3

4
Contents
Control Options 6
Type 10 (bracket) system 7
Type 10 (bracket) system, Chain operation - Removal of the blind 8
Type 10 (bracket) system, Motorised operation 9
Type 10 (bracket) system, Motorised operation - Removal of the blind 10
Type 20 (mounting profile) system 11
Type 20 (Mounting profile) system; LiteRise®, Chain, Motorised, Battery Control, PowerView™ operation.–Removal of the blind 12
Type 30 (cassetted) system 13
Type 30 (Cassetted) system; LiteRise®,Chain, Motorised, Battery Control, PowerView™ operation– Removal of the blind 14
Motorised operation 15
Child Safety 16
Roller Instructions 8-16.qxp_Layout 1 09/11/2016 08:58 Page 4

5
Roller Instructions 8-16.qxp_Layout 1 09/11/2016 08:58 Page 5

6
Control options
LiteRise® operationLiteRise® operation is the standard control operation for Luxaflex® Roller blinds. As LiteRise® is inherentlychild safe no safety devices are required.
Chain operation1) Safety chain breaks
This breakaway chain connector is pre-installed in the operating chain and is designed to safely split the chain apart if a reasonable force is applied to the loop.If the safety connector does break apart, check to ensure it isnot damaged before reconnecting.
Note! Care should be taken when raising and lowering the blind to avoid the connector breaking apart accidentally.Pulling sharply on the control chain or raising the blind bypulling below the safety breaks may result in accidental breakage.
2) Safety Clip
This device is used to prevent the control chain from forming ahazardous loop and must be fitted if supplied with this product.(i) Positioning: The safety clip shall be installed at the maximum
distance possible from the control mechanism to prevent thelooped cord/chain from becoming slack.
Place the chain loop inside the safety clip. Take up any slack and check to ensure that the chain is under tension. Do notapply excessive tension as this may affect the operation ofthe product. Mark the fixing hole at this position.
(ii) Fitting: Solid Plaster Walls:Drill a 5.5mm hole and insert the wall plug provided beforescrewing into this.
Wood Fixing:Drill a 2mm pilot hole and use the screw provided, screwing directly into the wood.
All other surfaces:(Hollow plaster board, UPVC, Metal etc) special fixings are required for these surfaces (not supplied). You will need topurchase these separately from a DIY store.
Check that the chain is under continuous tension.
Important! Ensure the safety clip has been fitted to a sound and secure surface.!
2 mm
5.5 mm
• Young children can be strangled by the loops in pull cords,chains, tapes and inner cordsthat operate the product.
• To avoid strangulation and entanglement, keep cords out of the reach of young children.Cords may become wrappedaround a child’s neck.
• Move beds, cots and furnitureaway from window coveringcords.
• Do not tie cords together. Make sure cords do not twistand create a loop.
Persons in charge of young children are ultimately responsible for following thesafety instructions provided by the manufacturer and to useany safety device supplied.
Luxaflex® is a member of the ‘make it safe’ campaign – the British Blind and Shutter Association’s national campaign to promote window blind cord safety. For more info see: www.makeitsafe.org.uk
! WARNING
Grasp chain above the connector
✓ x
Roller Instructions 8-16.qxp_Layout 1 09/11/2016 08:58 Page 6

7
Type 10 (bracket) system
1
2
3
4
Brackets can be installed either Top or Face Fixed.When receiving your chain operated Luxaflex® Roller blind, you will discover the blind and control unit will be separate.
Firstly install both the bracket and control unit bracket then insert thetube into the fitted Control Chain side first the push the plunger in andmove blind up into the bracket.
Chain Operation
After the blind has been installed the chain should run vertically andparallel. If this is not the case the control mechanism can be altered,please see Luxaflex.co.uk for more information.
7
Roller Instructions 8-16.qxp_Layout 1 09/11/2016 08:58 Page 7

8
Type 10 (bracket) system, Chain operation – Removal of the blind
When removing a type 10 roller blind please ensure the correct method is used, as per the below images.
8
Roller Instructions 8-16.qxp_Layout 1 09/11/2016 08:58 Page 8

9
Type 10 (bracket) system
1
2
3 4
Brackets can be installed either Top or Face Fixed.
Motorised operation
9
Roller Instructions 8-16.qxp_Layout 1 09/11/2016 08:58 Page 9

10
Type 10 (bracket) system, Motorised operation – Removal of the blind
10
Roller Instructions 8-16.qxp_Layout 1 09/11/2016 08:58 Page 10

11
Type 20 (mounting profile) system
1
2
3
Brackets can be either Top or Face Fixed.The bracket needs to be fitted close to the operation end (ideally 55 – 70mm from end)Insert back plate at top first then push down to secure. The profile will ‘click’ when in position.
LiteRise®, Chain Operation, Motorised, Battery Controland PowerView™
11
Roller Instructions 8-16.qxp_Layout 1 09/11/2016 08:58 Page 11

12
Type 20 (Mounting profile) system; LiteRise®, Chain, Motorised, Battery Control, PowerView™ operation.– Removal of the blind
Insert a Flat blade screw driver into the lip on the bracket, and push away from the mounting plate. Then remove the blind.
12
Roller Instructions 8-16.qxp_Layout 1 09/11/2016 08:58 Page 12

13
Type 30 (cassetted) system
1
2
3
Bracket can be either Top or Face Fixed.The bracket needs to be fitted close to the operation end (ideally 10 – 70mm from end)Insert back plate at top first then push down to secure. The profile will ‘click’ when in position.
LiteRise®, Chain Operation, Motorised,Battery Controland PowerView™
13
Roller Instructions 8-16.qxp_Layout 1 09/11/2016 08:58 Page 13

14
Type 30 (Cassetted) system; LiteRise®, Chain, Motorised, Battery Control, PowerView™ operation.– Removal of the blind
Insert a Flat blade screw driver into the lip on the bracket, and twist 45° in an anticlockwise direction. Then remove the blind.
14
Roller Instructions 8-16.qxp_Layout 1 09/11/2016 08:58 Page 14

15
Motorised operation
1
2
The limits are preset in the Factory. If you need to adjust these, use the ‘Green’ key provided,and insert in to the motor. The blind will move either down or up – depending onwhich way the key is inserted. Once the blind is at the desired drop remove the key.
15
Roller Instructions 8-16.qxp_Layout 1 09/11/2016 08:58 Page 15

16
Child Safety
16
Notes:
Roller Instructions 8-16.qxp_Layout 1 09/11/2016 08:58 Page 16