mountbatten easy guide
TRANSCRIPT

The power to achieve
The Power to Achieve
A Professional Development Program
for the Mountbatten Brailler
Workshop One
Mountbatten Easy Guide
© October 2010Harpo Sp. z o. o.PoznanPolandwww.mountbattenbrailler.com
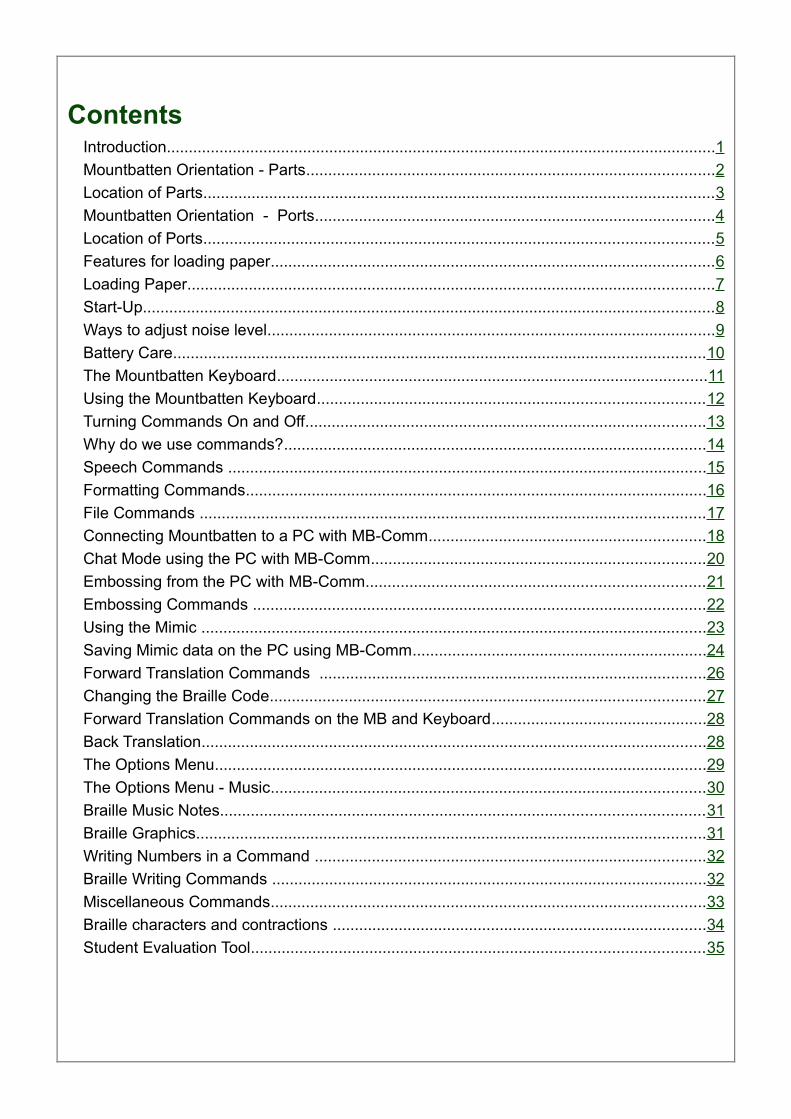
ContentsIntroduction.............................................................................................................................1Mountbatten Orientation - Parts.............................................................................................2Location of Parts....................................................................................................................3Mountbatten Orientation - Ports...........................................................................................4Location of Ports....................................................................................................................5Features for loading paper.....................................................................................................6Loading Paper........................................................................................................................7Start-Up..................................................................................................................................8Ways to adjust noise level......................................................................................................9Battery Care.........................................................................................................................10The Mountbatten Keyboard..................................................................................................11Using the Mountbatten Keyboard........................................................................................12Turning Commands On and Off...........................................................................................13Why do we use commands?................................................................................................14Speech Commands .............................................................................................................15Formatting Commands.........................................................................................................16File Commands ...................................................................................................................17Connecting Mountbatten to a PC with MB-Comm...............................................................18Chat Mode using the PC with MB-Comm............................................................................20Embossing from the PC with MB-Comm.............................................................................21Embossing Commands .......................................................................................................22Using the Mimic ...................................................................................................................23Saving Mimic data on the PC using MB-Comm...................................................................24Forward Translation Commands ........................................................................................26Changing the Braille Code...................................................................................................27Forward Translation Commands on the MB and Keyboard.................................................28Back Translation...................................................................................................................28The Options Menu................................................................................................................29The Options Menu - Music...................................................................................................30Braille Music Notes..............................................................................................................31Braille Graphics....................................................................................................................31Writing Numbers in a Command .........................................................................................32Braille Writing Commands ...................................................................................................32Miscellaneous Commands...................................................................................................33Braille characters and contractions .....................................................................................34Student Evaluation Tool.......................................................................................................35

Introduction
This guide has been prepared to provide you with a quick reference tool to use:
during Workshop One
as a resource when using your Mountbatten
During the Workshop, we suggest you mark the Easy Guide to help you remember those
sections covered.
Some information in the Easy Guide is introduced, but not applied. This allows those
already familiar with the Mountbatten to access information when needed, and for those
beginners who want to, to go ahead!
Suggestions: Store the Easy Guide near the Mountbatten.
Introduce the Guide and how to use it to all those who may need to
access the information, such as the Aide, Class Teacher and the
student.
Copy any procedures used regularly and put them on the wall near
the Mountbatten for easy reference.
Braille out reference information as the student user learns about the
Mountbatten parts, ports and functionality so that they build skills of
independence!
1

Mountbatten Orientation - PartsKeyboard Ergonomically designed, yellow keyboard with six black Braille
keys and seven blue keys that tell the Mountbatten what to do.
Embossing Head Silver metal with yellow marker to help indicate position on the page. On start-up, the embossing head moves to the right hand margin and back to identify paper size.
Reading Table A flat silver metal section on which to press when reading. The table has a groove along it to align the top of the page. Lay a new page flat on the table to assist with loading paper.
Margin Adjusters Both margin adjusters have grip wheels to help feed the paper through. The left margin adjuster is fixed. The right margin adjuster moves to accommodate paper size.
Paper Bail A long metal bar with two rubber wheels that sit across the reading table. The paper bail holds paper in place during embossing. It is spring loaded for easy removal. Slide the right hand margin to far right, grip paper bail and push to left to remove. It is best removed when a child is writing and reading Braille, giving unimpeded access.
Paper Lever A yellow plastic lever, located to the right of the embossing area, lifts up and back. When lifted it releases the right margin adjuster and prompts an audio response. When returned to lock position, the audio response prompt says “OK” and the embossing head checks for the size of the page inserted by moving between the margin adjusters.
Ruler A scale bar at the front of the embossing area to help re-align a Brailled page.
Paper Advance A yellow plastic grooved roller located to the left of the reading table. Assists with moving a new page into position.
On/Off Switch Located on the left front is the on/off switch.
Volume Control At the front of the Mountbatten and to the right of the on/off switch is a thin yellow knob for volume control.
Carry Handle In the center front is the yellow carry handle.
Pull it out and use it to carry the Mountbatten about.
2

Location of Parts
3
Left Margin Adjuster
Right Margin Adjuster[movable]Embossing Head
Keyboard
Ruler
Paper Advance
On/Off Switch
Volume Control Carry Handle
Reading Table
Paper Lever
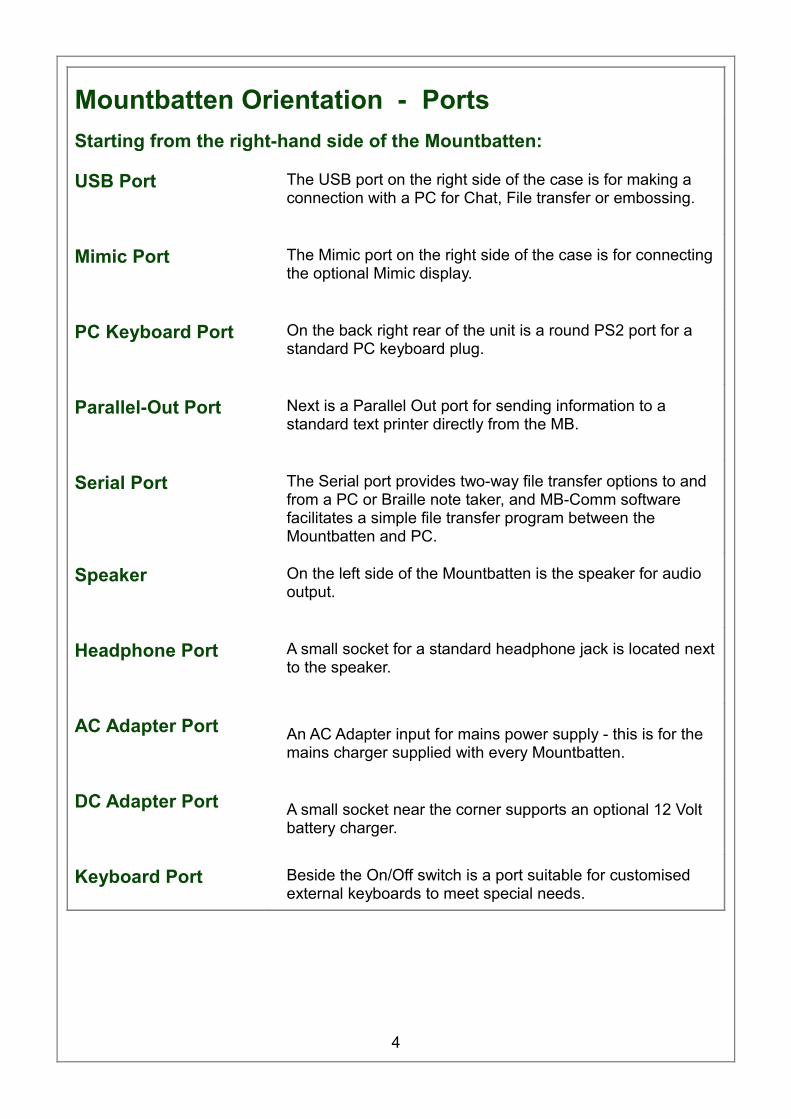
Mountbatten Orientation - PortsStarting from the right-hand side of the Mountbatten:
USB Port The USB port on the right side of the case is for making a connection with a PC for Chat, File transfer or embossing.
Mimic Port The Mimic port on the right side of the case is for connecting the optional Mimic display.
PC Keyboard Port On the back right rear of the unit is a round PS2 port for a standard PC keyboard plug.
Parallel-Out Port Next is a Parallel Out port for sending information to a standard text printer directly from the MB.
Serial Port The Serial port provides two-way file transfer options to and from a PC or Braille note taker, and MB-Comm software facilitates a simple file transfer program between the Mountbatten and PC.
Speaker On the left side of the Mountbatten is the speaker for audio output.
Headphone Port A small socket for a standard headphone jack is located next to the speaker.
AC Adapter Port An AC Adapter input for mains power supply - this is for the mains charger supplied with every Mountbatten.
DC Adapter Port A small socket near the corner supports an optional 12 Volt battery charger.
Keyboard Port Beside the On/Off switch is a port suitable for customised external keyboards to meet special needs.
4

Location of Ports
5
Mimic port
Back profile of Mountbatten
PC Keyboard Port : PS2
Speaker
Headphone PortAC Adapter Port
DC Adapter Port
Parallel Port
Serial Port
Right side profileLeft side profile
USB port

Features for loading paper
Embossing head moves along behind the ruler and embosses Braille dots. The
embossing head leads your finger to the ruler.
Paper lever is on the right - raise it to insert or remove paper.
Reading table is the flat strip of metal which supports paper.
Metal groove in the reading table assists to align the top of the page to make
sure it is straight
Paper bail is the round bar that goes from left to the right above the
reading table. When Brailling whole pages the rollers assist
with noise reduction. It is spring loaded for easy removal.
Margin adjusters the left margin is fixed, the right margin adjuster can be
adjusted to paper size. Rollers on the margin adjusters grip
paper while brailling.
Manual paper advance
is a knob set in a recess to the left of the paper control area.
Use it to adjust the top edge of paper when you are inserting a
new page.
Attention!! Do not use manual paper advance at other times - you will lose
the ability to correct or erase.
6
Paper bail Reading tableMargin adjuster
Paper advance wheel
Paper leverEmbossing head

Loading Paper
Step One Lift the yellow paper lever.
Step Two Slide the right margin left or right to make room if necessary.
Step Three Lay the page flat on the reading table.
Step Four Guide the paper under the embossing head.
Step Five Push the paper carefully into the Mountbatten.
Step Six Check that the paper is placed straight against the left hand margin
and under the left grip wheel.
Step Seven Align the top of the sheet of paper with the groove at the front edge of
the reading table.
Step Eight Hold the right side of the paper against the paper roller with your left
thumb, and hold the edge up with your left index finger.
Step Nine With your right hand, slide the right margin to the left, until it rests
against the right edge of the paper. The paper should slide easily
under the right grip wheel and over the base of the margin adjuster.
Step Ten Flip the yellow paper lever back down. The embossing head will move
to check the paper size.
7
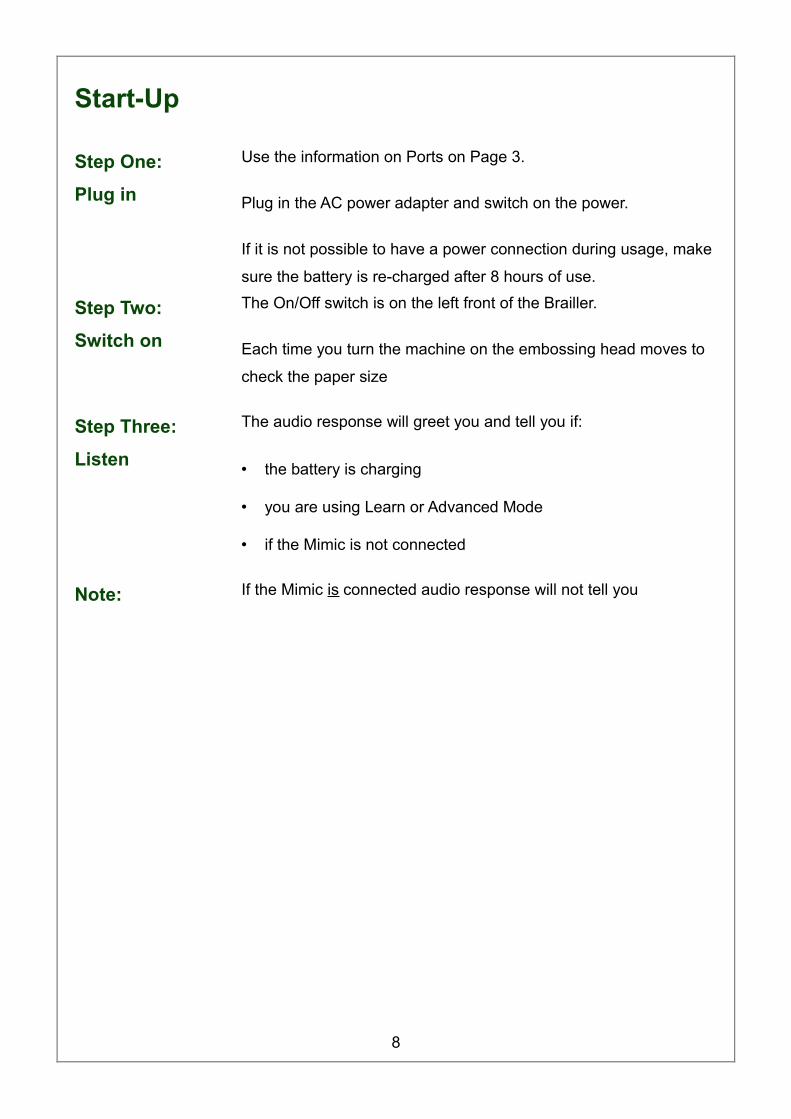
Start-Up
Step One:
Plug in
Use the information on Ports on Page 3.
Plug in the AC power adapter and switch on the power.
If it is not possible to have a power connection during usage, make
sure the battery is re-charged after 8 hours of use.
Step Two:
Switch on
The On/Off switch is on the left front of the Brailler.
Each time you turn the machine on the embossing head moves to
check the paper size
Step Three:
Listen
The audio response will greet you and tell you if:
• the battery is charging
• you are using Learn or Advanced Mode
• if the Mimic is not connected
Note: If the Mimic is connected audio response will not tell you
8

Ways to adjust noise level
Embossing sound
The sound of the Mountbatten writing Braille can be minimised in a
number of ways:
place the Mountbatten on a soft surface like 2 computer mouse
pads
use regular photocopy paper and turn impact force or Braille
pressure to a minimum
place the Mountbatten in front of a solid object such as a book
or facing wall
Speech sound
At times where a quieter class environment is needed:
adjust the volume
use headphones
9

Battery CareThe Mountbatten needs power! It uses a lot of power when embossing and has
a specially designed battery.
The battery will operate the Mountbatten for up to 8 hours or a day in class.
After this it must be recharged!
If possible connect the power adapter provided, at all times. Otherwise, use the
power adapter overnight to recharge the batteries.
It is important to remember the following battery care tips:
Each time you switch the Mountbatten on, it checks the battery status. It will
tell you to charge the battery if it is low.
It is a good idea to charge the battery overnight, every night.
If the battery is not re-charged when completely run down, permanent
damage may result. Replacing a battery is expensive and often inconvenient.
It is a good idea to leave the Mountbatten plugged in wherever possible to
ensure the battery is kept charged.
You need to charge your battery for at least 24 hours prior to storing it over
period of up to 6 weeks.
To maintain the battery when Mountbatten is out of service for longer periods,
call your supplier and arrange to disconnect the battery.
You can check battery status by pressing newline + space + b - an
audio response will tell you the status.
10

The Mountbatten Keyboard
Braille Keys
The Swing Cell
The Braille Cell
11
123 4 5 6
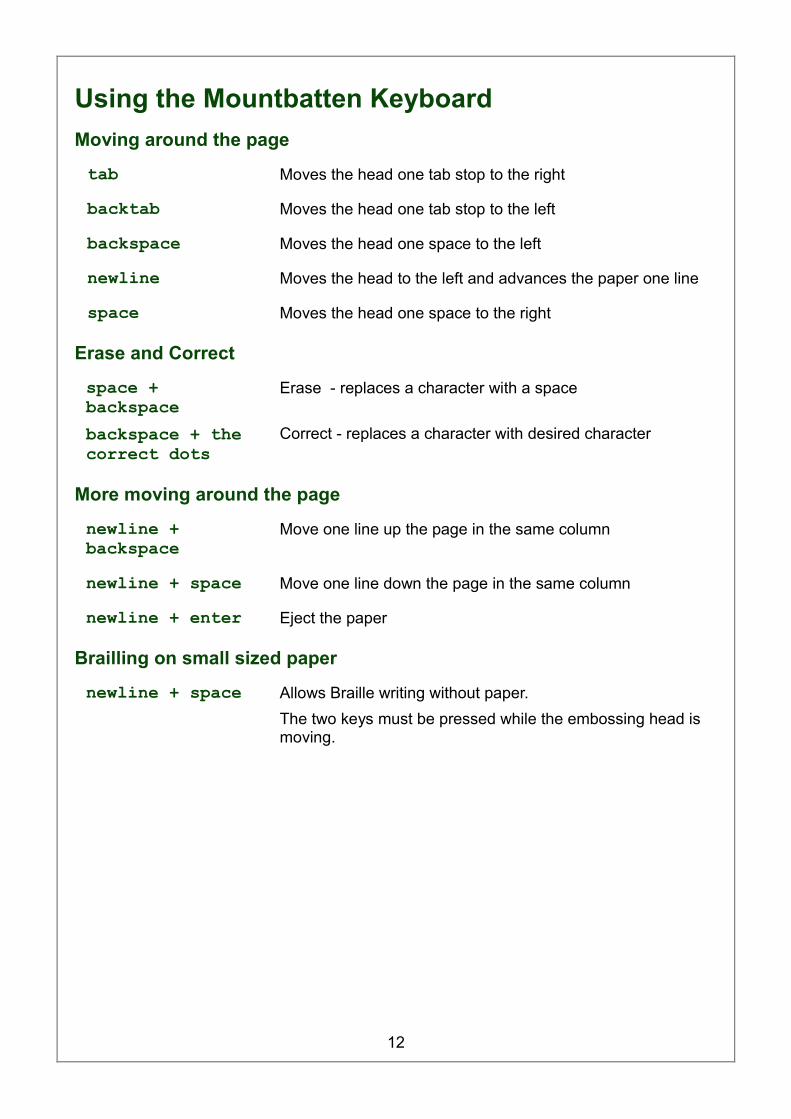
Using the Mountbatten KeyboardMoving around the page
tab Moves the head one tab stop to the right
backtab Moves the head one tab stop to the left
backspace Moves the head one space to the left
newline Moves the head to the left and advances the paper one line
space Moves the head one space to the right
Erase and Correct
space + backspacebackspace + the correct dots
Erase - replaces a character with a space
Correct - replaces a character with desired character
More moving around the page
newline + backspace
Move one line up the page in the same column
newline + space Move one line down the page in the same column
newline + enter Eject the paper
Brailling on small sized paper
newline + space Allows Braille writing without paper.The two keys must be pressed while the embossing head is moving.
12

Turning Commands On and OffLearn Mode In Learn Mode, the command key is disabled in the default setting.
To activate commands
Press the following 4 keys together:
space + newline + tab + backtabTo deactivate press the same 4 keys together. This is called an on/off toggle.
Entering commands
1. Press the command key
2. Type the command using Braille keys3. Press the enter key
Writing commands
Commands combine function keys and Braille letters.
For example: entering a command on the Mountbatten, use the Command Key, Braille code, Enter Key; on the PC use the Escape, text and the Enter key.
13

Why do we use commands?In Learn Mode Commands are used in Learn Mode to tell the Mountbatten to:
set margins, tabs, line spacing and centring
adjust dot height and paper settings
turn embossing on and off
format the Braille page eg page numbers, word wrap
save files to memory and emboss and delete files
use graphics mode
In Advanced Mode
Commands are used in Advanced Mode to tell the
Mountbatten to:
continue to perform all Learn Mode functions
do forward and back translation
provide structured introduction of Grade 2 Braille contractions
[using APH patterns]
do advanced editing of files in memory
control synthetic speech parameters
Toggle keys Command keys are usually ‘toggle’ keys. This means you repeat the command to undo it.
HINTS • Never use a space at the beginning or end of a command
• If you make a mistake while entering a command, press the ‘command’ key to start again.
14

Speech Commands For use with recorded and synthetic speech.
spk r Speaks recorded speech (default)
In MB Writer this command indicates the speaking mode is selected
spk a Speaks all keyboard keys, functions and commands
spk d Speaks dot keys only – no function keys
spk c Speaks commands, errors and prompts only – no dot keys
spk n No speech – tones only
spk s Speaks synthetic speech (only available in MB Pro)
15

Formatting Commandsww Word wrap
ce Center text (default off - toggle)
ra Right adjust (default off - toggle)
Margins
lm Set left hand margin to 0
lmh Set left hand margin to embossing head position
lm[n] Set left hand margin [n = number of columns]
rm Set right hand margin to 0
rmh Set right hand margin to embossing head position
rm[n] Set right hand margin [n = number of columns]
tm[n] Set Braille top margin [n = number of lines]
bm[n] Set Braille bottom margin [n = number of lines]
Tab Settings
tsh Set tab at position of embossing head
tc Clear all tab settings
Line Spacing
ls 1 Line spacing 1
ls 1.5 Line spacing 1.5
ls 2 Line spacing 2
16

File Commands Start a File
begin [filename] Opens a new file – filenames can have up to 16 characters
Close a File
end Closes an open file
Finding out what’s in the memory
dir Embosses all file names and their sizes
free Embosses all remaining free memory space
Change a File
Append [filename] Attaches more information to a file
rename filename1, filename2
Renames ‘filename1’ and calls it ‘filename2’
Delete Files
del [filename] Deletes a file
del all Deletes all files
undel Retrieves the last deleted file. This command only works if used before turning the unit off.
Emboss Files from the Memory
pr [filename] Prints the file
mpr n [filename] Prints ‘n’ copies of file
17
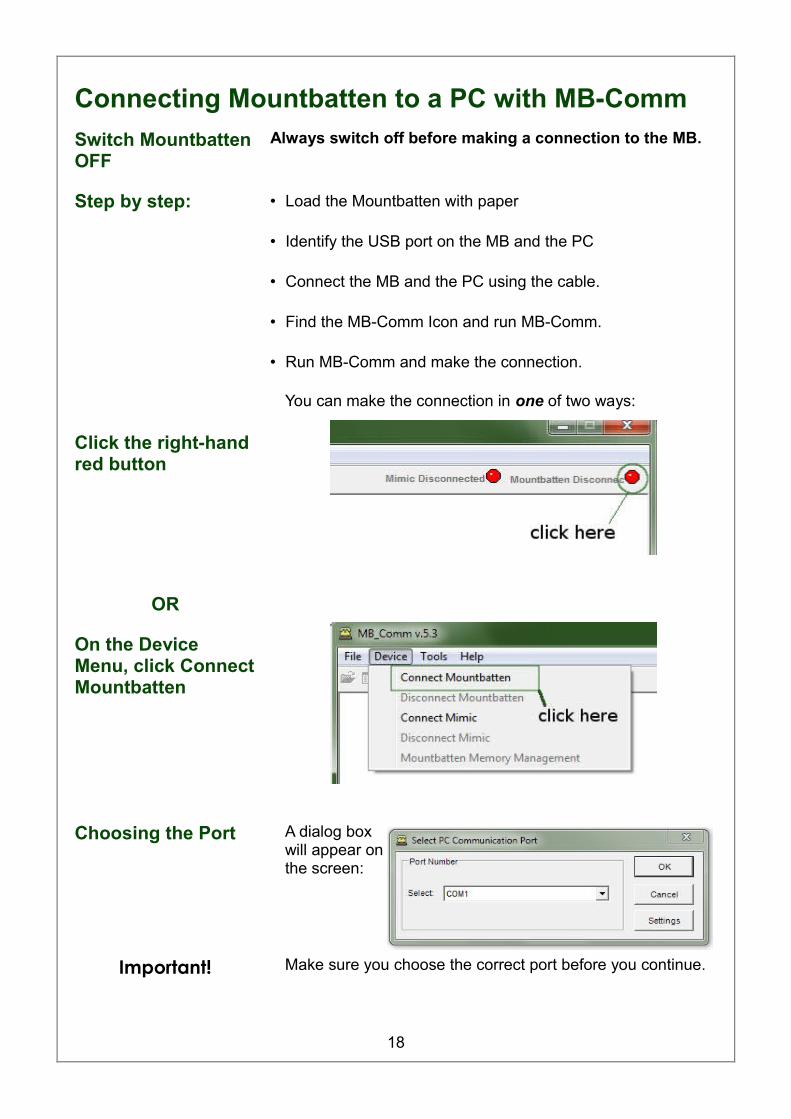
Connecting Mountbatten to a PC with MB-CommSwitch Mountbatten OFF
Always switch off before making a connection to the MB.
Step by step: • Load the Mountbatten with paper
• Identify the USB port on the MB and the PC
• Connect the MB and the PC using the cable.
• Find the MB-Comm Icon and run MB-Comm.
• Run MB-Comm and make the connection.
You can make the connection in one of two ways:
Click the right-hand red button
OR
On the Device Menu, click Connect Mountbatten
Choosing the Port A dialog box will appear on the screen:
Important! Make sure you choose the correct port before you continue.
18

If you are using USB The port you choose MUST say "Mountbatten USB".
Click OK when you have chosen the port.
Making sure everything is ready...
Next you will see a reminder:
...and then completing the connection.
If you are happy that everything is ready, click Continue.
What will happen? The Mountbatten will make a series of short, high-pitched beeps.
The red buttons will turn green one at a time. When the connection is complete, both buttons will be green.
You are now ready to use MB-Comm.
19

Chat Mode using the PC with MB-CommProducing translated Braille and Print simultaneously in real time
Important! • Mountbatten must be on and loaded with paper
• The PC and Mountbatten must be connected
• MB-Comm must be running and connected
• The two buttons on the MB-Comm screen must be green
Enter Chat Mode Go to the File Menu in MB-Comm and click "Chat Mode"
• Mountbatten will say: "Back"
This means that the Braille keyboard will send translated text to the MB screen.
Change between users
To change to the PC keyboard, the Braille user must press the tab key on the Mountbatten.
• Mountbatten says "Forward"
To change to the Braille keyboard, the Braille user must press the backtab key on the Mountbatten.
• Mountbatten says "Back".
Important! The Braille user on the Mountbatten keyboard
• types first - the Braille keyboard Back Translation is ready first
• changes between Forward and Back Translation using tab and backtab
The PC keyboard user • Types text
• produces Grade 2 Braille on the Mountbatten
• produces text on the MB-Comm screen
The Mountbatten keyboard user
• Types Braille
• produces Braille on the Mountbatten
• produces text on the MB-Comm screen
20

Embossing from the PC with MB-CommProducing a translated Braille copy from a text file on the PC
Preparing the file 1. Save the file as Plain Text with a .txt extension
2. Open the file in Notepad
3. Insert any commands you need at the beginning of the file
◦ {adv} if the Mountbatten is in Learn Mode
◦ {fe} to have Mountbatten translate the file
◦ {flit} to preserve print lines in Braille
◦ {fgr 1} to have Uncontracted (Grade 1) Braille
◦ {m} to emboss at double speed
4. Insert any commands you need at the end of the file
◦ {adv} to return to Learn Mode
◦ {m} to return to normal speed
5. Save the file again
Important! Insert your commands on a new line by themselves!
Tip: Have a folder on the PC to store ready for your text files to be embossed.
Always save to this folder so you can find them again.
Run MB-Comm and connect to the PC
See the instructions in previous sections
Make sure you prepare the Mountbatten before you begin!
From the File Menu
select
Emboss file to Mountbatten
MB-Comm will ask you to choose the file.
Navigate to the file and select it.
Click OK.
Mountbatten will begin embossing the translated file.
Tip Save a Notepad file with only the commands in it to use as a template.
Copy and paste directly from a Word or OpenOffice document into your template.
21
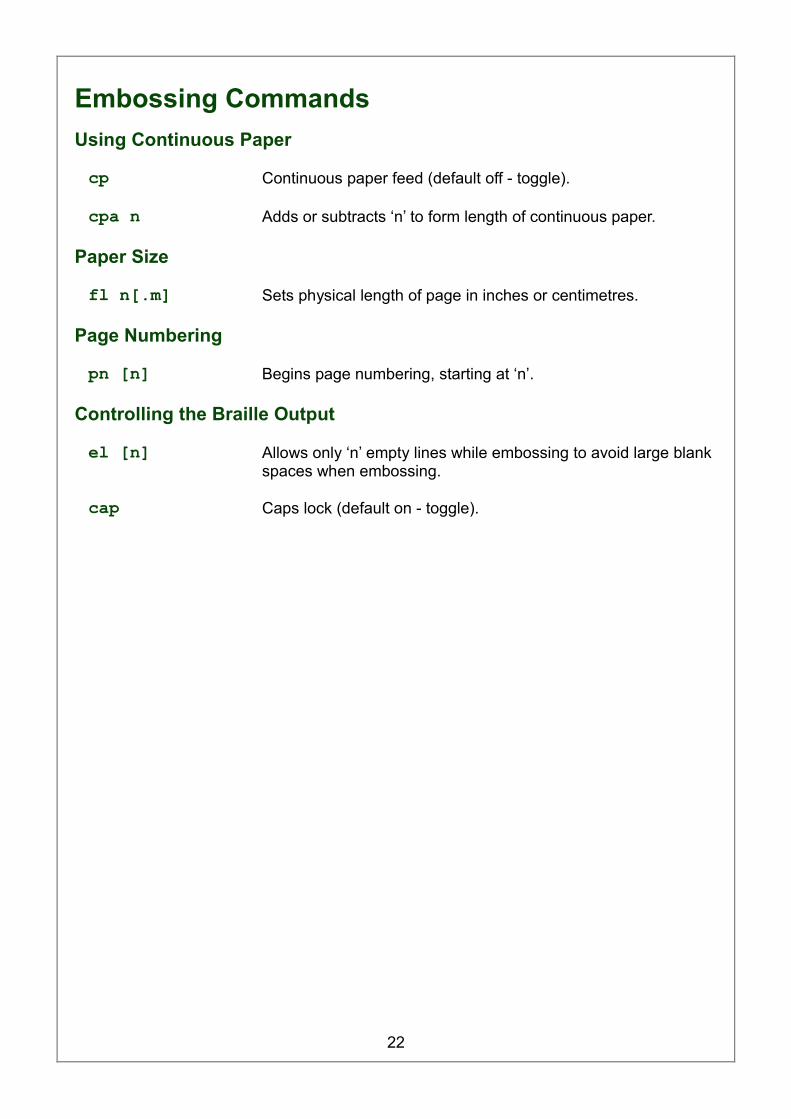
Embossing Commands Using Continuous Paper
cp Continuous paper feed (default off - toggle).
cpa n Adds or subtracts ‘n’ to form length of continuous paper.
Paper Size
fl n[.m] Sets physical length of page in inches or centimetres.
Page Numbering
pn [n] Begins page numbering, starting at ‘n’.
Controlling the Braille Output
el [n] Allows only ‘n’ empty lines while embossing to avoid large blank spaces when embossing.
cap Caps lock (default on - toggle).
22
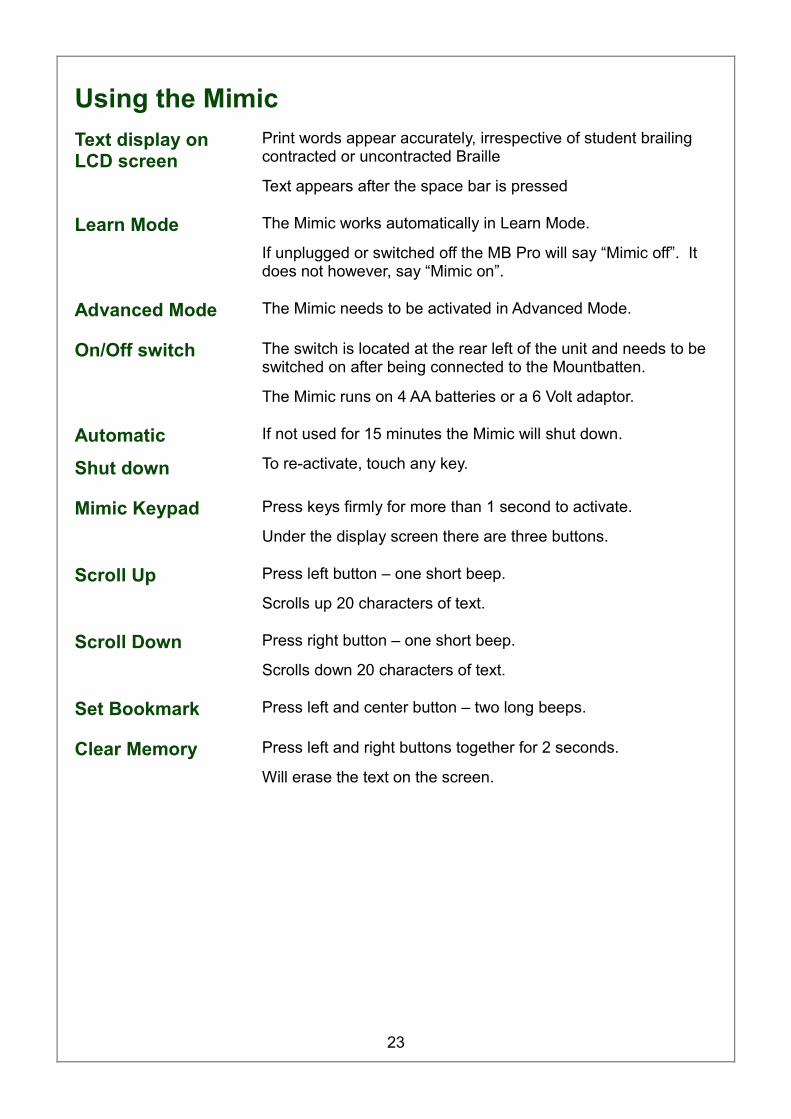
Using the Mimic Text display on LCD screen
Print words appear accurately, irrespective of student brailing contracted or uncontracted Braille
Text appears after the space bar is pressed
Learn Mode The Mimic works automatically in Learn Mode.
If unplugged or switched off the MB Pro will say “Mimic off”. It does not however, say “Mimic on”.
Advanced Mode The Mimic needs to be activated in Advanced Mode.
On/Off switch The switch is located at the rear left of the unit and needs to be switched on after being connected to the Mountbatten.
The Mimic runs on 4 AA batteries or a 6 Volt adaptor.
Automatic
Shut down
If not used for 15 minutes the Mimic will shut down.
To re-activate, touch any key.
Mimic Keypad Press keys firmly for more than 1 second to activate.
Under the display screen there are three buttons.
Scroll Up Press left button – one short beep.
Scrolls up 20 characters of text.
Scroll Down Press right button – one short beep.
Scrolls down 20 characters of text.
Set Bookmark Press left and center button – two long beeps.
Clear Memory Press left and right buttons together for 2 seconds.
Will erase the text on the screen.
23

Saving Mimic data on the PC using MB-CommPrepare the Mimic If you only want part of the Mimic's contents, set a bookmark
at the beginning of the text you want to send.
To set a bookmark, press and hold the left pushbutton and the center pushbutton together (see the picture on the Mimic).
When the two pushbuttons are pressed together, they must be held down for one second before the bookmark will be set.
You will then hear two beeps and a B will appear on the right side of the screen indicating the position of the bookmark.
Mimic will send everything from this bookmark to the next bookmark, or to the end of the memory if there is no other bookmark after this.
Check the Mimic User Guide
See also the pushbutton picture guide on the face of the Mimic.
Connect Mimic to the PC serial port
This connection uses the Serial Port on the back of the Mountbatten.
• Check the Ports in the Easy Guide to identify the right port.
• Make sure you read about Port Speed in the steps below.
This connection uses the Mimic Serial Cable.
If your computer has no Serial Port, you might need a USB-to-Serial converter - check with your distributor to obtain one.
When you are using a USB-to-Serial converter, you need to know which COM port it uses.
Turn off the Mimic Connect the cable to the Mimic and PC while the Mimic is off.
Turn the Mimic on.
Run MB-Comm Instead of clicking Connect Mountbatten, click Connect Mimic
When the Select Port dialog comes up:
24
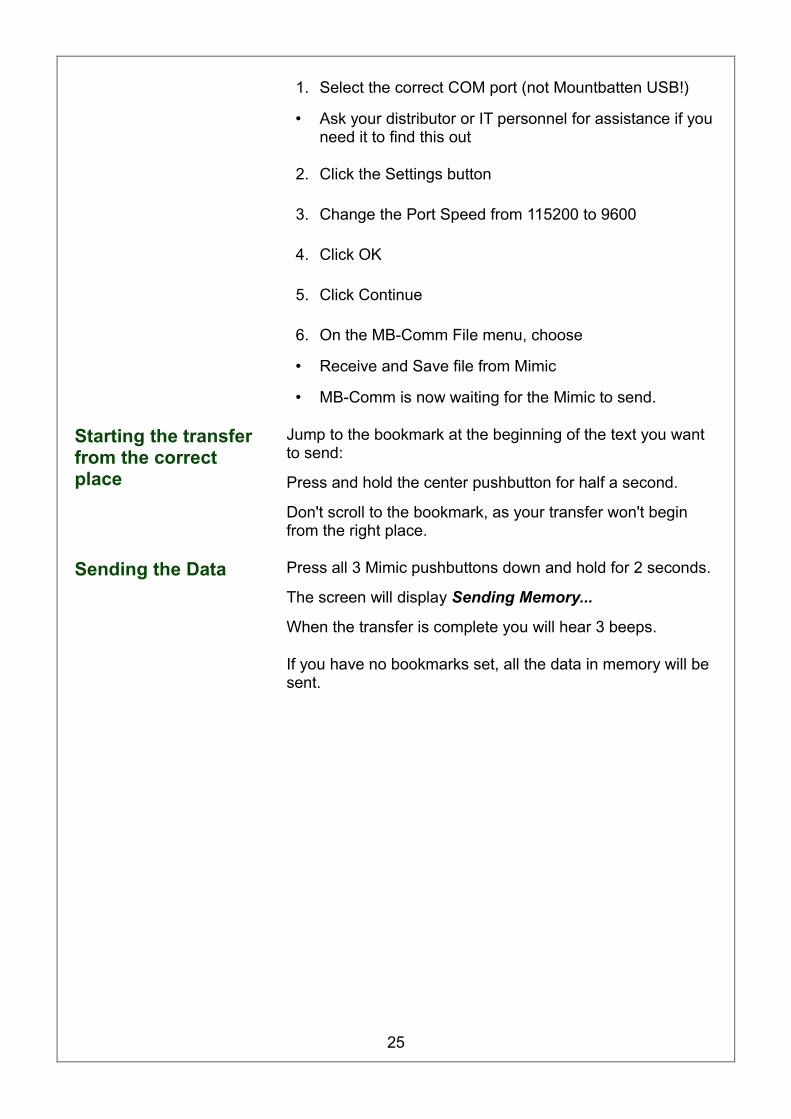
1. Select the correct COM port (not Mountbatten USB!)
• Ask your distributor or IT personnel for assistance if you need it to find this out
2. Click the Settings button
3. Change the Port Speed from 115200 to 9600
4. Click OK
5. Click Continue
6. On the MB-Comm File menu, choose
• Receive and Save file from Mimic
• MB-Comm is now waiting for the Mimic to send.
Starting the transfer from the correct place
Jump to the bookmark at the beginning of the text you want to send:
Press and hold the center pushbutton for half a second.
Don't scroll to the bookmark, as your transfer won't begin from the right place.
Sending the Data Press all 3 Mimic pushbuttons down and hold for 2 seconds.
The screen will display Sending Memory...
When the transfer is complete you will hear 3 beeps.
If you have no bookmarks set, all the data in memory will be sent.
25
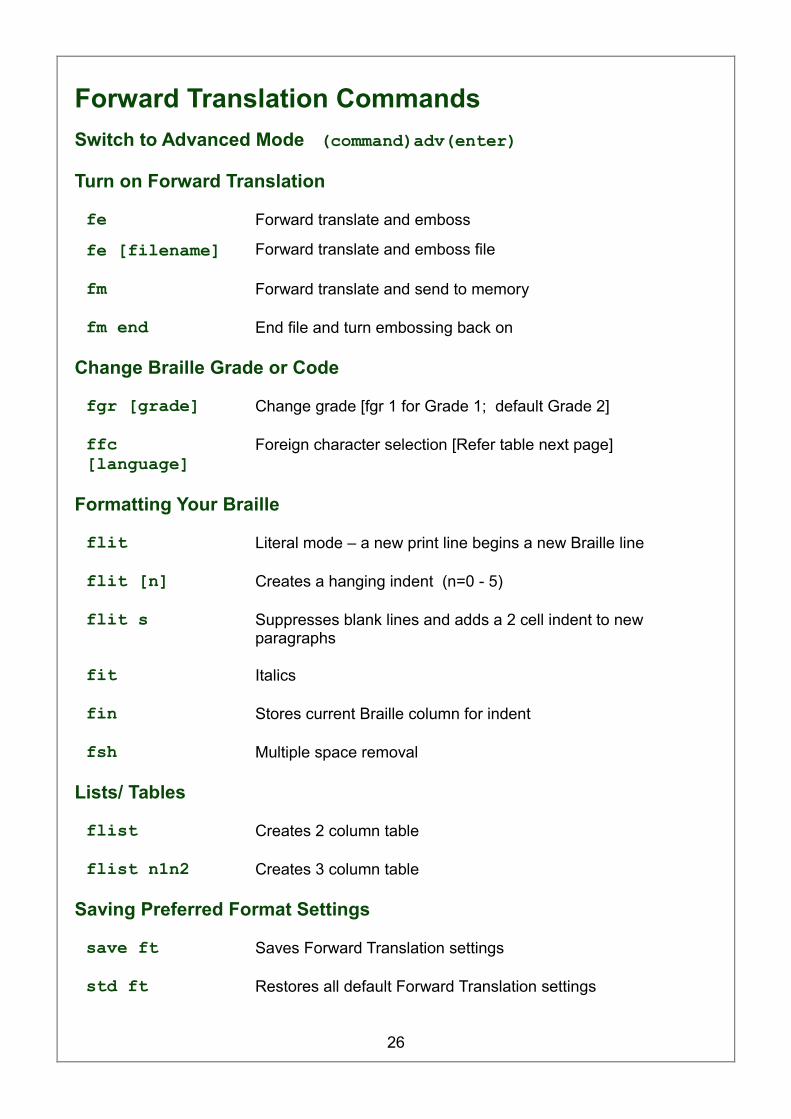
Forward Translation Commands Switch to Advanced Mode (command)adv(enter)Turn on Forward Translation
fefe [filename]
Forward translate and emboss
Forward translate and emboss file
fm Forward translate and send to memory
fm end End file and turn embossing back on
Change Braille Grade or Code
fgr [grade] Change grade [fgr 1 for Grade 1; default Grade 2]
ffc [language]
Foreign character selection [Refer table next page]
Formatting Your Braille
flit Literal mode – a new print line begins a new Braille line
flit [n] Creates a hanging indent (n=0 - 5)
flit s Suppresses blank lines and adds a 2 cell indent to new paragraphs
fit Italics
fin Stores current Braille column for indent
fsh Multiple space removal
Lists/ Tables
flist Creates 2 column table
flist n1n2 Creates 3 column table
Saving Preferred Format Settings
save ft Saves Forward Translation settings
std ft Restores all default Forward Translation settings
26
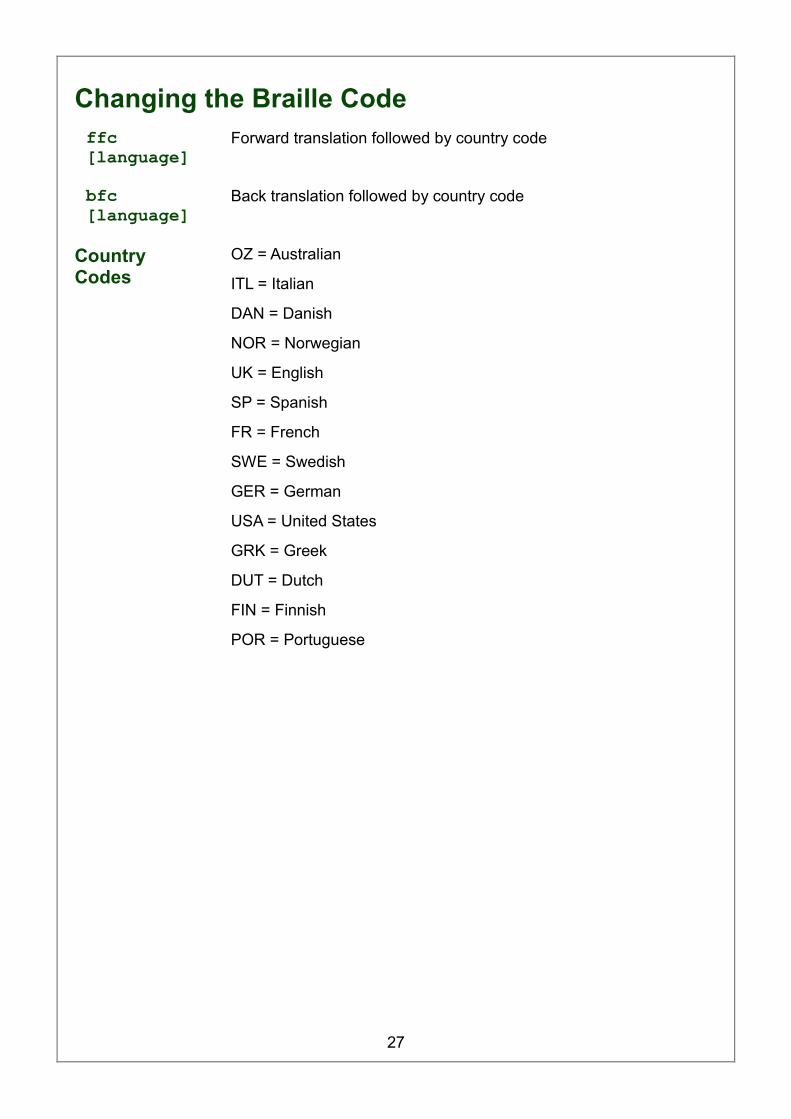
Changing the Braille Codeffc [language]
Forward translation followed by country code
bfc [language]
Back translation followed by country code
Country Codes
OZ = Australian
ITL = Italian
DAN = Danish
NOR = Norwegian
UK = English
SP = Spanish
FR = French
SWE = Swedish
GER = German
USA = United States
GRK = Greek
DUT = Dutch
FIN = Finnish
POR = Portuguese
27

Forward Translation Commands on the MB and KeyboardThe table below shows the PC keyboard strokes which are equivalent to Mountbatten
function keystrokes.
PC Keyboard Mountbatten Keyboard equivalent
Esc or { commandEnd or } enterF1 tabF2 backtabF3 tab + backtabEnter newlineDown Arrow newline + spaceUp Arrow newline + backspaceLeft Arrow backspaceRight Arrow space
Space spaceBackspace backspace + space (erase)
Back Translationbp Commence back translation to printer.
Automatically print a text copy and emboss at the same time
em Turn embossing off (default on – toggle)
28

The Options MenuThe Options Menu gives you access to a group of special functions of the Mountbatten Learning System (LS).
To use the Options Menu you must be in Advanced Mode.
Refer to your User Guide for detailed information about the use of each Option.
o-chord Press the letter o (dots 1,3,5) and space together.
o-chord is then followed by the appropriate letter to open each of the functions.
z-chord To exit any of the Options use the z-chord (z plus Space).
Music
o-chord u Music Fun mode. Intended for fun and pre-braille
o-chord u-chord Music Play Mode. Enter a Braille music character and hear it played back
Stopwatch
o-chord w Turns on a stopwatch. Test skills, time activities. Have fun.
Time and Date
o-chord d Have Mountbatten say the current date.
o-chord t Have Mountbatten say the current time.
o-chord s Set the current time and date.
Mathematics
o-chord m Open Simple Math Mode to use the simple calculator.
o-chord n Change to Nemeth mode. In literary Braille, Nemeth characters will be spoken as numbers.
o-chord c Turn on a full scientific calculator
29
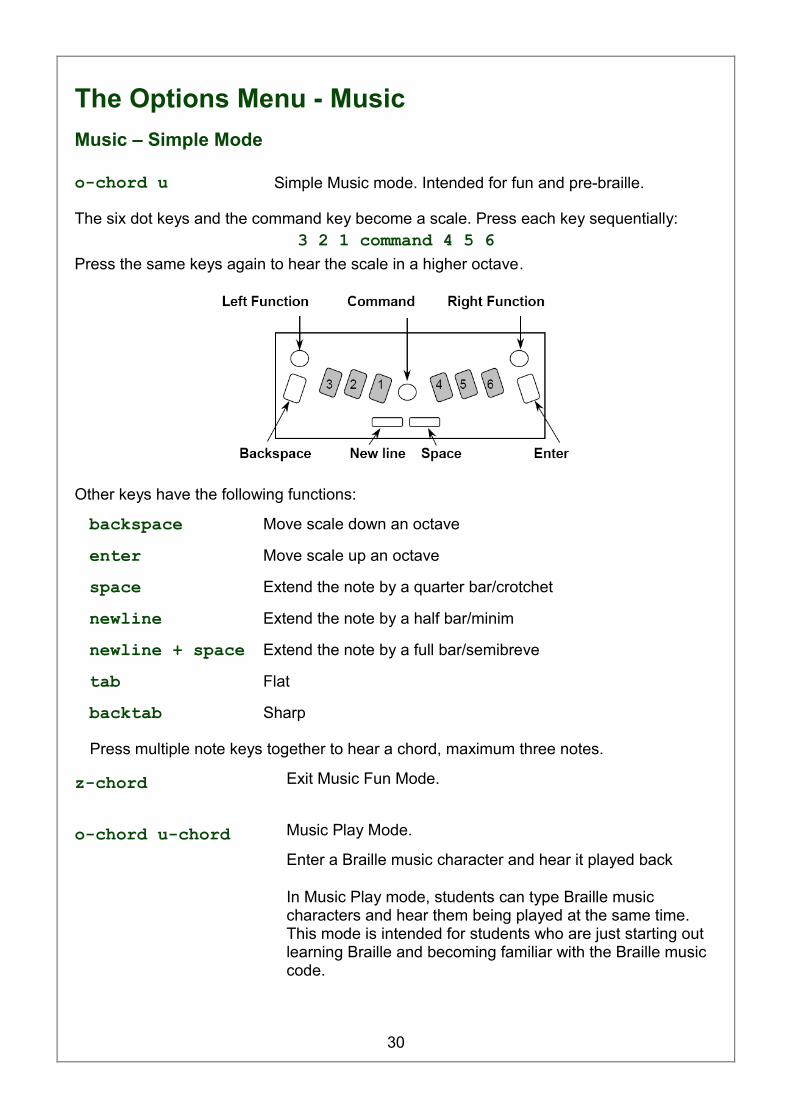
The Options Menu - MusicMusic – Simple Mode
o-chord u Simple Music mode. Intended for fun and pre-braille.
The six dot keys and the command key become a scale. Press each key sequentially:3 2 1 command 4 5 6
Press the same keys again to hear the scale in a higher octave.
Other keys have the following functions:
backspace Move scale down an octave
enter Move scale up an octave
space Extend the note by a quarter bar/crotchet
newline Extend the note by a half bar/minim
newline + space Extend the note by a full bar/semibreve
tab Flat
backtab Sharp
Press multiple note keys together to hear a chord, maximum three notes.
z-chord Exit Music Fun Mode.
o-chord u-chord Music Play Mode.
Enter a Braille music character and hear it played back
In Music Play mode, students can type Braille music characters and hear them being played at the same time. This mode is intended for students who are just starting out learning Braille and becoming familiar with the Braille music code.
30

Braille Music NotesC D E F G A B Rests Type
y
y
z
z
&
&
=
=
(
(
!
!
)
)
m
m
Wholes or 16ths
n
n
o
o
p
p
q
q
r
r
s
s
t
t
u
u
Halves or 32nds
?
?
:
:
$
$
]
]
\
\
[
[
w w V
v
Quarters or 64ths
d
d
e
e
f
f
g
g
h
h
i
i
j
j
x
x
8ths or 128ths
Braille Graphics
Making Braille Graphics
gf Reduces the space between dots so that lines can be drawn.
Type these simple Braille graphics from Sheila Amato on the Mountbatten keyboard.
sei:
< >
ei
Heart1. s, e, i, wh2. gh, space twice, ar3. space once, e, i
{o--{o
s{o{o:
< ei >
{s :o
9< >5
eie--iei
Teddy Bear1. space once, ow, o, two colons, ow, o2. space once, s, ow, o, ow, o, wh, 3. space once, gh, space once, e, i, space once, ar4. ow, s, space 4 times, wh, o5. in, gh, space 4 times, ar, en6. e, i, e, 2 colons, i, e, iSailboat1. space once, 4-5-6, ch2. space once, 4-5-6, space once, ch3. space once, 4-5-6, space twice, ch4. er, full cell, full cell, full cell, full cell, n
31
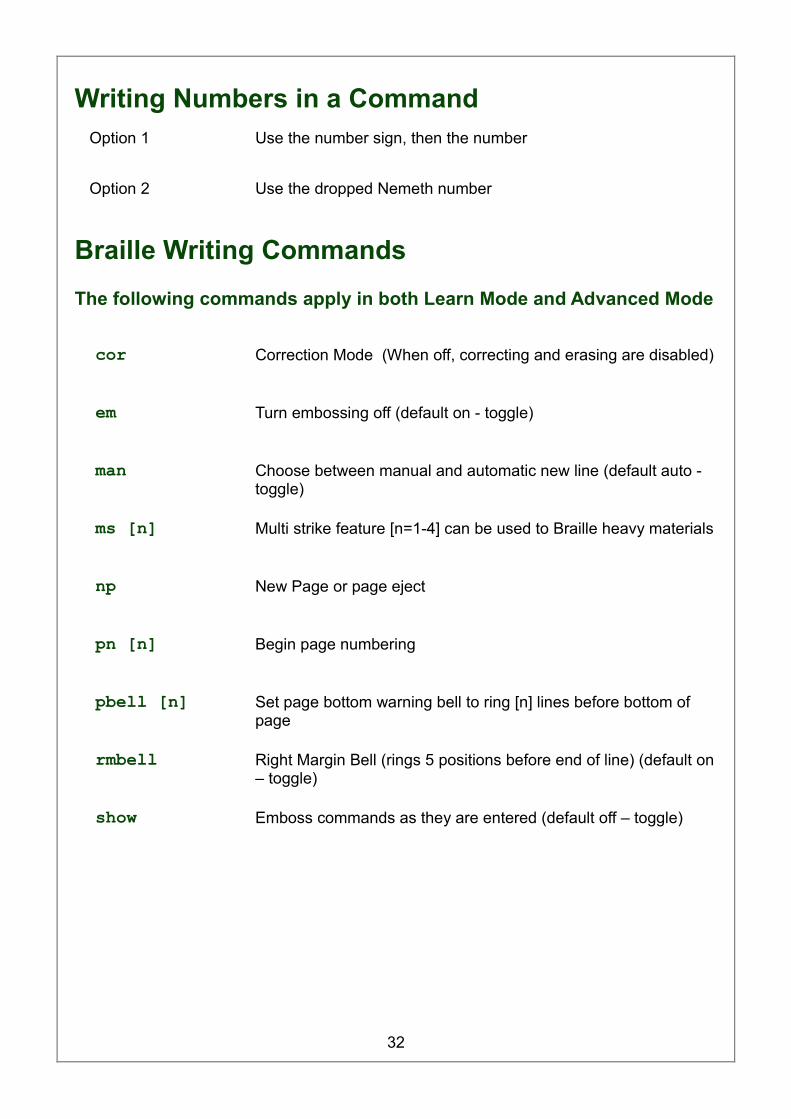
Writing Numbers in a Command Option 1 Use the number sign, then the number
Option 2 Use the dropped Nemeth number
Braille Writing Commands The following commands apply in both Learn Mode and Advanced Mode
cor Correction Mode (When off, correcting and erasing are disabled)
em Turn embossing off (default on - toggle)
man Choose between manual and automatic new line (default auto - toggle)
ms [n] Multi strike feature [n=1-4] can be used to Braille heavy materials
np New Page or page eject
pn [n] Begin page numbering
pbell [n] Set page bottom warning bell to ring [n] lines before bottom of page
rmbell Right Margin Bell (rings 5 positions before end of line) (default on – toggle)
show Emboss commands as they are entered (default off – toggle)
32

Miscellaneous Commandsnewline + space + b
Checks the battery status
ku One Handed Mode. The default status is off; ku is a toggle command.
ver Embosses or speaks the Mountbatten software version.
hp Help. Embosses a command summary.
save Saves all current settings
std Restores the Mountbatten factory settings
alt n Enters non-standard ASCII characters
Making Braille Graphics
gf Reduces space between dots so that lines can be drawn. The default status of gf is off; this is a toggle command.
Adjusting Dot Height
backtab + command
Increases the embossing impact
tab + command Decreases the embossing impact
ms [n] Multi-strike. (n=1 to 4)
Opening the Serial Port
S1 Opens the Serial Port so that text can be read on the Mimic while a
PC keyboard is in use [forward translation]
33

Braille characters and contractions This table shows the BANA Braille characters and contractions used in North America.
a b c d e f g h i j
a b c d e f g h i j
k l m n o p q r s t
k l m n o p q r s t
u v x y z & = ( ! )
u v x y z and for of the with
* < % ? : $ ] \ [ w
ch gh sh th wh ed er ou ow w
1 2 3 4 5 6 7 8 9 0
/ea/, be/ bb/ ;
con/ cc / :
dis/ dd / . en to /
ff / !were (/gg/)
his "//? in was
by/ /
/ + # > ' -
st ingnum/ ble/ ble
ar ' com -
@ ^ _ " . ; ,
dot 4 dot 4,5
dot 4,5,6 dot 5 dot
4,6letter sign cap
34
© 2010 Harpo Sp. z o. o.ul. 27 Grudnia 761-737 Poznań
Polandt: +48 61 853 1425f: +48 61 853 [email protected]
HARPO

Student Evaluation ToolFor Teachers and Para-professionals
This evaluation tool gives educators a basic skills checklist that can help in evaluating skills developed as the student learns to use the Mountbatten for every-day activities. The list can be used to set achievable objectives when drawing up instruction plans. Dating when skills were acquired will assist in measuring growth and provide a basis for review. Space has been left at the bottom of each section for comments to assist with monitoring.
Student Name: Class:
School:
Assessing Teacher: Date:
1. Mountbatten Orientation – Parts:OBJECTIVE YES DATEStudent can turn Mountbatten on and offStudent knows location of all 6 Braille keysStudent knows the dot number for each keyStudent can operate volume controlStudent can locate the following parts of the Mountbatten:
Paper leverMargin adjusters [left and right]Embossing headPaper advance knob
Student knows the location of the blue keys:Space barBack spaceNewlineEnter keyCommandTabBacktab
Student knows how to care for equipment:No food or drink near equipmentClean hands before useTurn off after useUse of power supplyCare of batteryKeep away from desk edgeLocation of carry handlePortability care

Comments:
2. Mountbatten Orientation – PortsOBJECTIVE YES DATEStudent can locate the following ports and identify the appropriate plug:
Headphone port and jackPower adapter port and plugPC keyboard port and plugSerial and Parallel printer portsSerial cable and plug Parallel cable plugMimic portMimic cable and plugs
Student will understand the concepts:Left frontRight frontLeft backRight backLeft sideRight side
Comments:
3. Set-up:Note: Being able to successfully plug in all connecting devices is a fine motor skill which requires development through assistance and instruction. This set of Objectives along with Objective 8, 9 and 10 may best be assessed when the skills required are developed rather than when they are first introduced.
OBJECTIVE YES DATEStudent can connect the power adaptor to the Mountbatten and

switch it onStudent can switch Mountbatten on and offStudent is aware of content of recorded speech output on Mountbatten at start-up (with and without Mimic connected)Student is aware of recorded speech response when BraillingStudent can connect the headphones and use the volume control
Comments:
4. Loading PaperOBJECTIVE YES DATEStudent can remove and replace paper bailStudent is aware of audio response when paper leaver is liftedStudent can load photocopy paper from the topStudent can load Braille paper from the topStudent can align paper with groove on reading table and position it correctly under wheel of margin adjustersStudent can decrease Braille pressureStudent can increase Braille pressureStudent can remove paper manuallyStudent can use automatic page ejectStudent can correctly load a pre-brailled worksheet
Comments:
5. Brailling in Grade 1OBJECTIVE YES DATEStudent can place fingers on Braille keys correctly

Student can use space key and new line key
Student can type Grade 1 Braille
Student can use audio response to support action
Student can identify and understand when to use Command key
Student can use reading table to track progress
Comments:
6. Moving around the page:OBJECTIVE YES DATEStudent can erase
Student can erase and correct
Student can move down page without moving embossing head
Student can move up the page without moving embossing head
Student can move across the page and back to left margin
Student understands the use of and can switch on Word Wrap
Student can centre a word
Student can set double line spacing
Student can widen left margin
Student can insert page numbers
Student can execute a command sequence accurately
Comments:
7. Creating and Saving Files in MemoryOBJECTIVE YES DATEStudent can start and name a file
Student can end a file

Student can emboss a directory
Student can select a file name
Student can emboss the contents of a stored file
Comments:
8. Connecting Devices – Mimic Note: Being able to successfully plug in all connecting devices is a fine motor skill which requires development through assistance and instruction. This set of Objectives may best be assessed when the skills required are developed rather than when they are first introduced.
OBJECTIVE YES DATEStudent can identify Mimic port and connect the Mimic
Student can switch on Mimic
Student is aware of changes to audio output on start-up
Student knows to press space to send information to Mimic
Student knows that in Learn Mode text is displayed automatically
Student is aware of the automatic shut-off feature
Student is aware of and can activate the wake-up feature
Student is familiar with the functionality of the Mimic
Comments:
9. Connecting Devices – PC keyboard Note: (1) Being able to successfully plug in all connecting devices is a fine motor skill which requires development through assistance and instruction. This set of Objectives may best be assessed when the skills required are developed rather than when they are first introduced.(2) Learning the layout of the QWERTY keyboard is a separate skill development exercise.

OBJECTIVE YES DATEStudent is aware of the correct procedure when connecting a PC keyboard [switch off Mountbatten prior to connecting PC keyboard]
Student can identify the correct port and plug in the PC keyboard
Student is aware of the main features of Advanced Mode
Student can activate Advanced Mode and return to Learn Mode
Student understands the concept of Forward Translation
Student knows the command for Forward Translation
Student can listen effectively to synthetic speech
Student is aware that Grade 2 Braille is the automatic default in Advanced Mode
Student is aware of the advantages of the PC keyboard for sighted users
Comments:
10. Connecting Devices – Printer Note: Being able to successfully plug in all connecting devices is a fine motor skill which requires development through assistance and instruction. This set of Objectives may best be assessed when the skills required are developed rather than when they are first introduced.
OBJECTIVE YES DATEStudent is aware of correct procedure when connecting a printer [Switch off Mountbatten prior to connecting printer]
Student can identify the correct port and can plug in the printer
Student can identify plugs and insert them correctly
Student can check for paper in printer
Student understands the concept of Back Translation
Student can turn on Back Translation
Student can send a file to be embossed & printed simultaneously

Student can send a file to be printed only
Student understands the buffer behaviour and can activate it
Student can use correct procedure to disconnect the printer
Comments:
Final comments:Use this space to write any other comments especially when a student is to move to a new teacher.