mosaic user guide - proceduresonline.com
TRANSCRIPT

Children Services
Page 1 of 40
Contents
Introduction ............................................................................................................................................ 4
Chapter 1: Logging into Mosaic .............................................................................................................. 4
Chapter 2: Navigating Mosaic ................................................................................................................. 5
Home Page Layout .............................................................................................................................. 5
Workview ............................................................................................................................................ 6
Act Fors ............................................................................................................................................... 6
Work Panes ......................................................................................................................................... 6
Work Item Icons .................................................................................................................................. 7
Top Menu Bar ..................................................................................................................................... 8
Chapter 3: Adding a new person to Mosaic ............................................................................................ 8
Creating a Mosaic Record ................................................................................................................... 8
Chapter 4: Updating a person’s demographic information .................................................................. 10
Person’s details ................................................................................................................................. 10
Basic details ....................................................................................................................................... 10
Title: .............................................................................................................................................. 10
First Name: .................................................................................................................................... 10
Last Name: .................................................................................................................................... 10
Date of Birth: ................................................................................................................................. 10
Gender: ......................................................................................................................................... 10
Context: ......................................................................................................................................... 10
Ethnicity: ....................................................................................................................................... 11
Sub Ethnicity: ................................................................................................................................ 11
First Language ............................................................................................................................... 11
Fluency in English: ......................................................................................................................... 11
Religion: ........................................................................................................................................ 11
Nationality: .................................................................................................................................... 11
Country of Birth: ........................................................................................................................... 11
Marital Status: ............................................................................................................................... 11
Addresses ...................................................................................................................................... 11
Telephone numbers ...................................................................................................................... 11
Email Address, Preferred Communication Method, Classes, Date of Death ................................ 12
Other Names ................................................................................................................................. 12
GP .................................................................................................................................................. 12
Organisation Relationships ........................................................................................................... 12
Mosaic User Guide
IROs are qualified social workers with at least five years’ experience, and who have
acquired the right skills to carry out this role.

Children Services
Page 2 of 40
Personal relationships ................................................................................................................... 12
Worker relationships .................................................................................................................... 13
Employment Status ....................................................................................................................... 13
References .................................................................................................................................... 14
Service User Groups ...................................................................................................................... 14
Notes ............................................................................................................................................. 14
Chapter 5: Navigating a Person Summary Page ................................................................................... 15
Side Bar Menu ................................................................................................................................... 15
Start button ................................................................................................................................... 15
Case Notes .................................................................................................................................... 15
Adding a case note ........................................................................................................................ 16
Editing a case note ........................................................................................................................ 17
Appending a case note .................................................................................................................. 17
Searching for case notes ............................................................................................................... 17
Show Related People .................................................................................................................... 17
Copying case notes ....................................................................................................................... 18
Viewing case notes ........................................................................................................................ 18
Printing Case Notes ....................................................................................................................... 18
Chronologies ................................................................................................................................. 19
Documents .................................................................................................................................... 19
Education ...................................................................................................................................... 20
Health ............................................................................................................................................ 20
LAC ................................................................................................................................................ 21
Consent ......................................................................................................................................... 21
Legal Status ................................................................................................................................... 22
Offences ........................................................................................................................................ 22
Registrations ................................................................................................................................. 22
Alert History .................................................................................................................................. 22
Child Protection History ................................................................................................................ 22
Financial Assessment Results ........................................................................................................ 22
Current Communication Needs .................................................................................................... 22
Chapter 6 Workflows and Worksteps ................................................................................................... 23
Worksteps ......................................................................................................................................... 23
Workstep component parts .......................................................................................................... 23
Workstep layout and control ........................................................................................................ 24
Uploading an Attachment to a form ............................................................................................. 25
Copy Forward ................................................................................................................................ 26
Copying Forms............................................................................................................................... 26

Children Services
Page 3 of 40
Printing Forms ............................................................................................................................... 26
Workflow........................................................................................................................................... 27
Starting a workflow from a person summary page ...................................................................... 27
Completing a Typical Workflow .................................................................................................... 28
Team Workflow ............................................................................................................................. 30
Reassigning the work of former team members .......................................................................... 30
Reallocating people in bulk ........................................................................................................... 32
Additional Help and Useful guidance .................................................................................................... 32
Mosaic Support ................................................................................................................................. 33
Diagram: Link between Annexe A and Mosaic ................................................................................. 35
Glossary ................................................................................................................................................. 36
A ........................................................................................................................................................ 36
B ........................................................................................................................................................ 36
C ........................................................................................................................................................ 36
D ........................................................................................................................................................ 36
F ......................................................................................................................................................... 37
G ........................................................................................................................................................ 37
H ........................................................................................................................................................ 37
I ......................................................................................................................................................... 37
J ......................................................................................................................................................... 37
K ........................................................................................................................................................ 37
L ......................................................................................................................................................... 37
M ....................................................................................................................................................... 37
N ........................................................................................................................................................ 37
O ........................................................................................................................................................ 38
P ........................................................................................................................................................ 38
Q ........................................................................................................................................................ 38
R ........................................................................................................................................................ 38
S ......................................................................................................................................................... 39
T ........................................................................................................................................................ 39
U ........................................................................................................................................................ 39
V ........................................................................................................................................................ 39
W ....................................................................................................................................................... 39
X ........................................................................................................................................................ 40
Y ........................................................................................................................................................ 40
Z ......................................................................................................................................................... 40

Children Services
Page 4 of 40
This guide is intended to give an overview of Mosaic and how to use it. For detailed practice guides please search Tri.X
Introduction Mosaic is the case management system for West Sussex County Council (WSCC). Mosaic is used to record the work you undertake with, and on behalf of, people in need. You will have a unique username and password provided to you, with a website/portal to access Mosaic in your browser.
Chapter 1: Logging into Mosaic Before you can login to Mosaic you will need to have been set up on the system as a worker and been provided with a username and password.
To enter Mosaic first go to The Point and click on the Children First tile.
Then click on the Mosaic tile:
This will take you to the Mosaic login screen:

Children Services
Page 5 of 40
Enter your User Name and Password and click the Login button. The first screen you will see when you enter is your Home Page.
Chapter 2: Navigating Mosaic
Home Page Layout
The left-hand side of the screen shows a compressed version of your Workview (see below for Full
Workview)
The right hand side of the Home page has a set of menus along the top of the screen, and a large area
to display information such as: who you are, which organisation you work for, when you last logged
on and the version of Mosaic you are currently accessing.
There are also several widgets on the home page that provide an overview of your work and offer a
quick way to navigate to a piece of work by clicking on it in the widget, for example your recent work,
unfinished case notes and case note alerts
Log out
Top menu bar
Widgets
Change
workview
Team
workflow
Act For
Work
Panes
Work
status

Children Services
Page 6 of 40
Workview
You can change between Narrow, Full or Closed workview by clicking on the icon and choosing from the options. In Narrow Workview the part of the page to the right is either your Home or Person Summary page. In Closed Workview the browser only shows your home/person summary page. Full Workview expands to fill the whole screen, from here you can organise your work in different ways or go directly to the individual piece of work or Person Summary page.
Act Fors
If you have been granted the relevant permission, you will be able to see who you can act for by
clicking this icon .
Work Panes
There are panes for Allocations, Recently Viewed, Current Work. The three panes contain different work items (please note: the slide below shows a Narrow Workview)
Click on the pane name to expand it; click on it again to collapse it. Expanding one pane automatically
collapses the others. You can update the list by clicking on the icon for each pane. Clicking on a
folder icon expands the view to show the contents of the folder, for example:
Allocations shows work for the people that you have a relationship with
Recently Viewed shows work items for the last 10 people you have viewed
Current Work shows items that you can complete or assign to another worker to complete.

Children Services
Page 7 of 40
Work Item Icons
Work Items will have one of the following icons to indicate their status
Icon Type of Work Item Options
Alert Acknowledge
Future work Start work Assign work Assignment history
Incoming item Start work Assign work Assignment history Cancel work
Incomplete item Resume work Assign work Assignment history
Incoming notification Resume work
Assign
Incoming request resume work
Assign
Request sent. An incomplete item that is waiting for a reply to a request
Resume Work Assign Work Assignment History
An incomplete item, requests have been sent and some, but not all, have replies
Resume Work Assign Work Assignment History
A request that has been returned Resume Work Assign Work Assignment History
An incomplete step, that has all its requests complete
Resume Work Assign Work Assignment History
In this case the workview is ordered by title, which groups work together by their step (case closure, case summary etc), you can also order the work by subject or type.
Items where a request has been sent are highlighted in yellow
A number of icons are used in the workview to represent different types of work and you will be able to do different things with each. If you hover the cursor over a work item icon it changes to .
Clicking on this icon takes you to the actions menu which lists the options for each work item. The actions you can take will vary according to your role and permissions.

Children Services
Page 8 of 40
Shows where requests have been sent and they have more than one status, for example completed & awaiting response.
Resume Work Assign Work Assignment History
Occurrence of a Payment Cycle Payment Cycle
A scheduled visit. visit
Indicates that this a privileged access work item.
Top Menu Bar
On the left is the home button, clicking on this will take you back to your home screen. There are also 8 menus: People, Organisations, Workers, Contacts, Finance, Reports, Tools, Help. You will mainly use the first three and these are explained in more detail below. The options you see when opening the menu will depend on the permissions you have, or if acting for another worker the permissions they have.
Chapter 3: Adding a new person to Mosaic
Creating a Mosaic Record
Before creating a new person record on Mosaic, it is important to complete a search to ensure that a record does not already exist. Click> People > Find Person:
A window appears with several fields, some of which are labelled with a red hashtag (#). You can use these fields to search for a person using different criteria.
Click> Find
Any matches will be listed. If no matches are found it is advised to carry out several searches using different criteria before concluding the person does not exist.

Children Services
Page 9 of 40
A new window will open, enter all information you have in order to create as accurate a record as possible.
Enter all the basic information you have in order to create as accurate a record as possible
These demographic details will pre-populate future worksteps
Click on Next>> to add the address
Enter Post Code or Street Name and click Find Address
Note: If the person lives outside of West Sussex, tick the box marked search all addresses in the UK.
From the search result list select the correct address and then click> Finish
If the search results in no matches, you will need to create a new person:
Click> Add New
If Mosaic cannot find the address it can be manually entered here
Complete other details using the drop down lists

Children Services
Page 10 of 40
Chapter 4: Updating a person’s demographic information
Person’s details
Basic details
You can make changes to any of the following items and then Click> Save to save the changes. Whilst it is not mandatory to populate all these details it is essential for statutory returns that we have complete demographic data and so it is important that all this information is included and correct. Any information provided when the person record was created will be included here.
If you Click> Cancel any changes are not saved.
Title: The person's title, such as Dr, Mr, Mrs, Miss etc.
First Name: You can change the person's first names, for example to correct a misspelling.
Last Name: You can change the last name, for example if a person gets married.
Date of Birth: Click on the date field to select the person's date of birth
or Age: If the date of birth is unknown you can enter an approximate age.
Gender: Select the appropriate category (note: this data must be consistent with NHS records)
Context: This is set automatically based on the person's age and date of birth.
This section explains the various information you can record for a person. The options on the side menu for a person differ according to your role.
The person details menu is found to the left of a person summary page.
To access, Click > Person Details

Children Services
Page 11 of 40
Ethnicity: Select an appropriate ethnicity from the list of available choices, such as White, Mixed,
Asian etc.
Sub Ethnicity: Select an appropriate sub division of the person’s Ethnicity.
First Language: Select the person's first language. If this is not English you can also click the Interpreter Needed tick box if appropriate.
Fluency in English: Select a fluency from the list, this also allows you to specify that the person communicates with sign language.
Religion: Select a religion from those listed and note if the person is Practising.
Nationality: Select the person's nationality.
Country of Birth: Select the person's country of birth.
Marital Status: Select from the list of statuses.
Addresses If the person has moved from the address listed on Mosaic (i.e. they no longer live here) you must follow the correct procedure to ensure that multiple current addresses are not listed:
Click on the removals van icon which is found on the right of the address. This will take you to the Find Address page, complete the fields as before.
Click> Save
The new address will now be visible on the Person Summary Page.
Please note: the Display Address may not be the same as the Primary Address. As it is the Primary Address where correspondence is sent to, it is essential that you check this is current and correct to prevent any data breaches.
If you wish to add another address to the person’s record e.g. another family member’s home where the child stays or a foster placement
Click> Add
and complete the fields as before, please ensure that you update whether this new address is the Display Address and/or Primary Address (i.e. where correspondence will be sent to).
Telephone numbers you can add or update telephone numbers here.
Click> Add
To amend (or delete) an existing number click on the icon next to the relevant number
If the number is no longer in use, enter the date when it ended to ensure it is no longer shown on the person summary page.
Click> Save
You can enter multiple phone numbers on a person’s summary page however it is essential that the information entered in this screen is correct and up to date as errors to phone numbers can cause
There are 2 mandatory fields, the number and the type. Type the number + who it belongs to in the first box, then choose the type from the drop down list.

Children Services
Page 12 of 40
significant delay to contacting families. If you become aware that a phone number listed on the screen is no longer in use it is your responsibility to amend the details, so they are always up to date.
Email Address, Preferred Communication Method, Classes, Date of Death can all be amended here.
Other Names The name entered on the main basic details page must be the name on the person’s birth certificate. If the person is known by or choses to be addressed by a different name then this should be recorded here, for example a child may be known as ‘Charlie’ but their birth certificate is recorded as ‘Charles’ so this is the name of the person record.
GP If you have a named GP for this person you can enter their details here using the search function. If you only have the name of the doctor’s surgery, you can enter this using the Organisation Relationships button.
Organisation Relationships
add organisations which are involved with the person here e.g. schools, nursery, doctor’s surgery, substance misuse etc using the find function. Add the type of relationship from the drop down list.
Personal relationships this function is used to create links between other persons’ records listed on mosaic, for the type of relationship to be recorded as well as other attributes such as parental responsibility or guardianship. Personal Relationships are also important in creating the person’s genogram.
Click>Personal Relationship>Add
Click> Relationship Type
This will open up a drop down list of possible relationship types. Choose the type of relationship from the original person’s perspective, for example Bart Simpson is the son of Homer Simpson, so in the drop down list you choose Son: Father
Use the date picker to establish when this relationship began, in this case it would be Bart’s date of birth.
The screen will then display this relationship in context:
Click>Find
If the related person is not already listed on Mosaic you will need to create a new person record using the previously explained process

Children Services
Page 13 of 40
If this person has parental responsibility for the other person in the relationship, tick the …has parental responsibility box.
You can also select one or more options from the roles beneath to further define the relationship.
Click > Save
To make changes to the relationship click the icon for the relevant relationship.
Worker relationships This function defines relationships between the person and professionals. It is used to identify the Allocated Worker and/or any other professional such as teachers, health visitors, youth workers, substance misuse workers etc. It is the responsibility of workers to keep these records accurate and up to date.
Please Note: If you are creating a relationship between the child/young person and the person who is the named worker for the case, the category of Allocated Worker must be used, DO NOT select Social Worker as only Allocated Worker will connect worker and child on Mosaic.
To add a worker relationship
Click> Add>Find
Search for the worker, if not found you will need to create a new worker record.
Click> Relationship Type
A drop down list will appear listing different professional relationships, choose the correct one, select the date this relationship started
Click> Save
If the professional is no longer working with this person, their relationship must be recorded as Ended.
Click> Person Details> Worker Relationships and the icon next to the worker’s name.
Enter the To Date and choose an End Reason from the drop-down list.
Click> Save
Employment Status
can be amended here by choosing the appropriate option from the dropdown list.
If these sentences are not correct go back to the relationship type drop down list and chooses a different type.

Children Services
Page 14 of 40
References It is essential that all children and young people have their NHS numbers recorded on their file, this can be added to the records here.
Click > Person Details > References > Add
Select the reference type from the drop down list and add the reference number in the box below.
Click > Save
Other important reference numbers (where applicable) include Impulse ID, Unique pupil number and Holistix number.
Information recorded here is displayed on a person’s summary page in the References widget.
Service User Groups Recording a child/young person’s service user group is a mandatory requirement.
To add a person’s Service User Group
Click> Person Details > Service User Groups this opens the following window
Notes Warnings and notes relating to the child/young person can be added here
Click> Notes> Add
Click> Type of Note
A drop-down list will appear, choose one option
Write note in the free text box below.
The note will appear in different areas of the person summary page depending on the type of note you selected, for example a warning note will appear at the top of the page in red letters; whereas a general note will appear on the bottom of the right side of the screen in blue
Click > Group to reveal a drop down menu.
Select the appropriate Group and Sub-Group and Click > Add > Save

Children Services
Page 15 of 40
Chapter 5: Navigating a Person Summary Page
Side Bar Menu
Start button You can start a new item of work, or workflow from a person’s summary page
Click> Start
This leads to two options, MASH Contact and Referral and New
Click> New
Case Notes This is where you will record all activity related to the case.
Click> Case Notes
This opens the Case Note Summary Page where all previous case notes are recorded in date order.
The person’s name and mosaic number
Side Menu Bar: use this to add or amend information
Widgets: these give an over view of the information stored in the file. Some Widgets can be opened to either amend information (such as current communication needs) or to reveal other information (such as work history- see below)
This opens a list of workflow items that you can start. The items in the list will be different dependent on your role.
Click on an item to start to start the workflow.
Click > Cancel to close this box without starting any new work.

Children Services
Page 16 of 40
Cases that have not been finished before the ‘timed out’ period has elapsed will have this icon
next to them. On the right of the case note are two further icons: which allows you to append a
timed out or finished case note; and which copies the case note to other persons records.
Adding a case note Click> Add
This opens a new page that has the following fields, some of which are mandatory:
Title:
The title will be displayed in the Case Note Summary Page. This should be a brief text to hint at the details contained within the note. It is advised to keep the title short and simple and to avoid abbreviations.
Type of Note:
Select from the drop down list
Date:
Select the date the event took place
Time:
Enter the time the event took place
Significant Event:
tick if this is a significant event. It will make the note appear in bold in the summary page.
Note:
The summary page has buttons along the bottom that allows you to:
Print multiple case notes
Find Case note
Show related people
View
Add
Clicking OK closes the page and returns to the person summary page
Children Services
Page 17 of 40
Type the case note in this box. Check your text carefully as you will not be able to edit it once the case note is finished.
The buttons at the bottom of the page:
Save and Continue:
Saves your work and allows you to continue
Save and Close:
Saves your work and closes the page. You can reopen the case note to edit until the timed out period elapses.
Finish:
Save and finish the case note. You will not be able to change the case note once finished however you will be able to append it.
Cancel:
Close the case note without saving any of the changes
You can alert one or more workers that this case note has been created, the alert will appear in their workview so they can navigate quickly to it, you can also request they are alerted by email.
Click> Add Alert Recipients for This Case Note
Editing a case note
If the case note has not been finished or timed out you can click the icon to edit it.
Appending a case note
If a case note has been finished or timed out you are able to append it by clicking the icon. You will see the original note, but you will not be able to edit it. A new text box appears below for you to enter any further information. You are also able to change whether this is a significant event or change alerts.
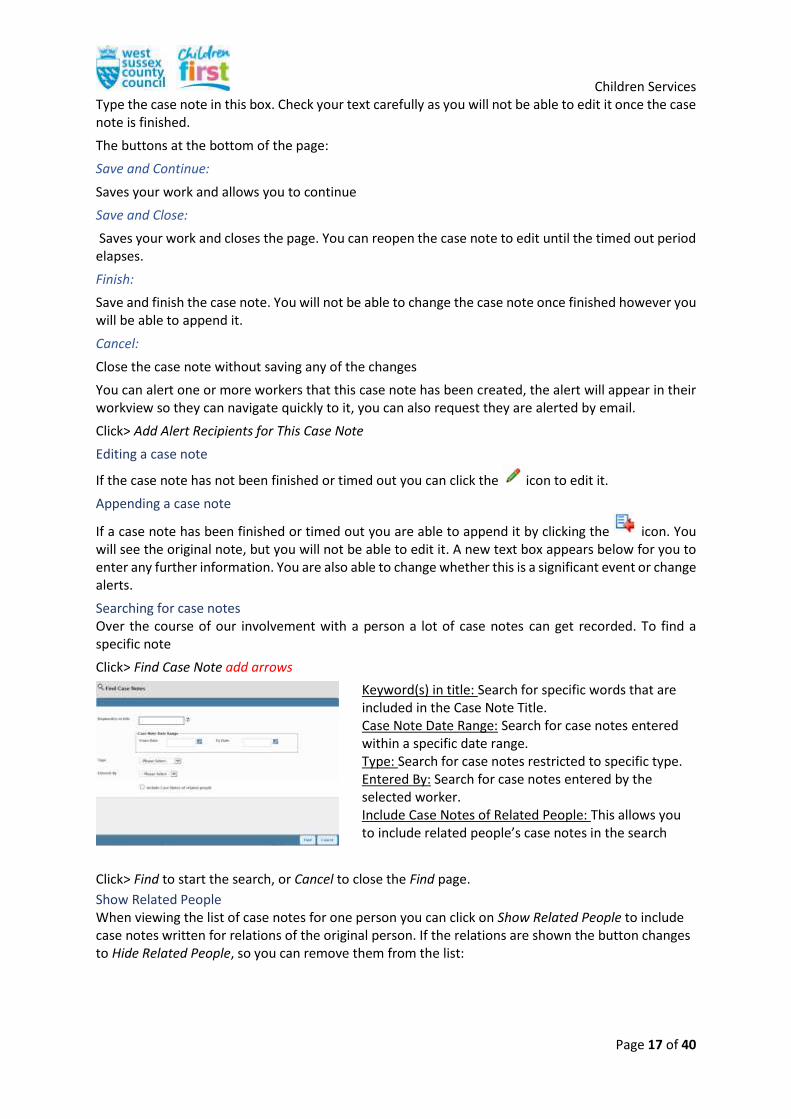
Searching for case notes Over the course of our involvement with a person a lot of case notes can get recorded. To find a specific note
Click> Find Case Note add arrows
Click> Find to start the search, or Cancel to close the Find page.
Show Related People When viewing the list of case notes for one person you can click on Show Related People to include case notes written for relations of the original person. If the relations are shown the button changes to Hide Related People, so you can remove them from the list:
Keyword(s) in title: Search for specific words that are included in the Case Note Title. Case Note Date Range: Search for case notes entered within a specific date range. Type: Search for case notes restricted to specific type. Entered By: Search for case notes entered by the selected worker. Include Case Notes of Related People: This allows you to include related people’s case notes in the search

Children Services
Page 18 of 40
Copying case notes
To copy the case note, select the relevant people Click> Copy.
The copied case note is identified as a copy on the recipient person's list of case notes.
Please Note: Case notes that are timed out cannot be copied; they must first be finished.
Viewing case notes To view individual case notes go to the case note summary screen, Click >View This displays the most recent case note. Use the Up and Down buttons to move through the list one at a time.
Printing Case Notes You can print the displayed case note by clicking the Print button
You can copy case notes to related people or unrelated co-inhabitants.
Click the icon, to copy the case note(s) and related people are listed You can also copy the case note to unrelated people who live at the same address by clicking the Show Unrelated Coinhabitants button.
If a case note has a history it has
the icon in the bottom right corner. Click it to display the history of that case note

Children Services
Page 19 of 40
Chronologies This function is not currently active in Mosaic however historic saved and finished Chronologies can be viewed here. Note: Current Chronologies can be found by viewing the person’s work history.
Documents Documents can be viewed and uploaded here
Click > Documents
Forms and Letters shows a history of all finished and saved forms and letters, whether created as part of a work item, or outside workflow. You can click on a document's name to display a read-only view of the document.
In the Actions column there are icons that indicate the actions you can take; these vary according to the type of document:
Documents created as part of a work item. Opens the step summary for the item, where you can for example, resume the work.
Documents created for a group. Opens the group summary for the item, where you can for example, resume the work.
Documents created outside workflow (from the Create button on this tab),clicking this icon opens the document for editing. If you Finish the document, the icon will no longer be displayed.
Allows you to delete a document created outside workflow.
You can include documents from people that this person has a personal relationship with by clicking the Show More People box. This will open a new dialogue box, select one or more people from the list
You can print one or more case notes by going to the case note summary page, Click > Print Multiple Case Notes
Check the notes you want to print (it is possible to Select/Deselect All Case Notes)
Click> Print
There are two tabs: Forms and Letters & Attachments.
Items are listed in date order (most recent at the top)
You can change the order of the list by clicking on the column headings

Children Services
Page 20 of 40
then Click > Show. (To go back to displaying only this person’s documents Click > Reset located at the top of the screen.
Attachments shows related documents that have been uploaded, such as Word documents, or photos. To upload an item to the person’s file Click > Upload
To create a new form or letter
Education
Health
In Health Assessments you can record a person’s health assessment and highlight when the next one is due. Click > Health > Health Assessment > Add
Click > Browse
Select document you wish to upload from your files.
Click > File As
Select the category of the document from the list. Select a sub category if appropriate.
Click > Upload if you wish to add another document or Upload and Close if you have finished.
Information about the child or young person’s education is stored here. This includes a summary page that pulls through demographic information.
Information about the child or young person’s health is stored here.
Details of health assessments can be added and viewed here.
Click > Create
Select an item from the list. Click > Cancel to close the box without making a selection.

Children Services
Page 21 of 40
Strengths & Difficulties Questionnaire Completed: Complete this section if applicable. Select either Yes, No or Not Applicable depending on whether or not the questionnaire was completed. If you select Yes, enter the score for the questionnaire. If you select No, pick a Reason for Not Completing.
LAC
Consent
Click > Consent > Add
Consent Type: Select from the list the type of consent to record. For example, Consent received verbally from parent or guardian.
Start Date: Select the date that consent was given
Consent to share information with Agencies: Tick the agencies the person consents to share information with.
No Consent to share information with Agencies: Tick the agencies the person does not consent to share information with.
Where consent is not provided, are there grounds to override?: Tick Yes if there are grounds to override no consent.
Override reason: If Yes was ticked in the previous question, select the relevant override reason from the drop down list.
Date Requested: Use the date picker to specify the date that an assessment is to take place.
Assessment Date: Use the date picker to specify the date an assessment actually took place.
Next Assessment Due: Use the date picker to specify when the next assessment should take place.
Notes: Option to add any notes relevant to the assessment.
Information about the child or young person’s CLA placements and their legal status is stored here
Information about consent to share information can be stored here.
It is important to record when consent is given and when it is withdrawn

Children Services
Page 22 of 40
End Date: When editing a consent you can end it, by specifying the end date.
End Reason: Select a reason that consent has ended from the drop down list.
Comment: Optional comments about the consent.
Click> Save to save the consent details.
Legal Status
Click> Legal Status > Add
Select the date the legal status started from, select a category from the drop down list. Record any notes if appropriate and Click> Save. The details are recorded in the Legal Status summary page and in a widget on the Person Summary page.
Offences
Registrations
Alert History
Child Protection History
Financial Assessment Results
Current Communication Needs This widget is located on the right of a person’s page and is used to record any communication needs.
A new box will open
The consent details are displayed on the Consent Summary and in a widget on the Person Summary page
The legal status of the child or young person can be recorded here.
Information about a person’s offences can be recorded here
You can record information such as a child disability here.
Alerts created in different parts of mosaic are recorded here, for example case note alerts
A summary of the person’s child protection history is recorded here.
Financial assessments can be added or amended here.
To add information, click here.
To review the history click here

Children Services
Page 23 of 40
The information will now be displayed within the widget on the person’s summary page; this can be
amended or deleted by clicking on these icons displayed next to the record.
Chapter 6 Workflows and Worksteps
Worksteps
A workstep is a single piece of work used to capture case recording, for example Child and Family Assessment and Adoption Support Plan etc. The process is typically made up of three component parts/stages: The Form (document), Request (manager’s approval), and the Actions Taken (next actions).
Workstep component parts
Document/Forms Worksteps will often contain form(s) on which workers will record the detail of the work.
Forms can be Mandatory or Optional
You could have multiple forms within a step but there is always ONE primary form. For example in the Adoption Planning workstep there are four forms which need to be completed and these are displayed as separate TABS:
Optional forms and letters associated with the form can be found by clicking on this icon in the top menu bar. This will open a list of forms and letters that can be completed as part of the step.
Requests A channel that gives another worker access to contribute to an ongoing workstep. This can be mandatory or optional for example, A manager’s sign off or authorisation
Next Actions This is a record of the intended decision taken based on the findings or information available so far
Select a date from the date picker
Select a category from the drop down list
Select a sub category from the list
Select an end date in appropriate from the date picker.
Click Add and Close to finish

Children Services
Page 24 of 40
Often a completed form will require a manager signoff; this is achieved through the Request process which can be activated via the Yellow Clipboard icon at the top of the workstep screen:
The final stage of a workstep is recording what needs to happen next – this is captured in the last section of the primary form also known as ‘Actions Taken’. In most cases this action will lead to the next workstep. The only exceptions are terminating worksteps; these are actions that lead to a dead-end, for example ‘Close Case’
Go to Next Actions section, Click > Add
Workstep layout and control The toolbar at the top of every form allows you to manage the workflow item:
When you start a workstep, by default it opens the primary Form which will have a number of sections. For example, this Form has 9 sections. You can click on the section title to move to it
Each section contains a series of questions some of which could be mandatory (these are usually marked by a red asterisk*). You will not be able to finish the Workstep until the mandatory fields have been completed
Detailed guidance about how to complete different forms can be found in Tri.X
A list of different requests will appear.
Click the request you wish to send
A new field will appear asking for the request to be passed to the relevant worker.
Either enter the name of the worker using the Find option or select from the drop down list.
A new box opens,
Click > Please Select to reveal a drop down pick list.
Select the correct next action
This can be assigned either to a named worker or team
Click either Add if more actions are required or Add and Close to finish.

Children Services
Page 25 of 40
The icons in the tool bar may differ according to the tasks or forms associated with the item.
The following icons may be present:
This saves the work item so it can be resumed at a later date
Once everything is completed within the form, the item is finished, and this moves onto the next action in the workflow. If all mandatory steps have not been completed, you will not be able to finish.
Refresh the current form
This creates a PDF of the item, which can be used to print
This icon indicates that there are requests associated with this form. The blue triangle
shows that at least one of the requests must be completed before the work can be saved.
If you attempt to save without completing the request the validation will change the
triangle colour to red.
Clicking on this icon will reveal the optional letters and forms associated with this item
This icon shows how many attachments have been uploaded. Click on it to display a list of the attachments.
You are able to copy from another person’s form by clicking on this icon.
Clicking on this icon switches the screen back to the Person Summary Window.
You will only see this icon if there have been changes made to the structure of the form and it needs updating to the newest version
This closes the work item. You will see a prompt to Save or Cancel any changes you have made since last saving
Uploading an Attachment to a form
To upload an attachment to a form Click on the icon located in the tool menu bar.
Click on this icon: and a new box will appear
You can click Delete to remove the attachment (provided you have the appropriate permissions), or
You can browse to find the file and specify a name for the attachment in the File As field.
You can also select a category and subcategory (such as Assessment and Health)
Click Add to upload the attachment to the form.

Children Services
Page 26 of 40
Edit to change the file name, category or subcategory.
Copy Forward Some forms have the ability to copy information from a previously finished form for the person. Where this is possible a dialogue box will appear when the form is started.
Copying Forms If you have been given the relevant permission, you can copy an item from a relative, coinhabitant
or another person. On the top menu bar of the form Click the icon. A new box will appear:
If you select a person from the list of Relations and Coinhabitants a new list of items available for copying belonging to that person are displayed.
Printing Forms
To print a form Click on the print Icon located on the top menu bar This will open a new window. This contains additional options for printing.
If you want to copy forward the data, check the box next to the form name. Click > OK
Check the information that has been copied carefully to be sure it is what you expected.
Click > Please Select
Select the relevant relation, or coinhabitant from the drop down list or Click > Find to search for the person to copy the item from.
Select the correct form to copy from and Click the copy icon on the right.

Children Services
Page 27 of 40
Workflow
A Workflow is a series of required actions that are related to an area of children’s social care, for example Child In Need, Child Protection, Child Looked After etc. They are managed as a sequence of Worksteps that need to be completed in order to progress to the case through the system. There are many workflows within the Children’s Social Care Service. Each workflow is associated with a particular process/area of child protection/safeguarding for example Contact Assessment and Intervention or Children Looked After.
Starting a workflow from a person summary page
Click> Start This reveals two options, • Contact and Referral, • New..., clicking on this opens a list of workflow items that you can start.
Scroll through the list to find the right item and Click to start.
Only steps that can be started ad hoc can be found here.
The list of workflow items will differ depending on your role.
You can start a new item of work, or workflow from the Summary page of the relevant person.
Change the font size here
Ticking/unticking these boxes changes what fields are included in the printed document. For example if you want to include a date stamp in the form click Verification Information
You are able to select to print all or only certain sections of the form by ticking/unticking these boxes.
Click here to change to a PDF in preparation for printing.

Children Services
Page 28 of 40
Completing a Typical Workflow This section will give an example of how to complete a typical Contact Referral and Assessment workflow through to closure. This is to illustrate how each workstep generates a next action. Whilst all workflows have their differing steps and forms they all follow this basic pattern.
• Find the person’s record (if new, create one) and Click> Start in the side menu on the Person Summary Page.
• Select MASH Contact/Referral, this will open the form.
• Enter all relevant information and complete all mandatory questions/action (highlighted with
a red *)
• Go to the last section: Actions Taken
• Click > Add a new box will appear
• Select Child and Family Assessment from the drop down list.
• Then choose who to assign the work to using these boxes:
• Click on the Request icon in the top menu
• Select the request type and then select the reviewing manager to send it to, using the Find button

Children Services
Page 29 of 40
• The next Workstep (Child and Family Assessment) will appear in the allocated workers Current Work pane and on the person’s summary page
• The allocated worker will now complete the Child and Family Assessment, ensuring the Mandatory fields have been completed.
• If there is to be no further action following assessment, Close Case should be selected from the next actions dropdown list.
• The completed assessment should be sent to a manager to be reviewed and to confirm the outcome. They will then finish the Workstep and a Case Closure Workstep will now appear in the worker’s incoming work folder and on the person’s summary page
• Follow the same process as before: complete the form, select Case Closure from the drop down list in the next action section, send request to a manager. The manager can then finish the step and the case is closed to children’s social care.
This workflow is visually represented on the person’s casefile. It can be found in the Current Work
Widget of a Person Summary Page by clicking on this icon
Clicking on the icon in the top menu bar reveals map’s key. The key explains the colour coding that is used to indicate the status of different work items on the workflow map. If there are several workflows in progress for this person, you can select the one you
wish to view by clicking this icon . The workflows still in progress have a green dot to the left. It is possible to move the workflow map by clicking and dragging it around the screen.
The request to review the information and confirm outcome will now appear in that person’s incoming work folder.
Once this has been completed and the Workstep finished, it will move into the person’s Work History and the form can be read in Documents

Children Services
Page 30 of 40
From this page it is also possible to read each form in the Workflow by clicking on the link ‘Summary’ located under each Workstep.
Clicking on the icon expands and collapses the workflow to show next actions.
Team Workflow If you have been granted permission, you will be able to see your team’s workflow by clicking this icon
.
Below is a full Workview. To change the screen to a Narrow Workview Click> and choose from the options
Work and requests that have been assigned to members of the team are displayed and you are able to assign work to other workers and/or navigate to see what a particular worker is working on from this window. (Team workflows are easiest to access using full workview).
Reassigning the work of former team members If a team member moves on to another team or leaves WSCC and still has work in progress, a list of former team members is available to help you see what is outstanding and to reassign their work to a different worker:
Team work is divided into two sections: Team Summary and Current Work. Click on the title of the section to expand it. The team summary gives a quick overview of work that is assigned to the team. Bulk assign icon

Children Services
Page 31 of 40
You can bulk assign work for a worker or a team by clicking the icon.
Once you have selected a worker or team, the Preview Assign button is enabled, clicking on this shows which of the selected items can be reassigned.
Click on Former Team Members to display a list
Click on the workers name to see what work is outstanding
OR click on the icon to assign their work to a different team member (see below).
All the current work is listed, you can filter the list, select individual items by clicking the check box to the right or click on the check box in the header bar to select all the current work. You can select an individual worker or sub-team worker to assign the work to or use the Find button to find a team to assign the work.
Click on the team name

Children Services
Page 32 of 40
Reallocating people in bulk Workers with a management role can reallocate people allocated to themselves, other members of their team, to another team member or, with the Assign Work to Any Worker or Organisation to any worker in Mosaic. You can change the allocations of a worker you are acting for, or from the team view for members of your team:
To move these allocations to a different person Click>
Additional Help and Useful guidance
Select the people to move allocations to another worker.
Select a worker from the Team Worker list If you have the Assign Work to Any Worker or Organisation system function in your worker role you and also click Find to search for a worker not in your team with the Pass to Worker field
You can add an optional note to the worker or team that is receiving the work here.
Click > Assign
Acting for John Riseborough you can see he has three people allocated to him. The icon to change the allocations is in the top right (this is only visible in Full Workview)

Children Services
Page 33 of 40
Mosaic Support
Configuration and Development
Contact number: 0330 222 8777
For anything non-urgent email: [email protected]
The Configuration and Development Team receive a significant number of emails each day, many of which do not have sufficient information for them to action immediately. They then have to communicate further to clarify the request which can cause further delays and take up valuable time.
When making a request the following information is required as a minimum
Minimal information Requirements
All requests give as much information as possible including Mosaic Person ID number
Access to Restricted Records - to give a worker access to a restricted record we require an authorisation email from allocated Team Manager. We do not accept authorisations from SSWP for access to restricted records.
New restrictions please provide reason for restricting as this must be entered in a ‘Reason for Restriction’ case note, this is to assist managers in understanding why a record has been restricted and who has access.
Document or case note deletion/amendment
give full title to ensure we action against the correct one.
Case Note remember to click finish on case notes when completed.
If you click Save and Close this will leave the case note open and it will time out after 24 hours.
Save and Continue allows you to save case note as typing, this is useful for long case notes.
Case notes copied from siblings /other records will need to be sense checked and click on finish or they will remain open.
Step deletions email to us only after obtaining Team Manager or SSWP authorisation, quoting Person ID number, Step ID number and Name and reason for the deletion. Please send the request first to your team manager or SSWP and ask them to forward email for you to: [email protected].
Check you have completed steps fully before closing them to avoid having to request steps to be reopened
When finishing steps check you have the correct date for next actions
Children’s Steps
ICPC Part 1
RCPC Part 1
Please ensure you have entered correct dates and chosen correct Next Actions as these steps cannot easily be reopened.
If a ‘roll back’ is required you will need to re-input data which is time consuming.

Children Services
Page 34 of 40
If steps need to be reopened please give a reason to enable us to take the correct actions.
Duplicate records conduct a thorough search before creating Person records to avoid duplicates. It takes significant time to correct duplicates.
Merge Duplicates For any confirmed duplicate records to be merged, please quote the Person Name and ID number for both records.
HANDY TIPS
Maintaining account If you do not use Mosaic regularly please remember to log in frequently to avoid losing access.
Adults Mosaic Guidance Guidance for Adult’s Social Care including Mosaic Guidance West Sussex Connect to Support Professional Zone
Childrens Mosaic Guidance Guidance for Children’s Social Care including Mosaic Guidance: Tri.X
Searching When searching for person records, enter the first two letters of the last name and initial of the first name, you can also narrow down the selection by selecting male/female and or adult/child. This will give you a wider search list and will help to avoid creating duplicate records. You can also conduct further searches by postcode and date of birth.
Reassigning incoming work If you have work in your incoming work folder that needs to be reassigned to another worker your Team Manager will be able to reassign via team folders.
Cancelling incoming work If you have work in your incoming work folder that is no longer required your Team Manager can cancel these via team folders giving a cancellation reason for audit purposes.
Team Changes Team Changes - if you are in the wrong team or change your team in Mosaic, please ask your Team Manager to complete a Mosaic ACS Request via Service Desk Online.
C&DT do not support the following, please contact IT Service Desk on
01243 777979 or via Service Desk Online Service Desk Online for:
Laptop issues
Bitlocker password resets
Connectivity/ Network issues /Wifi
Outlook
Sharepoint
Network Drives:

Children Services
Page 35 of 40
SAP
Lync phones
Mobile phones
Issues booking Annual Leave
Mileage /expenses
Please be assured Config & Dev are doing our best to support you and ensure you can complete your work as quickly as possible.
Diagram: Link between Annexe A and Mosaic

Children Services
Page 36 of 40
Glossary
A
Act For This is where a worker can assume the role and permissions of another worker, however a worker cannot assume the other worker’s permissions with respect to any Restricted Persons. Address Type For example: Main Address, Temporary Address, Placement Address, Other Address. Each address recorded against a Person must be given an Address Type. Note: Address type is not used by Mosaic to determine what displays on the Personal Details, neither is it used by the system to determine where a person is living, where letters are addressed etc. Alert This is a message to a worker to inform them that something requires their attention. When a new alert is received it appears as a pop-up and also appears in the Current Work pane in Workview (when workview is sorted by Type it will appear in an Alerts folder). Clicking on the incoming alert icon in Workview and selecting Acknowledge displays the alert in a popup, where the worker can view and acknowledge it. Once an alert is acknowledged it is removed from the Workview Allocations Pane Shows a list of people, on your Workview, for which you have a current worker relationship. Allocations have their own dedicated 'pane' in the new workview Allocated Worker The worker with overall immediate responsibility and case management for a particular person.
B
C
Case Note A brief free text record of some relevant information about a person. For example, a note of a telephone conversation. Current Work In the workview the pane marked 'Current Work' contains all the current user's assigned work, requests and alerts.
D
Display Address The person address list in Mosaic allows any one of the addresses recorded to be designated the 'Display Address'. This determines the address that displays on the Person Summary Page. Note: this may not be the same as the Primary Address and so vigilance is needed to ensure any correspondence is mailed to the correct address. Document

Children Services
Page 37 of 40
A document in Mosaic can be an external document uploaded to a person's file to form part of the record (for example email, word files, video files, or scanned documents) or Mosaic Forms or Letters that capture data entered by a worker.
F
Form In Mosaic, a form allows workers to collect and share elements of a case. They can be exported, printed, sent and stored.
G
Genogram A family tree, showing the relationships between a group of people in Mosaic.
H
Home Page The Mosaic view that shows who you are, which organisation you work for, when you last logged on and the version of Mosaic. It may also display a locally defined message. For example, requirements regarding confidentiality and data protection. The Home Page provides access to the main menu options.
I
J
K
L
Letter A Mosaic site can have a number of standard letters defined, which can be created against a person record, stored and sent out to the designated recipients. LAC Looked After Child. In West Sussex we use the term Child Looked After (CLA) out of respect for the person however the term LAC is still used in some of Mosaic’s work panes.
M
N
Next Action The options offered on completion of a piece of work. They conclude a piece of work and introduce the next work item or end the involvement. A piece of work can have more than one next action and so start different parallel workflow processes. Notification Notifications are e-mails that may be configured to be sent to external teams or workers who are recorded on the system as working with the subject but who are not direct users of Mosaic. Because they are not users of the system, notifications take the place of warnings and alerts.

Children Services
Page 38 of 40
O
Organisations
Organisations are either suppliers who provide services for a Person/People; teams, departments, external agencies, hospitals, schools, and residential units.
The team you work for would be an Organisation.
Outcome Now called a Next Action in Mosaic.
P
Person In Mosaic, a person could be a Service User, Foster Carer, Informal Carer, Adopters, Family Member or Other Interested Party. Primary Address The address that is used throughout the system. For example for populating forms, addressing letters, generating proximity alerts, reporting, interfaces and so on. Every person in Mosaic must have an address recorded. Where one address exists this is automatically regarded as the Primary Address; where there is more than one addresses the worker can select which one should be the Primary Address. Primary Role Every worker in Mosaic is given one or more worker roles. One of these roles must be designated the Primary Role and it is that role that determines the functions a worker can perform when logged in to Mosaic. Professional Relationship A generic term that indicates that this person or group have a relationship with a worker, an organisation or a key contact.
People
People in Mosaic are any people who are involved in a case personally, rather than in a professional capacity. This could be the child or young person, their relatives, household members, carers, or friend.
Each individual’s record in Mosaic is called a Person Record. When we go onto a Person Record, Mosaic defaults to showing you their Person Summary Record.
Q
R
Recently Viewed The Recently Viewed pane lists the last ten records viewed by the current user and their current work. Restricted Person A person whose Mosaic record has been restricted from general access. Only designated workers, teams and worker roles can view the person record. Workers not belonging to one of the designated groups see only the person id, person name, date of birth and gender. Request An activity within a step that requires action or approval from a worker or team.

Children Services
Page 39 of 40
S
Subject In Mosaic, subject is a generic term for person, worker or organisation as they can all be the subject of workflow
Swim Lanes
Swim lanes are charts that describe who does what action within a workflow, for example a social worker will complete a task and this is sent to a practice manager to authorise, they may then notify admin personnel to complete additional tasks before the step is finished. Each work flow chart has a connected swim lane chart and these are uploaded to Tri.X.
T
Team Work Where workers have the leading role conferred on them they have access to any work assigned to their team.
U
V
W
Warning A person note that displays top left on the Personal Details page in red text with warning triangle alongside. A warning can be entered manually from the Amend → Notes side menu, or can be generated automatically (for example because someone living in the vicinity of the subject or someone related to the subject has had a warning added to their record). Worker Includes any worker, internal or external to Social Care whose has a professional relationship to a person. For example, Health Visitors or GP’s, Social Workers, District Nurse and so on. Some workers have an account to log in to Mosaic, others do not. Anyone working with a Person in a professional capacity is a worker; whether they are workers who use Mosaic, such as WSCC social workers, managers or administrators, or external professional such as GPs, teachers, health visitors or housing officers. Only staff employed by WSCC that have been trained and vetted to use Mosaic will be provided with log in accounts for system access, however there are some professionals who have been granted special ‘read only’ access. Several workers can work on the same case over time, or jointly, and they can share information and pass work between them; if deemed appropriate. Worker Role Each worker in Mosaic is given a worker role like Social Worker, System Administrator, GP, District Nurse and so on, which describes the type of job they do (it does not necessarily describe to their actual job title). The primary worker role determines the functions that a worker can perform when logged in to the system. Worker Relationship If a person's case is allocated to a worker, that worker has a worker relationship with that person. Workflow Workflow is a collection of two or more worksteps specifically arranged in a particular sequence in which practitioners record details or levels of the intervention/support provided to service users. It is

Children Services
Page 40 of 40
also a pathway that allows the smooth transition of a person’s case. All the workflow charts are uploaded to Tri.x Workview When you log in to Mosaic, your Workview is shown first in its expanded form. The Workview shows Allocation, Current Work, Recently Viewed Work, Alerts and Work for Teams. It also provides quick access buttons for common tasks and allows a worker to act for a different worker.
X
Y
Z
Review / Contacts / References
Document title: Mosaic Guidance
Date approved: 19 June 2020
Approving body: Policy & Practice Steering Group
Last review date: June 2020
Revision history:
Next review date: June 2023
Document owner: Strategic Lead Policy and Practice
Lead contact / author: Suzanne Pollard