moon knight table guide by shoryukentothechinmarvelpinball.com/table_guides/moon knight table guide...
TRANSCRIPT

Page 1 of 15
Moon Knight Table Guide By ShoryukenToTheChin
Key to Table Image Above
1. Crime Scene Hole
2. Left Orbit
3. Left Ramp
4. Mission Orbit
5. Side Mission Hole
6. Crawley Target
7. Right Ramp
8. Right Orbit
9. Moon Ramp
In this Guide when I mention a Ramp etc. I will put a number in brackets which will correspond to the Key
above, so that you know where on the Table that particular feature is located.
1 2 6 4 8 3 7
9
5
Page 2 of 15
TABLE SPECIFICS
Introduction
This is one of the four Tables which were included in the Marvel Pinball Vengeance & Virtue Pack, this is
available for PFX2 on Xbox 360 for a mere 800MS PTS.
This Table is for me one of the Best, if not the Best that Zen Studios have produced. It truly blends the
Comic Book nature of the character of Moon Knight and his Universe. One of the most unique aspects of the
Table is that it has cinematic occurrences; these can of course be skipped at any time. This adds to the whole
immersion of the Characters World. The Layout of the Table is very unique and for me can’t be compared
with any Table that has come before it, but I would say it’s perhaps a Blade II Table so to speak.
Overall the Team once again have done such an amazing job they really captured the Character of Moon
Knight brilliantly and incorporated his Universe in the Table seamlessly. The voice acting is top notch
calibre and the Artwork etc. just looks plain beautiful. The cinematic approach allows them to tell the player
the story of the character very well. This Table is an all-round great make sure to play it.
Skill Shot & Super Skill Shot
Skill Shot -
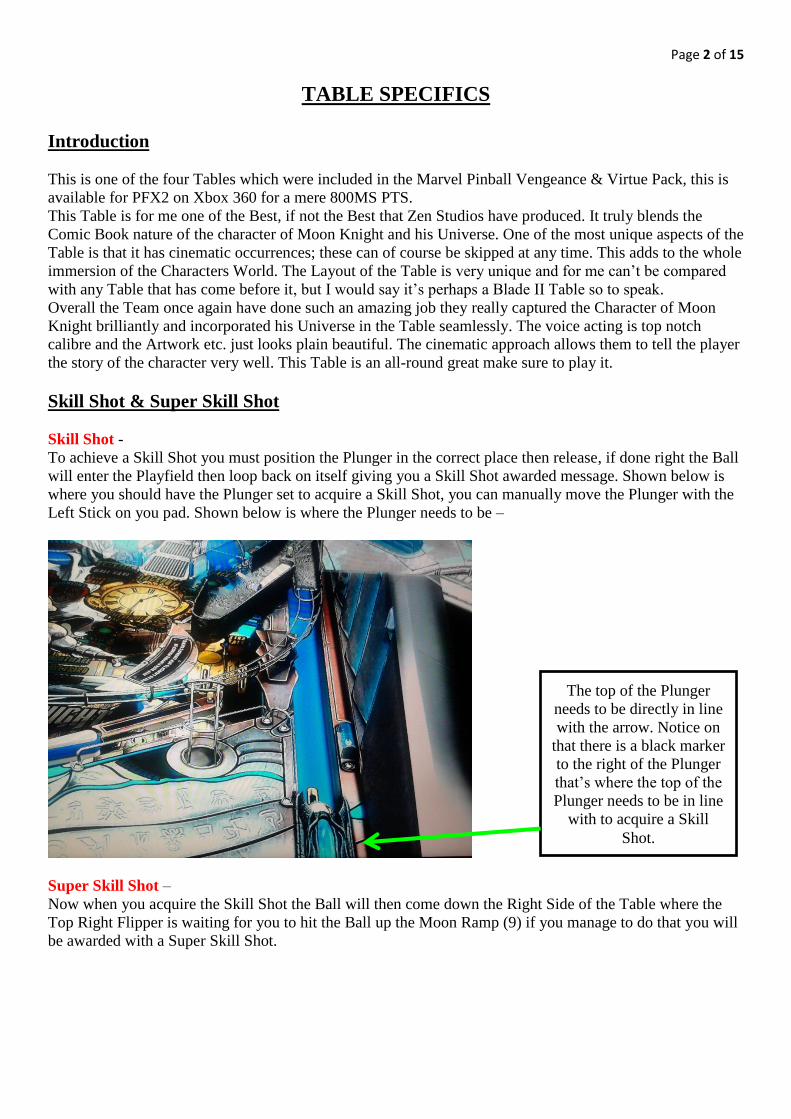
To achieve a Skill Shot you must position the Plunger in the correct place then release, if done right the Ball
will enter the Playfield then loop back on itself giving you a Skill Shot awarded message. Shown below is
where you should have the Plunger set to acquire a Skill Shot, you can manually move the Plunger with the
Left Stick on you pad. Shown below is where the Plunger needs to be –
Super Skill Shot –
Now when you acquire the Skill Shot the Ball will then come down the Right Side of the Table where the
Top Right Flipper is waiting for you to hit the Ball up the Moon Ramp (9) if you manage to do that you will
be awarded with a Super Skill Shot.
The top of the Plunger
needs to be directly in line
with the arrow. Notice on
that there is a black marker
to the right of the Plunger
that’s where the top of the
Plunger needs to be in line
with to acquire a Skill
Shot.

Page 3 of 15
Kick Back & Ball Save
Both the Left & Right Kickbacks are activated by hitting either of those Kickback Targets twice, and then
you hit the Crawley Target (6) to activate Kickback. The Left Kickback is lit first, repeat the above process
to light the Right Kickback.
As for Ball Save, just repeat the process above for lighting the Kickback and instead of lighting a Kickback,
you will gain Ball Save (Only if both Left & Right Kickbacks are lit first). Shown below you can see where
these are located –
*Note - This Table doesn’t reset the Kickbacks earned if you lose a Ball*
Extra Balls
The 4 Ways to achieve an Extra Ball per Ball–
Below are the 4 Ways in which you can acquire an Extra Ball -
1. By Repeating the lighting Kickback process (Detailed Above) while both Left & Right Kickbacks
along with Ball Save is lit. Extra Ball will then be available upon hit of the Crawley Target (6).
2. Max out Ball Out Multipliers - *View Raising the Ball out Multipliers Section of the Guide*
3. Completing all Police Radio/Crime Scene Hurry up Modes *View Side Missions – Police
Scanner/Crime Scene section of this Guide on instructions on how to do this. Extra Ball will
then be available upon hit of the Crawley Target (6).*
4. Setting all Eternal Flame Vessels on Fire *Note - View the End of Police Radio/Crime Scene on
Side Missions Section of the Guide for details, basically you hit all the Ramps/Orbits after you
set the Ball on Fire within the Time Limit. Extra Ball will then be available upon hit of the
Crawley Target (6).*
Kickback
Targets
Crawley Target
(6)
If Right Kickback
is activated then
this will be lit with
a Blue Light.
If Left Kickback is
activated then this
will be lit with a
Blue Light.

Page 4 of 15
Raising the Ball Out Multipliers
To do this you must hit the Ball round the Mission Orbit (4) 5 times when the Mission light is not activate
(This is a Blue Light, so if you see that you can’t advance the Multiplier till you complete a Mission or Fail
one) to gain 2X, repeat this again until you reach 10X. Once you max them out the Extra Ball Out will light
(This can be seen on either side on the Left & Right Outlane) so you need to have the Ball go down one of
those to collect it. Make sure to light Kickback on either side first (Detailed Earlier in the Guide).
Orbs
You should have noticed on the Dot-Matrix that it displays your Experience Rank & the amount of
Vengeance Orbs (Blue Orbs) you have collected. Now there are 2 Other Orbs which need to be unlocked
*Note – Don’t worry as Orbs get collected and unlocked with ease, most of the time they are all
unlocked for me without me knowing.* I will detail all of them below for you -
Blue Orbs – These are available from the start of the game, they are awarded from doing various
things like hitting Ramps/Orbits etc. You need to gain 100 of them to enable the Mission Orbit (4) to
allow access to the Main Mission activation. Every time you complete a Main Mission and recollect
another 100 Orbs you Experience rank will increase.
Red Orbs – After you have collected 100 Blue Orbs and completed certain tasks like Main
Missions (Look later in the Guide for details on how to complete them) etc. on the Dot-Matrix it will
tell you that a new Orb type has unlocked. This will be in fact the Red Orbs which is given to you
randomly by completing certain tasks and hitting things. When you max these out you will gain
access to the ‘Upgrade Your Hideout’ area. Where you can upgrade the Ramps/Orbits on the Table
up to 5 levels each, one Upgrade is allowed every time you max out your Red Orbs. You then need
to max those Orbs again to re-enter that to upgrade again.
Yellow Orbs – These are unlocked after you complete one of the Main Missions (Look later in the
Guide for details on how to complete them). These are sort of Bonus Points which Konshou (The
Moon God of Vengeance) awards to you for your services.
Upgrading Your Hideout
You gain access to this by maxing out you Red Orbs, anyways once you have maxed out your Red Orbs
hit the Ball up the Right Orbit (8) then you will be able to select which Ramp/Orbit you wish to Upgrade.
You can upgrade a specific Target only up to Level 5, you are given a score increase on the Ramp/Orbit this
is detailed below –
Level 1 = 1,000 Points
Level 2 = 2,000 Points
Level 3 = 5,000 Points
Level 4 = 10,000 Points
Level 5 = 50,000 Points

Page 5 of 15
Multiball Modes
There are 3 Multiball Modes on this Table –
Screw loose Multiball
To activate this Multiball Mode you must release the Ball that is locked inside the Archimedes Spinner
which is located at the far back right side of the Table. You do this be repeated shots through the Right Orbit
(8). After a couple of hits you will be able to see a Ball locked inside it, hit the Orbit a couple more times
and the Ball will be released thus starting this Multiball Mode.
All the Left (3) or Right (7) Ramps collects a Jackpot award, to raise the Jackpot just hit any of the other
Ramps/Orbits.
The Multiball will continue as long as you have a minimum of 2 Balls in play, you will have to repeat the
above process again if you wish to re-enter this Multiball Mode again.
Whirly Bird Multiball *Upon Activation you will light ‘T’*
To activate this Multiball Mode you must lock 3 Balls in the Right Ramp (7). Now you need to hit that
Ramp 4 times to activate the Locking process, once this is ready every shot up that Ramp will lock the Ball.
Once they are all locked the Multiball Mode will begin.
Collect the Jackpot Award at either the Left Ramp (3) or Right Ramp (7), all other Ramp/Orbits raise the
Jackpot Awards and the Moon Ramp (9) collects a Super Jackpot Award.
The Multiball will continue as long as you have a minimum of 2 Balls in play, you will have to repeat the
above process again if you wish to re-enter this Multiball Mode again.

Page 6 of 15
Nightmare Multiball *Upon Activation you will light ‘H’*
*Tip – when you are in the Launch Chamber (See Skill Shot earlier in the Guide) you will notice that
the Clock is spinning, wait till the 2 Hands are near the XII. So you would want the Little Hand on the
X and the Big Hand going round about half way. Then launch the Ball, if done right you will see that
the Hand are much closer to Midnight and thus it’s easier to activate this Multiball Mode.*
To activate this Multiball Mode you must make the Clock hit Midnight, The Right Ramp (7) moves the
Little Hand and the Left Ramp (3) moves the Big Hand. So this requires quite a bit of shots up those Ramps,
when you reach any of those Hands to the Midnight area (XII on the Clock) make sure to not hit that Ramp
again or the Hand will need to go round all over again. The clock is shown below in the Image –
Once the Big and Little Hands are at XII the Nightmare Multiball Mode will begin, Midnight will appear on
the Right Ramp (7) inflamed. You will notice that the Ball is acting nuts this is normal, if you manage to hit
Midnight you will be awarded with another Ball to play about with. Repeat that to gain another, so
essentially this becomes a 3 Ball Multiball Mode.
Try to hit the Ramps/Orbits to collect Jackpot Bonuses and Super Jackpot Bonuses, it constantly changes
which Ramp/Orbit is lit so it’s pretty much luck based. The Mode ends that’s if you go down to 1 Ball on
the Playfield.
Clock (Notice where
the Big and Little
Hands are). You
need to have them
both at XII

Page 7 of 15
Side Missions (Mini-Games etc.) –
Moon Mini-Game
If you manage to hit the Moon Ramp (9) 2 times you will be taken to a Mini-Playfield which you need to hit
all the Targets which are rotating round the Moon. This has 5 Levels to it, after each Level is complete the
Ball is deposited out of the Playfield and you need to repeat the above to gain access to the Mini-Playfield to
gain access to Level 2 etc. The Playfield looks like this –
Police Radio Hurry Up Mode/Crime Scene Hurry Up Mode
Activate the Police Radio from either the Left Ramp (3) or Right Ramp (7), usually takes 4 shots up either
of those ramps. When it begins you will see that all the Ramps/Orbits will be lit, each of them has a Crime
associated with them and they are listed below –
Left Orbit (2) – The Crime is Armed Robbery.
Left Ramp (3) – The Crime is Aggravated Assault.
Mission Orbit (4) – The Crime is Vandalism.
Right Ramp (7) – The Crime is Forcible Entry.
Right Orbit (8) – The Crime is Stolen Car.
Now you are given a small amount of time to hit one of those Ramps/Orbits above, if you managed to hit
one of them you are then tasked to hit the Crime Scene Hole (1). Upon hitting that you will be taken into a
Hurry Up mode which you are tasked in hitting a set number of Ramps/Orbits within a time limit to solve
the Crime. Depending on what Ramp/Orbit you hit in the Police Radio Hurry Up defines what you need to
do to solve the Crime at this stage. I will detail what you need to do for all 5 of them below –
Left Orbit (2) – The Crime is Armed Robbery, to complete this you must hit 4 Ramps/Orbits which
will be lit and this is random so it won’t always be the same Ramps/Orbits.
Left Ramp (3) – The Crime is Aggravated Assault, to complete this you must hit 2 Ramps/Orbits
which will be lit and this is random so it won’t always be the same Ramps/Orbits.
Mission Orbit (4) – The Crime is Vandalism, to complete this you must hit 1 Ramps/Orbits but note
all Ramps/Orbits will be lit but you only need to hit 1.

Page 8 of 15
Right Ramp (7) – The Crime is Forcible Entry, to complete this you must hit 1 Ramps/Orbits which
will be lit and this is random so it won’t always be the same Ramps/Orbits.
Right Orbit (8) – The Crime is Stolen Car, to complete this you must hit 1 Ramps/Orbits which will
be lit and this is random so it won’t always be the same Ramps/Orbits.
If you manage to solve all the 5 Crimes listed above you will light Extra Ball on the Crawley Target (6) hit
that to claim the Extra Ball.
Also there is another Extra Ball which can be claimed by lighting up all the Eternal Flame Vessels, when
you complete any of the above Crimes, the Ball is lit on Fire for a short time. Now if you manage to hit the
all the Ramps/Orbits, you will light Extra Ball on the Crawley Target (6) hit that to claim the Extra Ball.
Now it doesn’t need to be done all at once as the Ball is lit on fire again if you complete another of the
Crimes.
Taxi Around *Collect one Fare to light ‘K’*
Hit the Left Ramp (3) until Taxi Around starts, to collect a fare just hit the lit Ramp/Orbit (It’s usually lit
with a Yellow Light) do this twice and you will collect a Fare thus lighting ‘K’. You can continue to collect
Fares or let the timer run out.
Rough Costumers *Completion of Level 1 lights ‘G’*
This Side Mission is activated by cycling through the Right Ramps cycle usually takes about 3 Hits. Then
you need to hit the Side Mission Hole (5) about 3 times to begin that Mission. Shown Below is the Side
Mission Hole (5) whatever Mission is activated it will be lit –
ROUGH
CUSTOMERS - If
this light is lit then if
you hit this Hole a
total of 3 times then
this Side Mission
will activate.
RESPECTED
CITIZEN - If this
light is lit then if
you hit this Hole a
total of 3 times then
this Side Mission
will activate.
SILENT PURSUIT - If this light is lit
then if you hit this
Hole a total of 3
times then this Side
Mission will
activate.
Page 9 of 15
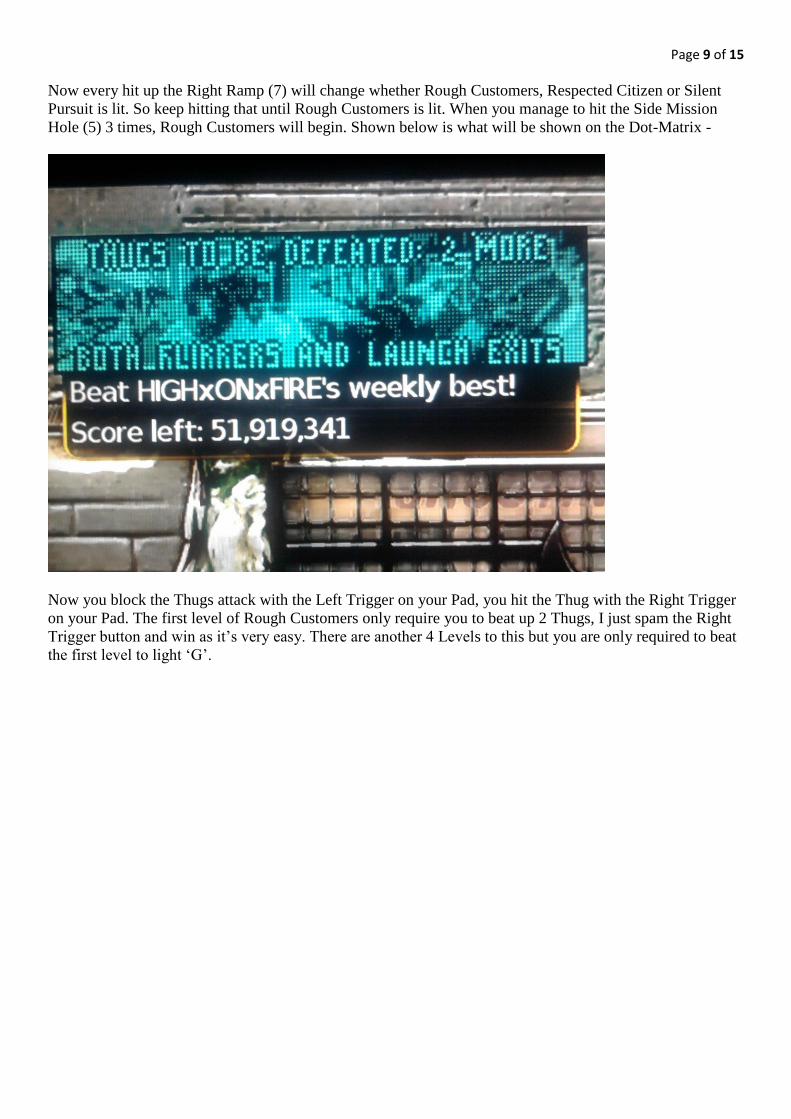
Now every hit up the Right Ramp (7) will change whether Rough Customers, Respected Citizen or Silent
Pursuit is lit. So keep hitting that until Rough Customers is lit. When you manage to hit the Side Mission
Hole (5) 3 times, Rough Customers will begin. Shown below is what will be shown on the Dot-Matrix -
Now you block the Thugs attack with the Left Trigger on your Pad, you hit the Thug with the Right Trigger
on your Pad. The first level of Rough Customers only require you to beat up 2 Thugs, I just spam the Right
Trigger button and win as it’s very easy. There are another 4 Levels to this but you are only required to beat
the first level to light ‘G’.

Page 10 of 15
Respected Citizen * Make Profit to light ‘N’*
Repeat the process detailed in the first part explaining how to activate Rough Customers but instead have
Respected Citizen lit. When you have hit the Side Mission Hole 3 times the Side Mission will begin, you are
given 1 Minute to gain some profit at the Stock exchange. All the Ramps/Orbits will be lit now try to Sell
High and Buy Low. This is achieved by changed whether your Buying or Selling (Changed by hitting the
‘Launch Button’ on your Pad), its displayed on the Dot-Matrix if you are Buying or Selling. Shown below is
what you will see on the Dot-Matrix if you’re selling –
I would say if you are just trying to get the ‘N’ lit then just Buy Low, now when you have Buy selected wait
till the Price displayed is low let’s say 45 to Buy you need to hit any Ramp/Orbit. Once Brought change to
Selling by pressing the ‘Launch Button’ on your Pad. Now hit any Ramp/Orbit to Sell. Once you done that
hit the Side Mission Hole (5) this will end the Stock Exchange and you should have made some profit.
Notice the ‘N’ will now light up.
Silent Pursuit
Repeat the process detailed in the first part explaining how to activate Rough Customers but instead have
Silent Pursuit lit. When you have hit the Side Mission Hole 3 times the Side Mission will begin, to complete
this Side Mission just hit the lit Ramps/Orbits and after about 5 successful hits the Side Mission is
completed.

Page 11 of 15
Moon Knight Crossbow *Completion of Level 1 lights ‘I’*
To activate this Side Mission you must first select it from the Left Ramp (3) this is achieved by hitting that
Ramp until you see that the Crossbow is selected. When you have done this you then need to hit the Right
Orbit to be taken to the Playfield for the Crossbow, Shown Below –
To complete this you must hit the Thugs with the Crossbow, use the Left Trigger on your Pad to move the
Crossbow to the Left and the Right Trigger on you Pad to move it to the Right. Finally use the ‘Launch
Button’ on your Pad to shoot. Remember if takes a couple of seconds for Moon Knight to reload the
Crossbow with another Ball so try to make every shot count. You are given about 10 Seconds to hit a Thug,
after each successful hit the timer resets to 10 Seconds. You need to hit 3 Thugs to complete the first Level
of the Moon Knight Crossbow, there are 5 levels to this Side Mission but you are only required to do the
First Level to light ‘I’.
Page 12 of 15
MAIN TABLE MISSIONS
This Table has 4 Main Missions you gain access to them you need to gain 100 Blue Orbs, they are awarded
from doing various things like hitting Ramps/Orbits etc. Once you have 100 of them you will see that the
Mission Orbit (4) will have a Blue Light which says ‘Mission’ lit. Hit that Orbit to gain access to the Main
Missions. Now when you complete or fail a Main Mission you will need to repeat the process to be given
access to the Main Mission selection again.
After you manage to gain access to the Main Mission selection, you will see on the Dot-Matrix 1 of the 4
Main Missions. You can cycle through them using Right Trigger (Moves Right) & Left Trigger (Moves
Left) on your Pad, then press the ‘Launch Button’ on your Pad to select which one you want to try first.
*Note – there is a time limit so if you take too long to select, it will automatically select the one which
is being displayed on the Dot-Matrix.*
The 4 Main Missions are listed below *Note – to skip the Cinematic stuff at the start of the Main
Missions just keep pressing the ‘Launch Button’ on your Pad.*
*Note – some Missions when you lose the Ball down the Outlanes or Middle Drain it will return the
Ball to you but the Mission will fail. I’ve only noticed this on the Morpheus & His Ebony Energy
Mission.*
I have detailed how to complete them for you –
Bushman Is Back
To complete this Mission you must only hit the Lit Ramps which happen to be the Left Ramp (3) & Right
Ramp (7) as they are the only ones which take damage off Bushman. If you hit any of the other
Ramps/Orbits he attacks you. After you hit the Left Ramp (3) & Right Ramp (7) a couple of times the
Mission will be completed, but remember if you hit any of the other Ramps/Orbits to many times instead of
the ones lit within the Mission it will fail and you have to go through restarting the Mission all over again.
Completing it will activated the Bonus Hurry Up Mode where you can gain Yellow Orbs these are just
Bonus points which Konshou (The Moon God of Vengeance) awards to you for your services.
Black Spectre Vote For Me
To complete this Mission you must only hit the Lit Ramps/Orbits, from my understanding the ones which
are lit are random. Every time you hit one it will change which you are required to hit next, hit enough to
defeat Black Spectre but remember by hitting non-lit Ramps/Orbits you take damage and if you do that
enough times the Mission is failed. I also remember that you should try to hit Ramps/Orbit that you haven’t
hit yet. Completing it will activated the Bonus Hurry Up Mode where you can gain Yellow Orbs these are
just Bonus points which Konshou (The Moon God of Vengeance) awards to you for your services.
Morpheus & His Ebony Energy
To complete this Mission you must stop Morpheus’ Ebony Energy from reach your Flippers this is done by
hitting the Ramp/Orbit where you see a Blackish Ooze coming down from it. You can hit all Ramps/Orbits
but try to go for the ones that have that Ooze coming down to stop it reaching your Flippers, after a certain
amount of shots the Mission will complete. Don’t hit the Same Ramp/Orbit over and over again try to hit a
variety of Ramps/Orbits. The Mission is failed if the Ooze reaches any of your Flippers (Left or Right
Flipper). Completing it will activated the Bonus Hurry Up Mode where you can gain Yellow Orbs these are
just Bonus points which Konshou (The Moon God of Vengeance) awards to you for your services.

Page 13 of 15
Midnight
To complete this Mission you must stop Midnight who has appeared on the Right Ramp (7) entrance. The
first thing you should do is hit him, and then you will need to hit a lit Ramp/Orbit to bring down his
defences before trying to hit him again. Repeat a further 2 times to successfully defeat Midnight. Be careful
if you hit him before doing that the Ball will be magnetised and it could be sent down the Middle Drain. If I
remember the only way to fail this Mission is to lose the Ball down the Outlanes or Middle Drain.
Completing it will activated the Bonus Hurry Up Mode where you can gain Yellow Orbs these are just
Bonus points which Konshou (The Moon God of Vengeance) awards to you for your services.

Page 14 of 15
WIZARD MODE (Final Mission)
Lunar Eclipse Activation
To Gain Access to the Lunar Eclipse (Wizard Mode) on this Table you must first light ‘MOON KNIGHT’
You light each light by doing the following –
‘M’ = Defeat the Morpheus & His Ebony Energy Main Mission
‘O’ = Defeat the Bushman Is Back Main Mission
‘O’ = Defeat the Black Spectre Vote For Me Main Mission
‘N’ = Defeat the Midnight Main Mission
‘K’ = Collect a Fare in Taxi Around Side Mission
‘N’ = Gain some Profit in Respected Citizen Side Mission
‘I’ = Complete the first level of Moon Knight Crossbow Side Mission
‘G’ = Complete the first level of Rough Customers Side Mission
‘H’ = Start the Whirly Bird Multiball Mode
‘T’ = Start Nightmare Multiball Mode
Once they have all been lit the Wizard Mode is available via the Mission Orbit (4).
*Note – Failure on the Wizard Mode doesn’t reset the Table, you will always start in Stage 1 upon hit
of the Mission Orbit as long as you don’t lose you game (Lose all your Balls).*
Lunar Eclipse Stage 1
Once the Wizard Mode begins you will notice that you need to hit 3 Targets –
Left Ramp (3) = This needs to be hit Once
Side Mission Hole (5) = this needs to be hit about 5 times
Right Ramp (7) = This needs to be hit 2 times to get rid of Midnight
Now there is a time limit to do those shots and it’s quite strict, make sure to get the Left Ramp (3) and Right
Ramp (7) shots down as fast as possible. Then hit the Side Mission Hole (5) until it starts the next Stage of
the Wizard Mode, I remember it required about 5 hits.
*Note - If you don’t manage to hit that within the time limit, you can just hit the Mission Orbit (4)
again to restart but the thing is you will start Stage 1 from the beginning.*
Lunar Eclipse Stage 2
If you managed to complete Stage 1, you are then given a 3 Ball Multiball which you need to hit 50 Targets
either they be Ramps or Orbits etc. Be carefully as the Ultraviolent colour of the Balls can cause you to
misjudge your shots. If they are hard to see try turning down the Brightness or Contrast of your TV. If you
manage to hit 50 the Wizard Mode is completed and the Table will then reset.
*Note - If you don’t manage to hit the 50 Targets in Stage 2, you can just hit the Mission Orbit (4)
again to restart but the thing is you will start Stage 1 from the beginning.*
*WIZARD MODE IS COMPLETED AT THIS POINT*
Page 15 of 15
Special Thanks to all the Zen Studios Forum Community! Members such as Cloda, Wednesday, Wims,
Steviej, shogun00 & Hypno74 I couldn’t have completed the Guide without your help either directly
or indirectly - you are all awesome!!!
In closing I hope you enjoyed this Table, I certainly have and I hope by using this Guide it increases that
Fun factor for you and everyone else who plays with you etc.
Check out the other Tables available and the original Marvel Pinball 4 Pack if you haven’t got it yet, they
are all available to download on the Xbox Live Marketplace in Add-Ons section or download it straight
from the PFX2 Platform itself. Marvel Pinball is also on Playstation Network.
Thanks for viewing my Guide, and Pinballers trust me this Table will have you playing for long hours as it’s
so addictive, I guess you will be hearing this in your head
“IT’S MIIIIDNNIGGGGHTTT!!!”
Yours
ShoryukenToTheChin