monitoring and backing up the bts · 3-3 cisco bts 10200 softswitch operations and maintenance...
TRANSCRIPT

Cisco BTS 10OL-12797-10
C H A P T E R 3
Monitoring and Backing Up the BTSRevised: February 18, 2010, OL-12797-10
IntroductionThis chapter includes overall BTS maintenance strategies.
Detecting and Preventing BTS CongestionWhen congested the BTS automatically does the following:
• Detects internal messaging congestion caused by traffic overload or other extraordinary events.
• Takes preventive action to avoid system failure (including shedding of traffic).
• Generates alarms when it detects internal messaging.
• Clears the alarms when congestion abates.
• Places the access control list (ACL) parameter (indicating congestion) into release messages sent to the SS7 network when the BTS internal call processing engine is congested.
• Routes emergency messages. Exact digit strings for emergency calls differ, specify up to ten digit strings (911 and 9911 are included by default). Contact Cisco TAC to do this, it involves a CA restart.
• Generates a SS7 termination cause code 42 for billing.
• Generates the cable signaling stop event with cause code “resource unavailable” for billing.
See the Cisco BTS 10200 Softswitch Troubleshooting Guide for congestion alarms.
Monitoring BTS HardwareBTS tracks devices and facilities that exceed their settings.
• A process exceeds 70 percent of the CPU.
• The Call Agent CPU is over 90 percent busy (10 percent idle).
• The load average exceeds 5 for at least a 5-minute interval.
• Memory is 95 percent exhausted and swap is over 50 percent consumed.
3-1200 Softswitch Operations and Maintenance Guide

Chapter 3 Monitoring and Backing Up the BTS Checking BTS System Health
• Partitions consumed:
– A partition 70 percent consumed generates a minor alarm.
– A partition 80 percent consumed generates a major alarm.
– A partition 90 percent consumed generates a critical alarm.
Checking BTS System HealthDo the following tasks as listed or more frequently if your system administrator recommends it.
.
Table 3-1 Managing Hardware
Task Sample Command
Running node reports report node node=prica42;
Viewing nodes status node node=prica42;
Rebooting the host machines control node node=prica42; action=REBOOT;
Caution Use this command with extreme caution.
Setting the host machine for maintenance
control node node=prica42; action=HALT;
Caution Use local console access or a power cycle to restart the node.
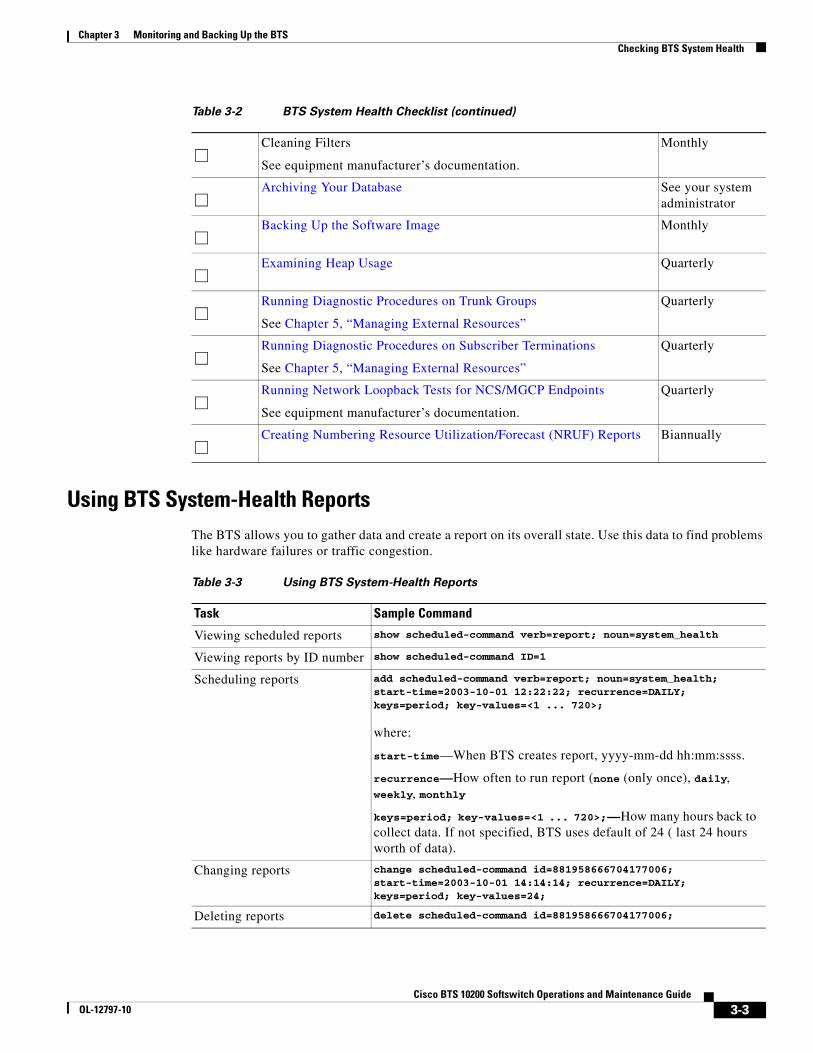
Table 3-2 BTS System Health Checklist
Tasks Frequency
Using BTS System-Health Reports Daily
Checking BTS System Time Daily
Checking Traffic Measurements
See Chapter 6, “Using Measurements.”
Daily
Checking Event and Alarm Reports
See Cisco BTS 10200 Softswitch Troubleshooting Guide.
Daily
Checking the OS Log of Each Host Machine Daily
Backing up the EMS Database Daily
Checking Disk Mirroring on Each Host Machine Weekly
Auditing Databases and Tables Monthly
3-2Cisco BTS 10200 Softswitch Operations and Maintenance Guide
OL-12797-10
Chapter 3 Monitoring and Backing Up the BTS Checking BTS System Health
Using BTS System-Health ReportsThe BTS allows you to gather data and create a report on its overall state. Use this data to find problems like hardware failures or traffic congestion.
Cleaning Filters
See equipment manufacturer’s documentation.
Monthly
Archiving Your Database See your system administrator
Backing Up the Software Image Monthly
Examining Heap Usage Quarterly
Running Diagnostic Procedures on Trunk Groups
See Chapter 5, “Managing External Resources”
Quarterly
Running Diagnostic Procedures on Subscriber Terminations
See Chapter 5, “Managing External Resources”
Quarterly
Running Network Loopback Tests for NCS/MGCP Endpoints
See equipment manufacturer’s documentation.
Quarterly
Creating Numbering Resource Utilization/Forecast (NRUF) Reports Biannually
Table 3-2 BTS System Health Checklist (continued)
Table 3-3 Using BTS System-Health Reports
Task Sample Command
Viewing scheduled reports show scheduled-command verb=report; noun=system_health
Viewing reports by ID number show scheduled-command ID=1
Scheduling reports add scheduled-command verb=report; noun=system_health; start-time=2003-10-01 12:22:22; recurrence=DAILY; keys=period; key-values=<1 ... 720>;
where:
start-time—When BTS creates report, yyyy-mm-dd hh:mm:ssss.
recurrence—How often to run report (none (only once), daily, weekly, monthly
keys=period; key-values=<1 ... 720>;—How many hours back to collect data. If not specified, BTS uses default of 24 ( last 24 hours worth of data).
Changing reports change scheduled-command id=881958666704177006; start-time=2003-10-01 14:14:14; recurrence=DAILY; keys=period; key-values=24;
Deleting reports delete scheduled-command id=881958666704177006;
3-3Cisco BTS 10200 Softswitch Operations and Maintenance Guide
OL-12797-10

Chapter 3 Monitoring and Backing Up the BTS Checking BTS System Health
Checking BTS System TimeBTS clocks must be accurate to 2 seconds.
Caution Do not change the date or time in your BTS host machines while CA, FS, EMS, and BDMS are running. Instead allow the Solaris OS to get the time automatically through NTP services.
Step 1 Log in to the primary and secondary EMSs as root.
Step 2 Enter <hostname># date.
Step 3 On each EMS ensure the following are correct:
a. The time does not deviate more than +/- 2 seconds.
b. Day, month, year, time zone
Step 4 Log in to both the primary and secondary CA as root.
Step 5 Enter <hostname># date.
Step 6 On each CA ensure the following are correct:
a. The time does not deviate more than +/- 2 seconds.
b. Day, month, year, time zone
Checking the OS Log of Each Host MachineMonitor the OS logs on all four host machines (primary and secondary EMS, primary and secondary CA) for errors or warnings. This report shows you recent messages like memory hits, disk errors, and frequent process restarts.
Step 1 Log in as root.
Step 2 Enter dmesg.
Step 3 For more history edit the /var/adm/messages file.
Checking Disk Mirroring on Each Host MachineEach procedure takes about 30 minutes.
Viewing completed reports In a web browser enter https://<active EMS IP addr or FQDN>:/report/system_health
Generating a report immediately
report system-health period=<1 ... 720>;
Table 3-3 Using BTS System-Health Reports (continued)
Task Sample Command
3-4Cisco BTS 10200 Softswitch Operations and Maintenance Guide
OL-12797-10

Chapter 3 Monitoring and Backing Up the BTS Checking BTS System Health
CA/FS Side A
Before doing this procedure, ensure your BTS platform is connected to controller 1 or controller 0.
Step 1 Log in as root to CA/FS Side A using telnet.
Step 2 Enter one of the following:
<hostname># metastat | grep c0
Or:
<hostname># metastat | grep c1
Step 3 Verify the return matches the following:
c1t0d0s1 0 No Okay Yes c1t1d0s1 0 No Okay Yes c1t0d0s5 0 No Okay Yes c1t1d0s5 0 No Okay Yes c1t0d0s6 0 No Okay Yes c1t1d0s6 0 No Okay Yes c1t0d0s0 0 No Okay Yes c1t1d0s0 0 No Okay Yes c1t0d0s3 0 No Okay Yes c1t1d0s3 0 No Okay Yes c1t1d0 Yes id1,sd@SSEAGATE_ST373307LSUN72G_3HZ9JG7800007518H8WV c1t0d0 Yes id1,sd@SSEAGATE_ST373307LSUN72G_3HZ9JC9N00007518Y15K
If the results differ synchronize the disk mirroring:
<hostname># cd /opt/setup<hostname># sync_mirror
Verify the results using Step 1 through Step 3.
Caution In case of a mismatch, synchronize once. If the mismatch continues, contact Cisco TAC.
CA/FS Side B
Step 1 Log in as root to CA/FS Side B using telnet.
Step 2 Enter <hostname># metastat | grep c0.
Step 3 Verify the return matches the following:
c0t0d0s6 0 No Okay c0t1d0s6 0 No Okay c0t0d0s1 0 No Okay c0t1d0s1 0 No Okay c0t0d0s5 0 No Okay c0t1d0s5 0 No Okay c0t0d0s7 0 No Okay c0t1d0s7 0 No Okay c0t0d0s0 0 No Okay c0t1d0s0 0 No Okay c0t0d0s3 0 No Okay c0t1d0s3 0 No Okay
3-5Cisco BTS 10200 Softswitch Operations and Maintenance Guide
OL-12797-10
Chapter 3 Monitoring and Backing Up the BTS Checking BTS System Health
If the results differ synchronize the disk mirroring:
<hostname># cd /opt/setup<hostname># sync_mirror
Verify the results using Step 1 through Step 3.
Caution In case of a mismatch, synchronize once. If the mismatch continues contact Cisco TAC.
EMS Side A
Step 1 Log in as root to EMS Side A using telnet.
Step 2 Enter <hostname># metastat | grep c0.
Step 3 Verify the return matches the following:
c0t0d0s6 0 No Okay c0t1d0s6 0 No Okay c0t0d0s1 0 No Okay c0t1d0s1 0 No Okay c0t0d0s5 0 No Okay c0t1d0s5 0 No Okay c0t0d0s7 0 No Okay c0t1d0s7 0 No Okay c0t0d0s0 0 No Okay c0t1d0s0 0 No Okay c0t0d0s3 0 No Okay c0t1d0s3 0 No Okay
If the results differ synchronize the disk mirroring:
<hostname># cd /opt/setup<hostname># sync_mirror
Verify the results using Step 1 through Step 3.
Caution In case of a mismatch, synchronize once. If the mismatch continues contact Cisco TAC.
EMS Side B
Step 1 Log in as root to EMS Side B using telnet.
Step 2 Enter <hostname># metastat | grep c0.
Step 3 Verify the return result matches the following:
c0t0d0s6 0 No Okay c0t1d0s6 0 No Okay c0t0d0s1 0 No Okay
3-6Cisco BTS 10200 Softswitch Operations and Maintenance Guide
OL-12797-10
Chapter 3 Monitoring and Backing Up the BTS Checking BTS System Health
c0t1d0s1 0 No Okay c0t0d0s5 0 No Okay c0t1d0s5 0 No Okay c0t0d0s7 0 No Okay c0t1d0s7 0 No Okay c0t0d0s0 0 No Okay c0t1d0s0 0 No Okay c0t0d0s3 0 No Okay c0t1d0s3 0 No Okay
If the results differ synchronize the disk mirroring:
<hostname># cd /opt/setup<hostname># sync_mirror
Verify the results using Step 1 through Step 3.
Caution In case of a mismatch, synchronize once. If the mismatch continues contact Cisco TAC.
Auditing Databases and TablesAudit either the complete database or entries in every provisionable table in both the Oracle database and shared memory. See the Cisco BTS 10200 Softswitch Troubleshooting Guide.
Caution Audits are time-intensive. Do only during a maintenance window. Completion time varies with database or table entries.
Table 3-4 Auditing Databases and Tables
Task Sample Command
Auditing individual tables audit trunk type=row-count;
Auditing every entry in each provisionable table
audit database;
Auditing provisionable tables based on type
audit database type=row-count;
Note type defaults to full
Auditing provisionable tables based on platform state
audit database platform-state=active;
Note platform-state defaults to active
3-7Cisco BTS 10200 Softswitch Operations and Maintenance Guide
OL-12797-10
Chapter 3 Monitoring and Backing Up the BTS Checking BTS System Health
Creating Numbering Resource Utilization/Forecast (NRUF) ReportsThe North American Numbering Plan Association (NANPA) collects, stores, and maintains how telephone numbers are used by 19 countries. Companies, like carriers, that hold telephone numbers must report to NANPA twice a year using the NRUF report. Go to http://www.nanpa.com for more information and job aids on submitting reports.
The BTS creates an NRUF report using the Number Block table. This table:
• Is a single table that is the sole reference for NANPA audits
• Can be customized
• Can be updated from data imported from other tables, changes from office-code updates, or manually
• Has the following fields:
– Number Block: NPA to NPA-NXX-XXXX—For FCC-required NANPA audit compliance, the report input is NPANXX. In markets outside of NANPA, the input can be based on either the combination of the national destination code (NDC) and the exchange code (EC), or just the EC.
– Code Holder = Y/N
– Block Holder = Y/N
– Native = Y/N
– Non-Native = Y/N
To generate the following reports, use report dn-summary:
• All DNs in NDC and EC
• Thousands group in NDC and EC
• Operating company number (OCN)
• Switch Common Language Location Identifier (CLLI) code
• OCN + CLLI code—entries must match LERG data
Auditing mismatches across network elements
1. Log in as root.
2. Enter:
bts_audit -ems priems01 -ca prica01 -platforms CA146,FSAIN205 -tables SUBSCRIBER,MGW_PROFILE
Note bts_audit cannot work in certain scenarios, for example, when a termination record points to an invalid mgw
Resolving mismatches across network elements
If a table references a missing row, the mismatch is not resolved. Only synchronize data mismatches between active network elemens.
1. Audit mismatches using bts_audit.
2. Enter:
bts_sync /opt/ems/report/Audit_CA146_root.sql
bts_sync applies updates directly to the databases.
Table 3-4 Auditing Databases and Tables (continued)
Task Sample Command
3-8Cisco BTS 10200 Softswitch Operations and Maintenance Guide
OL-12797-10

Chapter 3 Monitoring and Backing Up the BTS Checking BTS System Health
Creating Reports for Nonrural Primary and Intermediate Carriers
NRUF reporting for nonrural primary and intermediate carriers:
• Occurs at a thousands-block level (NPA-NXX-X)
• Applies only to NANP
The report returns the following based on the DN2SUBSCRIBER table’s STATUS token:
Table 3-5 NRUF Report Data for Nonrural Carriers
Data Groups Matching Data from the DN2SUBSCRIBER Table
Assigned DNs • Individual DNs:
ndc=<npa>; ec=<nxx>; DN=[0-9][0-9][0-9]; (status=assigned) AND ADMIN-DN=Nndc=<npa>; ec=<nxx>; DN=[0-9][0-9][0-9]; (status=ported-out) AND ADMIN-DN=N
• DID DNs:
ndc=<npa>; ec=<nxx>; DN=xxxx; (status=assigned) AND ADMIN-DN=N; X 10000ndc=<npa>; ec=<nxx>; DN=xxxx; (status=ported-out) AND ADMIN-DN=N; X 10000
ndc=<npa>; ec=<nxx>; DN=[0-9]xxx; (status=assigned) AND ADMIN-DN=N; X 1000ndc=<npa>; ec=<nxx>; DN=[0-9]xxx; (status=ported-out) AND ADMIN-DN=N; X 1000
ndc=<npa>; ec=<nxx>; DN=[0-9][0-9]xx; (status=assigned) AND ADMIN-DN=N; X 100ndc=<npa>; ec=<nxx>; DN=[0-9][0-9]xx; (status=ported-out) AND ADMIN-DN=N; X 100
ndc=<npa>; ec=<nxx>; DN=[0-9][0-9][0-9]x; (status=assigned) AND ADMIN-DN=N; X 10ndc=<npa>; ec=<nxx>; DN=[0-9][0-9][0-9]x; (status=ported-out) AND ADMIN-DN=N; X 10
• PORTED-OUT DNs
Intermediate Telephone Directory Numbers
0
Reserved DNs 0
3-9Cisco BTS 10200 Softswitch Operations and Maintenance Guide
OL-12797-10
Chapter 3 Monitoring and Backing Up the BTS Checking BTS System Health
Creating Reports for Rural Primary and Intermediate Carriers
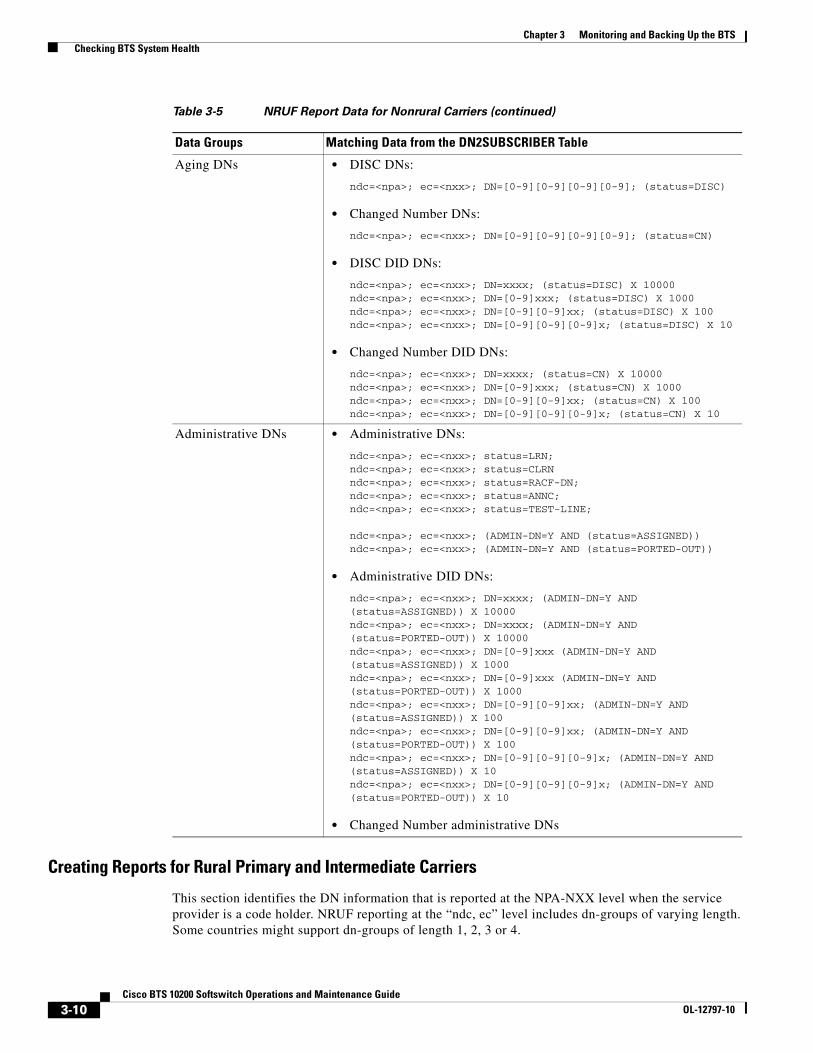
This section identifies the DN information that is reported at the NPA-NXX level when the service provider is a code holder. NRUF reporting at the “ndc, ec” level includes dn-groups of varying length. Some countries might support dn-groups of length 1, 2, 3 or 4.
Aging DNs • DISC DNs:
ndc=<npa>; ec=<nxx>; DN=[0-9][0-9][0-9][0-9]; (status=DISC)
• Changed Number DNs:
ndc=<npa>; ec=<nxx>; DN=[0-9][0-9][0-9][0-9]; (status=CN)
• DISC DID DNs:
ndc=<npa>; ec=<nxx>; DN=xxxx; (status=DISC) X 10000ndc=<npa>; ec=<nxx>; DN=[0-9]xxx; (status=DISC) X 1000ndc=<npa>; ec=<nxx>; DN=[0-9][0-9]xx; (status=DISC) X 100ndc=<npa>; ec=<nxx>; DN=[0-9][0-9][0-9]x; (status=DISC) X 10
• Changed Number DID DNs:
ndc=<npa>; ec=<nxx>; DN=xxxx; (status=CN) X 10000ndc=<npa>; ec=<nxx>; DN=[0-9]xxx; (status=CN) X 1000ndc=<npa>; ec=<nxx>; DN=[0-9][0-9]xx; (status=CN) X 100ndc=<npa>; ec=<nxx>; DN=[0-9][0-9][0-9]x; (status=CN) X 10
Administrative DNs • Administrative DNs:
ndc=<npa>; ec=<nxx>; status=LRN;ndc=<npa>; ec=<nxx>; status=CLRNndc=<npa>; ec=<nxx>; status=RACF-DN;ndc=<npa>; ec=<nxx>; status=ANNC;ndc=<npa>; ec=<nxx>; status=TEST-LINE;
ndc=<npa>; ec=<nxx>; (ADMIN-DN=Y AND (status=ASSIGNED))ndc=<npa>; ec=<nxx>; (ADMIN-DN=Y AND (status=PORTED-OUT))
• Administrative DID DNs:
ndc=<npa>; ec=<nxx>; DN=xxxx; (ADMIN-DN=Y AND (status=ASSIGNED)) X 10000ndc=<npa>; ec=<nxx>; DN=xxxx; (ADMIN-DN=Y AND (status=PORTED-OUT)) X 10000ndc=<npa>; ec=<nxx>; DN=[0-9]xxx (ADMIN-DN=Y AND (status=ASSIGNED)) X 1000ndc=<npa>; ec=<nxx>; DN=[0-9]xxx (ADMIN-DN=Y AND (status=PORTED-OUT)) X 1000ndc=<npa>; ec=<nxx>; DN=[0-9][0-9]xx; (ADMIN-DN=Y AND (status=ASSIGNED)) X 100ndc=<npa>; ec=<nxx>; DN=[0-9][0-9]xx; (ADMIN-DN=Y AND (status=PORTED-OUT)) X 100ndc=<npa>; ec=<nxx>; DN=[0-9][0-9][0-9]x; (ADMIN-DN=Y AND (status=ASSIGNED)) X 10ndc=<npa>; ec=<nxx>; DN=[0-9][0-9][0-9]x; (ADMIN-DN=Y AND (status=PORTED-OUT)) X 10
• Changed Number administrative DNs
Table 3-5 NRUF Report Data for Nonrural Carriers (continued)
Data Groups Matching Data from the DN2SUBSCRIBER Table
3-10Cisco BTS 10200 Softswitch Operations and Maintenance Guide
OL-12797-10

Chapter 3 Monitoring and Backing Up the BTS Checking BTS System Health
• The Rural Primary Carrier (U2 form) NPA-NXX report has:
– NPA-NXX (input as ndc, ec)
– Rate Center (read from LERG)
– State (read from LERG)
– Number of Assigned DNs
– Number of Intermediate DNs
– Number of Reserved DNs
– Number of Aging DNs
– Number of Administrative DNs
– Donated to Pool (always 0)
• The Rural Intermediate Carrier (U4 form) report has:
– NPA-NXX (input as ndc, ec)
– Rate Center (read from LERG)
– State (read from LERG)
– Number of Assigned DNs
– Number of Intermediate DNs
– Number of Reserved DNs
– Number of Aging DNs
– Number of Administrative DNs
– Numbers Received (always 0)
The report returns the following based on the DN2SUBSCRIBER table’s STATUS token:
3-11Cisco BTS 10200 Softswitch Operations and Maintenance Guide
OL-12797-10

Chapter 3 Monitoring and Backing Up the BTS Checking BTS System Health
Table 3-6 NRUF Report Data for Rural Carriers
Data Groups Matching Data from the DN2SUBSCRIBER Table
Assigned DNs • Individual DNs:
ndc=<npa>; ec=<nxx>; DN=[0-9][0-9][0-9]; (status=assigned) AND ADMIN-DN=Nndc=<npa>; ec=<nxx>; DN=[0-9][0-9][0-9]; (status=ported-out) AND ADMIN-DN=N
• DID DNs:
ndc=<npa>; ec=<nxx>; DN=xxxx; (status=assigned) AND ADMIN-DN=N; X 10000ndc=<npa>; ec=<nxx>; DN=xxxx; (status=ported-out) AND ADMIN-DN=N; X 10000
ndc=<npa>; ec=<nxx>; DN=[0-9]xxx; (status=assigned) AND ADMIN-DN=N; X 1000ndc=<npa>; ec=<nxx>; DN=[0-9]xxx; (status=ported-out) AND ADMIN-DN=N; X 1000
ndc=<npa>; ec=<nxx>; DN=[0-9][0-9]xx; (status=assigned) AND ADMIN-DN=N; X 100ndc=<npa>; ec=<nxx>; DN=[0-9][0-9]xx; (status=ported-out) AND ADMIN-DN=N; X 100
ndc=<npa>; ec=<nxx>; DN=[0-9][0-9][0-9]x; (status=assigned) AND ADMIN-DN=N; X 10ndc=<npa>; ec=<nxx>; DN=[0-9][0-9][0-9]x; (status=ported-out) AND ADMIN-DN=N; X 10
Intermediate Telephone Directory Numbers
0
Reserved DNs 0
3-12Cisco BTS 10200 Softswitch Operations and Maintenance Guide
OL-12797-10

Chapter 3 Monitoring and Backing Up the BTS Checking BTS System Health
Backing Up the Software ImageTo back up the software image do the following three procedures:
1. Full Database Auditing, page 3-14
2. Checking Shared Memory, page 3-14
3. Backing Up the Full BTS, page 3-16
Aging DNs • DISC DNs:
ndc=<npa>; ec=<nxx>; DN=[0-9][0-9][0-9][0-9]; (status=DISC)
• Changed Number DNs:
ndc=<npa>; ec=<nxx>; DN=[0-9][0-9][0-9][0-9]; (status=CN)
• DISC DID DNs:
ndc=<npa>; ec=<nxx>; DN=xxxx; (status=DISC) X 10000ndc=<npa>; ec=<nxx>; DN=[0-9]xxx; (status=DISC) X 1000ndc=<npa>; ec=<nxx>; DN=[0-9][0-9]xx; (status=DISC) X 100ndc=<npa>; ec=<nxx>; DN=[0-9][0-9][0-9]x; (status=DISC) X 10
• Changed Number DID DNs:
ndc=<npa>; ec=<nxx>; DN=xxxx; (status=CN) X 10000ndc=<npa>; ec=<nxx>; DN=[0-9]xxx; (status=CN) X 1000ndc=<npa>; ec=<nxx>; DN=[0-9][0-9]xx; (status=CN) X 100ndc=<npa>; ec=<nxx>; DN=[0-9][0-9][0-9]x; (status=CN) X 10
Administrative DNs • Administrative DNs:
ndc=<npa>; ec=<nxx>; status=LRN;ndc=<npa>; ec=<nxx>; status=CLRNndc=<npa>; ec=<nxx>; status=RACF-DN;ndc=<npa>; ec=<nxx>; status=ANNC;ndc=<npa>; ec=<nxx>; status=TEST-LINE;
ndc=<npa>; ec=<nxx>; (ADMIN-DN=Y AND (status=ASSIGNED))ndc=<npa>; ec=<nxx>; (ADMIN-DN=Y AND (status=PORTED-OUT))
• Administrative DID DNs:
ndc=<npa>; ec=<nxx>; DN=xxxx; (ADMIN-DN=Y AND (status=ASSIGNED)) X 10000ndc=<npa>; ec=<nxx>; DN=xxxx; (ADMIN-DN=Y AND (status=PORTED-OUT)) X 10000ndc=<npa>; ec=<nxx>; DN=[0-9]xxx (ADMIN-DN=Y AND (status=ASSIGNED)) X 1000ndc=<npa>; ec=<nxx>; DN=[0-9]xxx (ADMIN-DN=Y AND (status=PORTED-OUT)) X 1000ndc=<npa>; ec=<nxx>; DN=[0-9][0-9]xx; (ADMIN-DN=Y AND (status=ASSIGNED)) X 100ndc=<npa>; ec=<nxx>; DN=[0-9][0-9]xx; (ADMIN-DN=Y AND (status=PORTED-OUT)) X 100ndc=<npa>; ec=<nxx>; DN=[0-9][0-9][0-9]x; (ADMIN-DN=Y AND (status=ASSIGNED)) X 10ndc=<npa>; ec=<nxx>; DN=[0-9][0-9][0-9]x; (ADMIN-DN=Y AND (status=PORTED-OUT)) X 10
Table 3-6 NRUF Report Data for Rural Carriers (continued)
Data Groups Matching Data from the DN2SUBSCRIBER Table
3-13Cisco BTS 10200 Softswitch Operations and Maintenance Guide
OL-12797-10

Chapter 3 Monitoring and Backing Up the BTS Checking BTS System Health
Full Database Auditing
Step 1 Log in as CLI user on EMS Side A.
Step 2 Enter audit database type=full;.
Step 3 Check the audit report and verify that there is no mismatch or error. If errors are found, try to correct the errors. If you cannot make the correction, contact Cisco TAC.
Checking Shared Memory
This task checks shared memory to detect potential data problems.
From CA/FS Side A
Step 1 Log in as root.
Step 2 Enter:
<hostname># cd /opt/OptiCall/CAxxx/bin<hostname># ca_tiat data
Press Enter.
The result should match the following:
All tables are OK.For details, see ca_tiat.out
Caution If the result is not“All tables are OK”, stop and contact Cisco TAC. If the result is “All tables are OK”, go to Step 3.
Step 3 Enter:
<hostname># cd /opt/OptiCall/FSPTCzzz/bin <Return><hostname># potsctx_tiat data <Return>
Press Enter.
The result should match the following:
All tables are OK.For detail, see potsctx_tiat.out
Caution If the result is not“All tables are OK”, stop and contact Cisco TAC. If the result is “All tables are OK”, go to Step 4.
Step 4 Enter:
<hostname>#cd /opt/OptiCall/FSAINyyy/bin <hostname>#ain_tiat data
Step 5 Press Enter.
3-14Cisco BTS 10200 Softswitch Operations and Maintenance Guide
OL-12797-10
Chapter 3 Monitoring and Backing Up the BTS Checking BTS System Health
The result should match the following:
All tables are OK.For detail, see ain_tiat.out
Caution If the result is not“All tables are OK”, stop and contact Cisco TAC.
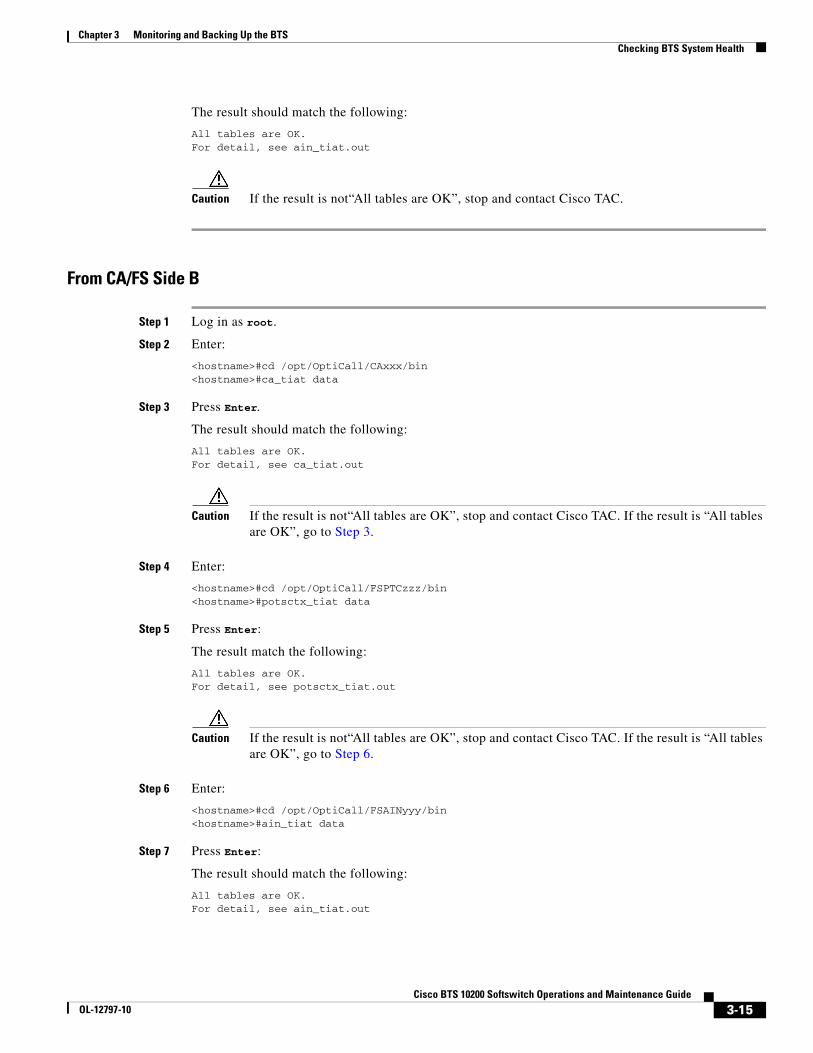
From CA/FS Side B
Step 1 Log in as root.
Step 2 Enter:
<hostname>#cd /opt/OptiCall/CAxxx/bin <hostname>#ca_tiat data
Step 3 Press Enter.
The result should match the following:
All tables are OK.For detail, see ca_tiat.out
Caution If the result is not“All tables are OK”, stop and contact Cisco TAC. If the result is “All tables are OK”, go to Step 3.
Step 4 Enter:
<hostname>#cd /opt/OptiCall/FSPTCzzz/bin<hostname>#potsctx_tiat data
Step 5 Press Enter:
The result match the following:
All tables are OK.For detail, see potsctx_tiat.out
Caution If the result is not“All tables are OK”, stop and contact Cisco TAC. If the result is “All tables are OK”, go to Step 6.
Step 6 Enter:
<hostname>#cd /opt/OptiCall/FSAINyyy/bin <hostname>#ain_tiat data
Step 7 Press Enter:
The result should match the following:
All tables are OK.For detail, see ain_tiat.out
3-15Cisco BTS 10200 Softswitch Operations and Maintenance Guide
OL-12797-10
Chapter 3 Monitoring and Backing Up the BTS Checking BTS System Health
Caution If the result is not“All tables are OK”, stop and contact Cisco TAC.
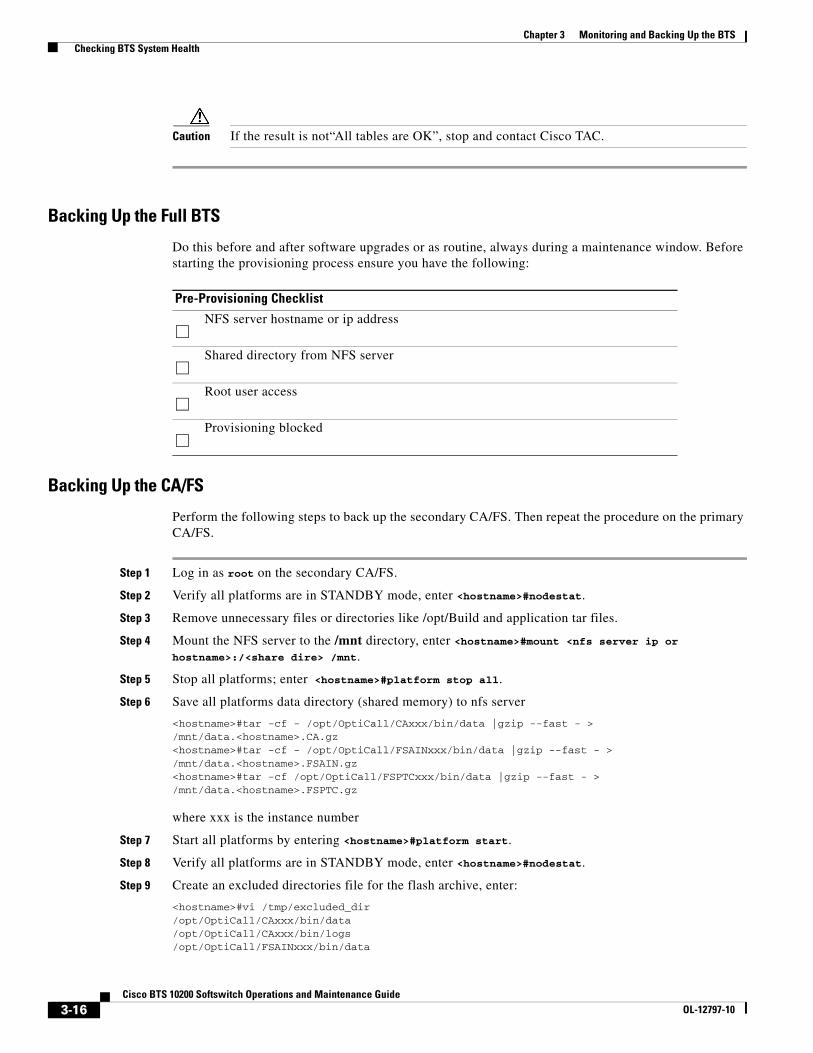
Backing Up the Full BTS
Do this before and after software upgrades or as routine, always during a maintenance window. Before starting the provisioning process ensure you have the following:
Backing Up the CA/FS
Perform the following steps to back up the secondary CA/FS. Then repeat the procedure on the primary CA/FS.
Step 1 Log in as root on the secondary CA/FS.
Step 2 Verify all platforms are in STANDBY mode, enter <hostname>#nodestat.
Step 3 Remove unnecessary files or directories like /opt/Build and application tar files.
Step 4 Mount the NFS server to the /mnt directory, enter <hostname>#mount <nfs server ip or hostname>:/<share dire> /mnt.
Step 5 Stop all platforms; enter <hostname>#platform stop all.
Step 6 Save all platforms data directory (shared memory) to nfs server
<hostname>#tar -cf - /opt/OptiCall/CAxxx/bin/data |gzip --fast - > /mnt/data.<hostname>.CA.gz<hostname>#tar -cf - /opt/OptiCall/FSAINxxx/bin/data |gzip --fast - > /mnt/data.<hostname>.FSAIN.gz<hostname>#tar -cf /opt/OptiCall/FSPTCxxx/bin/data |gzip --fast - > /mnt/data.<hostname>.FSPTC.gz
where xxx is the instance number
Step 7 Start all platforms by entering <hostname>#platform start.
Step 8 Verify all platforms are in STANDBY mode, enter <hostname>#nodestat.
Step 9 Create an excluded directories file for the flash archive, enter:
<hostname>#vi /tmp/excluded_dir/opt/OptiCall/CAxxx/bin/data/opt/OptiCall/CAxxx/bin/logs/opt/OptiCall/FSAINxxx/bin/data
Pre-Provisioning Checklist
NFS server hostname or ip address
Shared directory from NFS server
Root user access
Provisioning blocked
3-16Cisco BTS 10200 Softswitch Operations and Maintenance Guide
OL-12797-10

Chapter 3 Monitoring and Backing Up the BTS Checking BTS System Health
/opt/OptiCall/FSAINxxx/bin/logs/opt/OptiCall/FSPTCxxx/bin/data/opt/OptiCall/FSPTCxxxx/bin/logs
where xxx is the instance number
Step 10 Back up the system, enter:
<hostname>#mv /bin/date /bin/date.archive<hostname>#mv /bin/.date /bin/date<hostname>#flarcreate -n <hostname> -X /tmp/excluded_dir -c /mnt/<hostname>.archive<hostname>#mv /bin/date /bin/.date<hostname>#mv /bin/date.archive /bin/date
Step 11 Unmount the NFS server, enter:
<hostname>#umount /mnt
Step 12 From the active EMS switch over all platforms, enter:
<hostname>#ssh optiuser@<hostname>cli>control feature-server id=FSAINxxx;target-state=standby-active;cli>control feature-server id=FSPTCxxx;target-state=standby-active;cli>control call-agent id=CAxxx;target-state=standby-active;
where xxx is the instance number of each platform
Step 13 Repeat this procedure for the primary CA/FS.
Backing up the EMS/BDMS
Do the following to back up the STANDBY EMS/BDMS system.
Step 1 Log in as root.
Step 2 Verify all platforms are in STANDBY mode, enter <hostname>#nodestat.
Step 3 Remove unnecessary files or directories like /opt/Build and application tar files.
Step 4 Mount the NFS server to the /mnt directory, enter <hostname>#mount <nfs server ip or hostname>:/<share dire> /mnt.
Step 5 Stop all platforms, enter <hostname>#platform stop all.
Step 6 Save the Oracle database and MySQL directories, enter:
<hostname>#tar -cf - /data1/oradata |gzip --fast - >/mnt/oradata.<hostname>.gz<hostname>#tar -cf - /opt/ems/db |gzip --fast - >/mnt/db.<hostname>.gz
Step 7 Create an excluded directories file for the flash archive, enter:
<hostname>#vi /tmp/excluded_dir /data1/oradata
Step 8 Start all platforms <hostname>#platform start.
Step 9 Verify all platforms are in STANDBY mode, enter <hostname>#nodestat.
Step 10 Back up the system, enter:
<hostname>#mv /bin/date /bin/date.archive<hostname>#mv /bin/.date /bin/date<hostname>#flarcreate -n <hostname> -X /tmp/excluded_dir -c /mnt/<hostname>.archive
3-17Cisco BTS 10200 Softswitch Operations and Maintenance Guide
OL-12797-10

Chapter 3 Monitoring and Backing Up the BTS Checking BTS System Health
<hostname>#mv /bin/date /bin/.date<hostname>#mv /bin/date.archive /bin/date
Step 11 Unmount the NFS server, enter <hostname>#umount /mnt.
Step 12 From the active EMS switch over all platforms, enter:
<hostname>#ssh optiuser@<hostname>cli>control bdms id=BDMS01;target-state=standby-active;cli>control element-manager id=EM01;target-state=standby-active;
Step 13 Repeat the procedure starting with Step 3 to back up the PRIMARY EMS/BDMS.
Backing up the EMS DatabaseThis procedure is for experienced UNIX users. It tells you how to save the provisioning database from the EMS to a remote server. The remote server must be:
• Connected to a corporate LAN.
• Backed up daily by default, the daily hot backup is not turned on at installation
The back up processes:
• ora_hot_backup.ks—Backs up database data files, control files, and archive logs
• ora_arch_backup.ksh—Backs up archive logs
The target backup directory on both primary and secondary EMS systems is /opt/oraback. Backup files in /opt/oraback directory are later transferred to the /opt/backup directory in remote ftp site. After the files transfer to the remote ftp site they are purged from /opt/oraback.
Step 1 Cross check the databases on the primary and secondary EMSs before backing up.
Caution Cross check before ora_hot_backup.ksh and ora_arch_backup.ksh are scheduled. This validates database and archived log files for RMAN processes.
a. Log in as oracle, or su - oracle.
b. Enter dbadm -E backup_crosscheck..
c. Ensure the log file has no errors (except the “validation failed for archived log” messages). Ignore these messages of the /data1/arch/opticalx_yyy.arc files because the validation directs RMAN not to look for *.arc files. ora_purge_archlog.ksh purges *.arc files.
RMAN-06157: validation failed for archived logRMAN-08514: archivelog filename=/data1/arch/optical1_25.arc recid=1 stamp=461878656
Step 2 Remove the archive log purge process and schedule the backup processes.
Note Do this on the primary and secondary EMSs.
a. Disable the ora_purge_archlog.ksh process.
b. Enable the ora_hot_backup.ksh process.
c. Optional: Enable the ora_arch_backup.ksh process.
3-18Cisco BTS 10200 Softswitch Operations and Maintenance Guide
OL-12797-10

Chapter 3 Monitoring and Backing Up the BTS Checking BTS System Health
d. Log in as oracle, or su - oracle.
e. Enter crontab –e.
f. Modify the crontab file as follows. This is on the primary EMS site, database name optical1.
# Daily Oracle Hot backup - this also include archive log backup# Note: Set hot backup process to run at 2:00am every day.#0 2 * * * /opt/oracle/admin/scripts/ora_hot_backup.ksh optical1 > /opt/oracle/tmp/ora_hot_backup.log 2>&1## Oracle archive log backups, in addition to daily hot backup.# Note: Set one additional archive log backup to run at 6:00pm every day.#0 18 * * * /opt/oracle/admin/scripts/ora_arch_backup.ksh optical1 > /opt/oracle/tmp/ora_arch_backup.log 2>&1## Purge archive log files# Note: Delete or uncomment this line to stop purging archive log files.##0 1,3,…,23 * * * /opt/oracle/admin/scripts/ora_purge_archlog.ksh optical1 > /opt/oracle/tmp/ora_purge_archlog.log 2>&1
g. Repeat Step f by replacing optical1 with optical2 on the secondary EMS site.
Step 3 Configure the remote FTP site.
a. Verify the oracle user access and create backup directory on FTP server site.
Primary EMS hostname: priemsSecondary EMS hostname: secems FTP server hostname: ftpserver FTP server Oracle password: ora00 FTP server backup directory: /opt/backup
First, test the connection to the remote FTP server using the oracle user access. If the password of oracle is not ‘ora00’, update the ORA_PW variable in the /opt/oracle/admin/etc/dba.env file.
b. Do this on the primary and secondary EMSs:
telnet ftpserver
c. Log in as oracle and enter the password (in this case, ora00).
d. Create the /opt/backup directory. Ensure the oracle user has write permission to this directory.
mkdir /opt/backup
Note It is your responsibility to archive backup files from the ftp server /opt/backup directory to a tape device or enterprise tape library.
Step 4 Schedule the FTP process.
a. Do this on the primary and secondary EMSs:
Log in as oracle, or su – oracle and enter the following command: crontab –e
b. Add the following line to the Oracle crontab on the primary EMS.
## FTP backup files from primary (optical1) to /opt/backup directory of ftpserver. #
3-19Cisco BTS 10200 Softswitch Operations and Maintenance Guide
OL-12797-10

Chapter 3 Monitoring and Backing Up the BTS Archiving Your Database
0 6 * * * /opt/oracle/admin/scripts/ora_ftp_backup.ksh optical1 ftpserver /opt/backup > /opt/oracle/tmp/ora_ftp_backup.log 2>&1
c. Replace ftpserver with the correct host name of the remote FTP server. Replace /opt/backup with the correct target directory name, if they are different.
Note The 0 6 *** /opt/oracle/admin/scripts/ora_ftp_backup.ksh ……… ora_ftp_backup.log 2>&1 are all typed in the same line.
d. Edit the oracle crontab on secondary EMS site by replacing optical1 with optical2.
Step 5 Verify the backup files, enter:
cd /opt/oraback ⎜ EMS systemscd /opt/backup ⎜ Remote FTP system
Archiving Your Database
Step 1 Log in as root.
Step 2 Stop all platforms. If this is a primary node, use the CLI command to control the standby forced active.
Step 3 Verify that /var/yp exists. Enter ls -l /var/yp.
If the result is no such file or directory, enter mkdir -p /var/yp
Step 4 Mount the NFS server. Enter mount <nfsserver hostname/ip>:/<share directory> /mnt. Example:
mount 10.89.183.253:/opt/archive /mnt
Step 5 Back up all interfaces. Enter tar -cvf /mnt/<local_hostname>.tar host*. Example:
<hostname>#tar -cvf bts-prica.tar host.*
Step 6 Restore the Solaris “date” command to create the system Flash Archive. Enter:
mv /bin/date /bin/date.origmv /bin/.date /bin/date
Step 7 Create the archive. Enter <hostname>#flarcreate -n <archive name> -x /opt -S -c /mnt/<file name>
Note Example archive name: flarcreate -n CCPU-EMS -x /opt -S -c /mnt/secems04.archive
Step 8 Back up the /opt directory. Enter tar -cvf - /opt/* |gzip -c >/opt/<hostname_release>.tar.gz
Step 9 Restore the original configuration. Enter:
mv /bin/date /bin/.datemv /bin/date.orig /bin/date
Step 10 Unmount the NFS server. Enter umount /mnt
3-20Cisco BTS 10200 Softswitch Operations and Maintenance Guide
OL-12797-10

Chapter 3 Monitoring and Backing Up the BTS Archiving Your Database
Examining Heap UsageHeap is memory BTS reserves for data it creates as its applications execute. BTS audits heap usage of all the processes started by a platform, CA, AIN, POTS, EMS and BDMS. Heap auditing is added to the ADP process.
When heap usage of a process goes beyond certain threshold level, BTS generates an alarm. The alarm clears when heap usage goes below the threshold level.
Heap audit does the following:
• Monitors traces of heap usage in the last four periods for each process
• Measures heap usage of each process started by the platform once a day at 4 a.m
• Issues a minor alarm if the heap usage of a process exceeds 70% of its max heap size limit
• Clears a minor alarm if the heap usage of a process drops below 68% of its max heap size limit
• Issues a major alarm if the heap usage of a process exceeds 80% its max heap size limit
• Clears a major alarm if the heap usage of a process drops below 78% its max heap size limit
• Issues a critical alarm if the heap usage of a process exceeds 90% its max heap size limit
• Clears a critical alarm if the heap usage of a process drops below 88% its max heap size limit
• Reports, via trace logs, the last twenty heap measurements, including the time and the value for each process
• Clears heap usage alarms when process restarts
Checking the DNS ServerTo check the DNS server, do this for all nodes.
Step 1 Log in as root on the active CA.
Step 2 Enter more /etc/resolv.conf.
Note nameserver <ip address>
Step 3 Enter nslookup
This defaults to the first DNS server.
Step 4 Enter a valid gateway name and press Enter.
An IP address associated to gateway appears.
Step 5 Enter server <second dns server ip>
Step 6 Enter a valid gateway name and press Enter.
An IP address associated to gateway appears.
Step 7 Enter exit to quit.
3-21Cisco BTS 10200 Softswitch Operations and Maintenance Guide
OL-12797-10

Chapter 3 Monitoring and Backing Up the BTS Log Archive Facility (LAF)
Log Archive Facility (LAF)The LAF process in Cisco BTS 10200 transports the trace log files to a remote archive server for storage. LAF is a continuously running daemon process on all nodes (components) of the BTS 10200. It wakes up every minute when active and checks if there are any new log files.
The service provider can specify the external archive system, the target directory, host directory, and the disk quota for each trace log directory in the system. If any new log files are in these trace log directories, LAF transfers them by Secure FTP (SFTP) to an external archive server specified by the service provider.
Secure Transfer of FilesBTS 10200 uses Secure FTP to transfer trace log files to the external server. LAF opens an SFTP connection when its ready to transfer log file to the remote server. This connection is not closed even after the transfer is complete. If for some reason the connection closes, the LAF process re-establishes the connection during the next transfer. The connection is persistent till the LAF feature is disabled.
LAF operates on a single SFTP connection and transfer of files occurs one file at a time (using the SFTP put operation). The same connection is used to transfer multiple files. When the LAF process detects a bad connection, it terminates the SFTP session by closing the socket used to talk to the archive server.
The LAF process maintains a linked list for the files that need to be transferred. If the connection is lost during a transfer, the LAF process moves the unsuccessfully transferred file to the end of the list and raises Maintenance Alarm 108.
A re-attempt on a failed file depends on the number of files in the list and the time taken to transfer those files. When there is no file to be transferred (i.e. the list is empty), then there is a gap of 30 seconds before processing the list again.
The LAF process increments a counter, which is specifically used for the number of times the transfer was attempted for this file. If a counter is more than three, the log file is deleted from the list. That is, upon three failed attempts on the same file, the file entry is deleted from the list.
Other CapabilitiesThis section lists the additional capabilities of the LAF process.
• It performs disk space management when 90% of the disk space quota specified for the target directory is reached.
• It gracefully recovers from any abnormal conditions and re-initiates the process to continue the transfer of files.
• It generates alarms when any unsuccessful scenarios are encountered. These alarms are listed in the Cisco BTS 10200 Troubleshooting Guide.
Provisioning LAF
Caution The values provided by the user for the following parameters will be written into /etc/opticall.cfg file and transported to all the four BTS 10200 nodes.
3-22Cisco BTS 10200 Softswitch Operations and Maintenance Guide
OL-12797-10

Chapter 3 Monitoring and Backing Up the BTS Log Archive Facility (LAF)
The following parameters are associated with the LAF process. If they are left blank, the LAF process for a particular platform (such as, CA, FSPTC, FSAIN) is turned off.
To use this feature, you must provision the following parameters with the external archive system, the target directory, and the disk quota (in GB) for each platform.
CAxxx_LAF_PARAMETER
FSPTCxxx_LAF_PARAMETER
FSAINxxx_LAF_PARAMETER
Note that xxx must be replaced with each platform’s instance number.
Example 1
CA146_LAF_PARAMETER="yensid /CA146_trace_log 20"
Example 2
FSPTC235_LAF_PARAMETER="yensid /FSPTC235_trace_log 20"
Example 3
FSAIN205_LAF_PARAMETER="yensid /FSAIN205_trace_log 20"
To enable Log Archive Facility (LAF) process, refer to Enabling LAF Process section.
Enabling LAF Process To enable the Log Archive Facility (LAF) feature, you must set up the authorization for non-interactive SSH login to the external archive server for the Cisco BTS 10200 system to access and turn the LAF processes to active state. (Immediately after the fresh installation and platform start, the LAF process is in a dormant state).
The steps to set up the authorization in external archive server and turn the LAF processes to active is listed below:
Setup Non-Interactive SSH Login to External Archive Server
Note The external archive system is recommended to be located such that it can be accessed by the management network. In such a case, the static routes in the CA system should be explicitly set so that the traffic to the external archive system is routed through the management network (see “Adding Static Routes” section for more details). Otherwise, the traffic is routed through the default network (i.e. signaling network) and may not be able to reach the external archive system.
Step 1 Log in to the Cisco BTS 10200 primary EMS as root.
Step 2 From the EMS, login to the external archive server via ssh to get the external archive server added to the /.ssh/known_hosts file.
Step 3 Log off from the external archive server.
3-23Cisco BTS 10200 Softswitch Operations and Maintenance Guide
OL-12797-10

Chapter 3 Monitoring and Backing Up the BTS Log Archive Facility (LAF)
Step 4 While still logged in on the primary EMS as root, generate an SSH key.
a. Execute cd /opt/BTSossh/bin.
b. Execute ssh-keygen -t rsa.
c. Press Enter to accept the default file name for the key (/.ssh/id_rsa).
d. Enter y if prompted to choose whether to overwrite the existing file.
e. Press Enter when prompted to enter a passphrase (i.e. no passphrase).
f. Transfer the resulting file (/.ssh/id_rsa.pub) to a temporary location on the external archive server.
Step 5 Set up the external archive server with the key generated in Step 4.
a. Login to the external archive system as root.
b. If a /.ssh/authorized_keys file does not exist on the external archive system, rename the id_rsa.pub file (copied from the Cisco BTS 10200 EMS) to /.ssh/authorized_keys. If the file does exist, append the id_rsa.pub file to it.
Step 6 On the primary EMS, execute
ssh root@abcd
where abcd is the IP address or fully-qualified domain name of the external archive server.
Step 7 Verify that login to the external archive server is successful and that no prompts for username or password are issued.
Step 8 Run enableLAF in EMS platform directories (i.e. /opt/ems/bin and /opt/bdms/bin)
Step 9 Repeat Steps 1-8 for the secondary EMS, primary CA and secondary CA. (In CA, the platform directories are /opt/OptiCall/CAxxx/bin, /opt/OptiCall/FSPTCyyy/bin, /opt/OptiCall/FSAINzzz/bin).
Note Billing has a similar mechanism/steps to SFTP their Call Detail Blocks (CDB) files to an external machine. If the LAF and Billing use the same target machine, then in both EMS, perform Steps 1-7 only once. You must still run Step 8 to enable LAF. And you must still run Steps 1 -9 in CA nodes.
Adding Static Routes
To add static routes to all Cisco BTS 10200 systems, perform the following steps:
Step 1 From the shell or window of the primary call agent, change directory to /opt/utils.
cd /opt/utils
Step 2 Edit S96StaticRoutes using an editor.
Step 3 Add the subnet of NTP server, DNS server, external archive server and any other machine to the file, which user wants to have access to Cisco BTS 10200 system in the following format:
route add -net <destination network> <network gateway>
3-24Cisco BTS 10200 Softswitch Operations and Maintenance Guide
OL-12797-10
Chapter 3 Monitoring and Backing Up the BTS Exporting Bulk Data to ASCII Data Files
Note All NTP, DNS traffic, traffic to external archive server, and traffic from other machine to Cisco BTS 10200 system (eg. login), should all go through management networks. (i.e. network gateway in management network). This is particularly important in CA system because CA has both management and signaling network. If user does not specify explicitly in this file, those traffic will be directed to signaling network, because signaling network is the default one in CA/FS.
Step 4 Make sure there is a soft link pointing from /etc/rc3.d/S96StaticRoutes to /opt/utils/S96StaticRoutes.
ls -l /etc/rc3.d/S96StaticRoutes
Step 5 After editing, close the file, and run S96StaticRoutes.
/etc/rc3.d/S96StaticRoutes
Step 6 Repeat Step 1 to Step 5 on the secondary CA.
Step 7 Verify the connectivity by pinging the DNS server, NTP server, external archive server, or any machine that user just added in that file.
LAF Alarm InformationRefer to the following link to see the LAF alarm information.
Exporting Bulk Data to ASCII Data FilesThe BTS 10200 introduces a new database tool to export the BTS 10200 EMS provisioning data from the Oracle database to raw ASCII data files. It provides a transport for the customer to migrate the BTS 10200 data to other reporting systems. It also serves as a supplemental backup mechanism.
This new data export tool reduces the total data export time from several hours to minutes. It also provides customers with better granularity and flexibility to specify the export contents.
LimitationsThe user must logon to the BTS 10200 EMS system as one of the following users to execute the tool:
• The btsoper user
• Any user that belongs to the btsoper group
• The Oracle user
The operating system btsoper group and btsoper user is created at the BTS 10200 installation.
A few dbexp operations are allowed only to be executed by the privileged Oracle user. For example, the create directory option is only permitted when the user is logged on as Oracle.
Document Name Link to the Document
Cisco BTS 10200 Troubleshooting Guide http://www.cisco.com/en/US/docs/voice_ip_comm/bts/6.0/troubleshooting/guide/07tg01.html#wp1938289
3-25Cisco BTS 10200 Softswitch Operations and Maintenance Guide
OL-12797-10

Chapter 3 Monitoring and Backing Up the BTS Exporting Bulk Data to ASCII Data Files
Data Export ObjectData export unit is based on tables. An entire table or subset of a table (by specified columns) can be dumped or exported to a single file. The user has an option to dump all of the BTS 10200 provisioning tables. The user can also export selected tables. The selected tables are listed in a source file with this format:
# This is a comment line.BTSOPER.TABLE_NAMEBTSOPER.TABLE_NAME:column1,column2,column3
A subset of data exported from joining multiple tables is not supported.
Export OutputThe exported data is in ASCII CSV format with a common delimiter. The default delimiter is the comma “,” character. It is recommended that the default delimiter be used since other characters like “:” may be part of the provisioning data.
The output file name is defaulted to <TABLE_NAME>.dat, unless another name is specified. The user has an option to quote the data by each column (field) with double quote character. By default the output data is not quoted.
All of the export output files are created with Oracle as the owner.
Export DirectoryBy default, all data files are written to the /opt/oraback/exp directory. The user can specify another directory that is accessible by the operating system Oracle user.
The export directory can only be created by the Oracle user. Once created, all users in btsoper group are able to export data to this directory.
Operating System btsoper Group and btsoper UserAt the BTS 10200 installation, the operating system btsoper group and btsoper user are created. The user can logon to the EMS system as the btsoper user to execute the dbexp command.
The system administrator can also create other users in the btsoper group to use the dbexp tool.
Database btsoper UserA new database user, btsoper, is created with read-only access to all of the BTS 10200 provisioning tables owned by the OPTICALL schema.
dbexpThe dbexp command line interface provides various options for user to export data. This tool is only executable by the Oracle user and all users in the btsoper group.
3-26Cisco BTS 10200 Softswitch Operations and Maintenance Guide
OL-12797-10

Chapter 3 Monitoring and Backing Up the BTS Exporting Bulk Data to ASCII Data Files
SQLPlus InterfaceIn addition to the BTS 10200 export interfaces, the dbexp tool also uses the Oracle SQLPlus interface as an alternative data export option. The SQLPlus interface provides much better performance.
When the dbexp command is executed with the -Q option (the quick mode), the SQLPlus interface is used. If -Q option is not specified, the BTS 10200 export package is used.
Only the Oracle user is allowed to execute the dbexp command in quick mode.
The dbexp Command Line InterfaceTo execute the dbexp command, the user must login to the BTS 10200 EMS system as the Oracle user or as an user in the btsoper group.
The information included in this section is also available by the dbexp -h command.
Synopsis:
dbexp [-t <table>] [-c <column1,column2,...>]dbexp [-d <target_OS_dir>] …. oracle user onlydbexp [-r <target_OS_dir>] …. btsoper userdbexp [-T <target_file_name>]dbexp [-F <delimiter>]dbexp [-f <source_file>]dbexp [-Q ] [ -l <output_line_size>] …. oracle user onlydbexp [-G <target_source_file>]dbexp [-x ]dbexp [-h ]
-a
Export all tables accessible by the btsoper user, with all columns of each table. The -f, -t and -c options are ignored.
-t <table>
Table name. Default table owner is btsoper. If -T is not specified, the output file is named TABLE_NAME.dat.
-c <column1,column2,column3,...>
List of columns to be exported. This list includes one or multiple column names, separated by a comma. Tab, space or other special characters are not allowed in the column list string.
Example:
-t subscriber -c id,name,address,status-D <OPT_ORABACK_EXP>
Target Oracle directory to store the exported data files. Default Oracle directory is 'OPT_ORABACK_EXP', which is created for operating system directory /opt/oraback/exp. This option is not applicable for -Q option.
-d <OPT_ORABACK_EXP>
Target operating system directory to store the exported data. Default directory is '/opt/oraback/exp'.
If the specified OS directory does not exist, it will create one. It will also create an Oracle directory definition, if not already exists.
3-27Cisco BTS 10200 Softswitch Operations and Maintenance Guide
OL-12797-10

Chapter 3 Monitoring and Backing Up the BTS Exporting Bulk Data to ASCII Data Files
For example, Oracle directory 'OPT_ORABACK_EXP' is created for O/S directory '/opt/oraback/exp'. Use -d or -D, but not both at the same command.
Only the Oracle user is allowed to execute this option. See -r option for btsoper user.
-F <delimiter>
The column delimiter. Default delimiter is comma ','character.
-f <source_file>
Source file name that includes tables to be exported. Format of the file should be like:
# This is a comment line. Table format: # OWNER.TABLE_NAME # OWNER.TABLE_NAME:colume1,column2,column3 # **** Note: database schema owner must be BTSOPER BTSOPER.MGW BTSOPER.SUBSCRIBER:ID,NAME,TERM_ID,MGW_ID,TGN_ID,STATUS
If -f option is specified, -t and -T option is ignored.
Use -G option to generate a source file with all tables accessible by btsoper.
-G <target_source_file>
To generate a source file with all tables accessible by btsoper. Then this source file can be used for the -f option. When -G is given, all other options are ignored.
-l <output_line_size>
Specify an integer greater than 80 and less than 32767 as the output line size of each record. Default line size is 1000. Use with -Q option only.
Setting a lower line size will get better performance, yet too small of line size may not accommodate the entire row of the table.
-Q
Used to export data in quick mode. This option runs faster if the output line size (by -l option) is set properly. Setting to a lower line size will get better performance. If the line size is set too high the process may run slower.
Only the oracle user is allowed to execute the -Q option. The Oracle user would choose to run in quick mode if a quick non-routine export of the data is needed.
-r <target_OS_dir>
Target repository directory for the exported data. Default directory is '/opt/oraback/exp'. The btsoper user is allowed with -r option but not with -d option.
-T <target_file_name>
Target file name to store the exported data. It should NOT be prefixed with any directory path.
If -T is not specified, the data file name is defaulted to <TABLE_NAME>.dat.
If -f option is specified, -T option is ignored.
-x Export data with double quotes on each field.
-h Display help information.
3-28Cisco BTS 10200 Softswitch Operations and Maintenance Guide
OL-12797-10

Chapter 3 Monitoring and Backing Up the BTS Exporting Bulk Data to ASCII Data Files
Operating ExamplesTo export all of the BTS 10200 provisioning tables in the quick mode; login as the Oracle user:
dbexp -a -Q
Create a new directory and export the timezone table; login as ‘oracle’ user:
dbexp -d /opt/oraback/exp2 -t timezone
Export the SUBSCRIBER table to default directory (/opt/oraback/exp):
dbexp -t subscriber
Export all of the BTS 10200 provisioning tables to /opt/oraback/exp2020
dbexp -a -r /opt/oraback/exp2
Export SUBSCRIBER table with the specified columns to the default directory:
dbexp -t subscriber -c id,name,mgw_id,tgn_id,term_id,status
Export SUBSCRIBER table in “quick” mode, with line size of 500: (as oracle user)
dbexp -t subscriber -Q -l 500
Generate a source file, /tmp/dbexp_tables.txt, with names of all of BTS 10200 tables:
dbexp -G /tmp/dbexp_tables.txt
Export tables listed in /opt/oraback/dbexp_tables.txt file, with delimiter "|":
dbexp -f /opt/oraback/dbexp_tables.txt -F "|"
Export tables listed in /opt/oraback/exp/dbexp_tables.txt to /opt/oraback/exp2:
dbexp -r /opt/oraback/exp2 -f /opt/oraback/exp/dbexp_tables.txt
Scheduling Data ExportCisco recommends that the routine data export processing be scheduled in the EMS system ‘oracle’ user crontab file. Since the regular BTS 10200 Oracle database hot backup is already scheduled in the ‘oracle’ crontab, it is suggested that the data export processing schedule is not overlapping with the daily hot backup schedule(s).
In the following example, the data export process is scheduled at 20:00 PM every day to dump tables listed in the /opt/oraback/exp/src_8pm.txt file. The output directory is defaulted to /opt/oraback/exp.
The ‘dbexp -G /opt/oraback/exp/src_8pm.txt’ command can be used to create the base source file.
# File name: /opt/oraback/exp/dbexp_src_20pm.txt#BTSOPER.DN2SUBSCRIBERBTSOPER.MGWBTSOPER.SUBSCRIBER....
# su - oracle
$ crontab -e
3-29Cisco BTS 10200 Softswitch Operations and Maintenance Guide
OL-12797-10

Chapter 3 Monitoring and Backing Up the BTS Switchover Data Mismatch Deferror Prevention
## Add the following line to crontab file. The entire command should be on the same line.
0 20 * * * /opt/oracle/admin/bin/dbexp -f /opt/oraback/exp/src_8pm.txt > /opt/oraback/exp/dbexp.log 2>&1
Note The old data will be over written with the new data from the latest cron job.
Switchover Data Mismatch Deferror PreventionThis section describes how to prevent Oracle data mismatch errors upon switchover. Previously, at Element Management System (EMS) switchover, the standby EMS platform was transitioned to active without waiting for the Oracle replication queue to completely drain from the active EMS. To alleviate this, Session Manager (SMG) now queries the previously active EMS database for the number of replication transactions to drain from the replication queue. If there are no transactions, the switchover occurs immediately, otherwise, the SMG waits and re-queries up to a maximum time of 120 seconds. If the replication queue has not drained after the maximum wait time, the SMG brings up the processes on the newly active side regardless of the replication queue state. Two new commands, Query Oracle Replication Queue on the Active EMS and Control Element Manager to Switchover have also been added.
Caution If any command response states that the Oracle Replication Queue is broken (or BROKEN=Y), contact Cisco Technical Assistance Center (TAC).
Query Oracle Replication Queue on the Active EMS Two new commands permit querying either the status of a job or the number of unpushed calls left in the replication queue.
Job Status Query
This command queries the job status of the Oracle Replication Queue. A user must be logged in to Oracle to execute this command. This example shows that the replication PUSH job is broken. The Oracle Replication Queue is not draining. If the Oracle Replication Queue is broken, it will never drain.
Examples priems# su - oracle
Sample response:
$ dbadm -r push_job_status
JOB=2 BROKEN=Y FAILURES=0
3-30Cisco BTS 10200 Softswitch Operations and Maintenance Guide
OL-12797-10

Chapter 3 Monitoring and Backing Up the BTS Switchover Data Mismatch Deferror Prevention
Query Number of Unpushed Calls
This command queries Oracle for the number of unpushed calls left in the Replication Queue and the estimated time for the Queue to drain. The following example shows that there are 18262 calls in the Replication Queue that may take up to 514 seconds to drain.
Examples $ dbadm -r unpushed_defcall_cnt
Sample response:
UNPUSHED_CALLS=18262 ESTIMATED_PUSH_TIME_SECOND=514
Control Element Manager to Switchover When the command line interface (CLI) Control Element Manager to Switchover command is executed, the system now checks the replication queue for unpushed calls. If the number of unpushed calls is greater than a preset threshold, the control command fails. Try the control command repeatedly until the number of transactions is below the threshold. If switchover is still desired, regardless of the unpushed calls in the queue, the option FORCED=Y is permitted as a bypass. Switchover occurs immediately if the forced flag is used.
Control Element Manager without Forced=Y
This command checks the status of the Oracle Replication Queue before executing a switchover. The following example shows that the control command failed because the Oracle replication queue was not empty.
Examples CLI> control element-manager id=EM01; target-state=standby-active;
Sample response:
Reply: Failure: at 2007-07-19 15:50:42 by optiuser The replication queue contains 128262 transactions, and it is expected to take 513 seconds for the queue to drain.
The oracle push job is broken. Please contact Cisco TAC Support.
Control Element Manager with Forced=Y
The following example forces the system to switch over immediately. If the replication queue is not empty, the newly active EMS waits for replication transactions to drain (up to the maximum wait time of 120 seconds) before enabling the Queuing and Audit Manager (QAM), CLI, FTP, and Common Object Request Broker Architecture (CORBA) processes/sessions to accept connections.
Caution The forced=y option is not recommended. This option can potentially result in data mismatch and deferrors when the replication queue is not empty.
3-31Cisco BTS 10200 Softswitch Operations and Maintenance Guide
OL-12797-10

Chapter 3 Monitoring and Backing Up the BTS Switchover Data Mismatch Deferror Prevention
Examples CLI> control element-manager id=EM01; target-state=standby-active; forced=y
Monitoring Switchover with Non-empty Replication QueueThese commands monitor the standby (soon to be active) EMS status upon automatic switchover by the system or by forced switchover using the control element-manger... forced=y command. The system checks the replication queue for unpushed calls and waits up to 120 seconds before switching over.
Commands
Execute one of the following commands to monitor the status of the standby EMS. A user must be logged in as root to execute these commands:
# cat /tmp/SMG.status... # nodestat ...
Or, login into the CLI as a btsadmin user:
# su - btsadmin
btsadmin> status application ... .....
Examples Example:
secemsXX# cat /tmp/SMG.status
Sample response:
SESSION_BLOCKED WAIT_REPQUEUE_WITH_SIZE 128262
Example:
secemXX# nodestat
Sample response:
------------------------------------------------------------- | ORACLE DB | ORACLE REPLICATION | OMSHUB | ------------------------------------------------------------- | REPLICATING | IN SERVICE | IN SERVICE | ------------------------------------------------------------- |Switchover in progress... | |Waiting for Oracle replication queue to finish | |transactions... | |The size of unfinished replicating transaction is 19608 | |The estimated time left to finish all replication | |transactions is 78.432 second(s) | | | | EM01-B : ACTIVE | | Replication Status: REPLICATING | | Last state change: 2007/07/26-16:42:56 | | System is up since: 2007/07/24-15:21:16 | | This side up since: 2007/07/26-11:35:03 |
3-32Cisco BTS 10200 Softswitch Operations and Maintenance Guide
OL-12797-10
Chapter 3 Monitoring and Backing Up the BTS Switchover Data Mismatch Deferror Prevention
CLI Blocked
During the 120 second wait time, CLI users are blocked. A BLOCKED response is returned when a CLI user executes a status command.
Examples CLI> status application id=EM01; node=priems107
Sample response:
SUB_STATUS=SESSION_BLOCKED WAIT_REPQUEUE_WITH_SIZE 19608
While the SMG waits for the replication queue to drain, and before the maximum wait time has expired, an operator can force the SMG to switch over by executing the control application command:
CLI> control application id=SMG; node=priems107; action=resume
Blocked Prompt
During the 120 second wait time, all non-btsadmin CLI users are blocked and the CLI> prompt changes to BLK_PROV_CLI>. Only the show, status, and report commands are permitted.
Examples # su – btsuser
BLK_PROV_CLI> show session
BLK_PROV_CLI> show subscriber id=xxxxx;
After the replication queue is drained, or when the maximum wait time has expired, the system returns the following message before the normal CLI prompt is given:
You are no longer blocked from executing commandsCLI>
Shutdown Platform with Non-empty Replication QueueThe command platform stop all is valid when the replication queue is not empty. The platform stop all command shuts down the EM01 and BDMS01 immediately, but waits up to 120 seconds before shutting down the Oracle database.
Examples # platform stop all
Sample response:
==========================================================
=== Terminating application pmg.EM01 ===
==========================================================
=== Terminating application pmg.BDMS01 ===
3-33Cisco BTS 10200 Softswitch Operations and Maintenance Guide
OL-12797-10

Chapter 3 Monitoring and Backing Up the BTS Switchover Data Mismatch Deferror Prevention
==========================================================
=== Terminating oracle database servers ===
==========================================================
Oracle replication queue has 128851 statements waiting to be pushed.
Waiting....... maximum wait time = 120 seconds....
Oracle replication queue has 128851 statements waiting to be pushed.
Waiting....... maximum wait time = 110 seconds....
Oracle replication queue has 128851 statements waiting to be pushed.
Waiting....... maximum wait time = 100 seconds....
...
Oracle replication queue has 128851 statements waiting to be pushed
Waiting....... maximum wait time = 10 seconds....
Maximum wait time is reached.
Oracle replication queue still has 128851 statements not being pushed.
WARNING: This may potentially cause data mismatch and/or deferror.
Waiting...
oracle database servers TERMINATED successfully...
Pressing the control key with C (Ctrl+C) while the platform stop all command waits for the replication queue immediately shuts down Oracle. Execute the platform start -i oracle command to bring up Oracle to resume draining a non-empty replication queue. Then execute the platform stop -i oracle command to shutdown Oracle after the replication queue has completely drained.
Change Replication Queue Maximum Transactions NumberThe maximum number of replication transactions for which the control command fails without using forced=y can be changed. Modify this line in the ems.props property file located at /opt/ems/etc/ems.props on the system:
rep.maxQueueDepth=1000
A value between 200 and 1000 is recommended to allow the queue to drain in under five seconds without excessive failures based on a typical Oracle load.
3-34Cisco BTS 10200 Softswitch Operations and Maintenance Guide
OL-12797-10