mongodb tutorial for beginners - techbooks360.com for beginners.pdf · mongodb tutorial for...
TRANSCRIPT

MongoDB Tutorial for Beginners Mongodb is a document-oriented NoSQL database used for high volume data storage. In this tutorial you will learn how Mongodb can be accessed and some of its important features like indexing, regular expression, sharding data, etc.
MongoDB is a database which came into light around the mid-2000s. It falls under the category of a NoSQL database.
Here is what we cover in the Course
1. What is MongoDB?
2. Download and Install MongoDB on Windows - Complete Guide
3. MongoDB Create & Insert Database
4. Add MongoDB Array using insert()
5. Mongodb ObjectId()
6. MongoDB Query Document using find()
7. MongoDB cursor
8. MongoDB Query Modifications using limit(), sort()
9. MongoDB Count() & remove() function
10. MongoDB Update() Document
11. MongoDB Indexing, Monitoring & Backup
12. How to Create User in Mongodb & assign Roles
13. Mongodb authentication with Kerberos
14. MongoDB Replica Set Tutorial
15. MongoDB Sharded Cluster - Step by Step Implementation
16. MongoDB Indexing Tutorial - createIndex()
17. MongoDB Regular Expression (Regex) Tutorial

18. MongoDB Interview Questions & Answers
What is MongoDB
1. MongoDB is a document database. Each database contains collections which in turn contains documents. Each document can be different with varying number of fields. The size and content of each document can be different from each other.
2. The document structure is more in line with how developers construct their classes and objects in their respective programming languages. Developers will often say that their classes are not rows and columns but have a clear structure with key-value pairs.
3. As seen in the introduction with NoSQL databases, the rows (or documents as called in MongoDB) doesn't need to have a schema defined beforehand. Instead, the fields can be created on the fly.
4. The data model available within MongoDB allows you to represent hierarchical relationships, to store arrays, and other more complex structures more easily.
5. Scalability – The MongoDB environments are very scalable. Companies across the world have defined clusters with some of them running 100+ nodes with around millions of documents within the database
The below example shows how a document can be modeled in MongoDB.
1. The _id field is added by MongoDB to uniquely identify the document in the collection. 2. What you can note is that the Order Data ( OrderID , Product and Quantity ) which in RDBMS will
normally be stored in a separate table, while in MongoDB it is actually stored as an embedded document in the collection itself. This is one of the key differences of how data is modelled in MongoDB.

What Is Meant By NoSQL
NoSQL is not a relational database. It provides more flexibility since all records are not restricted by the same column names and types defined across the entire table. The below example will give a better idea of what is NoSQL.
Following 2 tables are simple example of a Customer table and an Order table wherein the Customer's table is linked to the Order's table via a relationship.
Customer Table
CustomerID CustomerName OrderID 11 Guru99 111 22 Trevor Smith 222 33 Nicole 333
Order Table
OrderID Product Quantity 111 ProductA 5 222 ProductB 8 333 ProductC 10
In NoSQL, the tables can probably look like the ones as shown below
Customer Table
CustomerID
11
CustomerName
Guru99
OrderID
111
City
US CustomerID
22
CustomerName
Trevor Smith
OrderID
222
Status
Privilege CustomerID
33
CustomerName
Nicole
OrderID
333
Order Table
OrderID
111
Product
ProductA
Quantity
5
Shipment Date
22-Mar-15

OrderID
222
Product
ProductB
Quantity
8
OrderID
333
Product
ProductC
Quantity
10
1. The first thing you will notice straightaway is that you don't have columns with special column names defined, but instead each field has a key-value pair.
2. You will notice that in the customer's table that the first 3 keys are the same for all 3 rows, but the fourth key (City and Status) is different for the first 2 rows and not applicable for the third row.
3. Likewise, in the Orders tables, the 2nd and 3rd row have no values defined for the 4 column (shipment date).
This is what makes NoSQL so special and unique and also very flexible. In our dynamic and ever changing technology world, business owners now demand for a faster turnaround time to software solutions.
By using flexible databases such as NoSQL databases, we can inculcate a faster turnaround time, because we have more flexibility and less constraints in the way data can be defined.
Just imagine the amount of time spent in adding or editing columns to existing tables in a relational database compared to the amount of effort required in adding the same in a NoSQL database.
Common Terms in MongoDB
Below are the a few of the common terms used in MongoDB
1. _id – This is a field required in every MongoDB document. The _id field represents a unique value in the MongoDB document. The _id field is like the document's primary key. If you create a new document without an _id field, MongoDB will automatically create the field. So for example, if we see the example of the above customer table, Mongo DB will add a 24 digit unique identifier to each document in the collection.
_Id CustomerID CustomerName OrderID 563479cc8a8a4246bd27d784 11 Guru99 111 563479cc7a8a4246bd47d784 22 Trevor Smith 222 563479cc9a8a4246bd57d784 33 Nicole 333
2. Collection – This is a grouping of MongoDB documents. A collection is the equivalent of a table which is created in any other RDMS such as Oracle or MS SQL. A collection exists within a single database. As seen from the introduction collections don't enforce any sort of structure.

3. Cursor – This is a pointer to the result set of a query. Clients can iterate through a cursor to retrieve results.
4. Database – This is a container for collections like in RDMS wherein it is a container for tables. Each database gets its own set of files on the file system. A MongoDB server can store multiple databases.
5. Document - A record in a MongoDB collection is basically called a document. The document in turn will consist of field name and values.
6. Field - A name-value pair in a document. A document has zero or more fields. Fields are analogous to columns in relational databases.
The following diagram shows an example of Fields with Key value pairs. So in the example below CustomerID and 11 is one of the key value pair's defined in the document.
7. JSON – This is known as JavaScript Object Notation. This is a human-readable, plain text format for expressing structured data. JSON is currently supported in many programming languages.
Just a quick note on the key difference between the _id field and a normal collection field. The _id field is used to uniquely identify the documents in a collection and is automatically added by MongoDB when the collection is created.
Why to Use MongoDB
Below are the few of the reasons as to why one should start using MongoDB
1. Document-oriented – Since MongoDB is a NoSQL type database, instead of having data in a relational type format, it stores the data in documents. This makes MongoDB very flexible and adaptable to real business world situation and requirements.

2. Ad hoc queries - MongoDB supports searching by field, range queries, and regular expression searches. Queries can be made to return specific fields within documents.
3. Indexing - Indexes can be created to improve the performance of searches within MongoDB. Any field in a MongoDB document can be indexed.
4. Replication - MongoDB can provide high availability with replica sets. A replica set consists of two or more mongo DB instances. Each replica set member may act in the role of the primary or secondary replica at any time. The primary replica is the main server which interacts with the client and performs all the read/write operations. The Secondary replicas maintain a copy of the data of the primary using built-in replication. When a primary replica fails, the replica set automatically switches over to the secondary and then it becomes the primary server.
5. Load balancing - MongoDB uses the concept of sharding to scale horizontally by splitting data across multiple MongoDB instances. MongoDB can run over multiple servers, balancing the load and/or duplicating data to keep the system up and running in case of hardware failure.
Data Modelling
As we have seen from the Introduction section, the data in MongoDB has a flexible schema. Unlike in SQL databases, where you must have a table's schema declared before inserting data, MongoDB's collections do not enforce document structure. This sort of flexibility is what makes MongoDB so powerful.
When modeling data in Mongo, keep the following things in mind
1. What are the needs of the application – Look at the business needs of the application and see what data and the type of data needed for the application. Based on this, ensure that the structure of the document is decided accordingly.
2. What are data retrieval patterns – If you foresee a heavy query usage then consider the use of indexes in your data model to improve the efficiency of queries.
3. Are frequent insert's, updates and removals happening in the database – Reconsider the use of indexes or incorporate sharding if required in your data modeling design to improve the efficiency of your overall MongoDB environment.
Difference between MongoDB & RDBMS
Below are some of the key term differences between MongoDB and RDBMS
RDBMS MongoDB Difference
Table Collection
In RDBMS, the table contains the columns and rows which are used to store the data whereas, in MongoDB, this same structure is known as a collection. The collection contains documents which in turn contains Fields, which in turn are key-value pairs.
Row Document In RDBMS, the row represents a single, implicitly structured data item in a table. In MongoDB, the data is stored in documents.
Column Field In RDBMS, the column denotes a set of data values. These in MongoDB are known as Fields.

Joins Embedded documents
In RDBMS, data is sometimes spread across various tables and in order to show a complete view of all data, a join is sometimes formed across tables to get the data. In MongoDB, the data is normally stored in a single collection, but separated by using Embedded documents. So there is no concept of joins in Mongodb.
Apart from the terms differences, a few other differences are shown below
1. Relational databases are known for enforcing data integrity. This is not an explicit requirement in MongoDB.
2. RDBMS requires that data be normalized first so that it can prevent orphan records and duplicates Normalizing data then has the requirement of more tables, which will then result in more table joins, thus requiring more keys and indexes.
As databases start to grow, performance can start becoming an issue. Again this is not an explicit requirement in MongoDB. MongoDB is flexible and does not need the data to be normalized first.
Download and Install MongoDB on Windows - Complete Guide
The installers for MongoDB are available in both the 32-bit and 64-bit format. The 32-bit installers are good for development and test environments. But for production environments you should use the 64-bit installers. Otherwise, you can be limited to the amount of data that can be stored within MongoDB.
It is advisable to always use the stable release for production environments.
In this tutorial, you will learn –
Download & Install MongoDB on Windows Install Driver- Javascript, Python and Ruby Install Robomongo- MongoDB Management Tool MongoDB Configuration, Import and Export Configuring MongoDB server with configuration file
Download & Install MongoDB on Windows
The following steps can be used to install MongoDB on Windows
Step 1) Double click on the mongodb-win32-i386-3.0.7-signed.exe file which can be downloaded from the MongoDB website.

Step 2) Click on the Next button
Step 3) Click on the Next button to agree to the End User License Agreement.

Step 4) Click on the "complete" button to install all of the components. The custom option can be used to install selective components or if you want to change the location of the installation.

Step 5) Click on the Install button to start the installation.
Step 6) Click on the Finish button to complete the installation.

Install Driver- Javascript, Python and Ruby
Drivers in MongoDB are used for connectivity between client applications and the database. For example, if you had Java program and required it to connect to MongoDB then you would require to download and integrate the Java driver so that the program can work with the MongoDB database.
The driver for Javascript comes out of the box. The MongoDB shell which is used to work with MongoDB database is actually a javascript shell. The following screenshot shows how this can be done.

Code Explanation:
1. We are just declaring a simple Javascript variable to store a string called 'Hello World.' 2. We are using the printjson method to print the variable to the screen.
Python Driver – For Python, first ensure that Python is present on the system. Then download the Python driver which is called the "pymongo" drivers. Then follow the following steps for the installation
Step 1) Launch the Installer and click on the Next button
Step 2) The installer will detect an existing Python installation. Click on the Next button to proceed.

Step 3) Click on the Next button to start the installation
Step 4) Click on the Next button to mark the installation as complete.

For the Ruby driver to be installed for MongoDB, follow the below steps
Step 1) Ensure Ruby is installed on the system
Step 2) Ensure gems is updated by issuing the command
gem update –system
Step 3) Install the mongo related drivers by issuing the below command
gem install mongo
Install Robomongo- MongoDB Management Tool
There are tools in the market which are available for managing MongoDB. One such non-commercial tool is Robomongo.
Some of the features of Robomongo are given below:
1. Full power of the Mongoshell 2. Multiple shells 3. Multiple results
Step 1) After installing the tool and launching it you need to first specify a connection

1. Click on the Create link to create a new connection. 2. Leave the address and port number as it is 3. Click on the "Save" button
Step 2) Click on the Connect button

Once you connect to your instance, you can view all of your databases and collections in the interface. You can use this interface to insert documents, delete or update documents, find documents, etc.
MongoDB Configuration, Import, and Export
Before starting the MongoDB server, the first key aspect is to configure the data directory where all the MongoDB data will be stored. This can be done in the following way

The above command 'md \data\db' makes a directory called \data\db in your current location.
MongoDB will automatically create the databases in this location, because this is the default location for MongoDB to store its information. We are just ensuring the directory is present, so that MongoDB can find it when it starts.
The import of data into MongoDB is done using the "mongoimport" command. The following example shows how this can be done.
Step 1) Create a CSV file called data.csv and put the following data in it
Employeeid,EmployeeName
1. Guru99 2. Mohan 3. Smith
So in the above example, we are assuming we want to import 3 documents into a collection called data. The first row is called the header line which will become the Field names of the collection.
Step 2) Issue the mongo import command

Code Explanation:
1. We are specifying the db option to say which database the data should be imported to 2. The type option is to specify that we are importing a csv file 3. Remember that the first row is called the header line which will become the Field names of the
collection, that is why we specify the –headerline option. And then we specify our data.csv file.
Output
The output clearly shows that 3 documents were imported into MongoDB.
Exporting MongoDB is done by using the mongoexport command

Code Explanation:
1. We are specifying the db option to say which database the data should be exported from. 2. We are specifying the collection option to say which collection to use 3. The third option is to specify that we want to export to a csv file 4. The fourth is to specify which fields of the collection should be exported. 5. The –out option specifies the name of the csv file to export the data to.
Output
The output clearly shows that 3 records were exported from MongoDB.
Configuring MongoDB server with configuration file
One can configure the mongod server instance to startup with a configuration file. The configuration file contains settings that are equivalent to the mongod command-line options.

For example, supposed you wanted MongoDB to store all its logging information to a custom location then follow the below steps
Step 1) Create a file called, "mongod.conf" and store the below information in the file
1. The first line of the file specifies that we want to add configuration for the system log file, that is where the information about what the server is doing in a custom log file.
2. The second option is to mention that the location will be a file. 3. This mentions the location of the log file 4. The logAppend: "true" means to ensure that the log information keeps on getting added to the
log file. If you put the value as "false", then the file would be deleted and created fresh whenever the server starts again.
Step 2) Start the mongod server process and specify the above created configuration file as a parameter. The screenshot of how this can be done is shown below

Once the above command is executed, the server process will start using this configuration file, and if you go to the /etc. directory on your system, you will see the mongod.log file created.
The below snapshot shows an example of what a log file would look like.
MongoDB Create & Insert Database

In MongoDB, the first basic step is to have a database and collection in place. The database is used to store all of the collections, and the collection in turn is used to store all of the documents. The documents in turn will contain the relevant Field Name and Field values.
The snapshot below shows a basic example of how a document would look like.
The Field Names of the document are "Employeeid" and "EmployeeName" and the Field values are "1" and "Smith' respectively. A bunch of documents would then make up a collection in MongoDB.
In this article, you will learn -
Creating a database Creating a collection
Creating a database using “use” command
Creating a database in MongoDB is as simple as issuing the "using" command. The following example shows how this can be done.
Code Explanation:
1. The "use" command is used to create a database in MongoDB. If the database does not exist a new one will be created.

If the command is executed successfully, the following Output will be shown:
Output:
MongoDB will automatically switch to the database once created.
Creating a collection using insert()
The easiest way to create a collection is to insert a record (which is nothing but a document consisting of Field names and Values) into a collection. If the collection does not exist a new one will be created.
The following example shows how this can be done.
db.Employee.insert
(
{
"Employeeid" : 1,
"EmployeeName" : "Martin"
}
)
Code Explanation:
As seen above, by using the "insert" command the collection will be created.
Adding documents using insert() command
MongoDB provides the insert () command to insert documents into a collection. The following example shows how this can be done.
Step 1) Write the "insert" command

Step 2) Within the "insert" command, add the required Field Name and Field Value for the document which needs to be created.
Code Explanation:
1. The first part of the command is the "insert statement" which is the statement used to insert a document into the collection.
2. The second part of the statement is to add the Field name and the Field value, in other words, what is the document in the collection going to contain.
If the command is executed successfully, the following Output will be shown
Output:

The output shows that the operation performed was an insert operation and that one record was inserted into the collection.
Add MongoDB Array using insert()
The "insert" command can also be used to insert multiple documents into a collection at one time. The below code example can be used to insert multiple documents at a time.
The following example shows how this can be done,
Step 1) Create a Javascript variable called myEmployee to hold the array of documents
Step 2) Add the required documents with the Field Name and values to the variable
Step 3) Use the insert command to insert the array of documents into the collection
var myEmployee=
[
{
"Employeeid" : 1,
"EmployeeName" : "Smith"
},

{
"Employeeid: : 2,
"EmployeeName" : "Mohan"
},
{
"Employeeid: : 3,
"EmployeeName" : "Joe"
},
];
db.Employee.insert(myEmployee);
If the command is executed successfully, the following Output will be shown
The output shows that those 3 documents were added to the collection.

Printing in JSON format
JSON is a format called JavaScript Object Notation, and is just a way to store information in an organized, easy-to-read manner. In our further examples, we are going to use the JSON print functionality to see the output in a better format.
Let's look at an example of printing in JSON format
db.EMployee.find().forEach(printjson)
Code Explanation:
1. The first change is to append the function called for Each() to the find() function. What this does is that it makes sure to explicitly go through each document in the collection. In this way, you have more control of what you can do with each of the documents in the collection.
2. The second change is to put the printjson command to the forEach statement. This will cause each document in the collection to be displayed in JSON format.
If the command is executed successfully, the following Output will be shown
Output:
The output clearly shows that all of the documents are printed in JSON style.
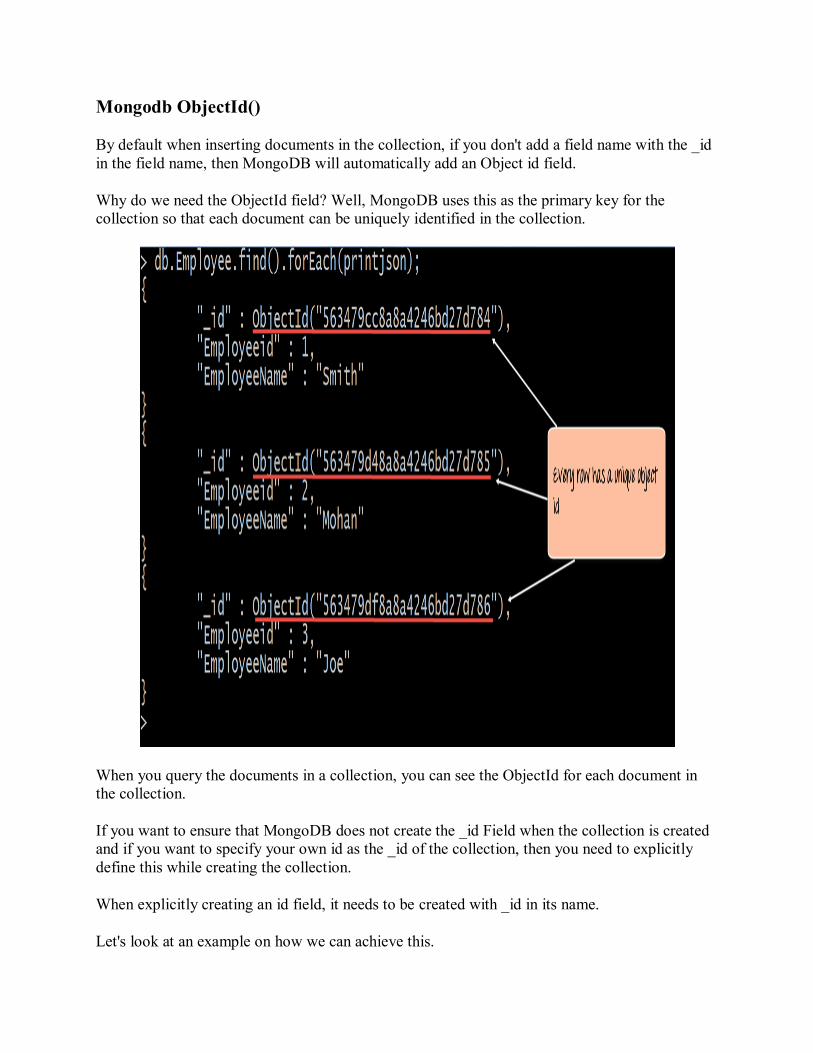
Mongodb ObjectId()
By default when inserting documents in the collection, if you don't add a field name with the _id in the field name, then MongoDB will automatically add an Object id field.
Why do we need the ObjectId field? Well, MongoDB uses this as the primary key for the collection so that each document can be uniquely identified in the collection.
When you query the documents in a collection, you can see the ObjectId for each document in the collection.
If you want to ensure that MongoDB does not create the _id Field when the collection is created and if you want to specify your own id as the _id of the collection, then you need to explicitly define this while creating the collection.
When explicitly creating an id field, it needs to be created with _id in its name.
Let's look at an example on how we can achieve this.

db.Employee.insert({_id:10, "EmployeeName" : "Smith"})
Code Explanation:
1. We are assuming that we are creating the first document in the collection and hence in the above statement while creating the collection, we explicitly define the field _id and define a value for it.
If the command is executed successfully and now use the find command to display the documents in the collection, the following Output will be shown
Output:
The output clearly shows that the _id field we defined while creating the collection is now used as the primary key for the collection.
Performing Queries
The method of fetching or getting data from a MongoDB database is carried out by using queries. While performing a query operation, one can also use criteria’s or conditions which can
be used to retrieve specific data from the database.
MongoDB provides a function called db.collection.find () which is used for retrieval of documents from a MongoDB database.
During the course of this tutorial, you will see how this function is used in various ways to achieve the purpose of document retrieval.

MongoDB Query Document using find()
The basic query operations cover the simple operations such as getting all of the documents in a MongoDB collection. Let’s look at an example of how we can accomplish this.
All of our code will be run in the MongoDB javascript command shell. Consider that we have a collection named ‘Employee’ in our MongoDB database and we execute the below command.
Code Explanation:
1. Employee is the collection name in the MongoDB database 2. The find command is an in-built function which is used to retrieve the documents in the
collection.
If the command is executed successfully, the following Output will be shown
Output:

The output shows all the documents which are present in the collection.
We can also add criteria to our queries so that we can fetch documents based on certain conditions.
Let's look at a couple of examples of how we can accomplish this.
db.Employee.find({EmployeeName : "Smith"}).forEach(printjson);
Code Explanation:
1. Here we want to find for an Employee whose name is "Smith" in the collection , hence we enter the filter criteria as EmployeeName : "Smith"
If the command is executed successfully, the following Output will be shown
Output:

The output shows that only the document which contains "Smith" as the Employee Name is returned.
Now, let's take a look at another code example which makes use of the greater than search criteria. When this criteria is included, it actually searches those documents where the value of the field is greater than the specified value.
db.Employee.find({Employeeid : {$gt:2}}).forEach(printjson);
Code Explanation:
1. Here we want to find for all Employee's whose id is greater than 2. The $gt is called a query selection operator, and what is just means is to use the greater than expression.
If the command is executed successfully, the following Output will be shown
Output:

All of the documents wherein the Employee id is greater than 2 is returned.
MongoDB cursor
When the db.collection.find () function is used to search for documents in the collection, the result returns a pointer to the collection of documents returned which is called a cursor.
By default, the cursor will be iterated automatically when the result of the query is returned. But one can also explicitly go through the items returned in the cursor one by one. If you see the below example, if we have 3 documents in our collection, the cursor will point to the first document and then iterate through all of the documents of the collection.

The following example shows how this can be done.
var myEmployee = db.Employee.find( { Employeeid : { $gt:2 }});
while(myEmployee.hasNext())
{
print(tojson(myCursor.next()));
}
Code Explanation:
1. First we take the result set of the query which finds the Employee's whose id is greater than 2 and assign it to the JavaScript variable 'myEmployee'
2. Next we use the while loop to iterate through all of the documents which are returned as part of the query.
3. Finally for each document, we print the details of that document in JSON readable format.
If the command is executed successfully, the following Output will be shown
Output:
