module 2 building and using queries - testbanklive.com · microsoft office 2016 – illustrated...
TRANSCRIPT

Microsoft Office 2016 – Illustrated Introductory Access-1
Solutions to Access 2016 Module 2 EOM Exercises
© 2016 Cengage Learning®. May not be scanned, copied or duplicated, or posted to a publicly accessible website, in whole or in part.
MODULE 2 Building and Using Queries
TTaabbllee ooff CCoonntteennttssUnit B: Building and Using Queries ................................................................................................................ 2 Concepts Review ............................................................................................................................................ 2 Skills Review ................................................................................................................................................... 3 Independent Challenge 1 ............................................................................................................................... 6 Independent Challenge 2 ............................................................................................................................... 6 Independent Challenge 3 ............................................................................................................................... 6 Independent Challenge 4 ............................................................................................................................... 7 Visual Workshop ............................................................................................................................................ 9

Microsoft Office 2016 – Illustrated Introductory Access-2
Solutions to Access 2016 Module 2 EOM Exercises
© 2016 Cengage Learning®. May not be scanned, copied or duplicated, or posted to a publicly accessible website, in whole or in part.
MMoodduullee 22:: BBuuiillddiinngg aanndd UUssiinngg QQuueerriieess
CCoonncceeppttss RReevviieeww
SSccrreeeenn LLaabbeelliinngg MMaattcchhiinngg IItteemmss MMuullttiippllee CChhooiiccee1. Trips table field list 6. h 16. b
2. Duration field from Trips table in query grid
7. c 17. a
3. Ascending sort order on TripName field
8. d 18. d
4. Or criteria on two rows 9. j 19. b
5. And criteria on one row 10. e 20. a
11. a
12. i
13. b
14. f
15. g

Microsoft Office 2016 – Illustrated Introductory Access-3
Solutions to Access 2016 Module 2 EOM Exercises
© 2016 Cengage Learning®. May not be scanned, copied or duplicated, or posted to a publicly accessible website, in whole or in part.
SSkkiillllss RReevviieeww
Data File: Salvage-2.accdb. Solution File: Salvage-2-Solution.accdb
1.-2. The final CenterDeposits query is shown below.
Note: 1b: CenterName, DepositDate, Weight, ClubName fields 1c: Johnson Recycling was changed to a center name that has the student’s last name. 2a: The first record (A1 Salvage Center with a DepositDate of 2/4/2014) has been deleted 2b: JavaScript KC (ClubName) has changed to Bootstrap Club. 2d: The date of 1/30/2017 is entered for the current first record
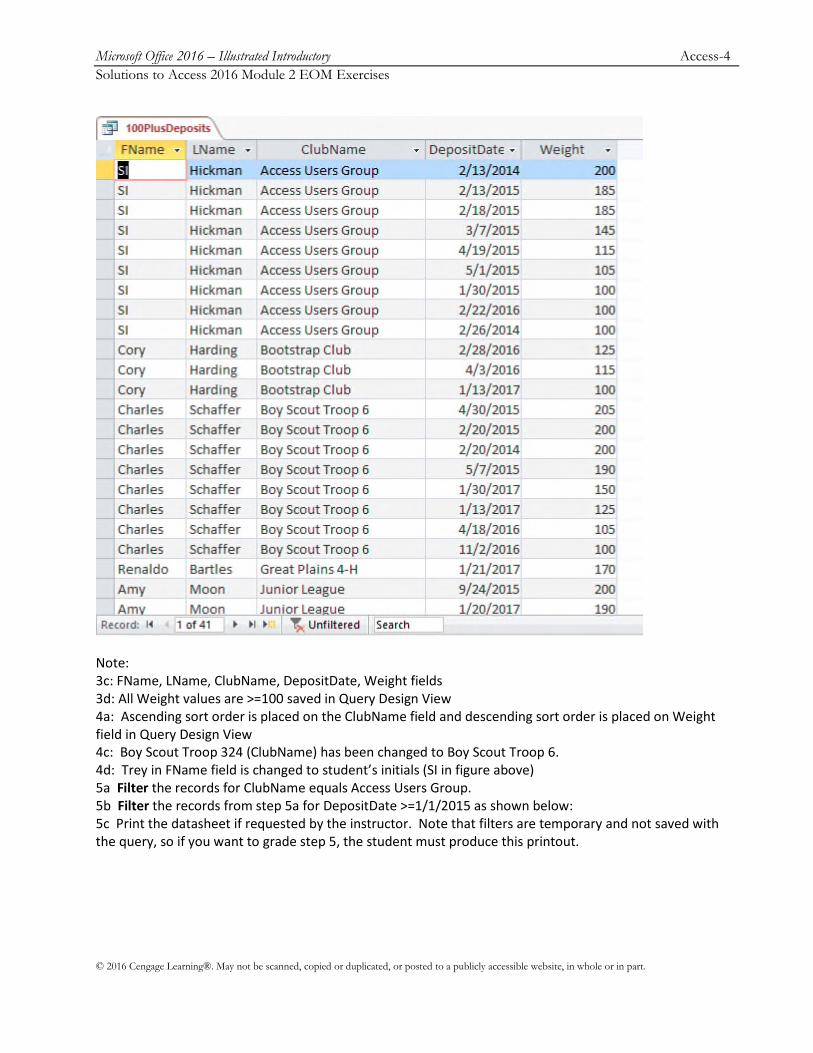
3-5: The final 100PlusDeposits query is shown below:
Microsoft Office 2016 – Illustrated Introductory Access-4
Solutions to Access 2016 Module 2 EOM Exercises
© 2016 Cengage Learning®. May not be scanned, copied or duplicated, or posted to a publicly accessible website, in whole or in part.
Note: 3c: FName, LName, ClubName, DepositDate, Weight fields 3d: All Weight values are >=100 saved in Query Design View 4a: Ascending sort order is placed on the ClubName field and descending sort order is placed on Weight field in Query Design View 4c: Boy Scout Troop 324 (ClubName) has been changed to Boy Scout Troop 6. 4d: Trey in FName field is changed to student’s initials (SI in figure above) 5a Filter the records for ClubName equals Access Users Group. 5b Filter the records from step 5a for DepositDate >=1/1/2015 as shown below: 5c Print the datasheet if requested by the instructor. Note that filters are temporary and not saved with the query, so if you want to grade step 5, the student must produce this printout.

Microsoft Office 2016 – Illustrated Introductory Access-5
Solutions to Access 2016 Module 2 EOM Exercises
© 2016 Cengage Learning®. May not be scanned, copied or duplicated, or posted to a publicly accessible website, in whole or in part.
6a: Save the 100PlusDeposits query as 100PlusDeposits2016. 6c. The criteria entry Like "*/*/2016" should be in the DepositDate field in Query Design View. Alternatively, the criteria >=1/1/2016 and <= 12/31/2016 or >12/31/2015 and <1/1/2017 are also equivalent ways to select all records in the year 2016 as shown below:
7. Save the 100PlusDeposits query as 100PlusDeposits2Clubs. The solution is shown in Figure 2-20. Note: 7b-7c. All records have ClubName = Social Media Club or Access Users Group and Weight >=100
8a. For the Centers table, the Times New Roman font with 14-point font size is applied 8b. All columns have been resized so data and field names are visible. 8c-8d. If creating a printout, the printout should be in landscape orientation and use narrow margins so that it fits on a single sheet of paper.

Microsoft Office 2016 – Illustrated Introductory Access-6
Solutions to Access 2016 Module 2 EOM Exercises
© 2016 Cengage Learning®. May not be scanned, copied or duplicated, or posted to a publicly accessible website, in whole or in part.
IInnddeeppeennddeenntt CChhaalllleennggee 11
Data File: Service-2.accdb. Solution File: Service-2-Solution.accdb
The solution to this exercise is shown in Figure 2-21. d. Check for the Relationships for Service-2 report shown below:
e. Create a query (named March2017 in step i) with these fields: FirstName, LastName, ActivityDate, HoursWorked. The solution to this is shown in Figure 2-21.
g. Add criteria to select only those records in March 2017. h. In Query Design View, apply an ascending sort order on the LastName and ActivityDate fields. i. Make sure that the student’s name has replaced Quentin Garden and that the columns have been
widened to clearly display all data and field names.
IInnddeeppeennddeenntt CChhaalllleennggee 22
Data File: HouseOfReps-2.accdb. Solution File: HouseOfReps-2-Solution.accdb
The final solution is shown in Figure 2-22. Note:
c. The fields are in the following order: StateAbbrev, StateName, Capital, FName, LName d. An ascending sort order on StateName then LName. e. Criteria to select only Ohio or Pennsylvania using OH and PA criteria in the StateAbbrev field. f. The query is named OhioAndPenn. The student’s name is entered instead of Butterfield.
IInnddeeppeennddeenntt CChhaalllleennggee 33
Data File: VetClinic-2.accdb. Solution File: VetClinic-2-Solution.accdb

Microsoft Office 2016 – Illustrated Introductory Access-7
Solutions to Access 2016 Module 2 EOM Exercises
© 2016 Cengage Learning®. May not be scanned, copied or duplicated, or posted to a publicly accessible website, in whole or in part.
The solution is shown in Figure 2-23. Note:
c. Student Name is added as a new record in Vets table. e. ClinicVetListing is the new query name with the following fields: VetLast, VetFirst, ClinicName, and
Phone. (Note the order of fields is changed in step h.) f. Animal Haven (ClinicName) changed to Animal Emergency Shelter. g. In Query Design View, criteria is added to the ClinicName field to select only Animal Emergency Shelter
or Veterinary Specialists. h. In Query Design View, the ClinicName field is moved to the first field column and an ascending sort
order is added to the ClinicName and VetLast fields. i. Fields are resized to show all data.
IInnddeeppeennddeenntt CChhaalllleennggee 44
No Data File. Solution File: Jobs-Solution.accdb
b. Check Table Design View of the Positions table. The field names, data types, and descriptions should match this step.
c. Check Table Design View of the Employers table. The field names, data types, and descriptions should match this step.
d. Make sure EmployerID is the primary key field of the Employers table. Make sure PositionID is the primary key field of the Positions table. e. Make sure the relationships window looks like the following:
f-g. Answers will vary, but a potential solution is shown below. There should be five valid records in the Employers table, and five valid records in the Positions table. The records in the Positions table can be attached to any employer record.

Microsoft Office 2016 – Illustrated Introductory Access-8
Solutions to Access 2016 Module 2 EOM Exercises
© 2016 Cengage Learning®. May not be scanned, copied or duplicated, or posted to a publicly accessible website, in whole or in part.
h. A potential solution to the JobList query is shown below. (Answers will vary based on the records entered in the Positions table). Make sure the query contains these fields: CompanyName, Title, CareerArea, AnnualSalary, and Desirability. Make sure the records are sorted in descending order on the Desirability field.

Microsoft Office 2016 – Illustrated Introductory Access-9
Solutions to Access 2016 Module 2 EOM Exercises
© 2016 Cengage Learning®. May not be scanned, copied or duplicated, or posted to a publicly accessible website, in whole or in part.
VViissuuaall WWoorrkksshhoopp
Data File: Baseball-2.accdb. Solution File: Baseball-2-Solution.accdb
The solution is shown in Figure 2-24. Make sure the correct fields are selected: TeamName, PlayerLast, PlayerFirst, and Position. Make sure only Position 1 and 2 are selected and an ascending sort order is added to the TeamName and PlayerPosition fields in Query Design View.
Aaron Campanella should be changed to the student’s name.
The query should be saved with the name PitchersAndCatchers.
All fields should be widened to see all of the data.

Access 2016 Instructor’s Manual Page 1 of 8
© 2017 Cengage Learning®. All rights reserved. May not be scanned, copied or duplicated, in whole or in part, except for use as permitted in a license distributed with a certain product or service or otherwise on a password-protected website for classroom use.
Access Module 2: Building and Using Queries
A Guide to this Instructor’s Manual: We have designed this Instructor’s Manual to supplement and enhance your teaching experience through classroom activities and a cohesive module summary.
This document is organized chronologically, using the same heading in blue that you see in the textbook. Under each heading you will find (in order): Lecture Notes that summarize the section, Teacher Tips, Classroom Activities, and Lab Activities.
In addition to this Instructor’s Manual, our Instructor’s Resources Site also contains PowerPoint Presentations, Test Banks, and other supplements to aid in your teaching experience.
Table of Contents Module Objectives 2Access 28: Use the Query Wizard 2Access 30: Work with Data in a Query 3Access 32: Use Query Design View 3Access 34: Sort and Find Data 4Access 36: Filter Data 5Access 38: Apply AND Criteria 6Access 40: Apply OR Criteria 8Access 42: Format a Datasheet 8End of Module Material 9
Module Objectives
Students will have mastered the material in Access Module 2 when they can: Use the Query Wizard Work with data in a query Use Query Design View Sort and find data
Filter data Apply AND criteria Apply OR criteria Format a datasheet
Access 28: Use the Query Wizard
LEARNING OUTCOMES
• Describe the purpose for a query
• Create a query with the Simple Query Wizard

Access 2016 Instructor’s Manual Page 2 of 8
© 2017 Cengage Learning®. All rights reserved. May not be scanned, copied or duplicated, in whole or in part, except for use as permitted in a license distributed with a certain product or service or otherwise on a password-protected website for classroom use.
LECTURE NOTES
• Introduce the Simple Query Wizard in FIGURE 2-1 and, depending on the background of students, show them that using the wizard spares students having to write SQL (Structured Query Language) code.
• Make sure students realize that a query is merely a question – it is not a duplication of the data even though the datasheet that is presented (the logical view of the data, shown in FIGURE 2-2) can be used for data entry and updates.
• Be sure students understand that a query allows you to focus on specific information that answers the query question.
• Emphasize the wide and extensive use of queries to the database user.
TEACHER TIPS Introduce this module by reminding students that when they use an online search engine, such as Google or Bing they are really asking questions of a database. When they access the online catalog at the library, they also are querying a database.
Querying is one of the main benefits of creating a database. Users want to be able to find answers quickly to questions concerning the data.
CLASSROOM ACTIVITIES 1. Critical Thinking: Ask students to come up with reasons they would use a query (versus opening a
table datasheet). Answers include:
• To view fields from more than one table in a single datasheet.
• To view subsets of records rather than all the records in a table datasheet (filtering and adding criteria – covered later in Unit B).
• To create calculated fields.
• To collect the fields and records needed for forms and reports.
2. Class Discussion: Ask students for sample questions that might be asked of a student database.
Access 30: Work with Data in a Query
LEARNING OUTCOMES
• Edit records in a query
• Delete records in a query
LECTURE NOTES
• Compare entering and editing data in a query datasheet to the same tasks in a table datasheet.
• Use FIGURES 2-3 and 2-4 to show the effects of updating a record in the query datasheet and deleting another record.

Access 2016 Instructor’s Manual Page 3 of 8
© 2017 Cengage Learning®. All rights reserved. May not be scanned, copied or duplicated, in whole or in part, except for use as permitted in a license distributed with a certain product or service or otherwise on a password-protected website for classroom use.
TEACHER TIP Inherent to students’ understanding of how relational databases work is understanding that every other object is built “on top of” the tables. Any time data is being edited, it is being changed/stored in table objects. Tables, queries, and forms can all be used to enter and update data, but data is only physically stored in tables. Without this understanding students may be led to believe that they need to update data every place it is presented – in every query, form, or report where it is shown. This is not true. Once data is changed, for example, once the name Friedrichsen is changed to Franklin, every other object that displays that data is automatically updated as well.
CLASSROOM ACTIVITIES 1. Class Discussion: Ask students to brainstorm some real-world scenarios in which they would
make the kinds of modifications demonstrated in this section. 2. Critical Thinking: Querying means asking questions. What kind of questions do you ask in a
typical day? Would a database be able to answer those questions?
Access 32: Use Query Design View
LEARNING OUTCOMES
• Work in Query Design View
• Add criteria to a query
LECTURE NOTES
• Point out the various parts of the Query Design View window in FIGURE 2-5, and the resulting query in FIGURE 2-6.
• Explain that students should be extremely familiar with Query Design View, criteria, field lists, join lines (link lines), and the query design grid.
• Point out the one-to-many relationship line between related tables in the query in FIGURE 2-5.
• Distinguish between the use of the Save command on the File tab and the Save Object As command, reminding students that Access saves data automatically as they move from record to record.
TEACHER TIPS Note that when there is no scroll bar in a field list, it means that all fields are visible.
Access uses Query-by-Example (QBE) to query a database. Query-by-Example is a query manipulation language for relational databases in which users indicate the action to be taken by completing on-screen forms. The query feature of Microsoft Excel uses QBE.
Students should understand that although the answer displays in Datasheet view, no table exists. It is a dynamic or virtual set of records. When a query design is saved, only the design is saved not the answer. Query results, therefore, always show the most current data.

Access 2016 Instructor’s Manual Page 4 of 8
© 2017 Cengage Learning®. All rights reserved. May not be scanned, copied or duplicated, in whole or in part, except for use as permitted in a license distributed with a certain product or service or otherwise on a password-protected website for classroom use.
CLASSROOM ACTIVITIES 1. Quick Quiz:
1. How is the relationship between two tables displayed? (Answer: With a join line, or link line) 2. What does the query design grid display? (Answer: The field names, sort orders, and criteria
used within the query)
2. Assign a Project: Have students research QBE, an early language for creating queries and then
share the results of their research with the class.
Access 34: Sort and Find Data
LEARNING OUTCOMES
• Apply short orders to a query
• Find and replace data in a query
• Undo edits in a query
LECTURE NOTES
• Make sure students understand how ascending and descending sort orders apply to each different type of field, for example text, number, currency, and date/time data.
• Make sure students know that they can click any field and use it to sort the records. Point out the field selector in FIGURE 2-7. Access never sorts just a single field/column at a time. Review the result of the new sort orders in the datasheet in FIGURE 2-9.
• Review the features of the Find and Replace dialog box in FIGURE 2-8.
CLASSROOM ACTIVITIES 1. Critical Thinking: Sorting means ordering records in a particular way. When would it be useful to
sort data in ascending order? Why? When would it be useful to sort data in descending order? Why?
2. Quick Quiz: 1. Deleting a field from a query deletes it from the underlying table. T/F? (Answer: False) 2. Sort orders always work from right to left. T/F? (Answer: False)
LAB ACTIVITY Using the query shown in FIGURE 2-7, have students practice sorting on more than one field such as Category and TripName. Ask them to sort by duration within each category. Show them how to move the Price field to the left of the Category field, select both fields, and apply a sort to the two fields at the same time to achieve the desired sort.
Access 36: Filter Data
LEARNING OUTCOMES
• Apply and remove filters in a query
• Use wildcards in criteria

Access 2016 Instructor’s Manual Page 5 of 8
© 2017 Cengage Learning®. All rights reserved. May not be scanned, copied or duplicated, in whole or in part, except for use as permitted in a license distributed with a certain product or service or otherwise on a password-protected website for classroom use.
LECTURE NOTES
• Filtering data is a temporary activity. As soon as the filter is removed, it is not saved. Therefore, if a question about the data is asked over and over again, it should be saved as a query so that the query can simply be opened to see the resulting data.
• Simple filters require only that students click the field they want to filter on (such as Adventure in the Category field), and click the Selection button. Any filtering done with two or more fields requires the use of the advanced filter tools.
• Contrast the use of the Filter By Selection feature with the use of Filter By Form feature.
• Use TABLE 2-2 to compare filters and queries. Point out to students, however, that queries are by far more powerful. Discuss the filter buttons shown in TABLE 2-3 and when each one would be used.
• Review the wildcard characters shown in the Clues to Use box.
TEACHER TIPS Be sure to have students view the navigation buttons after each filter to get a sense of how many records they are viewing at any one time. This will help them answer the “reasonableness” test question. Is the answer I’m seeing reasonable? (or not?) Students may not know the answer to this when working with sample database files provided by this textbook, but they certainly would be able to answer that question in the real world when working with their own data.
Note that while a filter is not the same thing as a query, if you create a filter and decide that you would like to reuse it, and therefore should have created a query, a filter can be saved as a query object and reused. For the most part, however, filters are temporary views of data and do not contain as much power as queries (see TABLE 2-2).
Filtering produces a subset of the table. This is useful when you need to update a field in several records with the same value but do not need an update query.
Make sure students understand the difference between the Toggle Filter button and the Clear All Filters button. The Toggle Filter button redisplays all records but does not clear any filters that have been applied.
When a criterion is entered in a query, the criterion is an example of the expected result. Entering criterion in a query is similar to entering an author’s name in a search of a library card catalog or an electronic library database. The asterisk and question mark wildcards are the same wildcards that are used with the search features in Windows and other Microsoft applications. Access automatically adds the LIKE operator and quotation marks to criteria that use wildcards.
CLASSROOM ACTIVITIES 1. Class Discussion: Consider circumstances in which the Filter By Selection feature is the tool to use.
When is Filter By Form better to use?

Access 2016 Instructor’s Manual Page 6 of 8
© 2017 Cengage Learning®. All rights reserved. May not be scanned, copied or duplicated, in whole or in part, except for use as permitted in a license distributed with a certain product or service or otherwise on a password-protected website for classroom use.
2. Critical Thinking: Why does Microsoft provide so many different features (filters versus queries for example) that overlap in functionality? (Even though there are times when more than one tool could do a job, depending on the nature of the problem there is generally a “best” way to accomplish a task. Providing many different tools gives the user the choice of several ways to tackle a problem. It is incumbent on the user to be trained well enough to know which tool is most productive and best for each job.)
3. Critical Thinking: Compare the two methods of finding records presented in this chapter: searching and filtering. Which do you consider to be more efficient? As a database user, when do you think it would be best to use filtering rather than searching?
Access 38: Apply AND Criteria
LEARNING OUTCOMES
• Enter AND criteria in a query
• Define criteria syntax
• Use comparison operators with criteria
LECTURE NOTES:
• Being able to master query criteria is absolutely essential to the success of every Access user. Do not let students go beyond this lesson until they completely understand it.
• Note that the use of “AND” means that BOTH criteria must be true in order for the record to be selected.
• The AND criteria are entered in one row of the query grid as shown in FIGURE 2-13. It is absolutely essential that students understand what AND criteria is as well as how to enter it in the query grid.
• Discuss the support that Access provides with criteria syntax and review the function of the comparison operators in TABLE 2-4.
• Explain how to search for blank fields using the Clues to Use box.
TEACHER TIPS Comparison operators are used with both numeric and text data. The order of the greater than or equal to (>=) and less than or equal to (<=) operators is fixed; they cannot be reversed.
The difference between putting criteria in one versus two rows is extremely important and is covered in the lessons on AND versus OR criteria. At this point, students are starting to see how important precision is when working with databases.
Be sure students understand that they can go back and forth between Datasheet and Query Design View to make sure you get the records desired. The most common errors would be not entering the criteria on one row or making a typo.
You can use a Venn diagram to illustrate the concept of AND and OR criterion visually:

Access 2016 Instructor’s Manual Page 7 of 8
© 2017 Cengage Learning®. All rights reserved. May not be scanned, copied or duplicated, in whole or in part, except for use as permitted in a license distributed with a certain product or service or otherwise on a password-protected website for classroom use.
CLASSROOM ACTIVITIES 1. Class Discussion: Design a truth table on the board and fill in the values with the students. Ask
students for other uses of a truth table.
2. Quick Quiz: 1. With AND criteria, all criteria must be true to select the record. T/F? (Answer: True) 2. Criteria syntax are rules that specify how to enter criteria. T/F? (Answer: True)
Access 40: Apply OR Criteria
LEARNING OUTCOMES
• Enter OR criteria in a query
• Rename a query
LECTURE NOTES:
• Explain the difference between AND and OR criteria in the query grid. Students show know how it is entered (as shown in FIGURE 2-15) as well as how many records are selected (as shown in FIGURE 2-16).
• Note that OR criteria always retrieves more records. AND criteria always narrows the number of records selected. OR criteria always expands the number of records selected.
CLASSROOM ACTIVITIES Critical Thinking: How would you write a query to find all trips where the state was Colorado and the
duration was either 7 or 10 days? 1. Quick Quiz:
1. You use AND criteria when one criterion must be true in order for the record to be selected. T/F? (Answer: False)
Access 42: Format a Datasheet
LEARNING OUTCOMES
• Zoom in print preview
• Format a datasheet
• Change page orientation
LECTURE NOTES:
• Many of the buttons and tools students will use to format a datasheet are already familiar to them from Word and Excel such as Bold, Italic, Underline, Font Color, Font Face, Font Size, and Fill. The Alternate Fill/Back Color button helps readers differentiate different lines on datasheet printouts.
• Note that the entire datasheet is formatted as a single unit. You do not format individual cells as you do in Excel.

Access 2016 Instructor’s Manual Page 8 of 8
© 2017 Cengage Learning®. All rights reserved. May not be scanned, copied or duplicated, in whole or in part, except for use as permitted in a license distributed with a certain product or service or otherwise on a password-protected website for classroom use.
TEACHER TIP: Point out the differences between a color and black and white printer. On a black and white printer, all colors are converted to shades of gray. Bright colors may be converted to solid black boxes. Always encourage students to print preview before printing.
CLASSROOM ACTIVITIES 1. Assign a Project: Have students open a datasheet and apply at least three formats that they feel
enhance the printout. Print the datasheets, pair students up, and have them critique each other’s printouts. Remind students that some formatting embellishments, such as too much color, font size too small to read, font face too fancy to be legible, can actually detract from readability and professionalism.
2. Group Activity: Ask students to apply three different formats to a datasheet in three different categories (font face, font size, color) and print them. Have them write down the formatting embellishments on the back of the paper. Pass the papers around the class and ask students to vote on the one they like best and explain why.
End of Module Material
• Concepts Reviews consist of multiple choice, matching, and screen identification questions.
• Skills Reviews provide additional hands-on, step-by-step reinforcement.
• Independent Challenges are case projects requiring critical thinking and application of the module skills. The Independent Challenges increase in difficulty, with the first one in each module being the easiest. Independent Challenges 2 and 3 become increasingly open-ended, requiring more independent problem solving.
• Independent Challenge 4: Explore contain practical exercises to help students with their everyday lives by focusing on important and useful essential skills, including creating photo montages for scrapbooks and photo albums, retouching and color-correcting family photos, applying layer styles and getting Help online.
• Visual Workshops are practical, self-graded capstone projects that require independent problem solving.
Top of Document