modelling a jack-o-lantern with
TRANSCRIPT

Modelling a Jack-O-Lantern with
by Russ Painter
CoderDojo Ennis
October 2016
© Feel free to share. No copyright. Contact: [email protected]

1. Blender’s User InterfaceBlender has some wacky GUI stuff. You really should have a 3 button mouse with a scroll wheel to work with it. There are options to configure it to work with a 2 button mouse, but it’s harder. And don’t even think of doing it with a laptop touchpad. Press CTRL+S often to save your work. Sometimes blender crashes!
2. New SceneWhen you create a new scene in Blender, it starts with:A. a camera
B. a lamp
C. a cube
3. Other things you’ll see:A. The 3D Cursor
This is the positionwhere new items are added to the scene. If you LEFT-CLICK in the scene, it will change the position of this.
B. An axis indicator for the selected item.This shows which directions apply to theselected item.RED = XGREEN = YBLUE = Z
4. The mouse needs a homeAnother thing to note is that the position of the mouse on the screen is important! Pressing keys on the keyboard behavedifferently depending on which area of the screen the mouse is over! (I told you it was wacky)
5. Moving around the scene.There are different ways to do this, but I think the easiest is to go into “First Person Game Mode”.A. Put your mouse inside the area where the cube is, because
that’s where we want to move aroundB. Press SHIFT-F to get into First Person Gaming Mode.C. Now you can use WASD (or arrow keys) to move, use the mouse
to look, and Q&E to move up and down.

D. Once you’re in a position you like, LEFT-CLICK the mouse (or press the ENTER key). If you RIGHT-CLICK the mouse (or press the ESC key), then it will put you back to where you were previously.
6. Making Changes to an Entire ObjectA. RIGHT-CLICK on the cube to select it. It will glow orange
and show it’s axis indicator.B. With the mouse still in the same area, press G (Grab). This
will allow you to move the box with your mouse. LEFT-CLICKwill save the change, RIGHT-CLICK will put it back where itwas previously.
C. Press S (Scale) and you can now grow/shrink the cube. If you only want to scale it in one direction, press that axiskey. So if you press S X then you’ll only scale it on the x axis. The axis limiters also apply to the Grab function.
7. Making Changes to an Object’s VerticesA. Press TAB to toggle between OBJECT mode and EDIT mode. In
Edit mode you can change individual vertices or edges.B. In EDIT mode you can press A to toggle ALL vertices between
selected and not selected.C. Press B to draw a BOX around vertices to select themD. Press C to use a CIRCLE to drag over vertices to select
them.E. Once you have vertices selected, you can use tools like G
(Grab) to modify these
8. Clean Up This Mess!A. Press TAB to get back to object modeB. Press DELETE to remove the cube, or whatever mess you’ve
made of the cube at this point.
9. Wasn’t this supposed to be somewhat pumpkin related?A. LEFT-CLICK in the middle of your ground plane to place the
3D Cursor. This is where our new element will be created.B. Press SHIFT-A to bring up the ADD menuC. Select Mesh : UV SphereD. Press the “.” on the number pad to zoom into our new
“pumpkin”E. Press CTRL-2 to Subdivide every face. This will make it
appear smoother. It dosn’t actually have that many faces (yet), these are just like virtual faces for now.
F. Press TAB to go to edit mode, and you’ll see the actual vertices.

G. RIGHT-CLICK on the very topvertex so that it is the only onethat is selected (orange).
H. We can now use G Z to grab thison the Z axis and drag it down.BUT, this will only drag the onepoint, and it won’t look anythinglike a pumpkin.
I. Press ESC or RIGHT-CLICK tocancel that. Instead of movingone vertext, we want toproportionally move all the onesnear it. We need to turn onProportional Editing
J. While we’re at it – also change the pivotpoint to the Median Point so that we don’tneed to worry about the 3D cursor.
K. Now when you press G Z you’ll see awhite circle showing the area wherethe vertexes will be affected. Themouse scroll wheel changes the sizeof this circle. Make it big enoughso that you can drag down just thetop half of the sphere to flattenit out.
L. Do the same thing on the bottom.Adjusting the circle until you geta shape you like.
M. DISABLE proportional editing now, or it’ll end up confusingus later.
N. Position yourself above or below andALT-RIGHT-CLICK one of the edgesgoing away from the pole. This is aRing Select.

O. We want to select every other ring.So hold down SHIFT and ATL-RIGHT-CLICK every 2nd one. Like this
P. We want to make the ridges byshrinking these rings. Press S andthen use the mouse to scale thesedown VERY SLIGHTLY! When you’rehappy press TAB to go back toobject mode and you should havesomething like this.
10. ColourA. Our model can have any number of materials. For this one,
we’re going to make 3:▪ Dark orange for the outside▪ Yellow/orange for the inside▪ Dull green for the stem
B. With the pumpkin object selected go overto the lower right menu and find the tabwith the shiny sphere. This is thematerial tab. Then press the button tocreate the first new material.
C. Then type in a name for the material
D. Press the + button to create two morematerial slots
E. Use the NEW button for each of these togenerate materials for each of these slots, and give them names.

F. Select each of the slots and choose anappropriate “Diffuse” colour.
G. The model will default to the firstmaterial, so it should now display inorange.
11. No more virtual vertexesA. Once we’re happy with the shape, we can
convert our virtual vertexes to realones.
B. On the right menu select the spanner tab.This is for Modifiers. Then click theApply button, and the modifier willbecome permanent.
12. CARVE!A. On the number-pad press “1” then “7” to
get a top view. Then left click below thepumpkin to place the 3D cursor in frontof it. This is where we’ll do ourdrawing.
1B. On the number-pad press “1” then “.” to get a side close up
view of the pumpkin. Careful not to left-click or you’ll move the 3D cursor.
C. Press SHIFT-A and create a new Curve – Path
D. Press TAB then A then DELETE to delete all ofthe vertices in this path. We want to draw ourown.
E. In the left menu select “Draw Curve” and use the mouse and left button to draw an eye shape.

F. Press Draw Curve again for theother eye.
G. And repeat again for the mouth
H. We want to take that set of shapes and cut them out of our pumpkin. Press TAB to get out of edit mode. Then SHIFT-RIGHT-CLICK the pumpkin to also select it. The shapes should be outlined dark-orange, and the pumpkin outlined light orange.
I. Press TAB to put thepumpkin into edit mode.Then on the left toolsmenu select “KnifeProject”. Thiscreates new vertexes onour model in the shapeswe drew. They’re alsoselected now.
J. Press E for “Extrude”and Y to limit to the Yaxis. Push it in just alittle bit (the thicknessof the pumpkin’s flesh.Then press ENTER
K. Press DELETE and selectFACES to remove the selected faces, so we can see inside the pumpkin
L. Select FACE EDIT MODE

M. ALT-RIGHT-CLICK the flesh inside the mouth. This should select the entire ring. Then in the material tab on the right select “Pumkin Flesh” and press the “Assign” button.
N. Do the same again for the flesh inside each of the eye holes
O. Press TAB to get out of edit modeand it should look like this
13. The StemA. Press TAB to get back in edit
mode and rotate so you can seethe top of your pumpkin. LEFT-CLICK to place the 3D Cursor.
B. Press SHIFT-A (Add) and pick Cylinder. It’s going to be HUGE.
C. Press S to scale it downwith the mouse.
D. In the material panelselect our stem materialand press Assign
14. RenderingA. With the pumpkin selected in edit mode, on the left menu
select Tools – Shading – Smooth. This will smooth out the flat faces.
B. Now we’ll add a candle light. Press 7 on the number pad to view the top. Left click the centre, and press SHIFT-A (Add) – Lamp – Point.
C. Press 1 on the number pad to view the front. Then G (grab) Z, and drag the light down to the centre.
D. Use Shift-F to get into first person game mode to get the viewport the way you want to see it.
E. Press CTRL-ALT-NUMPAD-0 to align the rendering camera with the viewport
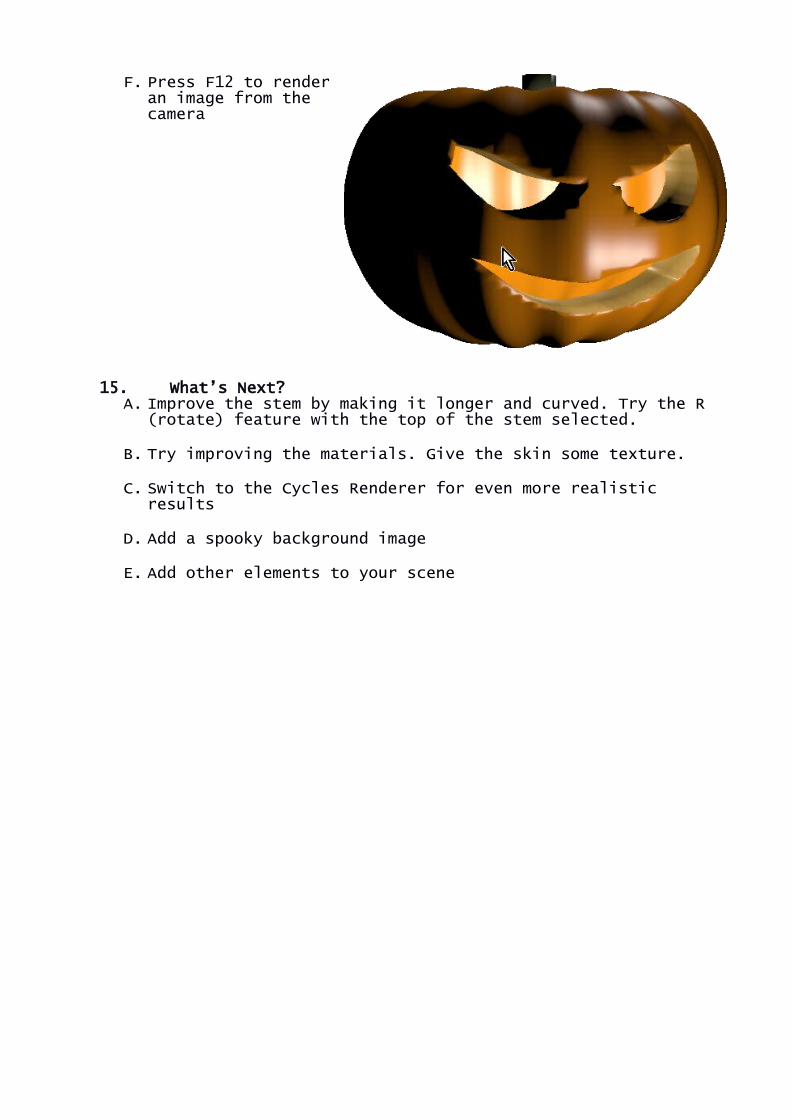
F. Press F12 to renderan image from thecamera
15. What’s Next?A. Improve the stem by making it longer and curved. Try the R
(rotate) feature with the top of the stem selected.
B. Try improving the materials. Give the skin some texture.
C. Switch to the Cycles Renderer for even more realistic results
D. Add a spooky background image
E. Add other elements to your scene
