model: r-1630c owner's manual - national weather … r-1630c owner's manual please read...
TRANSCRIPT

Model: R-1630C
Owner's Manual
Please read before using this Alert Radio
S.A.M.E Digital Weather / All Hazard Alert Radio
Reecom Electronics Inc.
http://www.reecominc.com
FCC InformationThis device complies with Part 15 of the FCC Rules. Operation is subject to the following two conditions: (1) This device may not cause harmful interference, and (2) This device must accept any interference received, including interference that may cause undesired operation.
In accordance with FCC requirements, changes or modifications to this unit not expressly approved by the party responsible for compliance could void the user's authority to operate this product.
NOTE: This equipment has been tested and found to complywith the limits for a Class B digital device, pursuant to Part 15 of the FCC Rules. These limits are designed to provide reasonable protection against harmful interferencein a residential installation. This equipment generates, usesand can radiate radio frequency energy and, if not installed and used in accordance with the instructions, may cause harmful interference to radio communications.
However, there is no guarantee that interference will not occur in a particular installation. If this equipment does cause harmful interference to radio or television reception,which can be determined by turning the equipment off and on, the user is encouraged to try to correct the interference by one or more of the following measures:
1. Reorient or relocate the receiving antenna;2. Increase the separation between the equipment and receiver;3. Connect the equipment into an outlet on a circuit different from that to which the receiver is needed;4. Consult the dealer or an experienced radio/TV technician for help.
- 1 -

Table Of Contents
Features -------------------------------------------------Getting Started -----------------------------------------
Setting Up the Radio ----------------------------------- Setting Date / Time ---------------------------------Setting Weather Channel ------------------------- Storing County Code -------------------------------Setting Alert Mode ---------------------------------Setting Siren Volume -------------------------------
Choosing A Location -------------------------------Installing the Back-up Batteries -------------------Powering Up the Radio -----------------------------
Receiving Alert Message ------------------------------
4 5555
6
6
7
79
1011
1112
14
15
16
1718
National Weather Service Test Signals ------------Alert / Test Message Table -------------------------
Setting Event Blocking --------------------------------ALARM OUT Socket -----------------------------------AUDIO OUT Socket ------------------------------------Siren Tes t ------------------------------------------------Deleting County Code ---------------------------------
16
- 2 -
Non-Alert Messages -----------------------------------Non-Alert Message Table -------------------------- 14

Trouble Shooting --------------------------------------- 26
2728
29ONE YEAR LIMITED WARRANTY ------------------Service ---------------------------------------------------Specification --------------------------------------------
- 3 -
Operation ----------------------------------------------- LCD Back Light -------------------------------------Access to Program Menu Page --------------------- Review Stored County Codes ----------------------Review Alert Message ------------------------------Turn On the Radio -----------------------------------Turn Off the Radio ----------------------------------
23
232323232424
25
252525
Activate / De-activate Alarm Clock 1--------------Activate / De-activate Alarm Clock 2--------------Stop Alarm -------------------------------------------
Alarm Clocks -------------------------------------------
Features:
S.A.M.E. (Specific Area Message Encoding) Operation - Receives and decodes alert messages to text on LCD - capable to filter out alerts that is not declared in your area
LCD - Two-Line Alert Messages and Effective Time display
LED - indicates Warning, Watch and Advisory alert levels
County Code Memory - stores / monitors up to 26 counties
Siren Volume Control - Sixteen (16) siren loudness levels
7 Weather Channels - digital PLL tuning to NOAA channels
LCD Back Light - continuous back light selectable
Event Memory - stores up to 25 alert messages with date/time
Digital Volume Control - Sixteen (16) voice loudness levels
Time Function - real time clock and Auto-Calendar on display
Battery Low Detection - detects backup battery voltage level
Alarm Out Socket - allows to connect external control system
External Antenna Jack - allows to connect external antenna
Dual Alarm Clocks - buzzer alarms up to 1 hour
Selectable Defeat Siren - sets siren On / Off for some events
Voice Alert - automatically activates voice announcement
Audio Out Socket - provides audio source to external system
- 4 -

Getting Started
Choosing A Location
Powering Up the Radio
Installing the Back-up Batteries
1. Press down the battery base cover and slide it downward to remove.2. Insert four batteries with the correct polarity as indicated by the '+' and '-' symbols inside the component.3. Place the battery case cover back on the radio by sliding it upwards until it clicks into place.
The radio requires four (4) 1.5 Volt AA size batteriesfor back-up power when AC power fails (especially during emergency) or is temporarily disconnected.
1. When the back-up battery is low, the LCD will display icon.2. It is recommended to always power up the radio with the supplied AC adapter to maximize back up battery life time.3. Do not leave weak or dead batteries in the battery compartment; the batteries may leak and damage the radio.
Connect the supplied AC adapter to the radio's DC Jack and to a standard 120V AC wall outlet.
- Choose a location nearing a window that is facing the direction the NOAA (National Oceanic and Atmospheric Administration) broadcast is coming from.- Keep the radio away from obstructions such as a refrigerator, a metal door, cabinet or wall, or a water pipe hidden behind a wall which would greatly reduces the radio's reception sensitivity.- keep the radio away from sources of electrical noise such as motors, microwave ovens, and fluorescent lighting. - The location should be close to a continuous power outlet which is not switchable.
- 5 -
Info
Note
Setting Up the Radio
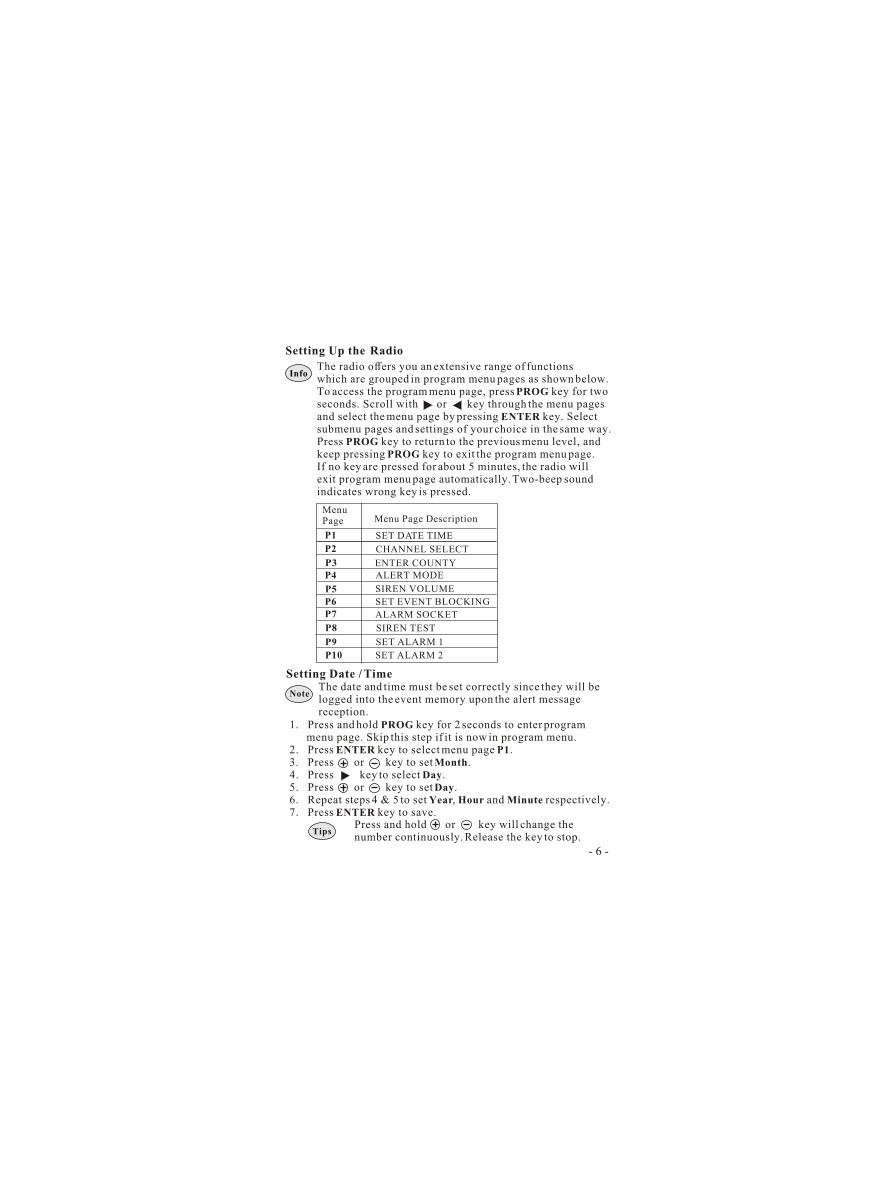
The radio offers you an extensive range of functionswhich are grouped in program menu pages as shown below.To access the program menu page, press PROG key for two seconds. Scroll with or key through the menu pagesand select the menu page by pressing ENTER key. Select submenu pages and settings of your choice in the same way.Press PROG key to return to the previous menu level, and keep pressing PROG key to exit the program menu page.If no key are pressed for about 5 minutes, the radio will exit program menu page automatically. Two-beep sound indicates wrong key is pressed.
MenuPage
SET DATE TIME
CHANNEL SELECT
ENTER COUNTYALERT MODE
SET EVENT BLOCKING
SIREN VOLUME
SIREN TEST
ALARM SOCKET
SET ALARM 1
SET ALARM 2
P1
P2
P3P4
P5
P6P7
P8
P9
P10
Menu Page Description
Setting Date / TimeThe date and time must be set correctly since they will belogged into the event memory upon the alert messagereception.
- 6 -
Info
Note
TipsPress and hold or key will change thenumber continuously. Release the key to stop.
1. Press and hold PROG key for 2 seconds to enter program menu page. Skip this step if it is now in program menu.2. Press ENTER key to select menu page P1. 3. Press or key to set Month.4. Press key to select Day.5. Press or key to set Day.6. Repeat steps 4 & 5 to set Year, Hour and Minute respectively.7. Press ENTER key to save.

Setting Weather Channel
Obtaining Weather Channel/County Codes From NOAA
1. Press and hold PROG key for 2 seconds to enter program menu page. Skip this step if it is now in program menu.2. Press key to menu page P2.3. Press ENTER key to select.
Storing County Code1. Press and hold PROG key for 2 seconds to enter program menu page. Skip this step if it is now in program menu.2. Keep pressing key to menu page P3.3. Press ENTER key to select.4. Press or key to select county option.
In order to receive alerts, the radio must be set to the correct weather channel and county code(s) (FIPS code) .To get these information for your area, call the NWStoll free number: 1-888-NWS-SAME (1-888-697-7263),or visit the NOAA web site: http://www.nws.noaa.gov/nwr/indexnw.htmIn the above web site, search the state and county for your area and then write down the Channel (Frequency)and county code(s). You may want to obtain the codesfor other local areas that you travel through to work. The radio memory can store up to 26 county codes (FIPScodes) to monitor alerts.
There are three (3) county options available foryour selection. They are: 1. ALL COUNTY CODES,2. MULTIPLE COUNTY and3. SINGLE COUNTY.
Press PROG key will leave this section without update.
- 7 -
Info
Hint
Info
4. Press key to set the weather channel as you desired.5. Press ENTER key to confirm and complete this section.
Press or key to adjust the volume. Hint
5. Press ENTER key to confirm.
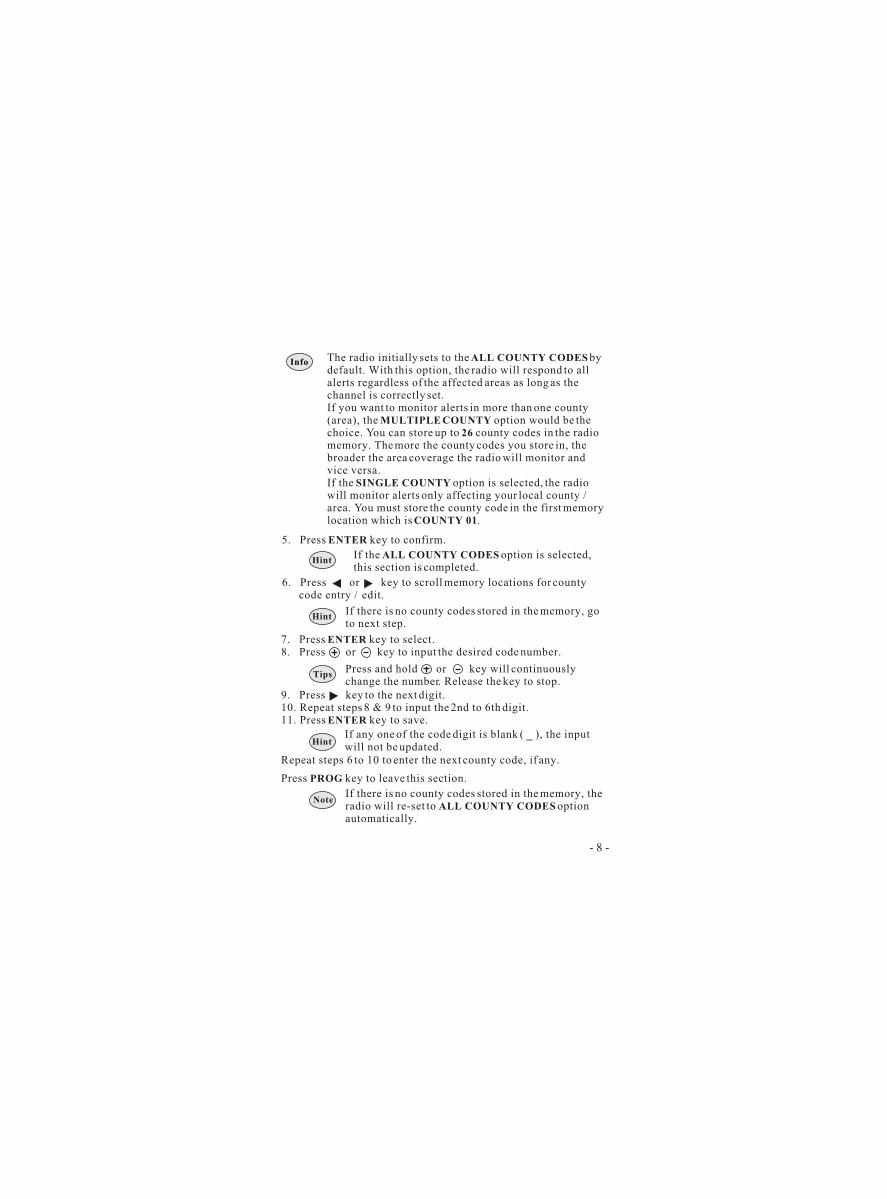
The radio initially sets to the ALL COUNTY CODES bydefault. With this option, the radio will respond to all alerts regardless of the affected areas as long as the channel is correctly set.If you want to monitor alerts in more than one county (area), the MULTIPLE COUNTY option would be the choice. You can store up to 26 county codes in the radiomemory. The more the county codes you store in, thebroader the area coverage the radio will monitor andvice versa. If the SINGLE COUNTY option is selected, the radio will monitor alerts only affecting your local county / area. You must store the county code in the first memorylocation which is COUNTY 01.
If the ALL COUNTY CODES option is selected,this section is completed.
If there is no county codes stored in the memory, goto next step.
6. Press or key to scroll memory locations for county code entry / edit.
7. Press ENTER key to select.8. Press or key to input the desired code number.
9. Press key to the next digit.10. Repeat steps 8 & 9 to input the 2nd to 6th digit.11. Press ENTER key to save.
Press and hold or key will continuouslychange the number. Release the key to stop.
Repeat steps 6 to 10 to enter the next county code, if any.
If any one of the code digit is blank ( _ ), the input will not be updated.
If there is no county codes stored in the memory, the radio will re-set to ALL COUNTY CODES option automatically.
Press PROG key to leave this section.
- 8 -
Info
Hint
Hint
Tips
Hint
Note

Setting Alert Mode
Alert Option Table:
You Hear:Alert Option: ALARM OUTSocket:
You See:
AlertEnable
VOICE
Alert Disable
8 seconds sire, then,voice broadcast the message (maximum15 minutes) or until you press STOP key.
Activates for 8 seconds LCD
displaysevent alertmessage andEffective Time.
5 minutes siren oruntil you press STOP key.
No siren and voice broadcast
Activates for 5 minutes or untilyou pressSTOP key.
SIREN
Not activate
At the VOICE option, after voice broadcast, the radiowill return to the previous state.
The Alert Option Table below describes how the radio will respond in both visual and audio upon receiving alerts. .
Alert Enable and VOICE options are preset by default.If you are satisfied with this setting, skip this section.
1. Press and hold PROG key for 2 seconds to enter program menu page. Skip this step if it is now in program menu.2. Keep pressing key to the menu page P4.3. Press ENTER key to select. 4. Press key to select the alert option either Alert Enable or Alert Disable..
6. Press key to select either VOICE or SIREN option.7. Press ENTER key to confirm and complete this section.
If Alert Disable is selected, this section is completed.
Press PROG key will leave this section without update.
5. Press ENTER key to confirm.
- 9 -
Info
Hint
Note
Hint

Setting Siren Volume
1. Press and hold PROG key for 2 seconds to enter program menu page. Skip this step if it is now in program menu.2. Keep pressing key to menu page P5.3. Press ENTER key to select. The siren volume is displayed.4. Press or key to adjust siren volume.5. Press ENTER key to save and complete this section.
The radio provides 16 siren volume level adjustment fordifferent noise environment and hearing impaired use.Siren mute option is available for non-critical events.
1. Press STOP key to stop and save the siren volume.2. The ALARM OUT socket becomes active during siren.
If the radio receives the below alert messages and thesiren volume has been set to 00 or SIREN MUTE, it willstill be siren at the volume level the same as to what youhave previously set the volume to hear radio broadcast.1. BIOLOGICAL HAZARD WARNING2. CIVIL DANGER WARNING3. CIVIL EMERGENCY MESSAGE 4. CHEMICAL HAZARD WARNING5. DAM BREAK WARNING6. CONTAGIOUS DISEASE WARNING7. CONTAMINATED WATER WARNING8. EMERGENCY ACTION NOTIFICATION9. EMERGENCY ACTION TERMINATION10 EARTHQUAKE WARNING11. IMMEDIATE EVACUATION12. FOOD CONTAMINATION WARNING13. HAZARDOUS MATERIALS WARNING14. HURRICANE WARNING15. INDUSTRIAL FIRE WARNING16. LOCAL AREA EMERGENCY17. LAW ENFORCEMENT WARNING18. LAND SLIDE WARNING19. NUCLEAR POWER PLANT WARNING20. RADIOLOGICAL HAZARD WARNING21. SHELTER IN-PLACE WARNING22. TORNADO WARNING23. TROPICAL STORM WARNING24. TSUNAMI WATCH25. TSUNAMI WARNING26. VOLCANO WARNING27. WILD FIRE WARNING
- 10 -
Info
Tips
Note

National Weather Service (NWS) Test SignalsPeriodic test signals (Required Weekly Test or RequiredMonthly Test) are sent out by NWS transmitter stations.Such test signals are used to let the users to confirm theiralert radios in use functioning properly. Upon receiving the test signal, the radio will display the test message on the LCD. The beep tone (for test signals)is disabled by default. You can enable the beep tone in program menu page P6.
If the radio has not received any messages (e.g. Test, Alert or Non-Alert messages) for consecutive 10 days, the LCD will display: RE-CHECK SET UP.
Receiving Alert MessageWhen the radio receives an alert message, it will displaythe Effective Time and respond according to the alert option set in program menu page P4 ( refer to AlertOption Table).The flashing LED indicatesthe alert level (Warning, Watch, or Advisory/ ).The radio's real time clock / date,
Statementtogether with the alert
message will be logged and saved into the event memory.
When the radio receives Non-Alert Messages (refer topage 14), it will not give audio and visual response but save the message to the event memory. If a new message is received, the Non-Alert Message will be cleared fromthe event memory right away.
For the scrolling message, press and hold STOP key willstop scrolling. Release the key will resume scrolling.
In such occasion, you have to1. check if the weather channel is set correctly,2. check if the county codes stored are right for your local area,3. check if the radio is in weak signal reception (statics),4. contact your local NOAA to see if they transmit test signals periodically. The RE-CHECK SET UP message will disappear in about5 minutes after any key is pressed. After that, You canreview it in the event memory (by pressing MEMORYkey). It will be cleared from the memory as soon as the radio decodes the next coming message.- 11 -
Info
Tips
Info
Note
Info

Alert / Test Message Table
1. REQUIRED WEEKLY TEST 2. REQUIRED MONTHLY TEST3. ADMINISTRATIVE MESSAGE4. AVALANCHE WATCH5. AVALANCHE WARNING
Event N0.
31. NATIONAL SILENT TEST32. NETWORK NOTIFICATION MESSAGE33. PRACTICE / DEMO34. POWER OUTAGE ADVISORY35. SPECIAL MARINE WARNING
26. HURRICANE WATCH27. ICEBERG WARNING28. NATIONAL INFORMATION CENTER29. NATIONAL PERIODIC TEST30. NATIONAL AUDIBLE TEST
21. FLASH FREEZE WARNING22. FREEZE WARNING23. HIGH WIND WATCH24. HIGH WIND WARNING25. HURRICANE STATEMENT
16. FLASH FLOOD WARNING17. FLOOD STATEMENT18. FLOOD WATCH19. FLOOD WARNING20. FIRE WARNING
11. DAM WATCH 12. DUST STORM WARNING 13. EVACUATION WATCH14. FLASH FLOOD STATEMENT15. FLASH FLOOD WATCH
6. BOIL WATER WARNING7. BLIZZARD WARNING8. CHILD ABDUCTION EMERGENCY 9. COASTAL FLOOD WATCH 10. COASTAL FLOOD WARNING
Beep (disabled by default) Beep (disabled by default)Beep (disabled by default)Watch Siren Warning Siren
Audio Alert Tone
Warning Siren Warning SirenAdvisory SirenWatch SirenWarning Siren
Watch Siren Warning Siren Watch Siren Advisory SirenWatch Siren
Warning Siren Advisory SirenWatch SirenWarning SirenWarning Siren
Warning Siren Warning SirenWatch SirenWarning SirenAdvisory Siren
Watch Siren Warning SirenBeep (disabled by default)Beep (disabled by default)Beep (disabled by default)
Beep (disabled by default)Beep (disabled by default)Beep (disabled by default)Advisory SirenWarning Siren
Alert Message on Display
- 12 -

- 13 -
Event No.
Audio Alert Tone
Warning Siren Warning Siren
Warning SirenWarning Siren
Warning Siren
49. BIOLOGICAL HAZARD WARNING50. CIVIL DANGER WARNING51. CIVIL EMERGENCY MESSAGE 52. CHEMICAL HAZARD WARNING53. CONTAMINATED WATER WARNING
54. DAM BREAK WARNING55. CONTAGIOUS DISEASE WARNING56. EMERGENCY ACTION NOTIFICATION57. EMERGENCY ACTION TERMINATION58. EARTHQUAKE WARNING
59. IMMEDIATE EVACUATION60. FOOD CONTAMINATION WARNING61. HAZARDOUS MATERIALS WARNING62. HURRICANE WARNING63. INDUSTRIAL FIRE WARNING
64. LOCAL AREA EMERGENCY65. LAW ENFORCEMENT WARNING66. LAND SLIDE WARNING67. NUCLEAR POWER PLANT WARNING68. RADIOLOGICAL HAZARD WARNING
41. 911 TELEPHONE OUTAGE EMERGENCY42. TROPICAL STORM WATCH43. WINTER STORM WATCH44. WINTER STORM WARNING45. WILD FIRE WATCH
Advisory Siren Watch SirenWatch SirenWarning SirenWatch Siren
Warning Siren Warning SirenWarning
SirenWarning Siren
SirenAdvisory
Warning Siren Warning Siren
Warning SirenWarning Siren
Warning Siren
Advisory Siren
Warning SirenWarning SirenWarning Siren
Warning Siren
Advisory SirenWatch SirenAdvisory Siren
46. UNRECOGNIZED STATEMENT47. UNRECOGNIZED WATCH48. UNRECOGNIZED EMERGENCY
Alert Message on Display
Alert Test Message Table (continue)
36. SPECIAL WEATHER STATEMENT37. SEVERE WEATHER STATEMENT38. SEVERE THUNDERSTORM WATCH39. SEVERE THUNDERSTORM WARNING40. TORNADO WATCH
Advisory Siren Advisory SirenWatch SirenWarning SirenWatch Siren

- 14 -
1. The audio alert tone can be tested in menu page P8, SIREN TEST.2. The alert messages from Event No. 1 to 48 in the Alert / Test Message Table can be individually set to block or unblock. See page 15 for details.
No. Audio Alert Tone Non-Alert Messages
1. TRANSMITTER BACKUP ON2. TRANSMITTER CARRIER OFF3. TRANSMITTER CARRIER ON4. TRANSMITTER PRIMARY ON
None
When the radio receiving Non-Alert Messages described in the table below, it will not generate audio tone nor display the message on the LCD butthe message will be saved to the event memory. Anew received message will over-write the Non-Alertmessage in the event memory.
Non - Alert Message Table
Event No. Audio Alert Tone Alert Message on Display
73. TSUNAMI WARNING74. VOLCANO WARNING75. WILD FIRE WARNING76. UNRECOGNIZED WARNING
Warning Siren Warning SirenWarning SirenWarning Siren
Alert Message Table (continue)
Note
Note
69. SHELTER IN-PLACE WARNING70. TORNADO WARNING71. TROPICAL STORM WARNING72. TSUNAMI WATCH
Warning Siren
Warning SirenWatch Siren
Warning Siren
Non - Alert Messages

Setting Event Blocking (defeat siren / voice)
1. Press and hold PROG key for 2 seconds to enter program menu page. Skip this step if it is now in program menu.2. Keep pressing key to menu page P6.3. Press ENTER key to select. 4. Press key to scroll through the alert messages to edit.
7. Press ENTER key to confirm.8. Repeat steps 4 to 7 to edit others if you desire.
Alert Disable (flashing) = Event BlockedAlert Enable (flashing) = Event Not Blocked
5. Press ENTER key to select the message to be edited.6. Press key to set it to block or not.
The Event No., Corresponding to the Alert MessageTable, is displayed on the LCD.
Some alert messages can be set to no audio alert (SIREN and VOICE) but display the messages on the LCD inorder not to annoy you frequently.These messages are grouped from Event No. 1 to 48 in the Alert Message Table. When the radio receives such a message e.g. REQUIRED WEEKLY TEST, and you havealready set it blocked, there will be no siren nor voicealert but display the message on the LCD.
The ALARM OUT socket will not be activated if theblocked event is received.
The messages below are initially set to blockat the factory (by default).
1. REQUIRED WEEKLY TEST 2. REQUIRED MONTHLY TEST3. ADMINISTRATIVE MESSAGE4. NATIONAL INFORMATION CENTER5. NATIONAL PERIODIC TEST6. NATIONAL AUDIBLE TEST7. NATIONAL SILENT TEST8. NETWORK NOTIFICATION MESSAGE9. PRACTICE / DEMO
Editing Event Blocking
Press PROG key to end this section.
- 15 -
Info
Note
Hint
Note
Hint

- 16 -
ALARM OUT Socket
If the socket is set to DC OUT, then, when the radio receives alerts, the socket will output 6 Volts DC (the voltage will be less when the radio is only powered with back-up batteries) to the external device. (the output polarity is shown underneath the socket) If the socket is set to SWITCH (as internal POWER SWITCH), then, when the radio receives alerts, t
turning onthe power of the external device / accessory.
For this function, the socket's electrical maximum rating is: DC voltage: 12 Volt. DC current: 350mA.
connected
he internal power switch will be 'closed' and to
connected Press STOP key to 'open' the internal switch.Refer to program menu page P8 (SIREN TEST) to testthis function, if necessary.
The ALARM OUT socket is provided on the back of theradio. The socket's output is compatible with home automation devices from suppliers such as Plug'n Power,X-10 or others. Connect a 3.5mm (1/8inch) phone jackwith polarity as indicated underneath the socket.
AUDIO OUT Socket
1. Press and hold PROG key for 2 seconds to enter program menu page. Skip this step if it is now in program menu.2. Keep pressing key to menu page P7.3. Press ENTER key to select. 4. Press key to select DC OUT or SWITCH option.5. Press ENTER key to confirm.To exit the program menu, press PROG key.
The socket outputs siren and voice broadcast signal to the external audio systems such as Public Address system, external speaker system and etc.When it is necessary to use this socket, connect the 3.5mm (1/8 inch) phone jack to the socket with polarityas indicated underneath the socket; the speaker voice is muted. The volume keys or , controls the audio output level.
Info
Info
Info

Siren Test
The SIREN TEST menu page P8 lets you to pre-hear and be familiar with the actual siren / beep tonegenerated by the radio when actual alerts / tests are received.In addition, the ALARM OUT socket function can be tested here. If desired, connect the external deviceto the socket before proceeding to the steps below.
1. The siren / beep tone will last for about 15 seconds.2. Press STOP key will stop the siren / beep tone.3. During the siren, the ALARM OUT socket will output control signal to trigger the external device.4. When the siren / beep tone stops, press PROG key to exit program menu page.
- 17 -
Info
Hint
1. Press and hold PROG key for 2 seconds to enter program menu page. Skip this step if it is now in program menu.2. Keep pressing key to menu page P8.3. The warning siren, watch siren, advisory siren and beep tone will be generated respectively each time you press or ENTER key.
Deleting County Code
7. Press or key to set all 6 digits to _ _ _ _ _ _ (blank) and press ENTER key to delete.To delete other county codes, repeat steps 6 & 7.
1. Press and hold PROG key for 2 seconds to enter program menu page. Skip this step if it is now in program menu.2. Keep pressing key to menu page P3.3. Press ENTER key to select.4. Select the MULTIPLE COUNTY option.5. Press ENTER key.6. Press or key to select the county code you want to delete.
Press PROG key to end this section.
A beep tone confirms the county code was deletion.
- 18 -
Tips

- 19 -
Blank

- 20 -
Blank

- 21 -
Blank

- 22 -
Blank

- 23 -
Operation
Review Alert Message- Press MEMORY key (in standby mode) to enter event memory mode.
LCD Back Light If the radio is powered up by AC adapter, press ENTER key toturn on / off LCD back light (toggle key function). If the radio is powered up by back up battery, press any key oncewill turn on the LCD back light for 10 seconds.
If the radio has not received any alert message eversince the radio powered up, the LCD will display:'NO EVENT MESSAGES'.
Press MEMORY key again, you will see the date / timestamp for the alert message at the time received. The message number is shown on the bottom right at this time.
Access to Program Menu Page- Press and hold PROG key for 2seconds.(in standby mode)
Review Stored County Codes- Press or key (in standby mode) to see the county code(s).
If alerts have been received before, you will see the alert message and the message number on the display. The highest message number is for the latest alert message.The effective time will be shown if the alert event is still in effect. The 'Effective Time OFF', ifshown, indicates the event effective time count down hasexpired but the emergency event may still continue. The radio's memory can store up to 25 alert messages. Ifthe memory is full and if a new message receives, the oldest message will be cleared and the new message willbe saved to the memory.
You must set the real time clock and date correctly toensure the message receiving time in event memory isproperly displayed.
Standby Mode : When the radio is ready for use, no voice on the speaker, and you have not pressed anykey, the radio is in standby mode.
Info
Info
Tips
Note

Turn On the Radio- Press RADIO key to turn on the radio.
Press RADIO key again, the weather channel frequency will be displayed for a short while.
- Press or key to adjust the speaker volume if desired.
- Press or key to scroll through other alert messages if any.- Press PROG key to exit event memory mode, if desired.
If no key pressed for 2 minutes, the event memory modewill be exit automatically.
- Press STOP key will turn off the radio voice and the radio will be in standby mode.
Turn Off the Radio
- 24 -
Hint
Tips
Tips Press and hold the key will adjust the volume continuously.

Alarm Clocks
1. Press and hold PROG key for 2 seconds to enter program menu page. Skip this step if it is now in program menu.2. Keep pressing key to menu page P9.3. Press ENTER key to select. 4. Press key to activate or de-activate the alarm clock.
The bell icon or indicates alarm 1 or 2 has beenactivated.
Follow steps 1 to 9 in above but in program menu page P10.
Activate / De-activate Alarm Clock 1:
Activate / De-activate Alarm Clock 2:
ALARM ON flashing - activate alarmclock.ALARM OFF flashing - de-activate alarmclock.
5. Press ENTER key to save.If you choose to de-activate the clock alarm, the setting is completed. Press PROG to exit program menu.
Stopping Alarm
Press STOP key to turn off the alarm.Press SNOOZE key will turn off the alarm for about 7 minutes.After that, the alarm will re-activate. The SNOOZE function can repeat for up to 1 hour.
If uninterrupted, the alarm will stop in 1 hour.
The radio offers two (2) alarm clocks. The default alarmtimes are 7:00 AM and 7:30 AM for alarm clock 1 and 2respectively.
6. Press or key to set hour .7. Press key to minute digits.8. Press or key to set minute.9. Press ENTER key to save.
To exit program menu, press PROG key.
Press and hold or key will change the numbercontinuously.
- 25 -
Info
Hint
Note
Tips
Hint
Note

- 26 -
Trouble Shooting:
Problem Possible Cause / Suggestion
No Sound/Power
No weather broadcast whenturning on the radio
- AC adapter is not securely connected to the wall outlet or AC adapter DC jack loose connection to the radio.
Poor radioreception
- Weak signal- Fully extend the antenna- Direct / rotate the antenna to have optimum reception.- When external antenna is used, ensure good connection between the radio and antenna.
The display reads RE-CHECK SET UP
- The radio has not received any message for the past consecutive 10 days.- the channel and /or the county code may not set correctly. Re-set them in program menu page P2, P3.- the radio is in poor reception, fully extend the antenna or re-locate radio to get optimum reception, - contact your local NOAA to check if they transmitted test signal periodically.
- The weather channel is not set correctly. re-set the channel in program menu page P2. - Contact your local NOAA to check if it is currently broadcasting.
- 27 -
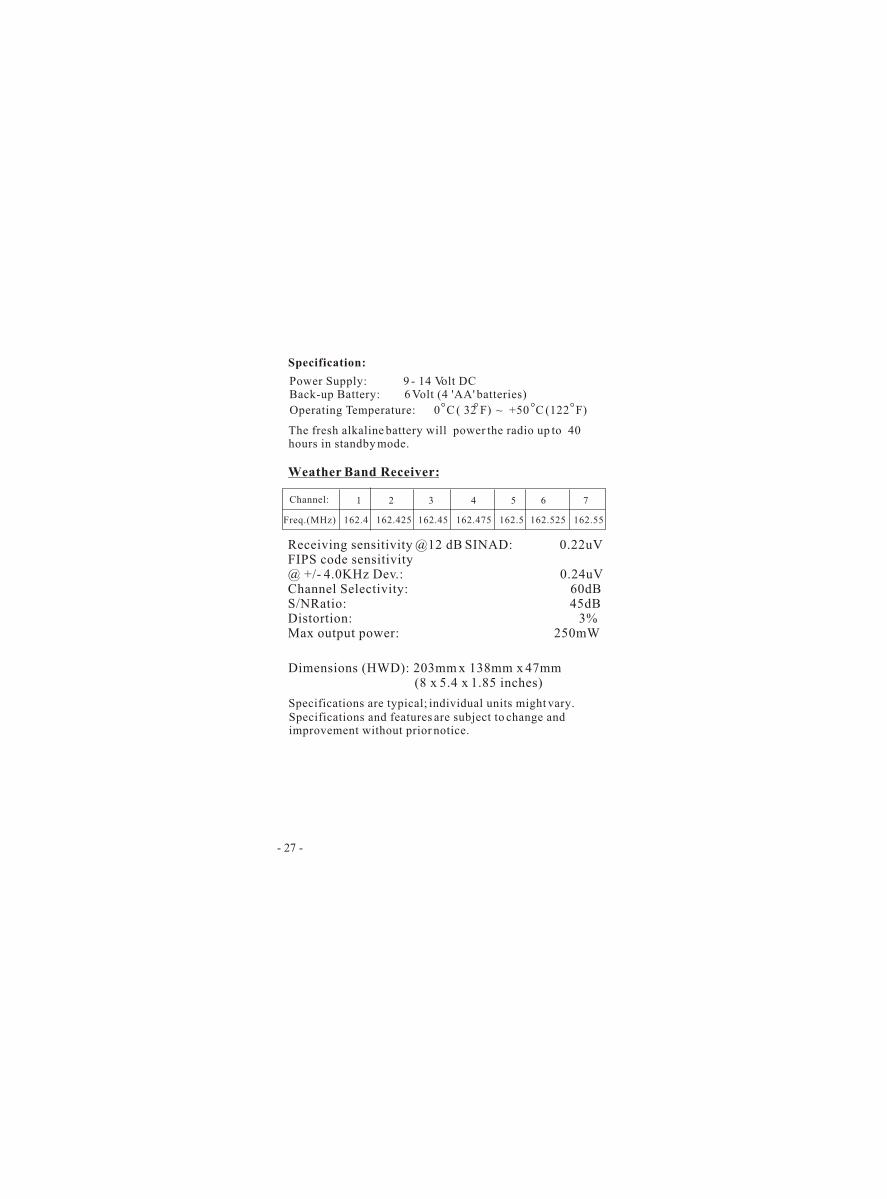
Specification:
Power Supply: 9 - 14 Volt DCBack-up Battery: 6 Volt (4 'AA' batteries)
Weather Band Receiver:
Receiving sensitivity @12 dB SINAD: 0.22uVFIPS code sensitivity@ +/- 4.0KHz Dev.: 0.24uVChannel Selectivity: 60dBS/NRatio: 45dBDistortion: 3%Max output power: 250mW
Dimensions (HWD): 203mm x 138mm x 47mm (8 x 5.4 x 1.85 inches)
Channel:
Freq.(MHz) 162.4 162.425 162.45 162.475 162.5 162.525 162.55
1 2 3 4 5 6 7
The fresh alkaline battery will power the radio up to 40 hours in standby mode.
Specifications are typical; individual units might vary.Specifications and features are subject to change and improvement without prior notice.
Operating Temperature: 0 C ( 32 F) ~ +50 C (122 F)

Service
If the Product fails to operate and it is covered by warranty,follow the procedures below:1. Pack the Radio and AC adapter in its original box. 2. Pack the original box in a suitable shipping carton. (Improper packing may result in damage during shipment). Enclose the followings to the package : A). A photocopy of the receipt showing the date of purchase. B). Detailed description of any problems. C). Your printed name, address and phone number that you can be contacted. D). A money order for $12.50 to cover shipping and handling.3. Ship the above package prepaid to the address below.
Address:
Please allow 3 to 4 weeks for the Product to be serviced.
If the Product is out of warranty or over one (1) year from thedate of purchase, ship the Product to the address below andthe repair charge is $44.00 plus $12.50 for shipping andhandling. Send only cashier check, money order or MasterCard / Visa Card number to:
Reecom Electronics Inc.3603 Woodlark Dr. Roswell, GA 30075
If Reecom Electrons, Inc. replaces the Product, the replaced Product will become the property of Reecom Electronics, Inc.
- 28 -

- 29 -
Limited One-Year WarrantySubject to the conditions of this Limited Warranty, Reecom Electronics Inc. (Reecom) warrants this Product to be free from defects in material and workmanship at the time of its original purchase by a consumer, and for a subsequent period of one (1) year.
1. This warranty does not cover (a) damage or failure resulting from liquid or due to acts of God, abuse, accident, misuse, improper or abnormal usage, failure to follow instructions, lightning or other incidence of excess voltage or current; (b) consumables such as back-up batteries; (c) cosmetic damage;(d) transportation, shipping or insurance costs; (e) costs of product removal, installation, set-up service adjustment or reinstallation of product in a vehicle or other mounting; or (f) any antennas, which may be a part of or included with the warranted Product. 2. This warranty does not cover Product failures caused by installation, modifications or hardware adjustment, or repaired or opening of the Product performed by a non-Reecom authorised person.3. If Reecom repairs or replaces the Product, the repaired or replaced Product shall be warranted for the remaining time of the original warranty period or for sixty (60) days from the date of repair, whichever is longer.
Reecom will at its option, either repair or replace the Product inaccordance with the terms and conditions stipulated herein.Reecom shall charge repair / replacement fee plus shipping handling fee if a returned Product is found not to be under warranty according to the conditions below.
CONDITIONS
Should your Product need warranty service, return the Product, freight prepaid, along with a copy of the original sales receipt specifying the date of purchase to:
Reecom Electronics Inc.3603 Woodlark Dr. Roswell, GA 30075

- 30 -
5. THERE ARE NO EXPRESS WARRANTIES, WHETHER WRITTEN OR ORAL, OTHER THAN THIS PRINTED LIMITED WARRANTY. ALL IMPLIED WARRANTIES, INCLUDING WITHOUT LIMITATION THE IMPLIED WARRANTIES OF MERCHANTABILITY OR FITNESS FOR A PARTICULAR PURPOSE, ARE LIMITED TO THE DURATION OF THIS LIMITED WARRANTY. IN NO EVENT SHALL Reecom BE LIABLE FOR INCIDENTAL OR CONSEQUENTIAL DAMAGES OF ANY NATURE WHATSOEVER, INCLUDING BUT NOT LIMITED TO LOST PROFITS OR COMMERCIAL LOSS, TO THE FULL EXTENT THOSE DAMAGES CAN BE DISCLAIMED BY LAW.
Reecom Electronics Inc.3603 Woodlark Dr. Roswell, GA 30075.
E-mail: [email protected] Site: www.reecominc.com
Printed in Hong Kong
Some states do not allow the exclusion or limitation of incidental or consequential damages, or limitation of the duration of implied warranties, so the preceding limitations or exclusions may not apply to you. Thiswarranty gives you specific legal rights, and you may also have other rights, which vary, from state to state.
Tel: (770) 641-9228Fax: (770) 641-1040
4. Damaging / tampering with any of the seals on the Product will void the warranty.
Note