model number: ps42309c instruction manual · note: countdown timer only works in on or off mode....
TRANSCRIPT

7-Day Digital TimerModel Number: PS42309C
After Sales Support - Help Desk
Telephone: 1300 663 907Internet: www.winplus.com.au
INSTRUCTION MANUAL

Description goes here
The product is guaranteed to be free from defects in workmanship and parts for a period of 12 months from the date of purchase. Defects that occur within this warranty period, under normal use and care, will be repaired, replaced or refunded at our discretion. The benefits conferred by this warranty are in addition to all rights and remedies in respect of the product that the consumer has under the Competition and Consumer Act 2010 and similar state and territory laws.
Our goods come with guarantees that cannot be excluded under the Australian Consumer Law. You are entitled to a replacement or refund for a major failure and for compensation for any other reasonably foreseeable loss or damage. You are also entitled to have the goods repaired or replaced if the goods fail to be of acceptable quality and the failure does not amount to a major failure.
7-Day Digital Timer
Warranty Details
The product is guaranteed to be free from defects in workmanship and parts for a period of 12 months from the date of purchase. Defects that occur within this warranty period, under normal use and care, will be repaired, replaced or refunded at our discretion. The benefits conferred by this warranty are in addition to all rights and remedies in respect of the product that the consumer has under the Competition and Consumer Act 2010 and similar state and territory laws. Our goods come with guarantees that cannot be excluded under the Australian Consumer Law. You are entitled to a replacement or refund for a major failure and for compensation for any other reasonably foreseeable loss or damage. You are also entitled to have the goods repaired or replaced if the goods fail to be of acceptable quality and the failure does not amount to a major failure.

3After Sales Support - Help Desk
Telephone: 1300 663 907Internet: www.winplus.com.au
Contents
Warranty 2
Contents 3
Welcome 4
General Safety Instructions 5
Product Features 6
Parts List / Technical Specifications 7
Product Setup 8
Product Operation 11
FAQ’S 17
Repair and Refurbished Goods or Parts Notice 19
4After Sales Support - Help Desk
Telephone: 1300 663 907Internet: www.winplus.com.au
WelcomeCongratulations on choosing to buy a BAUHN product. By doing so you now have the assurance and peace of mind that comes with purchasing a product made by one of the leading manufacturers. All products brought to you by BAUHN are manufactured to the highest standards of performance and safety and, as part of our philosophy of customer service and satisfaction, are backed by our comprehensive 1 Year Warranty. We hope you will enjoy using your purchase for many years to come.
®
®

5After Sales Support - Help Desk
Telephone: 1300 663 907Internet: www.winplus.com.au
Read this manual thoroughly before first use and keep it in a safe place for future reference, along with the warranty card, purchase receipt and carton. The safety precautions enclosed herein reduce the risk of fire, electric shock and injury when correctly adhered to. Follow all instructions and take notice of all warnings to reduce the risk of fire or electric shock.
• Do not expose this product to water, rain, moisture or dust. Electronic products of this kind should never be subjected to moisture or extreme temperatures.
• Do not attempt to open the product housing. There are no user-serviceable parts inside this product.
• Do not repair the unit yourself. If your device is not functioning correctly, disconnect the product from power, and contact after sales support.
• Supervise young children to ensure they do not play with the product.
• Do not expose to water, dust, moisture, chemicals, oils, or other liquids.
• Do not expose to naked flames or other heat sources.
• Do not drop or subject the device to undue shock.
• Keep device away from magnets at all times.
• Keep away from direct sunlight. Indoor use only.
• Unplug this device during lightning storms or when unused for long periods of time
• Do not operate or control heat producing devices connected to the Digital Timer unattended.
General Safety Instructions

6After Sales Support - Help Desk
Telephone: 1300 663 907Internet: www.winplus.com.au
Product Features
• 4 big buttons for easy operation• Large LCD display• 24 hour, 7 day programming• 16 Programmable On/Off cycles, up to 112 cycles per week• Reset function• Real time display• Easy changeover for daylight savings time• Random function
Control Buttons
Power Socket
Reset Button
WEDay of the Week
Time Display
Large LCD Display

7After Sales Support - Help Desk
Telephone: 1300 663 907Internet: www.winplus.com.au
Technical Specifications
– Voltage: 240V AC 50Hz – Max load current: 10A – Total load must not exceed 2400W – Working temperature: 0-50°C – Timer range: 1 minute – 168 hours (7days)
Parts List
• BAUHN 7-Day Digital Timer• Getting Started Guide• Warranty Card• Warranty Stickers• Instruction Manual
1. Current/Selected Day2. Hours / Minutes / Weeks Indicator3. Current/Selected Time4. Clock / Program Indicators
5. Operating Mode6. Countdown7. Daylight Savings Status8. Random Mode Indicator
MO TU WE TH FR SA SUHOURS MINUTES WEEKS
CLOCK
AUTO ON OFF COUNTDOWN
RANDOMSUMMERPROGRAM
1
2
3
48
7
65
Digital Display - Quick Guide
8After Sales Support - Help Desk
Telephone: 1300 663 907Internet: www.winplus.com.au
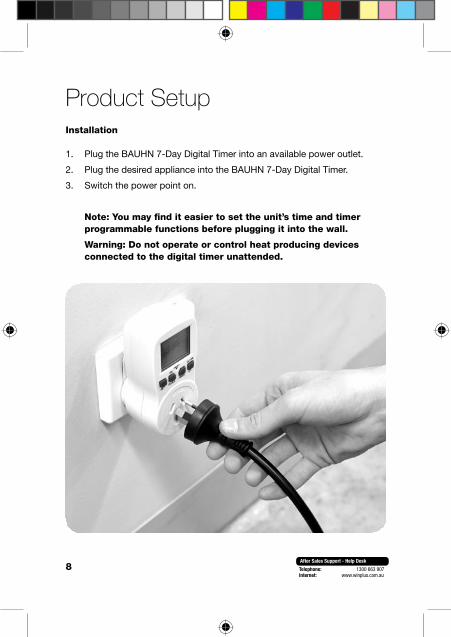
Product SetupInstallation
1. Plug the BAUHN 7-Day Digital Timer into an available power outlet.
2. Plug the desired appliance into the BAUHN 7-Day Digital Timer.
3. Switch the power point on.
Note: You may find it easier to set the unit’s time and timer programmable functions before plugging it into the wall.
Warning: Do not operate or control heat producing devices connected to the digital timer unattended.
9After Sales Support - Help Desk
Telephone: 1300 663 907Internet: www.winplus.com.au
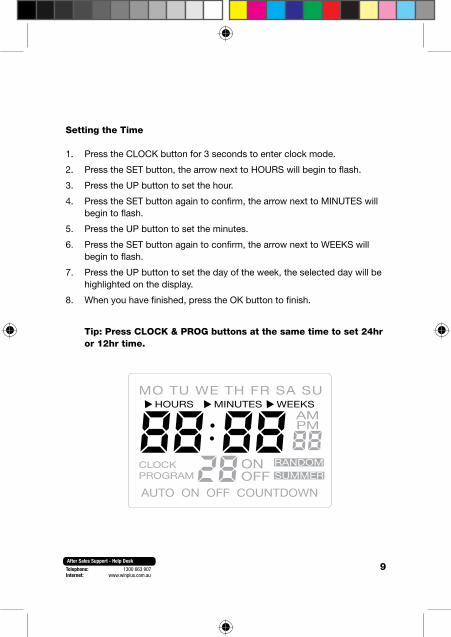
Setting the Time
1. Press the CLOCK button for 3 seconds to enter clock mode.
2. Press the SET button, the arrow next to HOURS will begin to flash.
3. Press the UP button to set the hour.
4. Press the SET button again to confirm, the arrow next to MINUTES will begin to flash.
5. Press the UP button to set the minutes.
6. Press the SET button again to confirm, the arrow next to WEEKS will begin to flash.
7. Press the UP button to set the day of the week, the selected day will be highlighted on the display.
8. When you have finished, press the OK button to finish.
Tip: Press CLOCK & PROG buttons at the same time to set 24hr or 12hr time.

10After Sales Support - Help Desk
Telephone: 1300 663 907Internet: www.winplus.com.au
Daylight Savings Time
1. Press the SET and CLOCK buttons at the same time to set SUMMER or WINTER time.
Note: During daylight savings, SUMMER is displayed on the bottom right of the screen. In winter mode, there is no special indicator on screen.

11After Sales Support - Help Desk
Telephone: 1300 663 907Internet: www.winplus.com.au
Operating Modes
1. The current operating mode is displayed on the bottom left of the screen.
2. Press the SET button to cycle through the operating modes.
3. The digital timer has 3 operating modes:
a. On: Always on mode, no timers are active. Power will run to connected device.
b. Off: Always off mode, no timers are active. Power will not run to connected device.
c. Auto: On / Off cycles will be controlled by the timer settings.
Product Operation

12After Sales Support - Help Desk
Telephone: 1300 663 907Internet: www.winplus.com.au
Timer Settings
1. Press the PROG button to enter timer mode. You can set up to 16 timers (on/off cycles).
2. The program cycle number will be displayed at the bottom of the screen. Press the PROG button repeatedly to scroll through all timers. Current settings for each timer are displayed on the screen.
3. Select the time you want to edit, press the SET button to edit the timer. The arrow next to HOURS will begin to flash.
4. Press the UP button to set the hour for the timer.
5. Press the SET button again to confirm, the arrow next to MINUTES will begin to flash.
6. Press the UP button to set the minutes.
7. Press the SET button again to confirm, the arrow next to WEEKS will begin to flash.
8. Use the UP button to cycle through the days of the week, and the days of the week cycles. You can choose from the following options:
- MO - TU- WE- TH- FR- SA- SU- MO TU WE TH FR- SA SU- MO TU WE TH FR SA- MO WE FR- TU TH SA- MO TU WE- TH FR SA- MO TU WE TH FR SA SU
13After Sales Support - Help Desk
Telephone: 1300 663 907Internet: www.winplus.com.au
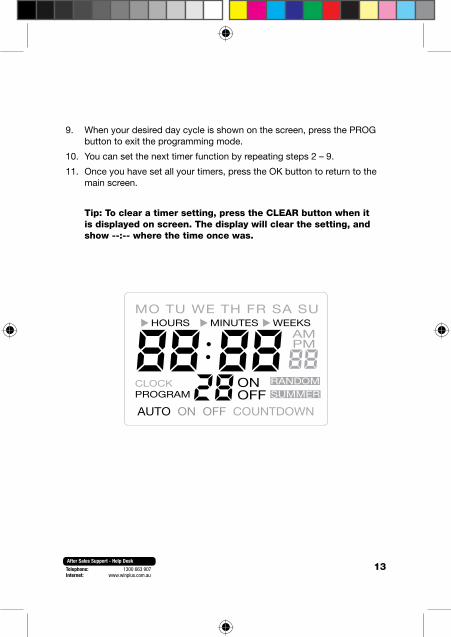
9. When your desired day cycle is shown on the screen, press the PROG button to exit the programming mode.
10. You can set the next timer function by repeating steps 2 – 9.
11. Once you have set all your timers, press the OK button to return to the main screen.
Tip: To clear a timer setting, press the CLEAR button when it is displayed on screen. The display will clear the setting, and show --:-- where the time once was.

14After Sales Support - Help Desk
Telephone: 1300 663 907Internet: www.winplus.com.au
Random Function
When the Random Function is active, the Digital Timer will automatically turn the connected device on or off during the hours of 6pm to 6am.
1. Press the SET & UP buttons at the same time to turn ON the random function. Random will be highlighted on the display.
2. Press the SET & UP buttons at the same time to turn OFF the random function. RANDOM will no longer be highlighted on the display.
3. Press the Set button until AUTO appears on the screen. Note the Random Function will only operate in AUTO mode.
Note: When active, the Random Function will override all timer settings from the hours of 6pm to 6am. Timer functions will operate as programmed outside of these hours.

15After Sales Support - Help Desk
Telephone: 1300 663 907Internet: www.winplus.com.au
Countdown Timer
The Digital Timer can be programmed to turn a device ON or OFF after a specified time using the Countdown Timer function
Note: Countdown timer only works in ON or OFF mode. Random function should be turned OFF.
If the digital timer is in ON mode when the countdown is activated, at the end of the countdown, the power will be switched to OFF.
If the digital timer is in OFF mode when the countdown is activated, at the end of the countdown, the power will be switched to ON.
1. Press the UP and PROG buttons at the same time to enter countdown mode.
2. Press the SET button, the arrow next to HOURS will begin to flash.
3. Use the UP button to set the number of hours desired for the countdown. You may select between 0 – 99 hours.
4. Press the SET button to confirm the number of hours, the arrow next to MINUTES will begin to flash.
5. Press the UP button to set the number of minutes between 0 – 59.
6. Press the OK button to confirm. The countdown will begin. COUNTDOWN will be highlighted on the display, and the time remaining in the countdown is shown on screen.
7. To cancel the countdown manually, press the UP and PROG buttons at the same time. COUNTDOWN will no longer be highlighted on the display.
16After Sales Support - Help Desk
Telephone: 1300 663 907Internet: www.winplus.com.au
Resetting the Timer
If you experience any problems or there is no response from the Digital Timer press the RESET button using a pen or pencil tip.

17After Sales Support - Help Desk
Telephone: 1300 663 907Internet: www.winplus.com.au
Frequently Asked QuestionsQuestion Answer
My timers are not turning off or on Ensure you have set the timer to AUTO
mode. Press the SET button to cycle
through ON/OFF/AUTO modes.
How can I temporarily turn off my
timers?
Set the timer to OFF mode. Press the SET
button to cycle through ON/OFF/AUTO
modes.
Can I use the BAUHN 7 Day Digital
Timer with a power board?
Yes, you can use the BAUHN 7-Day
Digital Timer with a power board as long
as the total rated maximum load through
the timer does not exceed 2400W.
Note: Do not exceed your power
board’s total maximum rated load.
Please refer to the rating plate on
your power board for its total rated
maximum load.
How much power does the BAUHN
7-Day Digital Timer use in standby?
The BAUHN 7 Day Digital Timer will
use about 1.3W while in standby mode,
recharging the internal battery.
How do I exit Countdown Mode? Press the PROG and UP buttons to exit
Countdown mode.
The Bauhn 7-Day Digital Timer is no
longer responding
Press the reset button to reset the timer to
default settings.

18After Sales Support - Help Desk
Telephone: 1300 663 907Internet: www.winplus.com.au
Notes

19After Sales Support - Help Desk
Telephone: 1300 663 907Internet: www.winplus.com.au
Description goes here
The product is guaranteed to be free from defects in workmanship and parts for a period of 12 months from the date of purchase. Defects that occur within this warranty period, under normal use and care, will be repaired, replaced or refunded at our discretion. The benefits conferred by this warranty are in addition to all rights and remedies in respect of the product that the consumer has under the Competition and Consumer Act 2010 and similar state and territory laws.
Our goods come with guarantees that cannot be excluded under the Australian Consumer Law. You are entitled to a replacement or refund for a major failure and for compensation for any other reasonably foreseeable loss or damage. You are also entitled to have the goods repaired or replaced if the goods fail to be of acceptable quality and the failure does not amount to a major failure.
7-Day Digital Timer
