model egh f8582g bk - elba
TRANSCRIPT

MODEL: EGH-F8582G(BK)

NOTICE
This product must not be disposed together with domestic waste. It has to be disposed at an authorized place for recycling of electrical and electronic appliances. By collecting and recycling waste, you help to save natural resources and make sure the product is disposed in an environmental friendly and healthy way.
-
REMOVE ALL PACKING MATERIALS FROM THIS PRODUCT BEFORE USING IT. THIS
APPLIANCE MUST BE INSTALLED ON A FLAT SURFACE. PLEASE ENSURE THE GAS
SUPPLY TO THIS APPLIANCE IS DISCONNECTED BEFORE INSTALLING.
Please read this instruction carefully. It is advisable to keep this instruction manual in a
safe place for future reference.
SAFETY PRECAUTIONS
1. Keep cooking appliance out of reach from children. Do not let them to operate theappliances without supervision.
2. To protect against the risk of fire, do not expose the appliance under direct sunlight orplace near to flammable materials.
3. This product is for household and indoor use only.4. This product is not intended for use by person (including children) with reduced
physical, sensory or mental capabilities unless they have been given supervision orinstruction concerning use of the appliance by a person responsible for their safety.
5. If the gas pipe or connector is damaged, it must be replaced immediately to avoidhazard.
6. Be sure to turn off the gas supplies and main cock if the unit is not in use.
WARNING - to reduce the risk of fire or injury to persons or property, please read and
follow below instructions carefully:
• Always operate the product from a source of the same gas pressure as indicated
on the product identification marking.
• Do not operate this product if it has malfunctioned, damaged hose or connector
or appears damaged in any way. Return the complete product to the place of
purchase for inspection, repair or replacement.
• This product should not be used in the place where high flammable material is
stored.
• Always turn off the gas supply from the gas tank when not in use, before assembling
or disassembling parts and before cleaning. Fully assemble the set before operating.
• Make sure all the burners are well positioned before operating the set. Do not
operate the set if the burners are not positioned properly.
• Always disconnect the gas source when moving the appliance from one location
to another.
• In case of gas leakage, turn off the main cock and ventilate the room immediately
by opening the windows and doors. Do not attempt to turn the wall switch of fans or
other electrical appliances on or off.
705 (W) x 375 (D)
4.8 4.8

CLEANING AND MAINTENANCE
Before cleaning, make sure the appliance is cool and the main cock is switched off. Clean
the appliance with a damp cloth with mild cleaner. Do not use chemical, steel, wooden or
abrasive cleaners to clean the appliance.
WARNING: DO NOT IMMERSE THE APPLIANCE INTO WATER. ENSURE THAT THE
SET IS UNPLUGGED FROM THE GAS SUPPLY BEFORE CLEANING.
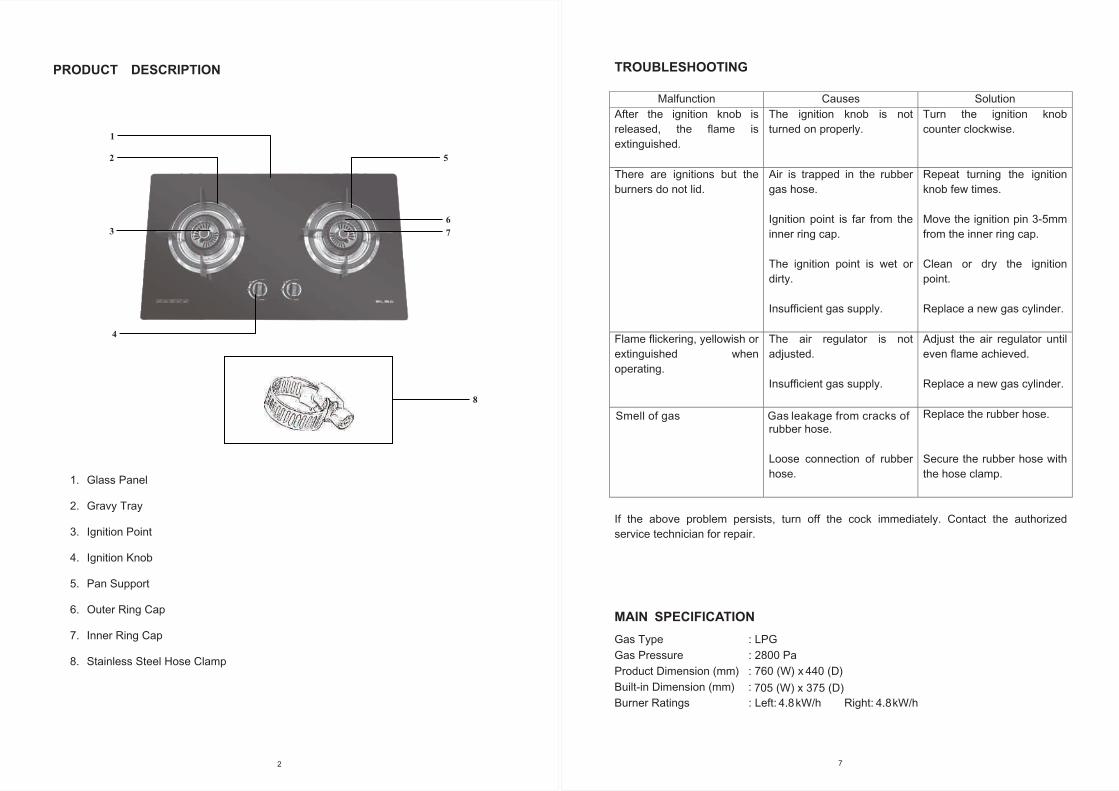
UNIT PARTS
Ring cap
Burners, Rlng caps, Pan support
Cook top and Control panel
Rubber hose
Cook top
MAINTENANCE
• Check if the slits In the ring caps are Toothbrush� clogged with dirt. Clean them with a nail, wire brush toothbrush, or the like.
�BumerCap • After washing the burner caps, dry them.
• Make sure the cap is mounted In place. �
_l (if the ring caps are not mounted property. � 1 Gas distribution may not be even.)
• When they gel dirty, use a soft cloth damped with a mild detergent solution to wipe off dirt. Do not use either thinner or benzine ror cleaning. This may damage plastic parts.
• Make sure the rubber hose is tightly secured over gas supply outlet and secure it wtth the rubber hose. If there are cracks In the hose, replace It.
• When they get dirty, use a soft cloth to wipe off dirt. • Make sure to wipe off dirt every-time when they get dirty, If they
are kept dirty for a long lime (more than one week), they will become stained or IL will become a cause of the stripping of the coating material.
• If the dirt Is difficult to wtpe off, use a soft cloth damped with a neutral detergent solution or water.
• The coating material is weak against a physical shock or high temperatures. The following must be kept in mind.
1. Do not use a swab. A polishing powder, a cleanser, a knife, an alkaline detergent or a bleaching solution to wipe off dirt.
2.Do not give a physical shock to the unit. 3.Do not give excessive heat to the unit by covering the burner
with a large Iron plate or a large pot. • It Is expcted that the section right below the grill support wtll be
scratched and a white surface comes out This will not cause any problems ln your daily use.
ASSEMBLY INSTRUCTIONS
1. Remove all packaging material from the product.
2. Make sure to install the stove in the room with no strong air flow.
3. Allow at least 15cm of space from kitchen walls, 100cm from the ceiling and 40cm
below the glass stove.
4. Make sure the glass stove is installed in the level position.
5. If the kitchen walls and cabinet are made of wood or any combustible material and the
spaces as specified cannot be maintained, you must install a heat-proof panel on the
kitchen wall so as to prevent possible fire hazard.
6. Open the battery box at the bottom of the glass stove, and install the battery according
to the correct polarity. Then close the battery box.
7. Lay the glass stove in the kitchen cabinet. Place the gravy tray and other parts on the
correct position.
8. Install the rubber hose with the stainless steel hose clamp. Use only approved rubber hose
and the length of not more than 2m. Do not bend, twist or stretch the hose.
Note: Make sure the hose clamp is properly fixed to avoid loose connection. Improper
connection of the rubber hose might result gas leakage and possess danger.
9. Avoid placing the gas cylinder near the glass stove.
ADJUSTMENT OF COMBUSTION (AIR & GAS MIXTURE)
Burner
Conduction tube--.,...,,...-1-
Air regulator---hl--r""---
Conduction tube
":/"�:'<-+-�.!!!!..-Air regulator
�1M""'=-----lnjector
Should the flame be: of a yellow color, burning black smoke, floating flame ordeposit black soot beneath the cooking utensils, this would indicate misadjustment of the air and gas mixture. To correct this, simply adjust the air regulator in the conduction tube in the following way:
• Move the regulator up or down to allow a greater or lesser flow of air.
• Adjust until pale blue flame is achieved.
3
