model 722 grinder - stalmic.com1. before starting grinder, have meat stomper within easy reach and...
TRANSCRIPT
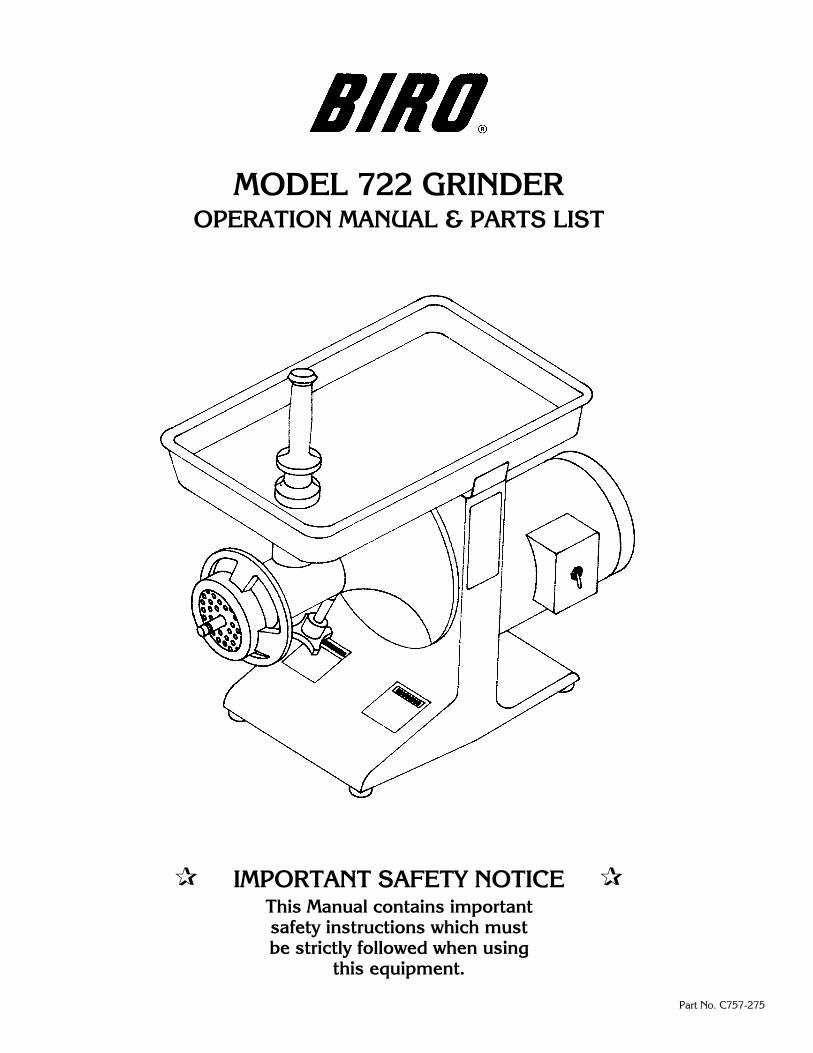
Part No. C757-275
� IMPORTANT SAFETY NOTICE �This Manual contains importantsafety instructions which mustbe strictly followed when using
this equipment.
MODEL 722 GRINDEROPERATION MANUAL & PARTS LIST
TABLE OF CONTENTS
Page
NOTICE TO OWNERS AND OPERATORS . . . . . . . . . . . . . . . . . . . . . . . . . . . . . . . . . . . . . . . . . 1
SAFETY TIPS . . . . . . . . . . . . . . . . . . . . . . . . . . . . . . . . . . . . . . . . . . . . . . . . . . . . . . . . . . . . . . . 2
INSTALLATION . . . . . . . . . . . . . . . . . . . . . . . . . . . . . . . . . . . . . . . . . . . . . . . . . . . . . . . . . . . . . 3
UNCRATING AND SET UP . . . . . . . . . . . . . . . . . . . . . . . . . . . . . . . . . . . . . . . . . . . . . . . . . . . 3
MOTOR WIRING AND ELECTRICAL REQUIREMENTS . . . . . . . . . . . . . . . . . . . . . . . . . . . . . . 4
OPERATION . . . . . . . . . . . . . . . . . . . . . . . . . . . . . . . . . . . . . . . . . . . . . . . . . . . . . . . . . . . . . . . . 5
TO PROCESS PRODUCT . . . . . . . . . . . . . . . . . . . . . . . . . . . . . . . . . . . . . . . . . . . . . . . . . . . . 5
CLEANING . . . . . . . . . . . . . . . . . . . . . . . . . . . . . . . . . . . . . . . . . . . . . . . . . . . . . . . . . . . . . . . . . 6
MAINTENANCE . . . . . . . . . . . . . . . . . . . . . . . . . . . . . . . . . . . . . . . . . . . . . . . . . . . . . . . . . . . . . 7
HIGH TORQUE DRIVE SYSTEM . . . . . . . . . . . . . . . . . . . . . . . . . . . . . . . . . . . . . . . . . . . . . . . 7
BEARINGS . . . . . . . . . . . . . . . . . . . . . . . . . . . . . . . . . . . . . . . . . . . . . . . . . . . . . . . . . . . . . . . 7
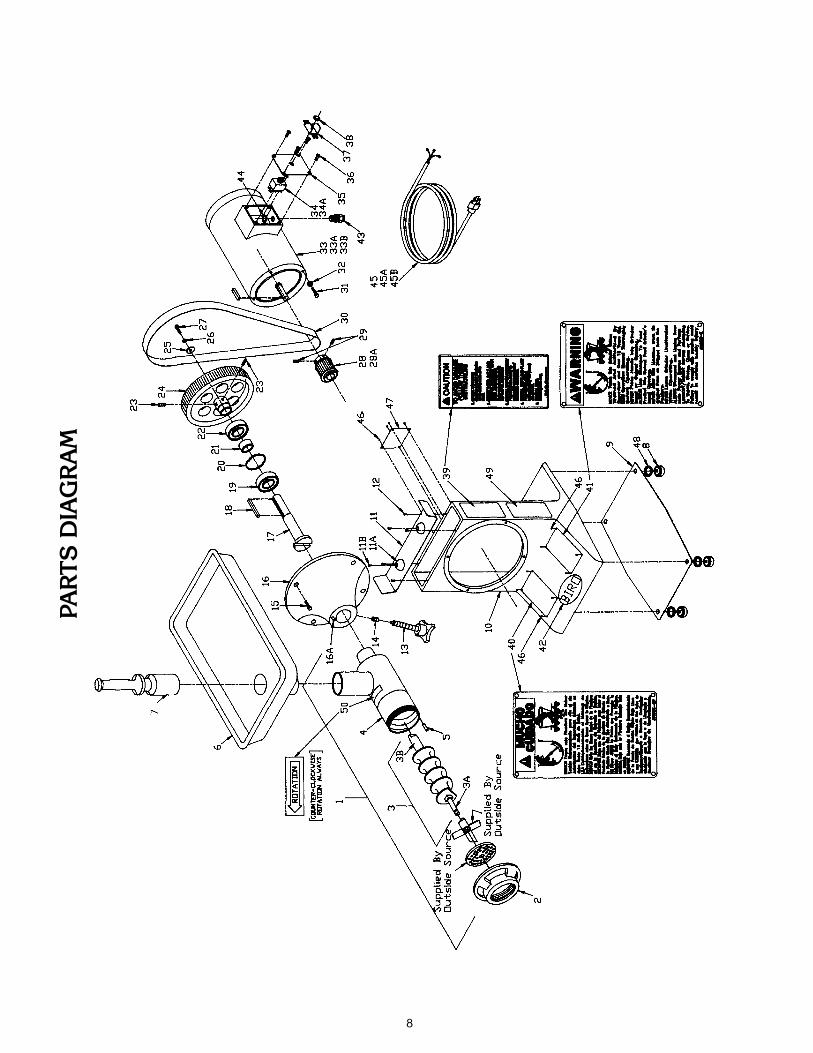
PARTS DIAGRAM . . . . . . . . . . . . . . . . . . . . . . . . . . . . . . . . . . . . . . . . . . . . . . . . . . . . . . . . . . . . 8
PARTS LIST, PARTS ORDERING . . . . . . . . . . . . . . . . . . . . . . . . . . . . . . . . . . . . . . . . . . . . . . . . 9
WIRING DIAGRAMS. . . . . . . . . . . . . . . . . . . . . . . . . . . . . . . . . . . . . . . . . . . . . . . . . . . . . . . . 10-13
OPERATOR'S SIGNATURE PAGE . . . . . . . . . . . . . . . . . . . . . . . . . . . . . . . . . . . . . . . . . . . . . . . . 14
LIMITED WARRANTY . . . . . . . . . . . . . . . . . . . . . . . . . . . . . . . . . . . . . . . . . . . . . . . . . . . . . . . . . 16
NOTICE TO OWNERS AND OPERATORS
BIRO’s products are designed to process food products safely and efficiently. Unless the oper-ator is properly trained and supervised, however, there is the possibility of a serious injury. It is theresponsibility of the owner to assure that this machine is used properly and safely, strictly followingthe instructions contained in this Manual and any requirements of local law.
No one should use or service this machine without proper training and supervision. All opera-tors should read and be thoroughly familiar with the procedures contained in this Manual. Even soBIRO cannot anticipate every circumstance or environment in which its products will be used.You, the owner and operator, must remain alert to the hazards posed by the function of this equip-ment – particularly the ROTATING GRINDING WORM, which can severely injure an inattentive op-erator amputating fingers and limbs. No one under eighteen (18) years of age should operate thisequipment. If you are uncertain about a particular task, ask your supervisor.
This Manual contains a number of safe practices in the SAFETY TIP section. Additional warn-ings are placed throughout the Manual. Warnings related to your personal safety are indicated by:
Warnings related to possible damage are indicated by:
BIRO also has provided warning labels on the equipment. If any warning label or Manual be-comes misplaced, damaged, or illegible, please contact your nearest Distributor or BIRO directlyfor a replacement.
Remember, however, this Manual or the warning labels do not replace the need to be alert andto use your common sense when using this equipment.
— NOTE —"A copy of this manual is included with each Model 722
Grinder."
"The descriptions and illustrations contained in this manualare not binding. The manufacturer reserves the right to intro-duce any modifications without updating the manual."
1
OR
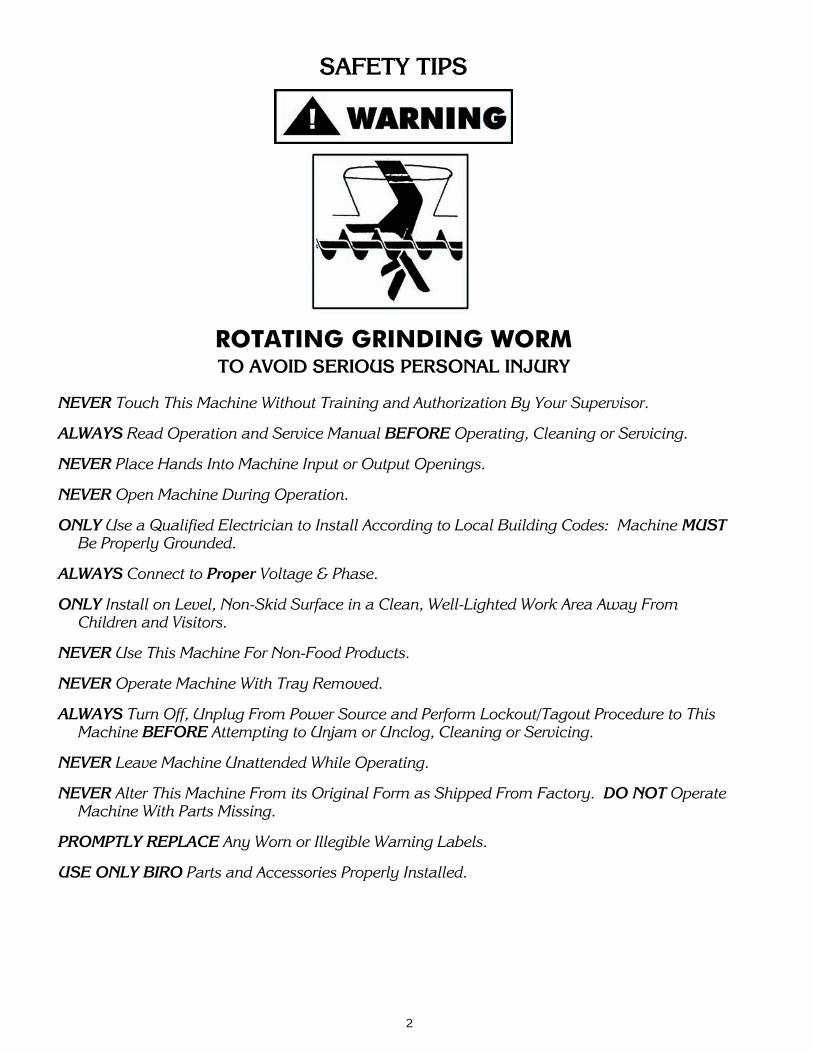
SAFETY TIPS
ROTATING GRINDING WORM
TO AVOID SERIOUS PERSONAL INJURY
NEVER Touch This Machine Without Training and Authorization By Your Supervisor.
ALWAYS Read Operation and Service Manual BEFORE Operating, Cleaning or Servicing.
NEVER Place Hands Into Machine Input or Output Openings.
NEVER Open Machine During Operation.
ONLY Use a Qualified Electrician to Install According to Local Building Codes: Machine MUSTBe Properly Grounded.
ALWAYS Connect to Proper Voltage & Phase.
ONLY Install on Level, Non-Skid Surface in a Clean, Well-Lighted Work Area Away FromChildren and Visitors.
NEVER Use This Machine For Non-Food Products.
NEVER Operate Machine With Tray Removed.
ALWAYS Turn Off, Unplug From Power Source and Perform Lockout/Tagout Procedure to ThisMachine BEFORE Attempting to Unjam or Unclog, Cleaning or Servicing.
NEVER Leave Machine Unattended While Operating.
NEVER Alter This Machine From its Original Form as Shipped From Factory. DO NOT OperateMachine With Parts Missing.
PROMPTLY REPLACE Any Worn or Illegible Warning Labels.
USE ONLY BIRO Parts and Accessories Properly Installed.
2

INSTALLATION
TO AVOID SERIOUS PERSONAL INJURYPROPERLY INSTALL EQUIPMENT IN ADEQUATE WORK AREA
ALWAYS Use Qualified Technician and Electrician for Installation.
ALWAYS Connect to Proper Voltage & Phase.
ALWAYS Install Equipment in Work Area with Adequate Light and Space Away From Childrenand Visitors.
ONLY Operate on a Solid, Level, Non-Skid Surface.
NEVER Bypass, Alter, or Modify This Equipment in Any Way From Its Original Condition.
NEVER Operate With Tray Removed.
NEVER Operate Without all Warning Labels Attached and Owner/Operator Manual Available tothe Operator.
UNCRATING AND SET UP
1. Read this Manual thoroughly before installation and operation. Do not proceed with installation and operation ifyou have any questions or do not understand anything in this Manual. Contact your local Distributor, or BIROfirst.
2. Install machine on a level, solid, non-skid surface in a well-lighted work area away from children and visitors.
3. This machine is complete except for a knife and plate. There is a bowl shipping plug (stamped steel) placed inthe output end of the grinding bowl to retain the grinding worm during shipment. REMOVE THE BOWLSHIPPING PLUG AND THE GRINDING WORM.
4. After checking and making sure the power supply is correct, plug in your machine. NEVER OPERATEMACHINE WITHOUT TRAY INSTALLED.
5. Machine must be properly grounded. Use qualified electrician to install according to building codes.
6. A toggle switch that activates the internal on/off switch is located on the motor junction box.
7. Lift the toggle handle up to “ON” position. CHECK THE ROTATION OF THE WORM DRIVE SHAFTROTATION MUST BE COUNTER-CLOCKWISE as indicated by the rotation decal affixed to the grinding bowl.ROTATION MUST ONLY BE CHECKED WITH THE GRINDING WORM REMOVED, otherwise seriousirreparable damage may occur to grinding components. Push toggle handle down to “OFF” position.
3
8. If machine runs clockwise (backwards), it must be rewired to correct rotation, otherwise serious irreparabledamage may occur to grinding components.
9. Check that the grinding bowl is properly seated and that the bowl lock assembly is tight. Insert worm assemblyinto grinding bowl, place knife (sharp edges out) onto the square end of the worm assembly. The breaker plateslides over the worm knife drive pin, and is held from rotating by pins in the grinding bowl. Put on the retainingring.
ONLY HAND TIGHTEN RETAINING RINGFor best results, use knife and plate as a set. Do not operate machine for any period of time without productin the grinding bowl. This will cause heating and dulling of the knife and plate.
10. Check placement of all warning labels and Manual. Machine is now ready for trained operators to processproduct.
11. Contact your local Distributor or BIRO directly if you have any questions or problems with the installation oroperation of this machine.
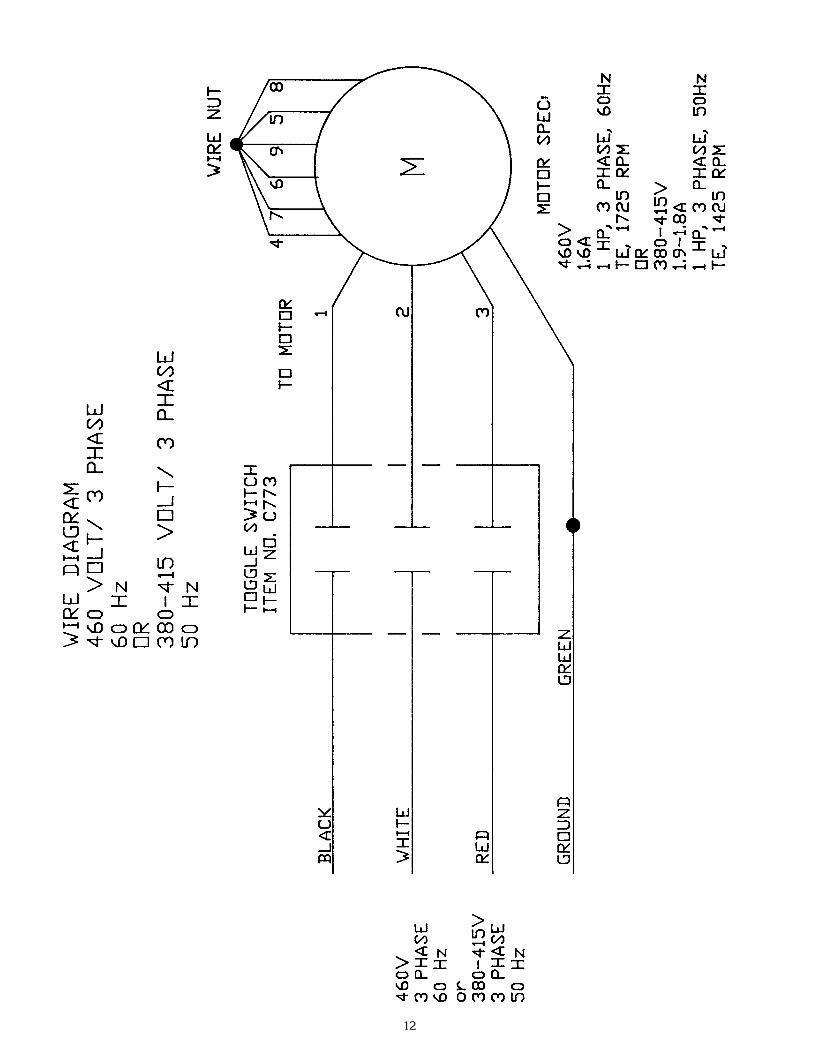
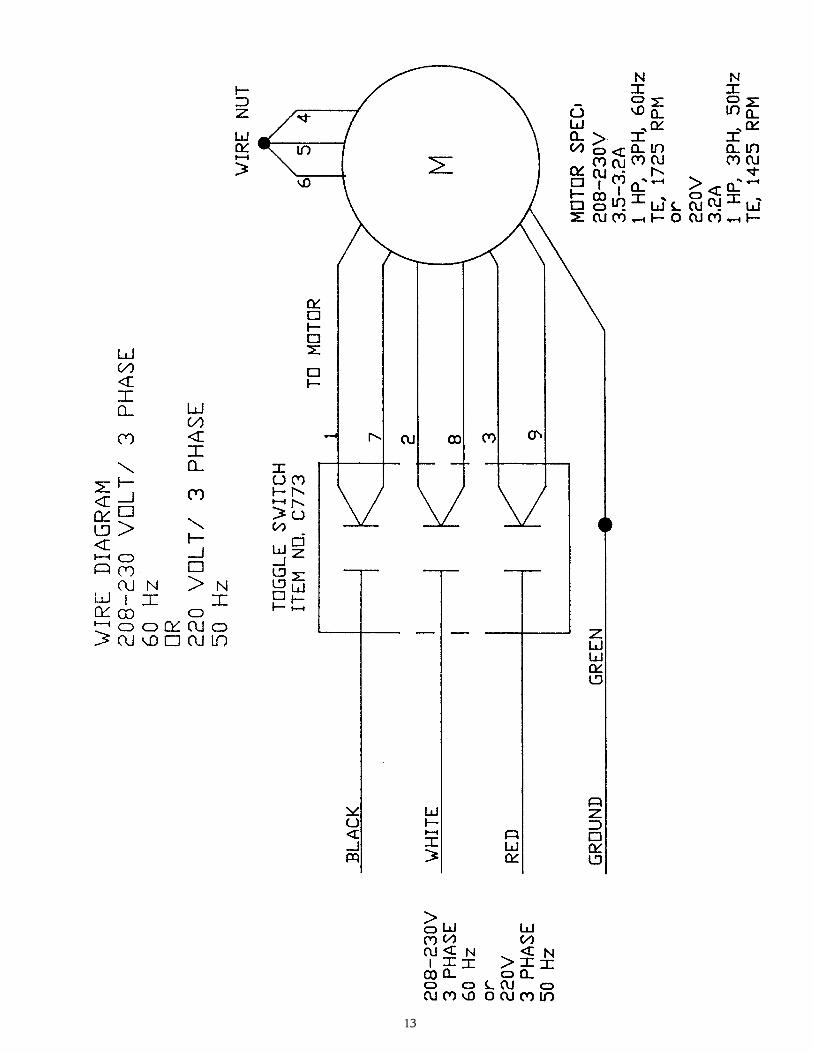
MOTOR WIRING AND ELECTRICAL REQUIREMENTS
(1) Interchange of current is made in motor outlet box. Leads are properly marked. Changing instructions areon the motor plate or motor outlet box.
(2) All grinders are wired for the voltage as ordered. Be sure motor specifications (voltage, cycle, phase) matchpower supply line. Be sure line voltage is up to specification.
(3) Electrical connections to be in accordance with safety codes and National Electrical Code.
(4) Rated voltage of the unit shall be identical with full supply voltage.
(5) Voltage drop on the supply line shall not exceed 10% of full supply voltage
(6) The feederline conductor size in the raceway from the branch circuit to the unit must be correct to assureadequate voltage under heavy starting and short overload conditions.
(7) The BIRO Manufacturing Company is not responsible for permanent wiring, connection or installation.
4
NOTE TO OWNER AND ELECTRICIAN: IF THIS MACHINE IS NOT CORDAND PLUG CONNECTED TO THE ELECTRICAL SUPPLY SOURCE, THEN ITSHOULD BE EQUIPPED WITH, OR CONNECTED TO, A LOCKABLE,MANUALLY-OPERATED DISCONNECT SWITCH (OSHA 1010.147).
OPERATION
ROTATING GRINDING WORM
TO AVOID SERIOUS PERSONAL INJURY
ONLY Properly Trained Personnel Should Use This Equipment.
NEVER Place Hands Into Machine Input or Output Openings.
NEVER Open Machine During Operation.
DO NOT Wear Gloves While Operating.
DO NOT Tamper With, Bypass, Alter, or Modify This Equipment in Any Way From Its OriginalCondition.
NEVER Operate Machine With Tray Removed.
ALWAYS Turn Off, Unplug From Power Source and Perform Lockout/Tagout Procedure to ThisMachine Before Unjamming, Unclogging, Cleaning or Servicing.
NEVER Leave Unattended While Operating.
NEVER Operate Without All Warning Labels Attached and Owner/Operator Manual Available tothe Operator.
A. TO PROCESS PRODUCT
1. Before starting grinder, have meat stomper within easy reach and container for receiving ground product atoutput end of grinding bowl.
2. Turn toggle to “ON” position. Look down grinder bowl and make certain grinding worm is turning in theproper direction (counter-clockwise).
3. Carefully push unground product to top opening of grinding bowl and let drop to grinding worm. Product willthen be ground out.
DO NOT REACH DOWN BOWL OPENING
4. Use meat stomper to assist any product that should “bridge up” in grinding bowl opening.
5. When finished grinding turn toggle handle to “OFF” position and unplug grinder from power source andperform lockout/tagout procedures.
5
CLEANING
ROTATING GRINDING WORM
TO AVOID PERSONAL INJURY
ALWAYS Turn Off, Unplug From Power Source and Perform Lockout/Tagout Procedure to ThisMachine BEFORE Cleaning or Servicing.
ONLY Use Recommended Cleaning Equipment, Materials and Procedures.
NEVER Spray Water or Other Liquid Substances Directly at Motor, Power Switch or any OtherElectrical Components.
ALWAYS Thoroughly Clean Equipment at Least Daily.
CLEANING THE BIRO TABLE TOP GRINDER
1. Disconnect grinder from power source and perform lockout/tagout procedures.
2. Remove grinding bowl end ring, breaker plate, knife and grinding worm.
DO NOT POWER SPRAY DIRECTLY AT ELECTRICAL COMPONENTS
3. Machine is now ready to be cleaned using warm soapy water and rinsed with clean water. Machine may becleaned by power spray washing, taking care to not spray directly at any electrical controls.
4. The grinding bowl can be removed for cleaning if desired. This is accomplished by unscrewing the bowl lockassembly.
5. After machine has been cleaned and allowed to air dry, all exposed metal surfaces should be coated with a goodfood grade light oil or grease.
6
CLEANING THE BOWL - RING AND WORMCARE OF TIN COATED PRODUCTS
(DO’S AND DON’TS)
1. Do not clean with abrasive cleaning materials, such as brillo pads or metal scrapers. Tin is a soft metal and should be cleaned with a soft cloth and dried.
2. Do not use a cleaning agent containing a high percentage of free alkali or acid.3. Do not use a detergent containing a high percentage of tri-sodium phosphate or meta-silicate.
Tin is reactive to both.4. Rinse well and dry thoroughly after washing to remove agents that may be reactive to tin.5. If sterilizing agent containing chlorine is used, the tinned surface must be thoroughly rinsed.
Chlorine is corrosive to tin.6. Dry thoroughly after rinsing and store in a dry environment.7. If water is exceptionally hard, drying will be necessary to prevent spotting.
MAINTENANCE
ROTATING GRINDING WORM
TO AVOID SERIOUS PERSONAL INJURY
ALWAYS Turn Off, Unplug From Power Source and Perform Lockout/Tagout Procedure to ThisMachine BEFORE Servicing.
NEVER Touch This Machine Without Training and Authorization By Your Supervisor.
NEVER Place Hands Into Machine Input or Output Openings.
NEVER Bypass, Alter, or Modify This Equipment in Any Way From Its Original Condition.
PROMPTLY REPLACE Any Worn or Illegible Labels.
USE ONLY GENUINE BIRO Parts and Accessories Properly Installed.
A. HIGH TORQUE DRIVE SYSTEM
The Model 722 is driven by a High Torque Drive system for power transmissions.“No Lubrication” is required (in fact) be sure no lubricant comes in contact with the sprockets or belt.
To insure a long life to the drive components:
1. Be sure the motor shaft and main drive shaft are parallel.
2. Be sure sprockets are in alignment.
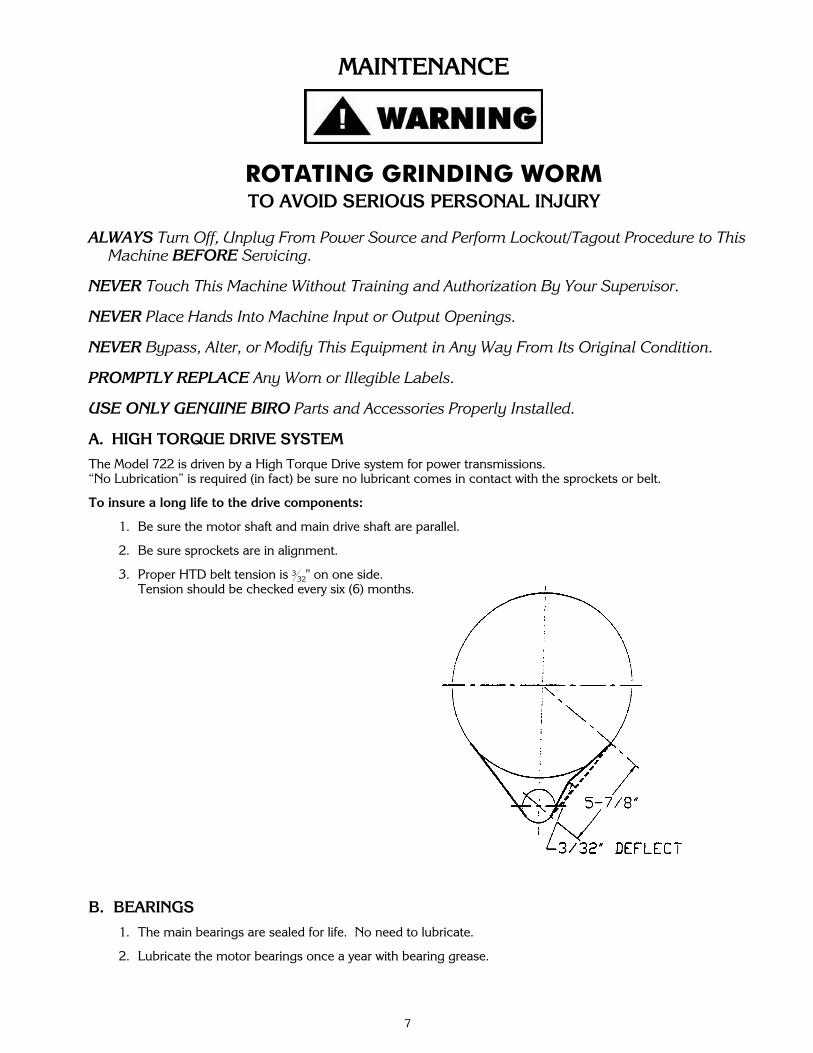
3. Proper HTD belt tension is 332" on one side.
Tension should be checked every six (6) months.
B. BEARINGS
1. The main bearings are sealed for life. No need to lubricate.
2. Lubricate the motor bearings once a year with bearing grease.
7
8
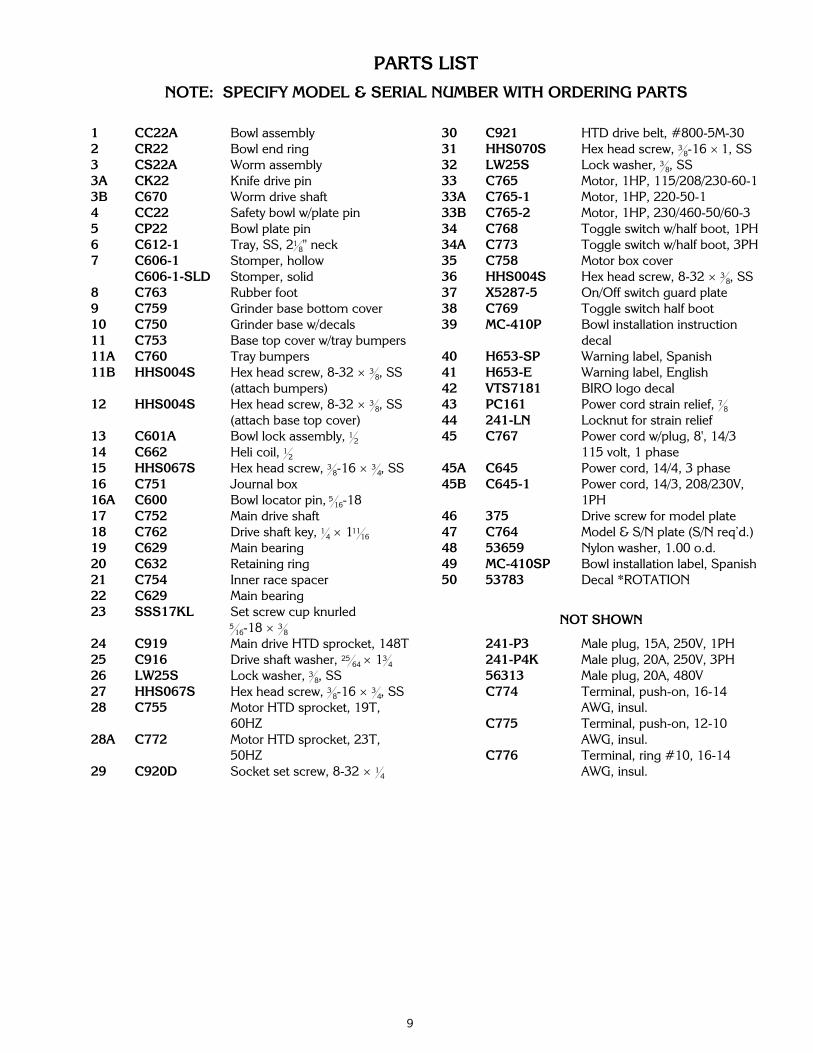
PARTS LIST
NOTE: SPECIFY MODEL & SERIAL NUMBER WITH ORDERING PARTS
9
1 CC22A Bowl assembly
2 CR22 Bowl end ring
3 CS22A Worm assembly
3A CK22 Knife drive pin
3B C670 Worm drive shaft
4 CC22 Safety bowl w/plate pin
5 CP22 Bowl plate pin
6 C612-1 Tray, SS, 218" neck
7 C606-1 Stomper, hollow
C606-1-SLD Stomper, solid
8 C763 Rubber foot
9 C759 Grinder base bottom cover
10 C750 Grinder base w/decals
11 C753 Base top cover w/tray bumpers
11A C760 Tray bumpers
11B HHS004S Hex head screw, 8-32 �3
8, SS
(attach bumpers)
12 HHS004S Hex head screw, 8-32 �3
8, SS
(attach base top cover)
13 C601A Bowl lock assembly, 12
14 C662 Heli coil, 12
15 HHS067S Hex head screw, 38-16 �
34, SS
16 C751 Journal box
16A C600 Bowl locator pin, 516-18
17 C752 Main drive shaft
18 C762 Drive shaft key, 14 � 111
16
19 C629 Main bearing
20 C632 Retaining ring
21 C754 Inner race spacer
22 C629 Main bearing
23 SSS17KL Set screw cup knurled5
16-18 �3
8
24 C919 Main drive HTD sprocket, 148T
25 C916 Drive shaft washer, 2564 � 13
4
26 LW25S Lock washer, 38, SS
27 HHS067S Hex head screw, 38-16 �
34, SS
28 C755 Motor HTD sprocket, 19T,
60HZ
28A C772 Motor HTD sprocket, 23T,
50HZ
29 C920D Socket set screw, 8-32 �1
4
30 C921 HTD drive belt, #800-5M-30
31 HHS070S Hex head screw, 38-16 � 1, SS
32 LW25S Lock washer, 38, SS
33 C765 Motor, 1HP, 115/208/230-60-1
33A C765-1 Motor, 1HP, 220-50-1
33B C765-2 Motor, 1HP, 230/460-50/60-3
34 C768 Toggle switch w/half boot, 1PH
34A C773 Toggle switch w/half boot, 3PH
35 C758 Motor box cover
36 HHS004S Hex head screw, 8-32 �3
8, SS
37 X5287-5 On/Off switch guard plate
38 C769 Toggle switch half boot
39 MC-410P Bowl installation instruction
decal
40 H653-SP Warning label, Spanish
41 H653-E Warning label, English
42 VTS7181 BIRO logo decal
43 PC161 Power cord strain relief, 78
44 241-LN Locknut for strain relief
45 C767 Power cord w/plug, 8', 14/3
115 volt, 1 phase
45A C645 Power cord, 14/4, 3 phase
45B C645-1 Power cord, 14/3, 208/230V,
1PH
46 375 Drive screw for model plate
47 C764 Model & S/N plate (S/N req’d.)
48 53659 Nylon washer, 1.00 o.d.
49 MC-410SP Bowl installation label, Spanish
50 53783 Decal *ROTATION
NOT SHOWN
241-P3 Male plug, 15A, 250V, 1PH
241-P4K Male plug, 20A, 250V, 3PH
56313 Male plug, 20A, 480V
C774 Terminal, push-on, 16-14
AWG, insul.
C775 Terminal, push-on, 12-10
AWG, insul.
C776 Terminal, ring #10, 16-14
AWG, insul.
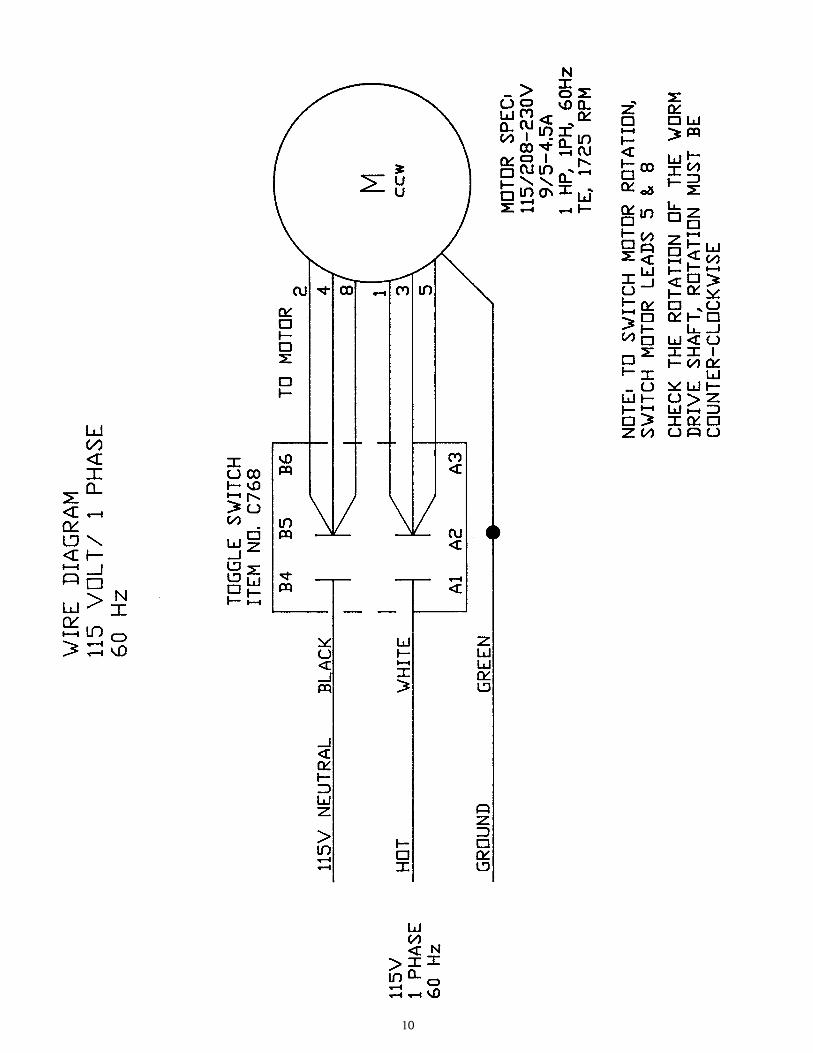
10
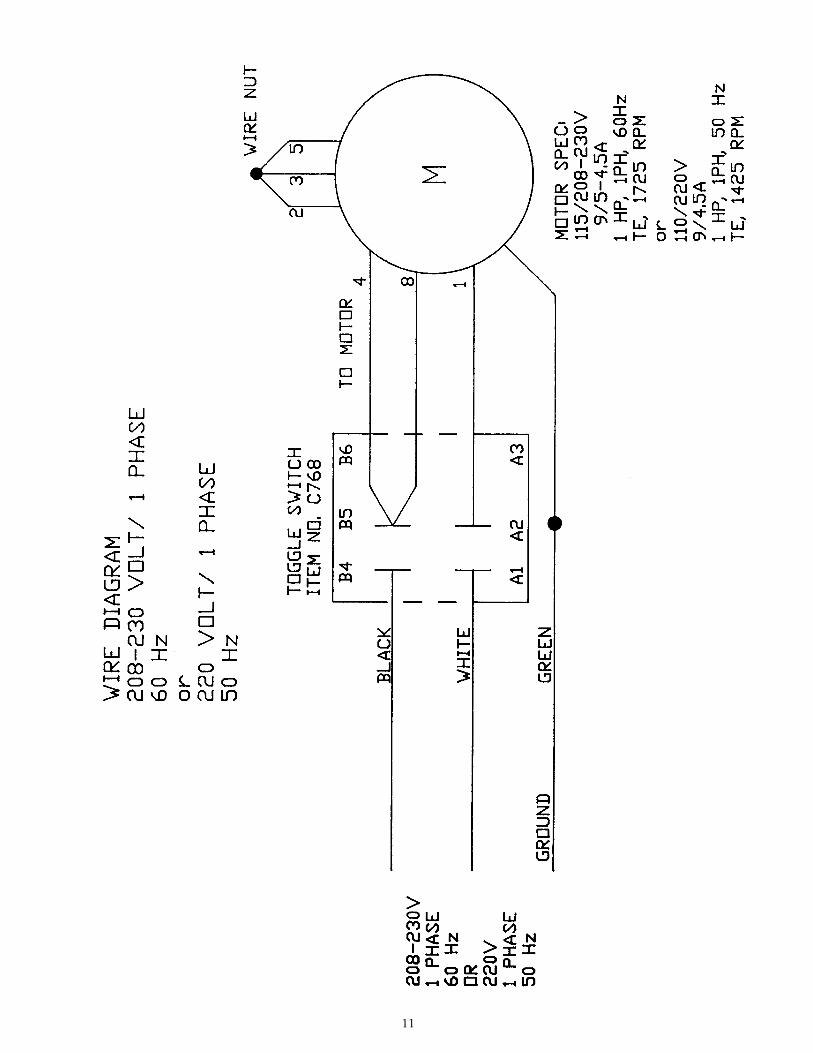
11
12
13

OPERATOR'S SIGNATURE PAGE
MY SIGNATURE ATTESTS THAT I HAVE COMPLETELY READ AND UNDERSTAND THISMANUAL. I REALIZE THAT THIS MACHINE, IF OPERATED CARELESSLY, CAN CAUSE SE-RIOUS INJURY TO MYSELF AND OTHERS.
NAME (PRINT) SIGNATURE SUPERVISOR’SINITIALS
DATE
14

— NOTES —
15
LIMITED WARRANTY
WARRANTY: The BIRO Manufacturing Company warrants that Model 722 Grinder will be freefrom defects in material and workmanship under normal use and with recommended service.BIRO will replace defective parts, which are covered by this limited warranty, provided that the de-fective parts are authorized for return, shipping charges prepaid, to a designated factory for in-spection and/or testing.
DURATION OF WARRANTY: The warranty period for all parts covered by this limited warranty isone (1) year from installation/demonstration as advised on the returned warranty registration card,or eighteen (18) months from original factory shipping date, whichever occurs first, except asnoted below.
PARTS NOT COVERED BY WARRANTY: The following are not covered by this limited warranty:wearable parts in the grinding system such as bowl, worm drive shaft, end ring, worm, knife drivepin. This limited warranty does not apply to machines sold as used, rebuilt, modified, or alteredfrom the original construction in which the machine was shipped from the factory. Water contam-inated electrical systems are not covered under this limited warranty. BIRO is not responsible forelectrical connection of equipment, adjustments to switch components or any other electrical re-quirements, which must be performed only by a certified electrician. BIRO is not responsible forservice charges or labor required to replace any part covered by this limited warranty or for anydamages resulting from misuse, abuse, lack of proper or recommended service.
EXCLUSION OF WARRANTIES AND LIMITATION OF REMEDIES: BIRO gives no warrantiesother than those expressly stated in this limited warranty. THE IMPLIED WARRANTY OF MER-CHANTABILITY, THE IMPLIED WARRANTY OF FITNESS FOR PROCESSING OF FOOD PROD-UCTS, AND ALL OTHER IMPLIED WARRANTIES ARE SPECIFICALLY EXCLUDED. BIRO IS NOTLIABLE FOR CONSEQUENTIAL OR INCIDENTAL DAMAGES, EXPENSES, OR LOSSES. THEREMEDIES PROVIDED IN THIS BIRO LIMITED WARRANTY ARE PURCHASER’S SOLE AND EX-CLUSIVE REMEDIES AGAINST BIRO.
REGISTRATION CARDS: You must sign, date and complete the warranty registration card sup-plied with each machine. The warranty registration card must be returned to The Biro Manufac-turing Company for proper registration. If no warranty registration card is returned to BIRO, thewarranty period will begin from the date the machine was originally shipped from the factory.
HOW TO GET SERVICE:
1. Contact the agency from whom you purchased the machine; or
2. Consult the yellow pages of the phone directory for the nearest authorized dealer; or
3. Contact BIRO Mfg. Company for the authorized service entity (250 plus worldwide) in yourarea.
THE BIRO MANUFACTURING COMPANY1114 Main Street
Marblehead, Ohio 43440-2099Ph. 419-798-4451Fax 419-798-9106
E-mail: [email protected]: http://www.birosaw.com
16
PART NO. C757-275Form No. 722-275-1-07-5 COMM
PART NO. C757-275Form No. 722-275-1-08-6 ACME