modbus gateway module - horner automation · pdf fileuser manual for the he660ggm100 modbus...
TRANSCRIPT

User Manual for the HE660GGM100
Modbus Gateway Module
Second Edition 09 August 2000
MAN0026-02


MAN0026-02 09 AUG 2000 PAGE 3
PREFACE This manual explains how to use the Horner APG Genius Gateway Module (GGM). Copyright (C) 2000 Horner APG, LLC., 640 North Sherman Drive Indianapolis, Indiana 46201. All rights reserved. No part of this publication may be reproduced, transmitted, transcribed, stored in a retrieval system, or translated into any language or computer language, in any form by any means, electronic, mechanical, magnetic, optical, chemical, manual or otherwise, without the prior agreement and written permission of Horner APG, LLC. All software described in this document or media is also copyrighted material subject to the terms and conditions of the Horner Software License Agreement. Information in this document is subject to change without notice and does not represent a commitment on the part of Horner APG, LLC. Genius, Series 90 and Logicmaster are trademarks of GE Fanuc Automation North America Inc. Alspa 8000 and P8 are trademarks of CEGELEC. Modbus is a trademark of AEG/Modicon.
For user manual updates, contact Horner APG, Technical Support Division, at (317) 916-4274 or visit our website at www.heapg.com.
PAGE 4 09 AUG 2000 MAN0026-02
LIMITED WARRANTY AND LIMITATION OF LIABILITY Horner APG, LLC. ("HE-APG") warrants to the original purchaser that the Genius Gateway Unit manufactured by HE-APG is free from defects in material and workmanship under normal use and service. The obligation of HE-APG under this warranty shall be limited to the repair or exchange of any part or parts which may prove defective under normal use and service within two (2) years from the date of manufacture or eighteen (18) months from the date of installation by the original purchaser whichever occurs first, such defect to be disclosed to the satisfaction of HE-APG after examination by HE-APG of the allegedly defective part or parts. THIS WARRANTY IS EXPRESSLY IN LIEU OF ALL OTHER WARRANTIES EXPRESSED OR IMPLIED INCLUDING THE WARRANTIES OF MERCHANTABILITY AND FITNESS FOR USE AND OF ALL OTHER OBLIGATIONS OR LIABILITIES AND HE-APG NEITHER ASSUMES, NOR AUTHORIZES ANY OTHER PERSON TO ASSUME FOR HE-APG, ANY OTHER LIABILITY IN CONNECTION WITH THE SALE OF THIS GENIUS GATEWAY UNIT. THIS WARRANTY SHALL NOT APPLY TO THIS GENIUS GATEWAY UNIT OR ANY PART THEREOF WHICH HAS BEEN SUBJECT TO ACCIDENT, NEGLIGENCE, ALTERATION, ABUSE, OR MISUSE. HE-APG MAKES NO WARRANTY WHATSOEVER IN RESPECT TO ACCESSORIES OR PARTS NOT SUPPLIED BY HE-APG. THE TERM "ORIGINAL PURCHASER", AS USED IN THIS WARRANTY, SHALL BE DEEMED TO MEAN THAT PERSON FOR WHOM THE GENIUS GATEWAY UNIT IS ORIGINALLY INSTALLED. THIS WARRANTY SHALL APPLY ONLY WITHIN THE BOUNDARIES OF THE CONTINENTAL UNITED STATES. In no event, whether as a result of breach of contract, warranty, tort (including negligence) or otherwise, shall HE-APG or its suppliers be liable of any special, consequential, incidental or penal damages including, but not limited to, loss of profit or revenues, loss of use of the products or any associated equipment, damage to associated equipment, cost of capital, cost of substitute products, facilities, services or replacement power, down time costs, or claims of original purchaser's customers for such damages. To obtain warranty service, return the product to your distributor with a description of the problem, proof of purchase, post paid, insured and in a suitable package. ABOUT PROGRAMMING EXAMPLES Any example programs and program segments in this manual or provided on accompanying diskettes are included solely for illustrative purposes. Due to the many variables and requirements associated with any particular installation, Horner APG cannot assume responsibility or liability for actual use based on the examples and diagrams. It is the sole responsibility of the system designer utilizing this software to appropriately design the end system, to appropriately integrate the Operator Interface Unit and to make safety provisions for the end equipment as is usual and customary in industrial applications as defined in any codes or standards which apply. Note: The programming examples shown in this manual are for illustrative
purposes only. Proper machine operation is the sole responsibility of the system integrator.

MAN0026-02 09 AUG 2000 PAGE 5
Revisions to This Manual This version (MAN0026-03) of the Modbus Gateway User Manual contains the following revisions, additions and deletions: 1. Converted manual into Word format. 2. Changed company name from Horner Electric, Inc. to Horner APG, LLC.

PAGE 6 09 AUG 2000 MAN0026-02
NOTES
MAN0026-02 09 AUG 2000 PAGE 7
Table of Contents PREFACE................................................................................................................................................3 ABOUT PROGRAMMING EXAMPLES ....................................................................................................4 Revisions to This Manual .........................................................................................................................5 CHAPTER 1: INTRODUCTION...............................................................................................................9
1.1 What You Have......................................................................................................................... 9 1.2 Genius Gateway Features......................................................................................................... 9 1.3 Hardware Description................................................................................................................ 9 1.4 Specifications...........................................................................................................................10
CHAPTER 2: INSTALLATION...............................................................................................................11 2.1 Mounting Requirements ...........................................................................................................11 2.2 Power Requirements................................................................................................................11 2.3 Genius Network Connection.....................................................................................................11 2.4 Main RS-232 Connector...........................................................................................................12 2.5 GENI Configuration..................................................................................................................12 2.6 Modbus Configuration ..............................................................................................................13
CHAPTER 3: OPERATION ...................................................................................................................15 3.1 Genius Bus Data......................................................................................................................15 3.2 Genius Bus Datagrams ............................................................................................................15 3.3 Modbus I/O ..............................................................................................................................15 3.4 Standard Modbus Commands and Responses.........................................................................17 3.5 Special Modbus Commands and Responses............................................................................17 3.6 Genius Bus Data to Modbus I/O Mapping.................................................................................18 3.7 Programming the Starting Modbus Reference with the Hand Held Monitor ...............................20
CHAPTER 4: MAPPING GENIUS I/O INTO MODBUS ..........................................................................21 4.1 Genius Hand Held Monitor Setup .............................................................................................21
APPENDIX A: SERIAL PORT WIRING .................................................................................................23

PAGE 8 09 AUG 2000 MAN0026-02
NOTES

MAN0026-02 09 AUG 2000 PAGE 9 CH. 1
CHAPTER 1: INTRODUCTION Congratulations on your purchase of the Horner APG Genius Gateway (GGM)! The HE660GGM100 is a
Modbus-to-Genius Gateway module which allows a RTU/ModbusTM Master to access Genius Bus Data, as though it were Modbus I/O. Modbus is a communications protocol used widely in distributed control systems (DCS), supervisory control and data acquisition systems (SCADA), and remote terminal unit (RTU) installations. GE Fanuc's Genius I/O Network is a versatile and powerful Distributed I/O system offering superior performance and diagnostic capabilities. Horner APG's Genius Gateway (GGM) allows DCS, SCADA, and RTU applications to use Genius as its I/O system. 1.1 What You Have The Horner APG Genius Gateway Module (GGM) comes complete with the following items: A. Stand-alone GGM in a backplate mountable aluminum enclosure. B. IBM compatible I/O mapping utility (Available February, 1993). C. This manual. 1.2 Genius Gateway Features The Horner GGM provides the following features: A. Self-enclosed in a backplate mountable aluminum enclosure. B. Integrated Genius Network Interface board (GENI) for communications on GE Fanuc's
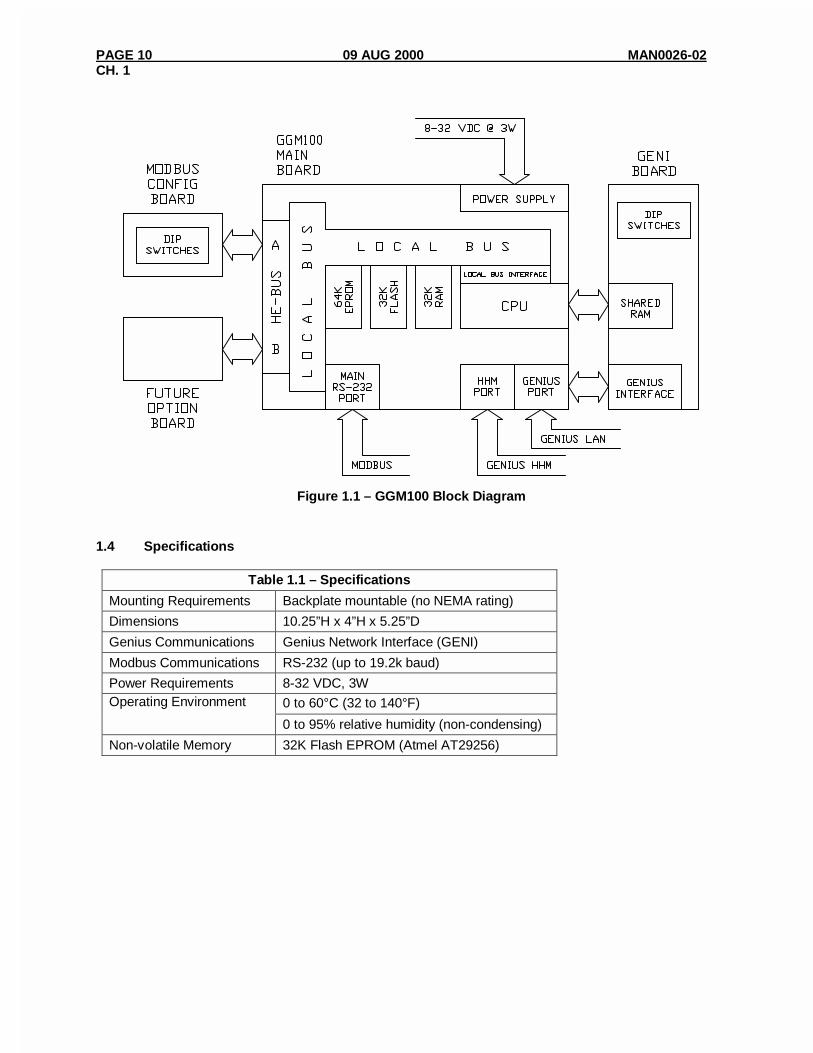
Genius Distributed I/O Network. C. Standard 9-pin RS232 port, communicating with Modbus slave protocol. . D. Genius Hand Held Monitor (HHM) port for convenient network configuration. E. Spare HE-BUS option slot for use with optional RS-232, RS-485, and modem boards. 1.3 Hardware Description The Genius Gateway (HE660GGM100) consists of four main components, and one optional component. They are: A) Metal Enclosure (2 pieces). B) Main Circuit Board. C) Genius Network Interface (GENI) Board. D) Modbus Configuration Board. E) (Optional) Auxiliary Serial Board. (HE-BUS architecture). The block diagram of the GGM is illustrated in Figure 1.1.
PAGE 10 09 AUG 2000 MAN0026-02 CH. 1
1.4 Specifications
Table 1.1 – Specifications
Mounting Requirements Backplate mountable (no NEMA rating)
Dimensions 10.25”H x 4”H x 5.25”D
Genius Communications Genius Network Interface (GENI)
Modbus Communications RS-232 (up to 19.2k baud)
Power Requirements 8-32 VDC, 3W
0 to 60°C (32 to 140°F) Operating Environment
0 to 95% relative humidity (non-condensing)
Non-volatile Memory 32K Flash EPROM (Atmel AT29256)
Figure 1.1 – GGM100 Block Diagram
MAN0026-02 09 AUG 2000 PAGE 11 CH. 2
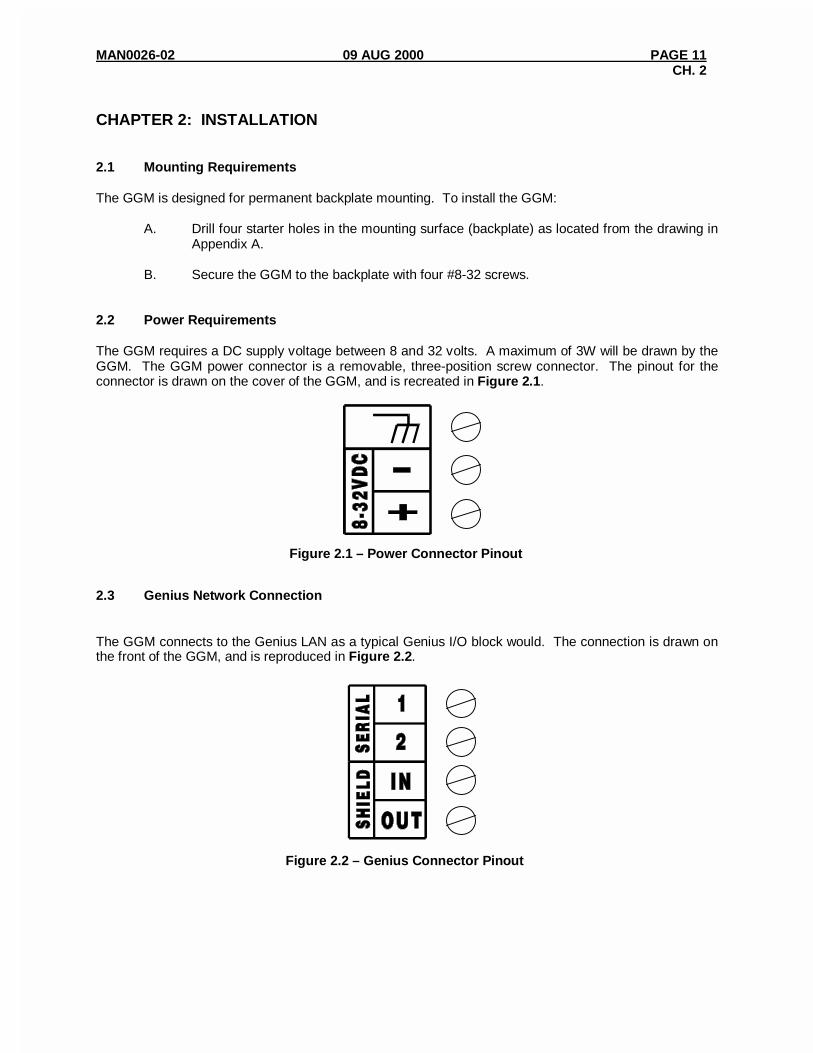
CHAPTER 2: INSTALLATION 2.1 Mounting Requirements The GGM is designed for permanent backplate mounting. To install the GGM: A. Drill four starter holes in the mounting surface (backplate) as located from the drawing in
Appendix A. B. Secure the GGM to the backplate with four #8-32 screws. 2.2 Power Requirements The GGM requires a DC supply voltage between 8 and 32 volts. A maximum of 3W will be drawn by the GGM. The GGM power connector is a removable, three-position screw connector. The pinout for the connector is drawn on the cover of the GGM, and is recreated in Figure 2.1. 2.3 Genius Network Connection The GGM connects to the Genius LAN as a typical Genius I/O block would. The connection is drawn on the front of the GGM, and is reproduced in Figure 2.2.
Figure 2.1 – Power Connector Pinout
Figure 2.2 – Genius Connector Pinout
PAGE 12 09 AUG 2000 MAN0026-02 CH. 2
2.4 Main RS-232 Connector The Main RS-232 port on the GGM is the Modbus/RTU communications link to the GGM. The pinout for the 9-pin “D” connector is illustrated in Table 2.1.
Table 2.1 – Main RS-232 Port Pinout
Pin Signal
1 DCD
2 TXD
3 RXD
4 DTR
5 GND
6 DSR
7 CTS
8 RTS
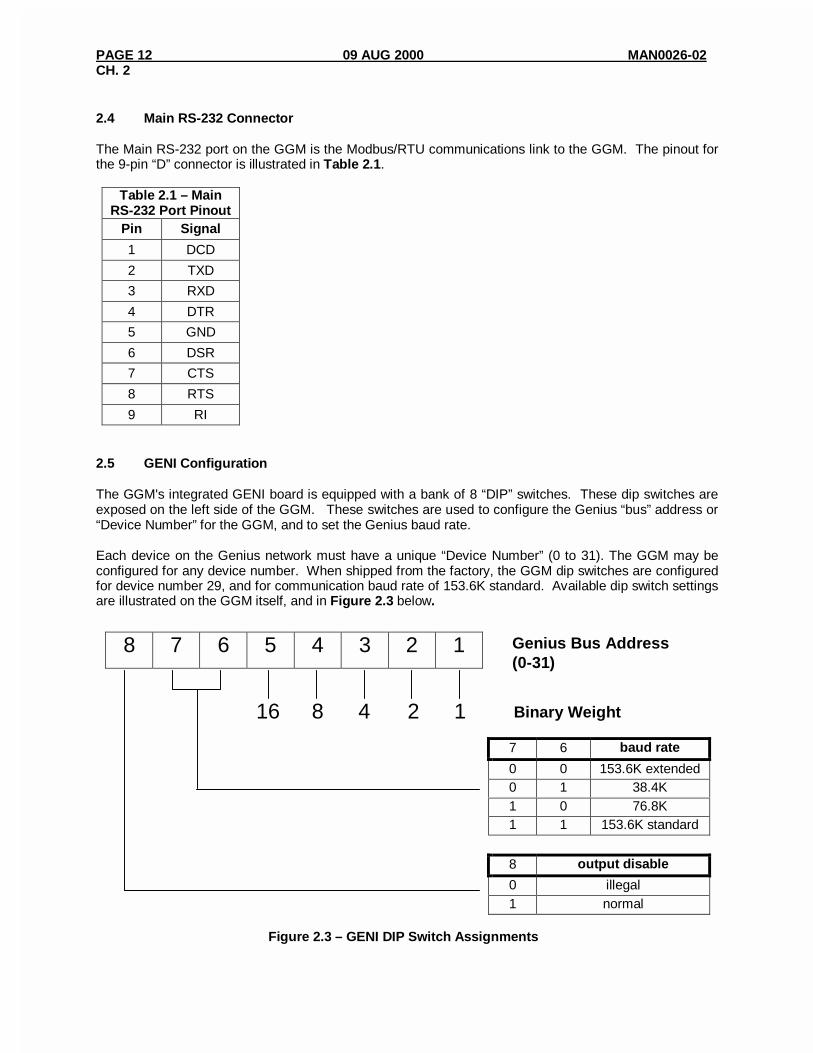
9 RI 2.5 GENI Configuration The GGM's integrated GENI board is equipped with a bank of 8 “DIP” switches. These dip switches are exposed on the left side of the GGM. These switches are used to configure the Genius “bus” address or “Device Number” for the GGM, and to set the Genius baud rate. Each device on the Genius network must have a unique “Device Number” (0 to 31). The GGM may be configured for any device number. When shipped from the factory, the GGM dip switches are configured for device number 29, and for communication baud rate of 153.6K standard. Available dip switch settings are illustrated on the GGM itself, and in Figure 2.3 below.
7 6 baud rate
0 0 153.6K extended 0 1 38.4K 1 0 76.8K 1 1 153.6K standard
8 output disable
0 illegal 1 normal
8 7 6 5 4 3 2 1
16 1 2 4 8
Genius Bus Address (0-31)
Binary Weight
Figure 2.3 – GENI DIP Switch Assignments

MAN0026-02 09 AUG 2000 PAGE 13 CH. 2
2.6 Modbus Configuration The GGM's Modbus Main RS-232 port is configured with two, 8-position dip switches which are mounted on a circuit board in one of the GGM's expansion slots. These switches are labeled SW1 and SW2, and are accessible from the front of the GGM. Proper configuration of the switches is illustrated in Figure 2.4, below.
8 7 6 5 4 3 2 1
16 1 2 4 8
Modbus Slave Address (1-247)
Binary Weight 32 64 128
SW1
8 7 6 5 4 3 2 1
SW2 3 2 1 baud rate
0 0 0 300 0 0 1 600 0 1 0 1200 0 1 1 2400 1 0 0 4800 1 0 1 9600 1 1 X 19200
4 stop bits
0 1 1 2
6 5 parity
0 0 Odd 0 1 Even 1 X None
7 protocol mode
0 ASCII 1 RTU (binary)
8 5 second timeout
0 disabled 1 disabled
Figure 2.3 – Main RS-232 Port Modbus DIP Switch Assignments

PAGE 14 09 AUG 2000 MAN0026-02 CH. 2
NOTES
MAN0026-02 09 AUG 2000 PAGE 15 CH. 3
CHAPTER 3: OPERATION As mentioned previously in the introduction, the GGM100 allows Genius Distributed I/O to be used with devices communicating with Modbus protocol, as if the Genius I/O was Modbus I/O. The GGM acts at once as a Genius master and a Modbus slave. This chapter describes both sides of the GGM's communications, first with Genius and second with Modbus. Later in the chapter it describes how the GGM allows the two protocols to interact with one another - the mapping of Genius I/O into the Modbus I/O scheme. 3.1 Genius Bus Data The Genius bus uses a token passing protocol, and consists of up to 32 Genius Devices numbered from 0 to 31. As a Genius Bus Controller, the GGM100: 1. Must be assigned a Genius Device Number from 0 to 31 (see Chapter 2), 2. can access Genius Bus Input and Output data from the other 31 Genius Devices, 3. can provide its own Genius Bus Input and Output Data and 4. can exchange datagrams with the other 31 Genius Devices. Each Genius Device (including the GGM100 itself) may provide the following Genius Bus Data: 1. Genius Bus Input Data - up to 128 bytes 2. Genius Bus Output Data - up to 128 bytes The GGM100 provides 12 bytes of Genius Bus Input Data of its own as follows: 1. Genius Bus Error Count - 2 bytes 2. Genius Bus Scan Time (mS) - 2 bytes 3. Genius Device Map Error Status - 4 bytes 4. Genius Device Present Status - 4 bytes For information on the Genius Bus Data bytes provided by other Genius Devices, refer to their individual user's manuals. 3.2 Genius Bus Datagrams As mentioned above, the GGM100 can exchange datagrams with other Genius Devices. Some datagrams are handled automatically by the GGM100, such as the "Set Status Table Address" datagram, and datagrams associated with "log-on" and "log-off" of Genius Devices. For other datagrams, the GGM100 simply acts as a datagram exchange buffer for the Modbus Master. This is accomplished via the two special Modbus Commands "Receive Datagram" and "Transmit Datagram" described later on 3.3 Modbus I/O Modbus uses a Master/Slave protocol, and consists of one Modbus Master and up to 247 Modbus Slaves numbered from 1 to 247.
PAGE 16 09 AUG 2000 MAN0026-02 CH. 3
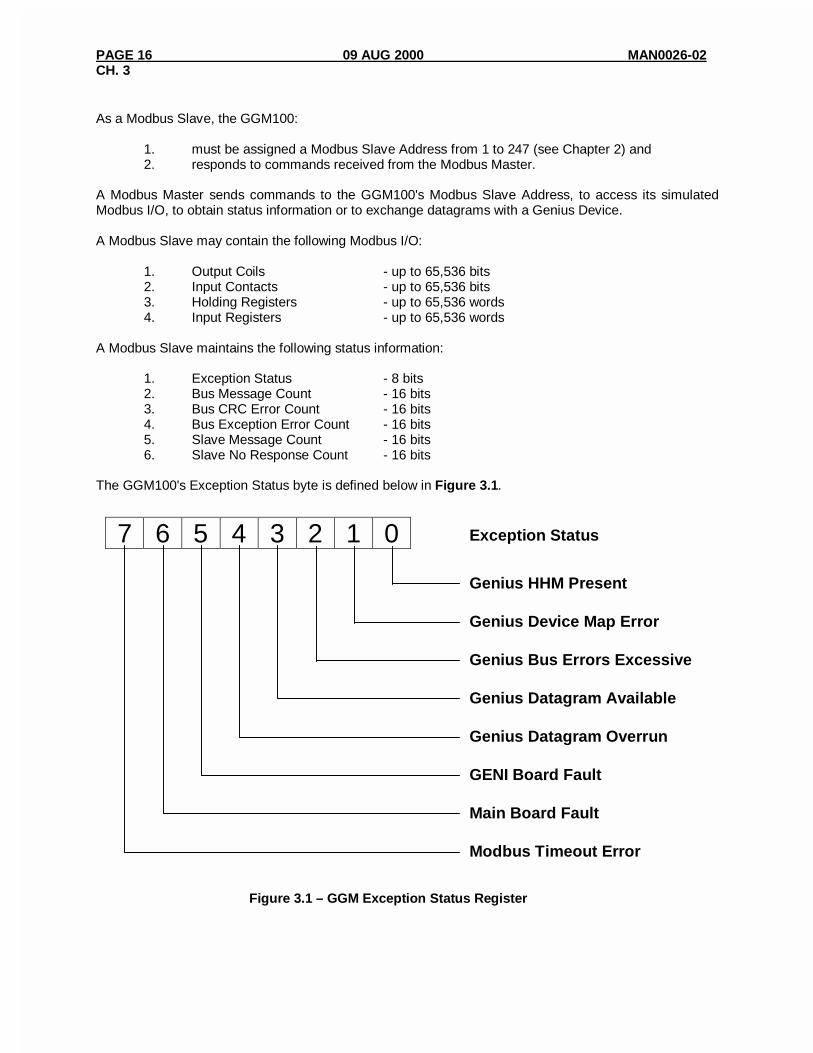
As a Modbus Slave, the GGM100: 1. must be assigned a Modbus Slave Address from 1 to 247 (see Chapter 2) and 2. responds to commands received from the Modbus Master. A Modbus Master sends commands to the GGM100's Modbus Slave Address, to access its simulated Modbus I/O, to obtain status information or to exchange datagrams with a Genius Device. A Modbus Slave may contain the following Modbus I/O: 1. Output Coils - up to 65,536 bits 2. Input Contacts - up to 65,536 bits 3. Holding Registers - up to 65,536 words 4. Input Registers - up to 65,536 words A Modbus Slave maintains the following status information: 1. Exception Status - 8 bits 2. Bus Message Count - 16 bits 3. Bus CRC Error Count - 16 bits 4. Bus Exception Error Count - 16 bits 5. Slave Message Count - 16 bits 6. Slave No Response Count - 16 bits The GGM100's Exception Status byte is defined below in Figure 3.1.
7 6 5 4 3 2 1 0 Exception Status
Modbus Timeout Error
Main Board Fault
GENI Board Fault
Genius Datagram Overrun
Genius Datagram Available
Genius Bus Errors Excessive
Genius Device Map Error
Genius HHM Present
Figure 3.1 – GGM Exception Status Register
MAN0026-02 09 AUG 2000 PAGE 17 CH. 3
3.4 Standard Modbus Commands and Responses The Modbus Master sends Modbus Commands to Modbus Slaves and receives Modbus Responses returned by Modbus Slaves. Modbus Commands and Modbus Responses consist of "message frames" in either ASCII or RTU (binary) format, which contain the following information: 1. Slave Address 2. Function Code 3. Data 4. Error Check Code If a Modbus Command's Slave Address matches a Modbus Slave's Slave Address, that Slave executes the indicated Function Code and then returns a Modbus Response back to the Modbus Master. If a Modbus Command's Slave Address is zero, ALL Modbus Slaves execute the indicated Function Code and DO NOT return Modbus Respones. Note that only Function Codes 5, 6, 15, 16, 72, and some sub-functions of Function 8 may be "broadcast" in this way. If a Modbus Slave detects an error, it DOES NOT execute the indicated Function Code, but may return an Exception Response. Data contained in Modbus Commands and Modbus Responses is dependent on the Function Code, while Error Check Codes are used to validate message frames. The GGM100 supports the standard Exception Codes listed below in Table 3.1:
Table 3.1 – GGM100 Supported Exception Codes
Code Meaning
01 Illegal Function
02 Illegal Data Address
03 Illegal Data Value
04 Failure in Associated Device
The GGM100 supports the standard Function Codes listed in Table 3.2 on Page 18. The standard Function 8 (Loopback Diagnostic Test) Sub-function Codes are listed in Table 3.3 on Page 18. For more specific information on the standard Exception codes, Function Codes, and Sub-function Codes listed in this chapter, refer to documentation provided by AEG/Modicon. 3.5 Special Modbus Commands and Responses The GGM100 supports two special Modbus commands, listed in Table 3.4 on Page18. These Modbus Commands are used for exchanging datagrams between the Modbus Master and Genius Devices.
PAGE 18 09 AUG 2000 MAN0026-02 CH. 3
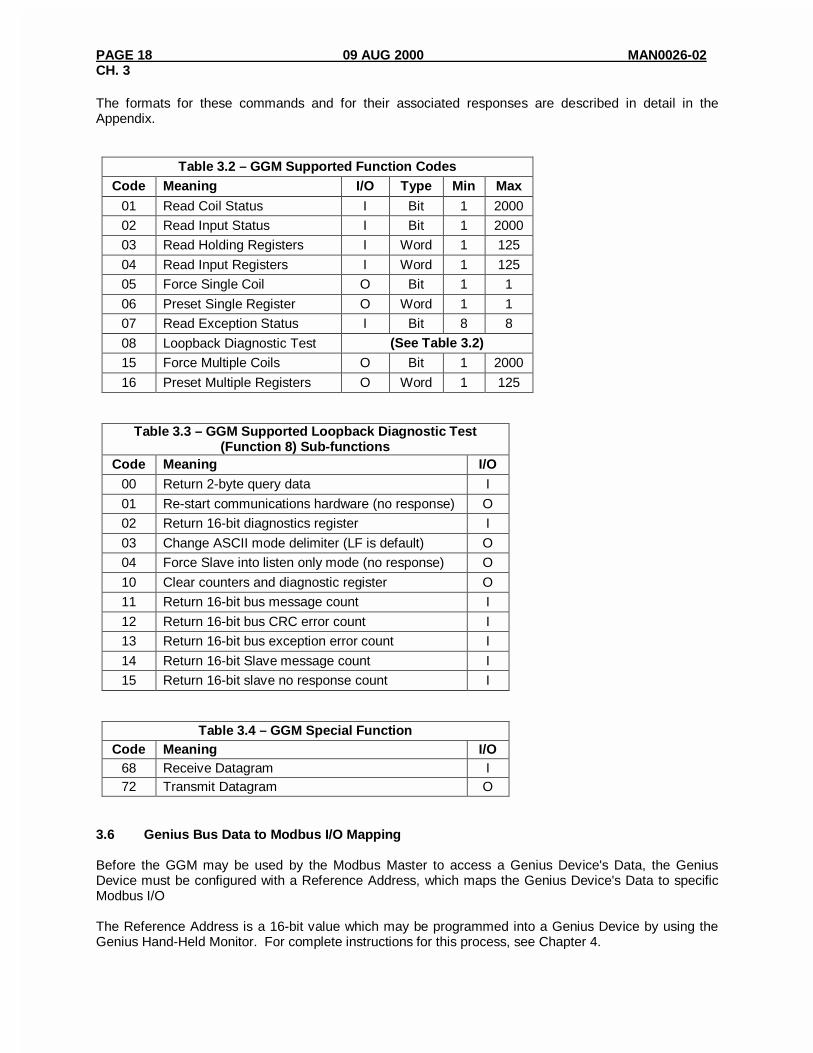
The formats for these commands and for their associated responses are described in detail in the Appendix.
Table 3.2 – GGM Supported Function Codes Code Meaning I/O Type Min Max
01 Read Coil Status I Bit 1 2000
02 Read Input Status I Bit 1 2000
03 Read Holding Registers I Word 1 125
04 Read Input Registers I Word 1 125
05 Force Single Coil O Bit 1 1
06 Preset Single Register O Word 1 1
07 Read Exception Status I Bit 8 8
08 Loopback Diagnostic Test (See Table 3.2) 15 Force Multiple Coils O Bit 1 2000
16 Preset Multiple Registers O Word 1 125
Table 3.3 – GGM Supported Loopback Diagnostic Test (Function 8) Sub-functions
Code Meaning I/O 00 Return 2-byte query data I
01 Re-start communications hardware (no response) O
02 Return 16-bit diagnostics register I
03 Change ASCII mode delimiter (LF is default) O
04 Force Slave into listen only mode (no response) O
10 Clear counters and diagnostic register O
11 Return 16-bit bus message count I
12 Return 16-bit bus CRC error count I
13 Return 16-bit bus exception error count I
14 Return 16-bit Slave message count I
15 Return 16-bit slave no response count I
Table 3.4 – GGM Special Function Code Meaning I/O
68 Receive Datagram I 72 Transmit Datagram O
3.6 Genius Bus Data to Modbus I/O Mapping Before the GGM may be used by the Modbus Master to access a Genius Device's Data, the Genius Device must be configured with a Reference Address, which maps the Genius Device's Data to specific Modbus I/O The Reference Address is a 16-bit value which may be programmed into a Genius Device by using the Genius Hand-Held Monitor. For complete instructions for this process, see Chapter 4.

MAN0026-02 09 AUG 2000 PAGE 19 CH. 3
Figure 3.2 shows Modbus I/O and a Genius Device's Data available for mapping. The connecting arrows show how they may be mapped to each other. The GGM100 uses a Genius Device's Reference Address to map its Genius Bus Input and Output Data to Modbus I/O as illustrated in Figure 3.3. If the Reference Address is either 0 or 0FFFFH, the Genius Device's data is not mapped into Modbus I/O at all, but is available for use by other Genius Bus Controllers.
Figure 3.2 – Genius to Modbus I/O Mapping
F E D C B A 9 8 7 6 5 4 3 2 1 0 Reference Address
Starting Modbus Address (1-32767) Binary Weight
F I/O Type
0 Map into Modbus Bit I/O
1 Map into Modbus Word I/O
1 2
4 8
16 32
64 128
256 512
210
211 212
213 214
Figure 3.3 – Genius reference Address for Modbus I/O Mapping

PAGE 20 09 AUG 2000 MAN0026-02 CH. 3
3.7 Programming the Starting Modbus Reference with the Hand Held Monitor Assigning a Modbus Reference to a Genius Device is accomplished with the Genius Hand Held Monitor. The procedure is slightly different for digital and non-digital I/O blocks. Programming Digital Blocks
1. Configure the Hand Held Monitor as a Series 5 Host. 2. Make "Active" the I/O Block to be configured. 3. Assign an I/O address. Legal values are 1-32767. The HHM will show the address as
I/OX-Y, where X is the starting Modbus bit address, and Y is the ending address.
Programming Analog Blocks (Including PowerTRAC) 1. Configure the Hand Held Monitor as a Series 6 Host. 2. Make "Active" the I/O Block to be configured. 3. Assign a REG address. Legal values are 1-32767. The HHM will show the address as
REGX-Y, where X is the starting Modbus word address, and Y is the ending address.
MAN0026-02 09 AUG 2000 PAGE 21 CH. 4
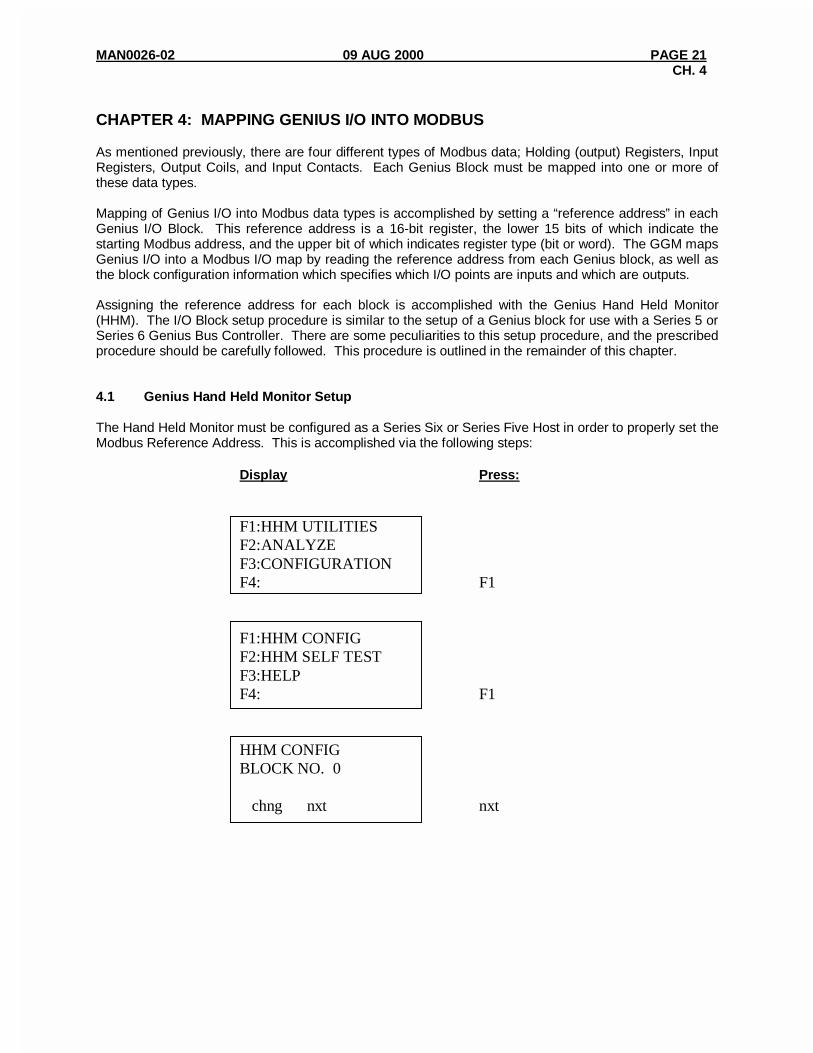
CHAPTER 4: MAPPING GENIUS I/O INTO MODBUS As mentioned previously, there are four different types of Modbus data; Holding (output) Registers, Input Registers, Output Coils, and Input Contacts. Each Genius Block must be mapped into one or more of these data types. Mapping of Genius I/O into Modbus data types is accomplished by setting a “reference address” in each Genius I/O Block. This reference address is a 16-bit register, the lower 15 bits of which indicate the starting Modbus address, and the upper bit of which indicates register type (bit or word). The GGM maps Genius I/O into a Modbus I/O map by reading the reference address from each Genius block, as well as the block configuration information which specifies which I/O points are inputs and which are outputs. Assigning the reference address for each block is accomplished with the Genius Hand Held Monitor (HHM). The I/O Block setup procedure is similar to the setup of a Genius block for use with a Series 5 or Series 6 Genius Bus Controller. There are some peculiarities to this setup procedure, and the prescribed procedure should be carefully followed. This procedure is outlined in the remainder of this chapter. 4.1 Genius Hand Held Monitor Setup The Hand Held Monitor must be configured as a Series Six or Series Five Host in order to properly set the Modbus Reference Address. This is accomplished via the following steps: Display Press: F1:HHM UTILITIES F2:ANALYZE F3:CONFIGURATION F4: F1 F1:HHM CONFIG F2:HHM SELF TEST F3:HELP F4: F1 HHM CONFIG BLOCK NO. 0 chng nxt nxt

PAGE 22 09 AUG 2000 MAN0026-02 CH. 4
Display Press: HHM CONFIG LANGUAGE = ENGLISH tgl entr nxt nxt HHM CONFIG SELECT HOST CPU SERIES 90 tgl entr nxt tgl HHM CONFIG SELECT HOST CPU SERIES SIX tgl entr nxt tgl(entr for Series 6) HHM CONFIG SELECT HOST CPU SERIES FIVE tgl entr nxt entr

MAN0026-02 09 AUG 2000 PAGE 23 APPENDIX A
APPENDIX A: SERIAL PORT WIRING
Figure A.1 – GGM Back Plate

PAGE 24 09 AUG 2000 MAN0026-02 APPENDIX A
NOTES