mobile electronic documentation user manual€¦ · tech writer – d. michael; s. ... june 2017...
TRANSCRIPT

MOBILE ELECTRONIC
DOCUMENTATION (MED)
USER MANUAL
Documentation Patch: TIU*1.0*311
Server Patch: TIU*1.0*257
Client Software: Version 2.3.311.6
June 2017
Department of Veterans Affairs (VA) Office of Information & Technology (OIT)
Product Development (PD)

This page intentionally left blank for double-sided printing.

June 2017 Mobile Electronic Documentation (MED) iii
User Manual
Revision History
Date Revision Description Author
06/02/2017 2.9 Update for Patch TIU*1*311
Two-Factor Authentication (2FA)
Updated all MED document file references to the following:
o TIU_1_311_MED_IG.doc/pdf
o TIU_MED_TM.doc/pdf
o TIU_MED_UM.doc/pdf
Project Manager – R. Ades
Tech Writer – D. Michael; S. Crichlow/Honey Chipman
09/21/2011 2.8 Tech review and edit updates based on review/feedback from Richard Sipe review:
Updated all MED document file references to the following:
o TIU_1_262_MED_IG.doc/pdf
o TIU_1_262_MED_TM.doc/pdf
o TIU_1_262_MED_UM.doc/pdf
Updated all footers to reference MED GUI Software Version 2.3 and documentation Patch TIU*1.0*262.
Project Manager—Tim Landy
Tech Writer—Thom Blom
09/15/2011 2.7 Tech review and edit updates based on review/feedback from Richard Sipe review:
Updated the following highlighted text in the second paragraph in Chapter 2:
"After starting MED, in order to access the MED menu toolbars, you must first retrieve a patient, then select a patient from the Patient Selection opening dialogue."
Updated the second Note in Chapter 2, on Page 3. Added the following text:
"While connected to the VA network/VistA, if you do not supply the appropriate signon credentials (i.e., VA Access and Verify codes) you can access MED but cannot retrieve patients and summaries. You must sign into MED using the appropriate signon credentials before being given access to retrieve patient information from VistA."
Project Manager—Tim Landy
Tech Writer—Thom Blom

Revision History
iv Mobile Electronic Documentation (MED) June 2017
User Manual
Date Revision Description Author
Updated the Cautionary Note in Section 3.1 as follows:
"CAUTION: If the patient name on
the list is not a manually entered
patient, when MED is started, any
notes that have been imported
over 7 days prior are deleted.
Then, any patients that are over 7
days old and do not have any
pending or imported notes are
deleted as well."
And in Section 10.3.1.
Updated notes in Step 2 in Section 3.2. Changed "need" to "needed."
Updated entering date of Birth information in Step 2d under the "Manually Enter a Patient" bullet in Section 3.2, Retrieving Patient Records Procedures."
Updated the "Summary Tab Overview" section. Changed "which includes:" to "which may include:".
Added the following sentence to blank pages added so all chapter/document ends on an even page for double-sided printing:
"This page intentionally left blank for double-sided printing."
09/05/2011 2.6 Tech review and edit updates based on review/feedback from MED Core team:
Added Step 3 to Section 3.2, "Retrieving Patient Records Procedures" informing users to press
the Close button to return to MED after selecting patients, as per J. Pasternock.
Updated introductory paragraph and Step 1 procedures in Section 7.3, "Create and Assign a Health Summary to MED," as per J. Pasternock.
Added all missing errors from the MED Technical Manual to Chapter 12, "Appendix B—Troubleshooting." Includes updates to the "Write Access Error" error description and resolution
to state users must be given Full
Project Manager—Tim Landy
Tech Writer—Thom Blom

June 2017 Mobile Electronic Documentation (MED) v
User Manual
Date Revision Description Author
Control access permission to the MED directory (i.e., Read, Write, Modify, and Execute), as per J. Pasternock, R. Hines, and R. Sipe.
Added a Note informing users to enter a Remedy ticket if the resolutions listed in the errors described in Chapter 12, "Appendix B—Troubleshooting," do not resolve the issue.
Added the "CPRS CHART – Library Not Registered Error" error message to Chapter 12, "Appendix B—Troubleshooting," as per feedback from R Hines.
Updated index entries for error messages in Chapter 12, "Appendix B—Troubleshooting."
08/11/2011 2.5 Tech review and edit updates based on review/feedback from MED Core team:
Removed patch compliance dates from the "How to Use this Manual", as per Chuck Schofer.
Project Manager—Tim Landy
Tech Writer—Thom Blom
08/10/2011 2.4 Tech review and edit updates based on review/feedback from MED Core team:
Updated "Assumptions About the Reader" section to remove reference to the M programming language, as per Robert Graziani (SQA) review.
Reordered and added content and updated intro paragraph in the "Starting MED" section, as per Richard Sipe review.
Added definitions for Retrieving Patient Records vs. Selecting Patient Records in MED in the "Retrieving Patient Records Overview" and "Glossary" sections, as per Richard Sipe review.
Updated procedures in Step 1 in the "Retrieving Patient Records Procedures" section.
Added commentary to "Select a Patient" button in the "Retrieving Patient Records Procedures" section, as per Richard Sipe review.
Added a Note regarding entering "Last Name,First Name" and spaces after comma in the "Manually Enter a
Project Manager—Tim Landy
Tech Writer—Thom Blom

Revision History
vi Mobile Electronic Documentation (MED) June 2017
User Manual
Date Revision Description Author
Patient" bullet in the "Retrieving Patient Records Procedures" section, as per Richard Sipe review.
Updated the "Selecting a Patient" section as per Richard Sipe review.
Removed instructions for disabling retrieval of Health Summaries in the "Summary Tab Procedures" section, as per Richard Sipe review.
Added Cautionary Note to Step 3 in the "Retrieve Health Summaries from VistA" section.
Updated the Notes in the "Creating Templates and Directory Access" section.
Updated figures in Step 6 in the "New Progress Notes" section, as per Richard Sipe review.
Added a Note to the Description field for the TIU MED MANUAL PATIENT security key in Table 1, as per Richard Sipe review.
Updated patient names in Table 2 through Table 5, as per Richard Sipe review.
Updated the image and directory path for the MED database reference in the "MED Database Open Error" section.
Added compact database messages to the new "MED Database Compact Messages" section, as per Seth Thompson email.
Removed author references, other than Project Manager and Tech Writer, from "Revision History" section, as per Product Support review.
Updated the Note contact info in Step 2b in the "Retrieving Patient Records Procedures" section, as per Product Support review.
Removed "Product Support (PS)" from the "Intended Audience" section, as per Product Support review.
07/27/2011 2.3 Tech review and edit updates based on review/feedback from Product Support team:
Project Manager—Tim Landy
Tech Writer—Thom Blom

June 2017 Mobile Electronic Documentation (MED) vii
User Manual
Date Revision Description Author
Added all Mobile Electronic Device (MED) VistA patch references and Graphical User Interface (GUI) client software version to the Title page.
Added the "Orientation" section in accordance with national documentation standards. Moved topics from the "Introduction" section into this new section.
Added a note regarding Access/Verify code prompt in the "Retrieving Patient Records Procedures" section.
Deleted the procedures for deleting a manually entered patient from the "Delete Manually Entered Patients (Duplicates)" section. This information is in the MED Technical Manual.
Added a Cautionary Note warning users about disabling Health Summaries in the "Summary Tab Procedures" section.
Added the "Create and Assign a Health Summary to MED" section.
Updated content in the "Creating Templates and Directory Access" section. Removed procedures for setting up network directory, since that information is already in the MED Technical Manual.
Deleted and moved the procedures for deleting a template from the "Deleting Templates" section. This information was moved to the MED Technical Manual.
Updated the content in the "Editing Existing Notes" section.
Updated the content in the "Finding Text in Notes" section.
Updated the Cautionary Note in the "Saving Notes" section.

Revision History
viii Mobile Electronic Documentation (MED) June 2017
User Manual
Date Revision Description Author
07/14/2011 2.2 Tech review and edit updates:
Updated the "Saving Notes" section to say "Select a new patient" rather than "Start a new patient," as per J. Pasternock review.
Added reference to procedures for selecting a new patient and added text to the Cautionary Note regarding shutting down the laptop before properly closing MED, as per Joy Pasternock review.
Project Manager—Tim Landy
Tech Writer—Thom Blom
07/12/2011 2.1 Tech review and edit updates:
Updated the "Date Sensitivity" section in the "Import Criteria for Progress Notes" topic, as per Jeanie Scott review.
Remedy Tickets #487293, 50587, and 502588: Updated content regarding properly saving a MED note in the "Saving Notes" section, as per Jeanie Scott review. Added the "Delete Manually Entered Patients" section regarding removing manually entered patients from the MED database, as per Jeanie Scott review.
Added the "Write Scratch Pad Text," "Find Scratch Pad Text," and "Delete Scratch Pad Text" (Remedy Ticket #487029) topics to the "Scratch Pad Tab" section, as per Jeanie Scott review.
Remedy Ticket #487861: Updated the "Creating Templates and Directory Access" and "Deleting Templates" sections with screen captures, as per Jeanie Scott review.
Project Manager—Tim Landy
Tech Writer—Thom Blom
06/23/2011 2.0 Tech review and updates:
Renamed document to remove patch reference ID.
Reformatted document to follow current national documentation standards and style guides.
Added alternate text to all images for Section 508 compliance.
Updated the "Introduction" section to
Project Manager—Tim Landy
Tech Writer—Thom Blom

June 2017 Mobile Electronic Documentation (MED) ix
User Manual
Date Revision Description Author
be consistent across the MED documentation set.
Updated Index entries.
Remedy Ticket #485510: Added the "Date Sensitivity" section in the "Import Criteria for Progress Notes" topic.
Remedy Tickets #465060 and #487293: Added the "Saving Notes" section with a Cautionary Note of known software anomaly.
Remedy Ticket #476482: Corrected Step 4 in "New Progress Notes" section.
Remedy Ticket #485507: Added the "Creating Templates and Directory Access" and "Deleting Templates" sections. These sections will need additional content updates: detailed procedures, examples, and GUI screen captures.
Made grammar, punctuation, and spelling updates as needed.
06/03/2010 1.0 Initial document. MED Development Team

June 2017 Mobile Electronic Documentation (MED) x
User Manual
Contents
Revision History .......................................................................................................................................... iii
Figures and Tables ..................................................................................................................................... xiv
Orientation ................................................................................................................................................. xvi
1 Introduction ....................................................................................................................................... 1
2 Starting MED .................................................................................................................................... 3
3 Retrieving Patient Records .............................................................................................................. 5
3.1 Retrieving Patient Records Overview ....................................................................................... 5
3.2 Retrieving Patient Records Procedures ..................................................................................... 5
3.3 Delete Manually Entered Patients (Duplicates) ...................................................................... 10
4 Selecting a Patient ........................................................................................................................... 11
5 Patient Information Available from Any Tab .............................................................................. 13
6 Printing from Within MED ........................................................................................................... 15
6.1 Printing Health Summaries and Notes Overview.................................................................... 15
6.2 Printing Health Summaries and Notes Procedures ................................................................. 15
7 Summary Tab .................................................................................................................................. 17
7.1 Summary Tab Overview.......................................................................................................... 17
7.2 Summary Tab Procedures ....................................................................................................... 19
7.2.1 Retrieve Health Summaries from VistA .................................................................... 19
7.2.2 Find Health Summary Text ........................................................................................ 20
7.3 Create and Assign a Health Summary to MED ....................................................................... 22
8 Scratch Pad Tab .............................................................................................................................. 23
8.1 Scratch Pad Tab Overview ...................................................................................................... 23
8.2 Scratch Pad Procedures ........................................................................................................... 23
8.2.1 Write Scratch Pad Text .............................................................................................. 23
8.2.2 Find Scratch Pad Text ................................................................................................ 24
8.2.3 Delete Scratch Pad Text ............................................................................................. 25

June 2017 Mobile Electronic Documentation (MED) xi
User Manual
8.3 Creating Templates and Directory Access .............................................................................. 26
8.4 Deleting Templates ................................................................................................................. 26
9 Notes Tab ......................................................................................................................................... 27
9.1 Icons on the Notes Tab ............................................................................................................ 27
9.2 Viewing Notes ......................................................................................................................... 28
9.3 Creating and Editing Notes ..................................................................................................... 29
9.4 Editing Existing Notes ............................................................................................................ 31
9.5 Saving Notes ........................................................................................................................... 31
9.6 Finding Text in Notes .............................................................................................................. 32
10 Importing MED Notes into CPRS ................................................................................................. 35
10.1 Existing Progress Notes .......................................................................................................... 35
10.2 New Progress Notes ................................................................................................................ 37
10.3 Import Criteria for Progress Notes .......................................................................................... 39
10.3.1 Date Sensitivity .......................................................................................................... 39
10.3.2 Security Keys ............................................................................................................. 40
10.3.3 Import Examples ........................................................................................................ 41
11 Appendix A—Keyboard Shortcuts for Common MED Commands .......................................... 43
11.1 Navigation Commands ............................................................................................................ 43
11.2 File Menu Commands ............................................................................................................. 43
11.3 Edit Menu Commands ............................................................................................................. 44
11.4 View Menu Commands ........................................................................................................... 44
11.5 Tools Menu Commands .......................................................................................................... 44
11.6 Action Menu Commands......................................................................................................... 44
11.7 Help Menu Commands ............................................................................................................ 45
12 Appendix B—Troubleshooting ...................................................................................................... 47
12.1 Patch TIU*1*257 is Not Current in VistA Error .................................................................... 47
12.2 MED Missing Remote Procedure Calls (RPCs) in VistA Error ............................................. 48
12.3 Invalid Pointer Operation Error .............................................................................................. 48
12.4 Application Context Error ....................................................................................................... 49
12.5 Write Access Error .................................................................................................................. 50
12.6 CPRS CHART – Library Not Registered Error ...................................................................... 50

Contents
xii Mobile Electronic Documentation (MED) June 2017
User Manual
12.7 MED Database Open Error ..................................................................................................... 51
12.8 MED Database Compact Messages ........................................................................................ 52
12.9 Network Connection Error ...................................................................................................... 53
12.10 RPC Broker Error .................................................................................................................... 54
12.11 CPRS Error .............................................................................................................................. 55
12.12 Invalid Date Error .................................................................................................................... 56
12.13 Missing Required Data Fields Error ....................................................................................... 56
13 Appendix C—Mobile Electronic Documentation (MED) Frequently Asked Questions
(FAQ) ............................................................................................................................................... 59
Glossary ...................................................................................................................................................... 61
Index ........................................................................................................................................................... 63

June 2017 Mobile Electronic Documentation (MED) xiii
User Manual
This page intentionally left blank for double-sided printing.

June 2017 Mobile Electronic Documentation (MED) xiv
User Manual
Figures and Tables
Figures
Figure 1. MED—Desktop shortcut icon ....................................................................................................... 3
Figure 2. MED—Patient Selection dialogue ................................................................................................ 3
Figure 3. MED—Retrieve Patient(s) dialogue ............................................................................................. 6
Figure 4. MED—Retrieve Patient(s): Personal Lists dialogue ..................................................................... 7
Figure 5. MED—Retrieve Patient(s): Select Patient dialogue ..................................................................... 8
Figure 6. MED—Retrieve Patient(s): Manually enter a Patient dialogue .................................................. 10
Figure 7. MED—Patient Selection dialogue .............................................................................................. 11
Figure 8. MED—Patient information ......................................................................................................... 13
Figure 9. MED Menus—File and Print options (partial capture) ............................................................... 15
Figure 10. MED—Print Documents dialogue: Sample list of notes that can be printed ............................ 16
Figure 11. MED—Print dialogue................................................................................................................ 16
Figure 12. MED—Health Summary tab dialogue ...................................................................................... 18
Figure 13. MED Menus—Tools and Settings options (partial capture) ..................................................... 19
Figure 14. MED Users & Settings dialogue—Data & Files ....................................................................... 20
Figure 15. MED—Find dialogue ................................................................................................................ 20
Figure 16. MED—Health Summary tab: Find dialogue ............................................................................. 21
Figure 17. MED—Scratch Pad tab dialogue .............................................................................................. 23
Figure 18. MED—Find dialogue ................................................................................................................ 24
Figure 19. MED—Scratch Pad tab: Find dialogue ..................................................................................... 25
Figure 20. MED—Notes tab ....................................................................................................................... 28
Figure 21. MED—Create a Note dialogue: Sample list of note templates that can be created .................. 29
Figure 22. MED—Home Based Primary Care (HBPC) template: CO-HBPC Note (D) ............................ 30
Figure 23. MED—Close button .................................................................................................................. 31
Figure 24. MED—Find dialogue ................................................................................................................ 32
Figure 25. MED—Notes tab: Find dialogue ............................................................................................... 33
Figure 26. CPRS—Patient Selection dialogue ........................................................................................... 35
Figure 27. CPRS—Select Note to Import dialogue .................................................................................... 36
Figure 28. CPRS—Patient Selection dialogue ........................................................................................... 37
Figure 29. CPRS—Progress Note Properties dialogue ............................................................................... 38
Figure 30. MED—Select Note to Import dialogue (sample 1 of 2) ........................................................... 38

June 2017 Mobile Electronic Documentation (MED) xv
User Manual
Figure 31. MED—Select Note to Import dialogue (sample 2 of 2) ........................................................... 39
Figure 32. MED Error—Patch TIU*1*257 is not current in VistA ........................................................... 47
Figure 33. MED Error—Missing RPCs ...................................................................................................... 48
Figure 34. MED Error—Invalid pointer operation ..................................................................................... 48
Figure 35. MED Error—Application context ............................................................................................. 49
Figure 36. MED Error—Write access permissions error ........................................................................... 50
Figure 37. MED Error—CPRS CHART – Library Not Registered Error .................................................. 50
Figure 38. MED Error—Database is not installed correctly ...................................................................... 51
Figure 39. MED Warning—Database closing ............................................................................................ 52
Figure 40. MED Information Message—Database Compacted ................................................................. 52
Figure 41. MED Error—Network Connection: Blank Retrieve Patient(s) dialogue (1 of 2) ..................... 53
Figure 42. MED Error—Network Connection: Blank Retrieve Patient(s) dialogue (2 of 2) ..................... 54
Figure 43. Errors—RPC Broker Error: Patient list retrieval error ............................................................. 54
Figure 44. Errors—CPRS - Patient Chart Error: Importing notes error message ....................................... 55
Figure 45. MED Error—Invalid date .......................................................................................................... 56
Figure 46. MED Error—Missing required data fields and Section 508 compliance: Active Caption
Color ................................................................................................................................................... 56
Tables
Table 1. MED—Security keys for validating patient identification for manually entered MED
patients ................................................................................................................................................ 40
Table 2. Import Example—TIU MED MANUAL PATIENT security key ............................................... 41
Table 3. Import Example—TIU MED MANUAL OVERRIDE security key: Different names ................ 41
Table 4. Import Example—TIU MED MANUAL OVERRIDE security key: Different DOB .................. 41
Table 5. Import Example—Unable to import due to different SSNs ......................................................... 42
Table 6. MED Navigation commands—Keyboard shortcuts ..................................................................... 43
Table 7. MED File menu commands—Keyboard shortcuts ....................................................................... 43
Table 8. MED Edit menu commands—Keyboard shortcuts ...................................................................... 44
Table 9. MED View menu commands—Keyboard shortcuts .................................................................... 44
Table 10. MED Tools menu commands—Keyboard shortcuts .................................................................. 44
Table 11. MED Action menu commands—Keyboard shortcuts ................................................................ 44
Table 12. MED Help menu commands—Keyboard shortcuts ................................................................... 45

June 2017 Mobile Electronic Documentation (MED) xvi
User Manual
Orientation
How to Use this Manual
The Mobile Electronic Documentation (MED) application consists of both a Veterans Health
Information Systems and Technology Architecture (VistA) M Server component and a Microsoft®
Windows laptop/client workstation Graphical User Interface (GUI) component:
Original VistA M Server Patch: TIU*1.0*244 (released date: 06/03/2010).
Updated VistA M Server Patch: TIU*1.0*257 (released date: 01/21/2011).
Documentation-only VistA M Server Patch TIU*1.0*262.
Current Laptop/Client Workstation software: MED.exe Version 2.3.311.6.
This manual is organized to help users understand the basic layout of the MED software and provide
users with information about the specific tasks performed. It includes sections on the following topics:
Starting MED—How to start the application
Retrieving Patient Records—Supplying patient credentials
Selecting a Patient—How to select a patient
Patient Information Available from Any Tab—An explanation of the features that are available
from each MED tab
Printing from Within MED
Summary Tab
Scratch Pad Tab
Notes Tab
Importing MED Notes into CPRS
Appendix A—Keyboard Shortcuts for Common MED Commands
Appendix B—Troubleshooting
Appendix C—Mobile Electronic Documentation (MED) Frequently Asked Questions (FAQ)
MED works in tandem with CPRS; however, this manual does not attempt to fully document how to
create templates or describe other functions of CPRS.
REF: For installation instructions; lists of routines, files, and options; additional technical
information; and user information on CPRS, see the CPRS documentation on the VA Document
Library (VDL) at the following link:
http://www.va.gov/vdl/application.asp?appid=61

Orientation
June 2017 Mobile Electronic Documentation (MED) xvii
User Manual
Intended Audience
The intended audience of this manual is all key stakeholders. The stakeholders include the following:
Information Resource Management (IRM)
Clinical Application Coordinators (CAC)
Home Based Primary Care (HBPC) end-users
Product Support (PS).
Legal Requirements
There are no special legal requirements involved in the use of MED software.
Disclaimers
This manual provides an overall explanation of how to configure the MED software; however, no attempt
is made to explain how the overall VistA programming system is integrated and maintained. Such
methods and procedures are documented elsewhere. We suggest you look at the various VA Web sites on
the Internet and VA Intranet for a general orientation to VistA. For example, visit the Office of
Information & Technology (OIT) VistA Development VA Intranet Web site:
http://vaww.vista.med.va.gov/
DISCLAIMER: The appearance of any external hyperlink references in this manual does
not constitute endorsement by the Department of Veterans Affairs (VA) of this Website
or the information, products, or services contained therein. The VA does not exercise
any editorial control over the information you may find at these locations. Such links
are provided and are consistent with the stated purpose of this VA Intranet Service.

Orientation
xviii Mobile Electronic Documentation (MED) June 2017
User Manual
Documentation Conventions
This manual uses several methods to highlight different aspects of the material:
Various symbols are used throughout the documentation to alert the reader to special
information. The following table gives a description of each of these symbols:
Table ii. Documentation symbol/term descriptions
Symbol Description
NOTE/REF: Used to inform the reader of general information including references to additional reading material.
CAUTION or DISCLAIMER: Used to caution the reader to take special notice of critical information.
Descriptive text is presented in a proportional font (as represented by this font).
Conventions for displaying TEST data in this document are as follows:
o The first three digits (prefix) of any Social Security Numbers (SSN) will begin with either
"000" or "666".
o Patient and user names will be formatted as follows: [Application Name]PATIENT,[N] and
[Application Name]USER,[N] respectively, where "Application Name" is defined in the
Approved Application Abbreviations document and "N" represents the first name as a
number spelled out and incremented with each new entry. For example, an MED test patient
and user names would be documented as follows: MEDPATIENT,ONE;
MEDPATIENT,TWO; MEDPATIENT,THREE; MEDUSER,ONE, MEDUSER,TWO,
MEDUSER,THREE, etc.
Sample HL7 messages, "snapshots" of computer online displays (i.e., character-based screen
captures/dialogues) and computer source code are shown in a non-proportional font and enclosed
within a box. Also included are Graphical User Interface (GUI) Microsoft® Windows images
(i.e., dialogues or forms).
o User's responses to online prompts will be boldface.
o The "<Enter>" found within these snapshots indicate that the user should press the Enter
key on their keyboard. Other special keys are represented within angle brackets (< >). For
example, pressing the PF1 key can be represented as pressing <PF1>.
o Author's comments, if any, are displayed in italics or as "callout" boxes.
NOTE: Callout boxes refer to labels or descriptions usually enclosed within a box,
which point to specific areas of a displayed image.
All uppercase is reserved for the representation of M code, variable names, or the formal name of
options, field and file names, and security keys (e.g., the TIU MED MGT key).

Orientation
June 2017 Mobile Electronic Documentation (MED) xix
User Manual
Documentation Navigation
This document uses Microsoft® Word's built-in navigation for internal hyperlinks. To add Back and
Forward navigation buttons to your toolbar, do the following:
1. Right-click anywhere on the customizable Toolbar in Word 2007 (not the Ribbon section).
2. Select Customize Quick Access Toolbar from the secondary menu.
3. Press the dropdown arrow in the "Choose commands from:" box.
4. Select All Commands from the displayed list.
5. Scroll through the command list in the left column until you see the Back command (green circle
with arrow pointing left).
6. Click/Highlight the Back command and press the Add button to add it to your customized
toolbar.
7. Scroll through the command list in the left column until you see the Forward command (green
circle with arrow pointing right).
8. Click/Highlight the Forward command and press the Add button to add it to your customized
toolbar.
9. Press OK.
You can now use these Back and Forward command buttons in your Toolbar to navigate back and forth
in your Word document when clicking on hyperlinks within the document.
How to Obtain Technical Information Online
Exported file, routine, and global documentation can be generated through the use of Kernel, MailMan,
and VA FileMan utilities.
NOTE: Methods of obtaining specific technical information online will be indicated where
applicable under the appropriate topic.
REF: See the Mobile Electronic Documentation (MED) Technical Manual for further
information.

Orientation
xx Mobile Electronic Documentation (MED) June 2017
User Manual
Online Help
VistA M-based software provides online help and commonly used system default prompts. Users are
encouraged to enter question marks at any response prompt. At the end of the help display, you are
immediately returned to the point from which you started. This is an easy way to learn about any aspect
of VistA M-based software.
The MED laptop/client workstation software includes an MED GUI online help file (i.e., MED.chm).
Instructions, procedures, and other information are available from the. To access the online help do either
of the following:
Inside MED, click on the Help | Contents menu options from the MED GUI toolbar or press the
F1 key while you have any MED dialogue screen open.
Outside MED, double-click on the MED.chm file.
Obtaining Data Dictionary Listings
Technical information about VistA M-based files and the fields in files is stored in data dictionaries
(DD). You can use the List File Attributes option on the Data Dictionary Utilities submenu in VA
FileMan to print formatted data dictionaries.
REF: For details about obtaining data dictionaries and about the formats available, see the "List
File Attributes" chapter in the "File Management" section of the VA FileMan Advanced User
Manual.
Assumptions about the Reader
This manual is written with the assumption that the reader is familiar with the following:
VistA computing environment
Microsoft® Windows
Reference Materials
Readers who wish to learn more about MED should consult the following:
Mobile Electronic Documentation (MED) Installation Guide (TIU*1.0*262)—Contains
instructions for installing, configuring, and deploying MED on the VistA M Server and
Laptop/Client Workstation.
Mobile Electronic Documentation (MED) Technical Manual—Contains instructions for
implementing and maintaining the MED software on the VistA M Server and Laptop/Client
Workstation.
FORUM Patches: TIU*1.0*244, TIU*1.0*257, and TIU*1.0*262.

Orientation
June 2017 Mobile Electronic Documentation (MED) xxi
User Manual
VistA documentation is made available online in Microsoft® Word format and Adobe® Acrobat
Portable Document Format (PDF). The PDF documents must be read using the Adobe® Acrobat Reader
(i.e., ACROREAD.EXE), which is freely distributed by Adobe® Systems Incorporated at the following
Website:
http://www.adobe.com/
VistA documentation can be downloaded from the VHA Software Document Library (VDL) Website:
http://www4.va.gov/vdl/
VistA documentation and software can also be downloaded from the Product Support (PS) anonymous
directories:
Preferred Method download.vista.med.va.gov
NOTE: This method transmits the files from the first available FTP server.
Albany OIFO ftp.fo-albany.med.va.gov
Hines OIFO ftp.fo-hines.med.va.gov
Salt Lake City OIFO ftp.fo-slc.med.va.gov


June 2017 Mobile Electronic Documentation (MED) 1
User Manual
1 Introduction
Mobile Electronic Documentation (MED) 2.3.311.6 is a Veterans Health Information Systems and
Technology Architecture (VistA) software application. It enables Department of Veterans Affairs (VA)
staff to access a patient's previously downloaded electronic medical record information when not
connected to the VA network. MED is designed to work in tandem with the Computerized Patient Record
System (CPRS) as temporary storage of patient notes. This includes the ability to enter notes using CPRS
exported Templates (.txml). MED promotes user satisfaction and efficiency in the login and
documentation process by allowing access to CPRS at the point of care (POC) and avoid the duplicate
process of charting handwritten notes at the end of the day.
When providing health care services, Home and Community Care staff (e.g., physicians, nurses,
dieticians, social workers, and health care providers) must travel to a variety of geographic locations in
which Internet access and coverage is often unreliable or sometimes unavailable. MED does the
following:
Allows access to secure patient information without the need for wireless Internet connectivity.
Promotes the security of patient information by removing the need to print and carry excessive
amounts of patient-sensitive data out of the clinical setting and into the community.
Allows users to view and download to their secured laptops/client workstations Health Summary
and MED Created Notes for patients in Home Based Primary Care (HBPC) Clinics.
Provides the ability to enter and review patient documentation (e.g., Progress Notes) remotely at
the point of care (POC), such as patient's home, when they are not connected to the VA network.
Enables the transfer of patient data documented in MED during a home visit to be imported into
CPRS as a patient note, which becomes part of the patient record.
Minimizes errors from home visits by removing the need for paper records or the need to
manually transfer (e.g., copy and paste) patient data from a mobile device.
CAUTION: This version of MED does not encrypt data. All laptops/client workstations
(PC) are required to have full disk encryption and VA security policies. PCs should have
normal health checks including security updates and antivirus.
Please be aware that if a PC is assigned to multiple users, MED notes and health
summaries include patient information that is viewable to all users of the PC. Therefore,
all users of the PC must have the same level of security access to view this information.

Introduction
2 Mobile Electronic Documentation (MED) June 2017
User Manual
This page intentionally left blank for double-sided printing.

June 2017 Mobile Electronic Documentation (MED) 3
User Manual
2 Starting MED
To start the Mobile Electronic Documentation (MED) laptop/client workstation software, double-click
the Launch MED shortcut icon on the laptop/client workstation desktop:
Figure 1. MED—Desktop shortcut icon
After starting MED, in order to access the MED menu toolbars, you must first retrieve a patient, then
select a patient from the Patient Selection opening dialogue:
Figure 2. MED—Patient Selection dialogue
REF: For more information on selecting patient records in MED, see Section 4, "Selecting a
Patient," in this manual.
NOTE: While connected to the VA network/VistA, if you do not supply the appropriate signon
credentials you can access MED but cannot retrieve patients and summaries. You must sign
into MED using the appropriate signon credentials before being given access to retrieve patient
information from VistA.
REF: If you encounter any errors when running MED, see "Appendix B—Troubleshooting" for
more information.

Starting MED
4 Mobile Electronic Documentation (MED) June 2017
User Manual
This page intentionally left blank for double-sided printing.

June 2017 Mobile Electronic Documentation (MED) 5
User Manual
3 Retrieving Patient Records
3.1 Retrieving Patient Records Overview
Patient lists should be retrieved (not just selected) within Mobile Electronic Documentation (MED) on a
regular basis in order to ensure updated Health Summaries for all the patients the clinician might visit
(including unscheduled visits).
Retrieving Patient Records — When you retrieve patient records in MED, you are obtaining
updated patient data (e.g., Health Summaries) from Veterans Information Systems Technology
Architecture (VistA) and updating the MED Microsoft® Access database. In order to retrieve
patient records in MED, you must be connected to VistA and will be prompted to enter your
VistA signon credentials.
Selecting Patient Records -When you select patient records in MED, you are selecting
previously retrieved patients from the MED Microsoft® Access database. In order to select
patient records in MED, you do not need to be connected to VistA and will not be prompted to
enter your VistA signon credentials.
REF: For more information on selecting patient records in MED, see Section 4,
"Selecting a Patient," in this manual.
You can refresh patient information from Veterans Information Systems Technology Architecture
(VistA) if you are connected to the Department of Veterans Affairs (VA) Network and have been
assigned the Mobile Electronic Documentation secondary option [TIU MED GUI RPC]. This ensures
that recent updates will be reflected. For example:
Patient Information (e.g., Name, SSN, DOB)
Health Summary
CAUTION: If the patient name on the list is not a manually entered patient, when MED is
started, any notes that have been imported over 7 days prior are deleted. Then, any
patients that are over 7 days old and do not have any pending or imported notes are
deleted as well.
NOTE: Patient retrieval time is only affected if over 20 patients are retrieved at one time.
3.2 Retrieving Patient Records Procedures
To retrieve patient records, perform the following procedures:
NOTE: While connected to the VA network/VistA, if you do not supply the appropriate signon
credentials (i.e., PIV PIN /VA Access and Verify codes) you can access MED but cannot retrieve
patients and summaries. You must sign into MED using the appropriate signon credentials before being
given access to retrieve patient information from VistA.

Retrieving Patient Records
6 Mobile Electronic Documentation (MED) June 2017
User Manual
1. Choose either of the following options to retrieve patient records:
On the Patient Selection dialogue (Figure 2), click the Retrieve Patient(s) button.
On the MED menu toolbar:
a. Select the File menu.
b. Select Retrieve Patient(s) menu option.
The following Retrieve Patient(s) dialogue opens:
Figure 3. MED—Retrieve Patient(s) dialogue

Retrieving Patient Records
June 2017 Mobile Electronic Documentation (MED) 7
User Manual
2. From the Retrieve Patient(s) dialogue (Figure 3), you have three choices to retrieve patients:
Retrieve From Personal List—Retrieve from a CPRS Personal List. It is recommended
that you create a Personal List in CPRS and keep it updated.
a. Click the Retrieve From Personal List button.
b. Sign onto VistA: Enter your PIV PIN or Access/Verify code.
NOTE: If you are not prompted for your signon credentials, contact
IRM to verify that the correct IP address and port number have been
assigned to the MED shortcut executable target line. If further assistance
is needed, please enter a National Remedy ticket or call the National
Service Desk-Tuscaloosa at 1-888-596-4357 for assistance.
c. Select one of your personal lists in the left pane under "Personal List."
d. Check/Uncheck the patient(s) you want to download to MED in the middle pane
under "Patients."
e. Click the Retrieve Checked Patients button in the right pane.
Figure 4. MED—Retrieve Patient(s): Personal Lists dialogue

Retrieving Patient Records
8 Mobile Electronic Documentation (MED) June 2017
User Manual
Select a Patient—Retrieve a single patient.
a. Click the Select a Patient button to retrieve a single patient.
b. Sign onto VistA: Enter your PIV PIN or Access and Verify codes.
NOTE: If you are not prompted for your signon credentials, contact
IRM to verify that the correct IP address and port number have been
assigned to the MED shortcut executable target line. If further assistance
is needed, please enter a National Remedy ticket or call the National
Service Desk-Tuscaloosa at 1-888-596-4357 for assistance.
c. Select a patient from the displayed list in the left pane, as you would in CPRS.
d. Click the Retrieve Patient button in the right pane.
Figure 5. MED—Retrieve Patient(s): Select Patient dialogue

Retrieving Patient Records
June 2017 Mobile Electronic Documentation (MED) 9
User Manual
Manually Enter a Patient
NOTE: Manual entry is for adding a patient in the event you did not download
the patient prior to leaving the facility, or there is an unscheduled visit.
REF: For important information about importing notes for manually entered
patients, see the "Importing MED Notes into CPRS" section.
a. Click the Manually Enter a Patient button.
b. Enter the Name in the following format as you would in VistA:
LAST NAME,FIRST NAME,MIDDLE INITIAL
NOTE: If the user types Last Name,First Name with a space after the
comma, the patient will not be recognized when attempting to import
into CPRS.
c. Enter the nine-digit Social Security Number (SSN).
d. Enter the Date of Birth (DOB) by doing either of the following:
To easily and quickly add the DOB, manually enter the month, day, and
year as follows:
i. Single click on the value you want to change.
ii. Enter the desired number.
iii. Repeat for all DOB values as needed.
Select the date from the dropdown list. You will have to scroll through
the calendar dates to arrive at the correct year, since the MED DOB year
defaults to 1899.

Retrieving Patient Records
10 Mobile Electronic Documentation (MED) June 2017
User Manual
e. Click the Save Patient button.
Figure 6. MED—Retrieve Patient(s): Manually enter a Patient dialogue
The updated information will be stored in the local database and new or updated patients
will be available at the "Patient Selection" screen.
NOTE: Health Summaries are stored as .hsm files in the db folder of MED.
This folder resides on the local laptop that is used for the Home Based Primary
Care (HBPC) visits.
3. Press the Close button once you have selected all of your patients from VistA in order to exit out
of VistA and return to MED.
3.3 Delete Manually Entered Patients (Duplicates)
A duplicate patient record in the MED database (i.e., identical Last Name, First Name, SSN, and DOB)
may occur when a provider manually enters a patient into MED while in the field, because he/she does
not see that the VistA patient has already been retrieved into the MED patient list (i.e., MED Access
database). If the provider enters a note to the VistA retrieved patient record and not the manually entered
record, it will not get imported.
When importing a note for a duplicate patient, the MED import process first finds the manually entered
patient. Since the note was not added to the manually entered patient, MED does not find a note for that
patient. The only way to import the note for that patient is to delete the manually entered patient from the
MED Access database.
Manually entered patients will never be automatically deleted. These patients can only be deleted from
the patient list through the database. To delete a manually added patient from the MED Access
database/selection list contact your CAC or IRM for assistance.

June 2017 Mobile Electronic Documentation (MED) 11
User Manual
4 Selecting a Patient
After starting the Mobile Electronic Documentation (MED) software, the Patient Selection dialogue
appears, as shown below:
Figure 7. MED—Patient Selection dialogue
NOTE: In order to select patient records in MED, you do not need to be connected to VistA
and will not be prompted to enter your VistA signon credentials.
Select a patient record to view. If you have a list of patients from which to select, perform the follow
procedures:
1. On the MED Patient Selection dialogue, select the patient using one of the following methods:
Choose a patient from the displayed list of patient names.
Type the first letter of the patient's last name and the last four digits of the patient's
Social Security Number (SSN) (e.g., M0001).
MED will try to match what you entered to a patient and highlight that patient. The
patient's name and other information will appear below in the Patient Box located below
the Retrieve Patient(s) button.
2. Verify that the correct patient is highlighted.
If the correct patient is highlighted, click OK.
If the correct patient is not highlighted:
a. Scroll through the list to find the correct patient.
b. Highlight the name.
c. Click OK.

Selecting a Patient
12 Mobile Electronic Documentation (MED) June 2017
User Manual
NOTE: If MED finds more than one patient with the same last name and same last four
digits of the SSN, the possible matches will be shown above the dividing line. Select the
correct patient and click OK.
3. When you click OK, MED opens to the Summary Tab (see Section 7).
If you do not have a list of patients to select from, you will need to click on the "Retrieve
Patient(s)" button. The process of retrieving patients is described in the previous section.

June 2017 Mobile Electronic Documentation (MED) 13
User Manual
5 Patient Information Available from Any Tab
Patient Information for the currently selected patient is located at the top of the MED window and is
available from any tab. The patient information includes:
Name
Social Security Number (SSN)
Date of Birth (DOB)
Figure 8. MED—Patient information

Information Available from Any Tab
14 Mobile Electronic Documentation (MED) June 2017
User Manual
This page intentionally left blank for double-sided printing.

June 2017 Mobile Electronic Documentation (MED) 15
User Manual
6 Printing from Within MED
6.1 Printing Health Summaries and Notes Overview
MED allows you to print the following information for patients:
Reports: Patients with Notes Report—Report showing the patients that have Notes and
Pending/Imported Notes for the Current Patient
Health Summaries
Individual Patient Notes
Scratch Pad entries
Use the instructions in the topics that follow to print MED reports to network Microsoft Windows
printer.
6.2 Printing Health Summaries and Notes Procedures
To print Health Summaries, Scratch Pad entries, Reports, and multiple Notes in MED, perform the
following procedures:
1. Launch MED.
a. Select a patient to make the MED menu options visible on the Patient Selection form (see
Section 4).
b. Select the File menu.
c. Select the Print option, as shown below:
Figure 9. MED Menus—File and Print options (partial capture)

Printing from within MED
16 Mobile Electronic Documentation (MED) June 2017
User Manual
2. The MED Print Documents dialogue opens, as shown below:
Figure 10. MED—Print Documents dialogue: Sample list of notes that can be printed
3. Select the documents you want to print by checking the checkbox next to each item. The Health
Summary, Scratch Pad entries, and the currently selected Note (if applicable) are checked by
default.
4. Click Print. The Print dialogue opens, as shown below:
Figure 11. MED—Print dialogue
5. Select the Printer to which the documents should be sent and click OK.

June 2017 Mobile Electronic Documentation (MED) 17
User Manual
7 Summary Tab
7.1 Summary Tab Overview
The Summary Tab is the first dialogue screen you see after selecting a patient. This tab displays the
Health Summary text-based overview of a patient's condition and history, which includes:
Patient demographics
Advance Directive information
Active problems
Allergies and postings
Active medications
Clinical reminders
Lab results
Vitals
List of appointments or visits
The actual information available depends on the Health Summary selected in the MED parameters. The
local Clinical Application Coordinator (CAC) can modify the Health Summary displayed in MED as
desired by the site.

Health Summary Tab
18 Mobile Electronic Documentation (MED) June 2017
User Manual
Figure 12. MED—Health Summary tab dialogue
The MED Health Summary displays a variety of information about a patient.

Health Summary Tab
June 2017 Mobile Electronic Documentation (MED) 19
User Manual
7.2 Summary Tab Procedures
You can type or select an item in the Find in Health Summary list to quickly jump to a section within
the Health Summary. Health Summaries are retrieved by default.
CAUTION: The effect of disabling retrieval of Health Summaries results in no Health
Summaries being displayed for all patients.
7.2.1 Retrieve Health Summaries from VistA
To change if Health Summaries are retrieved from VistA, perform the following procedures:
1. Launch MED:
a. Select a patient to make the MED menu options visible on the Patient Selection form (see
Section 4).
b. Select the Tools menu.
c. Select the Settings option, as shown below:
Figure 13. MED Menus—Tools and Settings options (partial capture)

Health Summary Tab
20 Mobile Electronic Documentation (MED) June 2017
User Manual
2. The Users & Settings dialogue opens. If not already selected, click on the Data & Files tab, as
shown below:
Figure 14. MED Users & Settings dialogue—Data & Files
3. Check/Uncheck the Retrieve Health Summaries checkbox option.
CAUTION: Unchecking the Retrieve Health Summaries checkbox disables
retrieving/displaying Health Summaries results for all patients.
7.2.2 Find Health Summary Text
To find specific text in the Health Summary, perform the following procedures:
1. Click Health Summary text.
2. Select Edit\Find. The Find dialogue opens, as shown below:
Figure 15. MED—Find dialogue
3. Enter the text that you want to find.

Health Summary Tab
June 2017 Mobile Electronic Documentation (MED) 21
User Manual
4. Click Find Next. If the text is found, it will be highlighted in the Health Summary.
Figure 16. MED—Health Summary tab: Find dialogue

Health Summary Tab
22 Mobile Electronic Documentation (MED) June 2017
User Manual
7.3 Create and Assign a Health Summary to MED
The Home Based Primary Care (HBPC) staff should develop a Health Summary that is suitable for the
type of care that they will be providing to their patients. Only one Health Summary can be assigned to a
user. The CAC is responsible for creating and assigning the HBPC Health Summaries that will be used:
1. Review the current Health Summaries in CPRS:
a. Select the Reports tab.
b. Select Health Summary.
2. Create a robust vs. minimal Health Summary to be used with MED; however, the MED Health
Summary does not replace the need to review a patient's record in CPRS in preparation for
patient visits. The length of the summary does not affect the length of time it takes to retrieve
patients.
NOTE: Patient retrieval time is only affected if over 20 patients are retrieved at one
time.

June 2017 Mobile Electronic Documentation (MED) 23
User Manual
8 Scratch Pad Tab
8.1 Scratch Pad Tab Overview
The Scratch Pad allows you to store notes and other information for referral. This information can be
viewed and/or printed, but cannot be copied or imported into the Computerized Patient Record System
(CPRS). The purpose for Scratch Pad is similar to a post-it note. The local Clinical Application
Coordinator (CAC) can create templates for you to use in the Scratch Pad if desired by the site (see
Section 8.3).
Figure 17. MED—Scratch Pad tab dialogue
8.2 Scratch Pad Procedures
8.2.1 Write Scratch Pad Text
To write text in the Scratch Pad, perform the following procedures:
1. Launch Mobile Electronic Documentation (MED).
2. Click on the Scratch Pad tab.
3. Enter any text in the white text box below the patient's Name, SSN, and DOB, as shown below:

Scratch Pad Tab
24 Mobile Electronic Documentation (MED) June 2017
User Manual
8.2.2 Find Scratch Pad Text
To find specific text in the Scratch Pad, perform the following procedures:
1. Click the Scratch Pad tab.
2. Select Edit\Find. The Find dialogue opens, as shown below:
Figure 18. MED—Find dialogue
3. Enter the text that you want to find.

Scratch Pad Tab
June 2017 Mobile Electronic Documentation (MED) 25
User Manual
4. Click Find Next. If the text is found, it will be highlighted in the Scratch Pad.
Figure 19. MED—Scratch Pad tab: Find dialogue
8.2.3 Delete Scratch Pad Text
To delete text in the Scratch Pad, perform the following procedures:
1. Highlight the text portion you want to delete.
2. Right-click on the selected text.
3. Press Delete.

Scratch Pad Tab
26 Mobile Electronic Documentation (MED) June 2017
User Manual
8.3 Creating Templates and Directory Access
A user can create a "personal template" in Text Integration Utility (TIU) if your site has enabled the
CPRS parameter to perform this task. If you have a "personal template" that you would like to use in
MED, contact your CAC or IRM to assist you.
REF: For information on how to create Personal Templates, please refer to the TIU User
Manual.
The local site Clinical Application Coordinator (CAC) can create TIU templates (.txml format). The
CAC then exports those templates, with the exception of Reminder Dialogs, through the CPRS Template
Editor into the Templates folder on the network share directory for use with MED Scratch Pad. MED
only recognizes template files with the .txml extension.
NOTE: Reminder Dialogs cannot be used within the MED application. In addition, you can use
patient data objects in any template, but the data will not populate until the template is imported
into CPRS.
By creating a network location to store MED templates, template management can be maintained on the
network server instead of each individual laptop/client workstation. Those templates will automatically
be pulled from the shared network directory to the local laptop/client workstation Templates folder when
the user launches MED:
C:/Program Files/Mobile Electronic Documentation/Templates
REF: For more information on Network Share Templates directory, see the "Create a Network
Share Download Directory" section in the Mobile Electronic Documentation (MED) Technical
Manual.
8.4 Deleting Templates
The local Clinical Application Coordinator (CAC) or IRM staff can delete templates for you.
REF: For more information on deleting templates, see the "Deleting Templates" section in the
Mobile Electronic Documentation (MED) Technical Manual.

June 2017 Mobile Electronic Documentation (MED) 27
User Manual
9 Notes Tab
From the Notes tab you can create a new Mobile Electronic Documentation (MED) note for a patient and
view existing Pending and Imported Notes. Documents on the Notes tab are organized in a directory tree
structure on the left side of the screen.
9.1 Icons on the Notes Tab
The icons in front of the document titles on the Notes tab help identify and categorize documents. For
example:
Notes Pending Import into Computerized Patient Record System (CPRS).
Notes Imported into CPRS within the Past 7 Days.

Notes Tab
28 Mobile Electronic Documentation (MED) June 2017
User Manual
9.2 Viewing Notes
To view the text of a Note, perform the following procedures:
1. Click the Notes tab.
2. Select a document title from the "Notes for this Patient" section in the upper left pane of the
screen. The text of the Note will be displayed on the right pane of the screen.
Figure 20. MED—Notes tab

Notes Tab
June 2017 Mobile Electronic Documentation (MED) 29
User Manual
9.3 Creating and Editing Notes
To create a new Note, perform the following procedures:
1. Click the Notes tab.
2. Select the type of note to create from the "Create a Note" section in the lower left pane of the
screen.
Figure 21. MED—Create a Note dialogue: Sample list of note templates that can be created
3. Click the Create Note button. The Template screen for the type of Note you selected appears.
Notes Tab
30 Mobile Electronic Documentation (MED) June 2017
User Manual
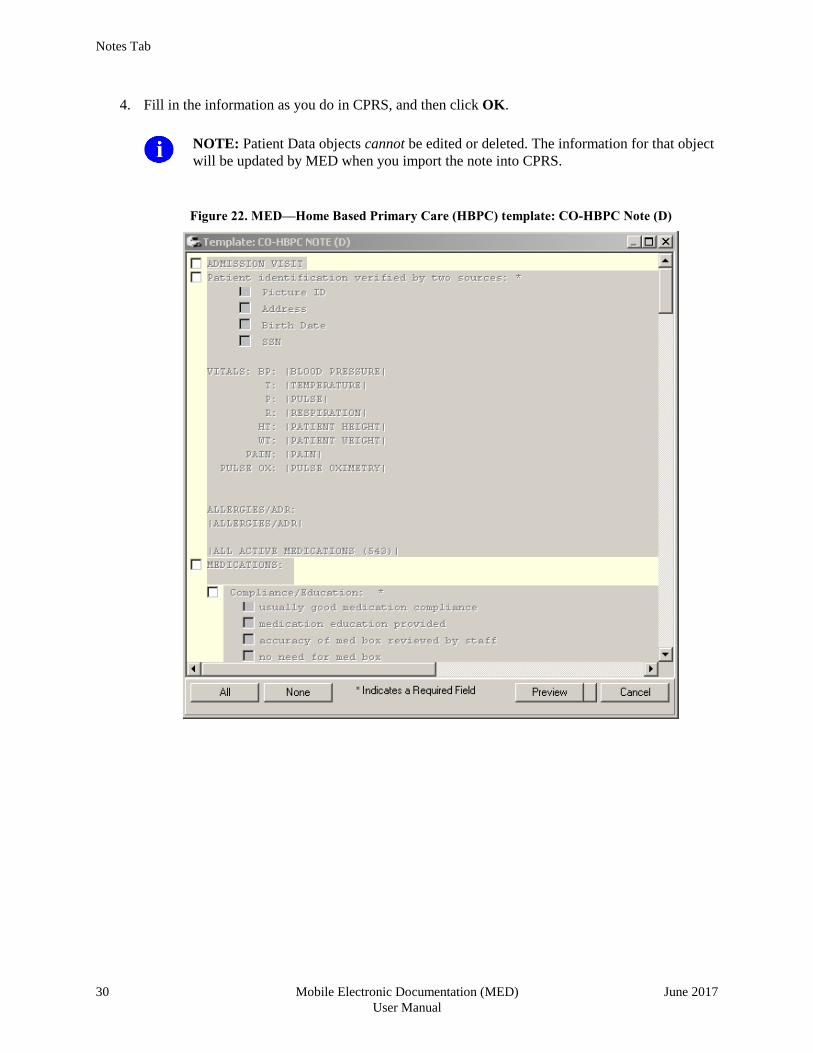
4. Fill in the information as you do in CPRS, and then click OK.
NOTE: Patient Data objects cannot be edited or deleted. The information for that object
will be updated by MED when you import the note into CPRS.
Figure 22. MED—Home Based Primary Care (HBPC) template: CO-HBPC Note (D)

Notes Tab
June 2017 Mobile Electronic Documentation (MED) 31
User Manual
9.4 Editing Existing Notes
To edit an existing Note, perform the following procedures:
1. Click the Notes tab.
2. Select a document from the left upper pane of the screen labeled "Notes for this patient". The
text of the Note will be displayed on the right side of the screen labeled "Note".
3. Select Action\Edit Note. You can now edit the Note.
NOTE: Patient Data objects cannot be edited or deleted.
9.5 Saving Notes
Currently, the MED software does not provide a Save button or auto-save action on the Notes tab. As a
workaround, to save a note and write the data to the MED database on the laptop/client workstation, do
one of the following actions:
Close the MED software using the Close button ("X"), as shown below:
Figure 23. MED—Close button
Select a new patient (see Section 4).
CAUTION: Do not shut down the laptop/client workstation before properly closing MED;
otherwise, data may be lost!
Simply pressing the OK button does not save the note. In order to save your note, you
must close MED by pressing the Close button ("X"; see Figure 23) to exit out of MED
prior to closing, shutting down, or putting your laptop on standby. If you do not close
MED first, the last note you created will not be saved to the MED database.

Notes Tab
32 Mobile Electronic Documentation (MED) June 2017
User Manual
9.6 Finding Text in Notes
To find specific text in a Note, perform the following procedures:
1. Click the Notes tab.
2. Select a document from the left upper pane of the screen labeled "Notes for this patient". The
text of the note will be displayed on the right side of the screen labeled "Note".
3. Right-click the text of the note.
4. Select Find. The Find dialogue opens, as shown below:
Figure 24. MED—Find dialogue
5. Enter the text that you want to find.

Notes Tab
June 2017 Mobile Electronic Documentation (MED) 33
User Manual
6. Click Find Next. If the text is found, it is highlighted in the Note.
Figure 25. MED—Notes tab: Find dialogue

Notes Tab
34 Mobile Electronic Documentation (MED) June 2017
User Manual
This page intentionally left blank for double-sided printing.

June 2017 Mobile Electronic Documentation (MED) 35
User Manual
10 Importing MED Notes into CPRS
From the Notes tab in the Computerized Patient Record System (CRPS) application you can import
Notes from the Mobile Electronic Documentation (MED) application. You must be connected to the
Department of Veterans Affairs (VA) network to import notes from MED into CRPS.
10.1 Existing Progress Notes
To import a MED Note into an existing CPRS Progress Note for a patient, perform the following
procedures:
1. Launch CPRS and select the patient whose notes you wish to import.
Figure 26. CPRS—Patient Selection dialogue
2. Select the Notes tab of CPRS.
3. Create or Edit a note, and move the cursor to where you would like to import the MED Note.

Importing MED Notes into CPRS
36 Mobile Electronic Documentation (MED) June 2017
User Manual
4. Double-click Templates\Shared Templates\Mobile Electronic Documentation. The Select
Note to Import dialogue will open, as shown below:
Figure 27. CPRS—Select Note to Import dialogue
5. Select the note to import.
6. Click OK.
7. The note will be imported into the CPRS Note that is currently being edited.
NOTE: Patient data objects embedded in the note will be retrieved from VistA and
updated with the appropriate values at the time of the import.

Appendix A—Keyboard Shortcuts for Common MED Command
June 2017 Mobile Electronic Documentation (MED) 37
User Manual
10.2 New Progress Notes
To create a new MED Progress Note and import it for a patient into CPRS, perform the following
procedures:
1. Launch CPRS and select the Patient whose notes you wish to import.
Figure 28. CPRS—Patient Selection dialogue
2. Select the Notes tab of CPRS.
3. Ensure that you are not editing an existing note.
4. Double-click: Templates\Shared Templates\Mobile Electronic Documentation\Import
M.E.D. Notes.

Importing MED Notes into CPRS
38 Mobile Electronic Documentation (MED) June 2017
User Manual
5. Select the location (if prompted), and enter the Progress Note properties.
Figure 29. CPRS—Progress Note Properties dialogue
6. If there is a template associated with the Progress Note Title, complete it as usual. The "Select
Note to Import" dialogue opens, as shown below:
Figure 30. MED—Select Note to Import dialogue (sample 1 of 2)
Appendix A—Keyboard Shortcuts for Common MED Command
June 2017 Mobile Electronic Documentation (MED) 39
User Manual
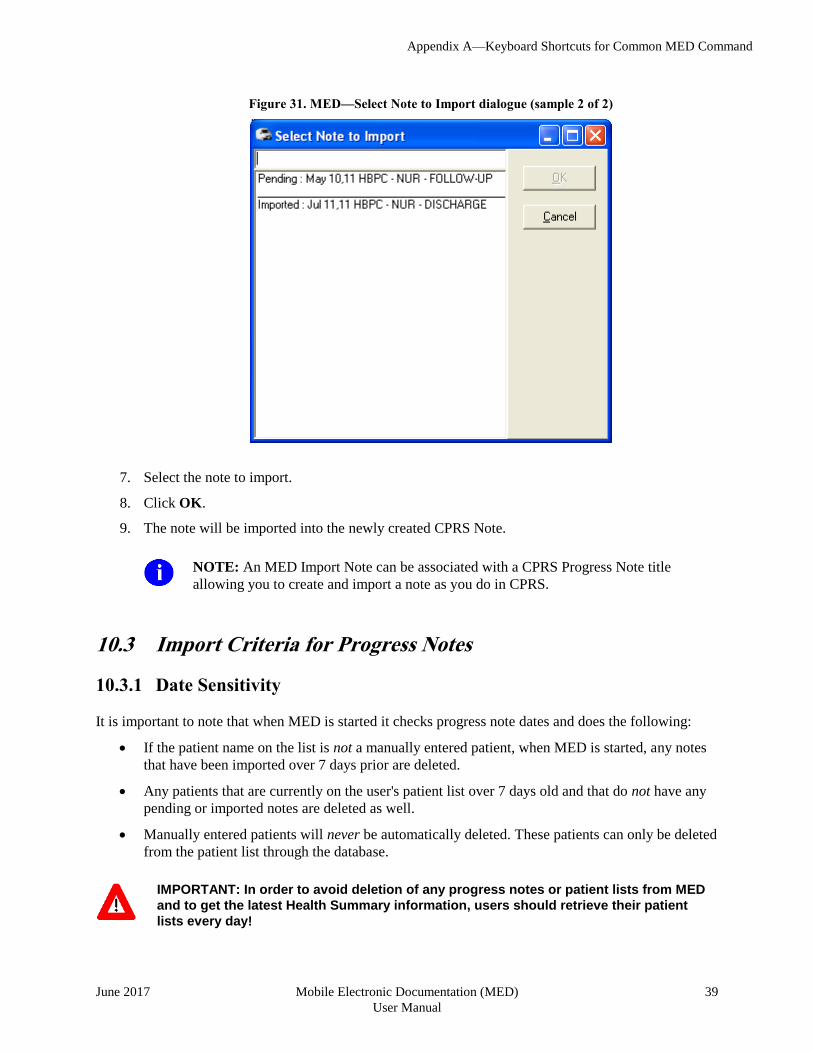
Figure 31. MED—Select Note to Import dialogue (sample 2 of 2)
7. Select the note to import.
8. Click OK.
9. The note will be imported into the newly created CPRS Note.
NOTE: An MED Import Note can be associated with a CPRS Progress Note title
allowing you to create and import a note as you do in CPRS.
10.3 Import Criteria for Progress Notes
10.3.1 Date Sensitivity
It is important to note that when MED is started it checks progress note dates and does the following:
If the patient name on the list is not a manually entered patient, when MED is started, any notes
that have been imported over 7 days prior are deleted.
Any patients that are currently on the user's patient list over 7 days old and that do not have any
pending or imported notes are deleted as well.
Manually entered patients will never be automatically deleted. These patients can only be deleted
from the patient list through the database.
IMPORTANT: In order to avoid deletion of any progress notes or patient lists from MED
and to get the latest Health Summary information, users should retrieve their patient
lists every day!

Importing MED Notes into CPRS
40 Mobile Electronic Documentation (MED) June 2017
User Manual
10.3.2 Security Keys
If you have a progress note for a manually entered patient, you must hold one of the following MED
security keys:
Table 1. MED—Security keys for validating patient identification for manually entered MED patients
Security Key Description
TIU MED MANUAL PATIENT If you hold this security key, the following must match exactly:
The first letter of the last name.
The first letter of the first name.
NOTE: If the user types Last Name,First Name with a space after the comma, the patient will not be recognized when attempting to import into CPRS.
The date of birth (DOB).
The nine-digit Social Security Number (SSN).
TIU MED MANUAL OVERRIDE If you hold this security key, the full SSN must match exactly.
CAUTION: Most users must not be
given the TIU MED MANUAL OVERRIDE
security key.
It is suggested that there be a document
review and patient review before importing
notes into patient records that have
typographical or missing data that stops a user
from importing the information as outlined with
the TIU MED MANUAL PATIENT security key.

Appendix A—Keyboard Shortcuts for Common MED Command
June 2017 Mobile Electronic Documentation (MED) 41
User Manual
10.3.3 Import Examples
For example, if you hold the TIU MED MANUAL PATIENT security key and have added a manually
entered patient like the one shown below, you will be allowed to import.
Table 2. Import Example—TIU MED MANUAL PATIENT security key
CPRS Patient:
Name: MED,PATIENT ONE
DOB: 01/01/1950
SSN: 000-44-0001
MED Patient:
Name: MED,PATIENTS ONE
DOB: 01/01/1950
SSN: 000-44-0001
However, if you have added a manually entered patient like any of those shown below, you will not be
allowed to import if you only have the TIU MED MANUAL PATIENT security key.
Holders of the TIU MED MANUAL OVERRIDE security key can import patients with different names:
Table 3. Import Example—TIU MED MANUAL OVERRIDE security key: Different names
CPRS Patient:
Name: MED,PATIENT ONE
DOB: 01/01/1950
SSN: 000-44-0001
MED Patient:
Name: MED,CASE ONE
DOB: 01/01/1950
SSN: 000-44-0001
Holders of the TIU MED MANUAL OVERRIDE key can import patients with different DOBs:
Table 4. Import Example—TIU MED MANUAL OVERRIDE security key: Different DOB
CPRS Patient:
Name: MED,PATIENT ONE
DOB: 01/01/1950
SSN: 000-44-0001
MED Patient:
Name: MED,PATIENT ONE
DOB: 01/21/1950
SSN: 000-44-0001

Importing MED Notes into CPRS
42 Mobile Electronic Documentation (MED) June 2017
User Manual
This record cannot be imported regardless of the security key a user holds, since the SSN does not match:
Table 5. Import Example—Unable to import due to different SSNs
CPRS Patient:
Name: MED,PATIENT ONE
DOB: 01/01/1950
SSN: 000-44-0001
MED Patient:
Name: MED,PATIENT ONE
DOB: 01/01/1950
SSN: 000-44-0002

June 2017 Mobile Electronic Documentation (MED) 43
User Manual
11 Appendix A—Keyboard Shortcuts for Common MED Commands
This appendix discusses the keyboard shortcut equivalents for common Mobile Electronic
Documentation (MED) commands. This allows users who prefer using shortcuts or other users with
limited vision or dexterity to use the software effectively and make it accessible.
11.1 Navigation Commands
Table 6. MED Navigation commands—Keyboard shortcuts
MED Navigation Command Keyboard Shortcut
Select the Health Summary tab Ctrl + S
Select the Notes tab Ctrl + N
Advance to the next field, button, or control (left to right) Tab
To exit a field that accepts tabs (e.g., the text of a Note) and move to the next control (left to right)
Control + Tab
To exit a field that accepts tabs and move to the previous control (right to left)
Shift + Control + Tab
Pull down a list box Down Arrow
Navigate a list box Up Arrow or Down Arrow
Select an item in a list box Enter
To switch between the tabbed page of a dialogue box Control + Tab
To toggle a check box on or off Spacebar
11.2 File Menu Commands
Table 7. MED File menu commands—Keyboard shortcuts
File Menu Command Keyboard Shortcut
Select New Patient Alt-F-N or Ctrl + Alt + N
Retrieve Patient List Alt-F-L or Ctrl + Alt + P
Print Alt-F-P or Ctrl + P
Exit Alt-F-X

Appendix A—Keyboard Shortcuts for Common MED Command
44 Mobile Electronic Documentation (MED) June 2017
User Manual
11.3 Edit Menu Commands
Table 8. MED Edit menu commands—Keyboard shortcuts
Edit Menu Command Keyboard Shortcut
Undo Alt-E-U or Ctrl + Z
Find Alt-E-F or Ctrl + F
Cut Alt-E-T or Ctrl + X
Copy Alt-E-C or Ctrl + C
Paste Alt-E-P or Ctrl + V
Select All Alt-E-A or Ctrl + A
11.4 View Menu Commands
Table 9. MED View menu commands—Keyboard shortcuts
View Menu Command Keyboard Shortcut
Summary Tab Alt-V-S or Ctrl + S
Notes Tab Alt-V-N or Ctrl + N
11.5 Tools Menu Commands
Table 10. MED Tools menu commands—Keyboard shortcuts
Tools Menu Command Keyboard Shortcut
Change Password Alt-T-P
Users & Settings Alt-T-U
Compact Database Alt-T-C
11.6 Action Menu Commands
Table 11. MED Action menu commands—Keyboard shortcuts
Action Menu Command Keyboard Shortcut
Delete Note Alt-A-D
Edit Note Alt-A-E

Appendix A—Keyboard Shortcuts for Common MED Command
June 2017 Mobile Electronic Documentation (MED) 45
User Manual
11.7 Help Menu Commands
Table 12. MED Help menu commands—Keyboard shortcuts
Help Menu Command Keyboard Shortcut
Contents Alt-H-C
About MED Alt-H-A

Appendix A—Keyboard Shortcuts for Common MED Command
46 Mobile Electronic Documentation (MED) June 2017
User Manual
This page intentionally left blank for double-sided printing.

June 2017 Mobile Electronic Documentation (MED) 47
User Manual
12 Appendix B—Troubleshooting
This appendix discusses the various errors and other messages you may encounter while using the
Mobile Electronic Documentation (MED) application.
NOTE: If the resolutions listed for the errors described in this section do not resolve the error
or problem, please enter a National Remedy ticket or call the National Service Desk-Tuscaloosa
at 1-888-596-4357 for assistance.
12.1 Patch TIU*1*257 is Not Current in VistA Error
Error Message:
The following error may be displayed when an older version of MED is installed or is the wrong KIDS
version in VistA:
Figure 32. MED Error—Patch TIU*1*257 is not current in VistA
Description:
MED is not installed or an older version is installed on VistA.
Resolution:
Install/Reinstall Patch TIU*1.0*257 (TIU*1.0*257.KID package).

Appendix B—Troubleshooting
48 Mobile Electronic Documentation (MED) June 2017
User Manual
12.2 MED Missing Remote Procedure Calls (RPCs) in VistA Error
Error Message:
The following error may be displayed when an older version of MED is installed in VistA:
Figure 33. MED Error—Missing RPCs
Description:
MED is not installed or an older version is installed on VistA and is missing remote procedure calls
(RPCs).
Resolution:
Install/Reinstall Patch TIU*1.0*257 (TIU*1.0*257.KID package).
12.3 Invalid Pointer Operation Error
Error Message:
The following error may be displayed if the MED VistA KIDS install is not correct:
Figure 34. MED Error—Invalid pointer operation

Appendix B—Troubleshooting
June 2017 Mobile Electronic Documentation (MED) 49
User Manual
Description:
The MED application is missing all the remote procedure calls (RPCs).
Resolution:
Install/Reinstall Patch TIU*1.0*257 (TIU*1.0*257.KID package).
12.4 Application Context Error
Error Message:
The following error may be displayed for MED application context errors:
Figure 35. MED Error—Application context
Description:
Application context is a menu requirement for using all Remote Procedure Call (RPC) Broker calls. Each
application has its own application context. The MED application context is TIU MED GUI RPC V2.
Resolution:
The TIU MED GUI RPC V2 menu option is distributed with Patch TIU*1*257 and needs to be assigned
to all MED users, either on a common menu or one of the user's secondary menus.

Appendix B—Troubleshooting
50 Mobile Electronic Documentation (MED) June 2017
User Manual
12.5 Write Access Error
Error Message:
The following access error may be displayed for MED application users who do not have the appropriate
access permissions to the MED directory:
Figure 36. MED Error—Write access permissions error
Exception EFCreateError in module MED.exe at 0002363E
Cannot create file "C:\Program Files\Mobile Electronic Documentation\med.err".
Access is denied.
Description:
The user does not have the appropriate access permissions to the MED executable directory on the client
workstation/laptop. In order for users to write the appropriate information while using the MED software,
all users must be given Full Control access permission to the following MED application directory:
C:\Program Files\Mobile Electronic Documentation
Resolution:
Give all users Full Control access permission to the following MED application directory on the client
workstation/laptop:
C:\Program Files\Mobile Electronic Documentation
12.6 CPRS CHART – Library Not Registered Error
Error Message:
The following access error may be displayed when trying to import a MED note into CPRS for those
MED application users who do not have the appropriate access permissions to the MED directory:
Figure 37. MED Error—CPRS CHART – Library Not Registered Error
CPRS CHART – Library Not Registered

Appendix B—Troubleshooting
June 2017 Mobile Electronic Documentation (MED) 51
User Manual
Description:
The user does not have the appropriate access permissions to the MED executable directory on the client
workstation/laptop. In order for users to write the appropriate information while using the MED software,
all users must be given Full Control access permission to the following MED application directory:
C:\Program Files\Mobile Electronic Documentation
Resolution:
Give all Home Based Primary Care (HBPC) users Full Control access permission to the following MED
application directory on the client workstation/laptop:
C:\Program Files\Mobile Electronic Documentation
12.7 MED Database Open Error
Error Message:
The following error may be displayed if there is a problem with opening the MED database:
Figure 38. MED Error—Database is not installed correctly
Description:
The MED.mdb database should be in the following db subdirectory:
C:\Program Files\Mobile Electronic Documentation\db\MED.mdb
Resolution:
Install/Reinstall Patch TIU*1.0*257 (TIU*1.0*257.KID package).

Appendix B—Troubleshooting
52 Mobile Electronic Documentation (MED) June 2017
User Manual
12.8 MED Database Compact Messages
Warning Message:
The following warning message will be displayed when compacting the MED Microsoft® Access
database:
Figure 39. MED Warning—Database closing
After clicking YES, you should see the following message:
Figure 40. MED Information Message—Database Compacted
After pressing OK, MED closes.
Description:
When the MED database meets or exceeds this size in the Suggest Compact After (MB) field (default
value is 1024 MB), MED automatically prompts the user to compact the database. Currently, it is
suggested the user answer No to compact the database when prompted. If users choose to compact the
database they will see a series of warning and action messages (see above).
The MED.mdb database should be in the following db subdirectory:
C:\Program Files\Mobile Electronic Documentation \db\MED.mdb
REF: For more information on compacting the MED database, see Step 3o in the "Configure
Client Workstation" section in the Mobile Electronic Documentation (MED) Technical Manual.

Appendix B—Troubleshooting
June 2017 Mobile Electronic Documentation (MED) 53
User Manual
Resolution:
Close and save all open notes before compacting the MED Microsoft® Access database.
12.9 Network Connection Error
Error Message:
The following blank dialogues may be displayed if the MED RPC Broker fails to make a VistA
connection:
Figure 41. MED Error—Network Connection: Blank Retrieve Patient(s) dialogue (1 of 2)
Or:

Appendix B—Troubleshooting
54 Mobile Electronic Documentation (MED) June 2017
User Manual
Figure 42. MED Error—Network Connection: Blank Retrieve Patient(s) dialogue (2 of 2)
Description:
There may be a very long pause after selecting Retrieve Patients, and then the Retrieve Patients
dialogue is blank. MED is running but not connected to VistA.
Resolution:
Check the desktop shortcut. Verify that the IP server address and port number is correct. Also, check for
a network connection error.
12.10 RPC Broker Error
Error Message
You may see the following Remote Procedure Call (RPC) Broker error dialogue when starting MED:
Figure 43. Errors—RPC Broker Error: Patient list retrieval error

Appendix B—Troubleshooting
June 2017 Mobile Electronic Documentation (MED) 55
User Manual
Description:
This means that the user has not been assigned the Mobile Electronic Documentation secondary option
[TIU MED GUI RPC].
Resolution:
Contact the Information Resource Management (IRM) or Clinical Applications Coordinator (CAC) to
gain access to the Mobile Electronic Documentation secondary option [TIU MED GUI RPC V2].
12.11 CPRS Error
Error Message
You may see the following dialogue when trying to import notes into CPRS:
Figure 44. Errors—CPRS - Patient Chart Error: Importing notes error message
Description:
You may be trying to import MED notes on a computer that does not have MED installed. For example,
MED is installed on the laptop/client workstation, but you are trying to import MED notes on another
client workstation.
Resolution:
If MED is loaded on the laptop/client workstation, contact IRM for assistance to "re-register" the
MEDImport.dll file and then restart CPRS.

Appendix B—Troubleshooting
56 Mobile Electronic Documentation (MED) June 2017
User Manual
12.12 Invalid Date Error
Error Message:
The following error may be displayed during the patient import process:
Figure 45. MED Error—Invalid date
Description:
The Date of Birth (DOB) is in the wrong format in the MED database (MED.mdb). Click the OK button
to retrieve more details.
Resolution:
Verify that the correct MED GUI Version 2.3.311.6 is running on the laptop/client workstation. If it is
the correct GUI, then the current patient information is from a prior version. To fix this, use the current
MED GUI to retrieve the patient data and it will properly update the DOB in the MED database.
12.13 Missing Required Data Fields Error
Error Message:
The following types of error messages may be displayed for missing data fields (highlighted):
Figure 46. MED Error—Missing required data fields and Section 508 compliance: Active Caption Color

Appendix B—Troubleshooting
June 2017 Mobile Electronic Documentation (MED) 57
User Manual
Description:
Required fields in templates that are missing data will display a warning message, and the missing fields
will be highlighted in blue. Just as in CPRS, the template cannot be completed and saved unless the
required fields are completed. Unlike CPRS regular dialog templates, the missing fields will be obviously
marked.
NOTE: Prior versions of MED highlighted required missing data fields in yellow. To make
MED Section 508 compliant, the color of the fields is now set to Active Caption Color.
REF: For more information on making templates Section 508 compliant, see the "Missing
Required Data Fields Error" section in this manual.
Resolution:
Enter the missing required data fields.
Users can reset he highlight colors by changing the Microsoft® Windows theme.

Appendix B—Troubleshooting
58 Mobile Electronic Documentation (MED) June 2017
User Manual
This page intentionally left blank for double-sided printing.

June 2017 Mobile Electronic Documentation (MED) 59
User Manual
13 Appendix C—Mobile Electronic Documentation (MED) Frequently Asked Questions (FAQ)
# Question Answer
1 Will I need to purchase a certain device or hardware in order to use Mobile Electronic Documentation (MED)?
No. MED can run on any Microsoft® Windows-based laptop/client workstation, but is not designed for use with a tablet device.
2 How can I get MED, and is it only available for the Home Based Primary Care (HBPC) Programs?
MED is a standalone application. All VA facility Information Technology (IT) departments have the software, which is installed on individual laptops/client workstations. MED is not restricted for use in the HBPC program. The software can be used by any VA staff needing access to the patient electronic medical records when not connected to the VA network.
3 Can I still use other programs such as CPRS, Microsoft (MS) Outlook or VistA when I am using MED.
Yes. You can use MED with other programs that IT has installed on the laptop/client workstation. MED actually requires interaction with VistA and CPRS for loading the patient information and transferring the notes into the clinical record.
4 Can I use MED at home? Yes, if you have virtual private network (VPN) access. MED can be used with VPN in the office or at home. You can upload and download patient progress notes in MED while using VPN.
5 What must I do prior to having the MED software loaded on my laptop?
To prepare for using MED, you will need a customized Health Summary. You will need a list of progress note templates that will be used with MED. The Clinical Application Coordinator will assist you to design customized health summaries and progress note templates that you will use in MED.
6 Do I need any special permission or security clearance in order to use the MED software?
No. The MED software meets all VA security and encryption requirements.
7 How much time does it take to retrieve (download) a list of patients in MED?
For small lists of 20-30 patients, it takes approximately 3-5 minutes. Larger lists containing over 150 patients will take approximately 30-35 minutes to download into MED.
8 Will MED alert the user to restricted patient records?
Yes. MED will start the retrieval process which includes restricted record. MED will display them at the end the retrieval process, alerting the user in the same manner that CPRS does. The user then has the option to continue to retrieve the restricted record or not to.
9 Can I complete clinical reminders when using MED?
No. As an option, you can complete a clinical reminder by editing a MED progress note once the template is uploaded into CPRS, prior to signature (completing the note).

Appendix C—Mobile Electronic Documentation (MED) Frequently Asked Questions (FAQ)
60 Mobile Electronic Documentation (MED) June 2017
User Manual
# Question Answer
10 Why can't I cut and paste from the scratch pad?
This is to ensure that users do not accidentally copy and paste into the wrong patient record. You can copy and paste into the scratch pad, but you cannot copy and paste from the scratch pad.
11 Will the ePads for obtaining consents and signatures on Advanced Directives be compatible with the MED program?
MED is not designed for use with iMed Consent. MED is only compatible with CPRS.
12 Will MED do appointing and scheduling? No, MED doesn't link with either the Appointment Management or Event Capture modules.
13 Can you enter Encounter information while working in MED?
The encounter will need to be created and completed in CPRS when transferring the notes from MED.
14 What do I need to do to safeguard patient information in MED since it doesn't have its own password?
The patient information is protected on the laptop/client workstation using several key steps Virtual Private Network (VPN) security, encryption and protection while communicating with the VA servers (CPRS, VistA, Outlook, etc.), Microsoft® Windows-based password protection and User physical safeguard of the computer while signed on such as ensuring information not viewable or available to unauthorized users.

June 2017 Mobile Electronic Documentation (MED) 61
User Manual
Glossary
CPRS Computerized Patient Record System, the VistA package (in both GUI
and character-based formats) that provides access to most components of
the patient chart.
CAC Clinical Applications Coordinator. The CAC is a person at a hospital or
clinic assigned to coordinate the installation, maintenance and upgrading
of CPRS and other VistA software programs for the end users.
HEALTH SUMMARY A VistA product that can be viewed through CPRS, Health Summaries
are components of patient information extracted from other VistA
applications.
HBPC Home Based Primary Care.
PROGRESS NOTES A component of TIU that can function as part of CPRS.
VISTA Veterans Information Systems Technology Architecture.
MED Mobile Electronic Documentation. Application that provides remote
documentation and importing of notes into CPRS.
MED NOTES Notes created from exported CPRS Templates that can then be re-
imported into CPRS.
RETRIEVING PATIENT
RECORDS
When you retrieve patient records in MED, you are obtaining updated
patient data (e.g., Health Summaries) from Veterans Information
Systems Technology Architecture (VistA) and updating the MED
Microsoft® Access database. In order to retrieve patient records in
MED, you must be connected to VistA and will be prompted to enter
your VistA signon credentials (i.e., Access and Verify codes).
SELECTING PATIENT
RECORDS
When you select patient records in MED, you are selecting previously
retrieved patients from the MED Microsoft® Access database. In order
to select patient records in MED, you do not need to be connected to
VistA and will not be prompted to enter your VistA signon credentials.

Glossary
62 Mobile Electronic Documentation (MED) June 2017
User Manual
This page intentionally left blank for double-sided printing.

June 2017 Mobile Electronic Documentation (MED) 63
User Manual
Index
A
Access Error, 50
CPRS CHART – Library Not Registered
Error, 50
Accessibility, 43
Action Menu Commands, 44
Adobe Website, xxii
Appendix A—Keyboard Shortcuts for Common
MED Commands, 43
Appendix B—Troubleshooting, 47
Appendix C—Mobile Electronic Documentation
(MED) Frequently Asked Questions (FAQ),
59
Application Context Error, 49
Assumptions about the Reader, xxi
C
Callout Boxes, xix
Commands
Action Menu, 44
Edit Menu, 44
File Menu, 43
Help Menu, 45
Keyboard Shortcuts, 43
Navigation, 43
Tools Menu, 44
View Menu, 44
Common MED Commands
Keyboard Shortcuts, 43
Contents, xi
CPRS, 37
Importing Notes, 35
CPRS CHART – Library Not Registered Error,
50
CPRS Error, 55
Create a Note, 29
Creating Notes, 29
D
Database, 10
MED Database Compact Messages, 52
MED Database Open Error, 51
Dates
Progress Notes, 39
Desktop Shortcut, 3
Disclaimers, xviii
Document Title, 28
Documentation Conventions, xix
Documentation Navigation, xx
E
Edit Existing Notes, 31
Edit Menu Commands, 44
Editing Notes, 29
Errors, 47
Application Context, 49
CPRS, 55
CPRS CHART – Library Not Registered
Error, 50
Invalid Date, 56
Invalid Pointer Operation, 48
MED Database Open, 51
MED Missing Remote Procedure Calls
(RPCs) in VistA, 48
Missing Required Data Fields, 56
Network Connection, 53
Patch TIU*1*257 is Not Current in VistA, 47
RPC Broker, 54
Section 508, 57
Write Access, 50
Existing Progress Notes, 35
F
Figures, xv
File Menu Commands, 43
Finding Text in Notes, 32
Frequently Asked Questions (FAQ), 59
G
Glossary, 61
GUI
Online Help, xxi
H
Health Summary, 5, 15, 16, 17, 18, 21, 59
Find, 19, 20

Glossary
64 Mobile Electronic Documentation (MED) June 2017
User Manual
Tab
Overview, 17
Procedures, 19
Find Text, 20
Retrieve, 19
Help
Online, xxi
Help Menu Commands, 45
History, Revisions to Documentation and
Patches, iii
Home Pages
Adobe Website, xxii
VHA Software Document Library (VDL)
Website, xxii
VistA Development Website, xviii
How to
Obtain Technical Information Online, xx
Use this Manual, xvii
I
Icons on the Notes Tab, 27
Import Criteria for Progress Notes, 39
Importing
MED Notes into CPRS, 35
Intended Audience, xviii
Introduction, 1
Invalid Date Error, 56
Invalid Pointer Operation Error, 48
K
Keyboard Shortcuts
Common MED Commands, 43
L
Launching MED, 3
Legal Requirements, xviii
Library Not Registered Error
CPRS CHART, 50
M
MED
Desktop Shortcut, 3
Introduction, 1
Notes Tab, 27
Printing, 15
Progress Notes Date Sensitivity, 39
Retrieving Patient Records, 5
Scratch Pad Tab, 23
Selecting a Patient, 11
Starting, 3
Tabs
Summary, 17
MED Database Compact Messages, 52
MED Database Open Error, 51
MED Missing Remote Procedure Calls (RPCs)
in VistA Error, 48
Missing Required Data Fields Error, 56
Mobile Electronic Documentation option, 5, 55
N
Navigation Commands, 43
Network Connection Error, 53
New Progress Notes, 37
Notes, 44
Creating, 29
Edit Existing, 31
Editing, 29
Finding Text, 32
Icons, 27
Importing, 35
Viewing, 28
Notes Tab, 27
O
Obtaining
Data Dictionary Listings, xxi
Technical Information Online, How to, xx
Online
Help, xxi
Options
Mobile Electronic Documentation option, 5,
55
TIU MED GUI RPC, 5, 55
TIU MED GUI RPC V2, 55
Orientation, xvii
Overview
Health Summary
Tab, 17
Printing Health Summaries and Notes, 15
Retrieving Patient Records, 5
Scratch Pad Tab, 23
P
Patch TIU*1*257 is Not Current in VistA Error,
47

Index
June 2017 Mobile Electronic Documentation (MED) 65
User Manual
Patient Information Available from Any Tab, 13
Patient Records
Retrieving, 5
Patient Selection, 6, 10
Patients
Selecting, 11
Permissions Error, 50
CPRS CHART – Library Not Registered, 50
Printing
Within MED, 15
Printing Health Summaries and Notes
Overview, 15
Procedures, 15
Procedures
Health Summary
Tab, 19
Find Text, 20
Retrieve, 19
Printing Health Summaries and Notes, 15
Retrieving Patient Records, 6
Scratch Pad Tab, 23
Delete Text, 25
Find Text, 24
Write Text, 23
Progress Note, 38
Progress Notes
Existing, 35
Import Criteria, 39
Importing into CPRS, 35
New, 37
PS Anonymous Directories, xxii
R
Reader, Assumptions about the, xxi
Reference Materials, xxi
Requirements
Legal, xviii
Retrieve Patient(s), 6
Retrieving Patient Records, 5
Overview, 5
Procedures, 6
Revision History, iii
RPC Broker Error, 54
S
Scratch Pad Tab, 23
Overview, 23
Procedures, 23
Delete Text, 25
Find Text, 24
Write Text, 23
Security Keys, 40
TIU MED MANUAL OVERRIDE, 40
TIU MED MANUAL PATIENT, 40
Selecting a Patient, 11
Starting MED, 3
Summary
Tab, 17
T
Table of Contents, xi
Tables, xvi
Tabs
Notes, 27
Patient Information Available from Any Tab,
13
Scratch Pad, 23
Summary, 17
Template, 29, 38
TIU MED GUI RPC Option, 5, 55
TIU MED GUI RPC V2 Option, 55
TIU MED MANUAL OVERRIDE Security
Key, 40
TIU MED MANUAL PATIENT Security Key,
40
Tools Menu Commands, 44
Troubleshooting, 47
U
URLs
Adobe Website, xxii
VHA Software Document Library (VDL)
Website, xxii
VistA Development
Website, xviii
V
VHA Software Document Library (VDL)
Website, xxii
View Menu Commands, 44
Viewing Notes, 28
W
Warnings
MED Database Compact, 52

Glossary
66 Mobile Electronic Documentation (MED) June 2017
User Manual
Web Pages
Adobe Website, xxii
VHA Software Document Library (VDL)
Website, xxii
VistA Development Website, xviii
Write Access Error, 50