mobile apps development using aws cloud services · 1 mobile apps development using aws cloud...
TRANSCRIPT
1
Mobile Apps Development Using AWS Cloud Services
16 July 2018, elCC2018
Amazon LEX
Amazon Lex is a service for building conversational interfaces into any application
using voice and text. Amazon Lex provides the advanced deep learning functionalities of
automatic speech recognition (ASR) for converting speech to text, and natural language
understanding (NLU) to recognize the intent of the text, to enable users to build applications
with highly engaging user experiences and lifelike conversational interactions. With Amazon
Lex, the same deep learning technologies that power Amazon Alexa are now available to any
developer, enabling users to quickly and easily build sophisticated, natural language,
conversational bots (“chatbots”).
Speech recognition and natural language understanding are some of the most
challenging problems to solve in computer science, requiring sophisticated deep learning
algorithms to be trained on massive amounts of data and infrastructure. Amazon Lex
democratizes these deep learning technologies by putting the power of Amazon Alexa within
reach of all developers. Harnessing these technologies, Amazon Lex enables users to define
entirely new categories of products made possible through conversational interfaces.
How Amazon LEX Work
Powered by the same technology as Alexa, Amazon Lex provides users with the tools
to tackle challenging deep learning problems, such as speech recognition and language
understanding, through an easy-to-use fully managed service. Amazon Lex integrates with
AWS Lambda which users can use to easily trigger functions for execution of users back-end
business logic for data retrieval and updates. Once built, users bot can be deployed directly to
chat platforms, mobile clients, and IoT devices. Users can also use the reports provided to
track metrics for users bot. Amazon Lex provides a scalable, secure, easy to use, end-to-end
solution to build, publish and monitor user’s bots.
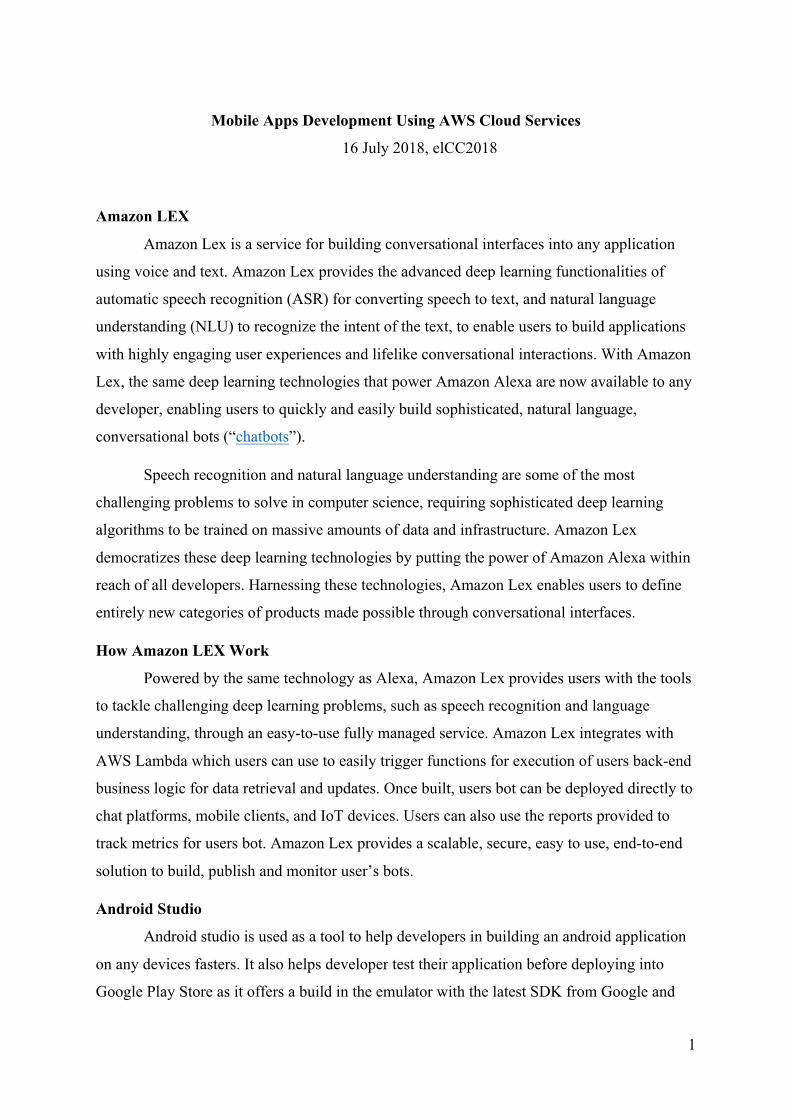
Android Studio
Android studio is used as a tool to help developers in building an android application
on any devices fasters. It also helps developer test their application before deploying into
Google Play Store as it offers a build in the emulator with the latest SDK from Google and
2
variations of devices to act as an emulator. The developer also can use their own devices to
test the application in the android studio by using the USB debugging feature.
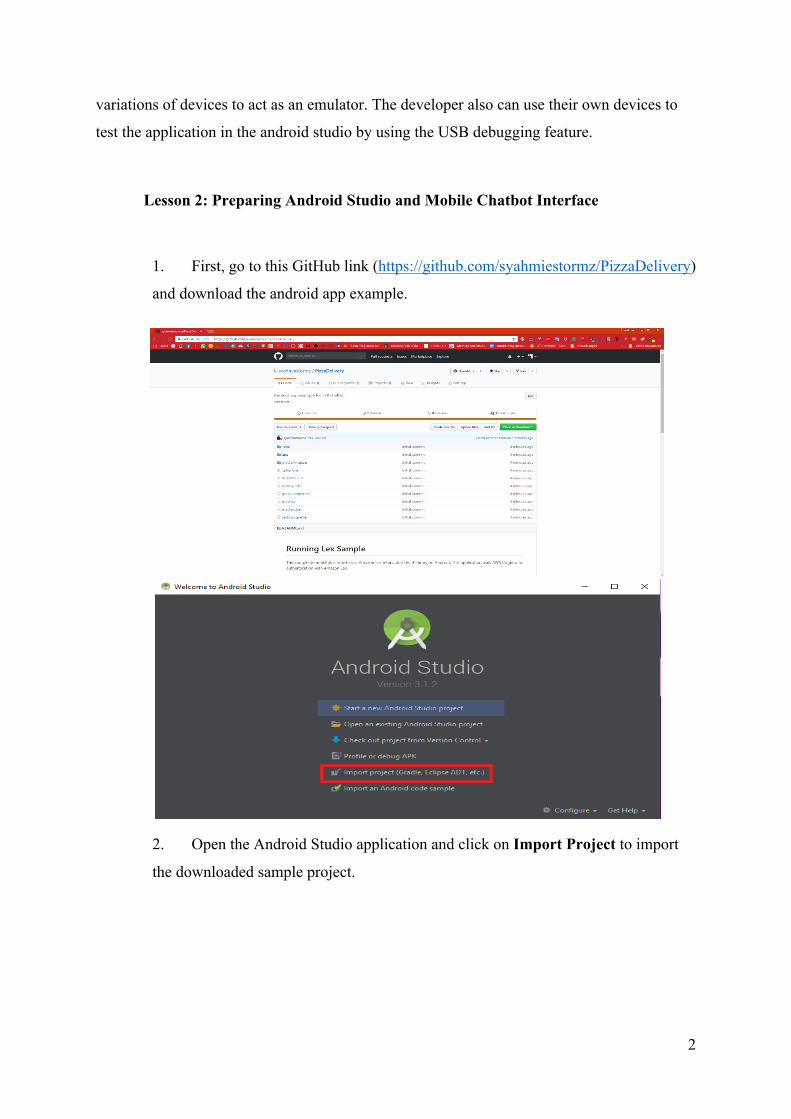
Lesson 2: Preparing Android Studio and Mobile Chatbot Interface
1. First, go to this GitHub link (https://github.com/syahmiestormz/PizzaDelivery)
and download the android app example.
2. Open the Android Studio application and click on Import Project to import
the downloaded sample project.
3
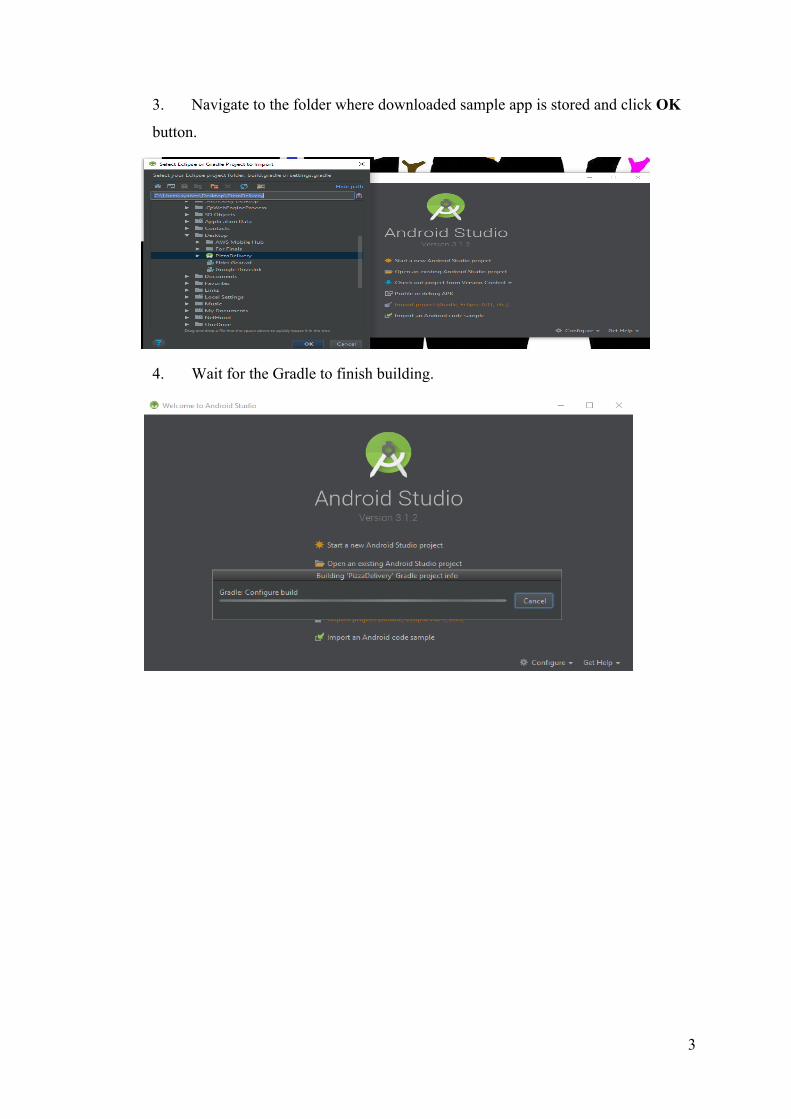
3. Navigate to the folder where downloaded sample app is stored and click OK
button.
4. Wait for the Gradle to finish building.
4
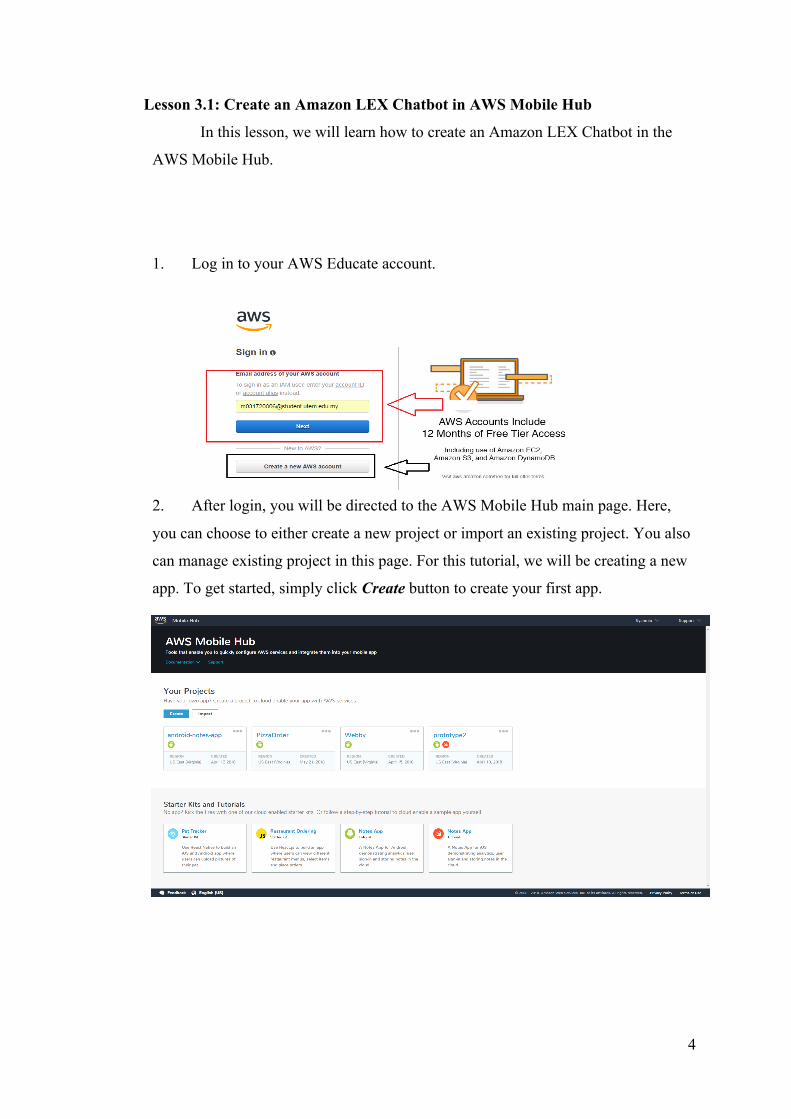
Lesson 3.1: Create an Amazon LEX Chatbot in AWS Mobile Hub
In this lesson, we will learn how to create an Amazon LEX Chatbot in the
AWS Mobile Hub.
1. Log in to your AWS Educate account.
2. After login, you will be directed to the AWS Mobile Hub main page. Here,
you can choose to either create a new project or import an existing project. You also
can manage existing project in this page. For this tutorial, we will be creating a new
app. To get started, simply click Create button to create your first app.
5
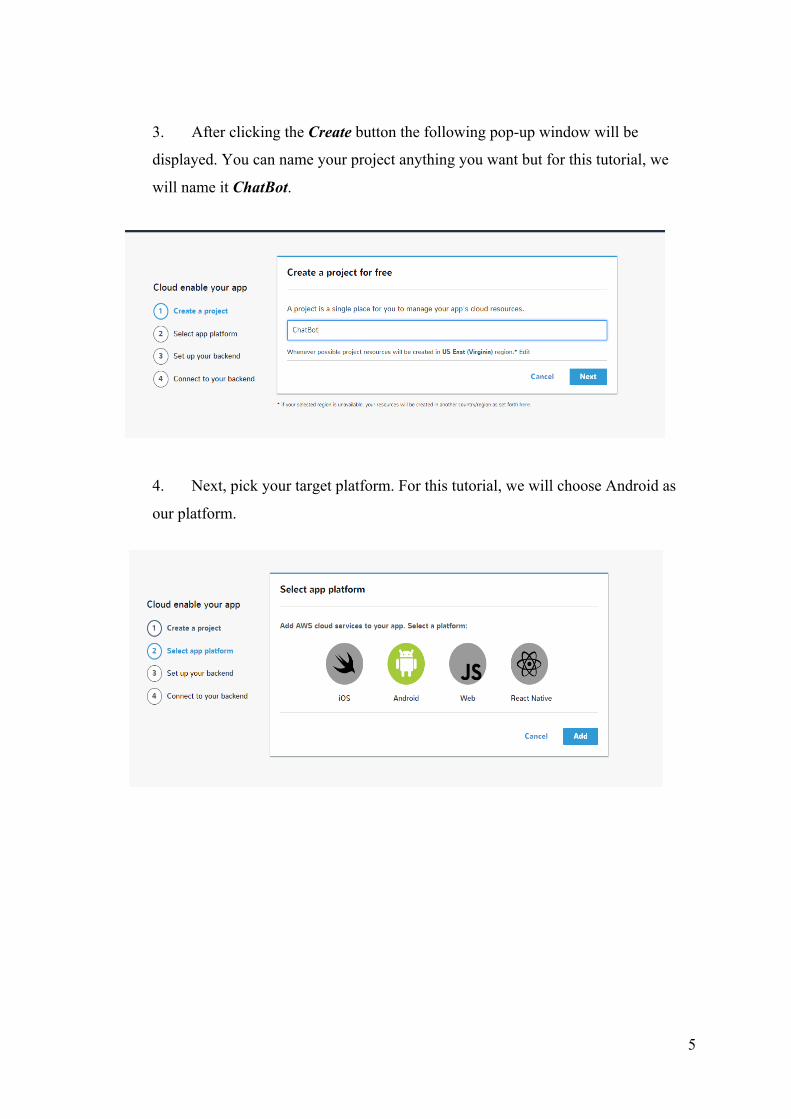
3. After clicking the Create button the following pop-up window will be
displayed. You can name your project anything you want but for this tutorial, we
will name it ChatBot.
4. Next, pick your target platform. For this tutorial, we will choose Android as
our platform.
6
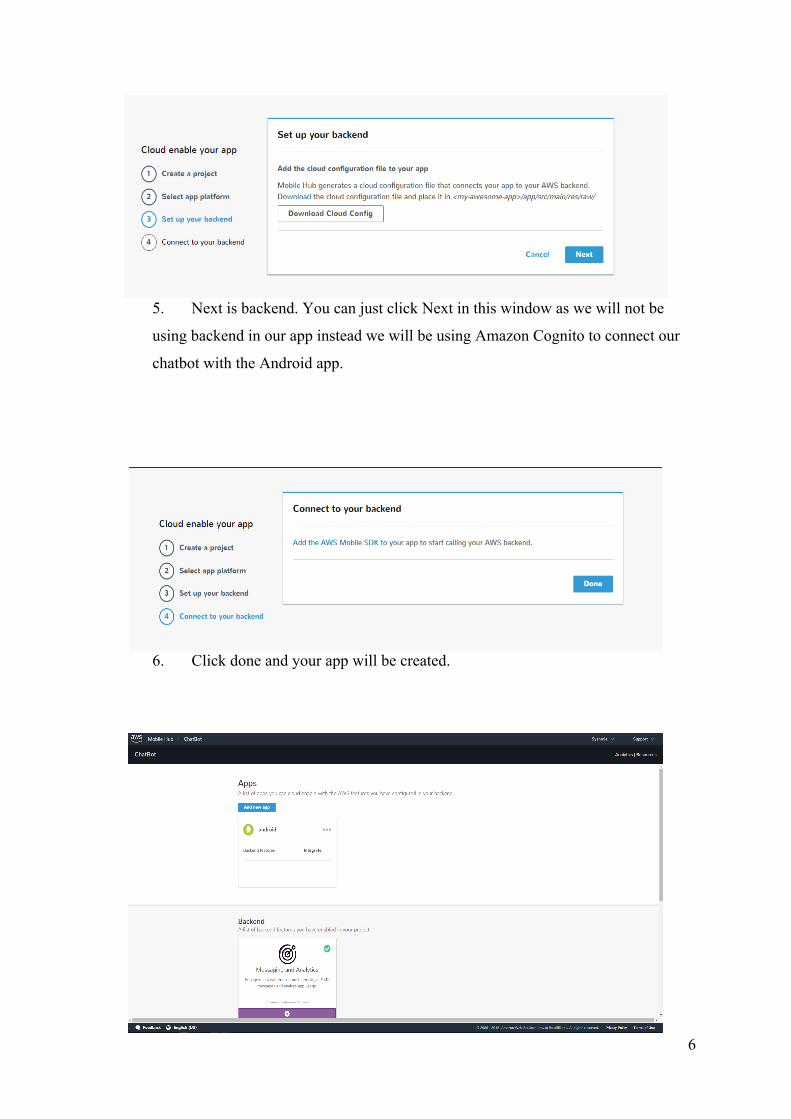
5. Next is backend. You can just click Next in this window as we will not be
using backend in our app instead we will be using Amazon Cognito to connect our
chatbot with the Android app.
6. Click done and your app will be created.
7
7. After clicking done you will be directed to the app main page. In this page,
there will be seven services that can be integrated into our app. For this tutorial, we
will choose conversational bots to be integrated into our app.
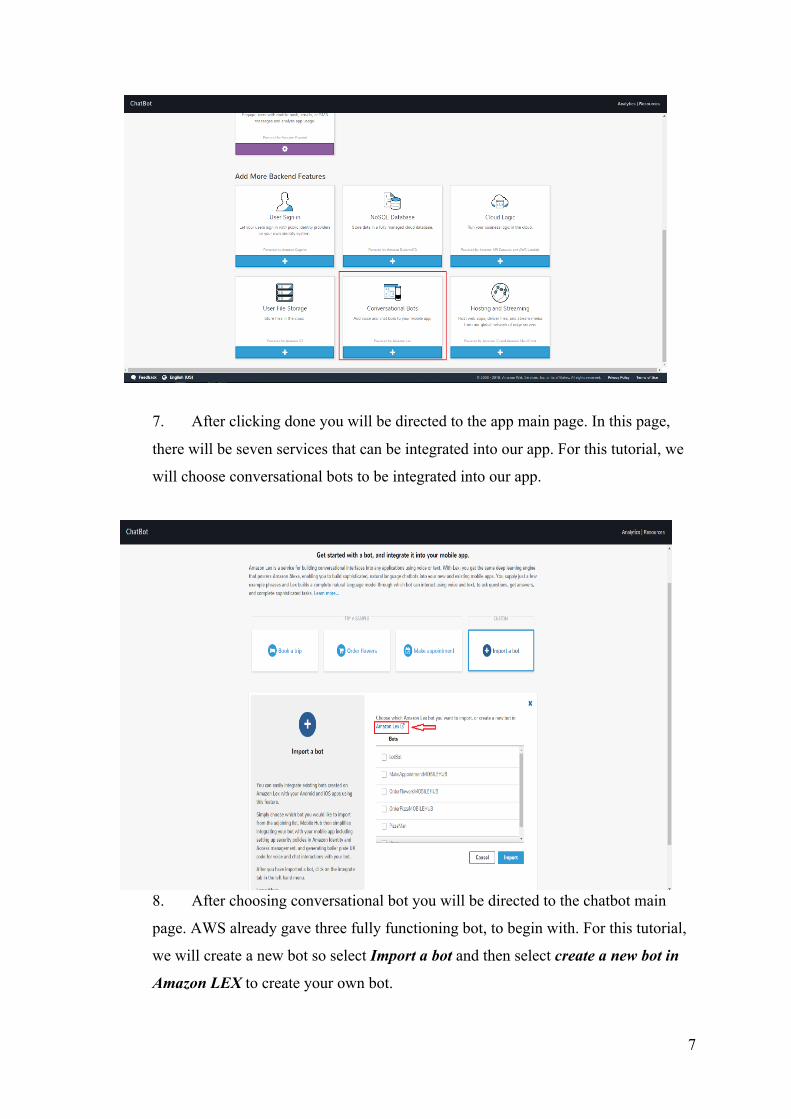
8. After choosing conversational bot you will be directed to the chatbot main
page. AWS already gave three fully functioning bot, to begin with. For this tutorial,
we will create a new bot so select Import a bot and then select create a new bot in
Amazon LEX to create your own bot.
8
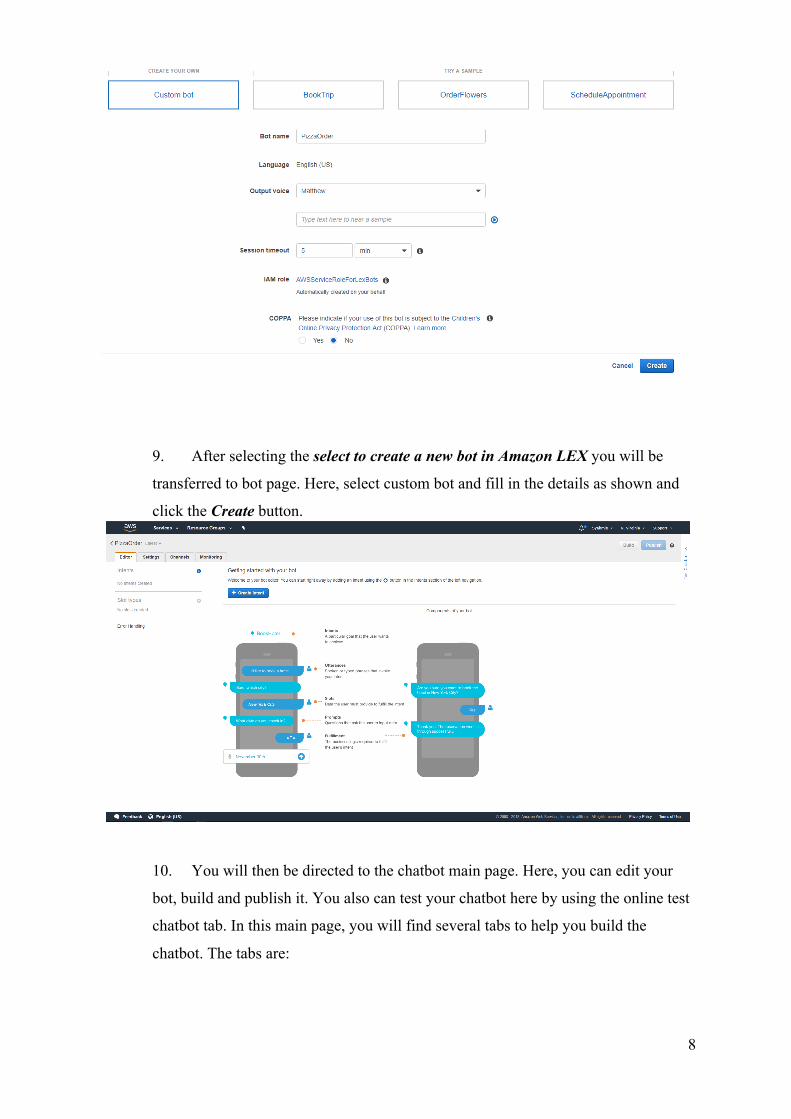
9. After selecting the select to create a new bot in Amazon LEX you will be
transferred to bot page. Here, select custom bot and fill in the details as shown and
click the Create button.
10. You will then be directed to the chatbot main page. Here, you can edit your
bot, build and publish it. You also can test your chatbot here by using the online test
chatbot tab. In this main page, you will find several tabs to help you build the
chatbot. The tabs are:
9
• Intents- A particular goal that the user wants to achieve.
• Utterances-Spoken or typed phrases that invoke your intent.
• Slots-Data the user must provide to fulfill the intent.
• Prompts-Question that ask the user to input data.
• Fulfillment- The business logic required to fulfill the user’s intent.
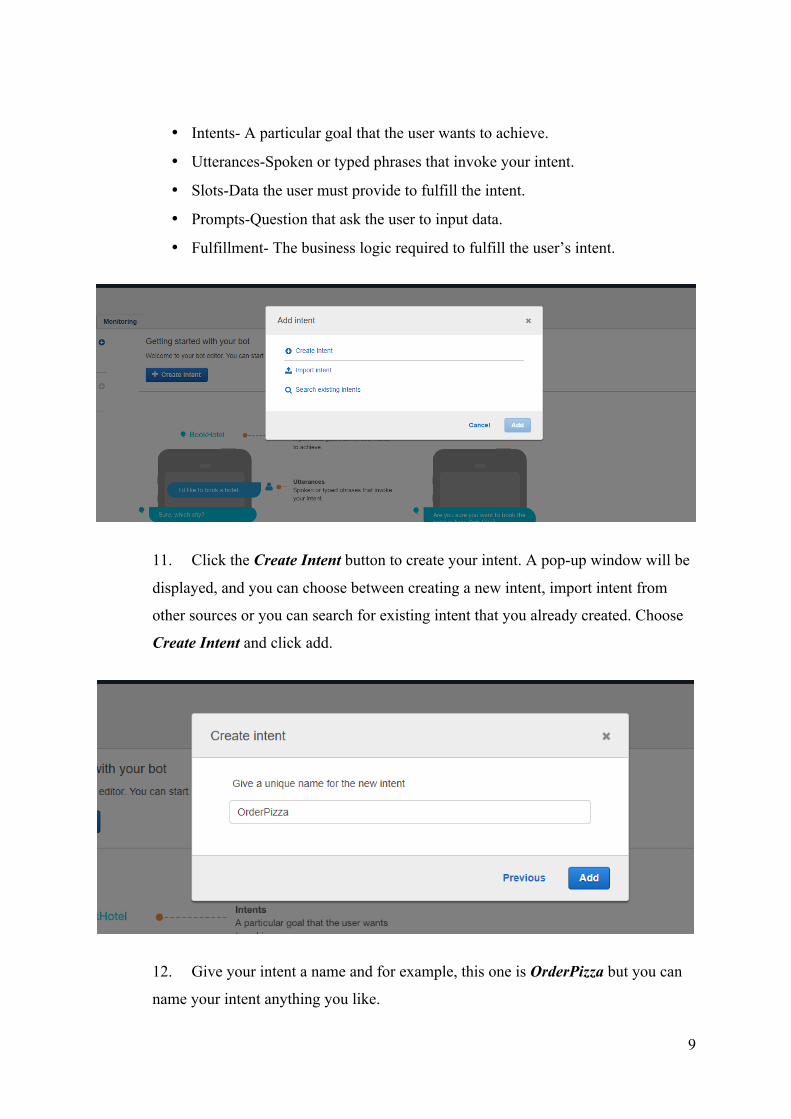
11. Click the Create Intent button to create your intent. A pop-up window will be
displayed, and you can choose between creating a new intent, import intent from
other sources or you can search for existing intent that you already created. Choose
Create Intent and click add.
12. Give your intent a name and for example, this one is OrderPizza but you can
name your intent anything you like.
10
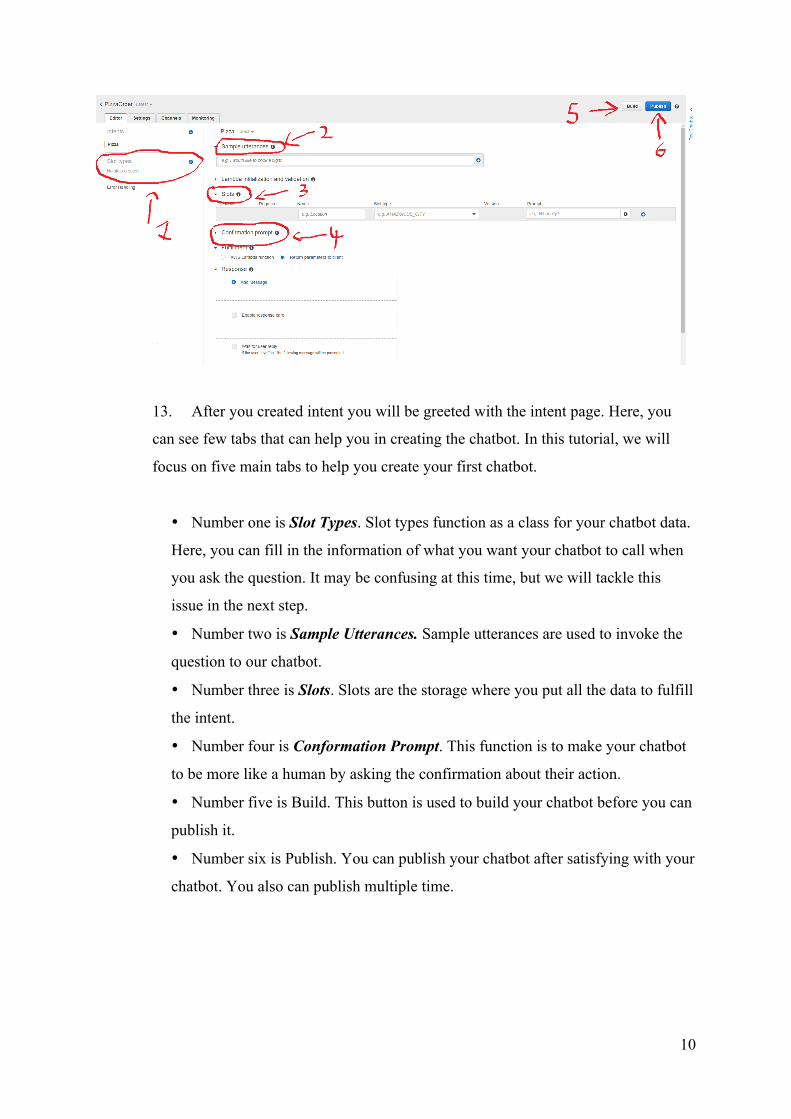
13. After you created intent you will be greeted with the intent page. Here, you
can see few tabs that can help you in creating the chatbot. In this tutorial, we will
focus on five main tabs to help you create your first chatbot.
• Number one is Slot Types. Slot types function as a class for your chatbot data.
Here, you can fill in the information of what you want your chatbot to call when
you ask the question. It may be confusing at this time, but we will tackle this
issue in the next step.
• Number two is Sample Utterances. Sample utterances are used to invoke the
question to our chatbot.
• Number three is Slots. Slots are the storage where you put all the data to fulfill
the intent.
• Number four is Conformation Prompt. This function is to make your chatbot
to be more like a human by asking the confirmation about their action.
• Number five is Build. This button is used to build your chatbot before you can
publish it.
• Number six is Publish. You can publish your chatbot after satisfying with your
chatbot. You also can publish multiple time.
11
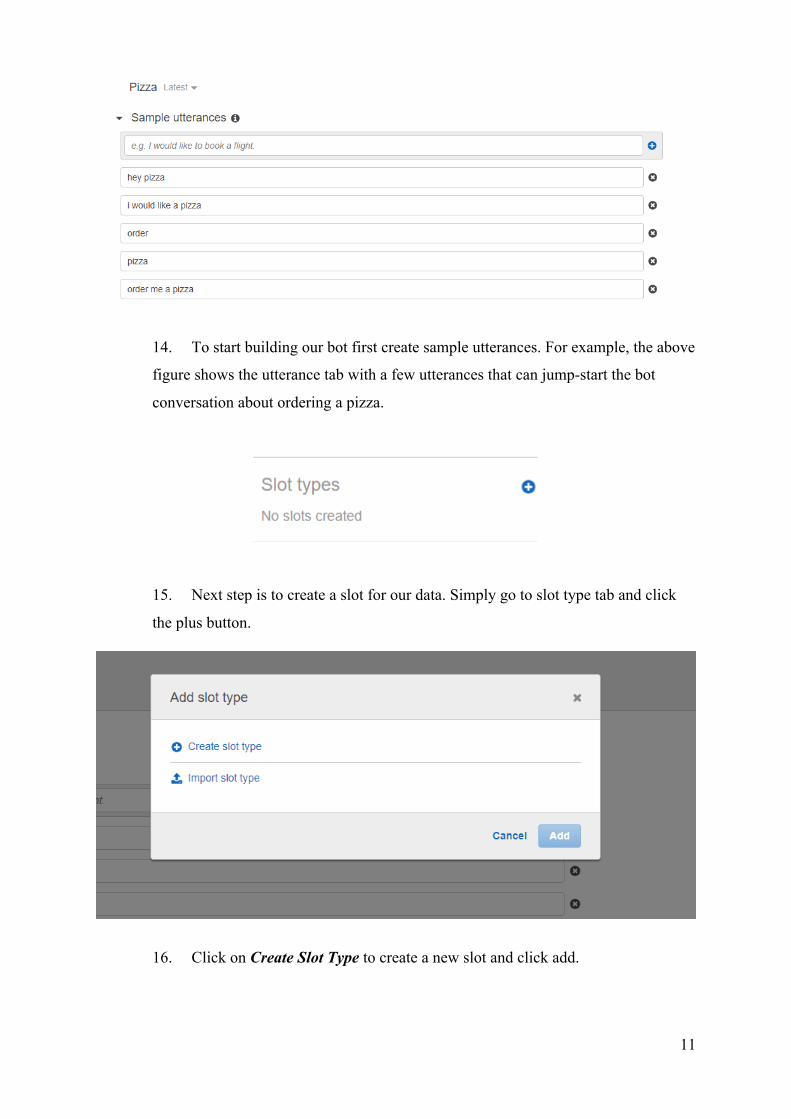
14. To start building our bot first create sample utterances. For example, the above
figure shows the utterance tab with a few utterances that can jump-start the bot
conversation about ordering a pizza.
15. Next step is to create a slot for our data. Simply go to slot type tab and click
the plus button.
16. Click on Create Slot Type to create a new slot and click add.
12
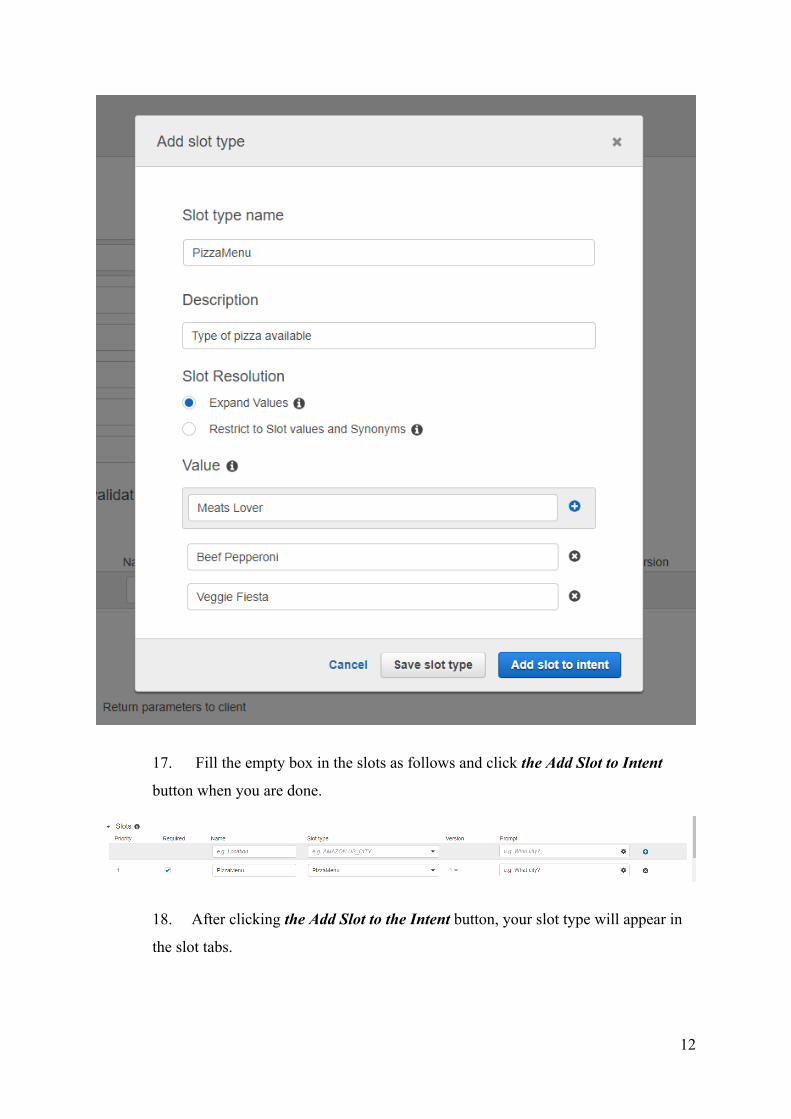
17. Fill the empty box in the slots as follows and click the Add Slot to Intent
button when you are done.
18. After clicking the Add Slot to the Intent button, your slot type will appear in
the slot tabs.
13
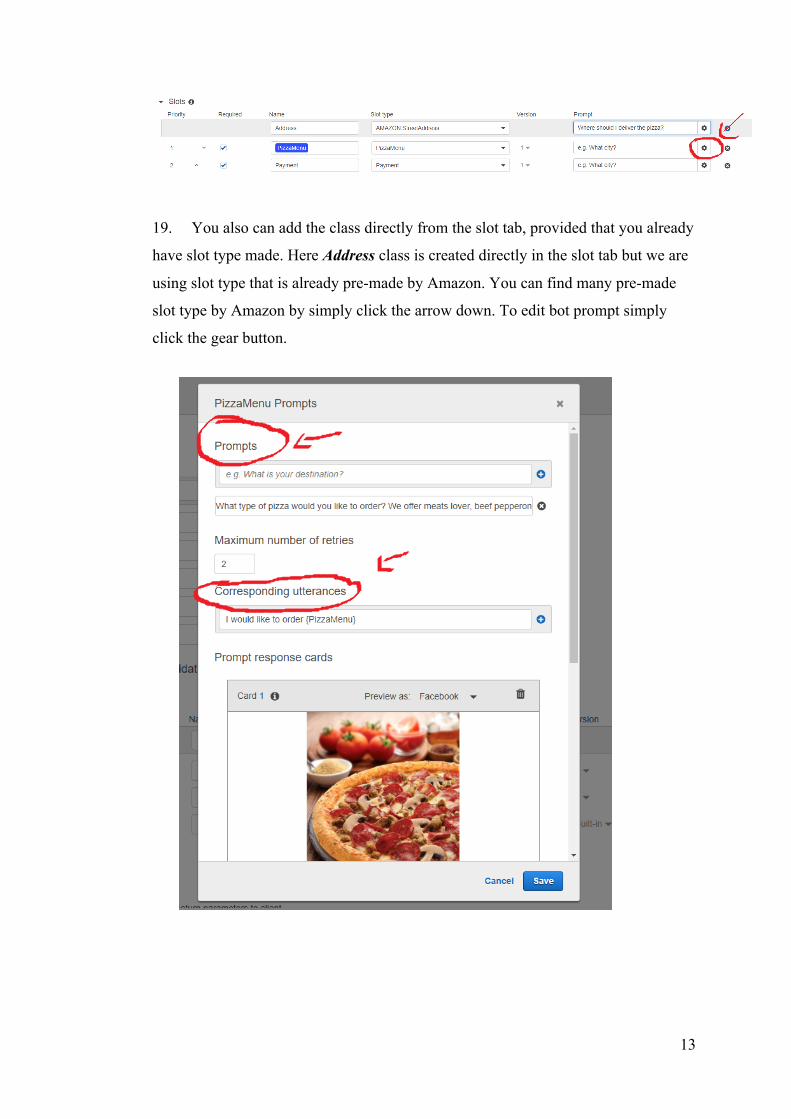
19. You also can add the class directly from the slot tab, provided that you already
have slot type made. Here Address class is created directly in the slot tab but we are
using slot type that is already pre-made by Amazon. You can find many pre-made
slot type by Amazon by simply click the arrow down. To edit bot prompt simply
click the gear button.
14
20. Here, we will focus on two things in prompts menu. First one is Prompts.
Prompts are used to enter the question that will be asked by the bot. Here is an
example of a question that bot asked when you want to order a pizza.” What type of
pizza would you like to order? We offer meats lover, beef pepperoni, and veggie
fiesta.”. Corresponding Utterances is what is the utterance that a user answers
which is based on the bot question.
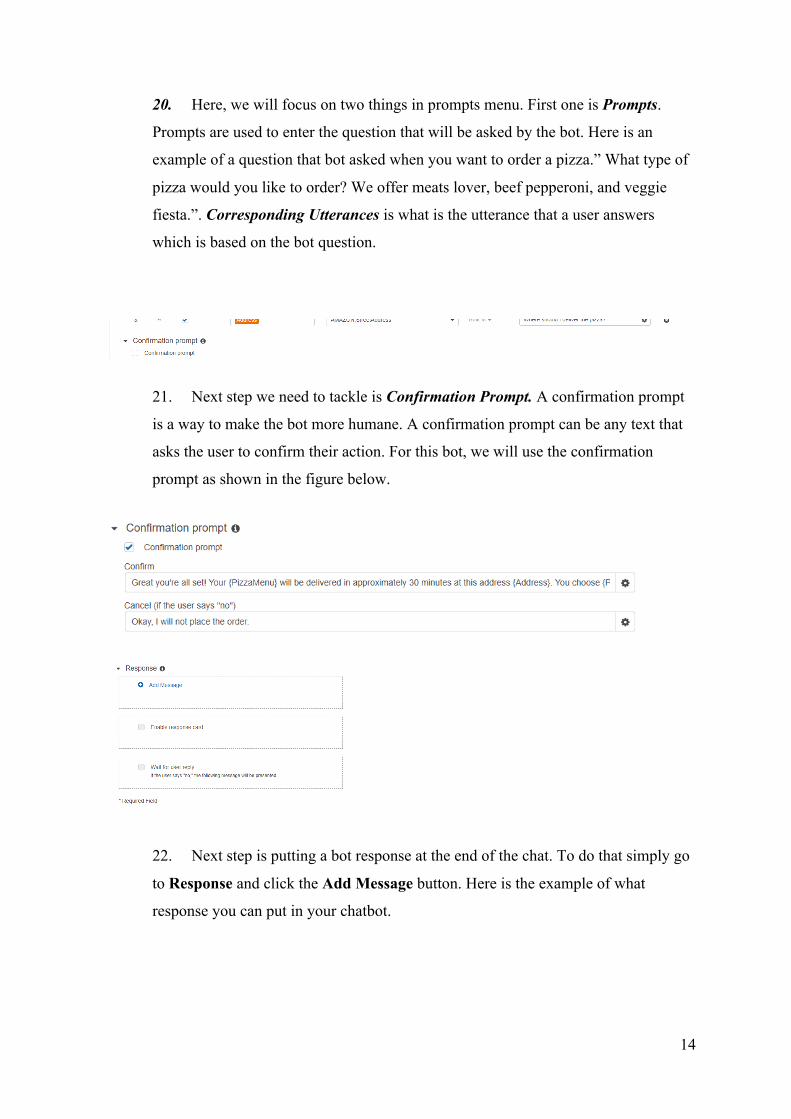
21. Next step we need to tackle is Confirmation Prompt. A confirmation prompt
is a way to make the bot more humane. A confirmation prompt can be any text that
asks the user to confirm their action. For this bot, we will use the confirmation
prompt as shown in the figure below.
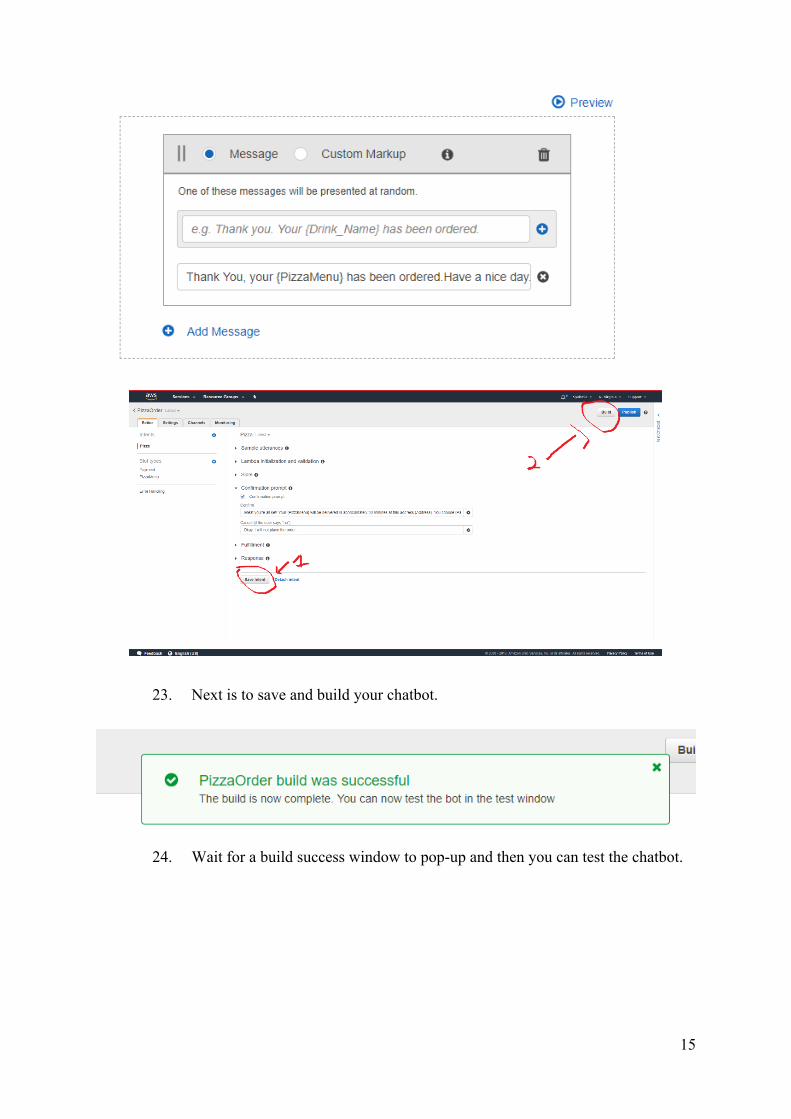
22. Next step is putting a bot response at the end of the chat. To do that simply go
to Response and click the Add Message button. Here is the example of what
response you can put in your chatbot.
15
23. Next is to save and build your chatbot.
24. Wait for a build success window to pop-up and then you can test the chatbot.
16
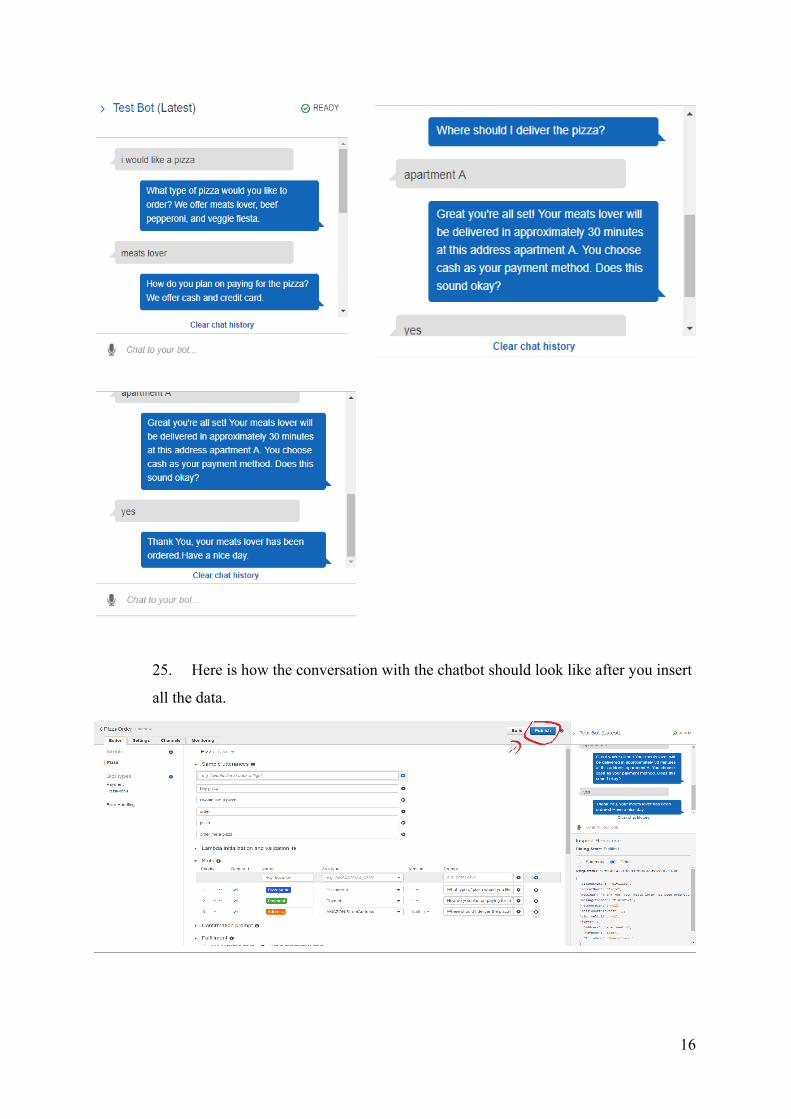
25. Here is how the conversation with the chatbot should look like after you insert
all the data.
17
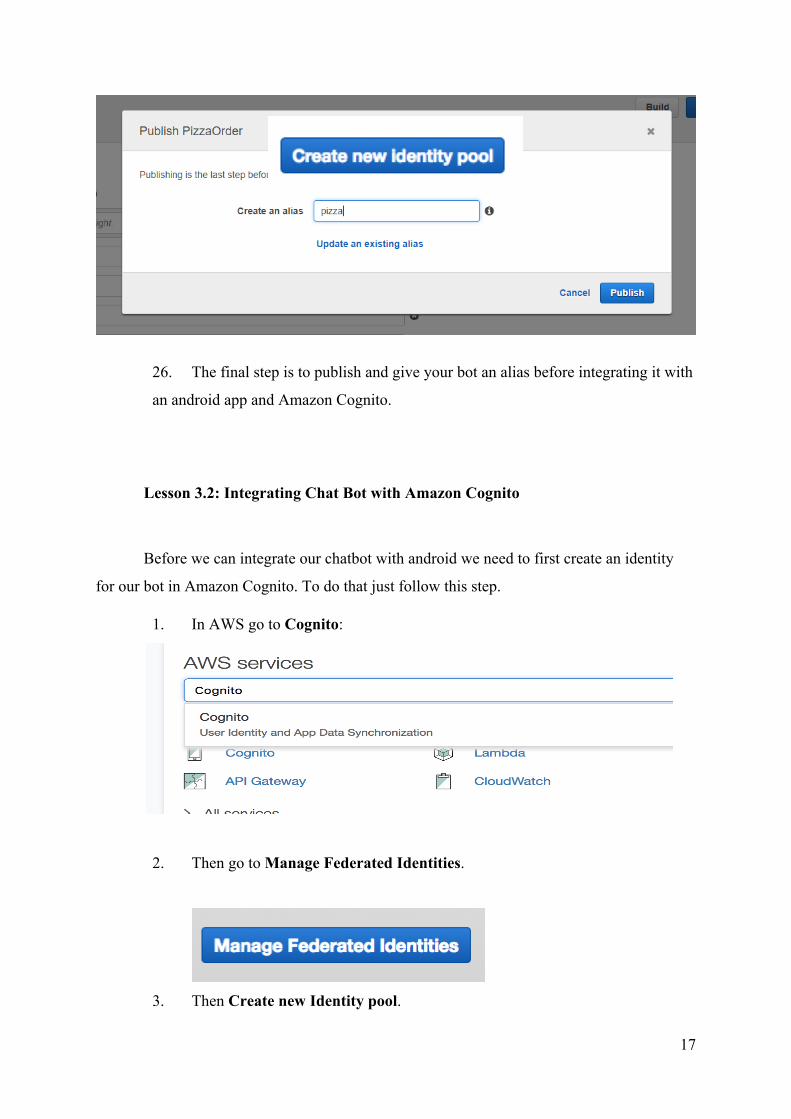
26. The final step is to publish and give your bot an alias before integrating it with
an android app and Amazon Cognito.
Lesson 3.2: Integrating Chat Bot with Amazon Cognito
Before we can integrate our chatbot with android we need to first create an identity
for our bot in Amazon Cognito. To do that just follow this step.
1. In AWS go to Cognito:
2. Then go to Manage Federated Identities.
3. Then Create new Identity pool.
18
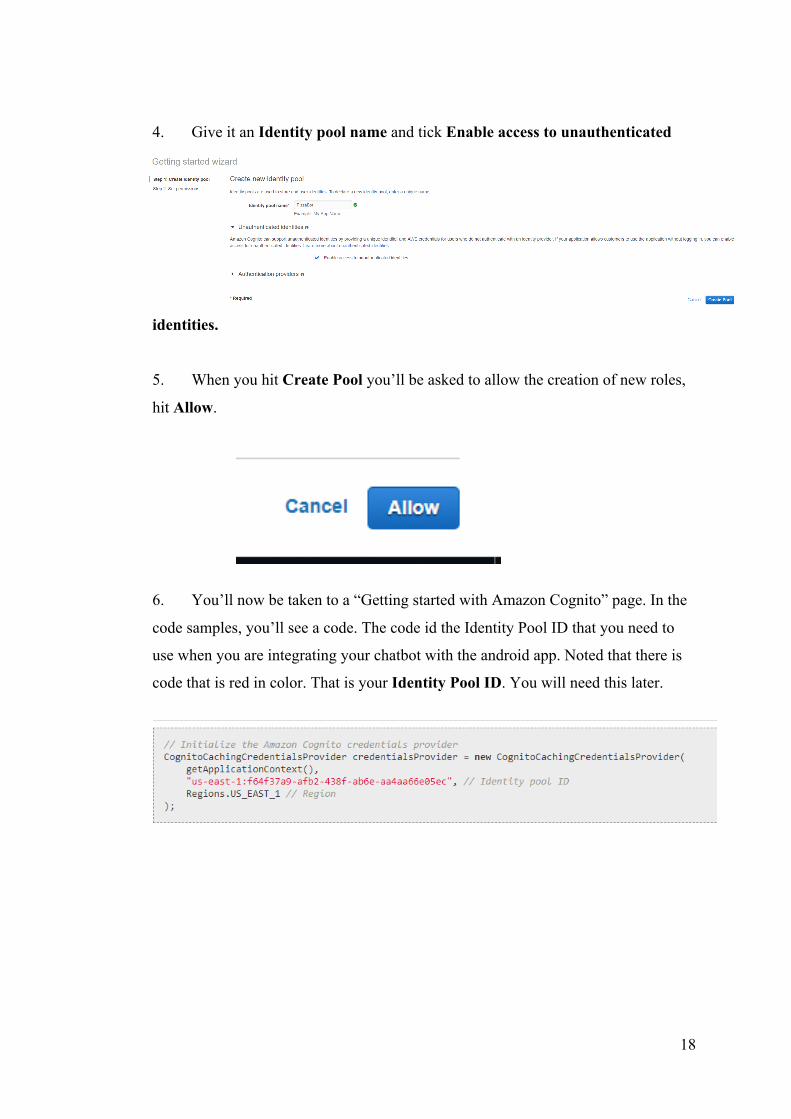
4. Give it an Identity pool name and tick Enable access to unauthenticated
identities.
5. When you hit Create Pool you’ll be asked to allow the creation of new roles,
hit Allow.
6. You’ll now be taken to a “Getting started with Amazon Cognito” page. In the
code samples, you’ll see a code. The code id the Identity Pool ID that you need to
use when you are integrating your chatbot with the android app. Noted that there is
code that is red in color. That is your Identity Pool ID. You will need this later.
19
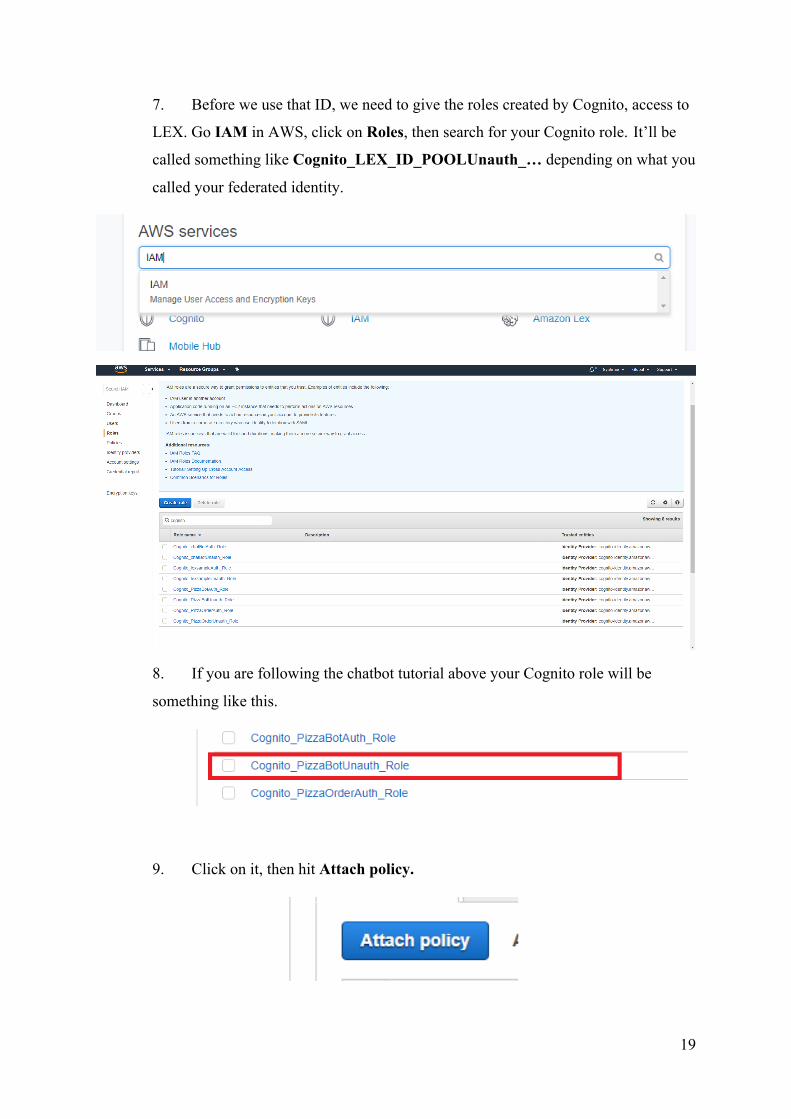
7. Before we use that ID, we need to give the roles created by Cognito, access to
LEX. Go IAM in AWS, click on Roles, then search for your Cognito role. It’ll be
called something like Cognito_LEX_ID_POOLUnauth_… depending on what you
called your federated identity.
8. If you are following the chatbot tutorial above your Cognito role will be
something like this.
9. Click on it, then hit Attach policy.
20
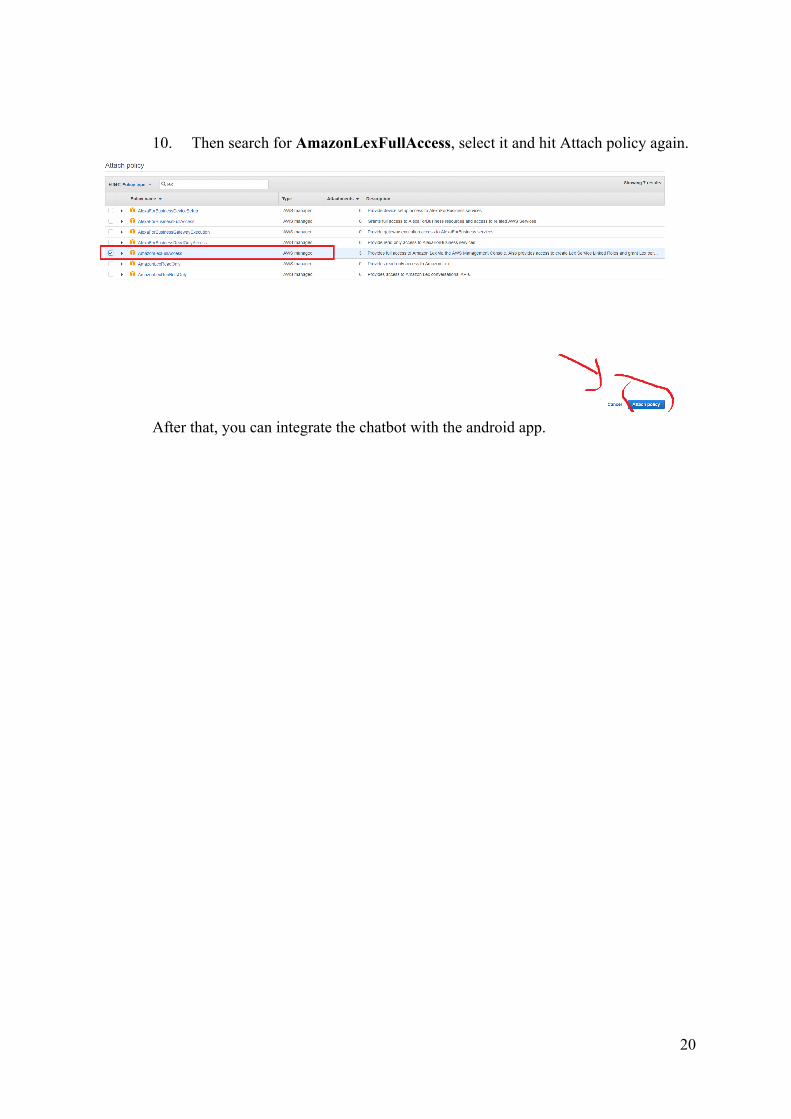
10. Then search for AmazonLexFullAccess, select it and hit Attach policy again.
After that, you can integrate the chatbot with the android app.
21
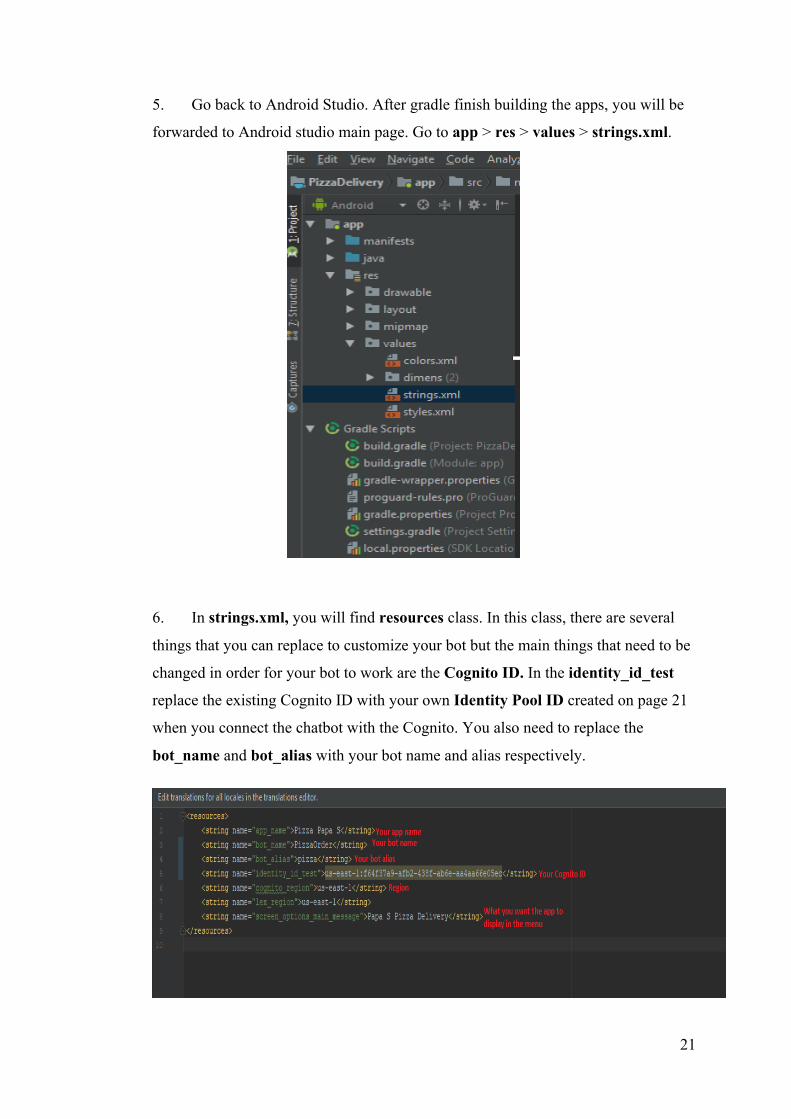
5. Go back to Android Studio. After gradle finish building the apps, you will be
forwarded to Android studio main page. Go to app > res > values > strings.xml.
6. In strings.xml, you will find resources class. In this class, there are several
things that you can replace to customize your bot but the main things that need to be
changed in order for your bot to work are the Cognito ID. In the identity_id_test
replace the existing Cognito ID with your own Identity Pool ID created on page 21
when you connect the chatbot with the Cognito. You also need to replace the
bot_name and bot_alias with your bot name and alias respectively.
22
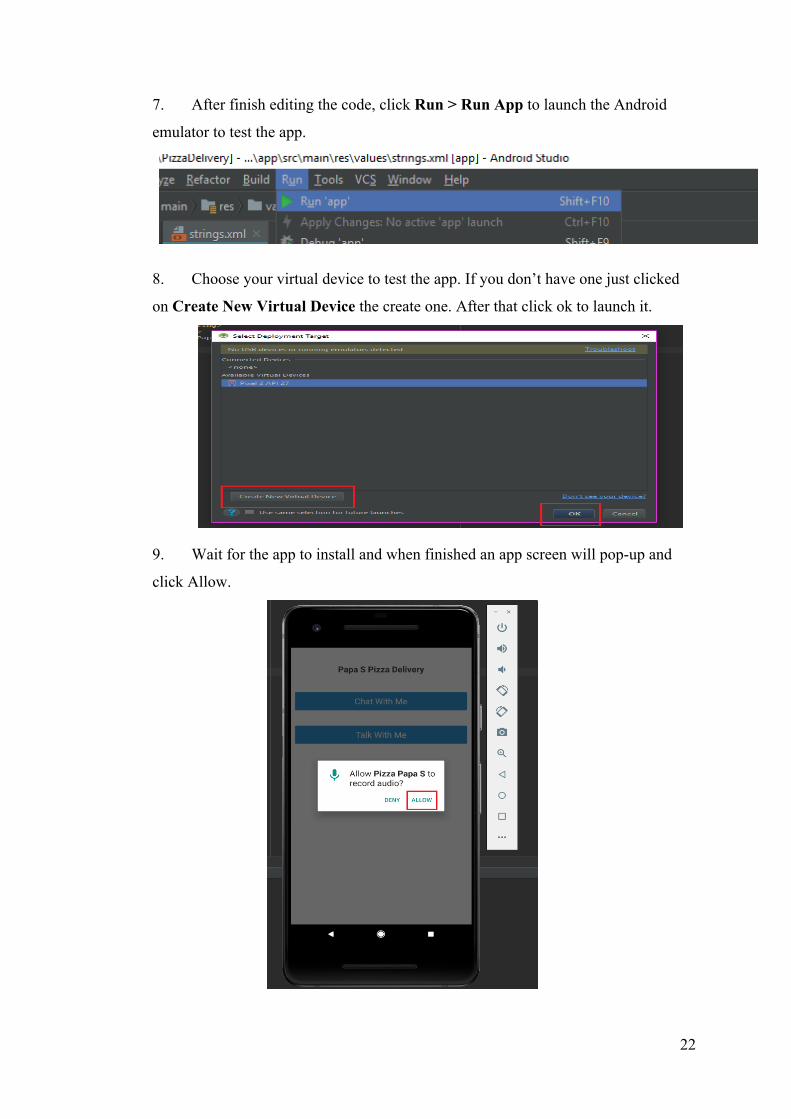
7. After finish editing the code, click Run > Run App to launch the Android
emulator to test the app.
8. Choose your virtual device to test the app. If you don’t have one just clicked
on Create New Virtual Device the create one. After that click ok to launch it.
9. Wait for the app to install and when finished an app screen will pop-up and
click Allow.
23
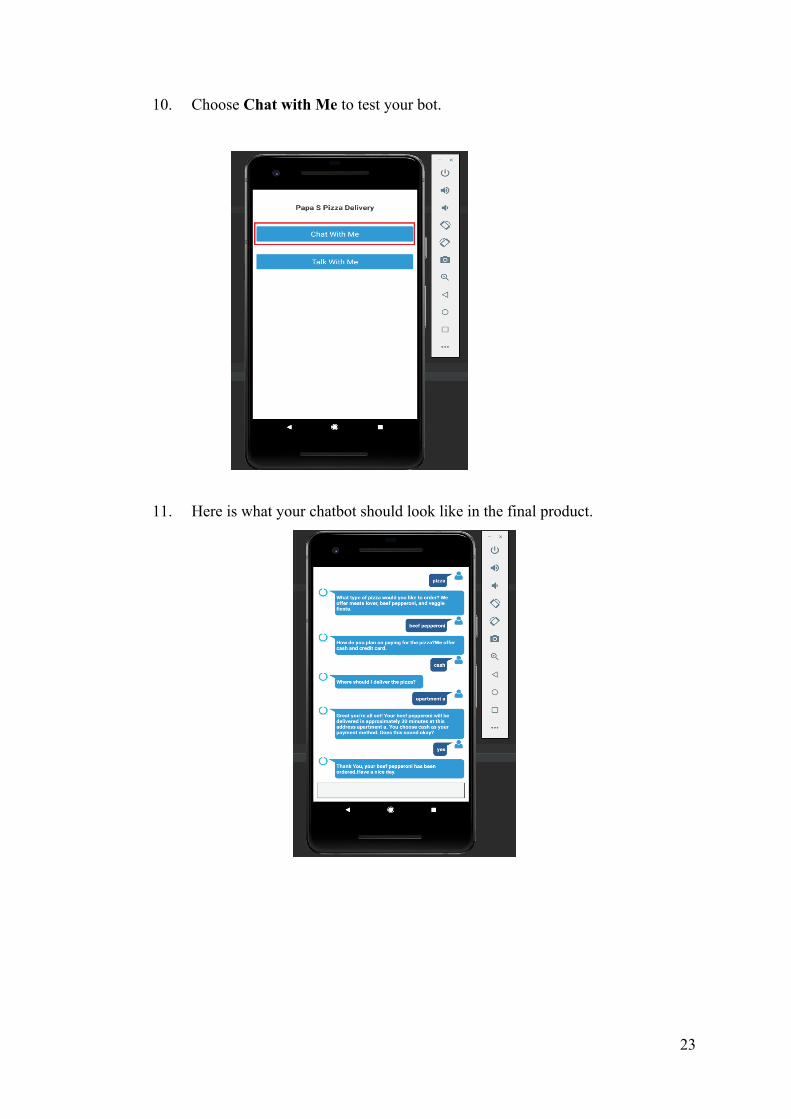
10. Choose Chat with Me to test your bot.
11. Here is what your chatbot should look like in the final product.
24
Final App Build
After a few tweaks and interface, the Android application is ready to be installed into
a smartphone to test its functionality. Figures below are screenshots and explanation of a
working application.
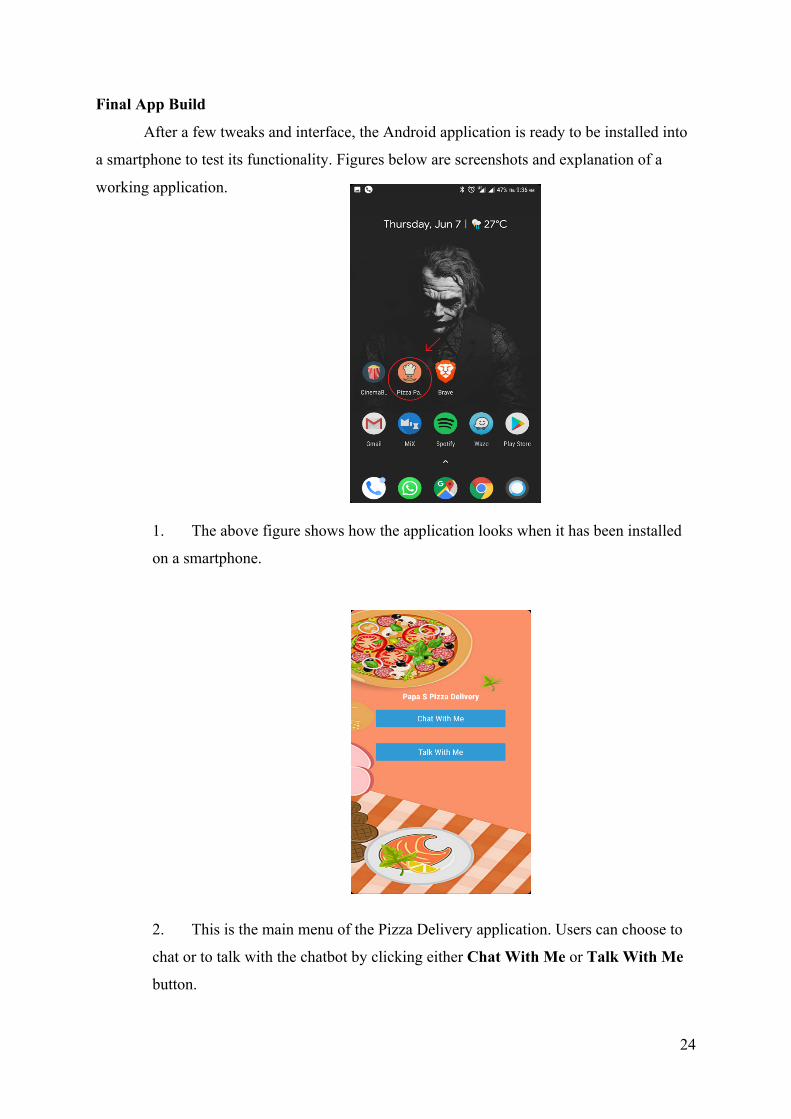
1. The above figure shows how the application looks when it has been installed
on a smartphone.
2. This is the main menu of the Pizza Delivery application. Users can choose to
chat or to talk with the chatbot by clicking either Chat With Me or Talk With Me
button.
25
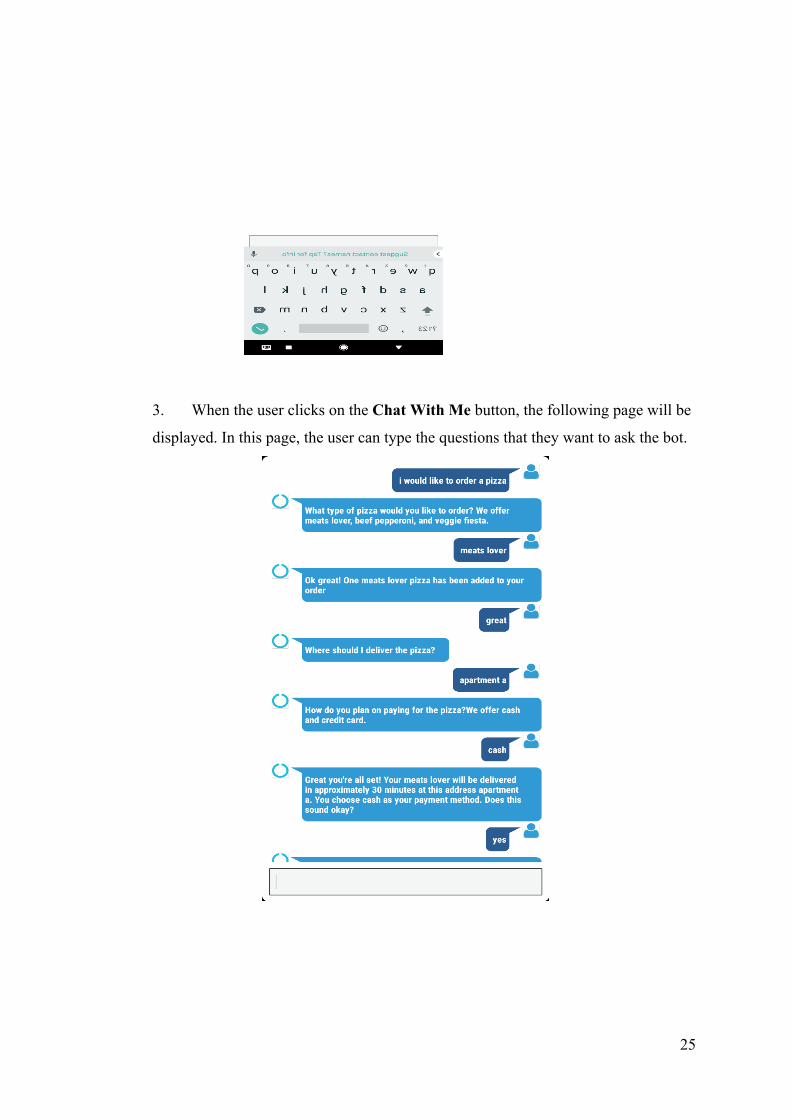
3. When the user clicks on the Chat With Me button, the following page will be
displayed. In this page, the user can type the questions that they want to ask the bot.

26
4. The above figure shows an example of how users ask the questions to chatbot
and how the chatbot answer the questions.
5. The above figure shows what happens when users click on Talk With Me
button. The above page will be displayed. When a user wants to ask questions to the
chatbot they simply tap the Microphone button to talk. Their questions will appear in
the Transcript tab while the chatbot answer will appear on Response as text tab.
Conclusion
There is another way of building a conversational bot. For example, we can also use
AWS Lambda to create the bot intents and prompts which require Javascript programming
using Node.js code. By using AWS Lambda, the bot can be more humane and intelligent than
using the slots and intents as this project is built in this tutorial.