mmiiccrroossoofftt eexxcceell 22000077 aa qquuiicckk
TRANSCRIPT

0
MMiiccrroossoofftt EExxcceell
22000077
AA QQuuiicckk RReeffeerreennccee GGuuiiddee
Author(s): Linda Powles
Owner: NWIS
Document Ref:
Document Review Date:

Microsoft Excel 2007 – A Quick Reference Guide 1
Training Document History
Document Location
This document is located in
P:\Health Informatics Development\Systems Training\WCCG\Office 2007
Revision History
Version Revision Date Summary of
Changes
Author
Version 0.1 7th January 2013
Linda Powles
Useful Contacts
Contact Name Contact Details
Primary Care Service Desk 08450 267 297
Learning & Professional Development
Department
Email:
Learning&[email protected]

Microsoft Excel 2007 – A Quick Reference Guide 2
Contents Introduction – Excel 2007 ........................................................................................... 3
The Office Button ................................................................................................ 4
Customising the Toolbar ..................................................................................... 5
Navigating Excel using the Keyboard .................................................................. 6
Microsoft Help Tool ............................................................................................ 7
Creating a New File .................................................................................................... 8
Open an Existing File ................................................................................................. 9
Formula ............................................................................................................. 11
Number Formats ............................................................................................... 12
Creating Charts ................................................................................................. 12
Printing in Excel 2007 ....................................................................................... 14
Terminology ...................................................................................................... 15
Useful Tips ........................................................................................................ 16
Tabs - HOME ........................................................................................................... 17
Tabs - INSERT ......................................................................................................... 18
Tabs – PAGE LAYOUT ............................................................................................ 19
Tabs - FORMULAS .................................................................................................. 20
Tabs - DATA ............................................................................................................ 21
Tabs - REVIEW ........................................................................................................ 22
Tabs - VIEW ............................................................................................................. 23
Using the CTRL key ................................................................................................. 24

Microsoft Excel 2007 – A Quick Reference Guide 3
INTRODUCTION – EXCEL 2007
Microsoft Excel uses an assortment of windows, ribbon tabs, toolbars, menus and
other features that enable you to make use of all the functions available. The main
difference in Excel 2007 is the use of the ribbon which replaces the old familiar
toolbars and menus. The ribbon is the container at the top of the window and holds
all the tools and features that you may wish to use. Tools for given tasks are grouped
together and these groups are then organised into Tabs. When a tab cannot hold all
the choices available there is a link to a list of commands, a dialog box, task pane or
galleries of options. Additional contextual tabs appear as the context of your work
changes, so if you have a picture selected a relevant tab option will appear.
Ribbon
0
20
40
60
80
100
1st Qtr 2nd Qtr 3rd Qtr 4th Qtr
East
West
North
Tool Groups (Font, Alignment & Styles)
Tab(s)

Microsoft Excel 2007 – A Quick Reference Guide 4
THE OFFICE BUTTON
Situated in the top left hand corner of the screen in Excel 2007, the Office Button is
used where the ‘File Menu’ was used in Excel 2003, but there are additional
functions that can now be carried out within this section.
The above 2 images show the differences between Microsoft Excel’s 2003 File menu
and the Excel’s 2007’s Office button. Both provide the user with a number of similar
actions or tasks, but the 2007 version displays a greater list of ‘Recent Documents’
and additional or new functionality added.
2003 ‘File’ menu
2007 Office Button
Where a task has a right-
pointing arrow displayed, a
sub-menu in 2007 provides
a greater description of the
options available.

Microsoft Excel 2007 – A Quick Reference Guide 5
CUSTOMISING THE TOOLBAR
Additional functionality in the Office button allows the user to customise Microsoft
Excel in many ways. Tasks and functions may be added or removed from the
window; using either the Office button and navigating to the ‘Excel Options’ button
or the drop-down button as indicated next to the Quick Access Toolbar, the user may
customise the Quick Access Toolbar to suit their needs.
At any time, the user may switch the ribbon view off; this will allow for the user to
have a greater view of the document. By right-clicking on the ‘Tab’ toolbar, the user
may click on ‘Minimize the Ribbon’. This may be returned to the original view by
removing the tick from the check box.
Quick Access Toolbar Customise menu
By right-clicking on any
icon on the toolbar, the
user will be able to add
the icon to the Quick
Access Toolbar.

Microsoft Excel 2007 – A Quick Reference Guide 6
NAVIGATING EXCEL USING THE KEYBOARD
If users wish to navigate their way around Excel using the keyboard, then the
following steps may be taken.
On using the ALT key, the tools and tasks will have numbers/letters overlaid that will
act as shortcuts to that task. For example, if the user selected ALT + N, then the
ribbon will change to the INSERT tasks.
Using ALT + N again will display the keyboard shortcuts to the different options
available within this ribbon.
To use a specific task, use the ALT key and the respective key/keys to use the
function, for example ALT + S + H together will open the Shapes dialogue box to
insert a shape.
As with Office 2003, the CTRL key may still be used to carry out specific functions
such as saving documents (CTRL + S) etc. A list of these functions may be found at
the end of this guide.
As with all Microsoft applications, HELP
may also be used for guidance and
support. In Microsoft 2007, this can be
found at the top right hand corner of the
screen, below the Close ‘X’.

Microsoft Excel 2007 – A Quick Reference Guide 7
MICROSOFT HELP TOOL
To use the offline support, the user may click on the link below the loading bar
displayed in the Excel Help window.
The offline support
allows the user to
search the database
installed with Excel
2007.
Type the query in the
Search text box at the
top of the page and
click on the magnifying
glass to begin the
search for that topic.
The example here shows
100 results returned with
the first 25 displayed on
the first page.
The toolbar at the top allows the
user to:
Stop the current search
Refresh the search
Return to HELP Home
Print page
Change the Font size
Display Table of Contents
Keeps HELP screen on top

Microsoft Excel 2007 – A Quick Reference Guide 8
CREATING A NEW FILE
On opening the Excel 2007 application, a new blank document will be displayed. To
create a new document while in the application, the user may either:
1. Click on the Office Button and select or
2. Use the CTRL key and N or
3. Use ALT then F then N then click on the Create button.
In addition to creating new files from blank documents, a number of templates are
also provided, both built in to the Excel application as well as being available online
to download.

Microsoft Excel 2007 – A Quick Reference Guide 9
OPEN AN EXISTING FILE
As with creating a new document, there are a number of ways to open an existing
document. If the document has recently been accessed, it will be displayed in the
‘Recent Documents’ list that may be found in the START menu or in the Office
Button menu in Excel 2007.
To locate a document that has not recently been accessed, the user will need to
navigate to the location where the document has been stored.
On selecting ‘Open’
from the Office
Button menu, the
user will be provided
with a dialogue box in
which to search the
computer for the
required file.

Microsoft Excel 2007 – A Quick Reference Guide 10
Using the ‘Look in’
drop down list or the
locations identified in
the left hand panel of
the dialogue box,
navigate to the drive or
folder where the
document has been
stored.
On locating the
file, the user
may either
double-click
the mouse to
open the file or
using a single
click, highlight
the file and click
on ‘Open’.
To assist with file identification, the view of
how the files are displayed may be changed.
When using ‘Details’, the file list may be
sorted by
Name (Alphabetically: A-Z or Z-A)
File size (E.g. 602kb, 710kb)
Date Modified (E.g. earliest to latest)
By clicking on the description headers, the
list order is reversed.

Microsoft Excel 2007 – A Quick Reference Guide 11
FORMULA
Displayed in the screenshot below is a simple formula for calculating a column of
numbers. By using the Autosum function, located on the top right hand corner of the
Home ribbon –
users are able to quickly add up a column or row of numbers.
The formula is displayed in both the formula toolbar and in the cell that the sum of
the numbers will appear in; in this example, B4.
To add up a column of numbers, click in the cell BELOW the numbers to be added.
Now click on the Formula icon, the column of the three figures will be highlighted.
Use your ‘Enter’ key to complete the task.
Formula Toolbar
Cell B4
Other calculations may also be
undertaken; the formula icon is
situated at the top right hand
corner of the window.

Microsoft Excel 2007 – A Quick Reference Guide 12
NUMBER FORMATS
CREATING CHARTS
To create charts in Excel, data must exist in a worksheet.
Where data exists, the user must select the Insert tab, and from the Charts section,
(with the data highlighted) select the type of chart required.
As with previous Excel
versions, users are able to
change the number format
they wish to use. This may
be achieved either by using
the drop down menu located
to the right of the format
description or the drop down
arrow to the right of the
‘Number’ label.

Microsoft Excel 2007 – A Quick Reference Guide 13
The chart will be displayed within the worksheet; this chart may be moved to any
location in the Worksheet by also be copied and pasted into a Word document (right
click on the graph and from the menu that appears select ‘Copy’. Open the Word
document you wish to add the graph to and right click again and select ‘Paste’).
If the user wishes to hide the legend (the descriptor on the right hand side of the
graph (Series1 in the above example), the user may right click on the legend and
select ‘Delete’ from the menu.

Microsoft Excel 2007 – A Quick Reference Guide 14
PRINTING IN EXCEL 2007
Users of Excel 2003 will be familiar with a Print icon being displayed in the toolbar at
the top of the screen.
In Excel 2007, the Print icon may not be immediately visible, but by adding the
function to the Quick Access Toolbar, the default printer may be displayed.
To remove a function from the Quick Access Toolbar, remove the tick displayed
against the task.
To print from the Office Button menu:
To add the printer – from the
drop down menu, highlight the
‘Quick Print’ function; this will
place a tick alongside the
description. The Quick
Access Toolbar will then
display the default printer
icon.
Selecting ‘Print’ will
open the standard
dialogue box that
enables the user to make
adjustments (number of
copies etc);
Quick Print sends the
document straight to the
default printer without
further prompting.
Print Preview allows the
user to make changes
prior to printing (margins,
orientation, size etc).

Microsoft Excel 2007 – A Quick Reference Guide 15
TERMINOLOGY
Cell – the area into which data is entered
Column – vertical group of cells
Row – horizontal group of cells
Range – a selection of cells. In this
example the cell range coloured in is
A1 to C4
Worksheet. A collection of Worksheets
is called a Workbook.
=SUM(A1:A5)
or
=SUM(A1:F1)
Formula – a tool for calculating a column
or row of numbers.

Microsoft Excel 2007 – A Quick Reference Guide 16
USEFUL TIPS
1. Where text has been entered into a cell and over-runs into the next, the
quickest way to display it is to move the cursor to the immediate line that
separates the two columns;
Double click on the arrow to automatically re-size the column.
2. To auto-fill a column or row with months, enter the first month in the first cell
When the cursor changes
to a double ended arrow
with a line through it -
Move the mouse to the indicated area.
When the cursor changes to a cross (+)
drag the mouse in a downwards or side-
wards movement
A tooltip text box will appear
indicating what will be filled into the
next cells. Release the mouse
button when the column or row is
complete.

Microsoft Excel 2007 – A Quick Reference Guide 17
TABS - HOME
Sort/Filter Columns
Angle of Text
Left Align
Centre
Font style
Italics
Bold
Cut/Copy/Paste
Cell Formatting
Number Format
Merge cells
Underline
Font size
Right Align
Wrap
Text
Auto-sum

Microsoft Excel 2007 – A Quick Reference Guide 18
TABS - INSERT
Create tables/pivot charts
Insert images/shapes
Insert WordArt
Add Signature Line
Insert symbol - ©
Insert Hyperlink
Create graphs
Insert Textbox
Add Headers/Footers
Insert an object

Microsoft Excel 2007 – A Quick Reference Guide 19
TABS – PAGE LAYOUT
Insert a background image
Customise the margins
Change page format
Change the style
Set scale for printing
Set the Print Area
Select Paper size
Tick to select Viewing/Printing Options
Set up duplicates
Arrange how the page is displayed

Microsoft Excel 2007 – A Quick Reference Guide 20
TABS - FORMULAS
Provides a menu of functions available
Autosum
Recently used functions
Financial functions
Logical (Boolean) functions
Change Text functions Assign names to formulas etc
Displays formula not result
Monitors changes
result
Search for data in tables
Maths & Trigonometry

Microsoft Excel 2007 – A Quick Reference Guide 21
TABS - DATA
Import data from an external
source; i.e. outside of Excel
Update the data from the
external source
Sort and filter columns
Splits text in fields
Removes duplicate Rows
Set rules on cell content
Create Scenarios
Group Data

Microsoft Excel 2007 – A Quick Reference Guide 22
TABS - REVIEW
Translate Text
Dictionaries, encyclopaedias etc
Thesaurus
Check Spelling
Protect the document
Share the workbook Display Comments
Add comments when reviewing Protect/Share Workbook
Allow & Monitor Changes

Microsoft Excel 2007 – A Quick Reference Guide 23
TABS - VIEW
Screen layout of document
Hide/Display Tools
Zoom Tools
Change Window display
Freeze panes
Split/Hide Screen
Switch between Workbooks
Create/Edit Macros
Microsoft Excel 2007 – A Quick Reference Guide 24
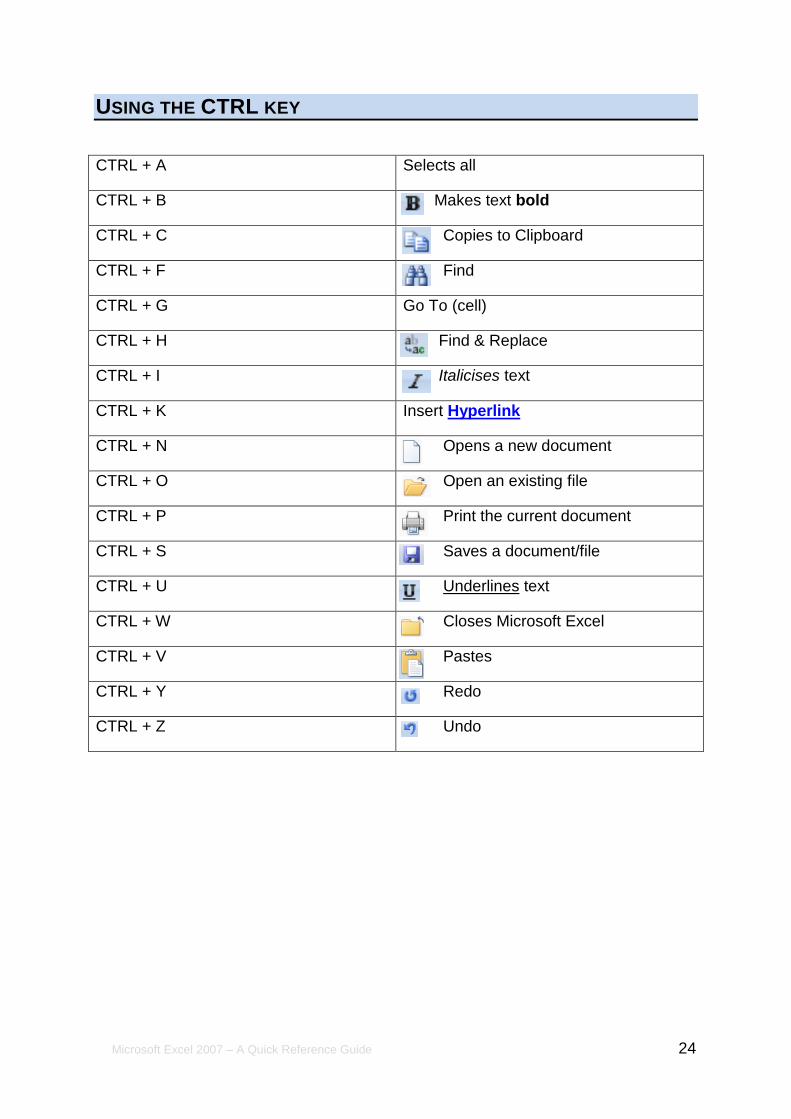
USING THE CTRL KEY
CTRL + A Selects all
CTRL + B Makes text bold
CTRL + C Copies to Clipboard
CTRL + F Find
CTRL + G Go To (cell)
CTRL + H Find & Replace
CTRL + I Italicises text
CTRL + K Insert Hyperlink
CTRL + N Opens a new document
CTRL + O Open an existing file
CTRL + P Print the current document
CTRL + S Saves a document/file
CTRL + U Underlines text
CTRL + W Closes Microsoft Excel
CTRL + V Pastes
CTRL + Y Redo
CTRL + Z Undo