mixir2 user's guide
TRANSCRIPT

© Copyright 2008-2011 by Red 5 Group, LLC dba Redwirez. ALL RIGHTS RESERVED.
mixIR2 Convolution Plug-in
Introducing the mixIR2, Redwirez’ very own high performance, zero latency convolution plug-in. The mixIR2
allows you to mix multiple IRs with minimal fuss and no loss of performance as you stack IRs. You can do stuff that previously required complicated bussing strategies and multiple plug-ins, all in a single plug-in. Now you have the power to sculpt your guitar sound like never before. Mix mics, cabinets, reverb, EQ curves, and more with ease at levels of performance unrivaled by any other convolution plug-in. We designed it with guitarists in mind, but it works well for general purpose convolution duties, as well. Looks pretty cool, too.
Features at a Glance
• Efficient, no-nonsense, drag-and-drop IR browser • Zero latency, so it adds no delay to the signal • Run one IR or 30 with the same unmatched performance • Efficient, optimized convolution engine with low CPU usage. Let's you run more plug-ins. • Powerful internal routing allows you to mix IRs without messing with busses and sends • Mix IRs in stereo with pan controls • Upload, download, share and rate presets on redwirez.com • Export your mix as a single IR in WAV or AIFF formats • No activation, authorization, or copy protection to get in the way • Neve 1073* EQ impulse responses included

© Copyright 2008-2011 by Red 5 Group, LLC dba Redwirez. ALL RIGHTS RESERVED.
System Requirements Windows
Windows XP SP3 or Later Minimum 1024x768 screen resolution 65MB of free disk space (includes installed IRs) VST-compatible 32-bit Digital Audio Workstation software* * 32 to 64-bit bridging adapters are not supported.
Mac OSX
32/64-bit AU on Snow Leopard or later 32-bit AU on Leopard
32-bit VST on Leopard or later Minimum 1024x768 screen resolution 65MB of free disk space (includes installed IRs) VST or AU compatible 32/64-bit Digital Audio Workstation software

© Copyright 2008-2011 by Red 5 Group, LLC dba Redwirez. ALL RIGHTS RESERVED.
Installing the Plug-in on Windows The installation is pretty standard stuff. Just follow the on-screen instructions and you’ll be fine, with one caveat. When you hit the “Select Destination Location” screen, you should select your VST plug-in folder, by clicking the “Browse” button and locating your VST folder on your hard drive. If you do not select the VST folder actually used by your DAW software (i.e. SONAR, Reaper, Cubase, Samplitude, etc.) the plug-in will not be available in your DAW.
The installer will place the plug-in’s binary in the VST folder you select on this screen. The mixIR2 comes with a User’s Guide and some “factory installed” IRs and Presets. It places these under “My Documents” in a folder called “mixIR2”. The actual “My Documents” folder is in slightly different places on your hard drive, depending on which version of Windows you are using. Prior to Vista and after Windows 95/98 it is located at: C:\Documents and Settings\[user name]\My Documents. After Vista it is located at: C:\Users\[user name]\Documents. There is usually a shortcut to this folder on your Desktop, or under Windows Explorer. The uninstaller is also located in the [My Documents]\mixIR2 folder. The plug-in does not require activation or authorization. After some deliberation, we decided against inconveniencing our users with a copy protection scheme.
© Copyright 2008-2011 by Red 5 Group, LLC dba Redwirez. ALL RIGHTS RESERVED.
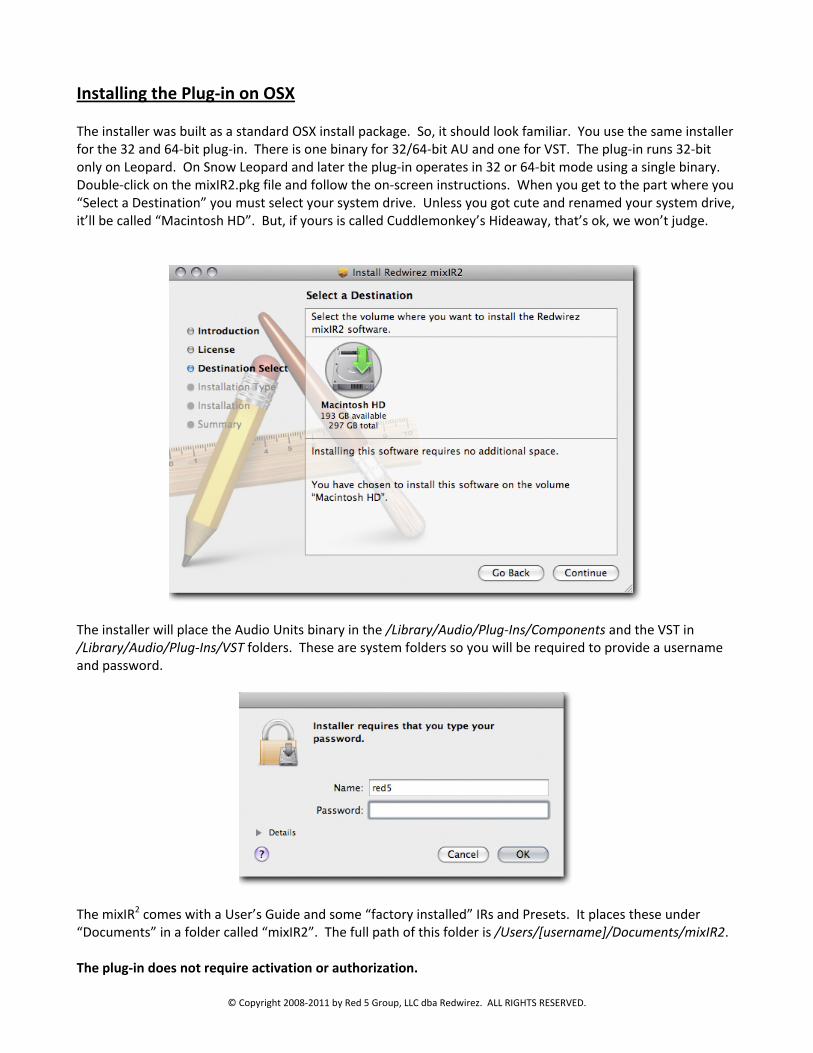
Installing the Plug-in on OSX The installer was built as a standard OSX install package. So, it should look familiar. You use the same installer for the 32 and 64-bit plug-in. There is one binary for 32/64-bit AU and one for VST. The plug-in runs 32-bit only on Leopard. On Snow Leopard and later the plug-in operates in 32 or 64-bit mode using a single binary. Double-click on the mixIR2.pkg file and follow the on-screen instructions. When you get to the part where you “Select a Destination” you must select your system drive. Unless you got cute and renamed your system drive, it’ll be called “Macintosh HD”. But, if yours is called Cuddlemonkey’s Hideaway, that’s ok, we won’t judge.
The installer will place the Audio Units binary in the /Library/Audio/Plug-Ins/Components and the VST in /Library/Audio/Plug-Ins/VST folders. These are system folders so you will be required to provide a username and password.
The mixIR2 comes with a User’s Guide and some “factory installed” IRs and Presets. It places these under “Documents” in a folder called “mixIR2”. The full path of this folder is /Users/[username]/Documents/mixIR2. The plug-in does not require activation or authorization.

© Copyright 2008-2011 by Red 5 Group, LLC dba Redwirez. ALL RIGHTS RESERVED.
Initial Configuration
One more step and we can start mixing some IRs. By default the plug-in will set your base IR Folder [1] to: [Documents]/mixIR2/Library/IRs, but you can change this to another folder or even point it to the root of your file system for maximum flexibility. All of the file paths stored in your presets will be relative to this folder, so give it some thought before setting it, as moving it later could break your presets (see Notes on Preset Handling below). The plug-in comes with IRs pre-installed in the folder displayed to the right of “Impulse Response Folder” [1]. These include the Marshall 1960A* with well-traveled Celestion 25 watt “Greenbacks”* that we offer as a free download, and some uber-useful Neve 1073* EQ impulse responses. If you already have an IR collection in another location and want to change the root IR Folder to point to this location, you should move the folders located under the “factory installed” default IR Folder to the folder housing your collection. If you don’t move the factory installed IRs and you change the location of the root IR Folder some of the presets may not function because they are expecting these IRs to be in your Impulse Response Folder. You can then change the location of the root Impulse Response Folder by clicking the Set button [1] and locating your IR Folder in the “dialog” box that pops up. You should probably leave the IR Block Folder [2] and Presets Folder [3] setting alone, as it will point to the folder containing factory installed presets, by default. The Set Factory Defaults [4] button will restore the folder paths to their default settings. The Export button [5] will take the composite IR created by the plug-in and save it to an audio file in the format selected in the Export File Type drop-down list [6]. This is useful for loading into another convolution plug-in (why would you use something else, again?) or a hardware IR loader.

© Copyright 2008-2011 by Red 5 Group, LLC dba Redwirez. ALL RIGHTS RESERVED.
Keyboard Mode [7] provides a workaround for keyboard input problems present in some Windows DAWs. This option is not present in the OSX version of the plug-in. In Normal mode, the plug-in takes no extraordinary measures to grab keystrokes from the DAW. Normal mode should be sufficient for most DAWs. If you have trouble entering text for blocks and presets, then try Capture mode to tell the plug-in to attempt to grab keystrokes. Cubase for Windows currently requires Capture mode. Reaper for Windows also works best in Capture mode. If you are using Cakewalk’s Sonar then run in Normal mode, but engage the keyboard passthrough button in the top-right of the plug-in window. Notes on Preset Handling We chose not bundle our IRs into a proprietary format even though this would have offered some distinct advantages for managing presets. Instead, your IRs live in the file system, so you can use them in other environments, as well. But, as a result, managing presets can be a little tricky. We’ve already walked you through setting your root IR Folder (see Initial Configuration above). Presets point to files that are stored in your file system relative to this root IR Folder. Meaning, the path that is stored in the preset is not a full path, but a path relative to the IR Folder. This allows you to move your IR Folder without breaking all your presets, provided you keep the same folder structure in the new root IR Folder as existed in the old IR Folder. Otherwise, the plug-in will fail to find your IRs. IRs that can no longer be located will show up in red in the IR Block window. Sample Rate Path Replacement So, that your presets are not locked to files of a particular sample rate, the plug-in will attempt find any references to sample rates in the paths within a preset and replace them with a generic tag. The plug-in will look for the following sample rate references and attempt to replace them with a [samplerate] tag:
44.1 KHz-16bit 44.1 KHz-24bit 48 KHz-16bit 48 KHz-24bit 88.2 KHz-16bit 88.2 KHz-24bit 96 KHz-16bit 96 KHz-24bit
When reading the preset in the future, the [samplerate] tag will be replaced with the current project’s sample rate. This insures that you will be using IRs of the correct sample rate without the need for resampling, which can negatively affect the accuracy of an IR. This is a nice convenience if you’ve kept the “factory installed” folder structure of your Redwirez IRs intact. But, can cause problems if you’ve changed it. So, for this reason we highly recommend that you do not alter the folder structure of your Redwirez collection after installation. Feel free to move the base Red Wire Impulses folder, but do not move things around or rename folders within the base folder. If you decide to make modifications, you may run into problems with your presets due to the sample rate replacement behavior described above. Redwirez.com Presets When you upload a preset to Redwirez.com, the system will normalize the preset, so that other people can use it. By “normalize” we mean, it will go through your preset, locate all Redwirez IRs and reset their relative paths to the factory default. This allows users who have not modified their Red Wire Impulses folders to share presets. But, if you have changed the default folder structure of the Red Wire Impulses folder, then the downloaded presets may not be able to find the files referenced and will be flagged as missing.

© Copyright 2008-2011 by Red 5 Group, LLC dba Redwirez. ALL RIGHTS RESERVED.
Browser Window
Ok. Let’s get started. The Browser “pane” highlighted in the screenshot above is a streamlined file system browser that displays the contents of your root IR Folders, your IR Block Preset folder and your Preset folder (more on these in a minute). The current folder name is displayed near the top of the browser window, [1] in the screenshot above. You double-click on a folder to view the contents of that folder. To navigate back to the current folder’s parent folder, you click the “Up Folder” icon [2]. The IR Browser “pane” has 3 tabs: IRs, IR Blocks, and Presets [3]. Clicking on “IRs” will display the contents of your root IR Folder. From here you can drag IRs onto the many available slots in the IR Blocks window, like so:

© Copyright 2008-2011 by Red 5 Group, LLC dba Redwirez. ALL RIGHTS RESERVED.
Under the “IR Blocks” tab, you will find your IR Block presets. Use these if you have entire blocks of IRs you wish to recall, without the need to recall all of your settings. And finally, clicking on the Presets tab will display your global Presets. Each preset is like a snapshot of plug-in settings and loaded IRs at a point in time. You can think of a preset as a “mix” and we sometimes use that term to refer to a preset. The IR Blocks and Presets tab, have two additional buttons:
An “Add/Save” button and a “Remove” button. The Remove will only appear when a preset is highlighted. So, when you have your mix set up the way you want, click on the Presets tab and then click the “Add/Save” button and it will create a new item in the Presets list and allow you to type in a name for this preset. If you want to overwrite an existing preset, then click on the preset name to highlight it, and then click the Add/Save button and respond to the “Overwrite” prompt.
TIP: Some DAW software won’t pass shortcut keys onto the plug-in. We’ve created a workaround for some DAWs, but Sonar requires special treatment. To make Sonar pass keystrokes to the plug-in, click on the little keyboard icon in the upper-right of the plug-in wrapper window and switch the plug-in Keyboard mode to Normal on the Options screen.
To remove a preset, click on the preset name to highlight it and then click the Remove button. If you want to load up a preset, or “mix” later, then just drag it from the Browser Pane onto the IR Blocks pane, like this:
Same goes for IR Block Presets.

© Copyright 2008-2011 by Red 5 Group, LLC dba Redwirez. ALL RIGHTS RESERVED.
IR Blocks Window
Each IR block has a user-definable name [1]. Just double-click the IR Block name and enter whatever you want. It’s probably a good idea to keep the names representative of the block’s purpose. Naming every block, “Sticky gorilla teats” is probably a little less than useful. But, hey, if it inspires you, then go ahead. The IRs [2] within a block occupy “slots”. Each slot has a “Mix %” [3] and an IR Length [4]. As described above, you drag IRs from the Browser window to an IR slot. You can truncate the IRs length by changing the value in the “Length ms” column. This is sometimes used to remove the “room sound” from an IR. You can experiment with different values. Very short IRs will lack low end resolution.
TIP: Hovering over the IR slot will pop-up the full path information for the IR. This can be useful when the IR name gets cut off.
The IRs within an IR Block are mixed in parallel according to mix percentages entered in the “Mix %” column. So, an SM57 in slot 1 at 50% and an R121 in slot 2, also at 50%, yields a mix with both mics represented equally. Mix percentages should add up to 100%, for the numbers to make sense, but the plug-in will still mix the block’s IRs according to their “Mix %” even if the numbers total more or less than 100%. Normally, you can just drop one IR per block, which allows you to tweak your IR mix using the sliders in the IR Routing window, which is a lot easier and will be discussed below. But, if you are mixing a lot of IRs, you may find you need to use multiple slots within a block and manually enter the mix percentages. To clear out a slot, select it by clicking on it and then hit the “Delete” key. Or, drag the IR from the IR Blocks window back to the IR Browser window and it will be removed. You can quickly scroll to a particular block by clicking on its corresponding block number on the IR Block Navigator [5].

© Copyright 2008-2011 by Red 5 Group, LLC dba Redwirez. ALL RIGHTS RESERVED.
IR Block Routing Window
For each block in the IR Blocks window, there is a corresponding Routing Block [1] in the Routing window. Put simply, the Routing window allows you to create an IR mix that will then be convolved with the dry signal, acting as a filter. A block can be a Parallel block or a Serial block. In the screenshot above, Mic1, Mic2, and the Room Mic blocks are parallel blocks. Meaning the IRs in these blocks are mixed together in parallel according to the value of the Level Slider [2] in much the same way multiple tracks are mixed at the Master buss in your DAW. You should not notice a significant change in “loudness” of the signal when adjusting the level slider on a parallel block. That’s because it’s adjusting the level of the IR Block in the overall IR mix, not adjusting the level of the signal itself. You should hear the tone of the wet signal change as you add more/or less of an IR Block, though. How we perceive the frequency content of a signal changes with the level of the signal (see Fletcher-Munson curves). Because the plug-in controls for the level of the signal as a fortuitous by-product of how it works, it helps you make critical mix decisions without fighting with levels. In the screenshot above, the Z Curve, EQ, and Reverb blocks are routed in serial. For serial blocks, imagine the signal is passed through each serial block in sequence, like stacked insert effects on a track in your DAW. In the example above, the signal passes through Z Curve, then EQ, then Reverb. On serial blocks the Level slider functions like a wet/dry slider. You can also think of it as a more/less slider. Meaning, at 100 the IR block is at “full strength”. Anything less than that and the IR Block’s effect on the signal becomes progressively less dramatic. So, for an EQ curve if you’re starting with an IR that produces a 16dB cut at 300Hz, a value of 50 on the Level slider would approximate an 8dB cut. For reverb, it would approximate a 50% wet reverb.
© Copyright 2008-2011 by Red 5 Group, LLC dba Redwirez. ALL RIGHTS RESERVED.
NOTE: Using the level slider on a serial block with third-party IRs, especially stereo IRs can sometimes have unexpected results, like a shift in the stereo image. To work around this issue, drop a Passthru IR (preinstalled in the IRs folder) with a mix percentage of 100 into one of the slots in the same IR block as your reverb IR. This will also make the level slider seem more responsive because the Passthru IR dampens the reverb somewhat. You can toggle a block from Parallel to Serial by clicking on the Routing Toggle [3], the circle at the junction point to the left of each block. Clicking on the “power” symbol [4] toggles the block Bypass. In bypass, the block is ignored. Blocks are also ignored if you set the Level slider to “0”.
TIP: It may be useful to visualize the signal flow from the top IR block to bottom IR block. Groups of parallel blocks and serial blocks are processed in order to arrive at a final IR mix.
An important concept to understand is that the controls in the routing window are not changing the wet, processed signal directly, although it may seem like they are, in many cases. The controls are changing the IR “mix” that will then be convolved with the dry signal (i.e. filtered). This distinction is especially important when it comes to panning. When you use the pan knobs in the plug-in, you are actually panning the IRs, not panning the processed signal. So, if you hard-pan an IR to the left, you are not shutting down the right channel, as you might expect, but taking the IR out of it. The dry signal then comes through the right channel unaffected, or is “passed through”. You can then pan an IR to the right and the “pass through” will stop because both channels are now being filtered through an IR. If your goal is to pan the final processed signal, you can use the Split Output Attenuators (see below), or better yet, leave the IRs panned to the center, or evenly panned hard-left and hard-right and use the panning in your DAW. We address this concept with concrete examples in the Tutorial section below.

© Copyright 2008-2011 by Red 5 Group, LLC dba Redwirez. ALL RIGHTS RESERVED.
Bottom Panel and Meters
The bottom panel contains a Pan Knob [1] for each IR Block. With the pan knob, you can place an IR to varying degrees in the right or left channel. 12 o’clock on the knob is centered. This just pans the IR, not the processed signal, so it takes a little experimentation to understand what it’s doing. This can be used to pan one cabinet mic to the right and another to left which can often present a wider stereo image. But, it’s probably most useful when used to implement different EQ treatments for the left and right channels. The Mono Switch [2] is used to sum, or merge, the left and right channels. When the LED is lit, the plug-in is running in Mono mode. When unlit, the plug-in is running in stereo. The Master IR Length [3] knob can be used to trim the length of the final IR mix. For you Axe-Fx users, trim the final IR to about 22ms to replicate what the mix will sound like in the Axe-Fx. Trim it to 43ms for the Axe-Fx II. The Wet and Dry knobs [4] control the level of the dry, unaffected signal and the wet signal, or the signal as it sounds run through your IR mix. When using cabinet IRs, EQ, or impedance curves, the Dry knob should be set to “off”. Sometimes, if you are mixing clean guitar or need just a touch more presence then it helps to mix in just a little of the dry signal. If you are using the plug-in for reverb only, then you should set the amount of dry signal to taste. The Input [6] Meter displays the level of the incoming dry signal. The Output [7] Meters display the level of the outgoing signal. The plug-in has a lot of headroom internally, but be careful not to clip the output because you may end up with clipping in plug-ins further down the signal chain or in your audio output path. There is no clip indicator and the meters are pretty fast, so it’s best to give it some headroom. There are two Split Output Attenuators [8] on either side of the Output Meters, one for attenuating the left channel, and one for the right. These sliders can be used to manually pan the final processed signal, or to compensate for an unbalanced IR mix by attenuating the louder channel. Just drag them up or down. The top position leaves the signal untouched, while the bottom position shuts it down completely.

© Copyright 2008-2011 by Red 5 Group, LLC dba Redwirez. ALL RIGHTS RESERVED.
Tips for Specific Types of IRs Cabinet IRs
If you are using a single cabinet, you should set it up as a serial block with the block level at 100. This runs 100% of the signal through the cabinet. If you find you want a little less cabinet sound, you can adjust the level slider to taste for more or less cab sound.
If you plan to mix more than one cab or mic, then use “back to back” (sequential) parallel blocks. Mix their respective levels with the level slider on each block. The last section, “Dialing in Your Tone with Redwirez IRs,” deals with this topic in more detail.
Impedance Curves (Z-Curves)
The Redwirez collection includes impedance curves of various speakers. These can be used to reproduce the effect that a tube amp can have on the frequency response of a speaker. Compared to solid-state power amps, tube amps have a higher output impedance. As a result the connected speaker's frequency response will change, causing its frequency plot to look more like its impedance curve than when driven by a solid-state power amp. You may appreciate the more scooped tone, or the added thump and sparkle. Some people perceive the low-end bump around the speaker’s resonance point as “warmth”. You should run these in a serial block, before or after the cab, the order is not important. The IR labeled "100perc" is the impedance curve as it was measured. This is a bit extreme if your goal is to simulate a real world tube-speaker effect. Files with 90perc, 80perc, etc. represent "toned down" versions of the impedance curve for less of an effect, where “90perc” is 90% wet, “80perc” is 80% wet, etc. 50-60% wet is equivalent to the real world effect we saw with many of the tube amps we tested.
EQ
We threw in some classic Neve 1073 IRs. Look for them in the factory installed IR set. We sampled each position on a 1073 at full cut and full boost. So, run these in a serial block and reduce the amount of cut/boost with the level slider.
Reverb
You can handle reverb a couple ways. First, if you’re just doing reverb, you can drop your reverb IRs in parallel blocks and use the Master Dry/Wet knob to control the mix of dry signal and reverb (wet). If you want to add reverb to the end of a longer chain of IRs, you should use a serial block and control the wet/dry mix with the level slider. Occasionally, reverb IRs will overpower the rest of your IR chain unless you mix in only a small amount (5 or less on the level slider). If you find you need finer control of the mix, then it helps to add a Passthru IR (preinstalled in the IRs folder) with a mix percentage of 100 into one of the slots in the IR block with your reverb IR. A “Passthru IR” is just a single 0dBFS spike followed by silence. When mixed with other IRs it effectively dampens them, or “waters them down”, if you will. NOTE: Using the level slider on a serial block with third-party IRs, especially stereo IRs can sometimes have unexpected results, like a shift in the stereo image. To alleviate this issue, use a Passthru IR as described above.

© Copyright 2008-2011 by Red 5 Group, LLC dba Redwirez. ALL RIGHTS RESERVED.
Tutorial: Let’s Try a Mix or Two
For the sake of simplicity, the following example assumes you have recorded a dry, amped guitar track and have placed the mixIR2 in the effects chain on this track. You can download a sample track and a backing track with drums and bass here, if you don’t mind metal: http://redwirez.com/dl/tutorial-sample.zip† Ok. Let’s get our virtual hands dirty. We’ll only be using the G12M cabinet IRs, probably not our first choice for high gain guitar, but a respectable performer and the IRs are included with the plug-in. So, the focus will not be on getting the absolute best sound, but on exploring some of the functionality of the plug-in. First, make sure the Dry Gain knob is set to “off” and the master IR Length knob is maxed out. Then, click the Presets tab in the plug-in, and drag the _Empty.xml preset to the IR Blocks window to clear everything out. Click on the IRs tab and you should see something like this:
Now, double-click the “IR Block 1” label in the IR Routing window. The appearance of the label will change, allowing you to edit the block name. Type “Mic 1”. In the IR Browser window, click on the “BIGBox” folder. The click on the folder that corresponds to the current project’s sample rate. We’ll use 44.1 KHz-24bit for this example. Navigate to the Marshall1960A-G12Ms > Royer R121 folder. This Marshall1960A cabinet IRs are included with the plug-in. Drag the Cap-2in IR into the top slot in the Mic 1 block. You don’t need to play with the “Mix %” and “Length ms” values. These will be filled in with sensible defaults. Rename IR Block 2 through 6 to Mic 2, Mic 3, Z-Curve, EQ and Reverb, respectively. This is a setup that seems to get used quite often around here. We won’t use all these slots in this example but it’s probably a good idea to reserve the space. It is not necessary to bypass empty blocks because they will be ignored, but it is good practice, so go ahead and bypass blocks 2 through 6 for now by clicking on the Power symbol to the left of each block. Let’s listen to the results. With our sample track, leaving the Wet Gain at -18dB gives us some headroom. Your setup should look something like the following:

© Copyright 2008-2011 by Red 5 Group, LLC dba Redwirez. ALL RIGHTS RESERVED.
Hmm, by itself the R121 at this position probably sounds a little muffled and boomy. Lots of proximity effect at play here. You could pull the mic back to 4in or so, to even it out, but for this example we’re going to use the Sennheiser MD421 to fill in the frequency gaps. You’ll notice the level slider on the Mic 1 block has no effect. That’s because it’s a lone parallel block and there is nothing to mix it with. Keep in mind the controls in the Routing window do not directly affect the dry signal, they are for creating an IR mix that will then filter the dry signal. If you set the level at zero, the plug-in ignores the block and because there are no other valid blocks it will pass the dry signal through the plug-in. When valid blocks are present this pass through is disengaged. Ok, let’s add a 421 to the mix. It works well with the R121, especially on metal tracks as the 421 adds some upper-midrange cut without sounding too grainy. Get out of the R121 folder by clicking on the Up Folder icon and then navigate to the Sennheiser MD421 folder. Drop the CapOffAxis-0in IR into the top slot in the Mic 2 block. It should look like this:

© Copyright 2008-2011 by Red 5 Group, LLC dba Redwirez. ALL RIGHTS RESERVED.
Ok. Let’s listen again. Now, you should hear more high-end. Try bypassing one or the other mic to hear the result. This time the level sliders will have an effect. It is subtle, mostly in the upper mids if you’re tweaking the 421 and in the low-end if you’re adjusting the R121. If you’ve mixed IRs manually in your DAW before, then you may be surprised that the sliders do not have a more dramatic effect. This is due in major part to how well the plug-in maintains a constant level as you tweak the elements of the mix. The relative level of the signal has a significant effect on our perception of its “tone”. Controlling for level, as best we can, gives you a truer sense of what each element is contributing to the mix. Ok. So, now we’re going to play with the impedance curves. Turn off bypass on block 5, the “Z-Curve” block, or put another way, power on the block. Now, click on the gray circle to the left of the Z-Curve block in the IR Routing window. This will put the Z-Curve block in serial mode, which is preferable for Z-curves, EQ and reverb. Now click on the Up Folder icon to navigate to the Impedance Curves folder. Just like before, choose the correct sample rate folder and then drag the CelestionG12M25-ImpCurve-100 IR into the top slot in the Z-Curve block. These curves are good for reproducing the thump and sparkle that a tube amp can impart due to its interaction with a speaker (relatively higher output impedance than a solid state amp). They’re a useful option to include in every guitar cab mix even if you don’t end up using them. Ok. Let’s listen to the results. Your setup looks something like this now:
Hmm, sounds like we may have sucked out the mids a bit too much. That’s the impedance curve at work. We dropped in the 100% wet curve, which is quite dramatic. The 50-60% wet curves are closer to the real-world effect, but the 100% curve can be fun to play with. So, instead of swapping the CelestionG12M25-ImpCurve-100 IR for CelestionG12M25-ImpCurve-50, we’re going to adjust the effect of the curve using the level slider on the Z-Curve block. Remember, the level slider on a serial block acts like a more/less slider. Cutting the slider to 50, will “dilute” the effect of by roughly 50%, you may find you need to cut or more or less.
© Copyright 2008-2011 by Red 5 Group, LLC dba Redwirez. ALL RIGHTS RESERVED.
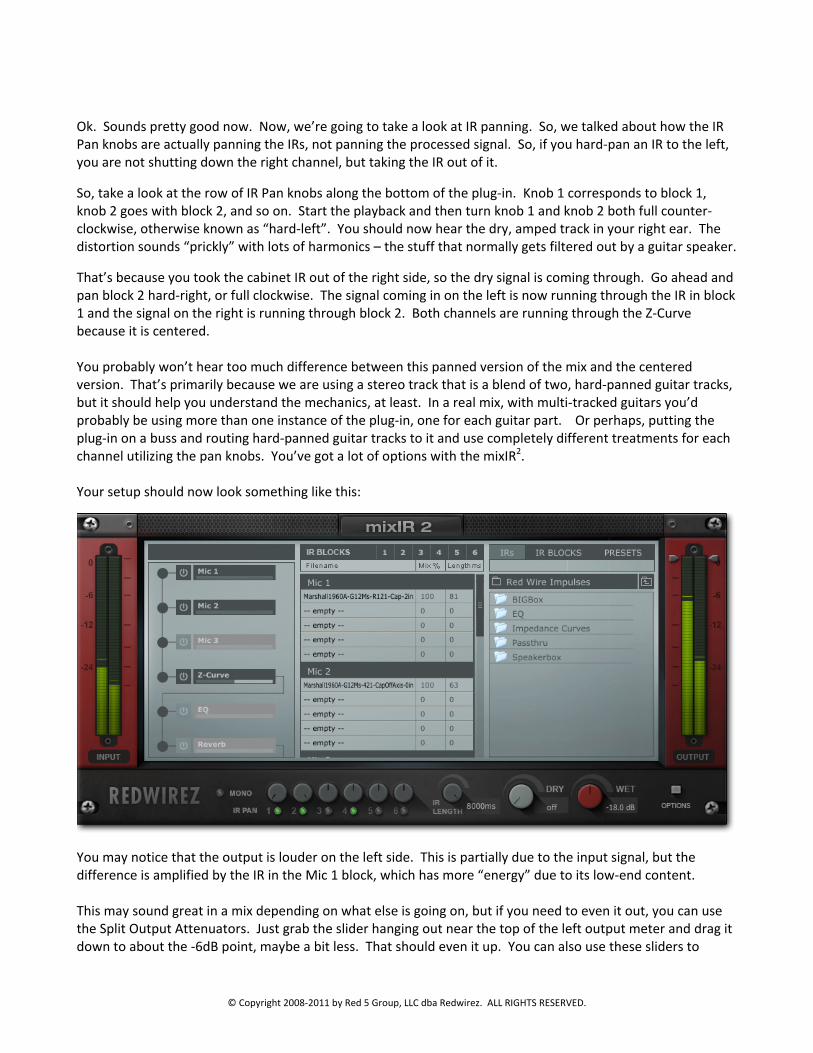
Ok. Sounds pretty good now. Now, we’re going to take a look at IR panning. So, we talked about how the IR Pan knobs are actually panning the IRs, not panning the processed signal. So, if you hard-pan an IR to the left, you are not shutting down the right channel, but taking the IR out of it.
So, take a look at the row of IR Pan knobs along the bottom of the plug-in. Knob 1 corresponds to block 1, knob 2 goes with block 2, and so on. Start the playback and then turn knob 1 and knob 2 both full counter-clockwise, otherwise known as “hard-left”. You should now hear the dry, amped track in your right ear. The distortion sounds “prickly” with lots of harmonics – the stuff that normally gets filtered out by a guitar speaker.
That’s because you took the cabinet IR out of the right side, so the dry signal is coming through. Go ahead and pan block 2 hard-right, or full clockwise. The signal coming in on the left is now running through the IR in block 1 and the signal on the right is running through block 2. Both channels are running through the Z-Curve because it is centered. You probably won’t hear too much difference between this panned version of the mix and the centered version. That’s primarily because we are using a stereo track that is a blend of two, hard-panned guitar tracks, but it should help you understand the mechanics, at least. In a real mix, with multi-tracked guitars you’d probably be using more than one instance of the plug-in, one for each guitar part. Or perhaps, putting the plug-in on a buss and routing hard-panned guitar tracks to it and use completely different treatments for each channel utilizing the pan knobs. You’ve got a lot of options with the mixIR2. Your setup should now look something like this:
You may notice that the output is louder on the left side. This is partially due to the input signal, but the difference is amplified by the IR in the Mic 1 block, which has more “energy” due to its low-end content. This may sound great in a mix depending on what else is going on, but if you need to even it out, you can use the Split Output Attenuators. Just grab the slider hanging out near the top of the left output meter and drag it down to about the -6dB point, maybe a bit less. That should even it up. You can also use these sliders to

© Copyright 2008-2011 by Red 5 Group, LLC dba Redwirez. ALL RIGHTS RESERVED.
manually pan the final processed signal, but it’s probably easier just to use the panning in your DAW for this purpose. Ok, that about wraps it up. We’ll leave EQ and reverb up to you. Just follow the tips laid out in the previous section and you’ll be fine. Remember to flip the EQ and Reverb blocks to serial before using them. Hope you had fun. Check out the next section for some tips on dialing in your tone with Redwirez IRs.

© Copyright 2008-2011 by Red 5 Group, LLC dba Redwirez. ALL RIGHTS RESERVED.
Dialing In Your Tone with Redwirez IRs
And now for a word from our sponsor… Part of the reason we gave you so many options is because we wanted you to feel like you’re sitting in the control room with an assistant in the live room moving the mic around the cabinet. If you’ve ever mic’ed up a real speaker cabinet, you will likely be perfectly comfortable with the number of choices we offer. But, if you usually leave that stuff up to the sound guy, then you may be feeling a bit overwhelmed. This guide was written to help you quickly dial in the tone you want. Finding your sound can be boiled down to a few simple rules. The first rule of rolling with Redwirez:
1. Do not feel like you need to try every IR.
The second rule of rolling with Redwirez:
2. Do NOT try every IR! Seriously. There’s absolutely no reason to do this, unless you are a big fan of ear fatigue. Because our IRs were captured in a rigorous manner, the differences between positions (IRs) is linear and predictable. Use this to your advantage. The point of having a ton of IRs is to give you the flexibility to zero in on your target tone. Not to send you down the rabbit-hole, never to return. Which leads us to the third rule:
3. Start with a neutral position and tweak from there.
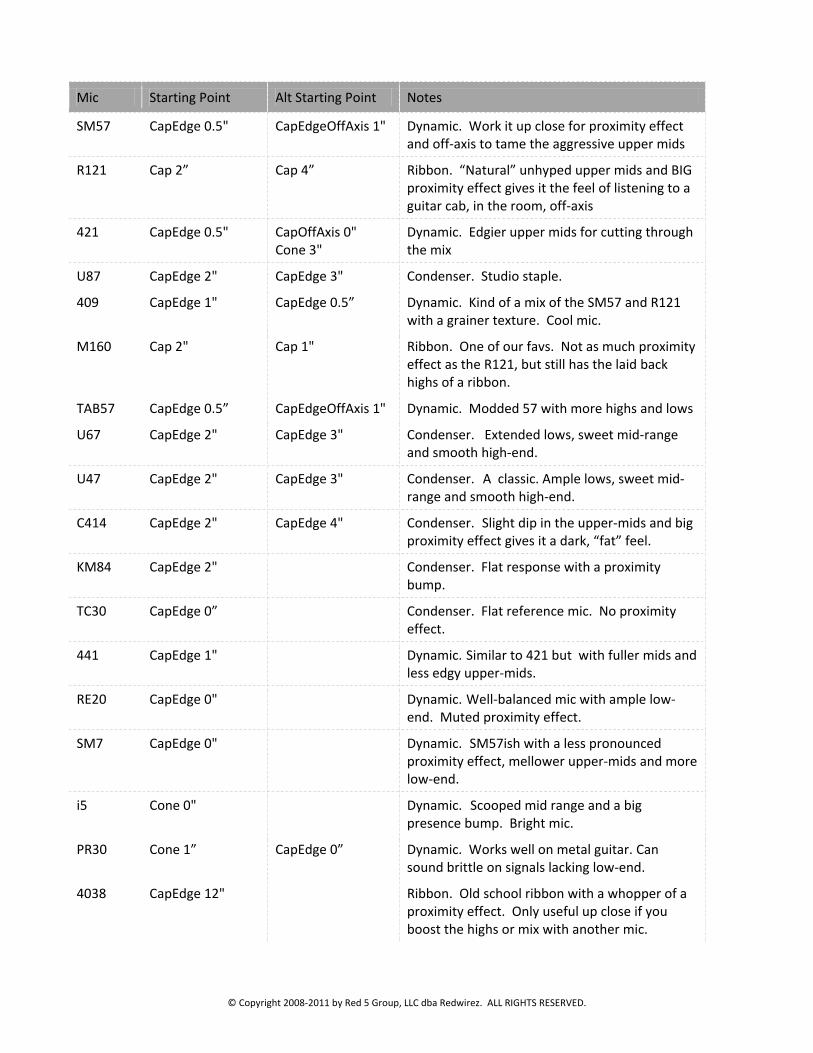
The base speaker positions are Cap, Cap Edge, Cone and Cone Edge. On most cabs, the Cap Edge series of positions is the most neutral. By neutral, we don’t mean flat (from a frequency perspective). We just mean that, for a given mic, the Cap Edge position will usually have the best balance between low frequencies and high frequencies. So, as a general rule, Cap Edge 1” makes a good starting point on most cabs and mics. Pull it back a bit more for ribbons and condenser mics because the more pronounced proximity effect will add low-end (see below). Go ahead and try a few mics in the CapEdge 1” position. This position should give you a pretty good idea of how the mic/cab combo is going to sound. If you never use anything besides the SM57, R121, 421 and U87 don’t feel bad, you’re in good company. However, each mic is designed to have its own unique frequency response, so a little experimentation may be called for. Here are some good starting points for different mics. The mics are loosely ordered based on their popularity with our users:
© Copyright 2008-2011 by Red 5 Group, LLC dba Redwirez. ALL RIGHTS RESERVED.
Mic Starting Point Alt Starting Point Notes
SM57 CapEdge 0.5" CapEdgeOffAxis 1" Dynamic. Work it up close for proximity effect and off-axis to tame the aggressive upper mids
R121 Cap 2” Cap 4” Ribbon. “Natural” unhyped upper mids and BIG proximity effect gives it the feel of listening to a guitar cab, in the room, off-axis
421 CapEdge 0.5" CapOffAxis 0" Cone 3"
Dynamic. Edgier upper mids for cutting through the mix
U87 CapEdge 2" CapEdge 3" Condenser. Studio staple.
409 CapEdge 1" CapEdge 0.5” Dynamic. Kind of a mix of the SM57 and R121 with a grainer texture. Cool mic.
M160 Cap 2" Cap 1" Ribbon. One of our favs. Not as much proximity effect as the R121, but still has the laid back highs of a ribbon.
TAB57 CapEdge 0.5” CapEdgeOffAxis 1" Dynamic. Modded 57 with more highs and lows
U67 CapEdge 2" CapEdge 3" Condenser. Extended lows, sweet mid-range and smooth high-end.
U47 CapEdge 2" CapEdge 3" Condenser. A classic. Ample lows, sweet mid-range and smooth high-end.
C414 CapEdge 2" CapEdge 4" Condenser. Slight dip in the upper-mids and big proximity effect gives it a dark, “fat” feel.
KM84 CapEdge 2" Condenser. Flat response with a proximity bump.
TC30 CapEdge 0” Condenser. Flat reference mic. No proximity effect.
441 CapEdge 1" Dynamic. Similar to 421 but with fuller mids and less edgy upper-mids.
RE20 CapEdge 0" Dynamic. Well-balanced mic with ample low-end. Muted proximity effect.
SM7 CapEdge 0" Dynamic. SM57ish with a less pronounced proximity effect, mellower upper-mids and more low-end.
i5 Cone 0" Dynamic. Scooped mid range and a big presence bump. Bright mic.
PR30 Cone 1” CapEdge 0” Dynamic. Works well on metal guitar. Can sound brittle on signals lacking low-end.
4038 CapEdge 12" Ribbon. Old school ribbon with a whopper of a proximity effect. Only useful up close if you boost the highs or mix with another mic.

© Copyright 2008-2011 by Red 5 Group, LLC dba Redwirez. ALL RIGHTS RESERVED.
Because our IRs were captured in a rigorous manner, the differences between positions (IRs) is linear and predictable. Because of this you do not need to try every IR. You can start with a neutral position and then dial it in from there because you have a good idea what moving the mic will do to the sound.
4. Dial in your tone using a few simple techniques.
1. Move the mic closer for MORE proximity effect and thus MORE low-end. 2. Move the mic farther away for LESS proximity effect and thus LESS low-end. 3. Move the mic towards the cap for definition (if it sounds too muddy). 4. Move the mic out towards the edge of the cone if it sounds too harsh. 5. If it sounds too bright, sometimes it'll work to leave the mic where it is and just flip it off axis. It will
roll-off the highs and depending on the mic give it "grainy-er" sound.
A word on mixing: You don’t need to mix mics to get a great tone, but it is common practice in the studio. Try blending mics with complimentary characteristics. The IRs are time-aligned so you can mix a 2" mic signal with a 0" mic signal and not have to worry about phase coherence due to the different distances. Try mixing an SM57 for some bite and an R121 for the beef. Or, try a 421 with an R121 for the same effect with more cut and less upper midrange bite. Try blending in the room mics, the back of cab mics, and the mics placed farther back for a more 3D sound.
One trick is to use an off-axis position and then apply a high shelf EQ to boost the highs and add some “air”. This can give the signal a more “vibrant” feel. Similarly, you can use a Cone or Cone Edge position and apply a high-shelf EQ to add highs with a different character than the speaker Cap position.
© Copyright 2008-2011 by Red 5 Group, LLC dba Redwirez. ALL RIGHTS RESERVED.
* THE FINE PRINT: All product names used in this document are trademarks of their respective owners, which are in no way associated or affiliated with Red Wire Impulses. These trademarks of other manufacturers are used solely to identify the products of those manufacturers whose tones and sounds were sampled during impulse response capture.
† The sample track used in the tutorial is based on a DI provided by Jeff Dunne of Arcane Recordings performing a short section of “Rose of Sharyn” by Killswitch Engage.