missionmaker training guidecreativeedutech.s3.amazonaws.com/products/missionmaker/mm... · as with...
TRANSCRIPT


1 Immersive Education ©
Contents Why Games? 2 Background 2 What is MissionMaker? 3 Potential Educational Benefits 3 Authoring 4 Playing 6
Example Game: Browning 8 Navigating 8
Walkthrough Features in the Editor 10 My Game 10 New 10 Properties, Actions, Associations 10
Editor Interface 11 New Menu 12 Location 12 Props 14 Triggers 15 Active Props 16 Special Effect 17 Door 18 Using a Door 18 Pickup 19 Character 21
Shoot ’em Ups 22 Creating Speech 23 Trigger Volume 25 Media 26
My Game Menu 29 Game Attributes 29 Player Attributes 30 Rules 30
Brief Walkthrough of Player Features 31 Inventory 31 Economies 32 Speech 32 Camera/Player’s Log 32
Glossary 33
2 Immersive Education ©
Mission Maker Thoughts & Walkthrough
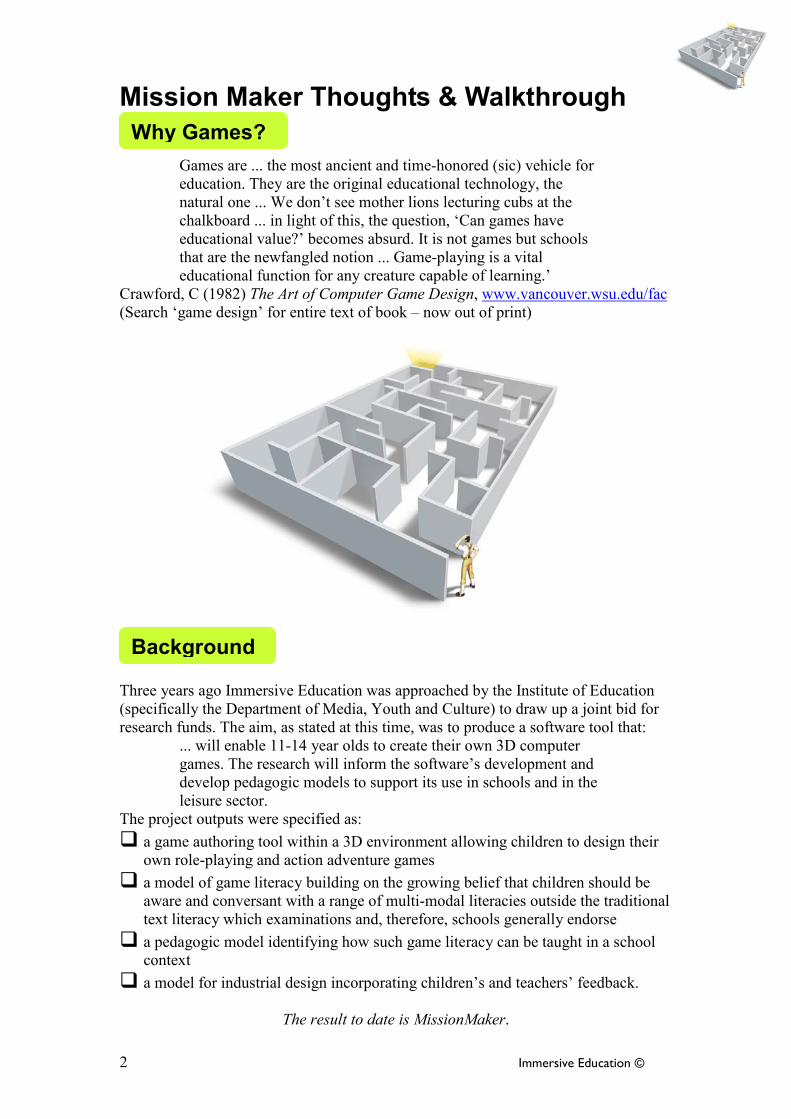
Why Games? Games are ... the most ancient and time-honored (sic) vehicle for
education. They are the original educational technology, the
natural one ... We don’t see mother lions lecturing cubs at the
chalkboard ... in light of this, the question, ‘Can games have
educational value?’ becomes absurd. It is not games but schools
that are the newfangled notion ... Game-playing is a vital
educational function for any creature capable of learning.’
Crawford, C (1982) The Art of Computer Game Design, www.vancouver.wsu.edu/fac
(Search ‘game design’ for entire text of book – now out of print)
Background Three years ago Immersive Education was approached by the Institute of Education
(specifically the Department of Media, Youth and Culture) to draw up a joint bid for
research funds. The aim, as stated at this time, was to produce a software tool that:
... will enable 11-14 year olds to create their own 3D computer
games. The research will inform the software’s development and
develop pedagogic models to support its use in schools and in the
leisure sector.
The project outputs were specified as:
� a game authoring tool within a 3D environment allowing children to design their
own role-playing and action adventure games
� a model of game literacy building on the growing belief that children should be
aware and conversant with a range of multi-modal literacies outside the traditional
text literacy which examinations and, therefore, schools generally endorse
� a pedagogic model identifying how such game literacy can be taught in a school
context
� a model for industrial design incorporating children’s and teachers’ feedback.
The result to date is MissionMaker.
Why Games?
Background

3 Immersive Education ©
What is Mission Maker As with all Immersive Education software, MissionMaker is fundamentally a creative
tool. It enables both students and teachers to plan, build and play a range of games
before evaluating and revising them according to end-user need. Its open-ended
approach means that it can be used to support a range of curriculum areas as well as
cross-curricular projects.
Unlike a level editor, MissionMaker allows users to start with a relatively blank
canvas and provides a number of choices enabling game-makers to select their own
game-playing genre based mainly around the chosen Locations and the consequent
narratives they suggest. The choices range from baronial courts, through modern
streets to science fiction space stations. All can be customised by the addition of
locally produced visual and audio Media.
Although as a BETA product the interface is fairly basic, it is still relatively intuitive
to use and provides users with a set of building blocks from which to build their
chosen game. The best way of introducing these and some of the concepts
underpinning good gameplay will be subject to the curriculum focus and intended
aims and objectives; and, to be honest, an area that the research is still investigating.
Therefore, this is something that we can work on together as the project progresses.
In summary, MissionMaker is a game authoring tool that enables users to become
critical producers of games as opposed to mere consumers.
Potential Educational Benefits Benefits dependent upon: • tasks set • feedback • teacher
mediation • type of game
It seems to us, and others, that there is a wealth of potential educational
benefits waiting to be tapped through a co-ordinated approach to game-
making and playing. There has been much media attention, numerous
academic articles and a host of educational conferences dedicated to the
subject. We maintain that, as with all creative tools, the specific benefits
will be largely a product of: the tasks set; the method of feedback and
target setting employed; the quality of teacher mediation as well as the
type of game.
It would be presumptuous, in these very early days, to say we can define
precisely what these are, but we can explore the potential. This view is
supported by Kirriemuir and McFarlane.
... the differences between genres, and even between
games within one genre, differentiate the way they are
played, and their potential to support learning ... there
are few hard and fast findings in the literature.
Kirriemuir, J and McFarlane, A (2004) Literature Review in Games and
Learning, NESTA Futurelab
With MissionMaker the identification of benefits is further complicated.
In the first instance, there are the benefits associated with authoring
games. There are also player benefits, particularly marked when the
game has a curriculum focus.
What is MissionMaker?
Potential Educational Benefits

4 Immersive Education ©
Learning Benefits
Development of cognitive skills ... Key Skills • Communication • Application of
number • Information
technology; • Working with
others • Improving own
learning and performance
• Problem solving Thinking Skills • Information-
processing • Communication • Reasoning • Enquiry • Creative thinking • Evaluation Understanding of: • grammar of game
design • needs of game
player Critical thinking about the medium of games and how they work Making curriculum-based games can help: • consolidate
learning • demonstrate
understanding
Authoring
One might argue that the learning benefits associated with games
authoring are mainly associated with the development of generic
cognitive skills. These can be mapped to Key Skills (Communication,
Application of Number; Information Technology; Working with Others;
Improving Own Learning and Performance; Problem Solving) and
Thinking Skills (Information-processing; Reasoning; Enquiry; Creative
Thinking; Evaluation) as outlined in the National Curriculum. The breadth
of potential learning is more eloquently described by NESTA Futurelab’s
Ben Williamson in his description of James Gee’s work on semiotic
domains. Although this talks about playing games, it seems equally, if not
more, applicable to the process of making and evaluating games.
... players must understand what they are doing and develop
their comprehension of both a game’s internal design
grammar, or the ways in which its content is presented, and
its external design grammar, or the ongoing social practices
that determine the principles and patterns through which
members of the domain recognise all the activities and
practices which comprise it. Such systematic thinking, Gee
argues, allows players to think about and critique games as
systems and designed spaces rather than simply moment-by-
moment playable environments. Such critical thinking is not
only absent in many schooling practices, but goes unnoticed
in much appreciation of what games can offer in terms of
learning.
Williamson, B (2003) A Review of Gee’s ‘What Videogames Can Teach Us
About Learning and Literacy’, NESTA Futurelab Website.
In considering audience and purpose, game authoring increases the
educational challenges.
In MissionMaker the games can be made by teachers, Immersive
Education, and, most importantly, by students. In the last example if
students make curriculum-based games for each other it provides a way
of consolidating learning and demonstrating understanding.
If we want to be more specific and make links to particular curriculum subjects it seems that
generic games authoring can be seen as relevant to, most obviously:
� production skills in Media Studies – historically it has been possible to be both a consumer
and producer of most of the media studied with the exception of games; increasingly games
are being analysed and are now a part of at least one A level Media course, but the focus is
still analysis rather than production – having said this, production can also support analysis
by making the theory concrete thus enabling a constructivist approach to study
� design process in D&T – through the process of planning, building, playing, evaluating and
refining games students engage in an end-to-end design process
� writing - MissionMaker can support both the development of transactional writing skills
(instructions, clues etc in pop-ups) and creative writing (scripts, narrative frames) as part of
the literacy curriculum.

5 Immersive Education ©
Developing notion of multiple literacies that demand: • multimodal
approaches • multi-layers • levels of
interpretation • multiple readings
In terms of literacy Brindley argues that, ‘It is my contention that
schooled literacy, which traditionally sees the acquisition of the ability to
construct and interpret text as largely an individual activity, bounded by
the concept of text as linear and fixed, is no longer adequate ... computer
literacy ... is a lifelong literacy. This entails the ability to construct and
manipulate text, which is no longer seen as linear but multidimensional
and multimedia and which is no longer fixed but infinitely changeable.
The model here is far closer to that required by school leavers at the
beginning of the new millennium’s world of literacy ... when reading
skills need to extend beyond book print to screen print ... (and arguably
other media) ... ICT is the medium of access and construction. Brindley,
S ‘ICT and Literacy’ in Gamble, N and Easingwood, N (2000) ICT and
Literacy, Continuum
Other areas of specific relevance might include vocational courses, DIDA, BTECs,
computing – what do you think?
Other potential educational benefits from game authoring and areas of curriculum relevance:
����

6 Immersive Education ©
Learning Benefits • problem-solving • decision making • strategic planning Prensky: • rapid information
processing • deciding
relevance • synthesising
information from range of sources
Doing in order to learn, rather than learning in order to do!
Playing
Many of the skills developed during the making of a game can also be
applied to thoughtful gameplay. How the Player solves problems, makes
decisions, thinks about their situation and formulates a strategy can be
captured within Mission Maker thus aiding the assessment of process as
well as product. (See Walkthrough Player at the end of the document). In
Williamson’s 2003 review cited earlier, he refers to the work of Marc
Prensky:
Prensky’s ten characteristics of new methods of learning
could be described as young people developing the ability to
process information very quickly, determining what is and is
not of relevance to them; the ability to process information
in parallel at the same time from a range of different sources;
the familiarity with exploring information in a non-linear
fashion ... creating links rather than following a story; the
tendency to access information in the first instance through
imagery and then use text to clarify/expand and explore...
and having a model of doing in order to learn, rather than
learning in order to do. (ibid)
Games players do all of these things throughout their gameplay. Game-play promotes active and critical learning: • Multi-tasking • collating and
processing information
• planning • thinking
strategically • trial and error • perseverance • plural reading • decision-making • testing
hypotheses, options, and imaginative alternatives
• active learning • reflection
Various academics in this field also list what they consider to be the key
benefits of game playing. Atkins says that game-play promotes ‘Multi-
tasking, collating and processing information, planning, thinking
strategically, trial and error, perseverance... plural reading – decision-
making, ... testing hypotheses, options, and imaginative alternatives.’
Atkins, B (2003) More Than A Game, Manchester University Press.
Whereas, talking about game worlds Bartle maintains, ‘Virtual worlds
offer educators the following features: they are collaborative; they are
motivational; they involve language use; children find it easier to express
themselves in them ...’ Bartle, R (2003) Designing Virtual Worlds, New
Riders.
Games encourage students to become active learners, positive about the
experience of learning. ‘The game encourages him to think of himself as
an active problem solver, one who persists in trying to solve problems
even after making mistakes; one who, in fact, does not see mistakes as
errors but as opportunities for reflection and learning ... Video games have
the potential to lead to active and critical learning ...They situate meaning
in a multimodal space through embodied experiences to solve problems
and reflect on the intricacies of the design of imagined worlds and the
design of both real and imagined social relationships and identities in the
modern world ... the potential of good video games played in
environments that encourage overt reflection.’ Gee, J (2003) What Video
Games Have to Teach Us About Learning and Literacy, Palgrave
Macmillan.

7 Immersive Education ©
Games: • engage people
intellectually and emotionally
• contextualise learning
• encourage enquiry based approach
In addition, where specific curriculum-based games are made the learning
benefits can be linked to subject specific skills and learning objectives.
Some of their value lies in their, ‘capacity to engage people intellectually
as well as emotionally, to enhance the contextual aspects of information,
and to encourage integrated, holistic responses.’ (Laurel, B (1991)
Computers as Theatre, Addison-Wesley) Games encourage active
process of enquiry rather than passive memorisation of facts.
Other potential educational benefits from game playing and areas of curriculum relevance:
����
8 Immersive Education ©
Example Game: Browning
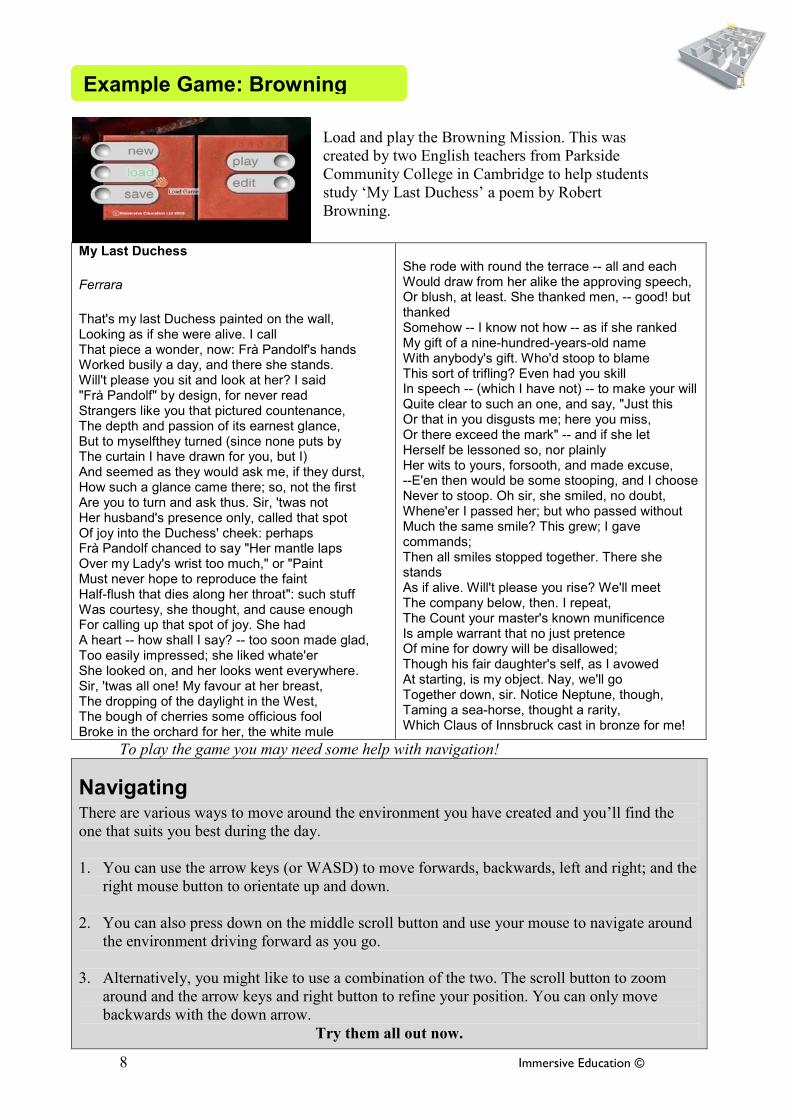
Load and play the Browning Mission. This was
created by two English teachers from Parkside
Community College in Cambridge to help students
study ‘My Last Duchess’ a poem by Robert
Browning.
My Last Duchess
Ferrara
That's my last Duchess painted on the wall, Looking as if she were alive. I call That piece a wonder, now: Frà Pandolf's hands Worked busily a day, and there she stands. Will't please you sit and look at her? I said "Frà Pandolf" by design, for never read Strangers like you that pictured countenance, The depth and passion of its earnest glance, But to myselfthey turned (since none puts by The curtain I have drawn for you, but I) And seemed as they would ask me, if they durst, How such a glance came there; so, not the first Are you to turn and ask thus. Sir, 'twas not Her husband's presence only, called that spot Of joy into the Duchess' cheek: perhaps Frà Pandolf chanced to say "Her mantle laps Over my Lady's wrist too much," or "Paint Must never hope to reproduce the faint Half-flush that dies along her throat": such stuff Was courtesy, she thought, and cause enough For calling up that spot of joy. She had A heart -- how shall I say? -- too soon made glad, Too easily impressed; she liked whate'er She looked on, and her looks went everywhere. Sir, 'twas all one! My favour at her breast, The dropping of the daylight in the West, The bough of cherries some officious fool Broke in the orchard for her, the white mule
She rode with round the terrace -- all and each Would draw from her alike the approving speech, Or blush, at least. She thanked men, -- good! but thanked Somehow -- I know not how -- as if she ranked My gift of a nine-hundred-years-old name With anybody's gift. Who'd stoop to blame This sort of trifling? Even had you skill In speech -- (which I have not) -- to make your will Quite clear to such an one, and say, "Just this Or that in you disgusts me; here you miss, Or there exceed the mark" -- and if she let Herself be lessoned so, nor plainly Her wits to yours, forsooth, and made excuse, --E'en then would be some stooping, and I choose Never to stoop. Oh sir, she smiled, no doubt, Whene'er I passed her; but who passed without Much the same smile? This grew; I gave commands; Then all smiles stopped together. There she stands As if alive. Will't please you rise? We'll meet The company below, then. I repeat, The Count your master's known munificence Is ample warrant that no just pretence Of mine for dowry will be disallowed; Though his fair daughter's self, as I avowed At starting, is my object. Nay, we'll go Together down, sir. Notice Neptune, though, Taming a sea-horse, thought a rarity, Which Claus of Innsbruck cast in bronze for me!
To play the game you may need some help with navigation!
Navigating There are various ways to move around the environment you have created and you’ll find the
one that suits you best during the day.
1. You can use the arrow keys (or WASD) to move forwards, backwards, left and right; and the
right mouse button to orientate up and down.
2. You can also press down on the middle scroll button and use your mouse to navigate around
the environment driving forward as you go.
3. Alternatively, you might like to use a combination of the two. The scroll button to zoom
around and the arrow keys and right button to refine your position. You can only move
backwards with the down arrow.
Try them all out now.
Example Game: Browning

9 Immersive Education ©
You’ll find that your students get the hang of this very quickly, especially if they
already play CD games. As a non- ‘digital native’ I can sometimes tie myself in
knots! It’s worth practising.
In addition there are some hidden tricks – features of an incomplete interface.
� To crouch click Ctrl (good when you get stuck in a corner)
� To run press Shift
� To jump click the Space Bar (you can alter the force of the jump in the MY
GAME menu under ‘Player Attributes’).
What sorts of things did you discover?
How might you use the software in your centre? Do you
want students to make games and/or to make games for
students to play?

10 Immersive Education ©
Walkthrough of Features in the Editor As you can see from the two dropdown menus, MissionMaker game
creation comprises a number of aspects.
My Game
The menu on the left allows a user to establish the overall context of
the game: requirements for success or failure based on such things as
point scoring and timings. It also allows the user to establish
something about the Player: health and vulnerability, hunger, strength
and how these can be influenced by the gameplay. In order to activate
many of these you need to establish your gaming environment, that is,
create a Location first. The other areas of MY GAME record all of
the features the game player adds to the game and consequently
allows them to be edited easily.
Take a look at the MY GAME elements now. In particular check out
Game Attributes and Player Attributes. You won’t be able to create
actions until you’ve started to build your game. However, you can
begin to think about what they might be.
New
The menu on the right provides access to the various building
blocks that make up the game. This walkthrough will take each
one in turn and take you through the functionality.
Once you are familiar with the way the software works, you
might choose to do this in a slightly different order with your
students. For instance, if the focus is literacy, and therefore the
narrative context, Media, and in particular Popups might be
the starting point. However, establishing the genre through the
choice of Location will also be essential.
It’s probably a good idea to browse the content and then do a
paper planning exercise before beginning game-making in
earnest. Some of the students in the pilot began by playing
board games and thinking about the criteria for defining a
game. How you begin will depend largely on the task you set.
Properties, Actions, Associations
Every item you add to your game
comprises:
• Properties – these are the physical characteristics of the item
• Actions – the things that you can cause to happen
• Associations – how this item links to others in the game.
You can alter Properties and Actions in order to create your gameplay.
Walkthrough of Features in the Editor
11 Immersive Education ©
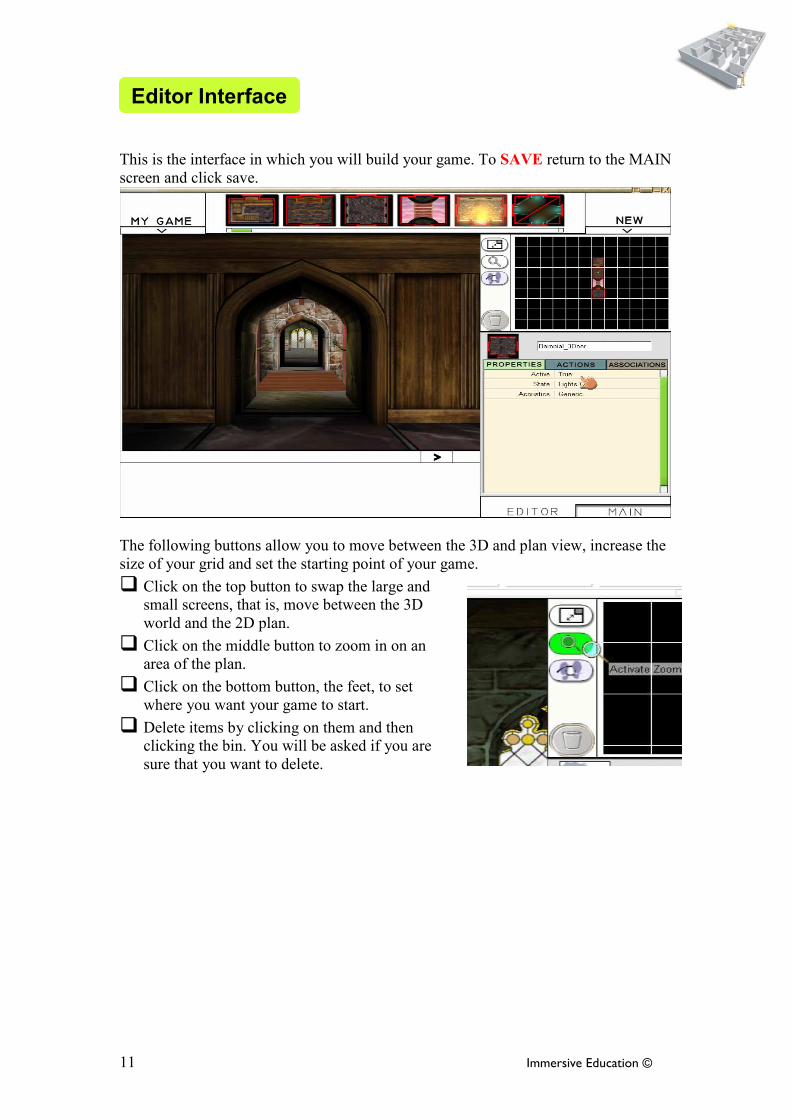
Editor Interface This is the interface in which you will build your game. To SAVE return to the MAIN
screen and click save.
The following buttons allow you to move between the 3D and plan view, increase the
size of your grid and set the starting point of your game.
� Click on the top button to swap the large and small screens, that is, move between the 3D
world and the 2D plan.
� Click on the middle button to zoom in on an
area of the plan.
� Click on the bottom button, the feet, to set
where you want your game to start.
� Delete items by clicking on them and then
clicking the bin. You will be asked if you are
sure that you want to delete.
Editor Interface

12 Immersive Education ©
NEW Menu For the purposes of the training we’ll work through all the features as they appear on
the menu. When you have separate sessions with students this might not be the most
useful or logical method depending on the outcomes you want to achieve.
Location
When you open MissionMaker you’ll see some tiles at the top of the screen.
If you can’t, click on NEW and then on the Location tab.
Use the green scrolling tool to work your way through the tiles. There are about 100
individual tiles making up scenes for about ten different types of Location.
These are grouped loosely, but some are a little haphazard in the prototype!
� Western
� Victorian � Egyptian � White Room – plain brightly lit room
� Holiday Resort � Industrial � Baronial � Cityscape � Mini-world (interior, exterior and drains)
� Space-ship/Science fiction � Stone Age
The sheer number seems daunting to start with, but it does allow for very creative
environment building and a wide range of genres/narrative types.
Each tile comprises a 3D Location and a number of Doors that enable it to be joined
to another tile of a similar or totally different style. Doors are indicated by the thicker
red lines on the perimeter of the tile.
These tiles form a virtual world when dragged onto the 2D grid below the selector
bar.
1. To locate a tile on the grid: choose the tile you want, click and drag to position.
2. To rotate a tile just click on it. Each click takes you through a 90° clockwise
rotation.
New Menu

13 Immersive Education ©
3. To add a second tile: select the tile and drag to a grid block adjacent to the first
tile. Click and rotate until the Doors match.
4. To delete a tile: click on the tile to select then click on the waste bin. You will be
asked if you are sure that you want to delete it.
When you have added sufficient tiles, you can build
your world in 3D. Try not to add too many to start –
four is good!
5. To create the 3D world, click on the pale blue
box at the top right of the screen and wait while
the computer compiles your world. This is
where the ‘wow’ factor enters the equation!
If you add unlinked tiles, when you build the world
you’ll find yourself in the first tile you added, that is
where the game starts. To access the others you’ll
need to use the teleport function (See later).
As with
every item
you add, the
Location can be described in terms of its
Properties and can have Actions attached to
it.
Properties
‘Active’ means that you can see the Location,
in other words it is active in the gameplaying
world. This actually doesn’t work in an
inactive state!
When you go into a Location the lights are by
default on, but you can change this and require
the player to do something in order to turn
them on.
You can also change the ‘Acoustics’ in order
to add to the atmosphere.
Actions
In this dialogue box you can add an audio
effect (See Media section later); turn lights on,
off or alternate between both using triggers.
See later hint box on triggers.
Associations In this dialogue box you will find a summary of every aspect of the game linked with
the particular Location. This helps the game editor/author keep track of the gameplay.
14 Immersive Education ©
Props
These can be used to furnish your world and ensure that the look of your game is
different to everyone else’s. They don’t really do much except add atmosphere,
although they can change state. There will be more about this later.
1. To add a Prop, click on the Prop you want, left click and drag it to your world. If
you get a warning (red circle with a diagonal line), the prop is too big for the area.
Just back up using the down arrow and try again.
2. To delete a Prop, click on it and then on the bin. You’ll be asked if you’re sure
you want to delete. This is just like you saw in Locations.
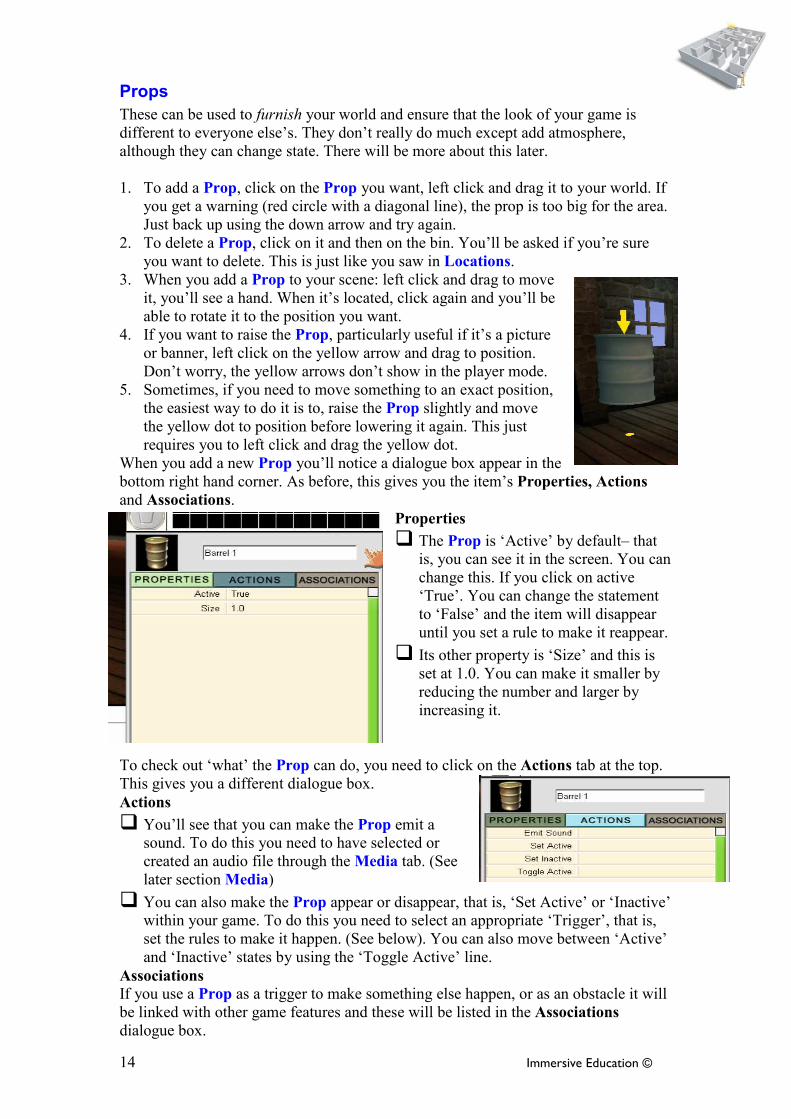
3. When you add a Prop to your scene: left click and drag to move
it, you’ll see a hand. When it’s located, click again and you’ll be
able to rotate it to the position you want.
4. If you want to raise the Prop, particularly useful if it’s a picture
or banner, left click on the yellow arrow and drag to position.
Don’t worry, the yellow arrows don’t show in the player mode.
5. Sometimes, if you need to move something to an exact position,
the easiest way to do it is to, raise the Prop slightly and move
the yellow dot to position before lowering it again. This just
requires you to left click and drag the yellow dot.
When you add a new Prop you’ll notice a dialogue box appear in the
bottom right hand corner. As before, this gives you the item’s Properties, Actions
and Associations.
Properties
� The Prop is ‘Active’ by default– that is, you can see it in the screen. You can
change this. If you click on active
‘True’. You can change the statement
to ‘False’ and the item will disappear
until you set a rule to make it reappear.
� Its other property is ‘Size’ and this is set at 1.0. You can make it smaller by
reducing the number and larger by
increasing it.
To check out ‘what’ the Prop can do, you need to click on the Actions tab at the top.
This gives you a different dialogue box.
Actions
� You’ll see that you can make the Prop emit a
sound. To do this you need to have selected or
created an audio file through the Media tab. (See
later section Media)
� You can also make the Prop appear or disappear, that is, ‘Set Active’ or ‘Inactive’
within your game. To do this you need to select an appropriate ‘Trigger’, that is,
set the rules to make it happen. (See below). You can also move between ‘Active’
and ‘Inactive’ states by using the ‘Toggle Active’ line.
Associations
If you use a Prop as a trigger to make something else happen, or as an obstacle it will
be linked with other game features and these will be listed in the Associations
dialogue box.

15 Immersive Education ©
At this point you might wonder why we’ve included ‘Active/Inactive’ and how you
might use it. So, as an example, within the game you might want to use the wand or
some other ‘Trigger’ to remove an obstacle. That is, make a Prop that is acting as an
obstacle into a Prop that is ‘Inactive’ and therefore removed from the world.
Triggers Before we go any further we need to explore ‘Triggers’ or the things that make other things
happen. In order to make a Prop active or inactive, a switch on or off, we need to insert
triggers.
When you click on ‘Active’ or ‘State’ in the Props and Active Props the ‘Trigger Type’
dialogue box appears. It’s worth playing with each of these to get an understanding of what
they can do.
As you can see there is a range of triggers:
� The Spatial Trigger means that you need to
add a Trigger Volume to something so
that when an object or person enters that
space you ‘trigger’ a pre-specified action
� Object Clicked – here the action occurs when a selected object is clicked by the
player. This object can be anything within
the game playing space.
� A State Trigger operates when an object within the game is in a certain ‘state’ active
or inactive, on or off and so forth.
� The Global Trigger can be one of a number of things – points exceeding a certain
number, the health of the player, based on time or the start of the game.
� As you would expect the Speech Trigger is prompted by something an in-game
Character or the Player says.
� Shot by Player, is also pretty obvious, this can be an object or an in-game Character.
� To select one of the triggers click on the orange arrow at the end of the
line.
You’ll then find that the rule editor appears. It might be helpful to think
of this as the statement:
If this happens then that will occur.
This is reinforced by the images.
Look at this example. We want the electrodes to turn on. In this instance the trigger ‘shot by
player has been selected’. Now all the editor has to do is decide what needs to be shot by the
player – this is the ‘activator’.
The statement will then read:
If [selected object] is shot by player electrodes change state to on.
If you are happy with this, create the rule by clicking on the blue right facing arrow >.
16 Immersive Education ©
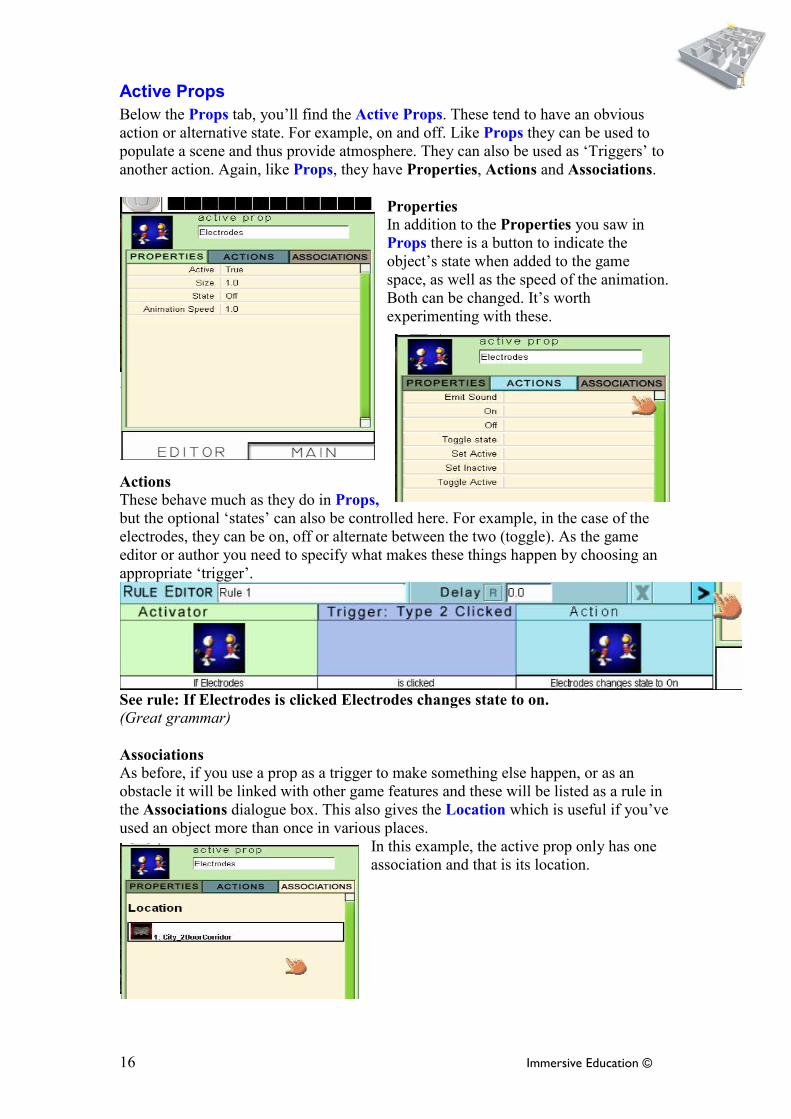
Active Props
Below the Props tab, you’ll find the Active Props. These tend to have an obvious
action or alternative state. For example, on and off. Like Props they can be used to
populate a scene and thus provide atmosphere. They can also be used as ‘Triggers’ to
another action. Again, like Props, they have Properties, Actions and Associations.
Properties
In addition to the Properties you saw in
Props there is a button to indicate the
object’s state when added to the game
space, as well as the speed of the animation.
Both can be changed. It’s worth
experimenting with these.
Actions
These behave much as they do in Props,
but the optional ‘states’ can also be controlled here. For example, in the case of the
electrodes, they can be on, off or alternate between the two (toggle). As the game
editor or author you need to specify what makes these things happen by choosing an
appropriate ‘trigger’.
See rule: If Electrodes is clicked Electrodes changes state to on.
(Great grammar)
Associations
As before, if you use a prop as a trigger to make something else happen, or as an
obstacle it will be linked with other game features and these will be listed as a rule in
the Associations dialogue box. This also gives the Location which is useful if you’ve
used an object more than once in various places.
In this example, the active prop only has one
association and that is its location.

17 Immersive Education ©
Special Effect
To add slime, smoke, fire, a fountain ... or a whole rang of other goodies; you need to
click on the Special Effect tab. To select your Special Effect use the scroll bar and
click on the effect you wish to add.
As with all the items, so far, left click on your selected effect and drag it to position.
The dialogue box for Properties, Actions and Associations will appear at the bottom
right.
Properties
This time you’ll see the ‘Active’
button as before and ‘Description’,
which you can change. This allows
some lateral thinking and wider use
of the Special Effect. What is
green slime to one person is soapy
bubbles to another!
Another additional feature is the
‘Attached To’ label. For instance,
you might want to attach the electricity to the electrodes, the fireball to the camp fire
and so forth. Click on the downward facing arrow and you’ll be able to select the item
to which you want to attach the effect. Just highlight and click on it.
Actions No surprises here; they work as they do in Props – Emit Sound, Active, Inactive and
Toggle.
Associations As before, these link objects and provide details of the Location.
Where and how do you think you might use
Special Effect function?

18 Immersive Education ©
Door
This is a typical feature of role-playing and
adventure games. Doors link two
environments and can be used to challenge the
player who needs to work out how to get
through.
You’re probably getting the idea about how to
do things by now. So have a look at Doors and
finish the instructions in the spaces below.
When showing students this feature it can be
quite useful to get them to choose a four door
room then demonstrate four different ways to open four Doors! You could try now.
Using a Door To add a Door:
Properties:
Actions (Tick as you use each trigger type and explain what you did):
� Spatial Trigger
� Object Clicked
� State Trigger
� Global Trigger
� Speech Trigger
� Shot by Player
Associations:

19 Immersive Education ©
Pickup
Pickups are a little different, slightly more complex, and they can contribute to the
gameplay in a different way. As you can see the dialogue box is bigger and you need
to use the green scroll bar at the side to see it all.
Some of the information required is much the same as
with Props, Active Props, Special Effects and
Doors. But Pickups can add more to the gameplay.
Properties
� Active/Inactive is as before. � You can add a description to
provide clues for the player.
What you type here appears
when the game player
investigates the Pickup in
their inventory.
� Size – you can rescale the object by changing the
number.
� State – ‘In World’ means it’s
ready to be added to the
Player’s inventory. ‘Owned
by Player’ means it is in the
inventory at the game start.
� The weight is significant because you can set a maximum weight for the
Player’s inventory. To do this you go
into the MY GAME menu, Player
Attributes and Properties. Change
the Inventory Weight Limit.

20 Immersive Education ©
� Vulnerability refers to its strength or hardiness in the world, oddly, the higher the vulnerability the harder it is to destroy with the gun or wand. (This will need
changing as the terminology isn’t right and will prove confusing. Until this is
fixed it may be helpful to think of the number as layers of protection.)
� Value – this has a history: at one point we were considering ‘trading’ as a concept. It hasn’t been implemented so ‘value’ in the prototype has no function.
� Health and Nutritional values refer to the number of points a player adds to these
‘economies’ when the object is added to the inventory. (In the MY GAME menu,
under Game Attributes you can set the number of points the Player needs to
win/die etc.) The three economies in the game comprise: health, strength and
nutrition. In the example below you can also see the inventory, timer and score
board. Time bonuses and points would be registered here.
� The ‘Uses’ line in the dialogue box prevents a player from putting an item in the
inventory, receiving all the points, taking it out, putting it back and getting the
points again. It also means you can use points more effectively to set Maths
challenges.
� On Pickup the player is allowed to left click and drag the item to their inventory,
for later use or to use the description as a clue. Alternatively once it has been
picked up it can be made to disappear. This is good if its only function is to add
points or some other value at this point in the game, but has no later use.
� Any Pickup can be used to make the map and/or compass appear as aids to the
Player.
Actions
These work in a way that is very
similar to all the other objects you
have added to your game, but with
one additional feature. A Pickup
can be teleported to another
Location. This can be a room
within the game, or to the player.
This means that if the player fails
to heed warnings they can lose
things from their inventory.
Alternatively, if they do something
good or meet a friendly player
objects can be drawn to them.

21 Immersive Education ©
Character
Adding a Character is just like adding an object.
• Click on NEW and then on Character.
• Select the Character you want by clicking and dragging him or her into the space.
This is where the fun starts!
Properties
You’re probably familiar with many of the Properties by this point, and within the
game the Character functions in many ways like the objects you’ve already explored.
For instance the default is, ‘Active’ and the size 1.0. Both of these can be changed, so
you can make Characters appear as if from nowhere and, by changing the size, you
can create tiny, pixie helpers or giant monsters.
• In order to suggest something
about your Character, and
introduce greater personalisation,
you can alter both the appearance
(head, torso, legs) and walk style.
(Remember the heads, bodies,
legs books you had as a child?).
• Vulnerability indicates how many
times you may need to shoot
them or wave your wand (!) and
so make them disappear. The
higher the number the harder it
will be. It doesn’t quite follow
with the definition of
vulnerability – so it might help to
think of it as the number of
bullet-proof vests the Character is wearing!
• Current activity can’t be changed in the Properties dialogue box, but it does
record the decisions made in the Actions area. Consequently it is ‘greyed out’.

22 Immersive Education ©
Actions
This is another quite involved
dialogue box involving the use of
the scroll bar to see all of the
options. It really is worth playing
with these, but the following may
help you start the process. You’ll
immediately recognise some of
the Actions associated with
earlier features in the game.
• If you have created an audio file,
you can make the Character ‘Emit
Sound’. Click on Emit sound, click
on the downward facing arrow and
choose the Media file you want and
then select the ‘Trigger’ by clicking
on the right facing arrow.
• Similarly with ‘Say’ you need to have created the Media file first. See the Speech
hints and tips box below.
• With Watch you can control what the Character sees. Clicking on this line
provides you with a menu of the things that the Character could potentially
watch. Click on the downward facing arrow. Having selected, click on the right
facing arrow and set the ‘Trigger’. This, along with the ‘Stop Watching’ means
that you can change the focus at any time in the game.
Shoot ’em Ups
The are four ‘shooting’ lines :
• Draw gun
• Replace gun
• Seek and destroy
• Turn and shoot
These are useful if the game genre is a ‘Shoot ’em Up’. Each option operates in the
same way as anything else that is managed by a ‘Trigger’. That is select line; select
trigger and establish the rule.
Where there is a choice of target, you’ll be provided with a drop down menu.
For the Player to shoot, the game author needs to have provided the appropriate
Pickups. These are a wand or gun and ammunition (bullets or flowers!).
To shoot, the Player selects the gun or wand and clicks on ‘Use’. This activates the
cross hair mechanism for shooting.

23 Immersive Education ©
1. Go To and Follow operate in a similar way to ‘shoot’. Select where you want
them to go or who to follow from the drop down menu and then the ‘Trigger’.
‘Stop’ just requires a trigger, but you’ll need to remove this when you want the
Character to move.
2. By using ‘Triggers’ to set ‘Active’, ‘Inactive’ or to alternate, toggle, between the
two, you can make the Character seem to appear and disappear – great in a magic
game.
Creating Speech In order to create a meaningful conversation, you need to plan your Speech carefully.
What you produce could be envisaged as a branching dialogue and might be
represented as a tree diagram. You may find it easier to plan this on paper first.
For example: (C = Character and P= Player) C: Hello, can I help you?
P: No thanks, I’m just looking around. P: Yes, please, I need to find my way out of here.
C: If you need me I’ll be hanging around. See you. C: Why should I help you?
P: Because I have a
gun
P: Because it would be
a kind thing to do and I can pay you.
C: Good call - okay C: How much?
The Player’s potential comments can be made to appear in the ‘Player List’ and the
Character’s reactions can be made to depend on the choice the Player makes.
Having got a rough, or even
detailed, idea of the branching
dialogue you want to create
select NEW and Media from
the drop down menu. Select
Speech. You’ll see this
dialogue box. (Note that it has
Properties, Actions and
Associations, just as before)
Properties
It’s worth highlighting the filename and giving your clip a meaningful title. This will
help you organise the order of the conversation later as well as allocate it to the
Character or the Player list.
The next important line is the ‘Speech Text’. Write
your conversation in here.
You can now use your computer’s default Text to
Speech (TTS) engine or record your own voice.
If you want to add your own recording, change
‘TTS Speech’ to ‘False’. If you’re using TTS select
your ‘Voicename’ by clicking in the box.
To start recording your own voice press the red, circular button. To stop hit the
square. Preview by clicking on the play arrow. It’s worth doing this to check that you
have recorded!
Now decide whether the Speech should be spoken by a Character or in the player
list. If it should be spoken by the player at some point, change ’In Player List’ to
True.
24 Immersive Education ©
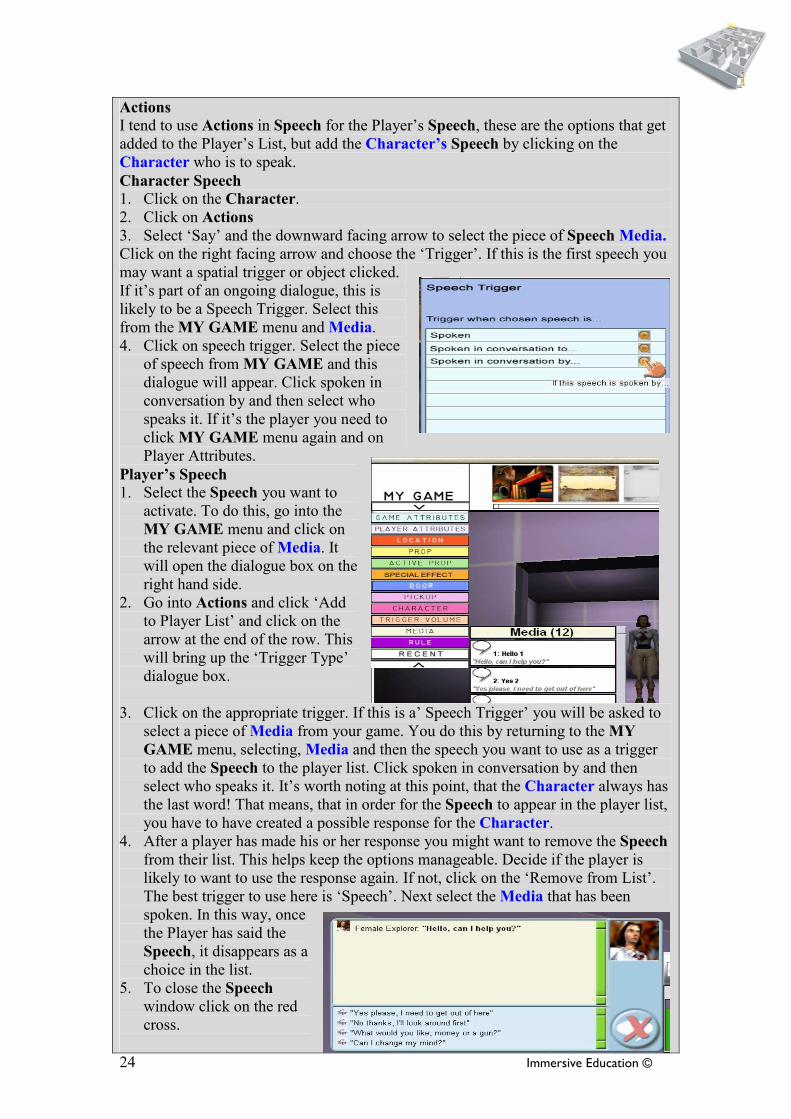
Actions
I tend to use Actions in Speech for the Player’s Speech, these are the options that get
added to the Player’s List, but add the Character’s Speech by clicking on the
Character who is to speak.
Character Speech
1. Click on the Character.
2. Click on Actions
3. Select ‘Say’ and the downward facing arrow to select the piece of Speech Media.
Click on the right facing arrow and choose the ‘Trigger’. If this is the first speech you
may want a spatial trigger or object clicked.
If it’s part of an ongoing dialogue, this is
likely to be a Speech Trigger. Select this
from the MY GAME menu and Media.
4. Click on speech trigger. Select the piece
of speech from MY GAME and this
dialogue will appear. Click spoken in
conversation by and then select who
speaks it. If it’s the player you need to
click MY GAME menu again and on
Player Attributes.
Player’s Speech
1. Select the Speech you want to
activate. To do this, go into the
MY GAME menu and click on
the relevant piece of Media. It
will open the dialogue box on the
right hand side.
2. Go into Actions and click ‘Add
to Player List’ and click on the
arrow at the end of the row. This
will bring up the ‘Trigger Type’
dialogue box.
3. Click on the appropriate trigger. If this is a’ Speech Trigger’ you will be asked to
select a piece of Media from your game. You do this by returning to the MY
GAME menu, selecting, Media and then the speech you want to use as a trigger
to add the Speech to the player list. Click spoken in conversation by and then
select who speaks it. It’s worth noting at this point, that the Character always has
the last word! That means, that in order for the Speech to appear in the player list,
you have to have created a possible response for the Character.
4. After a player has made his or her response you might want to remove the Speech
from their list. This helps keep the options manageable. Decide if the player is
likely to want to use the response again. If not, click on the ‘Remove from List’.
The best trigger to use here is ‘Speech’. Next select the Media that has been
spoken. In this way, once
the Player has said the
Speech, it disappears as a
choice in the list.
5. To close the Speech
window click on the red
cross.
25 Immersive Education ©
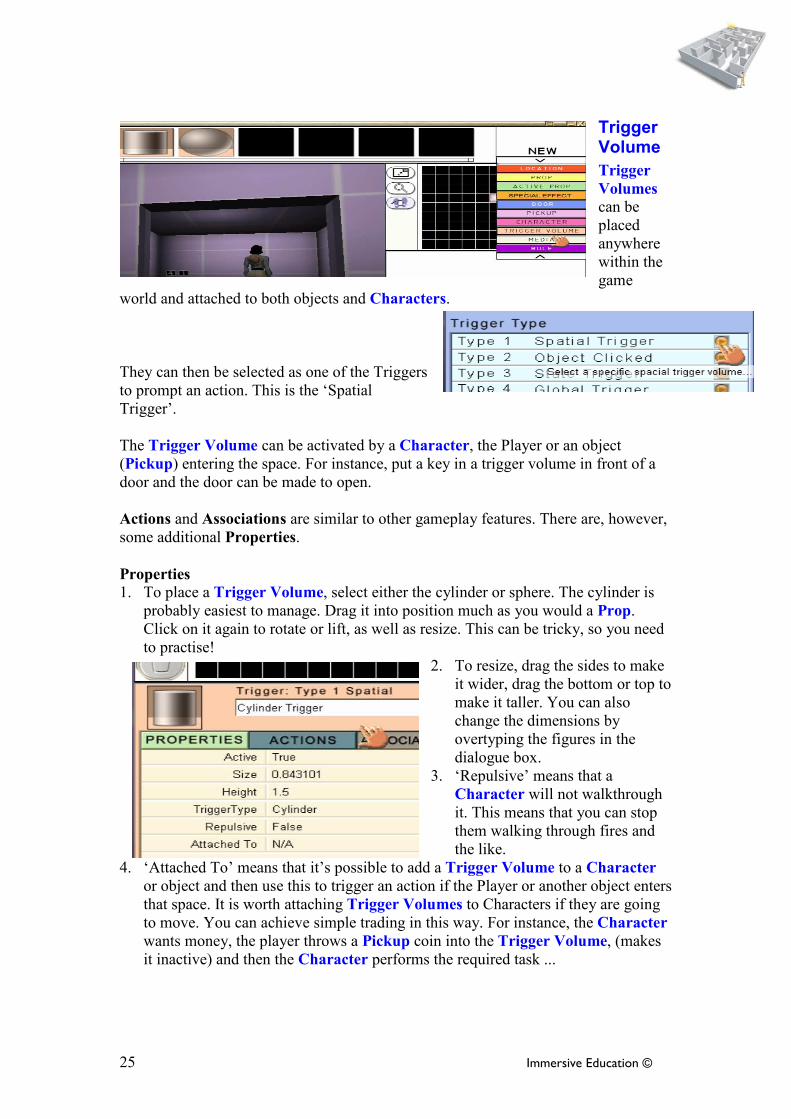
Trigger Volume
Trigger
Volumes can be
placed
anywhere
within the
game
world and attached to both objects and Characters.
They can then be selected as one of the Triggers
to prompt an action. This is the ‘Spatial
Trigger’.
The Trigger Volume can be activated by a Character, the Player or an object
(Pickup) entering the space. For instance, put a key in a trigger volume in front of a
door and the door can be made to open.
Actions and Associations are similar to other gameplay features. There are, however,
some additional Properties.
Properties
1. To place a Trigger Volume, select either the cylinder or sphere. The cylinder is
probably easiest to manage. Drag it into position much as you would a Prop.
Click on it again to rotate or lift, as well as resize. This can be tricky, so you need
to practise!
2. To resize, drag the sides to make
it wider, drag the bottom or top to
make it taller. You can also
change the dimensions by
overtyping the figures in the
dialogue box.
3. ‘Repulsive’ means that a
Character will not walkthrough
it. This means that you can stop
them walking through fires and
the like.
4. ‘Attached To’ means that it’s possible to add a Trigger Volume to a Character
or object and then use this to trigger an action if the Player or another object enters
that space. It is worth attaching Trigger Volumes to Characters if they are going
to move. You can achieve simple trading in this way. For instance, the Character
wants money, the player throws a Pickup coin into the Trigger Volume, (makes
it inactive) and then the Character performs the required task ...

26 Immersive Education ©
Media
As you can see from the image,
there is a range of different Media
types.
Audio
By clicking on this tab you are
provided with a selection of sound
effects. To preview them just click
on the appropriate image in the
selector bar. Scroll along until you
find a suitable noise.
Don’t worry if you can’t, you’re able to add
your own.
To do this click on the ‘Filename’ line and
using the down facing arrow navigate to where
your sound is stored on your computer or
network.
This needs to be in MP3 format. (There are free
tools to convert files to MP3, for example,
Audio Video to MP3 Maker which can be found with a Google search. Others include
Quintessential and Audacity).
Once you’ve selected your sound effect, give the audio a more memorable name. Next
you can choose to alter the Properties and create Actions.
Properties As always, these are pretty straightforward: just filename and then the default setting
(which is ‘stopped’).
Actions Here you can choose the Trigger to make the sound effect play much as you would
anything else.

27 Immersive Education ©
Popup
This is probably one of the first things you’ll
want to create once you’ve grasped the
functionality and have started making a game.
Having planned, and built your ‘world’ you’ll
probably want to create a Popup that plays at
the start of the game (Global Trigger) to
establish the context and set the gameplay
objectives. It can also be used to add images in
jpeg format.
Properties
1. It’s worth overtyping the name of the Popup so it’s easy to find in your list of
Media in the MY GAME menu.
2. Next select the Popup you want from the selector bar at the top. When you’ve
selected this the name will appear in the ‘Filename’ line.
3. If you want to add your own jpeg picture navigate to where it is saved through the
‘Filename’ line. Just as you did with the audio.
4. The default position is ‘Stopped’. (Set when you want it to play in the Actions
dialogue box.)
5. Choose whether or not you want to play as full screen or as a small Popup.
6. Type the text you want to appear in the ‘Overlay Text’ section.
7. Finally you need to decide whether you want the Popup to disappear if the player
clicks on it and how long the text should stay on the screen. The default is 4
seconds.
Actions
In order for the Popup to ‘Play On’ something,
the game author needs to have added an editable
Active Prop to the game space. There are a few
problems with displaying text on editable props in
the Beta version.
Editable props include monitors, TVs, banners
and so forth. If one has been added, the ‘Play On’
line includes a drop down menu (down facing
arrow) from which the author can select the object
onto which the Popup will play.
Having selected the screen/object the author then selects the trigger and creates the
rule. All the other possible Actions operate as in previous features.
Speech
This has already been covered under Character.

28 Immersive Education ©
Video
You can add any Video to your game
as full screen or to an editable Active
Prop.
Properties There are some Video loops provided
and, although there is no image in the
selector bar the tooltip tells you what
this is. Click on one of these and the
name will appear under ‘Filename’.
(depending on your machine’s codec
settings you may have problems with
some of these).
Alternatively, if you have your own
Video, you can click on the downward
pointing arrow and navigate to where
it is saved on your network.
The default is to play full screen. If
you want it to play on an Active Prop,
change the ‘Display As’ line.
You can add ‘Overlay Text’, much as in a Popup, but only in full screen mode. You
can also change the duration when in full screen mode. Type in the number of seconds
you want the Video to last. This allows you to shorten a performance. If you want to
play the whole thing leave this as 0.
The final line enables looping. If you don’t want this to happen, change ‘True’ to
‘False’.
Actions These are much as with other features with the author/editor selecting Triggers to
create rules. ‘Play On’ allows you to select the Active Prop on which you wish the
Video to be displayed.

29 Immersive Education ©
MY GAME Menu The two areas of this you might want to alter, probably near the start of creating your
game, are: Game Attributes and Player Attributes. In this area you can set the goals
of the game, criteria for failure and success and so forth.
The other sections list the features you have added to your game. If you want to
change a Rule access it from this menu.
Game Attributes
This is where settings can be applied to the whole game.
Properties
You can change the name of your game in the box at the top, by overtyping ‘My
Game’.
Initial Timer Setting and Control
Scheme don’t currently do anything.
Compass and Map From Start – just
decide whether you want the player to
have access immediately. By default
they’re not available. Change to ‘True’ if
you want them to appear in the player
space.
Initial Countdown, this is set at 5 minutes
(300 seconds). Nothing happens if you
exceed this time. To do this you need to
establish a rule.
Countdown rate is in seconds, but can be
speeded up – not sure why you would
want to do this because it can’t be
triggered as it’s not an action – you may,
however, have ideas!
Map All or Visited is a choice you can make at the start. Will the player have the
map of the whole world (when the map is made available) or will they only see the
Locations they have visited and so build up their world picture slowly.
Actions
As with previous Actions these need to be
triggered by something. So, having selected
one you are asked to select a trigger and
establish a rule. Most a re self-explanatory, but
for those that aren’t:
Quit Game takes you to the Editor and out of
Player mode.
Load Game allows you to link different
games – almost a teleporting feature. The only
limitation is that the player doesn’t take
anything in their inventory with them.
My Game Menu

30 Immersive Education ©
Player Attributes
Properties
This is where the game
designer establishes the
Player’s health, strength and
nutrition levels at the start of
the game as well as the speed
with which they deteriorate.
The editor can also establish
how high the player can jump,
as well as the size (number)
and weight of the items that can
be added to the inventory.
If you want to give the Player a
name overtype the ‘Player’ box
at the top.
Actions Here the Editor can enable these Player
Attributes to change in response to
selected triggers and rules.
Rules
To alter a Rule click on the MY GAME
menu and Rule. You will see a list of all the
Rules you have made. Select the one you
want to alter and it will appear at the bottom
of the screen. Amend as you want. If you
wish to delete a Rule click on the bin.

31 Immersive Education ©
Brief Walkthrough of Player Features In player mode various
things happen at the bottom
of the screen.
You’ll find the:
• Inventory
• Economies
• Speech.
• Camera/Player’s Log
Inventory
Pickups can be left clicked and dragged to the inventory.
• To explore them more fully the Player should click on the magnifying glass.
• To eject a Pickup, Players use the throw button.
• To use an item such as the gun or wand they click on the ‘use’ button.
The green capacity bar indicates how full
the inventory is, or conversely how much
more room there is.
The arrows at either end allow the Player to scroll through an inventory that
holds more than five objects.
When you click on Use with an item such as
a gun or wand, you’ll see the gun barrel,
cross-hairs and a number representing the
amount of ammunition you have left.
To shoot left click.
To return to the inventory, the Player must
right click.
Other Pickups can be used to add to health, strength and nutrition economies, as well
as to points.
Brief Walkthrough of Player Features

32 Immersive Education ©
Economies
These comprise:
• a timer at the top left; the default will be
to countdown from 5.00 minutes
• the score top right
• health – bottom left
• strength bottom centre
• nutrition bottom right
Health and strength reduce whereas
nutrition increases.
To add to any of these scores the editor/author needs to establish the rules.
Speech
When a Character
speaks this box
appears.
The Player can
select their response
from the box at the
bottom.
Click on the red cross to close this window.
Click on the speech bubble at the edge of the inventory to open it.
Camera/ Player’s Log
Press F6 to activate the Player’s log.
Aim the ‘sight’ at a selected image and press
the button (top right) to take a snapshot.
Click on the notes button to add a
commentary.
Players can scroll through images and notes by
using the curved arrows. They can delete one
or all of their pages of notes and pictures by
clicking on the bin.
At the end of the game they’ll be asked to save their images.
Close by clicking on the cross – bottom right.
33 Immersive Education ©
Glossary
Active/Inactive This refers to whether the object is in use, and visible, in the
gameplay space. Inactive means that the object is no longer there and can be made to
‘disappear’ by magic or violence!
Attach to Trigger Volumes can be attached to objects or Characters, this is useful
when they wander about!
Click dismiss This allows the Player to make Media disappear once they’ve got the
information they need.
Compass The Game designer can include a compass so that Players can orientate
themselves within the gameplay space.
Duration Length of time in seconds.
Emissive This refers to something like a screen emitting its own light., thus it would
glow in a darkened room.
Map The Game designer can include a map so that Players can see where they are
and/or where they have been within the gameplay space.
Repulsive Trigger Volumes can be used to prevent Characters going into certain
areas, thus avoiding Special Effects or creating safe spaces for the Player.
State All of the objects in the game have at least two states, active and inactive. many
have more: on/off; up/down and so forth.
Toggle This means switching between states depending on the action chosen.
Vulnerability This is currently a little counter intuitive: it does refer to the ease with
which something or someone is destroyed but the higher the ‘vulnerability’ the harder
it is to destroy them. View the number as layers of protection.
Glossary

34 Immersive Education ©
Checklist!