mind trekkers squishy circuit board lesson plan 2012/squishy circuit board... · mind trekkers...
TRANSCRIPT
MIND TREKKERS
Squishy Circuit Board Lesson Plan Amount of time Demo takes: 3-10 min. (note: making dough takes 1hr)# times per hour: 15 (materials will be used until broken/worn out, extras will be in kit)Container: Medium bin Lesson plan by Dr.A.M. Thomashttp://courseweb.stthomas.edu/apthomas/SquishyCircuits/howTo.htm Materials:1. Batteries in a Battery Pack (use 4 AA batteries or a single 9 Volt.) (1-9volt per hr)2. LEDs (Light Emitting Diodes) (2/hr)
We like using the 10mm diffused-lens ones from here, but have successfully used a wide range of LEDs. Note that the salt in the dough will cause the LEDs to rust over time. Cleaning them off with a damp towel after use may help.
3. Conductive and insulating dough (1 bag each/day)4. Motors, microprocessors (we use an Arduino for some of our projects) 5. Battery cleaner - please regularly clean off any metal that comes in contact with the dough. This will prolong the life of the equipment. (1)*Note- Instructions for making dough are in separate file “Squishy Circuits Dough Instructions” Set up instructions: 1. Pre-make salt and sugar dough2. Set out LED’s, battery pack, dough and motors SAFETY! Safe demo. Lesson’s big idea bullet points
● You can use anything that conducts electricity to make an electrical circuit: copper, pencil lead, fruit, even play dough! Adding salt to the dough helps electricity move through the material. With enough power, the electrical current can light LEDs and a motor.
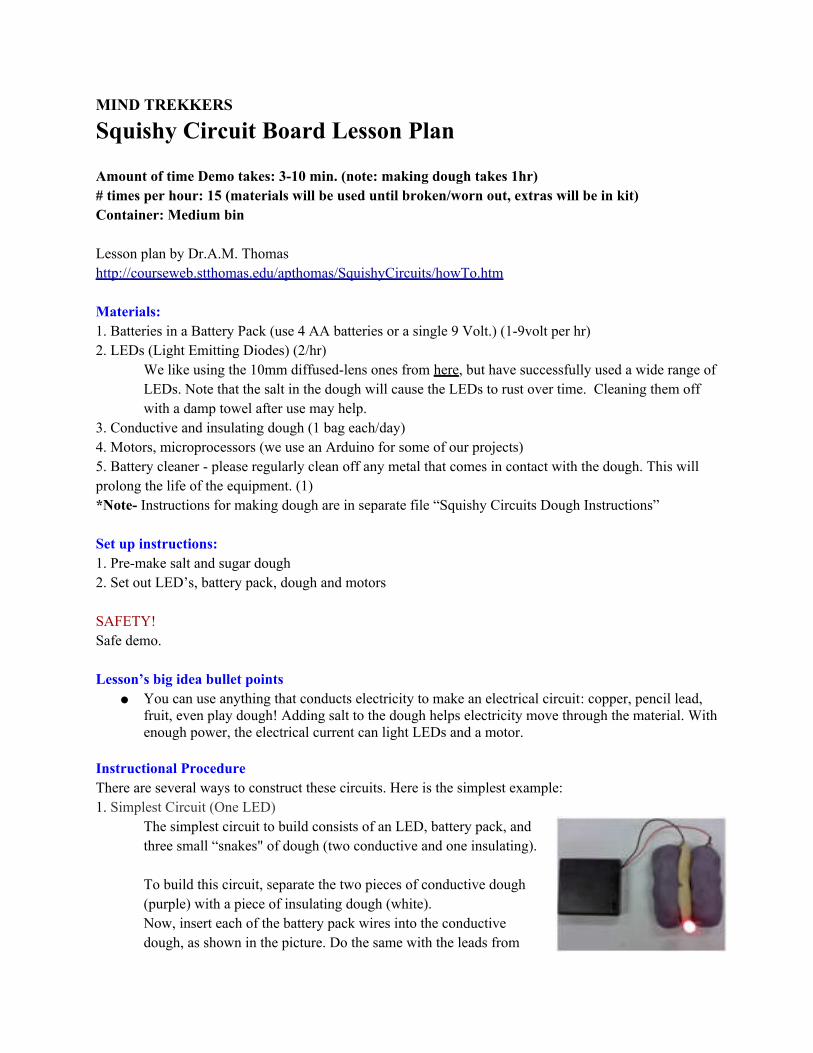
Instructional Procedure There are several ways to construct these circuits. Here is the simplest example:1. Simplest Circuit (One LED)
The simplest circuit to build consists of an LED, battery pack, and three small “snakes" of dough (two conductive and one insulating). To build this circuit, separate the two pieces of conductive dough (purple) with a piece of insulating dough (white). Now, insert each of the battery pack wires into the conductive dough, as shown in the picture. Do the same with the leads from

the LED but be sure that the short end of the LED is inserted into the same piece of conductive dough that holds the black, or negative, battery pack wire. It is good practice to turn the battery pack off while you are connecting the components and to turn it on after you have finished setting up the circuit.
* To prolong the life of the equipment, please do not put the motors or lights directly in contact with the wires to the batteries. This will cause them to break they are not meant to handle the amount of voltage that is coming from the battery. Clean UpClean up between demonstrations if needed. When completely finished gather all materials listed for this demonstration and make sure everything is accounted for. If something was used up, broken or damaged, let someone know so it can get replaced or fixed. Wipe down all metal parts that come in contact with the dough with a rag and battery cleaner. References :Website instructionshttp://courseweb.stthomas.edu/apthomas/SquishyCircuits/buildingCircuits.htmLink to TED talkhttp://www.wired.com/geekdad/2011/04/squishy-circuits-using-conductive-dough-to-teach-electronics-to-kids/Kid friendly directions, and further ideas of how to make dough creatures etc.http://www.pbs.org/teachers/includes/content/scigirls/activities/tech/doughcreatures.pdf National Standards:K-4 Content Standard B: Physical Science, Light, heat, electricity and magnetism5-8 Content Standard B: Physical Science, Transfer of energy, Motions and forces9-12 Content Standard B: Physical Science, Motions and forces, Interactions of energy and matter