mid-century modern walnut end table | how to build
TRANSCRIPT

instructables
Mid-Century Modern Walnut End Table | How to Build - Woodworking
by craftedworkshop
In this Instructable video project, I show you how to build a pair of mid-century modern end tables using solidWalnut and Walnut veneered plywood. I used a technique called "kerfing" to allow me to bend the corners of theend table's carcass into the smooth radius you see in the final piece. Let's get started!
Don't miss the build video above for a lot more detail!
https://www.youtube.com/watch?v=nzHzS4tesK4
Mid-Century Modern Walnut End Table | How to Build - Woodworking: Page 1

Step 1: Gather Tools and Materials
This is definitely a more tool-intensive build, as you'll ideally want a table saw, router, and drill at the very least. Ifyou don't have a table saw, you can make a circular saw work in a pinch.
Materials Used On Mid-Century Modern Walnut End Table:
Some of the links used below are affiliate links, for which I get a small percentage of the sales. Thanks for yoursupport!
Waterlox Tung Oil Wood Finish : http://bit.ly/waterloxcraftedPurebond Plywood : http://bit.ly/purebondHairpin Table Legs : http://amzn.to/2q0V2rm16-Inch Bottom Mount Drawer Slide : http://amzn.to/2q12a7cBrass Drawer Pulls : http://amzn.to/2phspHv
Tools Used On Mid-Century Modern Walnut End Table:
SawStop PCS 1.75-HP Professional Cabinet Saw : http://amzn.to/2aqqRynDEWALT FLEXVOLT 12" Compound Sliding Miter Saw : http://amzn.to/2ah20gSPowermatic PJ-882HH 8-Inch Jointer : http://amzn.to/2phphdgPowermatic 15HH 15-Inch Planer : http://amzn.to/2phKqE9Festool Domino XL : http://bit.ly/festooldealersMIRKA DEROS Sander : http://amzn.to/2oz4QINWhiteside Ultimate Flush Trim Bit : http://bit.ly/whitesideultimate
Mid-Century Modern Walnut End Table | How to Build - Woodworking: Page 2

Step 2: Rip Plywood to Size & Cut Kerfing Cuts
Before cutting the kerf cuts, rip your plywood to itsfinal width on the table saw. I built my table to a widthof 17", not including the face frame I will add later.
Next is the part of this project that really makes itshine: kerfing. To accomplish kerfing, you cut throughalmost the entire piece, leaving just enough for thewood to keep from breaking. In the case of the ¾"plywood I was using, I cut about 9/16" deep.
Cutting away this material allows the wood to flexwhere these kerf cuts are made. The amount and the
angle at which it bends depends on the spacing of thekerf cuts as well as the number of cuts made.
To end up with square corners, I made 8 kerf cuts percorner, with four corners total. I spaced my kerf cuts �"apart by moving the table saw fence over ¼" betweencuts. The blade kerf is �", which gets cut away,leaving an �" strip of wood. Watch the video at the topof the Instructable for a better explanation of thisprocess.
Step 3: Cut Plywood Strip & Add Dominos
I wanted my end table to be taller than the 2 foot by 4 foot piece of plywood would allow, so I cut an extra strip at6" wide and cut Domino mortises using my Domino XL. This strip could be attached with dowels or pocket screwsas well.
Mid-Century Modern Walnut End Table | How to Build - Woodworking: Page 3

Step 4: Glue Up End Table Carcass
The glue up on this piece was especially tricky. Iadded glue to each kerf cut and then started to bendthe piece to its final shape. I wiped on warm water onthe outside of the corners to help the wood keep fromcracking.
I just took my time, adding clamps to keep things inplace, and eventually got the whole thing clamped up.Make sure to check for square once the clamps areadded. If it's out of square, you can clamp from cornerto corner to bring it into square.
Step 5: Build Face Frame & Glue to Front of Carcass
To cover up the plywood edge and the kerf cuts, I made a quick face frame out of solid Walnut. I cut my pieces at1" wide to leave plenty of overhang to cover the radiused corners. I cut the 45 degree miters on my miter saw andglued the face frame onto the carcass after gluing up the face frame.
Mid-Century Modern Walnut End Table | How to Build - Woodworking: Page 4

Step 6: Trim Face Frame Flush With Flush Trim Bit
Using my massive flush trim bit, I trimmed the face frame flush with the carcass. If you are using a smaller bit, youwill need to make multiple passes to avoid tearout and burning.
Step 7: Mill & Shape Drawer Fronts
With the face frame done, I could trace the outline of the radiused corners onto a piece of wood to create thedrawer front. I used my oscillating belt sander to sand to the line I traced and kept checking the fit until I was happywith the way it looked.
Mid-Century Modern Walnut End Table | How to Build - Woodworking: Page 5
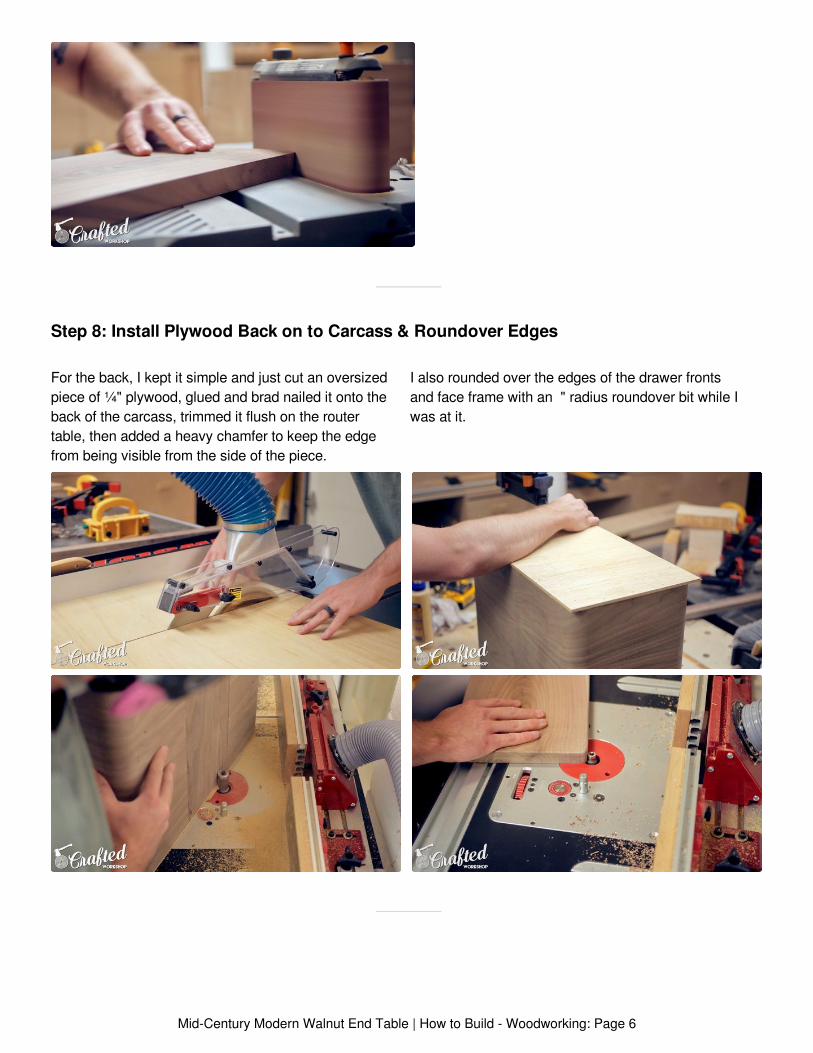
Step 8: Install Plywood Back on to Carcass & Roundover Edges
For the back, I kept it simple and just cut an oversizedpiece of ¼" plywood, glued and brad nailed it onto theback of the carcass, trimmed it flush on the routertable, then added a heavy chamfer to keep the edgefrom being visible from the side of the piece.
I also rounded over the edges of the drawer frontsand face frame with an �" radius roundover bit while Iwas at it.
Mid-Century Modern Walnut End Table | How to Build - Woodworking: Page 6

Step 9: Cut Drawer Parts & Assemble Drawer
I made the drawers from ¾" plywood for the sidesand ¼" plywood for the bottom. I ripped the drawersides to width on the table saw, cut them to length onthe miter saw, then cut the drawer bottom on the tablesaw.
To assemble, I added glue and tacked the sides
together with a brad nailer. I then tacked the bottomonto the sides, making sure the drawer was square.
Once everything was tacked in place, I went backand reinforced all of the corners and the bottom with 1¼" screws.
Step 10: Apply Finish to Mid-Century Modern Walnut End Table
Before applying finish, I sanded everything up to 180 grit and then removed any dust. For the finish, I usedWaterlox, one of my favorite finishes on Walnut. I applied three total coats with a foam brush.
Mid-Century Modern Walnut End Table | How to Build - Woodworking: Page 7

Step 11: Install the Drawers & Drawer Fronts
Next, I installed bottom mount drawer slides and then installed the drawer front. To get equal spacing around allsides of the drawer front, I used playing cards as shims, then temporarily attached the drawer front with doublesided tape before adding 1 ¼" screws from the inside of the drawer.
Step 12: Install Drawer Pulls & Hairpin Legs
I went with these brass drawer pulls and am reallyhappy with the way they look. I installed them using adrawer handle jig.
Finally, I installed the hairpin legs, which are definitely
the easiest legs you can use on a piece of furniture.These particular legs come already painted, which isnice. With that, the table is done!
Mid-Century Modern Walnut End Table | How to Build - Woodworking: Page 8

Step 13: Enjoy Your Beautiful New End Tables!
If you enjoyed this build, go ahead and getsubscribed to my email newsletter and my YouTubechannel so you never miss a build!
If you'd like to see more Mid-Century Modern
woodworking projects, check out the archives here.To see my other woodworking projects, check themout here. Thanks for reading, and until next time,happy building!
Mid-Century Modern Walnut End Table | How to Build - Woodworking: Page 9