microsoft word features
TRANSCRIPT

Microsoft Word
Definition:
Microsoft Word is word processing software that allows users to create and edit
text documents.
Word processing documents include:
Letters
Memorandums
Faxes
Mail Merges
Reports
One page flyers
History of Microsoft Word:
The first version of Microsoft Word was developed by Charles Simonyi and
Richard Brodie, former Xerox programmers hired by Bill Gates and Paul Allen
in 1981.
Microsoft Word, first released in 1983 as "Multi-Tool Word," is a word
processor available as a standalone product and as a component in the Microsoft
Office suite. The first version of Microsoft Word was based on the framework
of Bravo, the world's first word processor with a graphical user interface.
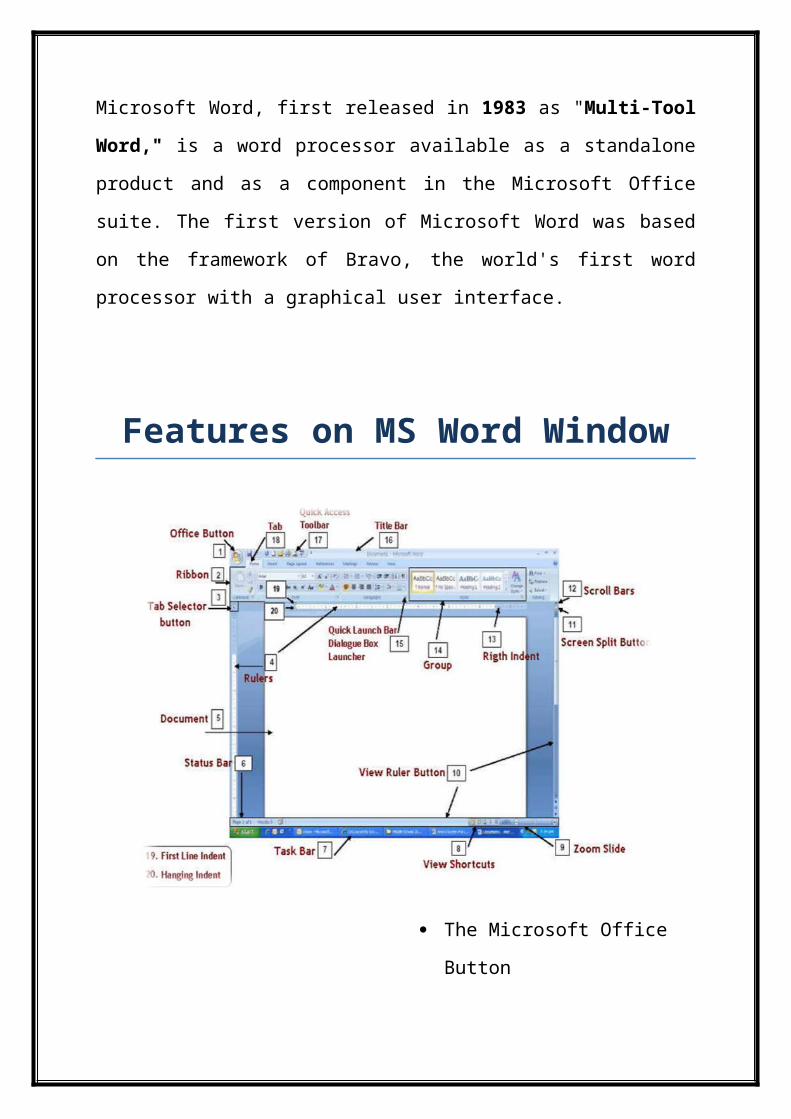
Features on MS Word Window
The Microsoft Office Button
The Quick Access Toolbar
The Title Bar
The Ribbon
The Ruler
The Text Area
The Vertical and Horizontal
Scroll Bars
The Status Bar
Understanding Document Views
Understanding Nonprinting
Characters
Create Sample Data and Select
Text
Place the Cursor
Execute Commands with
Keyboard Shortcuts
Start a New Paragraph
Exit Word

The Microsoft Office Button:
Office Button is found at the upper-left corner of the Word Window. You
can use the menu to create a new file, open an existing file, save a file, and
perform many other tasks.
The Quick Access Toolbar:
The Quick Access toolbar provides you with access to commands you
frequently use. By default Save, Undo, and Redo appear on the Quick
Access toolbar. You can use Save to save your file. Undo to rollback an
action you have taken and Redo to reapply an action you have rolled back.
Quick Access Toolbar
Customize Quick Access Toolbar
The Title Bar:
The Title bar displays the title of the document on which you are currently
working. E.g. Document1

The Ribbon:
The Ribbon is use to issue commands. It has several tabs; clicking a tab
displays several related command groups. Within each group are related
command buttons.
The Ruler:
The ruler is found below the Ribbon. You can use the ruler to change the
format of your document quickly.
If your ruler is not visible, follow the steps listed here:
1 Click the View tab to choose it.
2 Click the check box next to Ruler in the Show/Hide group. The ruler
appears below the Ribbon.

The Text Area:
The large area below the ruler is called text area. You type your document in
the text area. The blinking vertical line in the upper-left corner of the text
area is the cursor. It marks the insertion point. As you type, your text
displays at the cursor location.
The Vertical and Horizontal Scroll Bars:
The vertical and horizontal scroll bars enable you to move up, down, and
across your window simply by dragging the icon located on the scroll bar.
The vertical scroll bar is located along the right side of the screen.
The horizontal scroll bar is located just above the status bar.

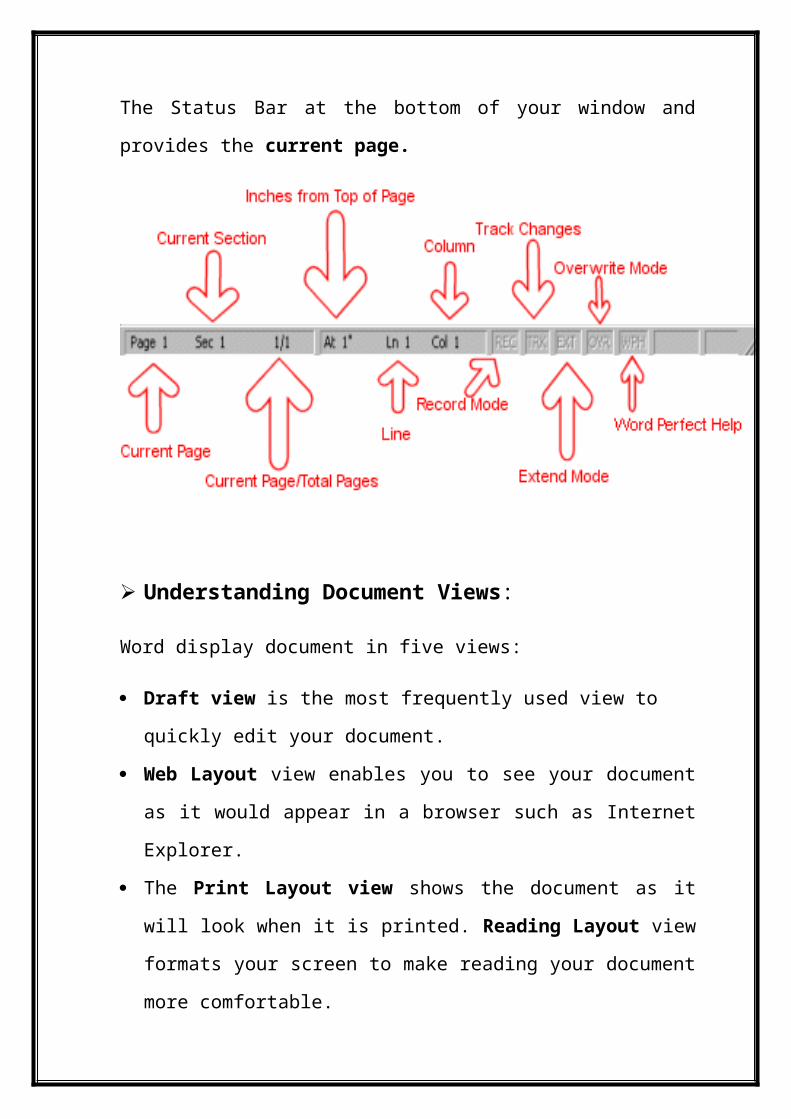
The Status Bar:
The Status Bar at the bottom of your window and provides the current page.
Understanding Document Views:
Word display document in five views:
Draft view is the most frequently used view to quickly edit your
document.
Web Layout view enables you to see your document as it would appear
in a browser such as Internet Explorer.
The Print Layout view shows the document as it will look when it is
printed. Reading Layout view formats your screen to make reading your
document more comfortable.
Outline view displays the document in outline form. You can display
headings without the text.

Add Bullets and Numbers:
In Microsoft Word, you can easily create bulleted or numbered lists of items.
Several bulleting and numbering styles are available, as shown in the examples.
You can select the one you wish to use. For Example:
Numbering:
Bulleting:

Undo and Redo:
You can quickly reverse most commands you execute by using
Undo. If you then change your mind again, and want to reapply a command,
you can use Redo.
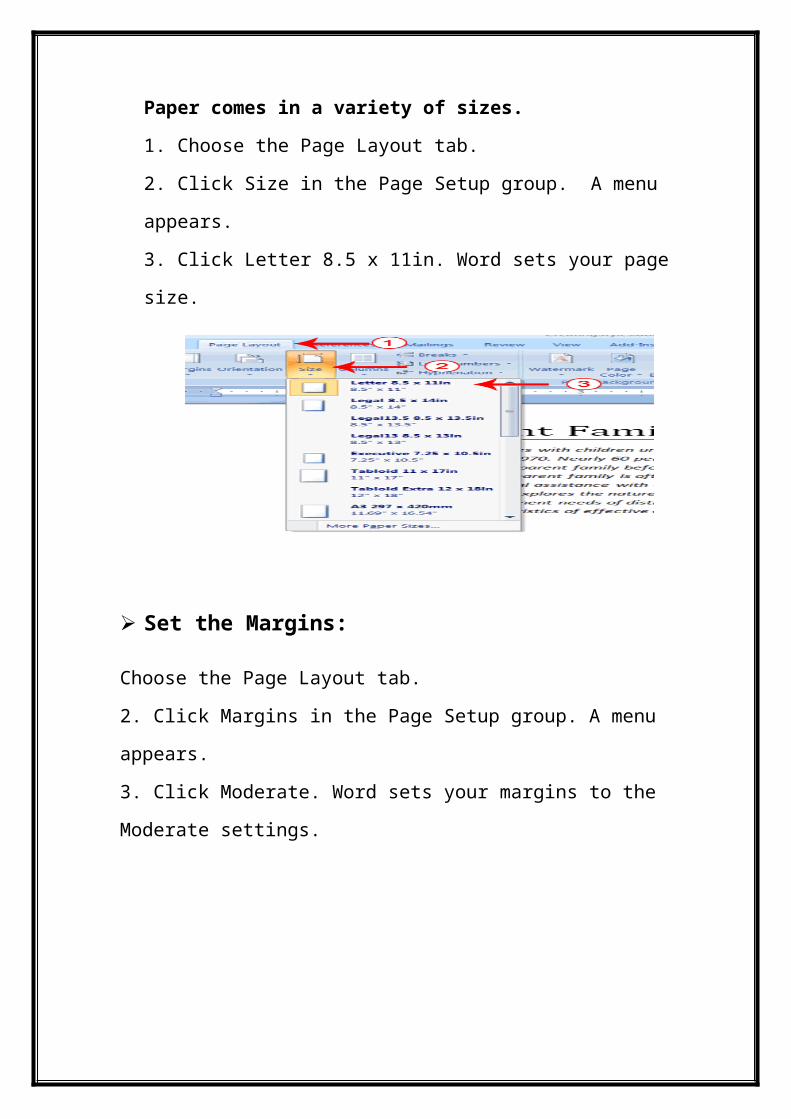
Set the Orientation:
Paper comes in a variety of sizes.
1. Choose the Page Layout tab.
2. Click Size in the Page Setup group. A menu appears.
3. Click Letter 8.5 x 11in. Word sets your page size.
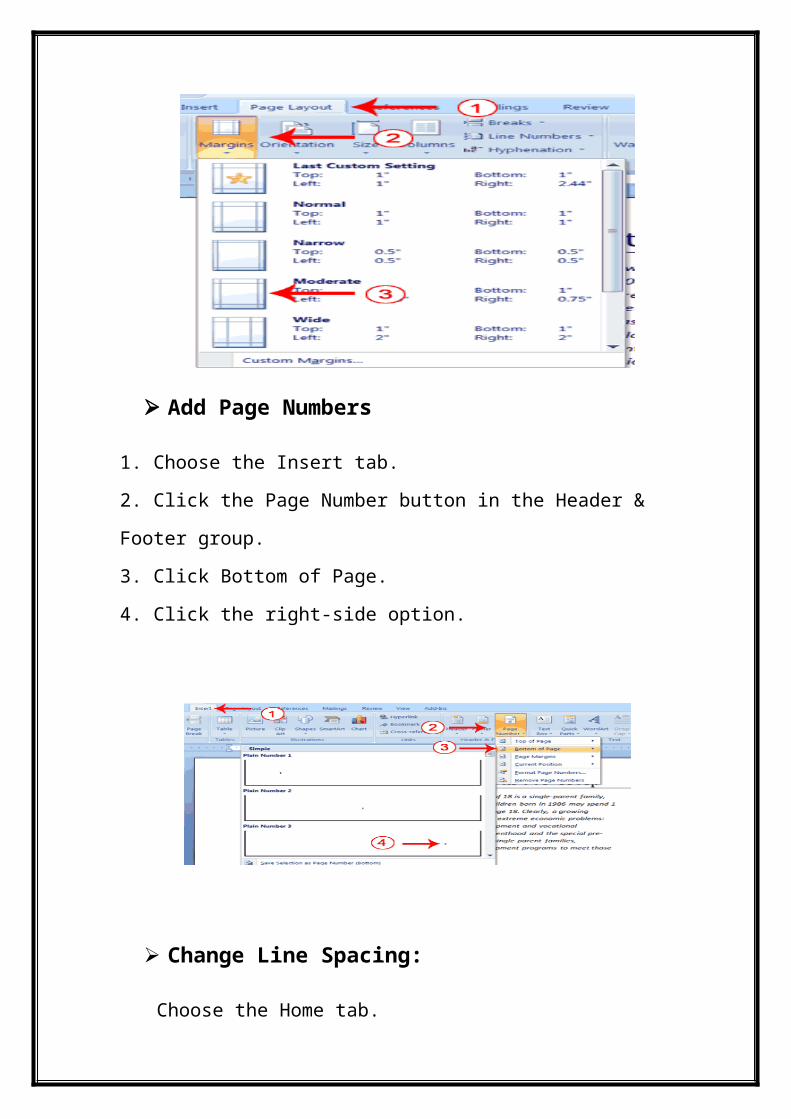
Set the Margins:
Choose the Page Layout tab.
2. Click Margins in the Page Setup group. A menu appears.
3. Click Moderate. Word sets your margins to the Moderate settings.
Add Page Numbers
1. Choose the Insert tab.
2. Click the Page Number button in the Header & Footer group.
3. Click Bottom of Page.
4. Click the right-side option.

Port
rait
Change Line Spacing:
Choose the Home tab.
Click the Line Spacing button in the Paragraph group.
Click 2.0 to double-space the first paragraph.
Set the Orientation:
We may want to change the orientation of your pages.
Landscape

Insert Page Breaks:
Place your cursor before the D in "Displaced Homemakers" Choose the Insert
tab.
Click Page Break. Word places a page break in your document. To delete a page
break, you select the page break and then press the Delete key.
Word Processing Tools-- Comments
Select the text or item you want to comment on, or click at the end of the text.
On the Insert menu, click Comment. Type the comment text in the comment
balloon.
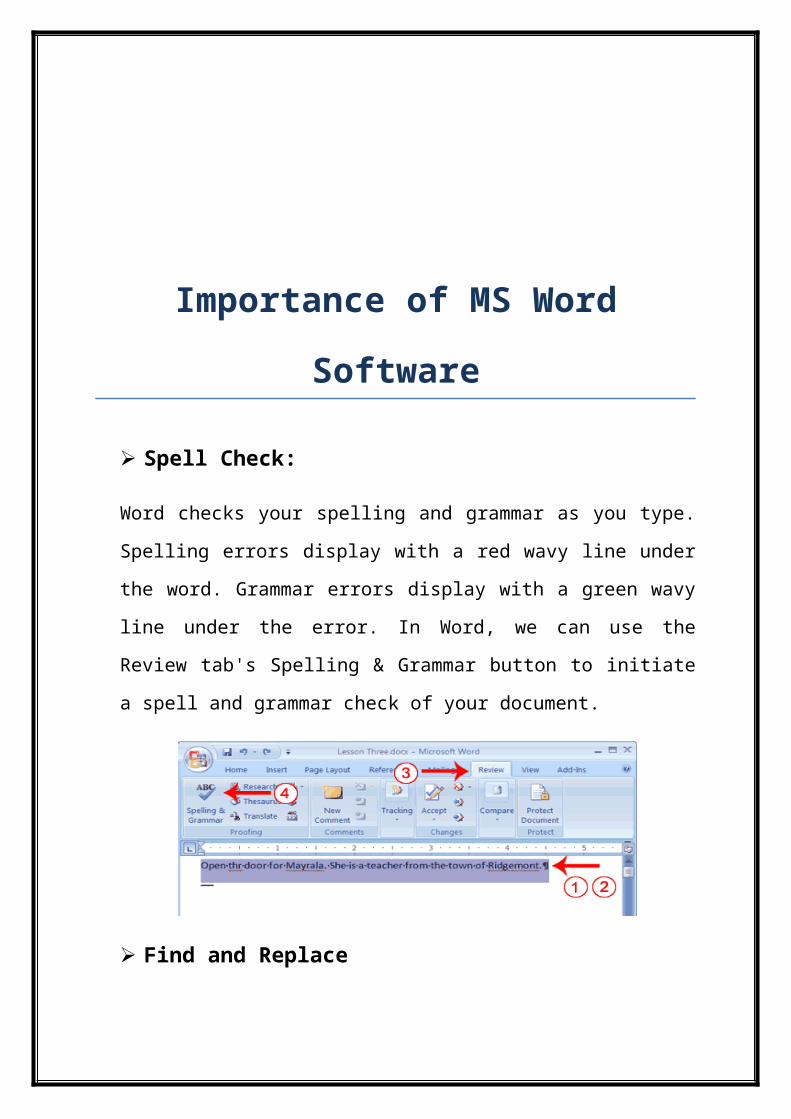
Importance of MS Word Software
Spell Check:
Word checks your spelling and grammar as you type. Spelling errors display
with a red wavy line under the word. Grammar errors display with a green
wavy line under the error. In Word, we can use the Review tab's Spelling &
Grammar button to initiate a spell and grammar check of your document.
Find and Replace
After you find the word or phrase you are searching for, you can replace it
with new text by executing the Replace command.
Choose the Home tab.
Click Find in the Editing group. A menu appears.
Click the Find option on the menu. The Find and Replace dialog box
appears.
Change the Font Size:
In Microsoft Word, you can change the size of your font. The following
exercise illustrates changing the font size.
Choose the Home tab.
In the Font group, click the down arrow next to the Font Size box. A menu of
font sizes appears.
Copy and Paste:
In Microsoft Word, you can copy information from one area of a document and
place the information you copied anywhere in the same or another document.
Select your text
Right-click. A Mini toolbar and a context menu appear.
Click Copy.
After that anther sheet press Right-click. A context menu appears.
Click Paste.

Use the Clipboard:
Place the cursor at the point at which you want to insert your text.
Choose the Home tab.
Click the Clipboard dialog box launcher to open the Clipboard.
Click the item on the clipboard you want to insert into your document.
Word pastes the Clipboard item into your document at the insertion point.
Choose a Style Set:
Choose the Home tab. Click Change Styles in the Styles group. A menu
appears. Click Style Set. A menu appears. You can choose from any of the
styles listed on the menu.

Indent Paragraphs:
Alternate Method—Right-Justify with Keys
select the paragraphs you created.
Press Ctrl+r. The paragraph is now right-aligned.
Alternate Method—Left-Justify with Keys
select the paragraphs you created.
Press Ctrl+l. The paragraph is now left-aligned.
Alternate Method—Center with Keys
Select the paragraphs you created.
Press Ctrl+e. The paragraph is now centered.
Alternate Method—Justify with Keys
Select the paragraphs you created.
Press Ctrl+j. The paragraph is now justified
Add Space Before or After Paragraphs:
Place your cursor anywhere in the second paragraph of the sample text you
created in Exercise. Choose the Page Layout tab. The default spacing appears in
the Spacing Before field. Click the up arrow next to the Spacing Before field to
increase the space before the paragraph. Click the up arrow next to the Spacing.
Watermark Effects:
Click the page layout
Watermark option is appear.
Click it.
Then select any watermark.
Change to Print View:
Choose the View tab. Click Print Layout in the Document Views group. Your
document changes to the Print Layout view.
TO Print A DOCUMENT:
Click the Print button. The Print dialog box appears.
Click the down arrow next to the Name field and select the printer to
which we want to print.
Choose All as the page range.
Click OK. Word prints your document.
We can save your document and close MS Word.