microsoft powerpoint · pdf filemicrosoft powerpoint 2010 ... copying a table from excel or...
TRANSCRIPT
© Dianne Harrison Ferro Mesarch
Microsoft PowerPoint 2010
Starting PowerPoint ............................................................................................................................................... 2 PowerPoint Window Properties ............................................................................................................................. 2 The Ribbon ............................................................................................................................................................ 3
Default Tabs ...................................................................................................................................................... 3 Contextual Tabs ................................................................................................................................................. 3 Minimizing and Restoring the Ribbon ................................................................................................................ 4
The Backstage View ............................................................................................................................................... 4 Customizing the Quick Access Toolbar ................................................................................................................... 6 Creating Slides ....................................................................................................................................................... 8
The Title Slide .................................................................................................................................................... 8 Inserting a New Slide ......................................................................................................................................... 9 Slide Layouts ...................................................................................................................................................... 9 Adding an Image to a Slide ................................................................................................................................10 Downloading Images from the Internet ............................................................................................................11 Adding Shapes to a Slide ...................................................................................................................................12 Adding a Table to a Slide ...................................................................................................................................13 Copying a Table from Excel or Word .................................................................................................................14 Inserting a Hyperlink to a Website ....................................................................................................................15 Inserting a Link to Another Slide .......................................................................................................................16
Different PowerPoint Views ..................................................................................................................................17 The Normal View ..............................................................................................................................................17 The Slide Sorter View ........................................................................................................................................17 The Notes Page View ........................................................................................................................................17 The Reading View .............................................................................................................................................17 The Slide Show View .........................................................................................................................................17 Starting Your Show from a Particular Slide ........................................................................................................17
Applying a Theme to a Presentation ......................................................................................................................18 Customizing an Existing Theme .........................................................................................................................19 Creating Your Own Theme ................................................................................................................................21
Slide Transitions ....................................................................................................................................................23 Animating Objects within a Slide ...........................................................................................................................24 Inserting Music into Your Presentation .................................................................................................................25 Your Presentation in Action ..................................................................................................................................27
A Quick Way to Start a Presentation .................................................................................................................27 Moving to the Next Slide...................................................................................................................................27 Returning to the Previous Slide .........................................................................................................................27 Exiting a Presentation .......................................................................................................................................27
Printing Slides, Handouts, and Notes .....................................................................................................................28 Saving Your Presentation as Launchable Show ......................................................................................................29

2
Starting PowerPoint 1. Log into your PC. 2. Click on the Microsoft PowerPoint icon on your desktop or on the Quick Launch bar. 3. The Microsoft PowerPoint application will open in its own window.
PowerPoint Window Properties The Microsoft PowerPoint window has many of the same attributes as other windows in the Microsoft Office Suite. The table below lists the different features and provides a brief description of each one.
ATTRIBUTE DESCRIPTION
The Ribbon A series of tabs that contain commands and icons organized into groups. The Ribbon has replaced the traditional menus and toolbars.
The Slide Area The large area in the middle of the screen, where you create your presentation slides.
The Slide Layout Pane The area on the left side of the screen that displays your slides in miniature. You can use the tabs above the first slide to switch between the Slides and Outline views.
The Ribbon
The Slide Layout Pane
The Slide Area

3
The Ribbon The Ribbon is made up of a series of tabs that contain commands and icons that are organized into groups. It replaces the menu bars, toolbars, and some task panes that were found in previous versions of PowerPoint.
Default Tabs There are nine default tabs on Ribbon. Each tab displays commands (icons) arranged in groups that are relevant to that particular module. For example, the Home tab provides access to PowerPoint’s most basic commands, such as inserting a new slide, choosing a slide layout, and formatting text.
Use the Insert tab to insert objects into your presentation, such as tables, pictures, shapes and music.
Use the Design tab to customize your slides’ background, theme design or colors.
Use the Transitions tab to apply, change, or remove transitions (how one slide flows into another).
Use the Animations tab to animate text and objects on your slides.
Use the Slide Show tab to start your slide show, customize the settings for your slide show, and hide individual slides.
Use the Review tab for spell-checking, adding comments, or comparing one presentation to another.
Use the View tab to access different PowerPoint views, open the slide master, and turn on or off the ruler and gridlines.
The File tab is new to PowerPoint 2010, taking the place of the Office button. It provides access to the commands that allow you to do things to your presentation, such as saving, printing, and emailing it. Your recent presentation list is also listed under the File tab.
Contextual Tabs Some tabs are contextual, which means that they are only visible when you are working with particular objects. Contextual tabs only appear when the particular objects are active (you are working on them and they are selected) and are usually displayed on the right-hand side of the Ribbon. In the example below, an image has been added to a presentation. So, the Picture Tools Format tab, which is contextual, has appeared. It will disappear once the image is deselected or deleted.
4
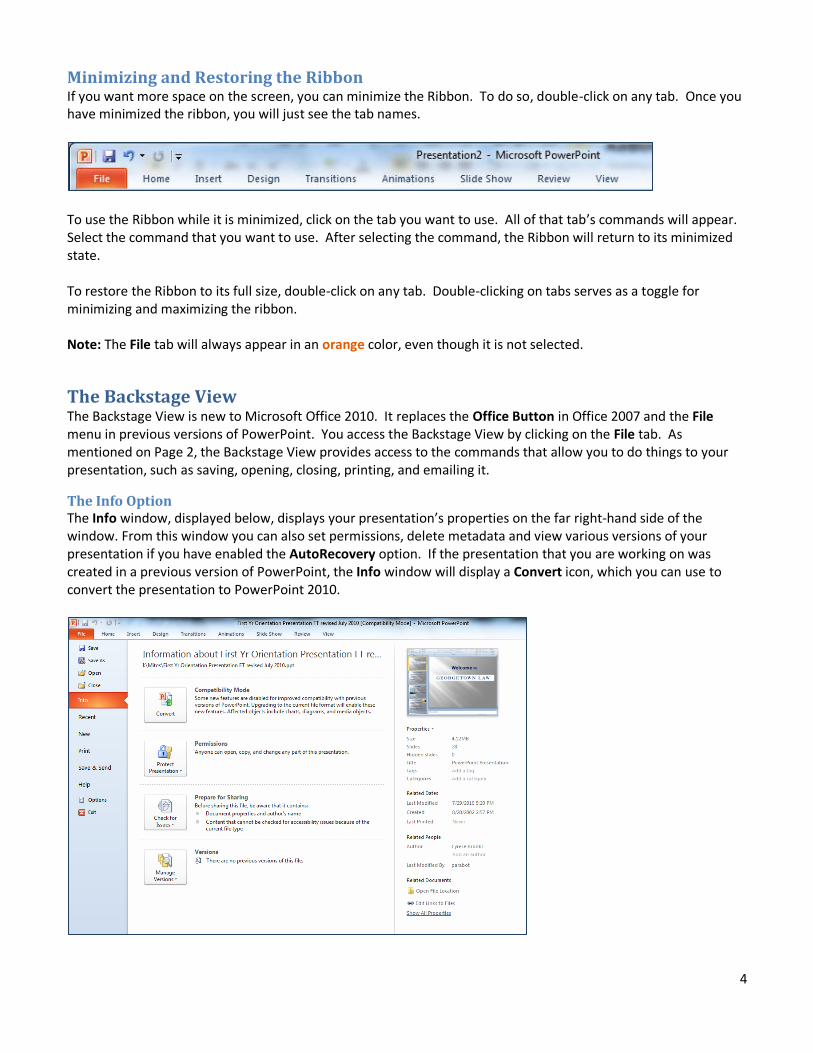
Minimizing and Restoring the Ribbon If you want more space on the screen, you can minimize the Ribbon. To do so, double-click on any tab. Once you have minimized the ribbon, you will just see the tab names.
To use the Ribbon while it is minimized, click on the tab you want to use. All of that tab’s commands will appear. Select the command that you want to use. After selecting the command, the Ribbon will return to its minimized state. To restore the Ribbon to its full size, double-click on any tab. Double-clicking on tabs serves as a toggle for minimizing and maximizing the ribbon. Note: The File tab will always appear in an orange color, even though it is not selected.
The Backstage View The Backstage View is new to Microsoft Office 2010. It replaces the Office Button in Office 2007 and the File menu in previous versions of PowerPoint. You access the Backstage View by clicking on the File tab. As mentioned on Page 2, the Backstage View provides access to the commands that allow you to do things to your presentation, such as saving, opening, closing, printing, and emailing it.
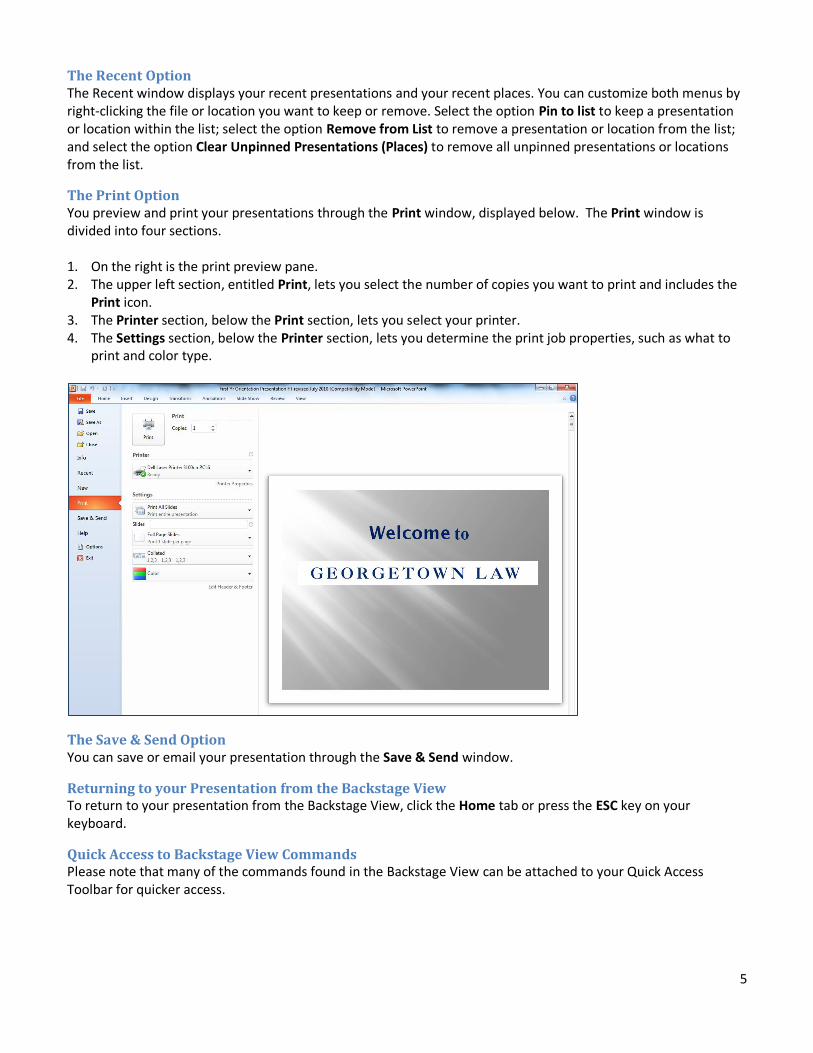
The Info Option The Info window, displayed below, displays your presentation’s properties on the far right-hand side of the window. From this window you can also set permissions, delete metadata and view various versions of your presentation if you have enabled the AutoRecovery option. If the presentation that you are working on was created in a previous version of PowerPoint, the Info window will display a Convert icon, which you can use to convert the presentation to PowerPoint 2010.
5
The Recent Option The Recent window displays your recent presentations and your recent places. You can customize both menus by right-clicking the file or location you want to keep or remove. Select the option Pin to list to keep a presentation or location within the list; select the option Remove from List to remove a presentation or location from the list; and select the option Clear Unpinned Presentations (Places) to remove all unpinned presentations or locations from the list.
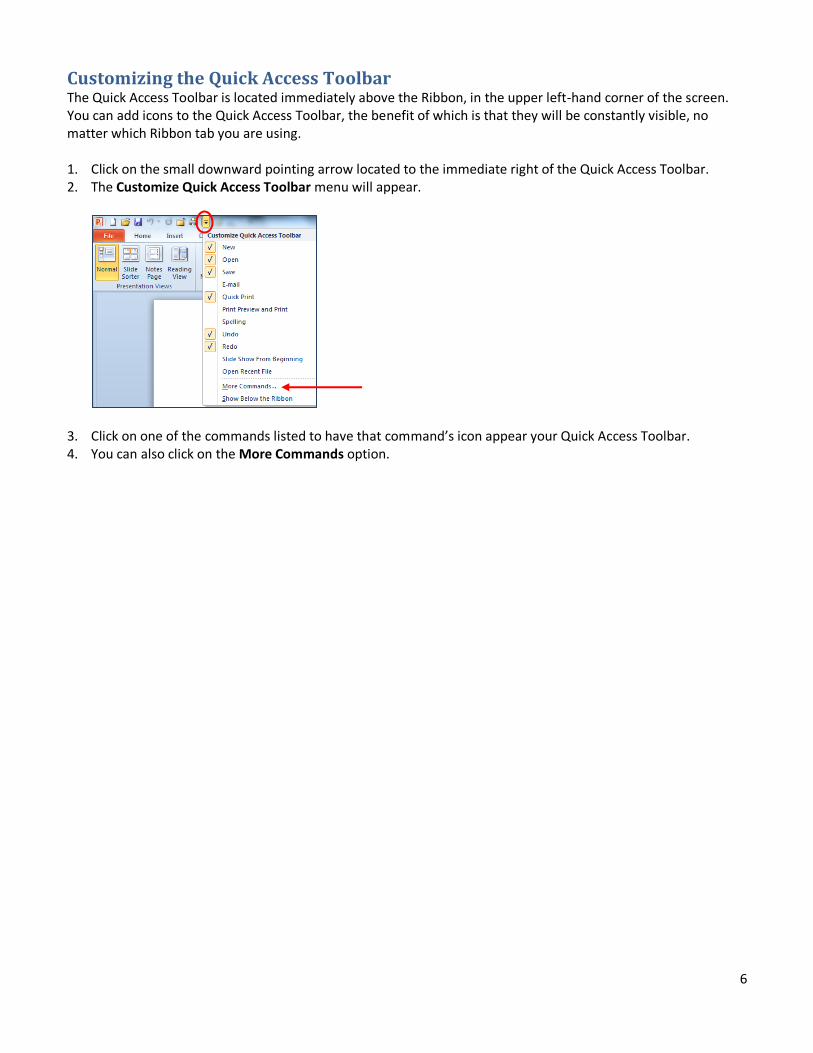
The Print Option You preview and print your presentations through the Print window, displayed below. The Print window is divided into four sections. 1. On the right is the print preview pane. 2. The upper left section, entitled Print, lets you select the number of copies you want to print and includes the
Print icon. 3. The Printer section, below the Print section, lets you select your printer. 4. The Settings section, below the Printer section, lets you determine the print job properties, such as what to
print and color type.
The Save & Send Option You can save or email your presentation through the Save & Send window.
Returning to your Presentation from the Backstage View To return to your presentation from the Backstage View, click the Home tab or press the ESC key on your keyboard.
Quick Access to Backstage View Commands Please note that many of the commands found in the Backstage View can be attached to your Quick Access Toolbar for quicker access.
6
Customizing the Quick Access Toolbar The Quick Access Toolbar is located immediately above the Ribbon, in the upper left-hand corner of the screen. You can add icons to the Quick Access Toolbar, the benefit of which is that they will be constantly visible, no matter which Ribbon tab you are using. 1. Click on the small downward pointing arrow located to the immediate right of the Quick Access Toolbar. 2. The Customize Quick Access Toolbar menu will appear.
3. Click on one of the commands listed to have that command’s icon appear your Quick Access Toolbar. 4. You can also click on the More Commands option.

7
5. The PowerPoint Options - Customize the Quick Access Toolbar window will open.
6. To view all available commands, click on the downward pointing arrow to the right of the Choose Commands From section and choose the option All Commands. Use the scroll bar the browse through the commands, which are listed in alphabetical order.
7. Select the command you want from the Choose Commands From section, located on the left-hand side of the window, and click on the Add>> button.
8. The command will be displayed in the Customize Quick Access Toolbar section, located on the right-hand side of the window. You can add as many commands as you want.
9. You can re-arrange the order of your commands by using the Up and Down arrows to the right of the Customize Quick Access Toolbar section.
10. Click on the OK button and the new icons will display in the Quick Access Toolbar. 11. If you want to reset the Quick Access Toolbar to its default, click on the Reset button, located in the bottom
right-hand corner of the PowerPoint Options - Customize the Quick Access Toolbar window. Note: The Quick Access Toolbar can appear above or below the Ribbon by clicking on the Show Below (Above) the Ribbon command located at the bottom of the Customize Quick Access Toolbar menu.
8
Creating Slides
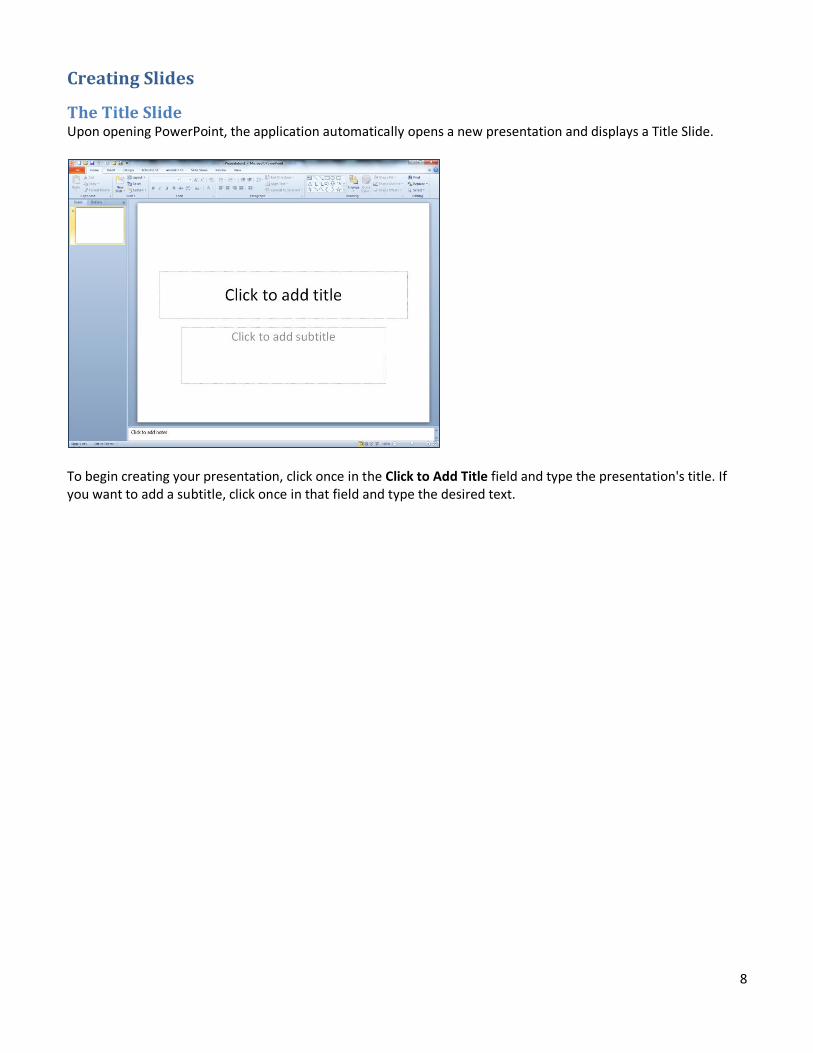
The Title Slide Upon opening PowerPoint, the application automatically opens a new presentation and displays a Title Slide.
To begin creating your presentation, click once in the Click to Add Title field and type the presentation's title. If you want to add a subtitle, click once in that field and type the desired text.
9
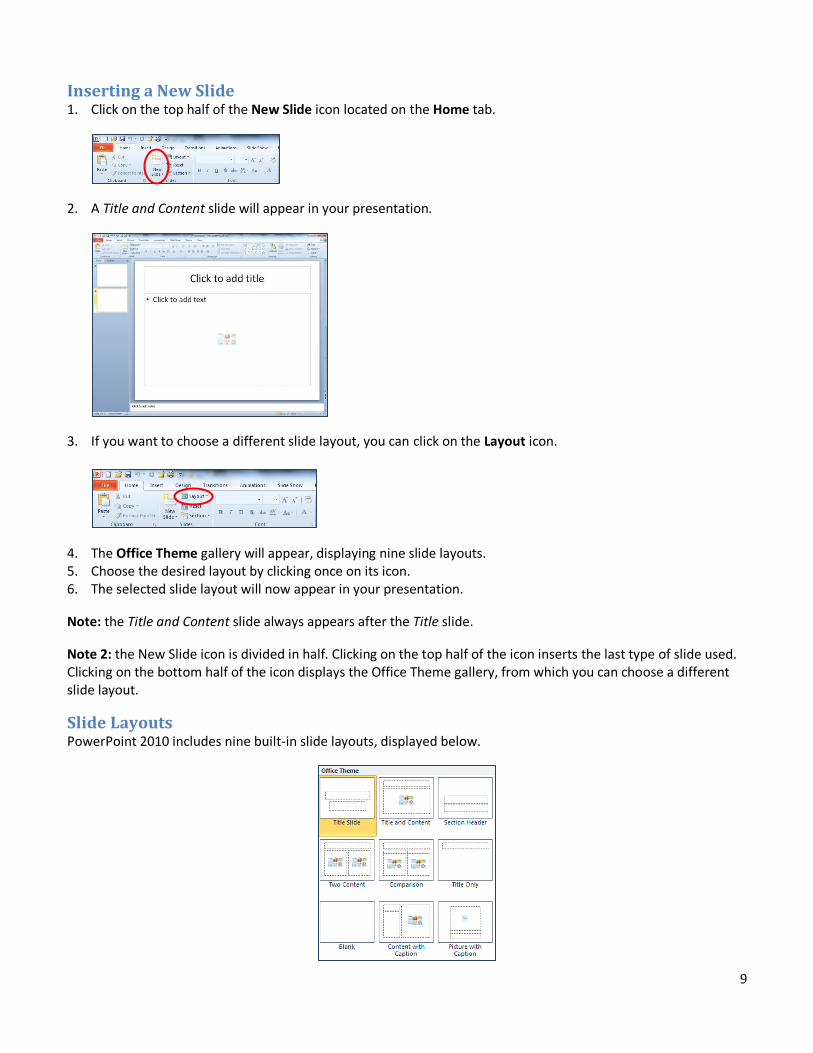
Inserting a New Slide 1. Click on the top half of the New Slide icon located on the Home tab.
2. A Title and Content slide will appear in your presentation.
3. If you want to choose a different slide layout, you can click on the Layout icon.
4. The Office Theme gallery will appear, displaying nine slide layouts. 5. Choose the desired layout by clicking once on its icon. 6. The selected slide layout will now appear in your presentation.
Note: the Title and Content slide always appears after the Title slide.
Note 2: the New Slide icon is divided in half. Clicking on the top half of the icon inserts the last type of slide used. Clicking on the bottom half of the icon displays the Office Theme gallery, from which you can choose a different slide layout.
Slide Layouts PowerPoint 2010 includes nine built-in slide layouts, displayed below.

10
Adding an Image to a Slide 1. Using the New Slide icon, select the Title Only or Blank slide layout. 2. If using the Title Only slide layout, type the title of the slide in the Click To Add Title area. 3. Click once in the blank portion of the slide. 4. Click on the Insert tab. 5. Click on the Picture icon.
6. The Insert Picture dialog will appear.
7. Navigate to the folder that contains the picture you wish to insert. 8. Select the picture. 9. Click on the Open button. 10. The picture will be inserted into the slide and the contextual Picture Tools Format tab will appear. 11. You can use the Picture Tools Format tab to adjust your image. 12. You can also resize the picture using the handles that appear around it. Note: If you want to resize the picture, make sure that you use the corner “handles” to ensure proportional resizing, otherwise you risk distorting the picture.

11
Downloading Images from the Internet A very good source for images is Google Image Search. Browse to http://www.google.com and click on the Images link, located in the upper left-hand corner of the window. To search for images, follow the instructions below. 1. Type the criteria for the desired images in the Search field and click on the Search button.
2. Click once on the thumbnail of the image that you want to download. 3. A page will open containing the image.
4. Click on the Full-Size Image link to the right of the image thumbnail. 5. The full-sized image will open in its own page. 6. Right-click on the image. 7. A menu will appear. 8. Choose the Save Picture As option. 9. The Save Picture dialog will appear. 10. Navigate to the folder where you want to save the image. 11. Click on the Save button. 12. Your image will be saved onto your computer, ready to use.

12
Adding Shapes to a Slide 1. Using the New Slide icon, select the Title Only or Blank slide layout. 2. If using the Title Only slide layout, type the title of the slide in the Click To Add Title area. 3. Click once in the blank portion of the slide. 4. Go to the Insert tab and click on the Shapes icon.
5. Click once on the desired shape icon from within the gallery. 6. Your cursor will appear as a thin plus-sign. 7. Using your mouse, draw the shape on the slide. 8. The shape will be inserted and the contextual Drawing Tools Format tab will appear. 9. Click once on the tab to make it active.
10. Use the Drawing Tools Format tab to format your shape. Note: To add text to your shape, right-click on it and choose the option Edit Text from the sub-menu that appears. Your cursor will appear as a thin straight line within the shape, blinking on and off. Start typing and your text will appear within the shape. To format the text, select it, go to the Home tab, and use the font formatting commands located there.
13
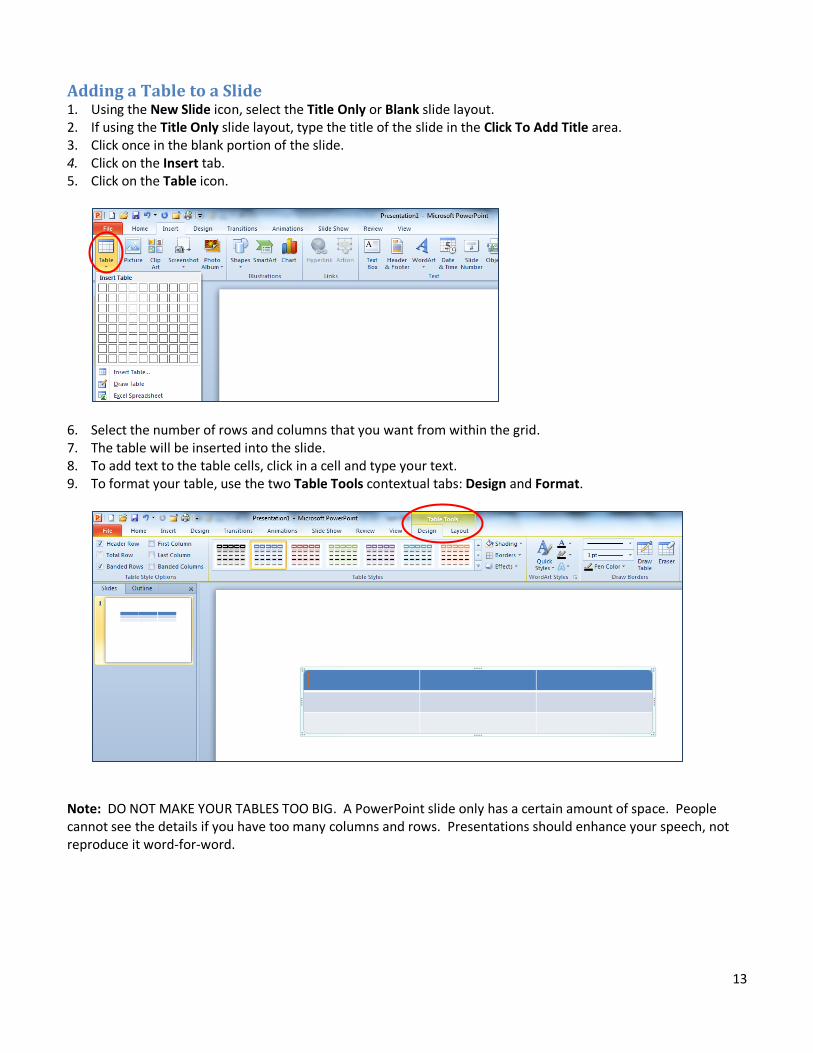
Adding a Table to a Slide 1. Using the New Slide icon, select the Title Only or Blank slide layout. 2. If using the Title Only slide layout, type the title of the slide in the Click To Add Title area. 3. Click once in the blank portion of the slide. 4. Click on the Insert tab. 5. Click on the Table icon.
6. Select the number of rows and columns that you want from within the grid. 7. The table will be inserted into the slide. 8. To add text to the table cells, click in a cell and type your text. 9. To format your table, use the two Table Tools contextual tabs: Design and Format.
Note: DO NOT MAKE YOUR TABLES TOO BIG. A PowerPoint slide only has a certain amount of space. People cannot see the details if you have too many columns and rows. Presentations should enhance your speech, not reproduce it word-for-word.
14
Copying a Table from Excel or Word After you create and format a table in Word or Excel, you can paste the table into a PowerPoint presentation without having to adjust the formatting.
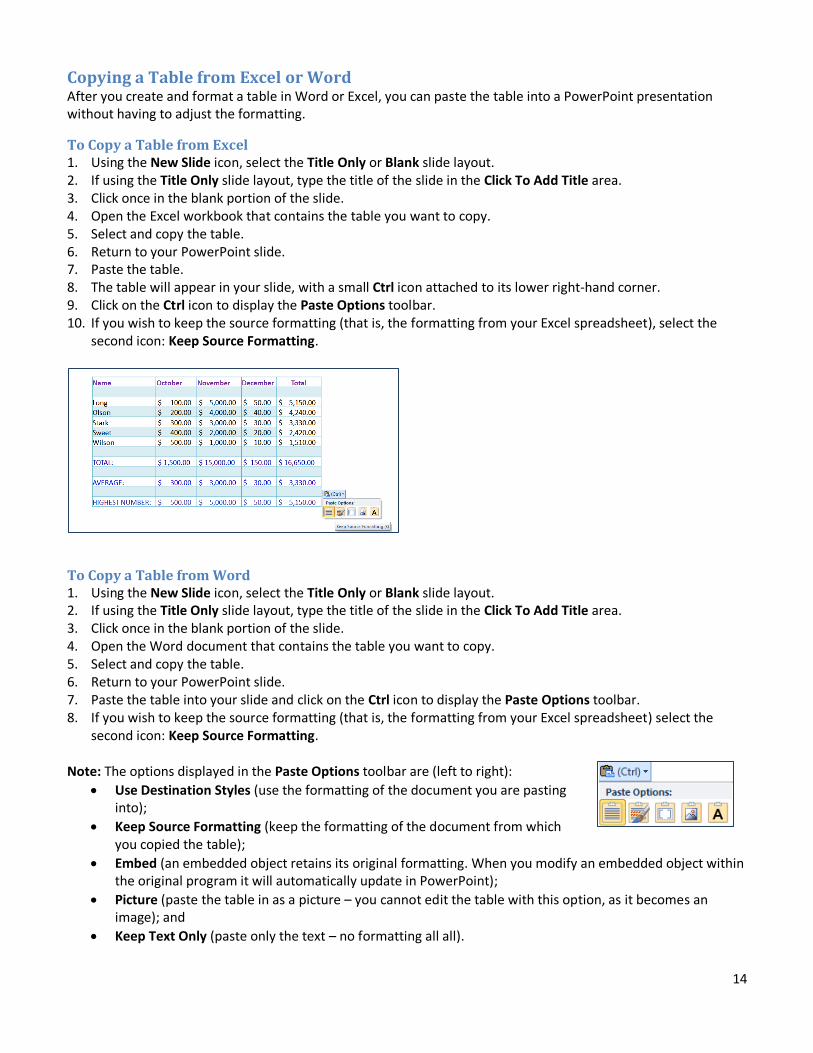
To Copy a Table from Excel 1. Using the New Slide icon, select the Title Only or Blank slide layout. 2. If using the Title Only slide layout, type the title of the slide in the Click To Add Title area. 3. Click once in the blank portion of the slide. 4. Open the Excel workbook that contains the table you want to copy. 5. Select and copy the table. 6. Return to your PowerPoint slide. 7. Paste the table. 8. The table will appear in your slide, with a small Ctrl icon attached to its lower right-hand corner. 9. Click on the Ctrl icon to display the Paste Options toolbar. 10. If you wish to keep the source formatting (that is, the formatting from your Excel spreadsheet), select the
second icon: Keep Source Formatting.
To Copy a Table from Word 1. Using the New Slide icon, select the Title Only or Blank slide layout. 2. If using the Title Only slide layout, type the title of the slide in the Click To Add Title area. 3. Click once in the blank portion of the slide. 4. Open the Word document that contains the table you want to copy. 5. Select and copy the table. 6. Return to your PowerPoint slide. 7. Paste the table into your slide and click on the Ctrl icon to display the Paste Options toolbar. 8. If you wish to keep the source formatting (that is, the formatting from your Excel spreadsheet) select the
second icon: Keep Source Formatting. Note: The options displayed in the Paste Options toolbar are (left to right):
Use Destination Styles (use the formatting of the document you are pasting into);
Keep Source Formatting (keep the formatting of the document from which you copied the table);
Embed (an embedded object retains its original formatting. When you modify an embedded object within the original program it will automatically update in PowerPoint);
Picture (paste the table in as a picture – you cannot edit the table with this option, as it becomes an image); and
Keep Text Only (paste only the text – no formatting all all).
15
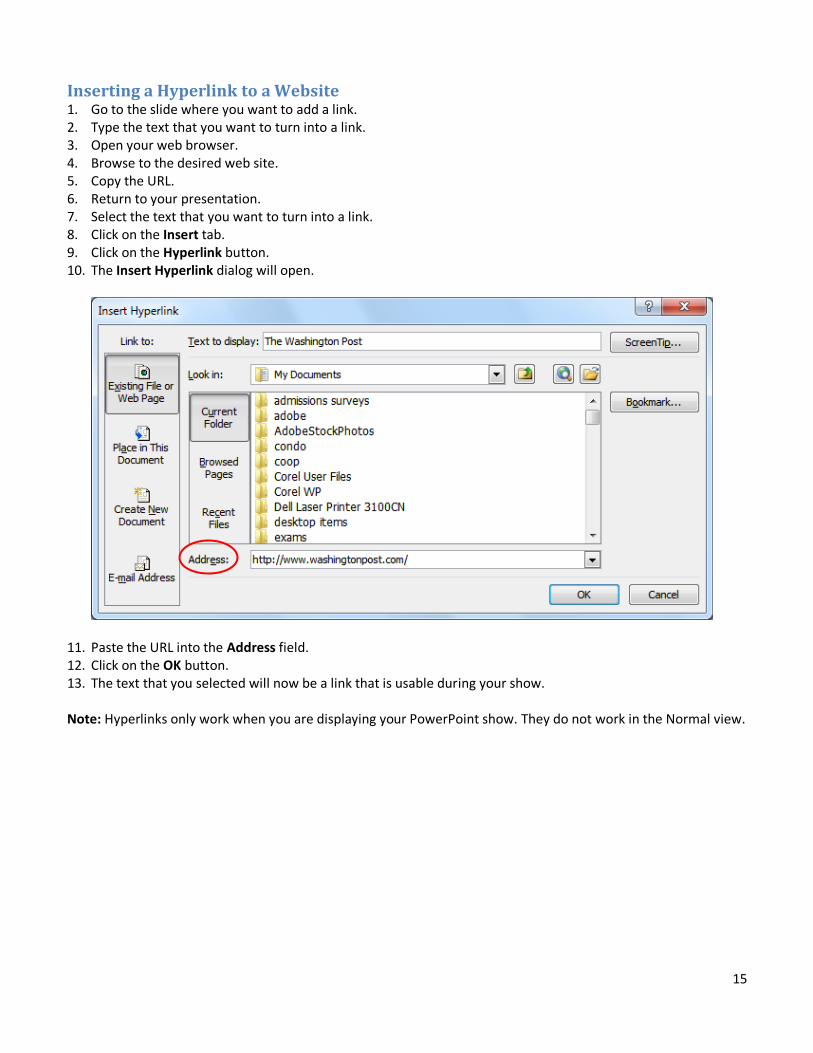
Inserting a Hyperlink to a Website 1. Go to the slide where you want to add a link. 2. Type the text that you want to turn into a link. 3. Open your web browser. 4. Browse to the desired web site. 5. Copy the URL. 6. Return to your presentation. 7. Select the text that you want to turn into a link. 8. Click on the Insert tab. 9. Click on the Hyperlink button. 10. The Insert Hyperlink dialog will open.
11. Paste the URL into the Address field. 12. Click on the OK button. 13. The text that you selected will now be a link that is usable during your show. Note: Hyperlinks only work when you are displaying your PowerPoint show. They do not work in the Normal view.
16
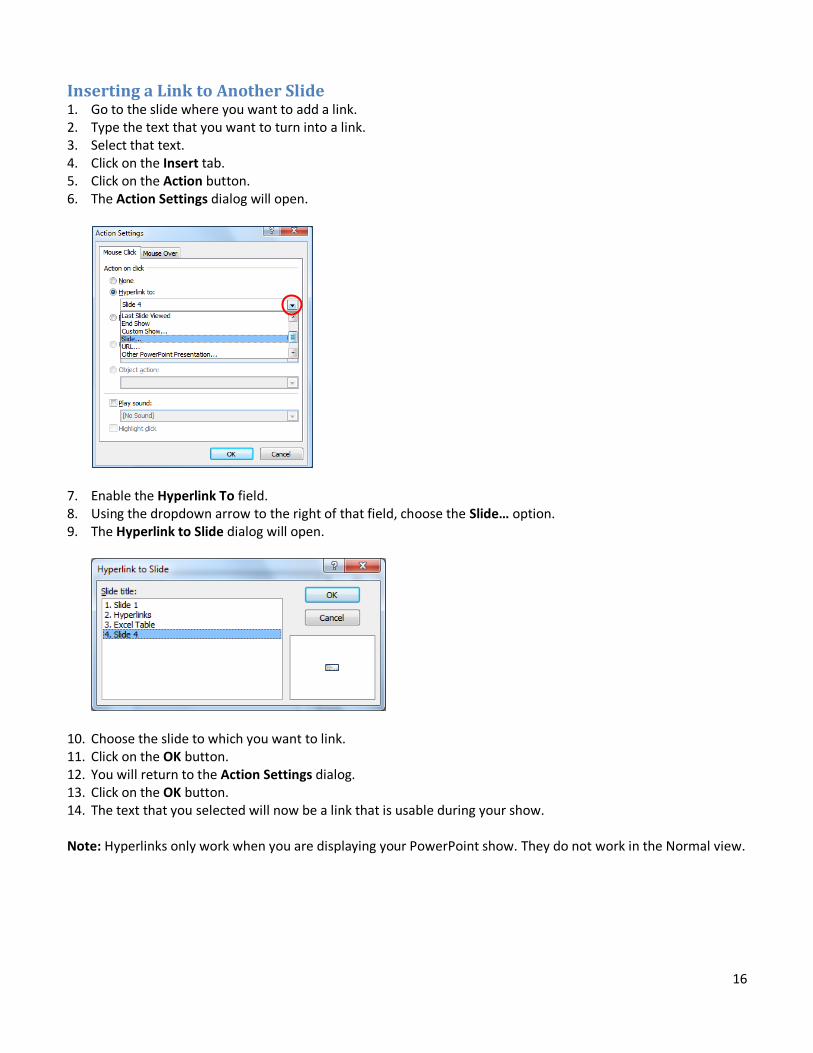
Inserting a Link to Another Slide 1. Go to the slide where you want to add a link. 2. Type the text that you want to turn into a link. 3. Select that text. 4. Click on the Insert tab. 5. Click on the Action button. 6. The Action Settings dialog will open.
7. Enable the Hyperlink To field. 8. Using the dropdown arrow to the right of that field, choose the Slide… option. 9. The Hyperlink to Slide dialog will open.
10. Choose the slide to which you want to link. 11. Click on the OK button. 12. You will return to the Action Settings dialog. 13. Click on the OK button. 14. The text that you selected will now be a link that is usable during your show. Note: Hyperlinks only work when you are displaying your PowerPoint show. They do not work in the Normal view.

17
Different PowerPoint Views
The Normal View The Normal View is PowerPoint’s default view. It displays the Slide Layout Pane, the Notes pane and the slide itself. You can select any slide from the Slide Layout Pane in order to edit it in the Slide Area.
The Slide Sorter View You can access the Slide Sorter view by going to the View tab and clicking on the Slide Sorter icon. The Slide Sorter view displays all of your slides in miniature. This view is optimal for moving and copying slides, especially from one presentation to another. Slide repositioning is accomplished by selecting and dragging or copying and pasting.
The Notes Page View You can access the Notes Page view by going to the View tab and clicking on the Notes Page icon. The Notes Page view opens the area where you can add text for notes. While your notes will not be visible on screen during your slide show, you can print them out for reference purposes.
The Reading View You can access the Reading view by going to the View tab and clicking on the Reading View icon. Use the Reading View on your own computer when you want to view your presentation not as a Show, but in a maximized window. Transitions and animations will be visible, but not timing. Press the Esc key on your keyboard to exit this view.
The Slide Show View You can access the Slide Show view by going to the Slide Show tab and clicking on the From Beginning icon or by pressing the F5 key on the keyboard. This is how you access your actual slide show! All transitions, animations, and timing will be visible. Press the Ctrl key on your keyboard while clicking on the From Beginning icon to launch a mini-slide show in the upper left-hand corner of your screen.
Starting Your Show from a Particular Slide You can view a particular slide in Slide Show view without going through your entire presentation. This is extremely helpful if your presentation contains many slides and the one that you want to test is in the middle or the end. To start your show from a particular slide, select that slide, go to the Slide Show tab and click on the From Current Slide icon.
18
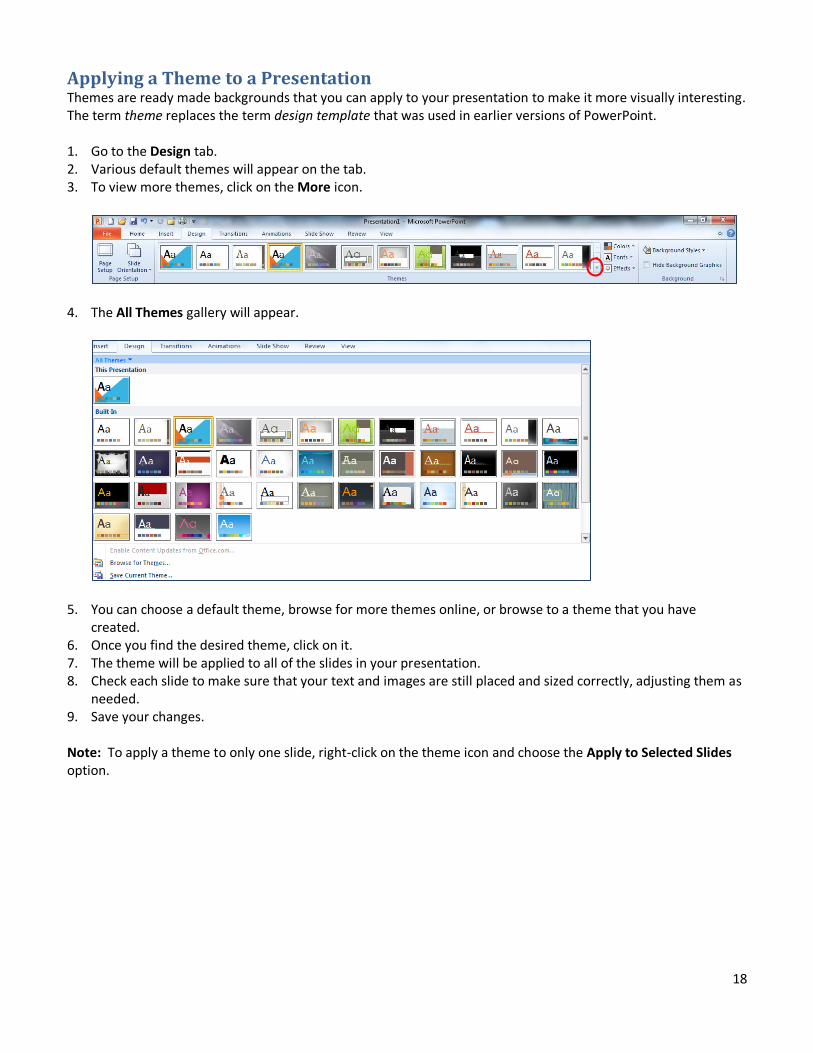
Applying a Theme to a Presentation Themes are ready made backgrounds that you can apply to your presentation to make it more visually interesting. The term theme replaces the term design template that was used in earlier versions of PowerPoint. 1. Go to the Design tab. 2. Various default themes will appear on the tab. 3. To view more themes, click on the More icon.
4. The All Themes gallery will appear.
5. You can choose a default theme, browse for more themes online, or browse to a theme that you have created.
6. Once you find the desired theme, click on it. 7. The theme will be applied to all of the slides in your presentation. 8. Check each slide to make sure that your text and images are still placed and sized correctly, adjusting them as
needed. 9. Save your changes. Note: To apply a theme to only one slide, right-click on the theme icon and choose the Apply to Selected Slides option.

19
Customizing an Existing Theme You can customize the colors and fonts of any of Microsoft’s default themes. 1. Apply a theme to your presentation. 2. Click on the Colors icon, located on the Design tab.
3. Microsoft’s default color choices will appear. 4. Hold your cursor over the available color choices to see a live preview of the offered color changes. 5. Click on the color option that you want and it will be applied to your presentation. 6. If you want to save it, click on the More icon i the Themes gallery. 7. The All Themes gallery will appear. 8. Click on the Save Current Theme option. 9. The Save Current Theme dialog will appear.
10. Type your customized theme’s name in the File Name field. 11. Accept the default file location and click on the Save button. 12. Your customized theme will be saved and ready to use in other presentations.

20
Note: If you do not like the theme colors offered by Microsoft, you can create your own by clicking on the Create New Theme Colors link, located at the bottom of the Colors gallery. The Create New Theme Colors dialog will appear. Select your colors, name your newly customized theme, and click on the Save button.
Note 2: You can customize a theme’s fonts and graphic effects by clicking on the Fonts and Effects icons, respectively.
21
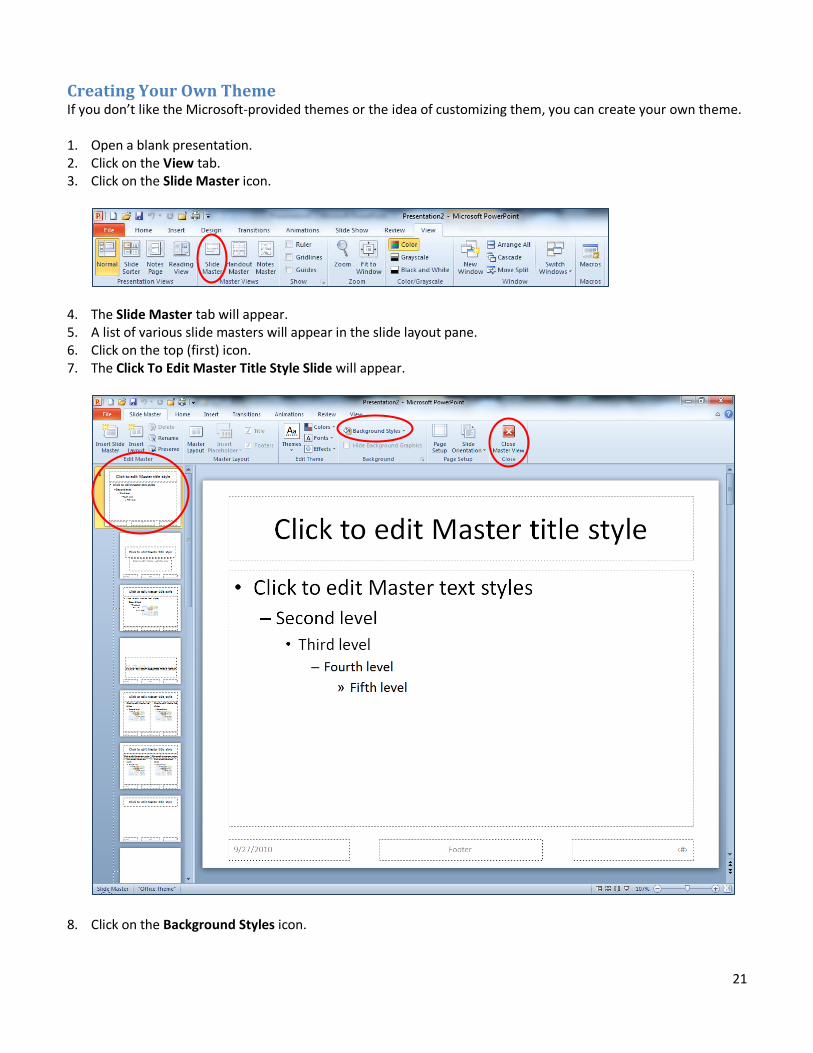
Creating Your Own Theme If you don’t like the Microsoft-provided themes or the idea of customizing them, you can create your own theme. 1. Open a blank presentation. 2. Click on the View tab. 3. Click on the Slide Master icon.
4. The Slide Master tab will appear. 5. A list of various slide masters will appear in the slide layout pane. 6. Click on the top (first) icon. 7. The Click To Edit Master Title Style Slide will appear.
8. Click on the Background Styles icon.

22
9. The Format Background dialog will appear.
10. Enable the Picture or Texture Fill field and click on the File button to add a picture as your slide’s background. 11. When you are done selecting an image and choosing its transparency, click on the Apply to All button. 12. You will return to your master slide. 13. Go to the Home tab and use the font formatting commands located there to change your theme’s font. 14. Once you are done creating your theme, return to the Slide Master tab and click on the Close Master View
icon. (This step is incredibly important!) 15. Go to the Design tab. 16. Apply your new theme by clicking on its icon. (It will be located at the top of the Themes section.) 17. Click on the More icon. 18. The All Themes dialog will appear 19. Click on the Save Current Theme option. 20. The Save Current Theme dialog will appear.
21. Type your new theme’s name in the File Name field. 22. Accept the default file location and click on the Save button. 23. Your newly created theme will be saved and ready to use in other presentations. Note: If you want to share your new theme, first save it on your computer, using PowerPoint’s default file location. Once saved on your machine, open the Save Current Theme dialog and right-click on the new theme’s name. Choose the Send To command to save it elsewhere.

23
Slide Transitions Slide transitions are the animation-like effects that occur in when you move from one slide to another during a presentation, such as fading in or checker-boarding out. 1. Select the slide to which you want to add a transition. 2. Go to the Transitions tab. 3. Various icons will appear in the Transition to This Slide section. 4. To view more transition effects, click on the More icon
5. The Transitions gallery will appear.
6. Click on a transition icon to apply it. 7. The Effect Options icon allows you to determine how the transition will be applied. 8. Select the transition speed by using the Duration field (the fewer the seconds, the faster the transition). 9. You can also add a sound to your transition by using the dropdown arrow to the right of the Sound field. 10. To test your slide transitions, click on the Preview icon. 11. To apply the transition to all of the slides, click on the Apply to All icon. 12. Once satisfied, save your presentation. Note: Unfortunately, there is no live preview of transitions in PowerPoint 2010. Note 2: To remove a transition, select the slide that has the transition, go the Transitions tab, click on the More button, and choose the None icon. Note 3: Use transitions and sound effects sparingly. Although they can be useful in making a presentation more dynamic and help emphasize a point, too many transitions and sounds can be distracting.

24
Animating Objects within a Slide You can animate various elements within your slides. For example, you can have text appear bullet-by-bullet or have objects fly in from a particular direction. 1. Go to the slide that has the text or objects you want to animate. 2. Select the part of the slide you want to animate 3. Go to the Animations tab. 4. Various icons will appear in the Animation section. 5. To view more animation effects, click on the More icon.
6. The Animations gallery will appear.
7. Hold your cursor over an animation icon for a live preview. 8. Select the animation speed by using the Duration field (the fewer the seconds, the faster the animation). 9. To test your slide animations, click on the Preview icon. 10. Once satisfied, save your presentation. Note: To remove an animation, select the animated object within the slide, go the Animations tab, click on the More button, and choose the None icon. Note 2: For more animation effects, click on the Add Animation icon located on the Animations tab. Animations from previous versions of PowerPoint can be found at the bottom of the gallery, under the More…. options.

25
Inserting Music into Your Presentation You can insert music into your presentation. Whether you want music playing throughout your presentation or just on one slide, the choice is yours. 1. Go to the slide where you want to add the sound. 2. Go to the Insert tab and click on the bottom half of the Audio icon.
3. Choose the Audio From File option. 4. The Insert Audio dialog will appear. 5. Browse to the folder that contains the sound file, and then insert it. 6. A sound icon will be inserted into the slide and the contextual Audio Tools Playback tab will appear.
7. Use the icons on the Playback tab to adjust the sound’s volume, preview the sound, determine when the sound starts and stops, and to hide the sound icon during your presentation.
8. Click on the downward pointing arrow to the right of the Start field and choose Automatically to have the music start without you having to click a mouse button.
9. For more sound options, go to the Animations tab and click on the Animation Pane icon, located in the Advanced Animation section.

26
10. The Animation task pane will open on the right side of the screen, along with the name of the inserted sound file.
11. Click on the downward-pointing arrow located to the right of the sound file name. 12. Choose Effect Options from the submenu that appears. 13. The Play Audio dialog will open.
14. Make sure you are on the Effect tab. 15. Set your Start and Stop playing options. 16. Click on the OK button. 17. Start your slide show and enjoy the music Note: To have a sound playing throughout your presentation, enable the From Beginning field in the Start Playing section. Enable the After field in the Stop Playing section. Type the total number of slides within your presentation in the Slides field. (For example, if you have 25 slides in your presentation, you would type 25 in the Slides field.) Click on the OK button. Music will play throughout your entire presentation.

27
Your Presentation in Action Once you have created your presentation and you are ready to display it in public, you will probably want to know how to move around in it.
A Quick Way to Start a Presentation Press the F5 key on the keyboard.
Moving to the Next Slide Press the Enter key.
Click once with the left mouse button.
Press the Page Down key.
Press the Down or the Right arrow key.
Returning to the Previous Slide Press the Page Up key.
Press the Up or the Left arrow key.
Exiting a Presentation Press the ESC key.

28
Printing Slides, Handouts, and Notes PowerPoint enables you to specify what component of your presentation you want to print. You can access the following print options.
Slides, which prints one slide per page.
Handouts, which prints two, three, four, six, or nine slide images per page.
Notes Pages, which contain your speaking notes and a slide image.
Outline View, which prints the presentation in a bulleted, outlined form. 1. Open the presentation you want to print. 2. Go to the File tab and click on the Print option. 3. The Print window will appear. 4. The Print section lets you select the number of copies you want to print. 5. The Printer section lets you choose your printer. 6. The Settings section lets you determine what you want to print: specific slides, notes, handouts or outline
view.

29
Saving Your Presentation as Launchable Show You can save your presentation as a PowerPoint Show. When you double-click on a PowerPoint Show icon, the presentation automatically opens in the Slide Show View. This feature is extremely convenient if you are going to be presenting on a computer that might not have Microsoft PowerPoint installed on it. Anyone can download the free PowerPoint Viewer software, which will allow you to view your presentation, as long as it is saved as a PowerPoint Show. 1. Go to the File tab and choose the Save As option. 2. The Save As dialog will open.
3. Navigate to where you want to save the show. 4. Type a name for the show in the File Name field. 5. Use the dropdown arrow to the right of the Save as Type field and select the option PowerPoint Show. 6. Click on the Save button. 7. Your presentation will be saved as a launchable show. Note: You cannot make any changes to a PowerPoint Show. So, you need to save your presentation normally before saving it as a launchable show. That way, you can make edits to the original. Note 2: You can find the PowerPoint Viewer software online at Microsoft’s download center, which is located at http://www.microsoft.com/downloads. Type PowerPoint Viewer in the search field and click on the Search icon.