microsoft office for mac 2011 tutorial: track and review document
TRANSCRIPT

Microsoft Office for Mac 2011 tutorial: Track and review document changes 1
Track and review document changes Writing a document is often a collaborative effort. If your research paper or project proposal has several authors and reviewers, you can use the Track Changes feature in Word to keep track of and comment on each other's changes. Take this tutorial to learn how.
Before you begin ....................................................................................................................................... 1 1. Turn Track Changes on and off ............................................................................................................. 2 2. Explore the different types of tracked changes ...................................................................................... 3 3. Accept and reject a reviewer's changes .................................................................................................. 4 4. Add your own changes .......................................................................................................................... 7 5. Work with comments ............................................................................................................................. 9 6. Hide tracked changes in a printout ...................................................................................................... 11 7. Make sure that all future changes are tracked ..................................................................................... 13 Quick Reference Card .............................................................................................................................. 15
Before you begin
What you'll learn After completing this tutorial, you'll be able to:
• Turn the Track Changes feature on and off.
• Identify the different types of tracked changes.
• Accept or reject a reviewer's changes and comments.
• Insert your own tracked changes and comments.
• Hide tracked changes in a printout.
• Set a password to make sure that future changes are tracked.
Requirements
• Word for Mac 2011
• Basic Word skills, including how to open a document, cut and paste, and format text.
Tip If you are new to Word, first take the tutorial Tutorial: Word basics.
Practice file Tutorial lessons are designed to be viewed in order. Use the practice file TrackChanges.docx for hands-on experience while taking the tutorial.
Estimated time to complete: 25 minutes

Microsoft Office for Mac 2011 tutorial: Track and review document changes 2
1. Turn Track Changes on and off When you open a document that contains tracked changes, the Track Changes feature is already turned on. To track changes in a new document, you must turn on Track Changes.
Let's open a document that contains tracked changes and then turn Track Changes off and on.
Open the practice file, which is located at the beginning of this tutorial.
On the Review tab, under Tracking, notice that Track Changes is On.
Click the Track Changes switch. Track Changes is now turned off.
Click the Track Changes switch again. Track Changes is now turned on.
Hints
• The Track Changes on and off settings apply to the current document only.
• We recommend that you use Track Changes in print layout view. To view a document in print layout view, click View > Print Layout.
• To hide the ribbon while you work, on the right side of the ribbon, click .
Before you move on
Make sure that you can do the following: Turn Track Changes on and off.

Microsoft Office for Mac 2011 tutorial: Track and review document changes 3
2. Explore the different types of tracked changes Whether you are reviewing another person's changes or making your own, there are five types of changes that you should be familiar with: insertions, deletions, moved content, formatting changes, and comments. Each type of change creates a different "revision mark" in the document, and each reviewer's changes appear in a different color.
Let's look at how each type of change appears in a document.
Formatting change: Formatting changes appear in a balloon labeled Formatted in the right margin. A small dashed line connects the balloon to the formatting change. To make the dashed line appear solid, click the balloon.
Insertion: Insertions appear underlined. To see the time, date, and reviewer who made the change, rest the pointer on any part of the inserted text.
Comment: Comments appear in balloons labeled Comment in the right margin of the document. A small dashed line connects the balloon to the text that was commented on. To make the dashed line appear solid, click the balloon.
Moved content: Text or other content that has been moved is deleted from its original location and appears in a balloon labeled Moved in the right margin. The moved content also appears as a double-underlined insertion in its new location.
Deletion: Deletions are removed from the document, and the deleted text appears in a balloon labeled Deleted in the right margin. A small dashed line connects the deletion to the balloon. To make the dashed line appear solid, click the balloon.

Microsoft Office for Mac 2011 tutorial: Track and review document changes 4
Hints
• To change how tracked changes appear (for example, to hide balloons or change the color), click Word > Preferences, and then click Track Changes.
• To hide any type of tracked change, on the Review tab, under Tracking, click Show Markup. Then clear the check mark next to the type of change that you want to hide (for example, Insertions and Deletions).
• A vertical black line appears in the left margin next to all lines that include changes.
• To see all tracked changes in a vertical pane, on the Review tab, under Changes, click Review Pane.
Before you move on
Make sure that you can do the following:
• Identify each type of change by its revision mark.
3. Accept and reject a reviewer's changes To review a document, you can step through each change and accept it or reject it. If a document appears cluttered with revision marks from several reviewers, you can hide changes from specific reviewers.
Let's hide the tracked changes for all but one reviewer, and then accept and reject the reviewer's changes.
On the Review tab, under Tracking, click Show Markup, point to Reviewers, and then click Mike Miller to hide Mike Miller's tracked changes.
Under Changes, click Next.

Microsoft Office for Mac 2011 tutorial: Track and review document changes 5
Notice that Carol Troup's "Tour Offering" insertion is selected.
Click Accept.
Notice that the revision mark is removed, the "Tour Offering" insertion is accepted, and the next change (Carol Troup's "flagship" deletion) is selected.

Microsoft Office for Mac 2011 tutorial: Track and review document changes 6
Click Reject.
Tip Rejected changes and deleted comments are not saved with a document. If you think that you might need to reference them at a later time, save a copy of the document before you reject any changes or delete any comments.
Notice that the revision mark and balloon are removed, the "flagship" text remains in the document, and the next change (Carol Troup's comment) is selected.
Hints
• To undo an accepted or rejected change, click Edit > Undo.
• To accept or reject changes directly in the document, hold down CONTROL and click any revision mark or balloon (or right-click the revision mark or balloon), and then click Accept Change or Reject Change. You can also click Accept and Reject in the upper-right corner of the balloons.
• When you open a document, Word automatically shows all reviewers' changes and comments.
Before you move on
Make sure that you can do the following:
• Show the tracked changes for a single reviewer.
• Accept and reject changes and comments.

Microsoft Office for Mac 2011 tutorial: Track and review document changes 7
4. Add your own changes As long as Track Changes is turned on, any insertions, deletions, formatting changes, text moves, and comments that you add to the document will be tracked. Sometimes it's easier to track your changes by hiding other reviewers' comments first.
Let's hide the tracked changes of the other reviewers, and then delete, insert, and move text in the document.
On the Review tab, under Tracking, click Show Markup, point to Reviewers, and then click Carol Troup to hide Carol Troup's tracked changes.
In the first paragraph, select the phrase "list of," and then press DELETE.
Notice that the text is removed from the document and appears in a balloon in the right margin.
Microsoft Office for Mac 2011 tutorial: Track and review document changes 8
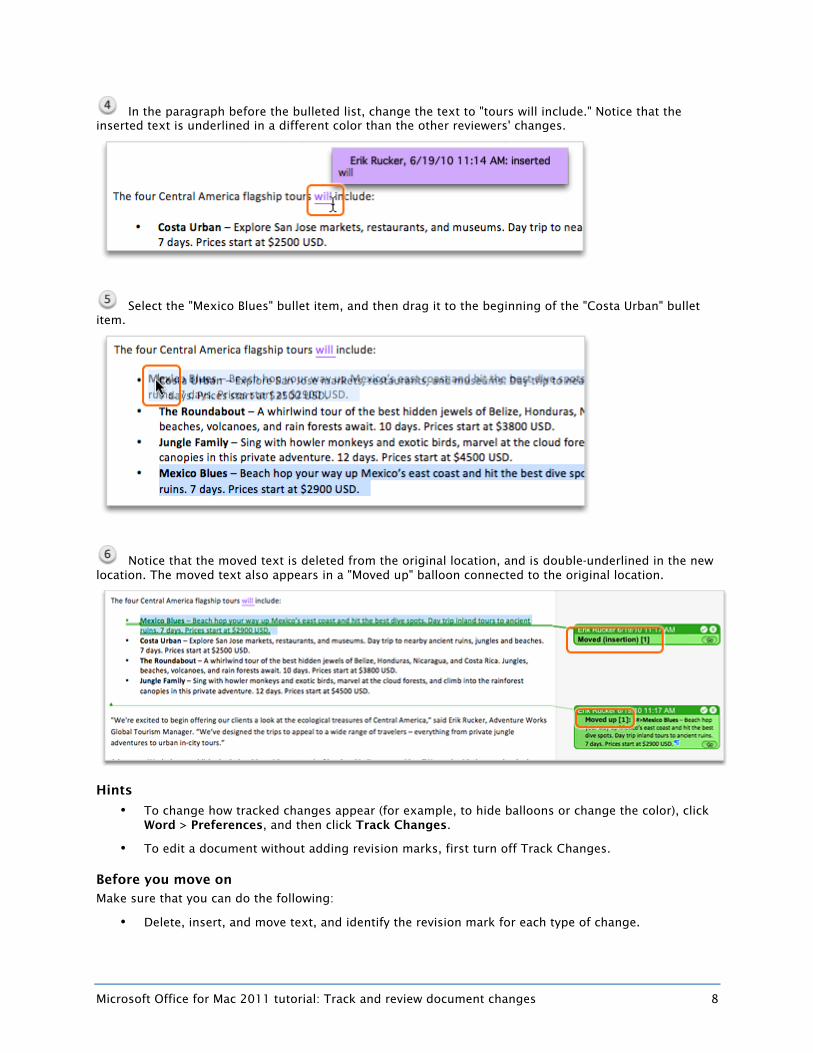
In the paragraph before the bulleted list, change the text to "tours will include." Notice that the inserted text is underlined in a different color than the other reviewers' changes.
Select the "Mexico Blues" bullet item, and then drag it to the beginning of the "Costa Urban" bullet item.
Notice that the moved text is deleted from the original location, and is double-underlined in the new location. The moved text also appears in a "Moved up" balloon connected to the original location.
Hints
• To change how tracked changes appear (for example, to hide balloons or change the color), click Word > Preferences, and then click Track Changes.
• To edit a document without adding revision marks, first turn off Track Changes.
Before you move on Make sure that you can do the following:
• Delete, insert, and move text, and identify the revision mark for each type of change.

Microsoft Office for Mac 2011 tutorial: Track and review document changes 9
5. Work with comments As part of the writing or reviewing process, you may want to add comments to a document. Comments appear in balloons in the right margin of your document.
Let's respond to a comment from another reviewer, and then insert a new comment.
Click Show Markup, point to Reviewers, and then click Carol Troup.
Click in the comment balloon from Carol Troup labeled Comment [2].
On the Review tab, under Comments, click New.

Microsoft Office for Mac 2011 tutorial: Track and review document changes 10
In the comment balloon, type a comment (for example, "I confirmed that the price is correct."). Notice that both comment balloons connect to text that was commented on ($4500).
Tip The [3R2] text in the comment balloon indicates that it is the third comment in the document, in response to comment number two.
In the press release title, select the text "Central America".
Under Comments, click New.
In the comment balloon, type your comment (for example, "Should we mention any of the new South American trips?").

Microsoft Office for Mac 2011 tutorial: Track and review document changes 11
Notice that brackets appear around the selected text, and a solid line connects the balloon to the text that was commented on.
Hints
• The Track Changes feature does not have to be on to insert comments.
• If you don't see the comment balloons, under Tracking, click Show Markup, and then make sure that a check mark appears next to Comments.
Before you move on Make sure that you can do the following:
• Respond to a reviewer's comment.
• Insert a new comment.
6. Hide tracked changes in a printout Tracked changes can clutter a printout if you want to see only the document's content. You can temporarily hide tracked changes for a clean printout.
Let's hide the tracked changes to see a print-friendly view of the document.
Click Tools > Track Changes > Highlight Changes.

Microsoft Office for Mac 2011 tutorial: Track and review document changes 12
Clear the Highlight changes on screen and Highlight changes in printed document check boxes, and then click OK.
Notice that all changes in the document are hidden.
Tip To show tracked changes on the screen again, on the Review tab, under Tracking, click the pop-up menu, and then click Final Showing Markup.
Hints
• As long as Track Changes is on, changes are tracked, even if the revision marks are currently hidden.
Before you move on Make sure that you can do the following:
• Hide tracked changes in a document so that they don't show in the printed version.

Microsoft Office for Mac 2011 tutorial: Track and review document changes 13
7. Make sure that all future changes are tracked Before you distribute a document for review, you can add a password to ensure that all future changes made to a document are tracked. This is the best way to make sure that you see each reviewer's changes and comments.
Let's add a password to make sure that all future changes are tracked.
On the Review tab, under Protection, click Document.
Click Tracked changes, type a password, and then click OK.
Tip If you protect a document for comments, the only way to make changes to the document will be to insert comments.
Microsoft Office for Mac 2011 tutorial: Track and review document changes 14
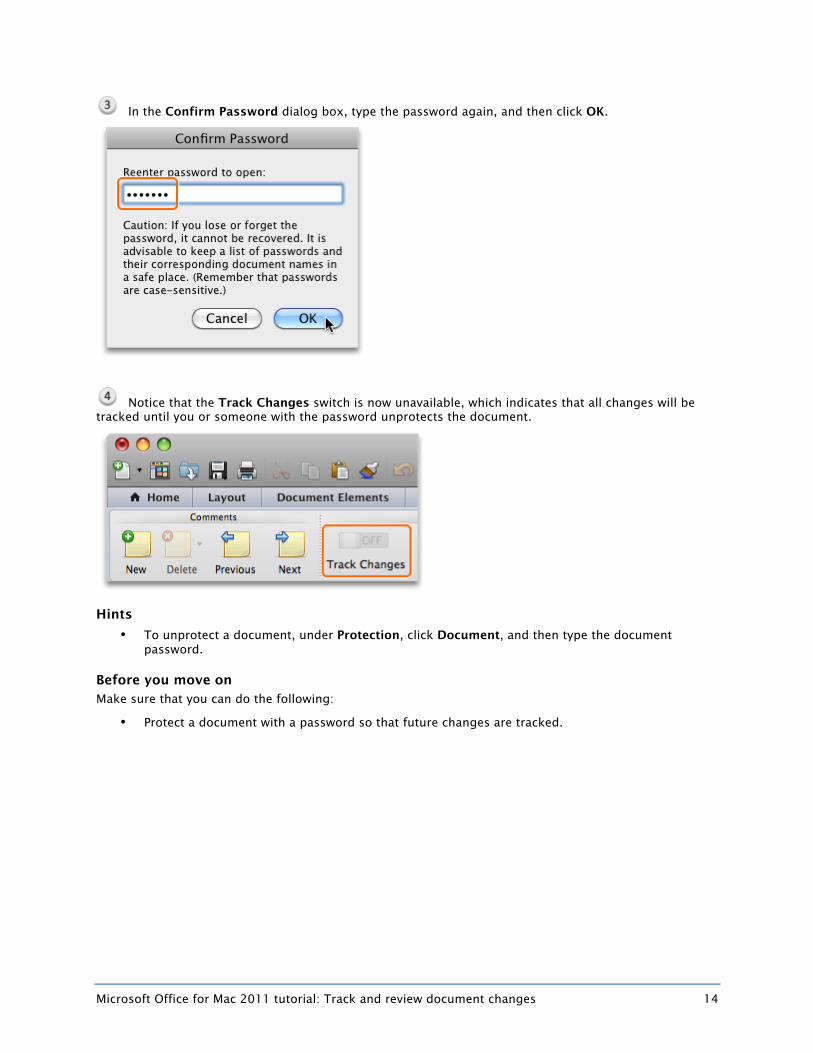
In the Confirm Password dialog box, type the password again, and then click OK.
Notice that the Track Changes switch is now unavailable, which indicates that all changes will be tracked until you or someone with the password unprotects the document.
Hints
• To unprotect a document, under Protection, click Document, and then type the document password.
Before you move on Make sure that you can do the following:
• Protect a document with a password so that future changes are tracked.

Microsoft Office for Mac 2011 tutorial: Track and review document changes 15
Quick Reference Card
To Do this
Turn Track Changes on or off On the Review tab, under Tracking, click the Track Changes switch.
Hide specific types of tracked changes (for example, insertions and deletions)
On the Review tab, under Tracking, click Show Markup. Then, clear the check mark next to the type of revision that you want to hide.
Hide the balloons and show tracked changes in the document only
Click Word > Preferences, and then click Track Changes. Under Balloons, clear the Use balloons to display changes check box.
Hide tracked changes for a specific reviewer
On the Review tab, under Tracking, click Show Markup. Then, point to Reviewers, and clear the check mark beside the reviewer's name.
Step through the document to accept or reject changes one at a time
On the Review tab, under Changes, click Next.
Accept or reject changes without using the tools on the Review tab
Hold down CONTROL and click (or right-click) any revision mark or balloon, and then click Accept Change or Reject Change. You can also click the Accept and Reject buttons located on balloons.
See the time, date, and name of the reviewer who made the change
Rest the pointer over the revision mark. The information appears in a ScreenTip.
Edit a document without tracking the changes
Turn off Track Changes, and then make the changes that you want.
Show hidden tracked changes On the Review tab, under Tracking, click the pop-up menu, and then click Final Showing Markup.
Add a password to ensure all future changes to a document are tracked
On the Review tab, under Protection, click Protect. Then click Tracked changes, and type a password.
Unprotect a document for tracked changes
On the Review tab, under Protection, click Document, and then type the password.
More Hints
• The Track Changes on and off settings apply to the current document only.
• The five types of revision marks that can appear in a tracked document are: deletions, insertions, moved content, formatting changes, and comments.
• When Track Changes is turned on, a vertical black line appears in the left margin next to each line in the document that contains a revision mark.
• Rejected changes and deleted comments are not saved with a document. If you think that you might need to reference them at a later time, save a copy of the document before you reject any changes or delete any comments.
• The Track Changes feature does not have to be on to insert comments.
• As long as Track Changes is on, changes are tracked, even if the revision marks are currently hidden.
• If the Track Changes switch is unavailable, the document has been password protected for tracked changes. All changes will be tracked until you or someone with the password unprotects the document.
• Lost track changes passwords cannot be recovered. Record and keep all passwords in a safe location.