microsoft for hyper-v vss emc networker module for · pdf filerecovering with a windows server...
TRANSCRIPT

EMC® NetWorker® Module forMicrosoft for Hyper-V VSSVersion 8.2 Service Pack 1
User Guide302-001-234
REV 01

Copyright © 2007-2015 EMC Corporation. All rights reserved. Published in USA.
Published January, 2015
EMC believes the information in this publication is accurate as of its publication date. The information is subject to changewithout notice.
The information in this publication is provided as is. EMC Corporation makes no representations or warranties of any kind withrespect to the information in this publication, and specifically disclaims implied warranties of merchantability or fitness for aparticular purpose. Use, copying, and distribution of any EMC software described in this publication requires an applicablesoftware license.
EMC², EMC, and the EMC logo are registered trademarks or trademarks of EMC Corporation in the United States and othercountries. All other trademarks used herein are the property of their respective owners.
For the most up-to-date regulatory document for your product line, go to EMC Online Support (https://support.emc.com).
EMC CorporationHopkinton, Massachusetts 01748-91031-508-435-1000 In North America 1-866-464-7381www.EMC.com
2 EMC NetWorker Module for Microsoft for Hyper-V VSS 8.2 Service Pack 1 User Guide

7
9
11
Introduction 15
Overview....................................................................................................... 16Microsoft Hyper-V environments....................................................................16
Hyper-V CSV in a failover cluster.......................................................16How NMM works with Hyper-V....................................................................... 17Using NMM with Hyper-V............................................................................... 18
Using NMM with Hyper-V in a stand-alone server environment......... 18Using NMM in a CSV environment.................................................... 20Using NMM with Hyper-V VMs over SMB 3.0.....................................21Granular level recovery.....................................................................21Using NMM with Client Direct to AFTD or Data Domain Boost storagedevices............................................................................................ 22
Required privileges....................................................................................... 22Required SMB privileges.................................................................. 23Required Hyper-V CSV privileges...................................................... 23Required RDZ privileges................................................................... 24
Example Hyper-V configurations....................................................................24Hyper-V on physical server configurations........................................ 24Hyper-V storage configurations........................................................ 25Hyper-V configuration requirements for backing up a VM that containsmultiple volumes............................................................................. 27
Backup overview........................................................................................... 27Backup types................................................................................... 28Types of supported backup.............................................................. 28Files included in backups.................................................................28Backup process workflow.................................................................29
Recovery overview.........................................................................................34Types of supported recovery.............................................................34Recovering to the original Hyper-V Server......................................... 35Redirected recovery of a VM to an alternate Hyper-V Server.............. 35
Special character considerations...................................................................35
Backups 37
Planning backups..........................................................................................38NMM capabilities for Window Server 2012 and 2012 R2 environments........................................................................................................ 38Integration services components version......................................... 39Viewing valid application data save sets.......................................... 39
Configuring backups..................................................................................... 40Configuring a Hyper-V client resource............................................................ 43
Creating the client by using the Client Configuration Wizard............. 43
Figures
Tables
Preface
Chapter 1
Chapter 2
CONTENTS
EMC NetWorker Module for Microsoft for Hyper-V VSS 8.2 Service Pack 1 User Guide 3

Creating the client manually by using the NetWorker ManagementConsole............................................................................................46Performing cluster-level and CSV VM backups..................................47Configuring multi-proxy backups......................................................48
Recoveries 51
Overview....................................................................................................... 52Turning the VM offline for recovery................................................................ 52Hosting the recovered virtual systems........................................................... 52Specifying the destinations for the Hyper-V configuration files and virtualsystem.......................................................................................................... 52Selecting Hyper-V recovery options............................................................... 53Selecting the Hyper-V recovery destination....................................................53
Performing Hyper-V recovery to the original machine and location....53Performing a directed Hyper-V recovery to a different machine orlocation........................................................................................... 54
Recovering Hyper-V CSV VMs.........................................................................56SMB 3.0 VM recovery....................................................................... 56CSV VM recovery.............................................................................. 56Recovering multiple CSV VMs to the original location....................... 57Recovering an individual CSV Hyper-V VM to a different location...... 57Recovering with a Windows Server 2012 and 2012 R2 proxy CSVserver...............................................................................................58Troubleshooting RPC service failure messages................................. 59
Granular Level Recoveries 61
Overview....................................................................................................... 62Windows Server 2012 Hyper-V GLR features..................................... 62
Recovering Hyper-V files and folders............................................................. 62Recovering AES-encrypted data from a Hyper-V VM.......................... 64
EMC Data Protection Add-in for SCVMM 65
Overview....................................................................................................... 66Recoveries....................................................................................... 66Backups...........................................................................................66Supported versions..........................................................................66Software dependencies....................................................................67Required privileges.......................................................................... 67Installation and configuration overview............................................68
How the Data Protection Add-in works with SCVMM.......................................68Workflows overview......................................................................... 69GUI overview.................................................................................... 69SCVMM user roles and allowed actions............................................ 70Supported scopes and contexts....................................................... 70
Installation and uninstallation.......................................................................70Installing SCVMM and the SCVMM console...................................... 71Installing SCVMM Update Rollups.................................................... 71Installing the Data Protection Add-in................................................ 71Importing the Data Protection Add-in................................................72Activating the Data Protection Add-in............................................... 72Uninstalling the Data Protection Add-in............................................73Upgrading the Data Protection Add-in.............................................. 74
Configuration................................................................................................ 75
Chapter 3
Chapter 4
Chapter 5
CONTENTS
4 EMC NetWorker Module for Microsoft for Hyper-V VSS 8.2 Service Pack 1 User Guide

Adding NetWorker servers................................................................ 75Removing NetWorker servers............................................................76Setting the refresh interval............................................................... 76Including debug output for logging purposes................................... 76Using multiple NetWorker Servers that define the same clients and VMsavesets.......................................................................................... 76
Data Protection Add-in overview data............................................................ 77Recoveries.................................................................................................... 81
Viewing available VMs..................................................................... 83VM Encrypted Recoveries................................................................. 83Recovering a VM to the original location...........................................84Redirected recoveries.......................................................................85Recovering a deleted VM..................................................................88
Monitoring.................................................................................................... 88Troubleshooting............................................................................................ 89
Recovered VM doesn’t start..............................................................89Installation fails due to access issue................................................89Importing fails due to access issue.................................................. 89VM attributes might display incorrect values.................................... 90Redirected recovery appears to succeed but no VM appears in Hyper-VManager.......................................................................................... 90Checks for redirected recovery failures ............................................ 90Avoid VM names with the same name within an SCVMM context......90Cluster VM backups do not display on the Recover page.................. 91Unable to recover if 'localhost' used as NetWorker server name....... 91Redirected recovery fails when the VM name or VM configuration pathcontains special characters..............................................................91
Best Practices and Recommendations 93
Overview....................................................................................................... 94Hyper-V Server backup and recovery best practices.......................................94Hyper-V VM applications backup and recovery best practices........................95Improving backup performance in Windows Server 2012 and 2012 R2 clusterswith CSV....................................................................................................... 95Data mining using Hyper-V granular level recovery........................................ 96Restrictions and requirements for relocating and recovering data to a differentlocation.........................................................................................................96Restrictions for backup and recovery of Hyper-V VMs in a Windows ServerFailover Cluster............................................................................................. 97Restrictions for Hyper-V VM granular level recovery....................................... 97
Troubleshooting 99
Troubleshooting backups............................................................................100Troubleshooting recovery............................................................................ 100
Recovering SQL Server, Exchange Server, and SharePoint Server Itemsfrom a Hyper-V VM 105
Overview..................................................................................................... 106Recovering items.........................................................................................106
Recovering SQL Server items..........................................................107Recovering Exchange Server items................................................. 108Recovering SharePoint Server items............................................... 109
Chapter 6
Chapter 7
Appendix A
CONTENTS
EMC NetWorker Module for Microsoft for Hyper-V VSS 8.2 Service Pack 1 User Guide 5

113Glossary
CONTENTS
6 EMC NetWorker Module for Microsoft for Hyper-V VSS 8.2 Service Pack 1 User Guide

Two-node Hyper-V failover cluster..................................................................................17Guest backup and recovery environment....................................................................... 18Image-level backup and recovery environment.............................................................. 19Granular level recovery environment.............................................................................. 22Windows Server 2008 host with Hyper-V VMs................................................................ 24NMM backup of Hyper-V components............................................................................ 25Hyper-V storage options................................................................................................ 26Image-level VSS backup workflow..................................................................................30Image-level saved state backup workflow...................................................................... 32Image-level backup workflow for federated backups......................................................33Data Protection Add-in architecture............................................................................... 68Data Protection Add-in for SCVMM Preferences page..................................................... 75Data Protection Add-in Overview page for Administrator, Fabric Administrator, and Read-Only Administrator user roles.........................................................................................78VM Protection Details tooltip for Administrator , Fabric Administrator, and Read-OnlyAdministrator user roles................................................................................................ 78VM Protection Details window for Administrator, Fabric Administrator, and Read-OnlyAdministrator user roles................................................................................................ 79Data Protection Add-in Overview page for Tenant Administrator and ApplicationAdministrator user roles ................................................................................................80Virtual Machine Backup Status tooltip for Tenant Administrator and ApplicationAdministrator user roles................................................................................................ 80VM Protection Details window for Tenant Administrator and Application Administratoruser roles...................................................................................................................... 81Data Protection Add-in for SCVMM Recover page........................................................... 82Data Protection Add-in for SCVMM Monitoring page.......................................................88
12345678910111213
14
15
16
17
18
1920
FIGURES
EMC NetWorker Module for Microsoft for Hyper-V VSS 8.2 Service Pack 1 User Guide 7

FIGURES
8 EMC NetWorker Module for Microsoft for Hyper-V VSS 8.2 Service Pack 1 User Guide
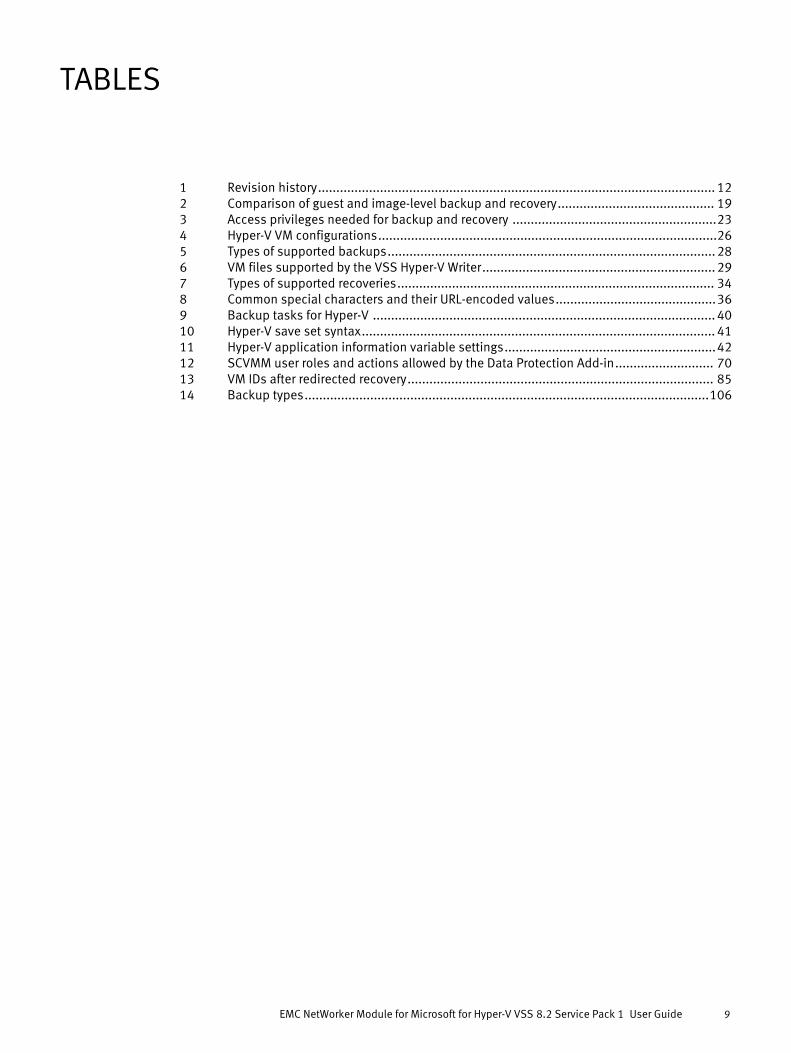
Revision history............................................................................................................. 12Comparison of guest and image-level backup and recovery........................................... 19Access privileges needed for backup and recovery ........................................................23Hyper-V VM configurations.............................................................................................26Types of supported backups.......................................................................................... 28VM files supported by the VSS Hyper-V Writer................................................................ 29Types of supported recoveries....................................................................................... 34Common special characters and their URL-encoded values............................................36Backup tasks for Hyper-V .............................................................................................. 40Hyper-V save set syntax................................................................................................. 41Hyper-V application information variable settings..........................................................42SCVMM user roles and actions allowed by the Data Protection Add-in........................... 70VM IDs after redirected recovery.................................................................................... 85Backup types...............................................................................................................106
1234567891011121314
TABLES
EMC NetWorker Module for Microsoft for Hyper-V VSS 8.2 Service Pack 1 User Guide 9

TABLES
10 EMC NetWorker Module for Microsoft for Hyper-V VSS 8.2 Service Pack 1 User Guide

Preface
As part of an effort to improve its product lines, EMC periodically releases revisions of itssoftware and hardware. Therefore, some functions described in this document might notbe supported by all versions of the software or hardware currently in use. The productrelease notes provide the most up-to-date information on product features.
Contact your EMC technical support professional if a product does not function properlyor does not function as described in this document.
Note
This document was accurate at publication time. Go to EMC Online Support (https://support.emc.com) to ensure that you are using the latest version of this document.
PurposeThis guide contains information about using the NetWorker Module for Microsoft (NMM)Release 8.2 SP1 software to back up and recover Hyper-V VMs using the Volume ShadowCopy Service (VSS) technology.
Note
The NetWorker Module for Microsoft Administration Guide supplements the backup andrecovery procedures described in this guide and must be referred to when performingapplication-specific tasks. Ensure to download a copy of the NetWorker Module forMicrosoft Administration Guide from EMC Online Support (https://support.emc.com)before using this guide.
AudienceThis guide is part of the NetWorker Module for Microsoft documentation set, and isintended for use by system administrators during the setup and maintenance of theproduct. Readers should be familiar with the following technologies used in backup andrecovery:
l EMC NetWorker software
l EMC NetWorker snapshot management
l Microsoft Volume Shadow Copy Service (VSS) technology
EMC NetWorker Module for Microsoft for Hyper-V VSS 8.2 Service Pack 1 User Guide 11

Revision historyThe following table presents the revision history of this document.
Table 1 Revision history
Revision Date Description
01 January 28, 2015 First release of this document for EMC NetWorker Modulefor Microsoft release 8.2 SP1.
Related documentationThe NMM documentation set includes the following publications:
l NetWorker Module for Microsoft Release Notes
l NetWorker Module for Microsoft Administration Guide
l NetWorker Module for Microsoft Installation Guide
l NetWorker Module for Microsoft for SQL and SharePoint VSS User Guide
l NetWorker Module for Microsoft for SQL VDI User Guide
l NetWorker Module for Microsoft for Exchange VSS User Guide
l NetWorker Module for Microsoft for Hyper-V VSS User Guide
l NetWorker Module for Microsoft for Windows Bare Metal Recovery Solution User Guide
l NetWorker Module for Microsoft Advanced Recovery Guide
l NetWorker Performing backup and recovery of SharePoint Server by using NetWorkerModule for Microsoft SQL VDI solution Technical Notes
l NetWorker Performing Exchange Server Granular Recovery by using NetWorker Module forMicrosoft with Ontrack PowerControls Technical Notes
l NetWorker SharePoint BLOB Backup and Recovery by using NetWorker Module forMicrosoft and Metalogix StoragePoint Technical Notes
Special notice conventions used in this documentEMC uses the following conventions for special notices:
NOTICE
Addresses practices not related to personal injury.
Note
Presents information that is important, but not hazard-related.
Typographical conventionsEMC uses the following type style conventions in this document:
Italic Use for full titles of publications referenced in text
Monospace Use for:
l System code
l System output, such as an error message or script
l Pathnames, file names, prompts, and syntax
l Commands and options
Monospace italic Use for variables
Preface
12 EMC NetWorker Module for Microsoft for Hyper-V VSS 8.2 Service Pack 1 User Guide

Monospace bold Use for user input
[ ] Square brackets enclose optional values
| Vertical bar indicates alternate selections - the bar means “or”
{ } Braces enclose content that the user must specify, such as x or y or z
... Ellipses indicate non-essential information omitted from the example
Where to get helpEMC support, product, and licensing information can be obtained as follows:
Product informationFor documentation, release notes, software updates, or information about EMC products,go to EMC Online Support at https://support.emc.com.
Technical supportGo to EMC Online Support and click Service Center. You will see several options forcontacting EMC Technical Support. Note that to open a service request, you must have avalid support agreement. Contact your EMC sales representative for details aboutobtaining a valid support agreement or with questions about your account.
Online communitiesVisit EMC Community Network at https://community.emc.com for peer contacts,conversations, and content on product support and solutions. Interactively engage onlinewith customers, partners, and certified professionals for all EMC products.
Your commentsYour suggestions will help us continue to improve the accuracy, organization, and overallquality of the user publications. Send your opinions of this document to [email protected]
Preface
EMC NetWorker Module for Microsoft for Hyper-V VSS 8.2 Service Pack 1 User Guide 13

Preface
14 EMC NetWorker Module for Microsoft for Hyper-V VSS 8.2 Service Pack 1 User Guide

CHAPTER 1
Introduction
This chapter includes the following sections:
l Overview............................................................................................................... 16l Microsoft Hyper-V environments............................................................................16l How NMM works with Hyper-V............................................................................... 17l Using NMM with Hyper-V....................................................................................... 18l Required privileges............................................................................................... 22l Example Hyper-V configurations............................................................................24l Backup overview................................................................................................... 27l Recovery overview.................................................................................................34l Special character considerations...........................................................................35
Introduction 15

OverviewMicrosoft Hyper-V is a hypervisor-based server virtualization product for MicrosoftWindows Server. Hyper-V enables you to create multiple virtual machines (VMs) on asingle physical server to consolidate workloads. EMC NetWorker Module for Microsoft(NMM) provides image level backup and recovery of the Microsoft Hyper-V role installedon Windows Server 2008, 2008 R2, 2012, and 2012 R2 and on Server Core installationsfor Windows Server 2008, 2008 R2, 2012, and 2012 R2.
NMM utilizes the VSS infrastructure, including writers and providers, to back up andrecover each VM and the Hyper-V Initial Store configuration file (or, in Windows Server2012 and 2012 R2, the host component/parent partition)
NMM supports Hyper-V cluster shared volume (CSV) backup and recovery on MicrosoftWindows Server 2008 R2, 2012, or 2012 R2.
For Hyper-V cluster and CSV environments, including proxy environments, you mustinstall the NetWorker client and NMM on all nodes in the cluster.
The NetWorker Module for Microsoft Installation Guide lists the Hyper-V hardwarerequirements.
Microsoft Hyper-V environmentsThe Microsoft Hyper-V documentation provides a complete and updated list of systemrequirements and supported guest operating system versions.
The EMC NetWorker Online Software Compatibility Guide on EMC Online Support lists themost up-to-date information about the operating systems and versions that NMMsupports.
Hyper-V CSV in a failover clusterTo prevent a Hyper-V Server from becoming a single point of failure, you can create afailover cluster. In a failover cluster, all servers (nodes) run Hyper-V and can host one ormore VMs. A VM can run on multiple nodes in the cluster, but can only be active on onenode at a time.
A failover cluster usually includes a shared storage device that is physically connected toall servers in the cluster. However, only one server at a time can access each storagevolume.
NMM supports failover clustering for Hyper-V through Clustered Shared Volumes (CSV). ACSV is a standard cluster disk with an NTFS volume that is accessible for read and writeoperations by all cluster nodes. This gives a VM complete mobility through the cluster, asany node can be an owner of the VM.
For Windows Server 2008 R2 environments, throughout the duration of the backup, theCSV is in redirected I/O mode. Other nodes cannot directly write to disks. Instead, the I/Ois redirected over the LAN to the owner node performing the backup.
The following figure illustrates a Hyper-V failover cluster with two nodes. There are fourVMs that can fail over between the nodes, and a fifth VM runs exclusively on the secondnode.
Introduction
16 EMC NetWorker Module for Microsoft for Hyper-V VSS 8.2 Service Pack 1 User Guide
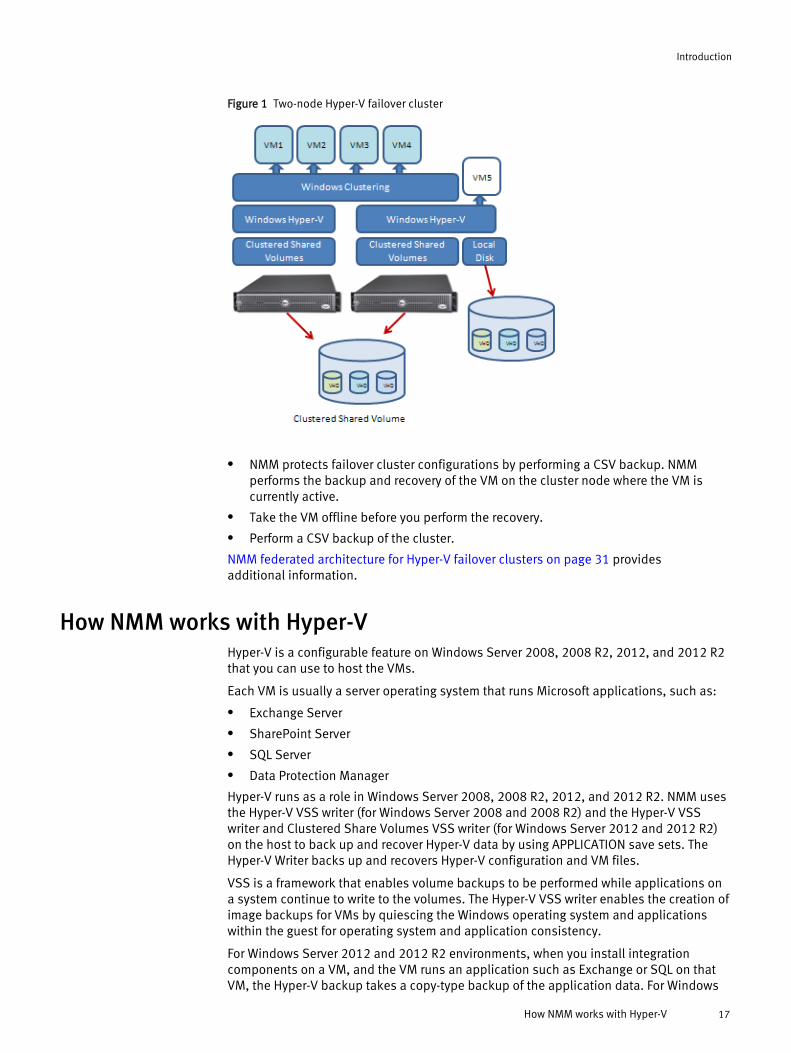
Figure 1 Two-node Hyper-V failover cluster
l NMM protects failover cluster configurations by performing a CSV backup. NMMperforms the backup and recovery of the VM on the cluster node where the VM iscurrently active.
l Take the VM offline before you perform the recovery.l Perform a CSV backup of the cluster.
NMM federated architecture for Hyper-V failover clusters on page 31 providesadditional information.
How NMM works with Hyper-VHyper-V is a configurable feature on Windows Server 2008, 2008 R2, 2012, and 2012 R2that you can use to host the VMs.
Each VM is usually a server operating system that runs Microsoft applications, such as:
l Exchange Serverl SharePoint Serverl SQL Serverl Data Protection Manager
Hyper-V runs as a role in Windows Server 2008, 2008 R2, 2012, and 2012 R2. NMM usesthe Hyper-V VSS writer (for Windows Server 2008 and 2008 R2) and the Hyper-V VSSwriter and Clustered Share Volumes VSS writer (for Windows Server 2012 and 2012 R2)on the host to back up and recover Hyper-V data by using APPLICATION save sets. TheHyper-V Writer backs up and recovers Hyper-V configuration and VM files.
VSS is a framework that enables volume backups to be performed while applications ona system continue to write to the volumes. The Hyper-V VSS writer enables the creation ofimage backups for VMs by quiescing the Windows operating system and applicationswithin the guest for operating system and application consistency.
For Windows Server 2012 and 2012 R2 environments, when you install integrationcomponents on a VM, and the VM runs an application such as Exchange or SQL on thatVM, the Hyper-V backup takes a copy-type backup of the application data. For Windows
Introduction
How NMM works with Hyper-V 17

Server 2008 R2 and earlier environments, the Hyper-V backup takes a full backup of theapplication data.
Using NMM with Hyper-VYou can use NMM with Hyper-V in stand-alone or clustered environments, over SMB 3.0,and with Client Direct to AFTD or Data Domain Boost devices.
Using NMM with Hyper-V in a stand-alone server environmentYou can use NMM to protect a stand-alone Hyper-V environment at the guest and imagelevel.
Guest backup and recoveryWith guest backup and recovery, you install an NMM client on each VM that hostsdatabases or specific applications on the Hyper-V server, for example Microsoft Exchangeor Microsoft SharePoint. NMM considers each VM to be a separate client, and you canperform individual backups of each VM and Microsoft application.
The following figure illustrates Hyper-V guest backup and recovery with NMM.
Figure 2 Guest backup and recovery environment
Image-level backup and recoveryWith image-level backup and recovery, you install the NMM client on the Hyper-VManagement operating system or the parent partition.
The following figure illustrates the image-level backup and recovery environment
Introduction
18 EMC NetWorker Module for Microsoft for Hyper-V VSS 8.2 Service Pack 1 User Guide

Figure 3 Image-level backup and recovery environment
You can perform full image-level backups of individual VMs or the initial store. ForWindows Server 2012 and 2012 R2, you can perform a full image-level backup of theindividual VMs and the host component. The initial store and host component containthe role-based security configuration for Hyper-V. Image-level backups occur from theHyper-V Management operating system instead of from the individual VMs.
Comparing NMM protection methods for Hyper-VYou can choose whether to perform Hyper-V guest or image-level backup and recoverydepending on criterion such as user knowledge of Hyper-V, the Windows operatingsystem running on the guest, and where the NMM software is installed.
The following table provides a comparison of the two methods.
Table 2 Comparison of guest and image-level backup and recovery
Criterion Guest backup and recovery Image-level backup andrecovery
User knowledge of Hyper-V No advanced Hyper-V knowledgeis required
Requires advanced Hyper-Vknowledge
Windows guest operatingsystem
Windows guest operating systemsthat Hyper-V supports, throughthe use of NMM clients
All guest operating systemsthat Hyper-V supports
NMM software installation NMM and NetWorker on eachguest operating system
NMM and NetWorker on themanagement operatingsystem
NetWorker server networkconnection
Required for each VM Required only for the Hyper-Vserver
Introduction
Using NMM with Hyper-V in a stand-alone server environment 19

Table 2 Comparison of guest and image-level backup and recovery (continued)
Criterion Guest backup and recovery Image-level backup andrecovery
Deduplication with theappropriate Data Domain orAvamar device
Data within each VM Data at image-level
Support for iSCSI/pass-through media
Yes No
Support for individualbackup of each VM
Yes Yes
Application-aware backupand recovery
Yes, with NMM for applicationssuch as:
l Microsoft Exchange Server
l Microsoft SharePoint Server
l Microsoft SQL Server
l Microsoft Active Directory
No
VM status for backup VM must be running VM does not need to berunning
Backup consumption of CPU,RAM, and disk resources
On the VM On the Hyper-V server
Backup customization,including exclusion of certainfiles or file types
Yes No
Recovery of individual filesand folders
Yes By using GLR
Disaster recoveryrequirements
Windows bare metal recovery(BMR) uses a two-step recovery:Recover the operating systemstate critical volumes.
Use NMM to recover applicationsand non-critical volume data.
One-step recovery of backupdata from NMM. However,backups are a “crash-consistent” snapshot of thefull VM image, which might ormight not reliably support afull system recovery withoutdata loss.
Using NMM in a CSV environmentCSV is a feature of failover clustering available in Windows Server 2008 R2, 2012, and2012 R2 for use with the Hyper-V role. CSV is available for Hyper-V VMs created withWindows Server 2008 R2, 2012, or 2012 R2 and is supported by NMM.
A CSV is a clustered disk that contains an NTFS volume. Each node within the cluster canaccess the volume for read and write operations. This gives the VM complete mobilitythroughout the cluster as any node can be the VM owner, and changing owners is easy.
A CSV is not owned by any one node in the cluster. Instead, the CSV travels betweencluster nodes as the backup and recoveries occur. Microsoft and NMM refer to the nodein the cluster where a CSV is locally mounted as the “coordinating node”. NMM must
Introduction
20 EMC NetWorker Module for Microsoft for Hyper-V VSS 8.2 Service Pack 1 User Guide

perform the backup and recovery operations from the coordinating node of the CSV ofeach VM that participates in the backup or recovery operation.
To perform a backup or recovery operation, NMM locates the VM cluster node that ownsthe CSV and then makes the node the CSV coordinating node. The same is true forclustered VM recovery: NMM finds the currently configured node for the VM and recoversthe VM to that cluster node after making it the CSV coordinating node. When a VMalready exists in the cluster, you must perform the recovery operation on the cluster nodethat owns the VM.
NMM supports physical proxy nodes for Windows Server 2012 and 2012 R2 Hyper-V CSVbackups. When you specify a Preferred Server Order List (PSOL) in the ApplicationInformation attribute for the client resource of Cluster Server Name, NMM performsshadow copies and backups on each proxy node. The shadow copies are done serially,one proxy node at a time. After all shadow copies are successfully completed, the proxynodes perform VM data backups in parallel. The recovery process is the same as for anormal Hyper-V VM.
For Hyper-V cluster and CSV environments, including proxy environments, you mustinstall the NetWorker client and NMM on all nodes in the cluster.
Using NMM with Hyper-V VMs over SMB 3.0NMM supports Hyper-V VMs residing on Windows Server 2012 and 2012 R2 SMB 3.0.Windows Server 2012 and 2012 R2 allows Hyper-V VMs to store their data on SMB 3.0shares and provides capabilities to take snapshots and back up the data remotely.
To back up application-consistent data, install NMM on the Hyper-V servers. The storagelocation presents no difference in configuring backups and in performing backups andrecoveries for a VM on a stand-alone server or failover cluster. The same operations thatprotect local VMs also apply to the VMs on SMB file shares. Required SMB privileges onpage 23 describes the required permissions for SMB backup and recovery.
Granular level recoveryWhen you perform image-level backups with NMM, you can use granular level recovery(GLR) to recover an image backup to a temporary file system on a different client, andthen browse and recover individual files and folders.
To browse and recover individual files and folders, select the GLR option when you installNMM on the virtual or physical machine that you want to use for GLR. This machine istypically a different machine than the management operating system.
The following figure illustrates an environment where NMM is installed on a VM toperform a GLR.
Introduction
Using NMM with Hyper-V VMs over SMB 3.0 21

Figure 4 Granular level recovery environment
Using NMM with Client Direct to AFTD or Data Domain Boost storage devicesYou can store Hyper-V backups on the NetWorker server, on an AFTD device, or on an EMCData Domain® system. By default, NMM stores backups on devices that are local to theNetWorker server.
The NMM software supports the NetWorker Client Direct feature. The Client Direct feature:
l Enables clients with network access to AFTD or Data Domain Boost storage devices tosend their backup data directly to the devices, bypassing the NetWorker storagenode. The storage node manages the devices for the NetWorker clients, but does nothandle the backup data.
l Reduces bandwidth usage and bottlenecks at the storage node.
l Provides highly efficient backup data transmission.
Destination devices must specify their complete paths in their Device Access Informationattribute. If the Client Direct backup is not available, NMM performs a traditional storagenode backup instead. When you create an NMM client resource in NMC, NetWorkerenables the Client Direct feature by default, but you can disable the Client Direct featurein each client resource.
The nmm.raw backup log will display details about the Client Direct activity for the Hyper-V server.
The NetWorker Administration Guide provides details about the Client Direct to AFTD orData Domain Boost storage devices.
Required privilegesThe required privileges for backing up and recovering Hyper-V VMs are the same as otherapplications. However, backup and recovery over SMB 3.0 or in a CSV or RDZenvironment require additional privileges.
The NetWorker Module for Microsoft Administration Guide and the NetWorker Module forMicrosoft Installation Guide provide additional details.
Introduction
22 EMC NetWorker Module for Microsoft for Hyper-V VSS 8.2 Service Pack 1 User Guide

Required SMB privilegesSMB backup and recovery requires additional privileges beyond Hyper-V backup andrecovery privileges.
The following table describes the required privileges for SMB backup and recovery.
Table 3 Access privileges needed for backup and recovery
SMB configuration Required privileges
All Do one of the following:
l Add backup permissions for the backup user on all file servers in thecluster.
l Add the backup user as the cluster administrator (domainadministrator).
File server scale out In the Local Backup operator group of each SMB node, configure theapplication server as a member of the Backup Operators group.
Cluster Add each CSV node to the SMB nodes of the Local Backup Operatorgroup.
Verify that Replication Manager (RM) replication service is running under an account thathas backup permissions on all file servers or domain administrator permissions. Verifythat the Hyper-V server and the file server are in the same domain. Recoveries require thesame permissions as the backup user.
To enable communication between the SMB host and clients, install the File ShareShadow Copy Agent on the file server that hosts the SMB file shares.
Required Hyper-V CSV privilegesHyper-V CSV backup and recovery requires additional privileges beyond Hyper-V backupand recovery privileges. You must create a Domain User for Hyper-V backups andrecoveries. During client resource configuration for NMM Hyper-V backups, provide thisDomain User account and password (instead of providing a Domain Administratoraccount and password) for backup and recovery.
Procedure
1. Create a Domain User for Hyper-V backups and recoveries.
2. Add the following groups to the newly created Domain User:
l Backup Operators
l Hyper-V Administrator
l Windows Authorization Access Group
l Users
l Remote Desktop Users
l Add Group Policy User Control
3. On each cluster node, log in and perform the following steps:
a. Provide local administrator privileges to the Domain User.
b. Provide access for cluster management to the group. Open PowerShell and typethis command:
Introduction
Required SMB privileges 23

PS C:\....\.NMMEMC> Grant-ClusterAccess -User domain\user -Full
Required RDZ privilegesNMM supports NetWorker Restricted Data Zones (RDZ). An RDZ adds an additionalpermission checking layer, which ensures that RDZ administrators accessing areas thathave not been specifically coded for this feature, by default, do not have access to thoseareas.
To perform SMB and CSV backups and recoveries in an RDZ, you must configureadditional permissions and configuration. The NetWorker Module for MicrosoftAdministration Guide provides details about the required permissions and configuration.The NetWorker Administration Guide provides detailed information about the NetWorkerRDZ feature.
Example Hyper-V configurationsThis section describes some of the possible Hyper-V configurations.
Hyper-V on physical server configurationsThe following figure illustrates a physical server that runs Windows Server 2008. Thisconfiguration also applies to Windows Server 2008 R2, 2012, and 2012 R2. The Hyper-Vrole has been enabled on the physical server, and four VMs have been created, eachrunning a separate operating system and different Microsoft applications.
Figure 5 Windows Server 2008 host with Hyper-V VMs
Introduction
24 EMC NetWorker Module for Microsoft for Hyper-V VSS 8.2 Service Pack 1 User Guide

For complete data protection, configure client resources for each of the following:
l Hyper-V VMs on the Hyper-V Server
l The applications within each VM
The following figure describes what the NMM client backs up in Hyper-V, by using theMicrosoft Hyper-V VSS Writer and NMM save sets.
Figure 6 NMM backup of Hyper-V components
Hyper-V storage configurationsThere are a wide variety of storage configurations available for Hyper-V VMs, such aspassthrough disks, direct-attached storage (DAS), storage area networks (SANs), and fileservers.
The following documentation provides more details about hardware and softwarerequirements for Hyper-V backup and recovery operations:
l The Microsoft website provides more details and the most up-to-date informationabout storage hardware supported by Hyper-V.
l The NetWorker Online Software Compatibility Guide provides the most up-to-dateinformation about supported software for Hyper-V backup and recovery in NMM.
The following figure illustrates Hyper-V storage options.
Introduction
Hyper-V storage configurations 25

Figure 7 Hyper-V storage options
The following table lists the Hyper-V VM configurations.
Table 4 Hyper-V VM configurations
Configuration Type
1 VHD1 on DAS
2 DAS passthrough
3 VHD2 on LUN
4 LUN passthrough
5 iSCSI target attached within VM
6 VHD3 on file server
NMM supports Hyper-V snapshots of virtual and physical machines with the MicrosoftVSS provider, depending on the hardware storage type and partition type.
The following list describes how NMM supports the configuration types listed in the tableabove:
l Snapshot support — NMM supports snapshots for both the Hyper-V server and VMs:
n VM — Install NMM on the VM to perform the backup. If you are using the MicrosoftSoftware VSS provider, NMM supports all configurations.
n Hyper-V server — Install NMM on the parent to perform the backup. If you areusing the Windows VSS system provider, NMM supports configuration 1 (VHD1),configuration 3 (VHD2), and configuration 6 (SMB 3.0).
l Cluster support — In addition to the supported configurations listed for snapshots,parent and child cluster scenarios support the following storage configurations:
Introduction
26 EMC NetWorker Module for Microsoft for Hyper-V VSS 8.2 Service Pack 1 User Guide

n VM clustering — Install NMM on the VM to perform the backup:For failover resource drives, NMM supports configuration 5 (LUN exposed directlyto VM). This is the only configuration that Microsoft currently supports forWindows Server 2008 Failover Clustering.
For operating system drives or local drives for the cluster nodes, the VM supportlisted under Snapshot support applies.
n Hyper-V server clustering — Install NMM on the parent to perform the backup.NMM supports all configurations.
When performing VM backups while executing on the Hyper-V server, the MicrosoftHyper-V Writer does not include the passthrough or child-attached iSCSI drives for a VM.Configurations such as 2, 4, and 5 are not supported by the Hyper-V Writer. Configuration6 is not supported because the VSS framework does not support network shares forWindows Server 2008 and 2008 R2.
Hyper-V configuration requirements for backing up a VM that contains multiplevolumes
When there are multiple virtual hard disks in the guest, the backup of the associated VMfrom the Hyper-V server might fail because of a Microsoft limitation. When there aremultiple volumes on the guest, VSS determines the shadowstorage area for thesnapshots based on which volume has more space. This can lead to a condition wherethe snapshots of volumes C and D both reside on volume D because volume D has morespace. During the snapshot revert stage, PostSnapshot, the snapshot of volume Csnapshot might be lost if the snapshot of volume D snapshot is reverted first.
To prepare a multiple volume guest for backup:
1. Use the vssadmin command to force the shadowstorage of each volume to occur onthe same volume. Run the following commands from inside each guest, not theparent physical Hyper-V Server.vssadmin Add ShadowStorage /For=C: /On=C:vssadmin Add ShadowStorage /For=D: /On=D:
2. Repeat as needed for each volume in the VM.
Backup overviewYou can perform full image-level backups of individual VMs or the initial store (or, inWindows Server 2012 and 2012 R2, the host component), which contains the role-basedsecurity configuration for Hyper-V.
Include the following backups in the backup strategy for a Hyper-V environment:
l Stand-alone Hyper-V servers and Hyper-V images
l Clustered Shared Volumes in a Hyper-V environment
Perform these backups regularly on either an on-demand or scheduled basis.
NOTICE
NMM image-level backups do not back up the management operating system. To protectthe Hyper-V management operating system, perform a disaster recovery backup.
Introduction
Hyper-V configuration requirements for backing up a VM that contains multiple volumes 27

Backup typesYou can perform both application and crash consistent image-level backups with NMM.
Application and crash consistent backups differ in the following ways:
l With an application-consistent backup, VSS runs in-guest and freezes the operatingsystem and all application states. Ensure that the VM is online and VSS-capable, andensure that you have installed Microsoft Integration Components (IC).
l With a crash consistent backup, the VM is offline or does not have the IC installed. Inthis case, the VM is paused before shadow copy creation and resumed after theshadow is created.
The Hyper-V writer in the management operating system determines if the backup imageis application consistent or crash consistent. You do not need to select the backup typewhen you perform on-demand or scheduled backups.
With image-level saved state or offline backups, the backup operation puts the VM into asaved state during the processing of the PrepareForSnapshot event. The backup processtakes snapshots of the appropriate volumes and then returns the VM to the previousstate during the processing of the PostSnapshot event.
Use image-level saved state backups when you cannot install Integration Components(IC) on the Windows clients or when the guest operating system (for example, Linux) doesnot support VSS. These backups do not communicate with the Hyper-V VSS writer in theVM. As a result, they ensure crash consistency, not application consistency, of the writersrunning in the VM.
Types of supported backupYou can perform disaster recovery backups, federated image-level backups of clusters,image level backups of stand-alone servers, and backups over SMB 3.0.
The following table lists the supported types of backup.
Table 5 Types of supported backups
Type of backup Includes
Disaster recovery backup for Hyper-Vserver
Does not include VMs and Initial Store (or, in WindowsServer 2012 and 2012 R2, the host component).
Federated Hyper-V image level backupof Hyper-V clusters
Includes VMs which are stored on clustered sharedvolumes.
Hyper-V image level backup of stand-alone Hyper-V servers
Includes all VMs and Initial Store (or, in Windows Server2012 and 2012 R2, the host component).
Hyper-V backup over SMB 3.0 Includes all VMs that are stored on SMB 3.0 file servers.
Files included in backupsThe Hyper-V VSS Writer reports certain files for each VM during image-level backups withNMM.
The following table lists the reported file type and extension.
Introduction
28 EMC NetWorker Module for Microsoft for Hyper-V VSS 8.2 Service Pack 1 User Guide

Table 6 VM files supported by the VSS Hyper-V Writer
File type Fileextension
Description
Virtual Hard Disk files(Windows Server 2008and earlier)
.VHD For VMs created with Windows Server 2008 andearlier, Hyper-V uses the Microsoft Virtual Hard Disk(VHD) specification to store virtual hard disks for VMs.A VM can have one or more virtual disks.
Virtual Hard Disk files(Windows Server 2012and later)
.VHDX For VMs created with Windows Server 2012 and later,Hyper-V uses the Microsoft Virtual Hard Disk (VHDX)specification to store virtual hard disks for VMs. A VMcan have one or more virtual disks.
VM configuration .XML Hyper-V uses a VM configuration file in XML format tostore VM settings (for example, CPU, memory, VHDs).
VM Running State files .BIN.VSV
Hyper-V uses a VM configuration file in XML format tostore VM running state (memory) files.
Virtual Hard DiskDifferencing files
.AVHD A VM snapshot creates one differencing VHD file perVM VHD.
VM ConfigurationSnapshot(s)
.XML A VM snapshot creates a copy of the current VMconfiguration and saves it to enable rollback.
Backup process workflowThe workflow for Hyper-V backups with NMM differs greatly, depending on theconfiguration and backup type.
Image-level VSS backup workflowThe VSS writer enables the creation of image backups for virtual machines by quiescingthe Windows operating system and applications within the guest for operating systemand application consistency.
The following figure illustrates the workflow for an image-level VSS backup.
Introduction
Backup process workflow 29

Figure 8 Image-level VSS backup workflow
During an image-level VSS backup, the following events occur:
1. The NetWorker server sends a request to the NMM client on the Hyper-V managementoperating system to start the backup for the specified VMs.
2. NMM sends a request to the VSS framework to create a point-in-time consistentbackup for the VM.
3. The VSS framework contacts the Hyper-V VSS writer and requests that the writerprepare for shadow volume copy (SVC) for the specified VM.
4. The Hyper-V VSS writer establishes a communication path with Hyper-V VSSIntegration Components (IC) on the VMs that are being backed up.
5. The Hyper-V VSS IC requests an SVC from VSS inside the VMs.
6. Inside the VM, VSS sends a prepare for SVC request to all applications within the VM.All of the applications are quiesced, and then control is returned to VSS.
7. VSS creates an SVC inside the VM.
8. VSS returns control to the VSS IC requestor.
9. When the SVC completes, the Hyper-V VSS IC requestor notifies the Hyper-V VSSwriter and CSV VSS writer (Windows Server 2012 and 2012 R2 only) on themanagement operating system.
10. The Hyper-V VSS writer returns control to VSS.
Introduction
30 EMC NetWorker Module for Microsoft for Hyper-V VSS 8.2 Service Pack 1 User Guide
11. VSS creates an SVC on the management operating system for the required volumes.
12. The post SVC process occurs to synchronize changes between the SVC created on theVM and the shadow copy created on the physical machine.
13. VSS returns control to NMM.
14. NMM performs a backup from the SVC.Ensure that the IC versions for the backup Hyper-V Server and the guest VM match. Ifyou plan to recover the guest VM to an alternate Hyper-V Server, then ensure that thealternate Hyper-V Server uses the same version of IC.
NMM federated architecture for Hyper-V failover clustersNMM supports failover clusters through a federated architecture that manages backupand recovery across the Hyper-V cluster. The federated architecture complies withMicrosoft CSV and Hyper-V cluster rules. The federated architecture provides failoverresiliency for Hyper-V highly available VMs by determining which physical cluster node isrunning a VM at the time of a backup or recovery operation.
The federated architecture includes two roles:
l Primary role—Provides the point of communication for the NetWorker browse,backup, and recovery jobs. The primary role also controls the high-level VM imagebackup and recovery workflow across the cluster nodes.
l Secondary role—Provides low-level VM image backup and recovery workflow onspecific cluster nodes.
You use the NMC client configuration wizard to configure the NMM Windows CSV client.After you configure the CSV client, NMM issues browse, backup, and recovery jobsagainst the NMM CSV client name.
The NMM process starts when NetWorker issues a job (workorder) to the NMM WindowsCSV client that is operating in the primary role. For VM image backup and recoveryoperations, the primary role determines which cluster nodes run the VMs specified in thejob (workorder), and then dispatches sub-jobs to the appropriate cluster nodes. Adispatched sub-job results in an NMM process starting on the target cluster node, andthat process operates in the secondary role. The secondary role manages the CSVs andinteracts with the Microsoft Hyper-V VSS writer for backup and recovery operations.
Image-level saved state backup workflowIf a virtual machine is paused when a backup occurs, then the state changes to a savedstate after the backup, which is also called an offline backup.
The following figure illustrates the workflow for an image-level saved state backup.
Introduction
Backup process workflow 31

Figure 9 Image-level saved state backup workflow
During an image-level saved state backup, the following events occur:
1. The NetWorker server sends a request to the NMM client on the Hyper-V managementoperating system to start the backup for the specified VMs.
2. NMM sends a request to VSS to create a point-in-time consistent backup for the VM.
3. VSS contacts the Hyper-V VSS writer and requests a prepare for SVC for the specifiedVM.
4. The Hyper-V VSS writer sends a request to the hypervisor to put the specified VMsinto a pause state to freeze the I/O.
5. The Hyper-V VSS writer returns control to VSS.
6. VSS creates an SVC on the management operating system for the required volumes.
7. The Hyper-V writer returns the specified VM to running state.
8. VSS returns control to NMM.
9. NMM performs a backup from the shadow copy volume copy.
Introduction
32 EMC NetWorker Module for Microsoft for Hyper-V VSS 8.2 Service Pack 1 User Guide

Image-level backup workflow in Hyper-V federated backupsFederated Hyper-V image-level backups of Hyper-V clusters include VMs that are storedon cluster shared volumes (CSVs).
The following figure illustrates the primary and secondary CSV backup workflows inHyper-V federated backups.
Figure 10 Image-level backup workflow for federated backups
Windows Server 2008 R2 and earlierDuring a Windows Server 2008 R2 and earlier Hyper-V federated backup, the followingevents occur:
1. The primary NMM client receives a work order from the NetWorker server. The workorder lists the VMs to back up.
2. NMM queries the cluster database to retrieve the active node for each VM.
3. NMM builds the sub-work orders for each node.
4. NMM serializes the backup across all cluster nodes.
5. The primary NMM client creates a final view of the backup based on the partial viewsreceived from the secondary clients.
6. The secondary NMM client receives a work order from the primary CSV.
7. The secondary NMM client calls the CSV API to discover the required CSV volume andclear the CSV backup state.
8. The VSS and Hyper-V VSS Writer are called to select the VMs for image backup and tocreate a shadow copy with the point-in-time copy of the VM files.
9. NMM backs up the VM files from the SCV to the NetWorker server.
10. The secondary NMM client creates a partial view of the backup and forwards it to theprimary NMM client.
Introduction
Backup process workflow 33

Windows Server 2012 and 2012 R2 CSV with no proxy nodeDuring a Windows Server 2012 and 2012 R2 Hyper-V federated backup with no proxynode, the following events occur:
1. The primary NMM client receives the save sets from the NetWorker Server, listing theVMs to backup.
2. The CSV API is called to discover the required CSV volume.
3. The VSS and Hyper-V VSS Writer and CSV VSS Writer are called to select the VMs forthe image backup and to create a shadow copy with the point-in-time copy of the VMfiles.
4. The VM files are backed up from the shadow copy to the NetWorker server.
Windows Server 2012 and 2012 R2 CSV with proxy nodeDuring a Windows Server 2012 and 2012 R2 Hyper-V federated backup with a proxynode, the following events occur:
1. The primary NMM client receives the save sets from the NetWorker Server, listing theVMs to backup and list of proxy servers.
2. The primary NMM client starts the backup on the proxy sever.
3. The VM files are backed up from the shadow copy to the NetWorker server.
Recovery overviewThe following recovery options are available when you perform regular backups asdiscussed in Backup overview on page 27:
l Perform a recovery of a VM to its original location on the original Hyper-V Server.
l Perform a redirected recovery of a VM to an alternate Hyper-V server.
l Perform a redirected recovery of a VM on the same Hyper-V server to a differentlocation.
l Perform a GLR of individual files and folders.
Types of supported recoveryThe following table lists the supported types of recoveries.
Table 7 Types of supported recoveries
Type of recovery Includes
Disaster recovery for Hyper-V server Hyper-V Server and role.
Federated Hyper-V image levelrecovery of Hyper-V clusters
VMs which are stored on clustered shared volumes.
VM recovery Individual VMs and the Initial Store (or, in WindowsServer 2012 and 2012 R2, the host component).
Granular level recovery Individual files and folders from a VM backup.
Introduction
34 EMC NetWorker Module for Microsoft for Hyper-V VSS 8.2 Service Pack 1 User Guide

Recovering to the original Hyper-V ServerYou might need to recover a VM to its original location on the original Hyper-V Server fromwhich the backup was performed if one certain scenarios occurs.
Recover to the original location when:
l You need to roll back the VM because a patching or virus issue occurred.
l You need to perform disaster recovery of the VM after a disk crash.
l The VM was accidentally deleted.
When you recover a VM to its original location. The recovery process deletes or overwritesall files on the VM, if the host exists.
Performing Hyper-V recovery to the original machine and location on page 53 describeshow to recover a VM to the original location.
Redirected recovery of a VM to an alternate Hyper-V ServerYou can recover a VM to an alternate Hyper-V server.
To perform the recovery:
l Select a different Hyper-V server for the VM recovery process.
l Select a different file system location for the files on the original Hyper-V Server.
l In a clustered environment, select the CSV where the files will be placed during arecovery.
Performing a directed Hyper-V recovery to a different machine or location on page 54describes how to recover a VM to an alternate Hyper-V Server.
Special character considerationsNMM Hyper-V restricts the use of special characters in VM names and configurationpaths.
Supported characters
NMM Hyper-V supports the following characters in VM names and VM configurationpaths, including stand-alone, CSV, and SMB 3.0 configurations:
l Alpha numeric (A–Z, a–z, 0–9)
l - . [ ] _ { } + = ` ~ ! # $ % ^ & ( )
l Space
If a Hyper-V save set contains a VM name or VM configuration path that includes acharacter not listed above, the backup or recovery might fail. For example, foreignlanguage character sets, such as Japanese or German, are not supported.
Backups
If a Hyper-V VM name or VM configuration path contains a character not listed above, theCSV backup fails. However, backups of VMs in a stand-alone or SMB configurationsucceeds if the VM name or configuration path contains a character not listed above.
Recovery
Recovery to the original location succeeds if the VM name or configuration path containsa character not listed above. Redirected recoveries to stand-alone or CSV destinations failwhen the VM name or VM configuration path contains a character not listed above. NMMdoes not support redirected recoveries for SMB 3.0.
Introduction
Recovering to the original Hyper-V Server 35

Save set names
When specifying a save set name that contains a character not listed above, replace thespecial character with a URL-encoded value. URL encoding converts non-ASCII andUnicode characters into a format that NMM supports.
The following table lists the most commonly used special characters and their associatedURL values.
Table 8 Common special characters and their URL-encoded values
Special character URL-encoded value Special character URL-encoded value
\ %5C ? %3F
/ %2F ] %5D
" %22 [ %5B
% %25 } %7D
# %23 { %7B
& %26 ^ %5E
< %3C ‘ %60
> %3E | %7C
For example, a save set that is named APPLICATIONS:\Microsoft Hyper-V\vmA&B should be specified as APPLICATIONS:\Microsoft Hyper-V\vmA%26B.
Introduction
36 EMC NetWorker Module for Microsoft for Hyper-V VSS 8.2 Service Pack 1 User Guide

CHAPTER 2
Backups
This chapter includes the following sections:
l Planning backups..................................................................................................38l Configuring backups............................................................................................. 40l Configuring a Hyper-V client resource.................................................................... 43
Backups 37

Planning backupsBefore backing up Hyper-V VMs, review the following information:
l NMM capabilities for Window Server 2012 and 2012 R2 environments on page 38
l Integration services components version on page 39
l Viewing valid application data save sets on page 39
NMM capabilities for Window Server 2012 and 2012 R2 environmentsNMM supports Windows Server 2008 R2, 2012, and 2012 R2 Hyper-V stand-alone serversand CSVs. NMM support for Windows Server 2012 and 2012 R2 Hyper-V stand-aloneservers is similar to Windows Server 2008 and 2008 R2, and stand-alone server backupand recovery is the same. In Windows Server 2012 and 2012 R2, the Initial Storeconfiguration file is replaced with the Host Component configuration file.
Backups over SMB 3.0NMM supports Hyper-V VMs residing on Widows Server 2012 and 2012 R2 SMB 3.0. Youback up stand-alone servers and non-CSV failover clusters over SMB the same way youback up local VMs. To back up CSVs over SMB, NMM does not use federated backuparchitecture. Instead, you configure a backup for each server like a stand-alone Hyper-Vserver.
Windows Server 2012 and 2012 R2 Hyper-V CSVsFor Windows Server 2012 and 2012 R2, Microsoft has released several specialrequirements and special APIs to support backup applications. A backup application canback up all the CSVs from a single node. CSVs are not required to be put in I/ORedirection Mode, and CSVs can be backed up in parallel.
The Windows Server 2012 and 2012 R2 interoperability backup application is CSV-awarebecause the CSV writer metadata information needs to be updated to its componentname by querying the primary server for CSV resources.
In Windows Server 2012 and 2012 R2, the new CSV VSS writer has the capability toreport the backup components on the behalf of a remote node. This CSV VSS Writer canalso take the snapshots of volumes on the remote node. These features enable NMM toback up not only the local image of a Hyper-V VM, but also to back up the image locatedon a remote node. This allows for more configuration options. For example, you candedicate a single node to back up the cluster.
Windows Server 2012 and 2012 R2 Hyper-V CSV Continuous AvailabilityDue to enhancements in Windows Server 2012 and 2012 R2 CSVs, you can back up CSVVMs as part of a highly available (cluster-aware) backup or a physical proxy node backup.The following sections provide an overview of how to configure these backups.
Highly Available Backups (cluster-aware backups)
Cluster-aware backups are highly available because you install NMM on each node in thecluster. If one node is not available, NMM initiates the backup from the node thatresolves to the cluster server name at runtime.
Procedure
1. Install NMM on each node in the cluster.
Backups
38 EMC NetWorker Module for Microsoft for Hyper-V VSS 8.2 Service Pack 1 User Guide

2. Create a dummy NetWorker client resources for each node in the cluster.
3. Create a client resource for the cluster server name and specify the save sets to backup. Add this client to a backup group.
4. At runtime, the cluster server name resolves to one of the nodes in the cluster. Thisnode becomes the master backup node.
Windows 2012 and 2012 R2 Scale Out File ServerIf a virtual machine is hosted on a Windows 2012 or 2012 R2 Scale Out File Server, thenon the standalone machine where the VM runs, install the Failover Clustering feature. TheMicrosoft documentation provides details.
Integration services components versionEnsure that the IC version that runs inside the VM is the same as the version of Hyper-Von the host. To determine the version of Hyper-V on the server, start the Hyper-V managerand then select About Hyper-V Manager from the Help menu.
Procedure
1. In the Device Manager application inside the guest VM, on System Devices, selectDevice Manager.
2. Right-click the entry Hyper-V Volume Shadow Copy.
3. Select Properties.
4. Check the version on the Driver tab.
5. If the version does not match the Hyper-V version, insert the integration services diskby choosing that option under the Action menu in the VM console.
6. Install the integration components, and then reboot the VM.
Viewing valid application data save setsWhen you configure a client resource, enter the save sets in the Save Set attribute of theclient resource.
To display a list of the application data save sets that are available for backup:
Procedure
1. Open a command prompt on the application server and type the required command.
2. If the Hyper-V Server is a stand-alone host, then type:
nsrsnap_vss_save -?
3. If the Hyper-V Server is configured as a cluster, then type:
nsrsnap_vss_save -s networker server -?
If the application server is on a cluster virtual host, run the command from thephysical node that is currently hosting the application server.
Example output:
The following examples show the application data (Hyper-V guest VM) save sets thatare available on a Hyper-V system with two VMs,virtual_machine_name_1 andvirtual_machine_name_2, on stand-alone and cluster virtual hosts.
Windows Server 2008 and 2008 R2 on a stand-alone virtual host:
“APPLICATIONS:\Microsoft Hyper-V”
“APPLICATIONS:\Microsoft Hyper-V\Initial Store”
Backups
Integration services components version 39

“APPLICATIONS:\Microsoft Hyper-V\virtual_machine_name_1”
“APPLICATIONS:\Microsoft Hyper-V\virtual_machine_name_2”Windows Server 2012 and 2012 R2 on a stand-alone virtual host:
“APPLICATIONS:\Microsoft Hyper-V”
“APPLICATIONS:\Microsoft Hyper-V\Host Component”
“APPLICATIONS:\Microsoft Hyper-V\virtual_machine_name_1”
“APPLICATIONS:\Microsoft Hyper-V\virtual_machine_name_2”
Windows Server 2008 and 2008 R2 on a cluster virtual host:
NMM : saveset on node.nmmcsv.com :
"APPLICATIONS:\Microsoft Hyper-V"
"APPLICATIONS:\Microsoft Hyper-V\Initial Store" nonCSV
"APPLICATIONS:\Microsoft Hyper-V\non-csv" nonCSV
"APPLICATIONS:\Microsoft Hyper-V\vm27_rename1" CSV
Windows Server 2012 and 2012 R2 on a cluster virtual host:
NMM : saveset on node.nmmcsv.com :
"APPLICATIONS:\Microsoft Hyper-V"
"APPLICATIONS:\Microsoft Hyper-V\Host Component" nonCSV
"APPLICATIONS:\Microsoft Hyper-V\non-csv" nonCSV
"APPLICATIONS:\Microsoft Hyper-V\vm27_rename1" CSV
Remove the inverted commas when copying the save set name from the output to thesave set attribute in the client resource.
4. Press Enter.
Each line of output corresponds to a save set entry that you can add to the Save Setattribute of a client resource. Type each entry that you add to the Save Set attribute ona separate line.
Configuring backupsWhen configuring backups, the backup tasks differ depending on the items to back up.You must specify the correct save set syntax and Application Information attributes toperform the desired backup type.
The following table describes the backup tasks to perform when you back up Hyper-Vparent and VMs.
Table 9 Backup tasks for Hyper-V
Items to back up Backup tasks to perform
On the serverThe Hyper-V role can coexistwith other Microsoftapplications, such as:
l SQL Server
l SharePoint Server
l Exchange Server
Complete tasks 1 through 7:Task 1: Configure a backup pool
Task 2: Configure snapshot policies
Task 3: Configure a backup schedule
Task 4: Configure a backup group
Task 5: Configure a client resource
Backups
40 EMC NetWorker Module for Microsoft for Hyper-V VSS 8.2 Service Pack 1 User Guide

Table 9 Backup tasks for Hyper-V (continued)
Items to back up Backup tasks to perform
l Windows Server Cluster Task 6: Configure privileges
Task 7: Configure a proxy client
The NetWorker Module for Microsoft Administration Guideprovides details how to perform these tasks.
Hyper-V on the serverHyper-V VMs and Initial Store/Host Component configurationfile
Complete tasks 1 through 5:Task 1: Configure a backup pool
Task 2: Configure snapshot policies
Task 3: Configure a backup schedule
Task 4: Configure a backup group
Task 5: Configuring a Hyper-V client resource on page 43
The NetWorker Module for Microsoft Administration Guideprovides details about tasks 1 through 4.
Hyper-V VM applicationsMicrosoft application data, suchas:
l SQL Server
l SharePoint Server
l Exchange Server
l Windows Server Cluster
Install NMM on the VM operating system and configureapplication backups with NMM installed within the VMoperating system. Specific instructions for the Microsoftapplication are provided in the following:
l Configure Windows application backups.
l Configure Windows Server cluster backups.
The NetWorker Module for Microsoft Administration Guide anduser guides provide specific instructions about how to back upeach application.
Hyper-V VM snapshots are not related to NMM or NetWorker snapshots. Hyper-V VMsnapshots are created, viewed, and applied to the VM through Hyper-V Manager. WhenNMM backs up a Hyper-V VM, the Hyper-V VM snapshots are part of that backup.
The following table lists the Hyper-V save set syntax to specify for supported types ofHyper-V backup.
Table 10 Hyper-V save set syntax
Type of backup data Save set syntax
Hyper-V ManagerThe Hyper-V configuration file andeach VM.
APPLICATIONS:\Microsoft Hyper-VThe Hyper-V Writer does not support offline backup of theconfiguration file. You cannot use the APPLICATIONS:\Microsoft Hyper-V save set in a proxy backup group.
Hyper-V configuration file (InitialStore/Host Component)There is one configuration file inthe Hyper-V Manager installation.This lists the Hyper-V settings forthe host operating system and theguest operating systems.
For Windows Server 2008 and 2008 R2:APPLICATIONS:\Microsoft Hyper-V\Initial Store
For Windows Server 2012 and 2012 R2:
APPLICATIONS:\Microsoft Hyper-V\Host Component
The Hyper-V Writer does not support offline backup of theconfiguration file. You cannot use the APPLICATIONS:
Backups
Configuring backups 41

Table 10 Hyper-V save set syntax (continued)
Type of backup data Save set syntax
\Microsoft Hyper-V\Initial Store and APPLICATIONS:\MicrosoftHyper-V\Host Componentsave sets in a proxy backup group.
Hyper-V VMThere are usually multiple VMs onthe host operating system.
APPLICATIONS:\Microsoft Hyper-V\virtual_machine_nameChild pertains or VMs can be included in a proxy backupgroup.
The following table lists the variables that can be specified in the Application Informationattribute of the client resource.
Table 11 Hyper-V application information variable settings
Attribute name Description Values
NSR_SNAP_TYPE=value Specifies thesnapshot serviceprovider name.
vssThis value is required.
NSR_FEDERATED_BACKUP Marks the backupfor CSV recovery.
Yes
NSR_FEDERATED_PSOL Optional.Distributes thebackup workloadacross all serversin the PSOL. If aserver is notavailable or down,then NMMperforms thebackup from thenode to which thecluster servername resolves.
Type a comma-separated list of theserver names. For example:NSR_FEDERATED_PSOL=server1,server2, server3
NSR_EXCLUDE_SMB Optional.Excludes VMs thathave data storedon SMB fileservers. Bydefault, SMB VMsare included inthe writer levelbackup.
Yes
NSR_VSS_FULL_BACKUP Performs VSSFULL or VSS COPYbackups in guestVMs. By default,all Hyper-V VMbackups are VSSCOPY type.
Yes
Backups
42 EMC NetWorker Module for Microsoft for Hyper-V VSS 8.2 Service Pack 1 User Guide

Table 11 Hyper-V application information variable settings (continued)
Attribute name Description Values
NSR_VSS_FORCE_SYSTEM_PROVIDER Required forbackups that arehosted overSMB-3.
No
NSR_EXCLUDE_COMPONENTS Optional.Excludes a VMfrom the backup.Specify the writerlevel saveset andthe componentsto exclude fromthe backup. NMMlogs the excludedcomponents inthe NMM.raw logfile for references.
Type a comma-separated list of theserver names. For example:NSR_EXCLUDE_COMPONENTS=VM1,VM2, VM3
Configuring a Hyper-V client resourceA client resource specifies what to include in a snapshot of an NMM client. Clientresources are associated with other backup resources, such as groups and snapshotpolicies. You can create a client resource by using the Client Configuration Wizard ormanually in the NetWorker Management Console.
You can create multiple client resources for the same NMM host. In this way, you canapply different backup attributes to different types of information on the same host.
Creating the client by using the Client Configuration WizardThe NMM Configuration Wizard for Hyper-V simplifies configuration of scheduled backupsfor NMM clients for Hyper-V servers.
The NMM Configuration Wizard for Hyper-V has the following properties:
l The wizard automatically configures Hyper-V save sets, backup commands,Application Information attributes, and backup options.
l The wizard does not require you to have privileges on the local machine root (on thehost where the GUI runs) or Administrator privileges.
l You can use the wizard to configure client resources on Windows Server 2008, 2008R2, 2012, and 2012 R2 platforms, both for stand-alone and federated environments.
Procedure
1. In the Administration window of the NetWorker Management Console:
2. Click Configuration > New Client Wizard.
The Specify the Client Name and Type page appears.
3. In the Client Name field, type the name of the client where NMM is installed:
l For federated backups, type the cluster server name.
Backups
Configuring a Hyper-V client resource 43

l For non-federated backups, type the node name.
4. Select the Traditional NetWorker Client option.
5. Click Next.
The Select the Backup Configuration Type page appears. On the Select the BackupConfiguration Type page, the wizard automatically detects the applications that areinstalled on the client specified on the Specify the Client Name and Type page anddisplays the list from which you can select the backup type. Because Hyper-V isinstalled, the backup option Microsoft Hyper-V Server appears in Specify the ClientBackup Options Type page.
6. Select Hyper-V Server and click Next.
The Specify the Client Backup Options page appears.
7. To use the Client Direct feature, select the Client Direct checkbox.
8. Leave the Target Pool field blank.
9. Select one of the following deduplication options:
l None — If you have not set up data deduplication.
l Data Domain backup — If you are using a Data Domain device for datadeduplication.
l Avamar deduplication backup — If you are using an Avamar device for datadeduplication. After you select this option, select the Avamar node from theavailable list.
10.Click Next.
The Select the Hyper-V Backup Objects page appears. The Select the Hyper-V BackupObjects page automatically discovers the save sets depending on the operatingsystem type and entered client name.
11.Select the save sets:
l For federated setups — Select the CSV save sets that are registered as clusterresources. If you select both registered and un-registered CSV VMs, then thebackup will fail.
The wizard creates dummy client resources for all nodes that are not used toperform the backup. The wizard also creates a client resource with the clustername and specifies the NSR_FEDERATED_BACKUP=yes attribute.
l For stand-alone setups — Select the non-CSV save sets to back up. The wizardcreates a client resource with the physical name using the selected save sets.
If you do not select any save sets, then the wizard applies the Hyper-V writer levelsave set.
If you select both CSV and non-CSV VMs, the backup will fail.
12.Click Next.
The Specify Backup Options page appears.
When you use the wizard to configure backups for Windows Server 2012 and 2012 R2federated setups, the wizard includes preferred server order list (PSOL) options. ThePSOL attribute allows you to back up the nodes, specify the attributeNSR_FEDERATED_PSOL and type a comma-separated list of user selected nodenames. For example: NSR_FEDERATED_PSOL=node1, node2, node4, node3.
13.In the Specify Backup Options page:
Backups
44 EMC NetWorker Module for Microsoft for Hyper-V VSS 8.2 Service Pack 1 User Guide

l For Windows Server 2008 and 2008 R2 setups, if a VSS hardware provider isinstalled on the host, then select Use a data mover for the backup and from theData mover name dropdown box, select the host name of the data mover.
l For Windows Server 2012 and 2012 R2, under Select VSS backup type, if youwould like to perform full backups, select Force VSS FULL backup type to specifythe VSS FULL backup type. By default, this box is unchecked and the backup typeis VSS COPY.
l For Windows Server 2012 and 2012 R2 setups, in the Select proxy servers section,you can specify the order in which to back up servers. Select a server from inAvailable Servers list and then click the right arrow to move it to the Proxy Serverslist. To adjust the order of servers, select a server in the Proxy Servers list and thenclick the up and down arrows.
14.Click Next.
The Select the Client Properties page appears.
15.Select the browse policy, retention policy, and backup schedule for the backup.
The NetWorker Administration Guide describes how to configure these resources.
16.(Optional) Type a comment for the client in the Client comment field.
17.In the Remote access field, type the user account of the administering machine in theformat of username@hostname.
18.Click Next.
The Specify the NetWorker Backup Group page appears.
19.To choose a group from the existing list, select Add to existing group. Only groupswithout snapshot policies are available for selection.
20.To create a new group, select Create a new group and enter the following details:
l Type the group name in the Group Name field.
l Select the number of client retries.
l Set the schedule backup time in the Schedule Backup Start Time field.
l Select Automatically start backup at the scheduled time to start the backupautomatically at the designated time.
l Select Snapshot Pool and set the Interval and Restart Window.
21.Click Next:
l If you selected Create a new group, then the Specify the Snapshot Policy pageappears.
l If the setup includes a storage node, then the Specify the Storage Node Optionspage appears. Changing the storage node option changes the configuration forthis setup.
22.Select the Add to an existing snapshot policy option to choose a snapshot policy fromthe existing list and click Next.
23.Select the Create a new snapshot policy option to enter the snapshot details and clickNext:
l Name—Type a unique snapshot policy name.
l Number of Snapshots—Select the number of snapshots that NetWorker createsand maintains for the Hyper-V backup.
l Retain Snapshots—Select the number of snapshots that NetWorker retains.
Backups
Creating the client by using the Client Configuration Wizard 45

l Snapshot Expiration—Select the length of time NetWorker keeps snapshot entriesin the media database and client file index on the NetWorker server. The choicesare defined by the set of existing management policies.
l Backup Snapshots—Select which snapshots to back up.
The Specify the Storage Node Options page appears.
24.Select either of the following options and click Next:
l Backup to the NetWorker server only—When the setup does not include aNetWorker storage node.
l Backup to the following storage nodes—To select the NetWorker storage nodename and other details.
The Backup Configuration Summary page appears.
25.Click Next.
The Backup Configuration Summary page appears.
26.Do one of the following:
l Click Back to revisit the previous pages.
l Click Create to configure the client resources.
The Client Configuration Results page appears with details about the clientresources that have been created for an Exchange stand-alone setup, or severalclient resources that have been created for an Exchange clustered setup.
27.To verify the details for the client, select the client and view the Client Properties pagein the NetWorker Management Console.
28.To make changes to the configuration that you created earlier, click Modify ClientWizard.
Creating the client manually by using the NetWorker Management ConsoleYou can manually create a Hyper-V client resource by using the NetWorker ManagementConsole.
Procedure
1. On the Administration page of the NetWorker Management Console, clickConfiguration.
2. In the expanded left pane, select Clients.
3. From the File menu, select New.
4. In the Name attribute, type the host name of the NetWorker client computer.
5. In the Comment attribute, type a description.
If you are creating multiple client resources for the same NetWorker client hostcomputer, then use this attribute to differentiate the purpose of each resource.
6. From the Browse Policy attribute, select a browse policy from the list.
The browse policy determines the time period during which the rolled-over data isavailable for quick access.
7. From the Retention Policy attribute, select a retention policy from the list.
The retention policy determines the time period during which the rolled-over data isavailable, although not necessarily quickly.
8. Select the Scheduled Backups attribute.
Backups
46 EMC NetWorker Module for Microsoft for Hyper-V VSS 8.2 Service Pack 1 User Guide

9. In the Save Set attribute, specify the components to be backed up. Place multipleentries on separate lines. Table 9 on page 29 on page 41 provides the save setsyntax.
10.For the Group attribute, select the backup group to which this client resource will beadded.
If you add client resources for the same NMM host to different backup groups, thenensure that the Start Time attribute for each backup group is spaced such that thebackups for the host’s client resources do not overlap.
11.For the Schedule attribute, select a backup schedule.
12.Click the Apps & Modules tab.
13.In the Access area, type the domain administrator username and password.
For guest VMs hosted over SMB 3.0, the backup fails if you do not provide the domainadministrator credentials.
14.In the Backup command attribute, type the following backup command:
nsrsnap_vss_save.exe
15.In the Application Information attribute, specify the attributes for the backup. Table 10 on page 30 on page 42 lists the application information attributes andsettings.
16.Click the Globals (1 of 2) tab.
17.In the Aliases attribute, type the NETBIOS name for the client.
NMM client uses the host machine NETBIOS or “short” name when connecting to theNetWorker server to browse backups. If the NETBIOS name is not found, NMM will notbe able to display backups.
18.Click the Globals (2 of 2) tab.
19.If you are setting up a proxy client for the NMM client, type the host name of the proxyclient in the Remote Access attribute.
If the NMM client is part of a cluster, type the names of the physical nodes of thecluster in the Remote Access attribute.
20.Click OK.
Performing cluster-level and CSV VM backupsNetWorker performs CSV VM backups through a client resource created for the clustervirtual server only. You create client resources for all of the nodes in the cluster and forthe cluster server. However, the backup will be scheduled against the cluster virtualserver client resource only. NetWorker indexes the backup against the cluster servername.
When you perform a backup on a specific cluster node, the backup requestor can onlyinclude the clustered VMs that are currently active on that node. This is to ensure that foreach cluster node, only VMs active on that node are backed up and that the host is thecoordinating node. In addition, the cluster node where the shadow copy is being createdmust be the coordinating node for the CSV. Therefore, backup of VMs on the same CSVbut on different nodes must be serialized.
NMM supports backups for all CSV VMs as well as individual CSV VMs. Configuringbackups on page 40 provides details about how to perform Hyper-V backups.
Backups
Performing cluster-level and CSV VM backups 47

NOTICE
A Hyper-V CSV distributed backup supports only conventional backups from a temporaryshadow copy (rollover). NMM does not support proxy host backups and instant backupsthat use persistent point-in-time shadow copies.
Hyper-V CSV supports only a RolloverOnly backup policy or a retention=0 snapshotmanagement policy. The Hyper-V CSV backup is a federated backup, where one Hyper-Vserver spawns jobs on other Hyper-V servers in cluster environment to perform thebackups of all the VMs residing on CSV volumes.
Performing a CSV-level backupTo perform a CSV-level backup:
l Set the save set attribute “Applications: \Microsoft Hyper-V\” in the client resourcefor the cluster virtual server to back up all the CSV VMs in the cluster.
l Add NSR_FEDERATED_BACKUP=yes to the Application Information attribute in theclient resource.
Performing a CSV VM backupTo perform a CSV VM backup, set the save set attribute APPLICATIONS:\MicrosoftHyper-V\ in the client resource for the cluster virtual server to back up the CSV VM in thecluster.
NMM supports backup of non-clustered VMs that run on specific cluster nodes. NMMexcludes VMs that do not reside on the CSV from the CSV backup. Backup and recovery ofnon-clustered VMs is managed through the individual physical node name, not thecluster virtual server client resource. The physical node name is the client resource name.
The number of save sessions depends on the number of Hyper-V VMs the volumecontains, not on whether the VMs is hosted on single CSV volume or on multiple CSVvolumes.
If you configure multiple VMs on a writer level save set, the maximum number of savestreams depends on PowerSnap settings.
Configuring multi-proxy backupsTo meet backup windows for larger Hyper-V environments, you can improve performanceby scaling out the Hyper-V CSV backups to multiple cluster nodes or proxies.
When you create multiple proxies, you add secondary roles, which must be physicalcluster nodes. You specify the proxy host by setting NSR_FEDERATED_PSOL in theApplication Information for the client resource of the cluster, or by using the PreferredServer Order List (PSOL) in the Client Configuration Wizard. The PSOL distributes thebackup workload across all servers in the PSOL. You schedule the backups against thecluster alias, and the primary role runs on the cluster alias. The recovery process for VMsbacked up as part of a multi-proxy setup is the same as the recovery process fortraditional backups.
In a multi-proxy architecture, you can select multiple cluster nodes to act as proxy nodesto perform parallel backups on all proxy nodes. An NMM CSV algorithm is used tointelligently reassign and change CSV ownerships to the proxy nodes you select. Thebackup load is evenly split between multiple nodes. All proxy nodes will perform backupsin parallel, increasing backup performance by 60-70% compared with single proxybackups in a normal distributed CSV environment.
Backups
48 EMC NetWorker Module for Microsoft for Hyper-V VSS 8.2 Service Pack 1 User Guide

CSV ownership can change seamlessly between nodes. The peformance of a running VMis not impacted when the underlying CSV ownership changes from one node to anothernode.
You can add or remove proxy nodes as needed.
In addition to the existing single proxy client components, NMM uses the followingsoftware components in multi-proxy backups:
l Main proxy client — NMM schedules and browses backups against the cluster servername. The main proxy client node acts as the primary node in the cluster.
l Client software — You must install the NetWorker and NMM client software on allsecondary proxy nodes.
l CSV ownership distribution algorithm — A CSV algorithm is used to intelligentlyreassign and change CSV ownerships to the proxy nodes you select. NMM evenlydistributes the backup load across the proxy nodes, and the proxy nodes performbackups in parallel to maximize the backup performance.
l Application Information attributes — To enable multi proxy backups, add thefollowing Application Information attributes on the main proxy client:
n NSR_FEDERATED_PSOL— Enables multi-proxy backups and distributes the backupworkload across all servers in the PSOL.For example:
NSR_FEDERATED_PSOL=server1, server2, server 3
where server1, server2, andserver3 will act as proxy servers.
If you do not specify NSR_FEDERATED_PSOL, NMM performs the backup from thecurrent active node and substitutes the cluster master node as the proxy node. Ifyou specify values for NSR_FEDERATED_PSOL, NMM performs backups from all thevalid, available nodes in the list. If the number of nodes is greater than thenumber of CSVs, NMM excludes the nodes that exceed this number.
n NSR_MOVE_CSV_OWNERSHIP—Allows or disallows CSV ownership change duringmulti-proxy backups for optimal backup performance. After you initially create theclient resource, you can allow or disallow CSV ownership changes as needed.For example:
NSR_MOVE_CSV_OWNERSHIP=Yes
NSR_MOVE_CSV_OWNERSHIP=No
The default value is Yes. If you set the value of this attribute to Yes, then NMMchanges the CSV ownership. To attain optimal backup performance, set thisattribute value to Yes. If you set this attribute value to No, then NMM does notchange the CSV ownership.
Best practices for configuring multi-proxy backupsYou can improve mutli-proxy backup performance by following best practices forconfiguring and allocating Hyper-V proxies.
The following section describes the components that affect multi-proxy backupperformance. This section also describes best practices for configuring thesecomponents to achieve optimal backup performance.
Backups
Configuring multi-proxy backups 49

Load balance VM data on CSVs
To attain maximum backup performance, load balance VM data on all the available CSVsas much as possible.
NMM performs load balancing by running a correlational factor of the number of VMsresiding on the CSVs and the common size share. NMM calculates a 'set of CSV' for a 'setof VM' whose maximum common share resides on those CSVs.
NMM moves this set of CSV to one proxy and backs up the set of corresponding VMs fromthat node. Maintaining proper CSV load balance will result in fewer CSV ownershipchanges.
Allocate the number of proxy nodes and CSVs
When determining how many number of proxy nodes to use, you should allocate themaximum number of proxy nodes to gain maximum backup performance. Increasing thenumber of proxy nodes can improve backup performance. However, this maximumnumber of proxy nodes should be less than or equal to the maximum number of CSVs.
For optimal performance, the number of CVSs should be multiples of the number of proxynodes. Each VM should be contained within a single CSV only, rather than distributedacross multiple CSVs.
Allow CSV ownership change
To achieve maximum backup performance, change CSV ownership to the nodes with lessCSV data. CSV ownership change will allow the NMM CSV algorithm to intelligentlychange CSV ownership to the proxy nodes you selected, thereby properly load balancingthe backup data. NMM performs data split per CSV, not per VM.
Select proxy nodes with good system resources
Backups can be an intensive operation on system resources. To attain optimal backupperformance, select cluster nodes with maximum resources available as proxy nodes.Select nodes with minimal live data movement, so that the backup operation will notdisturb the day-to-day production activities.
Backups
50 EMC NetWorker Module for Microsoft for Hyper-V VSS 8.2 Service Pack 1 User Guide

CHAPTER 3
Recoveries
This chapter includes the following sections:
l Overview............................................................................................................... 52l Turning the VM offline for recovery........................................................................ 52l Hosting the recovered virtual systems................................................................... 52l Specifying the destinations for the Hyper-V configuration files and virtual system
............................................................................................................................. 52l Selecting Hyper-V recovery options....................................................................... 53l Selecting the Hyper-V recovery destination............................................................53l Recovering Hyper-V CSV VMs.................................................................................56
Recoveries 51

OverviewDepending on what you specified in the backup save set, you can recover the followingfrom a NMM Hyper-V VM backup:
l All of the Hyper-V components
l The Initial Store/Host Component configuration file
l Individual or multiple VMs
l Individual files and folders (Granular level recoveries provides details)
Turning the VM offline for recoveryBefore you start the recovery operation, take the VM offline. If the VM is online when youstart the recovery, the Hyper-V Writer will turn off the VM.
Once the VM is offline, the recovery process destroys the current VM, recovers therecovery version, and registers the VM.
The Hyper-V Writer automatically detects whether the VM is online, and turns it off. Noaction is required by you.
Hosting the recovered virtual systemsThe Destination Host page allows you to recover the virtual system to the originallocation.
Procedure
1. Select Recover (Overwrite) Virtual System to original location.
The Finish button is available and Next button is unavailable when you select thisoption.
2. Click Finish.
The Finish button validates the server location and displays the Hyper-V RecoveryOptions page.
Specifying the destinations for the Hyper-V configuration filesand virtual system
The Destination Host page allows you to specify the destination directory for the Hyper-Vconfiguration files, and the destination host for each virtual system.
Procedure
1. In the Destination for Hyper-V configuration files dialog box, click Browse to changethe destination path.
The Select Virtual System Destination list displays the destinations for each virtualsystem VHD. The specified host must have the NMM client installed.
2. To change a destination host:
a. Select a virtual system.
b. Click Change Destination.
Recoveries
52 EMC NetWorker Module for Microsoft for Hyper-V VSS 8.2 Service Pack 1 User Guide

The Remote Directory Browser dialog box appears.
3. Click Finish to validate the settings.
If the destinations are valid, then the Hyper-V Recovery Options Summary dialog boxappears.
Selecting Hyper-V recovery optionsThe Recovery Options Summary page lists the Hyper-V Recovery and NetWorker Recoveryoptions. This allows you to review the settings before you start the recovery.
The Hyper-V Recovery Options page appears when you click Recover in the Hyper-VRecover Session view or at the end of the Hyper-V Recovery wizard. This page displays thesettings specified in the Destination Host Selection page and Destination Path page.
To change the Hyper-V recovery options:
l If you have reached this page through the Hyper-V Recover Session toolbar:
1. Click Cancel > Advanced Options.The Hyper-V Recovery Options wizard starts.
2. In the Hyper-V Recovery Options wizard, click Back.
l If you have reached this page through the Hyper-V Recover Session view, clickAdvanced Options on the Hyper-V Recover Session toolbar.
To change the NetWorker recover options, do one of the following:
l Click Recover Options.
l In the Hyper-V Recover Session view, click Recover Options on the Hyper-V RecoverSession toolbar.
The NetWorker Recover Options settings are specified on the General, NetWorker, andSecurity tabs. To validate all pages, click Start Recover. If all pages are valid, the wizardcloses and recovery starts.
Selecting the Hyper-V recovery destinationYou can select the destination of the Hyper-V recovery to the original machine or to adifferent machine or location.
When you perform a Hyper-V recovery on Windows Server Core 2008, 2008 R2, 2012, or2012 R2 the recovery is a directed recovery. Because the Server Core installation doesnot provide a GUI, you must use another machine to start the recovery. To recover aWindows Server 2012 and 2012 R2 Server Core VM through directed recovery, you mustuse the No Proxy option.
Restrictions and requirements for relocating and recovering data to a different location onpage 96 provides details about other restrictions.
Performing Hyper-V recovery to the original machine and locationYou might need to recover VMs to their original location if the VMs have been corruptedor deleted.
When you recover VMs to the original Hyper-V server, the original drive letters or mountpoints for the VMs must exist on the system, and the directory paths are automaticallycreated. If any of the files from the VMs are still on the Hyper-V Server, then the recoverydeletes or overwrites the files.
Recoveries
Selecting Hyper-V recovery options 53

If the recovered VM was a clustered VM, then the recovery creates the VM on one of thecluster nodes. However, you must use Microsoft Cluster Manager to make the VM highlyavailable.
Because Hyper-V recognizes VMs by an internal GUID, you can not move or rename thecurrent VM during the recover if the VM exists on the Hyper-V Server.
The Initial Store file (Windows Serer 2008 and 2008 R2) and the Host Component file(Windows Server 2012 and 2012 R2) contain the authorization configuration for Hyper-V.You might need to recover the Initial Store/Host Component to the original Hyper-V Serverif the file has become corrupted or you need to roll back the authorization settings. TheNMM system state backups also include the Initial Store/Host Component.
Procedure
1. Open the NMM client software and select the NetWorker Server on which the NMMclient software was configured for backup.
If NMM client is part of a cluster, select the physical client to which you are recoveringdata. The physical client can be selected from the Client list attribute in theapplication toolbar.
2. From the left pane, select Recover > Hyper-V Recover Session.
3. From the navigation tree, select the Hyper-V Writer or individual VMs under the Hyper-V Writer.
4. From the Hyper-V Recover Session toolbar, click Recover.
The Hyper-V Recover Session Summary dialog box appears.
5. If all the options look correct, then go to step 11 on page 54. If you want to changeoptions, then go to step 7 on page 54.
6. Click Recover Options.
7. On the General tab, specify the Diagnostic Output Level.
8. On the NetWorker tab, specify the Restore Type, and then select or clear Terminaterecover of item, if errors are encountered.
To recover Hyper-V components, select the Conventional Restore recovery type.
9. On the Security tab, specify pass phrases if any are needed. For GLR recovery, mountthe VM.
10.Click OK to close the Hyper-V Recover Session Options dialog box.
11.Click Start Recover.
NMM validates all pages. If all pages are valid, then the recovery begins.
Performing a directed Hyper-V recovery to a different machine or locationYou can recover a VM to the original Hyper-V Server, but move the VM files to different filesystem locations. This type of recovery is necessary if the VM files were moved after theselected backup time and you want to preserve the new locations. If the original VM ispresent, then the VM is overwritten during the recovery.
Procedure
1. Open the NMM client software and select the NetWorker Server on which the NMMclient software was configured for backup.
If NMM client is part of a cluster, select the physical client to which you are recoveringdata. The physical client can be selected from the Client list attribute in theapplication toolbar.
Recoveries
54 EMC NetWorker Module for Microsoft for Hyper-V VSS 8.2 Service Pack 1 User Guide

2. From the left pane, select Recover > Hyper-V Recover Session.
3. From the navigation tree, select the Microsoft Hyper-V Writer, or the individual VMsunder the Microsoft Hyper-V Writer.
4. From the Hyper-V Recover Session toolbar, click Advanced Recovery.
The Hyper-V Recovery wizard starts and the Destination Host page appears.
5. Specify the destination host server for the Virtual System recover:
l To recover to the same location as the original:
a. Select Recover (Overwrite) Virtual System to original location.
b. Perform the steps in “To perform validation and start recovery:” on page 43.
l To recover to a different path on the same Hyper-V Server:
a. Select Recover Virtual System to a different path and then click Next.The Destination Path page appears, and you can specify a destination for eachVirtual System. The specified host must have the NMM client installed.
If the VM is online or active, you must recover the VM to the same node onwhich it is active.
b. Click Browse to specify the destination location for the configuration files. Afteryou select the destination location for the configuration files, you can changethe destination location for the VM’s virtual disks.
c. To change the destination location for a virtual disk, select the VM’s virtual diskin the list, and then click Change Destination. Repeat as needed for eachvirtual disk destination that you want to change.
d. When you have completed changing destinations, go to “To perform validationand start recovery:” on page 43.The destinations provided on this page are Microsoft's default configurationfile locations and might not match your Hyper-V configuration. Change thedestination as needed.
When you attempt a directed recovery to a different path on the same Hyper-Vserver, the recovery process takes the recovery VM offline and then recoversthe data to the alternate location. NMM registers the VM pointing to the data inthe new location.
You can remove the Virtual Hard Disk (VHD) files of the original VM manuallyafter the recovered Hyper-V child components are up and running.
l To recover to a different Hyper-V server:
a. Click Recover Virtual System to a different Hyper-V Server.
b. From the Select Remote Host list, click the server you want to recover to.
c. Click Next.
d. The Destination Path page appears, where you can specify a destination foreach Virtual System.
e. On the Destination Path page, click Browse to specify the destination locationfor the configuration files. After you select the destination location for theconfiguration files, you can change the destination location for the VM’s virtualdisks.
f. To change the destination location for a virtual disk, select the VM’s virtual diskin the list, and then click Change Destination. Repeat as needed for eachvirtual disk destination that you want to change.
g. When you have completed changing destinations, go to “To perform validationand start recovery:” on page 43.
Recoveries
Performing a directed Hyper-V recovery to a different machine or location 55

The destinations provided on this page are Microsoft's default configurationfile locations and might not match your Hyper-V configuration. Change thedestination as needed.
When you attempt a directed recovery to a different Hyper-V Server and thedestination Hyper-V Server has an existing VM with the same name as the onebeing recovered, the recovery process takes the VM offline and recovers thedata to the alternate location. NMM registers the VM pointing to the data in thenew location.
You can remove the VHD files of the original VM present earlier with the samename manually after the recovered Hyper-V child components are up andrunning.
6. To perform validation and start recovery, click Finish.
NMM performs validation:
l If the validation is not successful, then NMM displays an error message.l If the validation is successful, then NMM displays a summary page that lists the
Hyper-V and NetWorker Recover options that you specified.l If you need to change any of the options, click the Recover Options or Back button.
7. Click Start Recover.
NMM validates all pages. If all pages are valid, NMM starts the recovery.
Recovering Hyper-V CSV VMsThe following sections describe the supported types of Hyper-V CSV recoveries.
SMB 3.0 VM recoveryWhen you recover Hyper-V VMs over SMB 3.0, use the same the steps that you use forother recovery types. Note that NMM does not support redirected recovery of VMs overSMB 3.0.
CSV VM recoveryNMM supports recoveries for Hyper-V CSV VMs at the cluster level and at the individualCSV VM level. NMM supports recoveries only on supported NMM hosts that run theHyper-V service. This host might be outside of the cluster.
NMM recovers the CSV VMs that you select on the cluster node where the VM is currentlyactive. If a CSV VM does not exist at the time of recovery, then NMM recovers the VM tothe majority node.
If no VMs exist in the cluster, then for the deleted VM:
l If the winclient started within the cluster, then the recovery operation starts on thenode that runs the winclient.
l If the winclient is started from outside cluster, then NMM recovers the deleted VM tothe cluster owner node.
Relocation recovery of a clustered VM to a node where it is not active is not allowed onthe cluster where the VM resides. If you request a relocated recovery of a VM to a node ona cluster, but the VM is already active on another cluster node, then the recovery will fail.EMC recommends that you move the VM to the desired node first and then initiate the VMrecovery.
When you select a single VM, NMM supports the following types of recoveries:
Recoveries
56 EMC NetWorker Module for Microsoft for Hyper-V VSS 8.2 Service Pack 1 User Guide

l Default recovery (Recover on the cluster node where the VM is active) — This is thedefault recovery when you click “Recover…” NMM recovers the selected VM to thecluster node where it is active. If the VM does not exist, NMM recovers it to themajority node where most of the VMs are active.
l Advanced recover — When you click the “Advanced Recover…” option, you can selectone of the following options:
n Recover Virtual System to active virtual system cluster nodeIf the VM is already active on the destination cluster node, then you can recoverthe VM to a path that differs from the path at the time of the backup.
n Recover Virtual System to a different cluster nodeYou can recover the selected VM to an alternate node in the cluster if the VM doesnot exist in the cluster. If the VM exists in the cluster but is not active on thedestination node, then the recovery fails. In this case, first migrate the VM to thedestination node and then perform either a default recovery or an advancedrecovery.
n Recover Virtual System to a different Hyper-V serverYou can recover the selected VM to Hyper-V server outside of the cluster.
You can choose to recover all CSV VMs or multiple CSV VMs. NMM cannot recover theselected CSV VMs on their respective cluster nodes when the VM is active. If a CSV VMdoes not exist at the time of recovery, NMM recovers the VM to the majority node.
After you recover a VM, confirm that the recovery process registers the VM. If the VM isnot registered as a cluster resource, use Failover Cluster Manager to register the VM ascluster resource.
Recovering multiple CSV VMs to the original locationYou can recover multiple clustered Hyper-V VMs to the same location as the original CSVVM.
Procedure
1. Open the NMM client software.
2. From the left pane, select Recover > Hyper-V Recover Session.
3. From the navigation tree, select Image Recovery.
4. Select the cluster name from the Client menu.
5. Select the VMs you want to recover.
6. Click Recover.
7. Click Start Recover.
NMM validates the information on all pages. If all pages are valid, then NMM startsthe recovery.
8. Perform the steps in “To perform validation and start recovery:” on page 43.
Recovering an individual CSV Hyper-V VM to a different locationYou can recover an individual CSV VM to a different location.
Procedure
1. Open the NMM client software.
2. From the left pane, select Recover > Hyper-V Recover Session.
3. From the navigation tree, select Image Recovery.
Recoveries
Recovering multiple CSV VMs to the original location 57
4. Select the cluster name from the Client menu.
5. Click Advanced Recover.
The Hyper-V Advance Recovery wizard starts and the Destination Host page appears.Select the destination to recover the CSV VM.
l To recover the VM to the node on which it is currently active:
a. Click Recover Virtual System to Active Virtual System Cluster Node.
b. Click Next. A dialog box displays the following warning: Proxy basedrecovery outside Cluster is Not Supported.
c. Click OK.
d. Click Recover Options.
e. Select the CSV Proxy Server tab.
f. Click No Proxy.
l To recover the VM to a different node:
a. Click Restore Virtual System to a Different Cluster Node.
b. Select the remote host to which you will recover the CSV VM.
c. Click Next.
d. Specify the destination path for the configuration files.
This option is only available if the selected VM does not exist in the cluster. Torecover a VM that exists on the cluster but is not active on the destination node,you must first migrate the VM to the destination node and then perform either adefault recovery or an advanced recovery.
l To recover the VM to a different Hyper-V Server:
a. Click Recover Virtual System to a Different Hyper-V Server.
b. Select the remote host to which you will recover the CSV VM.
c. Click Next.
d. Specify the destination path for the configuration files.
e. To perform validation, click Finish.
NMM performs the validation. If the validation is not successful, then NMM displaysan error message. If the validation is successful, then NMM displays a Summary pagethat lists the specified Hyper-V and NetWorker Recover options.
6. If you need to change any of the options, click the Recover Options or Back button.
7. Click Start Recover.
NMM validates the information on all pages. If all pages are valid, then NMM startsthe recovery.
Recovering with a Windows Server 2012 and 2012 R2 proxy CSV serverYou can select a proxy node for the CSV recovery operation.
Procedure
1. Open the NMM client software.
2. From the left pane, select Recover > Hyper-V Recover Session.
3. Click the CSV Proxy Server tab and select a proxy server recovery option.
Recoveries
58 EMC NetWorker Module for Microsoft for Hyper-V VSS 8.2 Service Pack 1 User Guide

4. For stand-alone setups, select No Proxy.
5. For federated setups, select one of the following options:
l Local Server or Current Host Server—Select this option only for nodes configuredusing the Windows Server 2012 and 2012 R2 GUI.
When the NMM GUI runs on a server in the cluster, NMM treats the local host asthe default server. Otherwise, NMM treats the current host server, the server towhich cluster server name resolves, as the default server for recovery operations.
l Choose a Server—Select this option for nodes configured using the WindowsServer 2012 and 2012 R2 GUI or nodes configured using Windows Server 2012and 2012 R2 core.
Select a server from the drop-down box to choose a proxy for recovery operations.You can select any server in the cluster.
l No Proxy—Select this option for all Windows Server 2012 and 2012 R2installations.
No proxy server will be used.
6. Click OK.
7. Click Recover.
8. Click Start Recover.
9. Perform the steps in “To perform validation and start recovery:” on page 43.
Troubleshooting RPC service failure messagesThe following section describes how to troubleshoot RPC service failure messages.
Error connecting to RPC serverThe following RPC failure message appears: Agent connection failed: Can'tconnect to RPC server on NMM_client_name where NMM_client_name is theNMM client name.
SolutionPerform the following steps:
1. In User Environment Variables, create two environment variables and type a value tospecify the number of seconds for each variable:
l NSR_CSC_RPC_TIMEOUT—The typical value is 6 seconds.
l NSR_CSC_METHOD_TIMEOUT—The typical value is 180 seconds.
2. Restart the host where you launched the NMM recovery GUI.
Unauthorized clientWhen you perform a directed recovery, the following error appears: Agentconnection failed: Request received from unauthorized clientNMM_client_name where NMM_client_nameis the NMM client name.
SolutionManually stop the nsrcscd.exe process on the destination host and then perform thedirected recovery.
Recoveries
Troubleshooting RPC service failure messages 59

Recoveries
60 EMC NetWorker Module for Microsoft for Hyper-V VSS 8.2 Service Pack 1 User Guide

CHAPTER 4
Granular Level Recoveries
This chapter includes the following sections:
l Overview............................................................................................................... 62l Recovering Hyper-V files and folders..................................................................... 62
Granular Level Recoveries 61

OverviewGranular level recovery (GLR) provides the ability to recover specific files from a singlebackup without recovering the full VM, reducing the recovery time.
NMM can perform a GLR for backups of Hyper-V VMs that you created with NMM 2.4 orabove. You can only use GLR for VMs running Windows operating systems.
You perform Hyper-V GLR by using the NMM GLR feature. The NMM GLR feature usesNetWorker Virtual File System (NWFS) to mount the VM that contains the items to recover.When the Hyper-V GLR completes, you can chose to unmount the VM from NWFS orperform another Hyper-V GLR operation. You can only use Hyper-V GLR to recover datathat has been rolled over to backup media that supports GLR.
NMM only allows browsing and recovery of one VM at a time, and NMM does not supportthe recovery of the same backup to multiple clients simultaneously. If you try to mountanother VM while you use the Hyper-V GLR, NMM unmounts the first VM and you loseaccess to the contents of the first VM until you remount it.
EMC recommends that you provision a system to act as the NMM Hyper-V GLR proxy. TheHyper-V GLR proxy has the required setup so that you can granularly recover files from aHyper-V image backup. NMM supports the use of a 64-bit Windows Server 2008 R2 or2012 VM or physical machine as the GLR proxy system.
Using this GLR proxy setup, you can recover files from any NMM Hyper-V backup of aHyper-V VM with a supported operating system installed. After NMM recovers the files orfolders that are local to the proxy machine, you must manually move or data mine thefiles as needed. The NetWorker administrator configures the NetWorker authentication toallow the NMM Hyper-V GLR proxy client the rights to recover any save set that NMMneeds to mount by using NWFS.
To enable GLR functionality, install the NMM client software on the system and select theGLR option to install the NWFS features. You can install NMM and NWFS on any systemsincluding any Hyper-V Guest VM, Hyper-V server, or stand-alone server, as long as theoperating system is Windows Server 2008 R2 or greater.
The NetWorker Module for Microsoft Administration Guide and the NetWorker AdministrationGuideprovides more information on NWFS.
Windows Server 2012 Hyper-V GLR featuresNMM supports the following Windows Server 2012 Hyper-V GLR features:
l Recovery of data from a VHDX hard disk
l Recovery of FAT32, NTFS, and ReFS volume data
l GLR of Hyper-V VMs over SMB
l Recovery of deduplicated data, after you enable the Deduplication role
NMM does not support the following Windows Server 2012 Hyper-V GLR features:
l Recovery of data from a Windows Server 2012 Storage Spaces disk on a VM
l Differencing disk with parent and child hard disk on different hard drives
Recovering Hyper-V files and foldersWhile you perform the steps in the following procedure, you can switch to the Monitorpane to see the progress of the recovery operation and to check for error messages. NMM
Granular Level Recoveries
62 EMC NetWorker Module for Microsoft for Hyper-V VSS 8.2 Service Pack 1 User Guide

displays any problems attaching hard disks, recognizing VM, or expanding VMs in theMonitor window.
Procedure
1. Open the NMM client on the GLR proxy server.
If the GLR proxy server is not available, open the NMM client on the physical machinewhere the backup was taken. This option requires you to install GLR on the physicalmachine.
2. From the left pane, click Recover > Hyper-V Recover Session > Granular LevelRecovery.
NMM displays the GLR-capable VMs for the selected client, as shown in the followingfigure.
NMM displays the GLR-capable VMs for the selected client.
When you attempt to mount an incompatible backup, such as a backup not createdusing NMM 2.4 or later, or a backup of a non-Windows VM, an error message appears.To view all compatible backups available and select a compatible backup, launch theversion dialog box.
3. In the navigation tree, locate the Hyper-V VM that contains the folders or items youwant to recover.
To search for a particular VM or item within the save set, right-click the VM and thenclick Search for.
4. Right-click the target VM and then click Mount.
NMM uses NWFS to mount the VM. If another VM is already mounted for GLR recovery,NMM notifies you that it will unmount the first machine. Click OK to continue themounting process with the second VM, or click Cancel to leave the first machinemounted.
5. Click a VHD to display a list of the VMs it contains in the right pane, as shown in thefollowing figure. If a VHD does not mount, NMM displays an error message. You cancontinue to work with the other available VHDs. Hyper-V GLR cannot mount raw virtualhard disks (hard disks that have not been formatted).
6. Locate the folders or items that you want to recover by completing one of the followingsteps:
l Expand the VMs to view a list of their contents.
l Right-click on a VM and then click Search for to search for a specific folder or item.
Depending on VM size, loading a VM can take awhile. You can start otheroperations in the Recover pane while waiting for a VM to load. After the VMs areloaded, you can perform data mining.
Granular Level Recoveries
Recovering Hyper-V files and folders 63

7. Select the check box beside each item that you want to recover. If you select a folderfor recovery, then NMM also selects the folder contents for recovery.
You can specify a destination file path to recover the files. NMM retains the files intheir original folder hierarchy. NMM overwrites files that already exist on thedestination path. If you do not specify a destination path, NMM uses a defaultrecovery path.
8. To specify a destination path for the recovered files, click Recover Options in theHyper-V Recover Session toolbar.
9. In the Hyper-V Recover Session Options window, click the Granular tab and specify adestination path for the recovered items.
10.Close the Hyper-V Recover Session Options window.
11.Click Recover in the Hyper-V Recover Session toolbar.
12.In the Hyper-V Recover Summary window, click Start Recover to start the recovery.NMM recovers the files in the destination path by creating the original folderhierarchy.
13.Close the Hyper-V Recover Session Summary window.
To view the recovery progress, click Monitor in the left pane. When a recovery is inprogress, you cannot perform other tasks in the Recover pane. After a recoverycompletes you can perform browse and recovery actions on the mounted VM.
Recovering AES-encrypted data from a Hyper-V VMYou can encrypt backup and archive data on Windows hosts by using an AdvancedEncryption Standard (AES) Application Specific Module (ASM) pass phrase. If you did notspecify a pass phrase but configured an AES encrypted backup, NetWorker encrypts thedata with a default pass phrase.
During data recovery, if you did not use the default or current pass phrase, you mustspecify the pass phrase used at the time of backup.
NOTICE
Do not use AES encryption when backing up files that are encrypted by using WindowsEncrypting File System (EFS). When NMM applies AES encryption to a file that is alsoencrypted by using the Microsoft EFS, NetWorker reports the backup as successful.However, recovery of the file will fail.
The EMC NetWorker Administration Guide provides more information about AES encryptionand setting the backup pass phrase.
Procedure
1. On the Options menu, select System Recover Session Options.
2. Click the Security tab.
3. Type the pass phrases.
4. Click OK.
5. Perform the granular level recovery.
Granular Level Recoveries
64 EMC NetWorker Module for Microsoft for Hyper-V VSS 8.2 Service Pack 1 User Guide

CHAPTER 5
EMC Data Protection Add-in for SCVMM
This chapter includes the following sections:
l Overview............................................................................................................... 66l How the Data Protection Add-in works with SCVMM...............................................68l Installation and uninstallation...............................................................................70l Configuration........................................................................................................ 75l Data Protection Add-in overview data.................................................................... 77l Recoveries............................................................................................................ 81l Monitoring............................................................................................................ 88l Troubleshooting.................................................................................................... 89
EMC Data Protection Add-in for SCVMM 65

OverviewThe EMC Data Protection Add-in for SCVMM leverages the System Center Virtual MachineManager (SCVMM) Add-in extension support to enable NetWorker client Hyper-V VMrecoveries from within the SCVMM console.
The Data Protection Add-in enables you to perform NMM Hyper-V recoveries from withinthe SCVMM console. You can view and recover all current SCVMM-managed VMs thathave NMM conventional backups. The Data Protection Add-in supports recoveries ofHyper-V VMs in cloud, cluster, host, host group, and VM contexts.
You can perform recoveries of Hyper-V VMs to the original location or to an alternate hostlocation.
RecoveriesThe Data Protection Add-in feature set supports recovery of Hyper-V VMs protected byNetWorker servers. The Data Protection Add-in supports recoveries of conventionalbackups to the original Hyper-V server on which the VM was backed up or to an alternateHyper-V server. The Data Protection Add-in does not support recoveries of VMware VMs orrecoveries from persistent snapshots.
The Data Protection Add-in can be used in the following SCVMM configurations:
l SCVMM console on the same machine as the SCVMM server
l SCVMM console on a different machine from the SCVMM server
To perform recoveries by using the Data Protection Add-in, you must have the requiredprivileges for the client to which you will recover the VM. Required privileges on page67 provides details about SCVMM privileges. The NetWorker Administration Guideprovides details about the required privileges.
BackupsThe SCVMM user cannot perform backups from the Data Protection Add-in. A NetWorkeradministrator must create and configure NetWorker client resources for the Hyper-Vservers from which the SCVMM can recover VMs.
After the Hyper-V server has been added to a NetWorker client, the basic workflow for ascheduled backup of a VM managed by SCVMM is the same as that of a standardphysical host. If the NetWorker administrator does not create and configure a NetWorkerclient for the Hyper-V server, then the NetWorker server cannot protect the SCVMM VMand therefore the VM is not available for recovery.
The EMC NetWorker Module for Microsoft for Hyper-V Guide Backups chapter and the EMCNetWorker Administration Guide provide details on scheduling and managing backups.
Supported versionsThe NetWorker Online Software Compatibility Guide on EMC Online Support lists the mostup-to-date information about the Windows Server versions that NMM supports. The DataProtection Add-in and the NMM client software must be the same version.
The Data Protection Add-in supports the following component versions of System Center:
l System Center 2012 SP1 Virtual Machine Manager with System Center Update Rollup 4
l System Center 2012 R2 Virtual Machine Manager
EMC Data Protection Add-in for SCVMM
66 EMC NetWorker Module for Microsoft for Hyper-V VSS 8.2 Service Pack 1 User Guide

The Data Protection Add-in is compatible with the following operating systems whenimported into the System Center 2012 SP1 Virtual Machine Manager Console:
l Windows Server 2012 (64 bit) Standard and Datacenter
l Windows 7 SP1 or later (64 or 32 bit) Professional, Enterprise and Ultimate
l Windows 8 (64 or 32 bit) Professional and Enterprise
The Data Protection Add-in is compatible with the following operating systems whenimported into the System Center 2012 R2 Virtual Machine Manager Console:
l Windows Server 2012 (64 bit) Standard and Datacenter
l Windows Server 2012 R2 (64 bit) Standard and Datacenter
l Windows 7 SP1 or later (64 or 32 bit) Professional, Enterprise and Ultimate
l Windows 8 (64 or 32 bit) Professional and Enterprise
l Windows 8.1 (64 or 32 bit) Professional and Enterprise
Software dependenciesThe Data Protection Add-in requires the following software:
l The Data Protection Add-in 8.2 SP1 and the NetWorker 8.2 SP1 client software mustbe installed on the SCVMM console machine. The Data Protection Add-in and theNMM client software must be the same version.
l The NetWorker and NMM 8.2 SP1 or greater client software must be installed on theHyper-V server to which the VM is recovered.
l The Data Protection Add-in requires access to a NetWorker 8.2 SP1 server.
Required privilegesTo perform recoveries, you must be a member of certain SCVMM roles and have certainprivileges.
To perform recoveries, you must:
l Be a member of the SCVMM Administrator or Fabric Administrators SCVMM roles.
l Have write access to the folder where the cached data files are stored. For example:C:\Users\%current user%\AppData\Local\EMC\NetWorker\SCVMM.
l Have NetWorker directed recovery privileges, which requires the following:
n The Data Protection Add-in machine is a client of the NetWorker server thatcontains the backup information. This administering client can be a differentplatform from the source and destination clients.
n Use the local root or Administrator account to start the recovery. Ensure the useraccount is a member of one of the following:
– The Operators, Application Administrators, Database Administrators, orDatabase Operators User Group.
– A customized User Group with the following privileges on the NetWorkerserver:Remote Access All Clients
Operate NetWorker
Monitor NetWorker
Operate Devices and Jukeboxes
Backup Local Data
EMC Data Protection Add-in for SCVMM
Software dependencies 67

Recover Local Data
Recover Remote Data
Installation and configuration overviewTo install the Data Protection Add-in, an SCVMM administrator and each user mustperform required steps.
Procedure
1. An SCVMM administrator must perform the following steps:
a. Installing SCVMM and the SCVMM console on page 71
b. For SCVMM 2012 SP1,Installing SCVMM Update Rollups on page 71
c. Installing the Data Protection Add-in on page 71
2. Each user must perform the following steps:
a. Importing the Data Protection Add-in on page 72
b. Activating the Data Protection Add-in on page 72
After you finish
To uninstall the Add-in, an SCVMM administrator and each user must perform the stepsdescribed in Uninstalling the Data Protection Add-in on page 73.
How the Data Protection Add-in works with SCVMMThe following figure illustrates the Data Protection Add-in architecture.
Figure 11 Data Protection Add-in architecture
The NetWorker client and NMM client software must be installed on each Hyper-Vphysical host. The SCVMM console can be installed on a separate machine or on the
EMC Data Protection Add-in for SCVMM
68 EMC NetWorker Module for Microsoft for Hyper-V VSS 8.2 Service Pack 1 User Guide

SCVMM server. However, the NetWorker client must be installed on the SCVMM consolemachine.
Workflows overviewThe following sections describe common workflows for the Data Protection Add-in.
Initialize the SCVMM console or change contextWhen you launch the SCVMM console or change context within the console, the DataProtection Add-in does the following:
Procedure
1. Accesses the SCVMM server to obtain a list of VMs for the context you selected.
2. Displays VMs for the selected context that have been backed up on servers in thePreferred NetWorker servers list.
Refresh the Data Protection Add-in displayWhen you click the Refresh button on any page in the Data Protection Add-in, the DataProtection Add-in does the following:
Procedure
1. Accesses the SCVMM server to obtain a list of all hosts.
2. Accesses the NetWorker server to obtain a list of all clients and save sets.
3. Accesses the SCVMM server to obtain a list of all VMs in the current context.
4. Displays the updated protection information on the Overview page and VMs availablefor recovery on the Recover page.
Perform a recoveryWhen you perform a recovery, the following occurs:
Procedure
1. The Data Protection Add-in passes the VM, backup time, and destination options youselected to the NWRecover service. The NWRecover service initiates the recoveryprocess.
2. The NWRecover service invokes a remote agent on the Hyper-V server and passes therequired information.
The NWRecover service posts recover messages to the Data Protection Add-in Monitorpage
3. The remote agent performs the requested recovery.
During the recovery process, the NWRecover service updates the log shown in theMonitor page as well as the Windows Event log under Applications and Services >NetWorker Recovery Service.
4. The NWRecover service posts the recover success message in the monitor log and theWindows event log.
GUI overviewThe Data Protection Add-in consists of the following pages:
l Overview - Displays the protection status for all VMs in the current SCVMM context.
EMC Data Protection Add-in for SCVMM
Workflows overview 69

l Preferences - Allows you to specify NetWorker servers, set the refresh rate, and setthe debug level.
l Recover - Allows you to perform recoveries and view VMs available for recovery.l Monitoring - Allows you to view in-progress and completed operations.
After you import the Data Protection Add-in, when you select the All Hosts or Cloud scopein the SCVMM console, the EMC Data Protection Add-in button displays in the SCVMMribbon within the VMs and Services context.
If you select a non-supported scope (within the VMs and Services context), the DataProtection Add-in button is disabled.
SCVMM user roles and allowed actionsThe Data Protection Add-in is cloud and tenant-aware, so you can only recover VMs towhich you have access. You cannot direct a recovery to a Hyper-V server to which you donot have access.
The following table lists the supported SCVMM User Roles and the actions that the DataProtection Add-in allows for each supported role.
Table 12 SCVMM user roles and actions allowed by the Data Protection Add-in
Role Actions allowed
Fabric Administrator(DelegatedAdministrator)
Can see all VMs, hosts, and clouds. Can recover all VMs managed bySCVMM to original and alternate locations.
Tenant Administrator Can see and recover VMs within the private cloud they manage. Onlyrecovery to original location is supported. On the Recover page, unableto see the Hyper-V Host and Recover Destination columns.
Read-OnlyAdministrator
Can see the VMs and hosts within the private cloud they manage. Norecovery operations are allowed.
ApplicationAdministrator (Self-Service Administrator)
Can see and recover VMs within the private cloud they manage. Onlyrecovery to original location is supported. On the Recover page, unableto see the Hyper-V Host and Recover Destination columns.
Supported scopes and contextsThe Data Protection Add-in supports the following SCVMM scopes:
l Cloudl Clusterl Host (clustered & standalone)l HostGroupl VM
The Microsoft website provides more information about SCVMM scopes.
Installation and uninstallationTo install the Data Protection Add-in, an SCVMM administrator installs the NetWorkerclient, SCVMM and the SCVMM console, SCVMM update rollups, and the Data ProtectionAdd-in. To begin using the Data Protection Add-in, each user imports and activates the
EMC Data Protection Add-in for SCVMM
70 EMC NetWorker Module for Microsoft for Hyper-V VSS 8.2 Service Pack 1 User Guide
Data Protection Add-in. To uninstall the Data Protection Add-in, each user removes theData Protection Add-in from the SCVMM console, and an SCVMM administrator uninstallsthe Data Protection Add-in.
Installing SCVMM and the SCVMM consoleDownload and install SCVMM from the Microsoft website. Install the SCVMM console sothat it is available for all users. This installation requires system administrator privileges.
Installing SCVMM Update Rollups
Before using the SCVMM 2012 SP1 console, you must install Update Rollup (UR) 4 orlater. Specifically the Data Protection Add-in requires the Virtual Machine ManagerAdministrator Console (KB2888946) update. The Microsoft website provides the updaterollups and instructions on how to install them.
Installing the Data Protection Add-inTo install the Data Protection Add-in, you access the installation files from a DVD disk orEMC Online Support. To install the Data Protection Add-in on the SCVMM server, you musthave local administrator privileges.
Procedure
1. To access the Data Protection Add-in software from a local DVD disk:
a. Log in as an administrator or equivalent on the NetWorker client.
b. Insert the Data Protection Add-in DVD disk into the DVD drive.
c. Run EMC_Data_Protection_UI_Addin_for_SCVMM.msi directly from the DVD.
d. Accept the default values during the installation.
2. To access the Data Protection Add-in software from EMC Online Support:
a. Log in as administrator or equivalent on the NetWorker client.
b. Browse to EMC Online Support (http://support.emc.com).
c. Browse to the Downloads for NetWorker Module for Microsoft page.
d. Download the Data Protection Add-in software .zip file, either the 32-bit or 64-bitversion as appropriate for the system, to a temporary folder that you create.
e. Extract the .zip file to the temporary folder.
f. Run EMC_Data_Protection_UI_Addin_for_SCVMM.msi.
g. Accept the default values during the installation.
Results
The installer places a Data Protection Add-in zip file in the public user documentationfolder and installs the required NWRecover Service. The NWRecover Service is set to autoand will automatically start during the installation process.
The default installation path for the Data Protection Add-in .zip file is: C:\Users\Public\Documents\EMC NetWorker\nsr\addins\VMM_DataProtection\. If you encounter any issues while installing or importing theData Protection Add-in, then ensure you have read and write permission for all folders inthis path.
Make note of the Data Protection Add-in .zip file installation path as it will be used in Importing the Data Protection Add-in on page 72. The default installation path for the
EMC Data Protection Add-in for SCVMM
Installing SCVMM and the SCVMM console 71
NWRecover Service is: C:\Program Files\EMC Networker\nsr\addins\VMM_DataProtection.
Importing the Data Protection Add-inEach Data Protection Add-in user must import the Data Protection Add-in. The users musthave write access to the folder where the cached data files are stored. For example: C:\Users\%current user%\AppData\Local\EMC\NetWorker\SCVMM.
Procedure
1. Launch the SCVMM console and connect to a Virtual Machine Manager server. Theconsole opens.
2. In the workspaces pane, click Settings.
3. In the navigation pane, click Console Add-ins.
4. If a previous version of the Data Protection Add-in exists, select it and click Remove onthe SCVMM ribbon.
5. On the SCVMM ribbon, click Import Console Add-in.
6. In the Import Console Add-in wizard, browse to the folder in which you installed theData Protection Add-in zip file.
7. Select EMC.DP.ScvmmAddIn.zip and click Open. For example: C:\Users\Public\Documents\EMC NetWorker\nsr\addins\VMM_DataProtection.
8. To continue installing, select the check box and click Next.
9. Click Finish and then click Close to close the Jobs window that displays.
Results
If an error message displays, delete the pre-existing add-in folder. For example: C:\Program Files\Microsoft System Center 2012\Virtual MachineManager\bin\AddInPipeline\AddIns\<domain_username>.
Activating the Data Protection Add-inAfter you install SCVMM, the SCVMM console, the SCVMM update rollups, and the DataProtection Add-in, you must activate the Data Protection Add-in.
Procedure
1. In the workspace pane of the SCVMM console, click VMs and Services.
2. In the navigation pane, select a host or cluster.
3. On the SCVMM ribbon, click EMC Data Protection.
After about 5-10 seconds, the main content area of the console will be replaced by theData Protection Add-in, as shown in the following figure:
EMC Data Protection Add-in for SCVMM
72 EMC NetWorker Module for Microsoft for Hyper-V VSS 8.2 Service Pack 1 User Guide

The first time a user launches the Data Protection Add-in, the Preferences pagedisplays. After initial configuration and refresh, subsequent launches of the Add-indisplay the Overview page first.
Uninstalling the Data Protection Add-inTo uninstall the Data Protection Add-in, each user must remove the Data Protection Add-in from the SCVMM console, and an SCVMM administrator must uninstall the DataProtection Add-in. If no users will perform other NetWorker operations on this machine,you can also uninstall the NetWorker software. These tasks can be performed in anyorder.
Removing the Data Protection Add-in from the SCVMM consoleEach user must remove the Data Protection Add-in from the SCVMM console. Removingthe Data Protection Add-in from the SCVMM console will remove all components copiedto the SCVMM AddIn folder during the import process, but not the originally downloadedData Protection Add-in .zip file itself.
Note
Removing the Data Protection Add-in only affects individual users. Other users whoimported the Add-in will not be affected.
Procedure
1. In the SCVMM console, click the Settings workspace.
2. Click the Console Add-ins setting.
3. In the list of installed Add-ins, select EMC Data Protection Add-in.
4. On the top ribbon, click Remove.
EMC Data Protection Add-in for SCVMM
Uninstalling the Data Protection Add-in 73

5. On the confirmation window that displays, click Yes.
After you finish
The Data Protection Add-in creates persistent data cache files during the refreshoperation. These files are created for each user. If a user removes the Add-in and is notexpected to upgrade or otherwise re-import the add-in in the future the files can bemanually removed from the following folder: C:\User\<user name>\AppData\Local\EMC\NetWorker\SCVMM.
Uninstalling the Data Protection Add-in by using Windows Program and FeaturesAn SCVMM administrator must uninstall the Data Protection Add-in from the SCVMMserver. Uninstalling the Data Protection Add-in ensures the Data Protection Add-in (.zipfile) is removed from the SCVMM console machine and ensures that the Data Protectionservice is stopped and uninstalled.
Note
This step affects all users who imported the Data Protection Add-in. If the Data ProtectionAdd-in is uninstalled, no users will be able to perform a recovery by using the DataProtection Add-in. Verify that each SCVMM console user has removed the Data ProtectionAdd-in before uninstalling.
Procedure
1. For Windows Server 2012 or Windows 8 or later: click Control Panel and then clickPrograms and Features.
2. For Windows 7 or earlier: click Control Panel and then click Uninstall a program.
3. Select EMC Data Protection UI Addin for SCVMM.
4. Click Uninstall.
Upgrading the Data Protection Add-inTo upgrade the Data Protection Add-in, you must complete the uninstallation proceduresto uninstall the current version and then complete the installation procedures to installthe new version.
Before you begin
Before upgrading the Data Protection Add-in, ensure that the NetWorker and NMM clientsoftware and the NetWorker Server software are compatible with the Data Protection Add-in. The Data Protection Add-in and the NMM client software must be the same version.The NetWorker Online Software Compatibility Guide on EMC Online Support lists the mostup-to-date information about supported versions.Procedure
1. Obtain the new Data Protection Add-in installer MSI file from the EMC Support site.
2. For all users, remove the existing Data Protection Add-in from the SCVMM console.
3. Follow the steps described in Uninstalling the Data Protection Add-in on page 73.
4. Follow the steps described in Installing the Data Protection Add-in on page 71.
5. Follow the steps described in Importing the Data Protection Add-in on page 72.
6. Follow the steps described in Activating the Data Protection Add-in on page 72.
7. In the Upgrade Successful window, click OK.
8. Click Refresh to repopulate the Data Protection Add-in.
EMC Data Protection Add-in for SCVMM
74 EMC NetWorker Module for Microsoft for Hyper-V VSS 8.2 Service Pack 1 User Guide

ConfigurationAfter completing the installation process, you must configure the Data Protection Add-into access the NetWorker servers that contain VM backups for recovery. You can also setthe refresh frequency and specify the logging debug level. After making any configurationchanges to the SCVMM environment, perform a Refresh operation from within the DataProtection Add-in to ensure the Add-in is displaying current information.
Figure 12 Data Protection Add-in for SCVMM Preferences page
Adding NetWorker serversYou can search for virtual machine backups on multiple NetWorker servers. Contact theNetWorker administrator to learn which NetWorker servers protect the virtual machinesyou manage, and then add them to the Data Protection Add-in.
Procedure
1. In the workspaces pane of the SCVMM console, click VMs and Services.
2. In the navigation pane, select the host or cloud you wish to manage.
3. In the SCVMM ribbon, click EMC Data Protection.
4. In the Data Protection Add-in, click Preferences.
5. In the text box next to the Preferred NetWorker servers list, type the FQDN or IPaddress of a NetWorker Server and click Add.
Note
The Data Protection Add-in does not support IPv6 addresses.
The NetWorker FQDN or IP address displays in the Preferred NetWorker servers list.
EMC Data Protection Add-in for SCVMM
Configuration 75
6. In the notification that displays, click OK.
7. Follow the directions in the notification.
8. Click Refresh to view the newly added NetWorker server VM protection status on theOverview page and the available VM backups on the Recover page.
Note
If adding more than one NetWorker server at a time, it is recommended to add allservers before starting the Refresh operation.
Removing NetWorker serversProcedure
1. In the workspaces pane of the SCVMM console, click VMs and Services.
2. In the navigation pane, select the host or cloud you wish to manage.
3. In the SCVMM ribbon, click EMC Data Protection.
4. In the Data Protection Add-in, click Preferences.
5. In the Preferred NetWorker servers list, select a server and click Remove.
The Data Protection Add-in automatically performs a Refresh operation to display VMdata for the remaining NetWorker servers.
Setting the refresh intervalOn the Preferences page, the Data Protection Add-in provides two options for scanningthe SCVMM environment for changes:
l Use manual refresh only - This is the default setting. When you select this option, youmust manually scan for changes by clicking the Refresh button on any DataProtection Add-in page. With this setting, the Data Protection Add-in does not scanfor changes automatically.
l Use specified refresh interval - You can specify the interval at which the DataProtection Add-in automatically refreshes the data. When you select this option, typea refresh interval and click anywhere in the SCVMM console to apply the change. Therefresh rate should correspond to how often a virtual machine is backed up in yourenvironment and the amount of time a refresh process takes to complete. If therefresh process does not complete within the interval you specify, lengthen theinterval accordingly.
Including debug output for logging purposesYou can choose to include debug output in log files. This can be especially helpful fortroubleshooting purposes. To include debug level output, on the Preferences page, selectthe Include debug level output checkbox.
Using multiple NetWorker Servers that define the same clients and VM savesetsThe Data Protection Add-in learns about protected virtual machines by querying theNetWorker servers that are specified on the Preferences page. If there is conflicting dataregarding a Hyper-V server and its virtual machine protection because the Hyper-V serveris a client of multiple NetWorker servers, the Data Protection Add-in might displayinconsistent data.
Therefore, if you are using multiple NetWorker servers that define the same Hyper-Vclients and VM save sets, it is best to change the Preference page's to one NetWorker
EMC Data Protection Add-in for SCVMM
76 EMC NetWorker Module for Microsoft for Hyper-V VSS 8.2 Service Pack 1 User Guide

server at a time to reduce NMM data protection metric inconsistency on the Overviewpage and protected virtual machine listings on the Recover page.
In scenarios where the Preferences page does include NetWorker servers that define thesame Hyper-V clients and VM save sets, then the Data Protection Add-in arbitrarilychooses information from one NetWorker server if conflicts exist. This prevents scenarioswhere a virtual machine is mis-counted for protection metrics or shows twice on theRecover page.
Data Protection Add-in overview dataThe Overview page summarizes the current NMM data protection metrics for the managedVMs in the currently selected SCVMM context. For Administrator, Fabric Administrator,and Read-Only Administrator user roles, the Data Protection Add-in displays virtualmachine protection status. For Tenant Administrator and Application Administrator (Self-Service Administrator) user roles, the Data Protection Add-in displays virtual machinebackup status.
Overview page for Administrator, Fabric Administrator, and Read-Only Administratoruser rolesFor Administrator, Fabric Administrator, and Read-Only Administrator user roles, theOverview page displays multiple sub-panes:
l Clouds, Clusters, Hosts, and Virtual machines sub-panes:These sub-panes list the number of clouds, clusters, hosts, and virtual machines theuser role manages within the currently selected SCVMM context.
l Configured for protection:This sub-pane provides protection characteristics for the VMs that are protected onthe NetWorker servers listed on the Preferences page.
The pie chart provides the following data about virtual machines:
VMs excluded from protectionThese VMs are currently listed in the NSR_EXCLUDE_COMPONENTS attribute for aNetWorker client resource and not protected by another client resource.
VMs not protectedThese VMs are not configured for a scheduled backup as part of a NetWorker clientresource and not explicitly excluded for backup.
VMs protectedThese VMs are configured for scheduled backup as part of a NetWorker clientresource.
A VM is protected when it is configured for scheduled backups as part of a NetWorkerclient resource. A VM that is configured for scheduled backups but does not have existingbackups is considered protected. Conversely, a VM that is not configured for scheduledbackups but has existing backups is not considered protected.
Note
The Data Protection Add-in is unable to distinguish between multiple VMs with the samename on the same host. If a host has multiple VMs with the same name, and any of theseVMs are backed up, the Data Protection Add-in shows all of the VMs as backed up.
The following figure shows the Data Protection Add-in Overview page for Administrator,Fabric Administrator, and Read-Only Administrator user roles.
EMC Data Protection Add-in for SCVMM
Data Protection Add-in overview data 77

Figure 13 Data Protection Add-in Overview page for Administrator, Fabric Administrator, and Read-Only Administrator user roles
When you position the mouse over a protection category in the pie chart, a tooltip liststhe first 10 VMs for that protection category. If there are more than 10 VMs in thatcategory, the list is truncated with an ellipsis. To view the full list, click the desiredsection of the pie chart. If the VM name is more than 30 characters in length, the tooltiptruncates the VM name with an ellipsis. The following figure shows the pie chart andtooltip for Administrator, Fabric Administrator, and Read-Only Administrator user roles.
Figure 14 VM Protection Details tooltip for Administrator , Fabric Administrator, and Read-OnlyAdministrator user roles
EMC Data Protection Add-in for SCVMM
78 EMC NetWorker Module for Microsoft for Hyper-V VSS 8.2 Service Pack 1 User Guide

When you click a protection category in the pie chart, the VM Protection Details windowdisplays. This window contains a table that lists the name, host, and ID for each VM inthe selected protection category. To copy data for all of the VMs to the clipboard, click theCopy All to Clipboard button. To copy data for specific VMs, select the desired rows in thetable and click the Copy Selected to Clipboard button. You can press Ctrl or Shift to selectmultiple rows, similar to other Windows applications.
Figure 15 VM Protection Details window for Administrator, Fabric Administrator, and Read-OnlyAdministrator user roles
Overview page for Tenant Administrator and Application Administrator user rolesFor Tenant Administrator and Application Administrator user roles, the Overview pagedisplays multiple sub-panes:
l Clouds, Clusters, and Hosts sub-panes:These sub-panes display "NA", since Tenant Administrator and ApplicationAdministrator user roles do not have access to other clouds, clusters, or hosts.
l Virtual machines sub-panes:This sub-pane lists the number of virtual machines that the Tenant Administrator andApplication Administrator user roles can access.
The pie chart provides the following data about virtual machines:
VMs not backed upThese VMs are not currently backed up as part of a NetWorker client resource.
VMs backed upThese VMs are currently backed up as part of a NetWorker client resource.
Note
The Data Protection Add-in is unable to distinguish between multiple VMs with the samename on the same host. If a host has multiple VMs with the same name, and any of theseVMs are backed up, the Data Protection Add-in shows all of the VMs as backed up.
EMC Data Protection Add-in for SCVMM
Data Protection Add-in overview data 79

The following figure shows the Data Protection Add-in Overview page for TenantAdministrator and Application Administrator user roles.Figure 16 Data Protection Add-in Overview page for Tenant Administrator and ApplicationAdministrator user roles
When you position the mouse over a backup status category in the pie chart, a tooltiplists the first 10 VMs for that backup status category. If there are more than 10 VMs inthat category, the list is truncated with an ellipsis. To view the full list, click the desiredsection of the pie chart. If the VM name is more than 30 characters in length, the tooltiptruncates the VM name with an ellipsis. The following figure shows the pie chart andtooltip for Tenant Administrator and Application Administrator user roles.
Figure 17 Virtual Machine Backup Status tooltip for Tenant Administrator and ApplicationAdministrator user roles
EMC Data Protection Add-in for SCVMM
80 EMC NetWorker Module for Microsoft for Hyper-V VSS 8.2 Service Pack 1 User Guide

When you click a backup status category in the pie chart, the VM Protection Detailswindow displays. This window contains a table that lists the VM name and VM ID for eachVM in the selected backup status category. To copy data for all of the VMs to theclipboard, click the Copy All to Clipboard button. To copy data for specific VMs, select thedesired rows in the table and click the Copy Selected to Clipboard button. You can pressCtrl or Shift to select multiple rows, similar to other Windows applications.
Figure 18 VM Protection Details window for Tenant Administrator and Application Administratoruser roles
RecoveriesThe Recover page displays a list of all VMs managed by SCVMM that are backed up by aNetWorker server in the Preferred Servers list and in the current selected context and
EMC Data Protection Add-in for SCVMM
Recoveries 81

match the date filtering criteria. When you access the Recover page for the first time, clickRefresh to populate the grid with backups performed on the VMs in the current context.
Figure 19 Data Protection Add-in for SCVMM Recover page
If you make a change in the SCVMM environment, such as adding a VM, adding aNetWorker server on the Preferences page, or performing a redirected recovery, clickRefresh to update the list of VMs on the Recover page.
When performing VM recoveries by using the Data Protection Add-in, consider thefollowing:
l The Data Protection Add-in supports recoveries only from conventional backups. Youcannot use the Data Protection Add-in to recover virtual machines from NMM Hyper-Vpersistent snapshots.
l The Data Protection Add-in is unable to distinguish between multiple VMs with thesame name on the same host. If a host has multiple VMs with the same name, theData Protection Add-in shows incorrect recovery options.
l The Data Protection Add-in does not support recoveries of VMs that have differencingdisks.
l The Data Protection Add-in does not perform multiple operations at the same time,such as recovering multiple VMs or refreshing the list of VMs during a recovery. TheRecover and Refresh buttons are disabled while a recovery or refresh operation is inprogress.
l The recovery progress log messages are reported in the following locations:
n On the Monitoring page in the Data Protection Add-in.
n On the Hyper-V server where the actual recovery is performed. For example: C:\Program Files\Emc Networker\nsr\applogs\nmm.raw.
EMC Data Protection Add-in for SCVMM
82 EMC NetWorker Module for Microsoft for Hyper-V VSS 8.2 Service Pack 1 User Guide

Figure 19 Data Protection Add-in for SCVMM Recover page (continued)
n Open the Windows Event Viewer on the machine that is hosting the SCVMMconsole. To access the event logs, navigate to Application and Services Logs >Networker Recovery Service.
l For cluster configurations, recovery to the original location is always to the activenode of the cluster, regardless of the existing VM physical host location. Beforestarting the recovery, confirm that the cluster active node is the same as the VMphysical host. After the recovery is complete, you might need to use Microsoft ClusterManager to make the VM highly available again.
Note
If this practice is not followed, the resulting conflict of the same VM on differentnodes can be very difficult to repair and might require a cluster reboot.
l For highly available VM recoveries, when you recover to a cluster physical node ratherthan to the cluster virtual server, you must use Microsoft Cluster Manager to make theVM highly available after the recovery completes.
l For recoveries of VMs on Hyper-V servers over SMB 3.0 configurations, the DataProtection Add-in supports recovery of stand-alone and clustered configurations.
Because the Data Protection Add-in performs Hyper-V recoveries by using NMM, the NMMHyper-V considerations described in the documentation also apply to performing Hyper-Vrecoveries by using the Data Protection Add-in.
Viewing available VMsThe Recover page displays a list of all VMs that match the following criteria:
l Reside within the currently selected context of the SCVMM navigation pane
l Have been backed up by a NetWorker server in the Preferred Servers list
l Have at least one backup date that matches the current date filter
You can sort the list by VM Name, Hyper-V Host, or Availability.
By default, the Recover page shows all VMs backed up on or before the current date. Youcan filter the VMs by selecting one of the date criteria options and choosing a date on thecalendar. Only VMs with backup times that match the specified date filtering criteria aredisplayed. If you select criteria that results in no matching backup dates for a particularVM, then that VM does not display in the table.
VM Encrypted RecoveriesThe Data Protection Add-in allows you to recover VM data that was backed up using AESencryption. When a NetWorker administrator configures a backup with AES encryption,NetWorker encrypts the backup data with a pass phrase stored on the NetWorker server.Before performing a recovery, contact your NetWorker administrator to determine whethera pass phrase is required for recovery.
The NMM Administrator Guide, NMM Hyper-V VSS Guide, and the NetWorker AdministrationGuide provide more details about AES and pass phrase usage.
Entering a pass phrase is not required if the backup is not encrypted. The Data ProtectionAdd-in does allow you to specify an AES pass phrase and recover AES-encrypted VM datato the original location or to an alternate location. On the Recover page, after you select aVM and click the Recover button, a confirmation message dialog box allows you to enter apass phrase, as shown in the following figure.
EMC Data Protection Add-in for SCVMM
Viewing available VMs 83

In the Recover Confirmation window:
l If the backup is encrypted and you need to specify a pass phrase, type the passphrase and click OK.
l If the backup is encrypted and the current pass phrase on the NetWorker server issufficient, you do not need to enter a pass phrase. Leave the pass phrase blank andclick OK.
l If the backup is not encrypted, leave the pass phrase blank and click OK.
The Data Protection Add-in provides this pass phrase to NMM, and NMM performs the VMrecovery. The Data Protection Add-in does not detect whether an AES password isrequired for a recovery. You will need to know whether a backup used AES encryption andwhich pass phrase was used for that backup.
When a pass phrase is required and a correct pass phrase is not provided, encrypteddata is not recovered. Instead, file names are created without data; for example, the VHDfile of a VM is created but there is no data associated with it. The recovery is failed and anerror message with "Invalid decryption key specified" is displayed in the Monitor log.
The Data Protection accepts the same characters that the NMM UI accepts.
Recovering a VM to the original locationThe recovery operation runs on the Hyper-V server that is hosting the VM or, if the VM ishighly available, on the active node of the cluster. The Monitoring page displays thestatus of the recovery.
Procedure
1. In the SCVMM console, ensure the Home tab is selected.
2. In the workspaces pane of the SCVMM console, click VMs and Services.
3. In the navigation pane, select the host or cloud that contains the VM you wish torecover.
4. On the SCVMM ribbon, click EMC Data Protection.
5. In the Data Protection Add-in, click the Recover tab.
6. On the Recover page of the Data Protection Add-in, select the desired VM in the table.
EMC Data Protection Add-in for SCVMM
84 EMC NetWorker Module for Microsoft for Hyper-V VSS 8.2 Service Pack 1 User Guide

7. Select the Date Backed Up cell, click again to activate the drop-down list, and selectthe desired backup date and time.
8. Click the Recover button.
9. In the Recover Confirmation dialog box that displays, do one of the following:
l If the backup is encrypted and you need to specify a pass phrase, type the passphrase and click OK.
l If you do not need to specify a pass phrase, click OK.
VM Encrypted Recoveries on page 83 provides details.
The recovery starts on the Hyper-V host. The Monitoring page displays the status ofthe recovery.
Redirected recoveriesThe Data Protection Add-in supports redirected recovery of VMs to an alternate host towhich you have access in the SCVMM console, provided the host is protected withNetWorker Server.
In the SCVMM host, the VM placement path properties contain one or more paths. Theredirected recovery location will be the first location in this list.
The Data Protection Add-in recovers to the default SCVMM placement path that theHyper-V administrator configured during the Hyper-V role installation.
The Data Protection Add-in does not support redirected recoveries of Hyper-V backupstaken before an NMM 8.2 upgrade.
The Data Protection Add-in does not support VM redirected recovery to an SMB pathlocation. If a VM placement path property specifies a path to an SMB location as the firstitem in the path list, then a redirected VM recovery to this Hyper-V server is notsupported.
VM IDs after redirected recoveryNMM assigns a new VM ID in certain redirected recovery scenarios. The redirectedrecovery proceeds normally, regardless of whether NMM assigns a new ID or uses theexisting ID. If NMM assigns a new ID during redirected recovery, then the VM will appearin both the source and destination hosts.
The following table provides details about whether NMM assigns the existing VM ID or anew VM ID during a redirected recovery:
Table 13 VM IDs after redirected recovery
Source operatingsystem
Destination host Destination VM IDassigned
Operating system Configuration type
Windows Server2008 R2
Windows Server2008 R2
N/A Existing
Windows Server2008 R2
Windows Server2012 or 2012 R2
CSV New
Windows Server2008 R2
Windows Server2012 or 2012 R2
Stand-alone Existing
EMC Data Protection Add-in for SCVMM
Redirected recoveries 85

Table 13 VM IDs after redirected recovery (continued)
Source operatingsystem
Destination host Destination VM IDassigned
Operating system Configuration type
Windows Server2012
Windows Server2012 or 2012 R2
CSV New
Windows Server2012
Windows Server2012 or 2012 R2
Stand-alone Existing
Windows Server2012 R2
Windows Server2012 or 2012 R2
CSV New
Windows Server2012 R2
Windows Server2012 or 2012 R2
Stand-alone Existing
File paths for redirected recovery VMs and VHDsFor a redirected recovery, the Data Protection Add-in uses the SCVMM placement pathproperty as the default location for recoveries. The Data Protection Add-in extends thedefault SCVMM placement path property value by appending the virtual machine nameand the recovery time(vmname_timestamp) to create a unique subfolder.
If you recover multiple VMs with the same name on different source hosts to the samedestination host, the Data Protection Add-in recovers these VMs to two different folderswith unique subfolders by appending vmname_timestamp to the folder names. Forexample, if two VMs that are both named Virtual_Machine are recovered to thedefault SCVMM placement path property "C:\ProgramData\Microsoft\Windows\Hyper-V", the VMs are recovered to the following unique subfolders:
l C:\ProgramData\Microsoft\Windows\Hyper-V\Virtual_Machine_20140917143500\
l C:\ProgramData\Microsoft\Windows\Hyper-V\Virtual_Machine_20140917152205\
If the VM has multiple disks with the same name, the Data Protection Add-in recoversthese disks to separate folders. For example, if a VM with two VHDs that are both namedDualDisk.vhd are recovered to the default SCVMM placement path property "C:\ProgramData\Microsoft\Windows\Hyper-V", the VMs are recovered to thefollowing unique subfolders:
l C:\ProgramData\Microsoft\Windows\Hyper-V\DualDisk_20140625133500\1\DualDisk.vhd
l C:\ProgramData\Microsoft\Windows\Hyper-V\DualDisk_20140625133500\2\DualDisk.vhd
Note
Microsoft limits VM file paths to 260 characters. If the appended file path exceeds 260characters, the recovery fails.
EMC Data Protection Add-in for SCVMM
86 EMC NetWorker Module for Microsoft for Hyper-V VSS 8.2 Service Pack 1 User Guide

Performing a redirected recoveryProcedure
1. (Recommended) Take the original VM offline to avoid conflicts during the recoveryoperation.
2. In the SCVMM console, ensure the Home tab is selected.
3. In the workspaces pane of the SCVMM console, click VMs and Services.
4. In the navigation pane, select the host or cloud that contains the VM you wish torecover.
5. On the SCVMM ribbon, click EMC Data Protection.
6. In the Data Protection Add-in, click the Recover tab.
7. On the Recover page of the Data Protection Add-in, select the desired VM in the table.
8. Select the Date Backed Up cell, click again to activate the drop-down list, and selectthe desired backup date and time.
9. Select the Recover Destination cell, click again to activate the drop-down list, andselect the desired destination host.
The Recover Destination drop-down list shows physical Hyper-V hosts that areNetWorker clients and that are visible in SCVMM for the current user. The RecoverDestination drop-down list does not list the NetWorker virtual server clientsrepresenting the clusters.
10.Click the Recover button.
11.In the Recover Confirmation dialog box that displays, do one of the following:
l If the backup is encrypted and you need to specify a pass phrase, type the passphrase and click OK.
l If you do not need to specify a pass phrase, click OK.
VM Encrypted Recoveries on page 83 provides details.
The recovery starts on the destination Hyper-V host. The Monitoring page displays thestatus of the recovery.
12.If an Action Needed message displays, click OK to clear the message.
13.Confirm the VM is successfully recovered by verifying that the VM appears in thehypervisor on the Hyper-V server where you recovered the VM.
14.If the Action Needed message displayed, delete the original VM from its original hostby using the SCVMM console. Alternatively, delete the VM by using Hyper-V Manageror PowerShell, and then refresh the SCVMM console.
15.In the navigation pane of the SCVMM console, right-click the destination host andclick Refresh Virtual Machines.
16.If a new ID was assigned to the VM as described in VM IDs after redirected recovery onpage 85, in the navigation pane of the SCVMM console, right-click the source host andclick Refresh Virtual Machines.
17.Ask the NetWorker administrator to perform a backup of the VM from its new Hyper-Vhost.
Viewing VMs after a redirected recoveryIf you perform a redirected recovery of a VM to a Hyper-V host, then the VM will not meetthe criteria listed in Viewing available VMs on page 83 until after a new backup of the VMis completed. Therefore, the Recover page does not immediately display the redirected
EMC Data Protection Add-in for SCVMM
Redirected recoveries 87

VMs. After you perform a redirected recovery for a VM, ask the NetWorker administrator toperform a backup of the Hyper-V host where the VM currently resides.
Because the Data Protection Add-in displays only backups for the current Hyper-V host ofthe VM, if you want to recover a VM from a backup taken prior to a redirected recovery,you must use NMM.
Recovering a deleted VMThe Data Protection Add-in does not support recovering VMs that have been deleted fromSCVMM. The NetWorker administrator must perform the recovery by using NMM.
MonitoringThe Monitoring page provides information about Data Protection Add-in events andoperations.
The Monitoring page displays:
l Status of recovery operations in progress
l Details of queries to the NetWorker servers and the SCVMM server
l All logging entries from previous uses of the Data Protection Add-in (if any)
Figure 20 Data Protection Add-in for SCVMM Monitoring page
The Monitoring page shows 3 columns, all of which can be sorted: DateTime, EventType,Message.
The monitor log information is updated in real-time as operations occur. To manuallyscan for updated protection information, click Refresh.
You can export the log file by clicking Export at the bottom of the Monitoring page. NMMlogs are stored on the destination host, where the VM is restored. The exported log file
EMC Data Protection Add-in for SCVMM
88 EMC NetWorker Module for Microsoft for Hyper-V VSS 8.2 Service Pack 1 User Guide

name is MonitorExportFile and is located at C:\Users\<current user>\AppData\Local\EMC\NetWorker\SCVMM.
TroubleshootingThe following section includes information about how to resolve general issues you mightencounter while using the Data Protection Add-in. The NetWorker Administration Guide andthe NetWorker Module for Microsoft Administration Guide provide additionaltroubleshooting details.
Recovered VM doesn’t startIf a recovered VM doesn't start, perform the following steps:
Procedure
1. Select the recovered VM, then right-click the VM and select Discard Saved State.
2. Right-click the recovered VM and then select Properties.
3. In the Properties dialog box, click Hardware Configuration and verify the NetworkAdapter settings of the VM.
Installation fails due to access issueWhen you install the Data Protection Add-in, you need access to the following path: C:\Users\Public\Documents\EMC NetWorker\nsr\addins\VMM_DataProtection
Note
This path applies to environments in which the system drive is C:.
Solution
Before you install the Data Protection Add-in, verify that you have read/write accesspermissions to the paths noted above.
Importing fails due to access issueWhen you import the Data Protection Add-in, you need access to the following paths:
l C:\Program Files\Microsoft System Center 2012 R2\VirtualMachine Manager\bin\AddInPipeline\AddInViews
l C:\Program Files\Microsoft System Center 2012 R2\VirtualMachine Manager\bin\AddInPipeline\AddIns
Note
These paths apply to environments in which SCVMM was installed in the defaultlocation of C:\Program Files):
If you do not have access to the required paths, you receive the following error:
The assemblyMicrosoft.SystemCenter.VirtualMachineManager.UIAddIns.dllreferenced by the add-in assembly EMC.BRS.ScvmmAddIn.AddInView could not befound in the add-in package. Make sure that this assembly was included with the add-inpackage.
Solution
EMC Data Protection Add-in for SCVMM
Troubleshooting 89

Before you import the Data Protection Add-in, verify that you have read/write accesspermissions to the paths noted above.
VM attributes might display incorrect valuesOn the Monitoring page of the Data Protection Add-in, the VM Availability attribute mightoccasionally show an incorrect value.
To show the correct information:
1. In the SCVMM navigation pane, refresh the VM.
2. In the Data Protection Add-in, click Refresh.
Redirected recovery appears to succeed but no VM appears in Hyper-V ManagerIf a redirected recovery appears to succeed but no VM appears in Hyper-V Manager, thenetwork of the target host might be incompatible. For example, if the target host is in anon-trusted domain, redirected recovery to this target host fails.
If the network of the target host is incompatible, then the VM is disconnected from thenetwork. The recovery succeeds according to the Data Protection Add-in monitor log andthe NMM.RAW log, and the VM files are stored on the target host and volume, but Hyper-VManager does not display or recognize the VM.
Solution
Reconnect the existing switch of the host by using the SCVMM GUI or by using thefollowing PowerShell command:
$sw=Get-VMSwitch;get-vm -Id <vmID> |Get-VMNetworkAdapter | Connect-VMNetworkAdapter -SwitchName$sw.Name
After reconnecting the existing switch, re-attempt the redirected recovery.
Checks for redirected recovery failuresRedirected recovery of a VM might fail due to VM network or saved state incompatibilitybetween the original Hyper-V host and the target Hyper-V host. The Hyper-V writer cannotregister the VM because of errors in VM configuration files which the writer cannotresolve.
If you suspect this is the problem for a failed redirected recovery, then examine the targethost destination location for the VM files: look in the Monitor logs for the "redirectedrestore cmd line options:" output. If the VM files are there, then try to register the VMmanually by using the SCVMM UI.
Avoid VM names with the same name within an SCVMM contextThe Data Protection Add-in primarily uses the virtual machine name, as displayed inHyper-V Manager or Failover Cluster Manager, as an identifier for the virtual machines. Ifmultiple virtual machines have the same name in the same SCVMM context, then theAdd-in is unable to distinguish between the VMs. Although not required, it is consideredbest practice for virtual machine names to be unique.
EMC Data Protection Add-in for SCVMM
90 EMC NetWorker Module for Microsoft for Hyper-V VSS 8.2 Service Pack 1 User Guide

Cluster VM backups do not display on the Recover pageIf a cluster VM backup does not display on the Recover page, check that the cluster isconfigured as highly available in Microsoft Cluster Manager.
If a VM is removed from Microsoft Cluster Manager and is no longer shown by PowerShellas highly available, the backups for that VM do not display on the Recover page.
Unable to recover if 'localhost' used as NetWorker server nameThe use of 'localhost' as a NetWorker server name in the Data Protection Add-inPreferences page might cause recoveries to fail. Replace the 'localhost' entry with any ofthe following: 127.0.0.1, the machine's actual IP address (IPv4), or the machine's fullyqualified domain name.
Sample error message for failed recovery:
12/9/2014 1:55:35 PM Info 44498:nsrsnap_vss_recover:common\apputil(288): Cannot connect to resdb database on localhost 102357:nsrsnap_vss_recover:Unknown ApplicationInformation parameter: PROXY, may not be supported 38006:nsrsnap_vss_recover:Program notregistered. 102803:nsrsnap_vss_recover:Terminating restore due to error. 50338:nsrsnap_vss_recover: usage: nsrsnap_vss_recover [<options>] 80291:nsrsnap_vss_recover: options: [-v] [-c client-name] 43597:nsrsnap_vss_recover:[-s server] 50422:nsrsnap_vss_recover: [-A key=value] 80292:nsrsnap_vss_recover:[-d destination] 80293:nsrsnap_vss_recover: [-S SSID] or [-I -]
Redirected recovery fails when the VM name or VM configuration path containsspecial characters
NMM Hyper-V restricts the use of special characters in VM names and VM configurationpaths.
NMM Hyper-V supports the following characters in VM names and VM configurationpaths, including stand-alone, CSV, and SMB 3.0 configurations:
l Alpha numeric (A–Z, a–z, 0–9)
l - . [ ] _ { } + = ` ~ ! # $ % ^ & ( )
l Space
When you attempt to recover a Hyper-V save set, VM name, or file path that contains acharacter not listed above, the Data Protection Add-in checks the name and path of theVM objects and displays an error.
If a redirected recovery fails, you can use SCVMM to perform the following workaround:
Procedure
1. Recover the VM to the original location of the backup.
2. Use SCVMM to export the VM to a temporary location.
3. Copy the VM files to an appropriate location on the target host.
4. Use SCVMM to import the VM.
EMC Data Protection Add-in for SCVMM
Cluster VM backups do not display on the Recover page 91

EMC Data Protection Add-in for SCVMM
92 EMC NetWorker Module for Microsoft for Hyper-V VSS 8.2 Service Pack 1 User Guide

CHAPTER 6
Best Practices and Recommendations
This chapter includes the following sections:
l Overview............................................................................................................... 94l Hyper-V Server backup and recovery best practices............................................... 94l Hyper-V VM applications backup and recovery best practices................................95l Improving backup performance in Windows Server 2012 and 2012 R2 clusters with
CSV....................................................................................................................... 95l Data mining using Hyper-V granular level recovery.................................................96l Restrictions and requirements for relocating and recovering data to a different
location.................................................................................................................96l Restrictions for backup and recovery of Hyper-V VMs in a Windows Server Failover
Cluster.................................................................................................................. 97l Restrictions for Hyper-V VM granular level recovery............................................... 97
Best Practices and Recommendations 93
OverviewThis chapter includes best practices for backing up and recovering Hyper-V VMs.
Hyper-V Server backup and recovery best practicesThis type of backup uses the Hyper-V Writer on the Hyper-V server:
l To get the most benefit from the Hyper-V role, create separate VMs for eachapplication, so that the application-type backup and recovery performed at the hostlevel is only for Hyper-V.
l After disaster recovery of the Hyper-V server, you might need to recover applicationswithin each VM:
n If you are performing separate VM backups.
n These backups are more recent than the complete Hyper-V server backups.
l Best use for this type of backup is Bare Metal Recover of a guest and for recovery ofoperating system roles.
l Best practice for Initial Store backup is to back up when Hyper-V configurationchanges are made. Initial Store does not need to be backed up each time a VM guestis backed up.
l In NMM, the Hyper-V Writer does not support backup of the configuration file InitialStore to a proxy client.
l The primary purpose for recovering Initial Store in NMM is for disaster recovery of theHyper-V Server.
l Back up DPM Server, Exchange Server, SQL Server, or SharePoint Server applicationsfrom within the VM.EMC does not recommend that you use the Hyper-V backup to back up applicationson a VM for the following reasons:
n The backup process uses the VM copy backup method.
n The backup process does not manage VM logs. For example, the backup processdoes not truncate Exchange logs.
l Roll-forward recovery is not available for VM level disaster scenarios. From a Hyper-Vserver, a roll-forward recovery of a VM is not possible. Recoveries from a Hyper-Vserver are point-in-time (disaster recovery).
l VM pass-through disks are skipped during Hyper-V server backup.
l Basic disks are supported only within VMs.NMM does not support backups of dynamic disks within VMs. NMM mounts the guestsnapshot during the Hyper-V backup process, and this changes the disk signature ondynamic disks in a guest.
l NMM supports Windows Server 2008, 2008 R2, 2012, and 2012 R2 FailoverClustering, which allows you to configure a failover of VM.
l EMC storage connected to Fibre Channel or iSCSI storage can be used in the parent tohost VMs.
l Do not take a Hyper-V VSS server snapshot of Hyper-V VMs that are part of aSharePoint farm.To back up SharePoint on the Hyper-V VM:
Best Practices and Recommendations
94 EMC NetWorker Module for Microsoft for Hyper-V VSS 8.2 Service Pack 1 User Guide

1. Install the NMM client on the VM.
2. Perform the Share Point backup locally from within the VM.
The Microsoft website provides recommendations and requirements about usingSharePoint and Hyper-V together.
Hyper-V VM applications backup and recovery best practicesThis type of backup and recovery is performed within the VM, and uses application andsystem components Writers available on that VM:
l Microsoft recommends using backups within the VM as the preferred method forExchange backup and recovery.
l NMM supports roll-forward recovery for Exchange, when Exchange is backed upwithin the VM.
l Within VMs, standard application backup and recovery rules and capabilities apply,including roll-forward recoveries.
l NMM skips VM pass-through disks in Hyper-V backups. NMM supports pass-throughdisks backups within the VM.
l Windows Server Failover Clustering with iSCSI storage is supported.
l VM Windows Server failover clustering with fibre channel storage is not supportedbecause SCSI-3 is not supported in Hyper-V VMs.
Improving backup performance in Windows Server 2012 and2012 R2 clusters with CSV
When you use the NMM cluster proxy client to perform image-level backups of VMs in aWindows Server 2012 and 2012 R2 cluster with the NMM cluster proxy client, NMMperforms the backup by using the data is serviced from the cluster node that owns theCSV where the VM files reside. For example, Cluster Node 1 owns CSV 1 where the VM 1files reside, and the cluster proxy client is currently executing on Cluster Node 2. Whenthe cluster proxy node backs up VM 1, the backup process:
l Creates a shadow copy of CSV1.
l Streams backup data from Cluster Node 1 to Cluster Node 2.
l Routes the backup data to the NMM server.
In this example, the backup performance depends on network performance between thecluster nodes. Performance for this backup will be slower than backups where the CSVnode ownership is co-resident with the cluster proxy client.
If you use a cluster proxy client for VM backups, then consider the followingrecommendations to improve performance for image-level backups:
l Maximize the network bandwidth between the cluster nodes.
l Move CSV ownership to the proxy cluster client so that the shadow copies of thesevolumes are local to the backup process.
To maximize backup performance, ensure that the cluster node that runs the NMM proxycluster client owns the targeted CSVs. Before you move the CSVs, consider the following:
l Ensure that the cluster node with the cluster client proxy has the capacity to own allphysical nodes.The CSV owner node is responsible for file system metadata updates to the NTFSpartition. If you change the ownership of a CSV volume to a single node, this might
Best Practices and Recommendations
Hyper-V VM applications backup and recovery best practices 95

impact the performance of all the associated VMs on the CSV. The cluster proxy clientnode should have the capacity to be the owner of all CSVs.
l Ensure that any CSV you move is in the “healthy state”, online, and in full accessmode.There are two ways to change the ownership of a CSV to the proxy node.
n Use the Failover Cluster Manager GUI.
n Use the PowerShell Module ‘FailoverClusters’ cmdlet ‘Move-ClusterSharedVolume’.The Microsoft Failover Cluster document provides additional instructions formoving CSV ownership.
Data mining using Hyper-V granular level recoveryNMM is capable of granular level recovery for backups of Hyper-V VMs created with NMM2.4 or above. NMM with Hyper-V also supports data mining the information from the VMimage drives by using a third party tool such as Kroll OnTrack PowerControls.
To prepare to mine the data, use the NMM GUI to mount the VM, attach the VHDs, andload the VMs. Then you can access the data on the mounted VHDs using the third partytool, outside of the NMM GUI.
For example, if the VM guest is running SharePoint, first use the NMM GUI to mount theHyper-V VM image, attach the VHSs, and load the VMs. Then use Kroll OnTrackPowerControls to recover SharePoint sites, lists, libraries, and items.
You must keep the NMM GUI open while you explore and recover files on the mounted VMVHDs. If you close or change the focus of the NMM GUI, you lose access to the mountedVHDs. A warning displays anytime a closure or focus change will cause loss of access to amounted VM image.
Restrictions and requirements for relocating and recovering datato a different location
Hyper-V has several restrictions on relocating and recovering to other locations.
NMM does not support redirect recovery of virtual machines to Hyper-V Servers of thesame or higher release as the Hyper-V Server where the virtual machine was created.Although a virtual machine can be redirect recovered to an older release of a Hyper-VServer, it may not fully function on that server. For mixed environments, you might not beable to perform a redirected restore of a virtual machine from one type of environment toanother. Mixed environments include the following configurations:
l Environments with both stand-alone and clustered Hyper-V Servers
l Cluster environments with different operating systems and types of virtual machinestorage (CSV and SMB file shares)
Hyper-V does not support:
l Recovering Hyper-V VMs to non-Hyper-V Servers.
l Recovering the Initial Store to a different location.
l Relocating or redirecting Hyper-V backups taken before an NMM upgrade.
Before you relocate or recover Hyper-V backups, review these requirements:
l The parent partition must run Windows Server 2008 SP2 or higher in order to recover,with relocation of files, a VM that has Hyper-V snapshots.
Best Practices and Recommendations
96 EMC NetWorker Module for Microsoft for Hyper-V VSS 8.2 Service Pack 1 User Guide

l The destination host must have the NMM client installed.
l When you perform a directed recovery of a VM to a second Hyper-V Server, you mustupdate the Network Adapter settings of the VM with the Hyper-V Manager before youstart the VM.
Restrictions for backup and recovery of Hyper-V VMs in aWindows Server Failover Cluster
When a Hyper-V VM resides on a physical host, which is part of a Windows 2008, 2008R2, 2012, and 2012 R2 Failover Cluster, you cannot back up or recover the VM as part ofthe cluster virtual server.
For example, consider the following Failover Cluster setup:
l A cluster, Cluster_Virtual_Name, contains two physical machines,Physical_Machine_1 and Physical_Machine_2.
l Physical_Machine_1 contains two VMs, VM1 and VM2.
You want to back up and recover VM1.
If you create a NetWorker client resource for:
l Cluster_Virtual_Name, NMM does not support backup and recovery of VM1 throughthat client resource.
l Physical_Machine_1, you can specify the following values in the save set attribute:
n APPLICATIONS:\Microsoft Hyper-V to back up the Hyper-V application. Thisincludes all VMs on the physical machine.
n APPLICATIONS:\Microsoft Hyper-V\VM1 to back up an individual VM, such asVM1.
You can recover VM1 from a backup of the NetWorker client resource of the physicalmachine, Physical_Machine_1. Performing Hyper-V recovery to the original machine andlocation on page 53 describes how to perform this type of recovery.
You can perform a directed recover to recover VM1 from the NetWorker client resource ofthe physical machine, Physical_Machine_1 to the Physical_Machine_2. Performing adirected Hyper-V recovery to a different machine or location on page 54 describes how toperform this type of recovery.
Restrictions for Hyper-V VM granular level recoveryThe following restrictions apply when you perform a granular level recovery of a Hyper-VVM.
Windows 2008 R2 and earlier does not support:
l Recovery of data from a VHDX hard disk.
l Recovery of deduplicated data. To recover deduplicated volume data, you mustenable the Deduplication role.
l Recovery of ReFs volume data.
NMM Hyper-V GLR does not support differencing disk with parent and child hard disk ondifferent hard drives.
Best Practices and Recommendations
Restrictions for backup and recovery of Hyper-V VMs in a Windows Server Failover Cluster 97

Best Practices and Recommendations
98 EMC NetWorker Module for Microsoft for Hyper-V VSS 8.2 Service Pack 1 User Guide

CHAPTER 7
Troubleshooting
This chapter includes the following sections:
l Troubleshooting backups....................................................................................100l Troubleshooting recovery.................................................................................... 100
Troubleshooting 99

Troubleshooting backupsThe following topics explain issues that might occur during the backup process for aHyper-V environment, as well as steps to resolve or work around the issues.
Redirected I/O status does not update after CSV backupDuring a CSV backup, the CSV is in redirected I/O status. Other nodes cannot directlywrite to disks. Instead, the I/O is redirected over the LAN to the owner node performingthe backup.
If the redirected I/O status does not update properly after the NMM CSV backup iscomplete, you must clear the status by performing one of the following steps:
l Type the following commands at the command prompt to delete the stale shadows:diskshadowDISKSHADOW> list shadows allDISKSHADOW> delete shadows all
l Type the following command at the Windows PowerShell command prompt:Test-ClusterResourceFailure "volume name"
Note
This command might clear the "backup in progress" status only.
l If the "redirected access" status is not cleared after performing steps 1 and 2, changethe coordinator node by moving the volume to another node in the cluster andverifying that the volume is online.
l Use nsrcsvutil.exe to clear the backup state for the affected volume by typingthe following:nsrcsvutil -c <csv_volume_path>For example: nsrcsvutil -c "c:\ClusterStorage\Volume1"
Hyper-V pass-through disks may not be backed up in a child partition backupFor Hyper-V backups, the child partition pass-through disks are skipped in Hyper-V parentpartition backup, and child partition pass-through disks are supported by backups withinthe child partition.
However, in some cases, Hyper-V parent partition backup of a child partition with a pass-through disk might fail completely. If this occurs, contact Microsoft support for assistancebecause the problem might be with the hardware configuration or the Microsoft Hyper-Vwriter.
Troubleshooting recoveryThe following topics explain issues that might occur while performing a Hyper-V recovery,as well as steps to resolve or work around the issues.
Where the NMM GUI is opened for Hyper-V Server Core recovery or other CSV setup,recovery needs two environmental variablesIn a Hyper-V Server core or other CSV setup, if you encounter an RPC service failuremessage, perform the following steps:
1. Create the following variables under User environment variables:
l NSR_CSC_RPC_TIMEOUTThe typical value is 6. This value will be treated in seconds.
Troubleshooting
100 EMC NetWorker Module for Microsoft for Hyper-V VSS 8.2 Service Pack 1 User Guide

l NSR_CSC_METHOD_TIMEOUTThe typical value is 180. This value will be treated in seconds.
2. To apply the changes, restart the host where you launch the NMM recovery GUI.
When recovering multiple Hyper-V CSV VM through proxy, all the VMs are recovered butall the VMs are not getting registered
ProblemIn a Hyper-V CSV setup, when recovery of multiple Hyper-V CSV VMs through proxy isperformed, all the VMs are recovered although only one VM is registered.
SolutionAfter recovery of multiple Hyper-V CSV VMs through proxy is complete, NMMrecovers .VHD and .XMLs files. Manually run the following Powershell command toregister the VMs that are not registered: PS C:\Users\administrator.CONTOSO>Import-VM -path "C:\ClusterStorage\Volume3\CSV-VM-013\CSV-VM-013\Virtual Machines\E45E8DBB-FAEF-4A79-B891-5386AB20F66B.xml"
Name State CPUUsage(%) MemoryAssigned(M) Uptime Status ---- ----- ----------- ----------------- ------ ------ CSV-VM-013 Off 0 0 00:00:00 Operating normally
After Hyper-V CSV disaster recovery, application data recovery fails and unable tobrowse CSV mount point
ProblemAfter disaster recovery, if NMM is used to recover Hyper-V data, the following issuesare observed:
l Hyper-V recovery of VMs located in a shared disk (but non-CSV volume) fails.
l The CSV volumes are not browsable, and recovery of VMs located in CSV volumefails.
SolutionPerform the following steps:
1. Remove stale entries from the cluster resource.
2. In the Domain Controller, start the Active Directory Users and Computers Snap-In, and cross-check that the failover cluster virtual network name account ofHyper-V Virtual Server is enabled.
Through Advanced Recovery option, recovery of online VM to other node in same clustersetup completes
ProblemIn a Hyper-V CSV setup, when a child partition is up and running, the same childpartition can be recovered to another node by using the Advanced Recovery option.This creates multiple VMs in different CSV nodes.
SolutionIf the VM is online or active, recover the VM to the same node.
For Hyper-V image recovery, in the differencing disk type configuration, recovery to thealternate location fails with error
ProblemIn the differencing disk type configuration, image recovery of child partition to thealternate location fails with error.
Troubleshooting
Troubleshooting recovery 101

SolutionFollow the example solution provided:
If the source of the backup is:
l D:\VMDiff\Diff\VMdiff01\diff.vhdl D:\VMDiff\Base\SA_Gold\SA_Gold.vhdDuring the recovery, if the alternate location is P:\, then manually create thefollowing path in P:\ and then perform the recover:
l P:\VMDiff\Diff\VMdiff01l P:\VMDiff\Base\SA_GoldThe recovery completes without any error.
Recovery by using the GUI fails for a child partition in Hyper-V Server 2008 cluster
ProblemRecovery by using the GUI for a child partition that is available in Hyper-V Server2008 cluster fails.
Troubleshooting
102 EMC NetWorker Module for Microsoft for Hyper-V VSS 8.2 Service Pack 1 User Guide

SolutionUse the following procedures to recover a child partition in a Hyper-V Server 2008cluster:l If the child partition .vhd file is corrupt and the child partition configuration file is
intact:1. Locate the child partition (*.vhd) file path.2. Move the corrupted .vhd file to a safe location (network share drive) for future
reference, if needed.3. Create a dummy .vhd file that is identical to the original child partition that
was created before the corruption occurred.4. Use the NMM GUI to select the child partition and perform a recovery to the
original location.5. Start the child partition after recovery is complete.6. After the child partition is functional, discard the .vhd file that was placed in
a safe location on the network share drive.l Both the child partition .vhd file and the child partition configuration file are
corrupt:1. Locate the child partition .vhd file and configuration file .xml path.2. Copy the child partition .vhd file path and the configuration file to a safe
location on a network share drive.3. Remove the child partition from the cluster service.4. From the Hyper-V Management Console, delete the child partition.5. Delete the corrupted .vhd files from the local hard drive.6. Create a dummy child partition that has the identical details to the original
child partition that was created before the corruption occurred. This includesthe following:n Observe that two child partitions with the same name are available.
n .vhd file location
Note
Do not install the operating system on the child partition.
7. From the Failover Cluster Manager Console, add this dummy child partition tothe cluster service. This makes the child highly available.
8. Use the NMM GUI to select the child partition and perform a recovery to theoriginal location.
9. From the Hyper-V Management Console, after the recovery operation:a. Observe that two child partitions with the same name are available.b. Note that one of the child partitions is the duplicate or corrupted instance
that needs to be deleted.10.From the Failover Cluster Manager Console, remove the child partition from
the cluster service.11.From the Hyper-V Management Console:
a. Start both instances of the child partitions. One of the instances will startsuccessfully and the other will fail.
b. Identify the corrupted instance, the one that fails to start.c. Delete the corrupted instance.d. Shut down the working instance of the child partition.
12.From the Failover Cluster Manager Console, make the child partition highlyavailable.
13.Start the child partition after the recovery operation is complete.14.After the child partition is functional, discard the .vhd files and the
configuration file that were placed in a safe location on the network sharedrive.
Troubleshooting
Troubleshooting recovery 103
NMM registers corrupted Hyper-V child partition to Hyper-V Server
ProblemEven if a recovery operation for a Hyper-V child partition fails, NMM still registers thecorrupted Hyper-V child partition to the Hyper-V Server.
SolutionAfter receiving a confirmation about a failed recovery operation, the Hyper-V systemadministrator must delete the following:
1. The corrupted Hyper-V child by using the Hyper-V Manager.
2. The corresponding child partition .vhd files.
Troubleshooting
104 EMC NetWorker Module for Microsoft for Hyper-V VSS 8.2 Service Pack 1 User Guide

APPENDIX A
Recovering SQL Server, Exchange Server, andSharePoint Server Items from a Hyper-V VM
This appendix includes the following sections:
l Overview............................................................................................................. 106l Recovering items.................................................................................................106
Recovering SQL Server, Exchange Server, and SharePoint Server Items from a Hyper-V VM 105

OverviewThis appendix describes how to recover Microsoft SQL Server, Exchange Server, andSharePoint Server items stored in Hyper-V VMs by using GLR.
The Hyper-V writer of Microsoft Hyper-V Server (Windows Server 2008, 2008 R2, 2012, or2012 R2) supports only full backups (VSS_BT_FULL). The Hyper-V requestor performs afull backup of VMs that run a Microsoft application (SQL, Exchange, or SharePoint) . If arequestor specifies VSS_BT_COPY, then the Hyper-V writer still performs a full backup, asper the VSS MSDN documentation.
The following table shows the backup types set by the requestor by using theSetBackupState on the host and the backup type set by the Hyper-V requestor inside theguest.
Table 14 Backup types
Backup type set by requestor viaSetBackupState on the host
Backup type set by Hyper-V's requestorinside the guest
VSS_BT_FULL VSS_BT_FULL
VSS_BT_COPY VSS_BT_FULL
VM image backups are copy-type backups in-guest for applications. Log groomingrequires aseparate in-guest application backups. The Microsoft documentation providesinformation about the VSS_BT_FULL backup type.
Recovering itemsTo recover items stored on a Hyper-V VM, you must first perform the following steps:
Procedure
1. Configure the Hyper-V Client resources on NetWorker server and choose the Hyper-VWriter save set for backup.
2. Perform a full backup.
3. Open the NMM GUI on the FLR proxy server that you configured for GLR.
4. Select the NetWorker server where the you performed the Hyper-V Server backup asshown in the following figure.
Recovering SQL Server, Exchange Server, and SharePoint Server Items from a Hyper-V VM
106 EMC NetWorker Module for Microsoft for Hyper-V VSS 8.2 Service Pack 1 User Guide

5. Use the Configure Option in the NMM GUI to select the Hyper-V Server Client resourcesas shown in the following figure.
6. Click Recover > Hyper-V Recover Session > Granular Level Recovery as shown in thefollowing figure.
Recovering SQL Server itemsYou can recover SQL Server items from a Hyper-V VM.
Procedure1. Mount the VM that hosts the SQL Server, attach the hard disk, and then browse to the
folder that contains the database and logs from which you will recover the items.The following figure provides an example.
Recovering SQL Server, Exchange Server, and SharePoint Server Items from a Hyper-V VM
Recovering SQL Server items 107

2. Select the database (mdf) and logs (ldf) files.
3. Perform the recovery to the folder of your choice.
If the database is offline in SQL Management Studio, then perform the followingsteps:
a. Copy the recovered database and logs files to the actual path.
b. Bring the database online.
c. Check that the recovered data is intact.
If the database is online in SQL Management Studio with some data corruption orloss, then perform the following steps:
d. Bring the database offline.
e. Replace the existing database and logs with the recovered database and logs files.
f. Bring the database online.
g. Check that the recovered data is intact.
Recovering Exchange Server itemsYou can recover Exchange Server items from a Hyper-V VM.
Procedure
1. Mount the VM that hosts the Exchange Server, attach the hard disk, and browse to thefolder that contains the database and logs from which you will recover the items.
The following figure provides an example.
2. Select the database and logs files.
3. Perform the recovery to the folder of your choice.
If the database is online in the Exchange Management Console with some datacorruption or loss, perform the following steps:
a. Bring the database offline.
b. Replace the existing database and logs folder with the recovered database andlogs folder in the actual path.
c. Bring the database online.
d. Check that the recovered data is intact.
If the database is offline in the Exchange Management Console, perform thefollowing steps:
Recovering SQL Server, Exchange Server, and SharePoint Server Items from a Hyper-V VM
108 EMC NetWorker Module for Microsoft for Hyper-V VSS 8.2 Service Pack 1 User Guide
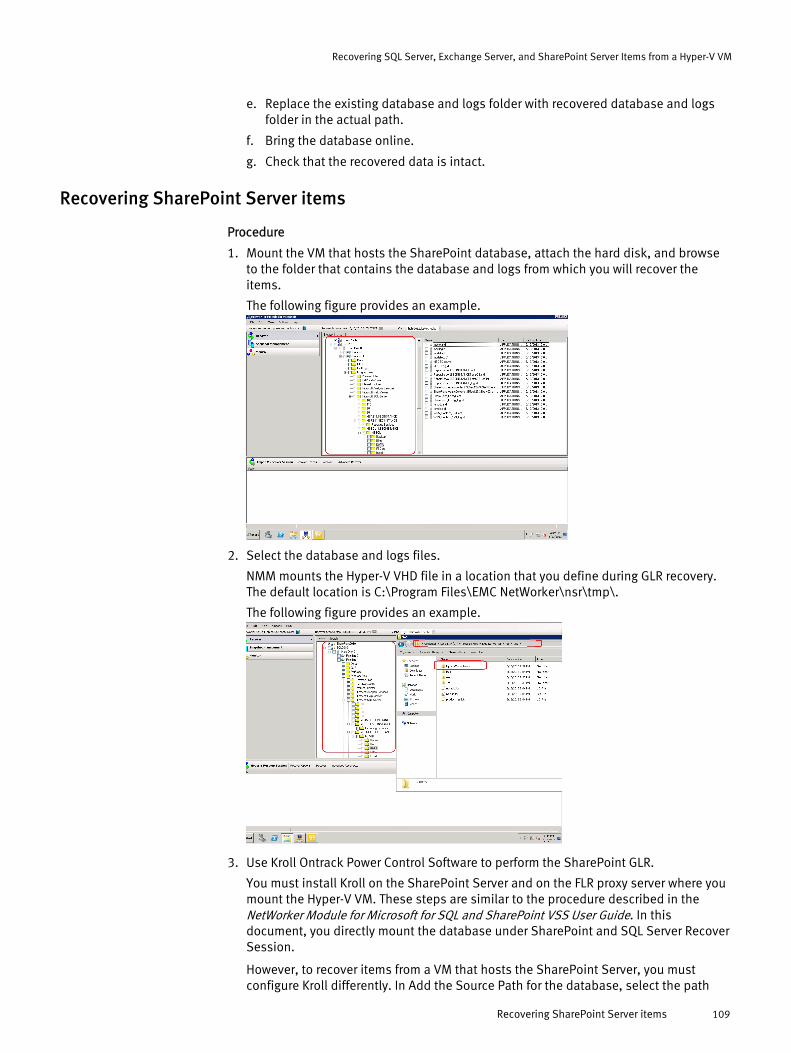
e. Replace the existing database and logs folder with recovered database and logsfolder in the actual path.
f. Bring the database online.
g. Check that the recovered data is intact.
Recovering SharePoint Server items
Procedure
1. Mount the VM that hosts the SharePoint database, attach the hard disk, and browseto the folder that contains the database and logs from which you will recover theitems.
The following figure provides an example.
2. Select the database and logs files.
NMM mounts the Hyper-V VHD file in a location that you define during GLR recovery.The default location is C:\Program Files\EMC NetWorker\nsr\tmp\.
The following figure provides an example.
3. Use Kroll Ontrack Power Control Software to perform the SharePoint GLR.
You must install Kroll on the SharePoint Server and on the FLR proxy server where youmount the Hyper-V VM. These steps are similar to the procedure described in theNetWorker Module for Microsoft for SQL and SharePoint VSS User Guide. In thisdocument, you directly mount the database under SharePoint and SQL Server RecoverSession.
However, to recover items from a VM that hosts the SharePoint Server, you mustconfigure Kroll differently. In Add the Source Path for the database, select the path
Recovering SQL Server, Exchange Server, and SharePoint Server Items from a Hyper-V VM
Recovering SharePoint Server items 109

where the Hyper-V VHD is mounted and then browse through the folder to select thedatabase.
For example:
C:\Program Files\EMC NetWorker\nsr\tmp\HyperVMountPoints\SQL2010\Hard Disk 0\Partition1\sqlfirstins\MSSQL11.FIRSTINSTANCE\MSSQL\DATAThe following figure provides an example.
4. Provide the target SharePoint Server with credentials as shown in the following figure.
The following figure provides an example.
Kroll Ontrack Software configures itself with the SharePoint Server and FLR proxyserver by scanning the logs, prescanning the logs, hashing the logs, and retrieving thecontent database.
The following figure provides an example.
Recovering SQL Server, Exchange Server, and SharePoint Server Items from a Hyper-V VM
110 EMC NetWorker Module for Microsoft for Hyper-V VSS 8.2 Service Pack 1 User Guide

5. After the Kroll OnTrack configuration completes, copy the content to be recoveredfrom the source to the target location.
The following figure provides an example.
Recovering SQL Server, Exchange Server, and SharePoint Server Items from a Hyper-V VM
Recovering SharePoint Server items 111

Recovering SQL Server, Exchange Server, and SharePoint Server Items from a Hyper-V VM
112 EMC NetWorker Module for Microsoft for Hyper-V VSS 8.2 Service Pack 1 User Guide

GLOSSARY
This glossary contains terms related to disk storage subsystems. Many of these terms areused in this manual.
A
ad hoc backup See manual backup.
administrator The person normally responsible for installing, configuring, and maintaining NetWorkersoftware.
administrators group Microsoft Windows user group whose members have the rights and privileges of users inother groups, plus the ability to create and manage the users and groups in the domain.
Application SpecificModule (ASM)
Program that is used in a directive to specify how a set of files or directories is to bebacked up or recovered. For example, compressasm is a NetWorker directive used tocompress files.
archive Backing up directories or files to an archive volume to free disk space. Archived data is notrecyclable.
archive volume Volume used to store archive data. Archived data cannot be stored on a backup volume ora clone volume.
ASR writer The VSS Writer, which is responsible for identifying critical data that is needed to performan offline restores.
autochanger See library.
autochanger sharing See library sharing.
auto media management Feature that enables the storage device to automatically label, mount, and overwrite anunlabeled or recyclable volume.
B
backup Operation that saves data to a volume.
See conventional backup. See snapshot.
backup components See metadata document.
backup group See group.
backup level See level.
backup volume Volume used to store backup data. Backup data cannot be stored on an archive volume ora clone volume. See volume.
EMC NetWorker Module for Microsoft for Hyper-V VSS 8.2 Service Pack 1 User Guide 113

Boot Configuration Data(BCD)
The ASR Writer component that identifies the location of the boot configuration database.This is required to perform an offline restore.
bootstrap Save set that is essential for NetWorker disaster recovery procedures. The bootstrapconsists of three components that reside on the NetWorker server. The media database,the resource database, and the server index.
browse policy NetWorker policy that specifies how long backed-up data will be readily available forrecovery. Backed-up data that has not exceeded its browse policy time can be recoveredmore quickly than data that has exceeded its browse policy time but not its retentionpolicy time.
See also retention policy
C
carousel See library.
client Computer, workstation, or fileserver whose data can be backed up and recovered.
client file index Database that tracks every database object, file, or file system that is backed up. TheNetWorker server maintains a single client index file for each client.
client-initiated backup See manual backup.
client resource NetWorker server resource that identifies the save sets to be backed up on a client. Theclient resource also specifies information about the backup, such as the schedule, browsepolicy, and retention policy for the save sets. See client. See resource.
clone Reliable copy of backed up data. Unlike volumes created with a simple copy command,clone volumes can be used in exactly the same way as the original backup volume. Singlesave sets or entire volumes can be cloned.
clone volume Exact duplicate of a backup volume. One of four types of volumes that NetWorker softwarecan track (backup, archive, backup clone, and archive clone). Save sets of these differenttypes may not be intermixed on one volume.
cluster 1. Two or more independent network servers that operate and appear to clients as if theyare a single unit. The cluster configuration enables work to be shifted from one server toanother, providing "high availability" that allows application services to continue despitemost hardware or software failures. Also known as an agent (Sun), logical server (HPTruCluster), package (HP-UX), and virtual server (Microsoft).
2. Group of disk sectors. The operating system assigns a unique number to each clusterand keeps track of files according to which clusters they use.
cluster shared volume(CSV)
A shared disk that contains an NTFS volume that is accessible for read and writeoperations by all nodes within the cluster. A virtual machine stored on CSV can changeownership from one node to another.
Cluster VSS Writer In a Windows Server 2012 or 2012 R2 cluster with virtual machine storage on CSV, theCluster VSS Writer reports components for backup for virtual machines that are owned bynodes other than the proxy or local node.
Glossary
114 EMC NetWorker Module for Microsoft for Hyper-V VSS 8.2 Service Pack 1 User Guide

command line Line on a display screen, also known as a command prompt or shell prompt, where youtype software commands.
component 1. Group of related data that must be treated as a single unit for backup and recovery.
2. In Microsoft VSS terminology, a component is a subordinate unit of a writer.
components metadatadocument
See metadata document.
consistent State of a dataset that is fully and immediately available to an application view.
console server Software program that is used to manage NetWorker servers and clients. The Consoleserver also provides reporting and monitoring capabilities for all NetWorker processes.
conventional backup See nonpersistent snapshot.
critical volume Any volume containing system state files or files for an installed service, including volumesmounted as NTFS directories which contain such files. The volume where a critical volumeis mounted is also considered to be critical. This is required to perform an offline restore,however maybe optional for this release depending upon the difficulties of implementingthis feature.
CSV Shadow CopyProvider
The VSS provider that performs the snapshot for virtual machines that are owned by nodesother than the proxy node in a Windows Server 2012 or 2012 R2 cluster with virtualmachine storage on CSV.
D
Data Mover (DM) Client system or application, such as NetWorker, that moves the data during a backup,recovery, or snapshot operation. See proxy client.
data retention policy See retention policy.
datawheel See library.
datazone Group of hosts administered by a NetWorker server.
device 1. Storage unit that reads from and writes to backup volumes. A storage unit can be atape device, optical drive, autochanger, or file connected to the server or storage node.
2. When dynamic drive sharing (DDS) is enabled, refers to the access path to the physicaldrive.
directed recovery Method of recovery that recovers data that originated on one client computer and re-creates it on another client computer.
directive Instruction that directs NetWorker software to take special actions on a given set of files fora specified client during a backup or recovery operation. Directives are ignored in manual(unscheduled) backups.
disk subsystem Integrated collection of storage controllers or HBAs, disks, and any required controlsoftware that provides storage services to one or more hosts, such as CLARiiON arrays.
Glossary
EMC NetWorker Module for Microsoft for Hyper-V VSS 8.2 Service Pack 1 User Guide 115

Distributed File System(DFS)
Microsoft Windows add-on that allows you to create a logical directory of shareddirectories that span multiple machines across a network.
domain controller Computer that stores directory data and manages user interactions within a domain,including logon, authentication, directory searches, and access to shared resources.
Dynamic Drive Sharing(DDS)
Feature that allows NetWorker software to recognize shared drives.
F
file index See client file index.
File server VSS agent Responds to commands from the file server VSS provider to back up server applicationsthat store data on a file server.
File Server VSS AgentService
A service that lets you create volume shadow copies of applications that store data on afile server.
File server VSS provider Sends commands through the VSS infrastructure to enable VSS operations on remote fileservers.
file system 1. The software interface used to save, retrieve, and manage files on storage media byproviding directory structures, data transfer methods, and file association.
2. The entire set of all files.
full backup See level.
G
granular recovery Granular recovery provides the ability to recover specific files in seconds from a singlebackup. This dramatically reduces the recovery time and the footprint of the backup onstorage resources.
group Client or group of client computers that are configured to back up files at a designated timeof day.
guest operating system The operating system on a virtual machine.
GUID The globally unique identifier of a virtual machine.
H
high-available system System of multiple computers configured as cluster nodes on a network that ensures thatthe application services continue despite a hardware or software failure. Each cluster nodehas its own IP address with private resources or disks that are available only to thatcomputer.
host ID Serial number that uniquely identifies a host computer.
Glossary
116 EMC NetWorker Module for Microsoft for Hyper-V VSS 8.2 Service Pack 1 User Guide

I
inactivity timeout Number of minutes to wait before a client is considered to be unavailable for backup.
incremental backup Backup level in which only files that have changed since the last backup are backed up.See level.
Initial Store An XML file on the management operating system that contains role-based securityconfiguration details for Hyper-V.
instant backup Process of creating a point-in-time copy (snapshot) of data from a single client and savingit on a primary storage volume, which can be immediately recovered as a backup copy.
instant restore Process of copying data created during an instant backup to its original location, or to analternate location, during a recover operation.
Integration Components A collection of services and software drivers that maximize performance and provide abetter user experience within a virtual machine. Integration services are only availablethrough Integration Components for supported guest operating systems.
J
jukebox See library.
L
label Electronic header on a volume used for identification by NetWorker or other Data Moverapplication.
legacy method Use of special-case Microsoft APIs to back up and recover operating system components,services, and applications.
level Backup configuration option that specifies how much data is saved during a scheduled ormanual backup. A full (f) backup backs up all files, regardless of whether they havechanged. Levels one through nine [1-9] backup files that have changed since the last lowernumbered backup level. An incremental (incr) backup backs up only files that havechanged since the last backup.
library Hardware device that contains one or more removable media drives, as well as slots forpieces of media, media access ports, and a robotic mechanism for moving pieces of mediabetween these components. Libraries automate media loading and mounting functionsduring backup and recovery. The term library is synonymous with autochanger, autoloader,carousel, datawheel, jukebox, and near-line storage.
library sharing Shared access of servers and storage nodes to the individual tape drives within a library.
local cluster client NetWorker client that is not bound to a physical machine, but is instead managed by acluster manager. It is also referred to as a logical or virtual client.
locale settings Settings that specify the input and output formats for date and time, based on locallanguage conventions.
Glossary
EMC NetWorker Module for Microsoft for Hyper-V VSS 8.2 Service Pack 1 User Guide 117

LUN (logical unit) Logical unit of storage on a CLARiiON system. This refers to a device or set of devices,usually in a CLARiiON storage array.
LUN address SCSI identifier of a logical unit number (LUN) within a device target. Each LUN addressidentifies a device on a SCSI bus that can perform input/output (I/O) operations.
M
manual backup Backup that a user performs from the client, also known as an unscheduled backup or anad hoc backup. The user specifies the files, file systems, and directories to back up.
media Physical storage medium, such as magnetic tape, optical disk, or file system to whichbackup data is written.
media database Database that contains indexed entries of storage volume location and the life cycle statusof all data and volumes managed by the NetWorker server. See volume.
media index See media database.
metadata document VSS Information stored in an XML document that is passed from the writer to therequestor. Metadata includes the Writer name, files, and components to back up, a list ofcomponents to exclude from the backup, and the methods to use for recovery. See shadowcopy set.
mount To make a database available for use or to place a removable tape or disk volume into adrive for reading or writing.
mount point See volume mount point.
N
Network DataManagement Protocol
(NDMP)
TCP/IP-based protocol that specifies how heterogeneous network componentscommunicate for the purposes of backup and recovery.
NetWorker administrator User who can add to or change the configuration of the NetWorker server, media devices,and libraries. NetWorker administrators must have their usernames included in theNetWorker server Administrator list.
NetWorker client See client.
NetWorker Console server See console server.
NetWorker ManagementConsole
See console server.
NetWorker server Computer on a network running the NetWorker software, containing the online indexes,and providing backup and recover services to the clients on the same network.
NetWorker storage node See storage node.
nonclone pool Pools that contain data that has not been cloned.
Glossary
118 EMC NetWorker Module for Microsoft for Hyper-V VSS 8.2 Service Pack 1 User Guide

noncritical volume A volume containing files that are not part of the system state or an installed service. Thebackup of non-critical volumes is not supported by either product for their initial releases.
nonpersistent snapshot Snapshot backup that is moved to secondary storage on the NetWorker server or storagenode and is no longer available for instant restore from a supported type of primarystorage.
O
offline restore A restore operation performed from the Windows PE environment.
online indexes Databases located on the NetWorker server that contain all the information pertaining tothe client backups (See client file index) and backup volumes (See media database).
online restore A restore operation performed using the normal recover UI, and the computer has beenbooted from an installed operating system.
operator Person who monitors the server status, loads backup volumes into storage devices, andexecutes day-to-day NetWorker tasks.
P
pathname Set of instructions to the operating system for accessing a file. An absolute pathnameindicates how to find a file starting from the root directory. A relative pathnameindicateshow to find the file starting from the current directory.
persistent snapshot Snapshot that is retained on disk. A persistent snapshot may or may not be rolled over totape.
point-in-time copy (PiT) Fully usable copy of a defined collection of data, such as a consistent file system,database, or volume, which contains an image of the data as it appeared at a single pointin time. A PiT copy is also called a shadow copy or a snapshot.
policy Set of constraints that specify how long the save sets for a client are available for recovery.Each client has a browse policy and a retention policy. When the retention policy expires,the save sets associated with that policy are marked recyclable.
pool Feature to sort backup data to selected volumes.
PowerSnap EMC technology that provides point-in-time snapshots of data to be backed up.Applications that are running on the host system continue to write data during thesnapshot operation, and data from open files is included in the snapshots.
provider Software component defined by Microsoft VSS, that plugs in to the VSS environment. Aprovider, usually produced by a hardware vendor, enables a storage device to create andmanage snapshots.
proxy client Surrogate client that performs the NetWorker save operation for the client that requests thebackup. A proxy client is required to perform a serverless backup.
proxy node The node with the proxy cluster client in a Windows Server 2012 or 2012 R2 cluster withvirtual machine storage on CSV.
Glossary
EMC NetWorker Module for Microsoft for Hyper-V VSS 8.2 Service Pack 1 User Guide 119

Q
quiescing Process in which all writes to disk are stopped and the file system cache is flushed.Quiescing the database prior to creating the snapshot provides a transactionallyconsistent image that can be remounted without file system checks or databaseconsistency checks. Quiescing a database is the most common way of creating a databasesnapshot.
R
recover To recover files from a backup volume to a client disk.
Registry Microsoft Windows database that centralizes all Windows settings and provides securityand control over system, security, and user account settings.
replica See shadow copy.
requestor Interface with the Microsoft VSS infrastructure to initiate the creation and destruction ofSee shadow copy. NetWorker software is a requestor.
resource Component that describes the NetWorker server or its clients. Clients, devices, schedules,groups, and policies are all NetWorker resources. Each resource has attributes that defineits properties.
restore Process of retrieving individual datafiles from backup storage and copying the files to disk.
retention policy NetWorker policy that specifies the minimum period of time that must elapse beforebacked-up data is eligible to be overwritten on the backup media. Backed-up data that hasnot exceeded its browse policy time can be recovered more quickly than data that hasexceeded its browse policy time but not its retention policy time. See browse policy.
retrieve To locate and recover archived files and directories.
rollover Process of backing up a snapshot to a conventional backup medium such as tape.Whether or not the snapshot is retained on disk depends on the snapshot policy.
root Highest level of the system directory structure.
S
save set Group of files or a file system from a single client computer, which is backed up on storagemedia.
save set ID (SSID) Internal identification number assigned to a save set.
save set recover To recover data by specifying save sets rather than by browsing and selecting files ordirectories.
save set status NetWorker attribute that indicates whether a save set is browsable, recoverable, orrecyclable. The save set status also indicates whether the save set was successfullybacked up.
Glossary
120 EMC NetWorker Module for Microsoft for Hyper-V VSS 8.2 Service Pack 1 User Guide

save stream The data and save set information being written to a storage volume during a backup.
server index See client file index.
serverless backup Backup method that uses a proxy client to move the data from primary storage on theapplication server host to secondary storage on another host. Serverless backups free upresources on the application server by offloading the work of processing snapshots to asecondary host.
Server Message Block(SMB) 3.0 file share
File share that uses the SMB 3.0 protocol. You can store virtual machines on a SMB 3.0 fileshare for a stand-alone Windows Server 2012 or 2012 R2 computer with Hyper-V or for aWindows Server 2012 or 2012 cluster with Hyper-V.
service port Port used to listen for backup and recover requests from clients through a firewall.
shadow copy Temporary, point-in-time copy of a volume created using VSS technology. See VolumeShadow Copy Service (VSS).
shadow copy set Complete roadmap of what was backed up at a single instant in time. The shadow copy setcontains information about the Writers, their components, metadata, and the volumes. Abackup components metadata document containing that information is created andreturned to the requestor after the snapshot is complete. NetWorker uses this documentwith the corresponding save set at recover time.
shadow copy technology Defined and standard coordination between business application, file system, and backupapplication that allows a consistent copy of application and volume data to exist forreplication purposes.
skip Backup level in which designated files are not backed up.
snap clone Exact copy of a snap set data backup. The clone operation is an archive operation withoutthe deletion of the source data. A new snap ID is assigned to the cloned copy.
snap ID Also known as a snapid, a unique 64-bit internal identification number for a snap set.
snap set Group of files, volumes, or file systems from a single client, describing the collection ofdata for which a point-in-time copy is created on an external disk subsystem, such as astorage array.
snapshot Point in time, read-only copy of data created during an instant backup. In Microsoftapplications, this is known as a shadow copy or replica.
snapshot expirationpolicy
Policy that determines how long snapshots are retained before their storage space is madeavailable for the creation of a new snapshot.
snapshot policy Set of rules that control the lifecycle of a snap set. The snapshot policy specifies thefrequency of snapshots, and how long snapshots are retained before recycling.
snapshot retention policy Policy that determines how many PIT copies are retained in the media database and thusare recoverable.
staging Moving data from one storage medium to a less-costly medium, and later removing thedata from its original location.
Glossary
EMC NetWorker Module for Microsoft for Hyper-V VSS 8.2 Service Pack 1 User Guide 121

stand-alone device Storage device that contains a single drive for backing up data. Stand-alone devicescannot store or automatically load backup volumes.
storage device See device.
storage node Storage device physically attached to a computer other than the NetWorker server, whosebackup operations are administered from the controlling NetWorker server.
system state All files that belong to VSS Writers with a usage type of BootableSystemState orSystemService. This is required to perform an offline restore.
V
virtual hard disk (VHD)files
The file format for a virtual hard disk, which is the storage medium for a virtual machine. AVHD file can reside on any storage topology that the management operating system canaccess, including external devices, storage area networks, and network-attached storage.For Windows Server 2008 R2 and earlier, the file extension is .vhd. For Windows Server2012 and later, the file extension is .vhdx.
volume 1. A unit of physical storage medium, such as a magnetic tape, optical disk, or file systemto which backup data is written.
2. An identifiable unit of data storage that may reside on one or more host disks.
volume ID Internal identification that NetWorker software assigns to a backup volume.
volume mount point Disk volume that is grafted into the namespace of a host disk volume. This allows multipledisk volumes to be linked into a single directory tree, and a single disk or partition to belinked to more than one directory tree.
volume name Name assigned to a backup volume when it is labeled. See label.
volume pool See pool.
Volume Shadow CopyService (VSS)
Microsoft technology that creates a point-in-time shadow copy of a disk volume.NetWorker software backs up data from the shadow copy. This allows applications tocontinue to write data during the backup operation, and ensures that open files are notomitted.
VSS See Volume Shadow Copy Service (VSS).
VSS component Subordinate unit of a writer.
W
writer Database, system service, or application code that provides metadata documentinformation about what to back up and how to handle VSS component and applicationsduring backup and recovery operations. A Writer provides information to requesters toensure that application data is consistent, application files are closed and ready for aslight pause to make a Shadow Copy.
Glossary
122 EMC NetWorker Module for Microsoft for Hyper-V VSS 8.2 Service Pack 1 User Guide