microsoft dynamics ax 2012 r3 july 2014 warehouse ... warehouse management system implementation...
TRANSCRIPT

1
Warehouse Management System Implementation Guide
White paper
Microsoft Dynamics AX 2012 R3 July 2014
Warehouse Management
System Implementation
Guide
White paper www.microsoft.com/dynamics/ax
Send feedback.

1
Warehouse Management System Implementation Guide
White paper
Contents
Additional resources 4
Introduction 5
1 Setup requirements 6
1.1 Understanding the Warehouse Management parameters 6 1.1.1 General Warehouse Management parameters 6 1.1.2 Additional Warehouse Management parameters 9
1.2 Setting up the warehouse 14
2 Case study – Inbound process 19
2.1.1 Warehouse details 19 2.1.2 Product storage details 19 2.1.3 Stock management details 19 2.1.4 Warehouse layout 20 2.1.5 Location types 20 2.1.6 Case study continued 21 2.1.7 Location formats 21 2.1.8 Case study continued 22 2.1.9 Location profiles 22 2.1.10 Case study continued 22 2.1.11 Zones and zone groups 23 2.1.12 Case study continued 23 2.1.13 Case study continued 24 2.1.14 Storage dimension groups 25 2.1.15 Case study continued 25 2.1.16 Tracking dimension groups 25 2.1.17 Case study continued 26 2.1.18 Unit of measure sequence groups 26 2.1.19 Case study continued 26 2.1.20 Inventory status 28 2.1.21 Case study continued 31 2.1.22 Disposition codes 31 2.1.23 Case study continued 32 2.1.24 Location setup wizard 32 2.1.25 Case study continued 32 2.1.26 Create inventory items – case study continued 36 2.1.27 Create a new item group – case study continued 36 2.1.28 Item groups and filters 39 2.1.29 Case study continued 39
2.2 Location directives and work templates 41 2.2.1 Location directives 41 2.2.2 Case study continued 45 2.2.3 Case study continued 47 2.2.4 Work templates 48 2.2.5 Case study continued 49 2.2.6 Case study continued 51 2.2.7 Mobile Device setup 52 2.2.8 Case study continued 52 2.2.9 Mobile device menu items 52
2.3 Testing the case study – Purchase receive and put away 53 2.3.1 Create a purchase order 54 2.3.2 Open the Mobile Device Emulator 56
2
Warehouse Management System Implementation Guide
White paper
2.3.3 Create the purchase receipt 59 2.3.4 Create the put away 62 2.3.5 Create a receipt for the purchase order in Procurement & Sourcing 64 2.3.6 Receipt using lot batch controlled items 66 2.3.7 Purchase returns 72 2.3.8 Cycle counting 77 2.3.9 Threshold quantity - case study continued 77 2.3.10 Capacity threshold cycle counting - case study continued 88 2.3.11 Cycle count plans - case study continued 94 2.3.12 Replenishment 99 2.3.13 Receive inventory with a non-good item status 104
3 Case study – Outbound/Picking process 111
3.1 Understanding the flows in outbound 111 3.1.1 Outline of the outbound process 111 3.1.2 Set up the reservation hierarchy 111 3.1.3 Set up the location directives associated to the outbound process 114 3.1.4 Set up the work template for sales order picking 123 3.1.5 Top grid – Overview 124 3.1.6 Top grid – General tab 125 3.1.7 Understanding wave templates 128 3.1.8 Manual wave steps 130 3.1.9 Wave release 130 3.1.10 Set up a new wave template sequence - case study continued 131 3.1.11 Test the case study setup and create a sales order 131 3.1.12 Understanding how to introduce staging into the picking process 139 3.1.13 Adjusting the location directives 140 3.1.14 Understanding the work template for staging 141 3.1.15 Test the use of staging in the outbound process 143 3.1.16 Understanding how to use anchoring in the staging process 149 3.1.17 Understanding cluster picking 150
4 Transfer Order Process 166
4.1 Outbound – Setup requirements 166 4.1.1 Enable the wave template 166 4.1.2 Enable the work template 166 4.1.3 Enable the location directives 166 4.1.4 Enable the mobile menu item 167 4.1.5 Enable the mobile device menu 168 4.1.6 Enable a work user 168 4.1.7 Enable an additional transit warehouse 169 4.1.8 Add on-hand to ship from warehouse 170 4.1.9 Create a transfer order 170 4.1.10 Mobile device transfer order outbound execution 171 4.1.11 Shipment confirmation 172
4.2 Inbound - Setup requirements 173 4.2.1 Enable the work template 173 4.2.2 Enable the location directives 173 4.2.3 Enable the mobile device menu item 174 4.2.4 Enable the mobile device menu 174 4.2.5 Execute inbound transfer order process 174 4.2.6 Mobile device transfer order inbound execution 175
5 Manufacturing and Warehouse management 178
5.1 Using warehouse management in production 178

3
Warehouse Management System Implementation Guide
White paper
5.1.1 Aligning the concepts: Release production, release to warehouse and reservation 178 5.1.2 Multiple release to warehouse 178 5.1.3 Release to warehouse requires full reservation 182 5.1.4 Reservation before release to warehouse 183 5.1.5 Material staging for production or batch orders 184

4
Warehouse Management System Implementation Guide
White paper
Additional resources Use the following links to access blog posts on subjects not covered in this document or resources that provide supplemental
guidance:
• Warehouse management online Help on TechNet
• Upgrading code that relies on available and reserved inventory quantities in AX 2012 R3
• Manual packing functionality in Warehouse management available in AX 2012 R3
• Warehouse Key Performance Indicators in Microsoft Dynamics AX 2012 R3
• Warehouse and Transportation management vs. the “old” Advanced warehouse management
• Serial Number Tracking for Service and Warranty in Microsoft Dynamics AX R3
Additional resources will be added in future versions of this document.
5
Warehouse Management System Implementation Guide
White paper
Introduction The purpose of the Microsoft Dynamics AX Warehouse Management System Implementation Guide is to provide functional and
technical guidance to users who want to implement or use the Warehouse Management System provided as part of the Microsoft
Dynamics AX 2012 R3 solution. The document walks you through a case study to implement warehouse management for a fictitious
company, and contains explanations of concepts and descriptions of fields used in the warehouse forms. This document is a
supplement to the Online Help for Warehouse management that’s available on TechNet.
Warehouse Management for Microsoft Dynamics AX is an integrated warehousing solution for advanced distribution and order
fulfillment that adds to the current capabilities of Microsoft Dynamics AX to support distribution companies and logistics providers.
This is a module solution that integrates advanced supply chain capabilities seamlessly into your new or existing Microsoft Dynamics
AX system. It’s designed to support best-practice logistics and fulfillment services without having to purchase and interface a
separate Warehouse Management system. The solution is native to the Microsoft Dynamics AX client, and provides a uniform
appearance and behavior to business users who are familiar with the Microsoft Dynamics AX user interface.
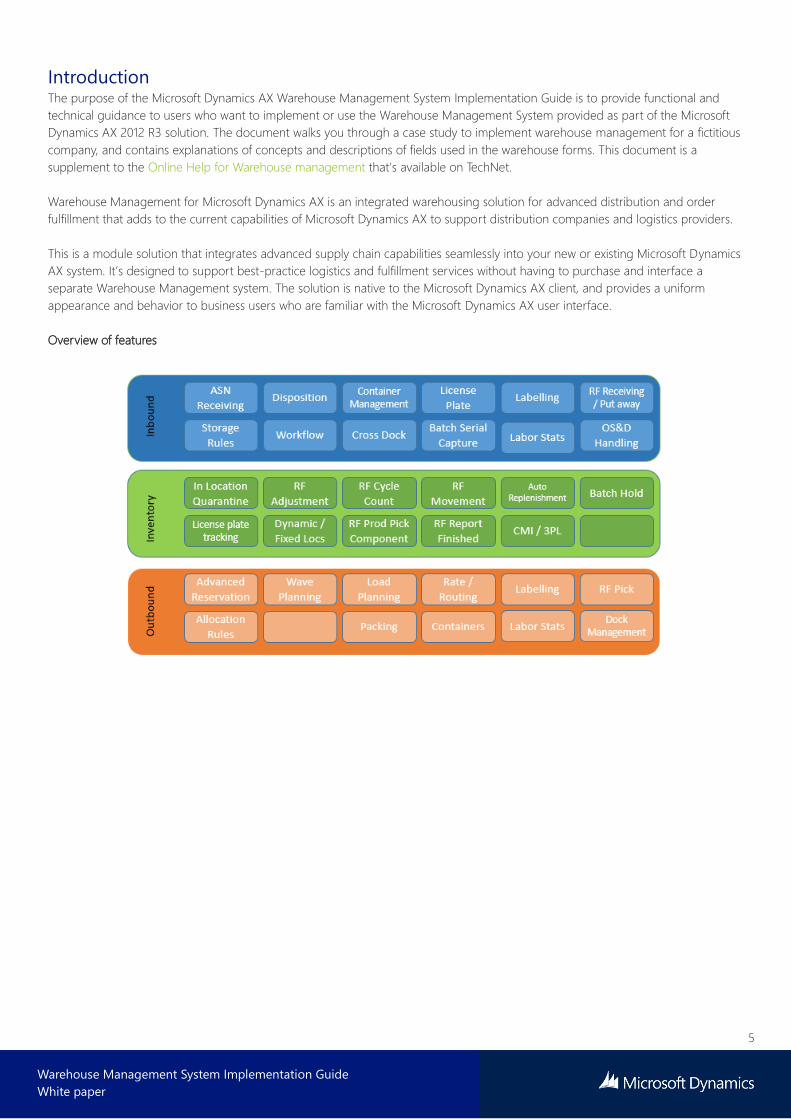
Overview of features
6
Warehouse Management System Implementation Guide
White paper
1 Setup requirements
1.1 Understanding the Warehouse Management parameters
Use the Warehouse management parameters form to set up the Warehouse Management parameters that are provided as part of
the Microsoft Dynamics AX 2012 R3 solution.
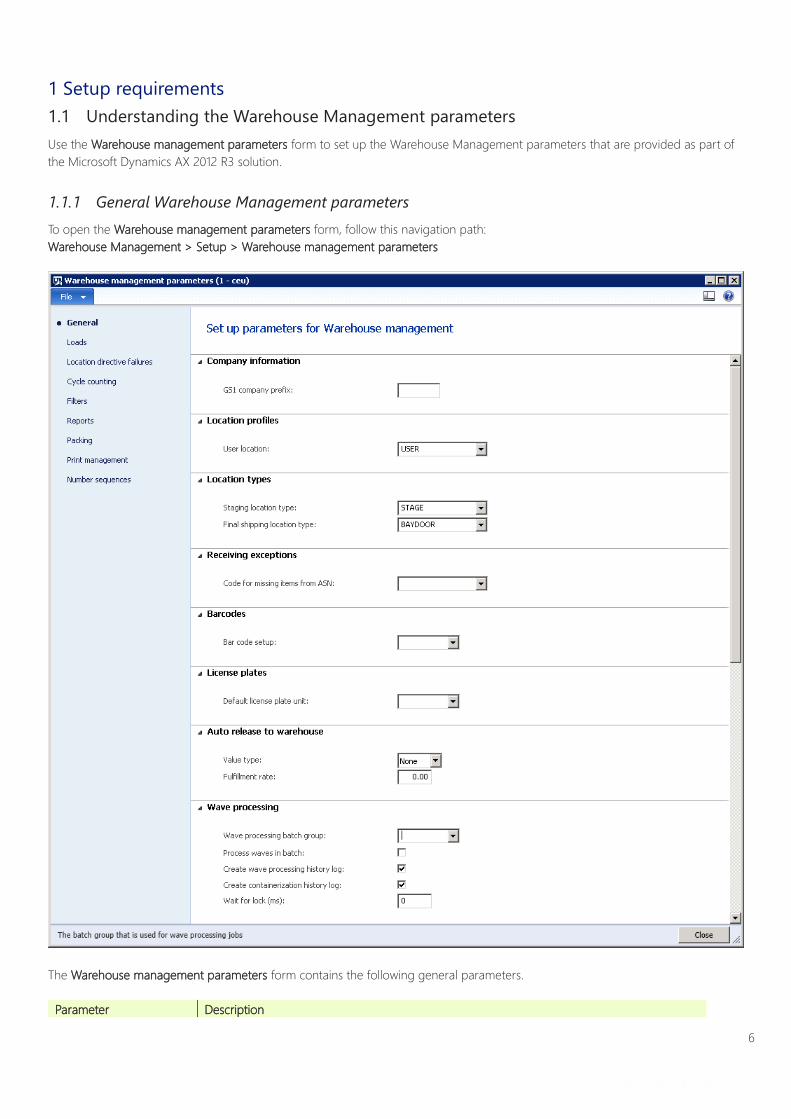
1.1.1 General Warehouse Management parameters
To open the Warehouse management parameters form, follow this navigation path:
Warehouse Management > Setup > Warehouse management parameters
The Warehouse management parameters form contains the following general parameters.
Parameter Description

7
Warehouse Management System Implementation Guide
White paper
Parameter Description
Company information Used to automatically generate license plates. This can be the default prefix of the license
plate number.
Location profiles A user location must be specified as a location profile. This is the location that is used when
goods are in transit in the warehouse. For example, a user will collect goods from the
receiving bay and move to the picking location when the stock is in a location profile and
being transported. An inventory inquiry will show that it is attached to the user, which is the
default profile.
Location types These are the default staging and shipping locations that are defined at a parameter level.
The override for staging and shipping locations are defined on the location directives.
Receiving exceptions This shows the packing structure that is created and the code that will be used if the structure
does not contain what it is on load. This is basically to stop misalignment between the load
and the packing structure that is created out of the ASN (Advanced Shipment Notification).
License plates This is the location storage limit that is set on location stocking limits. If you have three
different pallets that are almost the same and you can fit these in three pallet locations, you
can run that location as the default license plate unit.
Auto release to
warehouse
You can automate the process of releasing sales orders to the warehouse. This means that
you can set the parameter level for a fulfillment rate based on either quantity or price. You
are then able to set a threshold for that fulfillment type. For example, if you set quantity
fulfillment type you can set the threshold for automatic release at a minimum of 80% of the
ordered quantity that is available and then ship the line.
Wave processing You can either automatically create a wave template at time of release of the sales order to
the warehouse, or you can create a template via the wave threshold fulfillment rate, or it can
be manually triggered via periodic and sent to a batch. The parameter setting here defines
the default batch that is required to run the wave template creation, or if there are multiple
batches to create the wave template, how the logs are created in the system.
8
Warehouse Management System Implementation Guide
White paper
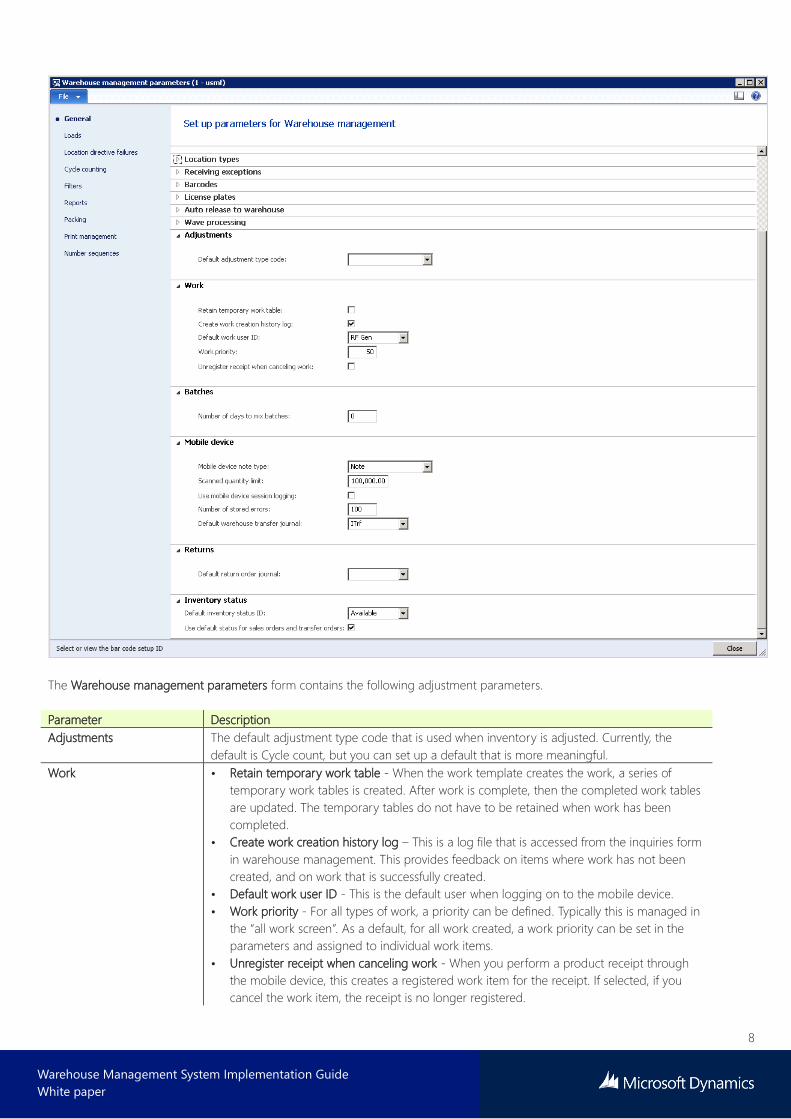
The Warehouse management parameters form contains the following adjustment parameters.
Parameter Description
Adjustments The default adjustment type code that is used when inventory is adjusted. Currently, the
default is Cycle count, but you can set up a default that is more meaningful.
Work • Retain temporary work table - When the work template creates the work, a series of
temporary work tables is created. After work is complete, then the completed work tables
are updated. The temporary tables do not have to be retained when work has been
completed.
• Create work creation history log – This is a log file that is accessed from the inquiries form
in warehouse management. This provides feedback on items where work has not been
created, and on work that is successfully created.
• Default work user ID - This is the default user when logging on to the mobile device.
• Work priority - For all types of work, a priority can be defined. Typically this is managed in
the “all work screen”. As a default, for all work created, a work priority can be set in the
parameters and assigned to individual work items.
• Unregister receipt when canceling work - When you perform a product receipt through
the mobile device, this creates a registered work item for the receipt. If selected, if you
cancel the work item, the receipt is no longer registered.
9
Warehouse Management System Implementation Guide
White paper
Parameter Description
Batches An option in the location profile allows for mixed inventory batches. For example, if the
number of days to mix batches is set to 30 days, when a location is proposed and a batch
already exists, then a new batch will be accepted in that location if the expire date difference
is no more than 30 days. Mobile device The mobile device enables messages to display on the users screen.
Returns When performing a sales return, this is the default journal that is used for the movement of
stock.
Inventory status • Default inventory status ID - The inventory status default can be set at the parameter
level, warehouse level, or stocking level.
• Use default status for sales orders and transfer orders – If selected, the status is
automatically applied to sales orders or transfer orders.
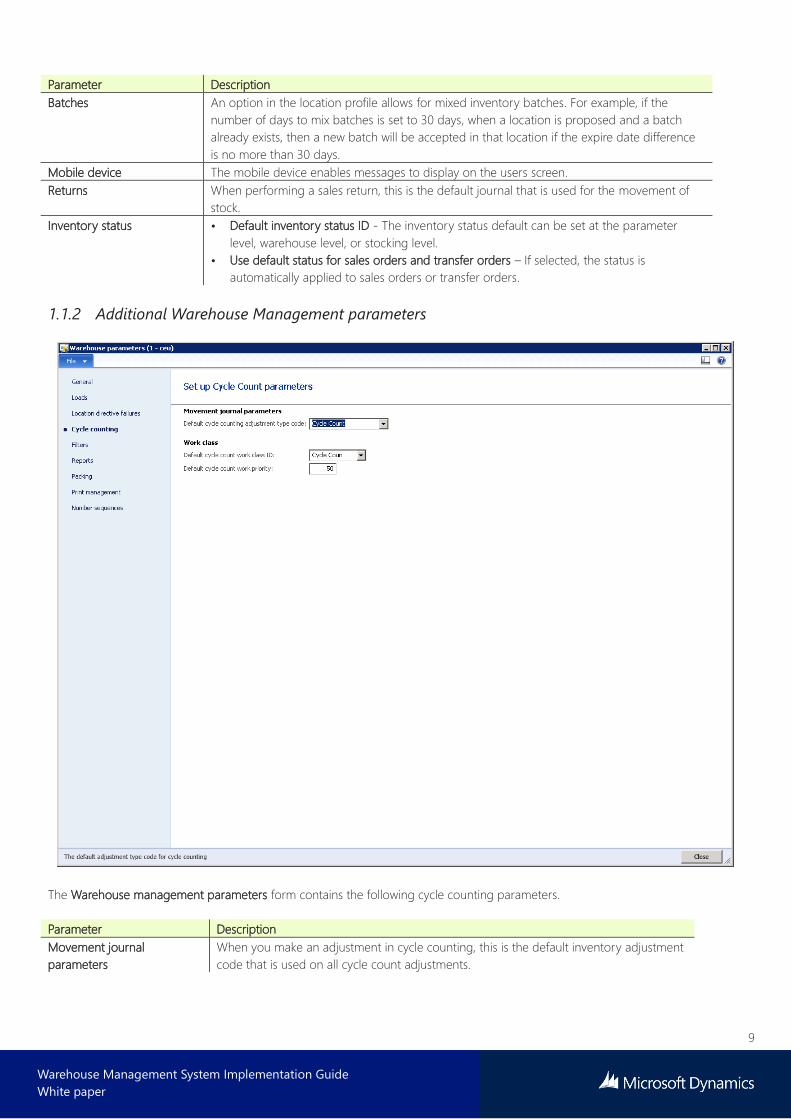
1.1.2 Additional Warehouse Management parameters
The Warehouse management parameters form contains the following cycle counting parameters.
Parameter Description
Movement journal
parameters
When you make an adjustment in cycle counting, this is the default inventory adjustment
code that is used on all cycle count adjustments.
10
Warehouse Management System Implementation Guide
White paper
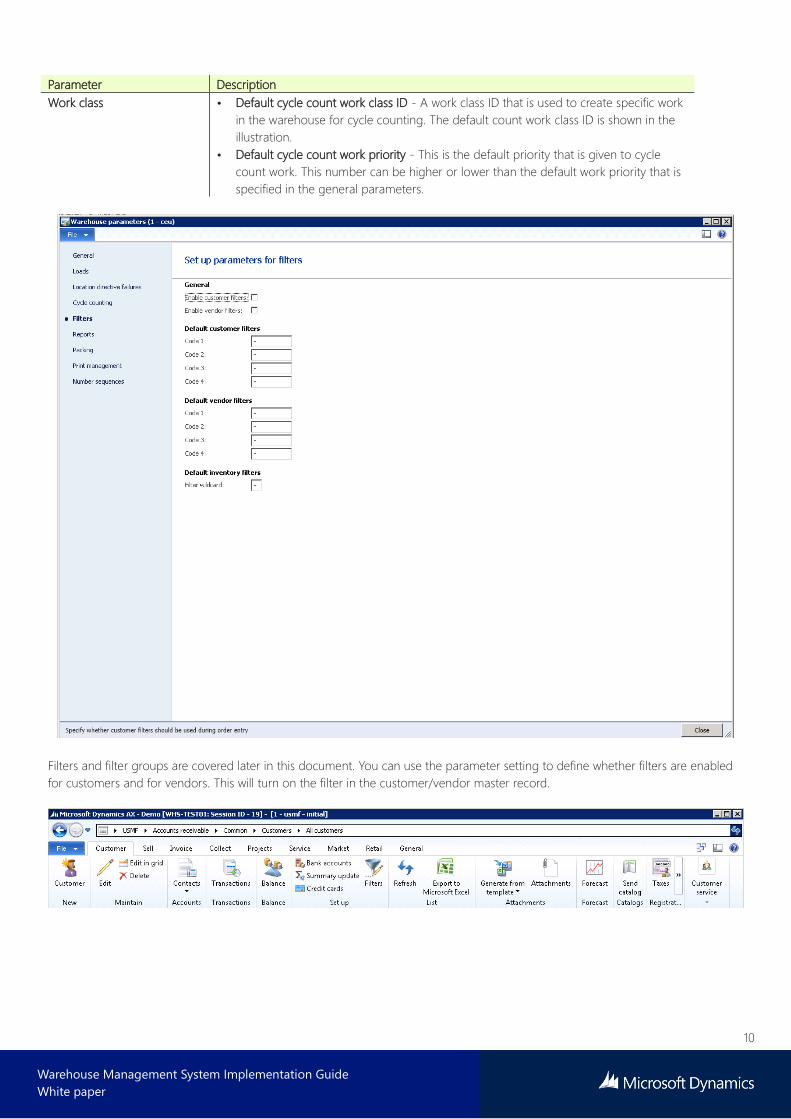
Parameter Description
Work class • Default cycle count work class ID - A work class ID that is used to create specific work
in the warehouse for cycle counting. The default count work class ID is shown in the
illustration.
• Default cycle count work priority - This is the default priority that is given to cycle
count work. This number can be higher or lower than the default work priority that is
specified in the general parameters.
Filters and filter groups are covered later in this document. You can use the parameter setting to define whether filters are enabled
for customers and for vendors. This will turn on the filter in the customer/vendor master record.
11
Warehouse Management System Implementation Guide
White paper
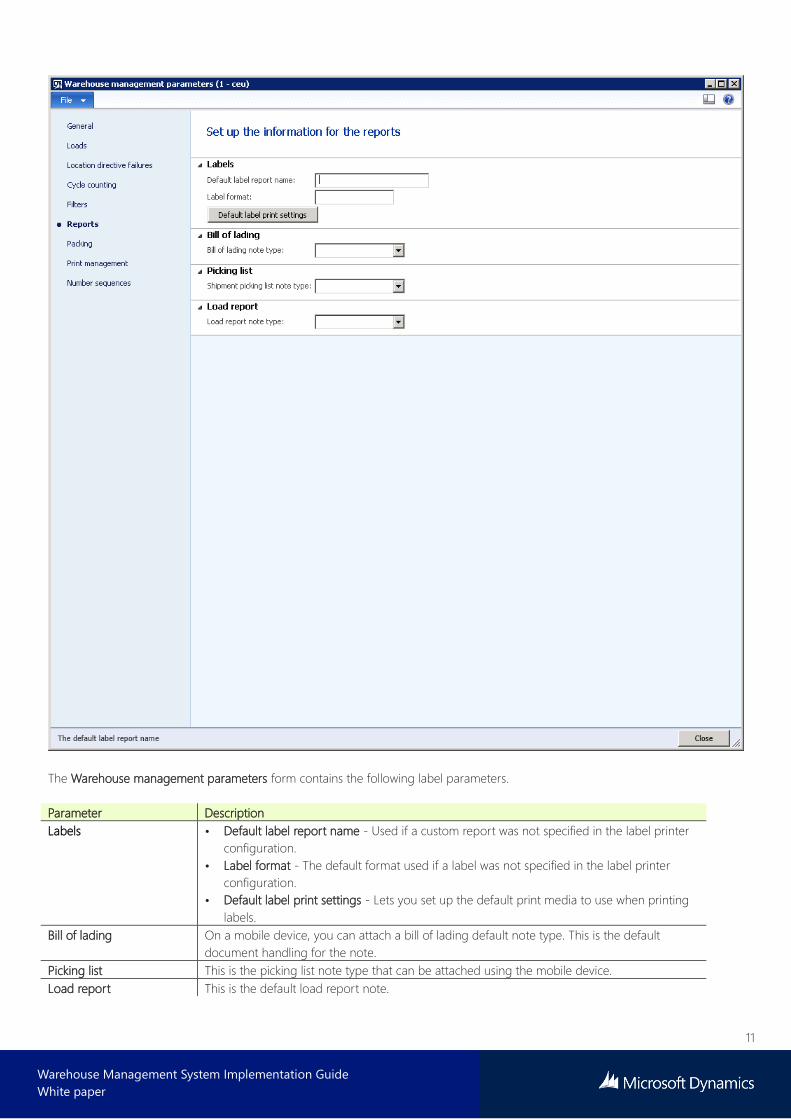
The Warehouse management parameters form contains the following label parameters.
Parameter Description
Labels • Default label report name - Used if a custom report was not specified in the label printer
configuration. • Label format - The default format used if a label was not specified in the label printer
configuration.
• Default label print settings - Lets you set up the default print media to use when printing
labels.
Bill of lading On a mobile device, you can attach a bill of lading default note type. This is the default
document handling for the note.
Picking list This is the picking list note type that can be attached using the mobile device.
Load report This is the default load report note.
12
Warehouse Management System Implementation Guide
White paper
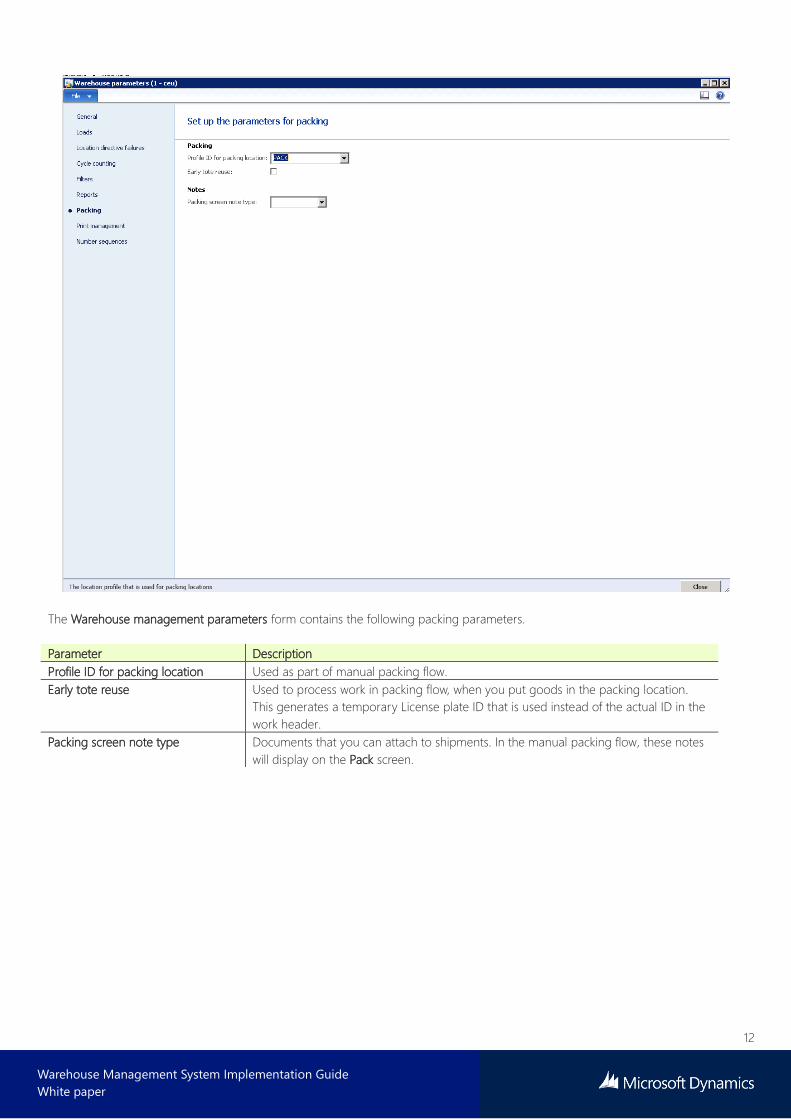
The Warehouse management parameters form contains the following packing parameters.
Parameter Description
Profile ID for packing location Used as part of manual packing flow.
Early tote reuse Used to process work in packing flow, when you put goods in the packing location.
This generates a temporary License plate ID that is used instead of the actual ID in the
work header.
Packing screen note type Documents that you can attach to shipments. In the manual packing flow, these notes
will display on the Pack screen.

13
Warehouse Management System Implementation Guide
White paper
The Warehouse management parameters form contains the following number sequence parameters.
Parameter Description
Load ID A unique identifier for Warehouse Management loads.
Shipment ID A unique identifier for Warehouse Management shipments.
Work transaction ID A unique identifier assigned to user transactions that are performed against work
for labor tracking
Work ID A unique identifier for work headers.
Work voucher This is placeholder required for Warehouse Management. This must be able to
handle a large number.
Work creation number Used each time work creation is run. This number should be large enough to
handle the number of times that work is created in the company.
License plate Used for license plate generation, as detailed above. The ID must be 9 digits,
without text.
Label ID A unique identifier assigned to each label that is printed through the mobile device.
Work creation ID A unique identifier that is used every time that work is built, to group a series of
work headers together by build.
Work grouping ID When a user groups work together during mobile device transactions, a unique
transaction is automatically assigned to the group.
14
Warehouse Management System Implementation Guide
White paper
Parameter Description
Wave ID A unique identifier that is assigned to waves.
Release to warehouse ID Each time a group of orders/loads are released to the warehouse, the release is
assigned a unique ID for tracking purposes.
Bill of Lading ID Each bill of lading (BOL) that generated in Warehouse Management receives a
unique ID.
Container transaction ID This is a unique ID that is assigned during container close.
Temporary tote ID This is the license plate that is assigned when a tote is set down in a packing station.
Wave processing ID A unique ID that is assigned to a wave when the wave is executed.
Cluster ID A unique ID that can be automatically generated for a work cluster.
Container ID A unique ID that is generated for a container that is created during
containerization.
Container build ID Each time a containerization wave step is executed, a unique ID is generated for
tracking purposes.
1.2 Setting up the warehouse
In order to use warehouse management in Microsoft Dynamics AX, you must create a warehouse and enable this for more
advanced or specialized warehouse management activities. Traditional warehousing, where no automatic pick and put away rules
exist, does not require this step.
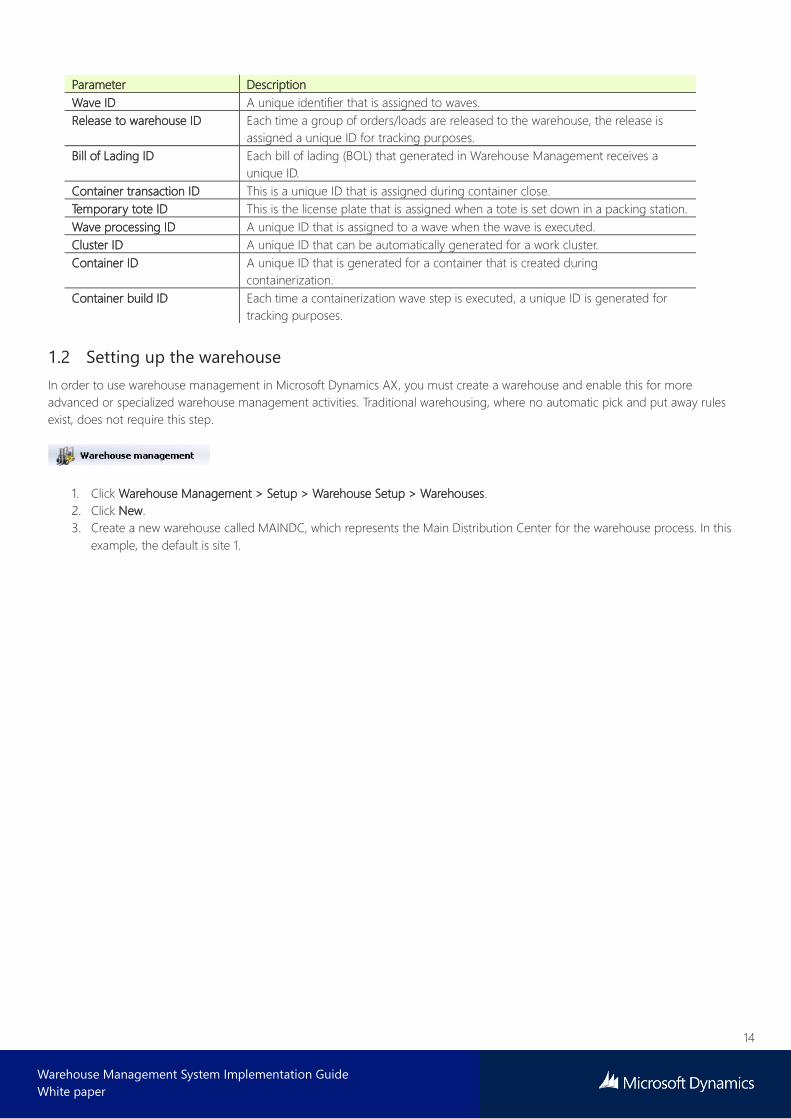
1. Click Warehouse Management > Setup > Warehouse Setup > Warehouses.
2. Click New.
3. Create a new warehouse called MAINDC, which represents the Main Distribution Center for the warehouse process. In this
example, the default is site 1.
15
Warehouse Management System Implementation Guide
White paper
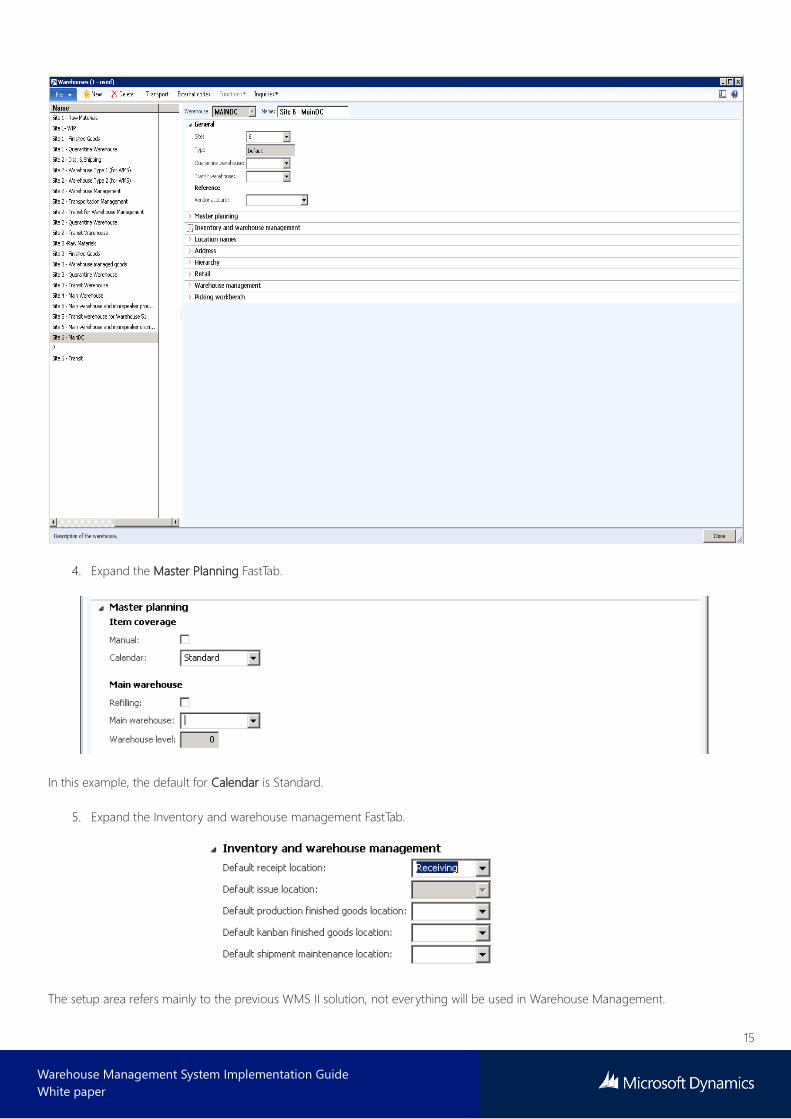
4. Expand the Master Planning FastTab.
In this example, the default for Calendar is Standard.
5. Expand the Inventory and warehouse management FastTab.
The setup area refers mainly to the previous WMS II solution, not everything will be used in Warehouse Management.
16
Warehouse Management System Implementation Guide
White paper
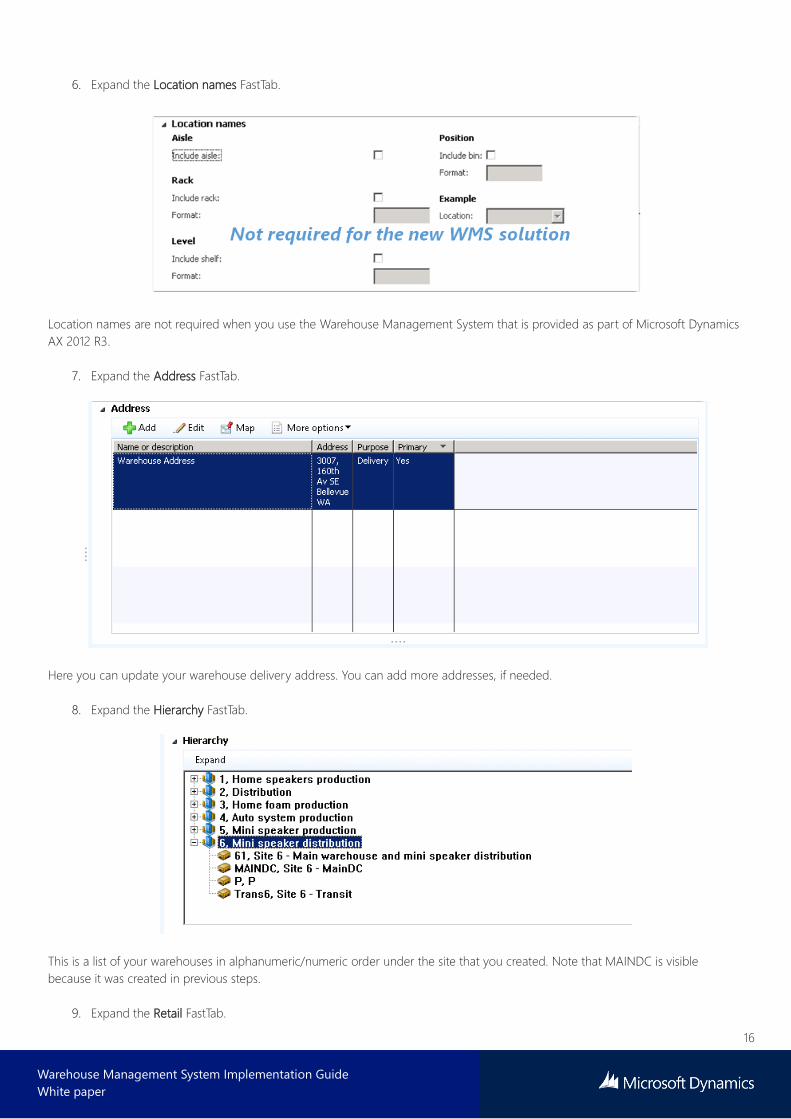
6. Expand the Location names FastTab.
Location names are not required when you use the Warehouse Management System that is provided as part of Microsoft Dynamics
AX 2012 R3.
7. Expand the Address FastTab.
Here you can update your warehouse delivery address. You can add more addresses, if needed.
8. Expand the Hierarchy FastTab.
This is a list of your warehouses in alphanumeric/numeric order under the site that you created. Note that MAINDC is visible
because it was created in previous steps.
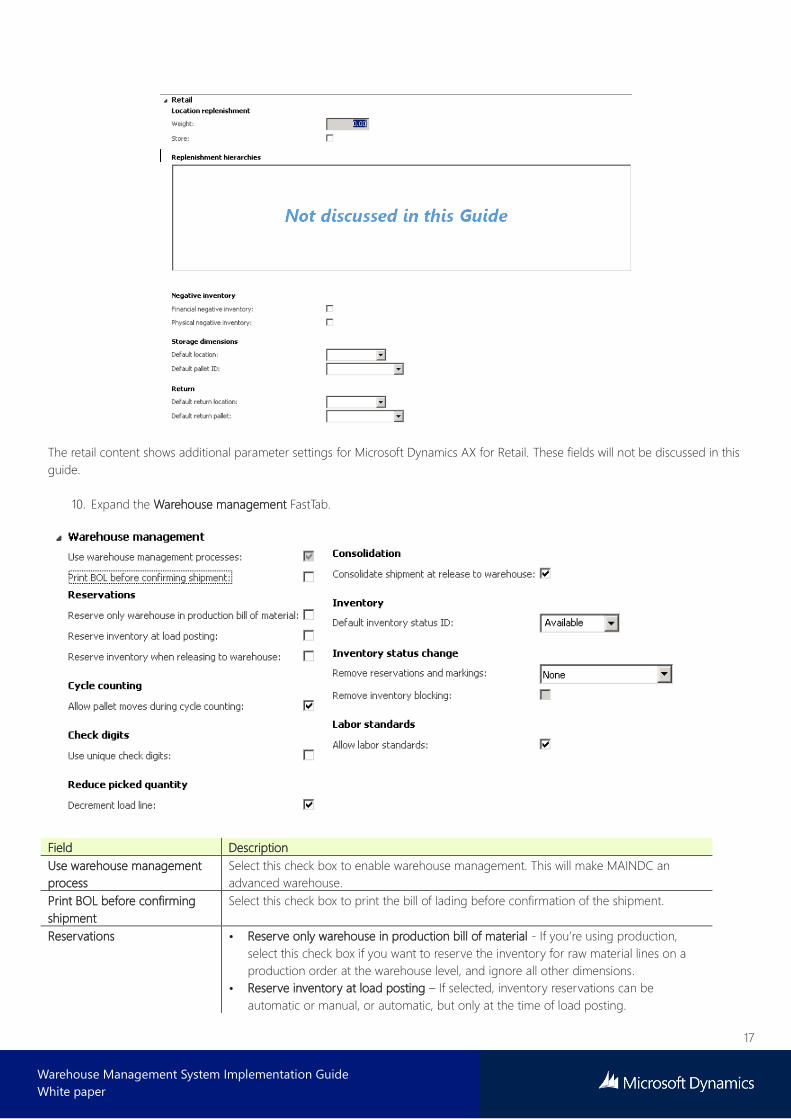
9. Expand the Retail FastTab.
17
Warehouse Management System Implementation Guide
White paper
The retail content shows additional parameter settings for Microsoft Dynamics AX for Retail. These fields will not be discussed in this
guide.
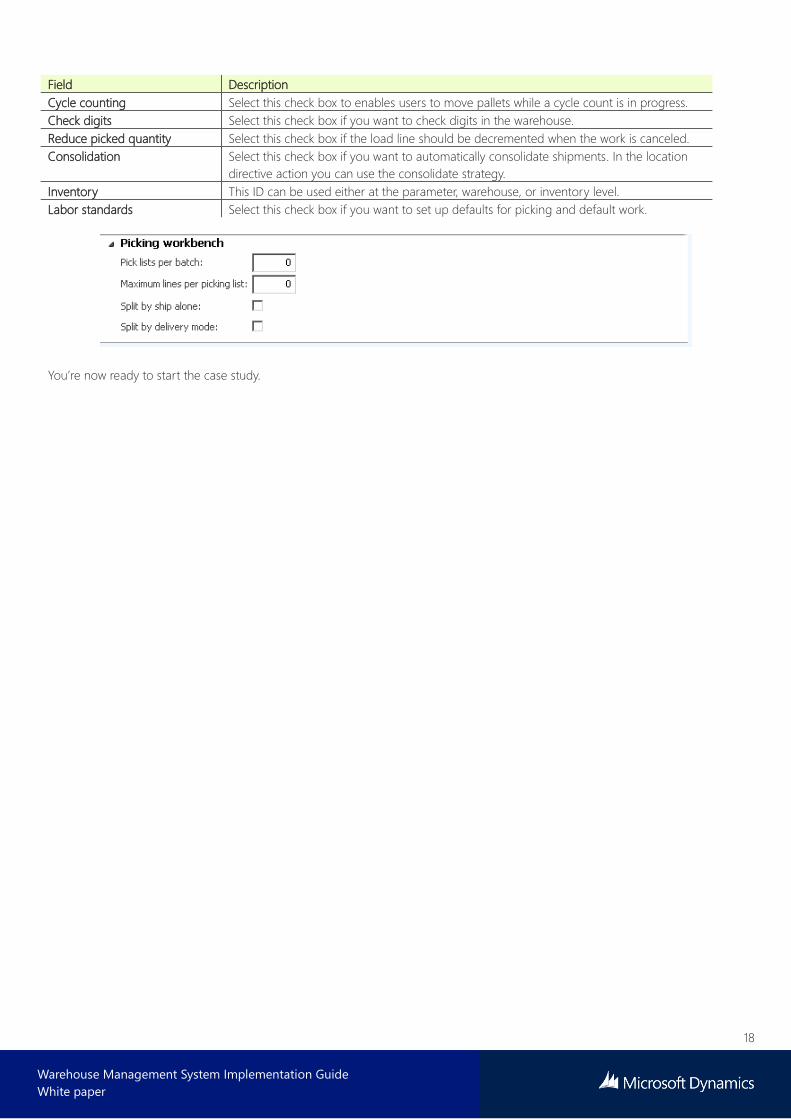
10. Expand the Warehouse management FastTab.
Field Description
Use warehouse management
process
Select this check box to enable warehouse management. This will make MAINDC an
advanced warehouse.
Print BOL before confirming
shipment
Select this check box to print the bill of lading before confirmation of the shipment.
Reservations • Reserve only warehouse in production bill of material - If you’re using production,
select this check box if you want to reserve the inventory for raw material lines on a
production order at the warehouse level, and ignore all other dimensions.
• Reserve inventory at load posting – If selected, inventory reservations can be
automatic or manual, or automatic, but only at the time of load posting.
18
Warehouse Management System Implementation Guide
White paper
Field Description
Cycle counting Select this check box to enables users to move pallets while a cycle count is in progress.
Check digits Select this check box if you want to check digits in the warehouse.
Reduce picked quantity Select this check box if the load line should be decremented when the work is canceled.
Consolidation Select this check box if you want to automatically consolidate shipments. In the location
directive action you can use the consolidate strategy.
Inventory This ID can be used either at the parameter, warehouse, or inventory level.
Labor standards Select this check box if you want to set up defaults for picking and default work.
You’re now ready to start the case study.
19
Warehouse Management System Implementation Guide
White paper
2 Case study – Inbound process The following case study focuses on a large food distributor that services the end consumer in the retail industry. This case study
only covers the warehouse management/distribution side of the supply chain, there is no focus on any retail capability.
• Customer – Bingos food supplies
• Address – 123 Anywhere Street, Bellevue WA 98022
• Multiple warehouses, but the focus will be on warehouse MAINDC, which is located in Bellevue, WA
2.1.1 Warehouse details
• Warehouse currently has three activity zones. In each zones, particular areas are defined in the warehouse. For Frozen and
Fresh, cold/frozen storage is required.
• Dry food
• Fresh food
• Frozen food
• In each activity zone (Dry, Fresh, Frozen) there are several location types.
• For all incoming inventory, an inbound area location must be defined.
• Each activity zone has a picking location.
• Each activity zone has a bulk location (reserve).
• Each activity zone has a staging location.
• Each activity zone has an anomaly location, such as Bad, Returned, Broken, or Expired items.
• Each zone has Racks, Shelving, and Pallets for reserve stock.
• Default picking paths for each activity zone must be set (wave templates).
2.1.2 Product storage details
• Products are categorized into family groupings.
• Each family grouping can contain sub-family groups for picking frequency and optimization.
• Each product can have 1 to many production locations available.
• Each product can have 1 to many product EAN’s.
2.1.3 Stock management details
• Replenishment from reserve to pick location can be automatic.
• Stock movements are available and created.
• Cycle counts are required.
• FEFO/Lot batch control is required.

20
Warehouse Management System Implementation Guide
White paper
2.1.4 Warehouse layout
• Inbound area – Represented in green, referred to as Inbound.
• Office area – Represented in blue in the lower-left corner.
• Bulk area – The bulk locations are shown in yellow and have Racks B1 – B24, which consists of 3 shelves represented as S1-S3. A
typical location for built would read B2-S2, which is Rack Bulk 2 on shelf 2.
• Dry zone – Represented as Aisle D1 – D12, which consists of Racks 1-7 and Shelves S1- S2. A typical location code for the Dry
zone area represents D4-1-S2, which is Aisle 4 rack 1 on shelf 2.
• Anomaly - Used for returned, damaged, or expired inventory. This is indicated in red and is Rack A – A3 shelf 1-2. A typical
location code for Anomaly would be A2-S2, which represents Rack 2 on Shelf 2.
• Staging - Represented by the orange outline and there are areas on the floor represented by G1 – G11 without shelving.
• Fresh locations - Represented as F1 – F11. Racks are represented as 1-4 and shelves are represented as S1-S2. A typical Fresh
location would resemble F6-3-S2, which is Aisle F5, Rack 3, and Shelf 2.
• Freezer section - Represented as Rack Z1 – Z10. There are two shelves in the freezer section represented as S1 – S2. A typical
location would be Z3-S1, which represents Freezer door 3 on shelf 1.
• Bay-door – This represents the shipping of picked items, shown as the customer vehicles in the illustration.
2.1.5 Location types
Location types are used to describe or define the locations that your warehouse will be using. For example, the previous section
shows the warehouse layout and the different areas that are mapped to Location types in Warehouse Management.
To create Location types, follow this navigation path:
Warehouse Management > Setup > Warehouse Setup > Location Types
21
Warehouse Management System Implementation Guide
White paper
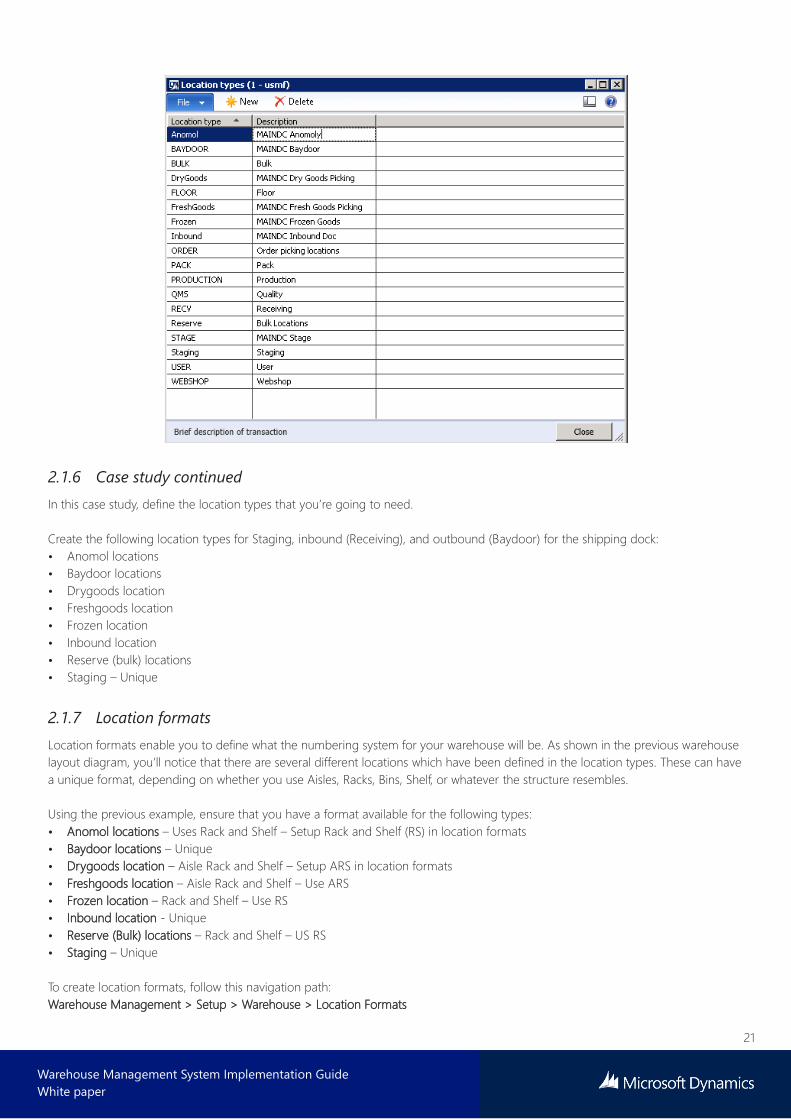
2.1.6 Case study continued
In this case study, define the location types that you’re going to need.
Create the following location types for Staging, inbound (Receiving), and outbound (Baydoor) for the shipping dock:
• Anomol locations
• Baydoor locations
• Drygoods location
• Freshgoods location
• Frozen location
• Inbound location
• Reserve (bulk) locations
• Staging – Unique
2.1.7 Location formats
Location formats enable you to define what the numbering system for your warehouse will be. As shown in the previous warehouse
layout diagram, you’ll notice that there are several different locations which have been defined in the location types. These can have
a unique format, depending on whether you use Aisles, Racks, Bins, Shelf, or whatever the structure resembles.
Using the previous example, ensure that you have a format available for the following types:
• Anomol locations – Uses Rack and Shelf – Setup Rack and Shelf (RS) in location formats
• Baydoor locations – Unique
• Drygoods location – Aisle Rack and Shelf – Setup ARS in location formats
• Freshgoods location – Aisle Rack and Shelf – Use ARS
• Frozen location – Rack and Shelf – Use RS
• Inbound location - Unique
• Reserve (Bulk) locations – Rack and Shelf – US RS
• Staging – Unique
To create location formats, follow this navigation path:
Warehouse Management > Setup > Warehouse > Location Formats
22
Warehouse Management System Implementation Guide
White paper
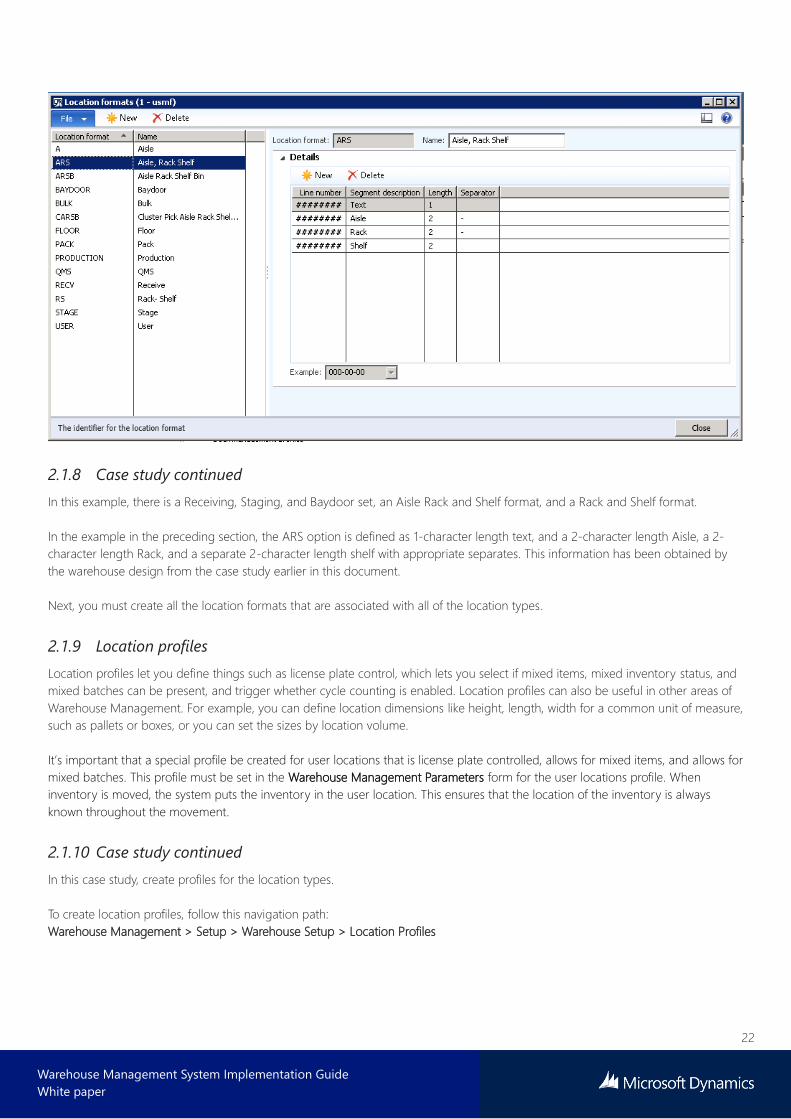
2.1.8 Case study continued
In this example, there is a Receiving, Staging, and Baydoor set, an Aisle Rack and Shelf format, and a Rack and Shelf format.
In the example in the preceding section, the ARS option is defined as 1-character length text, and a 2-character length Aisle, a 2-
character length Rack, and a separate 2-character length shelf with appropriate separates. This information has been obtained by
the warehouse design from the case study earlier in this document.
Next, you must create all the location formats that are associated with all of the location types.
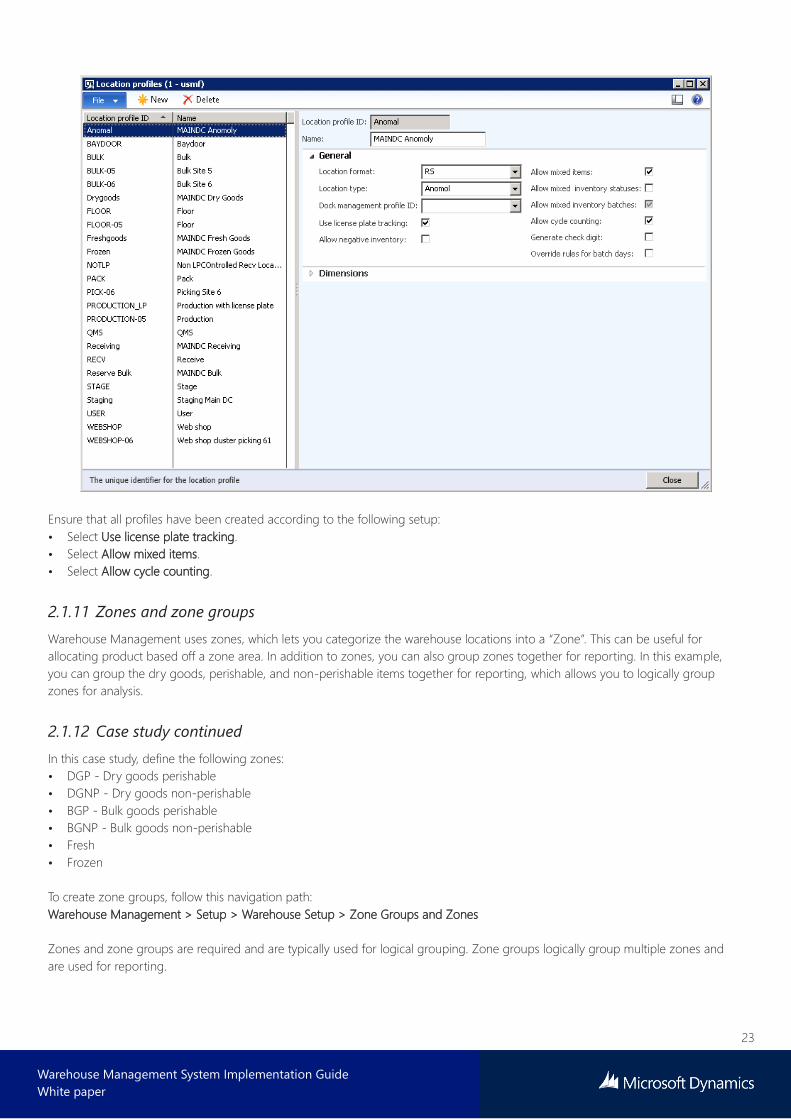
2.1.9 Location profiles
Location profiles let you define things such as license plate control, which lets you select if mixed items, mixed inventory status, and
mixed batches can be present, and trigger whether cycle counting is enabled. Location profiles can also be useful in other areas of
Warehouse Management. For example, you can define location dimensions like height, length, width for a common unit of measure,
such as pallets or boxes, or you can set the sizes by location volume.
It’s important that a special profile be created for user locations that is license plate controlled, allows for mixed items, and allows for
mixed batches. This profile must be set in the Warehouse Management Parameters form for the user locations profile. When
inventory is moved, the system puts the inventory in the user location. This ensures that the location of the inventory is always
known throughout the movement.
2.1.10 Case study continued
In this case study, create profiles for the location types.
To create location profiles, follow this navigation path:
Warehouse Management > Setup > Warehouse Setup > Location Profiles
23
Warehouse Management System Implementation Guide
White paper
Ensure that all profiles have been created according to the following setup:
• Select Use license plate tracking.
• Select Allow mixed items.
• Select Allow cycle counting.
2.1.11 Zones and zone groups
Warehouse Management uses zones, which lets you categorize the warehouse locations into a “Zone”. This can be useful for
allocating product based off a zone area. In addition to zones, you can also group zones together for reporting. In this example,
you can group the dry goods, perishable, and non-perishable items together for reporting, which allows you to logically group
zones for analysis.
2.1.12 Case study continued
In this case study, define the following zones:
• DGP - Dry goods perishable
• DGNP - Dry goods non-perishable
• BGP - Bulk goods perishable
• BGNP - Bulk goods non-perishable
• Fresh
• Frozen
To create zone groups, follow this navigation path:
Warehouse Management > Setup > Warehouse Setup > Zone Groups and Zones
Zones and zone groups are required and are typically used for logical grouping. Zone groups logically group multiple zones and
are used for reporting.

24
Warehouse Management System Implementation Guide
White paper
2.1.13 Case study continued
In this case study, create the following zone groups:
• Dry goods | Bulk goods
• Fresh | Frozen
This case study uses a rather simple structure for the zoning and grouping, but you can get very detailed with the layout and
zoning of the warehouse, so that you can be as specific as you want.

25
Warehouse Management System Implementation Guide
White paper
2.1.14 Storage dimension groups
Storage dimension groups are required and are used to determine the inventory storage information that will be used, including
whether the warehouse processes are active. You’ll notice some additional options:
• Use warehouse management process
• Inventory status
• License plate
To create storage dimension groups, follow this navigation path:
Product Information Management > Setup > Dimension Groups – Storage Dimensions
The two options shown in this illustration are required when you use Warehouse Management. Notice on the model group that you
can enable Warehouse Management.
By default, when Use warehouse management processes is selected, this turns on the following dimensions: Site, Warehouse,
Location, and License plate. These dimensions are not optional and are set up and required by Warehouse Management.
New dimensions which are managed by Warehouse Management include:
• License plate - License plates can be turned on and off at the location level via the location profile (see location profile setup).
License plates can be set up at Warehouse Management > Setup > Warehouse > License Plates.
• Inventory status - Statuses can be set up for reservations. Anything that is not available for reservation cannot be shipped. The
effect of inventory status on reservations is explained later in this document. Inventory statuses can be set up at Warehouse
Management > Setup > Inventory > Inventory Status.
2.1.15 Case study continued
In this case study, create a new storage dimension for the products and call it MDCSD, which means main distribution center
storage dimension. Refer to the previous screenshot to see the fields in this form.
2.1.16 Tracking dimension groups
Serial number and batch number are typical configuration options. However, there are new options on the dimension group that
enable Warehouse Management to capture serial or batch numbers only at picking or packing.
26
Warehouse Management System Implementation Guide
White paper
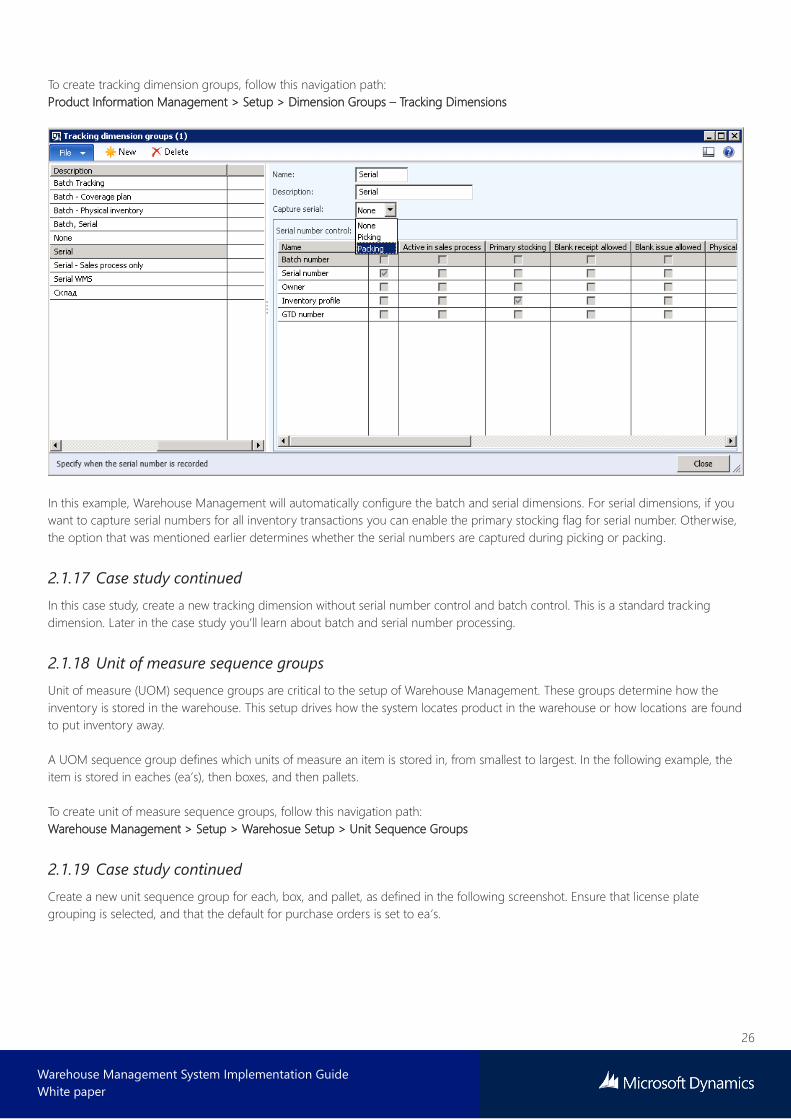
To create tracking dimension groups, follow this navigation path:
Product Information Management > Setup > Dimension Groups – Tracking Dimensions
In this example, Warehouse Management will automatically configure the batch and serial dimensions. For serial dimensions, if you
want to capture serial numbers for all inventory transactions you can enable the primary stocking flag for serial number. Otherwise,
the option that was mentioned earlier determines whether the serial numbers are captured during picking or packing.
2.1.17 Case study continued
In this case study, create a new tracking dimension without serial number control and batch control. This is a standard tracking
dimension. Later in the case study you’ll learn about batch and serial number processing.
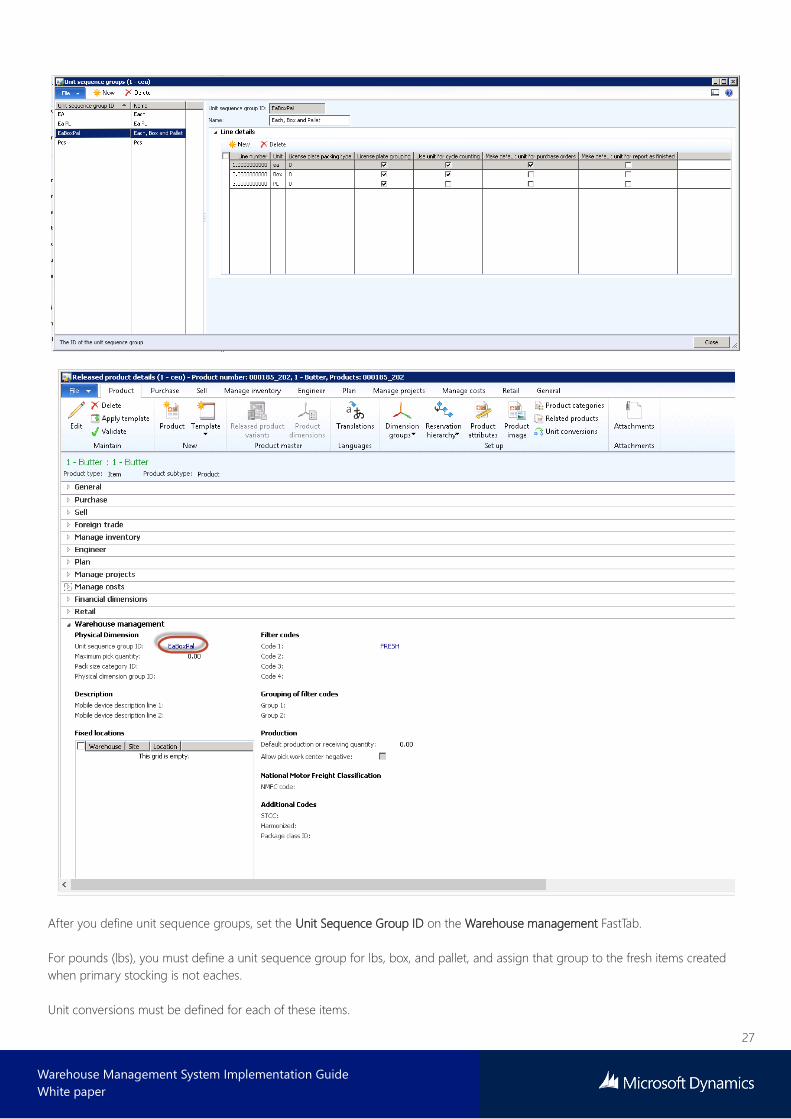
2.1.18 Unit of measure sequence groups
Unit of measure (UOM) sequence groups are critical to the setup of Warehouse Management. These groups determine how the
inventory is stored in the warehouse. This setup drives how the system locates product in the warehouse or how locations are found
to put inventory away.
A UOM sequence group defines which units of measure an item is stored in, from smallest to largest. In the following example, the
item is stored in eaches (ea’s), then boxes, and then pallets.
To create unit of measure sequence groups, follow this navigation path:
Warehouse Management > Setup > Warehosue Setup > Unit Sequence Groups
2.1.19 Case study continued
Create a new unit sequence group for each, box, and pallet, as defined in the following screenshot. Ensure that license plate
grouping is selected, and that the default for purchase orders is set to ea’s.
27
Warehouse Management System Implementation Guide
White paper
After you define unit sequence groups, set the Unit Sequence Group ID on the Warehouse management FastTab.
For pounds (lbs), you must define a unit sequence group for lbs, box, and pallet, and assign that group to the fresh items created
when primary stocking is not eaches.
Unit conversions must be defined for each of these items.

28
Warehouse Management System Implementation Guide
White paper
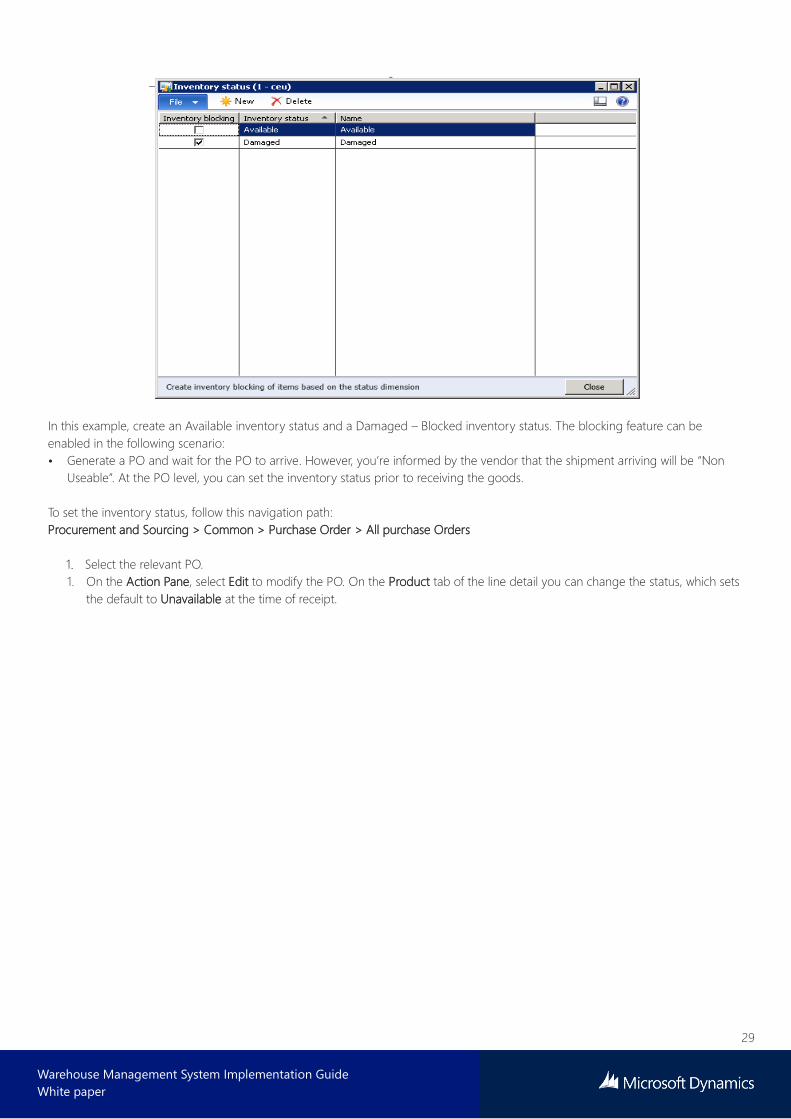
2.1.20 Inventory status
Inventory statuses are configurable, and can be designated as blocking or non-blocking. If Inventory Blocking is not selected, the
status is considered “Good Status”. If Inventory Blocking is selected, the item cannot be shipped or specified on a sales order,
transfer order, or production BOM. In addition, the inventory is not considered available for reservation at the status, warehouse,
site, and item levels in the hierarchy. It is still available in the location level, so that the inventory can be moved in the warehouse.
To configure inventory status, follow this navigation path:
Warehousing for AX menu under Setup > Inventory > Inventory Status
29
Warehouse Management System Implementation Guide
White paper
In this example, create an Available inventory status and a Damaged – Blocked inventory status. The blocking feature can be
enabled in the following scenario:
• Generate a PO and wait for the PO to arrive. However, you’re informed by the vendor that the shipment arriving will be “Non
Useable”. At the PO level, you can set the inventory status prior to receiving the goods.
To set the inventory status, follow this navigation path:
Procurement and Sourcing > Common > Purchase Order > All purchase Orders
Select the relevant PO.
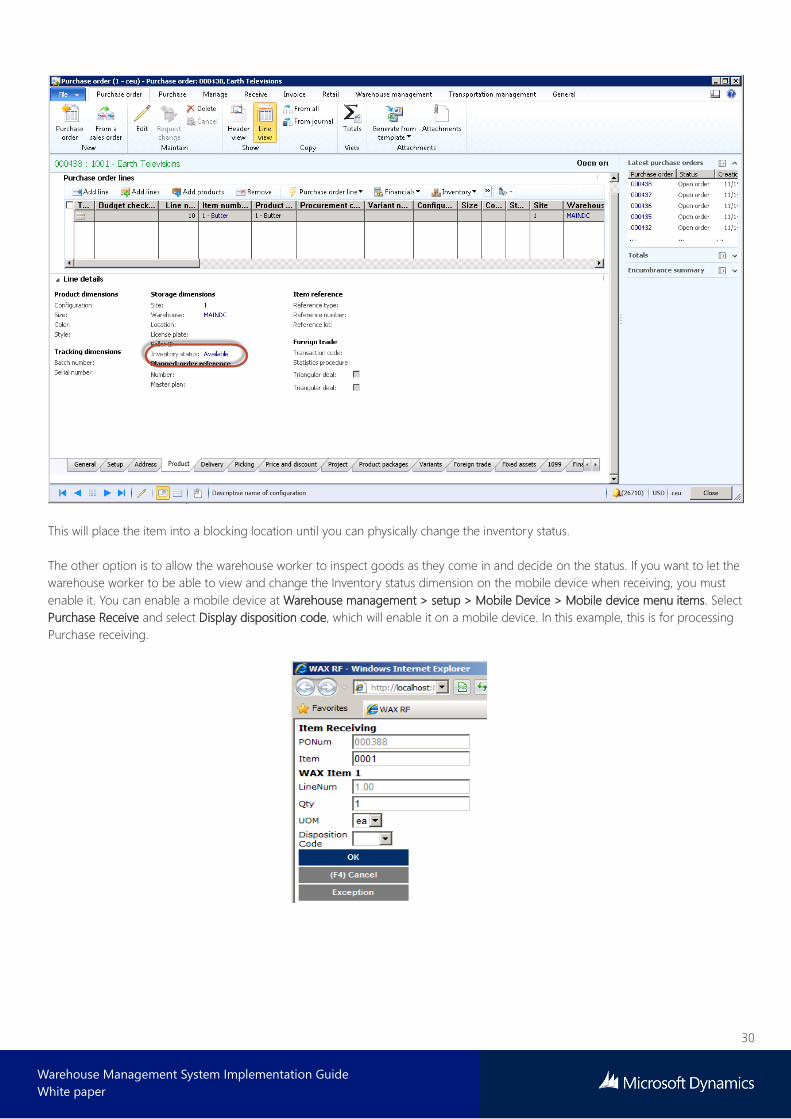
1. On the Action Pane, select Edit to modify the PO. On the Product tab of the line detail you can change the status, which sets
the default to Unavailable at the time of receipt.
30
Warehouse Management System Implementation Guide
White paper
This will place the item into a blocking location until you can physically change the inventory status.
The other option is to allow the warehouse worker to inspect goods as they come in and decide on the status. If you want to let the
warehouse worker to be able to view and change the Inventory status dimension on the mobile device when receiving, you must
enable it. You can enable a mobile device at Warehouse management > setup > Mobile Device > Mobile device menu items. Select
Purchase Receive and select Display disposition code, which will enable it on a mobile device. In this example, this is for processing
Purchase receiving.

31
Warehouse Management System Implementation Guide
White paper
2.1.21 Case study continued
Ensure that these two inventory statuses exist – available and damaged.
2.1.22 Disposition codes
In conjunction with the inventory status, Warehouse Management supports the identification of a disposition code. The code is user
definable. The disposition points to a disposition configuration, which defines the inventory status that will be associated with this
part of the receipt.
Disposition is often used to define that a product is in a non-usable state. The product might be damaged or require some attention
or rework prior to being available for sales orders.
To create disposition codes, follow this navigation path:
Warehouse Management > Setup > Mobile Device > Disposition Code

32
Warehouse Management System Implementation Guide
White paper
2.1.23 Case study continued
In this example, there are two disposition codes for the MAINDC Receiving warehouse (see the previous screenshot). The disposition
codes are directly related to the inventory status. In order for this to function, allocation of the disposition code to a work template
is necessary. Work templates are covered later in this document.
If you want the disposition code to appear on the Mobile Device menu, you must enable that. Mobile Device menu items are
covered later in this document.
2.1.24 Location setup wizard
The Location Setup wizard lets you create locations based on the formats that were previously defined. The process of creating the
locations is simple.
To open the Location setup wizard, follow this navigation path:
Warehouse Management > Setup > Warehouse Setup > Location setup wizard
2.1.25 Case study continued
In the previous example, you created locations for the MAINDC warehouse, and locations for Bulk goods, Non-perishable items. If
you refer to the warehouse layout, this is rack B1 through to B7.
After the locations are defined, click Build in the lower right of the form.

33
Warehouse Management System Implementation Guide
White paper
2. A message is displayed that the location codes have been created. Repeat this step for all zones.
3. Create the perishable bulk section, rack 8 – 24.
34
Warehouse Management System Implementation Guide
White paper
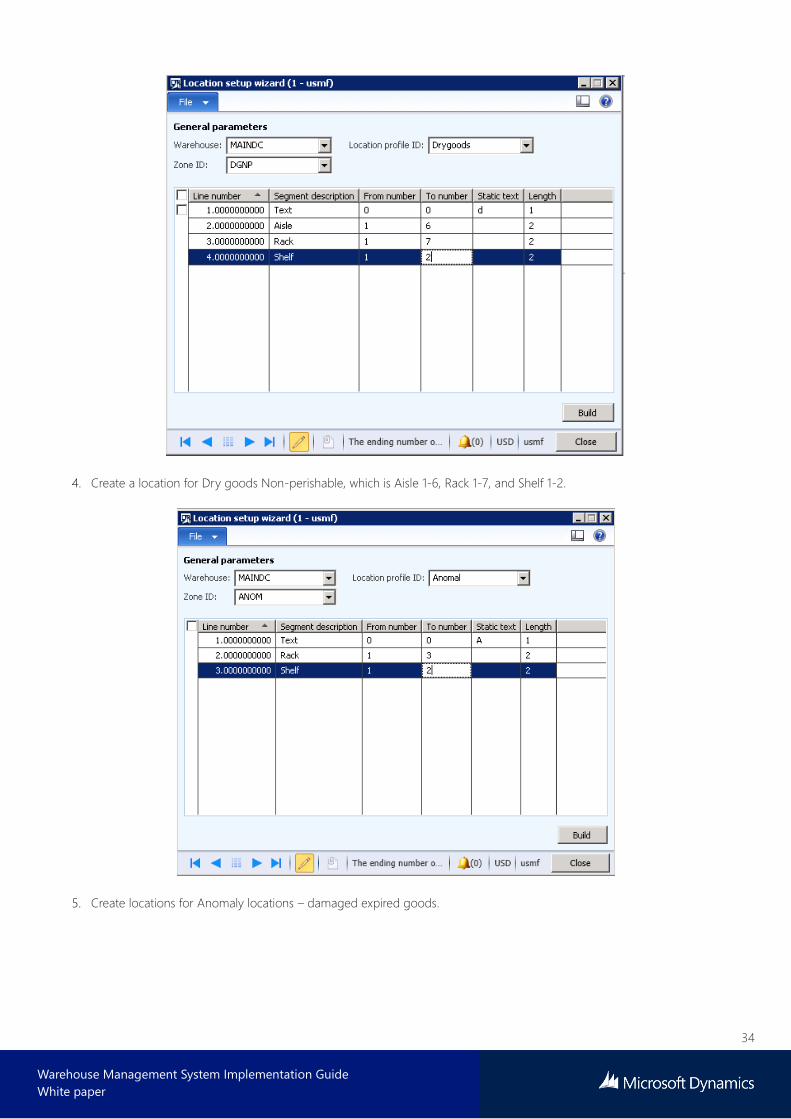
4. Create a location for Dry goods Non-perishable, which is Aisle 1-6, Rack 1-7, and Shelf 1-2.
5. Create locations for Anomaly locations – damaged expired goods.
35
Warehouse Management System Implementation Guide
White paper
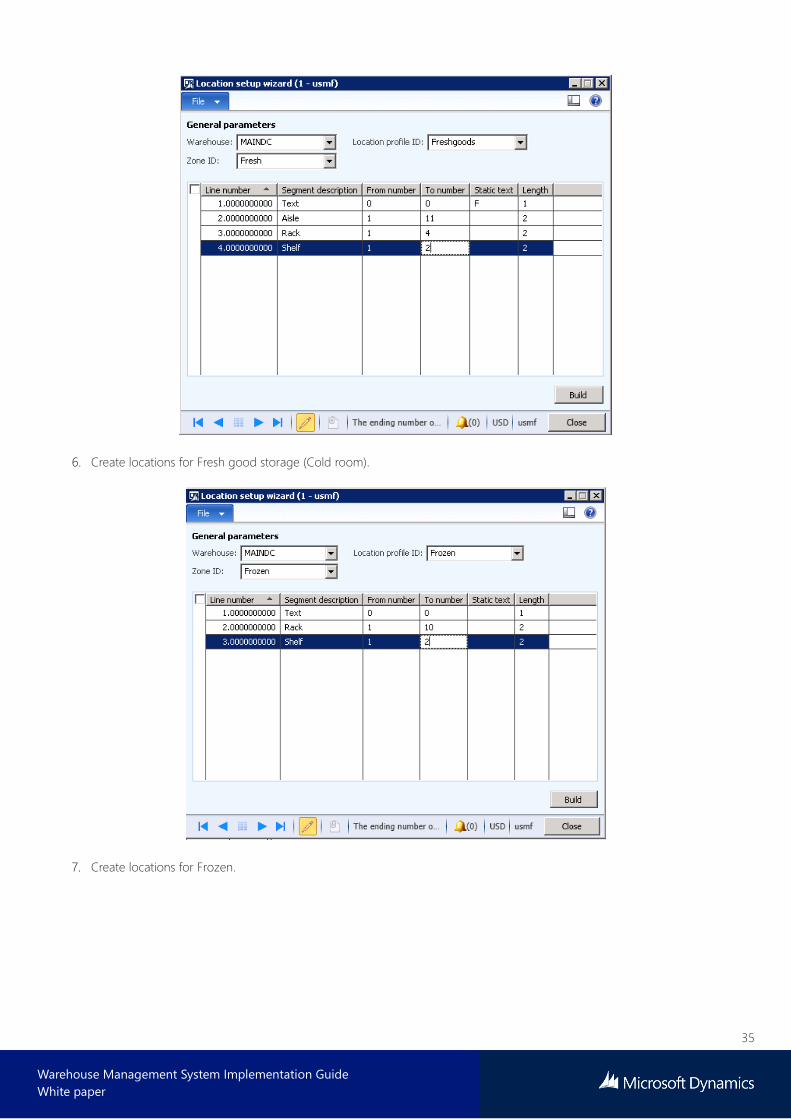
6. Create locations for Fresh good storage (Cold room).
7. Create locations for Frozen.
36
Warehouse Management System Implementation Guide
White paper
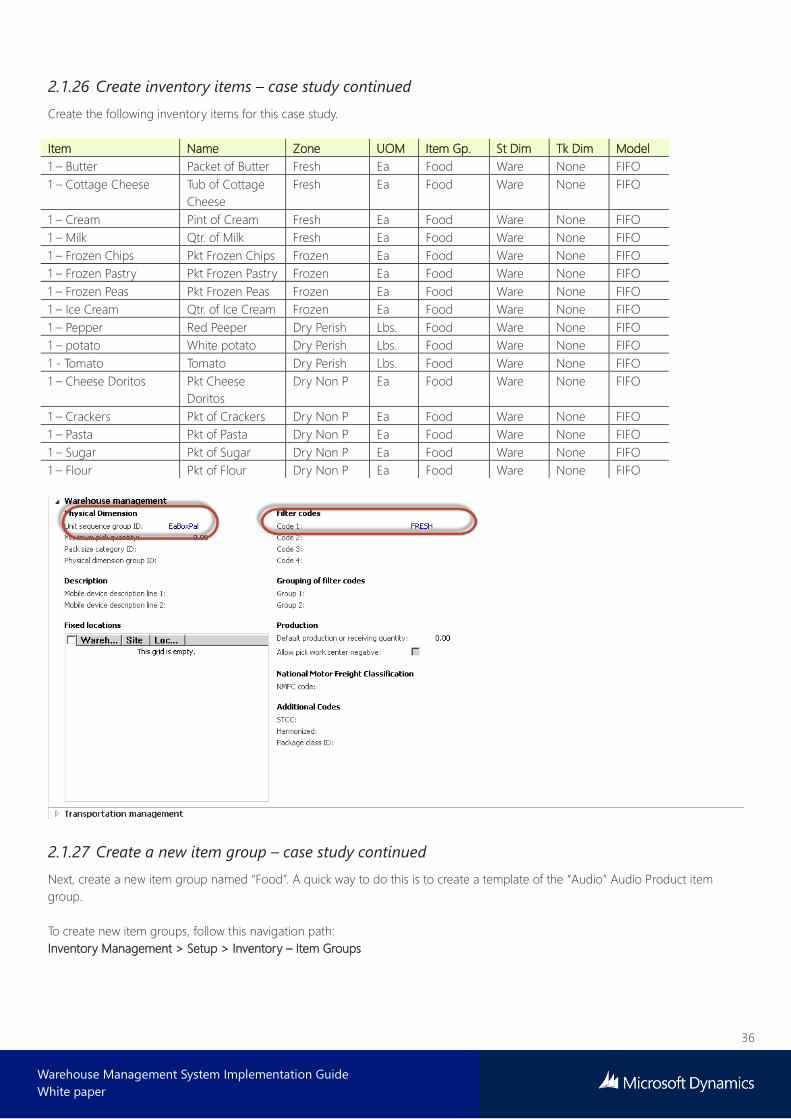
2.1.26 Create inventory items – case study continued
Create the following inventory items for this case study.
Item Name Zone UOM Item Gp. St Dim Tk Dim Model
1 – Butter Packet of Butter Fresh Ea Food Ware None FIFO
1 – Cottage Cheese Tub of Cottage
Cheese
Fresh Ea Food Ware None FIFO
1 – Cream Pint of Cream Fresh Ea Food Ware None FIFO
1 – Milk Qtr. of Milk Fresh Ea Food Ware None FIFO
1 – Frozen Chips Pkt Frozen Chips Frozen Ea Food Ware None FIFO
1 – Frozen Pastry Pkt Frozen Pastry Frozen Ea Food Ware None FIFO
1 – Frozen Peas Pkt Frozen Peas Frozen Ea Food Ware None FIFO
1 – Ice Cream Qtr. of Ice Cream Frozen Ea Food Ware None FIFO
1 – Pepper Red Peeper Dry Perish Lbs. Food Ware None FIFO
1 – potato White potato Dry Perish Lbs. Food Ware None FIFO
1 - Tomato Tomato Dry Perish Lbs. Food Ware None FIFO
1 – Cheese Doritos Pkt Cheese
Doritos
Dry Non P Ea Food Ware None FIFO
1 – Crackers Pkt of Crackers Dry Non P Ea Food Ware None FIFO
1 – Pasta Pkt of Pasta Dry Non P Ea Food Ware None FIFO
1 – Sugar Pkt of Sugar Dry Non P Ea Food Ware None FIFO
1 – Flour Pkt of Flour Dry Non P Ea Food Ware None FIFO
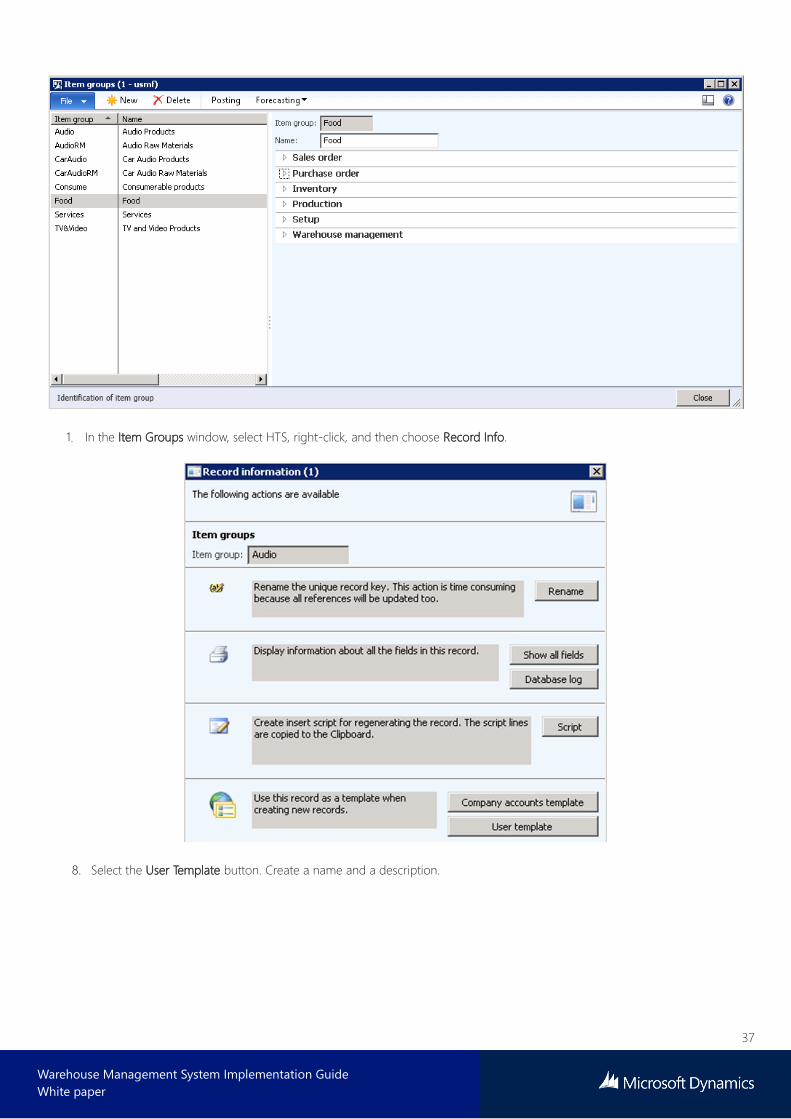
2.1.27 Create a new item group – case study continued
Next, create a new item group named “Food”. A quick way to do this is to create a template of the “Audio” Audio Product item
group.
To create new item groups, follow this navigation path:
Inventory Management > Setup > Inventory – Item Groups
37
Warehouse Management System Implementation Guide
White paper
In the Item Groups window, select HTS, right-click, and then choose Record Info.
8. Select the User Template button. Create a name and a description.
38
Warehouse Management System Implementation Guide
White paper
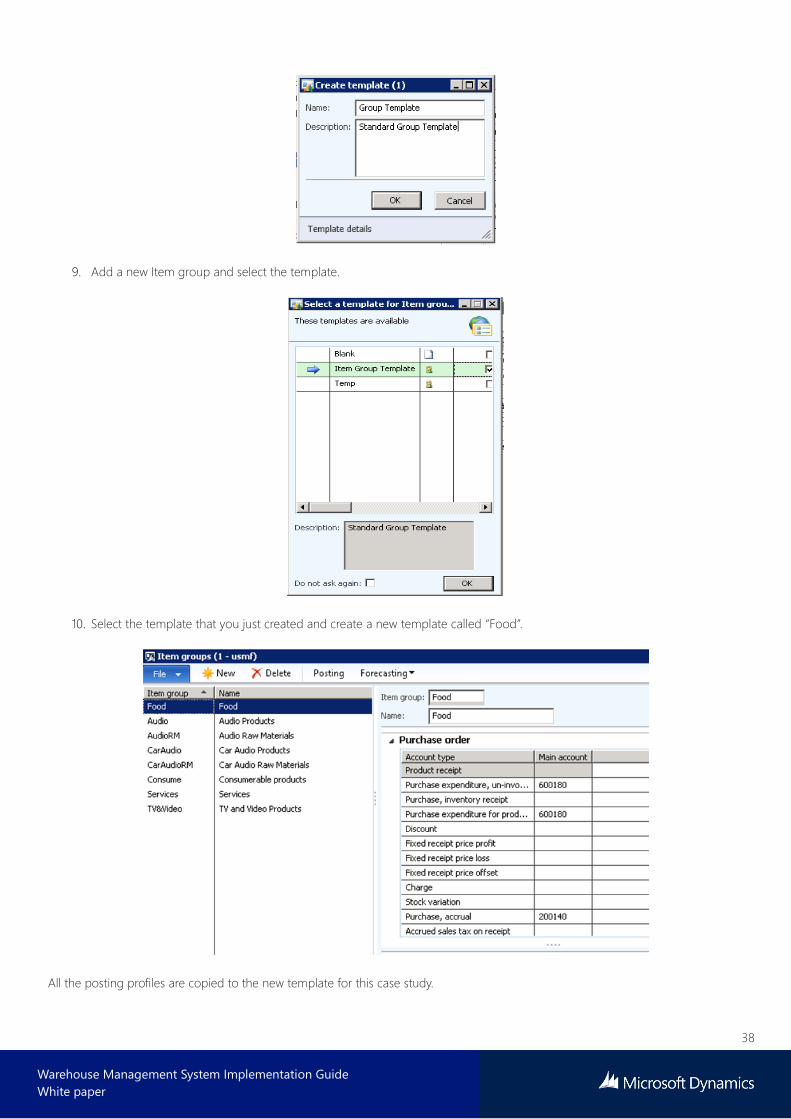
9. Add a new Item group and select the template.
10. Select the template that you just created and create a new template called “Food”.
All the posting profiles are copied to the new template for this case study.
39
Warehouse Management System Implementation Guide
White paper
2.1.28 Item groups and filters
Item filters are a new concept in Warehouse Management that let you:
• Categorize items. These categories can then be used throughout all of Microsoft Dynamics AX, not just in Warehouse
Management.
• Limit which customers can order an item.
• Limit which items can be purchased from a vendor.
Filters are turned on and off via the item group. The Use filter code option lets you turn on the filter code that you’ll use for the item
group. You can then manually set that filter code on the item.
In addition, you can set up filter groups which will automatically default the filter codes based on the item group selection.
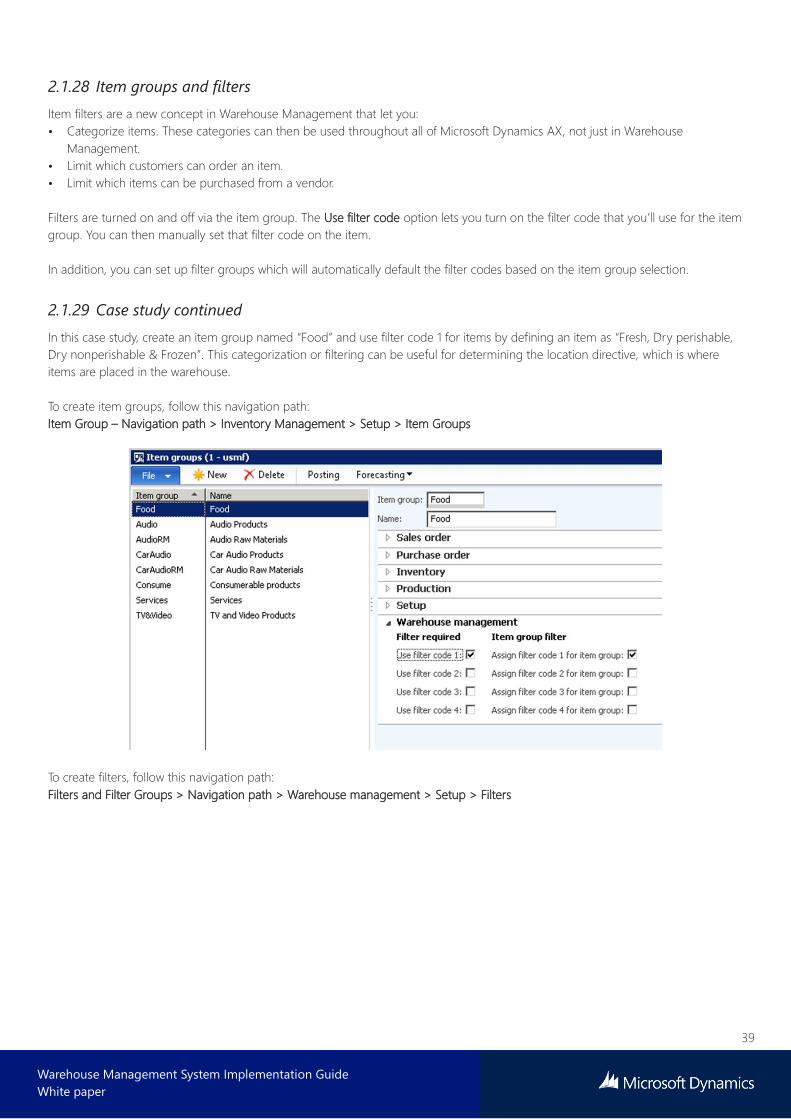
2.1.29 Case study continued
In this case study, create an item group named “Food” and use filter code 1 for items by defining an item as “Fresh, Dry perishable,
Dry nonperishable & Frozen”. This categorization or filtering can be useful for determining the location directive, which is where
items are placed in the warehouse.
To create item groups, follow this navigation path:
Item Group – Navigation path > Inventory Management > Setup > Item Groups
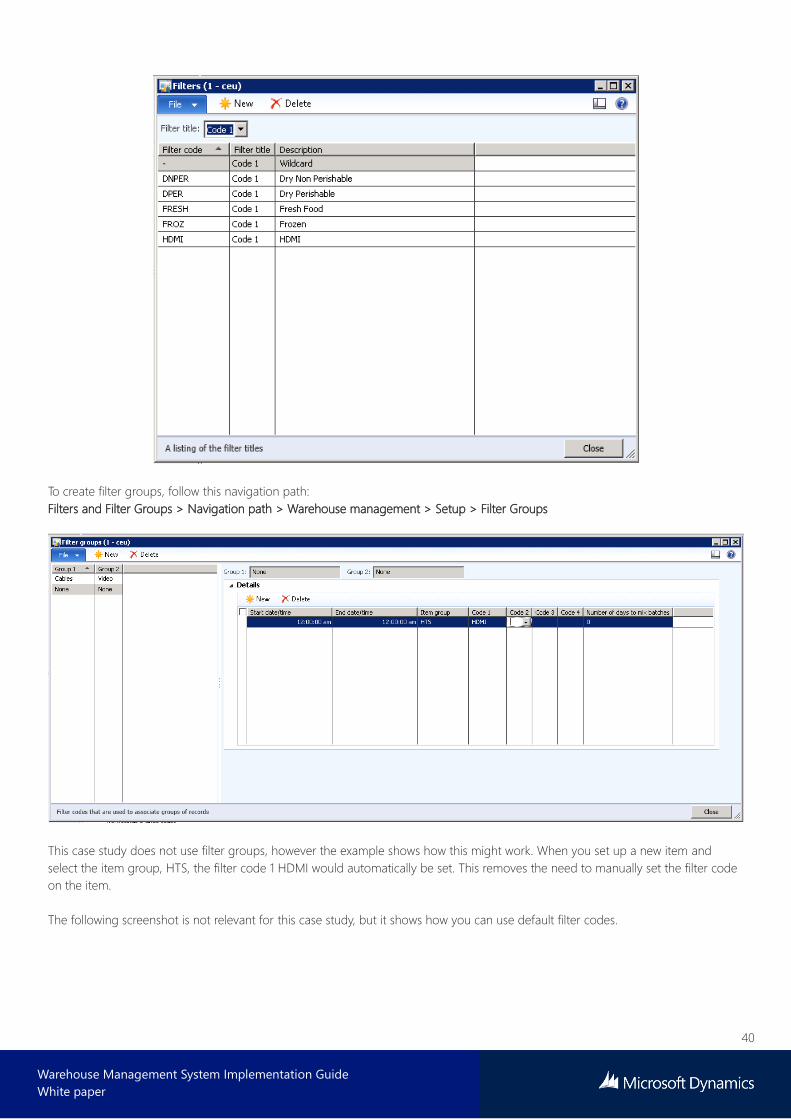
To create filters, follow this navigation path:
Filters and Filter Groups > Navigation path > Warehouse management > Setup > Filters
40
Warehouse Management System Implementation Guide
White paper
To create filter groups, follow this navigation path:
Filters and Filter Groups > Navigation path > Warehouse management > Setup > Filter Groups
This case study does not use filter groups, however the example shows how this might work. When you set up a new item and
select the item group, HTS, the filter code 1 HDMI would automatically be set. This removes the need to manually set the filter code
on the item.
The following screenshot is not relevant for this case study, but it shows how you can use default filter codes.
41
Warehouse Management System Implementation Guide
White paper
2.2 Location directives and work templates
The two most important areas in Warehouse Management are location directives and work templates. Both of these options are
important in the configuration of how items will move around the warehouse.
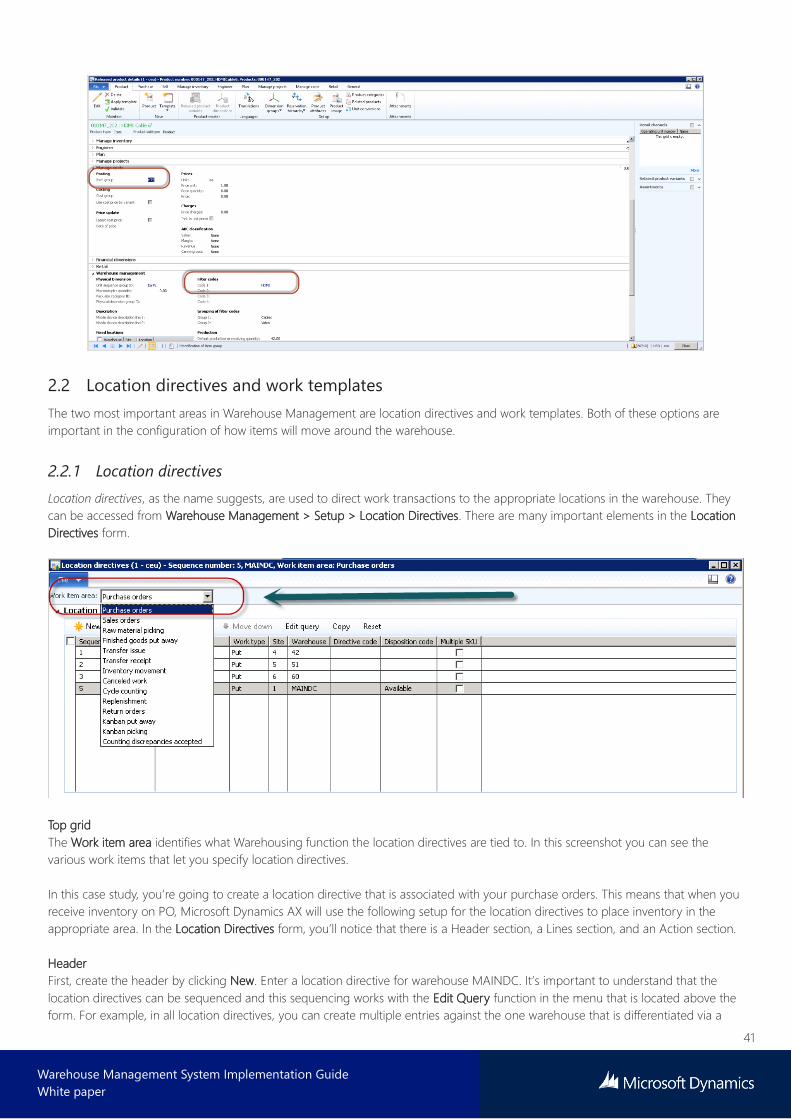
2.2.1 Location directives
Location directives, as the name suggests, are used to direct work transactions to the appropriate locations in the warehouse. They
can be accessed from Warehouse Management > Setup > Location Directives. There are many important elements in the Location
Directives form.
Top grid
The Work item area identifies what Warehousing function the location directives are tied to. In this screenshot you can see the
various work items that let you specify location directives.
In this case study, you’re going to create a location directive that is associated with your purchase orders. This means that when you
receive inventory on PO, Microsoft Dynamics AX will use the following setup for the location directives to place inventory in the
appropriate area. In the Location Directives form, you’ll notice that there is a Header section, a Lines section, and an Action section.
Header
First, create the header by clicking New. Enter a location directive for warehouse MAINDC. It’s important to understand that the
location directives can be sequenced and this sequencing works with the Edit Query function in the menu that is located above the
form. For example, in all location directives, you can create multiple entries against the one warehouse that is differentiated via a

42
Warehouse Management System Implementation Guide
White paper
sequence number and a query. This means that you could filter the location directive by any field on the item table or by any cross
referenced table that is available. See the following illustration for an example.
In this example, look at the range of inventory items or a specific inventory group or even one of the filter codes that was
referenced earlier (Fresh, Frozen, Dry perishable, etc.). Warehouse Management will work through the sequences in numeric order,
so if you create sequences with linked queries, you must make sure that you have a sequence at the end without a query, so that
there is an “ALL” option. For example, if you set Sequence 1 to Frozen, Sequence 2 to Fresh, and Sequence 3 to Dry, it’s important
that you set sequence 4 to query blank so that it will pick up any items that do not fall into the fresh, frozen or dry category. This is
like the concept of Table, Group, or All in the posting profiles of Microsoft Dynamics AX. First, search for table relationship, then
search for group, and if not found, then use all.
To test location directives and make sure that the setup is accurate, you will set up queries later in the case study. For now, you’ll
create a new line for warehouse MAINDC on site 1 and define the work type. The two most prevalent values that are used in
location directives are "pick" and "put". A work type equal to "pick" means that Warehouse Management will find the most ideal
location to reserve inventory from. There is not an actual pick done until the work is completed, but the reservation is the first step
in picking inventory. A work type equal to "put" means that the location directive will try to find the most ideal location to place or
locate inventory coming into the system, either from receiving, production, or inventory adjustments, such as trying to find a
location to "put" the inventory into.
For this purchase example, create a “put” work type because you want Microsoft Dynamics AX to put inventory away after the PO
has been received.
43
Warehouse Management System Implementation Guide
White paper
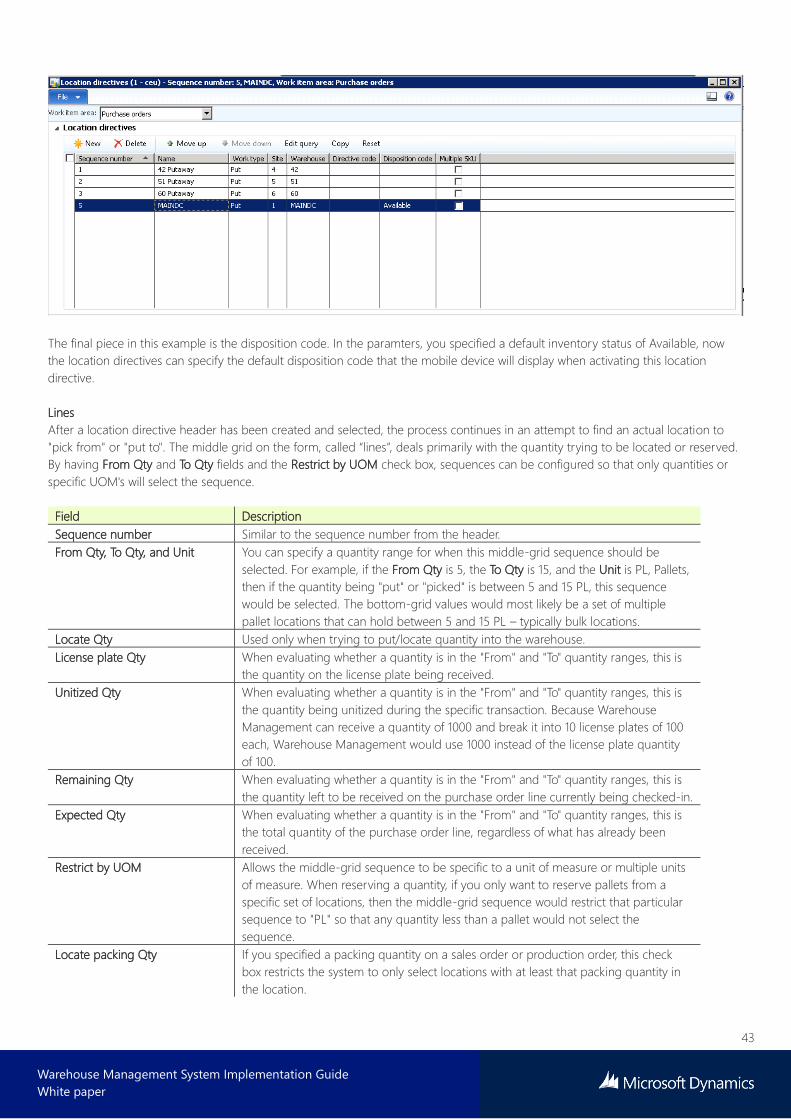
The final piece in this example is the disposition code. In the paramters, you specified a default inventory status of Available, now
the location directives can specify the default disposition code that the mobile device will display when activating this location
directive.
Lines
After a location directive header has been created and selected, the process continues in an attempt to find an actual location to
"pick from" or "put to". The middle grid on the form, called “lines”, deals primarily with the quantity trying to be located or reserved.
By having From Qty and To Qty fields and the Restrict by UOM check box, sequences can be configured so that only quantities or
specific UOM's will select the sequence.
Field Description
Sequence number Similar to the sequence number from the header.
From Qty, To Qty, and Unit You can specify a quantity range for when this middle-grid sequence should be
selected. For example, if the From Qty is 5, the To Qty is 15, and the Unit is PL, Pallets,
then if the quantity being "put" or "picked" is between 5 and 15 PL, this sequence
would be selected. The bottom-grid values would most likely be a set of multiple
pallet locations that can hold between 5 and 15 PL – typically bulk locations.
Locate Qty Used only when trying to put/locate quantity into the warehouse.
License plate Qty When evaluating whether a quantity is in the "From" and "To" quantity ranges, this is
the quantity on the license plate being received.
Unitized Qty When evaluating whether a quantity is in the "From" and "To" quantity ranges, this is
the quantity being unitized during the specific transaction. Because Warehouse
Management can receive a quantity of 1000 and break it into 10 license plates of 100
each, Warehouse Management would use 1000 instead of the license plate quantity
of 100.
Remaining Qty When evaluating whether a quantity is in the "From" and "To" quantity ranges, this is
the quantity left to be received on the purchase order line currently being checked-in.
Expected Qty When evaluating whether a quantity is in the "From" and "To" quantity ranges, this is
the total quantity of the purchase order line, regardless of what has already been
received.
Restrict by UOM Allows the middle-grid sequence to be specific to a unit of measure or multiple units
of measure. When reserving a quantity, if you only want to reserve pallets from a
specific set of locations, then the middle-grid sequence would restrict that particular
sequence to "PL" so that any quantity less than a pallet would not select the
sequence.
Locate packing Qty If you specified a packing quantity on a sales order or production order, this check
box restricts the system to only select locations with at least that packing quantity in
the location.
44
Warehouse Management System Implementation Guide
White paper
Field Description
Allow split This specifies if Warehouse Management splits the quantity being received or the
quantity being reserved across multiple locations or if the quantity must be located to
a single location or reserved from a single location.
45
Warehouse Management System Implementation Guide
White paper
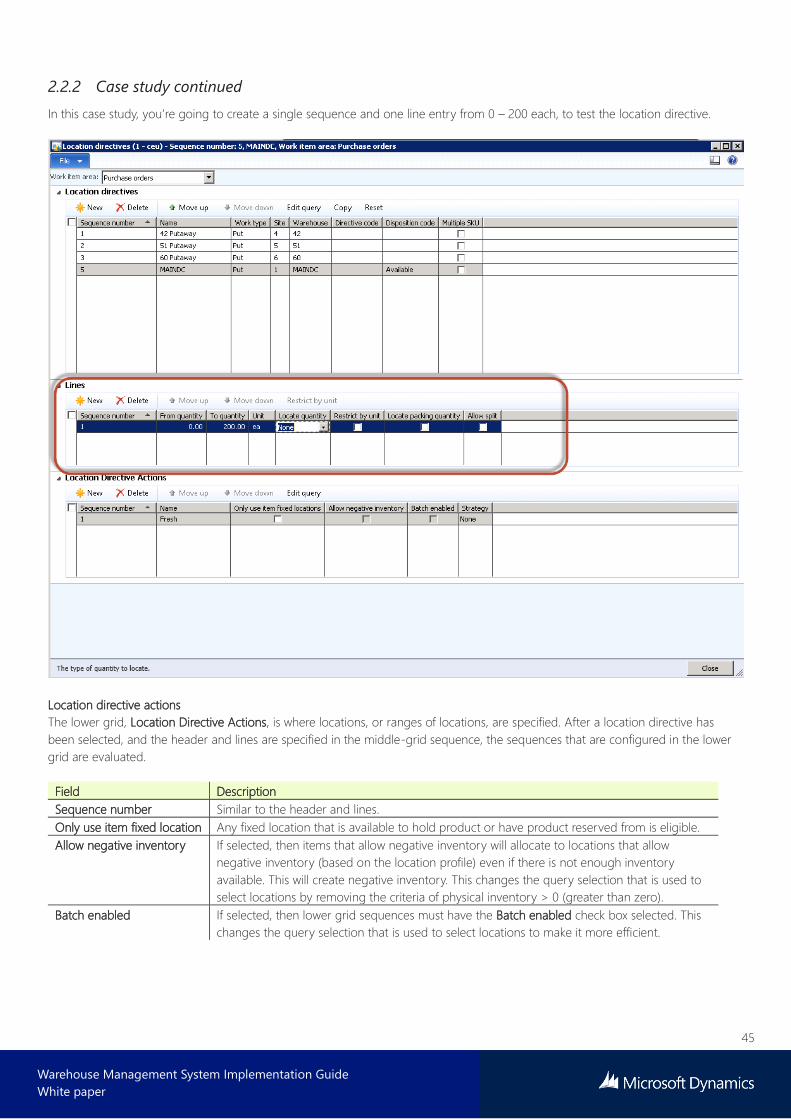
2.2.2 Case study continued
In this case study, you’re going to create a single sequence and one line entry from 0 – 200 each, to test the location directive.
Location directive actions
The lower grid, Location Directive Actions, is where locations, or ranges of locations, are specified. After a location directive has
been selected, and the header and lines are specified in the middle-grid sequence, the sequences that are configured in the lower
grid are evaluated.
Field Description
Sequence number Similar to the header and lines.
Only use item fixed location Any fixed location that is available to hold product or have product reserved from is eligible.
Allow negative inventory If selected, then items that allow negative inventory will allocate to locations that allow
negative inventory (based on the location profile) even if there is not enough inventory
available. This will create negative inventory. This changes the query selection that is used to
select locations by removing the criteria of physical inventory > 0 (greater than zero).
Batch enabled If selected, then lower grid sequences must have the Batch enabled check box selected. This
changes the query selection that is used to select locations to make it more efficient.
46
Warehouse Management System Implementation Guide
White paper
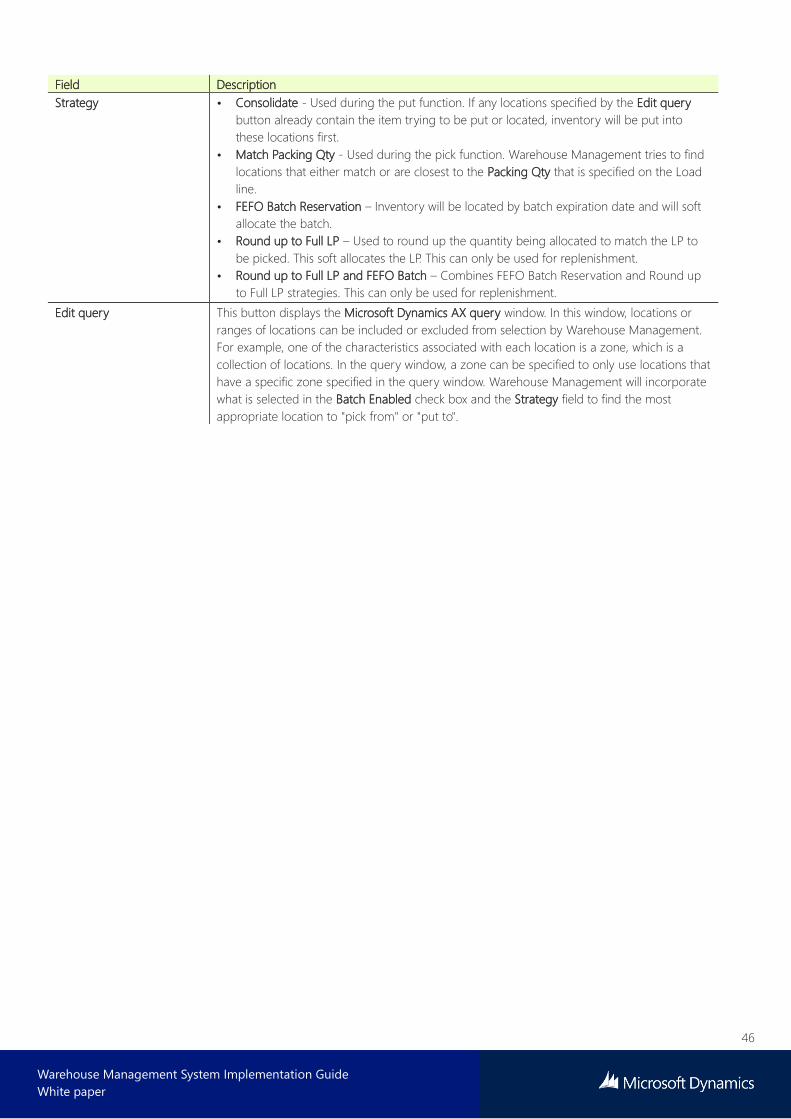
Field Description
Strategy • Consolidate - Used during the put function. If any locations specified by the Edit query
button already contain the item trying to be put or located, inventory will be put into
these locations first.
• Match Packing Qty - Used during the pick function. Warehouse Management tries to find
locations that either match or are closest to the Packing Qty that is specified on the Load
line.
• FEFO Batch Reservation – Inventory will be located by batch expiration date and will soft
allocate the batch.
• Round up to Full LP – Used to round up the quantity being allocated to match the LP to
be picked. This soft allocates the LP. This can only be used for replenishment.
• Round up to Full LP and FEFO Batch – Combines FEFO Batch Reservation and Round up
to Full LP strategies. This can only be used for replenishment.
Edit query This button displays the Microsoft Dynamics AX query window. In this window, locations or
ranges of locations can be included or excluded from selection by Warehouse Management.
For example, one of the characteristics associated with each location is a zone, which is a
collection of locations. In the query window, a zone can be specified to only use locations that
have a specific zone specified in the query window. Warehouse Management will incorporate
what is selected in the Batch Enabled check box and the Strategy field to find the most
appropriate location to "pick from" or "put to".
47
Warehouse Management System Implementation Guide
White paper
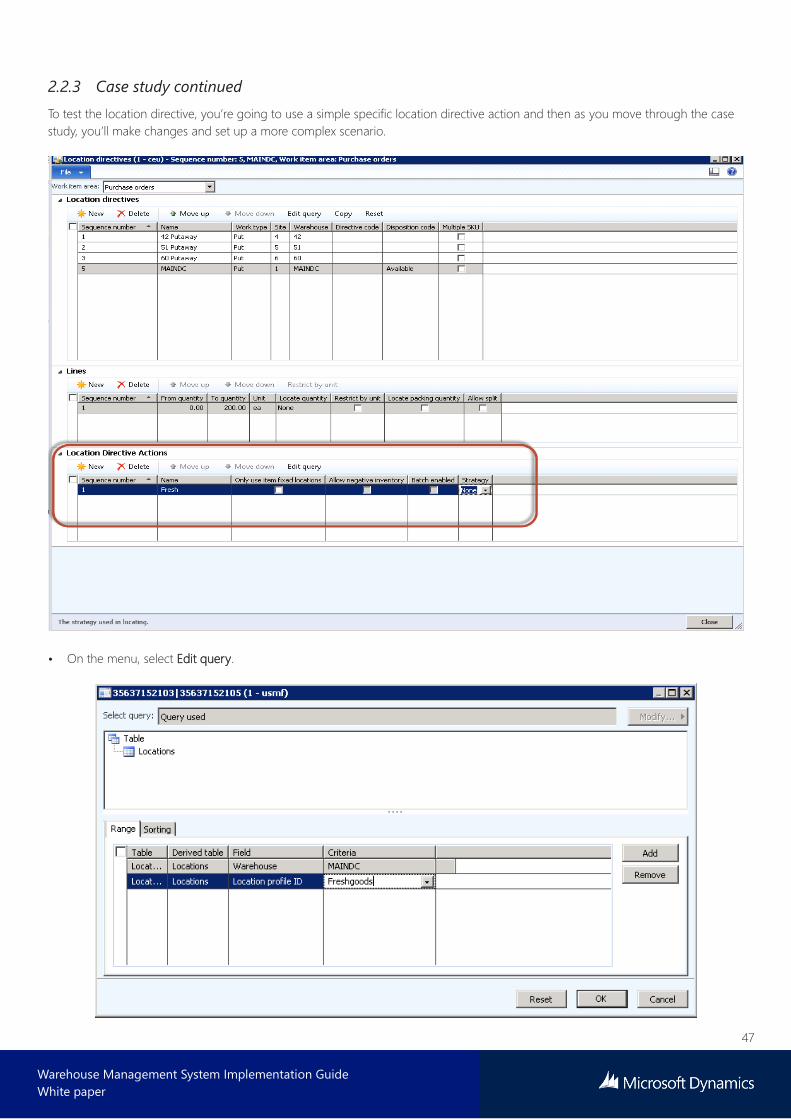
2.2.3 Case study continued
To test the location directive, you’re going to use a simple specific location directive action and then as you move through the case
study, you’ll make changes and set up a more complex scenario.
• On the menu, select Edit query.
48
Warehouse Management System Implementation Guide
White paper
In this example, you’re basically defining that for all purchase orders in the MAINDC warehouse, if the quantity is between 0-200,
find a location in the MAINDC warehouse, and then use the location profile ID of Fresh in the warehouse.
By querying on the locations and filtering on the profile of “Fresh”, you’ll get a list of possible locations in which the directive will
place inventory.
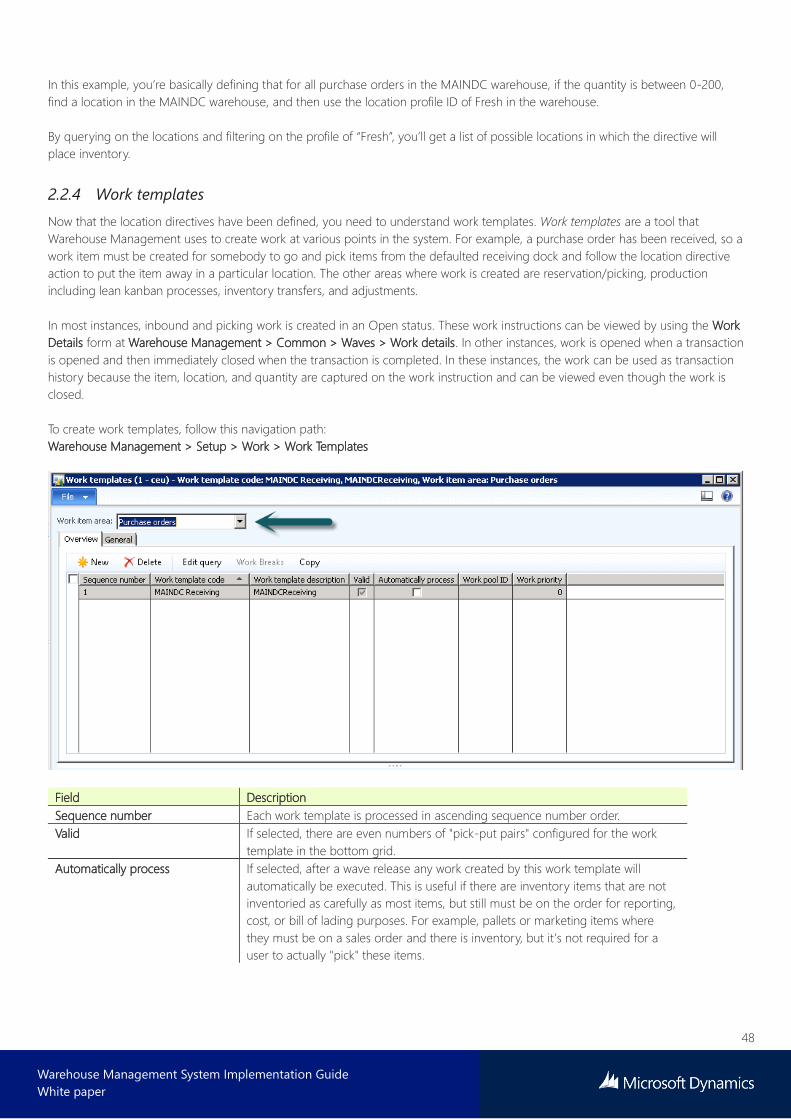
2.2.4 Work templates
Now that the location directives have been defined, you need to understand work templates. Work templates are a tool that
Warehouse Management uses to create work at various points in the system. For example, a purchase order has been received, so a
work item must be created for somebody to go and pick items from the defaulted receiving dock and follow the location directive
action to put the item away in a particular location. The other areas where work is created are reservation/picking, production
including lean kanban processes, inventory transfers, and adjustments.
In most instances, inbound and picking work is created in an Open status. These work instructions can be viewed by using the Work
Details form at Warehouse Management > Common > Waves > Work details. In other instances, work is opened when a transaction
is opened and then immediately closed when the transaction is completed. In these instances, the work can be used as transaction
history because the item, location, and quantity are captured on the work instruction and can be viewed even though the work is
closed.
To create work templates, follow this navigation path:
Warehouse Management > Setup > Work > Work Templates
Field Description
Sequence number Each work template is processed in ascending sequence number order.
Valid If selected, there are even numbers of "pick-put pairs" configured for the work
template in the bottom grid.
Automatically process If selected, after a wave release any work created by this work template will
automatically be executed. This is useful if there are inventory items that are not
inventoried as carefully as most items, but still must be on the order for reporting,
cost, or bill of lading purposes. For example, pallets or marketing items where
they must be on a sales order and there is inventory, but it’s not required for a
user to actually "pick" these items.
49
Warehouse Management System Implementation Guide
White paper
Field Description
Work priority Work created by Warehouse Management uses a default value from the
Warehouse Management Parameters form. However, by specifying a value in this
field on the work template, a different priority can be set on the work for a specific
template. Work priority is used during some mobile device flows, specifically
system grouping.
Edit query This opens the Microsoft Dynamics AX query window. In this window, values can
be specified that help Warehouse Management determine which work template
to select. For example, a work template can be configured that will be selected for
any item that starts with "836*". Warehouse Management will continue to evaluate
each work template configured until one is found that meets the current criteria.
You must assign a lower sequence number to the most specific work templates
and a higher sequence number to those templates that are more general.
Work breaks
This will group and break the work by the criteria specified in this window. When
work templates are used, a record is created in the Temp Work Transactions table.
A single temp work transaction record will be created for each item/location
combination. However, depending on how the warehouse is configured, this
record could be for multiple pallet picks. By using work breaks, you can break
work by item and location, or break work on other attributes, such as batch ID or
license plate.
Use the Sorting tab to sort work in a specific order. It’s important to sort the work created to allow for work breaks to be configured
appropriately.
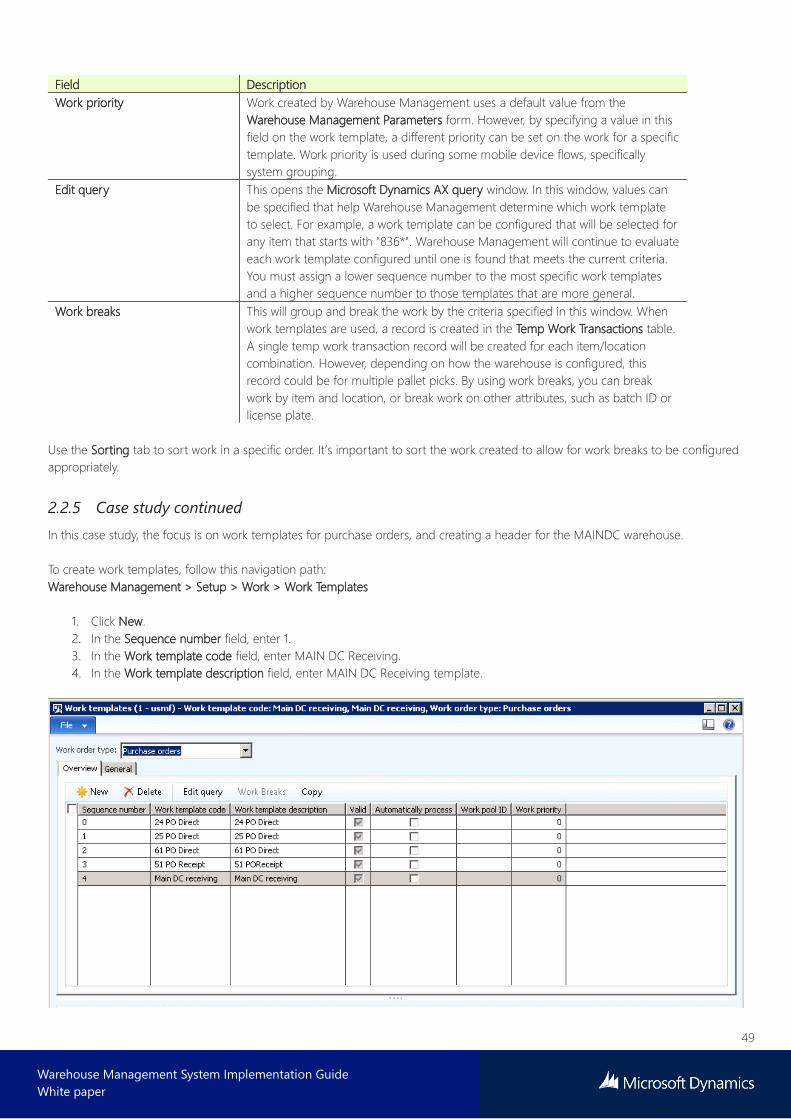
2.2.5 Case study continued
In this case study, the focus is on work templates for purchase orders, and creating a header for the MAINDC warehouse.
To create work templates, follow this navigation path:
Warehouse Management > Setup > Work > Work Templates
1. Click New.
2. In the Sequence number field, enter 1.
3. In the Work template code field, enter MAIN DC Receiving.
4. In the Work template description field, enter MAIN DC Receiving template.
50
Warehouse Management System Implementation Guide
White paper
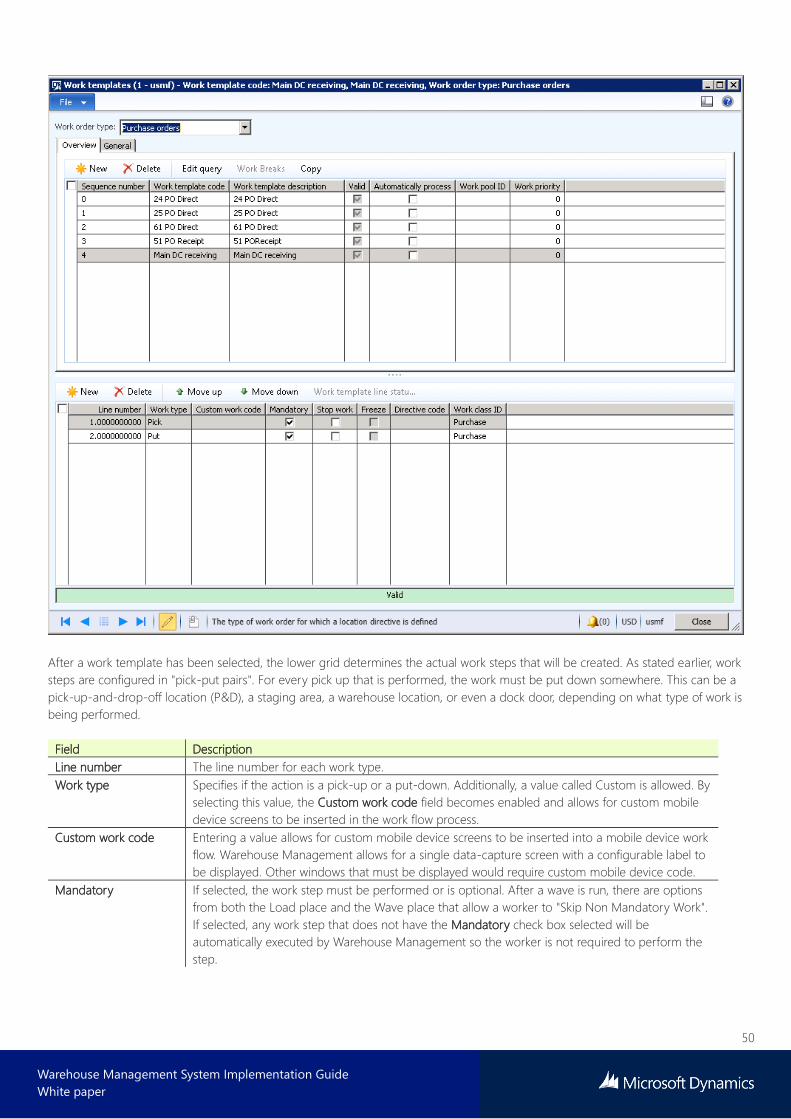
After a work template has been selected, the lower grid determines the actual work steps that will be created. As stated earlier, work
steps are configured in "pick-put pairs". For every pick up that is performed, the work must be put down somewhere. This can be a
pick-up-and-drop-off location (P&D), a staging area, a warehouse location, or even a dock door, depending on what type of work is
being performed.
Field Description
Line number The line number for each work type.
Work type Specifies if the action is a pick-up or a put-down. Additionally, a value called Custom is allowed. By
selecting this value, the Custom work code field becomes enabled and allows for custom mobile
device screens to be inserted in the work flow process.
Custom work code Entering a value allows for custom mobile device screens to be inserted into a mobile device work
flow. Warehouse Management allows for a single data-capture screen with a configurable label to
be displayed. Other windows that must be displayed would require custom mobile device code.
Mandatory If selected, the work step must be performed or is optional. After a wave is run, there are options
from both the Load place and the Wave place that allow a worker to "Skip Non Mandatory Work".
If selected, any work step that does not have the Mandatory check box selected will be
automatically executed by Warehouse Management so the worker is not required to perform the
step.
51
Warehouse Management System Implementation Guide
White paper
Field Description
Stop work If selected, Warehouse Management displays the next mobile device screen to the worker or stops
the transaction. In the example above, when the work instruction is first scanned, the worker will
be presented with a pick transaction, and then a put transaction. At that point, the mobile device
would exit the work and be ready to process the next piece of work. If the Stop work check box is
cleared on the second pick step, the worker will be presented with a pick then a put, but then will
be immediately presented with a second pick and put transaction.
Freeze If selected, the work line will be blocked and you need to release the wave or unblock the actual
work before you can complete the work on your mobile device.
Directive code This field is a link between the work templates and the location directives. If the directive code is
blank, then Warehouse Management evaluates the work step to find a location directive with a
blank directive code. If the directive code is not blank on the work template, then Warehouse
Management accesses the location directives to find a directive with the specific directive code.
In the previous illustration, the first work step is a pick, which is associated with a sales order work
template. The first step is to use location directives to find a location to reserve the necessary
inventory for picking. Since there is no directive code on this work step, Warehouse Management
will find a sales order location directive that also has a blank directive code and use it to find the
most appropriate location to reserve the inventory.
The next work step is a request for a worker to put what was picked in the first work step into a
shipping staging location. Again, for this work step Warehouse Management will access location
directives to find the appropriate location to direct the worker to put down the picked inventory.
However, in this case, Warehouse Management will only use a location directive that has a
directive code equal to ShipStage, because this is the directive code configured on the work
template work step.
Work Class ID This lets you control what mobile device menu item can process the work. On the Mobile Device
Menu Item form, any menu item that is configured to use existing work can specify which work
classes the mobile device menu item will process.
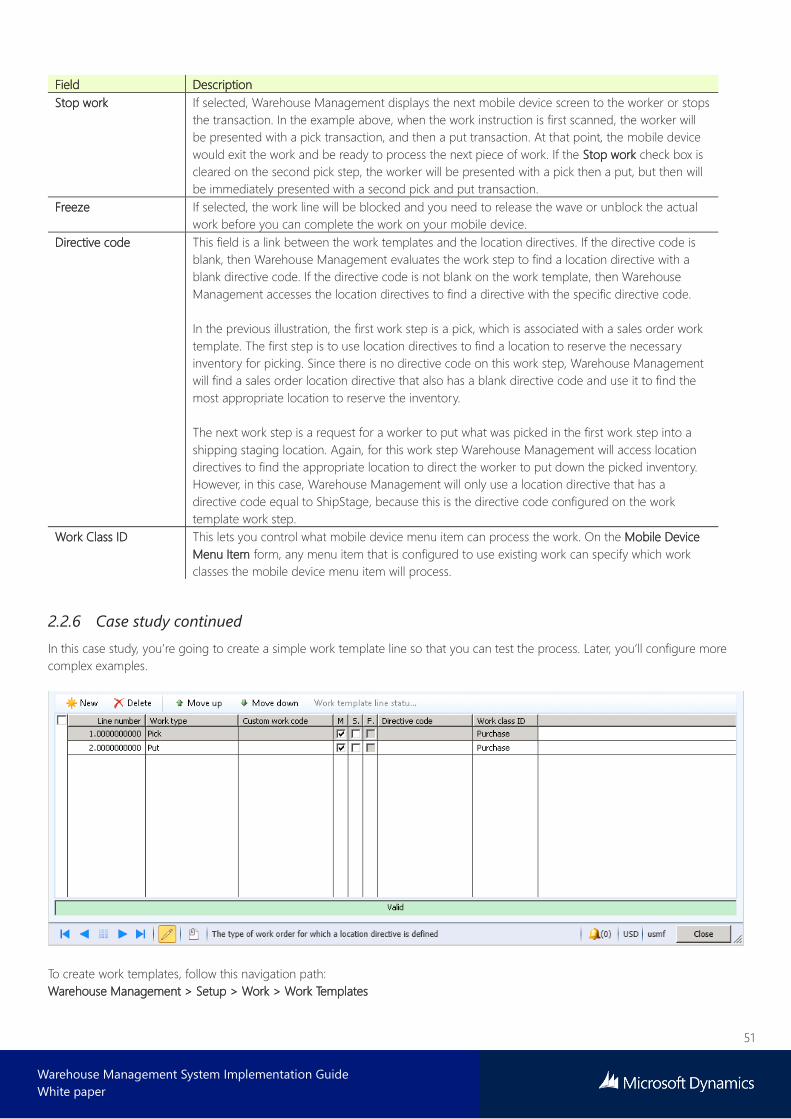
2.2.6 Case study continued
In this case study, you’re going to create a simple work template line so that you can test the process. Later, you’ll configure more
complex examples.
To create work templates, follow this navigation path:
Warehouse Management > Setup > Work > Work Templates

52
Warehouse Management System Implementation Guide
White paper
1. Click New.
2. On line 1, in the Work type field, select Pick.
• Select Mandatory.
• Clear Stop work.
3. In the Work class ID field, select Purchase.
4. On line 2, in the Work type field, select Put
• Select Mandatory.
• Clear Stop work.
5. In the Work class ID field, select Purchase.
2.2.7 Mobile Device setup
The first step in using the mobile device is to set up a user ID for workers who will be using the mobile device. This can be
accomplished by using the Work users form. Here you can define which menu the user will use. Different menus can be different
screens for different users. You can also define groups, with different rules for different users.
To access the user form, follow this navigation path:
Warehouse Management > Setup > Work User > Worker
2.2.8 Case study continued
In this case study, the ADMIN user is linked to Julia Funderburk. If you select Julia in the leftmost part of the window, you can view
the work user ID’s listed in the rightmost part of the window. Note that the new worker user ID, “MainDC”, has been linked to
warehouse MAINDC and the default menu to be displayed is “Main”. You can reset the password details for this user by selecting the
Reset Password option. In this case study, the password is set to “Main”.
2.2.9 Mobile device menu items
Warehouse Management provides a variety of mobile device menu items, and also lets you create customized mobile device menus
without writing code. On the Mobile Device Menu item form, you can set up the different menus that will be displayed on the
mobile device.
53
Warehouse Management System Implementation Guide
White paper
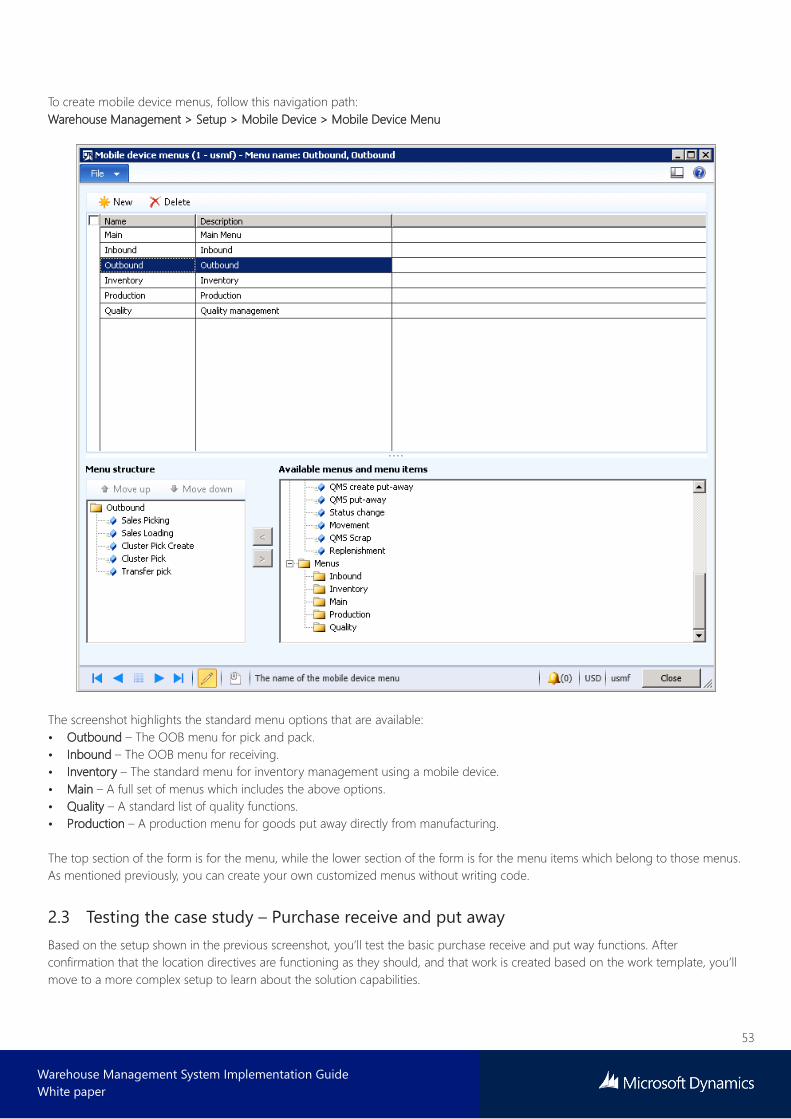
To create mobile device menus, follow this navigation path:
Warehouse Management > Setup > Mobile Device > Mobile Device Menu
The screenshot highlights the standard menu options that are available:
• Outbound – The OOB menu for pick and pack.
• Inbound – The OOB menu for receiving.
• Inventory – The standard menu for inventory management using a mobile device.
• Main – A full set of menus which includes the above options.
• Quality – A standard list of quality functions.
• Production – A production menu for goods put away directly from manufacturing.
The top section of the form is for the menu, while the lower section of the form is for the menu items which belong to those menus.
As mentioned previously, you can create your own customized menus without writing code.
2.3 Testing the case study – Purchase receive and put away
Based on the setup shown in the previous screenshot, you’ll test the basic purchase receive and put way functions. After
confirmation that the location directives are functioning as they should, and that work is created based on the work template, you’ll
move to a more complex setup to learn about the solution capabilities.
54
Warehouse Management System Implementation Guide
White paper
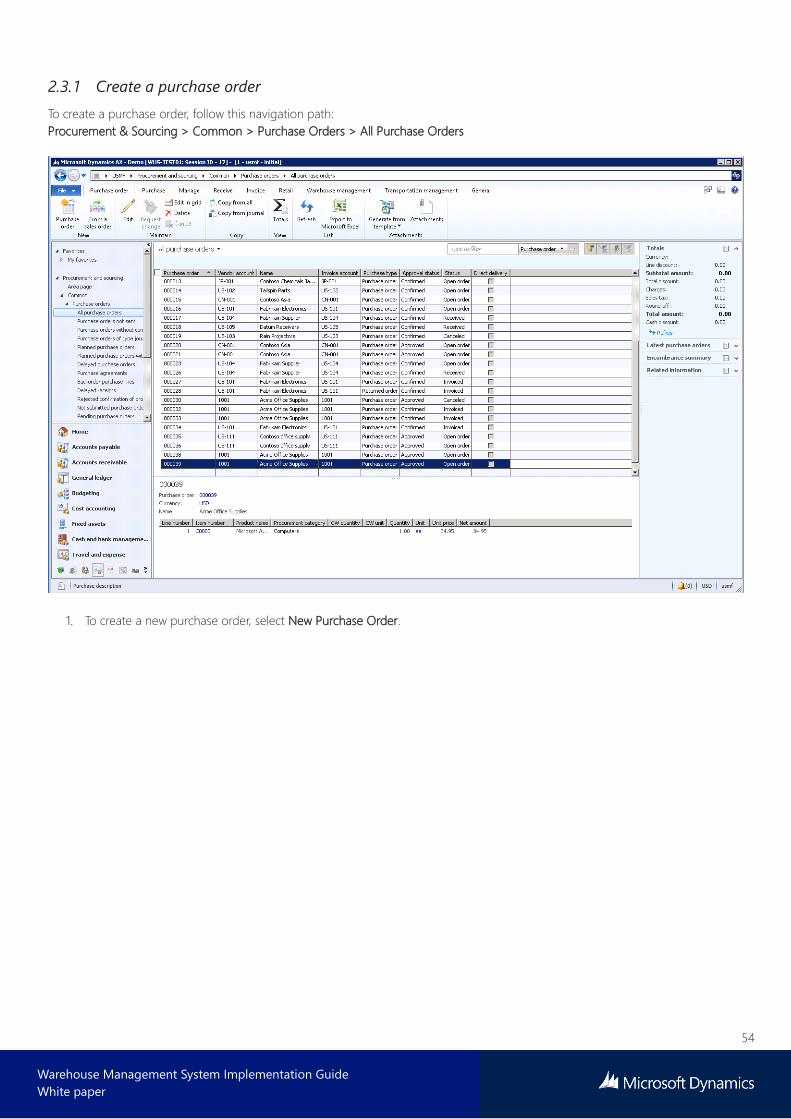
2.3.1 Create a purchase order
To create a purchase order, follow this navigation path:
Procurement & Sourcing > Common > Purchase Orders > All Purchase Orders
1. To create a new purchase order, select New Purchase Order.

55
Warehouse Management System Implementation Guide
White paper
2. Select a vendor account. In this example, 1001 is selected.
3. Expand the General FastTab. Set the site to 6 and the warehouse to MAINDC.
4. Click OK.
56
Warehouse Management System Implementation Guide
White paper
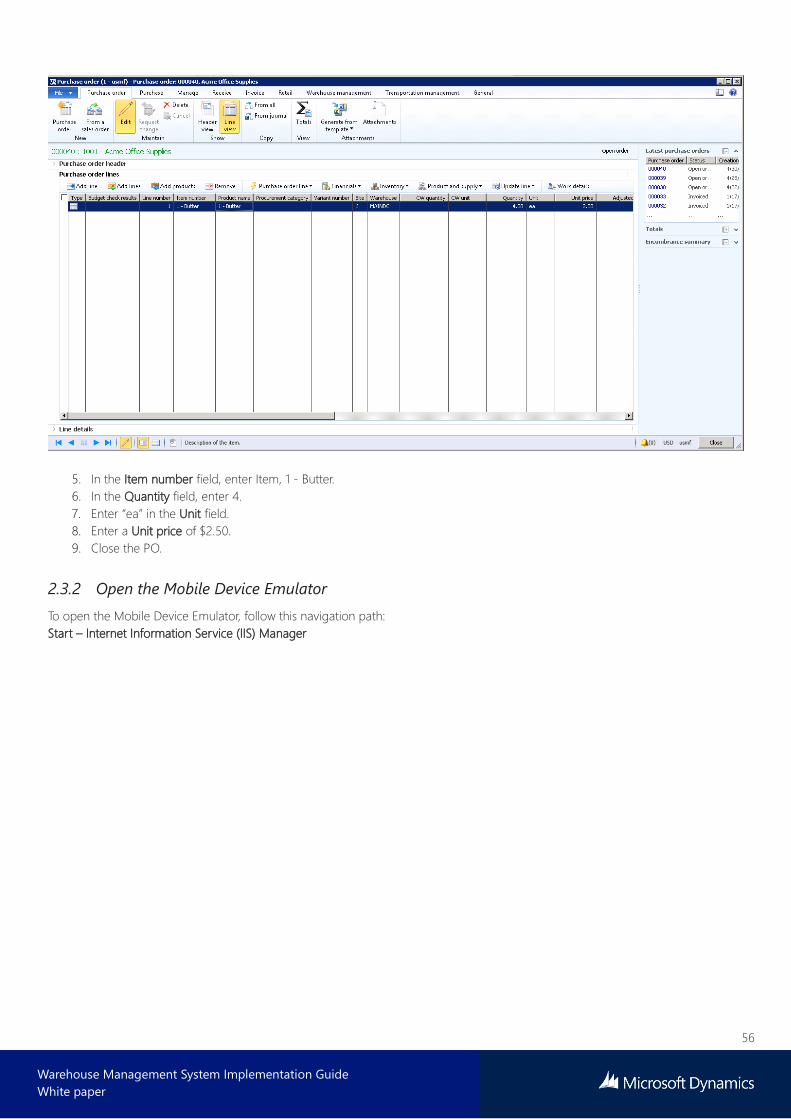
5. In the Item number field, enter Item, 1 - Butter.
6. In the Quantity field, enter 4.
7. Enter “ea” in the Unit field.
8. Enter a Unit price of $2.50.
9. Close the PO.
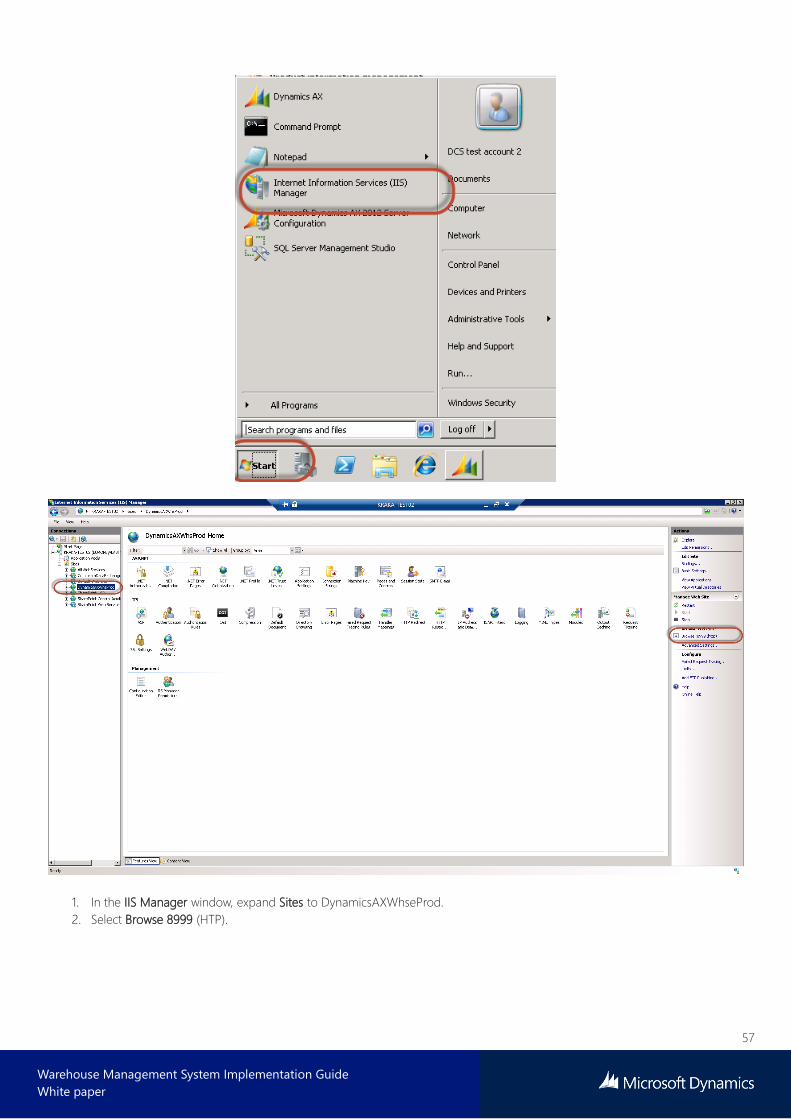
2.3.2 Open the Mobile Device Emulator
To open the Mobile Device Emulator, follow this navigation path:
Start – Internet Information Service (IIS) Manager
57
Warehouse Management System Implementation Guide
White paper
1. In the IIS Manager window, expand Sites to DynamicsAXWhseProd.
2. Select Browse 8999 (HTP).
58
Warehouse Management System Implementation Guide
White paper
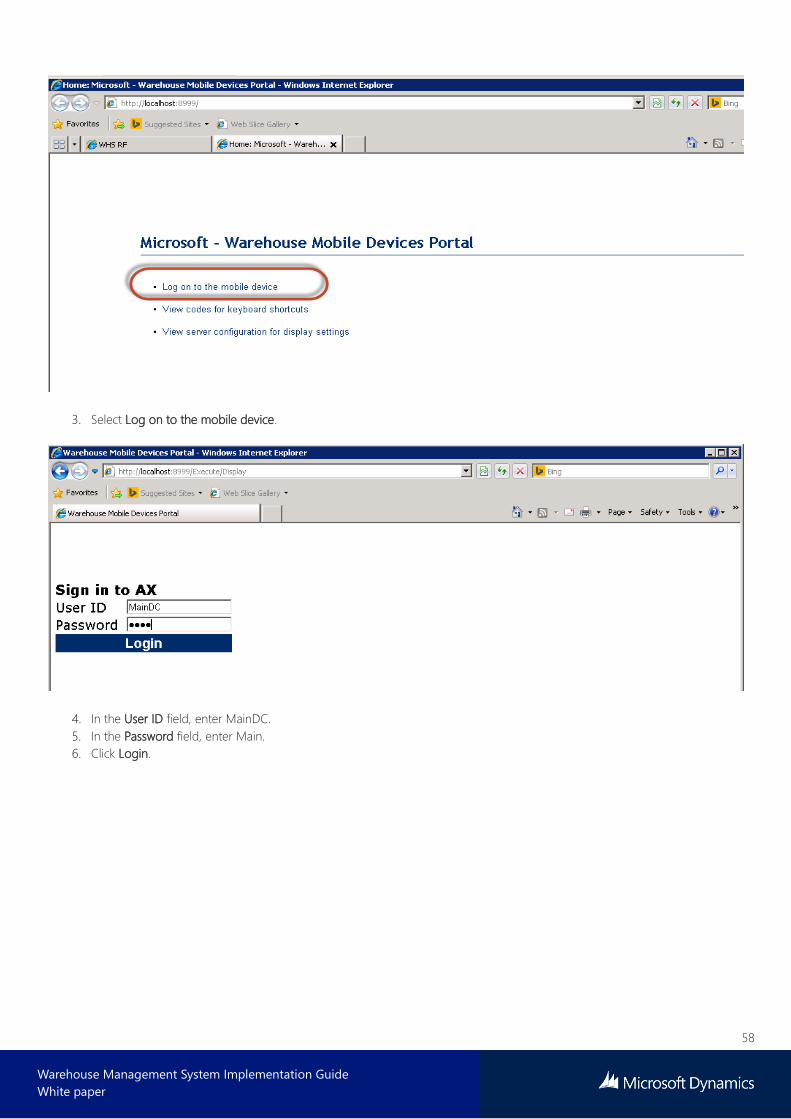
3. Select Log on to the mobile device.
4. In the User ID field, enter MainDC.
5. In the Password field, enter Main.
6. Click Login.
59
Warehouse Management System Implementation Guide
White paper
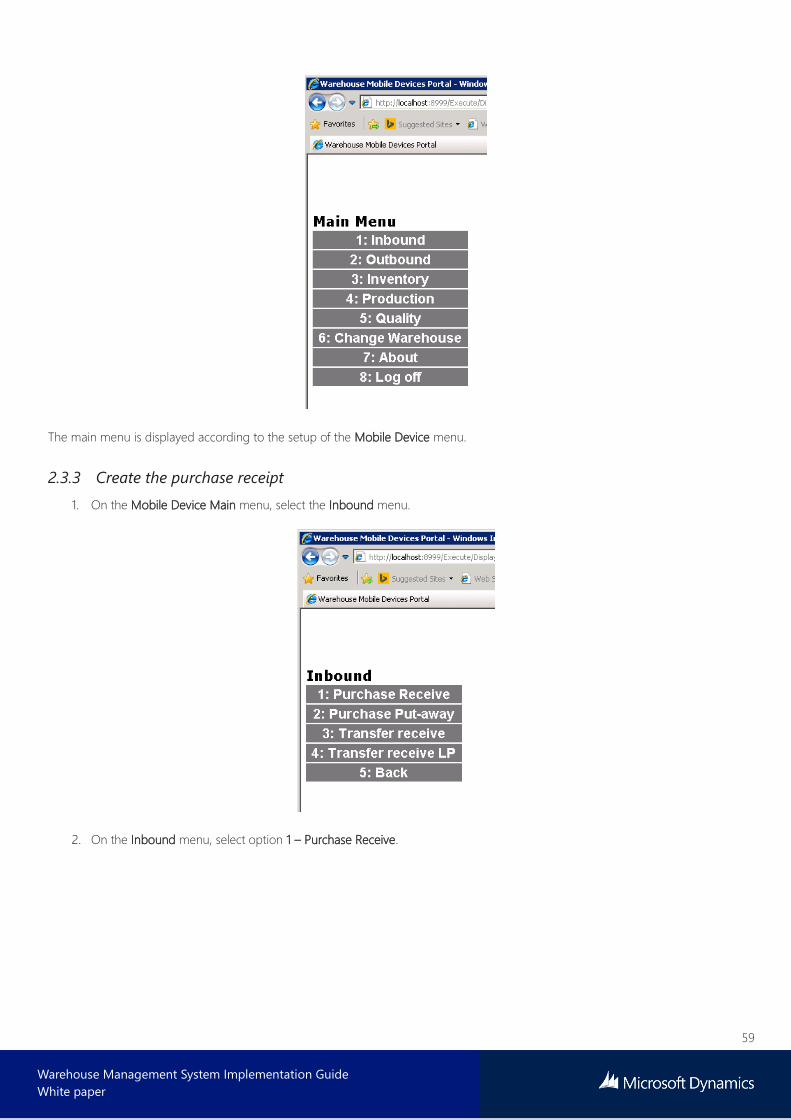
The main menu is displayed according to the setup of the Mobile Device menu.
2.3.3 Create the purchase receipt
1. On the Mobile Device Main menu, select the Inbound menu.
2. On the Inbound menu, select option 1 – Purchase Receive.
60
Warehouse Management System Implementation Guide
White paper
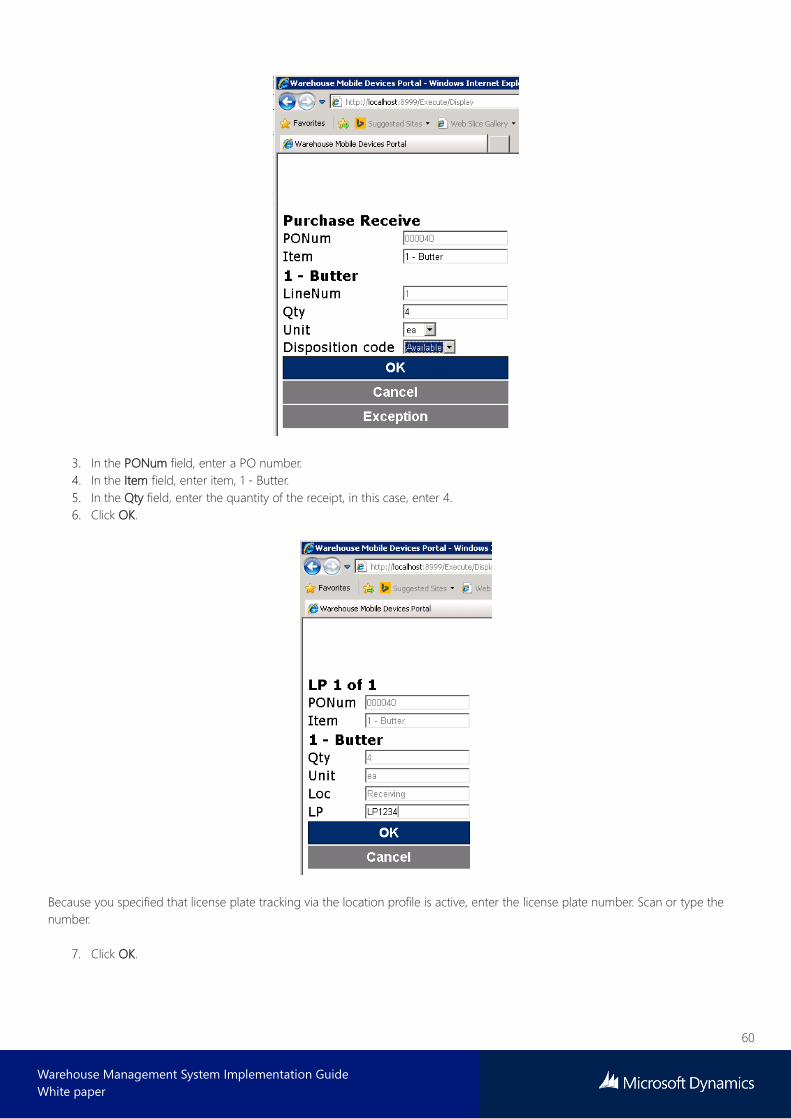
3. In the PONum field, enter a PO number.
4. In the Item field, enter item, 1 - Butter.
5. In the Qty field, enter the quantity of the receipt, in this case, enter 4.
6. Click OK.
Because you specified that license plate tracking via the location profile is active, enter the license plate number. Scan or type the
number.
7. Click OK.
61
Warehouse Management System Implementation Guide
White paper
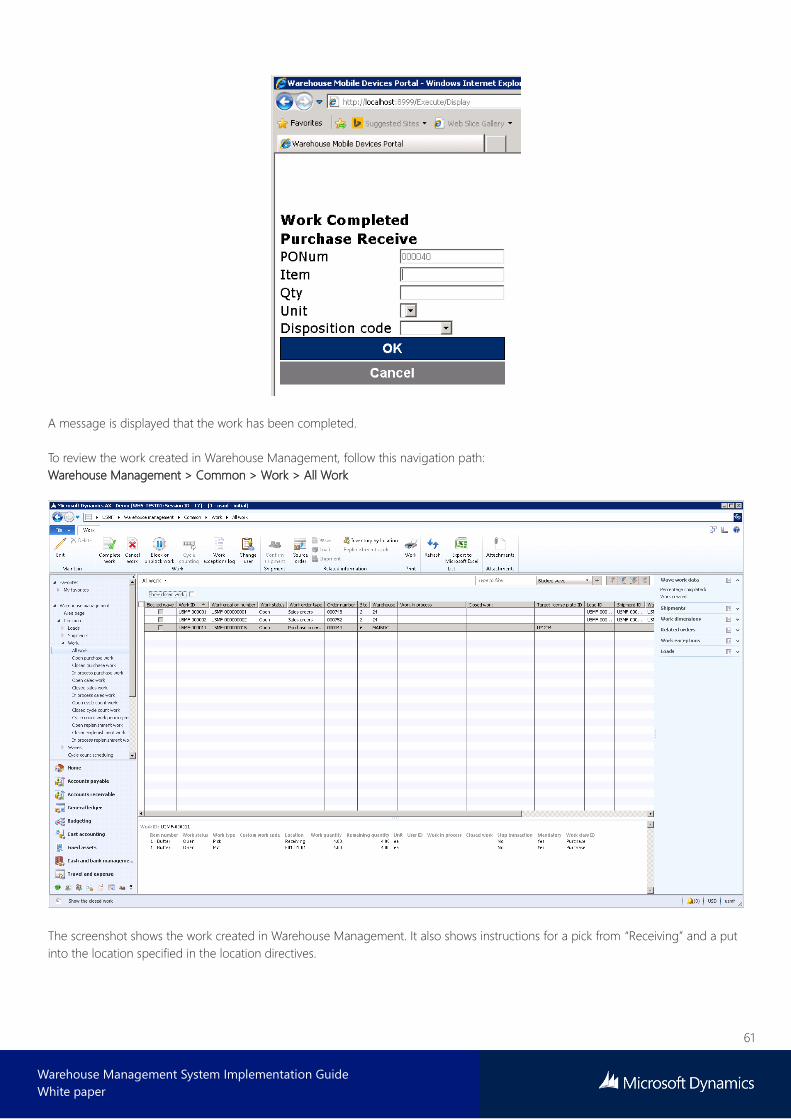
A message is displayed that the work has been completed.
To review the work created in Warehouse Management, follow this navigation path:
Warehouse Management > Common > Work > All Work
The screenshot shows the work created in Warehouse Management. It also shows instructions for a pick from “Receiving” and a put
into the location specified in the location directives.
62
Warehouse Management System Implementation Guide
White paper
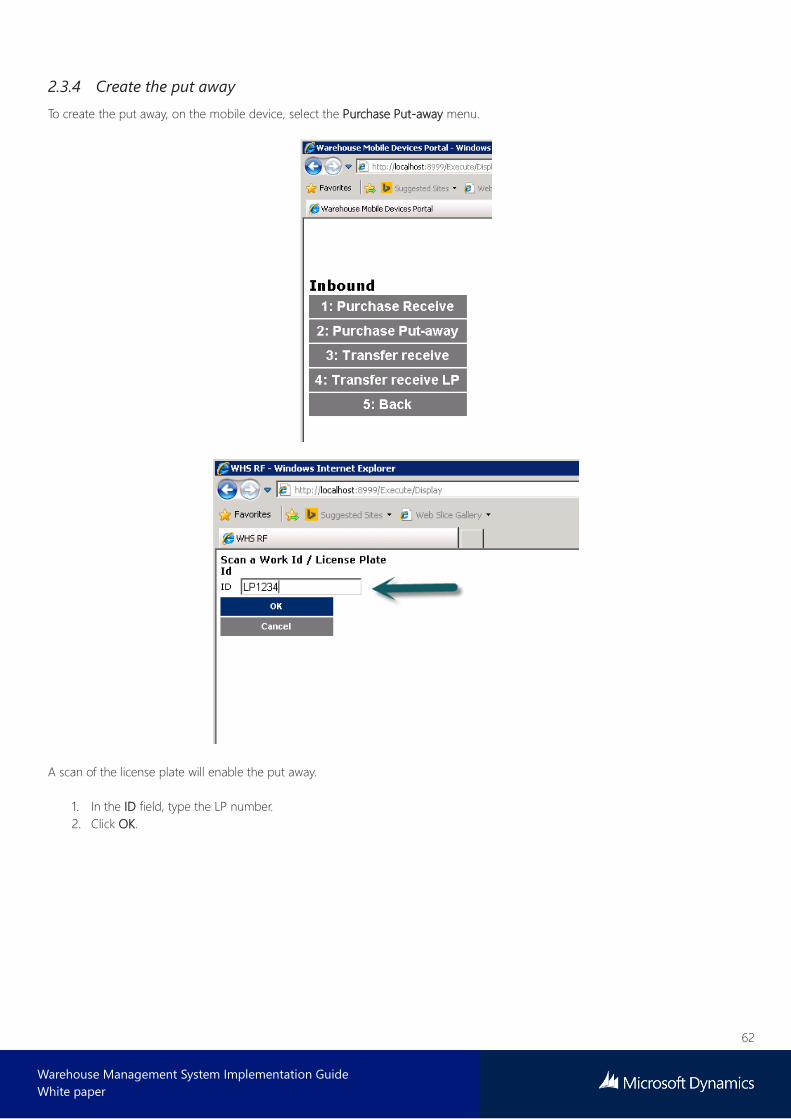
2.3.4 Create the put away
To create the put away, on the mobile device, select the Purchase Put-away menu.
A scan of the license plate will enable the put away.
1. In the ID field, type the LP number.
2. Click OK.
63
Warehouse Management System Implementation Guide
White paper
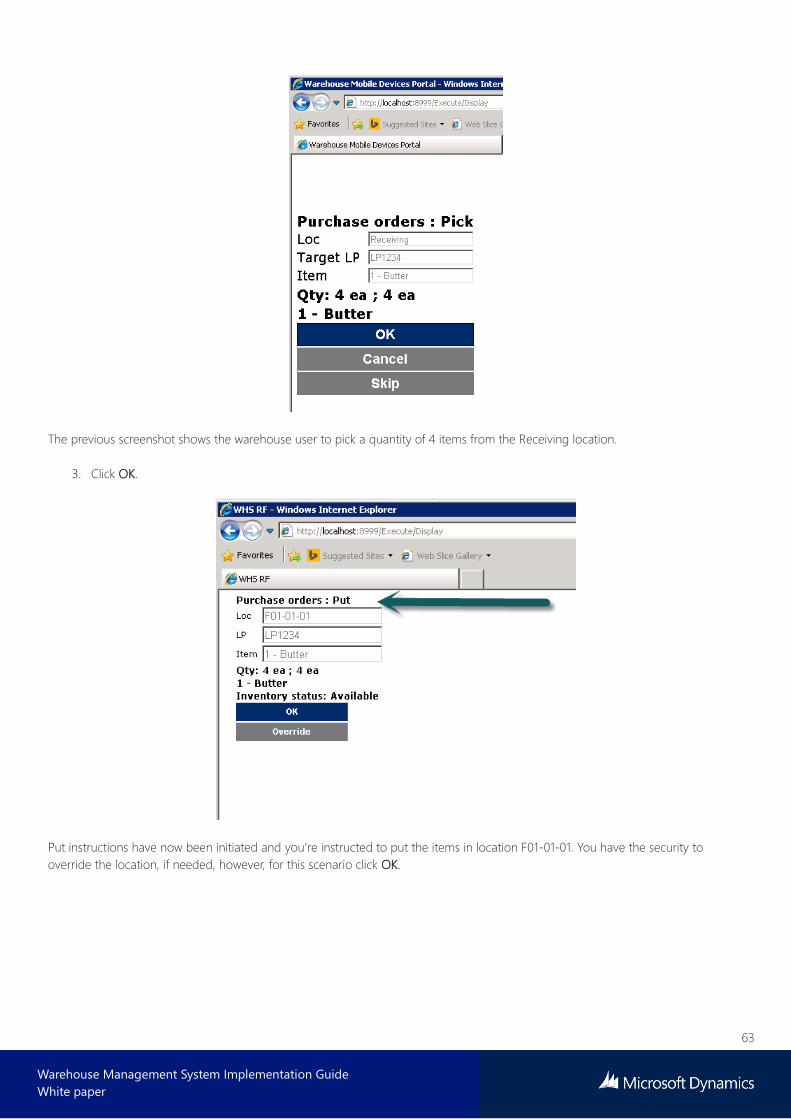
The previous screenshot shows the warehouse user to pick a quantity of 4 items from the Receiving location.
3. Click OK.
Put instructions have now been initiated and you’re instructed to put the items in location F01-01-01. You have the security to
override the location, if needed, however, for this scenario click OK.
64
Warehouse Management System Implementation Guide
White paper
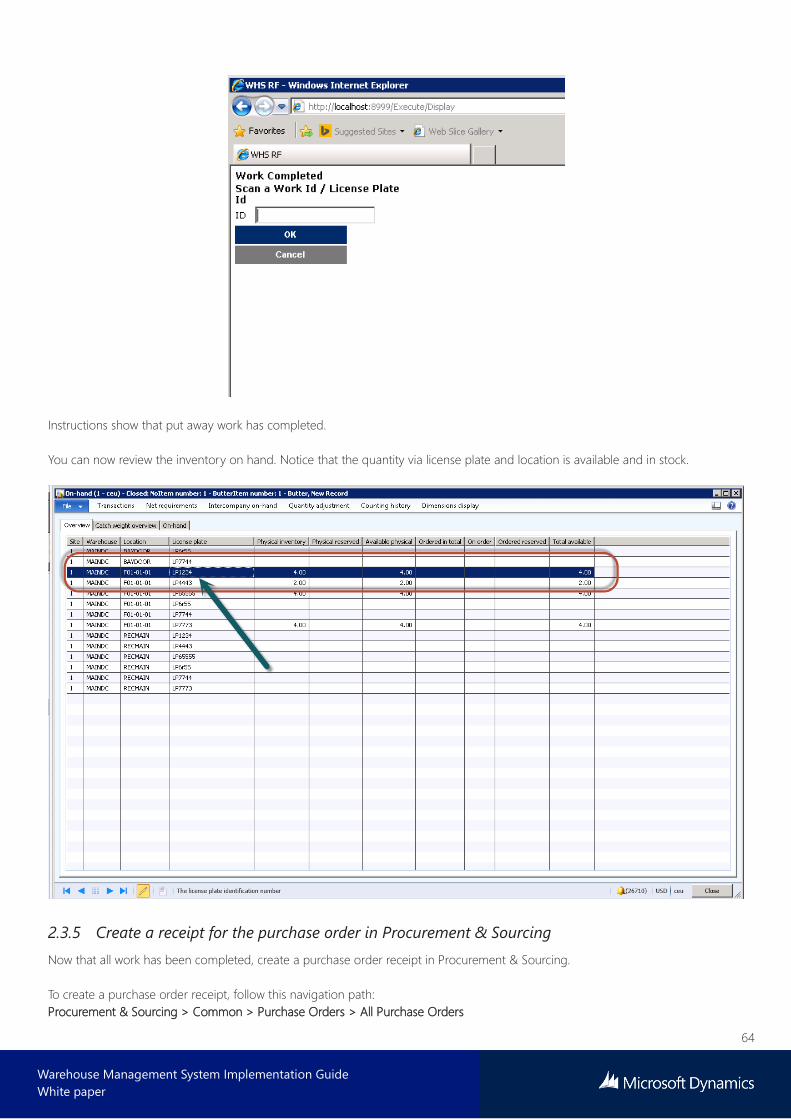
Instructions show that put away work has completed.
You can now review the inventory on hand. Notice that the quantity via license plate and location is available and in stock.
2.3.5 Create a receipt for the purchase order in Procurement & Sourcing
Now that all work has been completed, create a purchase order receipt in Procurement & Sourcing.
To create a purchase order receipt, follow this navigation path:
Procurement & Sourcing > Common > Purchase Orders > All Purchase Orders

65
Warehouse Management System Implementation Guide
White paper
1. Select the purchase order, 000040.
2. On the Purchase tab, select Confirm to confirm the purchase order.
3. On the Receive tab, select Product Receipt.
66
Warehouse Management System Implementation Guide
White paper
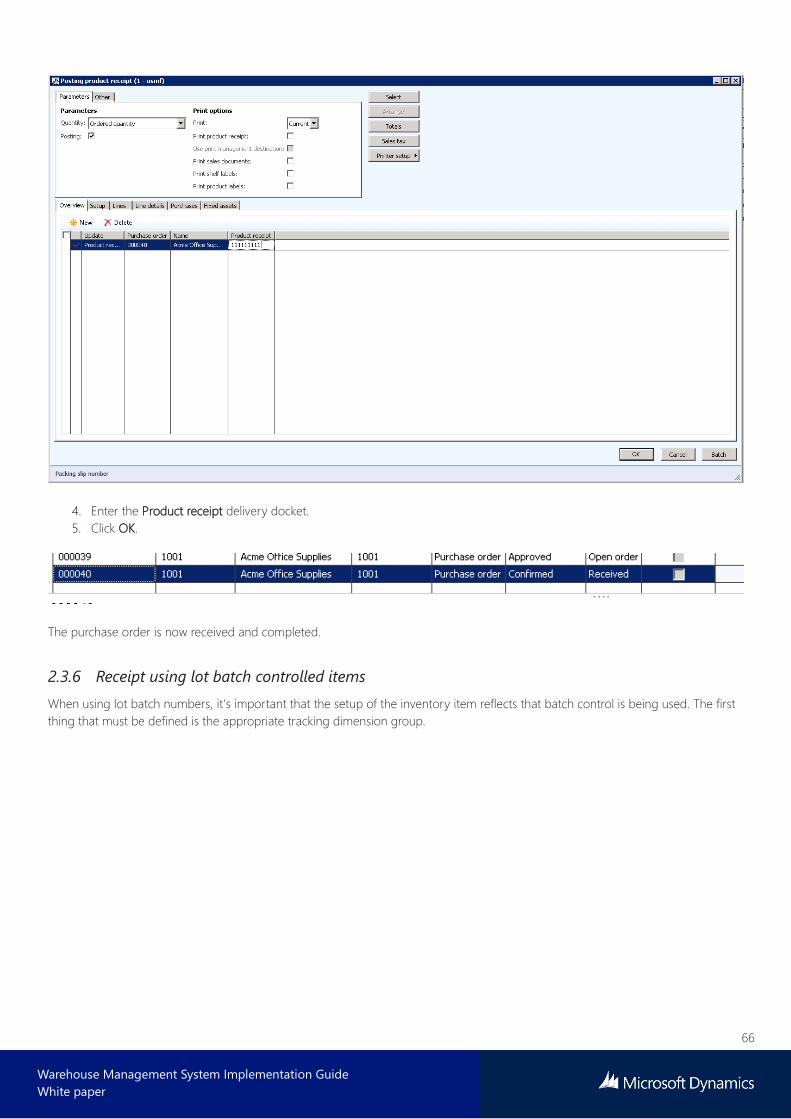
4. Enter the Product receipt delivery docket.
5. Click OK.
The purchase order is now received and completed.
2.3.6 Receipt using lot batch controlled items
When using lot batch numbers, it’s important that the setup of the inventory item reflects that batch control is being used. The first
thing that must be defined is the appropriate tracking dimension group.

67
Warehouse Management System Implementation Guide
White paper
The tracking dimension group, “Batch”, has lot batch tracking enabled.
68
Warehouse Management System Implementation Guide
White paper
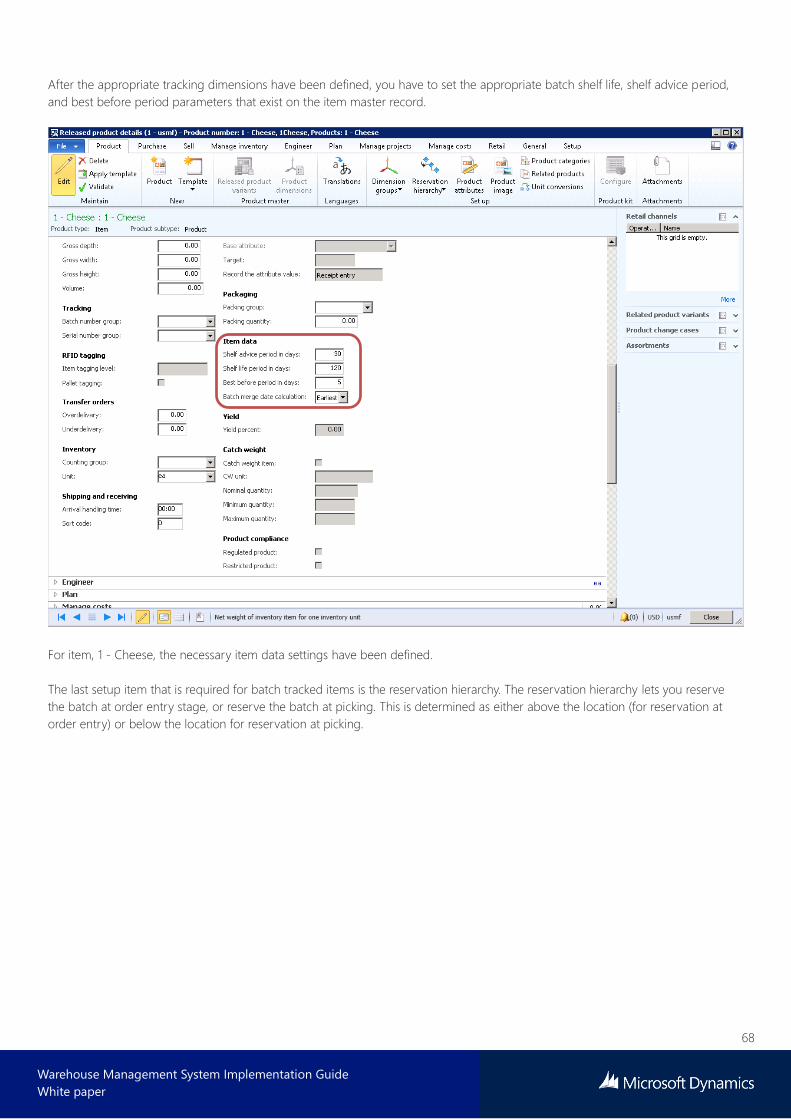
After the appropriate tracking dimensions have been defined, you have to set the appropriate batch shelf life, shelf advice period,
and best before period parameters that exist on the item master record.
For item, 1 - Cheese, the necessary item data settings have been defined.
The last setup item that is required for batch tracked items is the reservation hierarchy. The reservation hierarchy lets you reserve
the batch at order entry stage, or reserve the batch at picking. This is determined as either above the location (for reservation at
order entry) or below the location for reservation at picking.

69
Warehouse Management System Implementation Guide
White paper
To test the scenario, create a purchase order on item, 1 – Cheese, for a quantity of 2 items.
After the purchase order is created, log on to the mobile device to perform a goods receipt.

70
Warehouse Management System Implementation Guide
White paper
Enter the information shown above and then click OK.
Because license plate tracking is enabled through the location profile, enter the license plate. Click OK.
71
Warehouse Management System Implementation Guide
White paper
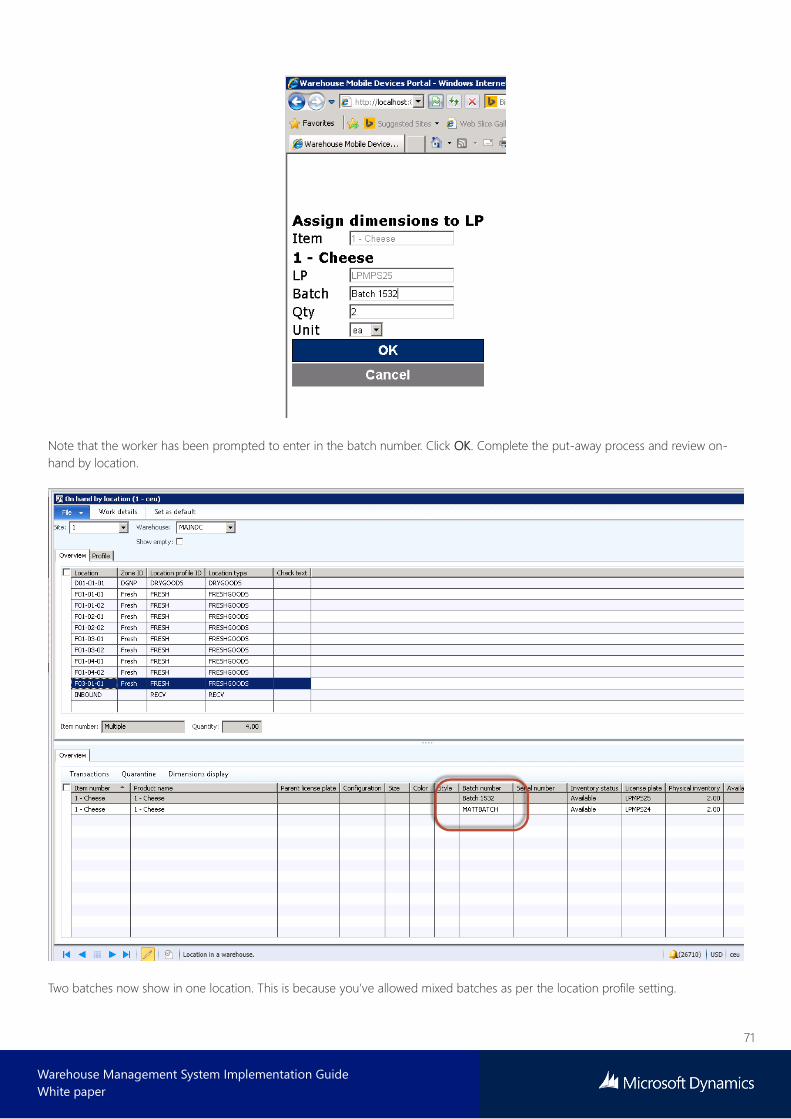
Note that the worker has been prompted to enter in the batch number. Click OK. Complete the put-away process and review on-
hand by location.
Two batches now show in one location. This is because you’ve allowed mixed batches as per the location profile setting.
72
Warehouse Management System Implementation Guide
White paper
2.3.7 Purchase returns
To process purchase returns, in this case study you’ll set up an “Anomaly” location on the warehouse floor, which is to be used for all
inventory that is awaiting returns, awaiting some kind of inspection, or needs an action associated to it. The next section shows
several ways in which to handle inventory that is considered unsaleable and requires attention or return to the supplier.
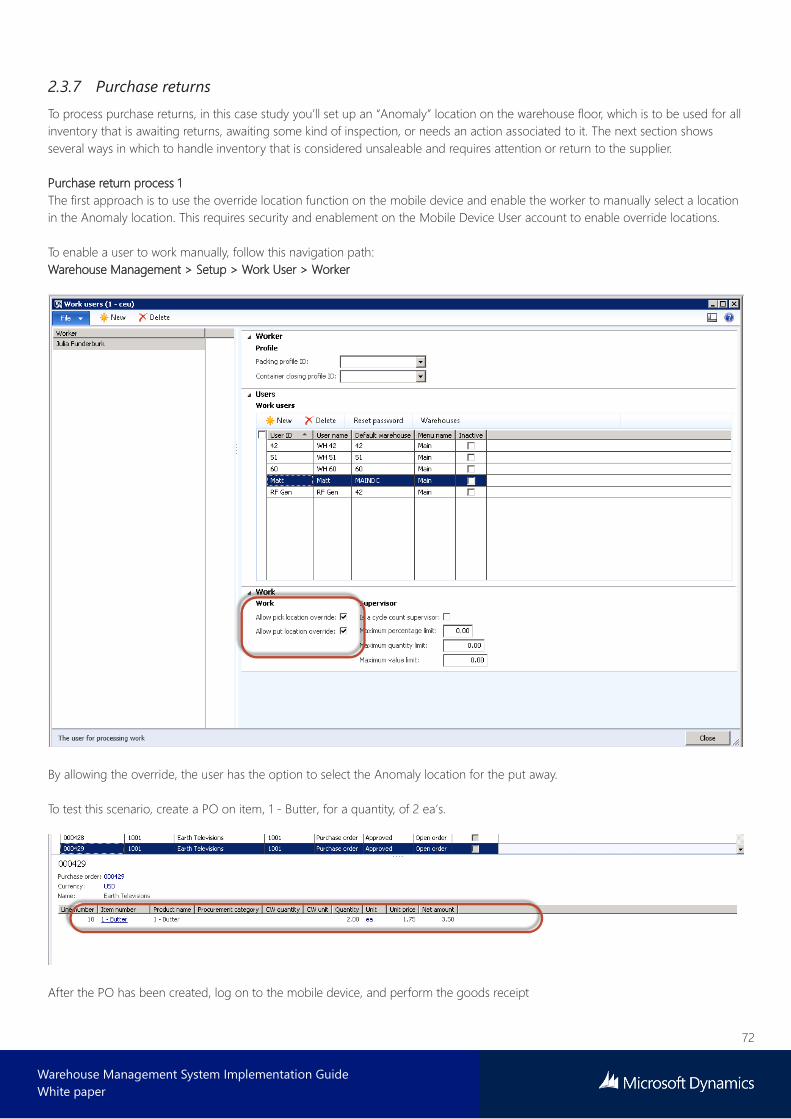
Purchase return process 1
The first approach is to use the override location function on the mobile device and enable the worker to manually select a location
in the Anomaly location. This requires security and enablement on the Mobile Device User account to enable override locations.
To enable a user to work manually, follow this navigation path:
Warehouse Management > Setup > Work User > Worker
By allowing the override, the user has the option to select the Anomaly location for the put away.
To test this scenario, create a PO on item, 1 - Butter, for a quantity, of 2 ea’s.
After the PO has been created, log on to the mobile device, and perform the goods receipt

73
Warehouse Management System Implementation Guide
White paper
Click OK to enter the license plate.
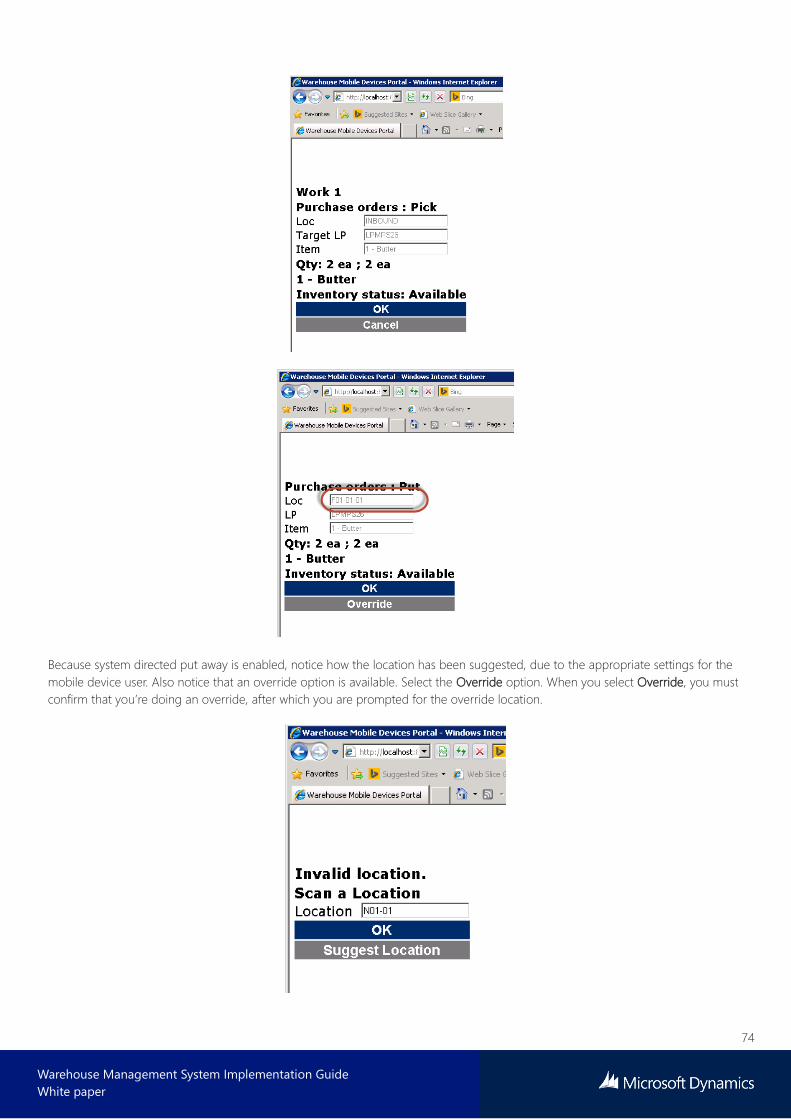
Go to process the put-away.
74
Warehouse Management System Implementation Guide
White paper
Because system directed put away is enabled, notice how the location has been suggested, due to the appropriate settings for the
mobile device user. Also notice that an override option is available. Select the Override option. When you select Override, you must
confirm that you’re doing an override, after which you are prompted for the override location.

75
Warehouse Management System Implementation Guide
White paper
Notice that the anomaly location, N01-01, has been suggested. Complete the put away and now the inventory has been stored in
the N01-01 location.
You’re now ready to process the purchase return to the vendor.
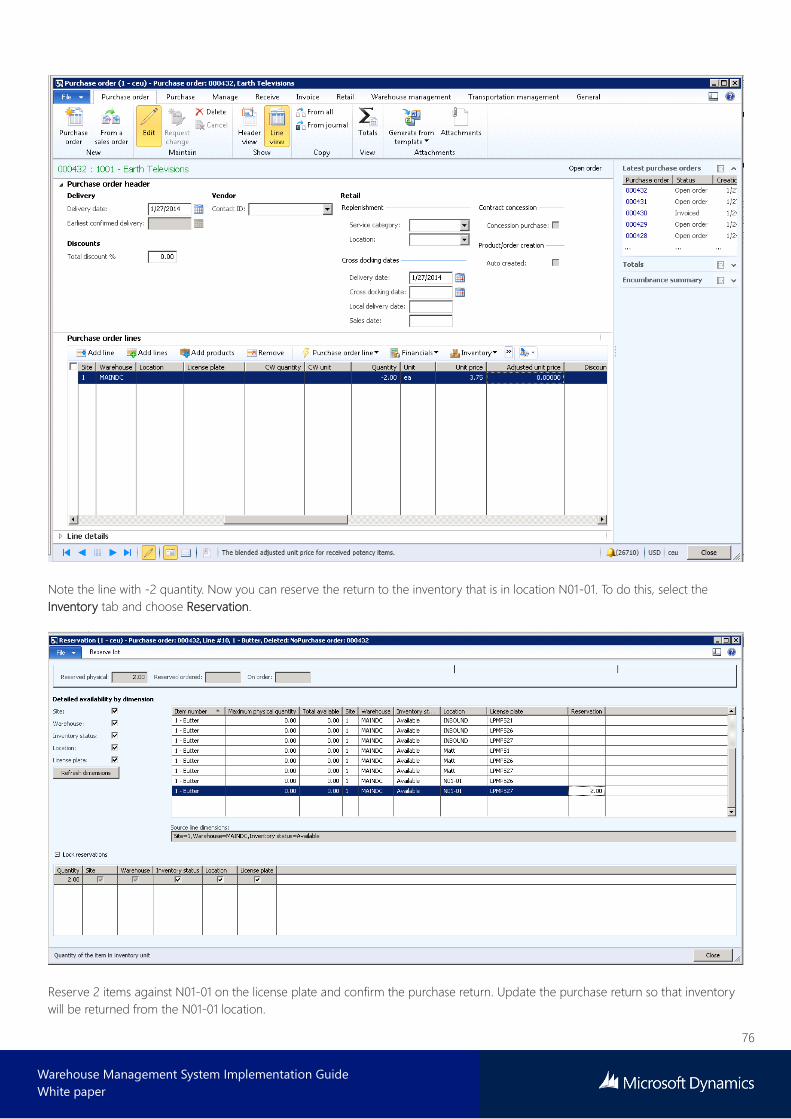
Create a PO return for the item, 1 – Butter, with a quantity of -2.
76
Warehouse Management System Implementation Guide
White paper
Note the line with -2 quantity. Now you can reserve the return to the inventory that is in location N01-01. To do this, select the
Inventory tab and choose Reservation.
Reserve 2 items against N01-01 on the license plate and confirm the purchase return. Update the purchase return so that inventory
will be returned from the N01-01 location.
77
Warehouse Management System Implementation Guide
White paper
2.3.8 Cycle counting
Warehouse Management can create cycle counting work. Cycle count work is its own “type” of work which can be executed through
the mobile device and verified through the client. Depending on the configuration, there are different ways to create and execute
cycle counting work in order to verify a warehouse’s inventory.
Threshold cycle counting
One way to create cycle count work is by using thresholds. As warehouse workers execute picking work in the warehouse, if a
threshold is met it will automatically create cycle count work for that location in the warehouse.
To set up thresholds, follow this navigation path:
Warehouse Management > Setup > Cycle Counting > Cycle Count Thresholds
Each threshold can be configured by using item and location queries, which are evaluated during the execution of picking work.
The threshold itself can be one of two types: either a straightforward check on a Quantity/UOM combination, or a volumetric
percentage check. If the inventory falls below this threshold when doing picking work, and the last counted date on the location falls
outside of the days between setup on the threshold, cycle count work will be created. There is also the option to have the
warehouse worker execute the cycle count work immediately after the threshold is achieved.
2.3.9 Threshold quantity - case study continued
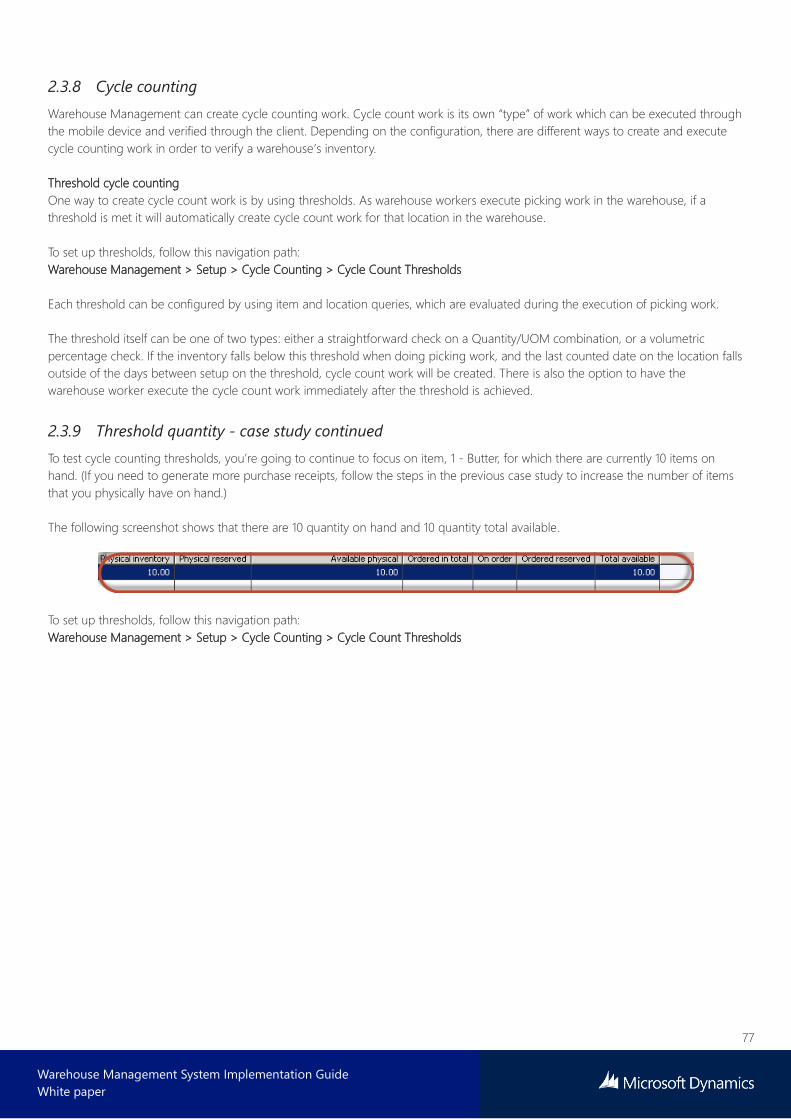
To test cycle counting thresholds, you’re going to continue to focus on item, 1 - Butter, for which there are currently 10 items on
hand. (If you need to generate more purchase receipts, follow the steps in the previous case study to increase the number of items
that you physically have on hand.)
The following screenshot shows that there are 10 quantity on hand and 10 quantity total available.
To set up thresholds, follow this navigation path:
Warehouse Management > Setup > Cycle Counting > Cycle Count Thresholds

78
Warehouse Management System Implementation Guide
White paper
1. Enter the Cycle counting threshold ID.
2. Enter a description.
3. In the Threshold quantity field, enter 4.
4. In the Unit field, enter ea as an abbreviation for the unit of measure.
5. Do not include a capacity threshold percentage.
6. In the Cycle counting threshold type field, select Quantity.
7. Select Process cycle counting immediately.
8. Set Days between cycle counting to 0.
9. Select the items or the query which this cycle count code will apply to.
10. On the menu, select Select items.
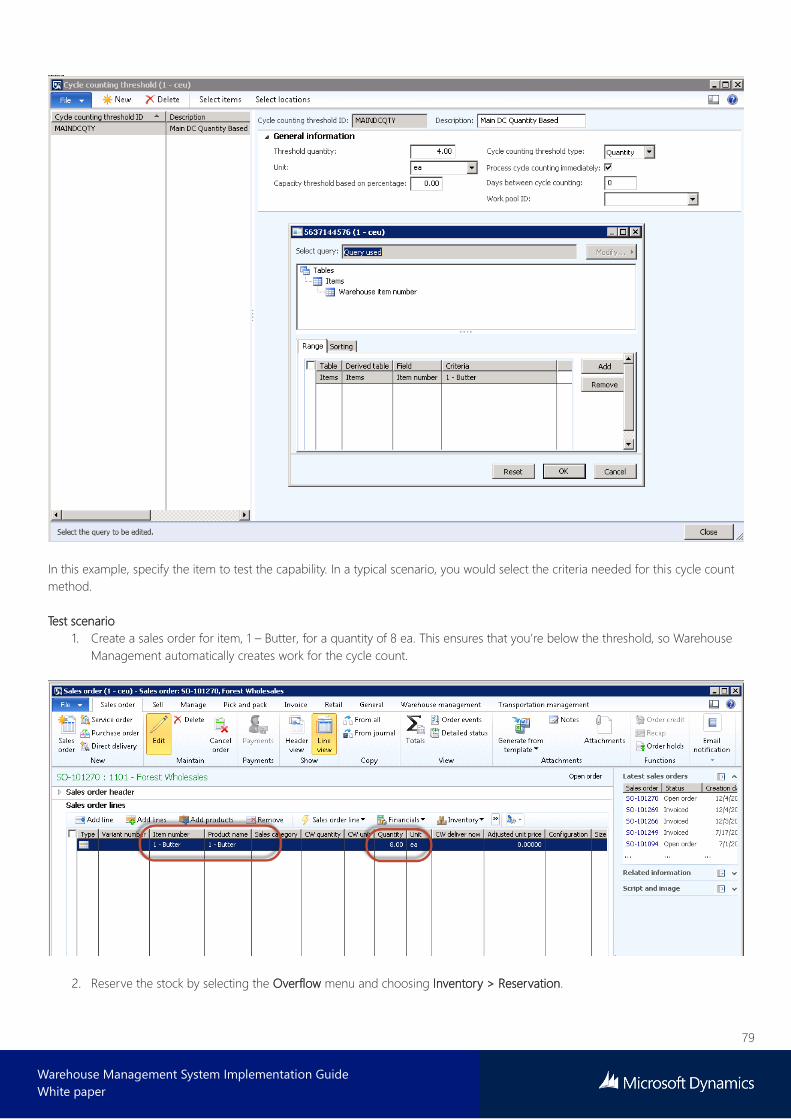
79
Warehouse Management System Implementation Guide
White paper
In this example, specify the item to test the capability. In a typical scenario, you would select the criteria needed for this cycle count
method.
Test scenario
1. Create a sales order for item, 1 – Butter, for a quantity of 8 ea. This ensures that you’re below the threshold, so Warehouse
Management automatically creates work for the cycle count.
2. Reserve the stock by selecting the Overflow menu and choosing Inventory > Reservation.
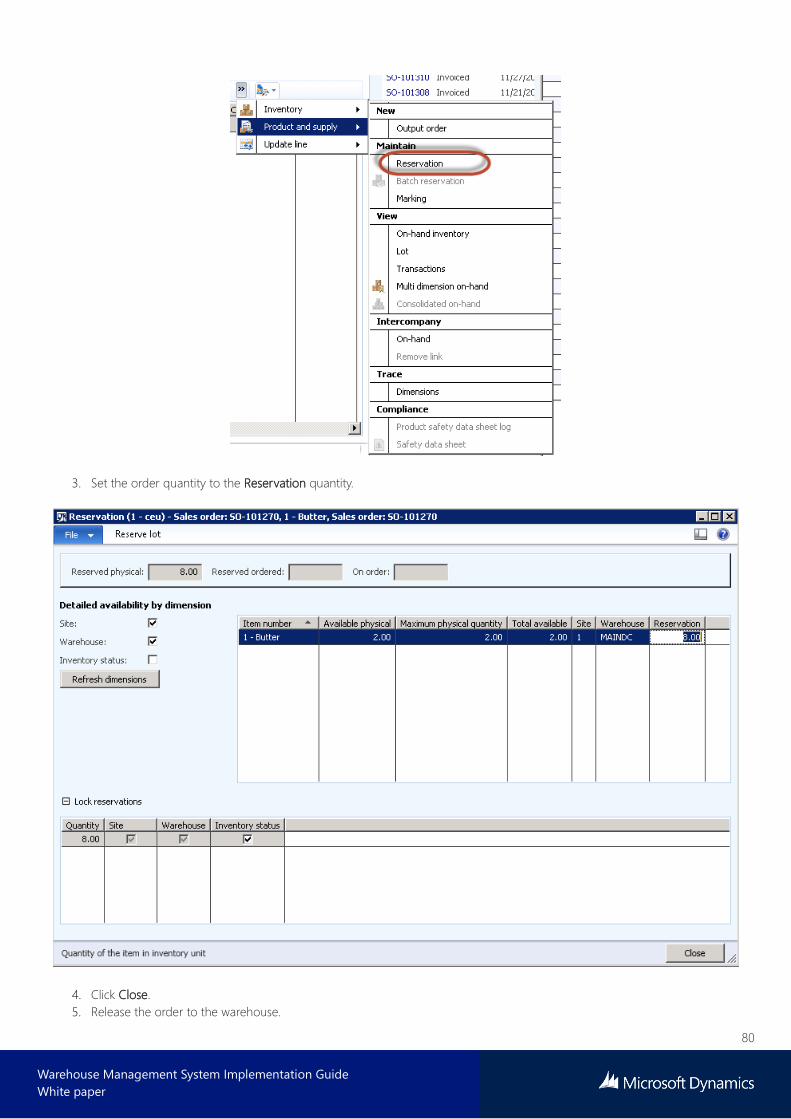
80
Warehouse Management System Implementation Guide
White paper
3. Set the order quantity to the Reservation quantity.
4. Click Close.
5. Release the order to the warehouse.
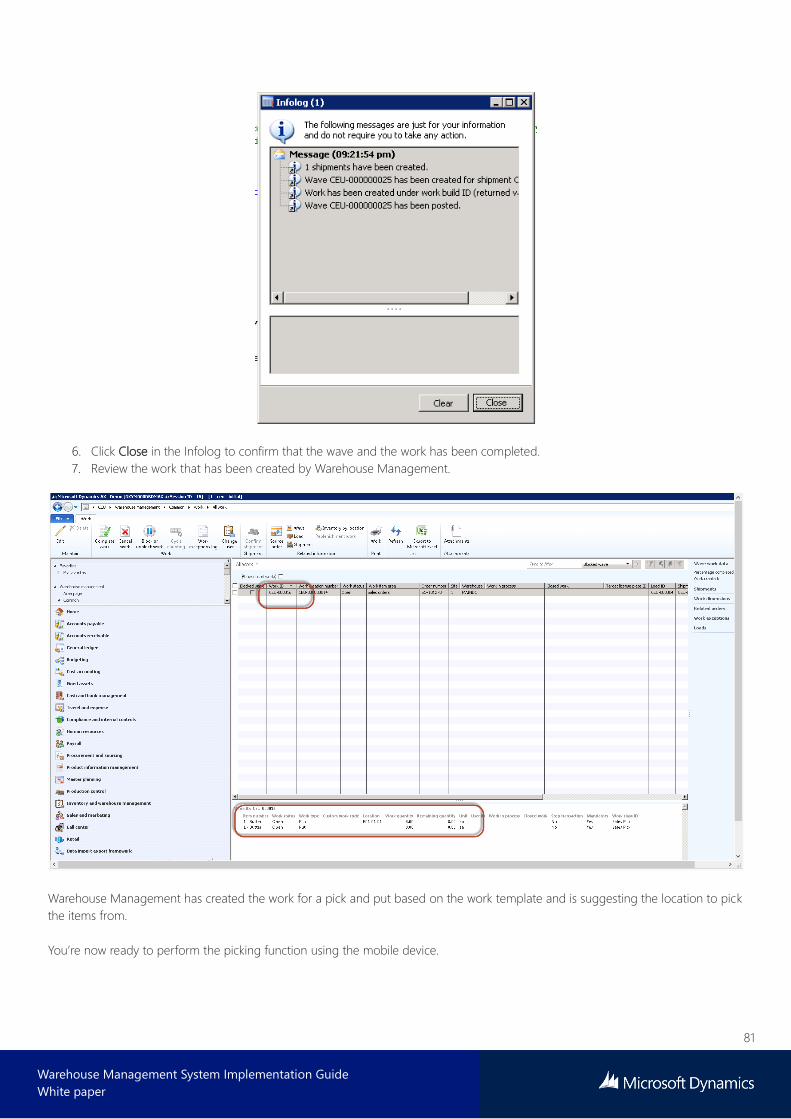
81
Warehouse Management System Implementation Guide
White paper
6. Click Close in the Infolog to confirm that the wave and the work has been completed.
7. Review the work that has been created by Warehouse Management.
Warehouse Management has created the work for a pick and put based on the work template and is suggesting the location to pick
the items from.
You’re now ready to perform the picking function using the mobile device.
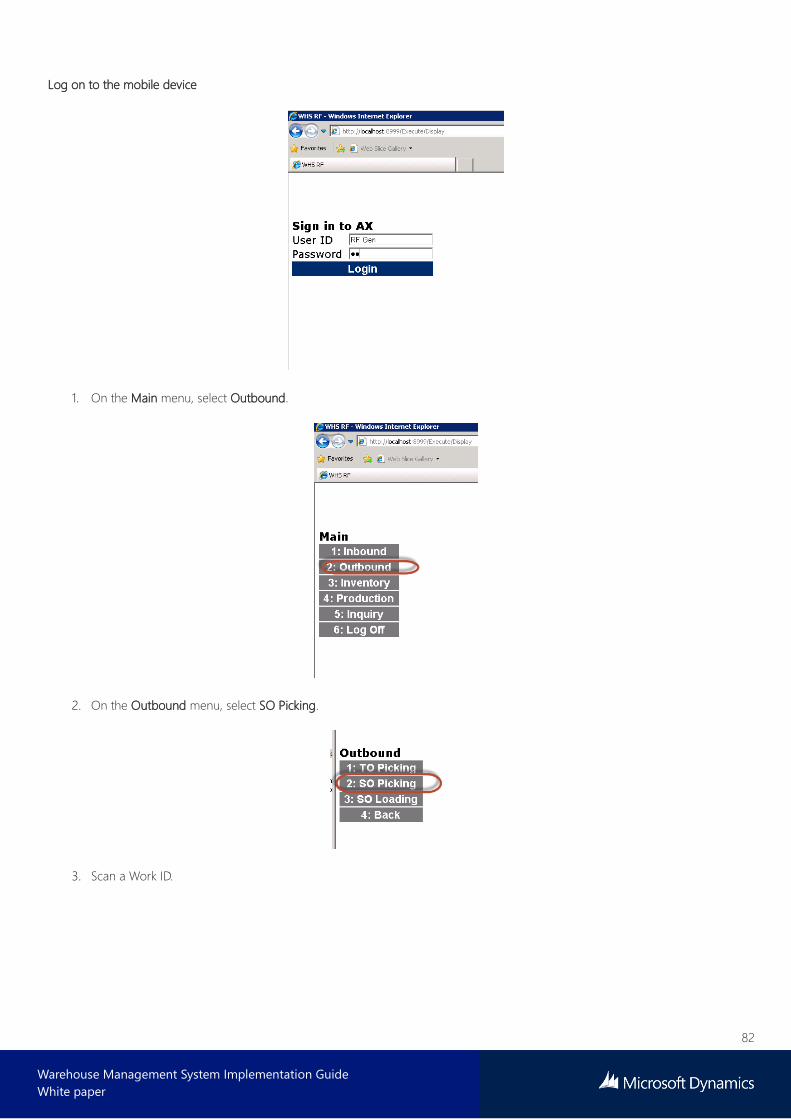
82
Warehouse Management System Implementation Guide
White paper
Log on to the mobile device
1. On the Main menu, select Outbound.
2. On the Outbound menu, select SO Picking.
3. Scan a Work ID.
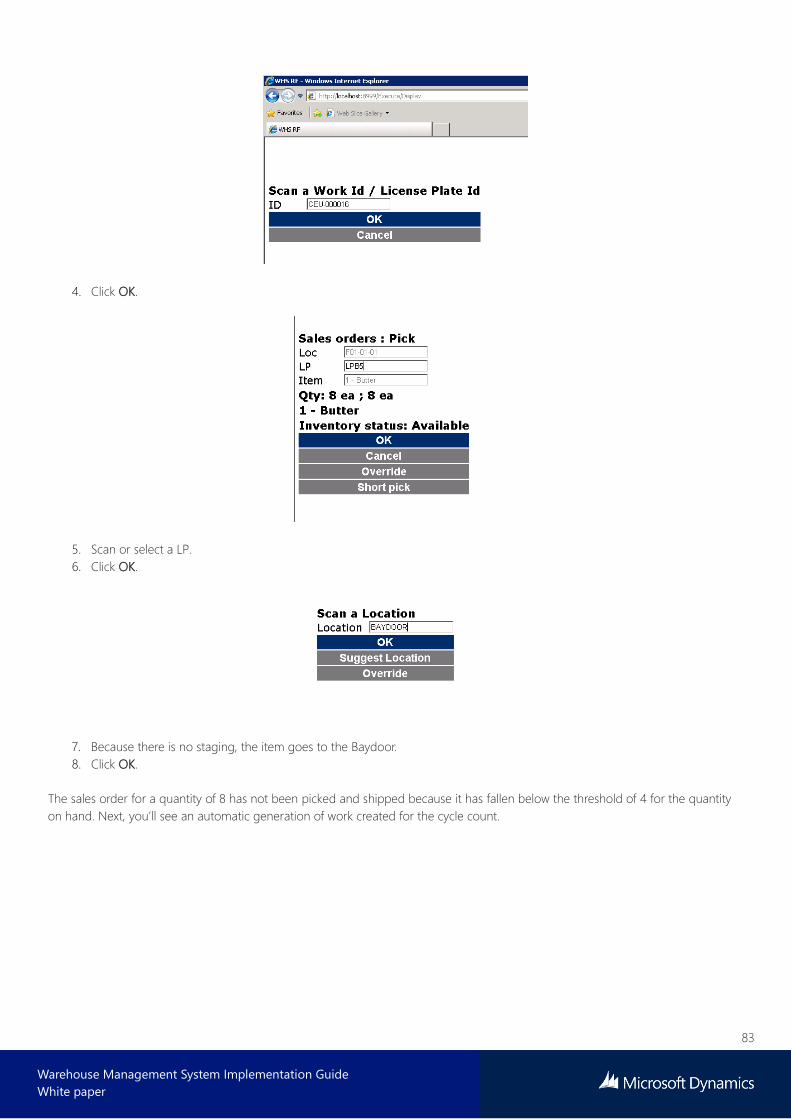
83
Warehouse Management System Implementation Guide
White paper
4. Click OK.
5. Scan or select a LP.
6. Click OK.
7. Because there is no staging, the item goes to the Baydoor.
8. Click OK.
The sales order for a quantity of 8 has not been picked and shipped because it has fallen below the threshold of 4 for the quantity
on hand. Next, you’ll see an automatic generation of work created for the cycle count.
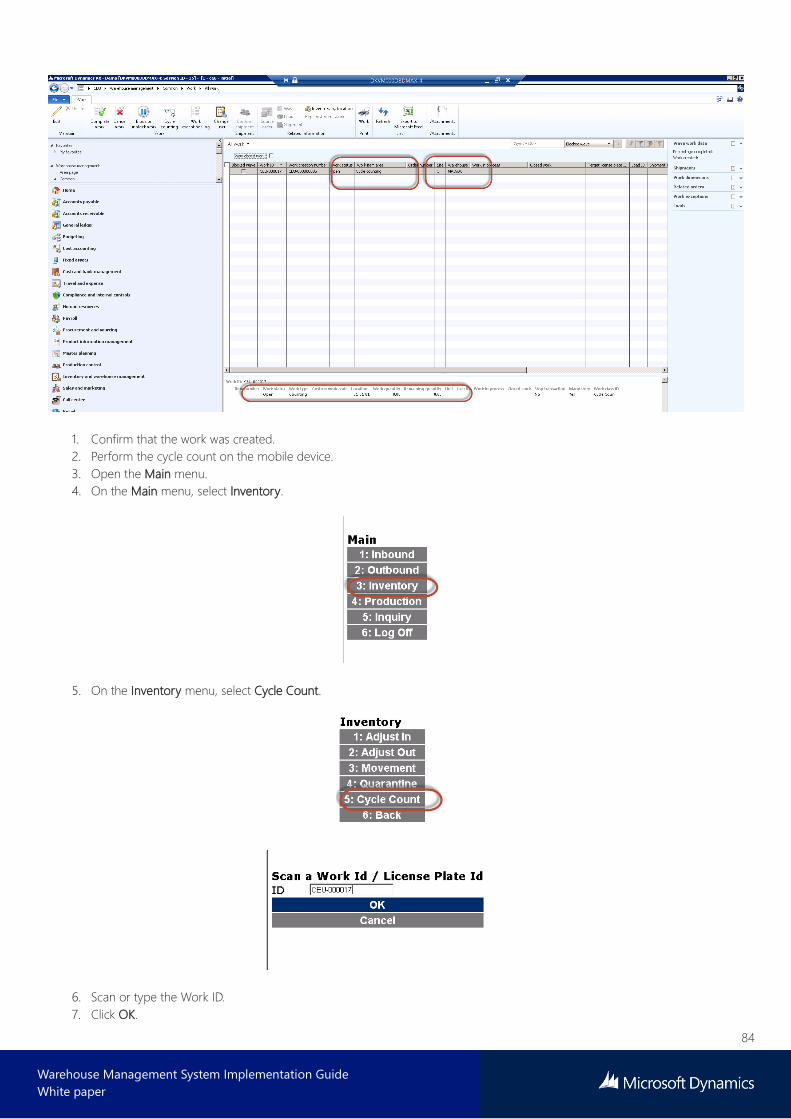
84
Warehouse Management System Implementation Guide
White paper
1. Confirm that the work was created.
2. Perform the cycle count on the mobile device.
3. Open the Main menu.
4. On the Main menu, select Inventory.
5. On the Inventory menu, select Cycle Count.
6. Scan or type the Work ID.
7. Click OK.

85
Warehouse Management System Implementation Guide
White paper
In this example, there were 10 Items. A pick for 8 items was processed from the sales order, and the quantity on hand is now 2.
Assume there are actually 3 items on hand, so enter a quantity of 3 as being counted.
A message displays on the mobile device stating that the current on hand quantity does not equal the counted quantity. This is a
configuration setting that can be changed on the mobile device menu. To change this, go to Warehouse Management > Setup >
Mobile Device > Mobile Device Menu Items. Select the Menu item name for cycle count, and then select Cycle Counting. Determine
the number of times that you want the user to confirm the count.
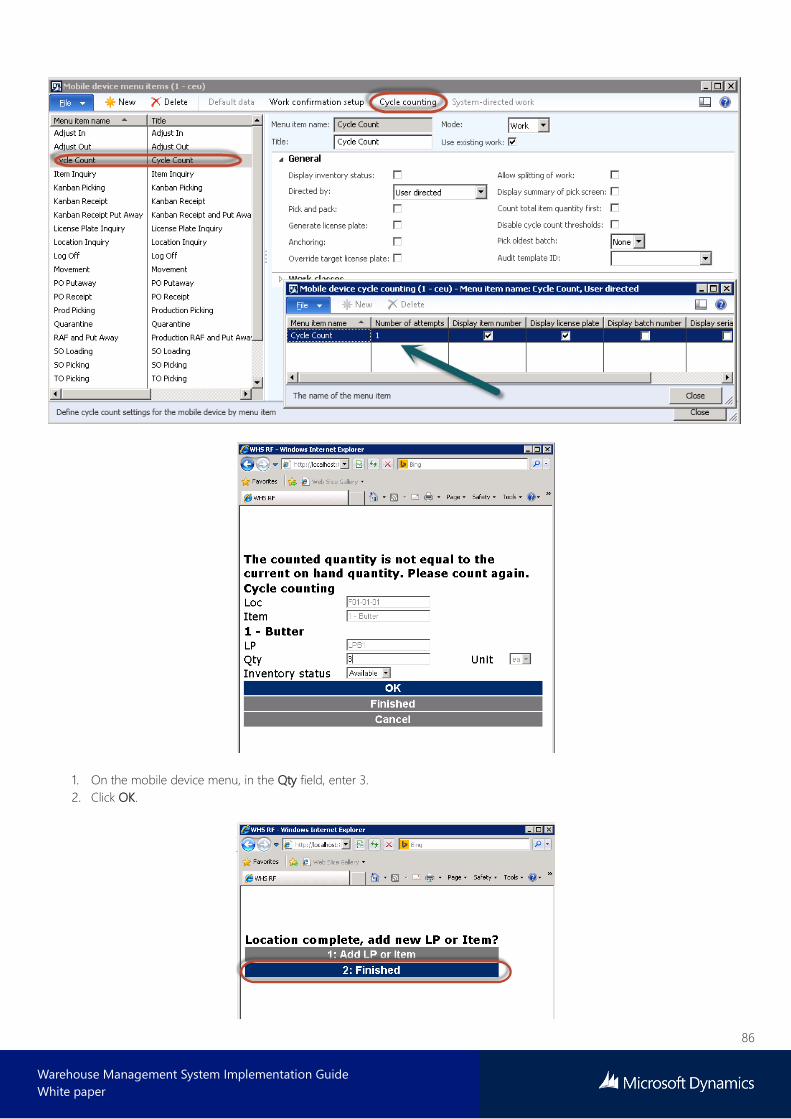
86
Warehouse Management System Implementation Guide
White paper
1. On the mobile device menu, in the Qty field, enter 3.
2. Click OK.
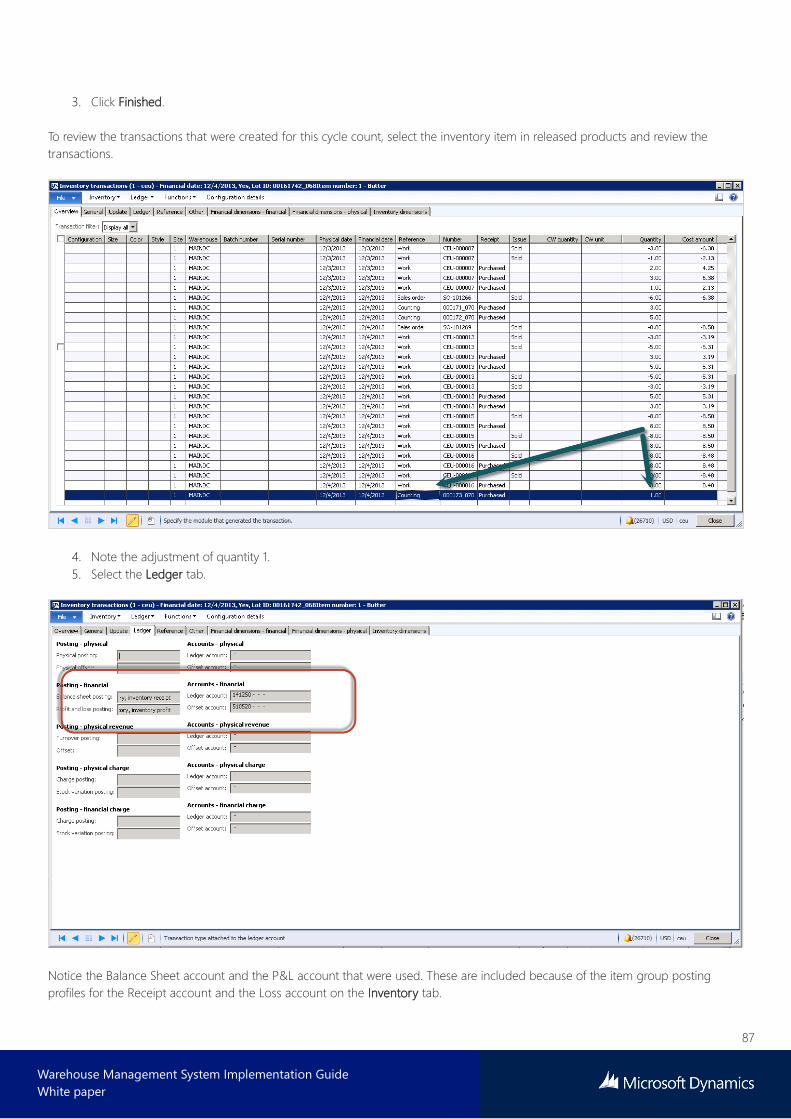
87
Warehouse Management System Implementation Guide
White paper
3. Click Finished.
To review the transactions that were created for this cycle count, select the inventory item in released products and review the
transactions.
4. Note the adjustment of quantity 1.
5. Select the Ledger tab.
Notice the Balance Sheet account and the P&L account that were used. These are included because of the item group posting
profiles for the Receipt account and the Loss account on the Inventory tab.

88
Warehouse Management System Implementation Guide
White paper
2.3.10 Capacity threshold cycle counting - case study continued
The second option available for cycle counting is the capacity threshold cycle count. The testing process is like the previous case
study.
1. Create a new cycle count threshold. This time, enter 60 in the Capacity threshold based on percentage field.
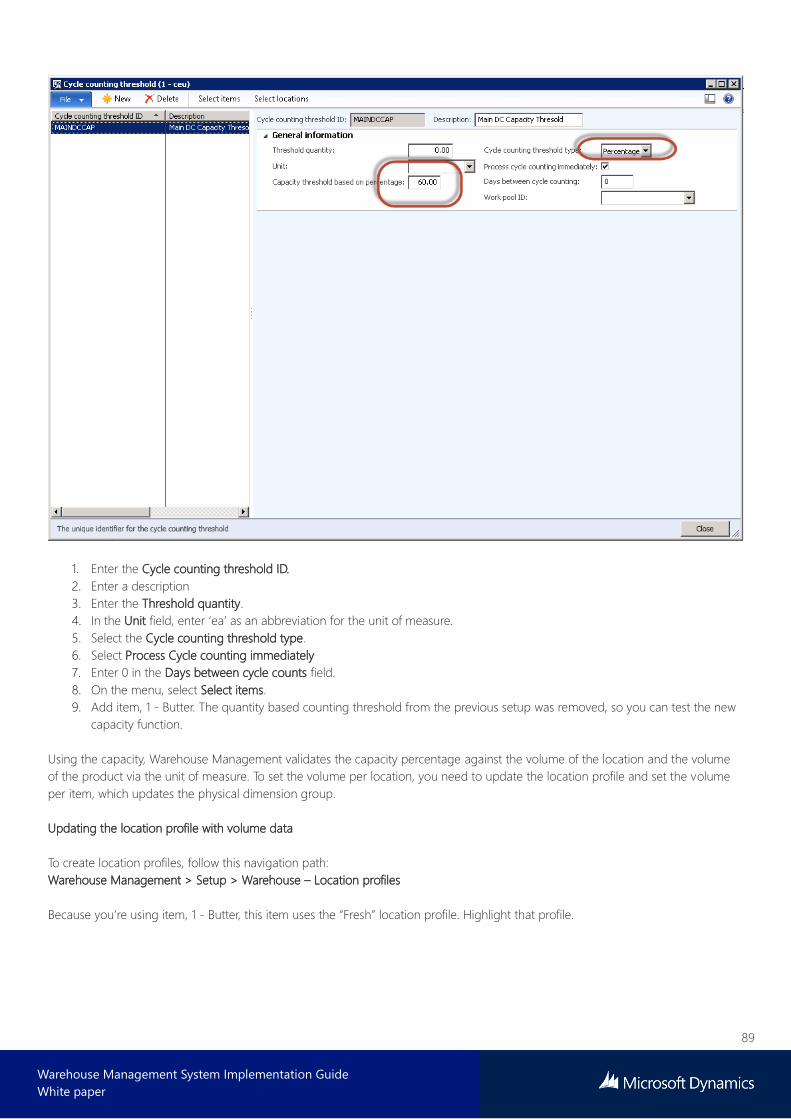
89
Warehouse Management System Implementation Guide
White paper
1. Enter the Cycle counting threshold ID.
2. Enter a description
3. Enter the Threshold quantity.
4. In the Unit field, enter ‘ea’ as an abbreviation for the unit of measure.
5. Select the Cycle counting threshold type.
6. Select Process Cycle counting immediately
7. Enter 0 in the Days between cycle counts field.
8. On the menu, select Select items.
9. Add item, 1 - Butter. The quantity based counting threshold from the previous setup was removed, so you can test the new
capacity function.
Using the capacity, Warehouse Management validates the capacity percentage against the volume of the location and the volume
of the product via the unit of measure. To set the volume per location, you need to update the location profile and set the volume
per item, which updates the physical dimension group.
Updating the location profile with volume data
To create location profiles, follow this navigation path:
Warehouse Management > Setup > Warehouse – Location profiles
Because you’re using item, 1 - Butter, this item uses the “Fresh” location profile. Highlight that profile.
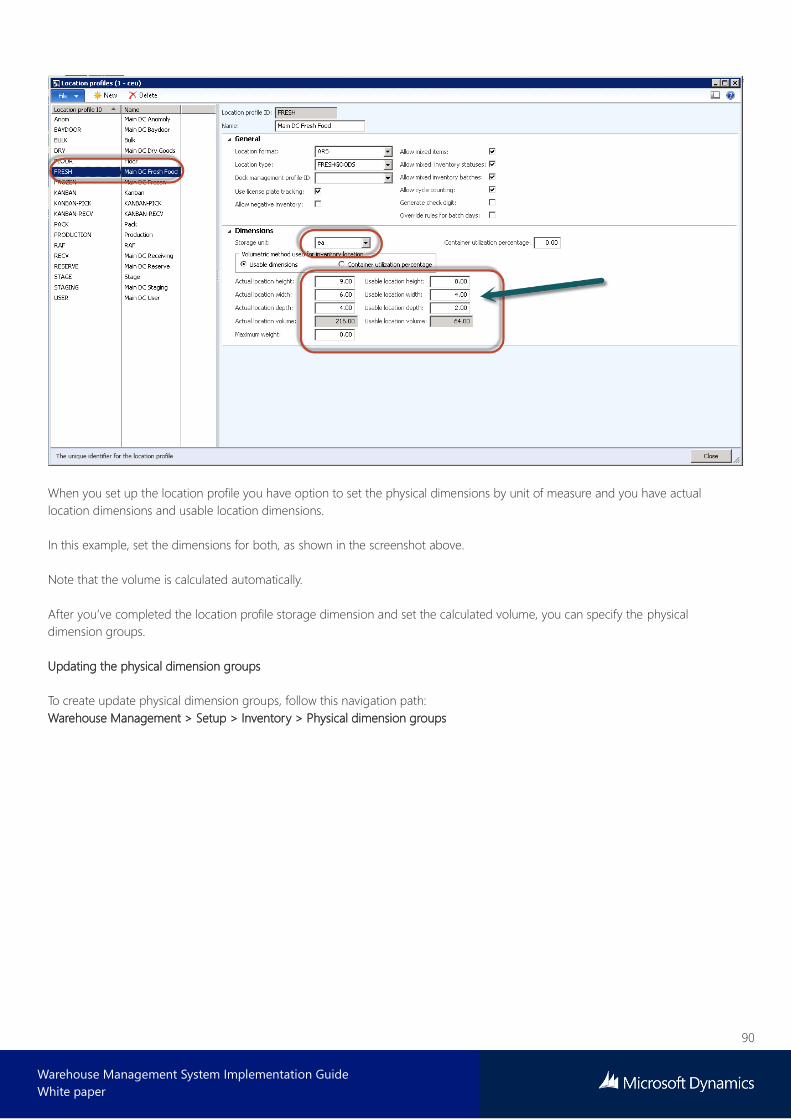
90
Warehouse Management System Implementation Guide
White paper
When you set up the location profile you have option to set the physical dimensions by unit of measure and you have actual
location dimensions and usable location dimensions.
In this example, set the dimensions for both, as shown in the screenshot above.
Note that the volume is calculated automatically.
After you’ve completed the location profile storage dimension and set the calculated volume, you can specify the physical
dimension groups.
Updating the physical dimension groups
To create update physical dimension groups, follow this navigation path:
Warehouse Management > Setup > Inventory > Physical dimension groups

91
Warehouse Management System Implementation Guide
White paper
The screenshot shows the height, width, and depth of the inventory item. If you compare that to the location profile, this example
shows that two items will display the location.
The final step of setup is to attach this Physical dimension group to the item, 1 - Butter.
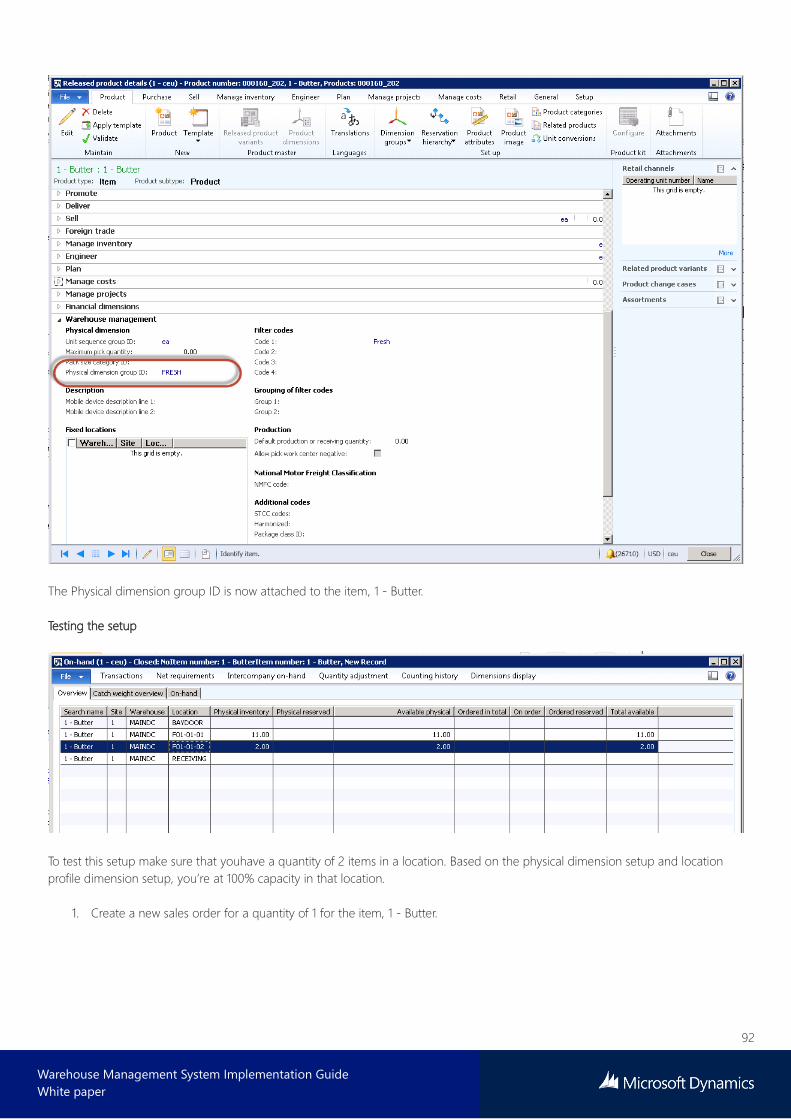
92
Warehouse Management System Implementation Guide
White paper
The Physical dimension group ID is now attached to the item, 1 - Butter.
Testing the setup
To test this setup make sure that youhave a quantity of 2 items in a location. Based on the physical dimension setup and location
profile dimension setup, you’re at 100% capacity in that location.
1. Create a new sales order for a quantity of 1 for the item, 1 - Butter.
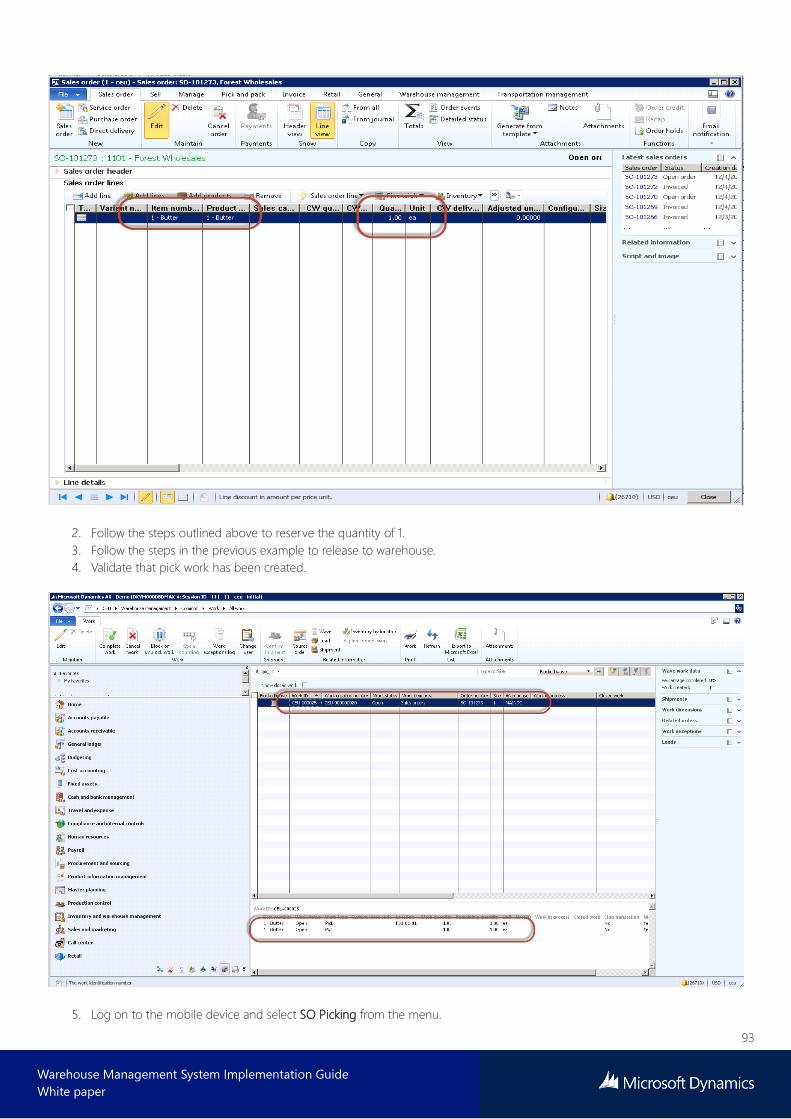
93
Warehouse Management System Implementation Guide
White paper
2. Follow the steps outlined above to reserve the quantity of 1.
3. Follow the steps in the previous example to release to warehouse.
4. Validate that pick work has been created.
5. Log on to the mobile device and select SO Picking from the menu.
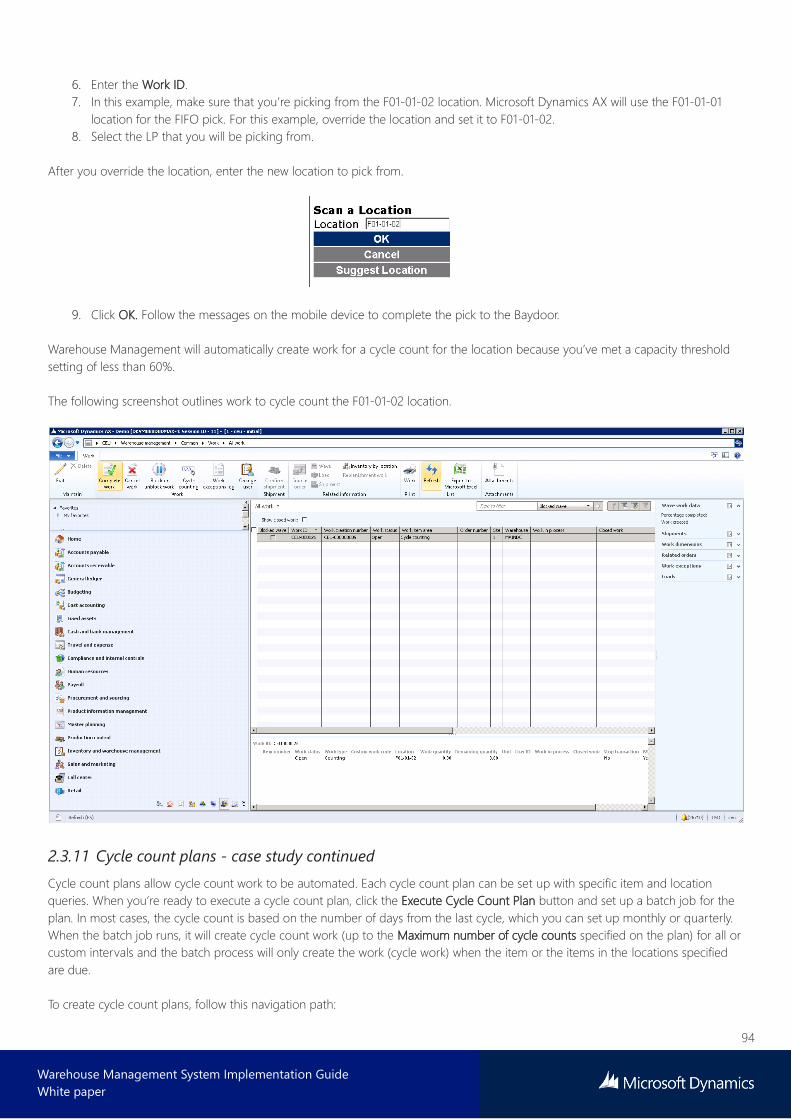
94
Warehouse Management System Implementation Guide
White paper
6. Enter the Work ID.
7. In this example, make sure that you’re picking from the F01-01-02 location. Microsoft Dynamics AX will use the F01-01-01
location for the FIFO pick. For this example, override the location and set it to F01-01-02.
8. Select the LP that you will be picking from.
After you override the location, enter the new location to pick from.
9. Click OK. Follow the messages on the mobile device to complete the pick to the Baydoor.
Warehouse Management will automatically create work for a cycle count for the location because you’ve met a capacity threshold
setting of less than 60%.
The following screenshot outlines work to cycle count the F01-01-02 location.
2.3.11 Cycle count plans - case study continued
Cycle count plans allow cycle count work to be automated. Each cycle count plan can be set up with specific item and location
queries. When you’re ready to execute a cycle count plan, click the Execute Cycle Count Plan button and set up a batch job for the
plan. In most cases, the cycle count is based on the number of days from the last cycle, which you can set up monthly or quarterly.
When the batch job runs, it will create cycle count work (up to the Maximum number of cycle counts specified on the plan) for all or
custom intervals and the batch process will only create the work (cycle work) when the item or the items in the locations specified
are due.
To create cycle count plans, follow this navigation path:
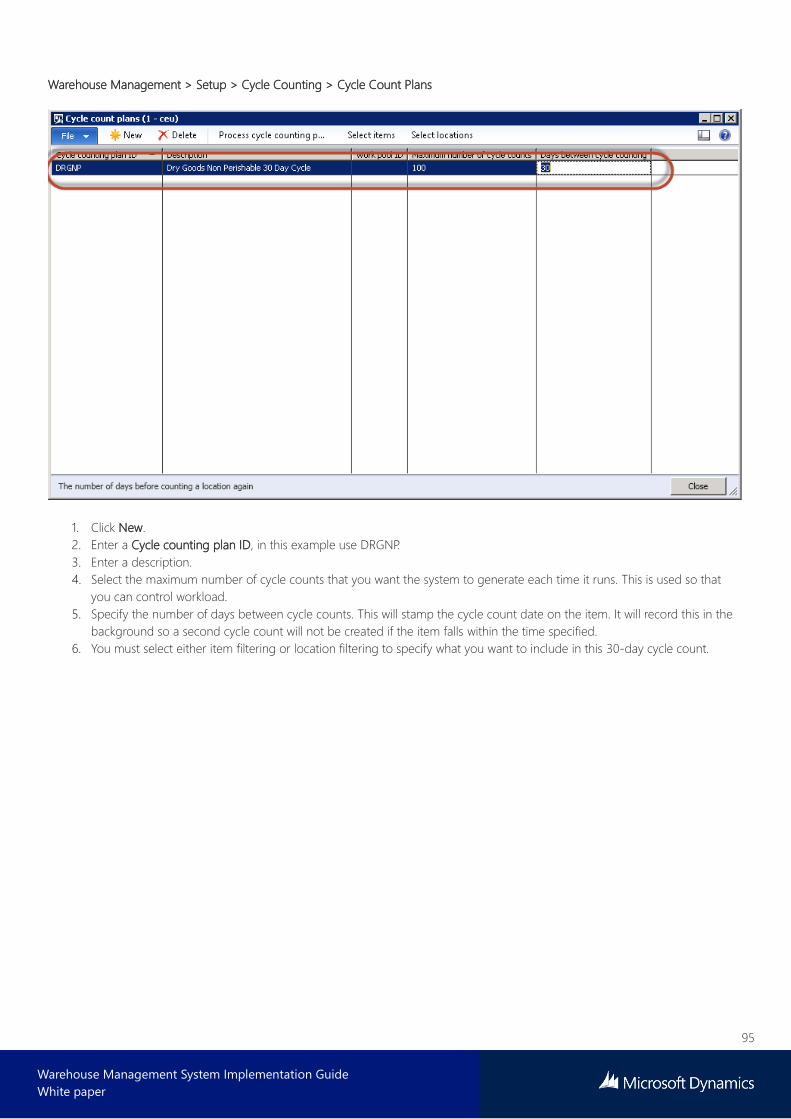
95
Warehouse Management System Implementation Guide
White paper
Warehouse Management > Setup > Cycle Counting > Cycle Count Plans
1. Click New.
2. Enter a Cycle counting plan ID, in this example use DRGNP.
3. Enter a description.
4. Select the maximum number of cycle counts that you want the system to generate each time it runs. This is used so that
you can control workload.
5. Specify the number of days between cycle counts. This will stamp the cycle count date on the item. It will record this in the
background so a second cycle count will not be created if the item falls within the time specified.
6. You must select either item filtering or location filtering to specify what you want to include in this 30-day cycle count.
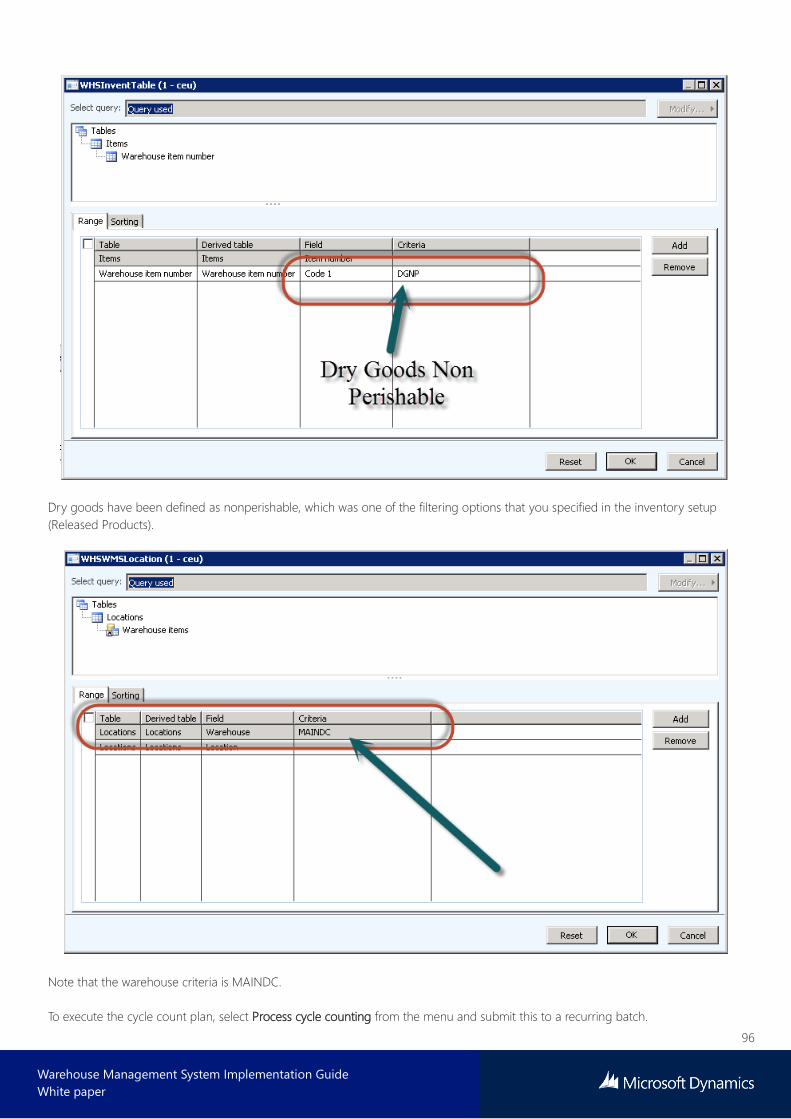
96
Warehouse Management System Implementation Guide
White paper
Dry goods have been defined as nonperishable, which was one of the filtering options that you specified in the inventory setup
(Released Products).
Note that the warehouse criteria is MAINDC.
To execute the cycle count plan, select Process cycle counting from the menu and submit this to a recurring batch.
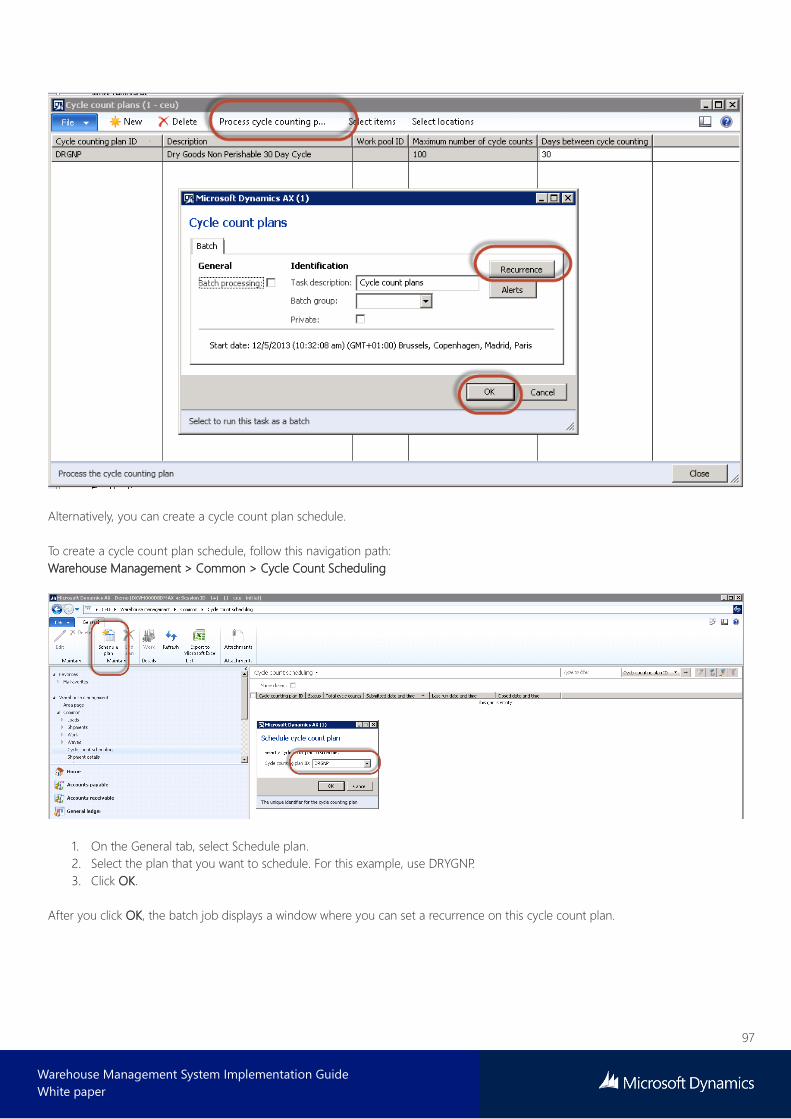
97
Warehouse Management System Implementation Guide
White paper
Alternatively, you can create a cycle count plan schedule.
To create a cycle count plan schedule, follow this navigation path:
Warehouse Management > Common > Cycle Count Scheduling
1. On the General tab, select Schedule plan.
2. Select the plan that you want to schedule. For this example, use DRYGNP.
3. Click OK.
After you click OK, the batch job displays a window where you can set a recurrence on this cycle count plan.
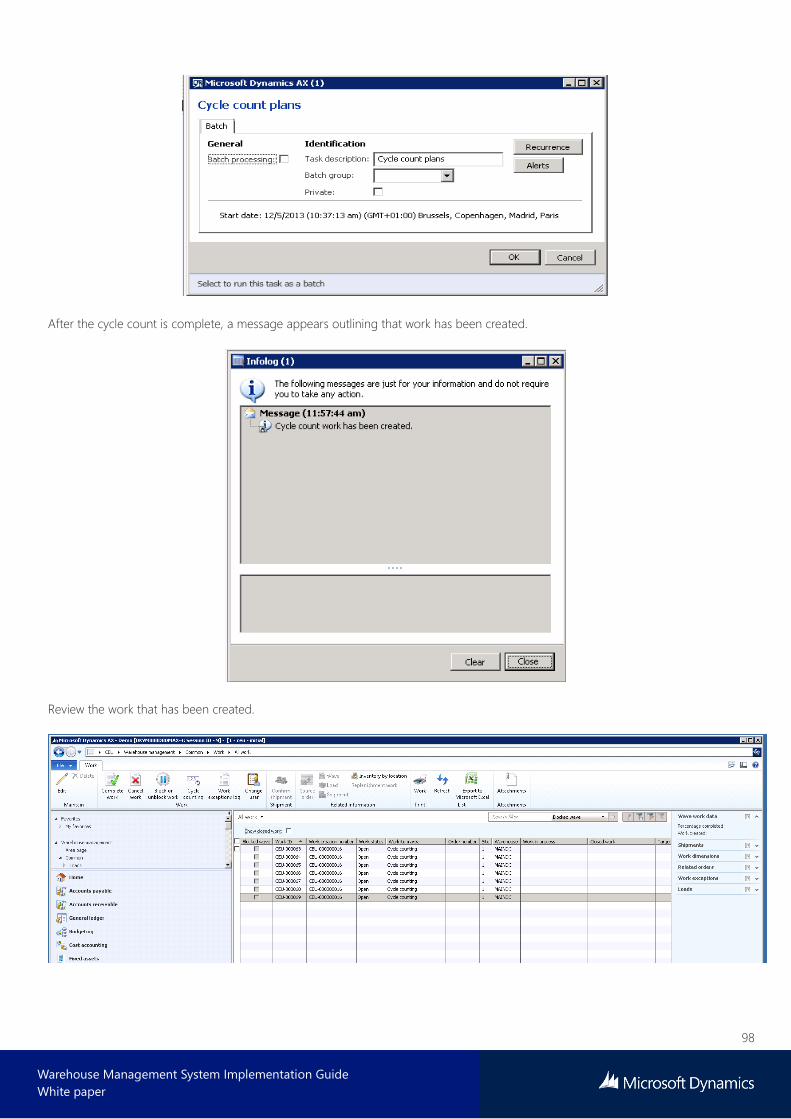
98
Warehouse Management System Implementation Guide
White paper
After the cycle count is complete, a message appears outlining that work has been created.
Review the work that has been created.
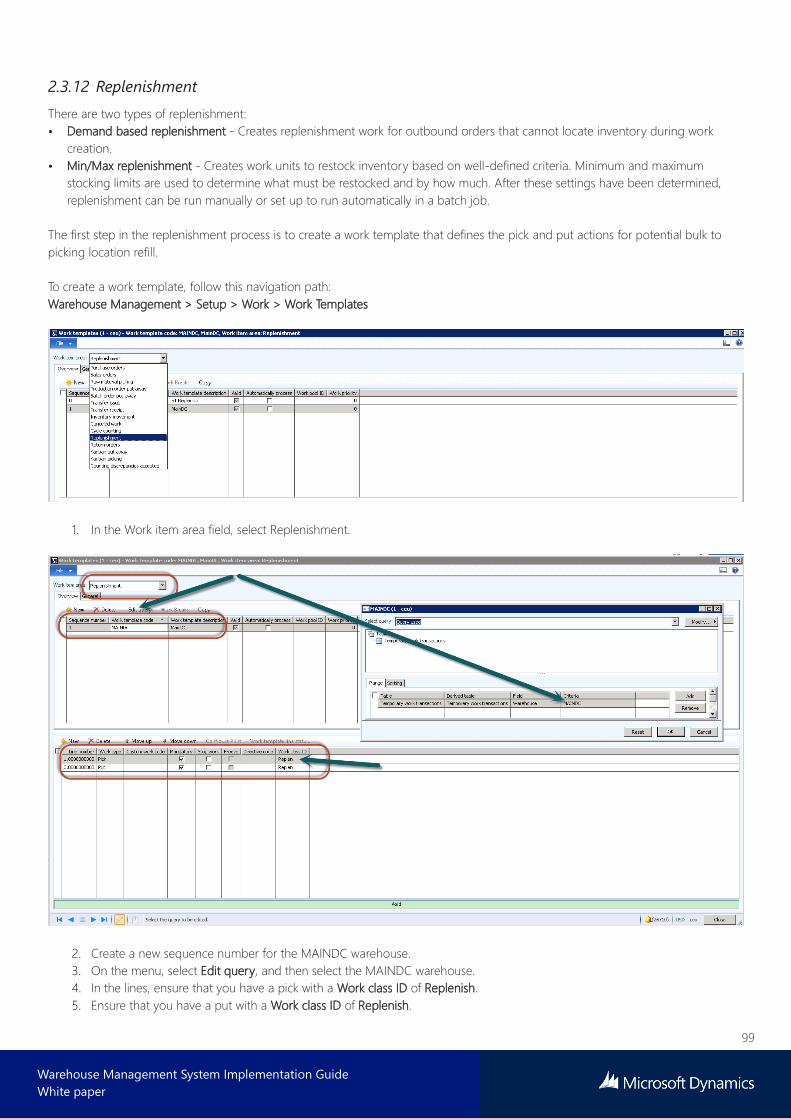
99
Warehouse Management System Implementation Guide
White paper
2.3.12 Replenishment
There are two types of replenishment:
• Demand based replenishment - Creates replenishment work for outbound orders that cannot locate inventory during work
creation.
• Min/Max replenishment - Creates work units to restock inventory based on well-defined criteria. Minimum and maximum
stocking limits are used to determine what must be restocked and by how much. After these settings have been determined,
replenishment can be run manually or set up to run automatically in a batch job.
The first step in the replenishment process is to create a work template that defines the pick and put actions for potential bulk to
picking location refill.
To create a work template, follow this navigation path:
Warehouse Management > Setup > Work > Work Templates
1. In the Work item area field, select Replenishment.
2. Create a new sequence number for the MAINDC warehouse.
3. On the menu, select Edit query, and then select the MAINDC warehouse.
4. In the lines, ensure that you have a pick with a Work class ID of Replenish.
5. Ensure that you have a put with a Work class ID of Replenish.
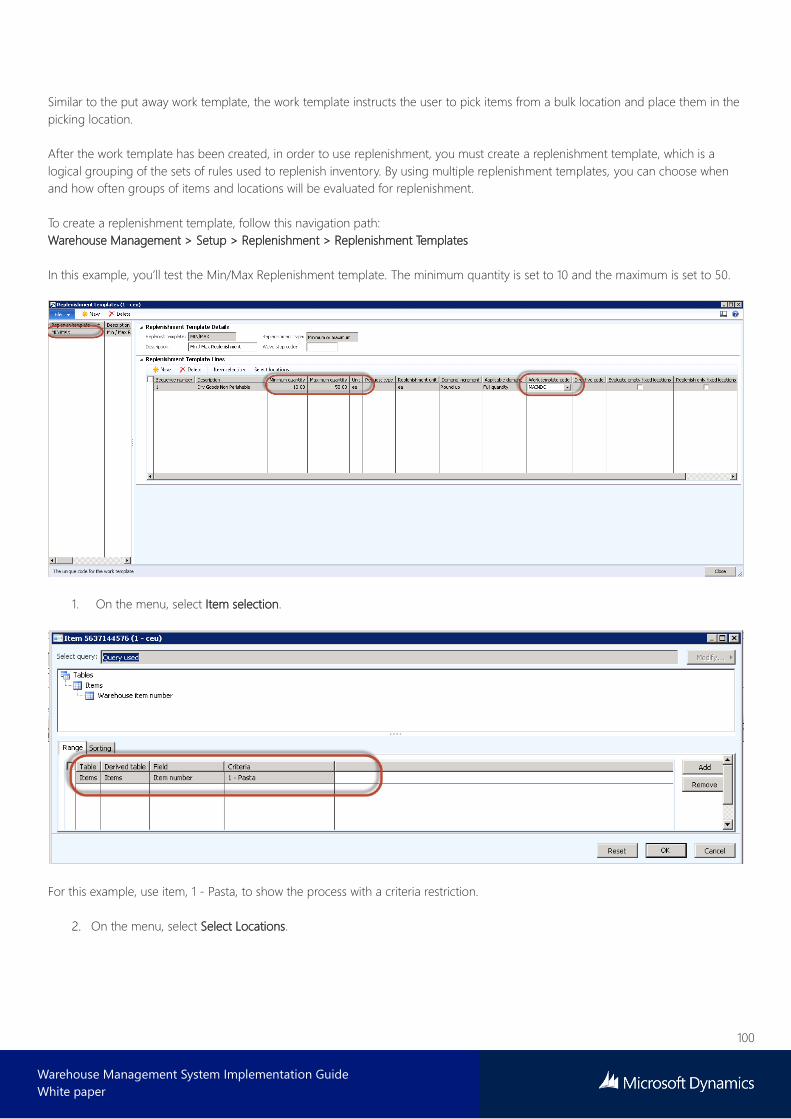
100
Warehouse Management System Implementation Guide
White paper
Similar to the put away work template, the work template instructs the user to pick items from a bulk location and place them in the
picking location.
After the work template has been created, in order to use replenishment, you must create a replenishment template, which is a
logical grouping of the sets of rules used to replenish inventory. By using multiple replenishment templates, you can choose when
and how often groups of items and locations will be evaluated for replenishment.
To create a replenishment template, follow this navigation path:
Warehouse Management > Setup > Replenishment > Replenishment Templates
In this example, you’ll test the Min/Max Replenishment template. The minimum quantity is set to 10 and the maximum is set to 50.
1. On the menu, select Item selection.
For this example, use item, 1 - Pasta, to show the process with a criteria restriction.
2. On the menu, select Select Locations.
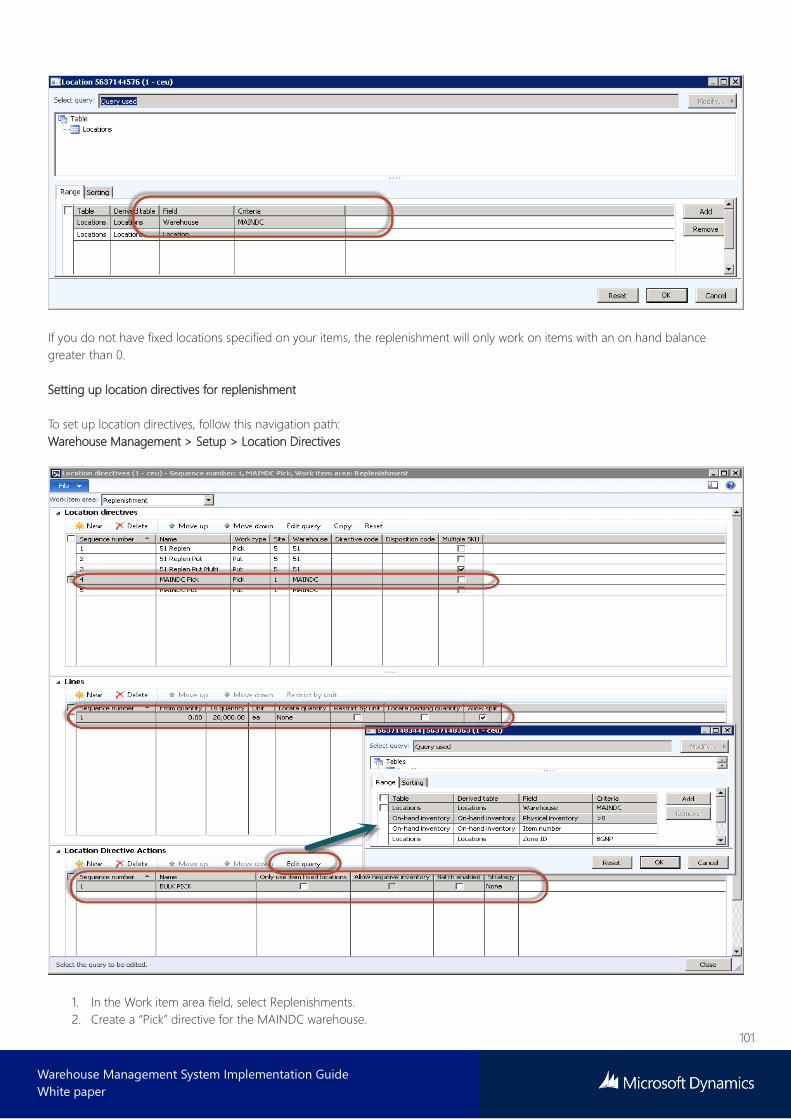
101
Warehouse Management System Implementation Guide
White paper
If you do not have fixed locations specified on your items, the replenishment will only work on items with an on hand balance
greater than 0.
Setting up location directives for replenishment
To set up location directives, follow this navigation path:
Warehouse Management > Setup > Location Directives
1. In the Work item area field, select Replenishments.
2. Create a “Pick” directive for the MAINDC warehouse.
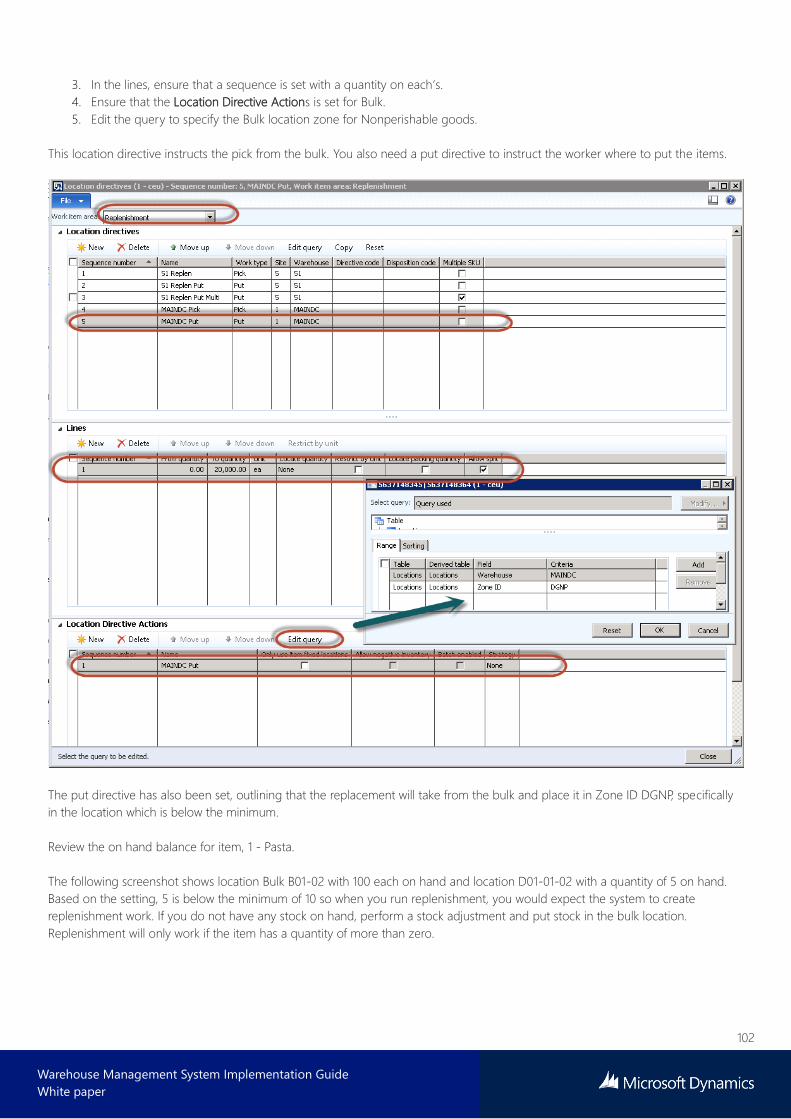
102
Warehouse Management System Implementation Guide
White paper
3. In the lines, ensure that a sequence is set with a quantity on each’s.
4. Ensure that the Location Directive Actions is set for Bulk.
5. Edit the query to specify the Bulk location zone for Nonperishable goods.
This location directive instructs the pick from the bulk. You also need a put directive to instruct the worker where to put the items.
The put directive has also been set, outlining that the replacement will take from the bulk and place it in Zone ID DGNP, specifically
in the location which is below the minimum.
Review the on hand balance for item, 1 - Pasta.
The following screenshot shows location Bulk B01-02 with 100 each on hand and location D01-01-02 with a quantity of 5 on hand.
Based on the setting, 5 is below the minimum of 10 so when you run replenishment, you would expect the system to create
replenishment work. If you do not have any stock on hand, perform a stock adjustment and put stock in the bulk location.
Replenishment will only work if the item has a quantity of more than zero.
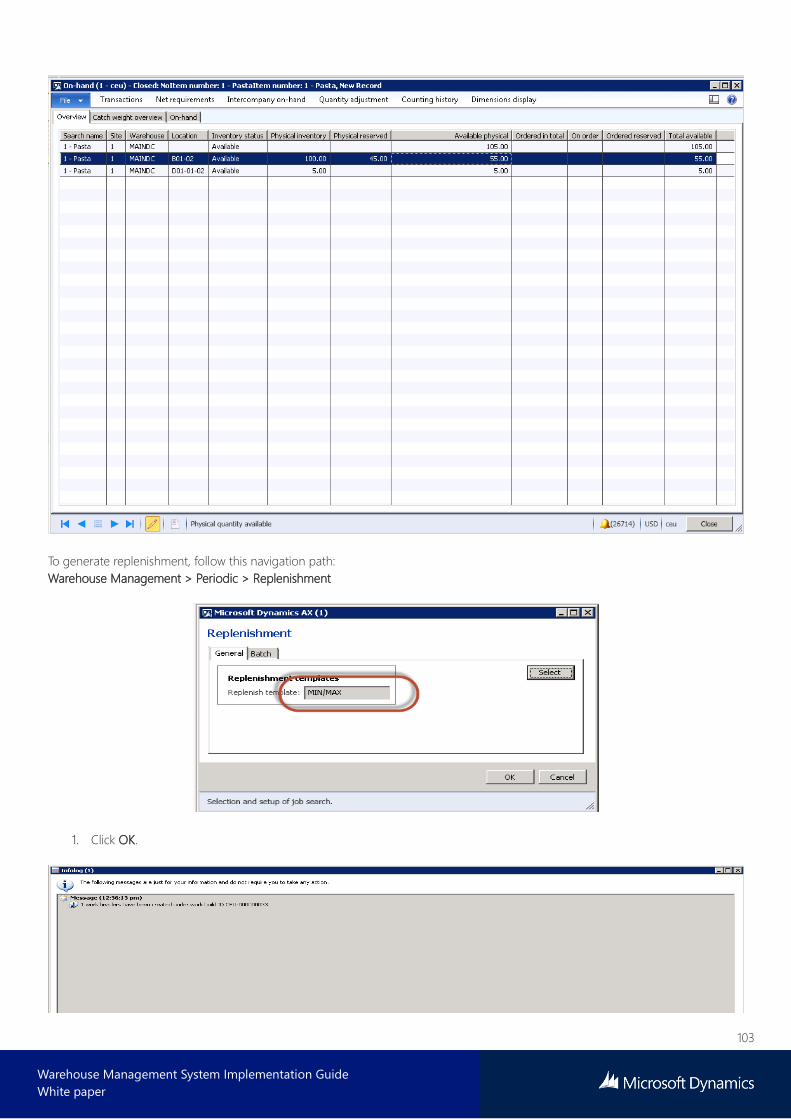
103
Warehouse Management System Implementation Guide
White paper
To generate replenishment, follow this navigation path:
Warehouse Management > Periodic > Replenishment
1. Click OK.

104
Warehouse Management System Implementation Guide
White paper
2. Review the work that is created.
3. Complete the work on the mobile device.
2.3.13 Receive inventory with a non-good item status
In this scenario, you’re going to test the process of selecting an inventory status at the time of receipt to something other than
available. You can set the status on incoming goods which are considered damaged or unsaleable. The first step is to make sure
that you have selected the Inventory blocking check box.
To change the inventory status, follow this navigation path:
Warehouse Management > Setup > Inventory > Inventory Status
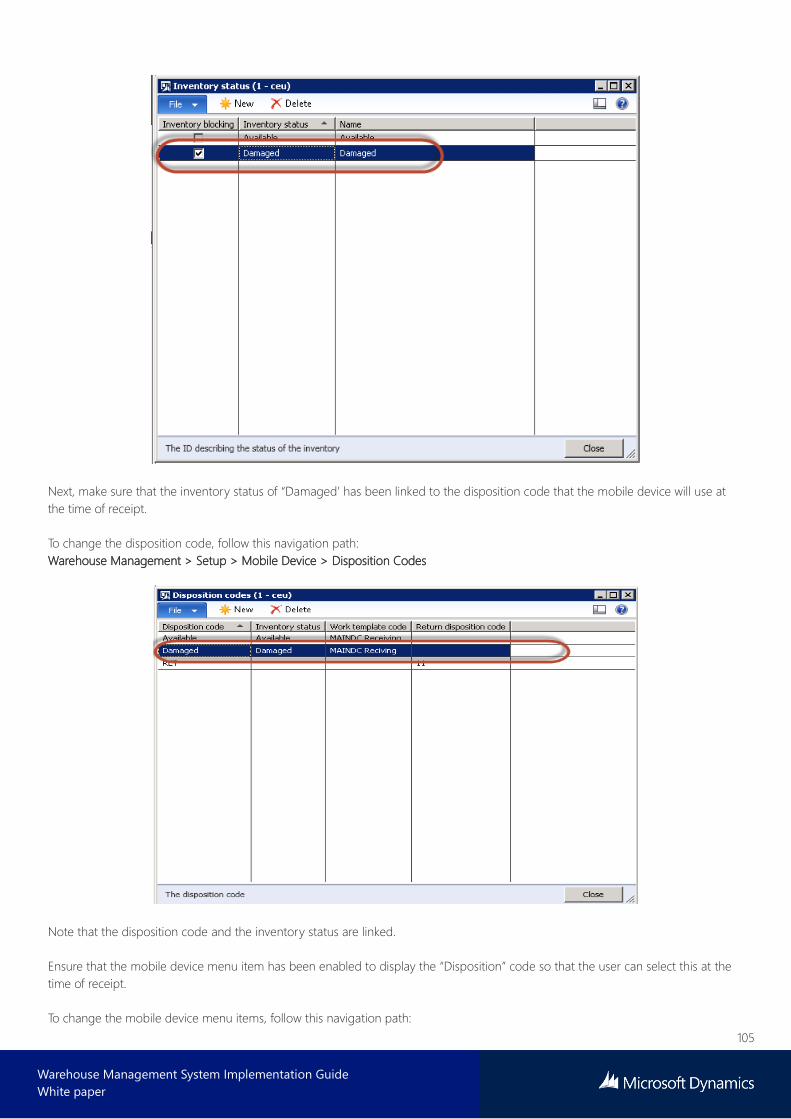
105
Warehouse Management System Implementation Guide
White paper
Next, make sure that the inventory status of “Damaged’ has been linked to the disposition code that the mobile device will use at
the time of receipt.
To change the disposition code, follow this navigation path:
Warehouse Management > Setup > Mobile Device > Disposition Codes
Note that the disposition code and the inventory status are linked.
Ensure that the mobile device menu item has been enabled to display the “Disposition” code so that the user can select this at the
time of receipt.
To change the mobile device menu items, follow this navigation path:

106
Warehouse Management System Implementation Guide
White paper
Warehouse Management > Setup > Mobile Device > Mobile Device Menu Items
In the Menu item name field, select Purchase receive.
Next, test the scenario and receive a purchase order on the mobile device. This time, select the inventory status of Damaged.
In this scenario, there are two options:
• Select the disposition code of “Damaged” at the time of Purchase receive, and then override the put away location to a
“Damaged” location in the warehouse. This is typically a manual override.
• Set the disposition code as “Damaged” and continue with the put away. In this scenario, Warehouse Management will set the
inventory status to “Blocked” and place the item in its usual location as per the location directive, however reservation of this
inventory is not possible. The item cannot be used for picking by any process. The only process that is available for a blocked
status item is the ability to move it around the warehouse. In this scenario, what typically occurs is an automated process to
move inventory from the default picking location is blocked, and placed in a damaged location. This work can be created by a
batch.
1. Ensure that you’ve created a purchase order, use item, 1 – Butter, as previously tested.
2. Log on to the mobile device.
3. Select the inbound process.
4. Select Purchase receive.
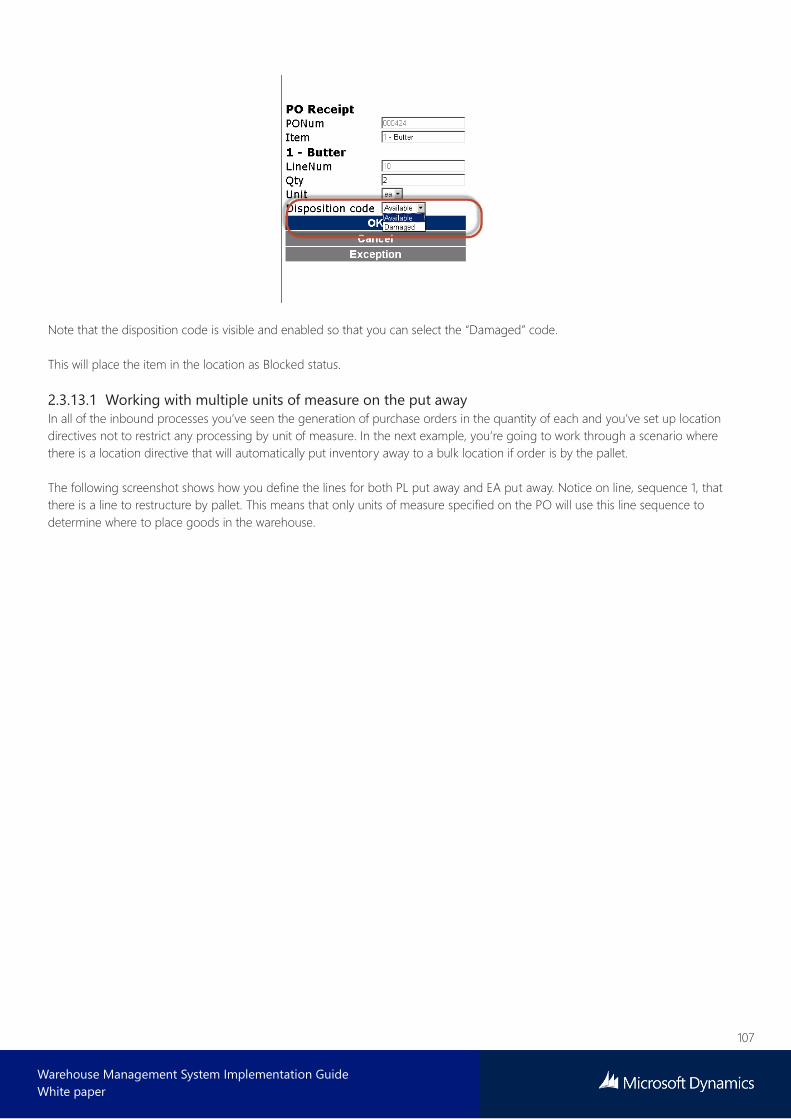
107
Warehouse Management System Implementation Guide
White paper
Note that the disposition code is visible and enabled so that you can select the “Damaged” code.
This will place the item in the location as Blocked status.
2.3.13.1 Working with multiple units of measure on the put away
In all of the inbound processes you’ve seen the generation of purchase orders in the quantity of each and you’ve set up location
directives not to restrict any processing by unit of measure. In the next example, you’re going to work through a scenario where
there is a location directive that will automatically put inventory away to a bulk location if order is by the pallet.
The following screenshot shows how you define the lines for both PL put away and EA put away. Notice on line, sequence 1, that
there is a line to restructure by pallet. This means that only units of measure specified on the PO will use this line sequence to
determine where to place goods in the warehouse.
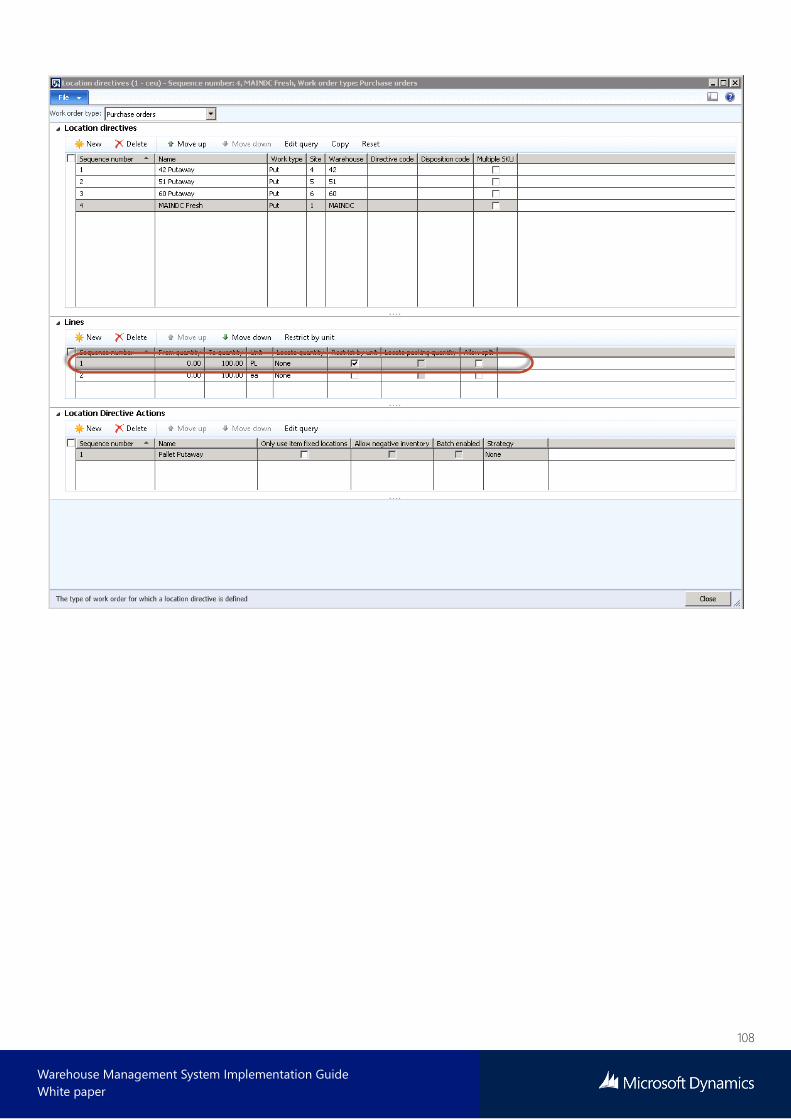
108
Warehouse Management System Implementation Guide
White paper
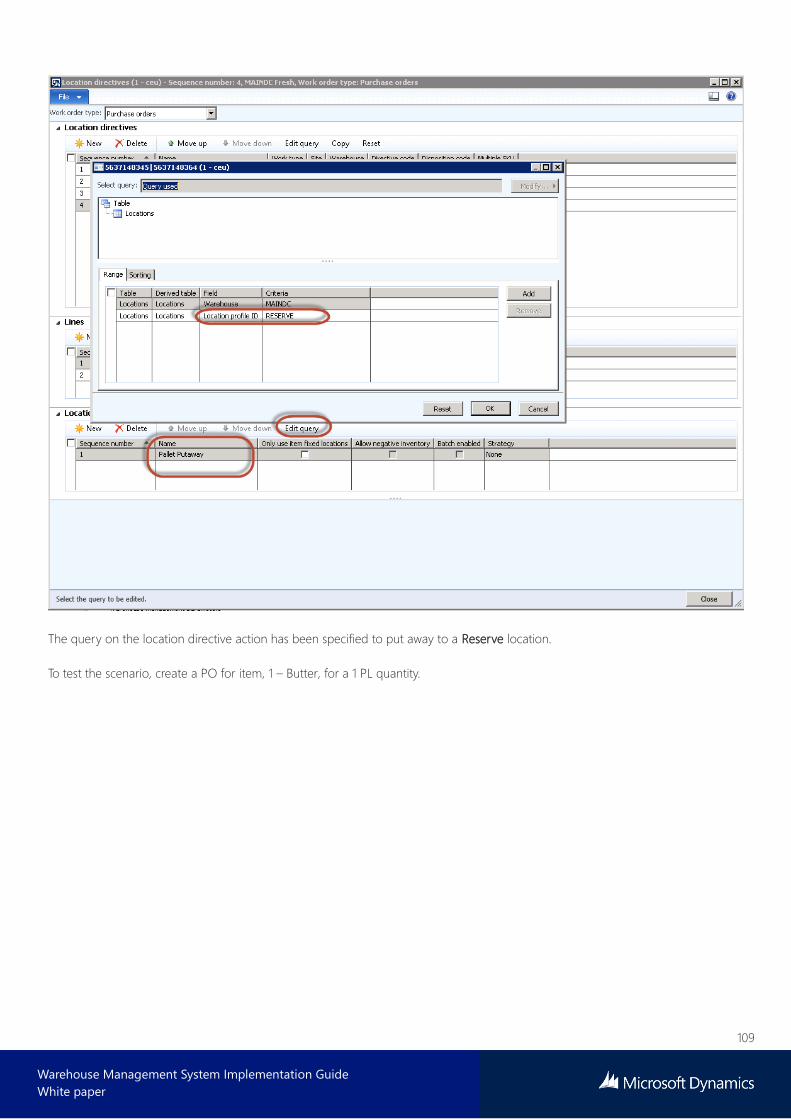
109
Warehouse Management System Implementation Guide
White paper
The query on the location directive action has been specified to put away to a Reserve location.
To test the scenario, create a PO for item, 1 – Butter, for a 1 PL quantity.
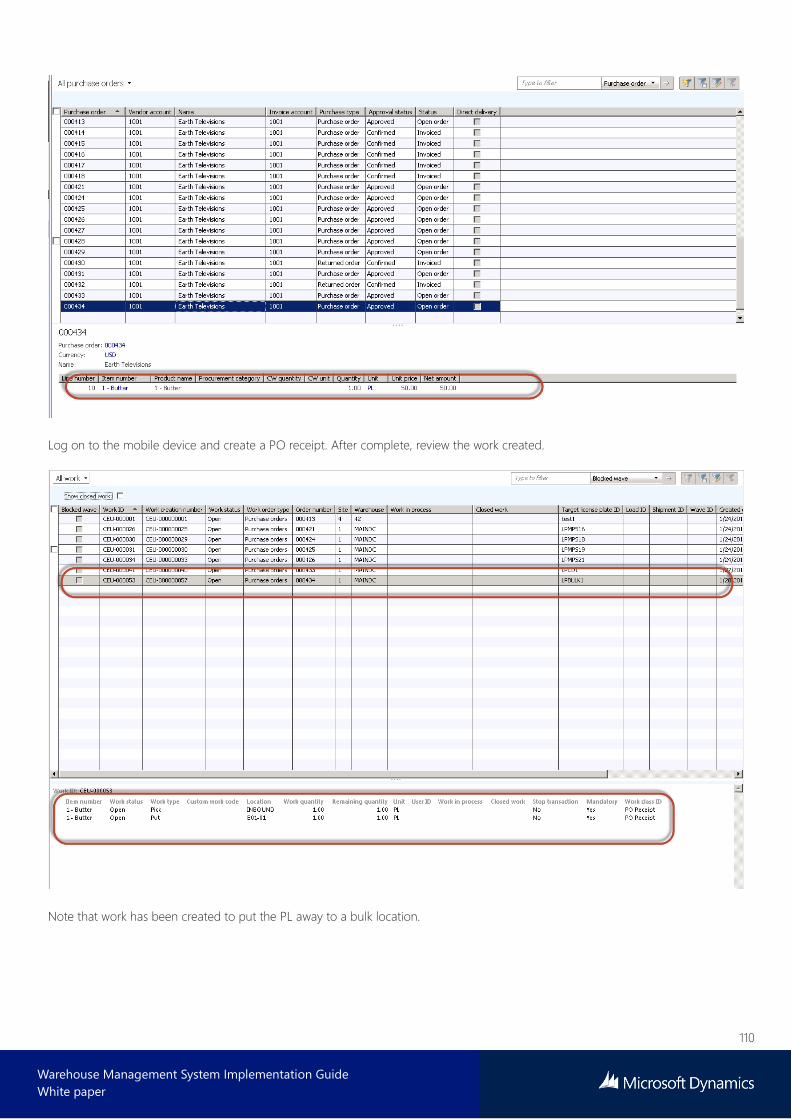
110
Warehouse Management System Implementation Guide
White paper
Log on to the mobile device and create a PO receipt. After complete, review the work created.
Note that work has been created to put the PL away to a bulk location.

111
Warehouse Management System Implementation Guide
White paper
3 Case study – Outbound/Picking process Sales entry in Warehouse Management for Microsoft Dynamics AX 2012 R3 is basically the same as standard Microsoft Dynamics
AX. The standard order entry screen is used, and most of the fields are the same. There are some additional tabs/buttons added to
the form to give visibility into the various functions of Warehouse Management for sales order processing, which are described later
in this section.
One of the key elements of Warehouse Management is the concept of deferred reservations. This section outlines what this
represents.
3.1 Understanding the flows in outbound
3.1.1 Outline of the outbound process
There are several terms which must be defined in order to understand the outbound process in Warehouse Management for
Microsoft Dynamics AX.
To ship sales order details, Warehouse Management for Microsoft Dynamics AX creates shipments and loads.
A shipment can be one or multiple sales orders going to the same destination. A shipment is a group of sales orders for the same
customer or for the same destination.
A load is a group of sales orders grouped together and typically going out on a single truck, rail car, or other mode of delivery.
A load can have one or many shipments, and a shipment can have one or many sales orders.
Warehouse Management for Microsoft Dynamics AX replaces the pick list and packing slip processing of sales orders. If an order is
run through standard Warehouse Management processing, the posting of pick lists and packing slips are handled by Warehouse
Management.
3.1.2 Set up the reservation hierarchy
You do not have to specify all inventory dimensions for an item in order to reserve against it. Instead, reservation totals are kept at
many levels for items. This is accomplished through the reservation hierarchy.
Reservations and availability buckets are kept at each of these hierarchy levels, and totaled at each level. Serial numbers and batch
numbers are optional based on the desired inventory dimension setup. Also, license plates are optional, because not all locations
will have license plates.
To set up the reservation hierarchy, follow this navigation path:
Warehouse Management > Setup > Inventory > Reservation Hierarchy
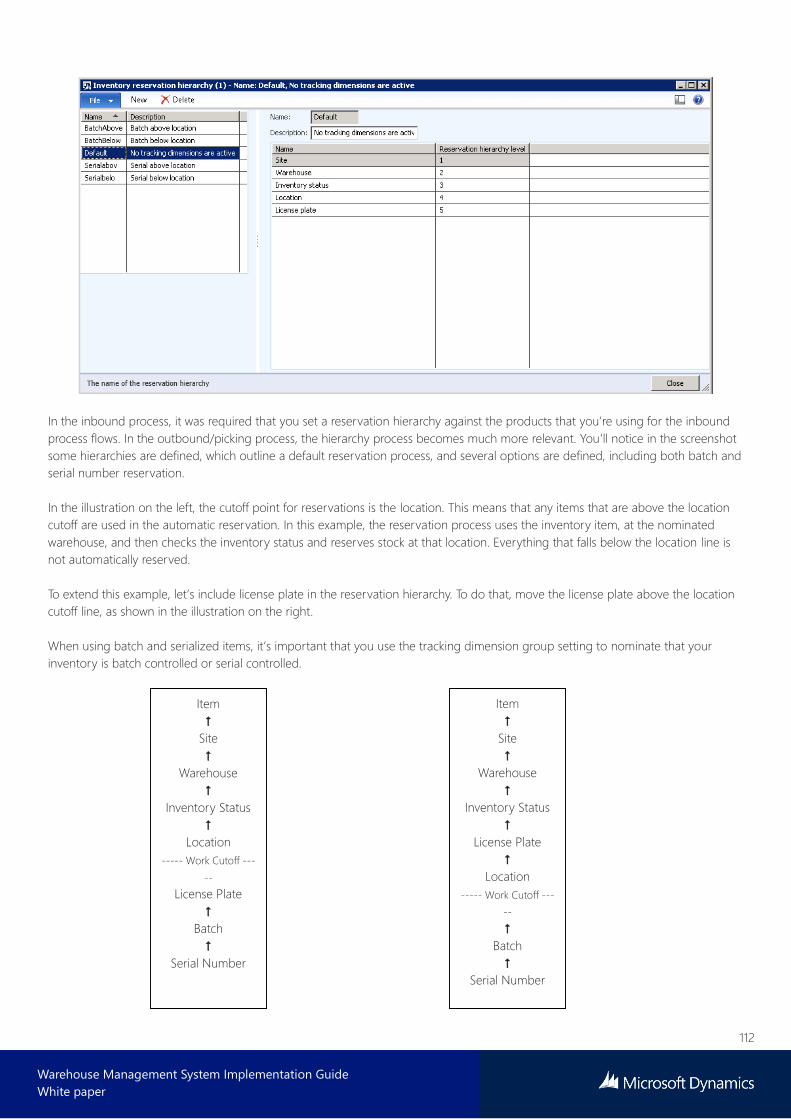
112
Warehouse Management System Implementation Guide
White paper
In the inbound process, it was required that you set a reservation hierarchy against the products that you’re using for the inbound
process flows. In the outbound/picking process, the hierarchy process becomes much more relevant. You’ll notice in the screenshot
some hierarchies are defined, which outline a default reservation process, and several options are defined, including both batch and
serial number reservation.
In the illustration on the left, the cutoff point for reservations is the location. This means that any items that are above the location
cutoff are used in the automatic reservation. In this example, the reservation process uses the inventory item, at the nominated
warehouse, and then checks the inventory status and reserves stock at that location. Everything that falls below the location line is
not automatically reserved.
To extend this example, let’s include license plate in the reservation hierarchy. To do that, move the license plate above the location
cutoff line, as shown in the illustration on the right.
When using batch and serialized items, it’s important that you use the tracking dimension group setting to nominate that your
inventory is batch controlled or serial controlled.
Item
Site
Warehouse
Inventory Status
Location
----- Work Cutoff ---
--
License Plate
Batch
Serial Number
Item
Site
Warehouse
Inventory Status
License Plate
Location
----- Work Cutoff ---
--
Batch
Serial Number
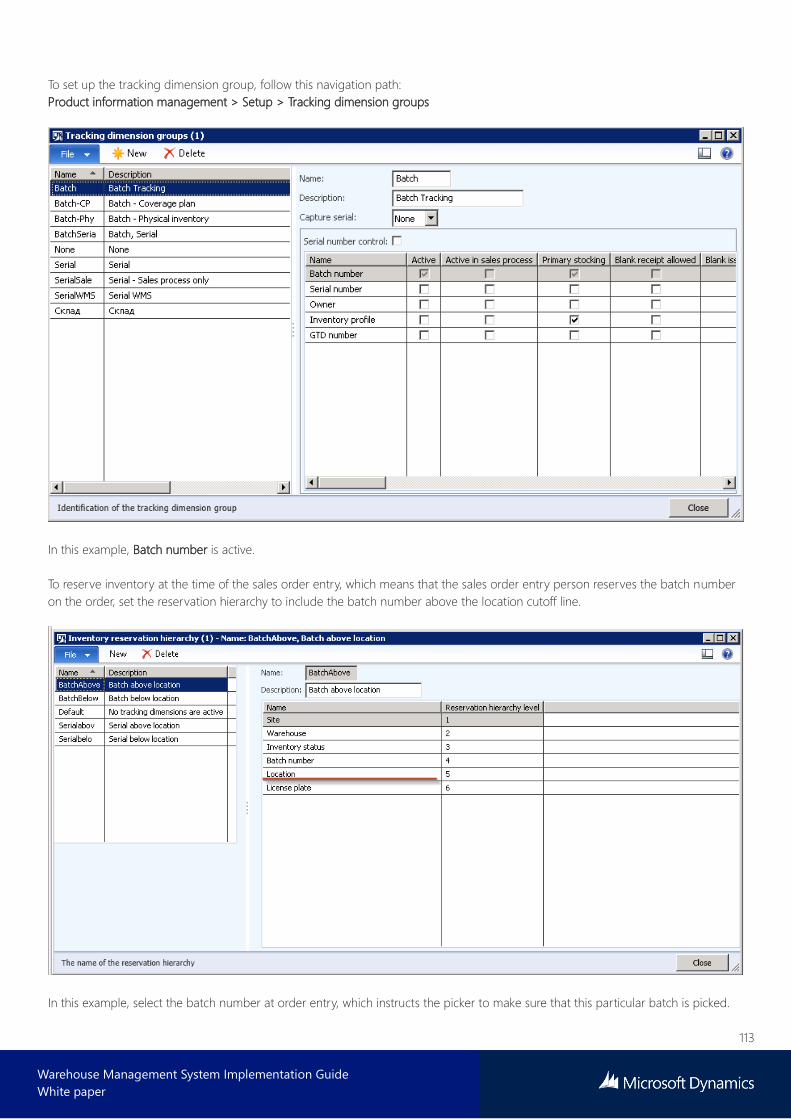
113
Warehouse Management System Implementation Guide
White paper
To set up the tracking dimension group, follow this navigation path:
Product information management > Setup > Tracking dimension groups
In this example, Batch number is active.
To reserve inventory at the time of the sales order entry, which means that the sales order entry person reserves the batch number
on the order, set the reservation hierarchy to include the batch number above the location cutoff line.
In this example, select the batch number at order entry, which instructs the picker to make sure that this particular batch is picked.
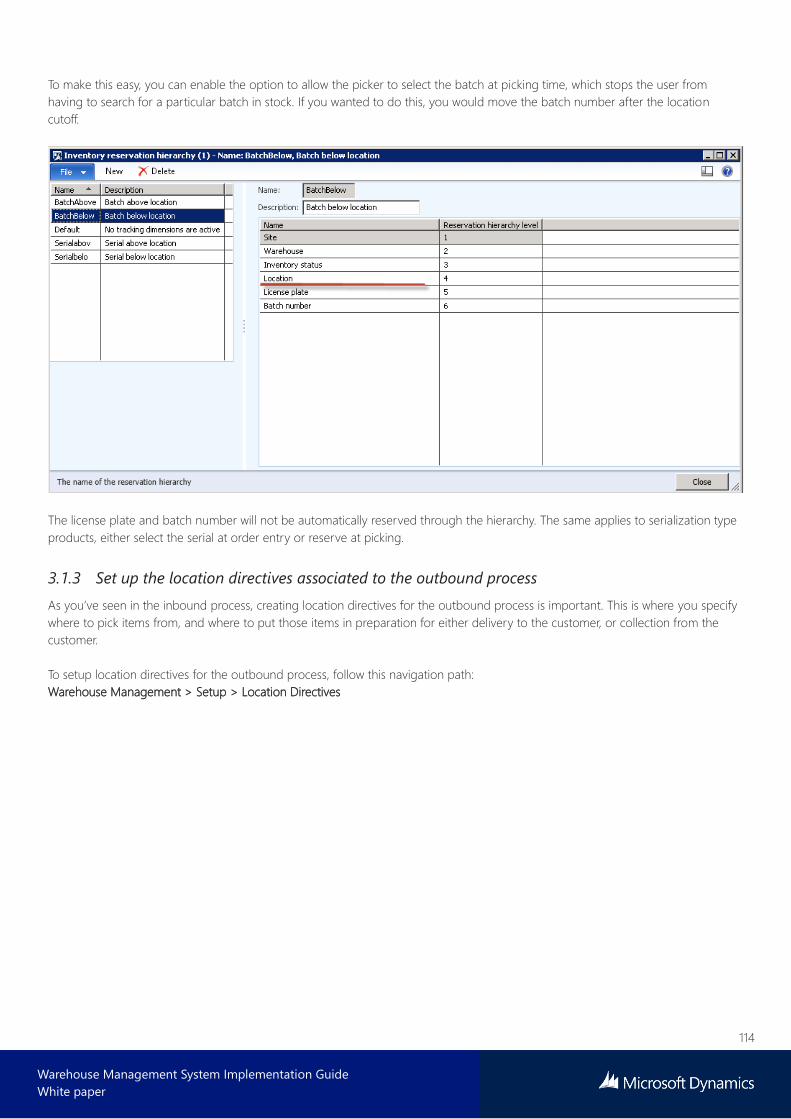
114
Warehouse Management System Implementation Guide
White paper
To make this easy, you can enable the option to allow the picker to select the batch at picking time, which stops the user from
having to search for a particular batch in stock. If you wanted to do this, you would move the batch number after the location
cutoff.
The license plate and batch number will not be automatically reserved through the hierarchy. The same applies to serialization type
products, either select the serial at order entry or reserve at picking.
3.1.3 Set up the location directives associated to the outbound process
As you’ve seen in the inbound process, creating location directives for the outbound process is important. This is where you specify
where to pick items from, and where to put those items in preparation for either delivery to the customer, or collection from the
customer.
To setup location directives for the outbound process, follow this navigation path:
Warehouse Management > Setup > Location Directives

115
Warehouse Management System Implementation Guide
White paper
Like the inbound process, the location directives are similar, however in this instance you will be doing the reverse - picking goods
and placing them somewhere on the warehouse floor for dispatch.
Top grid
The Work item area identifies what warehousing function the location directives are tied to. In the preceding screenshot, notice that
you can select various work items to specify location directives. In this example, you’ll be moving to sales order location directives.
Header
The header is where you specify the sequence in which you want Warehouse Management to look for sales orders. For example,
you can create location directives with unique filters and add them as a sequence in this form. By doing this you can create many
location directive actions associated with a filter, which means that Microsoft Dynamics AX will search until a match is found in the
sequence. That location directive action will be used to pick and put product.
Next, you’ll set up a basic location directive and process a sales order so that you can see how the directive works.
1. On the menu, in the Work order type field, select Sales orders.
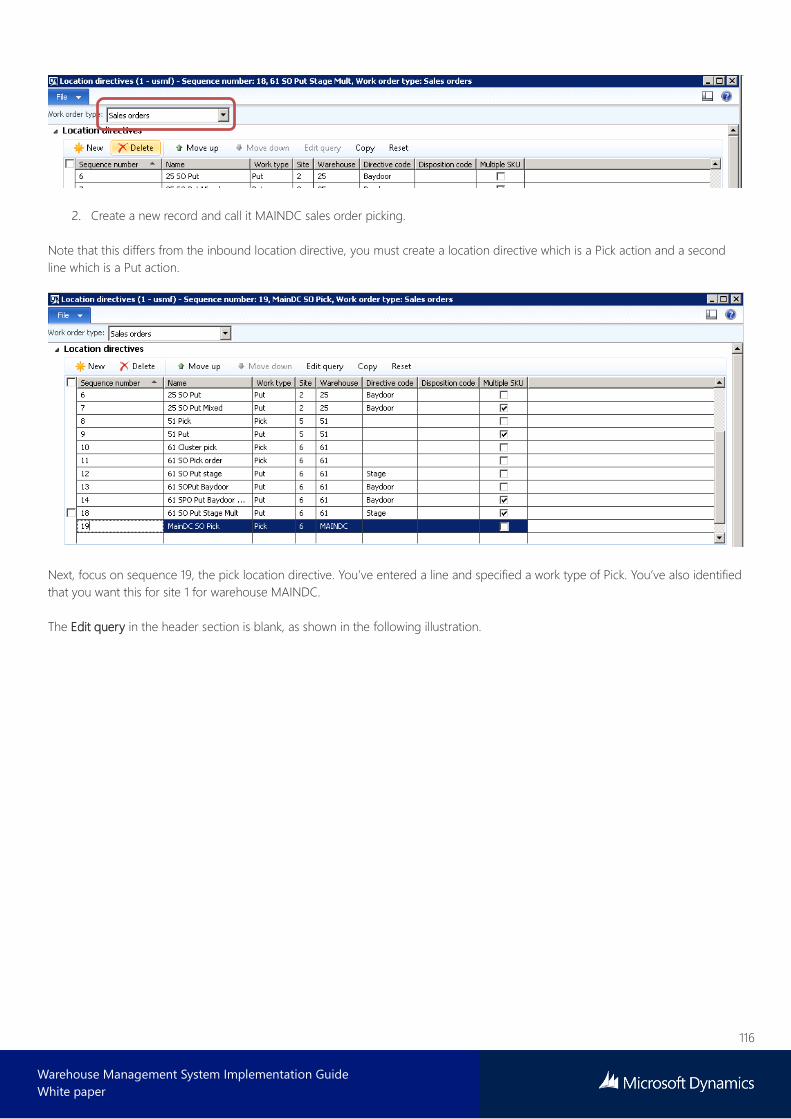
116
Warehouse Management System Implementation Guide
White paper
2. Create a new record and call it MAINDC sales order picking.
Note that this differs from the inbound location directive, you must create a location directive which is a Pick action and a second
line which is a Put action.
Next, focus on sequence 19, the pick location directive. You’ve entered a line and specified a work type of Pick. You’ve also identified
that you want this for site 1 for warehouse MAINDC.
The Edit query in the header section is blank, as shown in the following illustration.

117
Warehouse Management System Implementation Guide
White paper
Now let’s review the lines section of the form.
Lines
After a location directive header has been created and selected by Warehouse Management, the process continues in an attempt to
find an actual location to pick from or put to. The middle grid on the form, called lines, deals primarily with the quantity trying to be
located or reserved. By using the From Qty and To Qty fields and the Restrict by UOM check box, sequences can be configured so
that only quantities or specific UOM's will select the sequence.
Field Description
Sequence number Similar to the header.
From quantity, To
quantity, and Unit
Specify a quantity range for when the middle-grid sequence should be selected. For example, if
the From quantity is 5, the To quantity is 15, and the Unit is PL, Pallets, then if the quantity being
put or picked is between 5 and 15 PL, this sequence would be selected. The bottom-grid values
would most likely be a set of multiple pallet locations that can hold between 5 and 15 PL – typically
bulk locations.

118
Warehouse Management System Implementation Guide
White paper
Field Description
Locate Quantity Use this field if you want to put/locate quantity into the warehouse. The following options are
available:
• License Plate Qty - When evaluating whether a quantity is in the From quantity and To quantity
ranges, use the quantity on the license plate being received.
• Unitized Qty - When evaluating whether a quantity is in the From quantity and To quantity
ranges, use the quantity being unitized during the specific transaction. Since Warehouse
Management can receive a quantity of 1000 and break it into 10 license plates of 100 each,
1000 would be used instead of the license plate quantity of 100.
• Remaining Qty - When evaluating whether a quantity is in the From quantity and To quantity
ranges, this is the quantity left to be received on the Purchase order Line that is currently being
checked-in.
• Expected Qty - When evaluating whether a quantity is in the From quantity and To quantity
ranges, use the total quantity of the purchase order line, regardless of what has already been
received.
Restrict by unit of
measure
If selected, this allows the middle-grid sequence to be specific to a unit of measure or multiple
units of measure. When reserving quantity, if you only want to reserve pallets from a specific set of
locations, then the middle-grid sequence would restrict that particular sequence to PL so that any
quantity less than a pallet would not select the sequence.
Locate packing
quantity
If you specified a packing quantity on a sales order or production order, this check box restricts the
system to only select locations with at least that packing quantity in the location.
Allow split If selected, the quantity being received or the quantity being reserved across multiple locations is
split, or the quantity must be located to a single location or reserved from a single location.
Next, let’s use a simple scenario following the case study to show how to set up this action on a pick sequence.
In the preceding screenshot, a new Line sequence is attached to the pick line in the header, which means that for any unit of
measure up to a quantity of 10,000.00, you’ll need to do the next action.
Next, focus on the location directive actions, which is the actions where locations or ranges of locations are actually specified. After a
location directive has been selected, and the middle-grid sequence has been selected, the sequences that are configured in the
bottom-grid are evaluated.
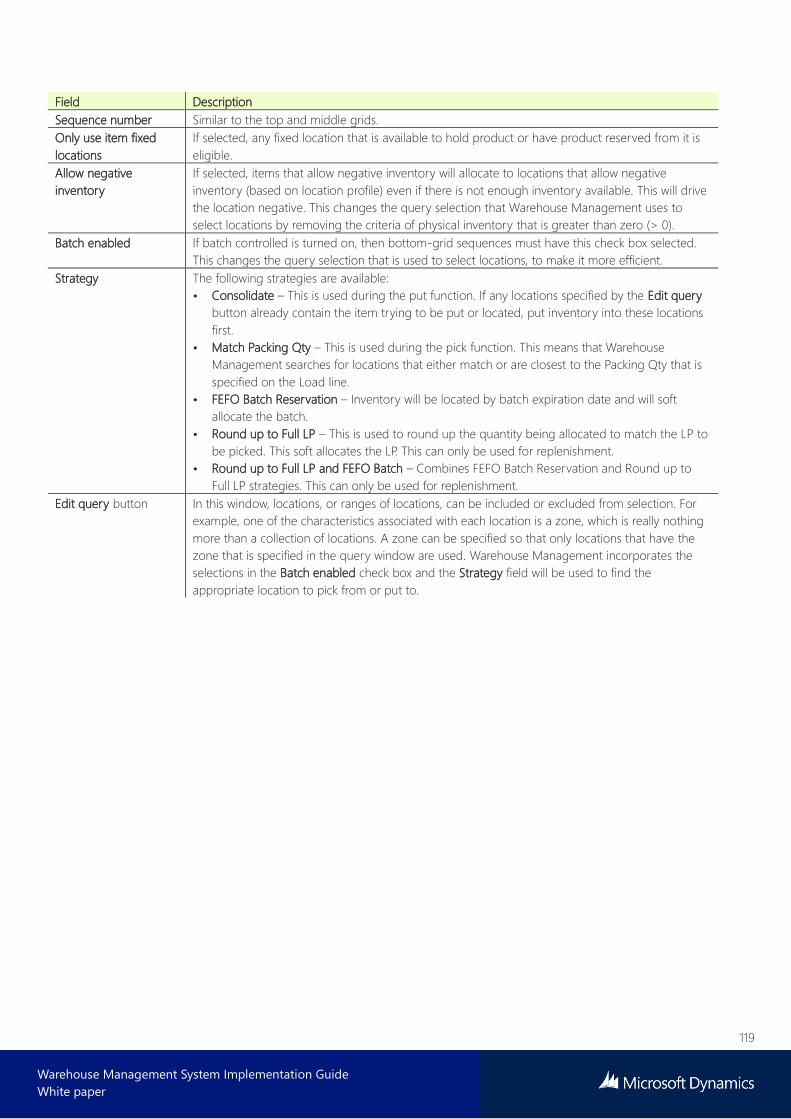
119
Warehouse Management System Implementation Guide
White paper
Field Description
Sequence number Similar to the top and middle grids.
Only use item fixed
locations
If selected, any fixed location that is available to hold product or have product reserved from it is
eligible.
Allow negative
inventory
If selected, items that allow negative inventory will allocate to locations that allow negative
inventory (based on location profile) even if there is not enough inventory available. This will drive
the location negative. This changes the query selection that Warehouse Management uses to
select locations by removing the criteria of physical inventory that is greater than zero (> 0).
Batch enabled If batch controlled is turned on, then bottom-grid sequences must have this check box selected.
This changes the query selection that is used to select locations, to make it more efficient.
Strategy The following strategies are available:
• Consolidate – This is used during the put function. If any locations specified by the Edit query
button already contain the item trying to be put or located, put inventory into these locations
first.
• Match Packing Qty – This is used during the pick function. This means that Warehouse
Management searches for locations that either match or are closest to the Packing Qty that is
specified on the Load line.
• FEFO Batch Reservation – Inventory will be located by batch expiration date and will soft
allocate the batch.
• Round up to Full LP – This is used to round up the quantity being allocated to match the LP to
be picked. This soft allocates the LP. This can only be used for replenishment.
• Round up to Full LP and FEFO Batch – Combines FEFO Batch Reservation and Round up to
Full LP strategies. This can only be used for replenishment.
Edit query button In this window, locations, or ranges of locations, can be included or excluded from selection. For
example, one of the characteristics associated with each location is a zone, which is really nothing
more than a collection of locations. A zone can be specified so that only locations that have the
zone that is specified in the query window are used. Warehouse Management incorporates the
selections in the Batch enabled check box and the Strategy field will be used to find the
appropriate location to pick from or put to.

120
Warehouse Management System Implementation Guide
White paper
For the pick location directive action, you’ve created a new line and called it MAINDC Sales Order Picking. You’re specifying on the
pick action a specific location or area for the picking to take place. This means that you need to go to a specific area in the
warehouse and pick these goods. This is handled through the query option.
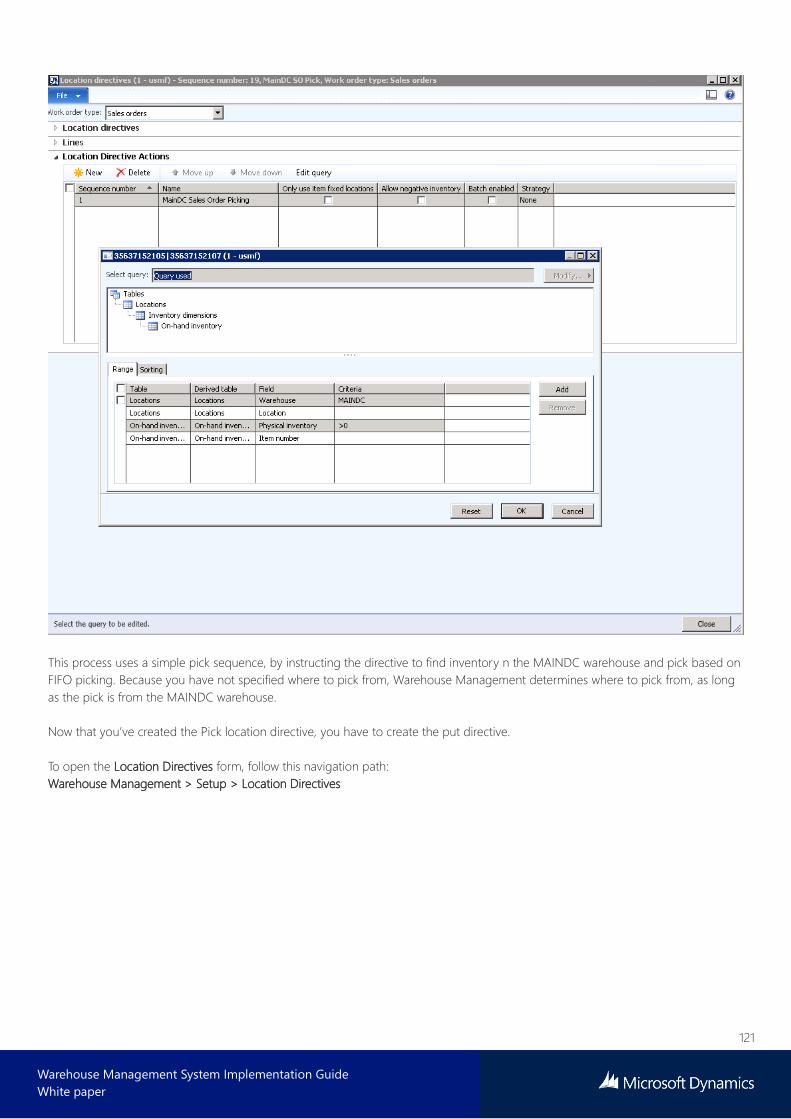
121
Warehouse Management System Implementation Guide
White paper
This process uses a simple pick sequence, by instructing the directive to find inventory n the MAINDC warehouse and pick based on
FIFO picking. Because you have not specified where to pick from, Warehouse Management determines where to pick from, as long
as the pick is from the MAINDC warehouse.
Now that you’ve created the Pick location directive, you have to create the put directive.
To open the Location Directives form, follow this navigation path:
Warehouse Management > Setup > Location Directives
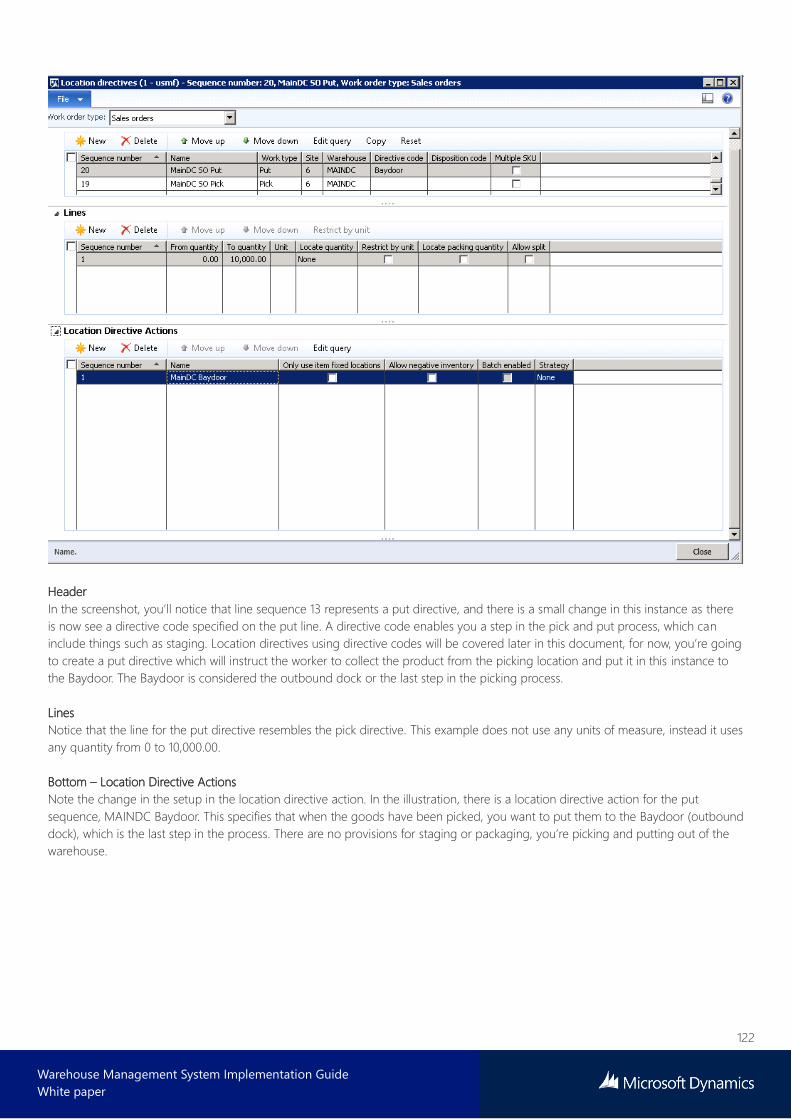
122
Warehouse Management System Implementation Guide
White paper
Header
In the screenshot, you’ll notice that line sequence 13 represents a put directive, and there is a small change in this instance as there
is now see a directive code specified on the put line. A directive code enables you a step in the pick and put process, which can
include things such as staging. Location directives using directive codes will be covered later in this document, for now, you’re going
to create a put directive which will instruct the worker to collect the product from the picking location and put it in this instance to
the Baydoor. The Baydoor is considered the outbound dock or the last step in the picking process.
Lines
Notice that the line for the put directive resembles the pick directive. This example does not use any units of measure, instead it uses
any quantity from 0 to 10,000.00.
Bottom – Location Directive Actions
Note the change in the setup in the location directive action. In the illustration, there is a location directive action for the put
sequence, MAINDC Baydoor. This specifies that when the goods have been picked, you want to put them to the Baydoor (outbound
dock), which is the last step in the process. There are no provisions for staging or packaging, you’re picking and putting out of the
warehouse.
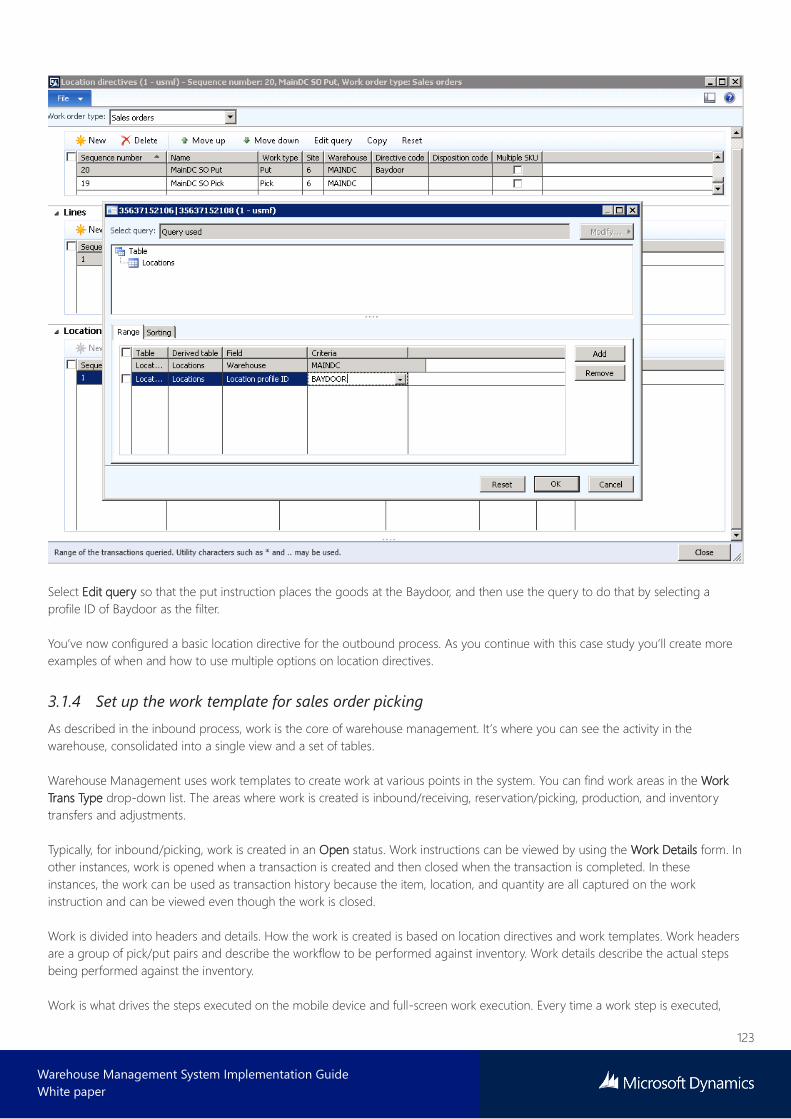
123
Warehouse Management System Implementation Guide
White paper
Select Edit query so that the put instruction places the goods at the Baydoor, and then use the query to do that by selecting a
profile ID of Baydoor as the filter.
You’ve now configured a basic location directive for the outbound process. As you continue with this case study you’ll create more
examples of when and how to use multiple options on location directives.
3.1.4 Set up the work template for sales order picking
As described in the inbound process, work is the core of warehouse management. It’s where you can see the activity in the
warehouse, consolidated into a single view and a set of tables.
Warehouse Management uses work templates to create work at various points in the system. You can find work areas in the Work
Trans Type drop-down list. The areas where work is created is inbound/receiving, reservation/picking, production, and inventory
transfers and adjustments.
Typically, for inbound/picking, work is created in an Open status. Work instructions can be viewed by using the Work Details form. In
other instances, work is opened when a transaction is created and then closed when the transaction is completed. In these
instances, the work can be used as transaction history because the item, location, and quantity are all captured on the work
instruction and can be viewed even though the work is closed.
Work is divided into headers and details. How the work is created is based on location directives and work templates. Work headers
are a group of pick/put pairs and describe the workflow to be performed against inventory. Work details describe the actual steps
being performed against the inventory.
Work is what drives the steps executed on the mobile device and full-screen work execution. Every time a work step is executed,
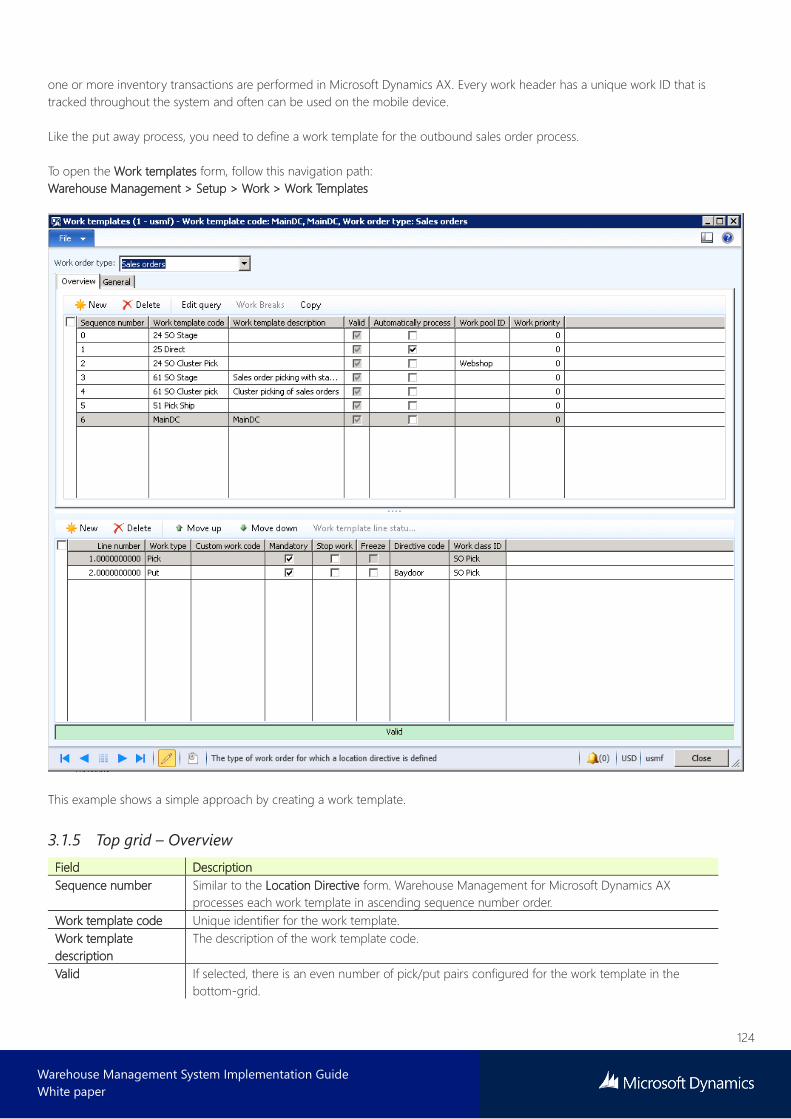
124
Warehouse Management System Implementation Guide
White paper
one or more inventory transactions are performed in Microsoft Dynamics AX. Every work header has a unique work ID that is
tracked throughout the system and often can be used on the mobile device.
Like the put away process, you need to define a work template for the outbound sales order process.
To open the Work templates form, follow this navigation path:
Warehouse Management > Setup > Work > Work Templates
This example shows a simple approach by creating a work template.
3.1.5 Top grid – Overview
Field Description
Sequence number Similar to the Location Directive form. Warehouse Management for Microsoft Dynamics AX
processes each work template in ascending sequence number order.
Work template code Unique identifier for the work template.
Work template
description
The description of the work template code.
Valid If selected, there is an even number of pick/put pairs configured for the work template in the
bottom-grid.
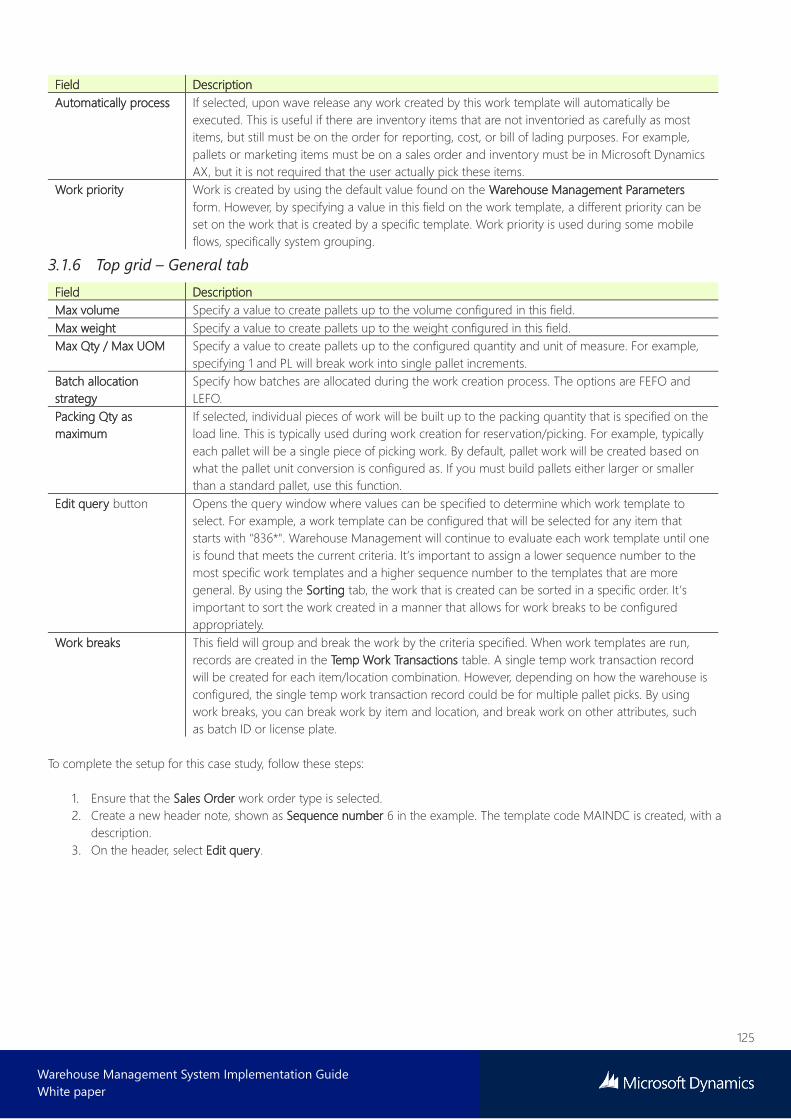
125
Warehouse Management System Implementation Guide
White paper
Field Description
Automatically process If selected, upon wave release any work created by this work template will automatically be
executed. This is useful if there are inventory items that are not inventoried as carefully as most
items, but still must be on the order for reporting, cost, or bill of lading purposes. For example,
pallets or marketing items must be on a sales order and inventory must be in Microsoft Dynamics
AX, but it is not required that the user actually pick these items.
Work priority Work is created by using the default value found on the Warehouse Management Parameters
form. However, by specifying a value in this field on the work template, a different priority can be
set on the work that is created by a specific template. Work priority is used during some mobile
flows, specifically system grouping.
3.1.6 Top grid – General tab
Field Description
Max volume Specify a value to create pallets up to the volume configured in this field.
Max weight Specify a value to create pallets up to the weight configured in this field.
Max Qty / Max UOM Specify a value to create pallets up to the configured quantity and unit of measure. For example,
specifying 1 and PL will break work into single pallet increments.
Batch allocation
strategy
Specify how batches are allocated during the work creation process. The options are FEFO and
LEFO.
Packing Qty as
maximum
If selected, individual pieces of work will be built up to the packing quantity that is specified on the
load line. This is typically used during work creation for reservation/picking. For example, typically
each pallet will be a single piece of picking work. By default, pallet work will be created based on
what the pallet unit conversion is configured as. If you must build pallets either larger or smaller
than a standard pallet, use this function.
Edit query button Opens the query window where values can be specified to determine which work template to
select. For example, a work template can be configured that will be selected for any item that
starts with "836*". Warehouse Management will continue to evaluate each work template until one
is found that meets the current criteria. It’s important to assign a lower sequence number to the
most specific work templates and a higher sequence number to the templates that are more
general. By using the Sorting tab, the work that is created can be sorted in a specific order. It’s
important to sort the work created in a manner that allows for work breaks to be configured
appropriately.
Work breaks This field will group and break the work by the criteria specified. When work templates are run,
records are created in the Temp Work Transactions table. A single temp work transaction record
will be created for each item/location combination. However, depending on how the warehouse is
configured, the single temp work transaction record could be for multiple pallet picks. By using
work breaks, you can break work by item and location, and break work on other attributes, such
as batch ID or license plate.
To complete the setup for this case study, follow these steps:
1. Ensure that the Sales Order work order type is selected.
2. Create a new header note, shown as Sequence number 6 in the example. The template code MAINDC is created, with a
description.
3. On the header, select Edit query.
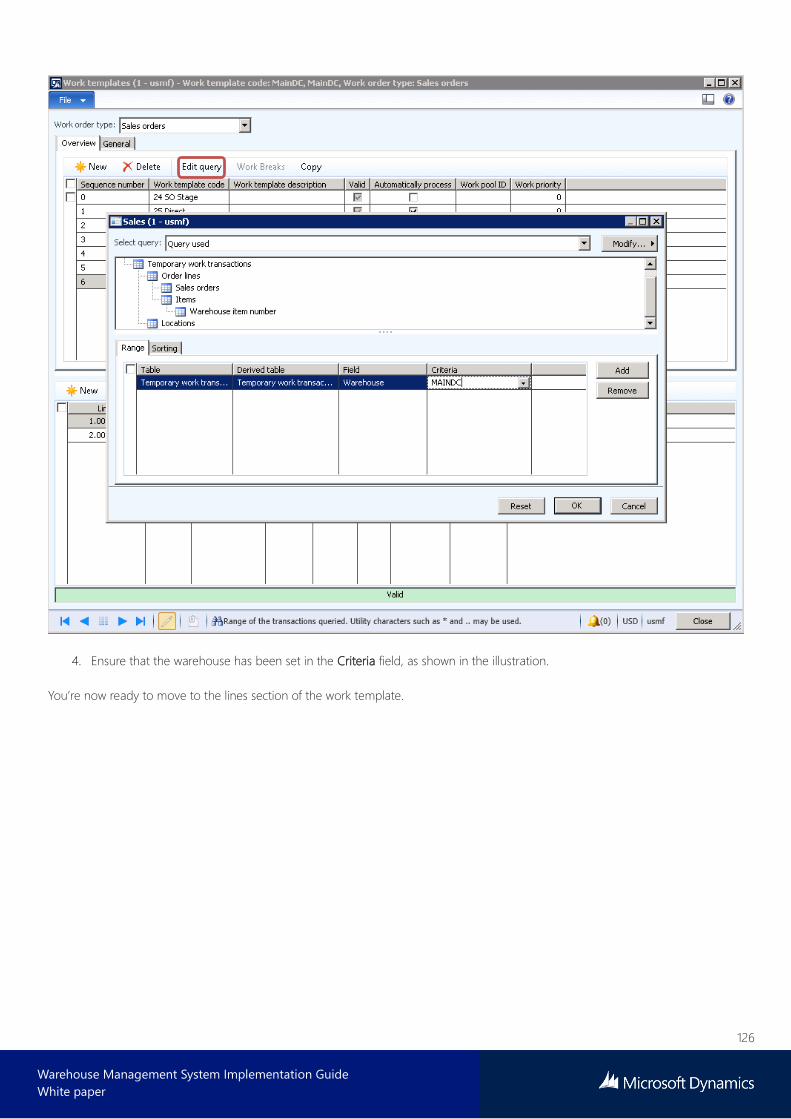
126
Warehouse Management System Implementation Guide
White paper
4. Ensure that the warehouse has been set in the Criteria field, as shown in the illustration.
You’re now ready to move to the lines section of the work template.
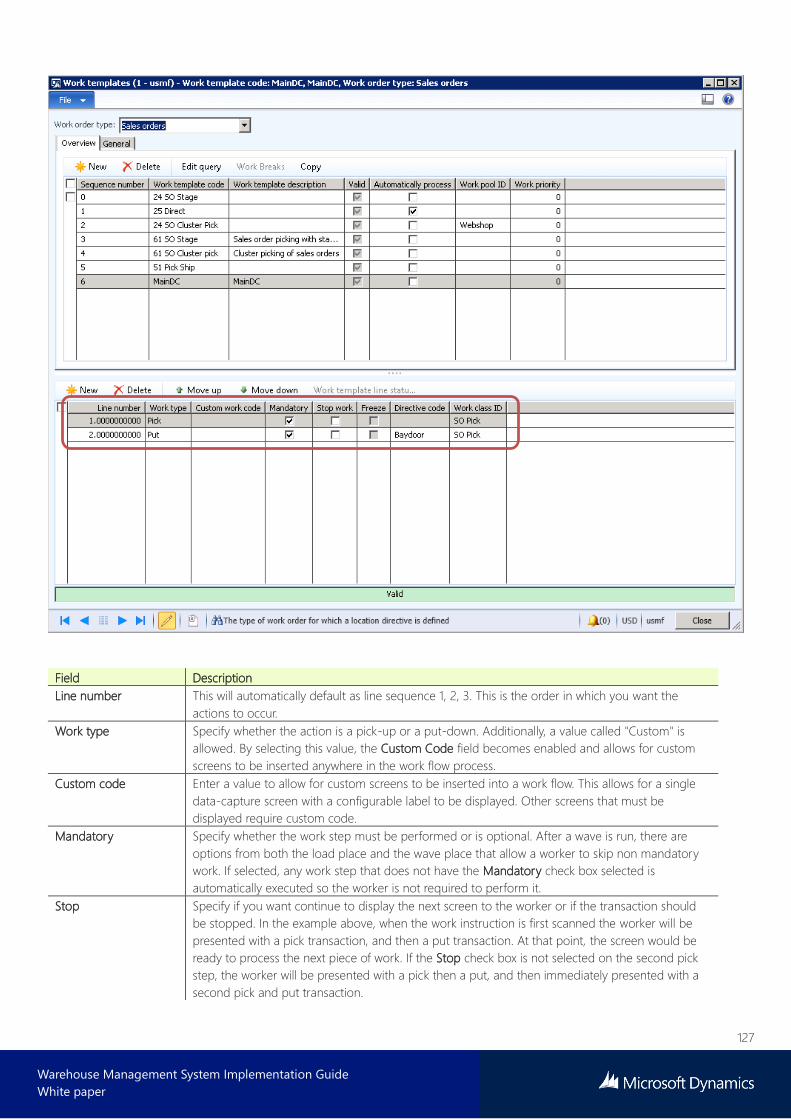
127
Warehouse Management System Implementation Guide
White paper
Field Description
Line number This will automatically default as line sequence 1, 2, 3. This is the order in which you want the
actions to occur.
Work type Specify whether the action is a pick-up or a put-down. Additionally, a value called "Custom" is
allowed. By selecting this value, the Custom Code field becomes enabled and allows for custom
screens to be inserted anywhere in the work flow process.
Custom code Enter a value to allow for custom screens to be inserted into a work flow. This allows for a single
data-capture screen with a configurable label to be displayed. Other screens that must be
displayed require custom code.
Mandatory Specify whether the work step must be performed or is optional. After a wave is run, there are
options from both the load place and the wave place that allow a worker to skip non mandatory
work. If selected, any work step that does not have the Mandatory check box selected is
automatically executed so the worker is not required to perform it.
Stop Specify if you want continue to display the next screen to the worker or if the transaction should
be stopped. In the example above, when the work instruction is first scanned the worker will be
presented with a pick transaction, and then a put transaction. At that point, the screen would be
ready to process the next piece of work. If the Stop check box is not selected on the second pick
step, the worker will be presented with a pick then a put, and then immediately presented with a
second pick and put transaction.
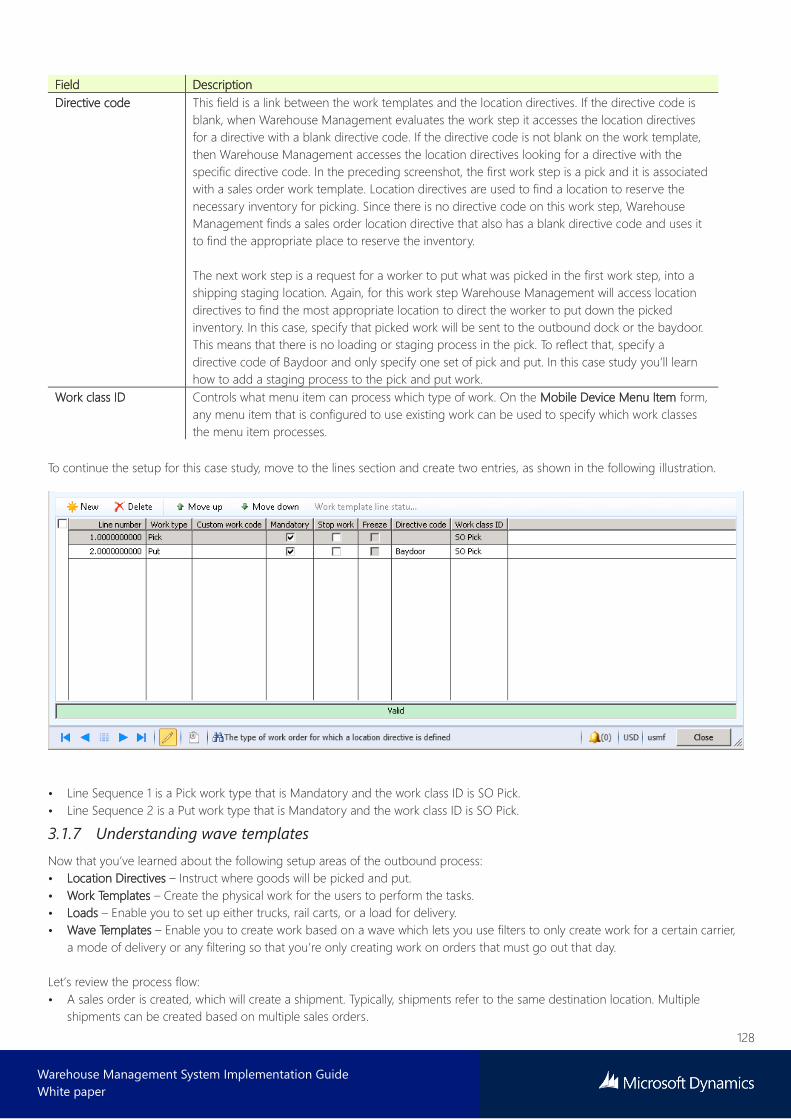
128
Warehouse Management System Implementation Guide
White paper
Field Description
Directive code This field is a link between the work templates and the location directives. If the directive code is
blank, when Warehouse Management evaluates the work step it accesses the location directives
for a directive with a blank directive code. If the directive code is not blank on the work template,
then Warehouse Management accesses the location directives looking for a directive with the
specific directive code. In the preceding screenshot, the first work step is a pick and it is associated
with a sales order work template. Location directives are used to find a location to reserve the
necessary inventory for picking. Since there is no directive code on this work step, Warehouse
Management finds a sales order location directive that also has a blank directive code and uses it
to find the appropriate place to reserve the inventory.
The next work step is a request for a worker to put what was picked in the first work step, into a
shipping staging location. Again, for this work step Warehouse Management will access location
directives to find the most appropriate location to direct the worker to put down the picked
inventory. In this case, specify that picked work will be sent to the outbound dock or the baydoor.
This means that there is no loading or staging process in the pick. To reflect that, specify a
directive code of Baydoor and only specify one set of pick and put. In this case study you’ll learn
how to add a staging process to the pick and put work.
Work class ID Controls what menu item can process which type of work. On the Mobile Device Menu Item form,
any menu item that is configured to use existing work can be used to specify which work classes
the menu item processes.
To continue the setup for this case study, move to the lines section and create two entries, as shown in the following illustration.
• Line Sequence 1 is a Pick work type that is Mandatory and the work class ID is SO Pick.
• Line Sequence 2 is a Put work type that is Mandatory and the work class ID is SO Pick.
3.1.7 Understanding wave templates
Now that you’ve learned about the following setup areas of the outbound process:
• Location Directives – Instruct where goods will be picked and put.
• Work Templates – Create the physical work for the users to perform the tasks.
• Loads – Enable you to set up either trucks, rail carts, or a load for delivery.
• Wave Templates – Enable you to create work based on a wave which lets you use filters to only create work for a certain carrier,
a mode of delivery or any filtering so that you’re only creating work on orders that must go out that day.
Let’s review the process flow:
• A sales order is created, which will create a shipment. Typically, shipments refer to the same destination location. Multiple
shipments can be created based on multiple sales orders.

129
Warehouse Management System Implementation Guide
White paper
• A wave template takes the shipments and creates the work which can create loads.
Wave templates are used to define the wave execution process and setup criteria for when waves are created, executed, and
released.
To open the Wave templates window, follow this navigation path:
Warehousing Management > Setup > Waves > Wave Templates
Multiple wave templates can be created by using different properties for each template. When you first create a wave template,
required base methods will be created as steps for that template and appear in the lower left grid. Additional wave execution
methods will appear in the lower right grid and can be manually added to the wave template using the arrow buttons. Some base
wave steps, such as containerization and replenishment, are optional and will have to be added manually to the wave template. The
containerization wave steps can also be marked as repeatable in the wave execute method setup (Warehousing for AX > Setup >
Waves > Wave Execution Methods). This allows the method to be called several times in a single wave template. New wave steps
also have a Wave step code field, which is used to pass information to the method being called. A wave step is used by
replenishment and containerization, as described later in this document.
Based on the wave template setup, the wave process can be automatic or manual. The following properties determine the setup:
• Automate wave creation – If selected, waves will automatically be created for shipments at release to the warehouse. The query
criteria can be used to limit what shipments will apply to this wave template.
• Assign to open waves – If selected, shipments will be assigned to open waves at release to the warehouse. The query criteria
can be used to limit what shipments will be assigned to waves for this template.
• Process wave at release to warehouse – If selected, waves created during the release to the warehouse will automatically be
executed to create work.
• Process wave automatically at threshold – If selected, waves will automatically execute when a defined threshold is reached.
• Automate wave release – If selected, waves will be automatically released after it is executed.
• Automate replenishment work – If selected, and demand based replenishment work is created, that work will be released
automatically.
• Wave template sequence – This sequence number determines in what order the wave template will be used when you create

130
Warehouse Management System Implementation Guide
White paper
waves and assign shipments to existing waves. If a shipment does not fit the query criteria of a wave template, the next wave
template in the sequence will be used.
3.1.8 Manual wave steps
Waves are required to create work for a load or shipment. Work is created through the wave that will run and execute steps defined
in the wave template. The following steps show how to manually create and process a wave:
• First, go to the Waves place form. Click the Create wave button.
• Search for the load, sales order number, or shipment that needs to be executed. Select the Add to wave check box and the line
will be added to the bottom grid.
• You can add several loads to one wave to make it a faster process. This is also how you consolidate shipments automatically.
• After the loads or shipments have been added to the new wave, click Execute wave on the form or in the Waves place form. This
uses the wave template steps and uses work templates and location directives to determine how to create the work. These
settings are configured on other forms.
• If the execution is successful, the new wave status will be Held. No work can be completed until this wave has been released. You
can view the work to determine whether it’s correct and determine if you want to continue or cancel the work and start over.
• If all work is created correctly, click the Release button at the top of the Waves place form.
3.1.9 Wave release
After releasing the wave, more work can be created if all of the inventory was not available at the time the wave was originally run.
You can create multiple waves for the same load/shipmen if any work has been canceled or not created for a load or shipment. To
see the wave history, click the Work creation history log.
Use the filter on this form to see all the locations and steps that work uses to create steps. Also, when a wave is released, it cannot
be executed again if any part of the work has been completed for it. If you want to do that, you’ll have to create a new wave for the
canceled portions.
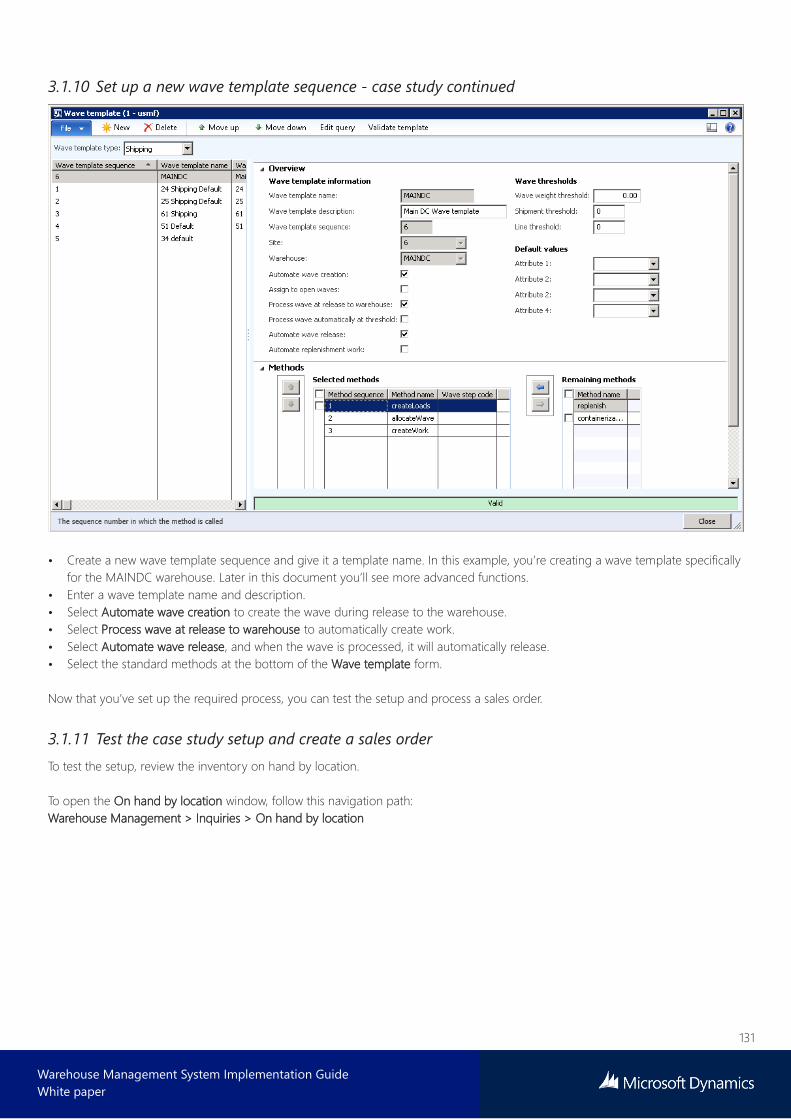
131
Warehouse Management System Implementation Guide
White paper
3.1.10 Set up a new wave template sequence - case study continued
• Create a new wave template sequence and give it a template name. In this example, you’re creating a wave template specifically
for the MAINDC warehouse. Later in this document you’ll see more advanced functions.
• Enter a wave template name and description.
• Select Automate wave creation to create the wave during release to the warehouse.
• Select Process wave at release to warehouse to automatically create work.
• Select Automate wave release, and when the wave is processed, it will automatically release.
• Select the standard methods at the bottom of the Wave template form.
Now that you’ve set up the required process, you can test the setup and process a sales order.
3.1.11 Test the case study setup and create a sales order
To test the setup, review the inventory on hand by location.
To open the On hand by location window, follow this navigation path:
Warehouse Management > Inquiries > On hand by location

132
Warehouse Management System Implementation Guide
White paper
In the On hand by location window there is available stock for the item, 1 - Cottage Cheese, so you need to create a sales order for
a quantity of 4.
1. Use Account 1101.

133
Warehouse Management System Implementation Guide
White paper
2. Ensure that site 1 and warehouse MAINDC have been selected.
3. Click OK.
• Look at item, 1 - Cottage Cheese, and note the quantity of 4.
• Because the default reservation parameter is manual, based on the accounts receivable parameters, you need to manually
reserve inventory. Inventory must be reserved in order to release it to the warehouse.
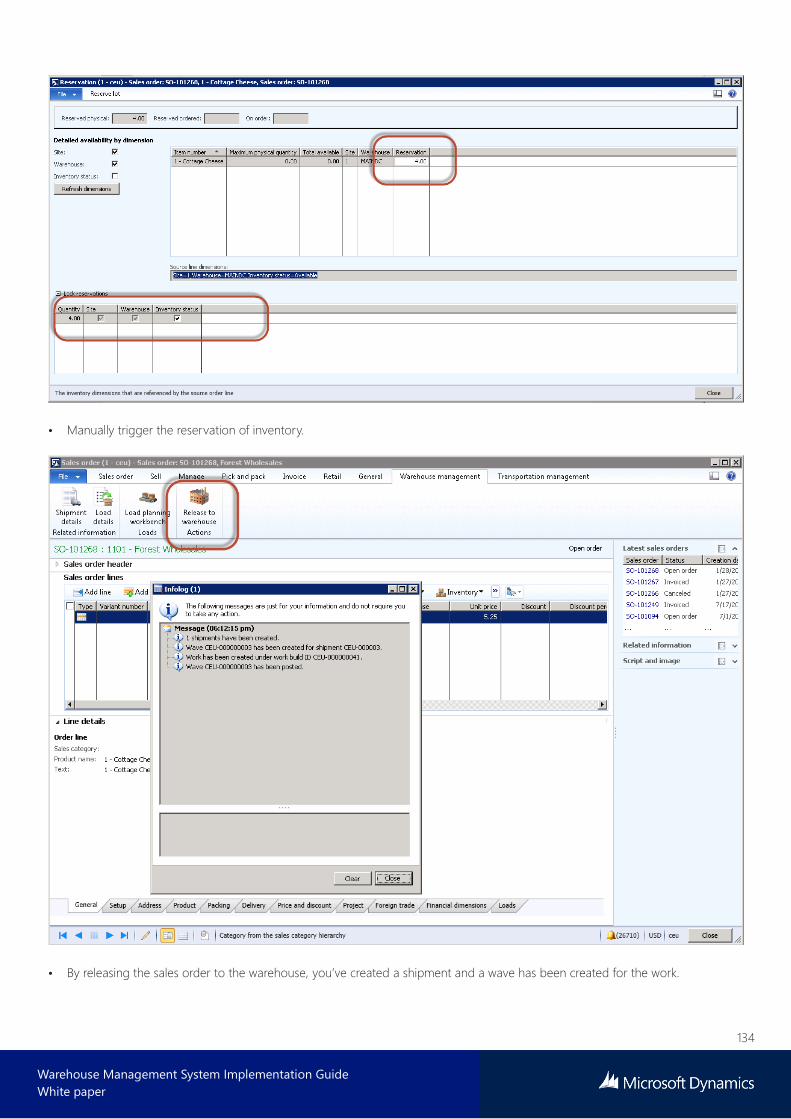
134
Warehouse Management System Implementation Guide
White paper
• Manually trigger the reservation of inventory.
• By releasing the sales order to the warehouse, you’ve created a shipment and a wave has been created for the work.
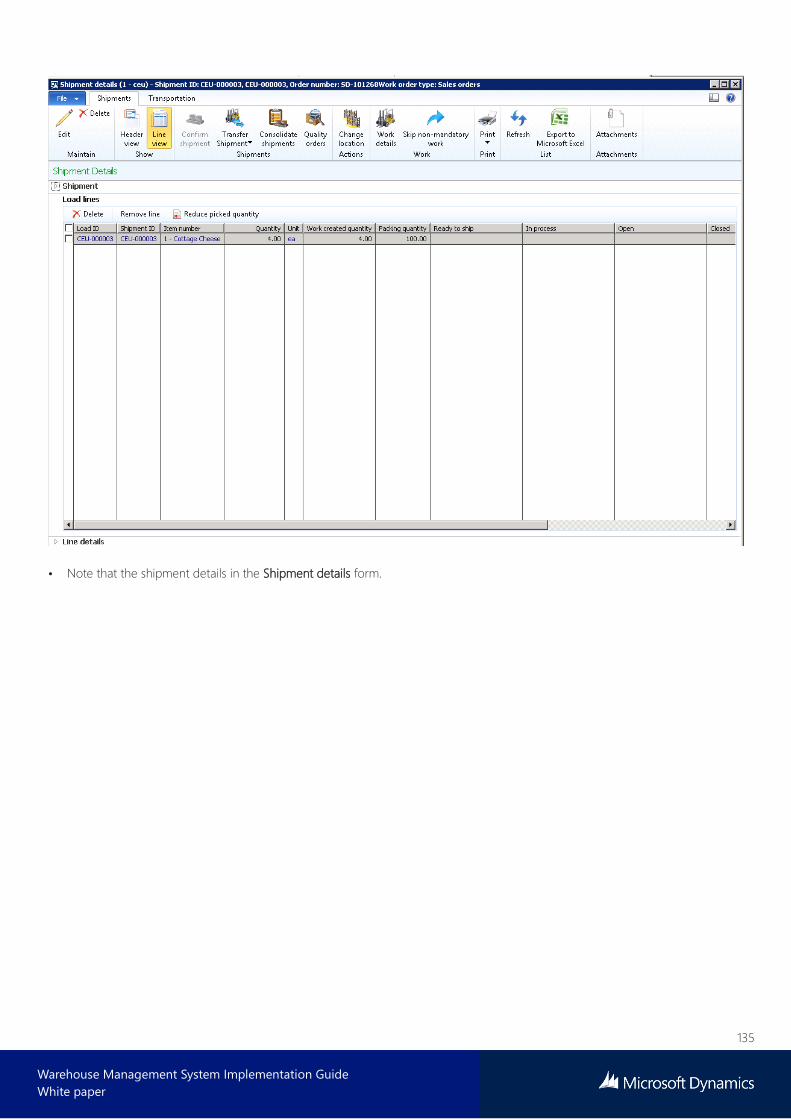
135
Warehouse Management System Implementation Guide
White paper
• Note that the shipment details in the Shipment details form.
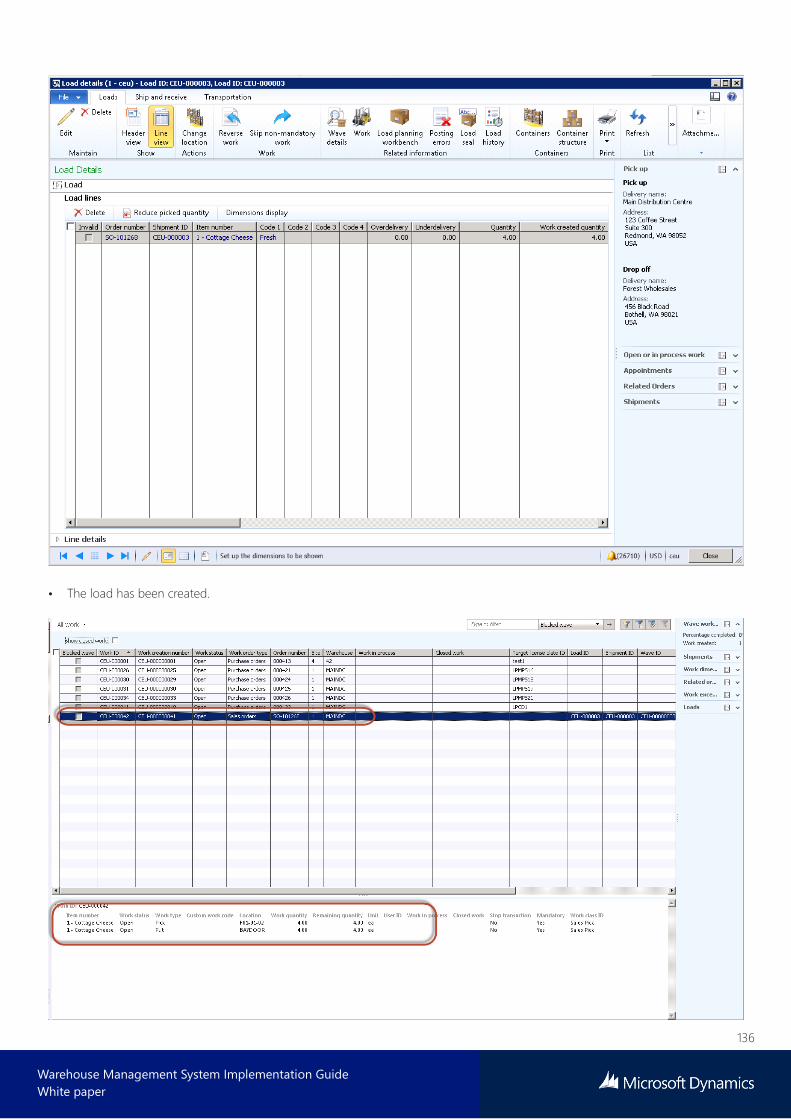
136
Warehouse Management System Implementation Guide
White paper
• The load has been created.
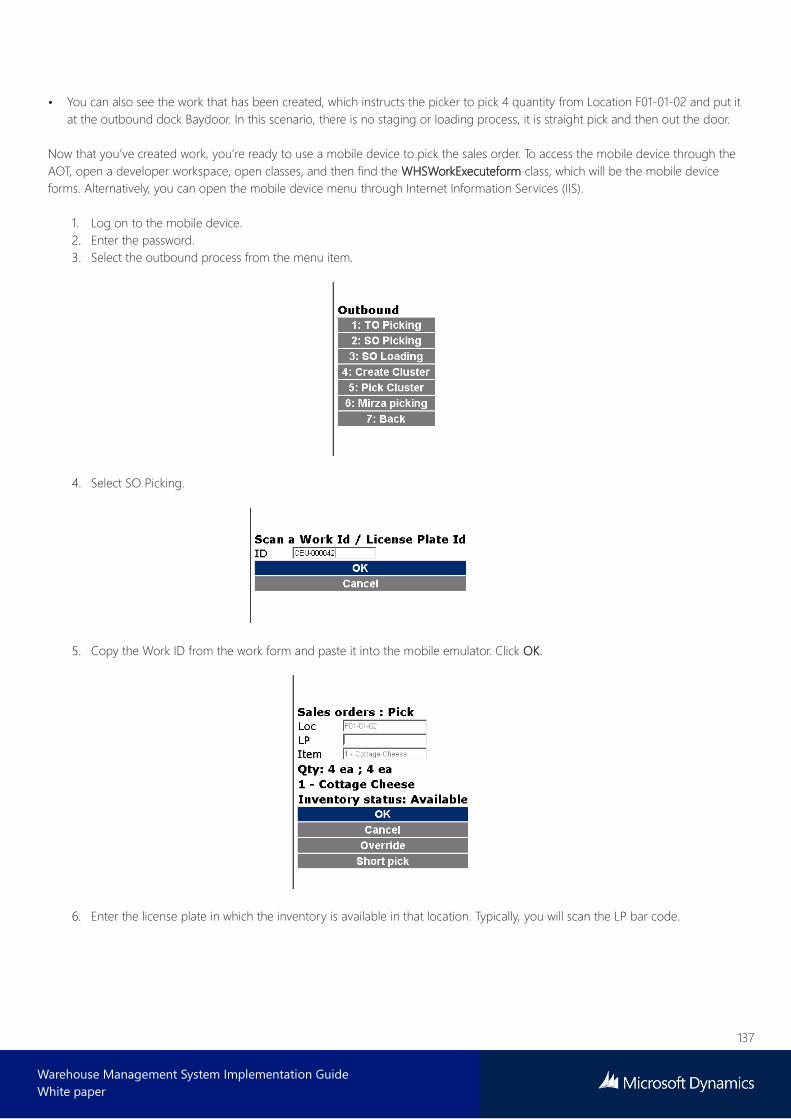
137
Warehouse Management System Implementation Guide
White paper
• You can also see the work that has been created, which instructs the picker to pick 4 quantity from Location F01-01-02 and put it
at the outbound dock Baydoor. In this scenario, there is no staging or loading process, it is straight pick and then out the door.
Now that you’ve created work, you’re ready to use a mobile device to pick the sales order. To access the mobile device through the
AOT, open a developer workspace, open classes, and then find the WHSWorkExecuteform class, which will be the mobile device
forms. Alternatively, you can open the mobile device menu through Internet Information Services (IIS).
1. Log on to the mobile device.
2. Enter the password.
3. Select the outbound process from the menu item.
4. Select SO Picking.
5. Copy the Work ID from the work form and paste it into the mobile emulator. Click OK.
6. Enter the license plate in which the inventory is available in that location. Typically, you will scan the LP bar code.
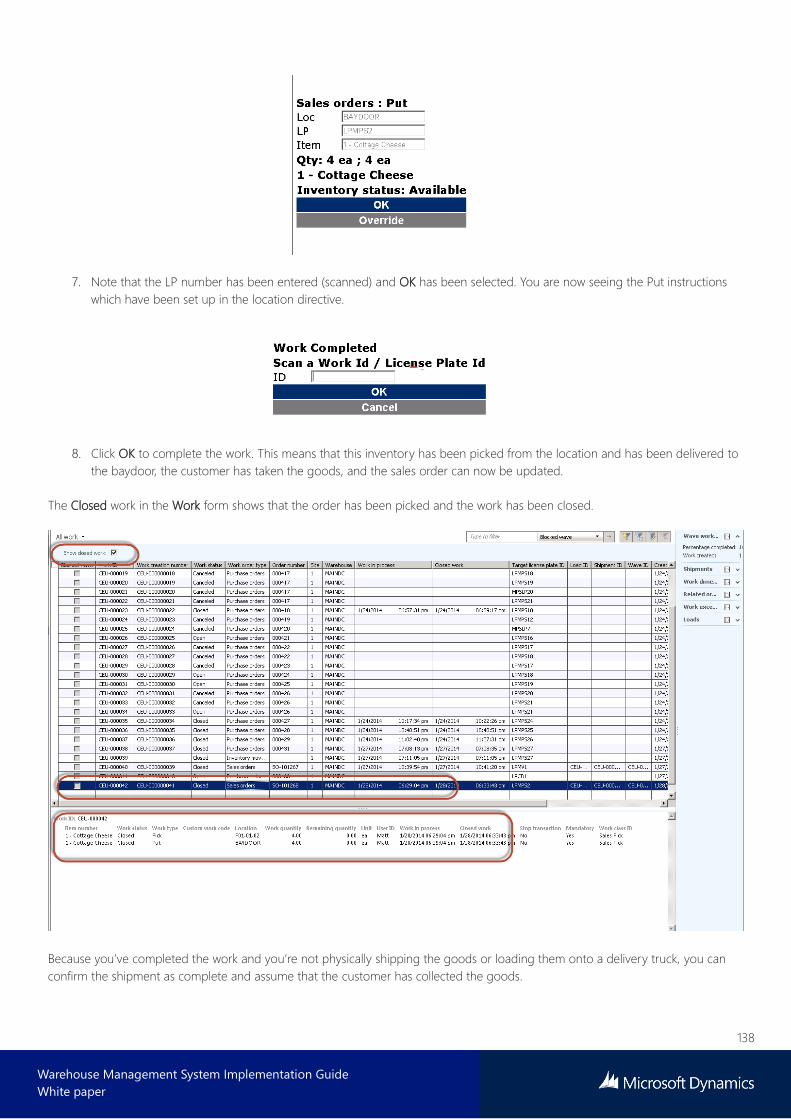
138
Warehouse Management System Implementation Guide
White paper
7. Note that the LP number has been entered (scanned) and OK has been selected. You are now seeing the Put instructions
which have been set up in the location directive.
8. Click OK to complete the work. This means that this inventory has been picked from the location and has been delivered to
the baydoor, the customer has taken the goods, and the sales order can now be updated.
The Closed work in the Work form shows that the order has been picked and the work has been closed.
Because you’ve completed the work and you’re not physically shipping the goods or loading them onto a delivery truck, you can
confirm the shipment as complete and assume that the customer has collected the goods.

139
Warehouse Management System Implementation Guide
White paper
The shipment is now closed and the shipment status is Closed.
3.1.12 Understanding how to introduce staging into the picking process
In the previous section you followed a simple location directive where you set a pick and a put work type for sales orders where pick
was from the location and put was to the outbound dock, Baydoor.
In the next example, you’re going to learn about staging. You’ll pick your items and then place them in a staging location where all
lines of the order will be held. This means the items can be packed, relabeled, or loaded onto a delivery truck, and then sent out the
door.
To do this, you need to adjust two things:
The location directives.
The work template.
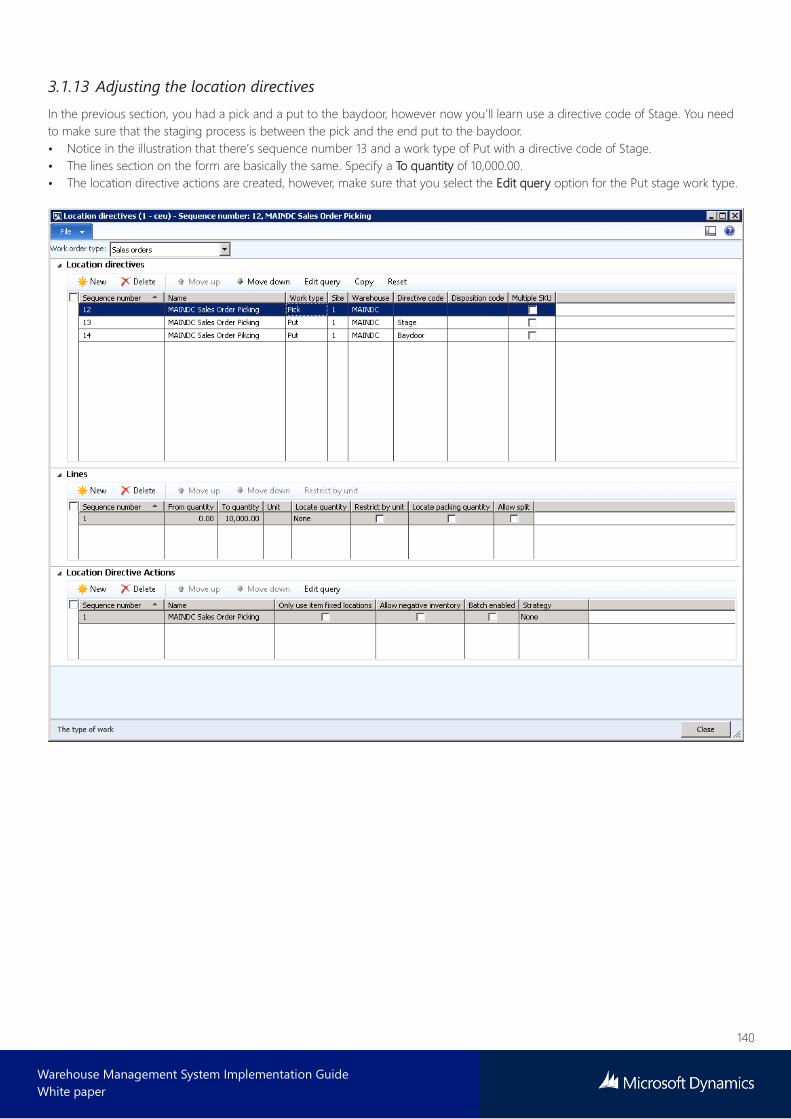
140
Warehouse Management System Implementation Guide
White paper
3.1.13 Adjusting the location directives
In the previous section, you had a pick and a put to the baydoor, however now you’ll learn use a directive code of Stage. You need
to make sure that the staging process is between the pick and the end put to the baydoor.
• Notice in the illustration that there’s sequence number 13 and a work type of Put with a directive code of Stage.
• The lines section on the form are basically the same. Specify a To quantity of 10,000.00.
• The location directive actions are created, however, make sure that you select the Edit query option for the Put stage work type.
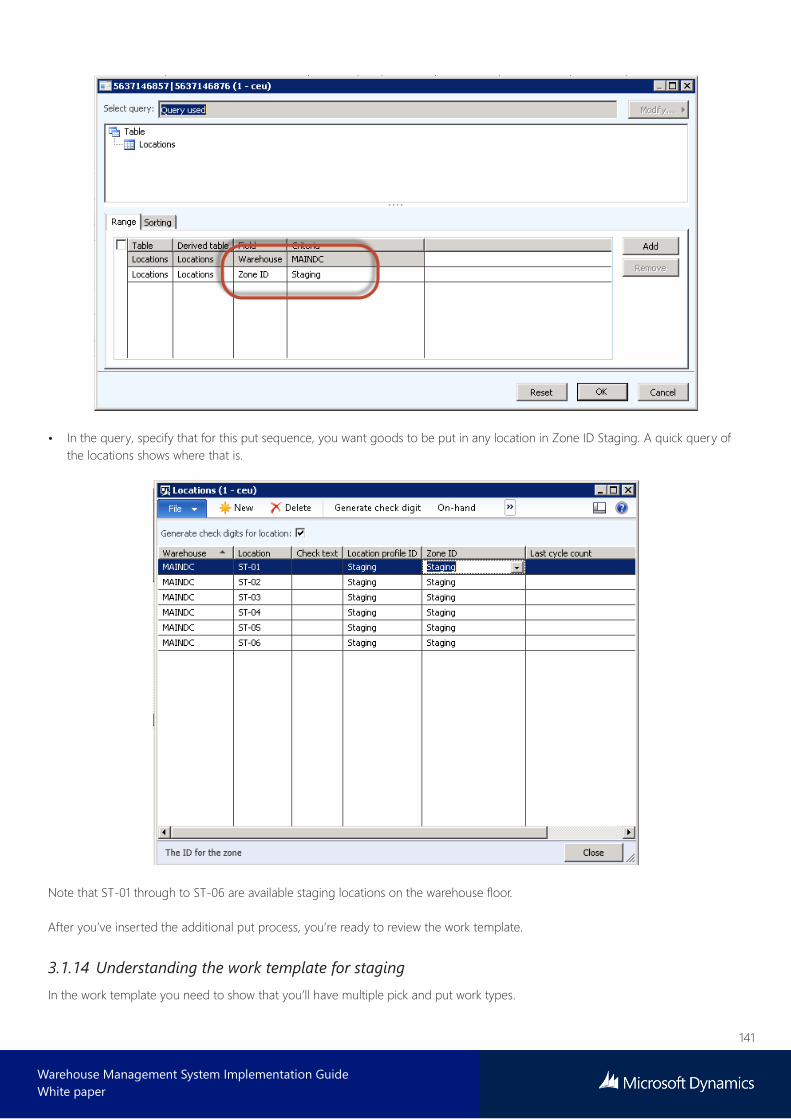
141
Warehouse Management System Implementation Guide
White paper
• In the query, specify that for this put sequence, you want goods to be put in any location in Zone ID Staging. A quick query of
the locations shows where that is.
Note that ST-01 through to ST-06 are available staging locations on the warehouse floor.
After you’ve inserted the additional put process, you’re ready to review the work template.
3.1.14 Understanding the work template for staging
In the work template you need to show that you’ll have multiple pick and put work types.
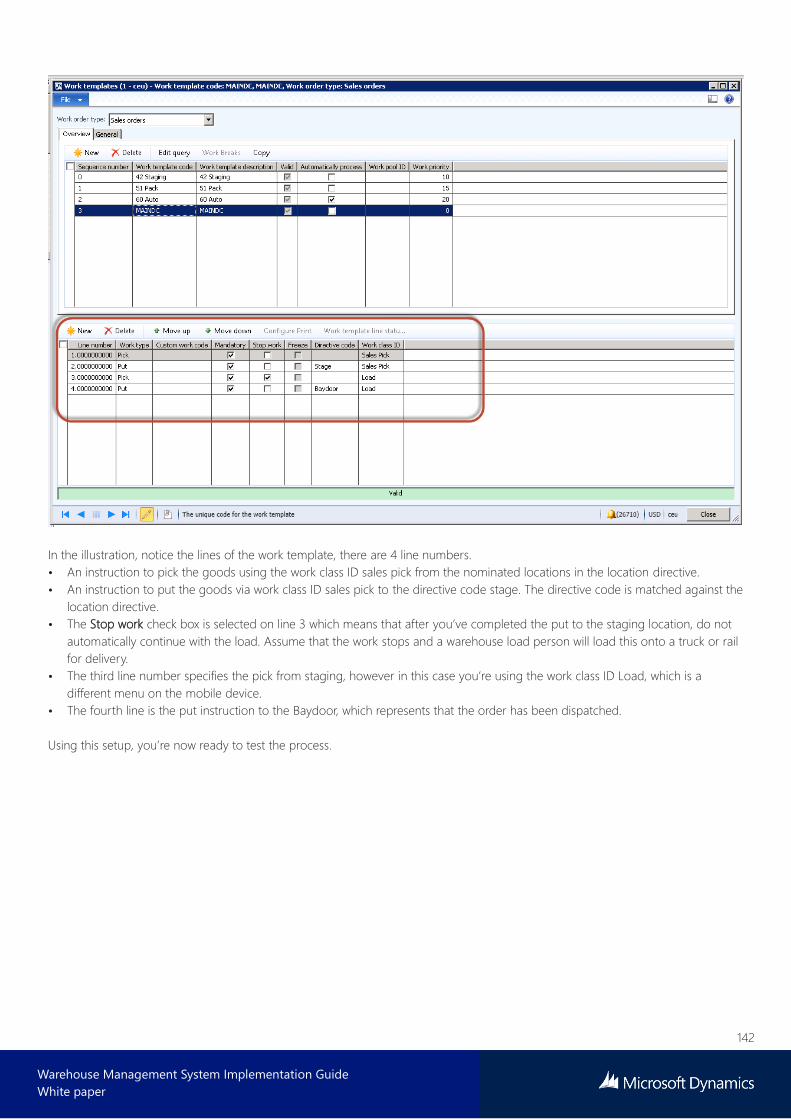
142
Warehouse Management System Implementation Guide
White paper
In the illustration, notice the lines of the work template, there are 4 line numbers.
• An instruction to pick the goods using the work class ID sales pick from the nominated locations in the location directive.
• An instruction to put the goods via work class ID sales pick to the directive code stage. The directive code is matched against the
location directive.
• The Stop work check box is selected on line 3 which means that after you’ve completed the put to the staging location, do not
automatically continue with the load. Assume that the work stops and a warehouse load person will load this onto a truck or rail
for delivery.
• The third line number specifies the pick from staging, however in this case you’re using the work class ID Load, which is a
different menu on the mobile device.
• The fourth line is the put instruction to the Baydoor, which represents that the order has been dispatched.
Using this setup, you’re now ready to test the process.
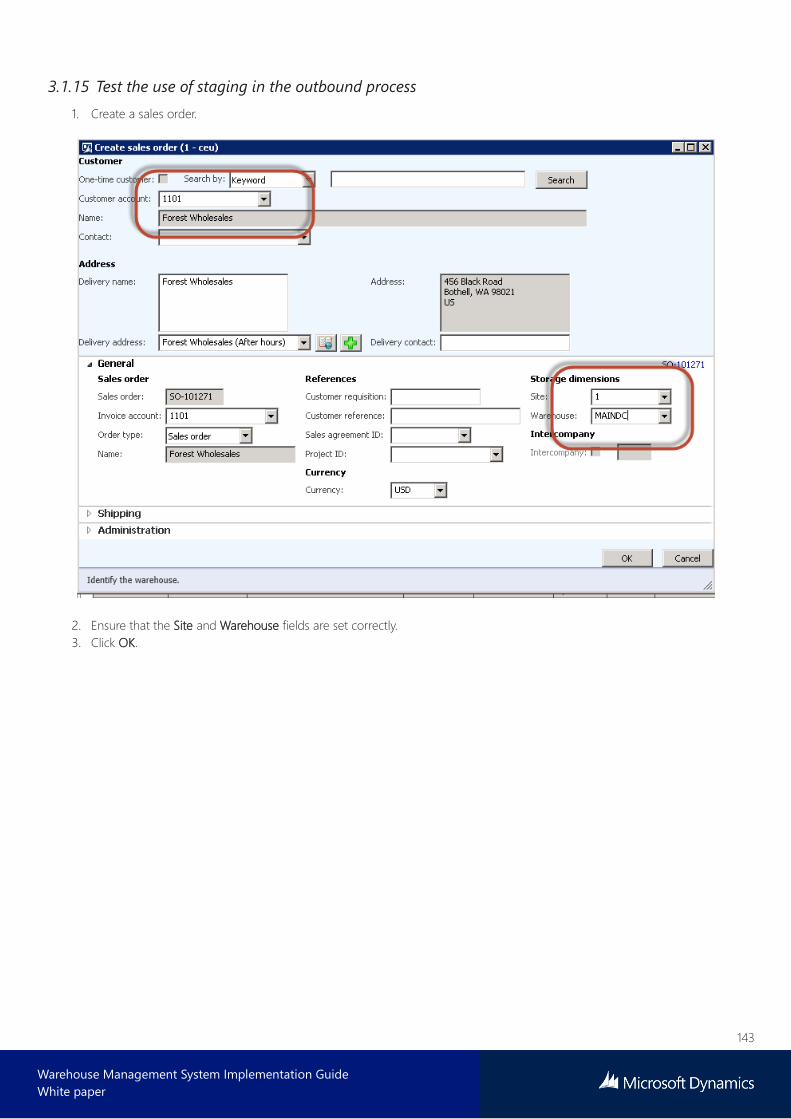
143
Warehouse Management System Implementation Guide
White paper
3.1.15 Test the use of staging in the outbound process
1. Create a sales order.
2. Ensure that the Site and Warehouse fields are set correctly.
3. Click OK.
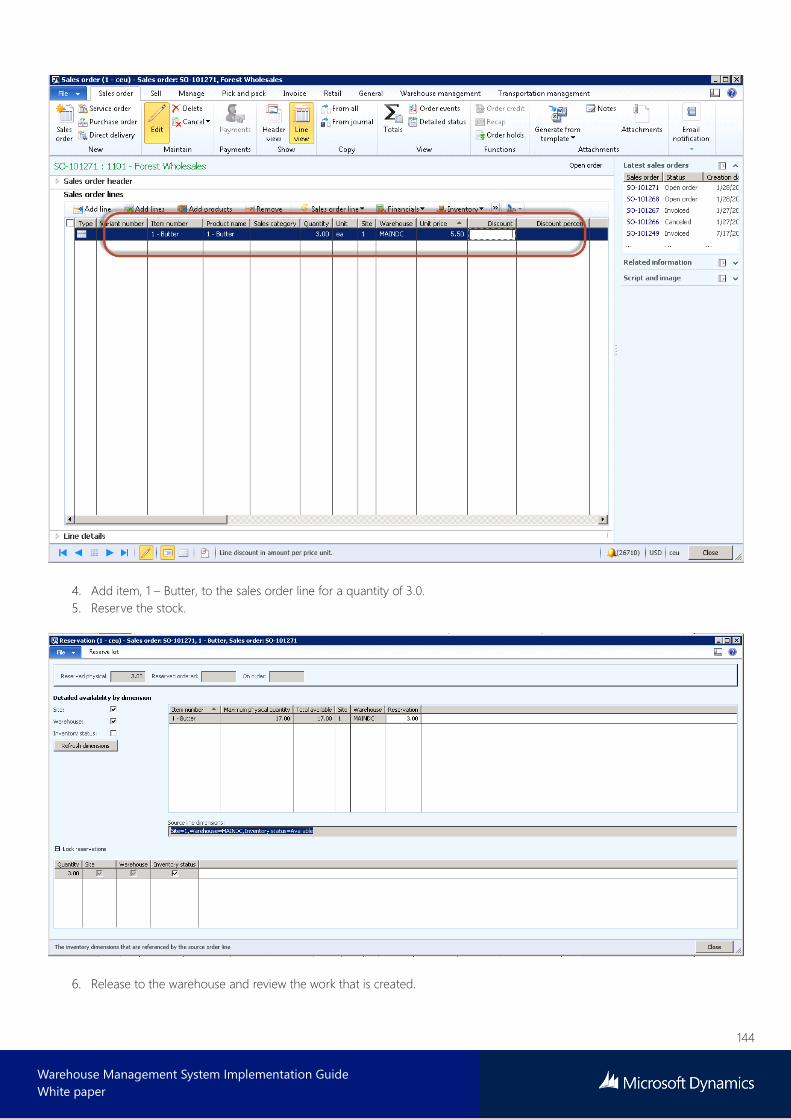
144
Warehouse Management System Implementation Guide
White paper
4. Add item, 1 – Butter, to the sales order line for a quantity of 3.0.
5. Reserve the stock.
6. Release to the warehouse and review the work that is created.
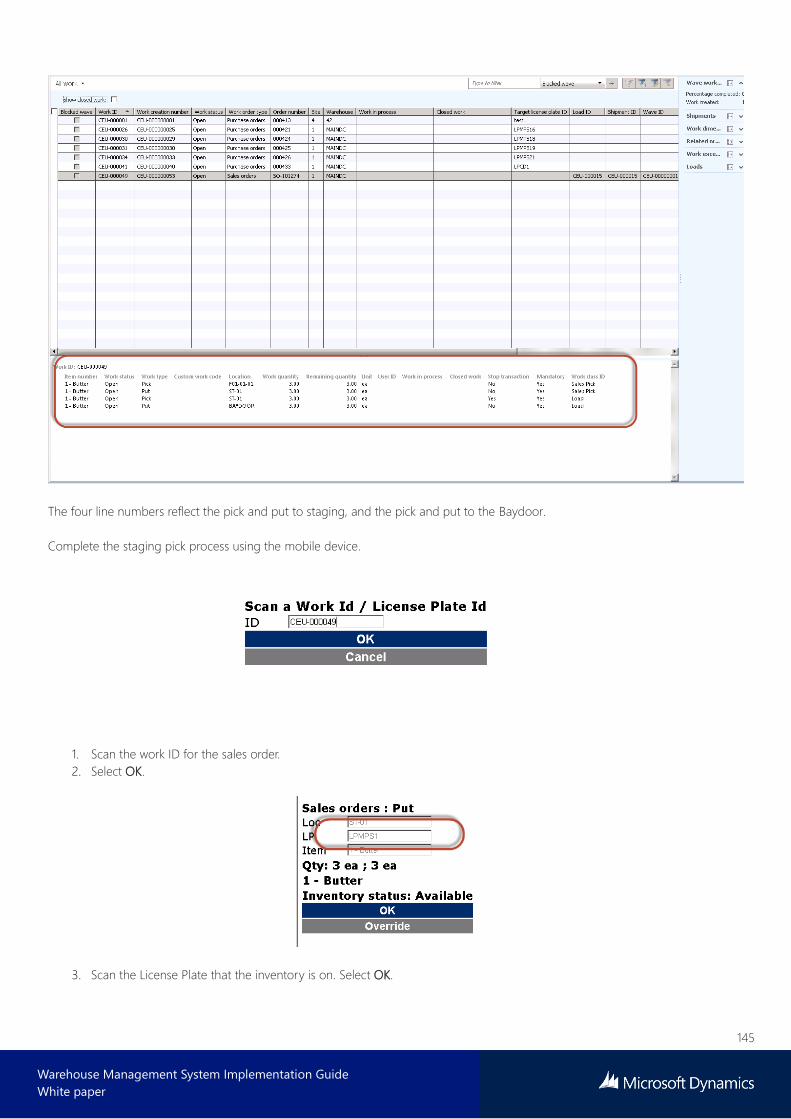
145
Warehouse Management System Implementation Guide
White paper
The four line numbers reflect the pick and put to staging, and the pick and put to the Baydoor.
Complete the staging pick process using the mobile device.
1. Scan the work ID for the sales order.
2. Select OK.
3. Scan the License Plate that the inventory is on. Select OK.
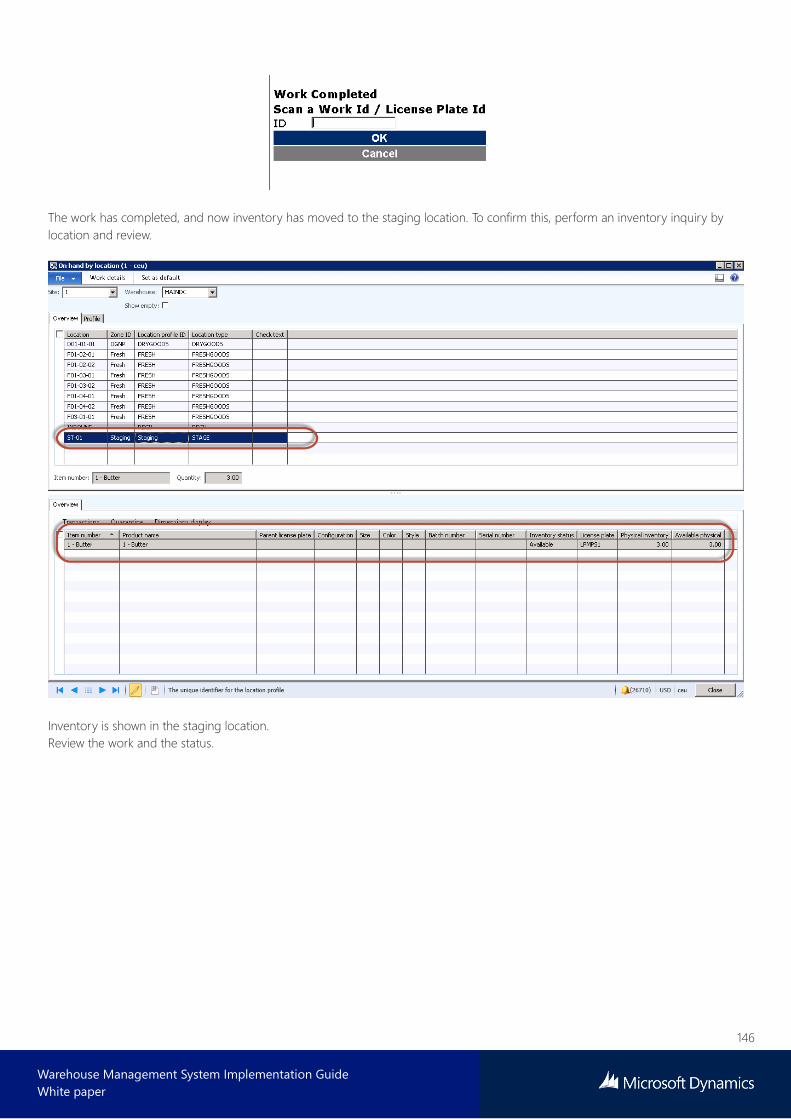
146
Warehouse Management System Implementation Guide
White paper
The work has completed, and now inventory has moved to the staging location. To confirm this, perform an inventory inquiry by
location and review.
Inventory is shown in the staging location.
Review the work and the status.
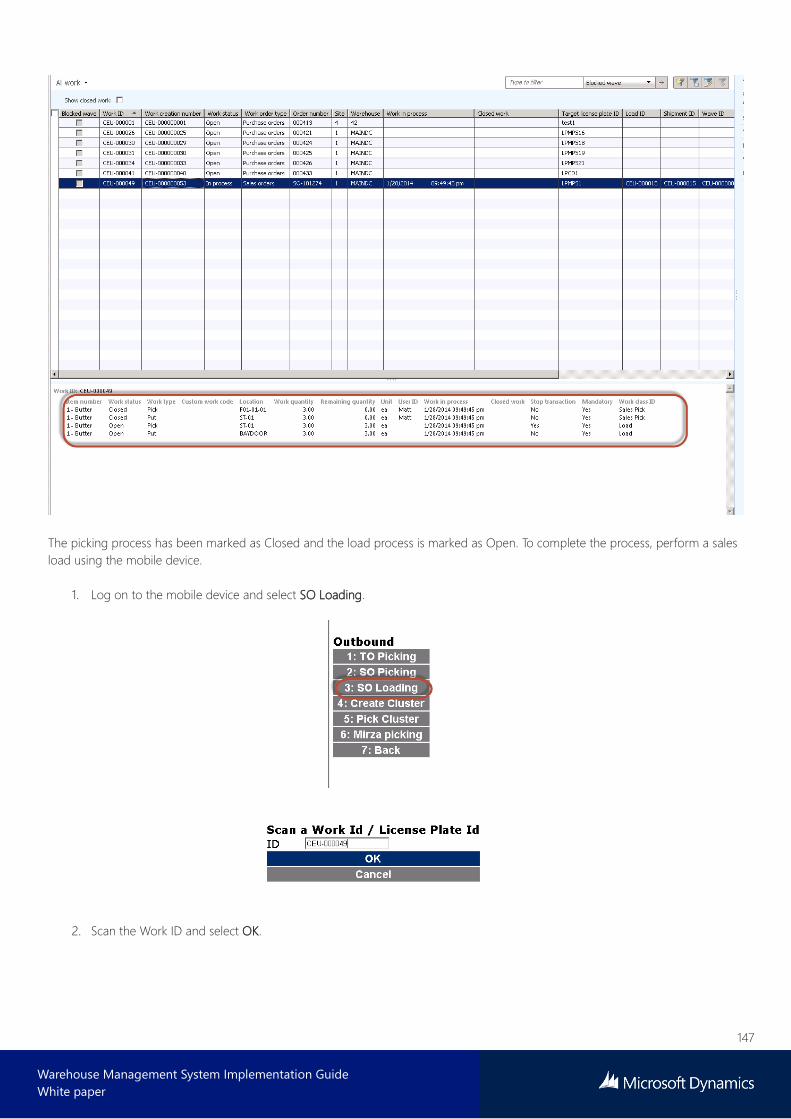
147
Warehouse Management System Implementation Guide
White paper
The picking process has been marked as Closed and the load process is marked as Open. To complete the process, perform a sales
load using the mobile device.
1. Log on to the mobile device and select SO Loading.
2. Scan the Work ID and select OK.
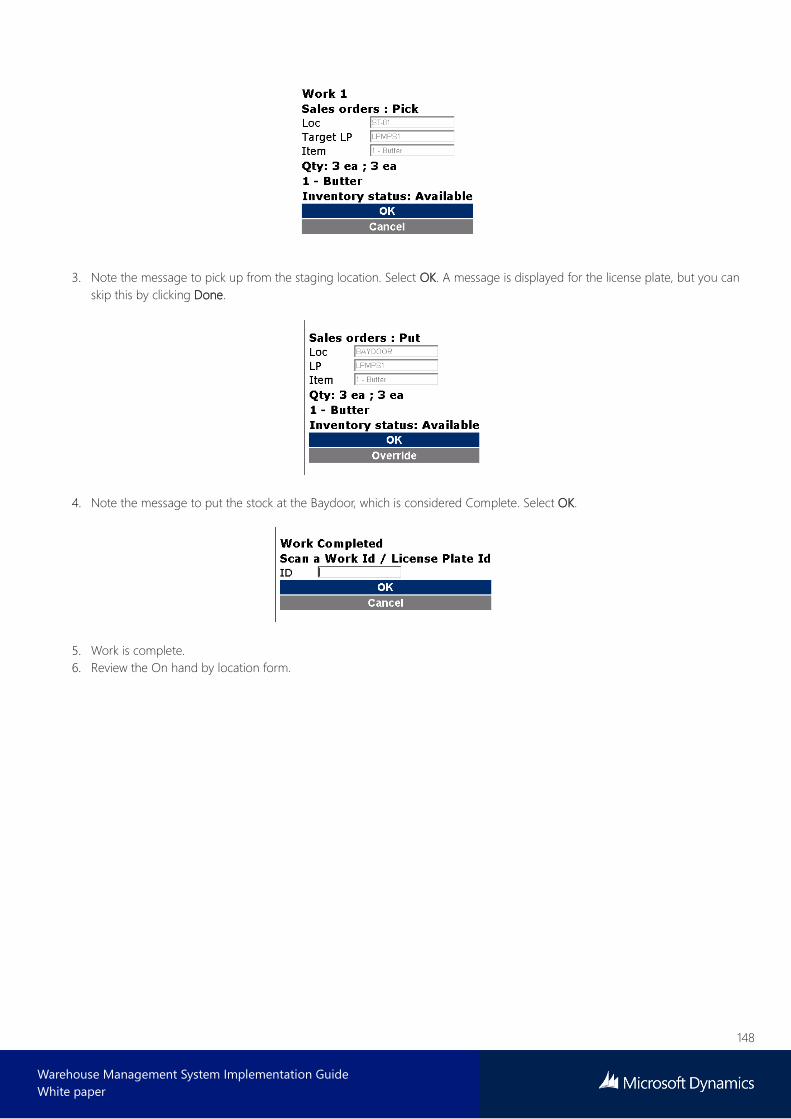
148
Warehouse Management System Implementation Guide
White paper
3. Note the message to pick up from the staging location. Select OK. A message is displayed for the license plate, but you can
skip this by clicking Done.
4. Note the message to put the stock at the Baydoor, which is considered Complete. Select OK.
5. Work is complete.
6. Review the On hand by location form.

149
Warehouse Management System Implementation Guide
White paper
All staging locations have now been depleted, the process is complete.
3.1.16 Understanding how to use anchoring in the staging process
Anchoring lets you override the staging or loading location so that all open puts will be directed to the new staging or loading
location. The Mobile Device Menu configuration is found on the Mobile Device Menu Item configuration. If the Anchor field is
selected, then you can anchor by shipment or by load. If anchoring is by shipment, then the subsequent open puts will be changed
to the new location for that shipment. If anchoring is by load, then the subsequent open puts will be changed to the new location
for that load.

150
Warehouse Management System Implementation Guide
White paper
3.1.17 Understanding cluster picking
Cluster picking offers significant levels of optimization. You can pick multiple orders at a time by incorporating the pick tasks for
various orders and sequencing them accordingly.
Work will be created in clusters, and the picking functionality ensures that the warehouse worker visits every location in the cluster
only one time. The worker will be instructed to pick the whole quantity needed and place the items into positions, for all cartons.
The following illustration shows an example of where cluster picking would be useful. Each blue box on the cart represents a
position and an order. This allows the picker to pick the item many times, but place it in the designated position.
To set this up, there are several steps required to identify what orders would be considered cluster picked orders and what orders
would not. The next case study example will identify orders that have a sales origin of INET, which will be picked in a cluster picking
environment.

151
Warehouse Management System Implementation Guide
White paper
Step 1
Create a new location directive for the sales order work type that specifies setup for cluster picking.
To open the Location directives window, follow this navigation path:
Warehouse Management > Setup > Location Directives
1. For the location directive, create two additional sequence numbers to support the cluster picking directive – a pick
instruction and a put instruction. Focus on line sequence 15 – the Pick instruction.
2. Create a new line and set it against MAINDC warehouse and site 1.
3. Select the Edit query option and specify that you only want sales orders that have a sales origin of INET to be routed
through the cluster picking location directive.
4. For the lines of the location directive for Pick, do not restrict by unit of measure and use a default of 0 to 10,000.00.
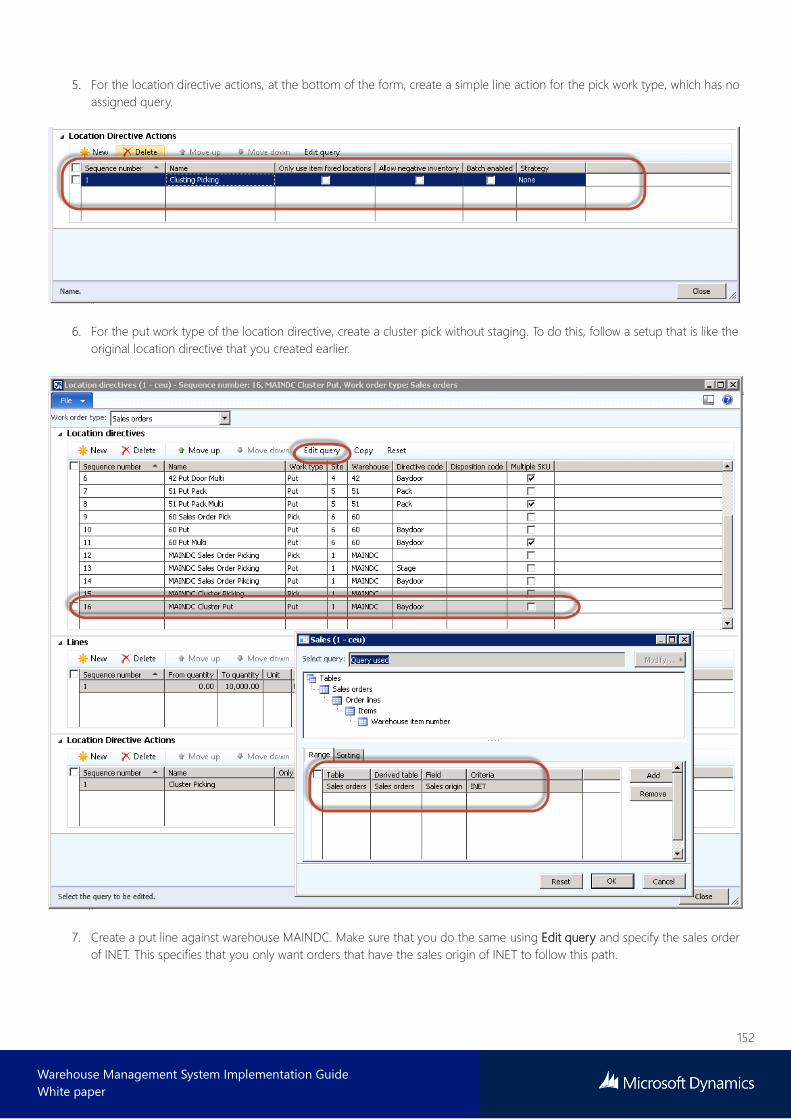
152
Warehouse Management System Implementation Guide
White paper
5. For the location directive actions, at the bottom of the form, create a simple line action for the pick work type, which has no
assigned query.
6. For the put work type of the location directive, create a cluster pick without staging. To do this, follow a setup that is like the
original location directive that you created earlier.
7. Create a put line against warehouse MAINDC. Make sure that you do the same using Edit query and specify the sales order
of INET. This specifies that you only want orders that have the sales origin of INET to follow this path.

153
Warehouse Management System Implementation Guide
White paper
8. The line sequence should have a 0 to 10,000.00 quantity.
9. On the Location Directive Actions FastTab, enter one sequence and enter the put instruction to place the items in the
location profile, Baydoor.

154
Warehouse Management System Implementation Guide
White paper
10. Specify !”NET” criteria on the standard location directive, which in this case study is Sequence number line 12.
Step 2
For step two, must make sure that you have a work template created to handle the work that is associated with a cluster pick.
To open the Work template window, follow this navigation path:
Warehouse Management > Setup > Work > Work Template
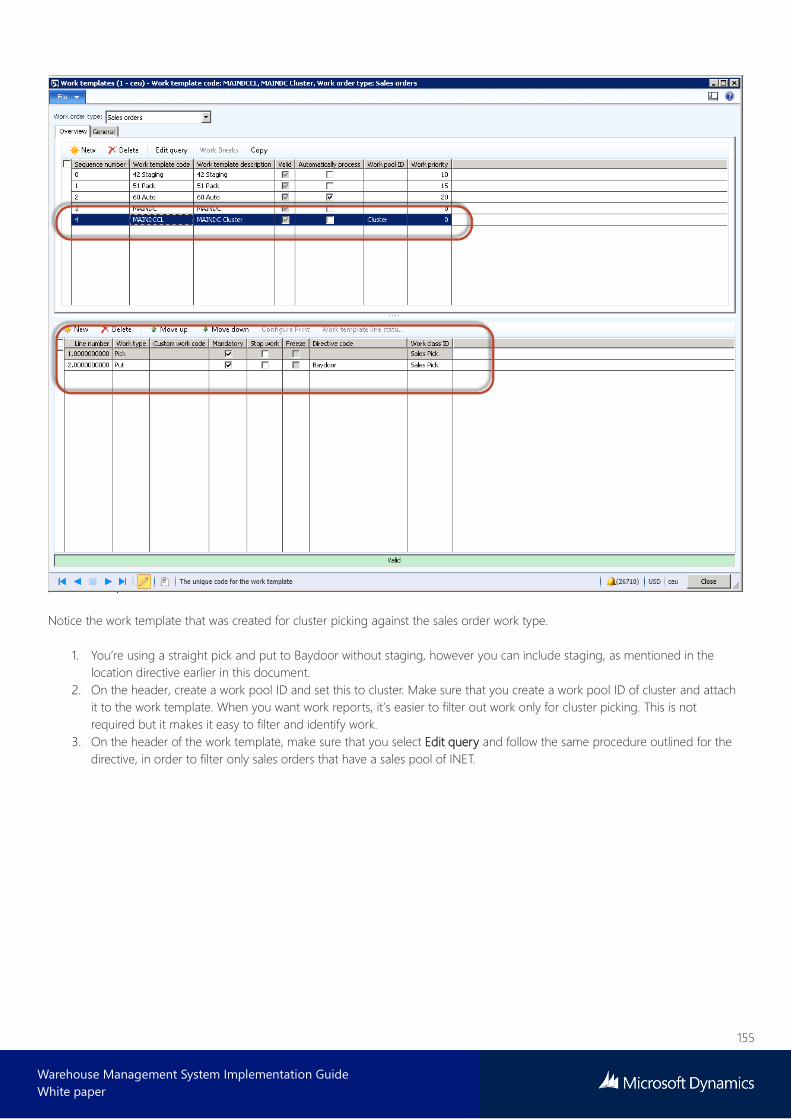
155
Warehouse Management System Implementation Guide
White paper
Notice the work template that was created for cluster picking against the sales order work type.
1. You’re using a straight pick and put to Baydoor without staging, however you can include staging, as mentioned in the
location directive earlier in this document.
2. On the header, create a work pool ID and set this to cluster. Make sure that you create a work pool ID of cluster and attach
it to the work template. When you want work reports, it’s easier to filter out work only for cluster picking. This is not
required but it makes it easy to filter and identify work.
3. On the header of the work template, make sure that you select Edit query and follow the same procedure outlined for the
directive, in order to filter only sales orders that have a sales pool of INET.
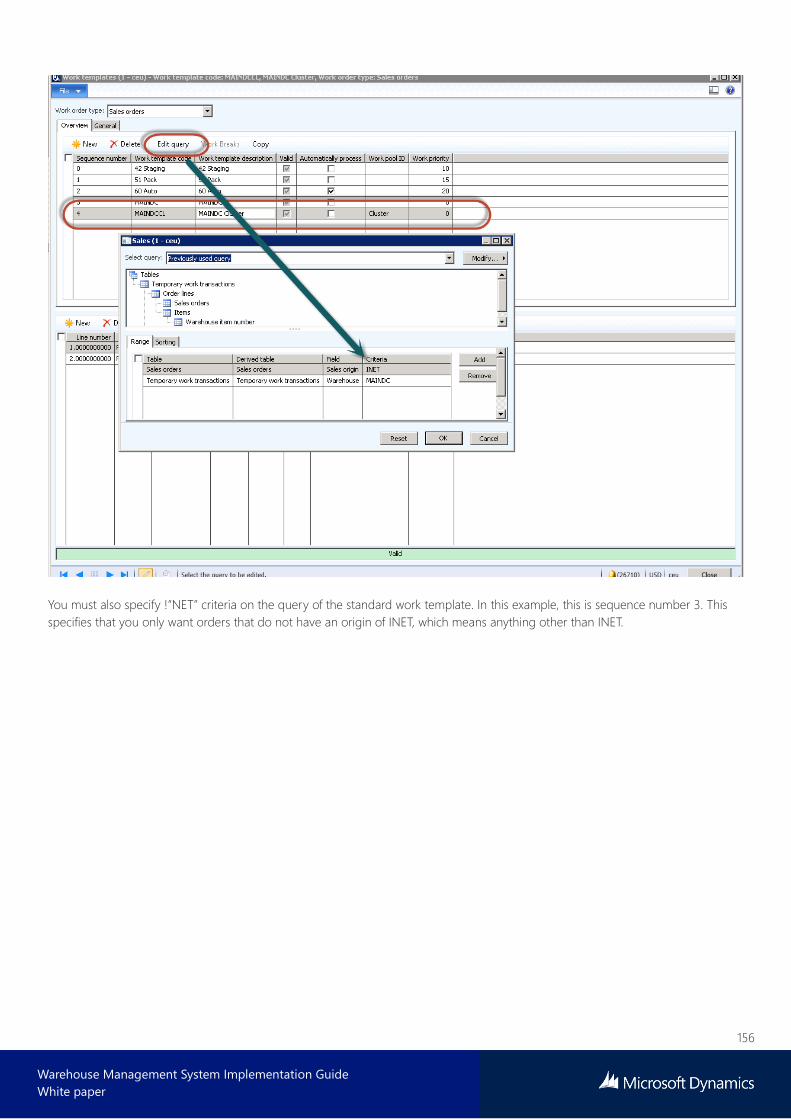
156
Warehouse Management System Implementation Guide
White paper
You must also specify !”NET” criteria on the query of the standard work template. In this example, this is sequence number 3. This
specifies that you only want orders that do not have an origin of INET, which means anything other than INET.
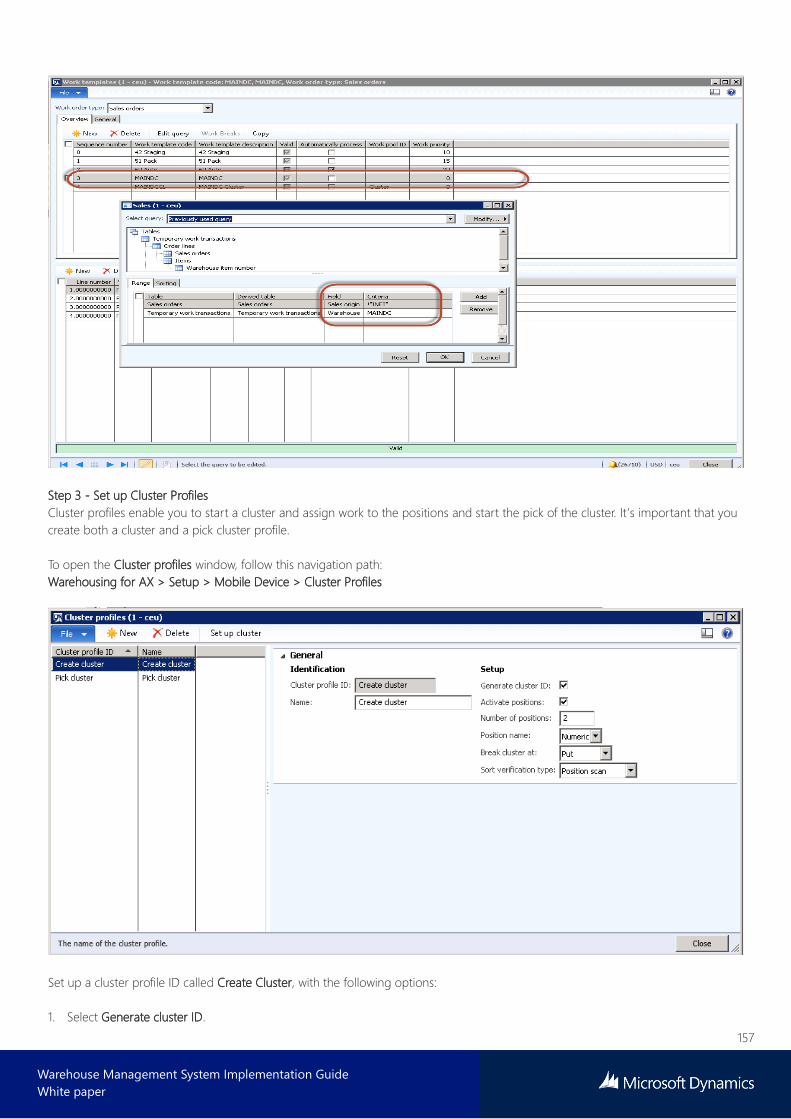
157
Warehouse Management System Implementation Guide
White paper
Step 3 - Set up Cluster Profiles
Cluster profiles enable you to start a cluster and assign work to the positions and start the pick of the cluster. It’s important that you
create both a cluster and a pick cluster profile.
To open the Cluster profiles window, follow this navigation path:
Warehousing for AX > Setup > Mobile Device > Cluster Profiles
Set up a cluster profile ID called Create Cluster, with the following options:
1. Select Generate cluster ID.
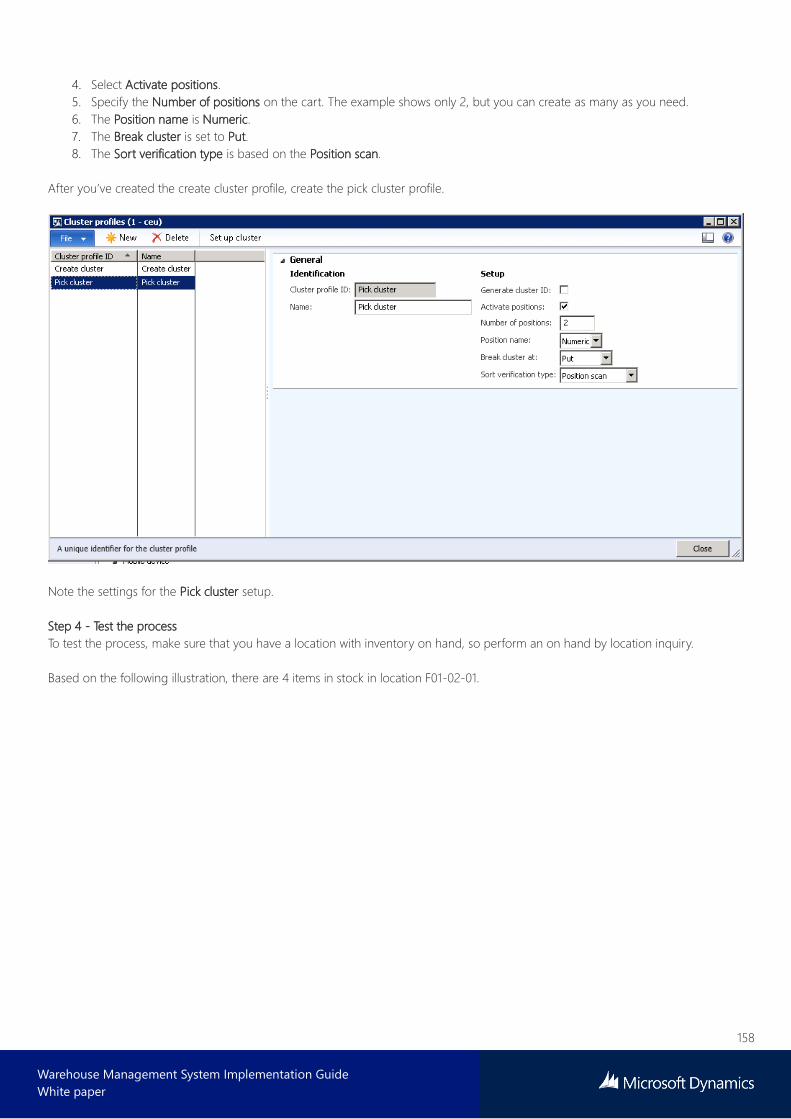
158
Warehouse Management System Implementation Guide
White paper
4. Select Activate positions.
5. Specify the Number of positions on the cart. The example shows only 2, but you can create as many as you need.
6. The Position name is Numeric.
7. The Break cluster is set to Put.
8. The Sort verification type is based on the Position scan.
After you’ve created the create cluster profile, create the pick cluster profile.
Note the settings for the Pick cluster setup.
Step 4 - Test the process
To test the process, make sure that you have a location with inventory on hand, so perform an on hand by location inquiry.
Based on the following illustration, there are 4 items in stock in location F01-02-01.
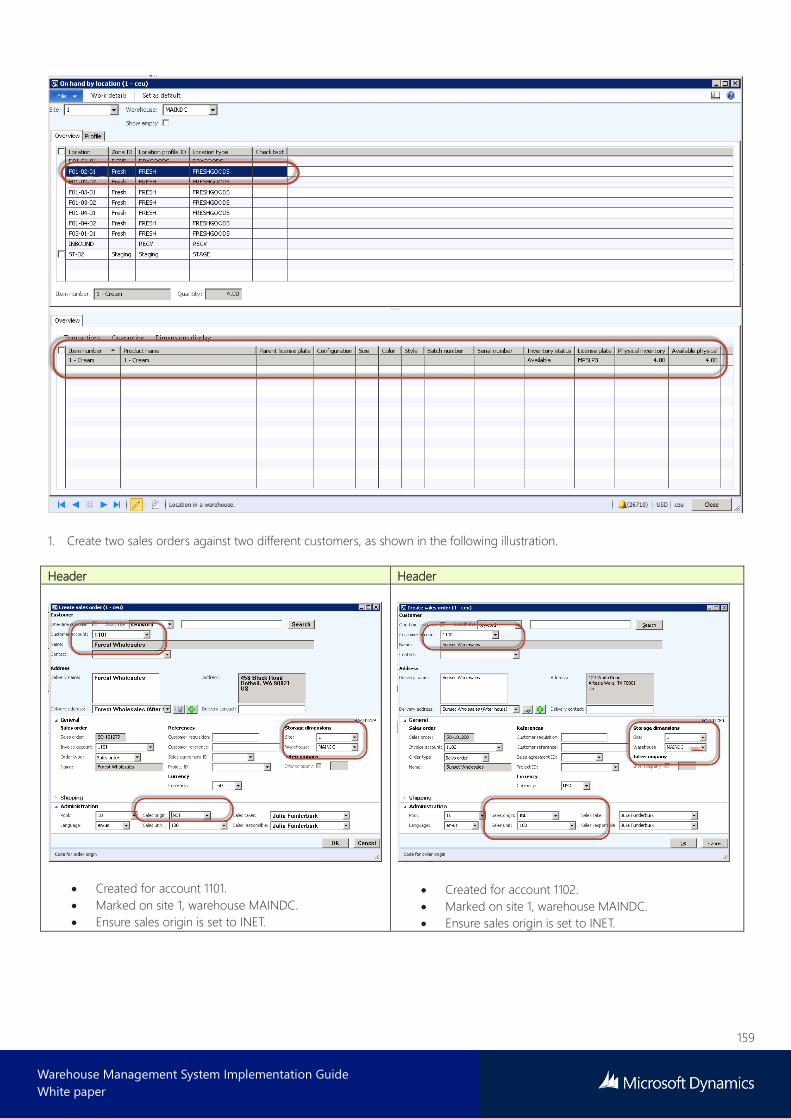
159
Warehouse Management System Implementation Guide
White paper
1. Create two sales orders against two different customers, as shown in the following illustration.
Header Header
Created for account 1101.
Marked on site 1, warehouse MAINDC.
Ensure sales origin is set to INET.
Created for account 1102.
Marked on site 1, warehouse MAINDC.
Ensure sales origin is set to INET.
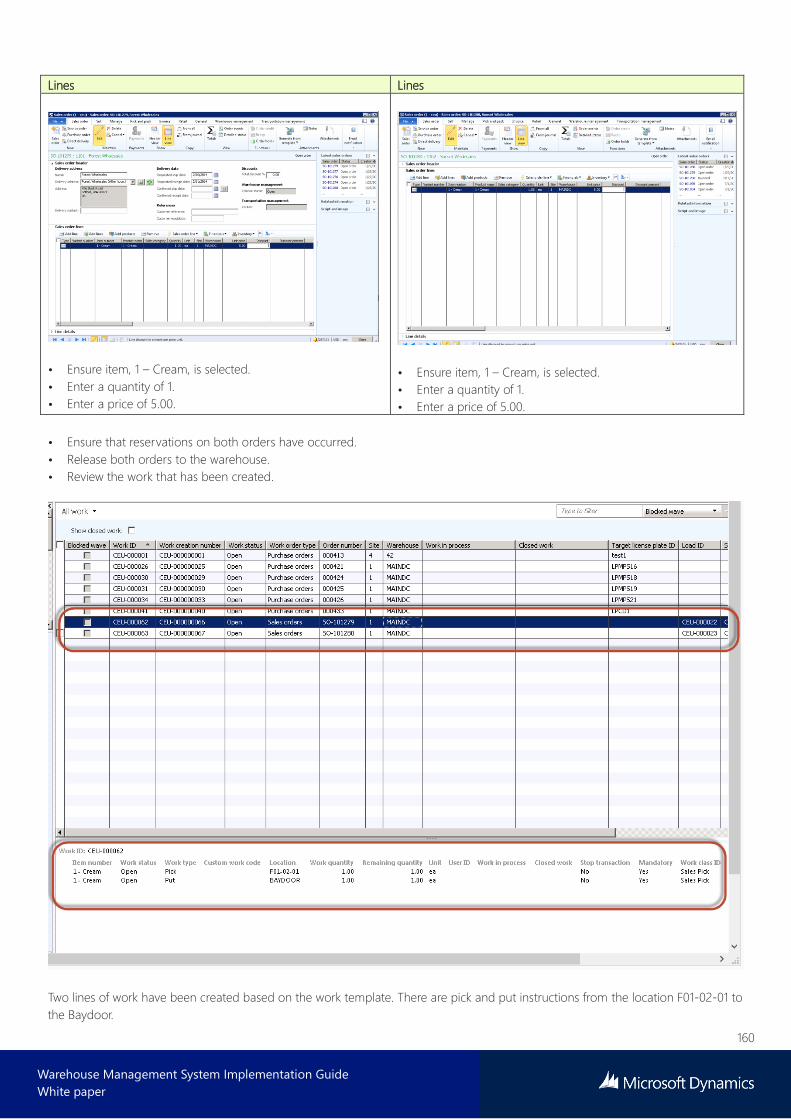
160
Warehouse Management System Implementation Guide
White paper
Lines Lines
• Ensure item, 1 – Cream, is selected.
• Enter a quantity of 1.
• Enter a price of 5.00.
• Ensure item, 1 – Cream, is selected.
• Enter a quantity of 1.
• Enter a price of 5.00.
• Ensure that reservations on both orders have occurred.
• Release both orders to the warehouse.
• Review the work that has been created.
Two lines of work have been created based on the work template. There are pick and put instructions from the location F01-02-01 to
the Baydoor.

161
Warehouse Management System Implementation Guide
White paper
Next, create the cluster, join both work ID’s, and then engage a trolley to pick the items.
Create the cluster.
Log on to the mobile device.
3. Select Create Cluster.
4. Note the message about assigning the Work ID to Position 1.

162
Warehouse Management System Implementation Guide
White paper
5. Select OK.
6. Select the second Work ID and assign to Position 2.
7. You’ve created Cluster ID, CEU-0000000004, for a quantity of 2 items, 1 per each sales order. In this case study, you do not
need to move on to picking, so select Pass.
Let’s review the cluster pick.
To open the Work clusters window, follow this navigation path:
Warehouse Management > Inquiries > Work Clusters

163
Warehouse Management System Implementation Guide
White paper
Notice that there are two sales orders on this cluster ID.
Next, you’re going to continue with the picking of the cluster.
Log on to the mobile device. This time select Pick Cluster from the outbound menu.
Select the cluster ID that is shown in the following illustration. Select OK.
3. Note the message to scan the license plate from where you will pick the item, 1 - Cream.
4. Select OK.
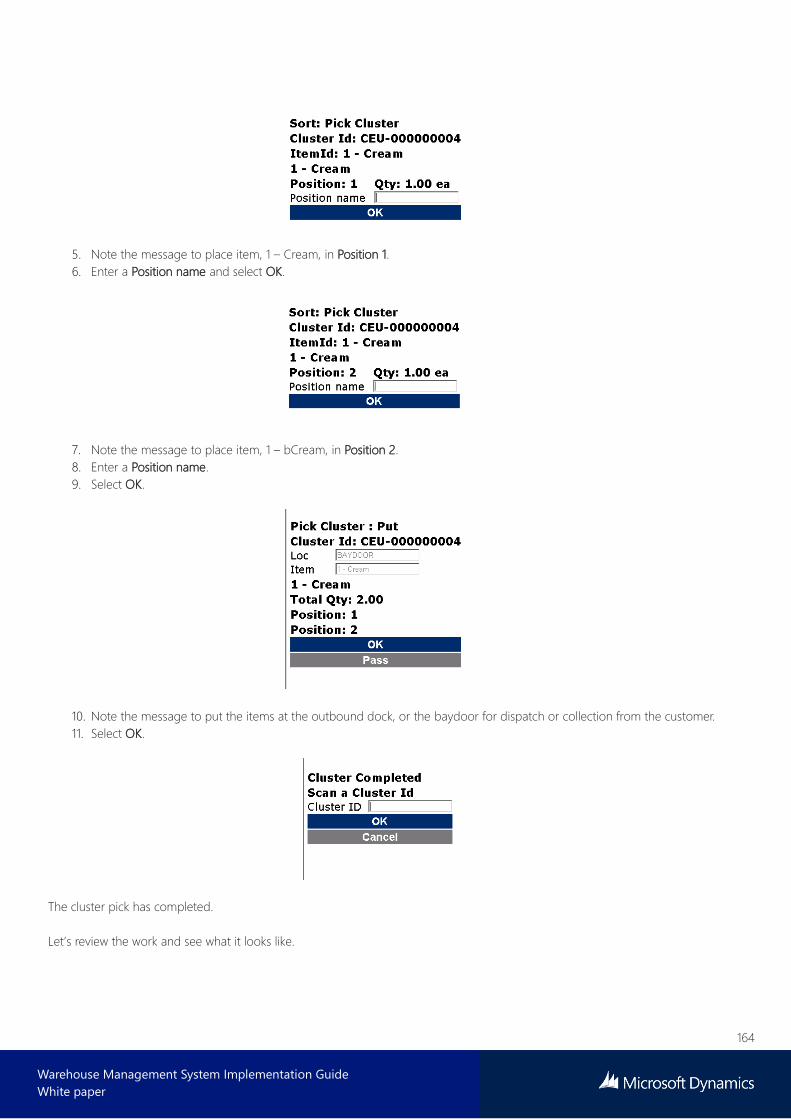
164
Warehouse Management System Implementation Guide
White paper
5. Note the message to place item, 1 – Cream, in Position 1.
6. Enter a Position name and select OK.
7. Note the message to place item, 1 – bCream, in Position 2.
8. Enter a Position name.
9. Select OK.
10. Note the message to put the items at the outbound dock, or the baydoor for dispatch or collection from the customer.
11. Select OK.
The cluster pick has completed.
Let’s review the work and see what it looks like.

165
Warehouse Management System Implementation Guide
White paper
Both work orders for the two sales orders are marked as Closed, so the customer pick was successful and completed.
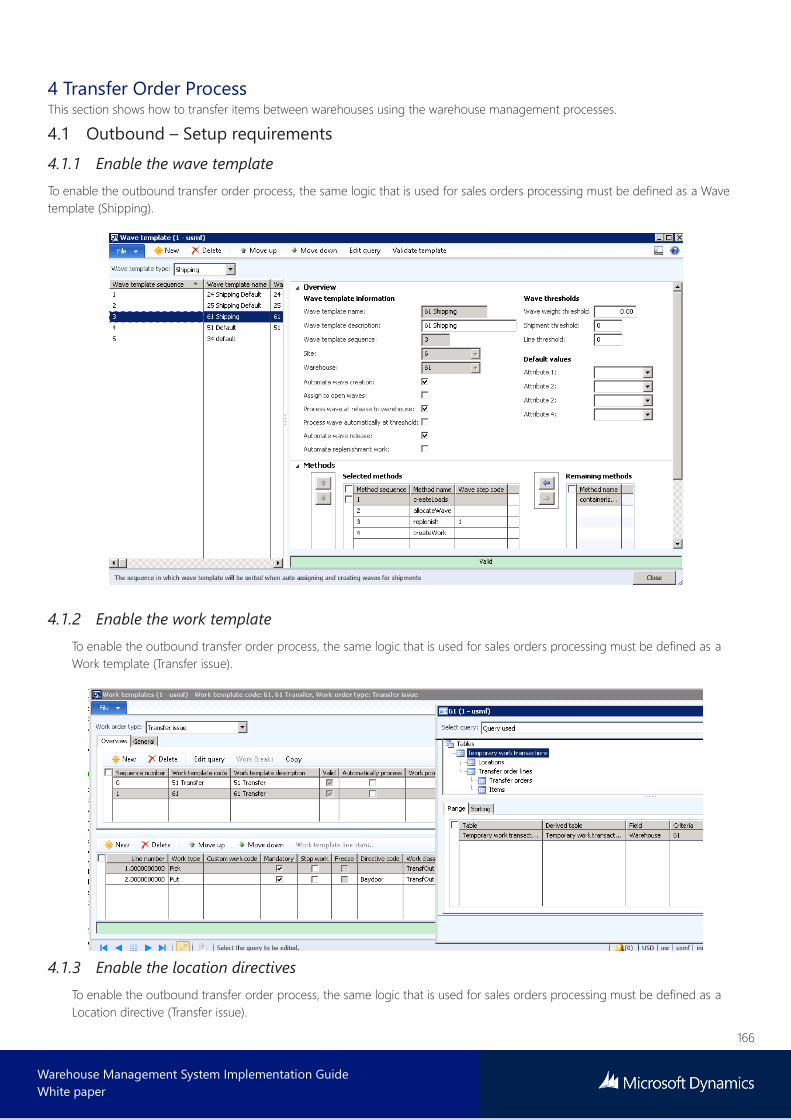
166
Warehouse Management System Implementation Guide
White paper
4 Transfer Order Process This section shows how to transfer items between warehouses using the warehouse management processes.
4.1 Outbound – Setup requirements
4.1.1 Enable the wave template
To enable the outbound transfer order process, the same logic that is used for sales orders processing must be defined as a Wave
template (Shipping).
4.1.2 Enable the work template
To enable the outbound transfer order process, the same logic that is used for sales orders processing must be defined as a
Work template (Transfer issue).
4.1.3 Enable the location directives
To enable the outbound transfer order process, the same logic that is used for sales orders processing must be defined as a
Location directive (Transfer issue).
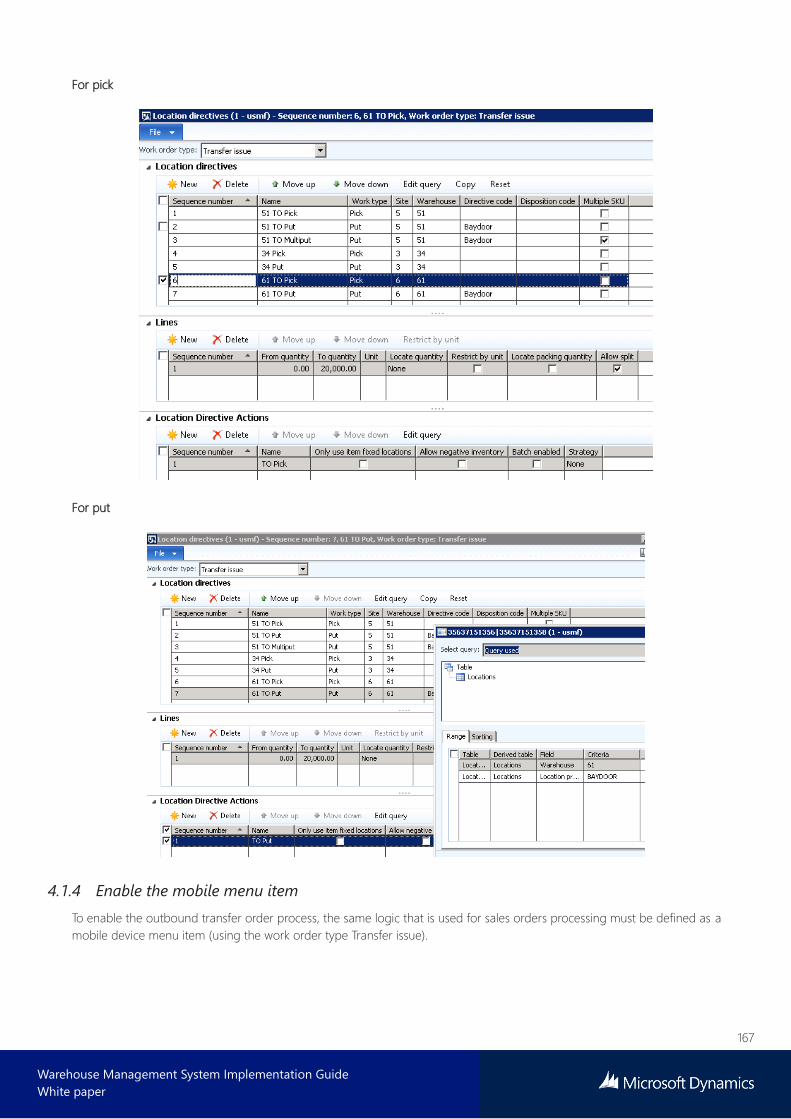
167
Warehouse Management System Implementation Guide
White paper
For pick
For put
4.1.4 Enable the mobile menu item
To enable the outbound transfer order process, the same logic that is used for sales orders processing must be defined as a
mobile device menu item (using the work order type Transfer issue).
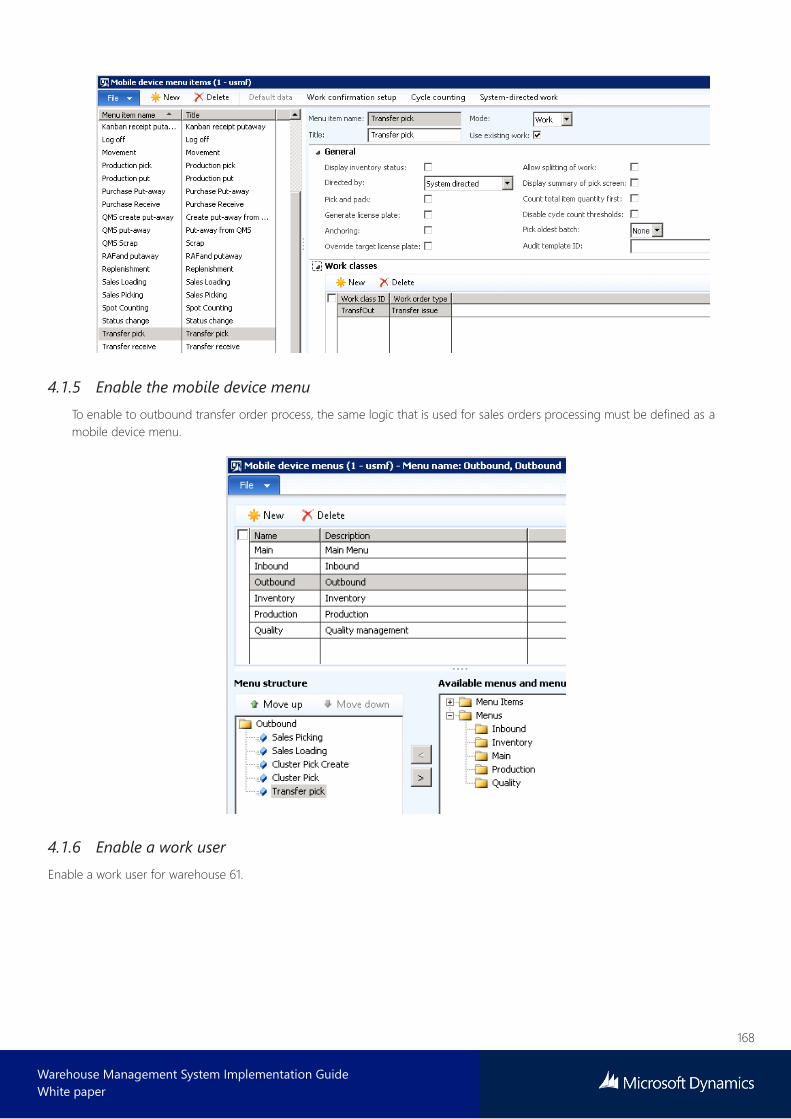
168
Warehouse Management System Implementation Guide
White paper
4.1.5 Enable the mobile device menu
To enable to outbound transfer order process, the same logic that is used for sales orders processing must be defined as a
mobile device menu.
4.1.6 Enable a work user
Enable a work user for warehouse 61.

169
Warehouse Management System Implementation Guide
White paper
4.1.7 Enable an additional transit warehouse
To enable the outbound transfer order process, a transit warehouse must be created and associated with the shipping
warehouse. In this example, this is 61. The Type must be Transit.
The 61 warehouse must be updated with the new transit warehouse.
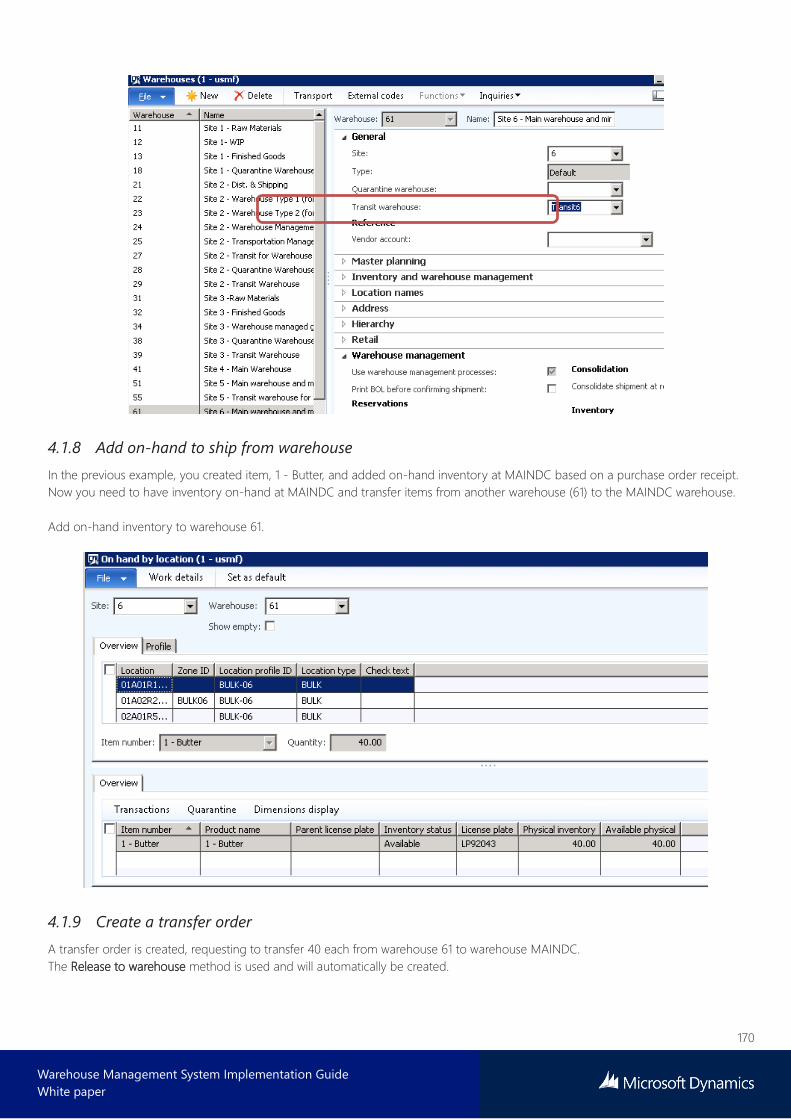
170
Warehouse Management System Implementation Guide
White paper
4.1.8 Add on-hand to ship from warehouse
In the previous example, you created item, 1 - Butter, and added on-hand inventory at MAINDC based on a purchase order receipt.
Now you need to have inventory on-hand at MAINDC and transfer items from another warehouse (61) to the MAINDC warehouse.
Add on-hand inventory to warehouse 61.
4.1.9 Create a transfer order
A transfer order is created, requesting to transfer 40 each from warehouse 61 to warehouse MAINDC.
The Release to warehouse method is used and will automatically be created.
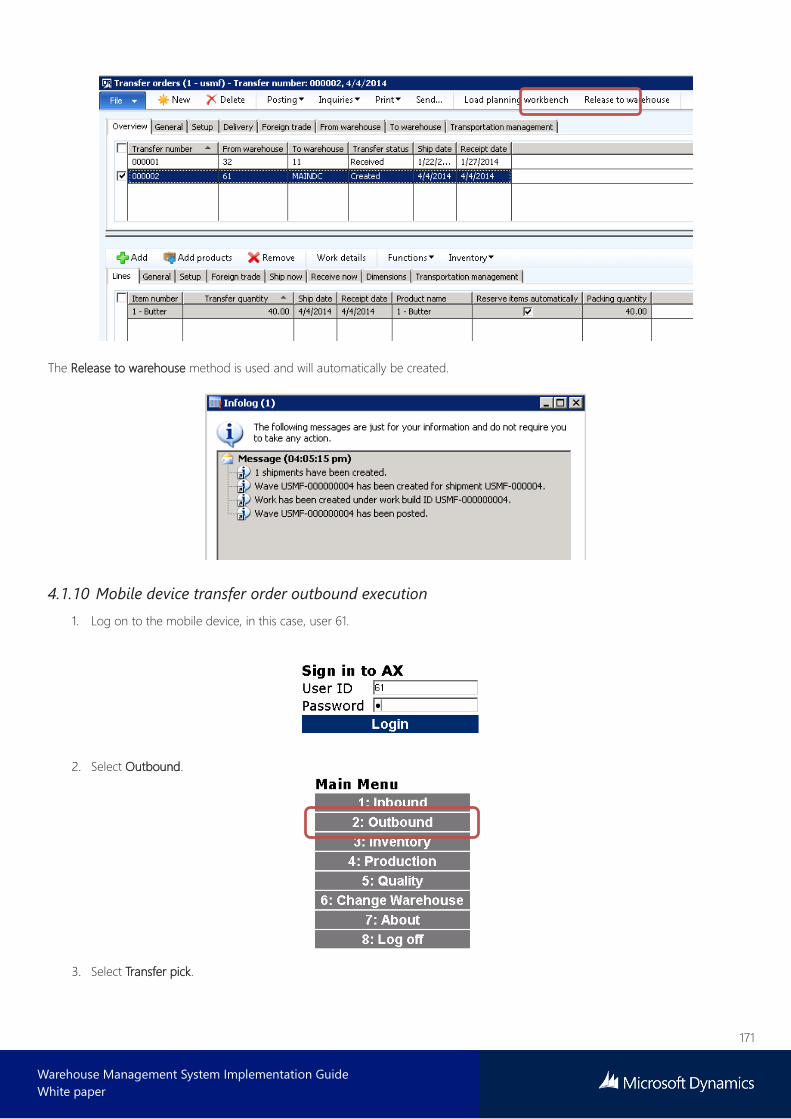
171
Warehouse Management System Implementation Guide
White paper
The Release to warehouse method is used and will automatically be created.
4.1.10 Mobile device transfer order outbound execution
1. Log on to the mobile device, in this case, user 61.
2. Select Outbound.
3. Select Transfer pick.
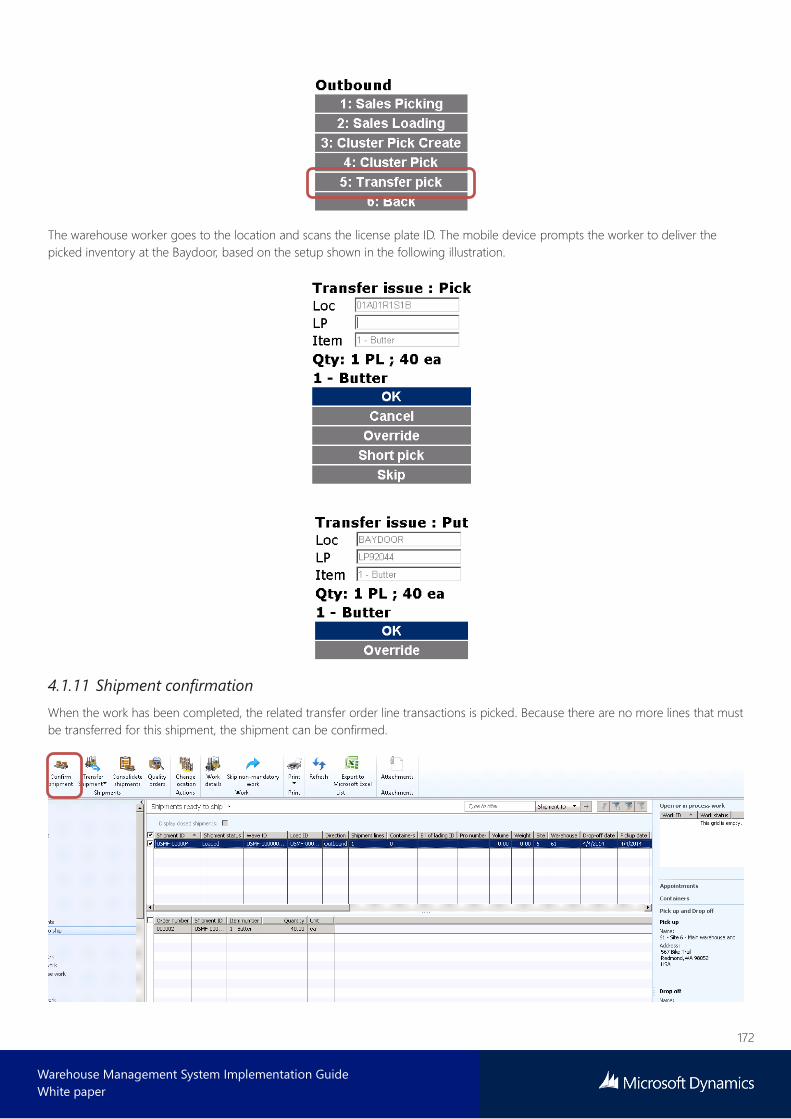
172
Warehouse Management System Implementation Guide
White paper
The warehouse worker goes to the location and scans the license plate ID. The mobile device prompts the worker to deliver the
picked inventory at the Baydoor, based on the setup shown in the following illustration.
4.1.11 Shipment confirmation
When the work has been completed, the related transfer order line transactions is picked. Because there are no more lines that must
be transferred for this shipment, the shipment can be confirmed.

173
Warehouse Management System Implementation Guide
White paper
4.2 Inbound - Setup requirements
4.2.1 Enable the work template
MAINDC has already been enabled for inbound purchase order processes, but it must also be enabled to transfer orders.
A work template must be enabled. In this case, pick and put warehouse operations are defined for put-away.
4.2.2 Enable the location directives
The inventory for all the Fresh goods will be directed to the locations that are related to the Freshgoods location profile.

174
Warehouse Management System Implementation Guide
White paper
4.2.3 Enable the mobile device menu item
The mobile device menu item must be enabled. In this case, License plate receiving will be used.
4.2.4 Enable the mobile device menu
Add the menu item to the mobile menu.
4.2.5 Execute inbound transfer order process
When the transfer order has a status of Shipped, you can receive.
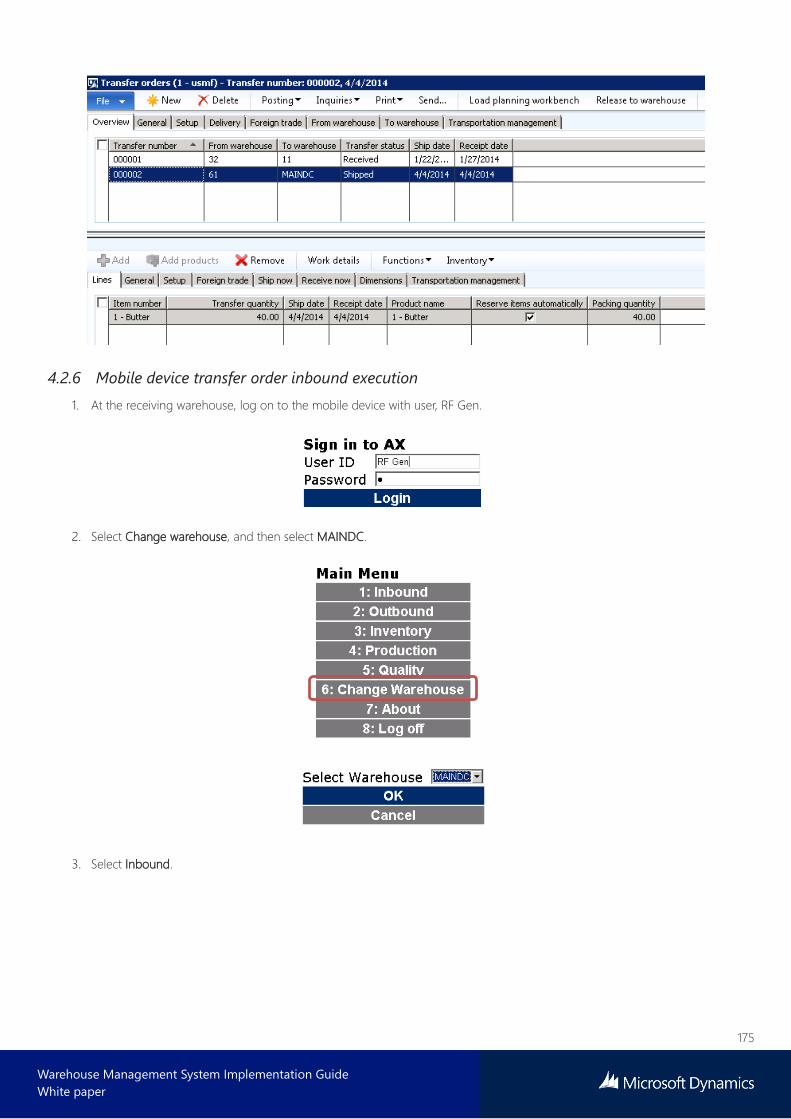
175
Warehouse Management System Implementation Guide
White paper
4.2.6 Mobile device transfer order inbound execution
1. At the receiving warehouse, log on to the mobile device with user, RF Gen.
2. Select Change warehouse, and then select MAINDC.
3. Select Inbound.
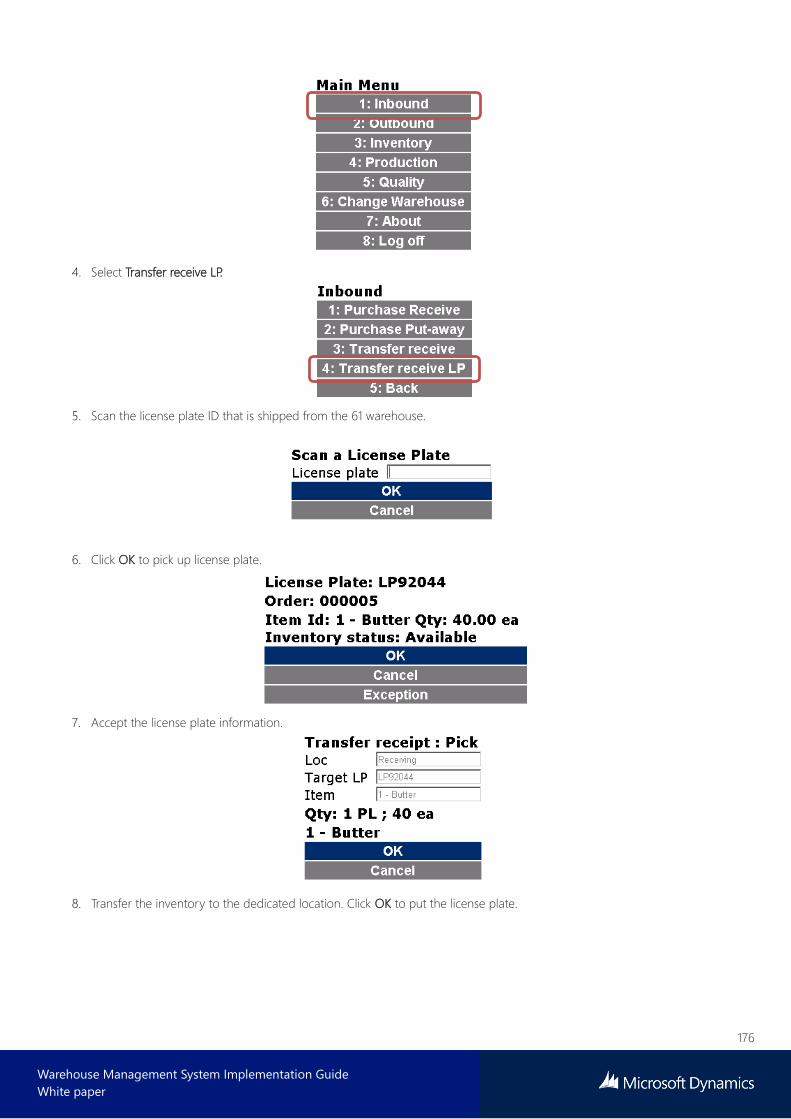
176
Warehouse Management System Implementation Guide
White paper
4. Select Transfer receive LP.
5. Scan the license plate ID that is shipped from the 61 warehouse.
6. Click OK to pick up license plate.
7. Accept the license plate information.
8. Transfer the inventory to the dedicated location. Click OK to put the license plate.
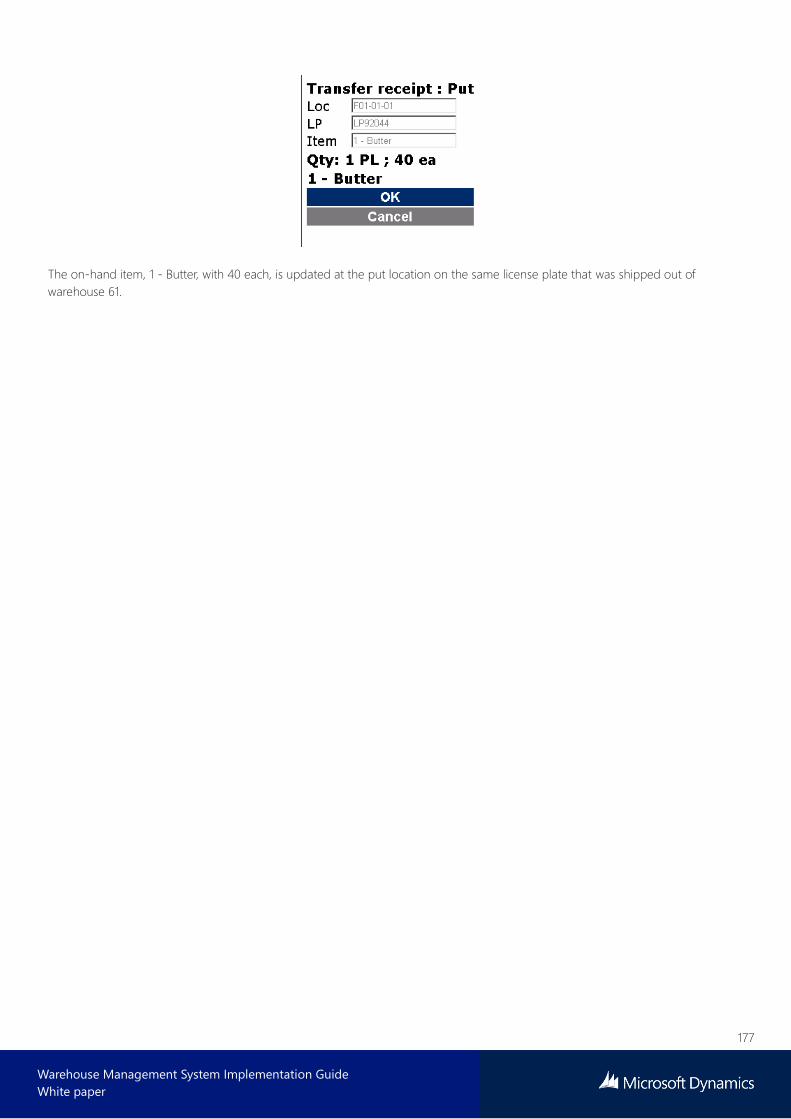
177
Warehouse Management System Implementation Guide
White paper
The on-hand item, 1 - Butter, with 40 each, is updated at the put location on the same license plate that was shipped out of
warehouse 61.

178
Warehouse Management System Implementation Guide
White paper
5 Manufacturing and Warehouse management In this section, you’ll learn how manufacturing scenarios are executed in conjunction with the Warehouse Management processes.
5.1 Using warehouse management in production
5.1.1 Aligning the concepts: Release production, release to warehouse and reservation
The new Warehouse Management functionality in Microsoft Dynamics AX 2012 R3 uses a slightly different conceptual approach for
triggering warehouse work. In addition, the mechanics of work creation for production picking do not match the concepts used in
picking for sales or transport. This is why it’s important to familiarize yourself with these new concepts.
The trigger for the release to warehouse is the production order release, combined with the reservation. In Microsoft Dynamics AX
2012 R3, to create picking work for production, the picked material must already be reserved. The quantities associated with the
wave lines are the reserved quantities that are used when the release to the warehouse is run.
To make it easier to automatically control reservations, two changes have been implemented in the production order reservation for
Microsoft Dynamics AX 2012 R3:
• Reservation principle release policy – With the reservation principle release policy, the reservation of components for production
or batch orders can be configured more granularly. Because the initial release to warehouse always happens at the release of the
production order, it’s recommended that you use the reservation at release in all quick turning inventory scenarios.
• Release to warehouse policy - The release to warehouse policy in production can be either set to Allow partial reservation or
Require full reservation. When full reservation is required, the release to warehouse is postponed unless all material can be fully
reserved. The reservation on order is enough to fulfill the condition, so the release to warehouse will be possible as soon as a
pegged production or purchase order can be reserved.
Both of these policies can be configured in either the production parameters or in the site-specific production parameters so that
the policy is the default for the initial production order creation.
When you manually create an order, the policies can be overwritten before creating the production order. When firming planned
orders, the default settings are used - in both cases, manual and automatic firming.
After you create the production order, both policies can be manually overwritten:
• The reservation principle can be overwritten on the production BOM lines.
• The release to warehouse condition can be changed on the Production order details form on the Warehouse Management
FastTab.
5.1.2 Multiple release to warehouse
If a partial release to warehouse is allowed during a production order release, a second release to warehouse might be needed.
The following scenario describes this process.
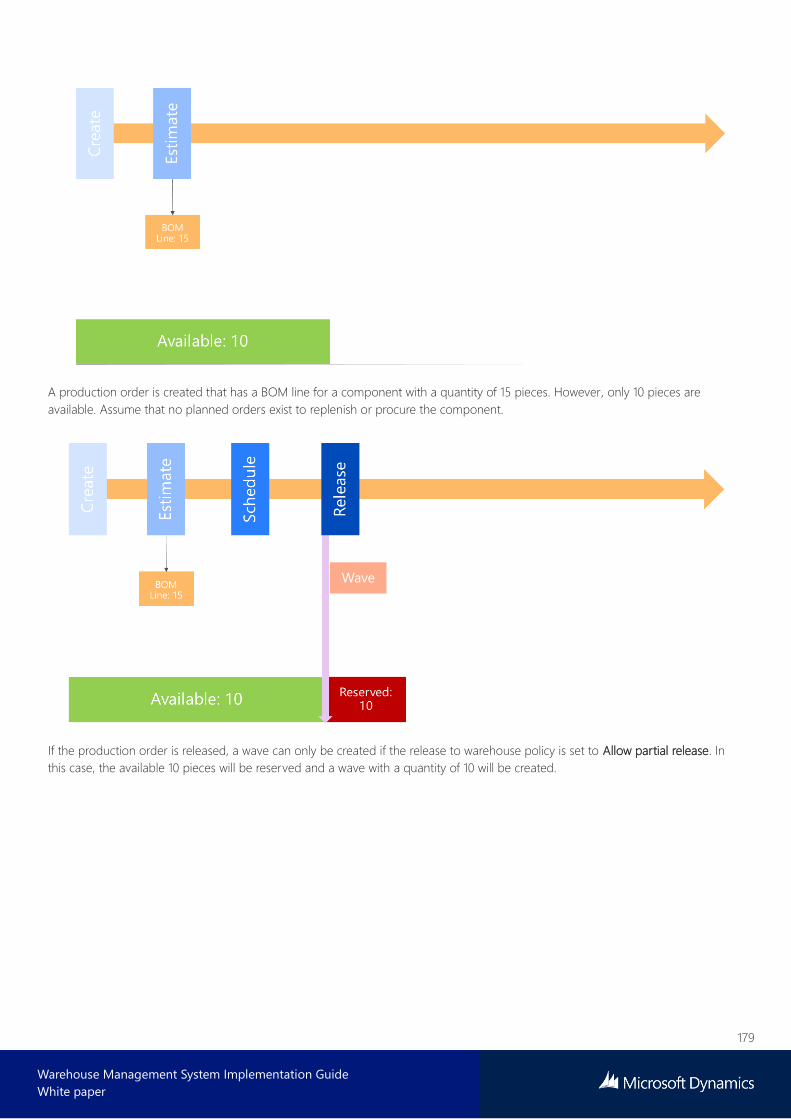
179
Warehouse Management System Implementation Guide
White paper
A production order is created that has a BOM line for a component with a quantity of 15 pieces. However, only 10 pieces are
available. Assume that no planned orders exist to replenish or procure the component.
If the production order is released, a wave can only be created if the release to warehouse policy is set to Allow partial release. In
this case, the available 10 pieces will be reserved and a wave with a quantity of 10 will be created.
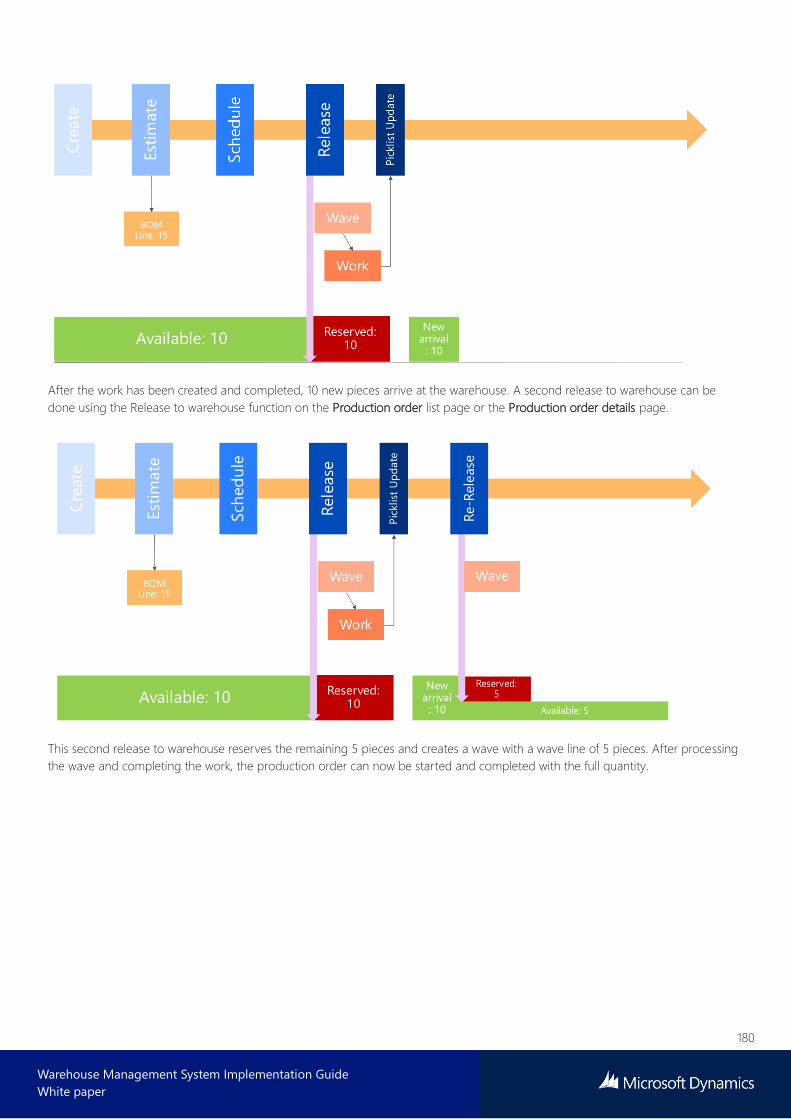
180
Warehouse Management System Implementation Guide
White paper
After the work has been created and completed, 10 new pieces arrive at the warehouse. A second release to warehouse can be
done using the Release to warehouse function on the Production order list page or the Production order details page.
This second release to warehouse reserves the remaining 5 pieces and creates a wave with a wave line of 5 pieces. After processing
the wave and completing the work, the production order can now be started and completed with the full quantity.

181
Warehouse Management System Implementation Guide
White paper
This scenario is not ideal because the first 10 pieces of the component are moved to the production shop floor before the
production order can be started, and these pieces might end up staying there for a long time.
The scenario makes more sense if the partial picked quantity can be used to do a partial start of the production order, as shown in
the following diagram.
After completing the pick work for 10 pieces, the production order is started with a partial quantity.
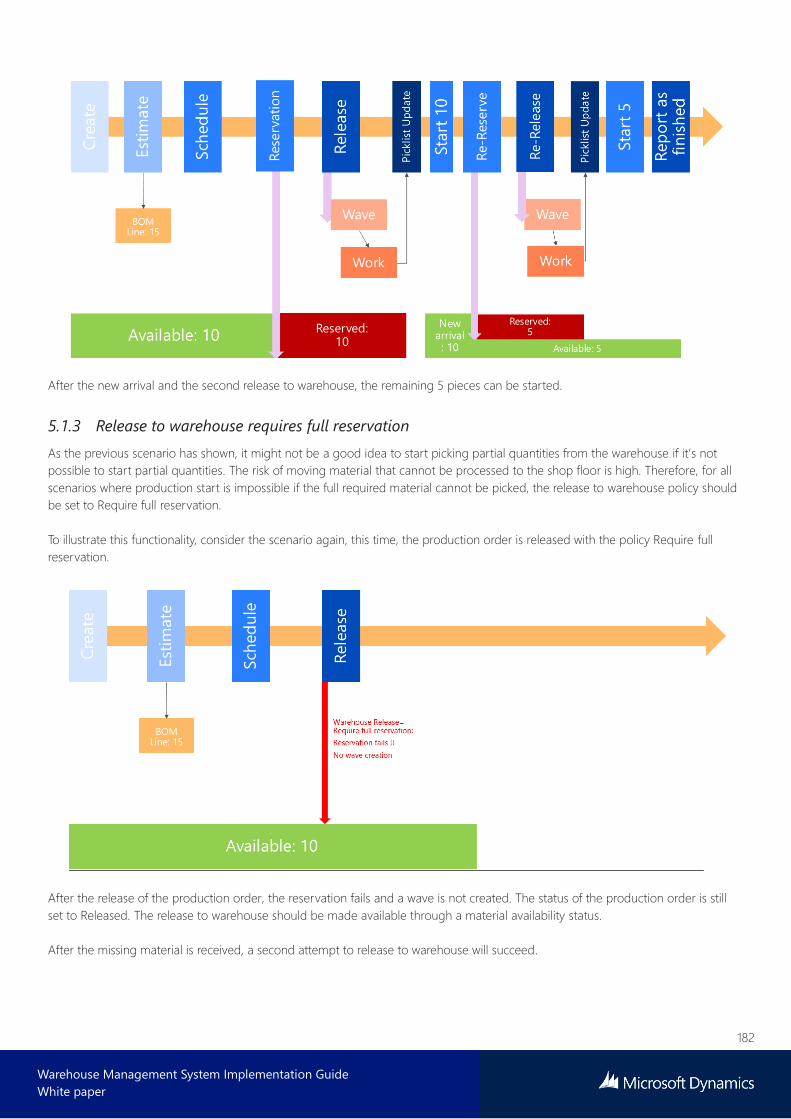
182
Warehouse Management System Implementation Guide
White paper
After the new arrival and the second release to warehouse, the remaining 5 pieces can be started.
5.1.3 Release to warehouse requires full reservation
As the previous scenario has shown, it might not be a good idea to start picking partial quantities from the warehouse if it’s not
possible to start partial quantities. The risk of moving material that cannot be processed to the shop floor is high. Therefore, for all
scenarios where production start is impossible if the full required material cannot be picked, the release to warehouse policy should
be set to Require full reservation.
To illustrate this functionality, consider the scenario again, this time, the production order is released with the policy Require full
reservation.
After the release of the production order, the reservation fails and a wave is not created. The status of the production order is still
set to Released. The release to warehouse should be made available through a material availability status.
After the missing material is received, a second attempt to release to warehouse will succeed.
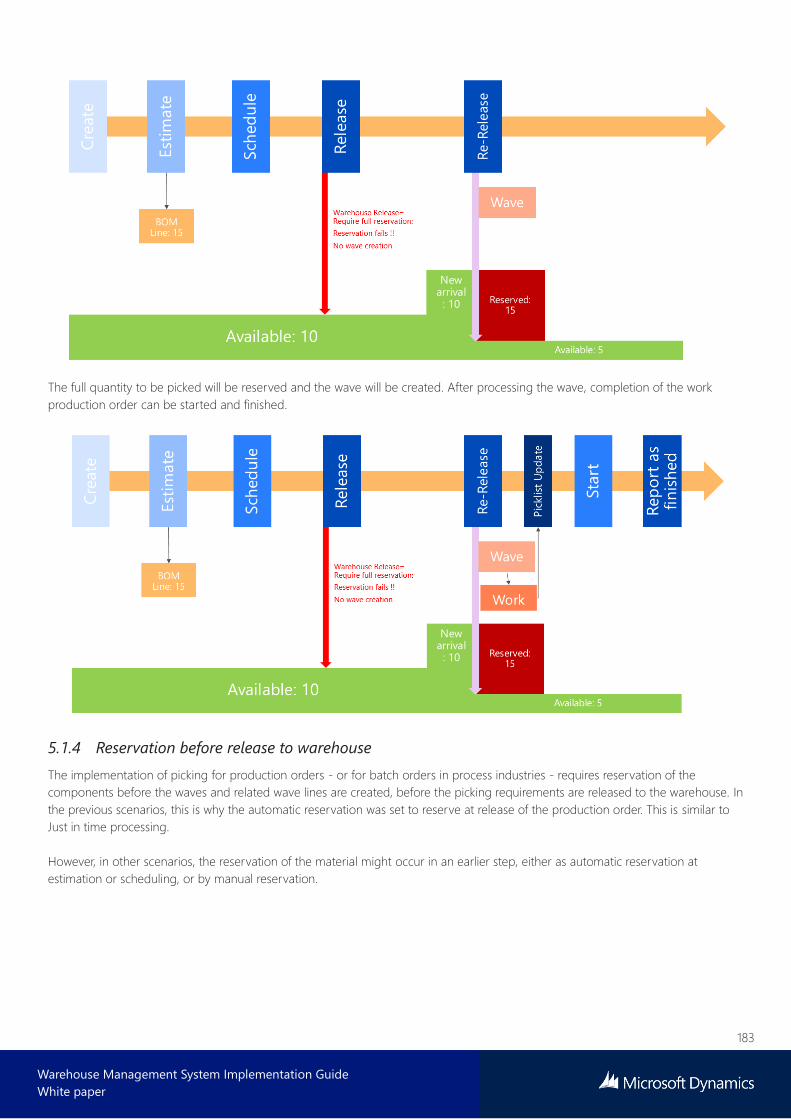
183
Warehouse Management System Implementation Guide
White paper
The full quantity to be picked will be reserved and the wave will be created. After processing the wave, completion of the work
production order can be started and finished.
5.1.4 Reservation before release to warehouse
The implementation of picking for production orders - or for batch orders in process industries - requires reservation of the
components before the waves and related wave lines are created, before the picking requirements are released to the warehouse. In
the previous scenarios, this is why the automatic reservation was set to reserve at release of the production order. This is similar to
Just in time processing.
However, in other scenarios, the reservation of the material might occur in an earlier step, either as automatic reservation at
estimation or scheduling, or by manual reservation.
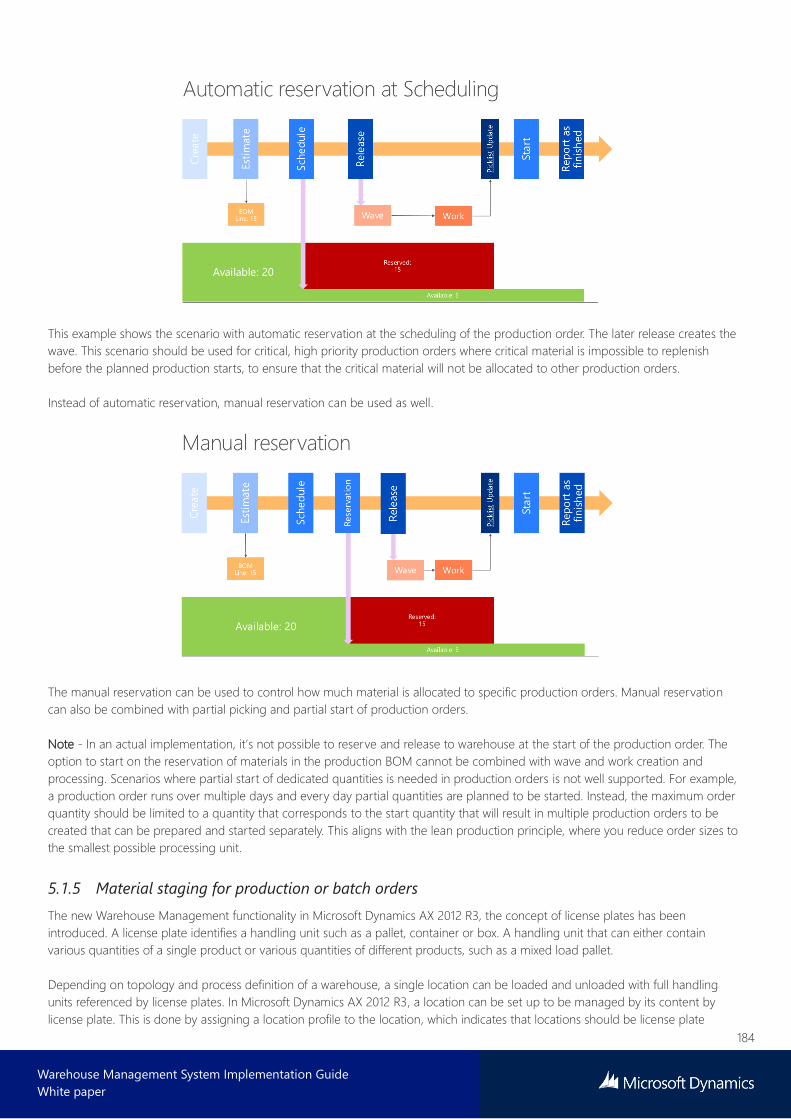
184
Warehouse Management System Implementation Guide
White paper
This example shows the scenario with automatic reservation at the scheduling of the production order. The later release creates the
wave. This scenario should be used for critical, high priority production orders where critical material is impossible to replenish
before the planned production starts, to ensure that the critical material will not be allocated to other production orders.
Instead of automatic reservation, manual reservation can be used as well.
The manual reservation can be used to control how much material is allocated to specific production orders. Manual reservation
can also be combined with partial picking and partial start of production orders.
Note - In an actual implementation, it’s not possible to reserve and release to warehouse at the start of the production order. The
option to start on the reservation of materials in the production BOM cannot be combined with wave and work creation and
processing. Scenarios where partial start of dedicated quantities is needed in production orders is not well supported. For example,
a production order runs over multiple days and every day partial quantities are planned to be started. Instead, the maximum order
quantity should be limited to a quantity that corresponds to the start quantity that will result in multiple production orders to be
created that can be prepared and started separately. This aligns with the lean production principle, where you reduce order sizes to
the smallest possible processing unit.
5.1.5 Material staging for production or batch orders
The new Warehouse Management functionality in Microsoft Dynamics AX 2012 R3, the concept of license plates has been
introduced. A license plate identifies a handling unit such as a pallet, container or box. A handling unit that can either contain
various quantities of a single product or various quantities of different products, such as a mixed load pallet.
Depending on topology and process definition of a warehouse, a single location can be loaded and unloaded with full handling
units referenced by license plates. In Microsoft Dynamics AX 2012 R3, a location can be set up to be managed by its content by
license plate. This is done by assigning a location profile to the location, which indicates that locations should be license plate

185
Warehouse Management System Implementation Guide
White paper
controlled.
If a location is set up as license plate controlled, warehouse work for raw material picking will move the full content of the license
plate to the production input location. Moving the content of a license plate, instead of moving the actual requested quantity of the
production material line, is called staging. This is different than order picking where you pick the actual demand.
In scenarios where there is a known variation in consumption of an ingredient, it’s useful to stage materials by the license plate
handling unit to the place of consumption. For example, a license plate, such as a pallet of the ingredient, is staged to the location.
When the production starts, the consumption from the pallet will begin. When the order is completed there might be some
leftovers of the staged materials on the pallet. This material can either be consumed by new orders that consume the same material
or moved back to the inventory by the warehouse worker. Generally, when raw material work is created, the system will first look at
on-hand material in the production input location. If materials are available in that location, no work will be created to move this
quantity of material, instead the material will be deducted from the location by the work. Work will only be created for quantities
that cannot be covered by the quantity on the production input location.
When raw material work is executed, the requested quantity from the production material lines deducts the on-hand material from
the production input location. The status of the inventory transactions for the material lines will change from On order to Picked.
After the warehouse work is completed for the production or batch order, consumption of the material from the production input
location to the order can start. Consumption of material is registered in the production picking list journal. Consumption can start
when the production or batch order has a status of Started. This is done be completing the Start step. There are some system
parameters associated with the Start step, for example, if the requested material should be consumed when the Start step is
complete. This process is known as forward flushing. The requested quantity of the material will automatically be posted in the
picking list journal. It’s also possible to set up the parameters in the Start step, so the materials are not consumed, and postponed
when the finished goods are reported. This process is known as back flushing.
You can complete the Start step from a menu item on the mobile device. This option does not leverage the parameters in the Start
function. When using the Start option, the requested materials are automatically consumed and there is no option to deviate from
that. Any corrections in the raw material consumption must be done by manually adjusting the production picking list journal.
The following prerequisites are needed to enable the staging process for the production warehouse processes:
• Materials can only be staged from dedicated locations that have been enabled for license plate tracking. This criteria is set up in
the Location profiles window.

186
Warehouse Management System Implementation Guide
White paper
• The location directive for raw material picking in production must be set up to point to picking for locations enabled for license
plate tracking.
• We recommend that the production input location be set up so that it is not license plate controlled.
Here’s a simple scenario to show where material staging is used. This example is based on the demo data for Microsoft Dynamics
AX 2012 R3.
A company produces plastic pellets. In this process some of the ingredients are staged to the production input location. The
following flowchart shows that polypropylene is an ingredient in the pellet production.
In this example, polypropylene is a purchased commodity that, when received, is stored in the warehouse in 220 pound bags. When
polypropylene is picked to production, only whole bags are moved from the warehouse locations to the production input location.
When the production process starts, the bags are opened and emptied into the extruding and cutting machine, which represents
the first operations on the line.
The following list shows information about the on-hand inventory of polypropylene bags, which can be extracted from the table
below:
• Each bag is identified by one unique license plate.
• One location can only contain one license plate.
• Each bag is referenced by a batch number with an expiration date. Multiple bags can be referenced by the same batch number.
When picking polypropylene, it’s required that you use first expiration, first out (FEFO) order.
To fulfill this process, some setup is required. First, ensure that the setup of the Location profile is associated with the locations.
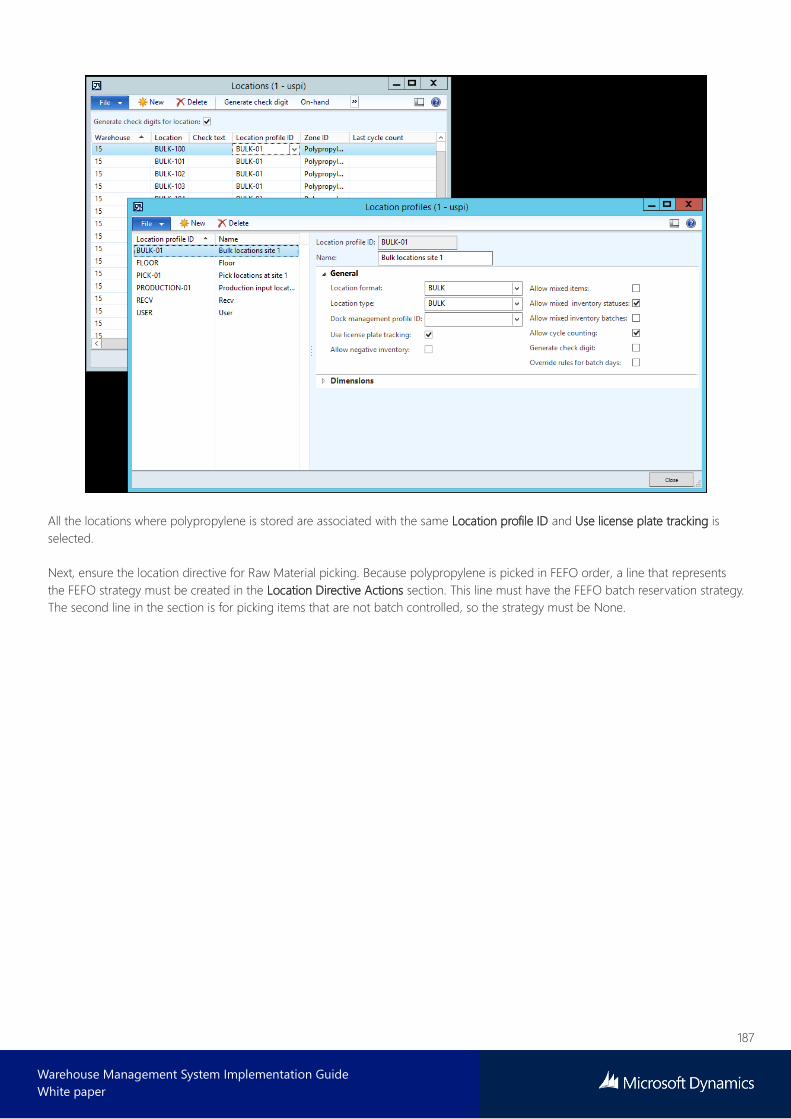
187
Warehouse Management System Implementation Guide
White paper
All the locations where polypropylene is stored are associated with the same Location profile ID and Use license plate tracking is
selected.
Next, ensure the location directive for Raw Material picking. Because polypropylene is picked in FEFO order, a line that represents
the FEFO strategy must be created in the Location Directive Actions section. This line must have the FEFO batch reservation strategy.
The second line in the section is for picking items that are not batch controlled, so the strategy must be None.
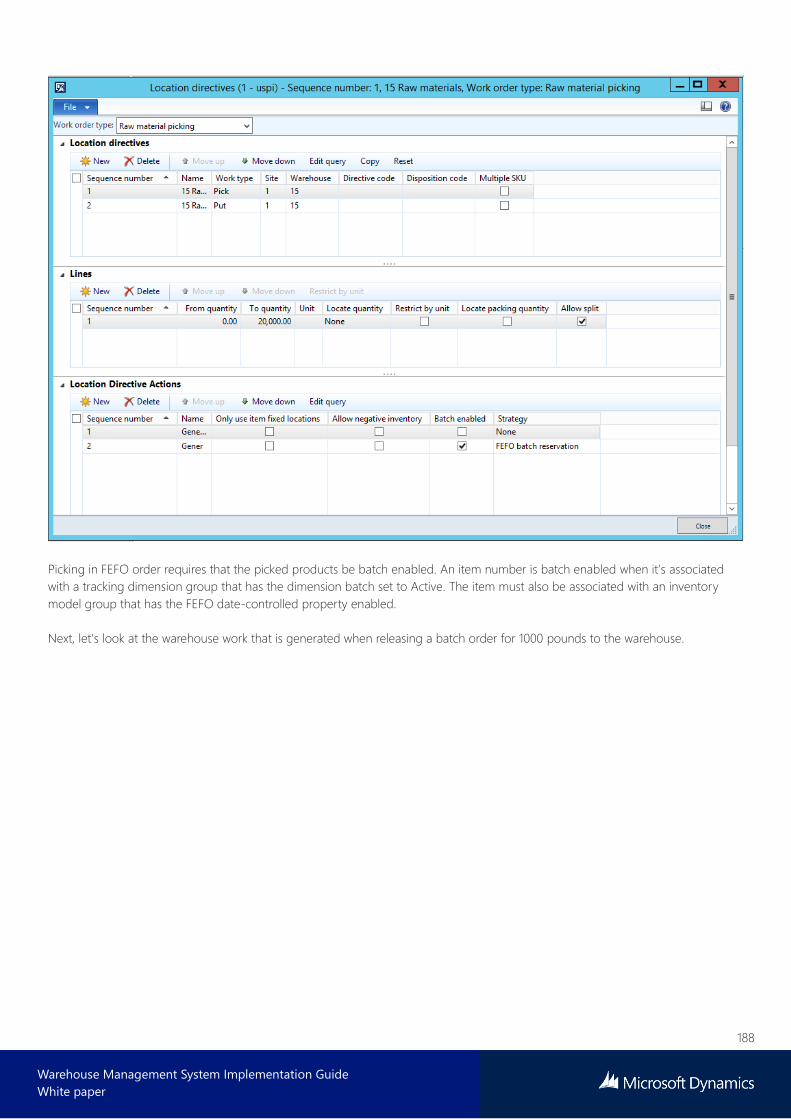
188
Warehouse Management System Implementation Guide
White paper
Picking in FEFO order requires that the picked products be batch enabled. An item number is batch enabled when it’s associated
with a tracking dimension group that has the dimension batch set to Active. The item must also be associated with an inventory
model group that has the FEFO date-controlled property enabled.
Next, let’s look at the warehouse work that is generated when releasing a batch order for 1000 pounds to the warehouse.

189
Warehouse Management System Implementation Guide
White paper
In the Lines section of the Work details form, there are four lines for polypropylene. The first three lines are in unit PL and the last
lines are in lb, for pounds. The sum of the work quantity represents the required quantity for the batch order. However, because the
locations for polypropylene are set up to be license plate controlled, only full license plates can be moved from the locations. The
result of this work will be that 4 pallets will be moved.
The lines are listed in FEFO order, so the first line represents work for moving a pallet from location BULK-102 where the batch that
expires first is located.
Because the bulk locations are set up to be license plate controlled, the warehouse worker will be prompted to enter a license plate
to pick in those locations.
For locations that are not setup to be license plate controlled, the warehouse worker will not be prompted for a license plate and
the exact ordered quantity will be moved.
General constraints
The ability to stage materials by moving whole license plates from the warehouse location to the production input location is only
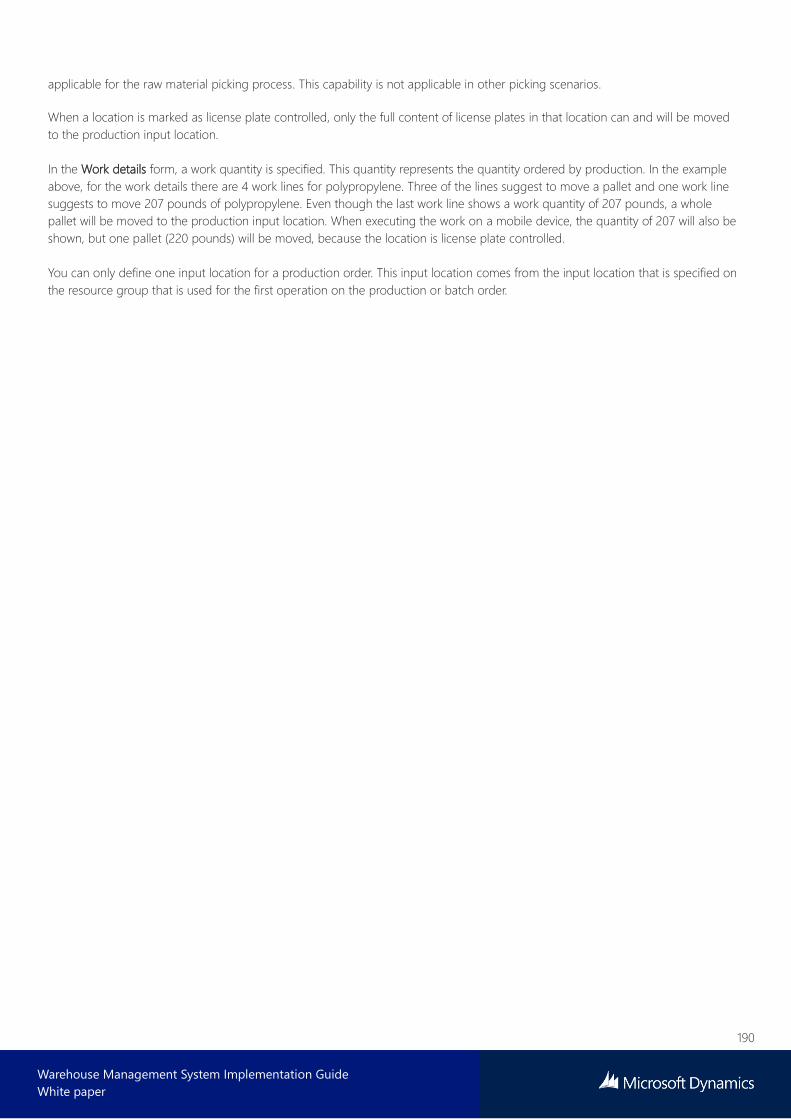
190
Warehouse Management System Implementation Guide
White paper
applicable for the raw material picking process. This capability is not applicable in other picking scenarios.
When a location is marked as license plate controlled, only the full content of license plates in that location can and will be moved
to the production input location.
In the Work details form, a work quantity is specified. This quantity represents the quantity ordered by production. In the example
above, for the work details there are 4 work lines for polypropylene. Three of the lines suggest to move a pallet and one work line
suggests to move 207 pounds of polypropylene. Even though the last work line shows a work quantity of 207 pounds, a whole
pallet will be moved to the production input location. When executing the work on a mobile device, the quantity of 207 will also be
shown, but one pallet (220 pounds) will be moved, because the location is license plate controlled.
You can only define one input location for a production order. This input location comes from the input location that is specified on
the resource group that is used for the first operation on the production or batch order.
Warehouse Management System Implementation Guide
White paper
Send feedback.
Microsoft Dynamics is a line of integrated, adaptable business management
solutions that enables you and your people to make business decisions with
greater confidence. Microsoft Dynamics works like and with familiar
Microsoft software, automating and streamlining financial, customer
relationship, and supply chain processes in a way that helps you drive
business success.
United States and Canada toll free: (888) 477-7989
Worldwide: (1) (701) 281-6500
www.microsoft.com/dynamics
The information contained in this document
represents the current view of Microsoft
Corporation on the issues discussed as of the
date of publication. Because Microsoft must
respond to changing market conditions, this
document should not be interpreted to be a
commitment on the part of Microsoft, and
Microsoft cannot guarantee the accuracy of
any information presented after the date of
publication.
This white paper is for informational
purposes only. MICROSOFT MAKES NO
WARRANTIES, EXPRESS, IMPLIED, OR
STATUTORY, AS TO THE INFORMATION IN
THIS DOCUMENT.
Complying with all applicable copyright laws
is the responsibility of the user. Without
limiting the rights under copyright, no part of
this document may be reproduced, stored in,
or introduced into a retrieval system, or
transmitted in any form or by any means
(electronic, mechanical, photocopying,
recording, or otherwise), or for any purpose,
without the express written permission of
Microsoft Corporation. Microsoft may have
patents, patent applications, trademarks,
copyrights, or other intellectual property
rights covering subject matter in this
document. Except as expressly provided in
any written license agreement from
Microsoft, the furnishing of this document
does not give you any license to these
patents, trademarks, copyrights, or other
intellectual property.
© 2014 Microsoft. All rights reserved.
Microsoft, Microsoft Dynamics, and the
Microsoft Dynamics logo are trademarks of
the Microsoft group of companies.