microsoft 2enhancing a presentation with pictures, …web.cse.ohio-state.edu/cse1111/electronic...
TRANSCRIPT

Microsoft PowerPoint 2010
ObjectivesYou will have mastered the material in this chapter when you can:
Change theme colors•
Insert a picture to create a • background
Format slide backgrounds•
Insert and size a shape•
Add text to a shape•
Apply effects to a shape•
Change the font and add a shadow•
Format pictures•
Apply a WordArt style•
Format WordArt•
Format text using the Format Painter•
Enhancing a Presentation with Pictures, Shapes, and WordArt
2
1439078483_ch2_FINAL.indd PPT731439078483_ch2_FINAL.indd PPT73 7/7/10 8:14:28 PM7/7/10 8:14:28 PM
Property of Cengage Learning

PPT 74
Microsoft PowerPoint 2010
2 Enhancing a Presentation with Pictures, Shapes, and WordArtIntroductionIn our visually oriented culture, audience members enjoy viewing effective graphics. Whether reading a document or viewing a PowerPoint presentation, people increasingly want to see photographs, artwork, graphics, and a variety of typefaces. Researchers have known for decades that documents with visual elements are more effective than those that consist of only text because the illustrations motivate audiences to study the material. People remember at least one-third more information when the document they are see-ing or reading contains visual elements. These graphics help clarify and emphasize details, so they appeal to audience members with differing backgrounds, reading levels, attention spans, and motivations.
Project — Presentation with Pictures, Shapes, and WordArtThe project in this chapter follows graphical guidelines and uses PowerPoint to create the presentation shown in Figure 2–1. This slide show, which discusses yoga and meditation, has a variety of illustrations and visual elements. For example, pictures have particular shapes and effects. The enhanced type has a style that blends well with the background and illustrations. Pictures and type are formatted using Quick Styles and WordArt, which give your presentation a professional look.
OverviewAs you read through this chapter, you will learn how to create the presentation
shown in Figure 2–1 by performing these general tasks:
Format slide backgrounds.• Insert and format pictures by applying styles and effects.• Insert and format shapes.• Format text using WordArt.• Print a handout of your slides.•
Yoga’s OriginsThe term, yoga, is derived from the Sanskrit word yuj, meaning to join or unite. Yogis have been practicing this system of exercises and philosophy of mental control for more than 26,000 years.
BTW
1439078483_ch2_FINAL.indd PPT741439078483_ch2_FINAL.indd PPT74 7/7/10 8:14:33 PM7/7/10 8:14:33 PM
Property of Cengage Learning

PPT 75
Microsoft PowerPoint 2010
Figure 2–1
(a) Slide 1 (Title Slide with Picture Background and Shapes)
(b) Slide 2 (Formatted Picture)
(c) Slide 3 (Formatted Picture)
(d) Slide 4 (Inserted and Formatted Shapes)
picture inserted to create background
font changed
backgroundformatted
border added and colored
picture inserted and formatted
WordArt inserted and formatted
shapes insertedand formatted
symbol inserted and sized
1439078483_ch2_FINAL.indd PPT751439078483_ch2_FINAL.indd PPT75 7/7/10 8:14:34 PM7/7/10 8:14:34 PM
Property of Cengage Learning

PPT 76 PowerPoint Chapter 2 Enhancing a Presentation with Pictures, Shapes, and WordArt
General Project GuidelinesWhen creating a PowerPoint presentation, the actions you perform and decisions you make will affect the appearance and characteristics of the fi nished document. As you create a presentation with illustrations, such as the project shown in Figure 2 – 1, you should follow these general guidelines:
1. Focus on slide text content. Give some careful thought to the words you choose. Some graphic designers advise starting with a blank screen so that the document theme does not distract from or infl uence the words.
2. Apply style guidelines. Many organizations and publishers establish guidelines for writing styles. These rules apply to capitalization, punctuation, word usage, and document formats. Ask your instructor or manager for a copy of these guidelines or use popular writing guides, such as the The Chicago Manual of Style, The Associated Press Stylebook, and The Elements of Style.
3. Use color effectively. Your audience’s eyes are drawn to color on a slide. Used appropriately, color can create interest by emphasizing material and promoting understanding. Be aware of symbolic meanings attached to colors, such as red generally representing danger, electricity, and heat.
4. Adhere to copyright regulations. Copyright laws apply to printed and electronic materials. You can copy an existing photograph or artwork if it is in the public domain, if your company owns the graphic, or if you have obtained permission to use it. Be certain you have the legal right to use a desired graphic in your presentation.
5. Consider graphics for multicultural audiences. In today’s intercultural society, your presentation might be viewed by people whose fi rst language is different from yours. Some graphics have meanings specifi c to a culture, so be certain to learn about your intended audience and their views.
6. Use WordArt in moderation. Used correctly, the graphical nature of WordArt can add interest and set a tone. Format text with a WordArt style only when needed for special emphasis.
When necessary, more specifi c details concerning the above guidelines are presented at appropriate points in the chapter. The chapter also will identify the actions you perform and decisions made regarding these guidelines during the creation of the presentation shown in Figure 2 – 1.
Plan Ahead
Starting PowerPointChapter 1 introduced you to starting PowerPoint, selecting a document theme, creating slides with clip art and a bulleted list, and printing a presentation. The following steps, which assume Windows 7 is running, start PowerPoint. You may need to ask your instruc-tor how to start PowerPoint for your computer. For a detailed example of the procedure summarized on the next page, refer to pages OFF 33 through OFF 35 in the Offi ce 2010 and Windows 7 chapter.
For an introduction to Windows 7 and instruction about how to perform basic Windows 7 tasks, read the Offi ce 2010 and Windows 7 chapter at the beginning of this book, where you can learn how to resize windows, change screen resolution, create folders, move and rename fi les, use Windows Help, and much more.
1439078483_ch2_FINAL.indd PPT761439078483_ch2_FINAL.indd PPT76 7/7/10 8:14:42 PM7/7/10 8:14:42 PM
Property of Cengage Learning

Enhancing a Presentation with Pictures, Shapes, and WordArt PowerPoint Chapter 2 PPT 77
Pow
erPo
int
Ch
apte
r 2
Plan Ahead
Focus on slide text content.Once you have researched your presentation topic, many methods exist to begin developing slide content.
Select a document theme and then enter text, illustration, and tables.•
Open an existing presentation and modify the slides and theme.•
Import an outline created in Microsoft Word.•
Start with a blank presentation that uses the default Offi ce Theme. Consider this practice • similar to an artist who begins creating a painting with a blank, white canvas.
Experiment using different methods of developing the initial content for slides. Experienced PowerPoint users sometimes fi nd one technique works better than another to stimulate creativity or help them organize their ideas in a particular circumstance.
Plan Ahead
Apply style guidelines.A good stylebook is useful to decide when to use numerals or words to represent numbers, as in the sentence, More than 25 students are waiting for the bus to arrive. Stylebooks also offer rules on forming possessives, capitalizing titles, and using commas. Once you decide on a style to use in your presentation, apply it consistently throughout your presentation.
Creating Slides and Changing Font Colors and Background StyleIn Chapter 1, you selected a document theme and then typed the content for the title and text slides. In this chapter, you will type the slide content for the title and text slides, select a background, insert and format pictures and shapes, and then insert and format WordArt. To begin creating the four slides in this presentation, you will enter text in four different layouts, change the theme colors, and then change the background style.
To Create a Title Slide
Recall from Chapter 1 that the title slide introduces the presentation to the audience. In addition to introducing the presentation, this project uses the title slide to capture the audience’s attention by using title text and a background picture. The follow-ing steps create the slide show’s title slide.
Click the Start button on the Windows 7 taskbar to display the Start menu.
Type Microsoft PowerPoint as the search text in the ‘Search programs and fi les’ text box.
Click Microsoft PowerPoint 2010 in the search results on the Start menu to start PowerPoint and display a new blank document.
If the PowerPoint window is not maximized, click the Maximize button.
Apply the Verve document theme.
1
2
3
4
5
To Start PowerPoint and Apply a Document Theme
For an introduction to Offi ce 2010 and instruction about how to perform basic tasks in Offi ce 2010 programs, read the Offi ce 2010 and Windows 7 chapter at the beginning of this book, where you can learn how to start a program, use the Ribbon, save a fi le, open a fi le, quit a program, use Help, and much more.
1439078483_ch2_FINAL.indd PPT771439078483_ch2_FINAL.indd PPT77 7/7/10 8:14:42 PM7/7/10 8:14:42 PM
Property of Cengage Learning

PPT 78 PowerPoint Chapter 2 Enhancing a Presentation with Pictures, Shapes, and WordArt
Figure 2 – 2
To Create the First Text Slide
The fi rst text slide you create in Chapter 2 emphasizes the relaxation and restoration benefi ts derived from practicing yoga and meditation. The following steps add a new slide (Slide 2) and then create a text slide using the Picture with Caption layout.
Click Home on the Ribbon to display the Home tab, click the New Slide button arrow, and then click Picture with Caption in the Layout gallery to add a new slide with this layout.
Type Relax and Restore in the title text placeholder.
Press CTRL+ENTER to move to the caption placeholder and then type Calm the mind and boost oxygen levels in the brain. in this placeholder (Figure 2 – 3).
1
2
3
title and subtitle text entered in placeholders
Some stylebooks recommend using lowercase letters when using coordinating conjunctions (for, and, nor, but, or, yet, so) and also when using articles (a, an, the). Why is the case of the word, and, changed in the subtitle text?
By default, PowerPoint capitalizes the fi rst word of each paragraph. For consistency, you can decide to lowercase this word to apply a particular style rule so that the word, and, is lowercase in both the title and subtitle text.
Q&
A
Note: To help you locate screen elements that are referenced in the step instructions, such as buttons and commands, this book uses red boxes to point to these screen elements.
Type Yoga and Meditation in the title text placeholder.
Type Unify Your Mind, in the subtitle text placeholder.
Press the ENTER key and then type Body, as the second line in the subtitle text placeholder.
Press the ENTER key and then type and Spirit as the third line in the subtitle text placeholder. Change the capital letter ‘A’ in the word, And, at the beginning of this line to a lowercase ‘a’ (Figure 2 – 2).
1
2
3
4
Verve theme applied
lowercase letter ‘a’
Q&AsFor a complete list of the Q&As found in many of the step-by-step sequences in this book, visit the PowerPoint 2010 Q&A Web page (scsite.com/ppt2010/qa).
BTW
1439078483_ch2_FINAL.indd PPT781439078483_ch2_FINAL.indd PPT78 7/7/10 8:14:42 PM7/7/10 8:14:42 PM
Property of Cengage Learning

Enhancing a Presentation with Pictures, Shapes, and WordArt PowerPoint Chapter 2 PPT 79
Pow
erPo
int
Ch
apte
r 2
To Create the Second Text Slide
The second text slide you create stresses the fact that yoga and meditation strengthen the body in multiple ways. The following steps add a new text slide (Slide 3) that uses the Content with Caption layout.
Click the New Slide button arrow and then click Content with Caption in the Layout gallery to add a new slide with this layout.
Type Strengthen Body in the title text placeholder.
Press CTRL+ENTER and then type Increase flexibility and tone muscles. in the caption placeholder (Figure 2 – 4).
1
2
3
Figure 2 – 3
New Slide button arrow
title and caption text entered in placeholders
Figure 2 – 4
Why does the text display with capital letters despite the fact I am typing uppercase and lowercase letters?
The Verve theme uses the All Caps effect for the title text. This effect converts lowercase letters to uppercase.
Q&
A
BTWsFor a complete list of the BTWs found in the margins of this book, visit the PowerPoint 2010 BTW Web page (scsite.com/ppt2010/btw).
BTW
title and caption text entered in placeholders
1439078483_ch2_FINAL.indd PPT791439078483_ch2_FINAL.indd PPT79 7/7/10 8:14:44 PM7/7/10 8:14:44 PM
Property of Cengage Learning

PPT 80 PowerPoint Chapter 2 Enhancing a Presentation with Pictures, Shapes, and WordArt
To Create the Third Text Slide
Yoga and meditation help create balance in an individual’s life. The last slide you create uses graphics to depict the connection among the mind, body, and spirit. You will insert symbols later in this project to create this visual element. For now, you want to create the basic slide. The following step adds a new text slide (Slide 4) that uses the Blank layout.
Click the New Slide button arrow and then click Blank in the Layout gallery. (Figure 2–5).1
Presentation Template Color SchemeEach presentation template has 12 complementary colors, which collectively are
called the color scheme. You can apply these colors to all slides, an individual slide, notes pages, or audience handouts. A color scheme consists of four colors for a background and text, six accent colors, and two hyperlink colors. The Theme Colors button on the Design tab contains a square with four colors; the top two colors indicate the primary text and background colors, and the bottom two colors indicate the accent colors. You also can cus-tomize the theme colors to create your own set and give them a unique name. Table 2–1 explains the components of a color scheme.
Table 2–1 Color Scheme Components
Component Description
Background color
The background color is the fundamental color of a PowerPoint slide. For example, if the back-ground color is black, you can place any other color on top of it, but the fundamental color remains black. The black background shows everywhere you do not add color or other objects.
Text color The text color contrasts with the background color of the slide. As a default, the text border color is the same as the text color. Together with the background color, the text and border colors set the tone for a presentation. For example, a gray background with black text and border sets a dramatic tone. In contrast, a red background with yellow text and border sets a vibrant tone.
Accent colors Accent colors are designed as colors for secondary features on a slide. They often are used as fi ll colors on graphs and as shadows.
Hyperlink colors The default hyperlink color is set when you type the text. When you click the hyperlink text during a presentation, the color changes to the Followed Hyperlink color.
Figure 2–5
Blank layout
The Ribbon and Screen ResolutionPowerPoint may change how the groups and buttons within the groups appear on the Ribbon, depending on the computer’s screen resolution. Thus, your Ribbon may look different from the ones in this book if you are using a screen resolution other than 1024 3 768.
BTW
1439078483_ch2_FINAL.indd PPT801439078483_ch2_FINAL.indd PPT80 7/7/10 8:14:48 PM7/7/10 8:14:48 PM
Property of Cengage Learning

Enhancing a Presentation with Pictures, Shapes, and WordArt PowerPoint Chapter 2 PPT 81
Pow
erPo
int
Ch
apte
r 2
Click Design on the • Ribbon and then click the Theme Colors button (Design tab | Themes group) to display the Theme Colors gallery.
Scroll down and then • point to the Oriel built-in theme to display a live preview of this color scheme (Figure 2–6).
I Experiment
Point to various • themes in the Theme Colors gallery and watch the colors change on Slide 4.
Why does a gold line surround the Verve color scheme in the Theme Colors gallery?
It shows the Verve document theme is applied, and those eight colors are associated with that theme.
1
Q&
A
To Change the Presentation Theme Colors
The fi rst modifi cation to make is to change the color scheme throughout the presentation. The following steps change the color scheme for the template from a gray title slide background with pink text and accents to a blue background with pink and orange accents.
Figure 2 – 6
Click Oriel in the • Theme Colors gallery to change the presentation theme colors to Oriel (Figure 2 – 7).
What if I want to return to the original theme color?
You would click the Theme Colors button and then click Verve in the Theme Colors gallery.
2
Q&
A
Figure 2 – 7
pointing to Oriel displays preview of color scheme, including blue background
current Verve color scheme Theme Colors
button
gold border indicates current color scheme
Oriel built-in theme
Theme Colors gallery
new Oriel themecolors applied
1439078483_ch2_FINAL.indd PPT811439078483_ch2_FINAL.indd PPT81 7/7/10 8:14:49 PM7/7/10 8:14:49 PM
Property of Cengage Learning

PPT 82 PowerPoint Chapter 2 Enhancing a Presentation with Pictures, Shapes, and WordArt
To Save a Presentation
You have performed many tasks while creating this slide and do not want to risk losing work completed thus far. Accordingly, you should save the document.
The following steps assume you already have created folders for storing your fi les, for example, a CIS 101 folder (for your class) that contains a PowerPoint folder (for your assignments). Thus, these steps save the document in the PowerPoint folder in the CIS 101 folder on a USB fl ash drive using the fi le name, Yoga. For a detailed example of the procedure summarized below, refer to pages OFF 27 through OFF 29 in the Offi ce 2010 and Windows 7 chapter at the beginning of this book.
With a USB fl ash drive connected to one of the computer’s USB ports, click the Save button on the Quick Access Toolbar to display the Save As dialog box.
Type Yoga in the File name text box to change the fi le name. Do not press the ENTER key after typing the fi le name because you do not want to close the dialog box at this time.
Navigate to the desired save location (in this case, the PowerPoint folder in the CIS 101 folder [or your class folder] on the USB fl ash drive).
Click the Save button (Save As dialog box) to save the document in the selected folder on the selected drive with the entered fi le name.
1
2
3
4
Inserting and Formatting Pictures in a PresentationWith the text entered and background formatted in the presentation, the next step is to insert digital pictures into the placeholders on Slides 2 and 3 and then format the pictures. These graphical images draw the viewers’ eyes to the slides and help them retain the information presented.
In the following pages, you will perform these tasks:
1. Insert the fi rst digital picture into Slide 3.2. Insert the second digital picture into Slide 2.3. Change the look of the fi rst picture.4. Change the look of the second picture.5. Resize the second picture.6. Insert a digital picture into the Slide 1 background.7. Format slide backgrounds.
Inserting WatermarksChecks, currency, business cards, and legal documents use watermarks to verify their authenticity. These semi-transparent images are visible when you hold this paper up to a light. You, likewise, can insert a clip art image or a picture as a watermark behind all or part of your slide to identify your unique PowerPoint presentation.
BTW
1439078483_ch2_FINAL.indd PPT821439078483_ch2_FINAL.indd PPT82 7/7/10 8:14:52 PM7/7/10 8:14:52 PM
Property of Cengage Learning

Enhancing a Presentation with Pictures, Shapes, and WordArt PowerPoint Chapter 2 PPT 83
Pow
erPo
int
Ch
apte
r 2
To Insert a Picture
The next step in creating the presentation is to insert one of the digital yoga pictures in the picture placeholder in Slide 3. The picture is available on the Data Files for Students. See the inside back cover of this book for instruc-tions on downloading the Data Files for Students, or contact your instructor for information about accessing the required fi les.
The following steps insert a picture, which, in this example, is located in the PowerPoint Chapter 02 folder on the same USB fl ash drive that contains the saved presentation, into Slide 3.
Plan Ahead
Adhere to copyright regulations.You have permission to use the clips from the Microsoft Clip Organizer. If you want to use a clip from another source, be certain you have the legal right to insert this fi le in your presentation. Read the copyright notices that accompany the clip and are posted on the Web site. The owners of these images and fi les often ask you to give them credit for using their work, which may be satisfi ed by stating where you obtained the images.
With your USB fl ash • drive connected to one of the computer’s USB ports, click the Previous Slide button to display Slide 3.
Click the Insert • Picture from File icon in the content placeholder to display the Insert Picture dialog box.
If Computer is not • displayed in the navigation pane, drag the navigation pane scroll bar (Insert Picture dialog box) until Computer appears.
Click Computer in the • navigation pane to display a list of available storage devices in the Insert Picture dialog box. If necessary, scroll through the dialog box until your USB fl ash drive appears in the list of available storage devices.
Double-click your USB fl ash drive in the list of available storage devices to display a list of • fi les and folders on the selected USB fl ash drive. Double-click the Data Files for Students folder, double-click the PowerPoint folder, and then double-click the Chapter 02 folder to display a list of fi les in that folder.
Scroll down and then click Hands Yoga to select the fi le name (Figure 2 – 8).• What if the picture is not on a USB fl ash drive?
Use the same process, but select the drive containing the picture.
1
2
Q&
A
Figure 2 – 8
selected picture fi le
Insert button
Insert Picture from File icon
Chapter 02 folder is open on selected device
pictures from Chapter 02 PowerPoint folder in Data Files for Students folder on USB fl ash drive (your list may differ)
1439078483_ch2_FINAL.indd PPT831439078483_ch2_FINAL.indd PPT83 7/7/10 8:14:52 PM7/7/10 8:14:52 PM
Property of Cengage Learning

PPT 84 PowerPoint Chapter 2 Enhancing a Presentation with Pictures, Shapes, and WordArt
Click the Insert • button (Insert Picture dialog box) to insert the picture into the content placeholder in Slide 3 (Figure 2 – 9).
What are the symbols around the picture?
A selected graphic appears surrounded by a selection rectangle, which has small squares and circles, called sizing handles, at each corner and middle location.
3
Q&
A
To Insert Another Picture into a Content Placeholder
The next step is to insert another digital yoga picture into the Slide 2 content placeholder. This second picture also is available on the Data Files for Students. See the inside back cover of this book for instructions on downloading the Data Files for Students, or contact your instructor for information about accessing the required fi les.
The following steps insert a picture into Slide 2.
Figure 2 – 9
Click the Previous Slide button to display Slide 2.
With your USB fl ash drive connected to one of the computer’s USB ports, click the Insert Picture from File icon in the content placeholder to display the Insert Picture dialog box.
If the list of fi les and folders on the selected USB fl ash drive are not displayed in the Insert Picture dialog box, double-click your USB fl ash drive to display them and then navigate to the PowerPoint Chapter 02 folder.
Scroll down and then click Green Tank Meditation to select the fi le name.
Click the Insert button (Insert Picture dialog box) to insert the picture into the Slide 2 content placeholder (Figure 2 – 10).
1
2
3
4
5
Picture tools and Format tabs appear automatically when a graphic is selected in the document
sizing handles
picture inserted into content placeholder
selection rectangle surrounds picture
project name changed to Yoga
Modernism’s Effect on Graphic DesignThe modernist movement of the late nineteenth and twentieth centuries infl uenced the design principles in use today. Artists and architects of that era simplifi ed the world in terms of legible fonts, abstract shapes, and balanced layouts. Modernists sought to create works independent of language so their message could reach people throughout the world.
BTW
1439078483_ch2_FINAL.indd PPT841439078483_ch2_FINAL.indd PPT84 7/7/10 8:14:53 PM7/7/10 8:14:53 PM
Property of Cengage Learning

Enhancing a Presentation with Pictures, Shapes, and WordArt PowerPoint Chapter 2 PPT 85
Pow
erPo
int
Ch
apte
r 2
To Insert a Picture into a Slide without a Content Placeholder
In Chapter 1, you inserted a clip into a slide without a content placeholder. You also can insert a picture into a slide that does not have a content placeholder. The picture for Slide 4 is available on the Data Files for Students. See the inside back cover of this book for instructions on downloading the Data Files for Students, or contact your instructor for information about accessing the required fi les. The following steps insert a picture into Slide 4.
Click the Next Slide button • two times to display Slide 4.
With your USB fl ash • drive connected to one of the computer’s USB ports, click Insert on the Ribbon (Figure 2 – 11).
1
Figure 2 – 11
Insert tab
Insert Picture from File button
Figure 2 – 10
picture inserted into content placeholder
1439078483_ch2_FINAL.indd PPT851439078483_ch2_FINAL.indd PPT85 7/7/10 8:14:57 PM7/7/10 8:14:57 PM
Property of Cengage Learning

PPT 86 PowerPoint Chapter 2 Enhancing a Presentation with Pictures, Shapes, and WordArt
Click the Insert button • (Insert Picture dialog box) to insert the picture into the Slide 4 content placeholder.
Move the picture so that it • displays approximately as shown in Figure 2 – 13.
3
Click Insert Picture from File • (Insert tab | Images group) to display the Insert Picture dialog box. If the list of fi les and folders on the selected USB fl ash drive are not displayed in the Insert Picture dialog box, double-click your USB fl ash drive to display them and then navigate to the PowerPoint Chapter 02 folder.
Click Arch Yoga to select the fi le • name (Figure 2 – 12).
2
Figure 2 – 13
To Correct a Picture
A photograph’s color intensity can be modifi ed by changing the brightness and contrast. Brightness determines the overall lightness or darkness of the entire image, whereas contrast is the difference between the darkest and lightest areas of the image. The brightness and contrast are changed in predefi ned percentage increments. The following step increases the brightness and decreases the contrast to intensify the picture colors.
What is the green circle attached to the selected graphic?
The green circle is a rotate handle. When you drag a graphic’s rotate handle, the graphic moves in either a clockwise or counter clockwise direction.
Q&
A
Figure 2 – 12
Insert button
selected picturefi le
picture moved to desired location
rotate handle
1439078483_ch2_FINAL.indd PPT861439078483_ch2_FINAL.indd PPT86 7/7/10 8:14:59 PM7/7/10 8:14:59 PM
Property of Cengage Learning

Enhancing a Presentation with Pictures, Shapes, and WordArt PowerPoint Chapter 2 PPT 87
Pow
erPo
int
Ch
apte
r 2
With the Arch Yoga • picture on Slide 4 still selected, click the Corrections button (Picture Tools Format tab | Adjust group) to display the Corrections gallery.
Point to Brightness: • 120% Contrast: 240% (fourth picture in fi rst row of Brightness and Contrast area) to display a live preview of these corrections on the picture (Figure 2 – 14).
I Experiment
Point to various • pictures in the Brightness and Contrast area and watch the brightness and contrast change on the picture in Slide 4.
Why is a yellow border surrounding the picture in the center of the gallery?
The image on Slide 4 currently has normal brightness and contrast (0%), which is represented by this center image in the gallery.
Click Brightness: • 120% Contrast: 240% to apply this correction to the yoga picture.
How can I remove all effects from the picture?
Click the Reset Picture button (Picture Tools Format tab | Adjust group).
1
Q&
AQ
&A
To Apply a Picture Style
The pictures on Slides 2, 3, and 4 grasp the audience’s attention, but you can increase their visual appeal by applying a style. A style is a named group of formatting characteristics. PowerPoint provides more than 25 pic-ture styles that enable you easily to change a picture’s look to a more visually appealing style, including a variety of shapes, angles, borders, and refl ections. The photos in Slides 2, 3, and 4 in this chapter use styles that apply soft edges, refl ections, or angled perspectives to the pictures. The following steps apply a picture style to the Slide 4 picture.
1. Click Picture Corrections Options, move Brightness or Contrast sliders or enter
number in box next to slider (Format Picture dialog box)
Other Ways
Figure 2 – 14
original brightnessand contrast
Picture Style gallery More button
Corrections button
preview with brightness and contrast adjusted
1439078483_ch2_FINAL.indd PPT871439078483_ch2_FINAL.indd PPT87 7/7/10 8:15:00 PM7/7/10 8:15:00 PM
Property of Cengage Learning

PPT 88 PowerPoint Chapter 2 Enhancing a Presentation with Pictures, Shapes, and WordArt
With the Slide 4 picture selected, • click the Picture Tools Format tab and then click the More button in the Picture Styles gallery (Picture Tools Format tab | Picture Styles group) (shown in Figure 2 – 14 on the previous page) to expand the gallery.
Point to Soft Edge Rectangle in the • Picture Styles gallery to display a live preview of that style applied to the picture in the document (Figure 2 – 15).
I Experiment
Point to various picture styles in the • Picture Styles gallery and watch the style of the picture change in the document window.
1
Click Soft Edge Rectangle in the • Picture Styles gallery to apply the style to the selected picture (Figure 2 – 16).
2
Figure 2 – 15
Figure 2 – 16
To Apply Other Picture Styles
The next step is to apply picture styles to the yoga pictures in Slides 3 and 2. To provide continuity, both of these styles will have a refl ection. The following steps apply other picture styles to the Slide 3 and Slide 2 pictures.
Click the Previous Slide button to display Slide 3.
Click the Slide 3 picture to select it, click the Picture Tools Format tab, and then click the More button in the Picture Styles gallery to expand the gallery.
Click Refl ected Perspective Right in the Picture Styles gallery to apply this style to the picture in Slide 3.
Click the Previous Slide button to display Slide 2.
Click the Slide 2 picture to select it, click the Picture Tools Format tab, and then click the More button in the Picture Styles gallery to expand the gallery.
Click Refl ected Rounded Rectangle in the Picture Styles gallery to apply this style to the picture in Slide 2 (Figure 2–17).
1
2
3
4
5
6
preview with picture style applied
Soft Edge Rectangle Picture Style applied
Picture Styles gallery
Refl ected Rounded Rectangle style
Refl ected Perspective Right style
1439078483_ch2_FINAL.indd PPT881439078483_ch2_FINAL.indd PPT88 7/7/10 8:15:01 PM7/7/10 8:15:01 PM
Property of Cengage Learning

Enhancing a Presentation with Pictures, Shapes, and WordArt PowerPoint Chapter 2 PPT 89
Pow
erPo
int
Ch
apte
r 2
With the Slide 2 • picture selected, click the Picture Effects button (Picture Tools Format tab | Picture Styles group) to display the Picture Effects menu.
What if the Picture Tools Format tab no longer is displayed on my Ribbon?
Double-click the picture to display the Picture Tools and Format tabs.
Point to Glow on the • Picture Effects menu to display the Glow gallery.
Point to Orange, 11 pt glow, Accent color 1 in the Glow Variations area (leftmost glow in • third row) to display a live preview of the selected glow effect applied to the picture in the document window (Figure 2 – 18).
I Experiment
Point to various glow effects in the Glow gallery and watch the picture change in the • document window.
1
Q&
A
To Apply Picture Effects
PowerPoint provides a variety of picture effects so that you can further customize a picture. Effects include shadows, refl ections, glow, soft edges, bevel, and 3-D rotation. The difference between the effects and the styles is that each effect has several options, providing you with more control over the exact look of the image.
In this presentation, the photos on Slides 2 and 3 have an orange glow effect and have a bevel applied to their edges. The following steps apply picture effects to the selected picture.
Figure 2 – 17
Figure 2 – 18
picture styles applied to Slides 2 and 3
Glow command
Picture Effects button
glow effect selected for live preview
Glow gallery
glow effect previewed
Picture Effects menu
1439078483_ch2_FINAL.indd PPT891439078483_ch2_FINAL.indd PPT89 7/7/10 8:15:03 PM7/7/10 8:15:03 PM
Property of Cengage Learning

PPT 90 PowerPoint Chapter 2 Enhancing a Presentation with Pictures, Shapes, and WordArt
Click Orange, 11 pt glow, Accent • color 1 in the Glow gallery to apply the selected picture effect.
Click the Picture Effects button • (Picture Tools Format tab | Picture Styles group) to display the Picture Effects menu again.
Point to Bevel on the Picture • Effects menu to display the Bevel gallery.
Point to Angle (leftmost bevel in • second row) to display a live preview of the selected bevel effect applied to the Slide 2 picture (Figure 2 – 19).
I Experiment
Point to various bevel effects in the • Bevel gallery and watch the picture change in the slide.
Click Angle in the Bevel gallery to apply the selected picture effect.•
2
3
4 Figure 2 – 19
To Apply a Picture Style and Effect to Another Picture
In this presentation, the Slide 3 picture also has orange glow and bevel effects. The following steps apply the picture style and picture effects to the picture.
Click the Next Slide button to display Slide 3 and then click the picture to select it.
Click the Picture Effects button (Picture Tools Format tab | Picture Styles group) to display the Picture Effects menu and then point to Glow on the Picture Effects menu to display the Glow gallery.
Click Orange, 11 pt glow, Accent color 1 (leftmost glow in third row) in the Glow gallery to apply the picture effect to the picture.
Click the Picture Effects button (Picture Tools Format tab | Picture Styles group) to display the Picture Effects menu again and then point to Bevel on the Picture Effects menu to display the Bevel gallery.
Click Convex (third bevel in second row) in the Bevel area to apply the picture effect to the selected picture (Figure 2 – 20).
1
2
3
4
5
1. Right-click picture, click Format Picture on shortcut menu, select desired options (Format Picture dialog box), click Close button
2. Click Format Shape dialog box launcher (Picture
Tools Format tab | Picture Styles group), select desired options (Format Picture dialog box), click Close button
Other Ways
Bevel gallery
default setting is No Bevel
Picture Effects menu
Picture Effects button
Angle Bevel effect selected for live preview
Bevel command
Angle Bevel effect previewed
1439078483_ch2_FINAL.indd PPT901439078483_ch2_FINAL.indd PPT90 7/7/10 8:15:04 PM7/7/10 8:15:04 PM
Property of Cengage Learning

Enhancing a Presentation with Pictures, Shapes, and WordArt PowerPoint Chapter 2 PPT 91
Pow
erPo
int
Ch
apte
r 2
Figure 2 – 20
To Add a Picture Border
The next step is to add a small border to the Slide 3 picture. Some picture styles provide a border, but the Refl ected Rounded Rectangle style you applied to this picture does not. The following steps add a border to the Slide 3 picture.
With the Slide 3 picture still selected, • click the Picture Border button (Picture Tools Format tab | Picture Styles group) to display the Picture Border gallery.
What if the Picture Tools Format tab no longer is displayed on my Ribbon?
Double-click the picture to display the Picture Tools and Format tabs.
Point to Weight on the Picture Border • gallery to display the Weight list.
Point to 1½ pt to display a live • preview of this line weight on the picture (Figure 2 – 21).
I Experiment
Point to various line weights in the • Weight list and watch the line thickness change.
Can I make the line width more than 6 pt?
Yes. Click More Lines and then increase the amount in the Width box.
Click 1½ pt to add this line weight to the picture.•
1
Q&
A
2
Q&
A
3
Figure 2 – 21
Convex Bevel effect applied
1½-pt border is previewed
Weight list
Picture Border button
desired border line weight
1439078483_ch2_FINAL.indd PPT911439078483_ch2_FINAL.indd PPT91 7/7/10 8:15:06 PM7/7/10 8:15:06 PM
Property of Cengage Learning

PPT 92 PowerPoint Chapter 2 Enhancing a Presentation with Pictures, Shapes, and WordArt
With the Slide 3 photo still • selected, click the Picture Border button (Picture Tools Format tab | Picture Styles group) to display the Picture Border gallery.
What if the Picture Tools Format tab no longer is displayed on my Ribbon?
Double-click the picture to display the Picture Tools and Format tabs.
Point to Red, Accent 3 (seventh • theme color from left in fi rst row) in the Picture Border gallery to display a live preview of that border color on the picture (Figure 2 – 22).
I Experiment
Point to various colors in the • Picture Border gallery and watch the border on the picture change in the slide.
Click Red, Accent 3 in the Picture Border gallery to change the picture border color.•
1
Q&
A
2
3
To Change a Picture Border Color
The default color for the border you added to the Slide 3 picture is White. Earlier in this chapter, you changed the color scheme to Oriel. To coordinate the border color with the title text color and other elements of this theme, you will use a shade of red in the Oriel color scheme. Any color galleries you display show colors defi ned in this current color scheme. The following steps change the Slide 3 picture border color.
To Add a Picture Border and Color to Another Picture
In this presentation, the Slide 2 picture does not have a border as part of the Refl ected Perspective Right picture style. The following steps add a border to Slide 2 and change the color.
Click the Previous Slide button to display Slide 2 and then click the picture to select it.
Click the Picture Border button (Picture Tools Format tab | Picture Styles group) to display the Picture Border gallery.
Point to Weight on the Picture Border gallery to display the Weight list and then point to 1½ pt to display a live preview of this line weight on the picture.
Click 1½ pt to add this line weight to the picture.
1
2
3
4
Figure 2 – 22
Picture Border button
desired picture border color
1½ pt-border is applied with preview of new border color
1439078483_ch2_FINAL.indd PPT921439078483_ch2_FINAL.indd PPT92 7/7/10 8:15:07 PM7/7/10 8:15:07 PM
Property of Cengage Learning

Enhancing a Presentation with Pictures, Shapes, and WordArt PowerPoint Chapter 2 PPT 93
Pow
erPo
int
Ch
apte
r 2
To Resize a Graphic by Entering Exact Measurements
The next step is to resize the Slide 3 picture so that it fi lls much of the empty space in the slide. In Chapter 1, you resized clips by dragging the sizing handles. This technique also applies to changing the size of photos. You also can resize graphics by specifying exact height and width measurements. The yoga picture can be enlarged so that its height and width measurements are 6.0". When a graphic is selected, its height and width measurements show in the Size group of the Picture Tools Format tab. The following steps resize the Slide 3 picture by entering its desired exact measurements.
Click the Next Slide button to • display Slide 3 and then select the picture. Click the Shape Height text box (Picture Tools Format tab | Size group) to select the contents in the text box and then type 6 as the height (Figure 2 – 24).
1
Figure 2 – 23
Click the Picture Border button (Picture Tools Format tab | Picture Styles group) to display the Picture Border gallery again and then click Red, Accent 3 in the Picture Border gallery to change the picture border color (Figure 2 – 23).
5
Figure 2 – 24
What if the contents of the Shape Height text box are not selected?
Triple-click the Shape Height text box.
Why did the width size also change?
PowerPoint kept the photo in proportion so that the width changed the same amount as the height changed.
Q&
AQ
&A
1½ pt border is applied with new border color
Shape Height text box
desired picture height is 6 inches
1439078483_ch2_FINAL.indd PPT931439078483_ch2_FINAL.indd PPT93 7/7/10 8:15:08 PM7/7/10 8:15:08 PM
Property of Cengage Learning

PPT 94 PowerPoint Chapter 2 Enhancing a Presentation with Pictures, Shapes, and WordArt
Click the Shape Width text box • (Picture Tools Format tab | Size group) to select the contents in the text box and then type 6 as the width if this number does not display automatically.
If necessary, move the photo to the • location shown in Figure 2 – 25.
What if I want to return a graphic to its original size and start again?
With the graphic selected, click the Size and Position dialog box launcher (Picture Tools Format tab | Size group), if necessary click the Size tab (Format Picture dialog box), click the Reset button, and then click the Close button.
2
Q&
A
Figure 2 – 25
1. Right-click picture, enter shape height and width values in text boxes on shortcut menu
2. Right-click picture, click Format Picture
on shortcut menu, click Size (Format Picture dialog box), enter shape height and width values in text boxes, click Close button
Other Ways
To Resize Another Graphic Using Exact Measurements
The Arch Yoga picture on Slide 4 also can be enlarged to fi ll space at the top of the slide. The yoga picture can be enlarged so that its height and width measurements are 3" and 4.48", respectively. The following steps resize the Slide 4 picture.
Click the Next Slide button to display Slide 4 and then select the picture. Click the Shape Height text box (Picture Tools Format tab | Size group) to select the contents in the text box and type 3 as the height.
Move the photo to the location shown in Figure 2 – 26.
1
2
Figure 2 – 26
picture height and width enlarged to 6 inches
picture moved to desired location
picture moved to desired location on slide
picture height changed to 3 inches
1439078483_ch2_FINAL.indd PPT941439078483_ch2_FINAL.indd PPT94 7/7/10 8:15:09 PM7/7/10 8:15:09 PM
Property of Cengage Learning

Enhancing a Presentation with Pictures, Shapes, and WordArt PowerPoint Chapter 2 PPT 95
Pow
erPo
int
Ch
apte
r 2
Formatting Slide BackgroundsA slide’s background is an integral part of a presentation because it can generate audience interest. Every slide can have the same background, or different backgrounds can be used in a presentation. This background is considered fi ll, which is the content that makes up the interior of a shape, line, or character. Three fi lls are available: solid, gradient, and picture or texture. Solid fi ll is one color used throughout the entire slide. Gradient fi ll is one color shade gradually progressing to another shade of the same color or one color progressing to another color. Picture or texture fi ll uses a specifi c fi le or an image that simulates a material, such as cork, granite, marble, or canvas.
Once you add a fi ll, you can adjust its appearance. For example, you can adjust its transparency, which allows you to see through the background, so that any text on the slide is visible. You also can select a color that is part of the theme or a custom color. You can use offsets, another background feature, to move the background from the slide bor-ders in varying distances by percentage. Tiling options repeat the background image many times vertically and horizontally on the slide; the smaller the tiling percentage, the greater the number of times the image is repeated.
To Save an Existing Document with the Same File Name
You have made several modifi cations to the document since you last saved it. Thus, you should save it again. The following step saves the document again. For an example of the step listed below, refer to page OFF 51 in the Offi ce 2010 and Windows 7 chapter at the beginning of this book.
Click the Save button on the Quick Access Toolbar to overwrite the previously saved fi le.1
To Insert a Texture Fill
A wide variety of texture fi lls are available to give your presentation a unique look. The 24 pictures in the Textures gallery give the appearance of a physical object, such as water drops, sand, tissue paper, and a paper bag. You also can use your own texture pictures for custom backgrounds. When you insert a fi ll, PowerPoint assumes you want this custom background on only the current slide displayed. To make this background appear on all slides in the presentation, click the Apply to All button in the Format Background dialog box. The following steps insert the Sand fi ll on Slide 4 in the presentation.
Right-click anywhere on the Slide 4 • blue background to display the shortcut menu (Figure 2 – 27).
1
Figure 2 – 27
Format Background command on shortcut menu
shortcut menu
Break Point: If you wish to take a break, this is a good place to do so. You can quit PowerPoint now. To resume at a later time, start PowerPoint, open the fi le called Yoga, and continue following the steps from this location forward.
Resetting BackgroundsIf you have made many changes to the background and want to start the process over, click the Reset Background button in the Format Background dialog box.
BTW
1439078483_ch2_FINAL.indd PPT951439078483_ch2_FINAL.indd PPT95 7/7/10 8:15:10 PM7/7/10 8:15:10 PM
Property of Cengage Learning
PPT 96 PowerPoint Chapter 2 Enhancing a Presentation with Pictures, Shapes, and WordArt
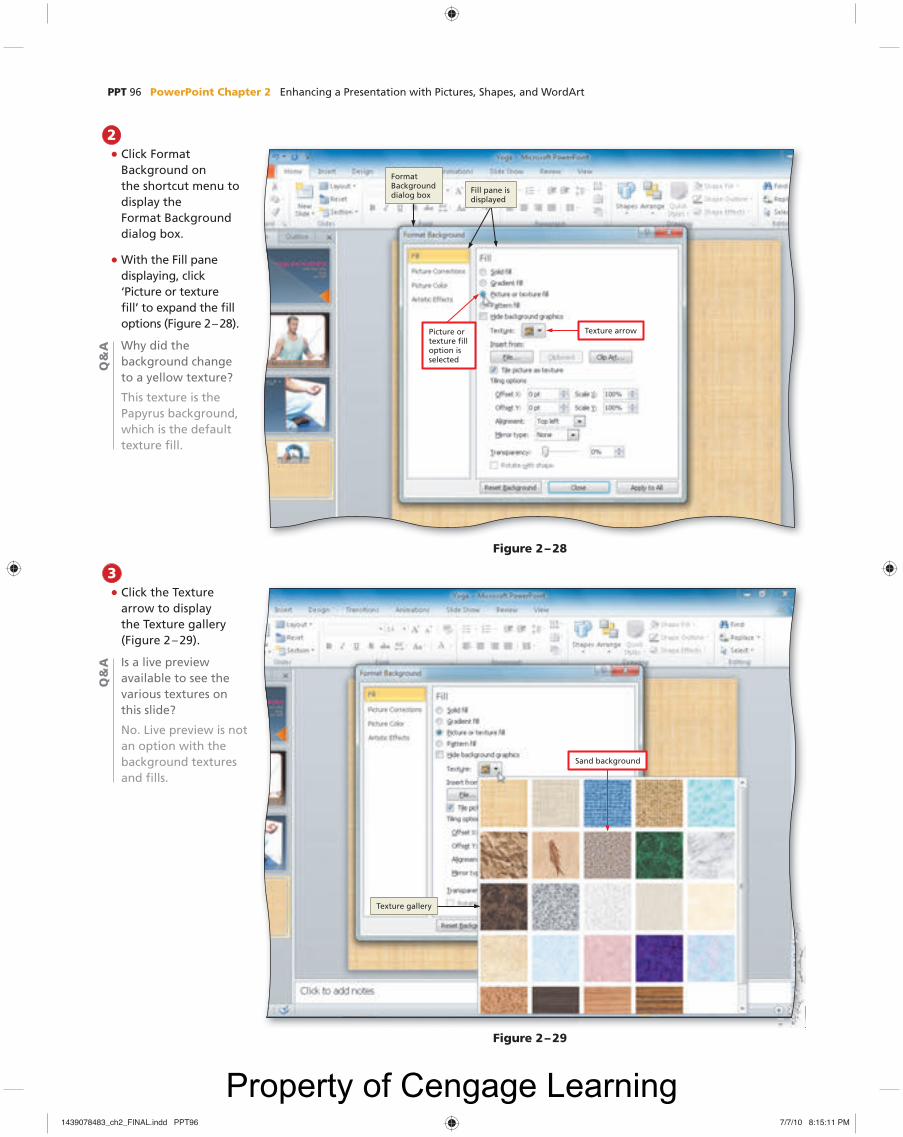
Click Format • Background on the shortcut menu to display the Format Background dialog box.
With the Fill pane • displaying, click ‘Picture or texture fi ll’ to expand the fi ll options (Figure 2 – 28).
Why did the background change to a yellow texture?
This texture is the Papyrus background, which is the default texture fi ll.
2
Q&
A
Figure 2 – 28
Click the Texture • arrow to display the Texture gallery (Figure 2 – 29).
Is a live preview available to see the various textures on this slide?
No. Live preview is not an option with the background textures and fi lls.
3
Q&
A
Figure 2 – 29
Sand background
Texture gallery
Format Background dialog box
Fill pane is displayed
Texture arrowPicture or texture fi ll option is selected
1439078483_ch2_FINAL.indd PPT961439078483_ch2_FINAL.indd PPT96 7/7/10 8:15:11 PM7/7/10 8:15:11 PM
Property of Cengage Learning

Enhancing a Presentation with Pictures, Shapes, and WordArt PowerPoint Chapter 2 PPT 97
Pow
erPo
int
Ch
apte
r 2
1. Click Design tab, Background Styles, click Format Background (Design tab | Background group)
Other Ways
To Insert a Picture to Create a Background
For variety and interest, you want to use another yoga picture as the Slide 1 background. This picture is stored on the Data Files for Students. PowerPoint will stretch the height and width of this picture to fi ll the slide area. The following steps insert the picture, Sunrise Yoga, on only Slide 1.
Click the Previous Slide button • three times to display Slide 1.
With the Fill pane displaying • (Format Background dialog box), click ‘Picture or texture fi ll’.
Click the File button in the Insert • from area (shown in Figure 2–30) to display the Insert Picture dialog box.
If necessary, double-click your USB • fl ash drive in the list of available storage devices to display a list of fi les and folders on the selected USB fl ash drive and then navigate to the PowerPoint Chapter 02 folder.
Scroll down and then click Sunrise • Yoga to select the fi le name
(Figure 2 – 31).
What if the picture is not on a USB fl ash drive?
Use the same process, but select the drive containing the picture.
1
Q&
A
Click the Sand background • (third texture in second row) to insert this background on Slide 4 (Figure 2 – 30).
The Format Background dialog box is covering part of the slide. Can I move this box?
Yes. Click the dialog box title and drag it to a different location so that you can view the slide.
Could I insert this background on all four slides simultaneously?
Yes. You would click the Apply to All button to insert the Sand background on all slides.
4
Q&
AQ
&A
Figure 2 – 30
Apply to All button
Sand background inserted on Slide 4
File button in Insert from area
Figure 2 – 31
Insert button
selected picture fi le
Insert Picture dialog box
1439078483_ch2_FINAL.indd PPT971439078483_ch2_FINAL.indd PPT97 7/7/10 8:15:13 PM7/7/10 8:15:13 PM
Property of Cengage Learning

PPT 98 PowerPoint Chapter 2 Enhancing a Presentation with Pictures, Shapes, and WordArt
To Format the Background Picture Fill Transparency
The Sunrise Yoga picture on Slide 1 is a rich color and confl icts with the title and subtitle text. One method of reducing this richness is to change the transparency. The Transparency slider indicates the amount of opaqueness. The default setting is 0, which is fully opaque. The opposite extreme is 100%, which is fully transparent. To change the transparency, you can move the Transparency slider or enter a number in the text box next to the slider. The following step adjusts the transparency to 10%.
Click the Transparency slider and • drag it to the right until 10% is displayed in the Transparency text box (Figure 2 – 33).
Can I move the slider in small increments so that I can get a precise percentage easily?
Yes. Press the RIGHT ARROW or LEFT ARROW key to move the slider in one-percent increments.
1
Q&
A
Click the Insert button (Insert • Picture dialog box) to insert the Sunrise Yoga picture as the Slide 1 background (Figure 2 – 32).
What if I do not want to use this picture?
Click the Undo button on the Quick Access Toolbar.
Why do the Left and Right offsets in the Stretch options area show a 26% value?
PowerPoint automatically reduced the photograph slightly so that it fi lls the entire slide.
Can I move the Format Background dialog box to the left so that I can see more of the subtitle text?
Yes. Click the dialog box title and then drag the box to the desired location on the slide.
2
Q&
AQ
&A
Q&
A
Figure 2 – 32
Figure 2 – 33
Transparency sliderSunrise Yoga picture inserted in Slide 1 background
default transparency is 0%
picture background transparency is increased
Transparency changed to 10%
1439078483_ch2_FINAL.indd PPT981439078483_ch2_FINAL.indd PPT98 7/7/10 8:15:14 PM7/7/10 8:15:14 PM
Property of Cengage Learning

Enhancing a Presentation with Pictures, Shapes, and WordArt PowerPoint Chapter 2 PPT 99
Pow
erPo
int
Ch
apte
r 2
Click the Next Slide button three • times to display Slide 4.
Click the Transparency slider and • drag it to the right until 50% is displayed in the Transparency text box (Figure 2 – 34).
Click the Close button (Format • Background dialog box).
1
2
To Format the Background Texture Fill Transparency
The Sand texture on Slide 4 is dark and may not offer suffi cient contrast with the symbols and text you are going to insert on this slide. You can adjust the transparency of slide texture in the same manner that you change a picture transparency. The following steps adjust the texture transparency to 50%.
Figure 2 – 34
To Choose a Background Style
Now that the backgrounds for Slides 1 and 4 are set, and the title and text paragraphs for the presentation have been entered, you need to make design decisions for Slides 2 and 3. In this project, you will choose a back-ground for these slides. For each theme, PowerPoint provides 12 background styles with designs that may include color, shading, patterns, and textures. Fill effects add pattern and texture to a background, which add depth to a slide. The following steps add a background style to Slides 2 and 3 in the presentation.
Close button
background texture fi ll transparency changed to 50%
background texture fi ll transparency is increased
1439078483_ch2_FINAL.indd PPT991439078483_ch2_FINAL.indd PPT99 7/7/10 8:15:15 PM7/7/10 8:15:15 PM
Property of Cengage Learning

PPT 100 PowerPoint Chapter 2 Enhancing a Presentation with Pictures, Shapes, and WordArt
Click the Previous Slide button • once to display Slide 3 and then click the Design tab on the Ribbon.
Click the Background Styles button • (Design tab | Background group) to display the Background Styles gallery.
Right-click Style 11 (third style in • third row) to display the shortcut menu (Figure 2 – 35).
I Experiment
Point to various styles themes in • the Background Styles gallery and watch the backgrounds change on the slide.
Are the backgrounds displayed in a specifi c order?
Yes. They are arranged in order from light to dark running from left to right. The fi rst row has solid backgrounds; the middle row has darker fi lls at the top and bottom; the bottom row has fi ll patterns. If you point to a background, a ScreenTip with the background’s name appears on the screen.
1
Q&
A
Click Apply to Selected Slides • to apply Style 11 to Slide 3 (Figure 2–36).
If I decide later that this background style does not fi t the theme of my presentation, can I apply a different background?
Yes. You can repeat these steps at any time while creating your presentation.
What if I want to apply this background style to all slides in the presentation?
Click the desired style or click Apply to All Slides in the shortcut menu.
2
Q&
AQ
&A
Figure 2 – 361. Click Background Styles, right-click desired background, press S
Other Ways
Figure 2 – 35
Background Styles gallery
shortcut menu
clicking Apply to Selected Slides command applies selected background style only to Slide 3
Background Style 11 desired for current slide
Background Style 11 applied to Slide 3
Background Styles button
1439078483_ch2_FINAL.indd PPT1001439078483_ch2_FINAL.indd PPT100 7/7/10 8:15:17 PM7/7/10 8:15:17 PM
Property of Cengage Learning

Enhancing a Presentation with Pictures, Shapes, and WordArt PowerPoint Chapter 2 PPT 101
Pow
erPo
int
Ch
apte
r 2
To Choose Another Background Style
In this presentation, the Slide 2 background can have a coordinating background to complement the yoga picture. The following steps add a background to Slide 2.
Click the Previous Slide button to display Slide 2. Click the Background Styles button (Design tab | Background group) and then right-click Style 10 (second style in third row) to display the shortcut menu.
Click Apply to Selected Slides to apply this background style to Slide 2 (Figure 2 – 37).
1
2
Formatting Title and Content TextChoosing well-coordinated colors and styles for text and objects in a presentation is pos-sible. Once you select a particular Quick Style and make any other font changes, you then can copy these changes to other text using the Format Painter. The Format Painter allows you to copy all formatting changes from one object to another.
To Change the Subtitle and Caption Font
The default Verve theme heading, subtitle, and caption text font is Century Gothic. To draw more attention to subtitle and caption text and to help differentiate these slide elements from the title text, you want to change the font from Century Gothic to Papyrus. To change the font, you must select the letters you want to format. In Chapter 1, you selected a paragraph and then formatted the characters. To format the text in multiple paragraphs quickly and simultaneously, you can select all the paragraphs to be formatted and then apply formatting changes. The following steps change the subtitle and caption font.
Figure 2 – 37
Background Style 10 applied to Slide 2
Introducing the PresentationBefore your audience enters the room, start the presentation and then display Slide 1. This slide should be visually appealing and provide general interest in the presentation. An effective title slide gives a good fi rst impression.
BTW
1439078483_ch2_FINAL.indd PPT1011439078483_ch2_FINAL.indd PPT101 7/7/10 8:15:18 PM7/7/10 8:15:18 PM
Property of Cengage Learning

PPT 102 PowerPoint Chapter 2 Enhancing a Presentation with Pictures, Shapes, and WordArt
Click the Previous Slide button • to display Slide 1. Move the mouse pointer to the left of the fi rst subtitle paragraph, Unify Your Mind, until the mouse pointer changes to an I-beam (Figure 2 – 38).
1
Drag downward to select all three • subtitle lines that will be formatted (Figure 2 – 39).
2
With the text selected, click Home • on the Ribbon and then click the Font box arrow (Home tab | Font group) to display the Font gallery (Figure 2 – 40).
Will the fonts in my Font gallery be the same as those shown in Figure 2– 40?
Your list of available fonts may differ, depending on what fonts you have installed and the type of printer you are using.
3
Q&
A
Figure 2 – 40
Figure 2 – 38
Figure 2 – 39
i 2 0
I-beam mouse pointer
subtitle text to format
subtitle text selected
Font boxarrow
Font gallery
Century Gothic is current font
Century Gothic is current subtitle body text font
1439078483_ch2_FINAL.indd PPT1021439078483_ch2_FINAL.indd PPT102 7/7/10 8:15:19 PM7/7/10 8:15:19 PM
Property of Cengage Learning

Enhancing a Presentation with Pictures, Shapes, and WordArt PowerPoint Chapter 2 PPT 103
Pow
erPo
int
Ch
apte
r 2
Scroll through the Font gallery and • then point to Papyrus (or a similar font) to display a live preview of the title text in the Papyrus font (Figure 2 – 41).
I Experiment
Point to various fonts in the Font • gallery and watch the subtitle text font change in the slide.
Click Papyrus (or a similar font) to • change the font of the selected text to Papyrus.
4
Figure 2 – 41
To Shadow Text
A shadow helps letters display prominently by adding a shadow behind the text. The following step adds a shadow to the selected subtitle text, Unify Your Mind, Body, and Spirit.
1. Click Font box arrow on Mini toolbar, click desired font in Font gallery
2. Right-click selected text, click Font on shortcut menu (Font dialog box), click
Font tab, select desired font in Font list, click OK button
3. Click Font dialog box launcher (Home tab | Font group), click Font tab (Font dialog box), select
desired font in Font list, click OK button
4. Press CTRL+SHIFT+F, click Font tab (Font dialog box), select desired font in the Font list, click OK button
Other Ways
With the subtitle text selected, click • the Text Shadow button (Home tab | Font group) to add a shadow to the selected text (Figure 2 – 42).
How would I remove a shadow?
You would click the Shadow button a second time, or you immediately could click the Undo button on the Quick Access Toolbar.
1
Q&
A
Figure 2 – 42
Papyrus font is previewed for subtitle body text
Text Shadow button
shadow applied to subtitle text
1439078483_ch2_FINAL.indd PPT1031439078483_ch2_FINAL.indd PPT103 7/7/10 8:15:21 PM7/7/10 8:15:21 PM
Property of Cengage Learning

PPT 104 PowerPoint Chapter 2 Enhancing a Presentation with Pictures, Shapes, and WordArt
To Format the Subtitle Text
To increase readability, you can format the Slide 1 subtitle text by bolding the characters and changing the font color to yellow. The following steps format the Slide 1 subtitle text.
With the subtitle text selected, click the Bold button (Home tab | Font group) to bold the text.
Click the Font Color arrow and change the color to Light Yellow, Text 2 (fourth color in fi rst row) (Figure 2 – 43).
1
2
Figure 2 – 43
To Format the Slide 2 Caption
The caption on a slide should be large enough for audience members to read easily and should coordinate with the font styles in other parts of the presentation. The caption on Slide 2 can be enhanced by changing the font, the font color, and the font size. The following steps format the Slide 2 caption text.
Click the Next Slide button to display Slide 2. Triple-click the caption text to select all the char-acters, click the Font box arrow on the Mini toolbar, and then scroll down and click Papyrus.
Click the Increase Font Size button on the Mini toolbar three times to increase the font size to 20 point.
Click the Bold button on the Mini toolbar to bold the text (Figure 2 – 44).
1
2
3
Figure 2 – 44
subtitle text is formatted
subtitle font color is Light Yellow
Font Color arrow
subtitle text bolded
increased font size
desired font
bolded text
caption text is formatted
Decreasing Font SizeThe Increase Font Size buttons on the Mini toolbar and in the Font group (Home tab) enlarge the selected characters in predetermined amounts. The Decrease Font Size buttons, which appear to the right of the Increase Font Size buttons, reduce the characters’ size in the same predetermined point sizes.
BTW
1439078483_ch2_FINAL.indd PPT1041439078483_ch2_FINAL.indd PPT104 7/7/10 8:15:22 PM7/7/10 8:15:22 PM
Property of Cengage Learning

Enhancing a Presentation with Pictures, Shapes, and WordArt PowerPoint Chapter 2 PPT 105
Pow
erPo
int
Ch
apte
r 2
Format PainterTo save time and avoid formatting errors, you can use the Format Painter to apply
custom formatting to other places in your presentation quickly and easily. You can use this feature in three ways:
To copy only character attributes, such as font and font effects, select text that has • these qualities.To copy both paragraph attributes, such as alignment and indentation and character • attributes, select the entire paragraph.To apply the same formatting to multiple words, phrases, or paragraphs, double-click • the Format Painter button and then select each item you want to format. You then can press the esc key or click the Format Painter button to turn off this feature.
To Format Text Using the Format Painter
To save time and duplicated effort, you quickly can use the Format Painter to copy formatting attributes from the Slide 2 caption text and apply them to Slide 3. The following steps use the Format Painter to copy formatting features.
With the Slide 2 caption text • still selected, double-click the Format Painter button (Home tab | Clipboard group).
Move the mouse pointer off • the Ribbon (Figure 2 – 45).
Why did my mouse pointer change shape?
The mouse pointer changed shape by adding a paintbrush to indicate that the Format Painter function is active.
1
Q&
A
Click the Next Slide button to • display Slide 3. Triple-click the caption placeholder to apply the format to all the caption text (Figure 2 – 46).
Press the • ESC key to turn off the Format Painter feature.
2
Figure 2 – 461. Click Format Painter
button on Mini toolbar
Other Ways
Figure 2 – 45
mouse pointer moved off the Ribbon
Format Painter button
formatted caption text
1439078483_ch2_FINAL.indd PPT1051439078483_ch2_FINAL.indd PPT105 7/7/10 8:15:23 PM7/7/10 8:15:23 PM
Property of Cengage Learning

PPT 106 PowerPoint Chapter 2 Enhancing a Presentation with Pictures, Shapes, and WordArt
Adding and Formatting a ShapeOne method of getting the audience’s attention and reinforcing the major concepts being presented is to have graphical elements on the title slide. PowerPoint provides a wide variety of predefi ned shapes that can add visual interest to a slide. Shape elements include lines, basic geometrical shapes, arrows, equation shapes, fl owchart symbols, stars, banners, and callouts. After adding a shape to a slide, you can change its default characteristics by adding text, bullets, numbers, and styles. You also can combine multiple shapes to create a more complex graphic.
Slides 1 and 4 in this presentation are enhanced in a variety of ways. First, a sun shape is added to the Slide 1 title text in place of the letter o. Then a circle shape is inserted on Slide 4 and copied twice, and text is added to each circle and then formatted. Finally, a triangle is inserted on top of the three circle shapes on Slide 4.
Click the Previous Slide button two • times to display Slide 1. Click the Shapes button (Home tab | Drawing group) to display the Shapes gallery (Figure 2 – 47).
1
To Add a Shape
Many of the shapes included in the Shapes gallery can direct the viewer to important aspects of the presentation. For example, the sun shape helps emphasize the presentation’s theme of practicing yoga and medita-tion, and it complements the Sunrise Yoga background picture. The following steps add the Sun shape to Slide 1.
Figure 2 – 47
Sun shape
Shapes button
Shapes gallery
Basic Shapes area
I do not see a Shapes button in the Drawing group. Instead, I have three rows of the shapes I have used recently in presentations. Why?
Monitor dimensions and resolution affect how buttons display on the Ribbon. Click the Shapes More button to display the entire Shapes gallery.
Q&
A
Break Point: If you wish to take a break, this is a good place to do so. Be sure to save the Yoga fi le again and then you can quit PowerPoint. To resume at a later time, start PowerPoint, open the fi le called Yoga, and continue following the steps from this location forward.
Sizing ShapesPowerPoint’s Shapes gallery provides a wide variety of symbols that can help emphasize your major points on each slide. As you select the shapes and then size them, keep in mind that your audience will focus on the largest shapes fi rst. The most important information, therefore, should be placed in or near the shapes with the most visual size.
BTW
1439078483_ch2_FINAL.indd PPT1061439078483_ch2_FINAL.indd PPT106 7/7/10 8:15:24 PM7/7/10 8:15:24 PM
Property of Cengage Learning

Enhancing a Presentation with Pictures, Shapes, and WordArt PowerPoint Chapter 2 PPT 107
Pow
erPo
int
Ch
apte
r 2
To Resize a Shape
The next step is to resize the Sun shape. The shape should be reduced so that it is approximately the same size as the letter o in the words Yoga and Meditation. The following steps resize the selected Sun shape.
With the mouse pointer appearing • as two-headed arrow, drag a corner sizing handle on the picture diagonally inward until the Sun shape is resized approximately as shown in Figure 2 – 50.
What if my shape is not selected?
To select a shape, click it.
What if the shape is the wrong size?
Repeat Steps 1 and 2.
1
Q&
AQ
&A
Figure 2 – 50
Click Slide 1 to insert the Sun shape • (Figure 2 – 49).
3
Click the Sun shape in the • Basic Shapes area of the Shapes gallery.
Why did my pointer change shape?
The pointer changed to a plus shape to indicate the Sun shape has been added to the Clipboard.
Position the mouse pointer • (a crosshair) above the person’s hands in the picture, as shown in Figure 2 – 48.
2
Q&
A
Figure 2 – 48
Figure 2 – 49
1. Click More button (Drawing Tools Format tab | Insert Shapes group)
Other Ways
crosshair mouse pointer
Sun shape inserted
smaller, lighter-shaded shape shows preview of resized Sun
1439078483_ch2_FINAL.indd PPT1071439078483_ch2_FINAL.indd PPT107 7/7/10 8:15:25 PM7/7/10 8:15:25 PM
Property of Cengage Learning

PPT 108 PowerPoint Chapter 2 Enhancing a Presentation with Pictures, Shapes, and WordArt
With the Sun shape still selected, • click the Copy button (Home tab | Clipboard group) (Figure 2 – 52).
What if my shape is not selected?
To select a shape, click it.
1
Q&
A
Release the mouse button to resize • the shape.
Drag the Sun shape on top of • the letter o in the word, Yoga (Figure 2 – 51).
What if I want to move the shape to a precise location on the slide?
With the shape selected, press the ARROW keys or the CTRL+ARROW keys to move the shape to the desired location.
2
Q&
A
Figure 2 – 51
Figure 2 – 52
1. Enter shape height and width in Height and Width text boxes (Drawing Tools Format tab | Size group)
2. Click Size and Position dialog box launcher
(Drawing Tools Format tab | Size group), click Size tab, enter desired height and width values in text boxes, click Close button
Other Ways
To Copy and Paste a Shape
The next step is to copy the Sun shape. The duplicate shape will be placed over the letter ‘o’ in the word, Meditation. The following steps copy and move the identical second Sun shape.
Sun shape moved on top of letter o
Copy
1439078483_ch2_FINAL.indd PPT1081439078483_ch2_FINAL.indd PPT108 7/7/10 8:15:26 PM7/7/10 8:15:26 PM
Property of Cengage Learning

Enhancing a Presentation with Pictures, Shapes, and WordArt PowerPoint Chapter 2 PPT 109
Pow
erPo
int
Ch
apte
r 2
Click the Paste button • on the Home tab to insert a duplicate Sun shape on Slide 1.
Drag the Sun shape on • top of the letter o in the word, Meditation, and release the mouse button when a dashed line connects this Sun shape to the Sun shape that is displaying in the word, Yoga (Figure 2 – 53).
What does the dashed line represent?
PowerPoint displays this Smart Guide when two shapes are aligned precisely. In this case, the two Sun shapes are centered horizontally.
2
Q&
A
Figure 2 – 53
To Add Other Shapes
Circles, squares, and triangles are among the geometric shapes included in the Shapes gallery. These shapes can be combined to show relationships among the elements, and they can help illustrate the basic concepts presented in your slide show. The following steps add the Oval and Isosceles Triangle shapes to Slide 4.
Click the Next Slide • button three times to display Slide 4 and then click the Shapes button (Home tab | Drawing group) to display the Shapes gallery (Figure 2 – 54).
1
Figure 2 – 54
1. Right-click selected shape, click Copy on shortcut menu, right-click, click Paste on shortcut menu
2. Select shape, press CTRL+C, press CTRL+V
Other Ways
Paste button
Sun shape duplicated and moved on top of letter ‘o’
Shapes button
Oval shape
Isosceles Triangle shape
Basic Shapes area
Shapes gallery
1439078483_ch2_FINAL.indd PPT1091439078483_ch2_FINAL.indd PPT109 7/7/10 8:15:27 PM7/7/10 8:15:27 PM
Property of Cengage Learning

PPT 110 PowerPoint Chapter 2 Enhancing a Presentation with Pictures, Shapes, and WordArt
Click the Oval shape in the Basic • Shapes area of the Shapes gallery.
Position the mouse pointer in the • center of Slide 4 and then click to insert the Oval shape.
Press and hold down the • SHIFT key and then drag a corner sizing handle until the Oval shape forms a circle and is the size shown in Figure 2 – 55.
Why did I need to press the SHIFT key while enlarging the shape?
Holding down the SHIFT key while dragging draws a perfect circle.
Move the shape so it is positioned • approximately as shown in the fi gure.
2
3
Q&
A
Click the Shapes button (Home • tab | Drawing group) and then click the Isosceles Triangle shape in the Basic Shapes area of the Shapes gallery.
Position the mouse pointer in the • right side of Slide 4 and then click to insert the Isosceles Triangle shape.
Resize the shape so that it • displays approximately as shown in Figure 2 – 56.
4
5
Figure 2 – 56
To Apply a Shape Style
Formatting text in a shape follows the same techniques as formatting text in a placeholder. You can change font, font color and size, and alignment. The next step is to apply a shape style to the oval so that it appears to have depth. The Shape Styles gallery has a variety of styles that change depending upon the theme applied to the presentation. The following steps apply a style to the Oval shape.
Figure 2 – 55
Oval shape inserted, sized, and moved to desired location on slide
Isosceles Triangle shape inserted, sized, and moved to desired location on slide
1439078483_ch2_FINAL.indd PPT1101439078483_ch2_FINAL.indd PPT110 7/7/10 8:15:28 PM7/7/10 8:15:28 PM
Property of Cengage Learning
Enhancing a Presentation with Pictures, Shapes, and WordArt PowerPoint Chapter 2 PPT 111
Pow
erPo
int
Ch
apte
r 2
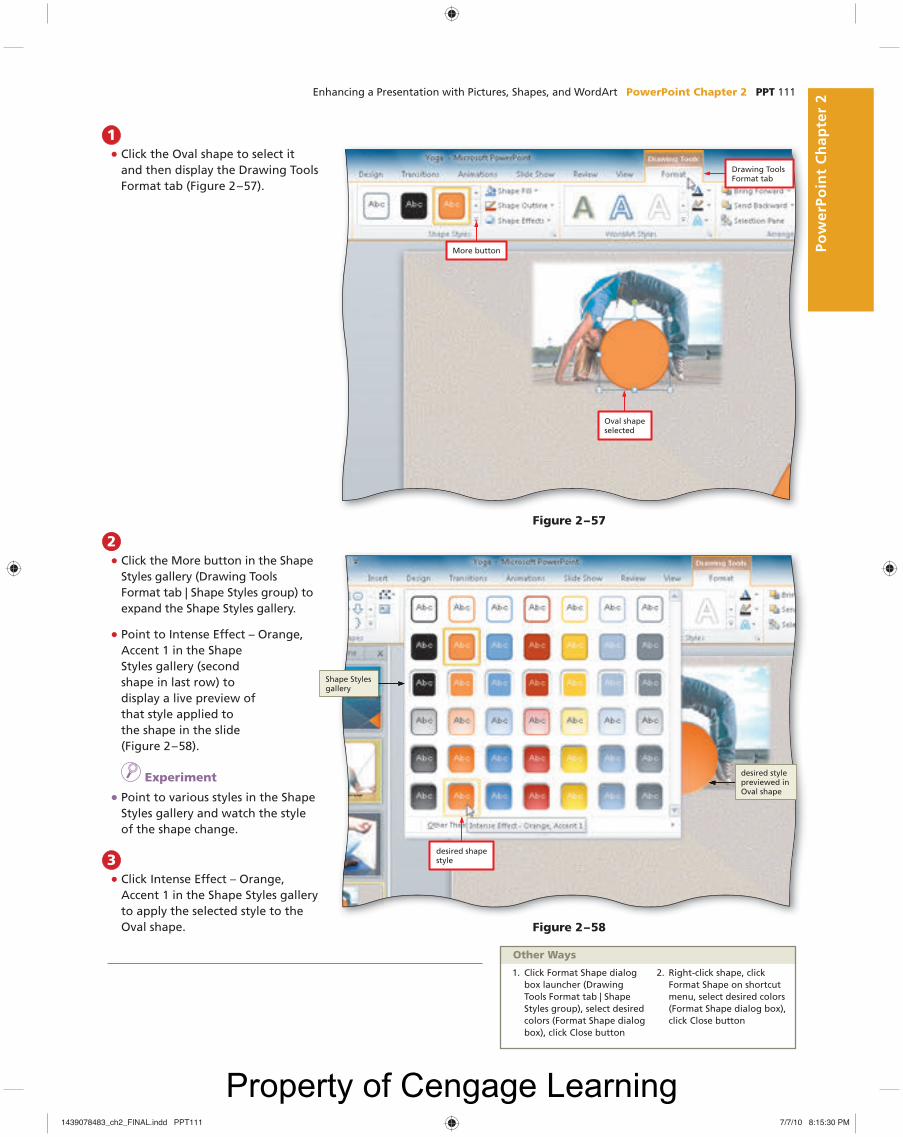
Click the Oval shape to select it • and then display the Drawing Tools Format tab (Figure 2 – 57).
1
Figure 2 – 57
Figure 2 – 58
1. Click Format Shape dialog box launcher (Drawing Tools Format tab | Shape Styles group), select desired colors (Format Shape dialog box), click Close button
2. Right-click shape, click Format Shape on shortcut menu, select desired colors (Format Shape dialog box), click Close button
Other Ways
Click the More button in the Shape • Styles gallery (Drawing Tools Format tab | Shape Styles group) to expand the Shape Styles gallery.
Point to Intense Effect – Orange, • Accent 1 in the Shape Styles gallery (second shape in last row) to display a live preview of that style applied to the shape in the slide (Figure 2 – 58).
I Experiment
Point to various styles in the Shape • Styles gallery and watch the style of the shape change.
Click Intense Effect – Orange, • Accent 1 in the Shape Styles gallery to apply the selected style to the Oval shape.
2
3
Drawing Tools Format tab
Oval shape selected
More button
desired shape style
Shape Styles gallery
desired style previewed in Oval shape
1439078483_ch2_FINAL.indd PPT1111439078483_ch2_FINAL.indd PPT111 7/7/10 8:15:30 PM7/7/10 8:15:30 PM
Property of Cengage Learning

PPT 112 PowerPoint Chapter 2 Enhancing a Presentation with Pictures, Shapes, and WordArt
To Add Formatted Text to a Shape
Formatting text in a shape follows the same techniques as formatting text in a placeholder. You can change font, font color and size, and alignment. The next step is to add the word, Mind, to the shape, change the font to Papyrus and the font color to Blue-Gray, center and bold the text, and increase the font size to 24 point. The follow-ing step adds text to the Oval shape.
With the Oval shape selected, type • Mind in the shape.
Change the font to Papyrus.•
Change the font color to Blue-• Gray, Background 2 (third color in fi rst Theme Colors row).
Change the font size to 24 point • and bold the text (Figure 2 – 59).
1
Figure 2 – 59
To Copy a Shape
Your presentation emphasizes that mind, body, and spirit are equal components in fi nding balance in life. Each of these elements can be represented by an oval. The follow-ing steps copy the Oval shape.
Click Home on the Ribbon. Click the edge of the Oval shape so that it is a solid line.
Click the Copy button (Home tab | Clipboard group).
Click the Paste button (Home tab | Clipboard group) two times to insert two duplicate Oval shapes on Slide 4.
Move the Oval shapes so they appear approximately as shown in Figure 2 – 60.
In the left oval, select the word, Mind, and then type the word, Body, in the oval.
In the right oval, select the word, Mind, and then type the word, Spirit, in the oval (Figure 2 – 60). You may need to enlarge the size of the oval shapes slightly so that each word is displayed on one line.
1
2
3
4
5
6
Figure 2 – 60
style applied to Oval shape
formatted Oval shape text
new shape text
Oval shapes copied and positioned in desired locations
Drawing a SquareHolding down the SHIFT key while dragging a Rectangle shape draws a square.
BTW
1439078483_ch2_FINAL.indd PPT1121439078483_ch2_FINAL.indd PPT112 7/7/10 8:15:32 PM7/7/10 8:15:32 PM
Property of Cengage Learning

Enhancing a Presentation with Pictures, Shapes, and WordArt PowerPoint Chapter 2 PPT 113
Pow
erPo
int
Ch
apte
r 2
To Apply Another Style
The triangle shape helps show the unity among body, mind, and spirit. You can apply a coordinating shape style to the isosceles triangle and then place it on top of the three ovals. The following steps apply a style to the Isosceles Triangle shape.
Display the Drawing Tools Format tab. Click the Isosceles Triangle shape on Slide 4 to select it.
Click the More button in the Shape Styles gallery (Drawing Tools Format tab | Shape Styles group) to expand the Shape Styles gallery and then click Intense Effect – Blue, Accent 2 (third style in last row) to apply that style to the triangle.
Move the triangle shape to the center of the Ovals.
Click the Bring Forward button twice (Drawing Tools Format tab | Arrange group) to dis-play the triangle on top of the ovals. Resize the triangle if necessary so that it displays as shown in Figure 2 – 61.
1
2
3
4
Using WordArtOne method of adding appealing visual elements to a presentation is by using WordArt styles. This feature is found in other Microsoft Offi ce applications, including Word and Excel. This gallery of decorative effects allows you to type new text or convert existing text to WordArt. You then can add elements such as fi lls, outlines, and effects.
As with slide backgrounds, WordArt fi ll in the interior of a letter can consist of a solid color, texture, picture, or gradient. The WordArt outline is the exterior border surrounding each letter or symbol. PowerPoint allows you to change the outline color, weight, and style. You also can add an effect, which helps add emphasis or depth to the characters. Some effects are shadows, refl ections, glows, bevels, and 3-D rotations.
Plan Ahead
Use WordArt in moderation.Some WordArt styles are bold and detailed, and they can detract from the message you are trying to present if not used carefully. Select a WordArt style when needed for special emphasis, such as a title slide that audience members will see when they enter the room. WordArt can have a powerful effect, so do not overuse it.
Figure 2 – 61
shape style applied
Isosceles Triangle shape moved and resized
Break Point: If you wish to take a break, this is a good place to do so. Be sure to save the Yoga fi le again and then you can quit PowerPoint. To resume at a later time, start PowerPoint, open the fi le called Yoga, and continue following the steps from this location forward.
Creating LogosMany companies without graphic arts departments create their logos using WordArt. The bevels, glows, and shadows allow corporate designers to develop unique images with 3-D effects that give depth to their companies’ emblems.
BTW
1439078483_ch2_FINAL.indd PPT1131439078483_ch2_FINAL.indd PPT113 7/7/10 8:15:34 PM7/7/10 8:15:34 PM
Property of Cengage Learning

PPT 114 PowerPoint Chapter 2 Enhancing a Presentation with Pictures, Shapes, and WordArt
To Insert WordArt
Yoga and meditation can help individuals fi nd balance among the mind, body, and spirit. The symbols on Slide 4 emphasize this relationship, and you want to call attention to the concept. You quickly can add a visual element to the slide by selecting a WordArt style from the WordArt Styles gallery and then applying it to a word. The following steps insert WordArt.
With Slide 4 displaying, click Insert • on the Ribbon.
Click the WordArt button (Insert • tab | Text group) to display the WordArt gallery (Figure 2 – 62).
1
Figure 2 – 62
Click Fill – Blue, Accent 2, Double • Outline – Accent 2 (last letter A in third row) to display the WordArt text box (Figure 2 – 63).
What is a matte bevel style that is part of some of the styles in the gallery?
A matte fi nish gives a dull and rough effect. A bevel edge is angled or sloped and gives the effect of a three-dimensional object.
Type • Balance in the text box, as the WordArt text (Figure 2 – 64).
Why did the Format tab appear automatically in the Ribbon?
It appears when you select text to which you could add a WordArt style or other effect.
2
Q&
A
3
Q&
A
Figure 2 – 63
Figure 2 – 64
WordArt button
WordArtgallery
desired WordArt style
WordArttext box
WordArt style applied
WordArttext
1439078483_ch2_FINAL.indd PPT1141439078483_ch2_FINAL.indd PPT114 7/7/10 8:15:34 PM7/7/10 8:15:34 PM
Property of Cengage Learning

Enhancing a Presentation with Pictures, Shapes, and WordArt PowerPoint Chapter 2 PPT 115
Pow
erPo
int
Ch
apte
r 2
Point to Transform in the Text • Effects menu to display the WordArt Transform gallery (Figure 2 – 66).
I Experiment
Point to various styles in the • Transform gallery and watch the format of the text and borders change.
How can I see the preview of a Transform effect if the gallery is overlaying the WordArt letters?
Move the WordArt text box to the left or right side of the slide and then repeat Steps 1 and 2.
2
Q&
A
Figure 2 – 65
To Change the WordArt Shape
The WordArt text is useful to emphasize the harmony among the mind, body, and spirit. You can further emphasize this word by changing its shape. PowerPoint provides a variety of graphical shapes that add interest to text. The following steps change the WordArt to Triangle Down shape.
With the Slide 4 text still selected, • click the Text Effects button (Drawing Tools Format tab | WordArt Styles group) to display the Text Effects menu (Figure 2 – 65).
1
Transform command
Text Effects button
Text Effects menu
Figure 2 – 66
Triangle Down shape
Warp area
Transform gallery
1439078483_ch2_FINAL.indd PPT1151439078483_ch2_FINAL.indd PPT115 7/7/10 8:15:36 PM7/7/10 8:15:36 PM
Property of Cengage Learning

PPT 116 PowerPoint Chapter 2 Enhancing a Presentation with Pictures, Shapes, and WordArt
Click the Triangle Down shape in • the Warp area to apply the Triangle Down shape to the WordArt text (Figure 2 – 67).
Can I change the shape I applied to the WordArt?
Yes. Position the insertion point in the text box and then repeat Steps 1 and 2.
3
Q&
A
Figure 2 – 67
Drag the WordArt downward until • it is positioned approximately as shown in Figure 2 – 68.
Drag a corner sizing handle • diagonally outward until the WordArt is resized approximately as shown in the fi gure.
4
Figure 2 – 68
Triangle Down shape applied to WordArt text
WordArt sized and moved to desired location
1439078483_ch2_FINAL.indd PPT1161439078483_ch2_FINAL.indd PPT116 7/7/10 8:15:38 PM7/7/10 8:15:38 PM
Property of Cengage Learning

Enhancing a Presentation with Pictures, Shapes, and WordArt PowerPoint Chapter 2 PPT 117
Pow
erPo
int
Ch
apte
r 2
To Apply a WordArt Text Fill
The Slide 4 background has a Sand texture for the background, and you want to coordinate the WordArt fi ll with a similar texture. The following steps add the Denim texture as a fi ll for the WordArt characters.
I Experiment
Point to various styles in the Text Fill gallery and watch the fi ll change.• How can I see the preview of a fi ll if the gallery is overlaying the WordArt letters?
Move the WordArt text box to the left or right side of the slide and then repeat Step 1.
Click the Denim texture (third texture in fi rst row) to apply this texture as the fi ll for • the WordArt.
Can I apply this texture simultaneously to text that appears in more than one place on my slide?
Yes. Select one area of text, press and then hold the CTRL key while you select the other text, and then apply the texture.
Q&
A
2
Q&
A
Figure 2 – 69
Text Fill button arrow
Denim texture
Texturecommand
Texture gallery
Q&
A
With the WordArt text selected, click • the Text Fill button arrow (Drawing Tools Format tab | WordArt Styles group) to display the Text Fill gallery.
The Text Fill gallery did not display. Why not?
Be sure you click the Text Fill button arrow, which is to the right of the Text Fill button. If you mistakenly click the Text Fill button, PowerPoint places the default fi ll in the WordArt instead of displaying the Text Fill gallery.
Point to Texture in the Text Fill • gallery to display the Texture gallery (Figure 2 – 69).
1
1439078483_ch2_FINAL.indd PPT1171439078483_ch2_FINAL.indd PPT117 7/7/10 8:15:39 PM7/7/10 8:15:39 PM
Property of Cengage Learning

PPT 118 PowerPoint Chapter 2 Enhancing a Presentation with Pictures, Shapes, and WordArt
With the WordArt still selected, • click the Text Outline button arrow (Drawing Tools Format tab | WordArt Styles group) to display the Text Outline gallery.
Point to Weight in the gallery to • display the Weight list.
Point to 6 pt to display a live • preview of this line weight on the WordArt text outline (Figure 2–70).
I Experiment
Point to various line weights in • the Weight list and watch the line thickness change.
Can I make the line width more than 6 pt?
Yes. Click More Lines and increase the amount in the Width box.
1
Q&
A
To Change the Weight of the WordArt Outline
The letters in the WordArt style applied have a double outline around the edges. To emphasize this characteristic, you can increase the width of the lines. As with font size, lines also are measured in point size, and PowerPoint gives you the option to change the line weight, or thickness, starting with ¼ point (pt) and increasing in one-fourth–point increments. Other outline options include modifying the color and the line style, such as changing to dots or dashes or a combination of dots and dashes. The following steps change the WordArt outline weight to 6 pt.
To Change the Color of the WordArt Outline
The WordArt outline color is similar to the Denim fi ll color. To add variety, you can change the outline color. The following steps change the WordArt outline color.
Figure 2 – 70
Click 6 pt to apply this line weight to the title text outline.• Must my text have an outline?
No. To delete the outline, click No Outline in the Text Outline gallery.
2
Q&
A
Text Outline button arrow
Weightcommand
desired outlineweight
Weight list
Denim texture fi llapplied to WordArt
1439078483_ch2_FINAL.indd PPT1181439078483_ch2_FINAL.indd PPT118 7/7/10 8:15:40 PM7/7/10 8:15:40 PM
Property of Cengage Learning

Enhancing a Presentation with Pictures, Shapes, and WordArt PowerPoint Chapter 2 PPT 119
Pow
erPo
int
Ch
apte
r 2
With the WordArt still selected, • click the Text Outline button arrow (Drawing Tools Format tab | WordArt Styles group) to display the Text Outline gallery.
Point to Orange, Accent 1 (fi fth • color in fi rst row) to display a live preview of this outline color (Figure 2–71).
I Experiment
Point to various colors in the • gallery and watch the outline colors change.
Click Orange, Accent 1 to apply • this color to the WordArt outline.
1
2
Figure 2 – 71
To Add a Transition between Slides
A fi nal enhancement you will make in this presentation is to apply the Rotate transition in the Dynamic Content category to all slides and change the transition speed to Slow. The following steps apply this transition to the presentation.
Click Transitions on the Ribbon. Click the More button (Transitions tab | Transition to This Slide group) to expand the Transitions gallery.
Click the Rotate transition in the Dynamic Content category to apply this transition to Slide 4.
Click the Duration up arrow in the Timing group four times to change the transition speed from 02.00 to 03.00.
Click the Preview Transitions button (Transitions tab | Preview area) to view the new transition time.
Click the Apply To All button (Transitions tab | Timing group) to apply this transition and speed to all four slides in the presentation (Figure 2–72 on the next page).
1
2
3
4
5
desired outline color
Text Outline button arrow
Orange outlinecolor previewed
Selecting Effect OptionsMany PowerPoint transitions have options that you can customize to give your presentation a unique look. When you click the Effect Options button (Transitions tab | Transition to This Slide group), you can, for example, select the option to have a slide appear on the screen from the left or the right, or the screen can fade to black before the next slide is displayed.
BTW
1439078483_ch2_FINAL.indd PPT1191439078483_ch2_FINAL.indd PPT119 7/7/10 8:15:41 PM7/7/10 8:15:41 PM
Property of Cengage Learning

PPT 120 PowerPoint Chapter 2 Enhancing a Presentation with Pictures, Shapes, and WordArt
To Change Document Properties
Before saving the presentation again, you want to add your name, class name, and some keywords as document properties. The following steps use the Document Informa-tion Panel to change document properties.
Figure 2 – 72
Click File on the Ribbon to open the Backstage view. If necessary, click the Info tab.
Click the Properties button in the right pane of the Info gallery.
Click Show Document Panel on the Properties menu to close the Backstage view and display the Document Information Panel.
Click the Author box, if necessary, and then type your name as the Author property.
Click the Subject text box and then type your course and section as the Subject property.
Click the Keywords text box and then type yoga, meditation as the Keywords property.
Click the Close the Document Information Panel button so that the Document Information Panel no longer is displayed.
1
2
3
4
5
6
7
To Print a Presentation
With the completed presentation saved, you may want to print it. If copies of the presentation are being distributed to audience members, you will print a hard copy of each individual slide on a printer. The following steps print a hard copy of the contents of the saved Yoga presentation.
durationincreasedRotate
transition
transition applied to all slides in presentation
Certifi cationThe Microsoft Offi ce Specialist (MOS) program provides an opportunity for you to obtain a valuable industry credential — proof that you have the PowerPoint 2010 skills required by employers. For more information, visit the PowerPoint 2010 Certifi cation Web page (scsite.com/ppt2010/cert).
BTW
1439078483_ch2_FINAL.indd PPT1201439078483_ch2_FINAL.indd PPT120 7/7/10 8:15:42 PM7/7/10 8:15:42 PM
Property of Cengage Learning

Enhancing a Presentation with Pictures, Shapes, and WordArt PowerPoint Chapter 2 PPT 121
Pow
erPo
int
Ch
apte
r 2
Click File on the Ribbon to open the Backstage view. Click the Print tab in the Backstage view to display the Print gallery.
Verify the printer name in the Printer box will print a hard copy of the document. If neces-sary, click the Printer box arrow to display a list of available Printer options and then click the desired printer to change the currently selected printer.
Click the Print button in the Print gallery to print the document on the currently selected printer. When the printer stops, retrieve the hard copy (Figure 2–73).
1
2
3
Figure 2 – 73 (Handouts printed using a black-and-white printer)
To Save an Existing Presentation with the Same File Name
You have made several changes to the presentation since you last saved it. Thus, you should save it again. The following step saves the document again.
Click the Save button on the Quick Access Toolbar to overwrite the previously saved fi le.1
(a) Slide 1 (b) Slide 2
(c) Slide 3 (d) Slide 4
picture background does not display
Quick ReferenceFor a table that lists how to complete the tasks covered in this book using the mouse, Ribbon, shortcut menu, and keyboard, see the Quick Reference Summary at the back of this book, or visit the PowerPoint 2010 Quick Reference Web page (scsite.com/ppt2010/qr).
BTW
1439078483_ch2_FINAL.indd PPT1211439078483_ch2_FINAL.indd PPT121 7/7/10 8:15:43 PM7/7/10 8:15:43 PM
Property of Cengage Learning

PPT 122 PowerPoint Chapter 2 Enhancing a Presentation with Pictures, Shapes, and WordArt
To Run an Animated Slide Show
All changes are complete, and the presentation is saved. You now can view the Yoga presentation. The following steps start Slide Show view.
Click the Slide 1 thumbnail in the Slides tab to select and display Slide 1.
Click the Slide Show button to display the title slide and then click each slide to view the transition effect and slides.
1
2
To Quit PowerPoint
This project is complete. The following steps quit PowerPoint.
If you have one PowerPoint document open, click the Close Button on the right side of the title bar to close the document and then quit PowerPoint; or if you have multiple PowerPoint documents open, click File on the Ribbon to open the Backstage view and then click Exit in the Backstage view to close all open documents and quit PowerPoint.
If a Microsoft PowerPoint dialog box appears, click the Save button to save any changes made to the presentation since the last save.
1
2
Chapter SummaryIn this chapter you have learned how to add a background style, insert and format pictures, add shapes, size graphic elements, apply styles, and insert WordArt. The items listed below include all the new PowerPoint skills you have learned in this chapter.
1. Change the Presentation Theme Colors (PPT 81) 2. Insert a Picture (PPT 83) 3. Insert a Picture into a Slide without a Content
Placeholder (PPT 85) 4. Correct a Picture (PPT 86) 5. Apply a Picture Style (PPT 87) 6. Apply Picture Effects (PPT 89) 7. Add a Picture Border (PPT 91) 8. Change a Picture Border Color (PPT 92) 9. Resize a Graphic by Entering Exact Measurements
(PPT 93) 10. Insert a Texture Fill (PPT 95) 11. Insert a Picture to Create a Background (PPT 97) 12. Format the Background Picture Fill Transparency
(PPT 98) 13. Format the Background Texture Fill Transparency
(PPT 99)
14. Choose a Background Style (PPT 99) 15. Change the Subtitle and Caption Font (PPT 101) 16. Shadow Text (PPT 103) 17. Format Caption Text Using the Format Painter
(PPT 105) 18. Add a Shape (PPT 106) 19. Resize a Shape (PPT 107) 20. Copy and Paste a Shape (PPT 108) 21. Add Other Shapes (PPT 109) 22. Apply a Shape Style (PPT 110) 23. Add Formatted Text to a Shape (PPT 112) 24. Insert WordArt (PPT 114)25. Change the WordArt Shape (PPT 115)26. Apply a WordArt Text Fill (PPT 117)27. Change the Weight of the WordArt Outline
(PPT 118)28. Change the Color of the WordArt Outline (PPT 118)
If you have a SAM 2010 user profi le, your instructor may have assigned an autogradable version of this assignment. If so, log into the SAM 2010 Web site at www.cengage.com/sam2010 to download the instruction and start fi les.
1439078483_ch2_FINAL.indd PPT1221439078483_ch2_FINAL.indd PPT122 7/7/10 8:15:44 PM7/7/10 8:15:44 PM
Property of Cengage Learning

Enhancing a Presentation with Pictures, Shapes, and WordArt PowerPoint Chapter 2 PPT 123
Po
wer
Poin
t C
hap
ter
2S
TU
DE
NT
AS
SIG
NM
EN
TS
Learn It Online
Test your knowledge of chapter content and key terms.
Instructions: To complete the Learn It Online exercises, start your browser, click the Address bar, and then enter the Web address scsite.com/ppt2010/learn. When the PowerPoint 2010 Learn It Online page is displayed, click the link for the exercise you want to complete and then read the instructions.
Chapter Reinforcement TF, MC, and SAA series of true/false, multiple choice, and short answer questions that test your knowledge of the chapter content.
Flash CardsAn interactive learning environment where you identify chapter key terms associated with displayed defi nitions.
Practice TestA series of multiple choice questions that test your knowledge of chapter content and key terms.
Who Wants To Be a Computer Genius?An interactive game that challenges your knowledge of chapter content in the style of a television quiz show.
Wheel of TermsAn interactive game that challenges your knowledge of chapter key terms in the style of the television show Wheel of Fortune.
Crossword Puzzle ChallengeA crossword puzzle that challenges your knowledge of key terms presented in the chapter.
Apply Your Knowledge
Reinforce the skills and apply the concepts you learned in this chapter.
Changing the Background and Adding Photographs, WordArt, and a Shape Quick StyleNote: To complete this assignment, you will be required to use the Data Files for Students. See the inside back cover of this book for instructions on downloading the Data Files for Students, or contact your instructor for information about accessing the required fi les.
Instructions: Start PowerPoint. Open the presentation, Apply 2-1 Lab Procedures, from the Data Files for Students.
The four slides in the presentation present laboratory safety procedures for your chemistry class. The document you open is an unformatted presentation. You are to add pictures, which are available on the Data Files for Students. You also will change the background style, change slide layouts, apply a transition, and use the Format Painter so the slides look like Figure 2–74.
Perform the following tasks:
1. Change the background style to Style 5 (row 2, column 1).
2. On the title slide (Figure 2–74a), create a background by inserting the picture called Lab Assistant. Change the transparency to 30%.
3. Apply the WordArt style, Fill – Red, Accent 2, Matte Bevel (row 6, column 3) to the title text and increase the font size to 54 point. Also, apply the WordArt Transform text effect, Chevron Up (row 2, column 1 in the Warp area) to this text.
4. In the Slide 1 subtitle area, replace the words, Student Name, with your name. Bold and italicize your name and the words, Presented by, and then apply the WordArt style, Fill – Red, Accent 2, Warm Matte Bevel (row 5, column 3). Position this subtitle text and the title text as shown in Figure 2–74a.
Continued >
1439078483_ch2_FINAL.indd PPT1231439078483_ch2_FINAL.indd PPT123 7/7/10 8:15:45 PM7/7/10 8:15:45 PM
Property of Cengage Learning

PPT 124 PowerPoint Chapter 2 Enhancing a Presentation with Pictures, Shapes, and WordArtS
TU
DE
NT
AS
SIG
NM
EN
TS
5. On Slide 2, change the layout to Two Content and insert the pictures shown in Figure 2–74b called Female in Lab Coat and Female with Goggles. In the left placeholder, apply the Rotated, White picture style to the inserted picture. In the right placeholder, apply the Refl ected Bevel, Black picture style to the inserted picture and then change the picture border color to Purple.
6. On Slide 3, change the layout to Two Content and insert the Fire Extinguisher picture shown in Figure 2–74c. Apply the Soft Edge Oval picture style and change the picture brightness to 120% (row 3, column 4 in the Brightness and Contrast area).
7. On Slide 4, change the layout to Picture with Caption and then insert the picture, Hand Washing shown in Figure 2–74d. Increase the subtitle text font size to 18 point. Change the title text font size to 28 point, add a shadow, change font to Algerian, and change the font color to Purple.
8. Use the Format Painter to format the title text on Slides 2 and 3 with the same features as the title text on Slide 4.
9. Apply the Wipe transition in the Subtle category to all slides. Change the duration to 2.00 seconds.
Apply Your Knowledge continued
Figure 2 – 74
(a) Slide 1
(b) Slide 2
WordArt styleapplied
substitute your name, and then format the text
picture inserted as background
Two Contentlayout
picture styles and borders applied
1439078483_ch2_FINAL.indd PPT1241439078483_ch2_FINAL.indd PPT124 7/7/10 8:15:45 PM7/7/10 8:15:45 PM
Property of Cengage Learning

Enhancing a Presentation with Pictures, Shapes, and WordArt PowerPoint Chapter 2 PPT 125
Po
wer
Poin
t C
hap
ter
2S
TU
DE
NT
AS
SIG
NM
EN
TS
10. Change the document properties, as specifi ed by your instructor. Save the presentation using the fi le name, Apply 2-1 Chemistry Lab Safety. Submit the revised document in the format specifi ed by your instructor.
(c) Slide 3
(d) Slide 4
Picture with Caption layout
font changed and formatted; Format Painter used to copy attributes to Slides 2 and 3 titles
Two Content layout
picture brightness adjusted
Figure 2 – 74 (Continued)
1439078483_ch2_FINAL.indd PPT1251439078483_ch2_FINAL.indd PPT125 7/7/10 8:15:47 PM7/7/10 8:15:47 PM
Property of Cengage Learning

PPT 126 PowerPoint Chapter 2 Enhancing a Presentation with Pictures, Shapes, and WordArtS
TU
DE
NT
AS
SIG
NM
EN
TS
Extend Your Knowledge
Extend the skills you learned in this chapter and experiment with new skills. You may need to use Help to complete the assignment.
Changing Slide Backgrounds and Picture Contrast, and Inserting Shapes and WordArtNote: To complete this assignment, you will be required to use the Data Files for Students. See the inside back cover of this book for instructions on downloading the Data Files for Students, or contact your instructor for information about accessing the required fi les.
Instructions: Start PowerPoint. Open the presentation, Extend 2-1 Smith Family Reunion, from the Data Files for Students.
You will create backgrounds including inserting a picture to create a background, apply a WordArt Style and Effect, and add shapes to create the presentation shown in Figure 2–75.
Perform the following tasks:
1. Change the background style to Denim (row 1, column 3) and change the transparency to 48%. On Slides 2 through 5, change the title text to bold.
2. On the title slide (Figure 2–75a), create a background by inserting the picture called Tree, which is available on the Data Files for Students. Change the transparency to 40%.
3. Apply the WordArt style, Gradient Fill – Blue, Accent 1, to the title text and increase the font size to 66 point. Also, apply the WordArt Transform text effect, Arch Up (row 1, column 1 in the Follow Path area), to this text.
4. In the Slide 1 subtitle area, insert the Wave shape in the Stars and Banners area. Also, apply the Shape Style, Subtle Effect – Orange, Accent 6 to the Wave shape. Type Highlights From Our Last Reunion and increase the font size to 40 point, change the text to bold italic and change the color to Green. Position the shape as shown in Figure 2–75a.
(a) Slide 1
picture inserted as background
WordArt style applied
shape inserted and style applied
Denim background style applied and transparency changed for Slides 2 through 6 picture styles
applied
picture border color changed
shape inserted and style applied
(b) Slide 2
Figure 2 – 75
1439078483_ch2_FINAL.indd PPT1261439078483_ch2_FINAL.indd PPT126 7/7/10 8:15:48 PM7/7/10 8:15:48 PM
Property of Cengage Learning

Enhancing a Presentation with Pictures, Shapes, and WordArt PowerPoint Chapter 2 PPT 127
Po
wer
Poin
t C
hap
ter
2S
TU
DE
NT
AS
SIG
NM
EN
TS
5. On Slide 2, change the layout to Two Content and insert the pictures shown in Figure 2–75b. The pictures to be inserted are called Bocce Ball and Frisbee Catcher and are available on the Data Files for Students. In the left placeholder, apply the Rotated White picture style to the inserted picture and change the picture border to Light Green. In the right placeholder, apply the Beveled Oval Black picture style to the inserted picture.
6. Insert the Plaque shape in the Basic Shapes area. Also, apply the Shape Style, Subtle Effect, Olive Green, Accent 3 and apply the Shape Effect, 3-D Rotation, Parallel, Off Axis 1 Right. Type Cousin Tom & His Frisbee Moves and increase the font size to 28 point. Move the shape as shown in Figure 2–75b.
7. On Slide 3, change the layout to Picture with Caption and insert the picture shown in Figure 2–75c. The picture to be inserted is called BBQ Grill. Increase the title font size to 44 point. Also, increase the subtitle font size to 32 point, and then bold and italicize this text.
8. On Slide 4, change the layout to Two Content and insert the pictures shown in Figure 2–75d. The pictures to be inserted are called Reunion Boys and Reunion Toddler. In the left placeholder, apply the Rotated, White picture effect to the picture. In the right placeholder, apply the Bevel Perspective picture effect. Move the pictures as shown in Figure 2–75d.
(c) Slide 3
font size increased subtitle text
bolded and italicized
Continued >
(d) Slide 4
picture effects applied
Figure 2 – 75 (Continued)
1439078483_ch2_FINAL.indd PPT1271439078483_ch2_FINAL.indd PPT127 7/7/10 8:15:50 PM7/7/10 8:15:50 PM
Property of Cengage Learning

PPT 128 PowerPoint Chapter 2 Enhancing a Presentation with Pictures, Shapes, and WordArtS
TU
DE
NT
AS
SIG
NM
EN
TS
9. On Slide 5, change the layout to Title and Content and insert the picture shown in Figure 2–75e. The picture to be inserted is called Reunion. Enlarge the picture as shown.
10. Insert the Oval Callout and Cloud Callout shapes in the Callouts area. In the Oval Callout shape, type I hope Grandma makes cookies! and change the font size to 24 point bold italic. Also add a Shape Style, Moderate Effect – Olive Green Accent 3 to this shape. In the Cloud Callout shape, type I’m looking forward to our next reunion! and change the font size to 24 point and the style to bold italic. Move the shapes as shown in Figure 2–75e. Use the adjustment handles (the yellow diamond below each shape) to move the callout arrows as shown in Figure 2–75e. You may need to use Help to learn how to move these arrows.
11. On Slide 6, change the layout to Picture with Caption and insert the picture shown in Figure 2–75f and change the picture contrast to 120. The picture to be inserted is called Reunion Tree.
12. Insert the Up Ribbon shape in the Stars and Banners area and type the words Announcing Our Next Reunion. Change the font color to Green, the font size to 32 point, and the style to bold italic. Also, apply the Shape Style, Subtle Effect – Orange Accent 6. In the title placeholder, type Save the date — June 20, 2012 and change the font size to 28 point. Bold this text.
13. Add the Orbit transition under the Dynamic Content section to Slide 6 only. You may need to use Help to learn how to apply the transition to only one slide. Change the duration to 2.00 seconds.
14. Change the document properties, as specifi ed by your instructor. Save the presentation using the fi le name, Extend 2-1 Smith Reunion.
15. Submit the revised document in the format specifi ed by your instructor.
(f) Slide 6
Figure 2 – 75 (Continued)
(e) Slide 5
shape style applied
callout shapes inserted and formatted
font size increased; text bolded and italicized
picture contrast adjusted
font size increased; text bolded and italicized; font color changed
shape inserted and style applied
Extend Your Knowledge continued
1439078483_ch2_FINAL.indd PPT1281439078483_ch2_FINAL.indd PPT128 7/7/10 8:15:52 PM7/7/10 8:15:52 PM
Property of Cengage Learning

Enhancing a Presentation with Pictures, Shapes, and WordArt PowerPoint Chapter 2 PPT 129
Po
wer
Poin
t C
hap
ter
2S
TU
DE
NT
AS
SIG
NM
EN
TS
Make It Right
Analyze a presentation and correct all errors and/or improve the design.
Changing a Theme and Background StyleNote: To complete this assignment, you will be required to use the Data Files for Students. See the inside back cover of this book for instructions on downloading the Data Files for Students, or contact your instructor for information about accessing the required fi les.
Instructions: Start PowerPoint. Open the presentation, Make It Right 2-1 New Aerobics Classes, from the Data Files for Students.
Correct the formatting problems and errors in the presentation while keeping in mind the guide-lines presented in this chapter.
Perform the following tasks:
1. Change the document theme from Flow, shown in Figure 2–76, to Waveform. Apply the Background Style 10 (row 3, column 2) to Slide 5 only.
2. On the title slide, change the title from New Aerobics Classes to New Pool Programs. Type your name in place of Northlake Fitness Center and change the font to bold italic.
3. Move Slide 2 to the end of the presentation so that it becomes the new Slide 5.
4. Adjust the picture sizes, font sizes, and shapes so they do not overlap text and are the appropriate dimensions for the slide content.
5. Apply the Ripple transition to all slides. Change the duration to 02.00.
6. Change the document properties, as specifi ed by your instructor. Save the presentation using the fi le name, Make It Right 2-1 New Pool Programs.
7. Submit the revised document in the format specifi ed by your instructor.
Figure 2 – 76
change title text
substitute your name, and then format the text
shapesoverlapping
change document theme to Waveform
1439078483_ch2_FINAL.indd PPT1291439078483_ch2_FINAL.indd PPT129 7/7/10 8:15:53 PM7/7/10 8:15:53 PM
Property of Cengage Learning

PPT 130 PowerPoint Chapter 2 Enhancing a Presentation with Pictures, Shapes, and WordArtS
TU
DE
NT
AS
SIG
NM
EN
TS
In the Lab
Design and/or create a presentation using the guidelines, concepts, and skills presented in this chapter. Labs 1, 2, and 3 are listed in order of increasing diffi culty.
Lab 1: Creating a Presentation Inserting Pictures and Applying Picture StylesProblem: You are studying German operas in your Music Appreciation class. Wilhelm Richard Wagner (pronounced ‘va:gner’) lived from 1813 to 1883 and was a composer, conductor, theatre director, and essayist known for his operas. Wagner wrote and composed many operas, and King Ludwig II of Bavaria was one of his biggest supporters. Because you recently visited southern Germany and toured King Ludwig’s castles, you decide to create a PowerPoint presentation with some of your photos to accompany your class presentation. These pictures are available on the Data Files for Students. Create the slides shown in Figure 2–77 from a blank presentation using the Offi ce Theme document theme.
Note: To complete this assignment, you will be required to use the Data Files for Students. See the inside back cover of this book for instructions on downloading the Data Files for Students, or contact your instructor for information about accessing the required fi les.
Instructions: Perform the following tasks: 1. On Slide 1, create a background by inserting the picture called Castle 1, which is available on the
Data Files for Students.
2. Type Fairy Tale Trip to Germany as the Slide 1 title text. Apply the WordArt style, Fill – Tan, Text 2, Outline – Background 2, and increase the font size to 60 point. Change the text fi ll to the Papyrus texture, and then change the text outline weight to 1½ pt. Also, apply the Transform text effect, Arch Up (in the Follow Path area), to this text. Position this WordArt as shown in Figure 2–77a.
3. Type the title and content for the four text slides shown in Figure 2–77. Apply the Two Content layout to Slides 2 and 3 and the Picture with Caption layout to Slides 4 and 5.
4. On Slide 2, insert the picture called Castle 2 from the Data Files for Students in the right placeholder. Apply the Bevel Perspective picture style. Resize the picture so that it is approximately 4.5" 3 6", change the border color to Purple, change the border weight to 6 pt, and then move the picture, as shown in Figure 2–77b.
5. On Slide 3, insert the picture called Castle 3 from the Data Files for Students. Apply the Refl ected Bevel, Black picture style and then change the border color to Green. Do not change the border weight.
6. On Slide 4, insert the picture called Castle 4 from the Data Files for Students. Apply the Beveled Oval, Black picture style, change the border color to Blue, and then change the border weight to 6 pt.
7. On Slide 5, insert the picture called Castle 5 from the Data Files for Students. Apply the Moderate Frame, Black picture style, change the border color to Purple, and then change the border weight to 6 pt.
8. For both Slides 4 and 5, increase the title text size to 28 point and the caption text size to 24 point.
9. On Slide 2, change the title text font to Algerian, change the color to purple, and bold this text. Use the Format Painter to apply these formatting changes to the Slide 3 title text. In Slide 3, insert the Vertical Scroll shape located in the Stars and Banners area, apply the Subtle Effect – Purple, Accent 4 shape style, and change the shape outline weight to 3 pt. Type the text, Inspiration for Disney’s Sleeping Beauty Castle, and then change the font to Curlz MT, or a similar font. Bold this text, change the color to Dark Blue, and then change the size to 28 point. Increase the scroll shape size, as shown in Figure 2–77c.
10. On Slides 2, 3, 4, and 5, change the background style to the White marble fi ll texture (row 2, column 5) and change the transparency to 35%. Apply the Glitter transition to all slides. Change the duration to 04.50.
1439078483_ch2_FINAL.indd PPT1301439078483_ch2_FINAL.indd PPT130 7/7/10 8:15:55 PM7/7/10 8:15:55 PM
Property of Cengage Learning

Enhancing a Presentation with Pictures, Shapes, and WordArt PowerPoint Chapter 2 PPT 131
Po
wer
Poin
t C
hap
ter
2S
TU
DE
NT
AS
SIG
NM
EN
TS
11. Change the document properties, as specifi ed by your instructor. Save the presentation using the fi le name, Lab 2-1 Trip to Germany.
12. Submit the revised document in the format specifi ed by your instructor.
Figure 2 – 77
(a) Slide 1
(c) Slide 3 (d) Slide 4
(e) Slide 5
(b) Slide 2
WordArt style, texture fi ll, and effect applied
picture inserted as background
font changed and formatted; Format Painter used to copy attributes to Slide 3 title
picture resized
picture style and border added and modifi ed
White marble fi ll texture applied to Slides 2 through 5; transparency changed to 35%
picture style applied and border color changed to Green
shape inserted and formatted
font changed to Curlz MT and formatted
picture style applied and border color and weight changed
font size increased
font size increased
picture style applied and border color and weight changed
1439078483_ch2_FINAL.indd PPT1311439078483_ch2_FINAL.indd PPT131 7/7/10 8:15:55 PM7/7/10 8:15:55 PM
Property of Cengage Learning

PPT 132 PowerPoint Chapter 2 Enhancing a Presentation with Pictures, Shapes, and WordArtS
TU
DE
NT
AS
SIG
NM
EN
TS
In the Lab
Lab 2: Creating a Presentation with a Shape and with WordArtProblem: With the economy showing some improvement, many small businesses are approaching lending institutions for loans to expand their businesses. You work part-time for Loans Are Us, and your manager asked you to prepare a PowerPoint presentation for the upcoming Small Business Fair in your community. The pictures for this presentation are available on the Data Files for Students.
Note: To complete this assignment, you will be required to use the Data Files for Students. See the inside back cover of this book for instructions on downloading the Data Files for Students, or contact your instructor for information about accessing the required fi les.
Instructions: Perform the following tasks: 1. Create a new presentation using the Austin document theme.
2. Type the title and content for the title slide and the three text slides shown in Figure 2–78a–d. Apply the Title Only layout to Slide 2, the Two Content layout to Slide 3, and the Picture with Caption layout to Slide 4.
3. On both Slides 2 and 4, create a background by inserting the picture called Money. Change the transparency to 35%.
4. On Slide 1, insert the picture called Meeting. Apply the Refl ected Bevel, White picture style. Resize the picture so that it is approximately 3.76" 3 4.7", change the border color to Dark Blue, change the border weight to 3 pt, and then move the picture, as shown in Figure 2–78a. Increase the title text font size to 60 point, and then apply the WordArt style, Fill – Orange, Accent 6, Warm Matte Bevel.
5. Increase the subtitle text, Loans Are Us, font size to 28 point and then bold and italicize this text. Apply the WordArt style, Fill – Green, Accent 1, Metal Bevel, Refl ection.
6. On Slide 2, bold the title text. Insert the pictures called Doc1, Doc2, and Doc3. Resize these pictures so they are approximately 3" x 2.7" and then move them to the locations shown in Figure 2–78b. Insert the Flowchart: Decision shape located in the Flowchart area, apply the Subtle Effect – Orange, Accent 6 shape style, and then resize the shape so that it is approximately 1.5" 3 5.83". Change the shape outline weight to 6 pt. Type Assets, Liabilities & Sales Reports as the shape text, change the font to Aharoni, or a similar font, change the color to Dark Blue, and then change the size to 24 point.
7. On Slide 3, bold the title text. Insert the picture called Presentation into the right placeholder, apply the Beveled Oval, Black shape picture style, resize the picture so that it is approximately 3.5" 3 5.25", and then sharpen the picture 50%.
8. On Slide 4, insert the picture called Cash and Credit Card. Change the title text font size to 36 point and bold this text. Change the subtitle text font size to 24 point and then bold and italicize these words.
9. Apply the Shape transition to all slides. Change the duration to 01.25.
10. Change the document properties, as specifi ed by your instructor. Save the presentation using the fi le name, Lab 2-2 Small Business Loans.
11. Submit the document in the format specifi ed by your instructor.
1439078483_ch2_FINAL.indd PPT1321439078483_ch2_FINAL.indd PPT132 7/7/10 8:15:59 PM7/7/10 8:15:59 PM
Property of Cengage Learning

Enhancing a Presentation with Pictures, Shapes, and WordArt PowerPoint Chapter 2 PPT 133
Po
wer
Poin
t C
hap
ter
2S
TU
DE
NT
AS
SIG
NM
EN
TS
(a) Slide 1
(c) Slide 3
(d) Slide 4
(b) Slide 2
Figure 2–78
background style changed
background style changed
picture inserted and resized, style applied, and border color and weight changed
WordArt font sizeincreased and styleFill applied
Money picture inserted as background; transparency changed to 35%
Money picture inserted as background; transparency changed to 35%
shape inserted and formatted
pictures inserted and sized
title text bolded
picture inserted and resized, style applied, sharpened 50%
font size increased and text formatted
picture inserted
1439078483_ch2_FINAL.indd PPT1331439078483_ch2_FINAL.indd PPT133 7/7/10 8:15:59 PM7/7/10 8:15:59 PM
Property of Cengage Learning

PPT 134 PowerPoint Chapter 2 Enhancing a Presentation with Pictures, Shapes, and WordArtS
TU
DE
NT
AS
SIG
NM
EN
TS
In the Lab
Lab 3: Creating a Presentation with Pictures and ShapesProblem: One of your assignments in your child development class is to give a speech about teaching children the value of money, so you decide to create a PowerPoint presentation to add a little interest to your speech. Prepare the slides shown in Figures 2–79a through 2–79e. The pictures for this pre-sentation are available on the Data Files for Students.
Note: To complete this assignment, you will be required to use the Data Files for Students. See the inside back cover of this book for instructions on downloading the Data Files for Students, or contact your instructor for information about accessing the required fi les.
Instructions: Perform the following tasks: 1. Create a new presentation using the Median document theme, and then change the presentation
theme colors to Flow. This presentation should have fi ve slides; apply the Title Slide layout to Slide 1, the Picture with Caption layout to Slides 2 and 5, the Comparison layout to Slide 3, and the Blank layout to Slide 4.
2. Type the title and content text for the title slide and the four text slides shown in Figure 2–79a–d.
3. On Slide 1, change the title text font size to 54 point. To make the letter ‘s’ appear smaller than the other letters in the fi rst word of the title slide title text placeholder, change the font size of this letter to 44 point. Insert the Oval shape, resize it so that it is approximately 0.5" 3 0.5", and change the shape fi ll to white, which is the second color in the fi rst row of the Theme Colors gallery. Type $, increase the font size to 48 point, change the color to green, and bold this dollar sign. Cover the letter ‘o’ in the word, Do, with this shape.
4. Insert the picture called Piggy Bank. Apply the Rounded Diagonal Corner, White picture style. Resize the picture so that it is approximately 4.4" 3 5.03", change the border color to Light Blue, change the border weight to 3 pt, and then move the picture, as shown in Figure 2–79a. Change the subtitle font size to 32 point and then bold this text.
5. On Slide 2, insert the picture called Child Doing Dishes and then decrease the picture’s contrast to –20%. Change the title text size to 36 point and bold this text. Change the caption text size to 32 point.
6. On Slide 3, change the background style to Style 6. Bold the title text. Change the heading title text size in both placeholders to 32 point. In the right placeholder, insert the picture called Father and Daughter and then apply the Refl ected Bevel, White picture style. Resize the picture so that it is approximately 3" 3 4", change the border color to Light Blue, and then change the border weight to 3 pt, as shown in Figure 2–79c.
7. On Slide 4, create a background by inserting the picture called Piggy Bank and Coins. Insert the Cloud shape located in the Basic Shapes area and then increase the cloud shape size so that it is approximately 3" 3 5.6". Change the shape outline color to Yellow and then change the shape outline weight to 3 pt. Type Teach your children to save for a big purchase. as the shape text, and then change the font to Comic Sans MS. Bold and italicize this text and then change the font size to 32 point.
8. On Slide 5, create a background by inserting the picture called Coins. Insert the picture called Father and Child Shopping and then decrease the picture’s brightness to 220%. Change the title text font size to 36 point and bold this text.
9. Apply the Box transition to all slides. Change the duration to 02.00. Check the spelling and correct any errors.
10. Change the document properties, as specifi ed by your instructor. Save the presentation using the fi le name, Lab 2-3 ABCs of Money.
11. Submit the revised document in the format specifi ed by your instructor.
1439078483_ch2_FINAL.indd PPT1341439078483_ch2_FINAL.indd PPT134 7/7/10 8:16:02 PM7/7/10 8:16:02 PM
Property of Cengage Learning

Enhancing a Presentation with Pictures, Shapes, and WordArt PowerPoint Chapter 2 PPT 135
Po
wer
Poin
t C
hap
ter
2S
TU
DE
NT
AS
SIG
NM
EN
TS
(a) Slide 1 (b) Slide 2
Median document theme; theme colors changed to Flow
picture inserted and resized, style applied, border color and weight changed
shape inserted to replace letter ‘O’; ‘$’ added and formatted
picture inserted and resized, contrast reduced to 220%
text resized
(c) Slide 3
(e) Slide 5
(d) Slide 4
Figure 2–79
background style changed
font size changed
title text bolded
picture inserted and resized, style applied, border color and weight changed
picture inserted as background
text added and formatted
shape inserted andformatted
Coins picture inserted as background
picture inserted and brightness changed to 220%
title text font size increased and bolded
1439078483_ch2_FINAL.indd PPT1351439078483_ch2_FINAL.indd PPT135 7/7/10 8:16:03 PM7/7/10 8:16:03 PM
Property of Cengage Learning

PPT 136 PowerPoint Chapter 2 Enhancing a Presentation with Pictures, Shapes, and WordArtS
TU
DE
NT
AS
SIG
NM
EN
TS
Cases and Places
Apply your creative thinking and problem-solving skills to design and implement a solution.
Note: To complete these assignments, you may be required to use the Data Files for Students. See the inside back cover of this book for instructions on downloading the Data Files for Students, or contact your instructor for information about accessing the required fi les.
As you design the presentations, remember to use the 7 3 7 rule: a maximum of seven words on a line and a maximum of seven lines on one slide.
1: Design and Create a Presentation about Acid Rain
AcademicNature depends on the correct pH balance. Although some rain is naturally acidic with a pH level of around 5.0, human activities have increased the amount of acid in this water. Burning fossil fuels, includ-ing coal, oil, and natural gas, produces sulfur dioxide. Exhaust from vehicles releases nitrogen oxides. Both of these gases, when released into the atmosphere, mix with water droplets, forming acid rain. In your science class, you are studying about the causes and effects of acid rain. Create a presentation to show what causes acid rain and what effects it can have on humans, animals, plant life, lakes, and rivers. The presentation should contain at least three pictures appropriately resized. The Data Files for Students con-tains fi ve pictures called Factory, Rain, Soil, Tree and Clouds, and Vehicles; you can use your own digital pictures or pictures from Offi ce.com if they are appropriate for this topic. These pictures also should have appropriate styles and border colors. Use shapes such as arrows to show what gases are released into the atmosphere. Apply at least three objectives found at the beginning of this chapter to develop the presentation. Add a title slide with a shape and a closing slide. Be sure to check spelling.
2: Design and Create a Presentation about Tutoring
PersonalYou have been helping some of your classmates with their schoolwork, and you have decided that you should start a small tutoring business. In the student center, there is a kiosk where students can fi nd out about programs and activities on campus. The student center manager gave you permission to submit a short PowerPoint presentation promoting your tutoring business; this presentation will be added to the kiosk. The presentation should contain pictures appropriately resized. The Data Files for Students con-tains four pictures called Tutoring 1, Tutoring 2, Tutoring 3, and Tutoring 4, or you can use your own digital pictures or pictures from Offi ce.com if they are appropriate for this topic. Change the contrast and brightness for at least one picture. Insert shapes and WordArt to enhance your presentation. Apply a transition in the Subtle area to all slides and increase the duration. Be sure to check spelling.
3: Design and Create a Presentation on Setting Up Children’s Fish Tanks
ProfessionalFish make great pets for young children, but there is a lot to learn before they can set up a fi sh tank properly. The owner of the pet store where you work has asked you to create a presentation for the store to give parents an idea of what they need to purchase and consider when setting up a fi sh tank. He would like you to cover the main points such as the appropriate size bowl or tank, setup procedures, fi ltration, water quality, types of fi sh, care, and feeding. The presentation should contain pictures appropriately resized. The Data Files for Students contains fi ve pictures called Fish 1, Fish 2, Fish 3, Fish 4, and Fish 5, or you can use your own digital pictures or pictures from Offi ce.com if they are appropriate for this topic. Add a title slide and closing slide to complete your presentation. Format the title slide with a shape and change the theme color scheme. Change the title text font on the title slide. Format the background with at least one picture and apply a background texture to at least one slide. This presentation is geared to parents of young children, so keep it colorful, simple, and fun.
1439078483_ch2_FINAL.indd PPT1361439078483_ch2_FINAL.indd PPT136 7/7/10 8:16:07 PM7/7/10 8:16:07 PM
Property of Cengage Learning