microscope lab part i: compound microscope …bio10bcc.weebly.com/uploads/6/7/9/9/6799747/4... ·...
TRANSCRIPT
#4 Biology 10 Lab BCC Page 1 of 23
MICROSCOPE LAB
PART I: COMPOUND MICROSCOPE
OBJECTIVES: After completing this exercise you should be able to:
Demonstrate proper care and use of a compound microscope.
Identify the parts of the compound light microscope and describe the function of each part.
Compare magnification, resolving power, and contrast.
Demonstrate proper technique of preparing a wet mount slide.
Demonstrate inversion and depth of field.
Use the compound microscope as an instrument of measurement.
INTRODUCTION:
The unaided human eye can detect objects as small as 0.1 mm in diameter. Most cells are between 0.01
mm and 0.1 mm in diameter and cannot be seen without a microscope. A microscope contains one or
more lenses and is used to view detail that cannot be seen with the unaided eye. The light microscope, by
virtue of its lens system, extends our vision a thousand times so that object as small as 0.1 micrometer
(µm) in diameter can be seen. The electron microscope further extends our viewing capability down to 1
nanometer (nm). At this magnification it is possible to see a virus and the outline of individual protein or
nucleic acid molecules. A lens functions by refracting (bending) light rays coming from an object and
focusing them to form an image of that object. Refraction of light is due to the angle at which it passes
from one transparent medium to another (for example, air to glass) and the difference in density between
the media. A magnifying glass is a simple light microscope. The microscope consists of a set of lenses
that focus an enlarged image of an object on the retina of the eye. The greater the area of the retina
covered by the image of a specimen, the greater its magnification.
A: PURPOSE OF THE MICROSCOPE
The microscope is useful in making observations and collecting data in scientific experiments.
Microscopy involves three basic concepts:
Magnification: The degree to which the image of a specimen is enlarged.
Resolving power: How well specimen detail is preserved during the magnifying process.
Contrast: The ability to see specimen detail against its background. Stains and dyes are added to
sections of biological specimens to increase contrast.
#4 Biology 10 Lab BCC Page 2 of 23
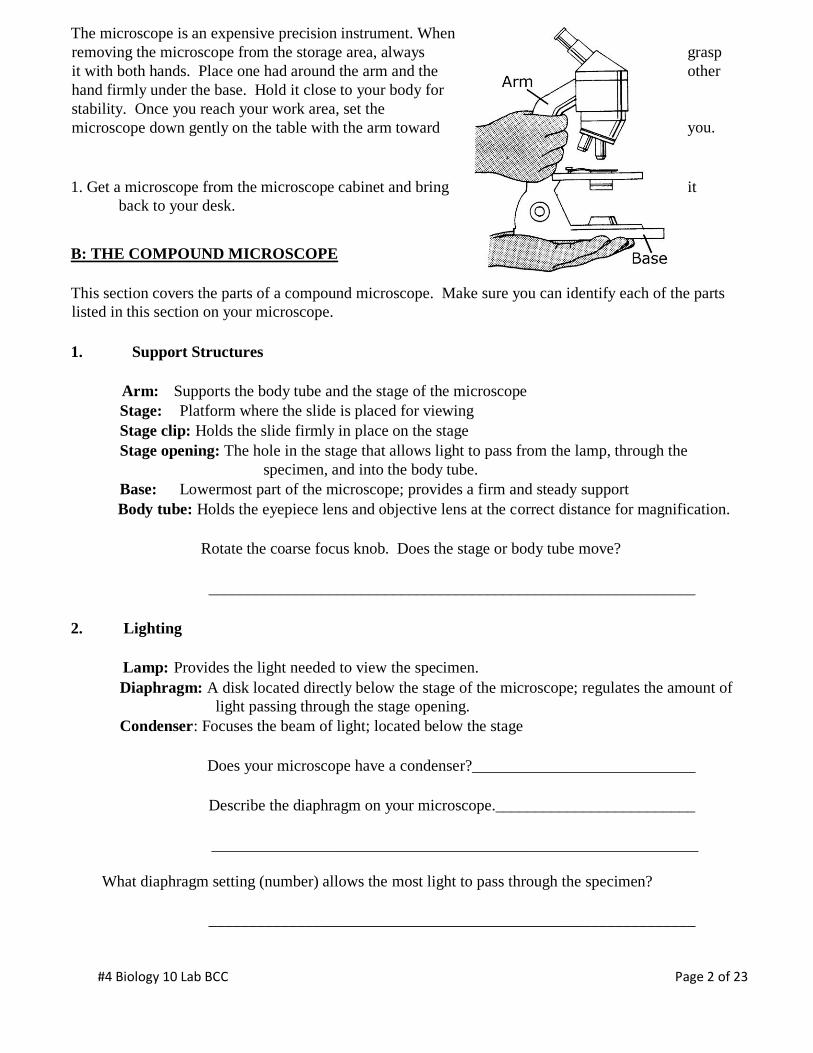
The microscope is an expensive precision instrument. When
removing the microscope from the storage area, always grasp
it with both hands. Place one had around the arm and the other
hand firmly under the base. Hold it close to your body for
stability. Once you reach your work area, set the
microscope down gently on the table with the arm toward you.
1. Get a microscope from the microscope cabinet and bring it
back to your desk.
B: THE COMPOUND MICROSCOPE
This section covers the parts of a compound microscope. Make sure you can identify each of the parts
listed in this section on your microscope.
1. Support Structures
Arm: Supports the body tube and the stage of the microscope
Stage: Platform where the slide is placed for viewing
Stage clip: Holds the slide firmly in place on the stage
Stage opening: The hole in the stage that allows light to pass from the lamp, through the
specimen, and into the body tube.
Base: Lowermost part of the microscope; provides a firm and steady support
Body tube: Holds the eyepiece lens and objective lens at the correct distance for magnification.
Rotate the coarse focus knob. Does the stage or body tube move?
_____________________________________________________________
2. Lighting
Lamp: Provides the light needed to view the specimen.
Diaphragm: A disk located directly below the stage of the microscope; regulates the amount of
light passing through the stage opening.
Condenser: Focuses the beam of light; located below the stage
Does your microscope have a condenser?____________________________
Describe the diaphragm on your microscope._________________________
_____________________________________________________________
What diaphragm setting (number) allows the most light to pass through the specimen?
_____________________________________________________________
#4 Biology 10 Lab BCC Page 3 of 23
What diaphragm setting (number) allows the least amount of light to pass through the specimen?
_____________________________________________________________
3. Focusing
Coarse focus knob: Larger knob used to elevate or lower the body tube or stage a large distance
with each turn.
Fine focus knob: Smaller knob used to elevate or lower the body tube or stage a small distance
with each turn; used to make fine adjustments when focusing on a
specimen.
Where are the coarse focus knobs located on your microscope?
_____________________________________________________________
Where are the fine focus knobs located on your microscope?
_____________________________________________________________
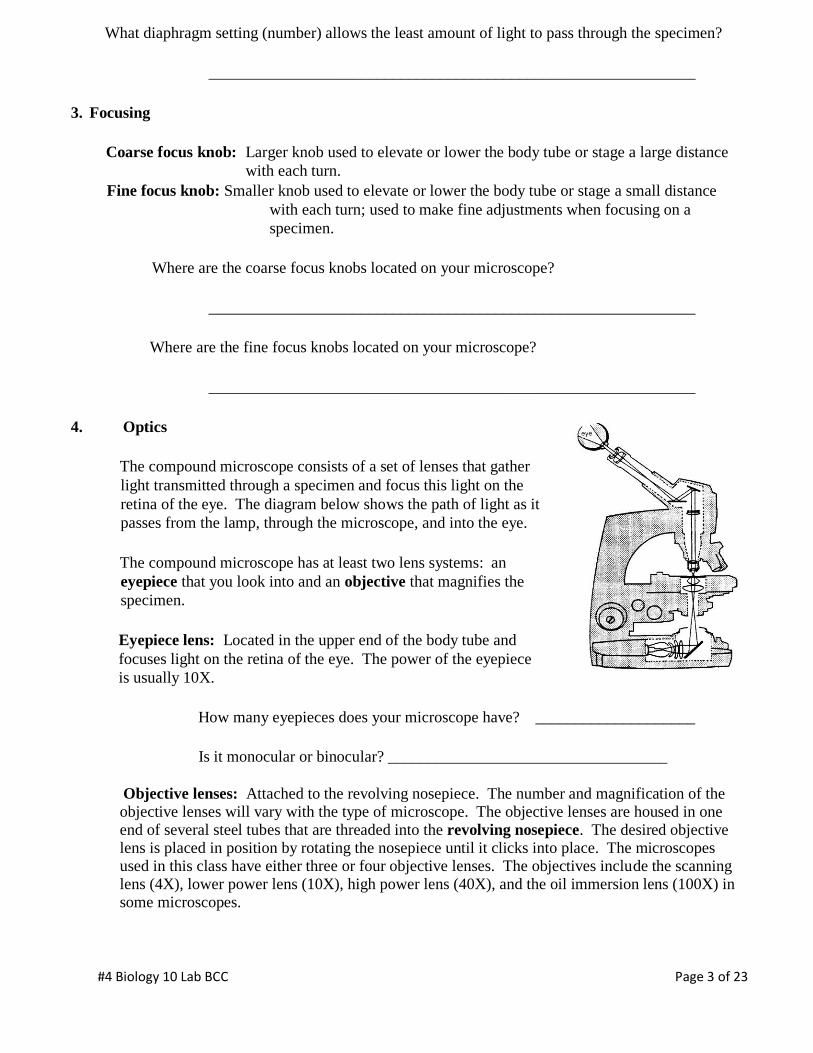
4. Optics
The compound microscope consists of a set of lenses that gather
light transmitted through a specimen and focus this light on the
retina of the eye. The diagram below shows the path of light as it
passes from the lamp, through the microscope, and into the eye.
The compound microscope has at least two lens systems: an
eyepiece that you look into and an objective that magnifies the
specimen.
Eyepiece lens: Located in the upper end of the body tube and
focuses light on the retina of the eye. The power of the eyepiece
is usually 10X.
How many eyepieces does your microscope have? ____________________
Is it monocular or binocular? ___________________________________
Objective lenses: Attached to the revolving nosepiece. The number and magnification of the objective lenses will vary with the type of microscope. The objective lenses are housed in one end of several steel tubes that are threaded into the revolving nosepiece. The desired objective lens is placed in position by rotating the nosepiece until it clicks into place. The microscopes used in this class have either three or four objective lenses. The objectives include the scanning lens (4X), lower power lens (10X), high power lens (40X), and the oil immersion lens (100X) in some microscopes.
#4 Biology 10 Lab BCC Page 4 of 23
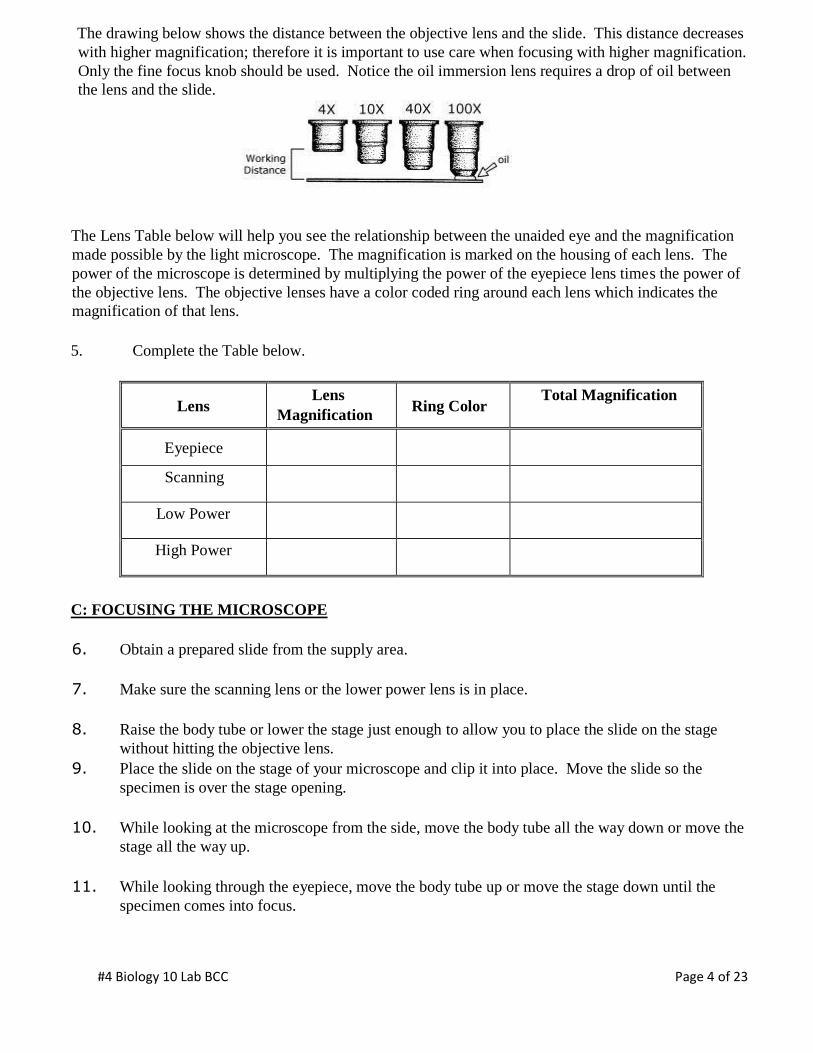
The drawing below shows the distance between the objective lens and the slide. This distance decreases
with higher magnification; therefore it is important to use care when focusing with higher magnification.
Only the fine focus knob should be used. Notice the oil immersion lens requires a drop of oil between
the lens and the slide.
The Lens Table below will help you see the relationship between the unaided eye and the magnification
made possible by the light microscope. The magnification is marked on the housing of each lens. The
power of the microscope is determined by multiplying the power of the eyepiece lens times the power of
the objective lens. The objective lenses have a color coded ring around each lens which indicates the
magnification of that lens.
5. Complete the Table below.
Lens Lens
Magnification Ring Color
Total Magnification
Eyepiece
Scanning
Low Power
High Power
C: FOCUSING THE MICROSCOPE
6. Obtain a prepared slide from the supply area.
7. Make sure the scanning lens or the lower power lens is in place.
8. Raise the body tube or lower the stage just enough to allow you to place the slide on the stage
without hitting the objective lens.
9. Place the slide on the stage of your microscope and clip it into place. Move the slide so the
specimen is over the stage opening.
10. While looking at the microscope from the side, move the body tube all the way down or move the
stage all the way up.
11. While looking through the eyepiece, move the body tube up or move the stage down until the
specimen comes into focus.
#4 Biology 10 Lab BCC Page 5 of 23
12. Adjust the diaphragm opening until you have the best view of the specimen.
13. With the specimen in focus and positioned in the center of the field of view, rotate the nosepiece
lens to the high power objective (40X). DO NOT move the coarse focus. Only fine focus
should be necessary to bring the specimen into sharp focus. The ability of the microscope to
remain in focus when switching from one objective lens to the next highest power is called
parfocal.
14. Adjust the diaphragm opening until you have the best view of the specimen.
12. Have your partner repeat steps 6 – 12.
13. Return the prepared slide to the supply area.
D: SPECIMEN ORIENTATION
14. Prepare a wet mount slide of an R by first cutting a capital R out of a newspaper. (Do not use one
from a headline.)
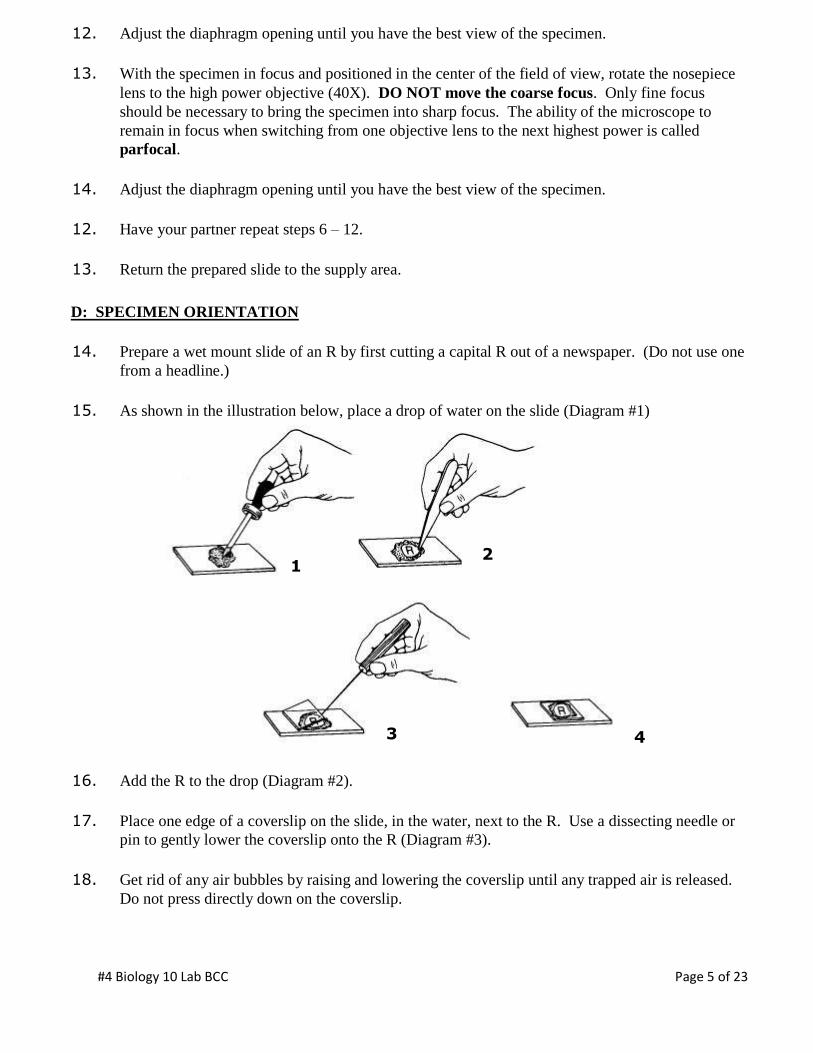
15. As shown in the illustration below, place a drop of water on the slide (Diagram #1)
16. Add the R to the drop (Diagram #2).
17. Place one edge of a coverslip on the slide, in the water, next to the R. Use a dissecting needle or
pin to gently lower the coverslip onto the R (Diagram #3).
18. Get rid of any air bubbles by raising and lowering the coverslip until any trapped air is released.
Do not press directly down on the coverslip.
1 2
3 4
#4 Biology 10 Lab BCC Page 6 of 23
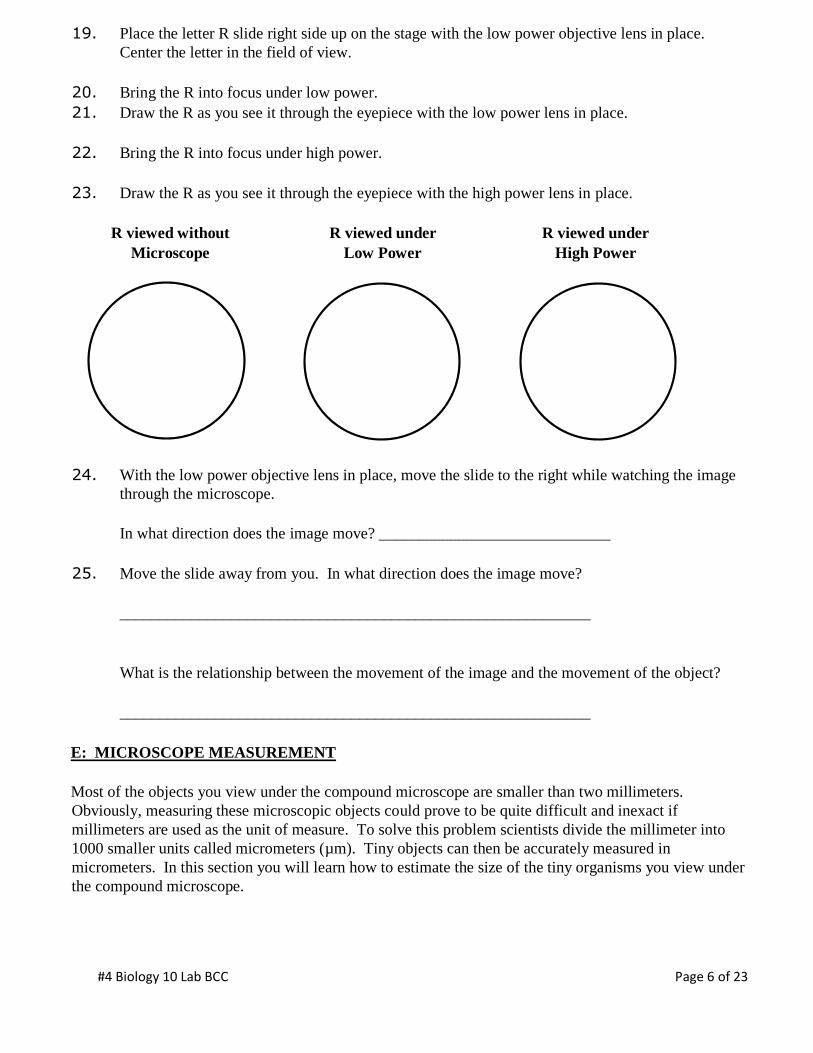
19. Place the letter R slide right side up on the stage with the low power objective lens in place.
Center the letter in the field of view.
20. Bring the R into focus under low power.
21. Draw the R as you see it through the eyepiece with the low power lens in place.
22. Bring the R into focus under high power.
23. Draw the R as you see it through the eyepiece with the high power lens in place.
R viewed without R viewed under R viewed under
Microscope Low Power High Power
24. With the low power objective lens in place, move the slide to the right while watching the image
through the microscope.
In what direction does the image move? _____________________________
25. Move the slide away from you. In what direction does the image move?
___________________________________________________________
What is the relationship between the movement of the image and the movement of the object?
___________________________________________________________
E: MICROSCOPE MEASUREMENT
Most of the objects you view under the compound microscope are smaller than two millimeters.
Obviously, measuring these microscopic objects could prove to be quite difficult and inexact if
millimeters are used as the unit of measure. To solve this problem scientists divide the millimeter into
1000 smaller units called micrometers (µm). Tiny objects can then be accurately measured in
micrometers. In this section you will learn how to estimate the size of the tiny organisms you view under
the compound microscope.
#4 Biology 10 Lab BCC Page 7 of 23
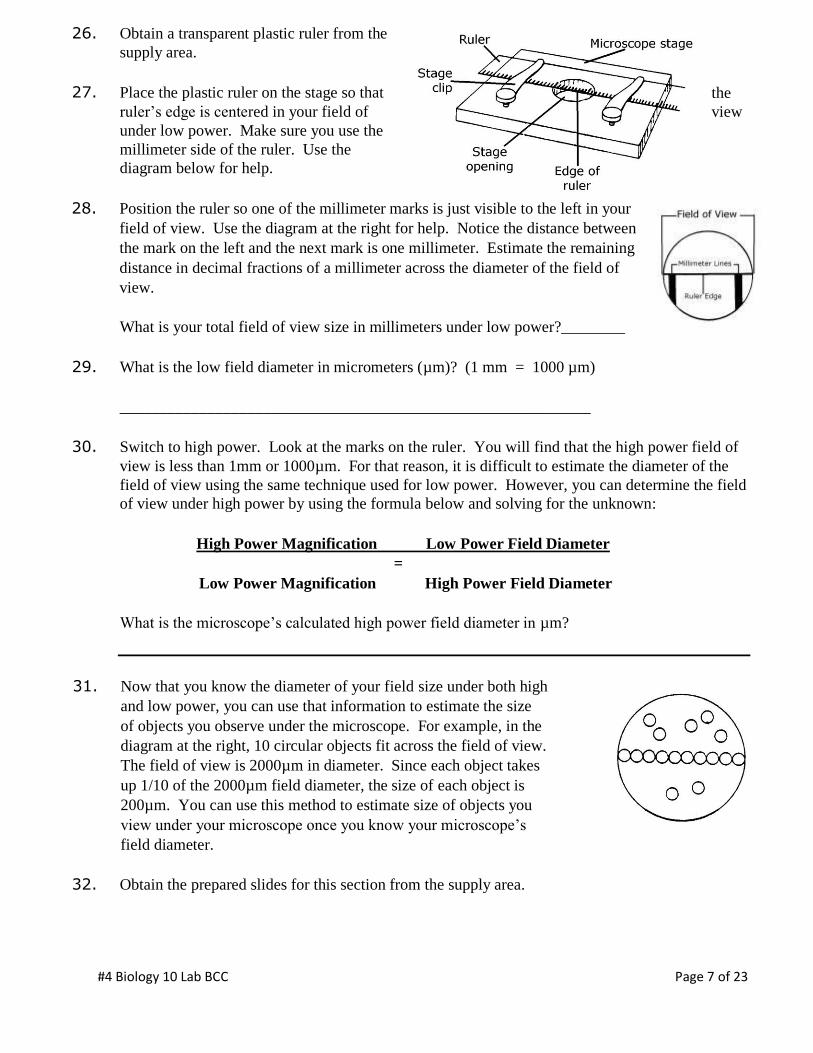
26. Obtain a transparent plastic ruler from the
supply area.
27. Place the plastic ruler on the stage so that the
ruler’s edge is centered in your field of view
under low power. Make sure you use the
millimeter side of the ruler. Use the
diagram below for help.
28. Position the ruler so one of the millimeter marks is just visible to the left in your
field of view. Use the diagram at the right for help. Notice the distance between
the mark on the left and the next mark is one millimeter. Estimate the remaining
distance in decimal fractions of a millimeter across the diameter of the field of
view.
What is your total field of view size in millimeters under low power?________
29. What is the low field diameter in micrometers (µm)? (1 mm = 1000 µm)
___________________________________________________________
30. Switch to high power. Look at the marks on the ruler. You will find that the high power field of
view is less than 1mm or 1000µm. For that reason, it is difficult to estimate the diameter of the
field of view using the same technique used for low power. However, you can determine the field
of view under high power by using the formula below and solving for the unknown:
High Power Magnification Low Power Field Diameter
=
Low Power Magnification High Power Field Diameter
What is the microscope’s calculated high power field diameter in µm?
31. Now that you know the diameter of your field size under both high
and low power, you can use that information to estimate the size
of objects you observe under the microscope. For example, in the
diagram at the right, 10 circular objects fit across the field of view.
The field of view is 2000µm in diameter. Since each object takes
up 1/10 of the 2000µm field diameter, the size of each object is
200µm. You can use this method to estimate size of objects you
view under your microscope once you know your microscope’s
field diameter.
32. Obtain the prepared slides for this section from the supply area.

#4 Biology 10 Lab BCC Page 8 of 23
33. Focus under low or high power to view each specimen and then estimate the size of each. Record
your observations in the table below.
Specimen
Viewed under
Low
or High
power
Field
Diameter
# of
specimens
that fit across
field
Estimated
Specimen
Size
34. Return all slides to the supply area.
F: DEPTH OF FIELD
35. Obtain a microscope slide of silk fibers from the supply area.
36. Look at the slide under low power where the threads cross. Adjust the diaphragm to give the sharpest view. Are all three thread colors equally visible under low power?
____________________________________________________________________________
37. Look at the slide under high power where the threads cross. Adjust the diaphragm to give the
sharpest view and fine focus. Are all three thread colors equally visible under high power?
______________________________________________________________________________
38. Slowly fine focus up and down to determine the order of the thread colors.
Which color is on top? ___________________________________________
Which color is on the bottom? _____________________________________
How did you determine the order of the thread colors? ______________
________________________________________________________________________
39. Return the slide to the supply area.
#4 Biology 10 Lab BCC Page 9 of 23
PART II: QUESTIONS
40. Describe how a compound microscope should be held and carried.
___________________________________________________________________________
___________________________________________________________________________
41. How is the total magnification of a microscope determined?
___________________________________________________________________________
42. If the eyepiece on a microscope has a magnification of 10X, what is the total magnification with a
15X objective?
________________________________________________________________________
43. If the eyepiece on a microscope has a magnification of 15X, what is the total magnification with a
45X objective?
________________________________________________________________________
44. A microscope gives a total magnification of 1500X, but the image is too blurry to be useful.
What might be the problem with the microscope?
________________________________________________________________________
________________________________________________________________________
45. An image is located in the lower right hand corner of the field of view. How would you move the
slide to center the image?
________________________________________________________________________
________________________________________________________________________
46. Objects viewed under a compound microscope are frequently lost when switching from low to
high power. Give one reason why this happens.
________________________________________________________________________
________________________________________________________________________
47. How did the light intensity change when you switched from low power to high power objective?
_________________________________________________________________________
#4 Biology 10 Lab BCC Page 10 of 23
48. In general, how would you have to adjust the diaphragm after switching from low to high power?
_________________________________________________________________________
49. Do you observe more or less area in your field of view when under high power compared to low
power?
_________________________________________________________________________
50. If a microscope has a low power magnification of 100X and a high power magnification of 500X,
and a low power field of 1500µm, what is the high power field in µm?
_________________________________________________________________________
51. If 20 objects fit across the diameter of a low power field of view whose field diameter is 4000µm,
what would be the approximate size of each object?
________________________________________________________________________
52. Why is it more difficult to measure the diameter of the high power field of view than the low
power field of view?
________________________________________________________________________
________________________________________________________________________
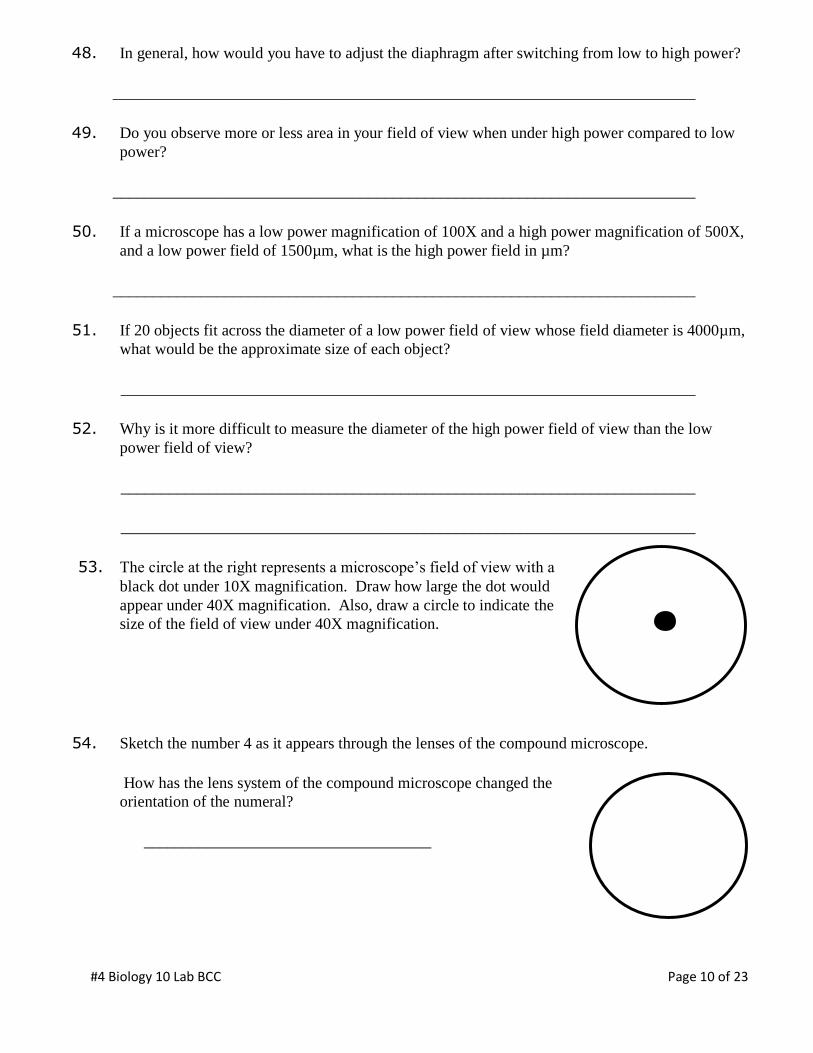
53. The circle at the right represents a microscope’s field of view with a
black dot under 10X magnification. Draw how large the dot would
appear under 40X magnification. Also, draw a circle to indicate the
size of the field of view under 40X magnification.
54. Sketch the number 4 as it appears through the lenses of the compound microscope.
How has the lens system of the compound microscope changed the
orientation of the numeral?
____________________________________
#4 Biology 10 Lab BCC Page 11 of 23
55. A student focuses on a specimen at low power and carefully centers it before changing to high
power. At high power, however, he doesn’t see the part of the specimen he was interested in.
What might be the problem?
____________________________________________________________________________
___________________________________________________________________________
56. Inspired by her biology lab, a student decides to make a closer study of the food she eats. She
uses a razor blade to make a very thin section from a raw potato and mounts it in a drop of water
on a slide. To her disappointment, she can barely make out the cells under the microscope. What
might she do to improve her results?
_____________________________________________________________________________
_____________________________________________________________________________
57. How is magnification different from resolving power?
Magnification Resolving Power
58. What are the advantages and limitations of studying cells using light microscopy?
Advantages Limitations
59. Do some research: Compare and contrast transmission electron microscopy (TEM) and scanning
electron microscopy (SEM). (Use Internet)
#4 Biology 10 Lab BCC Page 12 of 23
TEM SEM
Similarities
Differences
60. Do some research: What are the advantages and limitations of studying cells using electron
microscopy?
Advantages Limitations
#4 Biology 10 Lab BCC Page 13 of 23
PART IV:
CELL LAB
OBJECTIVES
After completing this lab you should be able to:
1. Compare and contrast prokaryotic and eukaryotic cells,
2. Prepare wet mount slides of eukaryotic cells,
3. Identify each cell part and state its function, and
4. Distinguish between plant and animal cells.
INTRODUCTION:
In the 17th century Robert Hooke built a microscope powerful enough to see objects at greater
magnification than had previously been possible. Hooke used his microscope to examine a thin piece of
cork. While viewing this section of cork, he observed many individual units making up the cork. He
published a report in 1655 in which he called these units “cells” because they reminded him of the small
cubicles in which monks lived.
Other scientists began to use microscopes to examine many different plants and animals and these
scientists often saw structures that reminded them of the cork cells Hooke described. Over the next 150
years, scientists realized that all living things are composed of cells.
With better microscopes, scientists observed that although cells vary in organization, size, and function,
all cells have the following structures:
• A plasma membrane defining the boundary of the living material,
• A region of DNA (deoxyribonucleic acid), which holds the genetic information, and
• A cytoplasm (everything inside the plasma membrane that is not part of the DNA region).
There are two basic types of cells: eukaryotic, those with a clearly defined nucleus and membrane-bound
organelles, and prokaryotic, those without a nucleus and membrane-bound organelles. The Greek word
karyon means kernel, referring to the nucleus. Thus, prokaryotic means “before a nucleus”, while
eukaryotic means true nucleus. The table on the next page compares the characteristics of prokaryotic
and eukaryotic cells.
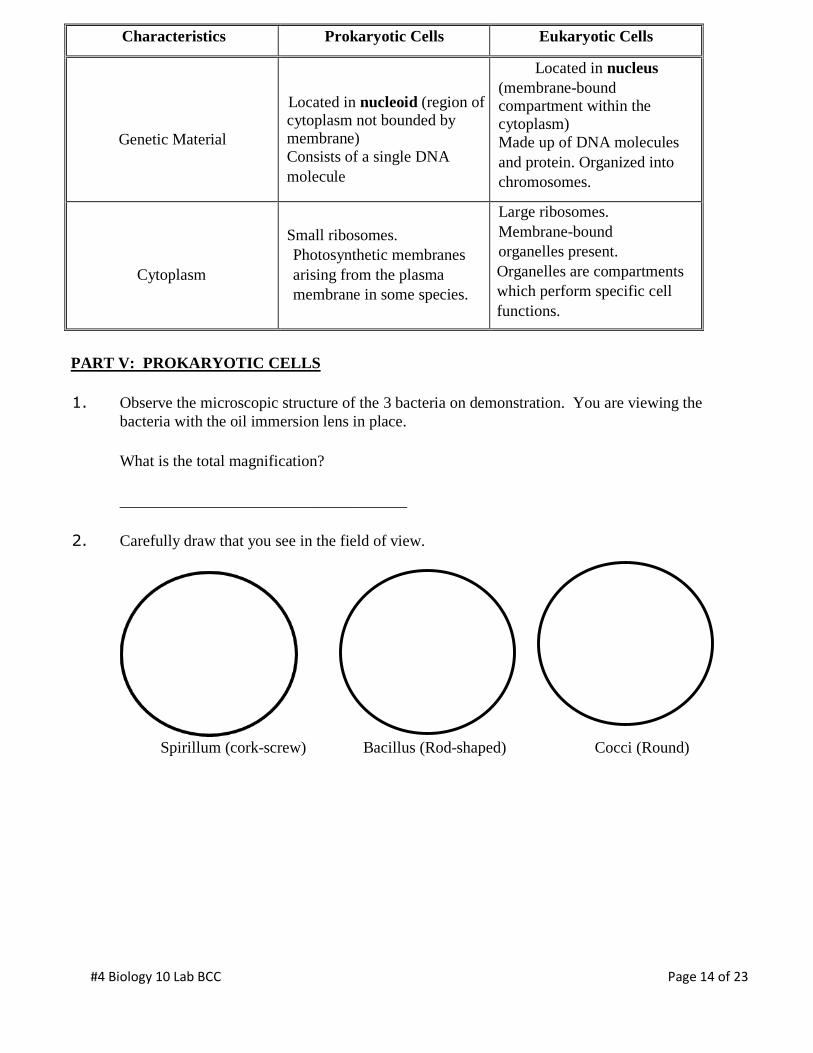
#4 Biology 10 Lab BCC Page 14 of 23
Characteristics Prokaryotic Cells Eukaryotic Cells
Genetic Material
Located in nucleoid (region of cytoplasm not bounded by membrane)
Consists of a single DNA
molecule
Located in nucleus
(membrane-bound compartment within the cytoplasm)
Made up of DNA molecules
and protein. Organized into
chromosomes.
Cytoplasm
Small ribosomes.
Photosynthetic membranes
arising from the plasma
membrane in some species.
Large ribosomes.
Membrane-bound
organelles present.
Organelles are compartments
which perform specific cell
functions.
PART V: PROKARYOTIC CELLS
1. Observe the microscopic structure of the 3 bacteria on demonstration. You are viewing the
bacteria with the oil immersion lens in place.
What is the total magnification?
____________________________________
2. Carefully draw that you see in the field of view.
Spirillum (cork-screw) Bacillus (Rod-shaped) Cocci (Round)
#4 Biology 10 Lab BCC Page 15 of 23
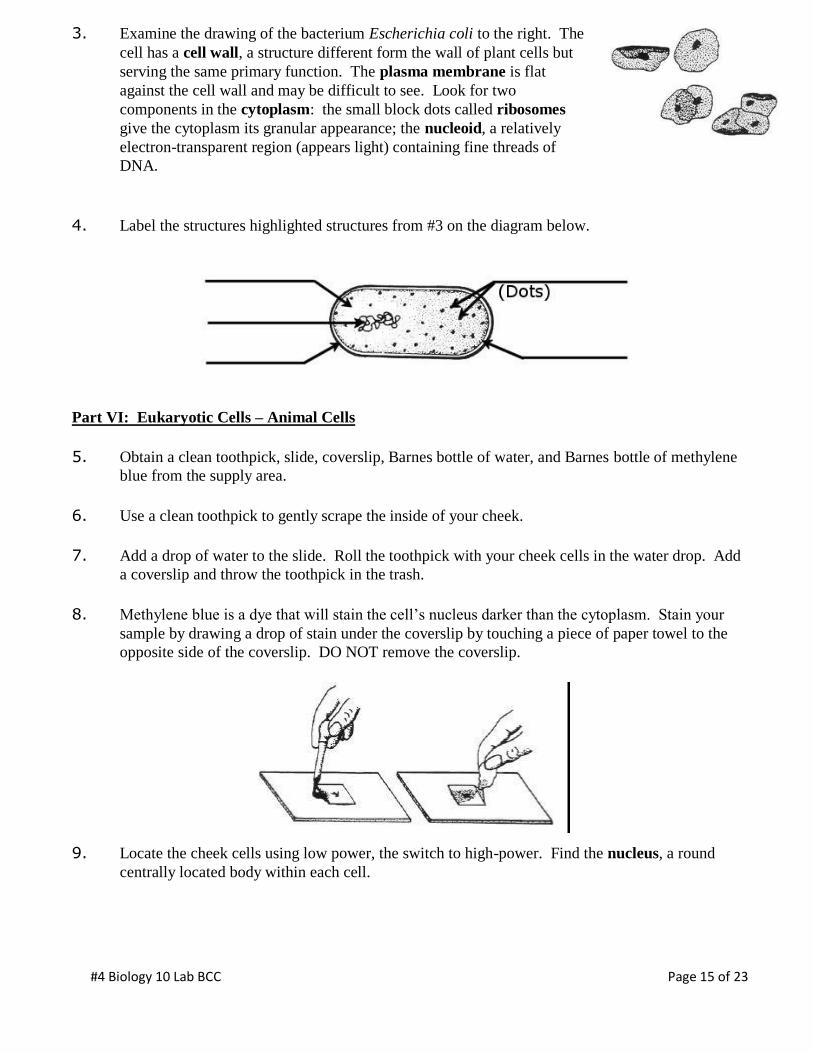
3. Examine the drawing of the bacterium Escherichia coli to the right. The
cell has a cell wall, a structure different form the wall of plant cells but
serving the same primary function. The plasma membrane is flat
against the cell wall and may be difficult to see. Look for two
components in the cytoplasm: the small block dots called ribosomes
give the cytoplasm its granular appearance; the nucleoid, a relatively
electron-transparent region (appears light) containing fine threads of
DNA.
4. Label the structures highlighted structures from #3 on the diagram below.
Part VI: Eukaryotic Cells – Animal Cells
5. Obtain a clean toothpick, slide, coverslip, Barnes bottle of water, and Barnes bottle of methylene
blue from the supply area.
6. Use a clean toothpick to gently scrape the inside of your cheek.
7. Add a drop of water to the slide. Roll the toothpick with your cheek cells in the water drop. Add
a coverslip and throw the toothpick in the trash.
8. Methylene blue is a dye that will stain the cell’s nucleus darker than the cytoplasm. Stain your
sample by drawing a drop of stain under the coverslip by touching a piece of paper towel to the
opposite side of the coverslip. DO NOT remove the coverslip.
9. Locate the cheek cells using low power, the switch to high-power. Find the nucleus, a round
centrally located body within each cell.

#4 Biology 10 Lab BCC Page 16 of 23
10. Carefully draw several cells as they appear under the microscope. Label the cytoplasm, nucleus,
and plasma membrane. Estimate the size of a typical cell. Record the cell size and
magnification used.
Magnification _____________
Cell size (µm) _____________
11. Wash and dry your slide and coverslip.
PART VII: EUKARYOTIC CELLS – PLANT CELLS
12. Use forceps to remove a young leaf from the growing tip of
an Elodea plant and prepare a wet mount slide.
13. Examine the leaf structure under low power. They study
the detail of several cells under high power.
14. Add a drop of safranin stain to make the cell wall more visible. Add the stain the same way you
stained your cheek cells with methylene blue. (Step #8)
15. You will notice many spherical green chloroplasts in the cytoplasm. These organelles function
in photosynthesis. The cell wall is a clear area outside the cytoplasm. The plasma membrane is
not visible because it is pressed tightly against the cell wall and because it is beyond the resolving
power of the light microscope. You may also see cytoplasmic streaming. This is evident by the
movement of chloroplasts along the cell wall. Microfilaments are responsible for this
intracellular movement. Toward the middle of the cell, you will find the large, water filled
central vacuole. This structure may take up over half of the cell interior. The nucleus, within
the cytoplasm, appears as a clear or slightly amber-colored body. It is slightly larger than the
chloroplasts.
#4 Biology 10 Lab BCC Page 17 of 23
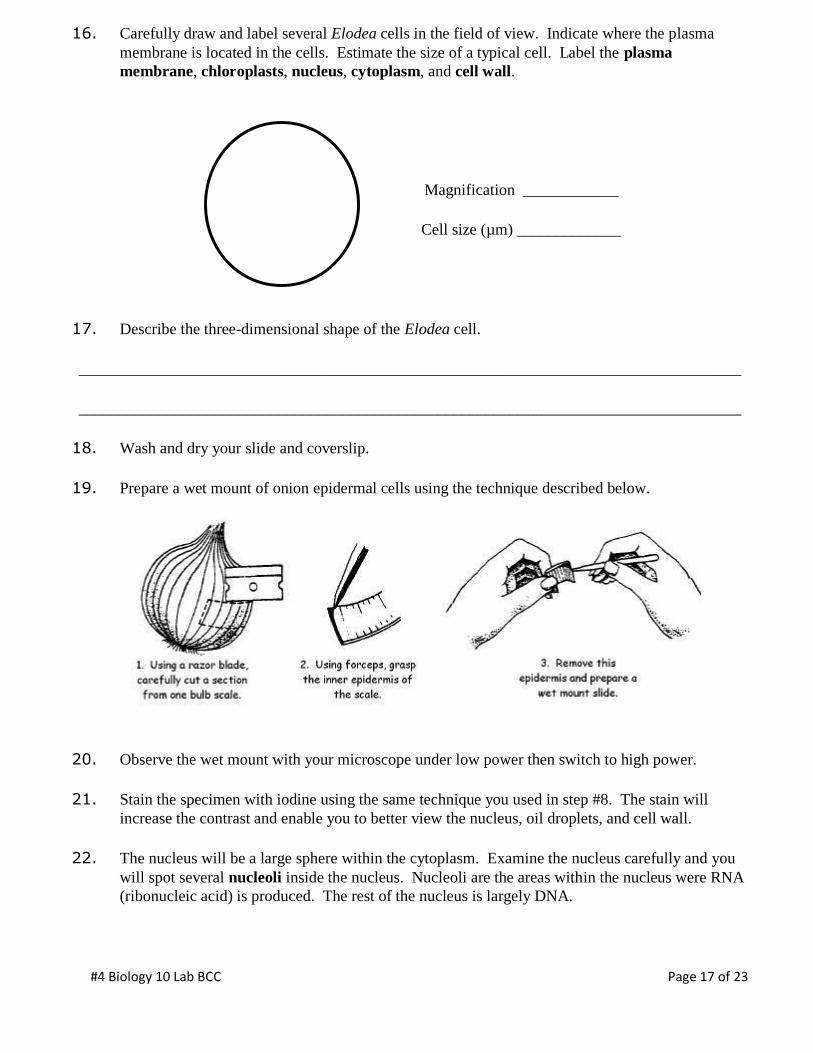
16. Carefully draw and label several Elodea cells in the field of view. Indicate where the plasma
membrane is located in the cells. Estimate the size of a typical cell. Label the plasma
membrane, chloroplasts, nucleus, cytoplasm, and cell wall.
Magnification ____________
Cell size (µm) _____________
17. Describe the three-dimensional shape of the Elodea cell.
___________________________________________________________________________________
___________________________________________________________________________________
18. Wash and dry your slide and coverslip.
19. Prepare a wet mount of onion epidermal cells using the technique described below.
20. Observe the wet mount with your microscope under low power then switch to high power.
21. Stain the specimen with iodine using the same technique you used in step #8. The stain will
increase the contrast and enable you to better view the nucleus, oil droplets, and cell wall.
22. The nucleus will be a large sphere within the cytoplasm. Examine the nucleus carefully and you
will spot several nucleoli inside the nucleus. Nucleoli are the areas within the nucleus were RNA
(ribonucleic acid) is produced. The rest of the nucleus is largely DNA.
#4 Biology 10 Lab BCC Page 18 of 23
23. Look for oil droplets in the form of granular material within the cytoplasm. The droplets are a
form of stored food for the cell.
24. What plant cell organelle is present in Elodea leaf cells that is absent in onion epidermal cells?
______________________________________________________________________________
______________________________________________________________________________
25. What is the observable difference between the Elodea cell and the onion epidermal cells?
______________________________________________________________________________
______________________________________________________________________________
26. Carefully draw several onion epidermal cells. Label the oil droplets, nucleus, cell wall, cell
membrane, and cytoplasm. Estimate the size of
a typical cell.
Magnification _____________
Cell size (µm) _____________
PART VIII: QUESTIONS
27. Determine if each of the following characteristics is true of Prokaryotic cells, Eukaryotic cells, or
Both cell types.
______ No membrane-bound nucleus
______ Membrane-bound nucleus
______ No membrane-bound organelles
______ Contains membrane-bound
organelles
______ Ribosomes present
______ Cell membrane present
______ Chromosomes present
______ Cytoplasm present
______ Mitochondria, endoplasmic
reticulum, Golgi, and vacuoles
present
#4 Lab BCC Page 19
28. How does the size of the bacteria cell observed compare with the size of the human cheek
cells or Elodea cells?
___________________________________________________________________________
___________________________________________________________________________
29. Name 4 structures common to all cells.
__________________________ ________________________
__________________________ ________________________
30. List 3 differences between plant and animal cells.
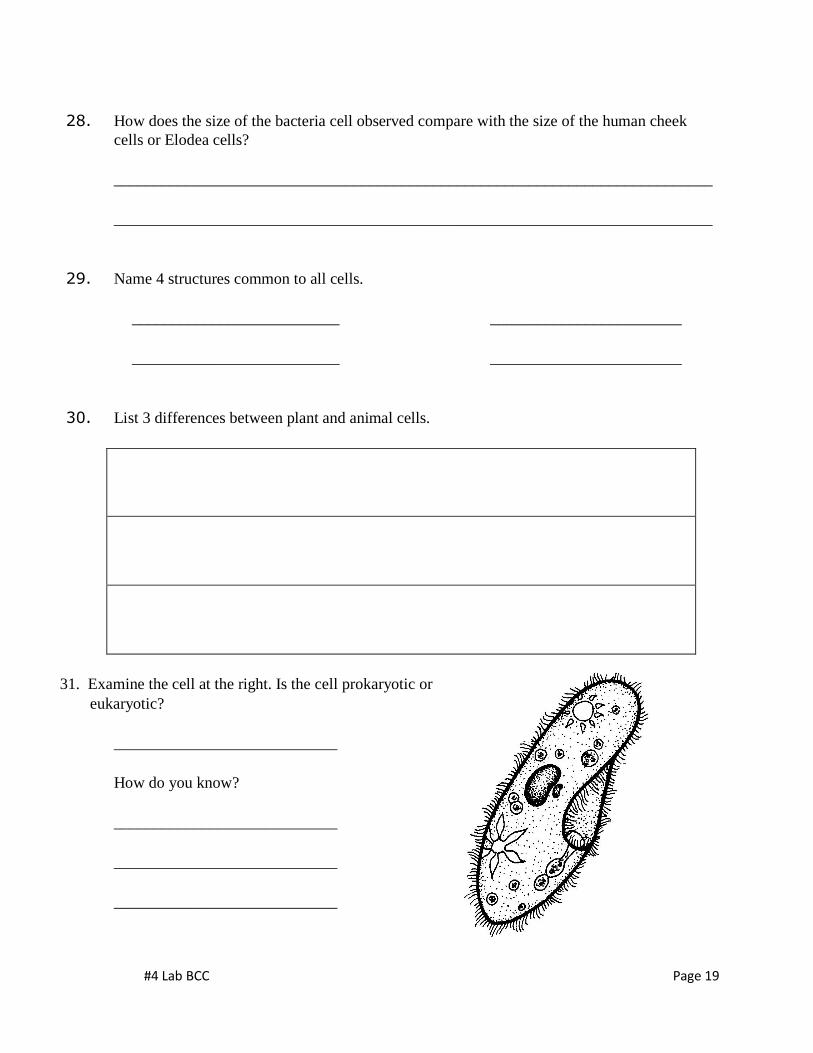
31. Examine the cell at the right. Is the cell prokaryotic or
eukaryotic?
____________________________
How do you know?
____________________________
____________________________
____________________________