microflow manual covers - new - bd biosciences - choose … · 2014-08-03 · 8. preparing fixative...
TRANSCRIPT


MicroFlowPLUS Kit (Rat Peripheral Blood)
(Version 090112)
Table Of Contents 1. Materials Provided .........................................................................................................................................................1 2. Additional Materials Required........................................................................................................................................1 3. Storing the Kit-Supplied Biological Standards ...............................................................................................................1 4. Ordering Information and Technical Services................................................................................................................1 5. First-Time Users ..........................................................................................................................................................2
5.1. Template Preparation............................................................................................................................................2 5.2. Using Positive and Negative Control Samples......................................................................................................2 5.3. Using a CD71 Setup Sample ................................................................................................................................2 5.4. Flow Cytometer Requirements..............................................................................................................................2 5.5. Daily Calibration with Biological Standards...........................................................................................................2
6. Introduction ....................................................................................................................................................................3 6.1. The Micronucleus Test..........................................................................................................................................3 6.2. The MicroFlow® Method........................................................................................................................................3 6.3. Regulatory Acceptance .........................................................................................................................................3
7. Overview of Method.......................................................................................................................................................4 8. Preparing Fixative Tubes and Anticoagulant/Diluent Vials ............................................................................................4
8.1. Preparing the Fixative Tubes ................................................................................................................................4 8.2. Preparing the Anticoagulant/Diluent Vials.............................................................................................................5
9. Collecting Blood Samples..............................................................................................................................................5 10. Fixing Blood Samples ....................................................................................................................................................5 11. Storing Fixed Samples Until Analysis ............................................................................................................................7
11.1. Maintain Samples in Ultracold Fixative .................................................................................................................7 11.2. Transferring into LTSS..........................................................................................................................................7
12. Washing Samples..........................................................................................................................................................8 12.1. Washing Samples out of LTSS .............................................................................................................................8 12.2. Washing Samples out of Fixative..........................................................................................................................8
13. Labeling Procedure........................................................................................................................................................8 13.1. Preparing Labeling Solutions I and II ....................................................................................................................8 13.2. Preparing DNA Staining Solution ..........................................................................................................................9 13.3. Labeling Washed Blood Samples for Flow Cytometric Analysis.........................................................................10
14. Flow Cytometric Analysis.............................................................................................................................................11 14.1. Flow Cytometer Calibration with Biological Standards........................................................................................11 14.2. Analysis of Experimental Samples......................................................................................................................14
15. Troubleshooting ...........................................................................................................................................................15 16. References ..................................................................................................................................................................17 17. License Agreement and Limited Product Warranty .....................................................................................................17
Appendix A: Template Preparation..............................................................................................................................18

MicroFlowPLUS Kit (Rat Peripheral Blood)
Page 1 of 19 (Version 090112)
1. Materials Provided
Kit Component Quantitya Storage Conditions Anticoagulant/Diluent 30 ml 2 °C to 8 °C Buffer Solution 2 liters 2 °C to 8 °C Long-Term Storage Solution (LTSS) 65 ml 2 °C to 8 °C RNase Solution 100 µl –10 °C to –30 °C Rat anti-CD71 Antibodyb 100 µl 2 °C to 8 °C DNA Stain 4 ml 2 °C to 8 °C Platelet Antibodyb 50 µl 2 °C to 8 °C Biological Standards
• Positive Control samples (fixed)c Four 1 ml aliquots –75 °C to –85 °C • Negative Control samples (fixed)d Four 1 ml aliquots –75 °C to –85 °C • Malaria Biostandard blood samples (fixed)e Four 1 ml aliquots –75 °C to –85 °C
CD-ROM 1 Ambient a. Sufficient materials are provided to collect and analyze 60 blood samples. b. Warning! Contains sodium azide. Irritant. See MSDS (on CD). c. Positive control sample: Noninfectious, nonhazardous denatured rat blood sample with an elevated level of
micronuclei. d. Negative control sample: Noninfectious, nonhazardous denatured rat blood sample with a background level of
micronuclei. e. Malaria Biostandard blood sample: Noninfectious, nonhazardous denatured rat blood sample used for calibration of
flow cytometer.
2. Additional Materials Required
• Fixative must be methanol. Litron recommends at least 99.8 % purity, CAS # 67-56-1
• –75 °C to –85 °C freezer (a chest freezer is preferred) • –10 °C to –30 °C freezer • 2 °C to 8 °C refrigerator • Micropipette and appropriate tips • 25 ml pipettes • Ice • Blood collection supplies (may include K2EDTA tubes,
Litron recommends BD Catalog number 367861)
• Swinging bucket centrifuge (a 4 °C refrigerated centrifuge is preferred)
• Flow cytometer capable of 488 nm excitation • Flow cytometry tubes • Polystyrene flasks • 15 ml polypropylene centrifuge tubes
(VWR catalog number 21008-103 recommended)
• Heat-inactivated, filter-sterilized fetal bovine serum
3. Storing Kit-Supplied Biological Standards
Upon receipt of the MicroFlowPLUS Kit, the container holding the Biological Standards should immediately be stored upright in a –75 °C to –85 °C freezer.
4. Ordering Information and Technical Services
Litron Laboratories 200 Canal View Blvd., Suite 106 Rochester, New York 14623 Telephone: 585-442-0930 Order Toll Free: 877-4-LITRON (877-454-8766) Fax: 585-442-0934 email: [email protected] World Wide Web: www.LitronLabs.com

MicroFlowPLUS Kit (Rat Peripheral Blood)
Page 2 of 19 (Version 090112)
5. First-Time Users
We strongly recommend reading the entire instruction manual before performing these procedures. Please do not deviate from the procedures described in this manual. It is important that these steps are followed using the reagents supplied with this kit in order to achieve reliable results. If you have questions, please contact Litron Laboratories by calling (585) 442-0930, faxing us at (585) 442-0934, or sending an email to [email protected].
5.1. Template Preparation
Template files are included on the CD provided with this kit, but are specific to CellQuest™ or FACSDiva™ software. If you are unable to use these templates, please prepare one PRIOR to washing any samples for analysis. See the appendix for screen images of the CellQuest™ templateʼs graphs and histogram. There is also a description of the gates utilized for each plot, and how a stop mode of 20,000 reticulocytes is set. Flow cytometry operators who are not using CellQuest™ software should find these pages valuable for constructing their own data acquisition and analysis template.
5.2. Using Positive and Negative Control Samples
First-time users of this kit are encouraged to analyze kit-supplied Positive and Negative Control samples after initial flow cytometer calibration and to calculate % RET and % MN-RET frequencies as described. These values should be similar to those indicated on the CD for that particular lot. If after performing the procedures as described, your results from the analysis of the Negative or Positive control samples are not consistent with the data provided, fax (585-442-0934) or email representative plots (including Malaria Biostandard) and associated data to Litron Laboratories for troubleshooting. We recommend that you do not proceed with analyses of experimental samples until Litron has evaluated these plots.
5.3. Using a CD71 Setup Sample
For flow cytometer setup, a CD71 Setup sample is required. This is typically a blood sample from an age-matched negative control or vehicle control rat.
5.4. Flow Cytometer Requirements
This assay requires that at least one laser provides 488 nm excitation. Standard factory-installed filter sets are typically sufficient to achieve fluorescent resolution of the relevant cell populations. For BD instruments (such as the FACSCalibur), the green (FITC) fluorescence should be collected in the FL1 channel, yellow (PE) fluorescence should be collected in the FL2 channel and the red (propidium iodide; PI) fluorescence should be collected in the FL3 channel. For other instruments, FL4 may provide better resolution of PI.
5.5. Daily Calibration with Biological Standards
A CD71 Setup sample and Malaria Biostandard samples should be used for flow cytometer calibration on each analysis day prior to the analysis of experimental samples.

MicroFlowPLUS Kit (Rat Peripheral Blood)
Page 3 of 19 (Version 090112)
6. Introduction This kit is used when preparing rat blood samples for flow cytometric enumeration of micronucleated erythrocyte populations. 6.1. The Micronucleus Test
The in vivo micronucleus test was established as a means of analyzing chromosomal damage. The test is based on the observation that displaced chromatin, resulting from chromosomal loss or breakage, can form a secondary nucleus (micronucleus) outside the daughter nuclei of a dividing cell. Micronuclei (MN) occur spontaneously, but an elevation in the frequency of MN in a population of cells can be indicative of exposure to a genotoxic agent.
Micronuclei are particularly apparent in red blood cells (erythrocytes), which otherwise lack DNA. During erythropoiesis, a hematopoetic stem cell differentiates into an erythroblast and eventually expels its nucleus to become a reticulocyte (RET). The newly formed RET is then released from the bone marrow into the circulating bloodstream, where it develops into a mature normochromatic erythrocyte (NCE). Although the main nucleus is lost during RET formation, MN may be retained in the RET cytoplasm. Peripheral blood is ideal for micronucleus analyses because samples can be obtained from an animal easily and at multiple time points.
6.2. The MicroFlow® Method
Litron Laboratories has developed and patented a flow cytometric method to measure micronuclei in both the RET and NCE populations. Unlike mature NCEs, immature RETs are still rich in RNA as well as certain surface proteins (e.g., transferrin receptor, also known as CD71), and can therefore be differentially stained based on these features. An increase in the frequency of micronucleated reticulocytes (MN-RETs) can indicate acute genotoxicity associated with a recent cell division. In mice, an increase in the frequency of micronuclei in the NCE population (MN-NCE) can indicate accumulated DNA damage associated with a sub-chronic or chronic treatment regimen. Elevated MN-NCE frequencies in rat blood need to be interpreted with caution, since splenic filtration function is the dominant factor that influences these values.
The MicroFlow method offers significant advantages compared to traditional microscopic scoring techniques, such as:
• Greater number of cells can be examined for MN • Faster data acquisition • Increased statistical power of the assay • Objective analysis of samples
The MicroFlow method also offers advantages over other automated methods, including:
• Availability for many species of toxicological interest • Anti-platelet antibody to ensure reliable data • Biological standards to ensure intra- and inter-laboratory reproducibility of data • Ability to store samples for extended periods of time before analysis
Crucial components of this method are the biological standards which aid flow cytometer configuration for the micronucleus scoring application. Fixed blood from animals infected with Plasmodium berghei are used to configure the flow cytometer before analysis. Whereas MN are relatively rare and exhibit a heterogeneous DNA content, parasitized cells are prevalent and have a homogenous DNA content. These characteristics make them ideal for calibrating the flow cytometer for the micronucleus scoring application. After optimizing the flow cytometer with the biological standards, micronucleus analyses can be performed reliably and with minimal intra- and inter-experimental variation.
6.3. Regulatory Acceptance
The US FDA accepts MicroFlow data, and this method adheres to the necessary guidelines as stated by the International Workshop on Genotoxicity Test Procedures (IWGTP). Additionally, the most current Organization for Economic Co-Operation and Development (OECD) guidelines regarding micronucleus testing, Guideline 474, indicate that flow cytometry is an acceptable alternative to manual evaluation.
With regard to rat peripheral blood analysis, Section 4 of the OECD Guideline 474 states “…any appropriate mammalian species may be used provided it is a species in which the spleen does not remove micronucleated erythrocytes or a species which has shown an adequate sensitivity to detect agents that cause structural or numerical chromosome aberrations.” Accumulating data suggests that rat peripheral blood is an adequately sensitive compartment for analyzing micronucleus formation, despite the ability of the rat spleen to remove micronucleated erythrocytes from circulation.
MicroFlowPLUS Kit (Rat Peripheral Blood)
Page 4 of 19 (Version 090112)
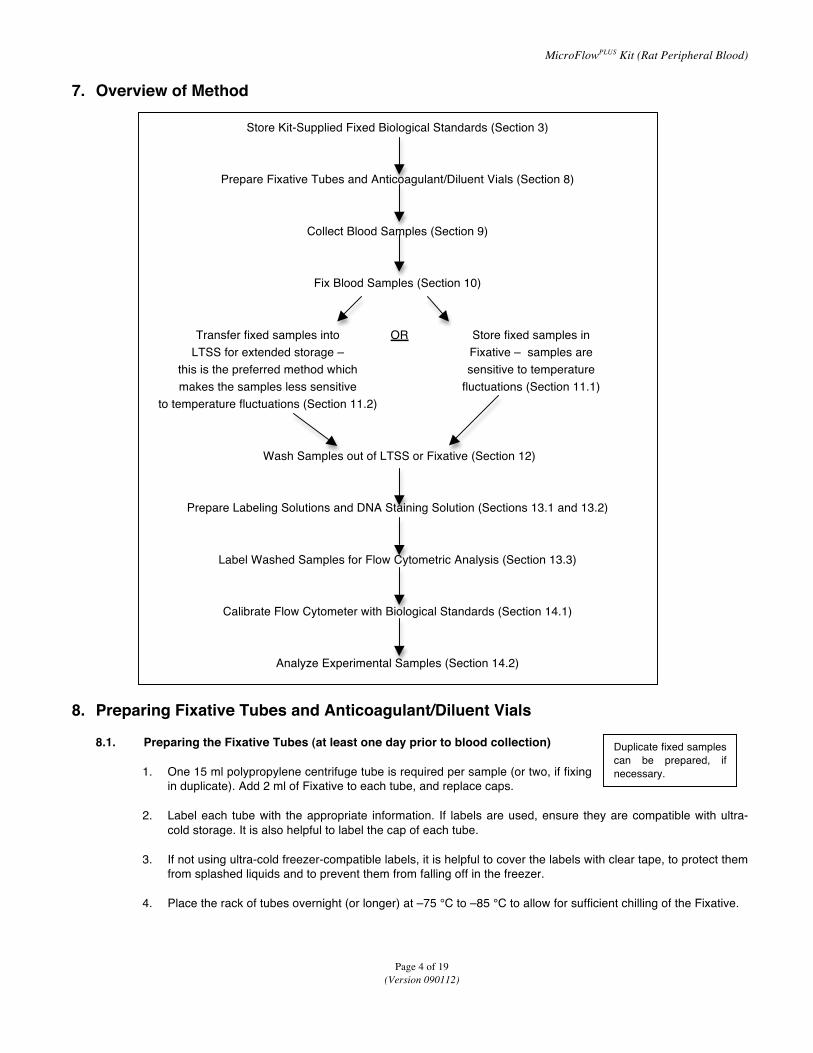
7. Overview of Method
8. Preparing Fixative Tubes and Anticoagulant/Diluent Vials 8.1. Preparing the Fixative Tubes (at least one day prior to blood collection)
1. One 15 ml polypropylene centrifuge tube is required per sample (or two, if fixing in duplicate). Add 2 ml of Fixative to each tube, and replace caps.
2. Label each tube with the appropriate information. If labels are used, ensure they are compatible with ultra-
cold storage. It is also helpful to label the cap of each tube.
3. If not using ultra-cold freezer-compatible labels, it is helpful to cover the labels with clear tape, to protect them from splashed liquids and to prevent them from falling off in the freezer.
4. Place the rack of tubes overnight (or longer) at –75 °C to –85 °C to allow for sufficient chilling of the Fixative.
Duplicate fixed samples can be prepared, if necessary. Hold the tip of the pipettor approximately 1 cm above the fixative. Forcibly inject blood/Solution B mixture into the ultracold fixative (Solution A). Secure cap, vortex or sharply strike the tube several times, and return to the ultracold freezer.
Store Kit-Supplied Fixed Biological Standards (Section 3)
Prepare Fixative Tubes and Anticoagulant/Diluent Vials (Section 8)
Collect Blood Samples (Section 9)
Fix Blood Samples (Section 10)
Transfer fixed samples into OR Store fixed samples in LTSS for extended storage – Fixative – samples are this is the preferred method which sensitive to temperature makes the samples less sensitive fluctuations (Section 11.1) to temperature fluctuations (Section 11.2)
Wash Samples out of LTSS or Fixative (Section 12)
Prepare Labeling Solutions and DNA Staining Solution (Sections 13.1 and 13.2)
Label Washed Samples for Flow Cytometric Analysis (Section 13.3)
Calibrate Flow Cytometer with Biological Standards (Section 14.1)
Analyze Experimental Samples (Section 14.2)

MicroFlowPLUS Kit (Rat Peripheral Blood)
Page 5 of 19 (Version 090112)
8.2. Preparing the Anticoagulant/Diluent Vials (prior to blood collection)
1. One clean vial is required for each sample. Aseptically aliquot 350 µl Anticoagulant/Diluent into each vial.
2. Label vials with the appropriate information and refrigerate until needed.
9. Collecting Blood Samples Method: Collect peripheral blood using a method approved by the Institutional Animal Care and Use Committee (IACUC). Volume: Collect 60 µl to 120 µl of blood from each animal into vials containing 350 µl Anticoagulant/Diluent. Collecting more than 120 µl of blood may compromise the flow cytometric analysis. Anticoagulant: Use only kit-supplied Anticoagulant/Diluent as the liquid anticoagulant, and collect blood directly into it. If a capillary tube or syringe is used to draw blood, pre-fill it with Anticoagulant/Diluent. Have extra vials containing Anticoagulant/Diluent ready in case of a spill. After collecting blood into Anticoagulant/Diluent, mix gently. Samples can be stored at room temperature for up to 6 hours before fixing. Refrigerated samples can be stored for up to 24 hours before fixing. An alternative method is to collect blood into K2EDTA-coated tubes (Litron recommends BD Catalog number 367861). Blood samples collected into K2EDTA tubes are stable at 2 °C to 8 °C for 2 days. They should be diluted into Anticoagulant/Diluent immediately before fixing as follows; invert to ensure a homogeneous suspension, remove 100 µl of a sample and dilute into 350 µl Anticoagulant/Diluent and fix as described below.
10. Fixing Blood Samples It is extremely important that the tubes containing Fixative remain ultracold (–75 °C to –85 °C ) and do not come in contact with vapors from dry ice. CO2 vapor causes carbonation and cellular aggregation. Therefore, Fixative should not be stored in a freezer containing dry ice. If you are unable to fix blood samples DIRECTLY from the –75 °C to –85 °C freezer as described here, follow the alternative fixing procedure supplied on the CD provided with the kit. Keep Fixative in an ultracold (–75 °C to –85 °C ) freezer (a chest freezer is preferred because they maintain temperature better than upright freezers). Perform the following steps very quickly and work near the freezer. Samples can be fixed in duplicate. It may be helpful for two individuals to perform this procedure, one filling the micropipettors with diluted blood samples and the other removing the Fixative tubes from the freezer. 1. Immediately prior to fixing, invert the vial containing the diluted blood to
ensure a homogeneous suspension.
2. Using a micropipettor, retrieve 180 µl of the diluted blood sample.
3. Remove the corresponding labeled 15 ml tube containing Fixative from the freezer, uncap and position the pipette tip approximately 1 cm above the surface of the ultracold Fixative.
4. Making sure that the pipette tip does not touch the side of the tube or the surface of Fixative, forcefully dispense directly into Fixative. See the diagram on the next page.
5. Cap the tube of fixed blood VERY tightly and vortex briefly (only 3 to 5 seconds) and return it to the ultracold freezer (–75 °C to –85 °C ). If a vortexer cannot be placed right next to the freezer, hold the top of the tube with one hand, use your other hand to sharply strike the bottom of the tube several times before returning it to the freezer. (Steps 3 through 5 should take no more than 10 seconds.)
Warning: Some capillary tubes include a clot activator that will cause aggregation and make the samples unanalyzable.
Remove only one tube of ultracold Fixative from the freezer at a time (unless two individuals are performing). After adding the blood sample and mixing, return this tube to the freezer before working with another tube. (As stated, the Fixative and fixed blood must be maintained at –75 °C to –85 °C .)
A video of the fixing procedure (QuickTime format) is available on our website: www.litronlabs.com and on the CD supplied with the kit.
MicroFlowPLUS Kit (Rat Peripheral Blood)
Page 6 of 19 (Version 090112)
6. Change the pipette tip and repeat steps 1 through 5 for the remaining diluted samples. There should be enough volume in each vial to fix each sample twice, if necessary.
7. If the freezer temperature begins to warm up significantly (i.e., raises by 5 °C), stop processing samples. Wait until the freezer temperature returns to the required range before completing sample fixation. Again, due to their ability to maintain temperature, chest freezers are recommended.
8. Store the samples at –75 °C to –85 °C for at least 3 days before washing to store in LTSS or analyzing on the flow cytometer.
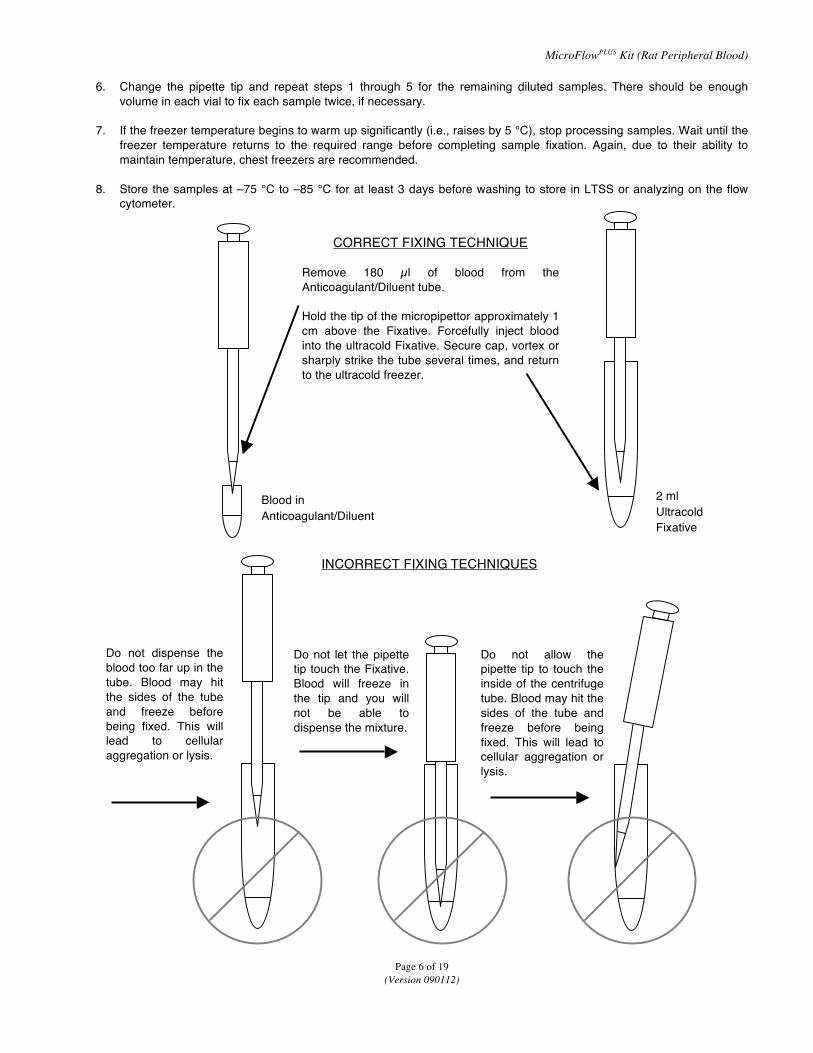
CORRECT FIXING TECHNIQUE Remove 180 µl of blood from the Anticoagulant/Diluent tube. Hold the tip of the micropipettor approximately 1 cm above the Fixative. Forcefully inject blood into the ultracold Fixative. Secure cap, vortex or sharply strike the tube several times, and return to the ultracold freezer.
INCORRECT FIXING TECHNIQUES
Do not dispense the blood too far up in the tube. Blood may hit the sides of the tube and freeze before being fixed. This will lead to cellular aggregation or lysis.
Do not let the pipette tip touch the Fixative. Blood will freeze in the tip and you will not be able to dispense the mixture.
Do not allow the pipette tip to touch the inside of the centrifuge tube. Blood may hit the sides of the tube and freeze before being fixed. This will lead to cellular aggregation or lysis.
Blood in Anticoagulant/Diluent
2 ml Ultracold Fixative

MicroFlowPLUS Kit (Rat Peripheral Blood)
Page 7 of 19 (Version 090112)
11. Storing Fixed Samples until Analysis
11.1. Maintain Fixed Samples in Ultracold Fixative
If you have access to a chest-style ultracold freezer that will maintain the fixed samples at the required temperature range consistently, samples can be maintained in Fixative until washing samples for subsequent analysis. If the freezer is not a chest freezer, is opened routinely, or the samples cannot be stored away from the freezer door, we recommend transferring the samples into LTSS, as described below.
11.2. Transferring into LTSS
Ideally, samples should be transferred into LTSS after they have been in fixative for at least 3 days. It is possible to transfer samples into LTSS many days or even weeks after fixation in Fixative, but during this time they are extremely sensitive to temperature fluctuations.
It may be helpful for two individuals to perform this procedure, one tapping and opening tubes and the other adding Buffer Solution. Once two people have become proficient with this procedure, it is possible to remove as many as 3 tubes from the freezer at a time.
1. Pack Buffer Solution on ice to achieve ice-cold, but not freezing, temperature (approximately 45 minutes).
2. Have a container of ice and a 25 ml pipette ready for aliquoting Buffer Solution in step 4. Perform the following steps as quickly as possible (within approximately 20 seconds); therefore plan to work at a location adjacent to the freezer.
3. Remove up to three tubes of fixed experimental samples from the ultracold
freezer. Quickly place the capped tubes on ice and close the freezer. Tap each tube sharply 3 or 4 times (or vortex for 3 to 5 seconds) to resuspend the cells and loosen the cap on each tube.
4. Immediately add 12 ml of ice-cold Buffer Solution to each tube. (Be careful not to touch the tube with the
pipette tip to prevent transfer of sample from one tube to another.) Tighten the caps, invert the tubes once to mix the solutions, and immediately replace on ice until all are processed.
5. Repeat steps 3 and 4 for additional samples. Note that once Buffer Solution has been added to the fixed
cells, it is important that the tubes remain on ice or at 2 °C to 8 °C unless otherwise specified.
6. Centrifuge the tubes at approximately 300 x g to 400 x g for 5 minutes. When centrifugation is complete, quickly remove the tubes and immediately replace them on ice.
7. Aspirate the supernatant from each tube, leaving less than 50 µl of supernatant in which to resuspend cells.
Recap the tubes and immediately return to ice.
8. Working with one sample at a time, quickly resuspend the cells in the remaining supernatant by tapping the bottom of the tube or by vortexing. Put the tube back on ice and continue to resuspend the remaining samples.
9. Add 1 ml of LTSS to each tube and store at –75 °C to –85 °C. Samples can also be transferred into cryo-vials
to save freezer space.
If a tube cracks, quickly transfer the fixed cells to another centrifuge tube.
MicroFlowPLUS Kit (Rat Peripheral Blood)
Page 8 of 19 (Version 090112)
12. Washing Samples 12.1. Washing Samples out of LTSS
Ideally, samples should be washed on the day they will be analyzed, but once washed out of LTSS, they are stable for approximately three days (stored at 2 °C to 8 °C).
It may be helpful for two individuals to perform this procedure, one tapping and opening tubes and the other adding Buffer Solution with 1 % FBS. Once two people have become proficient with this procedure, it is possible to remove as many as 3 tubes from the freezer at a time. Until you are familiar and comfortable with the procedures described in this manual, it is recommended that no more than 20 samples are prepared for analysis on any particular day.
1. Prepare at least 12 ml of Buffer Solution with 1 % FBS for each sample to be washed. Filter through a
0.2 µm filter and place on ice. (If all of this solution is not used, discard and prepare fresh when washing samples on another day.) a. If samples are in cryovials, aliquot 12 ml of this Buffer Solution + 1 % FBS into the appropriate number
of labeled 15 ml centrifuge tubes (one tube per sample) and keep on ice. b. If samples are in 15 ml tubes, you will add 12 ml of this Buffer + 1 % FBS to each tube.
2. Remove the appropriate cells from the ultracold freezer and thaw.
3. Immediately upon thawing, either aliquot contents into tubes containing 12 ml Buffer + 1 % FBS or, add
12 ml Buffer Solution + 1 % FBS to each tube. Invert once to mix, then place back on ice. Repeat with the remaining samples.
4. Centrifuge the tubes at approximately 300 x g to 400 x g for 10 minutes. When centrifugation is complete,
quickly remove the tubes and immediately replace them on ice.
5. Aspirate the supernatant from each tube, leaving less than 50 µl of supernatant in which to resuspend cells. Recap the tubes and immediately return to ice.
6. Working with one sample at a time, quickly resuspend the cells in the remaining supernatant by tapping the
bottom of the tube or by vortexing. Put the tube back on ice and continue to resuspend the remaining samples.
7. After all pellets are resuspended, store the samples at 2 °C to 8 °C, or on ice.
12.2. Washing Samples out of Fixative
Follow the procedure described above for Washing Samples out of LTSS, but DO NOT add 1 % FBS to the Buffer Solution.
13. Labeling Procedure
13.1. Preparing Labeling Solutions I and II
Labeling Solution I degrades RNA and labels RETs. Labeling Solution II degrades RNA, and labels RETs and platelets. Prepare one aliquot of Malaria Biostandard in Labeling Solution I. Prepare one aliquot of Malaria Biostandard and one aliquot of a CD71 Setup sample (see “First Time Users” section) in Labeling Solution II. Prepare all experimental samples in Labeling Solution II. Labeling solutions should be made fresh each analysis day and are prepared from Buffer Solution, RNase Solution, Rat anti-CD71 Antibody, and Platelet Antibody, in the proportions indicated in the tables below. [Note that heat-inactivated, filter-sterilized fetal bovine serum (FBS), has been found to subtly improve sample staining characteristics. If using FBS, create a mixture of 1 % FBS in Buffer Solution, filter, and use this in place of the “Volume of Buffer Solution” found in the table below.]
MicroFlowPLUS Kit (Rat Peripheral Blood)
Page 9 of 19 (Version 090112)
1. Determine the total number of samples that will be prepared that day (including Malaria Biostandard and CD71 Setup Samples), and use the chart below as a guide to preparing the Labeling Solutions and scale up as needed.
* with or without 1 % heat-inactivated FBS 2. Thaw RNase Solution. Quick spin RNase Solution and Rat anti-CD71 Antibody for best recovery of
contents.
3. Place the required volume of cold Buffer Solution into a sterile tube.
4. Aseptically add the required volumes of RNase Solution and Rat anti-CD71 Antibody to the tube containing Buffer Solution. Tap gently to mix. This is Labeling Solution I.
5. Remove 80 µl of Labeling Solution I and place into a flow cytometry tube. This will receive 20 µl of Malaria
Biostandard and will be used for calibrating the flow cytometer.
6. Quick spin Platelet Antibody for best recovery of contents.
7. Aseptically add the required volume of Platelet Antibody to the tube containing Labeling Solution I, using the chart below as a guide. Tap gently to mix. This is Labeling Solution II.
8. Aliquot 80 µl of Labeling Solution II into labeled flow cytometry tubes. Prepare one tube for each
experimental sample to be analyzed that day, and also one tube each for the Malaria Biostandard and CD71 Setup sample. Cover all tubes containing Labeling Solutions with foil, and store at 2 °C to 8 °C until needed.
13.2. Preparing DNA Staining Solution
The DNA Staining Solution is used to stain the DNA of malaria parasites and micronuclei. This solution should be prepared fresh each analysis day and is prepared from Buffer Solution and DNA Stain in the proportions indicated in the table, below. Note that Buffer Solution should not be supplemented with FBS.
1. Determine the number of samples that will be analyzed that day (including Malaria Biostandard and CD71
Setup samples), and use the chart below as a guide to preparing DNA Staining Solution and scale up as necessary.
2. Place the required volume of Buffer Solution into a sterile container, and add the necessary volume of
DNA Stain. 3. Cap the container and shake gently to mix. 4. Store DNA Staining Solution in the dark at 2 °C to 8 °C (not on ice) until needed.
Number of samples Volume of Buffer Solution*
Volume of RNase Solution
Volume of Rat anti-CD71 Antibody
1 100 µl 1 µl 1 µl
Number of samples Approximate Volume of Labeling Solution I
Volume of Platelet Antibody
1 100 µl 0.5 µl
Number of samples
Volume of Buffer Solution
Volume of DNA Stain
1 2 ml 0.05 ml

MicroFlowPLUS Kit (Rat Peripheral Blood)
Page 10 of 19 (Version 090112)
13.3. Labeling Washed Blood Samples for Flow Cytometric Analysis
To ensure an accurate reading, it is important that all cells are labeled and the cellular RNA is degraded. Therefore, make sure that when adding the blood sample to the Labeling Solution, all of the sample comes into contact with the Labeling Solution. If a drop of blood is on the side of the tube, wash it down with the solution already in that tube.
1. With washed blood samples on ice, tap the tubes to resuspend the cell pellets (if not recently tapped out).
2. Add 20 µl of Malaria Biostandard to the FCM tube containing Labeling Solution I. Gently tap to mix.
3. Add 20 µl of Malaria Biostandard to an FCM tube containing Labeling Solution II. Add 20 µl of CD71 Setup to
an FCM tube containing Labeling Solution II. Gently tap to mix.
4. Add 20 µl of each experimental blood sample to the appropriately labeled FCM tubes containing Labeling Solution II. Tap the tubes gently to mix.
5. Return any remaining washed blood samples to 2 °C to 8 °C for storage.
6. Cover FCM tubes with foil to protect from light, and incubate at 2 °C to 8 °C refrigerator (preferred) or on ice for 30 minutes.
7. After 30 minutes at 2 °C to 8 °C, tap each tube very gently to resuspend cells. Protect from light and incubate the tubes at room temperature for 30 minutes to ensure complete degradation of cellular RNA.
8. After the incubation at room temperature, return the tubes to 2 °C to 8 °C until analysis.
Buffer Solution
Remove 80 µl of Labeling Solution I and place in a flow cytometry tube. Later, 20 µl of washed Malaria Biostandard will be added to this solution.
Labeling Solution I
Add RNase Solution and Rat anti-CD71 Antibody to Buffer Solution to prepare Labeling Solution I.
Labeling Solution II
Add Platelet Antibody to Labeling Solution I to prepare Labeling Solution II.
Aliquot 80 µl of Labeling Solution II into each flow cytometry tube. Later, 20 µl of washed Malaria Biostandard, CD71 Setup, and experimental samples will be added.
Labeling Solution I
Platelet Antibody
RNase Solution
Rat anti-CD71 Antibody Labeling Procedure

MicroFlowPLUS Kit (Rat Peripheral Blood)
Page 11 of 19 (Version 090112)
14. Flow Cytometric Analysis 14.1. Flow Cytometer Calibration with Biological Standards
Please note that the following setup and compensation instructions are specific for CellQuest™ software, but should be useful with other software packages.
1. Before analyzing samples, ensure that the flow cytometer is working properly. Follow the manufacturer's
instructions for the appropriate setup and quality control procedures. Open the template file.
2. Gently tap the bottom of the tube containing the washed and labeled CD71 Setup sample to loosen settled cells. Add 1.5 ml to 2.0 ml of DNA Staining Solution and place the sample on the flow cytometer. (While this sample is being analyzed, DNA Staining Solution can be added to one or two samples, and they can be kept at 2 °C to 8 °C until analysis.) In Plot A, adjust the “Single Cells” region to include the cells of interest and exclude aggregates (see Appendix A).
3. Adjust FL1 PMT voltage so the High CD71-Positive RETs are located just above the lower green demarcation
on the Y-axis of Plot E. Adjust FL3 PMT voltage so the NCEs are within the first decade of red fluorescence. The resulting plot should look similar to the plot below.
4. Add 1.5 ml to 2.0 ml of DNA Staining Solution to the Malaria Biostandard sample that had been incubated in Labeling Solution I. Place on the flow cytometer. Refrigerate the CD71 Setup sample.
5. Viewing Plot D1, adjust the FL2 PMT voltage until the majority of cells in the lower left area are just to the left
of the “Platelets” region. The resulting plot should look similar to the one below.
6. Viewing Histogram B, adjust FL3 PMT voltage until the non-parasitized cells approach the first decade of FL3 fluorescence and the first parasite peak is well resolved. (BD CellQuest™ users are advised to place the first parasite peak at channel 22 ± 2 on Histogram B.) The location of the nucleated cells should fall in the last half of the last decade of red fluorescence. The resulting plot should look similar to the one below.
Plot E
Plot D1
Histogram B

MicroFlowPLUS Kit (Rat Peripheral Blood)
Page 12 of 19 (Version 090112)
7. Eliminate the yellow (FL2) component of the FITC signal. Adjust FL2-%FL1 compensation to eliminate the yellow component of FITC. Viewing Plot D1, increase compensation until the young, FITC-positive cells are positioned directly above the mature, FITC-negative cells. Correct compensation is set when cells containing a single parasite are aligned in a vertical plane. See the before and after plots below.
8. Adjust FL2-%FL3 compensation to eliminate the yellow component of propidium iodide. Viewing Plot D2,
increase compensation until the parasitized cells show low FL2-associated fluorescence which is on par with that observed for the NCEs at the origin. The nucleated cellsʼ fluorescence should be low, no more than the first decade of FL2. When compensation is set appropriately, the parasitized cells should not be evident in the “Platelets” region of Plot D1. See the before and after plots of D2 and D1, below.
BEFORE Compensation AFTER Compensation Plot D1
BEFORE Compensation AFTER Compensation
Plot D2
BEFORE Compensation AFTER Compensation
Plot D1

MicroFlowPLUS Kit (Rat Peripheral Blood)
Page 13 of 19 (Version 090112)
9. Readjust the FL3 PMT voltage, if necessary. (BD CellQuest™ users are advised to place the first parasite peak at channel 22 ± 2 on Histogram B.) If this is performed, compensation may need slight adjustments.
10. The green fluorescent antibody (FITC-conjugated) has a slight far-red (FL3) component. Use the FL3-%FL2 compensation to eliminate the red component of FITC. Viewing Plot E, increase compensation until the young, FITC-positive cells are positioned directly above the mature, FITC-negative cells. Correct compensation is set when cells containing a single parasite are aligned in a vertical plane. See the before and after plots, below.
11. Refrigerate the Malaria Biostandard in Labeling Solution I. Add 1.5 ml to 2.0 ml of DNA Staining Solution to
the Malaria Biostandard sample incubated in Labeling Solution II, and place on the flow cytometer. This sample includes the anti-platelet antibody, therefore it should have FL2-associated fluorescence (PE). Without adjusting voltages or compensation, the resulting plot should look similar to the one below. Refrigerate the Malaria Biostandard in Labeling Solution II.
BEFORE Compensation
AFTER Compensation
Histogram B
Plot E
Plot D1

MicroFlowPLUS Kit (Rat Peripheral Blood)
Page 14 of 19 (Version 090112)
12. Once instrumentation and software settings are configured with the CD71 Setup and Malaria Biostandard samples, continue to monitor the location of the nucleated cell peak of the experimental blood samples throughout the course of an analysis session. This measurement is useful for guarding against instrument drift. If the nucleated cells drift out of position, use the CD71 Setup and Malaria Biostandard samples stored at 2 °C to 8 °C to readjust the instrument as necessary.
13. After calibrating the flow cytometer with the CD71 Setup and Malaria Biostandard samples each day, analyze
experimental samples. 14.2. Analysis of Experimental Samples
1. It is preferable that the regions and quadrants are not changed between experimental samples. This is why it is worth taking some extra time to carefully consider PMT voltages and compensation settings initially. The region “Single Cells” on Plot A may need to be adjusted between samples (to accurately define the light scatter characteristics of unaggregated cells).
2. If this is your first time using this process, analyze the kit-supplied Positive and Negative Control Samples.
Otherwise, proceed to the analysis of experimental samples. 3. It is important to maintain a consistent flow rate, therefore, do not change the flow rate after calibrating your
instrument with the Biological Standards.
4. Analyze experimental samples by adding 1.5 ml to 2.0 ml of DNA Staining Solution to a sample. Place the sample on the flow cytometer and analyze. It is important not to change the FL3 PMT voltage (Malaria Biostandard assured this was appropriate), although FL3-%FL2 compensation may need slight adjustment so that RETs sit directly above the NCEs.
5. While one sample is being analyzed, add 1.5 ml to 2.0 ml of DNA Staining Solution to the next sample and
place at 2 °C to 8 °C.
6. To obtain meaningful micronucleus statistics, it is important to use a spreadsheet rather than CellQuestʼs “% Gated” or “% Total” statistics. A sample spreadsheet is available on the CD included with the kit, or on-line at www.litronlabs.com. Within this spreadsheet, input the number of “Events” observed in the Quadrant Statistics to calculate the following:
% RET = (UL+UR)/(UL+UR+LL+LR) * 100 % MN-NCE = (LR)/(LR+LL) * 100 % MN-RET = (UR)/(UR+UL) * 100

MicroFlowPLUS Kit (Rat Peripheral Blood)
Page 15 of 19 (Version 090112)
15. Troubleshooting Observation Possible cause Suggestion Blood clots Blood touches the side of
the tube before reaching Anticoagulant/Diluent
Shake the blood collection tube immediately before bleeding each animal to coat the inside of the tube with Anticoagulant/Diluent.
Clumps of cells in Fixative Blood touches the side of the tube and aggregates before reaching Fixative
Make sure the pipette tip is positioned straight down the middle of the tube and is not touching the side.
Carbonation observed upon addition of Buffer Solution to fixed blood samples
Fixative is carbonated by CO2 vapor from dry ice
Do not store Fixative on dry ice during fixation; take each tube directly from the freezer and forcefully dispense the sample into the fixative. Do not store Fixative in a freezer containing dry ice.
Compensation is insufficient
Increase FL3-%FL2 compensation until the nonparasitized reticulocyte population looks like that in Section 14.1, step 10.
Nonparasitized reticulocytes are pulled out in red fluorescence (see Troubleshooting Figure 1)
Incubation with Labeling Solution is too short
Follow the instructions in Labeling Washed Blood (Section 13.3); increase incubation time in Labeling Solution.
Populations of malaria-infected cells form arches rather than vertical planes (see Troubleshooting Figure 2)
Compensation is too great
Decrease FL3-%FL2 compensation until the populations of malaria-infected cells form vertical planes as in Section 14.1, step 10.
Fixative is carbonated by CO2 vapor from dry ice
Do not store Fixative on dry ice during fixation; take each tube directly from the freezer. Blood cells collected in Anticoagulant/Diluent can be maintained for up to 6 hours at room temperature or for up to 24 hours at 2 °C to 8 °C. Blood cells fixed in Fixative must be maintained at –75 °C to –85 °C at all times until the addition of Buffer Solution or being transferred into LTSS. Fixed cells placed in Buffer Solution must be maintained at 2 °C to 8 °C or on ice at all times (except during centrifugation if a refrigerated centrifuge is not available).
Wide FSC or cell aggregates (see Troubleshooting Figure 3)
Samples are not maintained at the appropriate temperatures
Washed cells are stable at 2 °C to 8 °C for up to three days.

MicroFlowPLUS Kit (Rat Peripheral Blood)
Page 16 of 19 (Version 090112)
If nonparasitized RETs are not well resolved from parasitized RETs, the FL3-%FL2 may not be set high enough. Another explanation for poor resolution between nonparasitized RETs and parasitized RETs is that cellular RNA may not be completely degraded. Incubate in the Labeling Solution for a longer period of time.
Troubleshooting Figure 1
Excessive FL3-%FL2 compensation can result in poor resolution as parasitized RETs arch back towards the RET population. It is important that the parasitized cells exhibit a vertical profile (i.e., consistent FL3 fluorescence as seen in Section 14.1, step 10).
Troubleshooting Figure 2
A large shoulder to the right of the main population of cells (SSC vs. FSC) is usually a sign of cellular aggregation. When cells are aggregated to a modest level (as shown), this problem can be addressed by restricting the “Single Cells” region to the dimensions close to those illustrated in Plot A, Appendix A. In the bivariate to the right, the region is set correctly, and excludes aggregated cells.
Troubleshooting Figure 3

MicroFlowPLUS Kit (Rat Peripheral Blood)
Page 17 of 19 (Version 090112)
16. References • Asanami S, Shimono K, Sawamoto O, Kurisu K and Uejima M (1995) Mutation Research 347, 73-78. • Asano N, Torous DK, Tometsko CR, Dertinger SD, Morita T, and Hayashi M (2006) Mutagenesis 21(1), 15-20 • Cammerer Z, Elhajouji A, Kirsch-Volders M and Suter W (2007) Mutagenesis 22, 129-134. • Cammerer Z, Elhajouji A and Suter W (2007) Mutation Research 626, 26-33. • Dertinger SD, Torous DK and Tometsko KR (1996) Mutation Research 371, 283–292. • Dertinger S, Torous D and Tometsko K (January 1999 [filed September 1996]) U.S. Patent No. 5,858,667. • Dertinger SD, Torous DK and Tometsko KR (August 2000 [filed January 1999]) U.S. Patent No. 6,100,038. • Dertinger, S. (Patent Pending [filed 6/28/04]). • Dertinger SD, Torous DK, Hall NE, Tometsko CR and Gasiewicz TA (2000) Mutation Research 464, 195–200. • Dertinger SD, Camphausen K, Macgregor JT, Bishop ME, Torous DK, Avlasevich S, Cairns S, Tometsko CR, Menard C, Muanza T, Chen Y, Miller RK,
Cederbrant K, Sandelin K, Pontén I and Bolcsfoldi G (2004) Environmental Molecular Mutagenesis 44, 427-435. • Dertinger SD, Bishop ME, McNamee JP, Hayashi M, Suzuki T, Asano N, Nakajima M, Saito J, Moore M, Torous DK and MacGregor JT (2006)
Toxicological Sciences 94, 83-91. • Dertinger SD, Tsai Y, Nowak I, Hyrien O, Sun H, Bemis JC, Torous DK, Keng P, Palis J and Chen Y (2007) Mutation Research 634, 119-125. • Hayashi M, Sofuni T and Ishidate M (1983) Mutation Research 121, 241-247. • Hayashi M, MacGregor JT, Gatehouse DG, Blakey DH, Dertinger SD, Abramsson-Zetterberg L, Krishna G, Morita T, Russo A, Asano N, Suzuki H,
Ohyama W and Gibson D (2007) Mutation Research 627, 10-30. • Heddle JA (1973) Mutation Research 18, 187–190. • Heddle JA, Hite M, Kirkhart B, Mavournin K, MacGregor JT, Newell GW and Salamone MF (1983) Mutation Research 123, 61-118. • Holden H, Majeska J and Studwell D (1997) Mutation Research 391, 87-89. • Hynes GM, Torous DK, Tometsko CR, Burlinson B and Gatehouse DG (2002) Mutagenesis 17, 15-23. • Kissling GE, Dertinger SD, Hayashi M and MacGregor JT (2007) Mutation Research 634, 235-240. • MacGregor JT, Wehr CM and Gould DH, (1980) Environmental Mutagenesis 2, 509–514. • MacGregor JT, Bishop ME, McNamee JP, Hayashi M, Asano N, Wakata A, Nakajima M, Saito J, Aidoo A, Moore M and Dertinger SD (2006)
Toxicological Sciences 94, 94-107. • Reed MD, Gigliotti AP, McDonald JD, Seagrave JC, Seilkop SK and Mauderly JL (2004) Inhalation Toxicology 16, 177-193. • Salamone M, Heddle J, Stuart E and Katz M (1980) Mutation Research 74, 347-356. • Salamone MF and Heddle JA (1983) In: F.J. de Serres, ed. Chemical Mutagens: Principles and Methods for their Detection, Vol 8. New York: Plenum,
1983; 111-149. • Schmid W (1975) Mutation Research 31, 9-15. • Serke S and Huhn D (1992) British Journal of Haematology 81, 432-439. • Tometsko AM (July 1993 [filed March 1990]) U.S. Patent No. 5,229,265. • Tometsko AM, Torous DK and Dertinger SD (1993) Mutation Research 292, 129–135. • Tometsko AM, Dertinger SD and Torous DK (1993) Mutation Research 292, 137-143. • Tometsko AM, Torous DK and Dertinger SD (1993) Mutation Research 292, 145-153. • Tometsko AM, Dertinger SD and Torous DK (1995) Mutation Research 334, 9-18. • Torous DK, Hall NE, Dertinger SD, Diehl MS, Illi-Love AH, Cederbrant K, Sandelin K, Bolcsfoldi B, Ferguson LR, Pearson A, Majeska JB, Tarca JP,
Hewish DR, Doughty L, Fenech M, Weaver JL, Broud DD, Gatehouse DG, Hynes GM, Kwanyuen P, McLean J, McNamee JP, Parenteau M, Van Hoof V, Vanparys P, Lenarczyk M, Siennicka J, Litwinska B, Slowikowska MG, Harbach PR, Johnson CW, Zhao S, Aaron CS, Lynch AM, Marshall IC, Rodgers B and Tometsko CR (2001) Environmental and Molecular Mutagenesis 38, 59–68.
• Torous DK, Hall NE, Murante FG, Gleason SE, Tometsko CR and Dertinger SD (2003) Toxicological Sciences 74, 309-314. • Torous DK, Hall NE, Illi-Love AH, Diehl MD, Cederbrant K, Sandelin K, Pontén I, Bolcsfoldi G, Ferguson LR, Pearson A, Majeska JB, Tarca JP,
Hynes GM, Lynch AM, McNamee JP, Bellier PV, Parenteau M, Blakey D, Bayley J, van der Leede BM, Vanparys P, Harbach PR, Zhao S, Filipunas AL, Johnson CW, Tometsko CR and Dertinger SD (2005) Environmental Molecular Mutagenesis 45, 44-55.
• Torous D, Asano N, Tometsko C, Sugunan S, Dertinger S, Morita T and Hayashi M (2006) Mutagenesis 21, 11-13 • Torous DK, Dertinger SD, Hall NE and Tometsko CR (2000) Mutation Research 465, 91-99. • Van Miert E, Vanscheeuwijck P, Meurrens K, Gomm W and Terpstra PM (2008) Mutation Research 652, 131-138. • Wakata A, Miyamae Y, Sato S, Suzuki T, Morita T, Asano N, Awogi T, Kondo K and Hayashi M (1998) Environmental Molecular Mutagenesis 32, 84-100. • Weaver JL and Torous D (2000) Methods (Duluth) 21, 281-287. • Witt KL, Livanos E, Kissling GE, Torous DK, Caspary W, Tice RR, and Recio L (2008) Mutation Research 649, 101-113.
17. License Agreement and Limited Product Warranty By utilizing this kit, your company is agreeing to be bound by the terms of this License. This License allows the use of the MicroFlow® Kit for the analysis of 60 samples, either in-house (MicroFlowPLUS Kit), or at Litronʼs facility (MicroFlowBASIC Kit). MicroFlow®. All rights reserved. µicroFlow® is a registered trademark of Litron Laboratories. U.S. Patent Nos. 5,229,265, 5,858,667 and 6,100,038. Copyright 2003-2007, Litron. By accepting these products, you acknowledge that they will be used in accordance with their intended labeling (For in vitro research use only. Not for human or animal diagnostic or therapeutic use.) Uses other than the labeled intended use may be a violation of local laws. This warranty limits our liability to replacement of this product. Litron shall have no liability for any direct, indirect, consequential, or incidental damages arising out of the use, the results of use, or the inability to use this product.

MicroFlowPLUS Kit (Rat Peripheral Blood)
Page 18 of 19 (Version 090112)
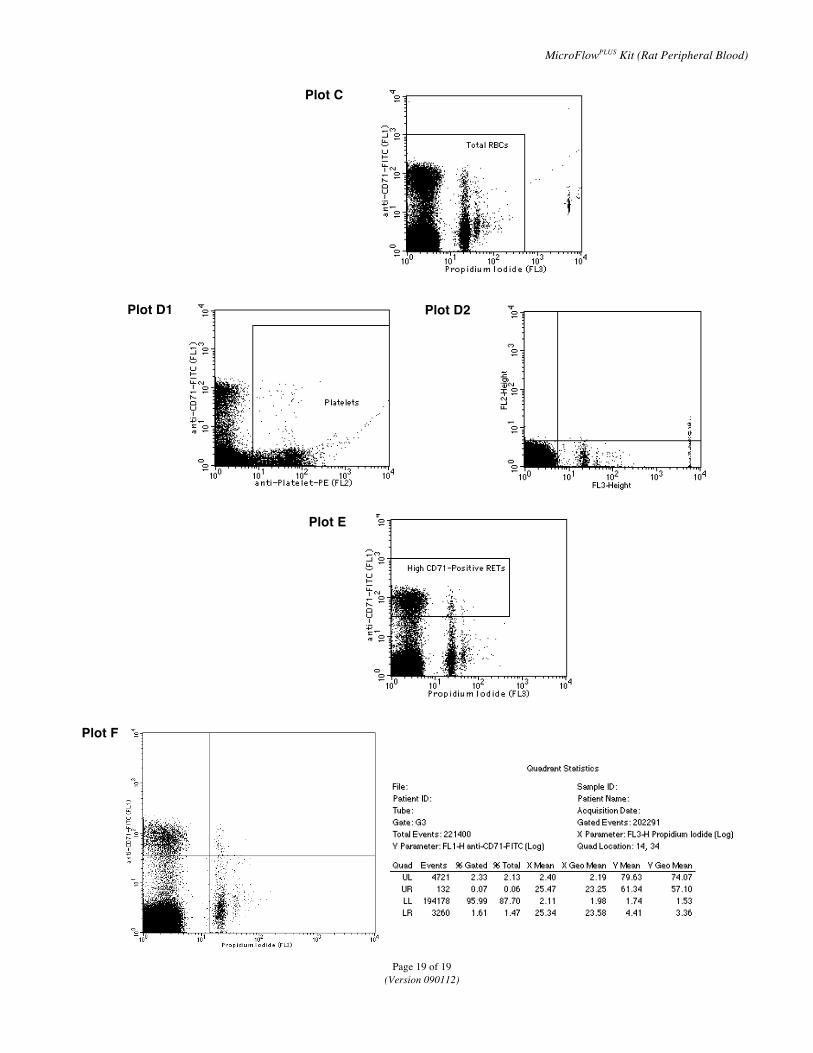
Appendix A: Template Preparation
Template files have been included with this kit, but are specific to CellQuest™ or FACSDiva™ software. The next pages show actual screen images of the CellQuest™ templateʼs graphs and histogram, the gates used for each plot, and how a stop mode of 20,000 reticulocytes was set. Flow cytometry operators who are not using CellQuest™ software should find these pages valuable for constructing their own data acquisition and analysis template.
It may be helpful to run Single-Color Compensation controls and use auto-compensation if this is available with the software you are using.
We recommend that if you are using FACSDiva™ software, have parameters in “Height” rather than “Area”. When analyzing the Single-Color control for the DNA stain, adjust PMT voltage so that nucleated cells fall in the last decade of red fluorescence. Defining Gates:
• G1 = R1 = “Single Cells” • G2 = R2 = “Total RBCs” • G3 = R1 and R2 = “Single Cells” AND “Total RBCs” • G4 = R3 = “RETs” • G5 = R1 and R2 and R3 = “Single Cells” AND “Total RBCs” AND “RETs” • G6 = R1 and R2 and not R4 = “Single Cells” AND “Total RBCs” AND NOT “Platelets” • G7 = R1 and R2 and R3 and not R4 = “Single Cells” AND “Total RBCs” AND “RETs” AND NOT “Platelets”
1. Gate for each Plot: Plot A No Gate
Plot B G1 Plot C G1 Plot D1 G3 Plot D2 G1 Plot E G3 Plot F G6
2. Use Gate G7 to set the stop mode. This will allow you to stop data acquisition at a specified number of RETs (typically
20,000). For this gate to work accurately, the lower green demarcation line for region “RETs” on Plot E and the horizontal line of the quadrant in Plot F need to be at the exact same Y-value.
3. Save this template file. This template file should be appropriate for all rat blood analyses. To ensure consistency of
data, it is preferable that no changes be made to the location and size of the regions between samples. The exception is the location and size of the Single Cells region on Plot A which may require minor adjustments.
Plot A Histogram B
MicroFlowPLUS Kit (Rat Peripheral Blood)
Page 19 of 19 (Version 090112)
Plot C
Plot D1 Plot D2
Plot E
Plot F