microbio amb 2-22 (read-only)
TRANSCRIPT

Microbiology Student Manual

3
Table of Contents
Introduction
Lab 1 Introduction to Science
Lab 2 Microbiology Lab Safety
Lab 3 Introduction to the Microscope
Fundamentals of Microbiology
Lab 4 Introduction to Culturing and Aseptic Technique
Lab 5 Structure and Microscopy
Lab 6 Growth of Microorganisms
Lab 7 Quantitation of Cultured Microorganisms
Lab 8 Selective Media and Agar
Lab 9 Differential and Biochemical Tests
Lab 10 Eukaryotic Microbes, Parasitology, and Viruses
Applied Microbiology
Lab 11 Food Microbiology
Lab 12 Environmental Microbiology and Water Quality
Lab 13 Microbial Genetics and Genetic Engineering
Appendix Good Lab Techniques


Fundamentals of Microbiology
Lab 8 Selective Media and Agar

107
Selective Media and Agar
Introduction
Selective media is used to grow microorganisms in many different types of experiments. It is unique in its
class because it can encourage the growth of certain microorganisms, but inhibit the growth of others. In
other words, these types of media contain a mix of nutrients that allows only specific types of species to sur-
vive. This gives it a lot of specific value when conducting experiments on bacterial tolerance, interactions,
species-specificity, etc.
Fundamental Nutrients
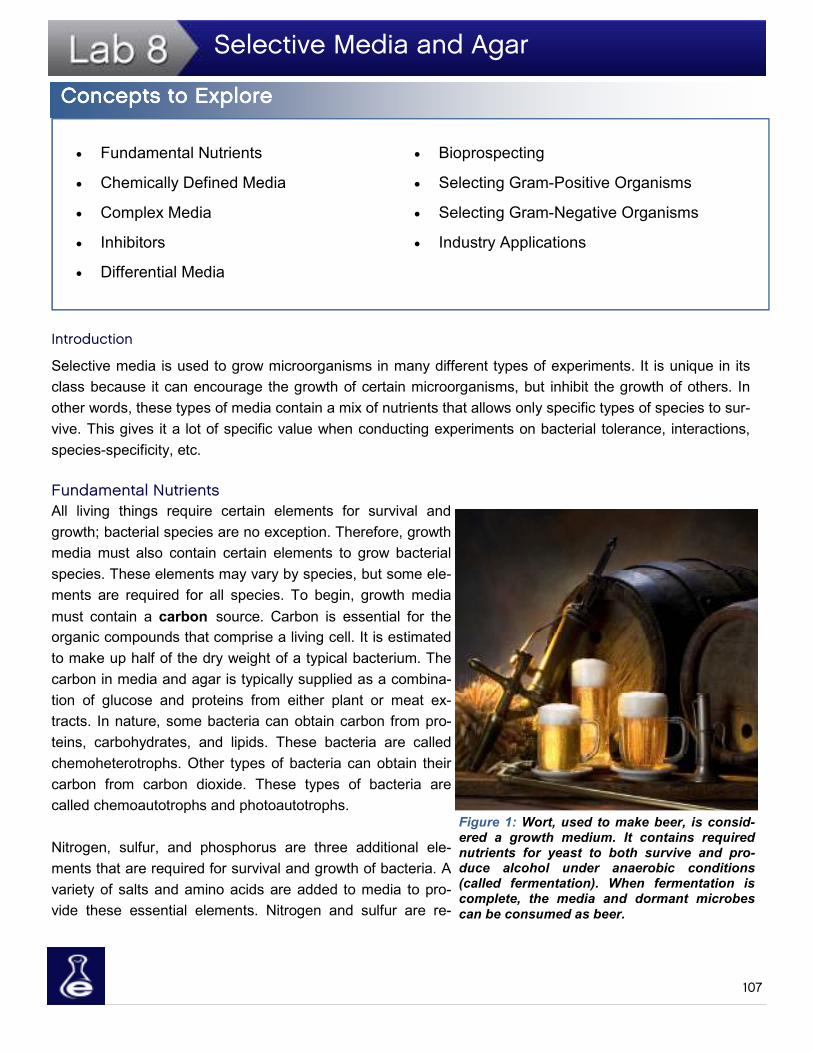
All living things require certain elements for survival and
growth; bacterial species are no exception. Therefore, growth
media must also contain certain elements to grow bacterial
species. These elements may vary by species, but some ele-
ments are required for all species. To begin, growth media
must contain a carbon source. Carbon is essential for the
organic compounds that comprise a living cell. It is estimated
to make up half of the dry weight of a typical bacterium. The
carbon in media and agar is typically supplied as a combina-
tion of glucose and proteins from either plant or meat ex-
tracts. In nature, some bacteria can obtain carbon from pro-
teins, carbohydrates, and lipids. These bacteria are called
chemoheterotrophs. Other types of bacteria can obtain their
carbon from carbon dioxide. These types of bacteria are
called chemoautotrophs and photoautotrophs.
Nitrogen, sulfur, and phosphorus are three additional ele-
ments that are required for survival and growth of bacteria. A
variety of salts and amino acids are added to media to pro-
vide these essential elements. Nitrogen and sulfur are re-
Figure 1: Wort, used to make beer, is consid-ered a growth medium. It contains required nutrients for yeast to both survive and pro-duce alcohol under anaerobic conditions (called fermentation). When fermentation is complete, the media and dormant microbes can be consumed as beer.
Concepts to ExploreConcepts to ExploreConcepts to ExploreConcepts to Explore
• Fundamental Nutrients
• Chemically Defined Media
• Complex Media
• Inhibitors
• Differential Media
• Bioprospecting
• Selecting Gram-Positive Organisms
• Selecting Gram-Negative Organisms
• Industry Applications

108
Selective Media and Agar
quired for protein synthesis. Nitrogen and phosphorous are required for DNA and RNA synthesis. It is esti-
mated that nitrogen comprises approximately 14% of a bacterium cell’s dry weight, with sulfur and phospho-
rus combined comprise another approximately 4% of the cell.
Chemically Defined vs. Complex Media
Media can be either chemically defined or
chemically complex. Chemically defined
media is a media in which the exact
chemical composition is known and is
made with purified ingredients. Different
bacterial species can have different nutri-
tional requirements. Therefore, using dif-
ferent chemically defined mediums can be
helpful to grow different microorganisms.
Chemically defined media is often used to
grow autotrophic bacteria; meaning, bac-
teria which can produce their own com-
plex organic molecules from simple, inor-
ganic ones.
Complex Media
In contrast, complex media is composed of yeast, plants, and/or animal extracts. Unlike the complete defini-
tion of ingredients found in defined media, the complete composition of this type of complex media is not
fully known. Carbon, nitrogen, and sulfur are provided when proteins from the extracts are broken down.
The extracts also provide vitamins and other essential organic growth factors for bacteria. Complex media is
frequently used for the growth of heterotrophic bacteria; meaning, bacteria which require a source of organic
carbon to produce their organic molecules.
Ingredient Chemical Formula Purpose
Sodium Acetate CH3COONa Carbon source and energy
Ammonium Sulfate (NH4)2SO4 Nitrogen and sulfur source
Sodium Phosphate Dibasic Na2HPO4 Phosphorus and sodium
Potassium Phosphate Monobasic KH2PO4 Phosphorus and potassium
Agar Varies Polymerization
Water H2O Hydrogen and oxygen
Ingredient Purpose
Beef Extract Carbon, nitrogen, sulfur, vita-mins, trace elements, energy
Peptone Peptides and single amino ac-
ids
Sodium Chloride Isotonic environment (prevents cell lysis)
Agar Polymerization
Water Diluent
Table 2: Example of a Complex Media Agar
for Growth of Heterotrophic Bacteria
Table 1: Example of a Chemically Defined Minimal Media Agar for Bacillus sphaericus

109
Selective Media and Agar
Media Inhibitors
Selective media contains nutrients required for
optimal growth of a selected bacteria species
and also inhibitor element(s) to make the media
selective. Inhibitors are targeted at the specific
types or groups of bacteria that a microbiologist
does not want to grow. Inhibitors can function in
a variety of ways, but they typically are used to
attack the structure or function of the unwanted
species. For example, an inhibitor might be used
to block DNA synthesis and/or protein expres-
sion. They may also be used to decrease mem-
brane stability and/or permeability
Differential Media
Differential media contains compounds that allow
microbiologists to distinguish amongst various
microorganisms growing on the same culture plate. Bacterial types can be distinguished (differentiated) by
virtue of colony appearance (e.g., color) or by a functional effect on the media (e.g., hemolysis by gram-
positive bacteria on blood agar plates). Media can be either selective, differential, or both selective and dif-
ferential.
Clinical and Environmental Use
Selective media is used by microbiologists to help identify
types of bacteria in a sample. Clinical microbiologists use se-
lective media to eliminate bacteria that may normally reside in
or on the body. They may also use selective media to help de-
tect pathogenic bacteria that can cause disease.
Environmental microbiologists may use selective media to test
for the presence of coliform bacteria in water samples. Coli-
form bacteria often indicates that a water sample has been
exposed to fecal contamination. In general, media can be
made to be selective by the addition of certain dyes (crystal
violet in MacConkey’s agar; methylene blue in EMB), by high
salt (7% NaCl in MSA) in normal media, or by manipulating the
pH of the media.
Although these different media make bacterial identification
and investigation much easier, there are still many obstacles
Figure 3: A wooden house frame damaged by termites. Termites harbor cellulose degrading bacteria in their digestive systems that allows the termites to use wood cellulose as an en-ergy source. Cellulose comprises approxi-mately 50% of the total biomass of wood.
Figure 2: Bacillus sphaericus is used to control mosquito populations as a microbial larvicidal insecticide. B. sphaericus is a naturally occurring bacterium that mos-quito larva ingest. The bacteria then produce a toxin that disrupts the gut and kills the larva, resulting in a reduced adult mosquito population.
Mosquito
Pupa
Larva
Eggs

110
Selective Media and Agar
to overcome. For example, one potential stumbling block when selecting for gram-positive cocci (spheres)
from a mixed sample is the fact that Gram-negative microorganisms can block the gram-positive cell growth.
Experiment 1: Bio-Prospecting for Starch Degrading Bacteria
Ethanol derived from plant material is currently used as an alternative fuel source for petroleum-based prod-
ucts. Plant biomass is approximately 50% cellulose, which is composed of repeating linked subunits of glu-
cose. Glucose is the primary carbohydrate used by most bacteria as an energy source. When joined togeth-
er, glucose can also form starch, a great energy store. However, starch can be difficult to break down, and
only a few types of identified bacteria are capable of doing so.
However, starch requires a specific enzyme to be broken down that not all bacteria have .The enzyme re-
sponsible for degrading starch is called amylase. In this experiment, you will select for bacteria that are ca-
pable of digesting starch by using starch agar petri plates and Gram Iodine. Starch agar is very similar to
nutrient agar, but it has 0.4% soluble starch added to the media. This alone is not enough to indicate if a mi-
croorganism possesses amylase. However, when Gram Iodine is added to the plate the iodine in the solu-
tion reacts with the starch in the agar and creates a blue coloration on the plate. Blue coloring indicates that
the starch is still present, and was not degraded by amylase. Clear coloring indicates that the starch has
been degraded, which can be interpreted to mean that amylase is present.
1 tsp. Cow manure
4 Sterile, snap-cap tubes
40 mL PBS
8 Pipettes
4 Sterile bacterial spreaders
Nutrient agar
Starch agar
Gram iodine
(8) 5 cm. Petri dishes
Parafilm™
Permanent marker
Hot pad
10 mL Graduated cylinder
4 Sterile inoculating loops
*10% Bleach solution
*You must provide
Materials

111
Selective Media and Agar
Procedure: Prepare Agar Plates: 1. Loosen or remove the cap on the nutrient agar bottle.
2. Place the bottle in the microwave (if you do not have a microwave, place the bottle in a heat-safe bowl
and pour boiling water around the bottle) and heat until the entire agar bottle is liquefied. You will need
to remove the bottle from the microwave and swirl it every 10 seconds to distribute the heat.
Note: If you notice the agar boiling over, STOP the microwave and let the bottle cool down before
handling. Hot agar can violently explode out of the bottle if heated too quickly and/or shaken. After
boiling has stopped, use a hot pad to remove the bottle from the microwave. Remember, the bottle
will be HOT!
3. Gently swirl the bottle to mix the solution.
4. Turn four of the petri dishes over and use the permanent marker to label them as “Nutrient”. Slowly
pour the liquefied nutrient agar into the bottom half of four petri dishes so that it covers the entire bot-
tom of the dish. It is important that the entire bottom is coated and that the agar is given time to
spread out over the dish.
5. Place the lids onto the dishes and allow the agar to gel undisturbed. If you will not be using the dishes
immediately, store them upside down in the refrigerator after they have fully gelled. Remove from the
refrigerator and allow them to sit at room temperature for at least one hour prior to use.
6. Repeat Steps 1 - 5 using starch agar instead of nutrient agar, to prepare four more petri plates.
Prepare Stock Solution: 7. Place 10 mL PBS into one 15 mL conical tube; add the cow manure sample to it. Tightly screw on the
cap and invert 10 times to mix thoroughly. Label this tube “Stock Solution”.
8. Place 9 mL of PBS into three 15 mL conical tubes (each tube should receive 9 mL).
9. Label one tube “10% Solution”, the second tube “1% Solution”, and the third tube “0.1% Solution”.
10. Perform serial dilutions of stock solution:
a. Using a pipette, transfer 1 mL from the “Stock Solution” tube to the “10% Solution” tube. Tight-
ly screw on the cap and invert 10 times to mix thoroughly.
b. Using a pipette, transfer 1 mL from the “10% Solution” tube to the “1% Solution” tube. Tightly
screw on the cap and invert 10 times to mix thoroughly.
c. Using a pipette, transfer 1 mL from the “1% Solution” tube to the “0.1% Solution” tube. Tightly
screw on the cap and invert 10 times to mix thoroughly.

112
Selective Media and Agar
Inoculating the Plates: 11. Label one nutrient plate “Stock”, one nutrient plate “10%”, one nutrient plate “1%”, and one nutrient plate
“0.1%”.
12. Using a clean pipette for each tube to transfer approximately 4 drops from each serial dilution tube to the
corresponding nutrient plate. You may need to re-invert the tubes the ensure that the manure remains in
the solution.
13. Spread the diluted manure solution evenly over the plates with a sterile spreader. Remember to use a
new spreader for each plate!
14. Allow to air dry then place tops on petri dishes.
15. Seal the plated with Parafilm™ and incubate them in a warm location (not to exceed 37.7 °C or 100 °F)
for 1 - 2 days (until well defined bacterial colonies appear).
16. Label the starch plates as Stock, 10%, 1%, and 0.1%.
17. Choose one colony from the “Stock” nutrient agar plate and
use an inoculating loop to individually streak the colony in
an X shape onto the center of the “Stock” starch plate. It
may be useful to draw a circle on the bottom of the plate
and streak an X onto this area. See Figure 4.
18. Repeat Step 17 for the 10%, 1%, and 0.1% plates.
19. Seal the plates with Parafilm™ and incubate them in a
warm location (not to exceed 37.7 °C or 100 °F) for 2 - 3
days or until well-defined, isolated bacterial colonies appear (this may take up to 1 week if incubated at
room temperature).
19. Flood the nutrient agar plates with a 10% bleach solution, incubate for 20 minutes, and pour the bleach
down the drain with running water. Wrap Parafilm™ around the plates and dispose of them in the trash.
Perform the Gram Iodine Staining:
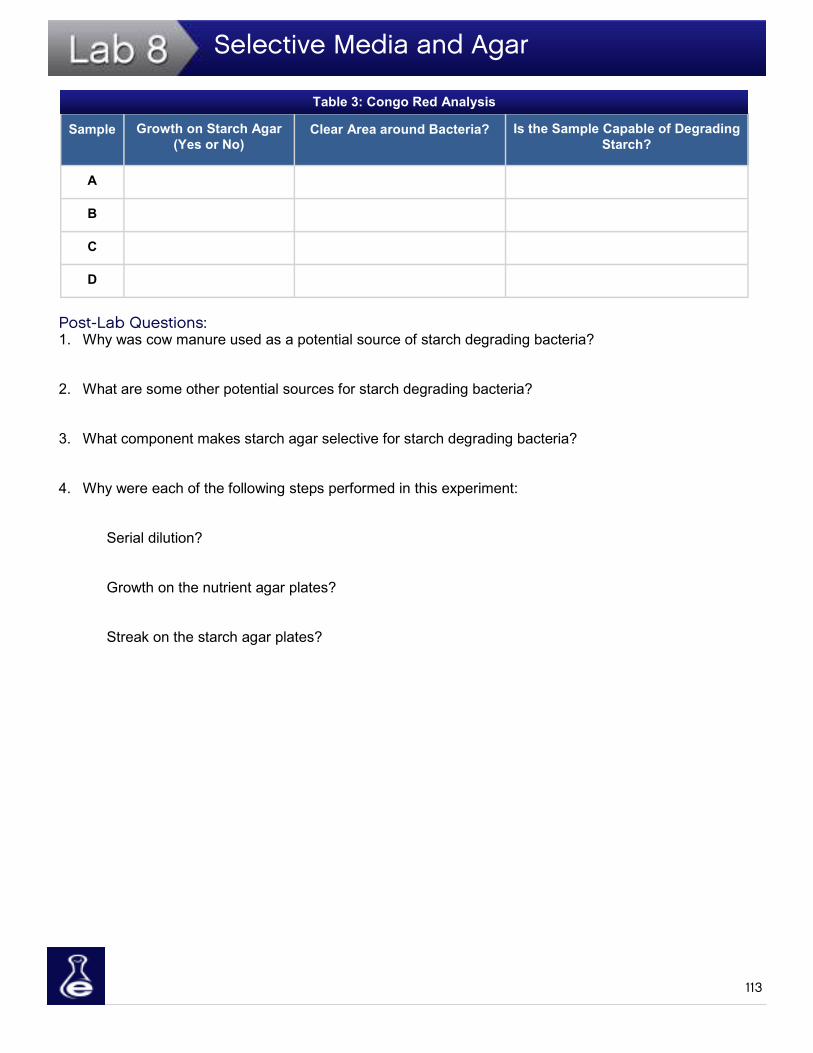
20. Record the growth on the starch agar plates in Table 3.
21. Cover each plate with Gram iodine (this should take approximately 1 mL of fluid).
22. Immediately examine the plate for any cleared areas surrounding the bacteria. The iodine will not stain
the bacterial growth itself, so look for a halo-like effect of “no-staining” near the edges of the growth.
Cleared areas indicate starch hydrolysis.
23. When you are finished with the experiment, flood the starch plates with a 10% bleach solution, incubate
for 20 minutes, and pour the bleach down the drain with running water. Wrap Parafilm™ around the
plates and dispose of them in the trash.
Figure 4
113
Selective Media and Agar
Post-Lab Questions: 1. Why was cow manure used as a potential source of starch degrading bacteria?
2. What are some other potential sources for starch degrading bacteria?
3. What component makes starch agar selective for starch degrading bacteria?
4. Why were each of the following steps performed in this experiment:
Serial dilution?
Growth on the nutrient agar plates?
Streak on the starch agar plates?
Sample Growth on Starch Agar
(Yes or No) Clear Area around Bacteria? Is the Sample Capable of Degrading
Starch?
A
B
C
D
Table 3: Congo Red Analysis

114
Selective Media and Agar
Experiment 2: Selection and Differentiation of Body Inhabiting, Gram-Positive Bacteria Mannitol Salt Agar (MSA) is both selective and differential for
gram-positive bacteria, containing a high (7.5%) salt (sodium
chloride) concentration, which makes it selective, and mannitol
as the carbohydrate source for fermentation, which makes it dif-
ferential. Most bacteria cannot grow in the high salt environment;
however, Staphylococcus species have adapted to high salt en-
vironments, such as human skin. The differentiation agent man-
nitol can be effectively fermented by Staphylococcus aureus, but
not by other Staphylococcus species. MSA also includes the pH
indicator dye phenol red, which is red in basic conditions and
yellow in acidic conditions. Fermentation of mannitol generates
an organic acid which lowers the pH of the agar and changes the
dye from red to yellow.
Procedure:
1. Turn four petri plates over, draw a line down the center of each plate, and label the bottom of two plates
as “MSA” and the bottom of two plates as “Nutrient”. Return the lids to the plates and set them aside.
2. Loosen or remove the cap on the MSA agar bottle. Place the bottle in the microwave (if you do not have a
microwave, place the bottle in a heat-safe cup and pour boiling water into the bowl around the bottle).
3. Heat the bottle in 10 second increments until the agar is liquefied. You may need to remove the bottle
from the microwave and swirl it every 10 seconds to evenly distribute the heat.
Note: If you notice the agar boiling over, STOP the microwave and let the bottle cool down before han-
dling. Hot agar can violently explode out of the bottle if heated too quickly and/or shaken. After boiling
has stopped, use a hot pad to remove the bottle from the microwave. Remember, the bottle will be
HOT!
4. Gently swirl the bottle to ensure that the contents are fully liquefied.
Figure 5: Different colonies can be distin-
guished by color and/or growth amount.
Note, your colonies will vary in color and
growth from the picture above.
MSA agar
Nutrient agar
(4) 5 cm. Petri plates
4 Sterile cotton swabs
Parafilm™
Permanent marker
Materials

115
Selective Media and Agar
5. Slowly pour the liquefied MSA agar into the bottom half of the two MSA plates so that it covers the en-
tire bottom of the dish. Return the lids to the petri dishes and set aside.
6. Repeat Steps 2 - 5 for the nutrient agar. Be sure to loosen or remove the cap on the bottle to allow for
heat expansion.
7. Pour the agar into the bottom of the two nutrient petri plates. It is important that the entire bottom is
coated and that the agar is given time to spread out over the plate.
8. Place the lids onto the plates and allow the agar to gel undisturbed.
Note: If you will not be using the dishes immediately, store them upside down in the refrigerator
after they have fully gelled. Remove from the refrigerator and allow them to sit at room tempera-
ture for at least one hour prior to use.
9. Use a sterile cotton swab to gently rub a portion of your skin (such as your arm, cheek, etc.).
10. Lightly rub the exposed swab over half the surface of one MSA plate and half of the surface of one
nutrient plate.
11. Use a permanent marker to label the respective half of each dish as “Skin”.
12. Use a new sterile cotton swab to gently swab the inside of your nose.
13. Lightly rub the exposed swab over the other half of the same MSA plate and half of the same nutrient
plate.
14. Use a permanent marker to label the respective half of each dish as “Nose”.
15. Use a new sterile cotton swab to gently swab a non-porous surface (such as a countertop).
16. Lightly rub the exposed swab over half of the second MSA plate and half of the second nutrient plate.
17. Use a permanent marker to label the respective half of each dish with surface you swabbed.
18. Lightly rub a new sterile cotton swab over the remaining halves of the second MSA plate and second
nutrient plate. Do not touch the cotton swab to anything!!
19. Use a permanent marker to label this half of each dish as “Control”.
20. Seal the plates with Parafilm™ and incubate them at room temperature (up to 37.7 °C or 100°F) for 1 -
2 days, or until colonies appear.
21. Examine the plates for amount of growth and colony/agar color. Record your results in Table 4.
22. When you are finished with the experiment, flood the plates with a 10% bleach solution, incubate for
20 minutes, then pour the bleach down the sink with running water.
23. Seal the plates with Parafilm™ and dispose of them in the trash.

116
Selective Media and Agar
Post-Lab Questions: 1. What substance in MSA confers selectivity? Why?
2. What substance makes MSA differential? Why?
3. What purpose does phenol red serve in MSA?
4. Why are the Nutrient agar plates used in this experiment?
Experiment 3: Selection and Differentiation of Gram-Negative Bacteria from Liquid Samples Water is often screened for the presence of coliform bacteria as an indicator of fecal contamination. Con-
taminated water can transmit a number of human diseases, including cholera, salmonella, dysentery, shi-
gella, and many others. Coliform bacteria are Gram-negative rods, many of which can ferment lactose
(the same sugar found in milk). MacConkey agar is a selective and differential media that contains a pH
indicator dye (neutral red), lactose, bile salts, and crystal violet. The bile salts and crystal violet select for
Gram-negative bacteria by inhibiting the growth of Gram-positive organisms. The lactose and neutral red
demonstrate which bacteria can ferment lactose as lactose fermentation produces acidic compounds that
lower the pH of the media and turn the lactose fermenting colonies red (neutral red is colorless at pH
above 6.8 and red at pH less than 6.8). In this experiment, you will collect liquid samples and test them
for the presence of coliform bacteria using MacConkey agar plates.
Surface Tested
Growth (Good or Poor?) Color
(Red or Yellow?) Other Observations
LB/Nutrient Agar MSA Agar
Skin
Nose
Countertop/Other
Control
Table 4: Experiment 2 Growth Observations

117
Selective Media and Agar
Procedure:
1. Prepare three MacConkey agar plates according to Steps 1 - 5 as listed in Lab 9 – Experiment 1.
2. Use your 15 mL conical tubes to collect 3 water-based liquid samples from different sources. These can
come from a faucet in your home, a water fountain, a flowing stream (be sure to not collect any of the
sediment at the bottom of the stream), iced tea from a restaurant, etc. Collect approximately 8-10 mL of
each sample.
3. Use a permanent marker to label each tube with the sample type and location.
4. Label each MacConkey agar dish with the same information you put on the collection tubes (i.e., each
petri dish should have the same information as each corresponding test tube).
5. Use a pipette to transfer approximately 4 drops of each sample onto the corresponding petri dish.
7. Use a disposable spreader to gently spread the liquid sample over the agar surface. Use a new spreader
for each sample/plate combination.
8. Allow to air dry. This should take approximately 5 - 10 minutes.
9. Cover the plates with the petri dish lid and incubate them in a warm location (not to exceed 37.7 °C or
100 °F) for 1 - 2 days; or, until well defined, isolated bacterial colonies appear.
10. Examine the plates and record the bacterial growth and color of the colonies in Table 5.
11. When you are finished with the experiment, flood the plates with the 10% bleach solution, incubate them
for 20 minutes, and then pour the bleach down the sink with running water.
12. Seal the plates with Parafilm™ and dispose of them in the trash.
Sample Growth (Yes or No) Colony Color Analysis
Table 5: MacConkey Agar Results
(3) 15 mL Sterile screw-top conical tubes
MacConkey Agar
3 Pipettes
3 Sterile disposable spreaders
(3) 5 cm. Petri dishes
Permanent marker
Hot pad
10 mL Graduated cylinder
Parafilm™
Materials

118
Selective Media and Agar
Post-Lab Questions:
1. What ingredient(s) makes MacConkey agar selective for Gram-negative bacteria?
2. What types of bacteria are inhibited on MacConkey agar?
3. What ingredient(s) makes MacConkey agar differential?
4. Why is an indicator dye used in MacConkey agar?
5. What are some potentially pathogenic bacteria that are lactose fermenters that will grow on MacConkey
agar?
6. What are some potentially pathogenic bacteria that do not ferment lactose that will grow on MacConkey
agar?
7. How would you verify that the colonies that grew on a MacConkey agar plate were Gram-negative
8. Look up the formulation for MacConkey agar either in a microbiology text book or online (http://
www.bd.com/ds/productCenter/221172.asp).
Is this a chemically defined or complex media?
Why is that important?

© 2012 eScience Labs, LLC - All rights reserved
www.eScienceLabs.com - 888.375.5487