micro-injection system - arborjet the quik-jet for micro-injection 6 ... formulation back into...
TRANSCRIPT

QUIK-jet Micro-Injection System
Training Manual
Revision Date: 04/27/15

QUIK-jet Training Manual
2
Table of ContentsSubject Headings PagesIntroduction 3QUIK-jet Assembly and Setup 4-5Prepare the QUIK-jet for Micro-Injection 6Adjust the QUIK-jet Dose Chamber 7Prime the QUIK-jet Dose Chamber 8Select Arborplug™ Sites 9Drill Sites for Arborplugs 10Set the Arborplugs 11Micro-Injection with the QUIK-jet 123 Easy Steps 13Procedure: Conifers vs. Deciduous 14Clean Out QUIK-jet 15Maintenance 16QUIK-jet Device Parts 17Troubleshooting 18-19Troubleshooting: Ball Valve 20QUIK-jet Tips and Cautions 21-22

QUIK-jet Training Manual
3
Introduction to Arborjet’s QUIK-jet Micro-Injection
For customer assistance, call from 8AM - 4:30PM EST Monday - Friday at 781-935-9070 or visit the website at www.arborjet.com. Arborjet welcomes your comments, questions, and suggestions concerning the QUIK-jet and injectable products.
QUIK-jet’s speedy delivery in fast uptake trees allows the applicator to work effectively and profitably in a variety of situations. Low volume
injections with the QUIK-jet are a breeze on ring porous oaks and diffuse porous maples.

QUIK-jet Training Manual
QUIK-jet Assembly and Setup
Connect Leur to PTC fitting
Connect Leur and PTC fitting to QUIK-jet device
Push VIPER Needle into PTC
Attach Supply Line to QUIK-jet device
1 2 3
4PTC fittings use a 5/16” hex tool for installation and removal.
VIPER NeedlePTC fitting
(Push To Connect)
Leur fitting
QUIK-jet Training Manual
QUIK-jet Assembly and Setup
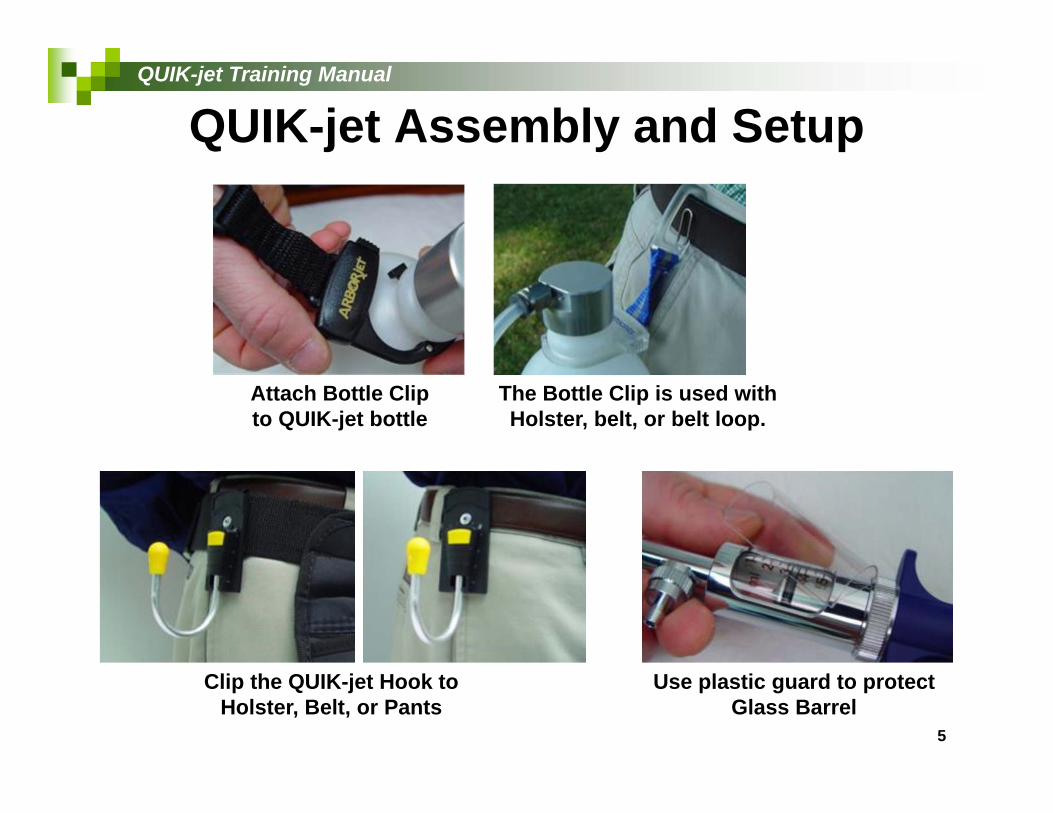
5
Clip the QUIK-jet Hook to Holster, Belt, or Pants
Use plastic guard to protect Glass Barrel
Attach Bottle Clip to QUIK-jet bottle
The Bottle Clip is used with Holster, belt, or belt loop.

QUIK-jet Training Manual
6
Prepare the QUIK-jet for Micro-Injection
1. Measure tree DBH (Diameter at Breast Height) in inches by using a diameter tape, or measure circumference and divide by Pi (3.1415)
2. Read product label and use DBH” to determine total injection volume for entire treatment application.
3. Measure volume in graduated cylinder.
4. Pour into QUIK-jet bottle using screw-on funnel.
5. Fasten QUIK-jet bottle-top
WARRANTY VOID WITH USE OF NON-ARBORJET APPROVED FORMULATIONS
1 2 3 4
Always wear safety glasses and gloves when handling equipment and products.
SAFETY REMINDER

QUIK-jet Training Manual
7
Adjust the QUIK-jet Dose ChamberAdjust the dose chamber to desired mL dose size. (1-5mL per trigger push)
Spin the piston rod to adjust the dose chamber, and use the lock nut to secure in place.
Piston RodLock Nut

QUIK-jet Training Manual
8
Prime the QUIK-jet Dose Chamber
1. Press trigger several times until formulation reaches the dose chamber.
2. Point VIPER needle upward to bring air bubble upward, and slowly press trigger until air bubble leaves the chamber.
OFF
OFF
1
2
Air bubble
NOW QUIK-jet is PRIMED AND READY.
QUIK-jet Training Manual
9
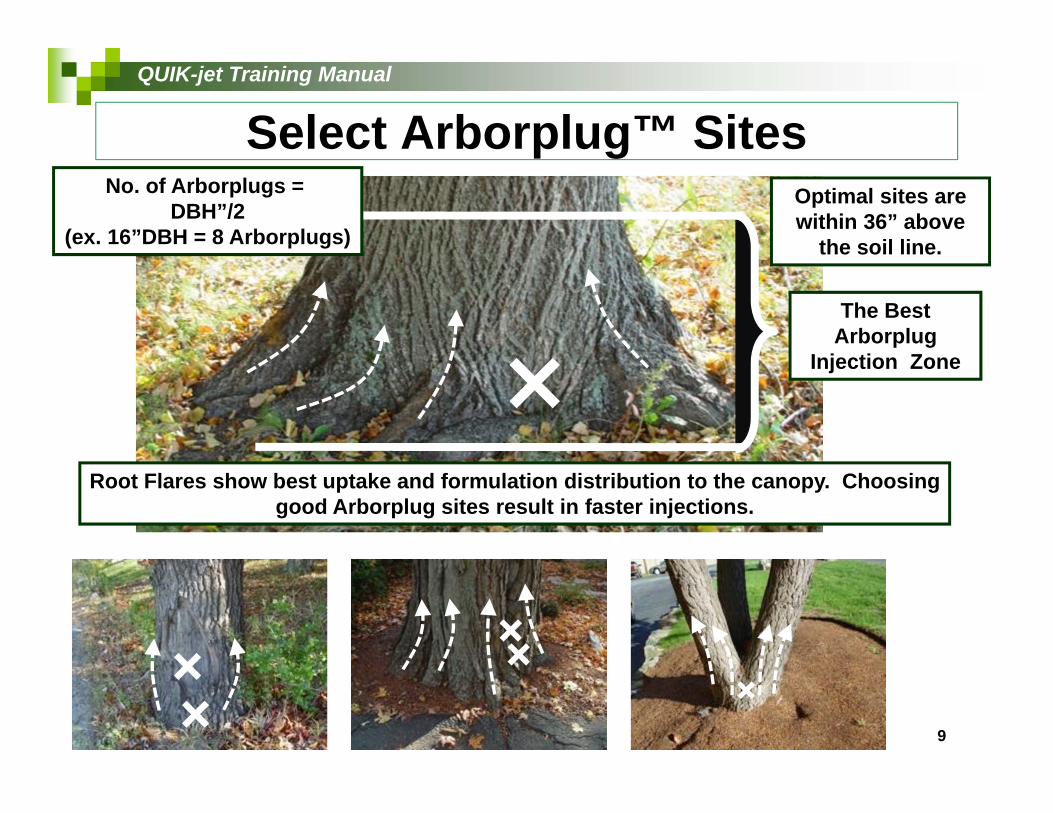
Select Arborplug™ Sites
The Best Arborplug
Injection Zone
No. of Arborplugs = DBH”/2
(ex. 16”DBH = 8 Arborplugs)
Root Flares show best uptake and formulation distribution to the canopy. Choosing good Arborplug sites result in faster injections.
Optimal sites are within 36” above
the soil line.

QUIK-jet Training Manual
10
Drill Sites for Arborplugs Use sharp, high-helix brad-
point drill bits (included in kit).
For Beginners- Drilling in 2 Steps:
1. Use light pressure to drill through outer bark. The drill bit will stop after the outer bark. You can remove drill bit to note the bark thickness.
2. Use quick heavy pressure to drill at least 5/8” into the Xylem.
Bark
DRILL BIT
Annual Rings
Inner Bark
Bark
DRILL BIT
Inner Bark
5/8” – 2”
Xylem tissue
Estimated Drill Depth into Xylem: Hardwoods: 5/8” – 2” deepConifers: 1 5/8” – 2” deep
Drill Bit Sizes:
9/32” for #3 Arborplugs
3/8” for #4 Arborplugs

QUIK-jet Training Manual
Set the Arborplugs1. Set Arborplugs into drilled holes using set tool (from kit) and hammer.
2. Make sure the barbs on the Arborplug make a seal between the xylem and the inner bark as illustrated.
Barbs
InfusionLegsB
arkInner B
ark
Bark
Inner Bark
CO
RR
ECT
CORRECT
Bark
Inner Bark
Xylem Tissue Bark
Inner Bark
INC
OR
REC
T
Too Deep Too Shallow
Xylem Tissue
Xylem Tissue Xylem Tissue
Barbs Barbs

QUIK-jet Training Manual
12
Micro-Injection with the QUIK-jet
1. Determine mL dose per injection site (per Arborplug)
2. Insert VIPER needle and push trigger to apply dose.
3. Keep an even LIGHT pressure when pushing trigger.
4. Repeat even dose per injection site until entire dose is in the tree.
NOTE: Putting excessive pressure on the trigger will NOT advance the dose more quickly. “Forcing” the trigger will likely cause damage to the tree.

QUIK-jet Training Manual
13
3 Easy Steps for QUIK-jet
1. DRILL 2. PLUG 3. INJECT1 2 3
QUIK-jet in use

QUIK-jet Training Manual
14
Procedure: Conifers vs. DeciduousImportant Note For Conifer Injections:
Sap flows out of conifers as a protective response to drilling.
For best results, make sure the QUIK-jet is inserted and the micro-injection occurs right after the Arborplug is set. Drill, plug, and inject 1 site at a time. If too much time has passed between Arborplug setting and QUIK-jet application, sap may flow into your injection site, and make your uptake slower.
Important Note For Deciduous Injections:No sap flows from deciduous trees after drilling.
QUIK-jet micro-injection can occur after each Arborplug is set, or after all Arborplugs are set in the tree.

QUIK-jet Training Manual
15
Before Clean-out: Make sure all product is out of QUIK-jet bottle and lines.
1. Remove bottle top and add CLEAN-jet (about 30mL is good)
2. Fasten bottle top and repeatedly press trigger. CLEAN-jet rinse can be squirted in the soil at the base of the tree, unless specified otherwise on the pesticide product label.*
3. Rinse all CLEAN-jet out of the bottle, line, and device.
* Dispose of waste according to local and state regulations.
Clean Out QUIK-jet
20-30mL
21
OR
CLEAN-jet is for rinsing formulation residues, to keep your QUIK-jet operating smoothly.
CLEAN-jet should notbe mixed with other formulations.

QUIK-jet Training Manual
16
To Clean out any debris in VIPER Needles:1. Remove VIPER Needle by pushing the
compression fitting in and pulling on the VIPER Needle.
2. Push the VIPER Needle Cleanout Tool into the VIPER Needle.
MaintenanceVIPER Molded Needle
VIPER Needle Cleanout Tool
21
Piston O-ring may need replacement over time.(070-2283)
Make sure to keep device clean by using CLEAN-jet.(020-2030)
If ball valves are sticking, add very light oil or silicone, and press trigger several times.

QUIK-jet Training Manual
7 6
3 62
1. Piston Rod Assembly 070-22702. Metal Piston 975-94473. Glass Barrel 975-94464. QUIK-jet Rebuild Kit 070-22815. Valve Housings A. 975-9914
B. 070-22756. Seal Kit 070-22807. Quick Connect Kit 070-2220
5A
4
4
1
QUIK-jet Device
070-2230
QUIK-jet Device Parts
QUIK-jet Bottle Assembly 070-2200
5B
QUIK-jet Kit070-2250

QUIK-jet Training Manual
If Trigger Handle is Not Pulling Back:•O-ring on the piston (QUIK-jet Tightness o-ring 2pk 070-2283) may need to be replaced (also included in QUIK-jet Seal Kit (070-2280))
Trouble Shooting
If Leaking Occurs:•VIPER Needle may not be snug – push all the way into PTC.•Tighten all parts tighter than hand tight.•If replacement is needed, order QUIK-jet Connect Kit (070-2220). 18
If Dose Chamber is Not Filling or Dispensing Formulation•Ball Valves may need cleaning. (see Troubleshooting: Ball Valve)
If Leaking Occurs:1. Make sure the glass barrel is sitting properly in
the glass barrel housing with the proper QUIK-jet Barrel Casing Washer (included in QUIK-jet Seal Kit (070-2280))

QUIK-jet Training Manual
Trouble Shooting
19
If Blue Trigger Handle Doesn’t Line Up with Input Valve Housing: •Loosen screw and reposition blue handle
If 1-5mL graduations can’t be read:•Loosen steel barrel, adjust glass barrel, and tighten steel barrel.

QUIK-jet Training Manual
Troubleshooting: Ball Valve
20
If QUIK-jet device pushes formulation back into bottle, ball may be stuck open.
If QUIK-jet device will not draw formulation up, ball may be stuck closed.
If QUIK-jet device will not push formulation out, ball may be stuck closed.
If QUIK-jet device will not prime and has a weak draw of formulation, ball may be stuck open.
NOTE: Make sure ball valves are re-assembled as shown on the illustration. Don’t replace ball on wrong side of spring.
CAUTION:Ball Valve assemblies contain small parts. Disassemble these parts over a bowl or cup so small ball and spring won’t be lost.
Ball valves can be lubricated by removing the tubing, and adding a very small amount of oil or silicone to the in-take check valve housing.
Ball should ALWAYS come in contact with liquid formulation BEFORE spring.

QUIK-jet Training Manual
QUIK-jet Tips and Cautions
Daily cleaning and regular maintenance are critical for consistent QUIK-jet operation.
Do not over tighten fittings. Fittings should be just more than hand tight.
Ball Valve assemblies contain small parts. Disassemble these parts over a bowl or cup so small ball and spring won’t be lost. DO NOT DISASSEMBLE IN THE FIELD.
Apply very light oil or grease to ball valve assemblies to keep them working properly.
Apply light to moderate pressure on the trigger handle QUIK-jet device. DO NOT try to force product into the tree.
21

QUIK-jet Training Manual
Always follow the formulation label for required personal protective equipment
Never point the VIPER needle toward yourself or anyone else
The QUIK-jet contains a Glass Barrel. Use caution when using or storing the device
Do not store device loaded with formulation. Always follow proper cleaning and disposal instructions
22
QUIK-jet Tips and Cautions