mi casa es tu casa - clay king · mi casa es tu casa a ... pencil poster board, cardstock or...
TRANSCRIPT
Lesson #17Mi Casa es Tu Casa
A Lesson in Creating Small, Animated Houses withAMACO® Clay and Gloss Decorating Colors (GDC’s)
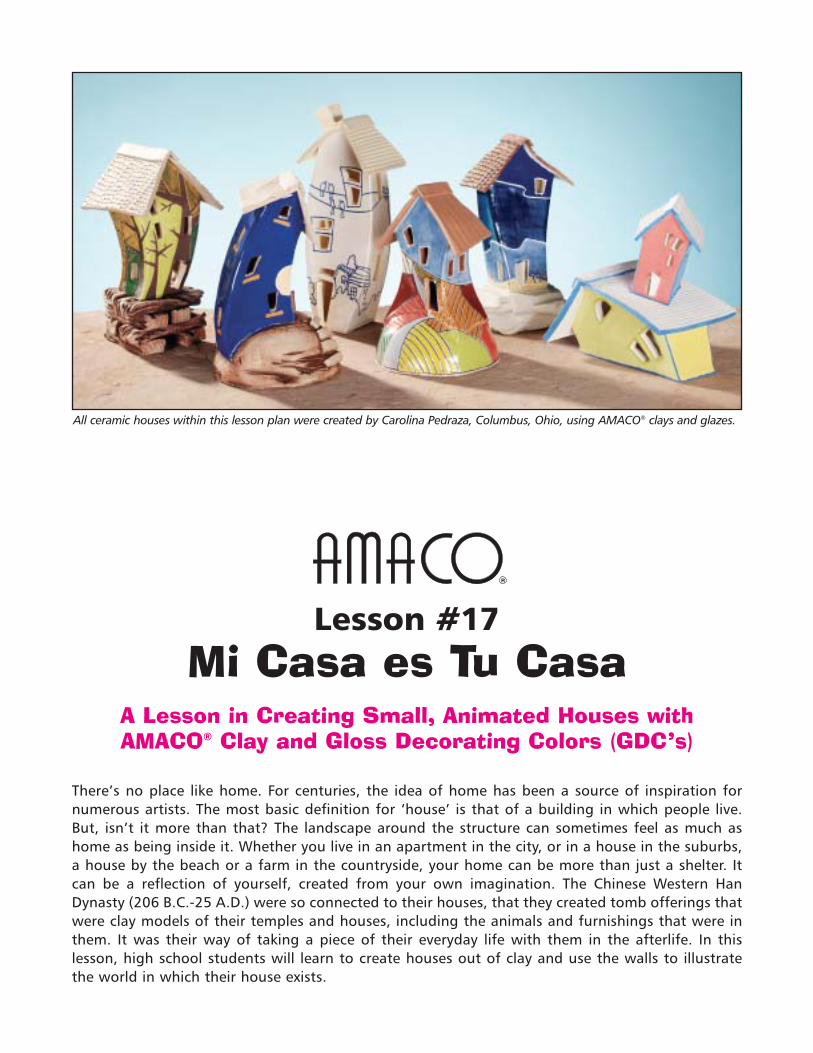
There’s no place like home. For centuries, the idea of home has been a source of inspiration fornumerous artists. The most basic definition for ‘house’ is that of a building in which people live.But, isn’t it more than that? The landscape around the structure can sometimes feel as much ashome as being inside it. Whether you live in an apartment in the city, or in a house in the suburbs,a house by the beach or a farm in the countryside, your home can be more than just a shelter. Itcan be a reflection of yourself, created from your own imagination. The Chinese Western HanDynasty (206 B.C.-25 A.D.) were so connected to their houses, that they created tomb offerings thatwere clay models of their temples and houses, including the animals and furnishings that were inthem. It was their way of taking a piece of their everyday life with them in the afterlife. In this lesson, high school students will learn to create houses out of clay and use the walls to illustratethe world in which their house exists.
All ceramic houses within this lesson plan were created by Carolina Pedraza, Columbus, Ohio, using AMACO® clays and glazes.

2
Lesson Goals and Objectives:1. Students learn to make animated housesusing slab-built clay ceramic techniques.
2. This lesson incorporates aesthetics, illus-tration, symbolism and personal expression.
3. This lesson focuses on slab building andcompositional elements essential for drawingon a three-dimensional object. It will alsoteach students fundamental technical skills forusing a technique known as majolica to treatthe surface of the houses.
BackgroundPreparation:1. This lesson is designed for high school students.
2. The teacher should present a brief history of architecture and the significanceand variety of dwellings.
3. The teacher should present the use of thehouse as a symbol in sculpture, painting,drawing and ceramics. Artists whose workcould be presented are: Robert Arneson,Christine Federighi, Han Dynasty tomb figures,Jack Earl, David Stabley, Jennifer Bartlett andJoel Shapiro, among others.
4. The teacher could also present a briefoverview of the use of humor and cartoon-likeillustration in the fine arts showing artists suchas Roy Lichtenstein, Claes Oldenburg, KeithHaring, Stuart Davis and Red Grooms.
5. The teacher should explain to studentshow to compose imagery on a three-dimen-sional surface, as opposed to compositions ona flat surface (i.e. a piece of paper or canvas).The imagery should wrap around the piece,instead of students focusing on each panel (orwall) of the house as separate.
Supplies:AMACO® Clay — 77M Terra Cotta clay with grogAMACO® LG-11 White Cone 04 GlazeAMACO® Gloss Decorating Colors (GDC’s)AMACO® Wax ResistAMACO® LUG-1 Black Rolling pin or slab rollerWooden rods24" x 24" piece of canvas Fettling knifeScratch tool, comb or forkWooden toolSmall and medium paintbrushCarving tool
AdditionalSupplies:PencilPoster board, cardstock or newspaperScissorsSmall container for slipSmall container for waterPlastic bagsElectric Kiln
Glossary:Sculpture — a three-dimensional work ofart that is intended to be viewed from allsides. It can be made out of materials such asplaster, stone, wood, metal, and clay.
Composition — the organization of line,value, color, shape, and form within a work ofart.
Glaze — a special clear or colored liquid mix-ture applied to ceramic surfaces that becomeshard and glass-like when fired to the righttemperature in a kiln.
Majolica — originally an Italian glazingtechnique that involves brushing on a whitebase glaze first, then applying colored oxideson top that will fuse with the glaze during the firing.
Slip — clay that has been mixed with waterinto a creamy consistency.
Scoring — a method of joining two parts ofclay together by scratching the two surfacesand spreading slip between them as “glue.”
Fire — to heat the clay in a kiln at a very hightemperature until it is hard and it becomesceramic.
Bisque — unglazed ceramic after the first firing.
Template — a positive pattern.
2-dimensional — images that are flat andcan be described in terms of height andwidth. The images can represent the illusionof real space and are viewed from the front.
3-dimensional — forms that have manysides and can be described in terms of depth,width and height. The forms actually occupyreal space, and should be viewed all around.
“How To” examples on next page at topby Ben Davis, Indianapolis, Indiana highschool students.AMACO® Velvet Underglazes.
AMACO® Velvet Underglazes.
Base: AMACO® Cone 5 Sahara HF-11 White. Design: AMACO® GDC's.
3
Instructions:1. Concept — Ask students to draw what kindof house structure they want to make. What willbe the shape of the front and back wall and whatwill be the shape of the side wall? What does therooftop look like? How many windows does thehouse have? Does the house have one or twodoors? Is the house in the city, the countryside orby the ocean? Are the people or animals that livein it there or are they gone for now?
2. Templates — From the drawings, stu-dents can draw the shape of the front wall andone of the side walls on a piece of poster board(cardstock or newspaper), as if they were goingto construct the house out of poster board(cardstock or newspaper). Houses should be nomore than 8 inches tall or wide, so the teachershould check the size of the walls before stu-dents cut them out. Once approved, have themcut those shapes, flip them over and trace thecut shapes on top of the remaining posterboard to get the shapes for the back and sec-ond sidewall. Cut those new shapes. Draweach side of the rooftop (or the shape, if it sitsflat on the top of the house) on what is left ofthe poster board and cut them out.
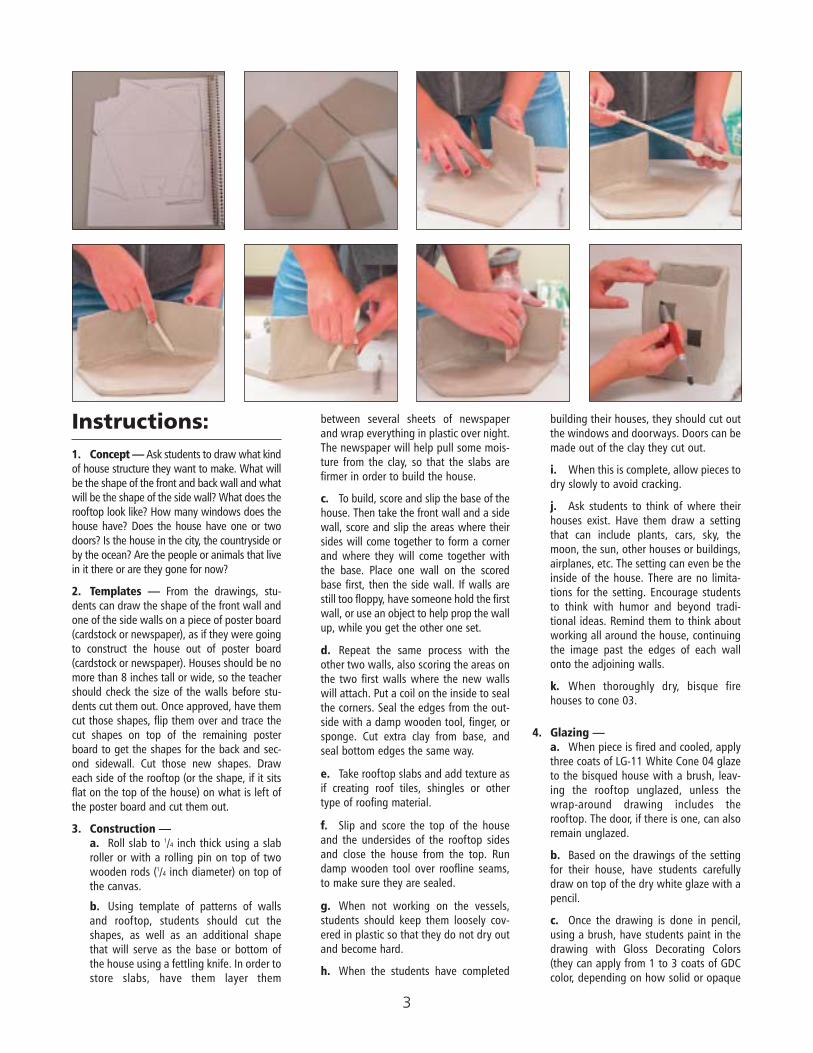
3. Construction —a. Roll slab to 1/4 inch thick using a slabroller or with a rolling pin on top of twowooden rods (1/4 inch diameter) on top ofthe canvas.
b. Using template of patterns of wallsand rooftop, students should cut theshapes, as well as an additional shapethat will serve as the base or bottom ofthe house using a fettling knife. In order tostore slabs, have them layer them
between several sheets of newspaperand wrap everything in plastic over night.The newspaper will help pull some mois-ture from the clay, so that the slabs arefirmer in order to build the house.
c. To build, score and slip the base of thehouse. Then take the front wall and a sidewall, score and slip the areas where theirsides will come together to form a cornerand where they will come together withthe base. Place one wall on the scoredbase first, then the side wall. If walls arestill too floppy, have someone hold the firstwall, or use an object to help prop the wallup, while you get the other one set.
d. Repeat the same process with theother two walls, also scoring the areas onthe two first walls where the new wallswill attach. Put a coil on the inside to sealthe corners. Seal the edges from the out-side with a damp wooden tool, finger, orsponge. Cut extra clay from base, andseal bottom edges the same way.
e. Take rooftop slabs and add texture asif creating roof tiles, shingles or othertype of roofing material.
f. Slip and score the top of the houseand the undersides of the rooftop sidesand close the house from the top. Rundamp wooden tool over roofline seams,to make sure they are sealed.
g. When not working on the vessels,students should keep them loosely cov-ered in plastic so that they do not dry outand become hard.
h. When the students have completed
building their houses, they should cut outthe windows and doorways. Doors can bemade out of the clay they cut out.
i. When this is complete, allow pieces todry slowly to avoid cracking.
j. Ask students to think of where theirhouses exist. Have them draw a settingthat can include plants, cars, sky, themoon, the sun, other houses or buildings,airplanes, etc. The setting can even be theinside of the house. There are no limita-tions for the setting. Encourage studentsto think with humor and beyond tradi-tional ideas. Remind them to think aboutworking all around the house, continuingthe image past the edges of each wallonto the adjoining walls.
k. When thoroughly dry, bisque firehouses to cone 03.
4. Glazing —a. When piece is fired and cooled, applythree coats of LG-11 White Cone 04 glazeto the bisqued house with a brush, leav-ing the rooftop unglazed, unless thewrap-around drawing includes therooftop. The door, if there is one, can alsoremain unglazed.
b. Based on the drawings of the settingfor their house, have students carefullydraw on top of the dry white glaze with apencil.
c. Once the drawing is done in pencil,using a brush, have students paint in thedrawing with Gloss Decorating Colors(they can apply from 1 to 3 coats of GDCcolor, depending on how solid or opaque
4
they want the color to be after glaze fir-ing), trying to leave pencil lines visible.
d. With a wider brush (take only 2 or 3brushes that everyone can use just for this,since the wax will not wash away completelyafter use) apply a thin coat of AMACO® WaxResist over all the glazed areas, making sureno glaze is left uncovered.
e. Using a carving tool, carefully carve outover all pencil lines around the coloredareas. Students will feel the tool scratch thebisqued clay surface occasionally.
f. Using a small brush, apply LUG-1Black to the carved line. See finishedexamples on this page. The wax will pro-tect the uncarved areas from taking any ofthe black underglaze. The Wax Resist willburn out during firing.
g. Glaze fire to cone 04.
American Art Clay Co., Inc. • 4717 West Sixteenth Street • Indianapolis, Indiana 46222 • (317)244-6871 • (800)374-1600 • www.amaco.com11731R 25M0603
This lesson plan was created and written by Carolina Pedraza, Columbus, Ohio.
This is one lesson in a series of art plans for elementary and secondary programs using American Art Clay Co., Inc. products. Successful lessonswill be considered for future publication. Send your ideas and slides to David Gamble, Vice President, Director of Marketing and Education – Brentand Educational Divisions, American Art Clay Co, Inc., 4717 West Sixteenth Street, Indianapolis, Indiana 46222.
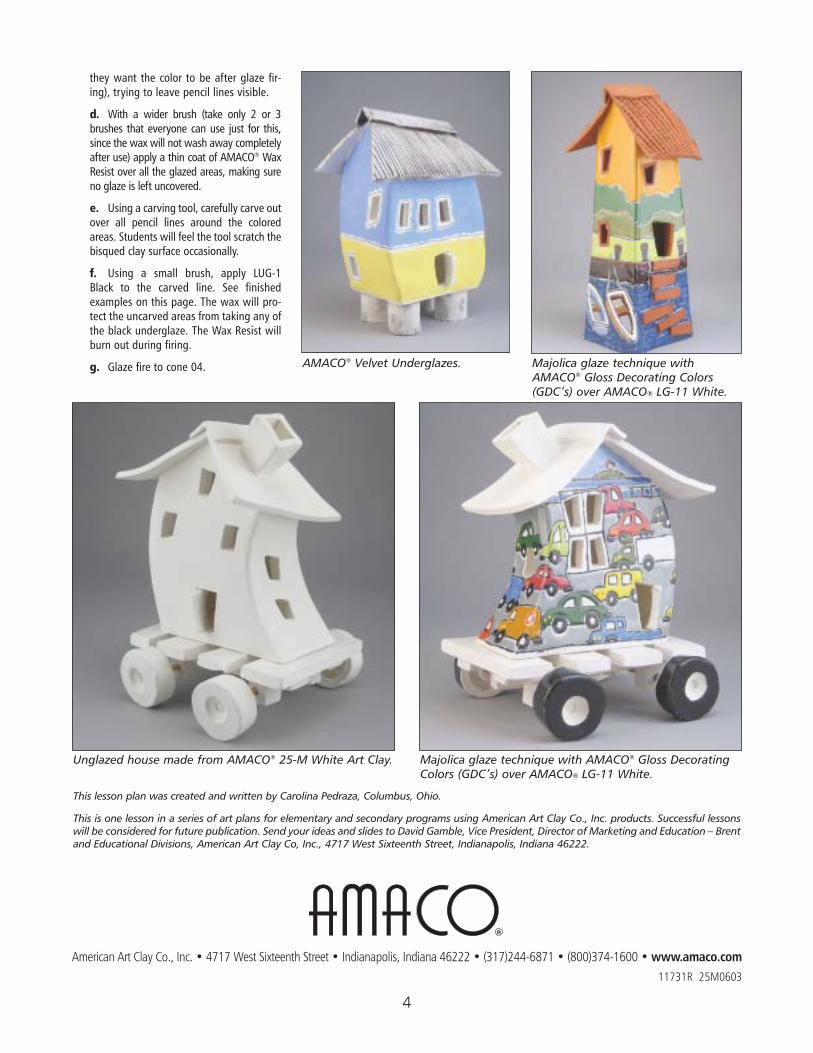
Majolica glaze technique withAMACO® Gloss Decorating Colors(GDC’s) over AMACO® LG-11 White.
Majolica glaze technique with AMACO® Gloss DecoratingColors (GDC’s) over AMACO® LG-11 White.
Unglazed house made from AMACO® 25-M White Art Clay.
AMACO® Velvet Underglazes.