mh corbin ss-10 electronic interface installation guide rausch drive | plain city, oh | 43064 |...
TRANSCRIPT
8355 Rausch Drive | Plain City, OH | 43064 | 800-380-1718 | 614-873-8095 fax
MH Corbin SS-10 Electronic Interface
Installation Guide Version 2.0
OVERVIEW
The SS-10 is designed to work with most vehicles that are equipped with non-
mechanical transmission sensors (no speedometer cable). This interface amplifies and
conditions the pulses emitted from your vehicle's speed sensor and supplies the signal to
your MH Corbin DMI to accurately compute traveled distances.
The SS-10’s sensitivity level, division factor, and diagnostics are controlled by six
momentary push buttons. Two, seven segment LEDs display the sensitivity and divisor
settings. When power is initially applied to the SS-10, the factory default settings are
displayed for 5 seconds. When the LEDs are on, the SS-10 is in “Adjust Mode” and the
user can change the default settings and execute diagnostics. The SS-10 will stay in
Adjust Mode until the user has not pressed a push button for 5 seconds. The LEDs will
then be turned off and 2 seconds later, the SS-10 will enter “Run Mode”. Run Mode is
the normal mode for operation. When you need to make an adjustment or execute
diagnostics, press and release any push button (SW1-SW6). The SS-10 will enter Adjust
Mode and the LEDs will display the current settings.
NOTE While in Adjust Mode, the SS-10 will not produce an output for the
DMI. Changes to sensitivity and divisor do not take effect until the
SS-10 is in Run Mode (2 seconds after LEDs are off).
CAUTION Failure to disconnect the positive battery lead may cause damage to
the sensor and related components. This does not apply to the
optional Power Adapter Cable.
DISCLAIMER: MH Corbin SS-10 electronic interface adapters are sold with the
understanding that they will be installed by a professional installer who has the required
expertise and supporting documentation such as Mitchell or Motor electrical service
manuals or equivalent. Any documentation or information provided by MH Corbin is a
general guideline for reference and is supplied without warranty or liability of any kind.
Since the conditions or methods of installation, operation, use and maintenance of this
equipment are beyond its’ control, MH Corbin does not assume responsibility and
8355 Rausch Drive | Plain City, OH | 43064 | 800-380-1718 | 614-873-8095 fax
expressly disclaims liability of loss, damage, or expense of any kind arising out of or in
any way connected with any installation, operation, or maintenance of this sensor. The
user who attempts to install the electronic interface adapter assumes all responsibility
for problems caused by incorrect or improper installation.
Installation
1. Disconnect the positive battery terminal.
NOTE Do not route any cables near the engine, exhaust manifold, or any
heat sources.
2. Two cable assemblies are required to connect the sensor. One is called a split cable
and consists of two separate cables. The split cable assembly contains one 15 ft.
cable and one 10 ft. cable. The 10 ft. cable has a black and red wire. Connect the
red wire to the positive battery terminal. Connect the black wire to the negative
battery terminal. Refer to Figure 1 for more information.
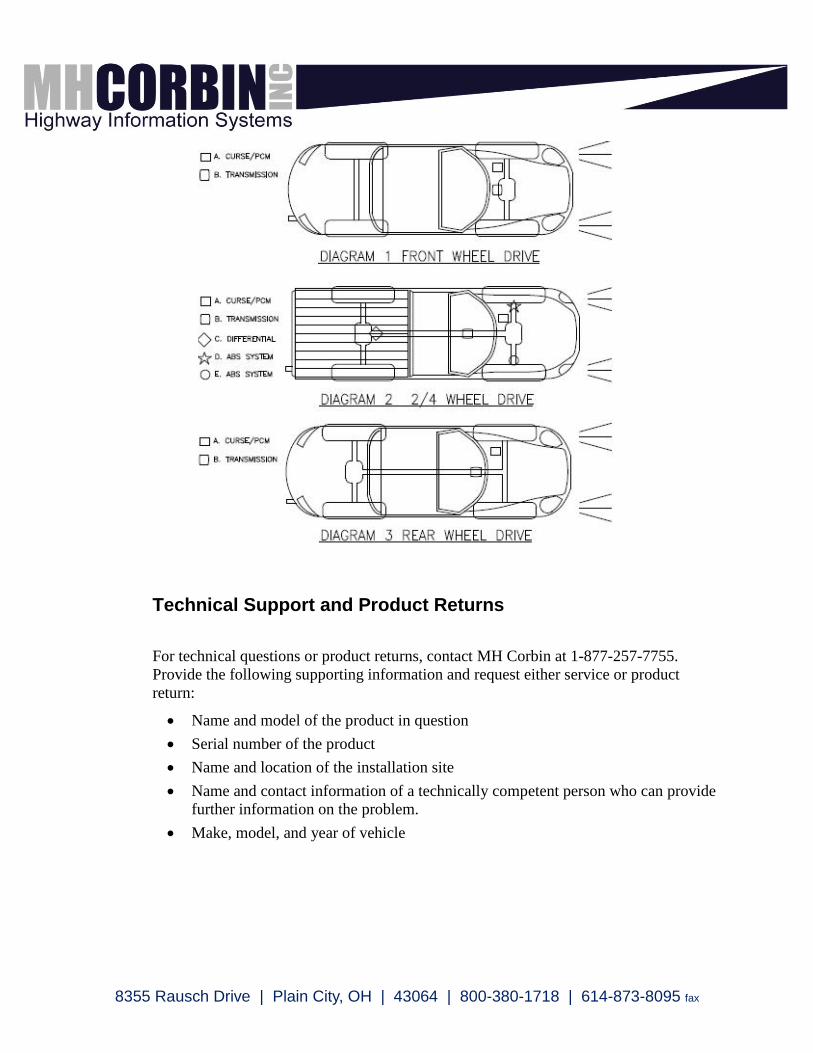
3. The 15 ft. cable mentioned in STEP 2 above will be connected to a wire from your
transmission, engine control module or differential depending on the vehicle model
& year.
NOTE A “quick crimp” connector is not recommended.
4. Route the remaining cable assembly to the DMI. Connect the modular phone jack
to the DMI receptacle labeled “POWER”. This is a two part cable. The end with
the modular phone jack that connects to the DMI must be entirely within the cab of
the vehicle. The end that connects to the SS-10 module must be routed through the
fire wall.
5. The SS-10 has two cables exiting the plastic enclosure. The label affixed to the
bottom side of the enclosure depicts the cable signals. Each cable has a connector
attached. One connector is an inline four (4) pin style and one is a dual row four (4)
pin style. These connectors are keyed such that they cannot be reversed. Attach
each connector to the respective mate of each cable assembly.
6. Connect the positive battery terminal. Turn on the DMI to verify the battery
connections. If the DMI will not power on, check your connections at the battery,
speed sensor and DMI.
7. The SS-10 speed sensor has adjustable sensitivity. The device is shipped with a
setting that is appropriate for most vehicles. Start the engine, power on the DMI
and press the “RUN/HOLD” button to enter run mode. The DMI should NOT
count while the vehicle is stationary. If you notice counting you will have to reduce
8355 Rausch Drive | Plain City, OH | 43064 | 800-380-1718 | 614-873-8095 fax
the sensitivity. Refer to Figure 3 and Troubleshooting Guide 2 for more
information.
8. Start driving, the DMI should start counting. If the DMI does not count or only
counts at higher speeds, you will need to increase the sensitivity. When the
sensitivity is set properly, the DMI will count at very low speeds (less than 1MPH)
and never count erroneously. Some vehicles do not generate a signal at extremely
low speeds. This is inherent to the vehicle model and connection (Engine Control
Module). Transmission connections generally produce a signal at very low speeds.
Refer to Figure 3 and Troubleshooting Guide 1 for more information.
9. A small percentage of vehicles may register false counting after driving and
coming to a stop. Decrease sensitivity if you notice this symptom. Refer to Figure 3
on page 5 and Troubleshooting Guide 2 on page 3 for more information.
10. Follow the calibration procedure outlined in the manual. You should have a
calibration number between 400 & 1400. The ideal calibration number should be as
close to 1000 as possible. The calibration number will appear in the far right-hand
window at the end of the calibration procedure. If the calibration number is less
than 400, increase the divisor. If the calibration number is greater than 1400,
decrease the divisor. The SS-10 speed sensor is shipped with a divisor equal to one,
but is adjustable to suit virtually all vehicle installations. Refer to Figure 3 on page
5 for more information.
11. Once the calibration is complete, you may want to seal the SS-10 enclosure with
silicon sealant to prevent corrosion or water damage to the components inside.
Troubleshooting Guides
Follow these simple steps to resolve a problem with your equipment or your installation.
There are basically three types of problems that are encountered by customers during
installations and are addressed in the following steps. Please refer to your specific
problem by answering the following questions:
1. Does your DMI power up and seem to work, but will not count at all? If so, refer to
Guide 1.
2. Does your DMI count all the time or at any time you feel it should not be counting?
If so, refer to Guide 2.
3. Does your DMI display AECs (Automatic Error Correction)? If so, refer to Guide
2.
4. Does your DMI seem to be counting just fine but it is not accurate enough? If so,
refer to Guide 3.
5. Does your DMI have a problem involving the MPH displayed? If so, refer to
Guide 3).

8355 Rausch Drive | Plain City, OH | 43064 | 800-380-1718 | 614-873-8095 fax
Troubleshooting Guide 1
If your DMI seems to be working correctly, but will not count follow these simple steps
to determine what the problem may be. Be sure to retest your DMI after each step or
when the cause of the issue is found. Increasing sensitivity beyond that which is
required may result in erroneous counting. If for some reason you change the sensitivity
and the problem is resolved through other means, you may need to decrease sensitivity
to prevent erroneous counting. The factory default setting of “3” will work in most
vehicles.
NOTE Sensitivity adjustments do not take effect until the SS-10 is in Run
Mode (2 seconds after the LEDs are off).
1. If a splice clip or quick connector clip was used in the installation, re-splice the
wire or solder the wire in. You may not be getting a good connection.
2. Recheck all the wiring (see Figure 1).
3. Check the calibration number in the DMI so that it is not set to zero. To check the
calibration number, simply turn the DMI on and press the 1CAL key. The display
should read "CAR1” followed by a number. If that number is zero, type 1000 and
press MARK/ENTER.
4. To increase sensitivity, follow these steps:
a. Put the SS-10 in Adjust Mode (to enter Adjust Mode, press and release any push
button SW1- SW6).
b. Once the current settings are displayed, press and release SW1. The LED value
for sensitivity will increment.
c. 2 seconds after the LEDs are off the SS-10 will enter Run Mode.
d. When in Run Mode, start driving to see if the DMI will count. If not, repeat
these steps until the DMI starts counting.
e. If you increased sensitivity to the maximum setting of “9” and the DMI is still
not counting, you may want to set the sensitivity setting back to the factory
default of “3”. Leaving the sensitivity setting at maximum may result in
erroneous counting once the problem is resolved.
5. At this point, you will want to do a "tap test" on the Nu-Metrics equipment. To do
this, power on the DMI and make sure the DMI is in “RUN” mode. To perform a
“TAP” test, the SS-10 must be in Adjust Mode (to enter Adjust Mode, press and
release any push button SW1- SW6). When the LEDs are on, press and hold SW6
until the LEDs rotate counterclockwise. The DMI should count for 10 seconds.
This test verifies that the connection from the SS-10 to the DMI is correct. Next,
you’ll need to perform a sensor test. To do this, the SS-10 must be in Adjust Mode.

8355 Rausch Drive | Plain City, OH | 43064 | 800-380-1718 | 614-873-8095 fax
Press and hold SW3 until the LEDs rotate clockwise. The DMI should count for 10
seconds. This test verifies that the SS-10 electronics are operating properly.
6. If the above steps have not resolved the problem, the possibility exists that your
vehicle’s speed sensor wires have been swapped, you have not interfaced to the
sensor properly, or the sensor is not receiving a signal from the vehicle speed
sensor.
Troubleshooting Guide 2
If your DMI is counting at an undesired time or all the time, engine noise or electrical
interference may be causing the problem. Depending on vehicle model and connection,
adjusting the SS-10 sensitivity may be necessary. Ideally, the sensitivity adjustment is
such that the DMI counts at very low speeds and never counts erroneously. Counting at
idle, after stopping or erratic counting while driving (which the DMI would display as
AEC) are examples of the sensitivity being too high. Rerouting cables and/or lowering
sensitivity should resolve the problem.
NOTE Sensitivity adjustments do not take effect until the SS-10 is in Run
Mode (2 seconds after the LEDs are off). This problem may be
caused by not attaching the positive and negative leads directly to the
battery.
Perform the following steps to correct this problem:
1. Ensure that all wiring is as far away from the vehicle’s electrical components as
possible. This could include the coil, plug wires, alternator, etc.
2. To decrease sensitivity, follow these steps:
a. Put the SS-10 in Adjust Mode (to enter Adjust Mode, press and release any push
button SW1- SW6).
b. Once the current settings are displayed, press and release SW2. The LED value
for sensitivity will decrement.
c. Two seconds after the LEDs are off, the SS-10 will enter Run Mode.
d. If the DMI still counts erroneously, repeat these steps until the DMI counts
accurately.
3. If you reach the minimum sensitivity setting of “0” you will need to contact the
MH Corbin Technical Support.

8355 Rausch Drive | Plain City, OH | 43064 | 800-380-1718 | 614-873-8095 fax
Troubleshooting Guide 3
If your NiteStar DMI is exhibiting these types of problems, it may be due to an
improper calibration of the DMI. Please refer to the calibration instructions located in
the NiteStar Distance Measuring Instruments User’s Guide.

8355 Rausch Drive | Plain City, OH | 43064 | 800-380-1718 | 614-873-8095 fax
FIGURE 1
SPEED SENSOR WIRING WITH THE STANDARD POWER CABLE
FIGURE 2
SPEED SNESOR WIRING WITH THE OPTIONAL POWER ADAPTER CABLE
NOTES Ensure there is separation between these cables along the entire
length. Coil the excess from each cable separately and secure to
prevent the cables from touching. Applies to the 70004085 and
7004086 cables.
The cable assembly to the DMI is a two part cable. The end with the
modular phone jack that connects to the DMI must be entirely within
the cab of the vehicle. The end that connects to the SS-10 module
must be routed through the fire wall.
Cables must not be routed near the engine, exhaust manifold, or
any heat sources.

8355 Rausch Drive | Plain City, OH | 43064 | 800-380-1718 | 614-873-8095 fax
FIGURE 3 ADJUSTMENT AND DIAGNOSTIC SWITCHES
SW1
-
SW2
-
SW5
-
SW3 -
SW6 -
SW4
-
DISPLAYS SENSITIVITY SETTING DISPLAYS DIVISOR SETTING
DIVISOR SETTINGS
VALUE DIVISION FACTOR 1 = 1 TO 1 2 = 1 TO 2 3 = 1 TO 3 4 = 1 TO 4 5 = 1 TO 6 6 = 1 TO 8 7 = 1 TO 16 8 = 1 TO 32 9 = 1 TO 64
SWITCH DESCRIPTIONS
SW1 - INCREASE SENSITIVITY SW2 - DECREASE SENSITIVITY SW3 - INTERFACE TEST SW4 - INCREASE DIVISOR SW5 - DECREASE DIVISOR SW6 - TAP TEST

8355 Rausch Drive | Plain City, OH | 43064 | 800-380-1718 | 614-873-8095 fax
Single/Differential Jumper
The default setting is Single mode (SNGL) and should work for most installations. The
red wire from the 15 ft. cable will connect to the vehicle speed sensor. The black wire
from the 15 ft. cable is not used when in Single mode and should be insulated with
electrical tape around the bare portion of the wire.
If you connected to the ABS and the DMI displays “AEC” when you activate a turn
signal, follow these instructions to resolve the problem:
1. Move the single/differential jumper to “DIFF” to enable Differential mode.
2. Connect the single red wire supplied with your sensor to the positive battery
terminal.
3. Solder the other end of the red wire to the black wire from the 15 ft. cable and
secure with electrical tape.
Adjust and Run Mode
Adjust Mode = LEDs ON
Run Mode = LEDs OFF
1. Before you can make adjustments or execute diagnostics, the SS-10 must be in
Adjust mode. The SS-10 will not produce an output to the DMI when in Adjust
mode.
2. To enter Adjust mode, press and release any push button (SW1-SW6). The LEDs
will display the current settings. You can now change Sensitivity, Divisor, or
Execute Diagnostics.
3. After you are finished making adjustments or executing diagnostics, the LEDs will
turn off after 5 seconds and the SS-10 will enter Run mode.
NOTE The SS-10 will not produce an output until 2 seconds after the LEDs
have turned off.
Calibration Values
- The ideal calibration number should be as close to 1000 as possible.
- If the calibration number display on the DMI is less than 400, increase the divisor
value.
- If the calibration number is greater than 1400, decrease the divisor value.

8355 Rausch Drive | Plain City, OH | 43064 | 800-380-1718 | 614-873-8095 fax
Connections for Specified Vehicles
Table 1 Wiring Connections
Year Make Model Location Wire Color
1 2000-09 GM/GMC Truck B PPL/WHT
2 2000-09 GM/GMC Truck D YEL/BLK
3 2007 GM Colorado B YELLOW
4 2004-06 GM Colorado B YELLOW
5 2004-06 GM Colorado A YEL/BLK
6 2006-07 GM Cars B YELLOW or ORANGE
7 2000-05 GM Cars B YELLOW
8 2000-05 GM Cars A DARK GREEN
9 2008 Ford Truck B YEL / ORG
10 2008 Ford Truck A YEL/ BLU
11 2000-07 Ford Truck B DRK BLU / YEL
12 2000-07 Ford Truck A GRY / BLK
13 2000-06 Ford Truck C RED / PNK OR GRN /RED
14 2003-06 Ford Crown Vic B DRK BLU / YEL
15 2003-06 Ford Crown Vic A GRY / BLK
16 2004-06 Dodge Truck B GRN / BRN
17 2004-06 Dodge Truck A GRN / YEL
18 2000-03 Dodge Truck B BLU / BLK

8355 Rausch Drive | Plain City, OH | 43064 | 800-380-1718 | 614-873-8095 fax
Year Make Model Location Wire Color
19 2000-03 Dodge Truck A WHT / ORG
20 2004-08 Dodge Durango B DK GRN / BRN
21 2000-03 Dodge Durango A WHITE / ORG
22 2005-06 Dodge Stratus B LT GRN / WHITE
23 2007 Toyota Tacoma B RED / YEL
24 2005-06 Toyota Tacoma B GRN
25 2005-06 Toyota Tacoma A VIOLET / WHT
26 2009-10 Ford F150/350 E VIOLET
27 2008 Ford F250 D VIOLET / WHITE
28 2008 Ford Explorer D YELLOW
29 2008 Ford Escape B BRN / GRN
30 2008 Ford Ranger D VIOLET / WHITE
8355 Rausch Drive | Plain City, OH | 43064 | 800-380-1718 | 614-873-8095 fax
Technical Support and Product Returns
For technical questions or product returns, contact MH Corbin at 1-877-257-7755.
Provide the following supporting information and request either service or product
return:
Name and model of the product in question
Serial number of the product
Name and location of the installation site
Name and contact information of a technically competent person who can provide
further information on the problem.
Make, model, and year of vehicle