mg-42 step by step build with brp receivermg-42 step by step build with brp receiver oakrodent mg-42...
TRANSCRIPT
MG-42 step by step build with BRP receiver
oakrodent
MG-42 step by step build with BRP receiver
« on: January 16, 2010, 12:02:36 PM »
I have this build posted on MG42.US and though this would be a great place to put it also.I decided show a step by step build of one of my BRP receiver. I have built a few of these and this is how I do them. I am not saying it is the only way, but it’s the way I do them and they all have worked without a flaw. I also don’t use rivets. I have used them my whole life. From using them on a large farm in the Midwest when I was going up to aircraft in the military to gas turbines in the power industry. Rivets are hard to do correctly. I have done millions of them. Even if you get them tight, sometimes they become loose. This is a flaw I am not happy with. I weld everything. When my MG42’s are done they have all the correct rivet heads in all the correct places, inside and out and it is quite easy to do. I will show every step for you first time builders. I will have this one completed in under a month. I measure everything in millimeters. All my tools are standard.
please ask questions here: http://www.weaponsguild.com/forum/index.php?topic=8598.msg115836#msg115836
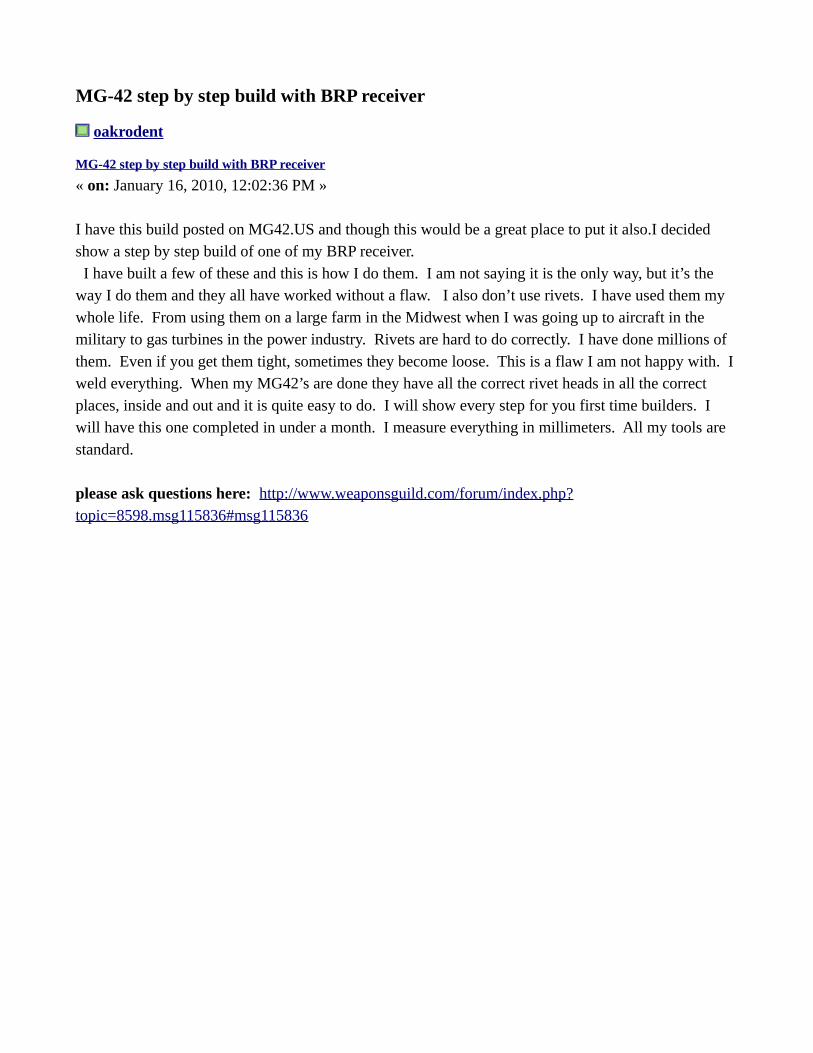
1: Lay out all your parts. I remove the bolts that hold the feed cover latch and barrel door latch. I then retap the holes and chase the threads of the screw. If there is a problem now is the time to catch it. Youwant do completely disassemble the Mg after you test fire so it can be sandblaster and blued.
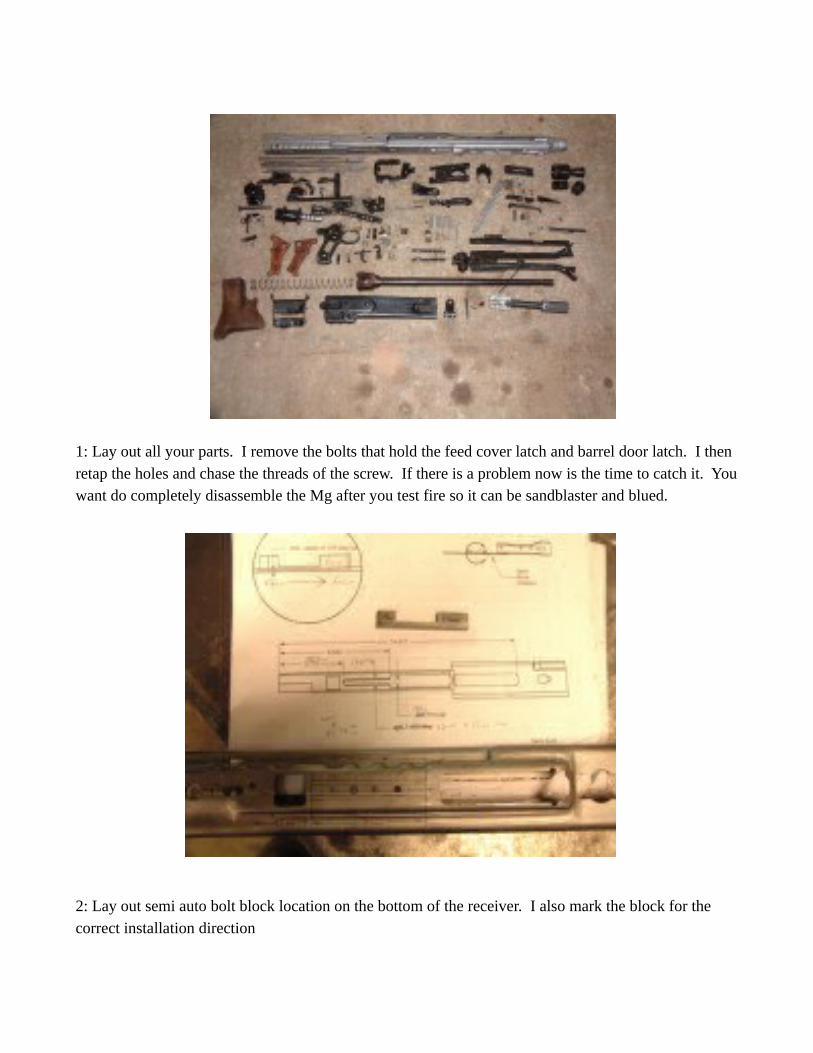
2: Lay out semi auto bolt block location on the bottom of the receiver. I also mark the block for the correct installation direction

3: Proper set up before milling is key! Make sure you are level
Mill notch.
oakrodent
Re: MG-42 step by step build with BRP receiver
« Reply #1 on: January 16, 2010, 12:18:39 PM »
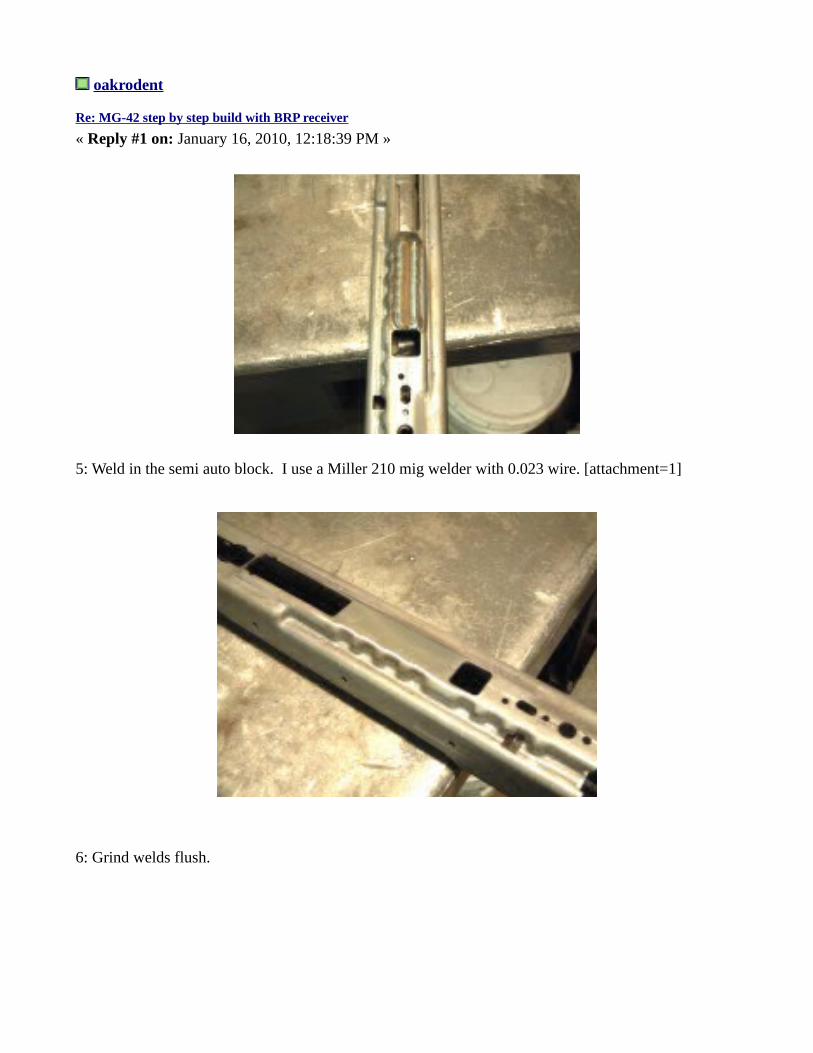
5: Weld in the semi auto block. I use a Miller 210 mig welder with 0.023 wire. [attachment=1]
6: Grind welds flush.
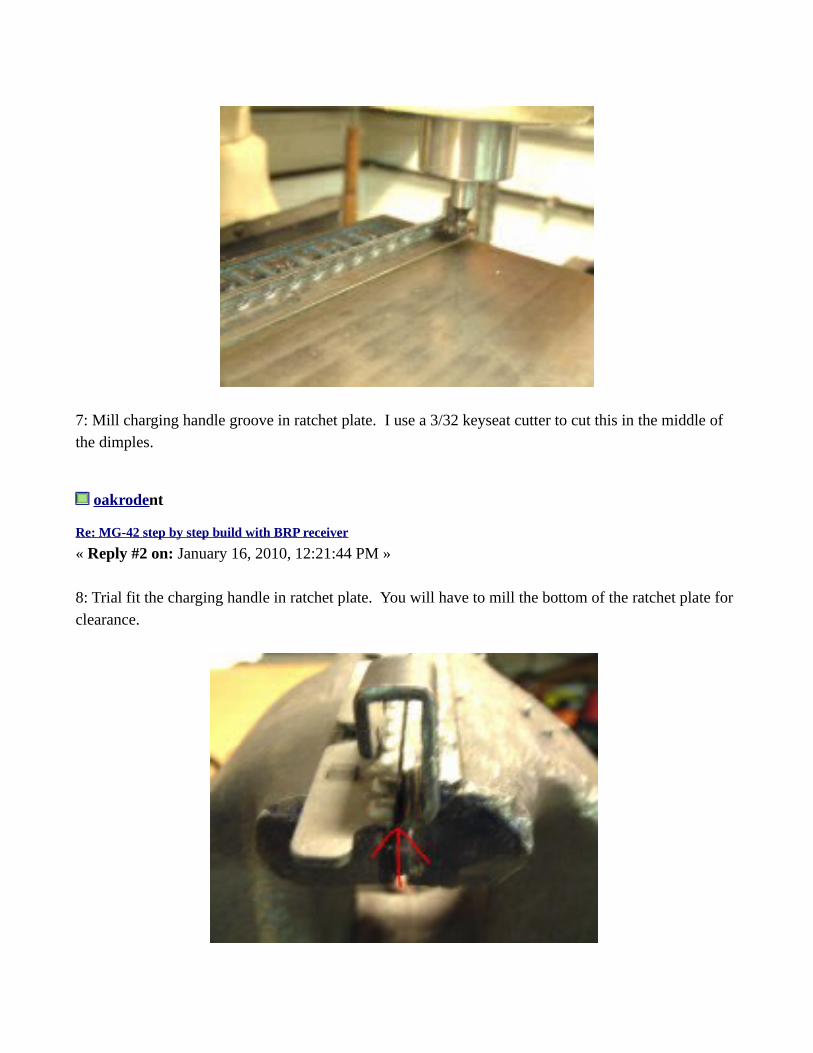
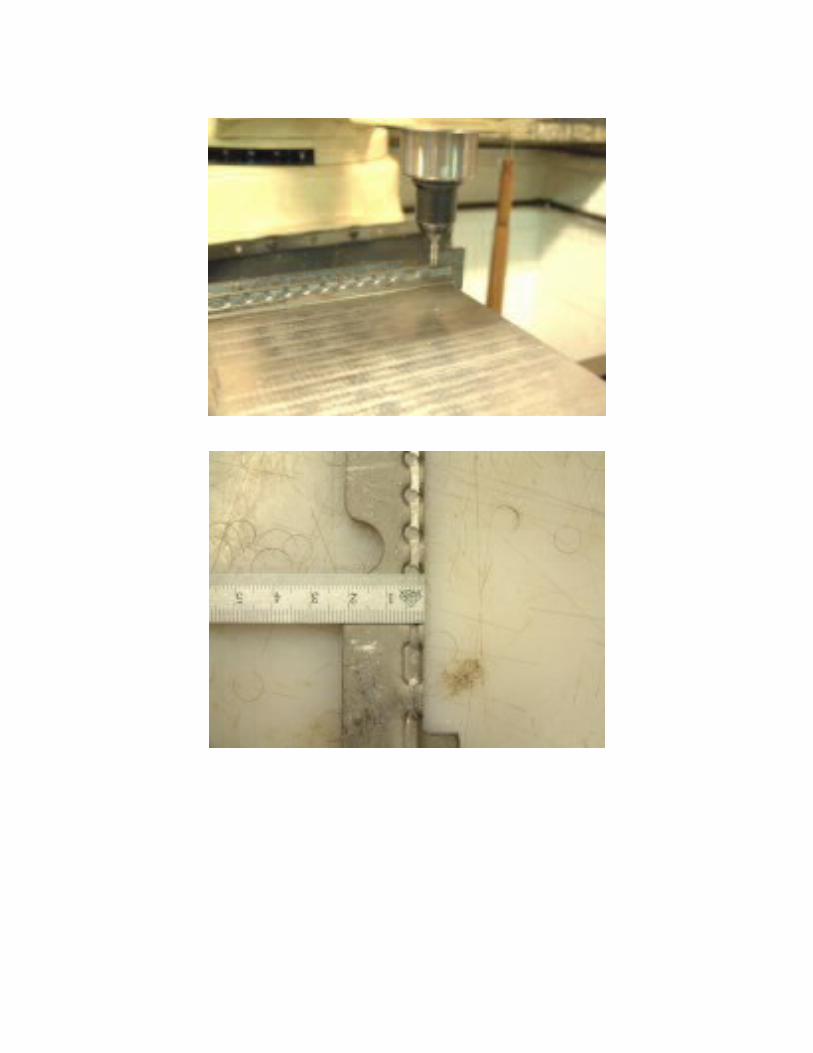
7: Mill charging handle groove in ratchet plate. I use a 3/32 keyseat cutter to cut this in the middle of the dimples.
oakrodent
Re: MG-42 step by step build with BRP receiver
« Reply #2 on: January 16, 2010, 12:21:44 PM »
8: Trial fit the charging handle in ratchet plate. You will have to mill the bottom of the ratchet plate for clearance.
oakrodent
Re: MG-42 step by step build with BRP receiver
« Reply #3 on: January 16, 2010, 12:25:21 PM »
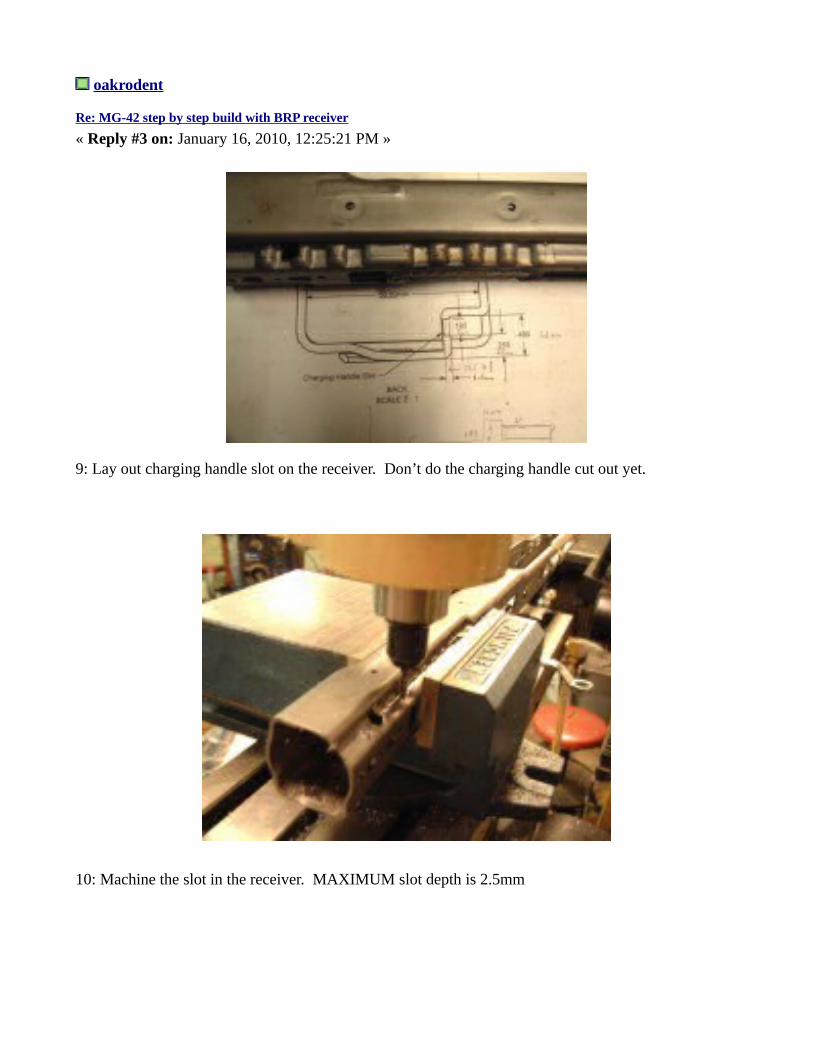
9: Lay out charging handle slot on the receiver. Don’t do the charging handle cut out yet.
10: Machine the slot in the receiver. MAXIMUM slot depth is 2.5mm
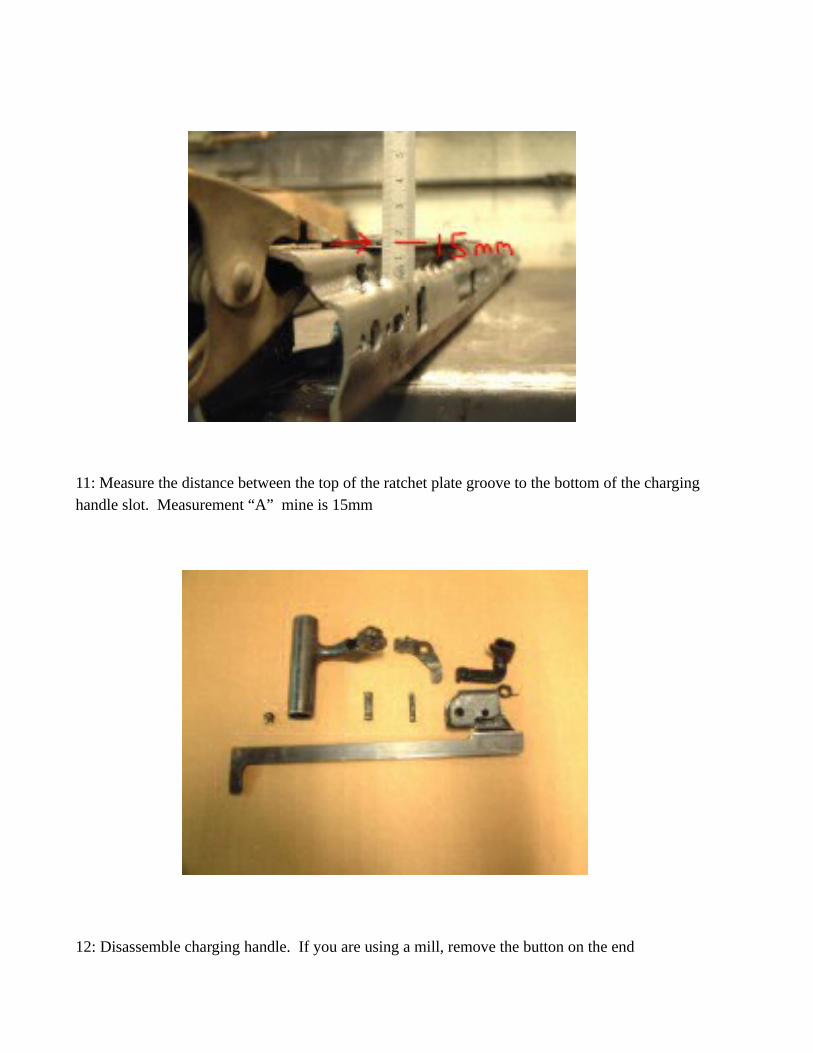
11: Measure the distance between the top of the ratchet plate groove to the bottom of the charging handle slot. Measurement “A” mine is 15mm
12: Disassemble charging handle. If you are using a mill, remove the button on the end
oakrodent
Re: MG-42 step by step build with BRP receiver
« Reply #4 on: January 16, 2010, 12:31:23 PM »
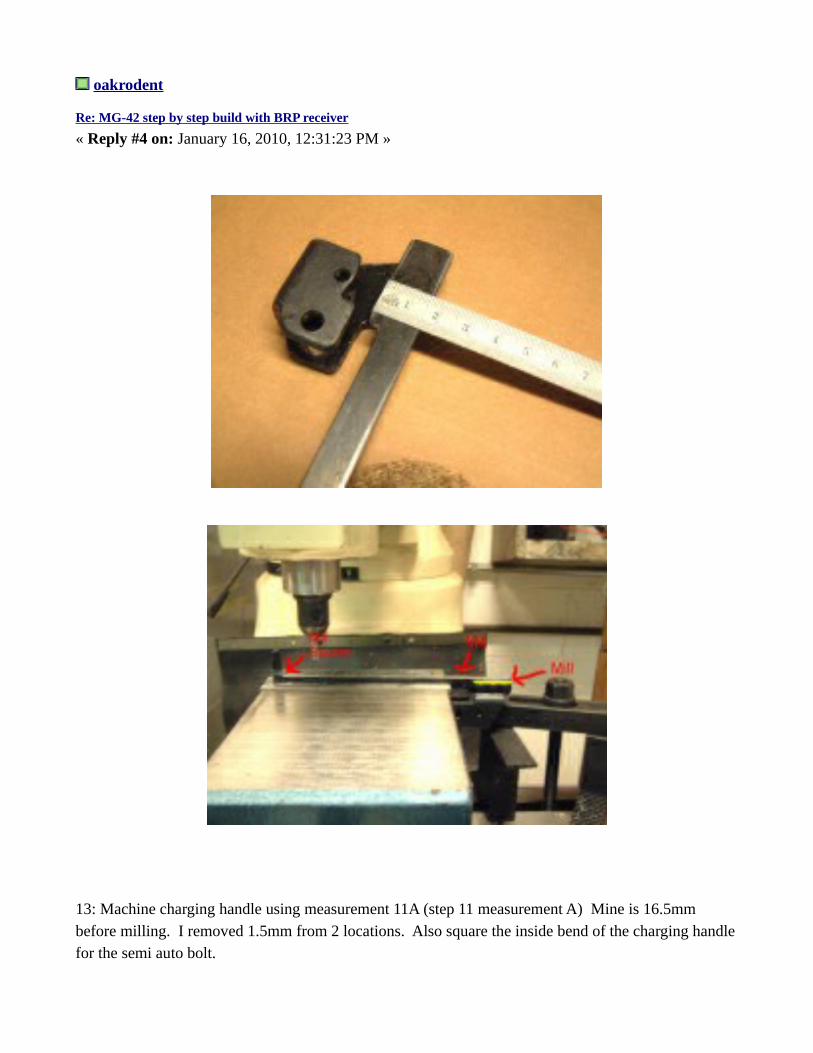
13: Machine charging handle using measurement 11A (step 11 measurement A) Mine is 16.5mm before milling. I removed 1.5mm from 2 locations. Also square the inside bend of the charging handlefor the semi auto bolt.

14: Lay out charging handle cut out.
oakrodent
Re: MG-42 step by step build with BRP receiver
« Reply #5 on: January 16, 2010, 12:34:49 PM »
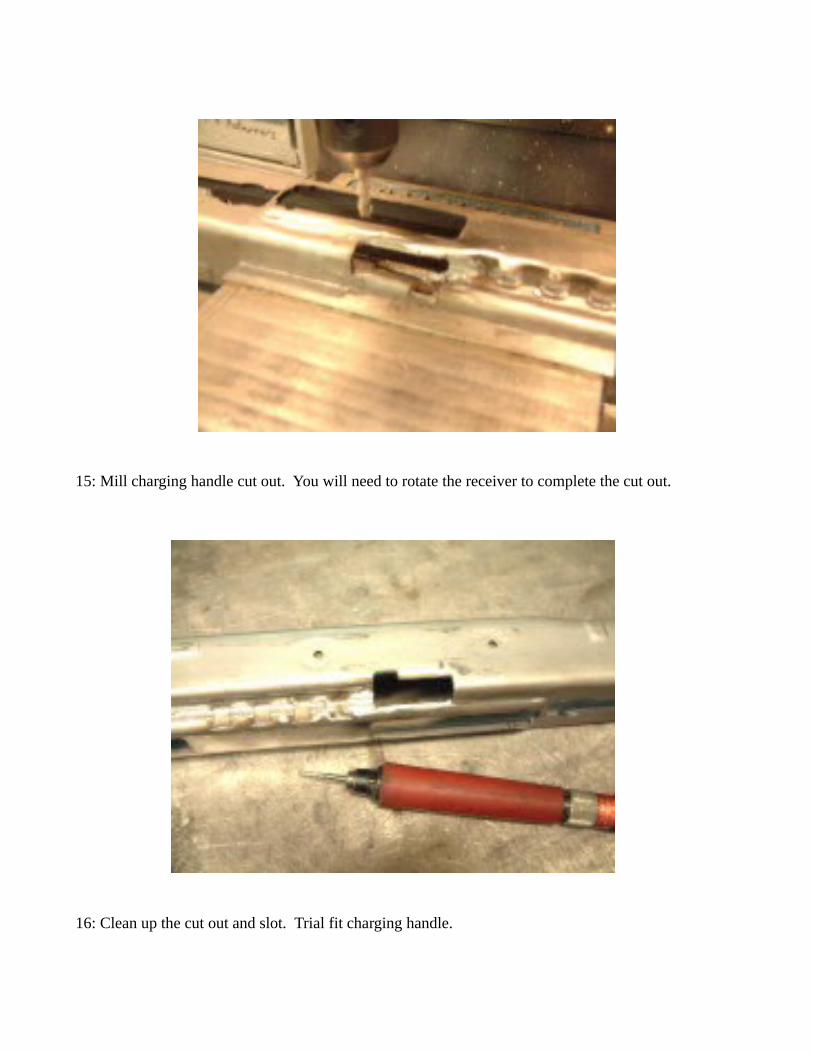
15: Mill charging handle cut out. You will need to rotate the receiver to complete the cut out.
16: Clean up the cut out and slot. Trial fit charging handle.

oakrodent
Re: MG-42 step by step build with BRP receiver
« Reply #6 on: January 16, 2010, 02:32:30 PM »
17: I sandblast all parts that are welded / riveted to the receiver. I then spray them with gun oil to prevent rusting
18: Lay out the holes for the rear barrel guide / barrel door bracket on both sides. Drill the 8 marked holes with a ¼ drill bit. Drill the barrel door rivet holes with a 15/64 drill bit. Clean all burrs
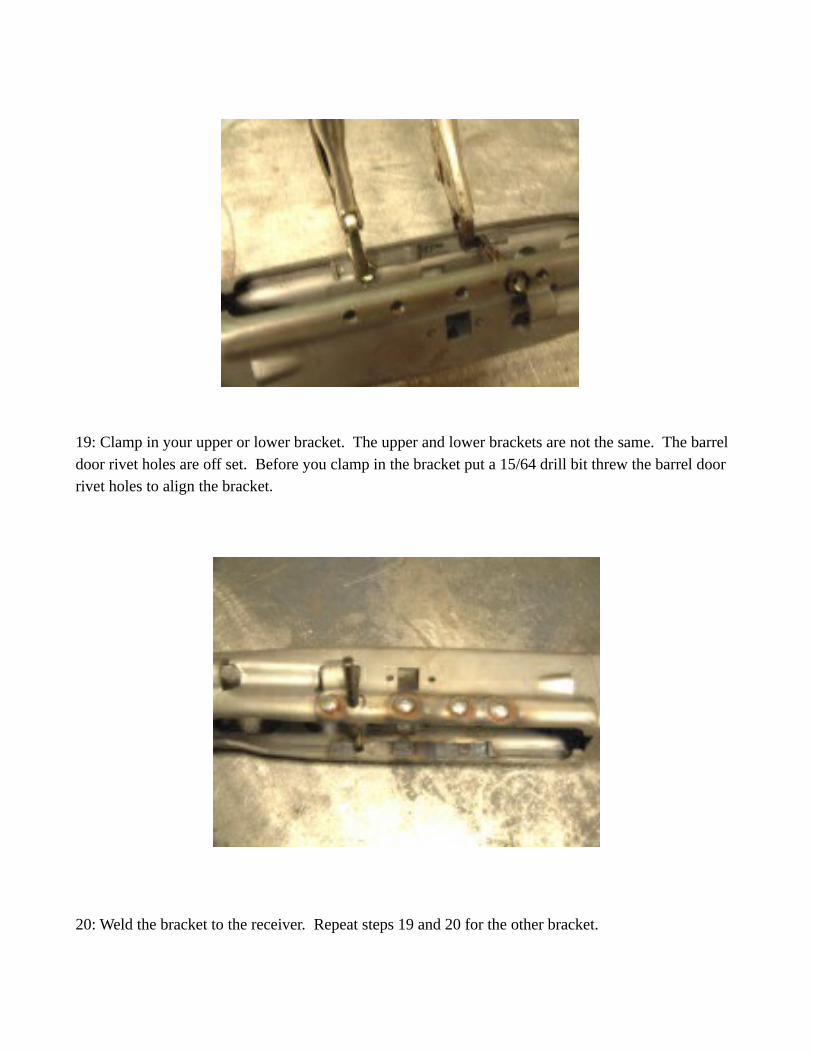
19: Clamp in your upper or lower bracket. The upper and lower brackets are not the same. The barrel door rivet holes are off set. Before you clamp in the bracket put a 15/64 drill bit threw the barrel door rivet holes to align the bracket.
20: Weld the bracket to the receiver. Repeat steps 19 and 20 for the other bracket.
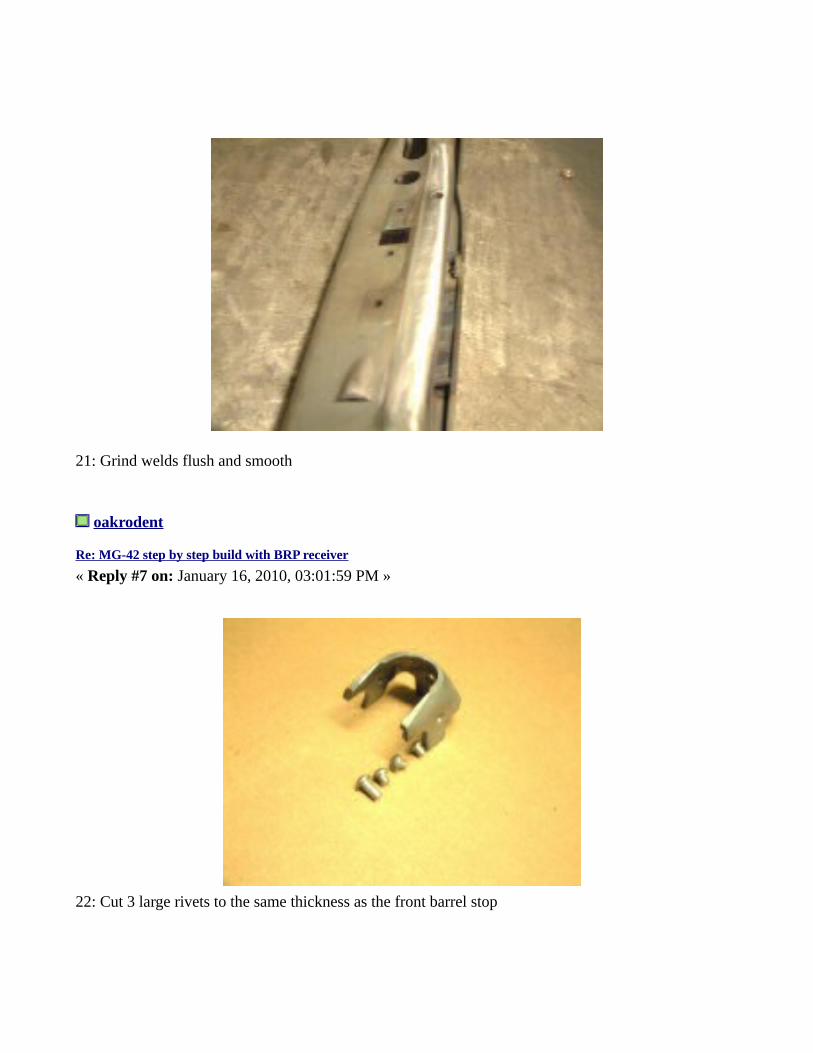
21: Grind welds flush and smooth
oakrodent
Re: MG-42 step by step build with BRP receiver
« Reply #7 on: January 16, 2010, 03:01:59 PM »
22: Cut 3 large rivets to the same thickness as the front barrel stop
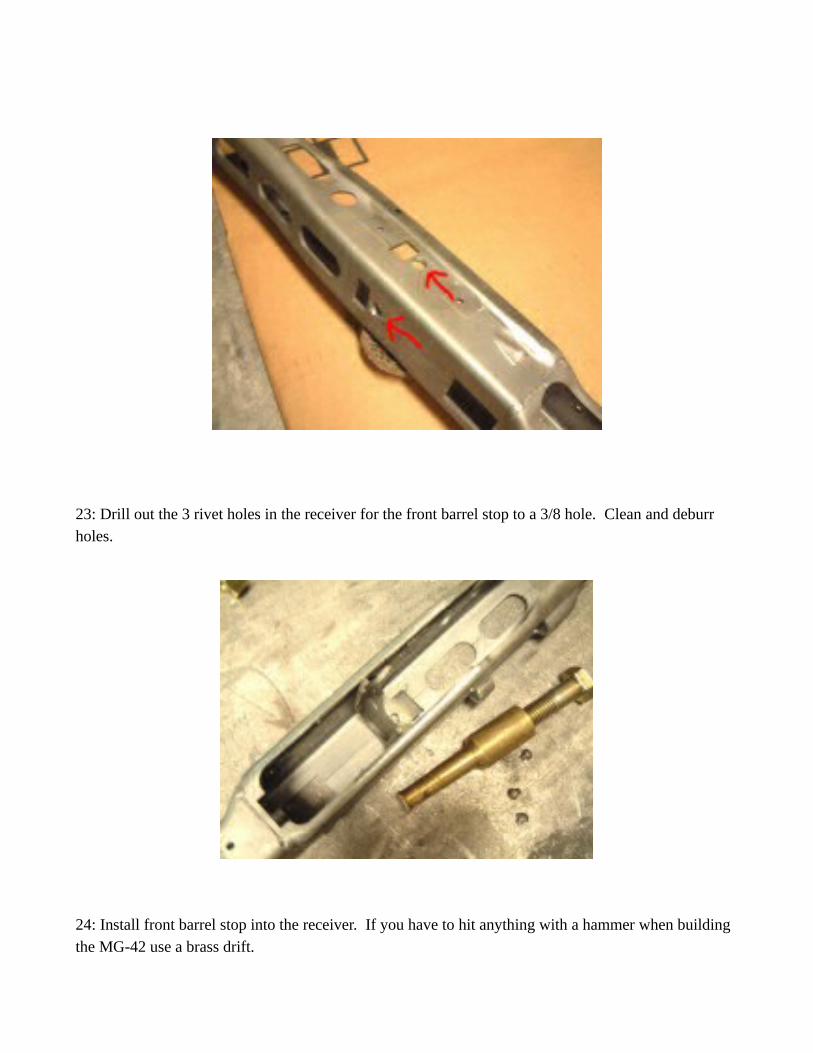
23: Drill out the 3 rivet holes in the receiver for the front barrel stop to a 3/8 hole. Clean and deburr holes.
24: Install front barrel stop into the receiver. If you have to hit anything with a hammer when building the MG-42 use a brass drift.
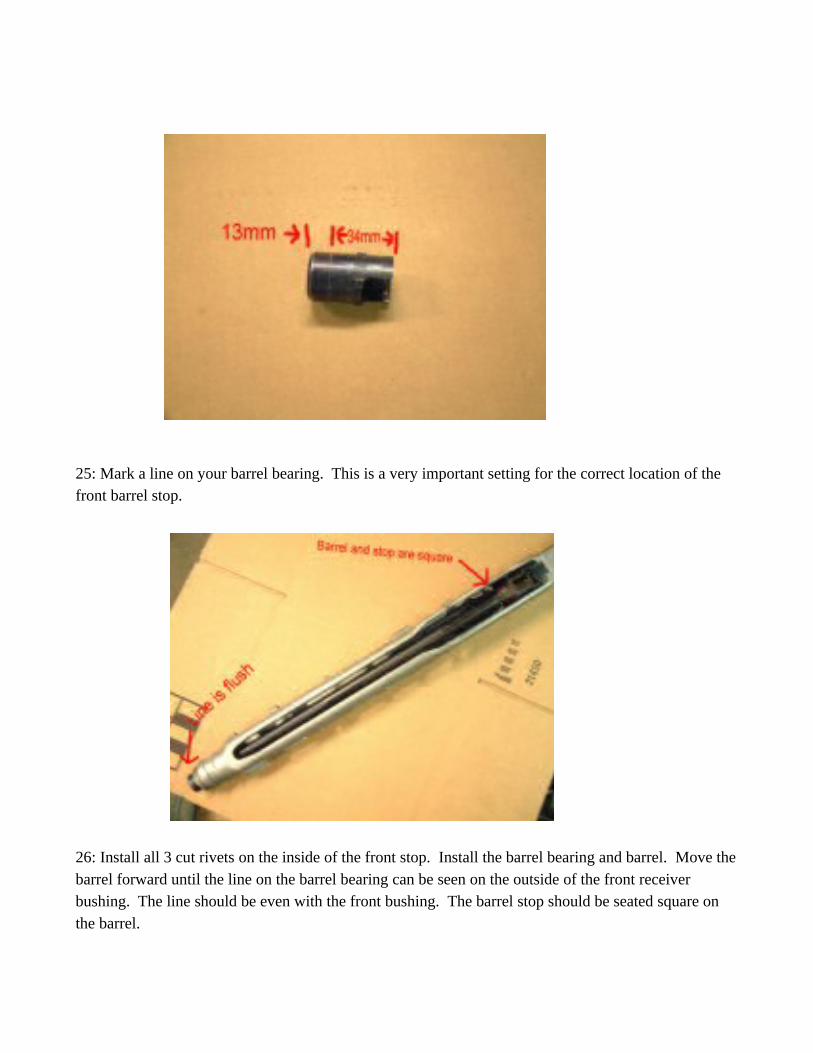
25: Mark a line on your barrel bearing. This is a very important setting for the correct location of the front barrel stop.
26: Install all 3 cut rivets on the inside of the front stop. Install the barrel bearing and barrel. Move thebarrel forward until the line on the barrel bearing can be seen on the outside of the front receiver bushing. The line should be even with the front bushing. The barrel stop should be seated square on the barrel.
oakrodent
Re: MG-42 step by step build with BRP receiver
« Reply #8 on: January 16, 2010, 04:59:10 PM »
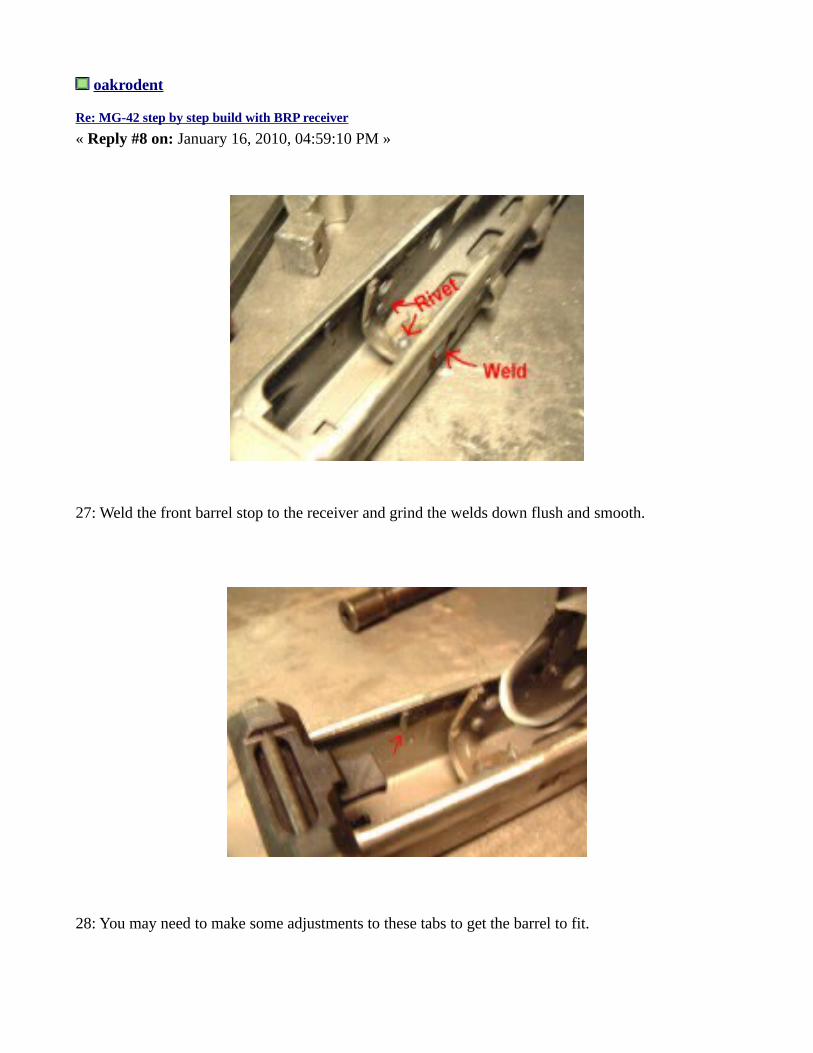
27: Weld the front barrel stop to the receiver and grind the welds down flush and smooth.
28: You may need to make some adjustments to these tabs to get the barrel to fit.
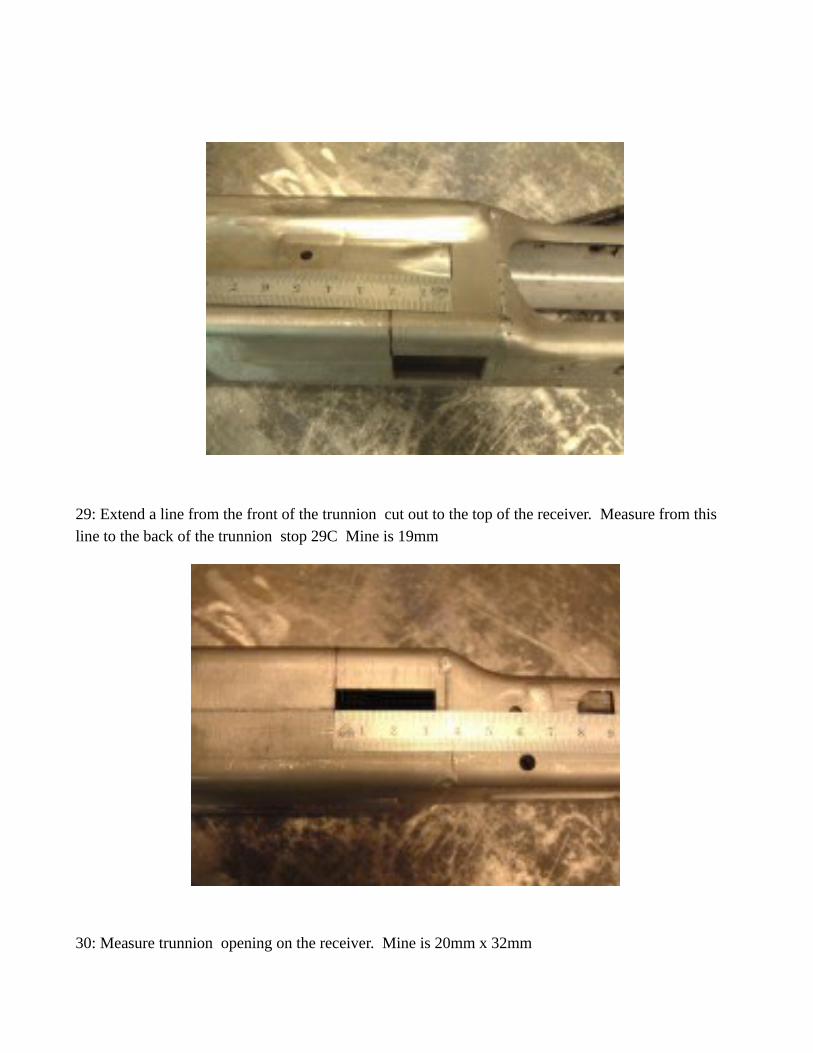
29: Extend a line from the front of the trunnion cut out to the top of the receiver. Measure from this line to the back of the trunnion stop 29C Mine is 19mm
30: Measure trunnion opening on the receiver. Mine is 20mm x 32mm
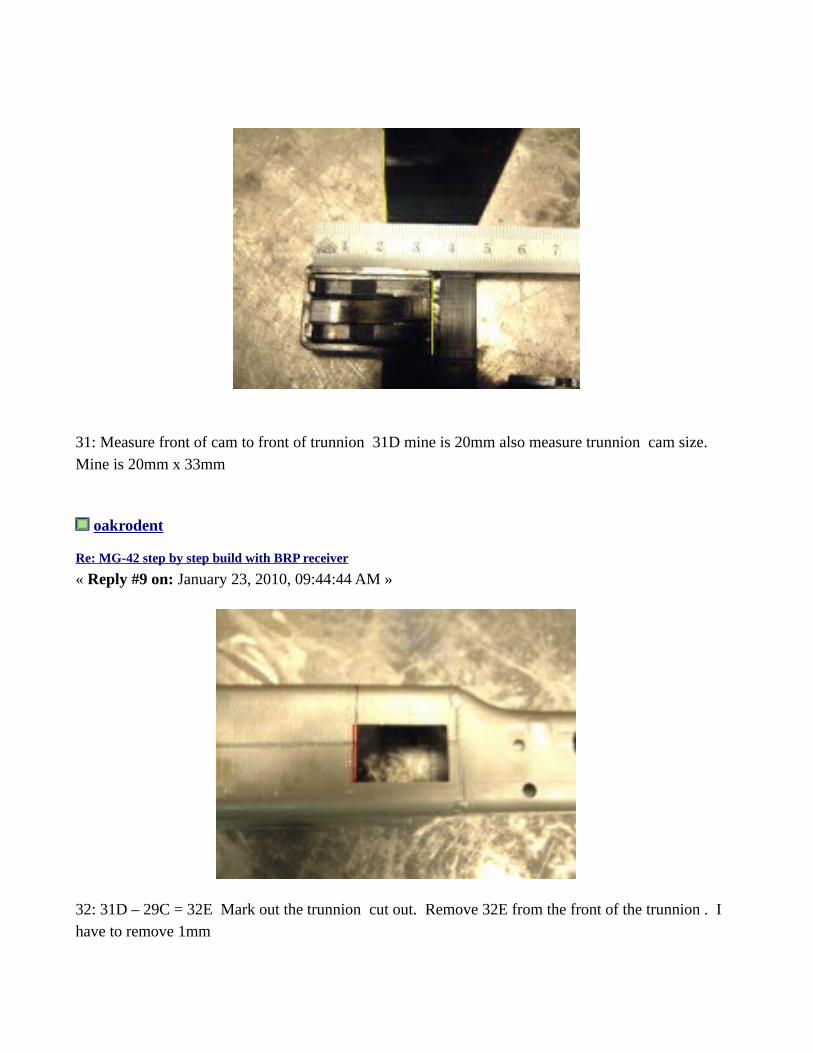
31: Measure front of cam to front of trunnion 31D mine is 20mm also measure trunnion cam size. Mine is 20mm x 33mm
oakrodent
Re: MG-42 step by step build with BRP receiver
« Reply #9 on: January 23, 2010, 09:44:44 AM »
32: 31D – 29C = 32E Mark out the trunnion cut out. Remove 32E from the front of the trunnion . I have to remove 1mm

33: Machine out you trunnion . My trunnion cam is 20mm x 33mm so I machined out my opening to 21mm x 34mm. Ensure you have .5mm clearance around your cam area.
34: Install your trunnion . You may need to remove a small amount of material from these areas to get the trunnion fit.
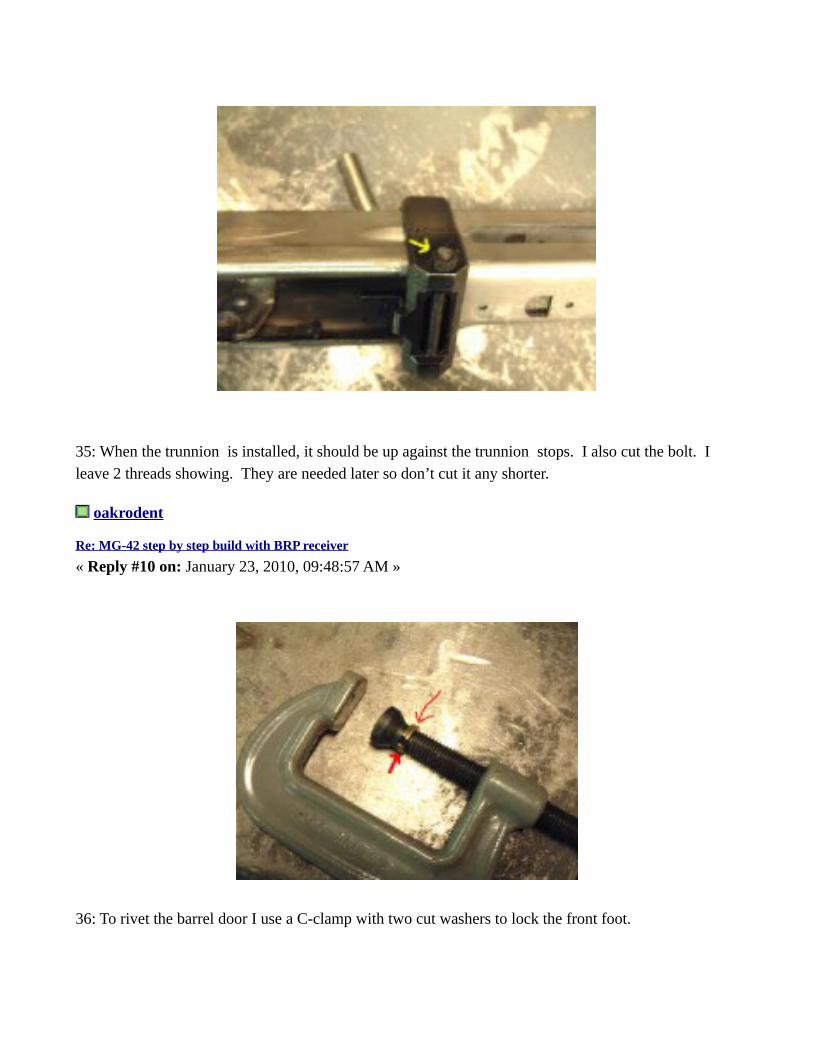
35: When the trunnion is installed, it should be up against the trunnion stops. I also cut the bolt. I leave 2 threads showing. They are needed later so don’t cut it any shorter.
oakrodent
Re: MG-42 step by step build with BRP receiver
« Reply #10 on: January 23, 2010, 09:48:57 AM »
36: To rivet the barrel door I use a C-clamp with two cut washers to lock the front foot.

37: Install barrel door and rivet. After riveting open and close the door a few times to loosen it up.
38: Install barrel door latch. Close door and ensure it latches.
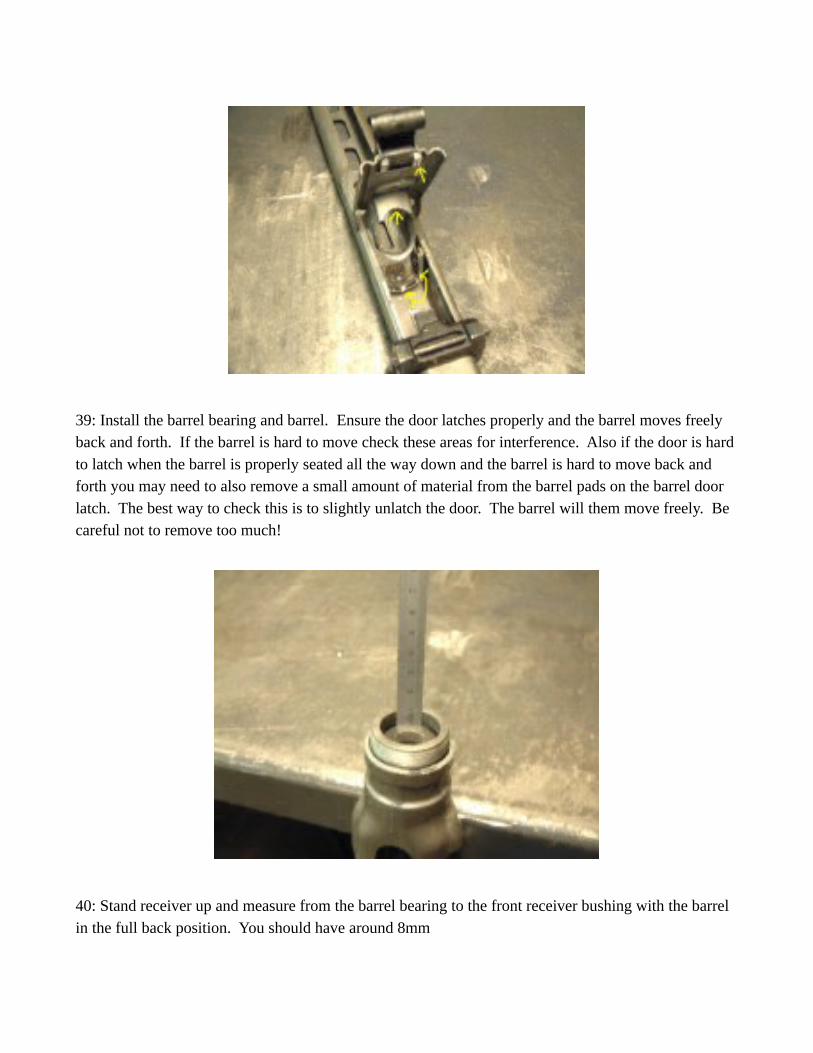
39: Install the barrel bearing and barrel. Ensure the door latches properly and the barrel moves freely back and forth. If the barrel is hard to move check these areas for interference. Also if the door is hard to latch when the barrel is properly seated all the way down and the barrel is hard to move back and forth you may need to also remove a small amount of material from the barrel pads on the barrel door latch. The best way to check this is to slightly unlatch the door. The barrel will them move freely. Be careful not to remove too much!
40: Stand receiver up and measure from the barrel bearing to the front receiver bushing with the barrel in the full back position. You should have around 8mm

oakrodent
Re: MG-42 step by step build with BRP receiver
« Reply #11 on: January 23, 2010, 10:06:00 AM »
41: The lower buffer tab is smaller than the upper tab.
42: The front of the tabs are going to be installed flush with the back of these machined grooves. This is very important!
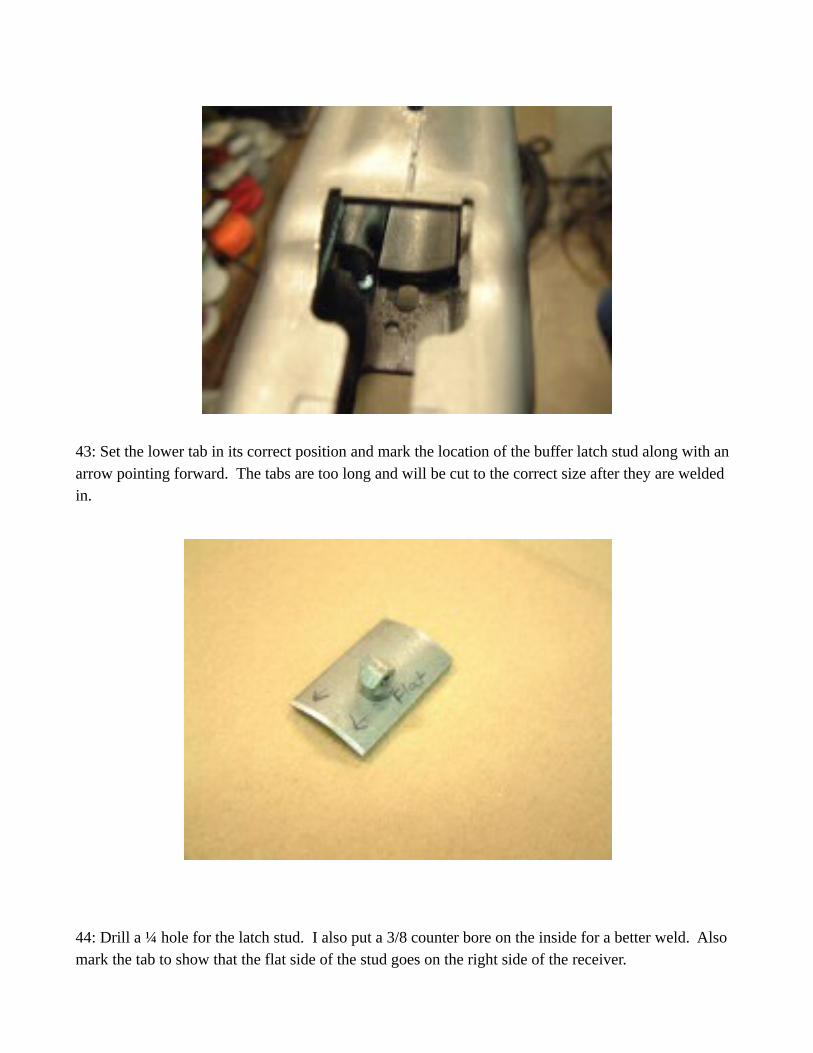
43: Set the lower tab in its correct position and mark the location of the buffer latch stud along with an arrow pointing forward. The tabs are too long and will be cut to the correct size after they are welded in.
44: Drill a ¼ hole for the latch stud. I also put a 3/8 counter bore on the inside for a better weld. Also mark the tab to show that the flat side of the stud goes on the right side of the receiver.
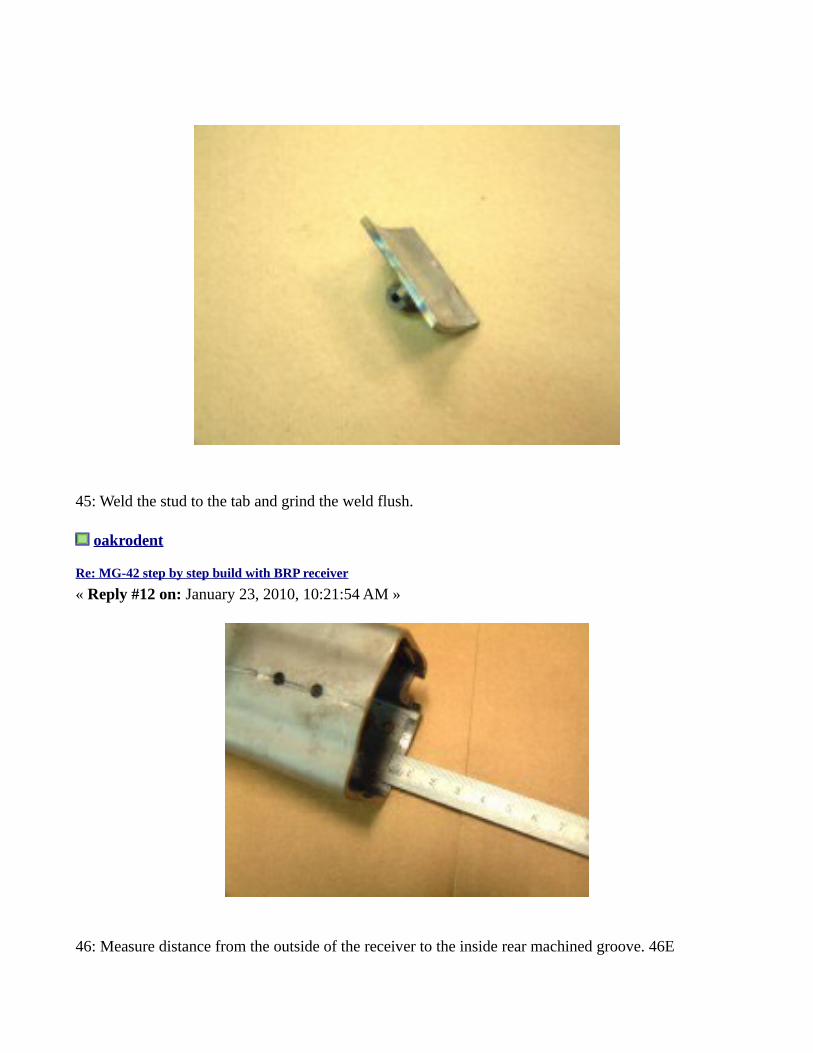
45: Weld the stud to the tab and grind the weld flush.
oakrodent
Re: MG-42 step by step build with BRP receiver
« Reply #12 on: January 23, 2010, 10:21:54 AM »
46: Measure distance from the outside of the receiver to the inside rear machined groove. 46E

47: Drill out the two lower buffer tab rivet holes and the two upper ones also with a 3/8 drill bit.
48: Clamp in the lower tab and weld. MAKE SURE you are flush with the machined groove.

49: Clamp in the upper tab and weld. Again make sure you are flush with the machined groove. Grind all welds flush.
50: Measure in 46E from the outside of the receiver and mark the tabs to be cut.
oakrodent
Re: MG-42 step by step build with BRP receiver
« Reply #13 on: January 23, 2010, 10:30:49 AM »
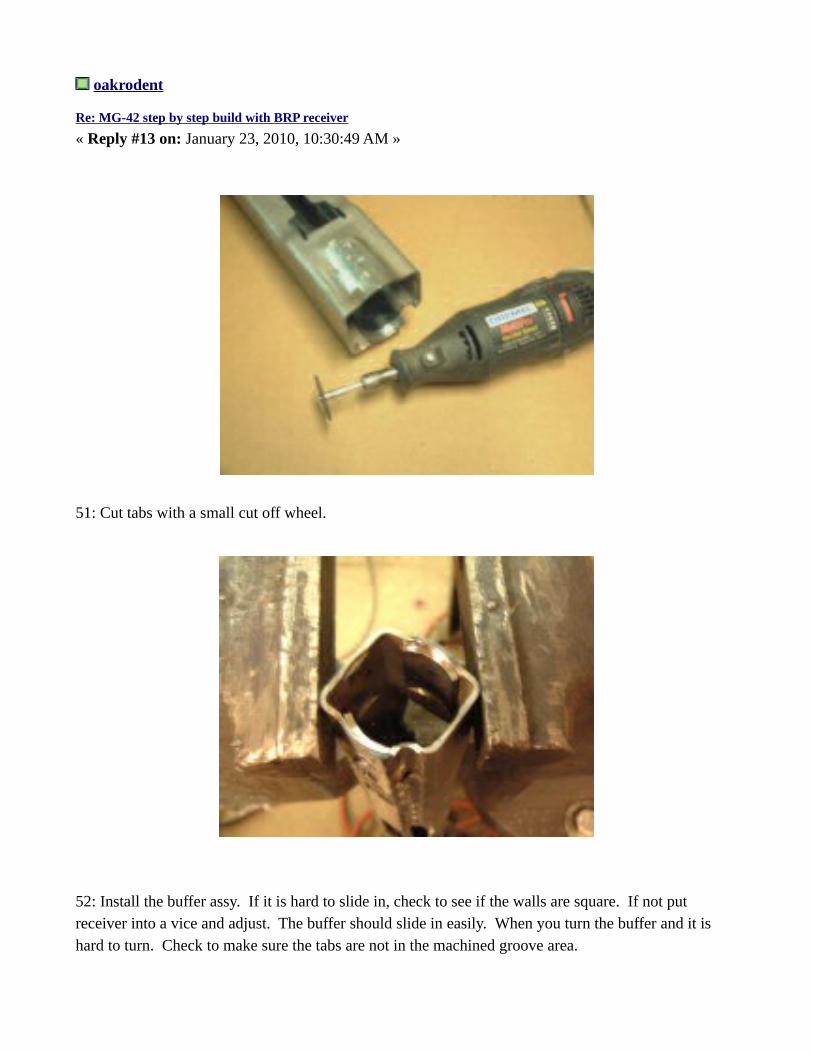
51: Cut tabs with a small cut off wheel.
52: Install the buffer assy. If it is hard to slide in, check to see if the walls are square. If not put receiver into a vice and adjust. The buffer should slide in easily. When you turn the buffer and it is hard to turn. Check to make sure the tabs are not in the machined groove area.

53: Mill a 3/16 hole 6 mm deep 10mm from the back of the receiver for the buffer latch spring.
oakrodent
Re: MG-42 step by step build with BRP receiver
« Reply #14 on: January 23, 2010, 10:47:00 AM »
54: Machine this area only so the opening is 18mm wide for the trigger housing.

55: Drill 3/8 holes in these three areas.
56: Cut one large recessed rivet to the same thickness as the trigger bracket/recoup stop.

57: Cut your recoup to match the top one.
58: This is the correct orientation for the front recoup bolt.
oakrodent
Re: MG-42 step by step build with BRP receiver
« Reply #15 on: January 23, 2010, 11:02:28 AM »
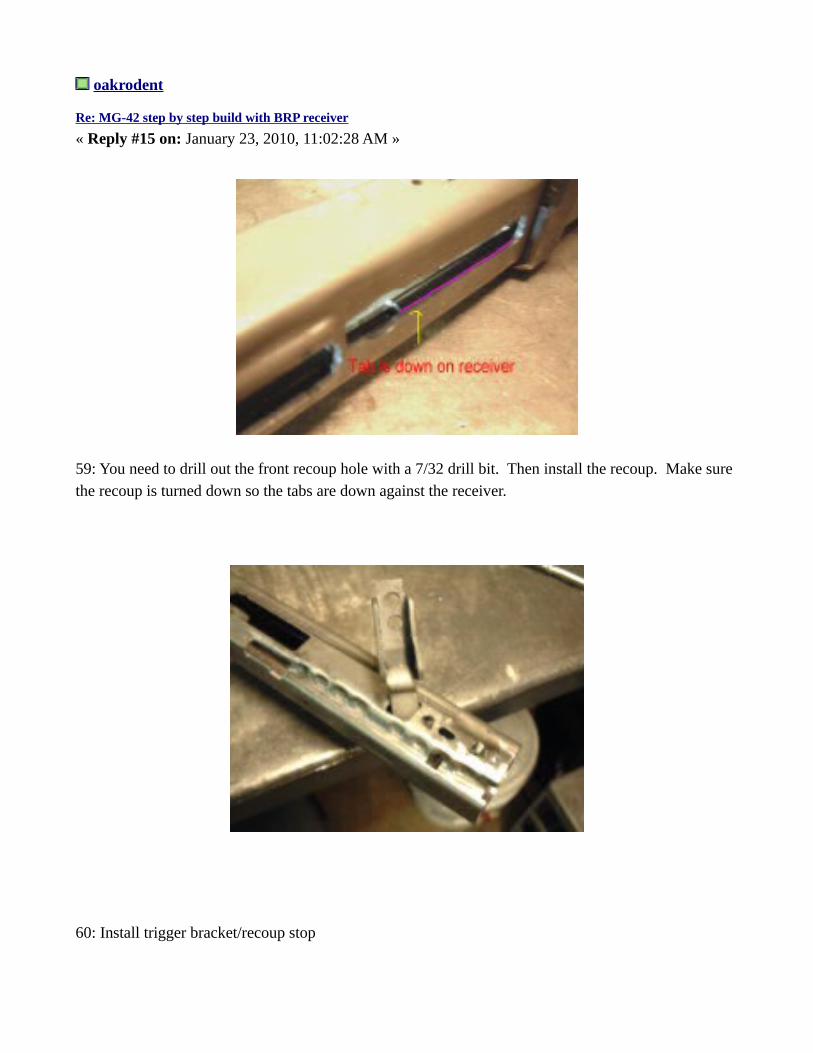
59: You need to drill out the front recoup hole with a 7/32 drill bit. Then install the recoup. Make sure the recoup is turned down so the tabs are down against the receiver.
60: Install trigger bracket/recoup stop
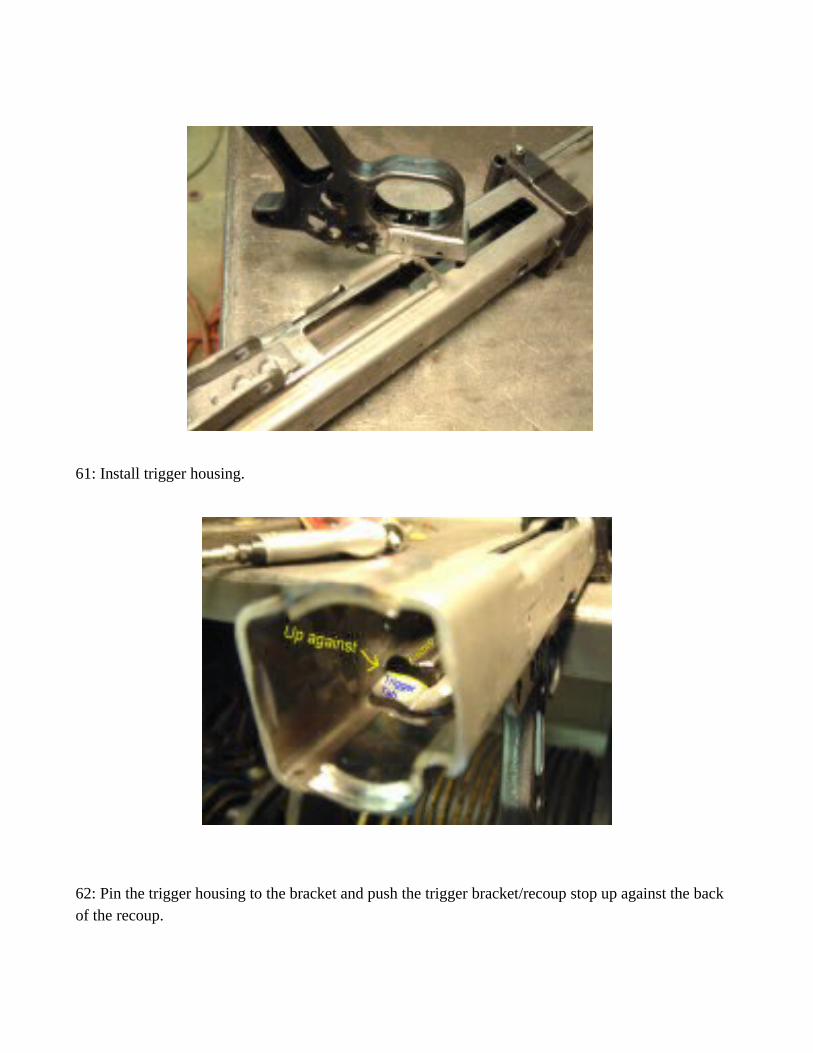
61: Install trigger housing.
62: Pin the trigger housing to the bracket and push the trigger bracket/recoup stop up against the back of the recoup.
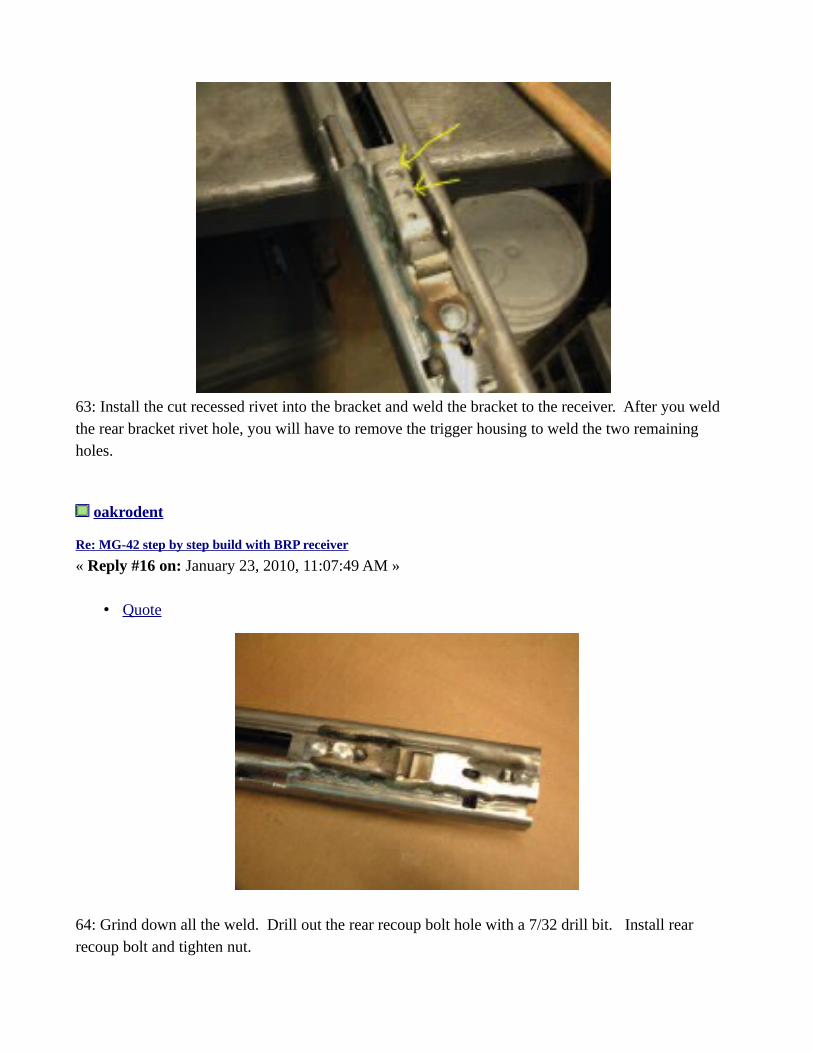
63: Install the cut recessed rivet into the bracket and weld the bracket to the receiver. After you weld the rear bracket rivet hole, you will have to remove the trigger housing to weld the two remaining holes.
oakrodent
Re: MG-42 step by step build with BRP receiver
« Reply #16 on: January 23, 2010, 11:07:49 AM »
• Quote
64: Grind down all the weld. Drill out the rear recoup bolt hole with a 7/32 drill bit. Install rear recoup bolt and tighten nut.
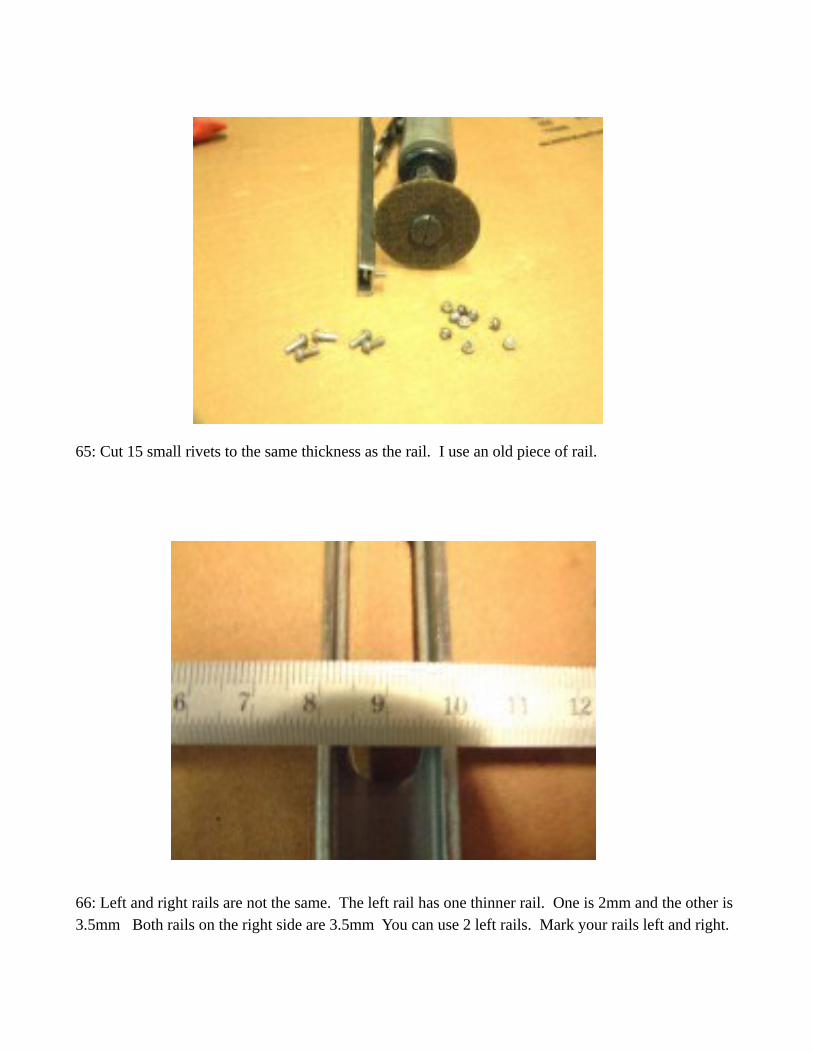
65: Cut 15 small rivets to the same thickness as the rail. I use an old piece of rail.
66: Left and right rails are not the same. The left rail has one thinner rail. One is 2mm and the other is 3.5mm Both rails on the right side are 3.5mm You can use 2 left rails. Mark your rails left and right.

67: Lay out your holes for your rails. They should be on the rails center line. When marking out your holes, you want the rails stops tight against the receiver. Use a 5/32 drill bit for the holes.
68: I made a simple way to hold the rivets tight in the rails so the rails can be welded tight against the receiver. Make sure you cut it so it can push on the rivet and has clearance for the middle bolt tabs. I used two 3/8-16 x ¾ bolts, one 3/8-16 nut, and one 3/8-16 coupler nut.

oakrodent
Re: MG-42 step by step build with BRP receiver
« Reply #17 on: January 23, 2010, 11:12:30 AM »
69: Drill out these 3 holes on both sides of the receiver with a 3/8 drill bit.
70: Install rails using four 6-32 x 1” bolts with nuts. MAKE sure the rails are centered on the trunnion.
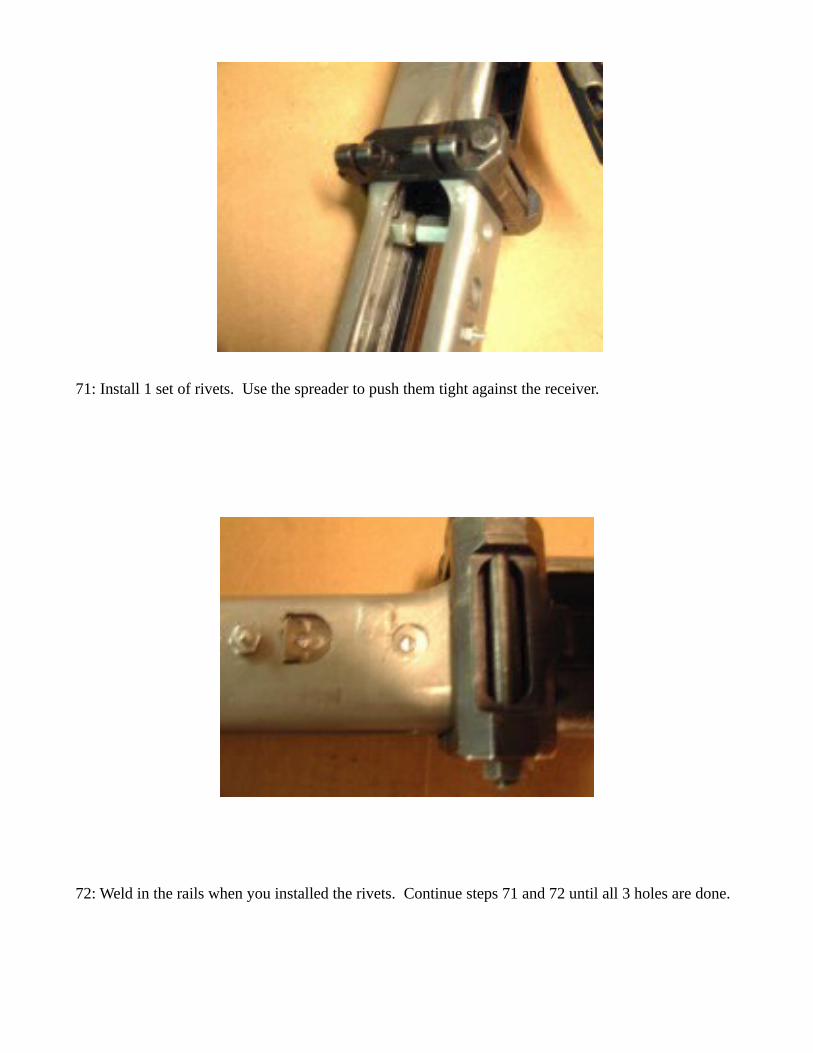
71: Install 1 set of rivets. Use the spreader to push them tight against the receiver.
72: Weld in the rails when you installed the rivets. Continue steps 71 and 72 until all 3 holes are done.
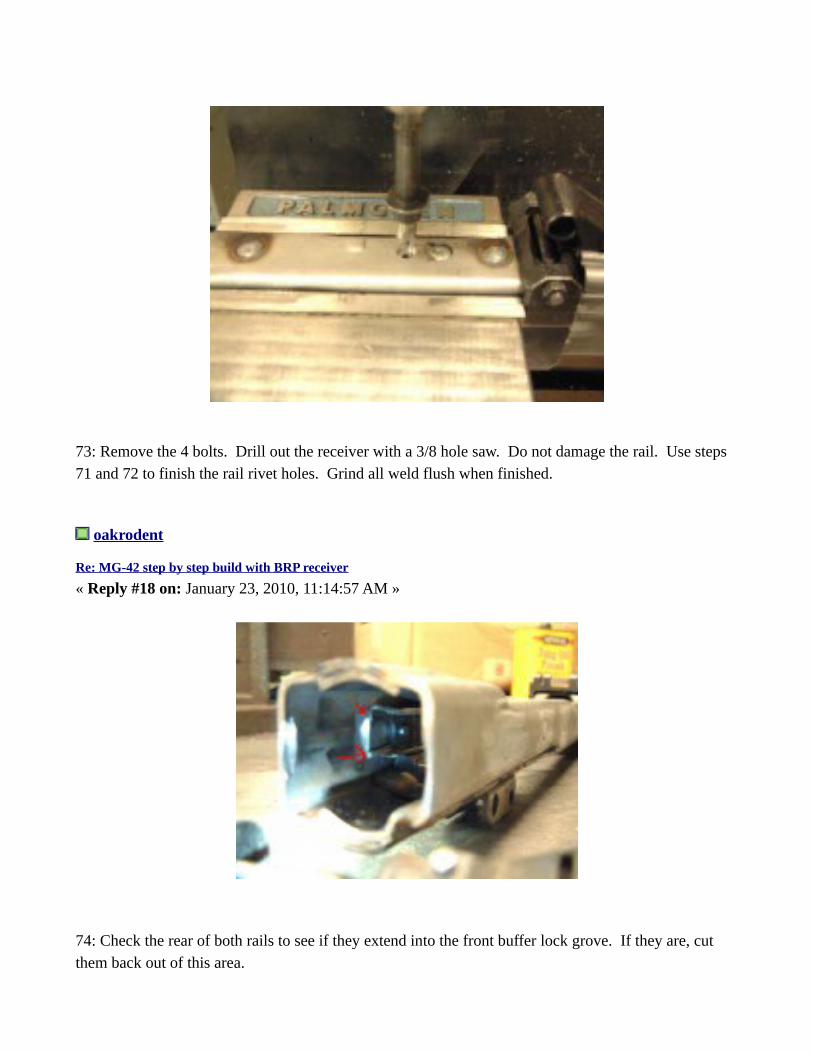
73: Remove the 4 bolts. Drill out the receiver with a 3/8 hole saw. Do not damage the rail. Use steps 71 and 72 to finish the rail rivet holes. Grind all weld flush when finished.
oakrodent
Re: MG-42 step by step build with BRP receiver
« Reply #18 on: January 23, 2010, 11:14:57 AM »
74: Check the rear of both rails to see if they extend into the front buffer lock grove. If they are, cut them back out of this area.
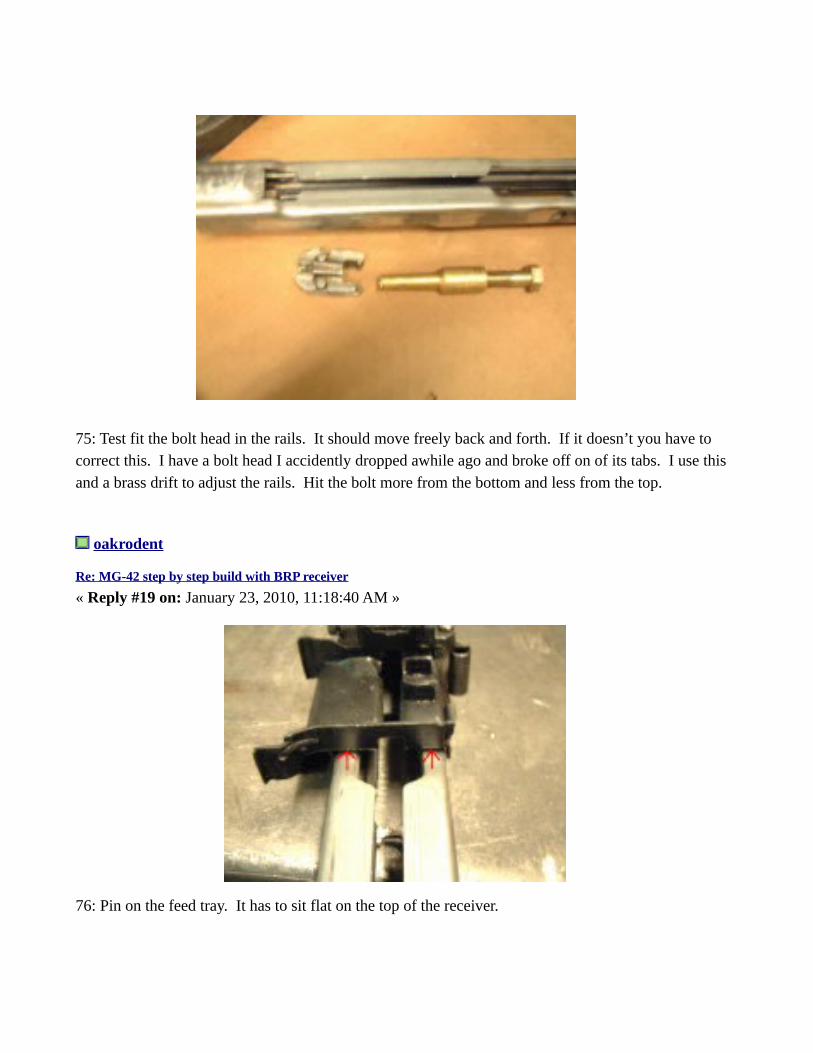
75: Test fit the bolt head in the rails. It should move freely back and forth. If it doesn’t you have to correct this. I have a bolt head I accidently dropped awhile ago and broke off on of its tabs. I use this and a brass drift to adjust the rails. Hit the bolt more from the bottom and less from the top.
oakrodent
Re: MG-42 step by step build with BRP receiver
« Reply #19 on: January 23, 2010, 11:18:40 AM »
76: Pin on the feed tray. It has to sit flat on the top of the receiver.
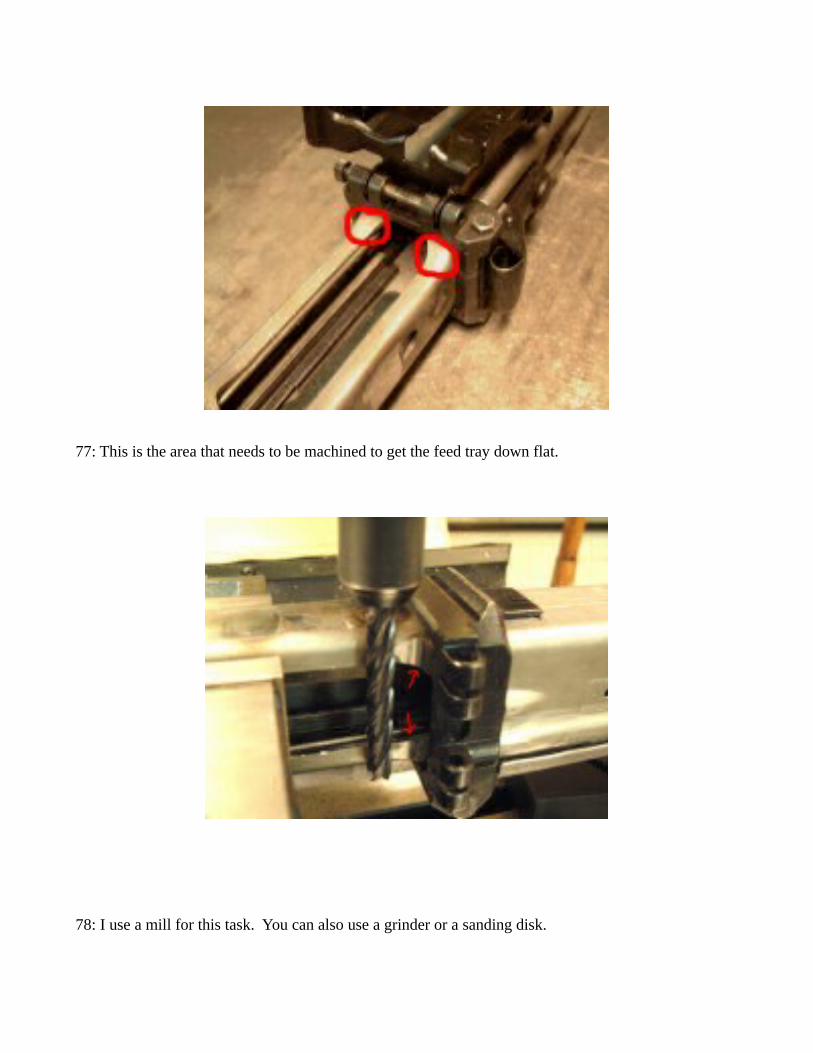
77: This is the area that needs to be machined to get the feed tray down flat.
78: I use a mill for this task. You can also use a grinder or a sanding disk.
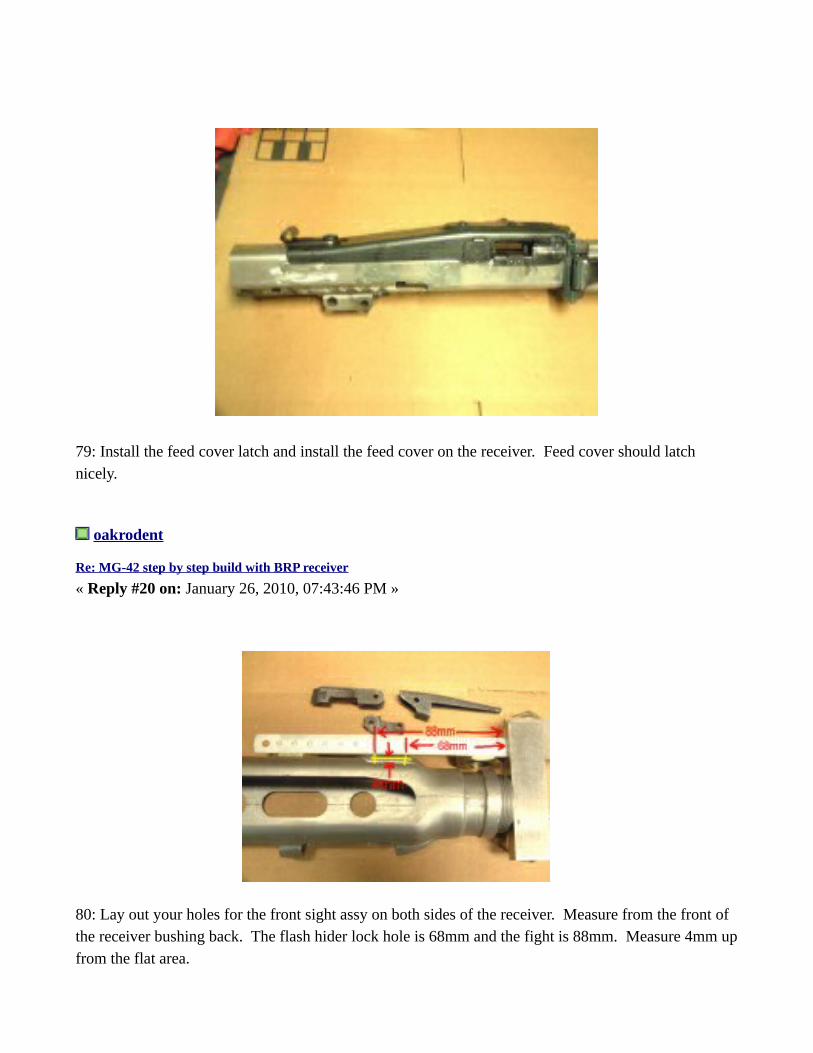
79: Install the feed cover latch and install the feed cover on the receiver. Feed cover should latch nicely.
oakrodent
Re: MG-42 step by step build with BRP receiver
« Reply #20 on: January 26, 2010, 07:43:46 PM »
80: Lay out your holes for the front sight assy on both sides of the receiver. Measure from the front of the receiver bushing back. The flash hider lock hole is 68mm and the fight is 88mm. Measure 4mm upfrom the flat area.
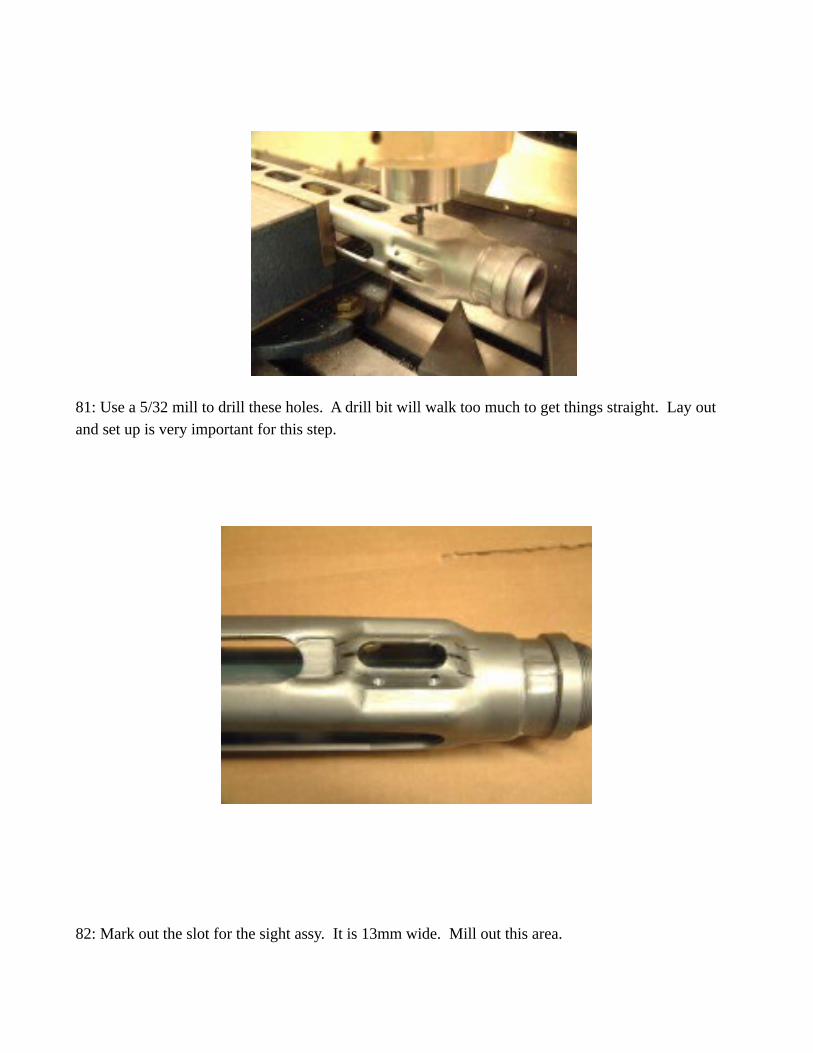
81: Use a 5/32 mill to drill these holes. A drill bit will walk too much to get things straight. Lay out and set up is very important for this step.
82: Mark out the slot for the sight assy. It is 13mm wide. Mill out this area.
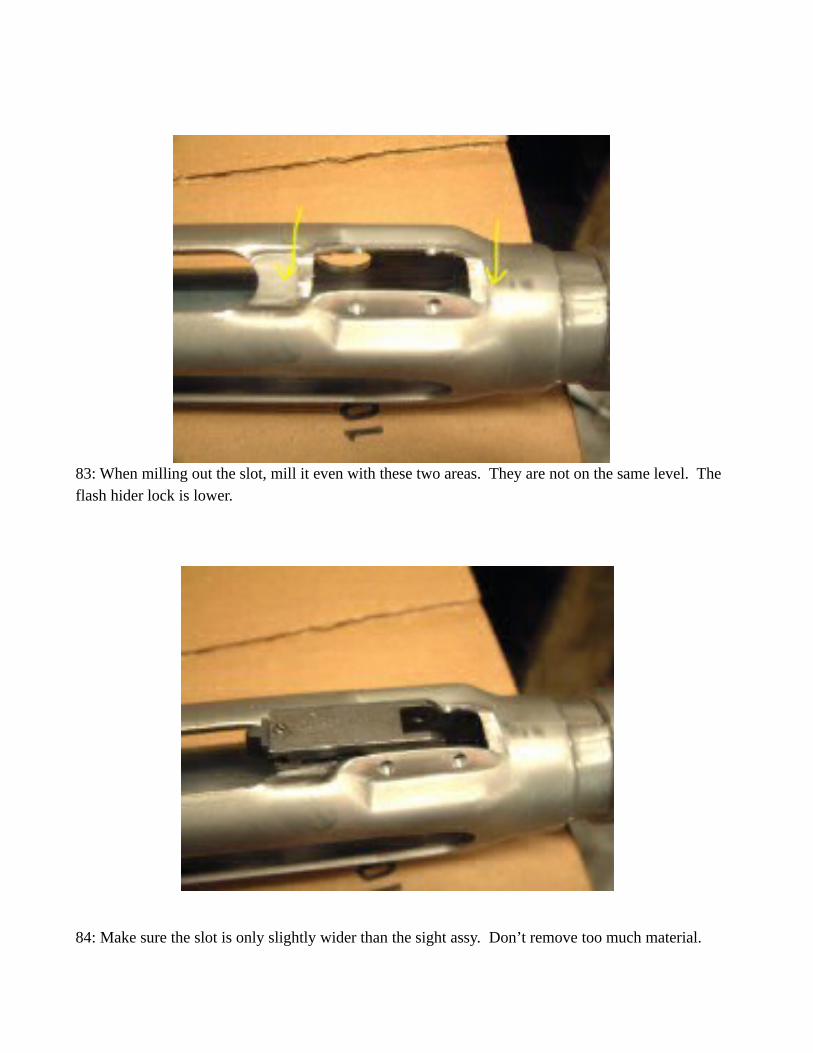
83: When milling out the slot, mill it even with these two areas. They are not on the same level. The flash hider lock is lower.
84: Make sure the slot is only slightly wider than the sight assy. Don’t remove too much material.
oakrodent
Re: MG-42 step by step build with BRP receiver
« Reply #21 on: January 26, 2010, 08:02:17 PM »
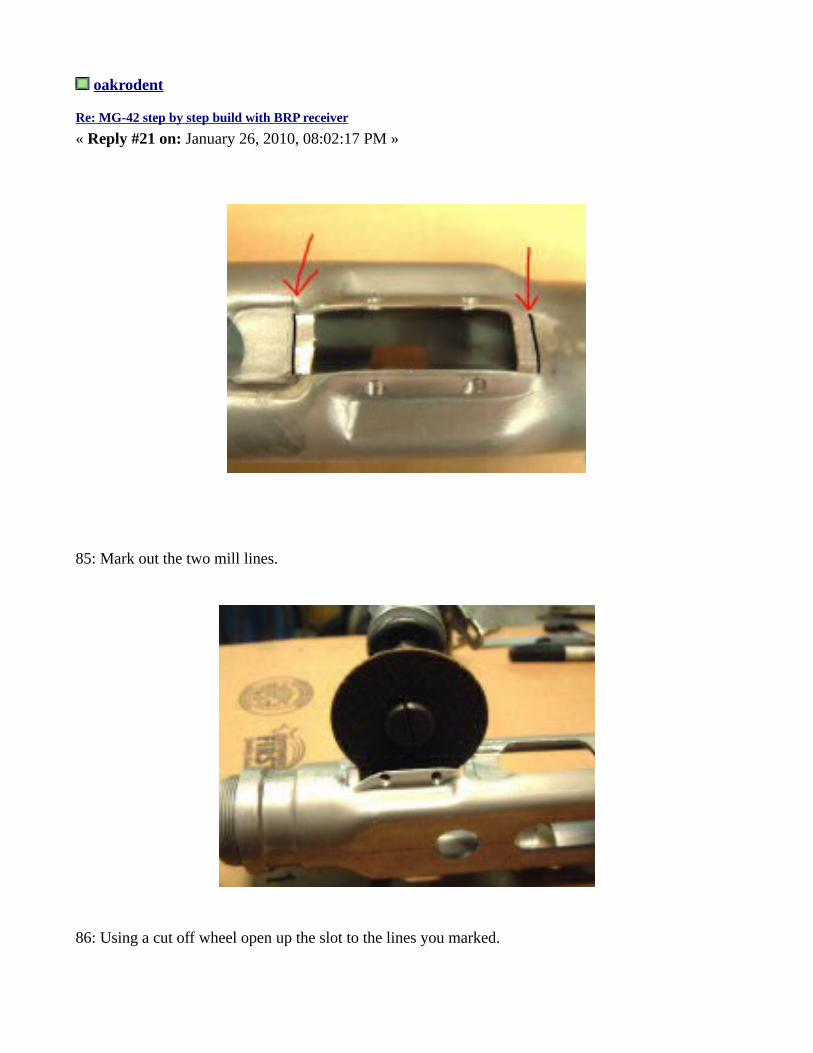
85: Mark out the two mill lines.
86: Using a cut off wheel open up the slot to the lines you marked.
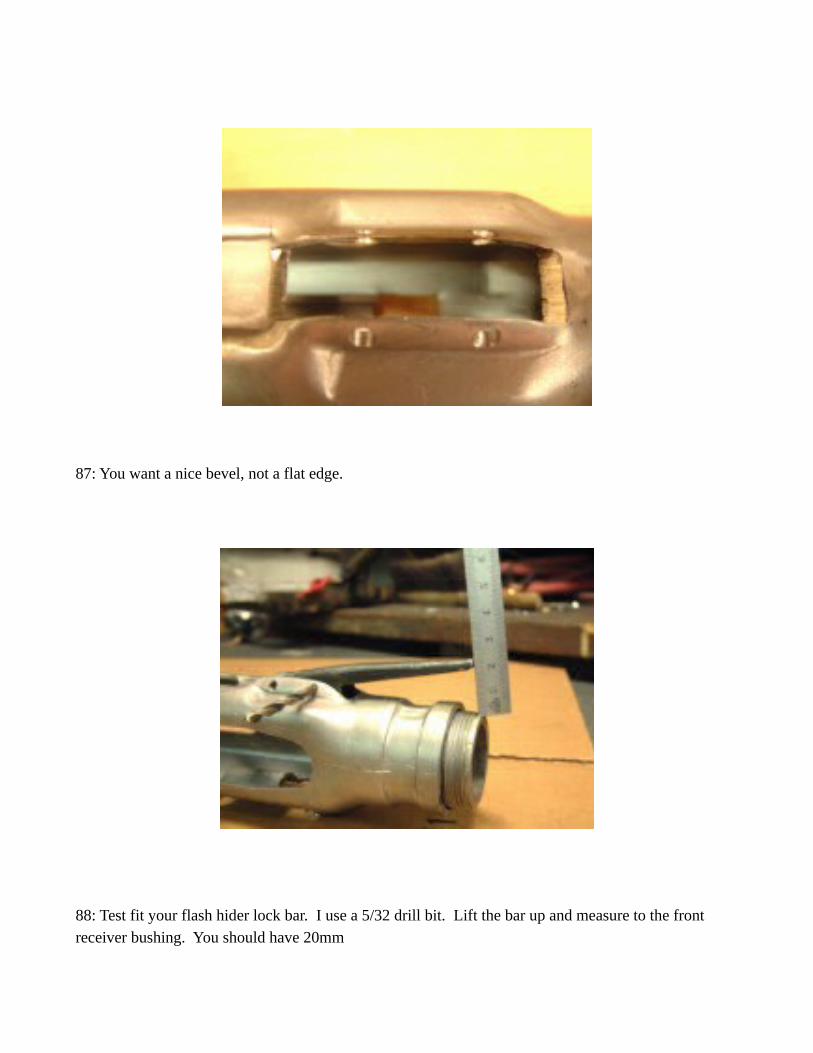
87: You want a nice bevel, not a flat edge.
88: Test fit your flash hider lock bar. I use a 5/32 drill bit. Lift the bar up and measure to the front receiver bushing. You should have 20mm

89: If your lock does not lift to the correct measurement. Remove some material from this area.
oakrodent
Re: MG-42 step by step build with BRP receiver
« Reply #22 on: January 26, 2010, 08:05:14 PM »
90: Cut 2 old pins to 13mm for assembling the front sight assy.
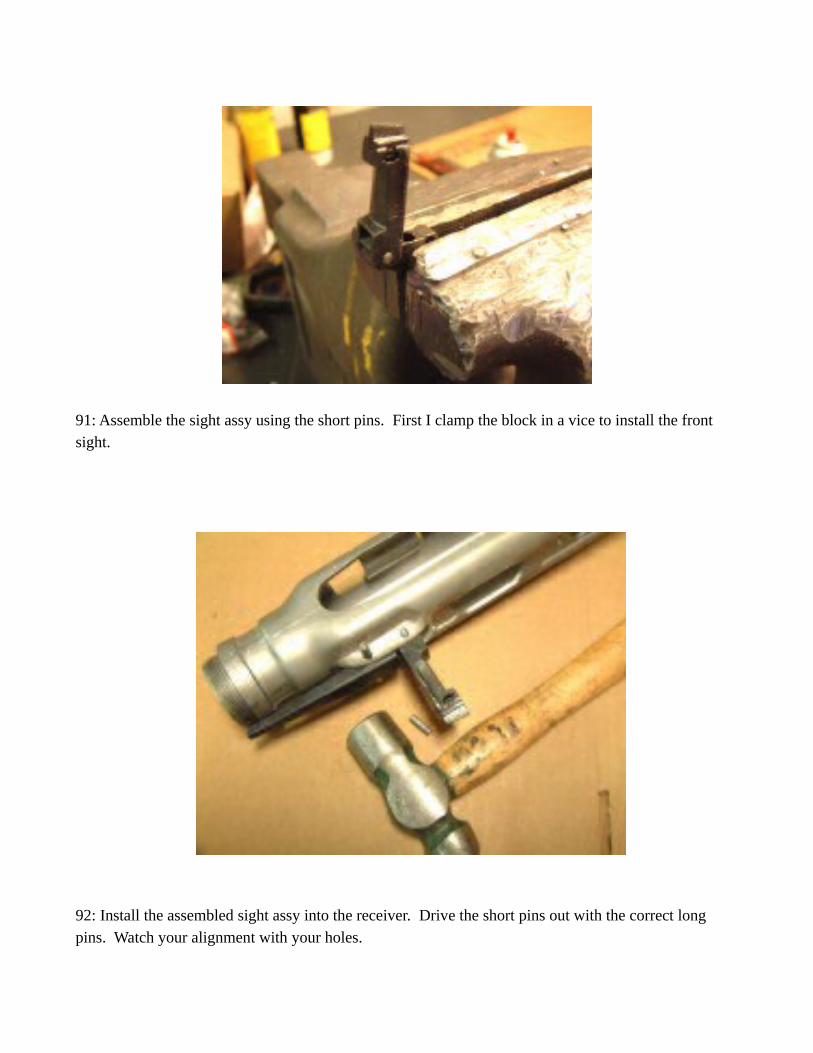
91: Assemble the sight assy using the short pins. First I clamp the block in a vice to install the front sight.
92: Install the assembled sight assy into the receiver. Drive the short pins out with the correct long pins. Watch your alignment with your holes.

93: Mushroom the ends of the pins. I use a lady finger up against a vice on one side while I hit the other. Don’t go crazy. These pins will have to be removed to prep the MG for bluing after the test firing.
oakrodent
Re: MG-42 step by step build with BRP receiver
« Reply #23 on: January 26, 2010, 08:08:58 PM »
94: Drill out these rivet holes with a 3/8 drill bit.
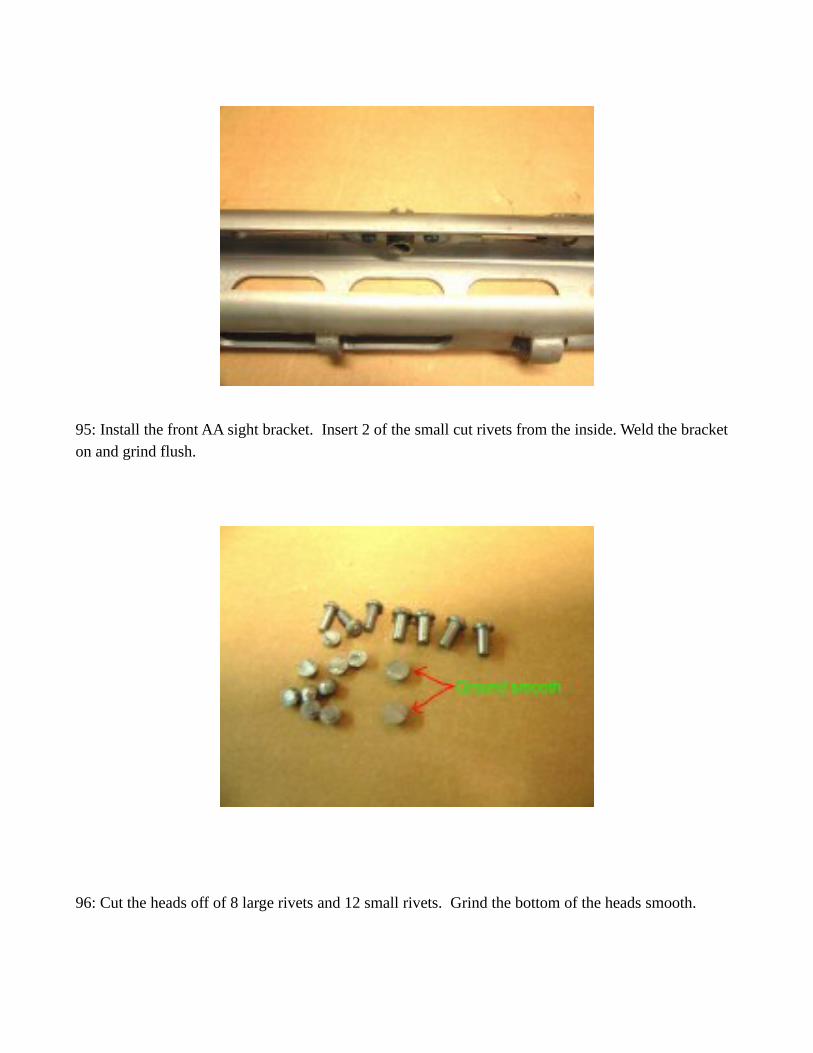
95: Install the front AA sight bracket. Insert 2 of the small cut rivets from the inside. Weld the bracket on and grind flush.
96: Cut the heads off of 8 large rivets and 12 small rivets. Grind the bottom of the heads smooth.
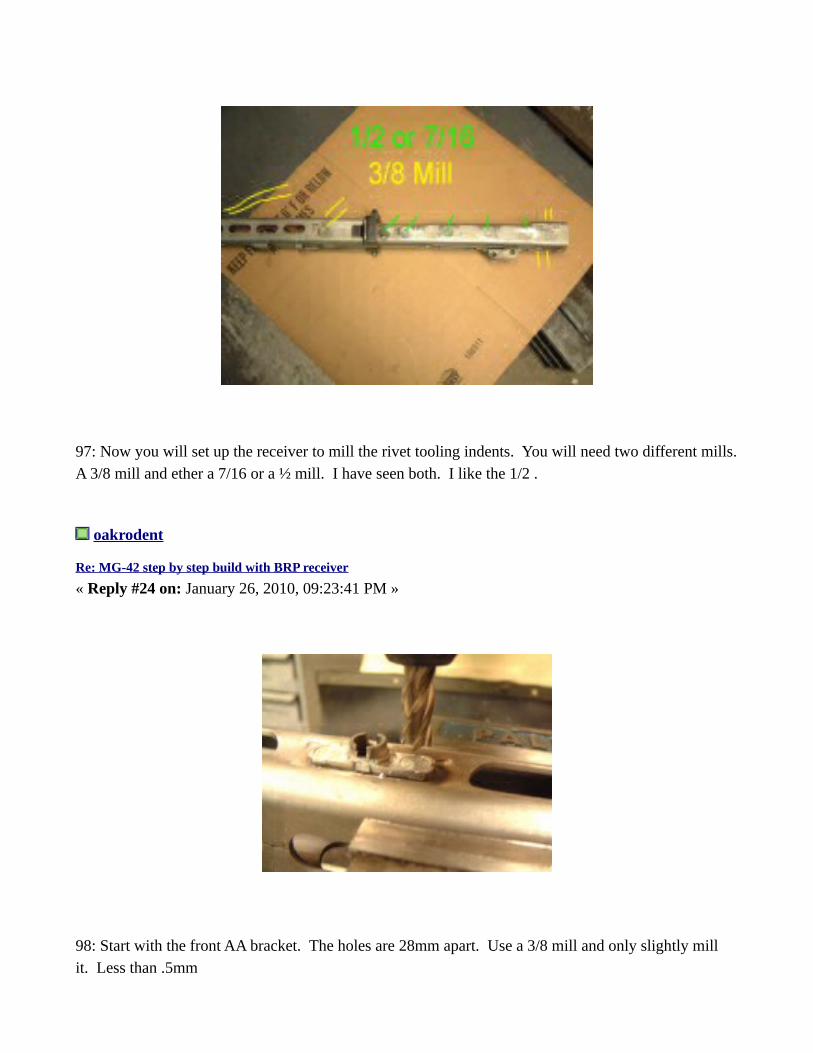
97: Now you will set up the receiver to mill the rivet tooling indents. You will need two different mills.A 3/8 mill and ether a 7/16 or a ½ mill. I have seen both. I like the 1/2 .
oakrodent
Re: MG-42 step by step build with BRP receiver
« Reply #24 on: January 26, 2010, 09:23:41 PM »
98: Start with the front AA bracket. The holes are 28mm apart. Use a 3/8 mill and only slightly mill it. Less than .5mm

99: Next do only the top and left side of the front barrel stop. Measure back 7mm from the cut outs. Center it with the cut outs.
100: Next is the top buffer tabs. Measure 13mm and 30mm from the back of the receiver. Center the holes on the top of the receiver. Mill with a 3/8 mill.

101: Next is the lower buffer tab and recoup stop. Measure 33mm and 60mm from the back of the receiver. Center the holes on the bottom of the receiver. Mill with a 3/8 mill.
102: Measure out and mill the left and right rails. Use ether a 7/16 or 1/2 mill.
oakrodent
Re: MG-42 step by step build with BRP receiver
« Reply #25 on: February 09, 2010, 05:07:33 PM »
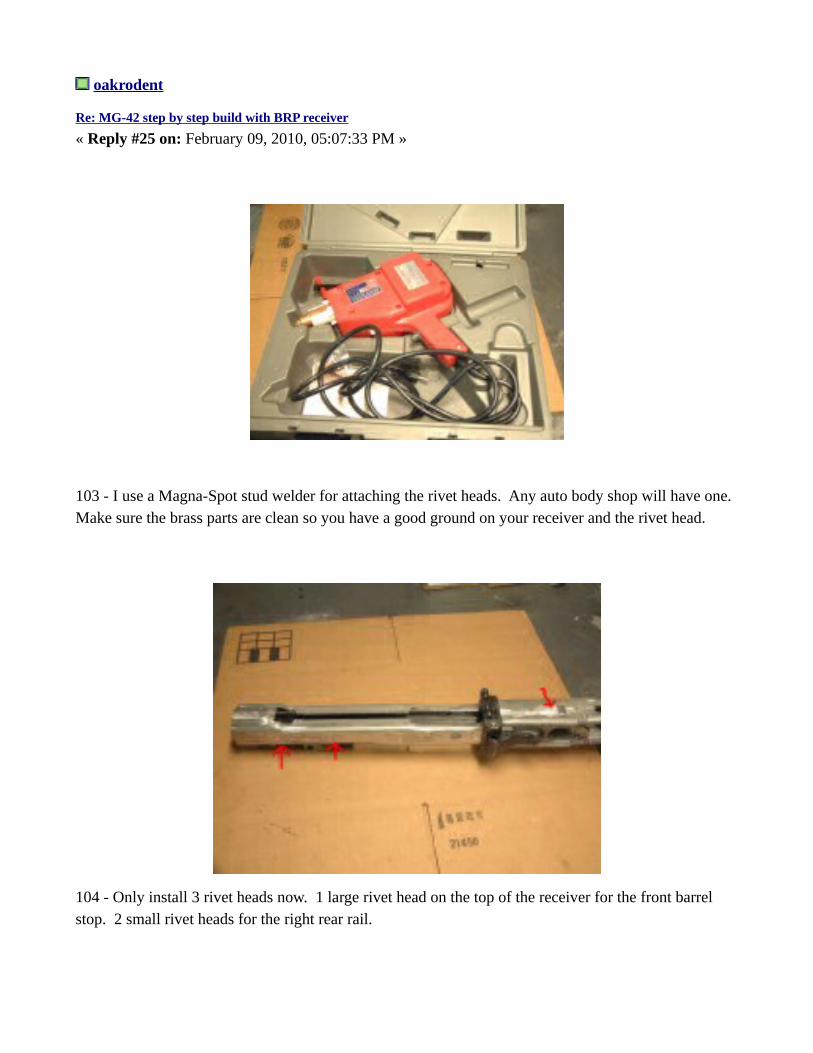
103 - I use a Magna-Spot stud welder for attaching the rivet heads. Any auto body shop will have one. Make sure the brass parts are clean so you have a good ground on your receiver and the rivet head.
104 - Only install 3 rivet heads now. 1 large rivet head on the top of the receiver for the front barrel stop. 2 small rivet heads for the right rear rail.
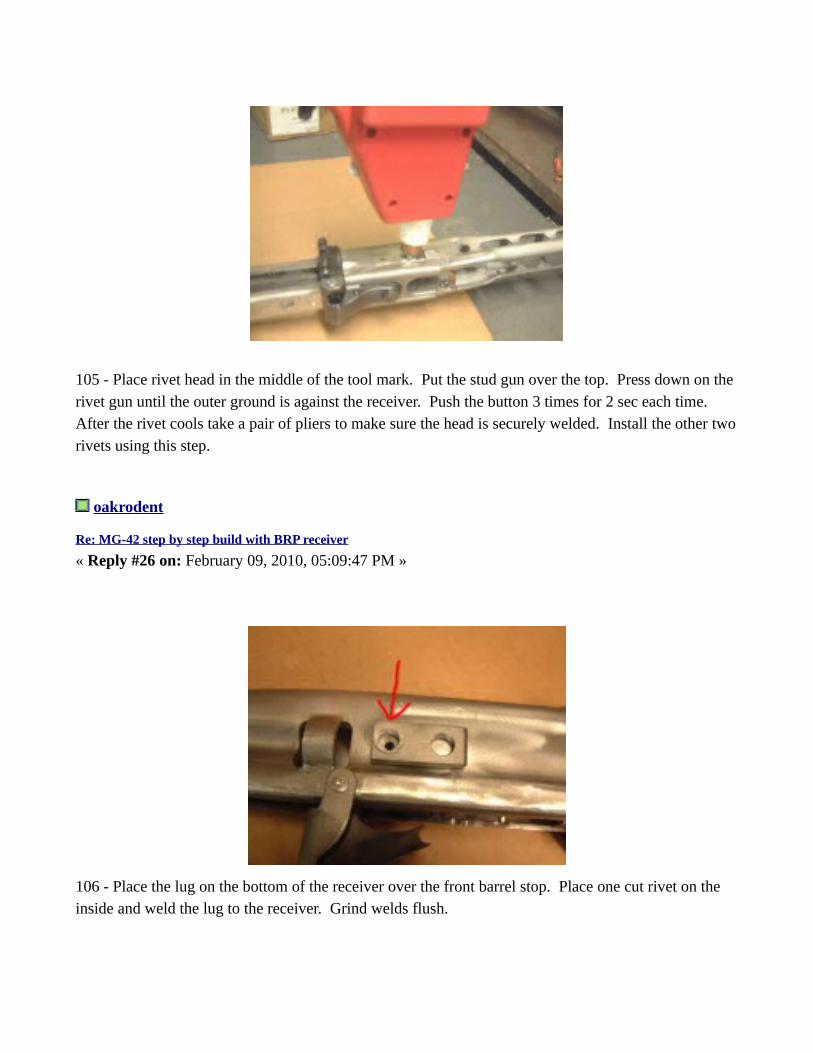
105 - Place rivet head in the middle of the tool mark. Put the stud gun over the top. Press down on the rivet gun until the outer ground is against the receiver. Push the button 3 times for 2 sec each time. After the rivet cools take a pair of pliers to make sure the head is securely welded. Install the other tworivets using this step.
oakrodent
Re: MG-42 step by step build with BRP receiver
« Reply #26 on: February 09, 2010, 05:09:47 PM »
106 - Place the lug on the bottom of the receiver over the front barrel stop. Place one cut rivet on the inside and weld the lug to the receiver. Grind welds flush.
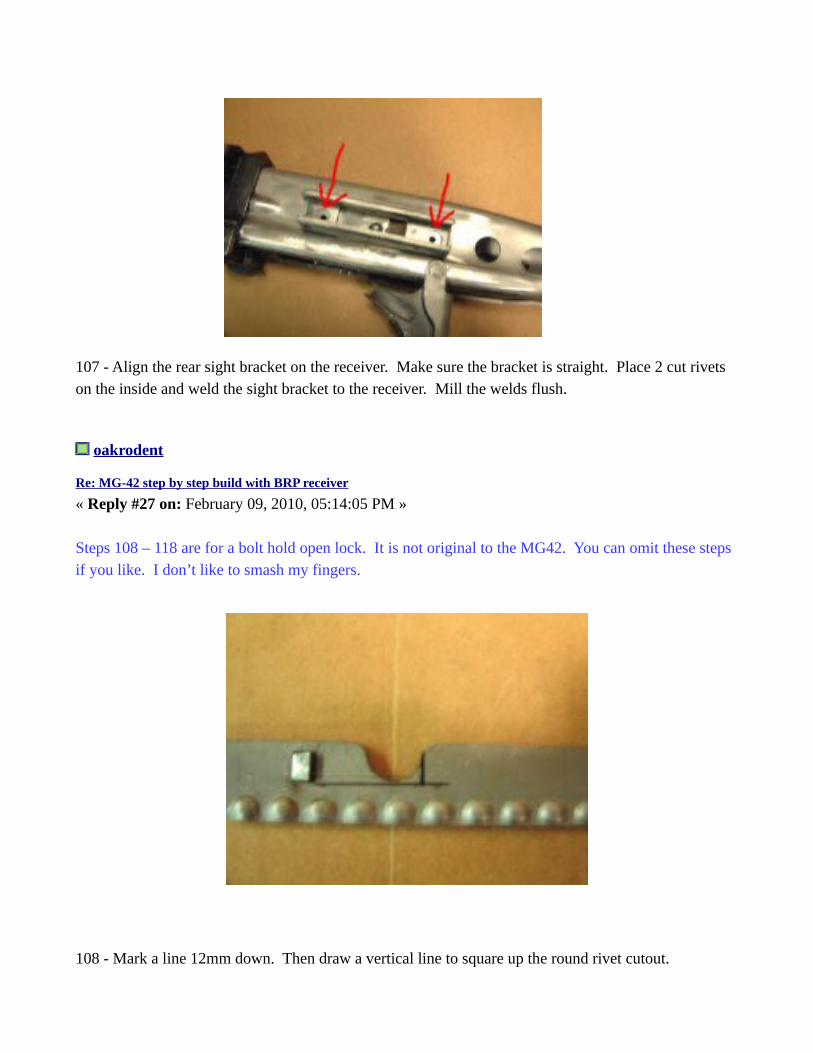
107 - Align the rear sight bracket on the receiver. Make sure the bracket is straight. Place 2 cut rivets on the inside and weld the sight bracket to the receiver. Mill the welds flush.
oakrodent
Re: MG-42 step by step build with BRP receiver
« Reply #27 on: February 09, 2010, 05:14:05 PM »
Steps 108 – 118 are for a bolt hold open lock. It is not original to the MG42. You can omit these steps if you like. I don’t like to smash my fingers.
108 - Mark a line 12mm down. Then draw a vertical line to square up the round rivet cutout.
109 - Mill out the area.
110 - Mark a vertical line 3mm in from the cut.
111 - Use a 1/8 x 3/8 key stock for steps 113 and 115
112 - Line up the key stock with the vertical line you marked on step 110 and with the horizontal line you machined out. Weld the front to the ratchet plate only.
oakrodent
Re: MG-42 step by step build with BRP receiver
« Reply #28 on: February 09, 2010, 06:38:36 PM »
113 - Cut the key stock flush with the notch you milled.
114 - Grind the weld into a smooth ramp
115 - Grind a bevel on one end of key stock.
116 - Weld the beveled key stock onto the charging handle lock assy. Only weld the top and sides. Do not weld the bottom.

oakrodent
Re: MG-42 step by step build with BRP receiver
« Reply #29 on: February 09, 2010, 06:42:12 PM »
117 - Cut key stock flush with the bottom of the lock assy.
118 - Grind Weld smooth.

oakrodent
Re: MG-42 step by step build with BRP receiver
« Reply #30 on: February 09, 2010, 06:49:01 PM »
119 - Lay out the holes on the ratchet plate. Drill them out with a 3/8 drill bit.
120 - 1-Bend the stop tab up until it looks like this. It can always be bend back down later if it is too far up.
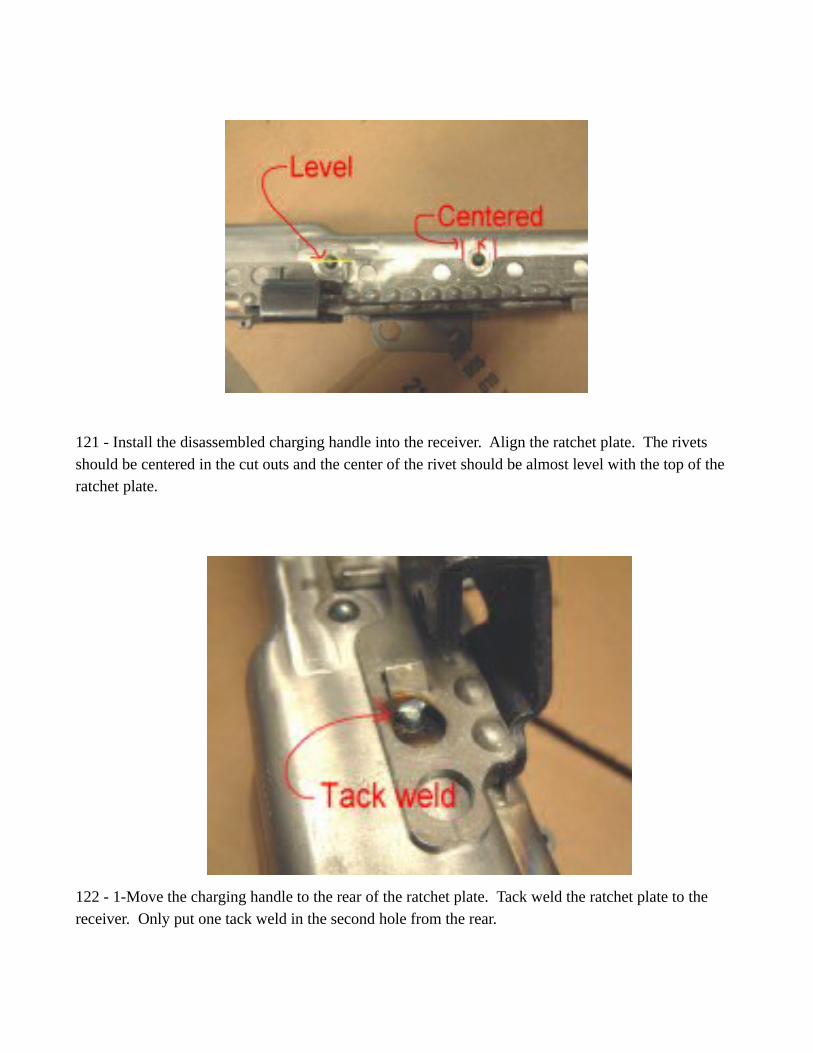
121 - Install the disassembled charging handle into the receiver. Align the ratchet plate. The rivets should be centered in the cut outs and the center of the rivet should be almost level with the top of the ratchet plate.
122 - 1-Move the charging handle to the rear of the ratchet plate. Tack weld the ratchet plate to the receiver. Only put one tack weld in the second hole from the rear.

oakrodent
Re: MG-42 step by step build with BRP receiver
« Reply #31 on: February 09, 2010, 06:54:11 PM »
123 - Move the charging handle all the way forward. Weld a small tack in the first hole. After welding ensure charging handled moves freely. You don’t want it to tight or too lose.
124 - Weld all the holes. You want to have nice welds. These welds do not get ground smooth. After welding check to make sure the charging handle still moves freely.

125 - Lay out the trigger parts. If your trigger assy is still assembled you do not need to disassemble.
126 - Hold the grips up against the trigger housing. Mark the grips where you need to mill them.

oakrodent
Re: MG-42 step by step build with BRP receiver
« Reply #32 on: February 09, 2010, 06:59:21 PM »
127 - I screw the grip s down to a 2x6 to mill them. Mill it very carefully. I trial fit the trigger housing to check the cut. Do not remove to much. I use a ¼ mill
128 - You should have a nice fit when you are finished.
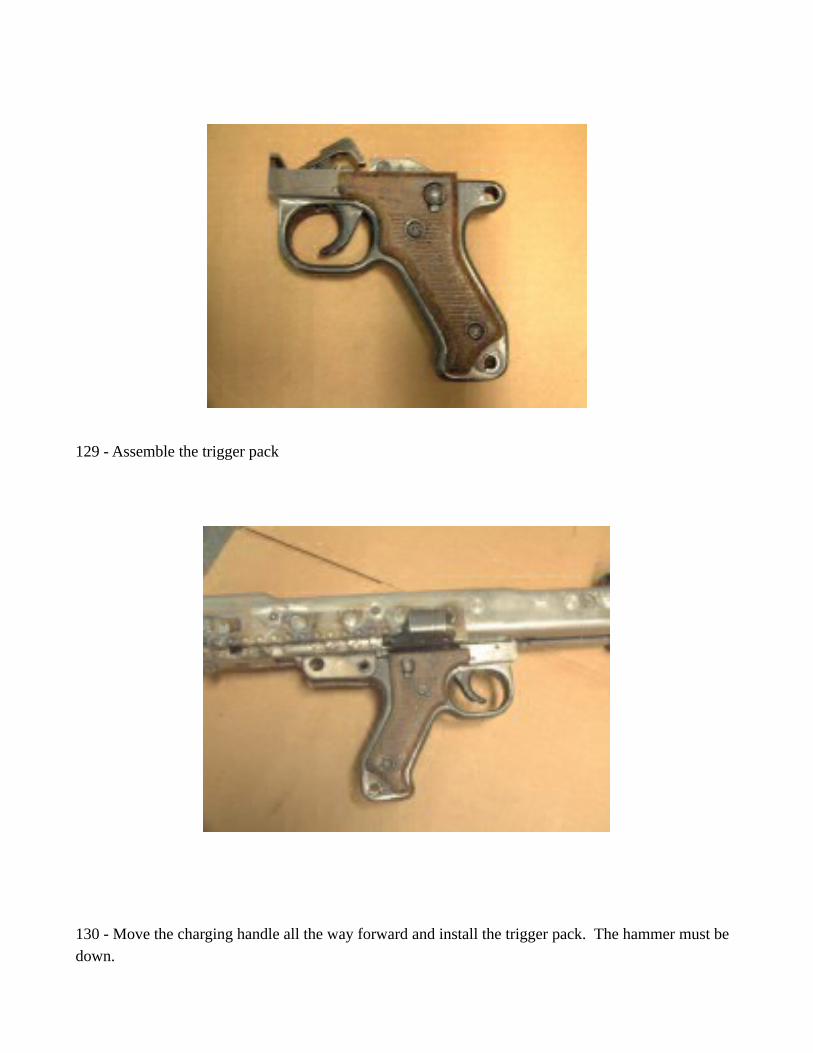
129 - Assemble the trigger pack
130 - Move the charging handle all the way forward and install the trigger pack. The hammer must be down.
oakrodent
Re: MG-42 step by step build with BRP receiver
« Reply #33 on: February 10, 2010, 01:39:42 PM »
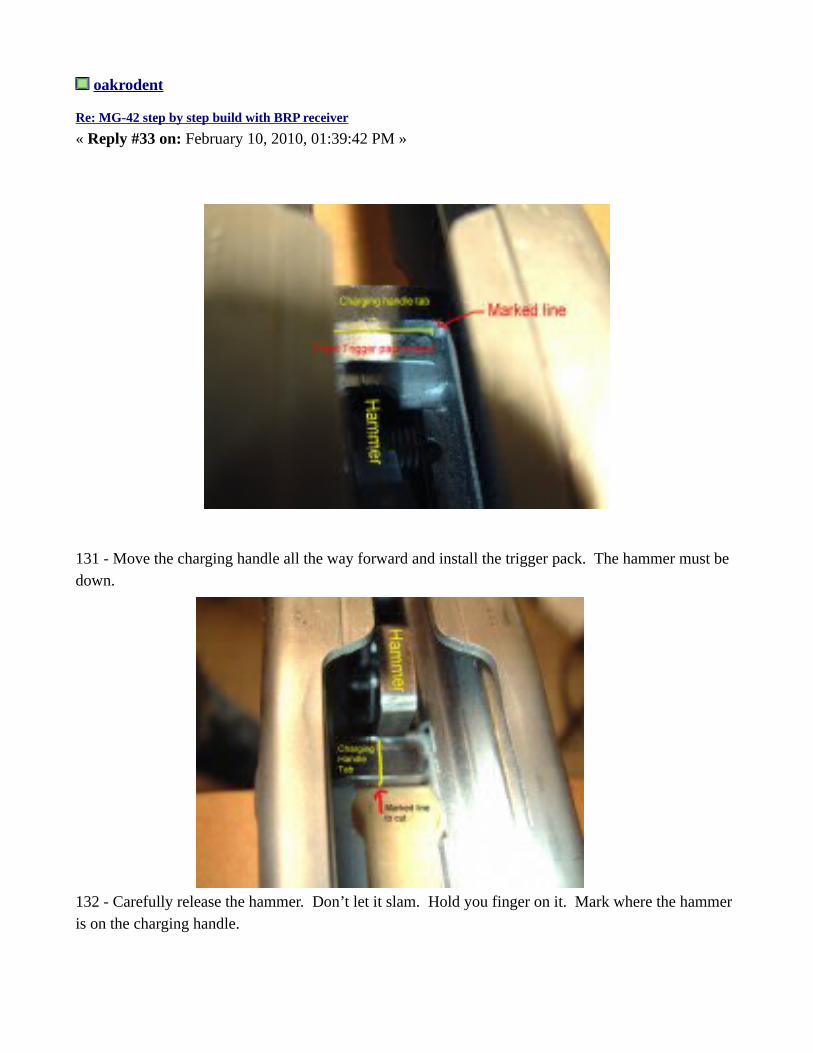
131 - Move the charging handle all the way forward and install the trigger pack. The hammer must be down.
132 - Carefully release the hammer. Don’t let it slam. Hold you finger on it. Mark where the hammer is on the charging handle.
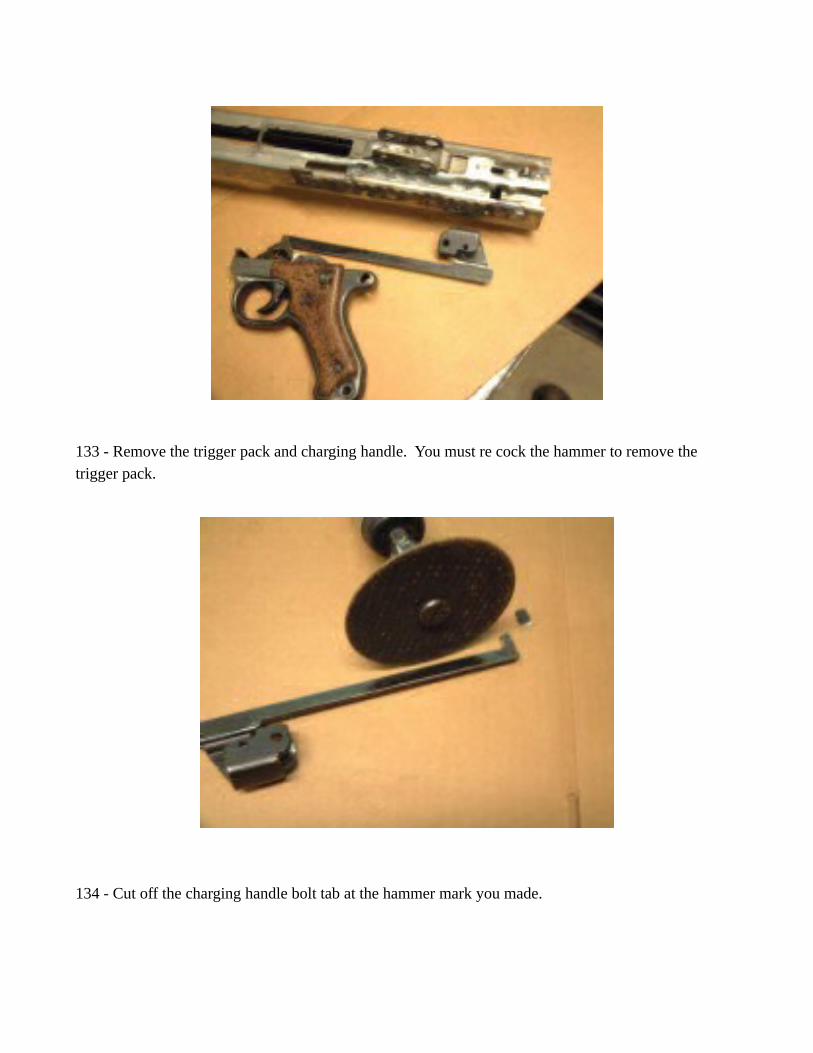
133 - Remove the trigger pack and charging handle. You must re cock the hammer to remove the trigger pack.
134 - Cut off the charging handle bolt tab at the hammer mark you made.
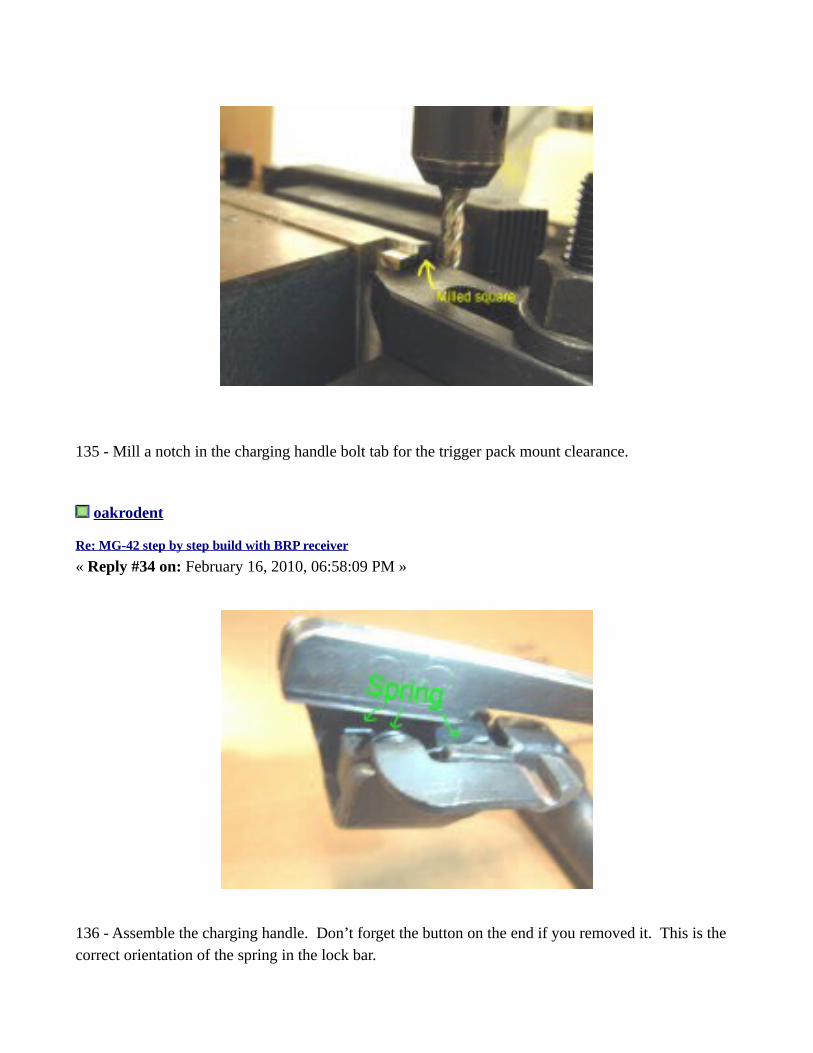
135 - Mill a notch in the charging handle bolt tab for the trigger pack mount clearance.
oakrodent
Re: MG-42 step by step build with BRP receiver
« Reply #34 on: February 16, 2010, 06:58:09 PM »
136 - Assemble the charging handle. Don’t forget the button on the end if you removed it. This is the correct orientation of the spring in the lock bar.
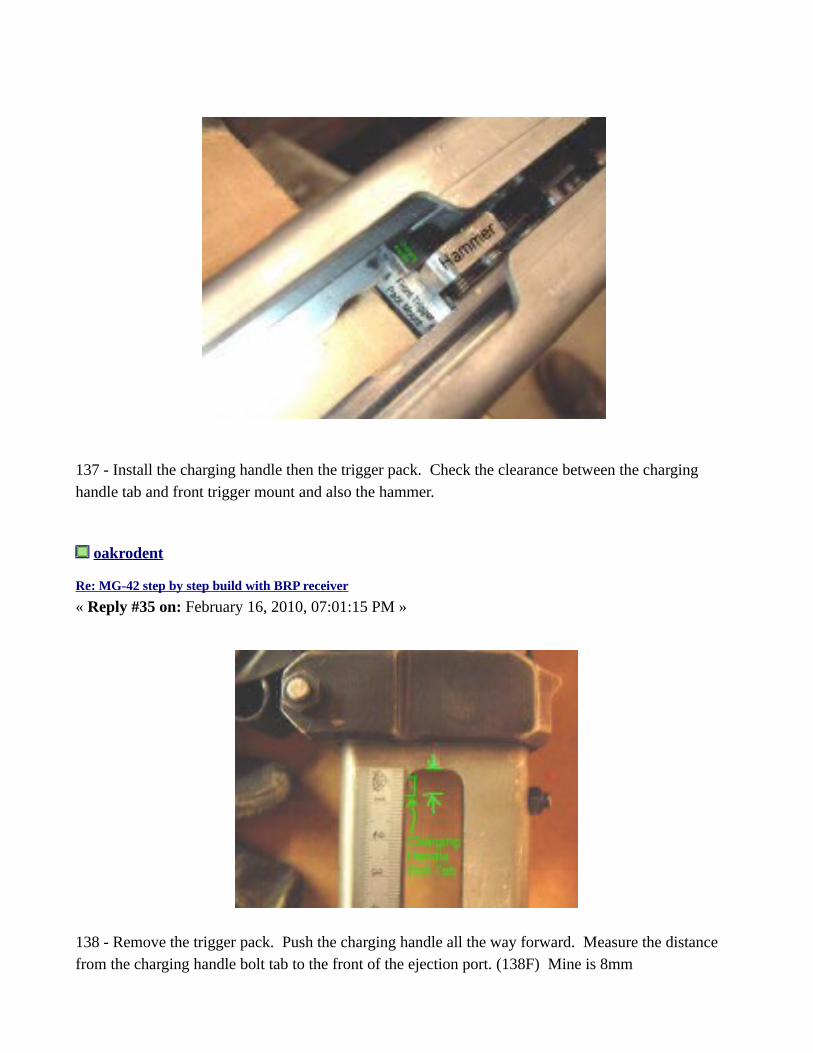
137 - Install the charging handle then the trigger pack. Check the clearance between the charging handle tab and front trigger mount and also the hammer.
oakrodent
Re: MG-42 step by step build with BRP receiver
« Reply #35 on: February 16, 2010, 07:01:15 PM »
138 - Remove the trigger pack. Push the charging handle all the way forward. Measure the distance from the charging handle bolt tab to the front of the ejection port. (138F) Mine is 8mm
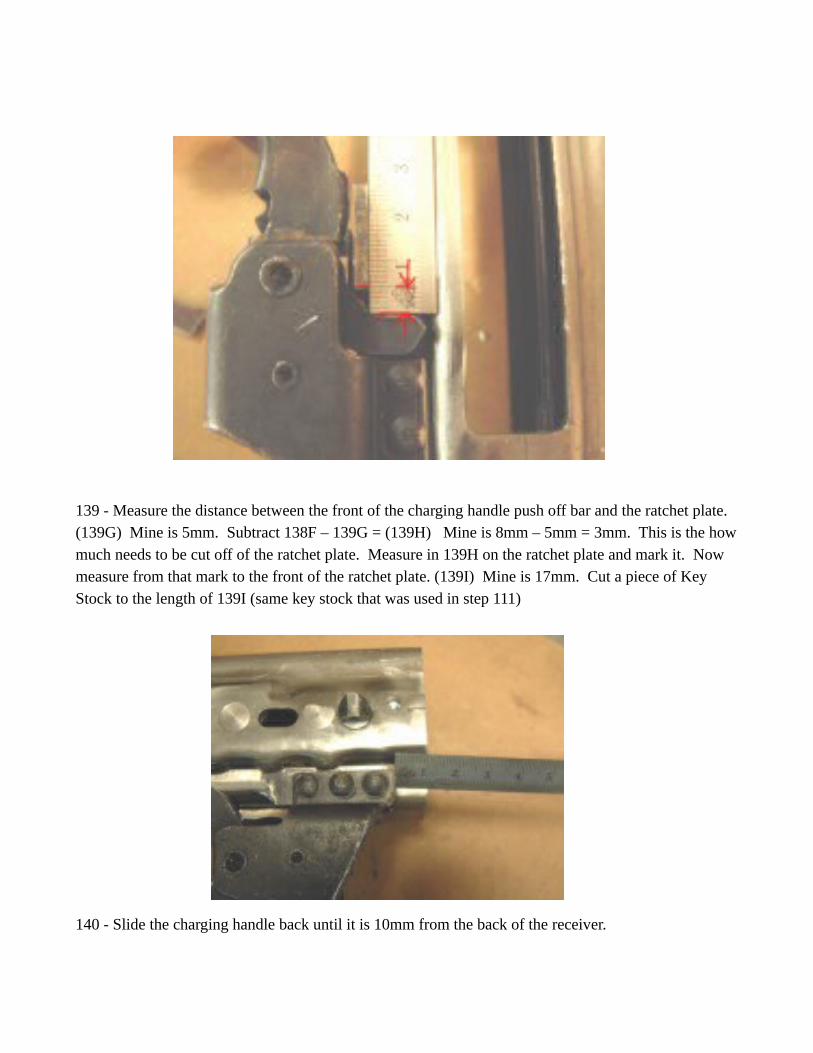
139 - Measure the distance between the front of the charging handle push off bar and the ratchet plate. (139G) Mine is 5mm. Subtract 138F – 139G = (139H) Mine is 8mm – 5mm = 3mm. This is the howmuch needs to be cut off of the ratchet plate. Measure in 139H on the ratchet plate and mark it. Now measure from that mark to the front of the ratchet plate. (139I) Mine is 17mm. Cut a piece of Key Stock to the length of 139I (same key stock that was used in step 111)
140 - Slide the charging handle back until it is 10mm from the back of the receiver.

141 - The end of the charging handle if exposed in the receiver cut out. A small piece of metal will be welded in to fill this area to prevent the charging handle from jumping out.
142 - Measure this distance (142J) Mine is 6mm
oakrodent
Re: MG-42 step by step build with BRP receiver
« Reply #36 on: February 16, 2010, 07:03:38 PM »
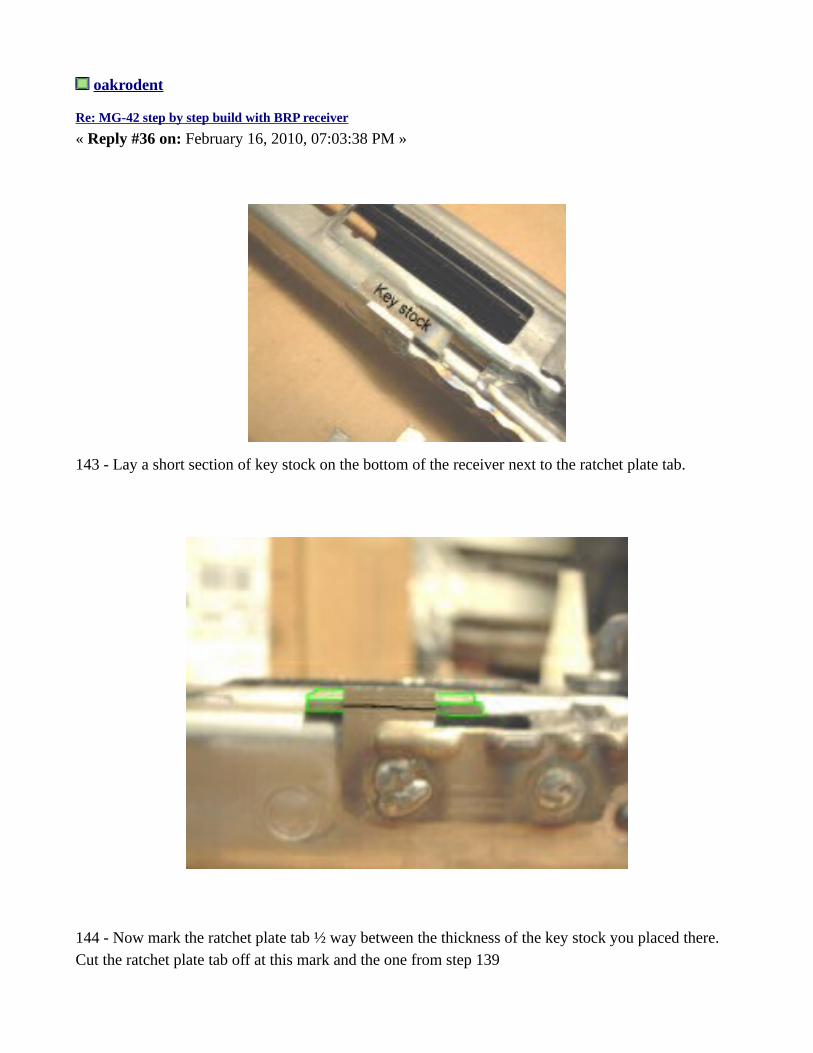
143 - Lay a short section of key stock on the bottom of the receiver next to the ratchet plate tab.
144 - Now mark the ratchet plate tab ½ way between the thickness of the key stock you placed there. Cut the ratchet plate tab off at this mark and the one from step 139

145 - Measure this distance (145K) Mine is 11mm. Cut a piece of key stock to these measurements: 142J x 145K Mine will be 6mm x 11mm
146 - Take the piece of key stock from step 139 and mark out a notch 3mm x 142J

oakrodent
Re: MG-42 step by step build with BRP receiver
« Reply #37 on: February 16, 2010, 07:06:48 PM »
147 - This is the way they get put together.
148 - Install these 2 pieces into the receiver and weld. Do not weld the side closest to the trigger pack cutout.
149 - Grind welds smooth. Don’t grind the weld on the front.
150 - Install charging handle and push it all the way forward. Mark the area where the push bar hits thenew receiver/ratchet plate area.
151 - Grind out the marked out area. Reinstall the charging handle.
oakrodent
Re: MG-42 step by step build with BRP receiver
« Reply #38 on: February 16, 2010, 07:10:07 PM »
152 - Check the charging handle stow lock. You may need to mill the front of the ratchet plate back to get it to lock properly. Check the clearance between the charging handle push off bar and the receiver. You may need to cut the push off bar down.
153 - Assemble the bolt assy. Install the bolt in the receiver.
154 - Mark the semi auto receiver block where the rear of the bolt hits it.
155 - Mill the semi auto receiver block. Remove as little as possible.
156 - Reinstall the bolt and check the fit of the charging handle tab on the bolt tab
oakrodent
Re: MG-42 step by step build with BRP receiver
« Reply #39 on: February 16, 2010, 07:27:39 PM »
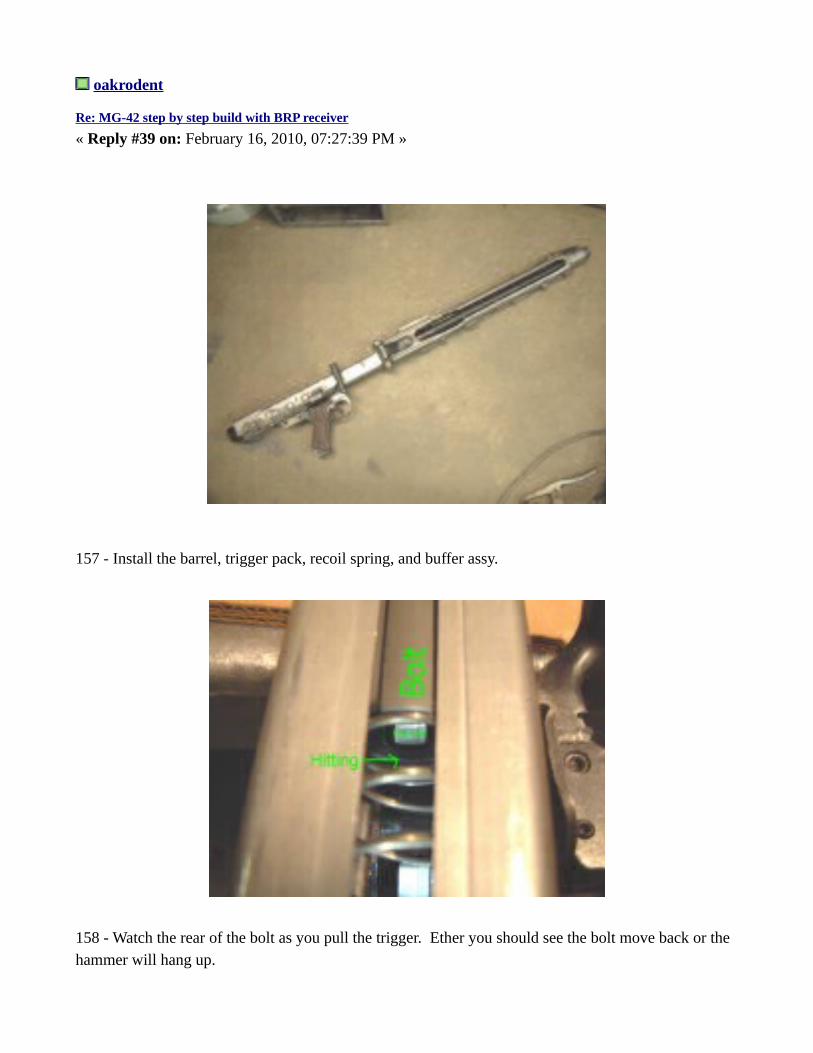
157 - Install the barrel, trigger pack, recoil spring, and buffer assy.
158 - Watch the rear of the bolt as you pull the trigger. Ether you should see the bolt move back or the hammer will hang up.
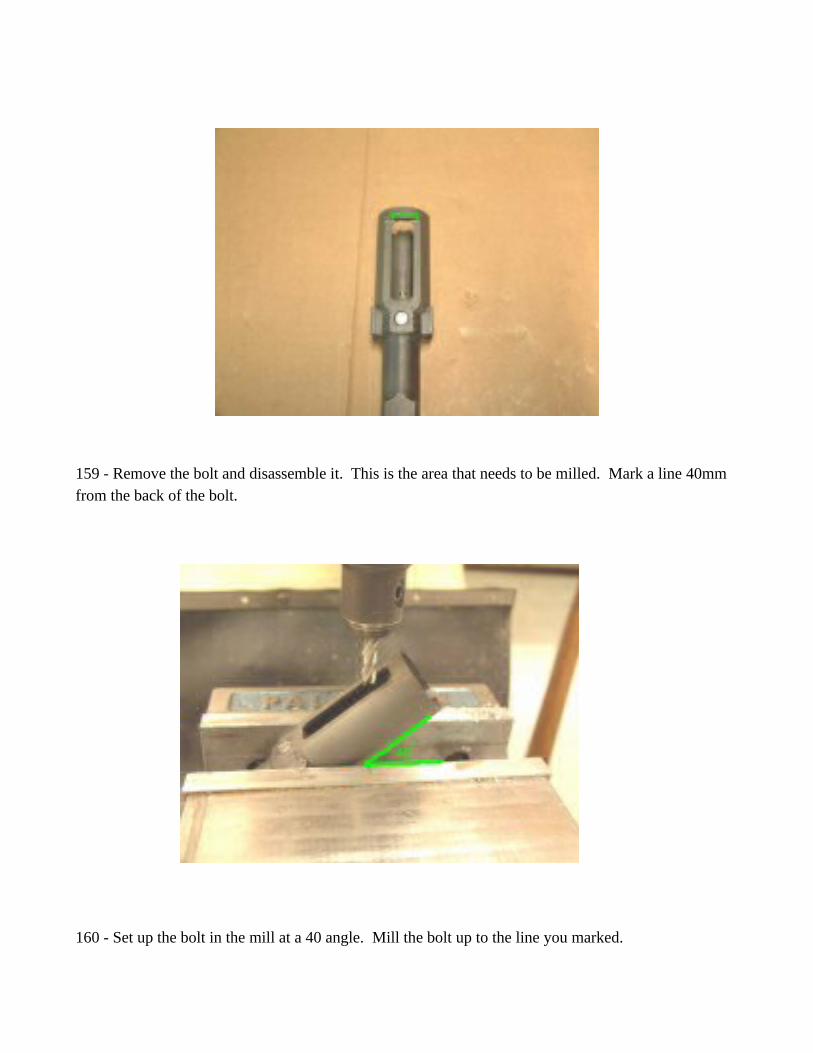
159 - Remove the bolt and disassemble it. This is the area that needs to be milled. Mark a line 40mm from the back of the bolt.
160 - Set up the bolt in the mill at a 40 angle. Mill the bolt up to the line you marked.

161 - Your bolt should look like this. Reassemble the bolt and install the bolt, recoil spring, and buffer assy. You will need to depress the hammer to slide the bolt head over it. Check the clearance of the hammer and the back of the bolt by pulling the trigger.
oakrodent
Re: MG-42 step by step build with BRP receiver
« Reply #40 on: February 16, 2010, 07:30:47 PM »
162 - Remove all major parts
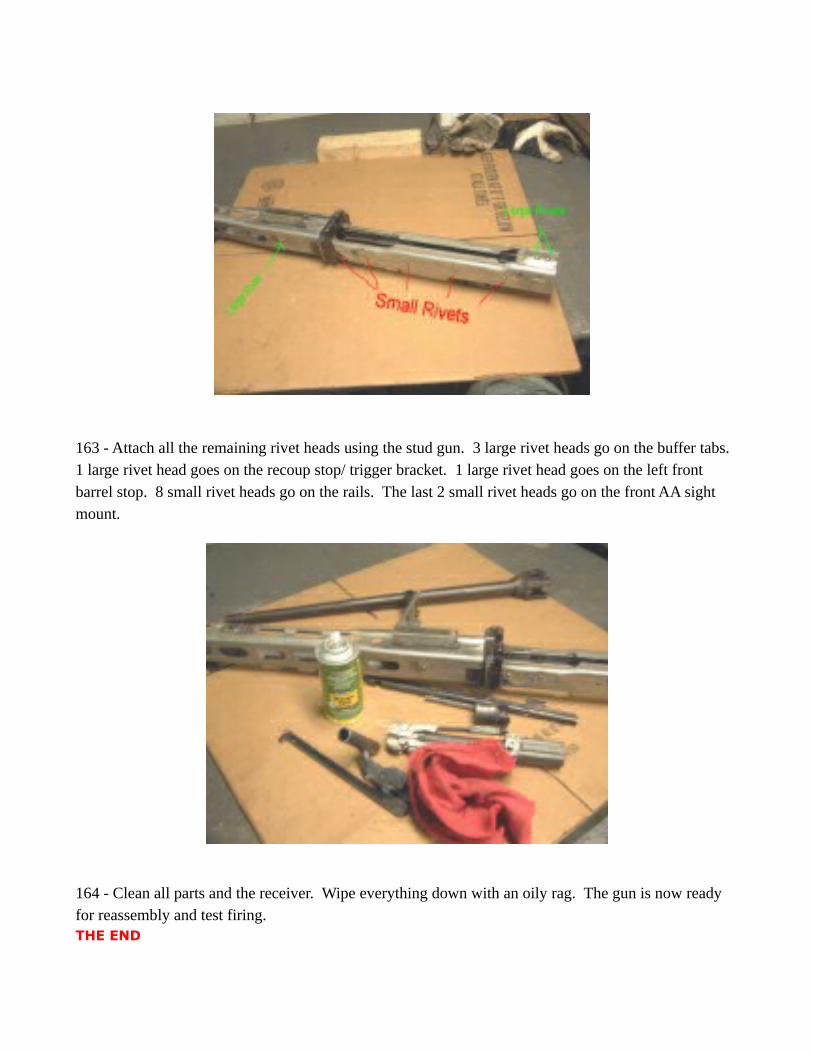
163 - Attach all the remaining rivet heads using the stud gun. 3 large rivet heads go on the buffer tabs. 1 large rivet head goes on the recoup stop/ trigger bracket. 1 large rivet head goes on the left front barrel stop. 8 small rivet heads go on the rails. The last 2 small rivet heads go on the front AA sight mount.
164 - Clean all parts and the receiver. Wipe everything down with an oily rag. The gun is now ready for reassembly and test firing.THE END