mettler toledo partnerportal user guideguide pg. 4 partnerportal user settings 1. creating a new...
TRANSCRIPT

PartnerPortal
Support at your Fingertips
Use
r G
uid
e
Partner
Portal Use
r G
uid
e
pg. 2
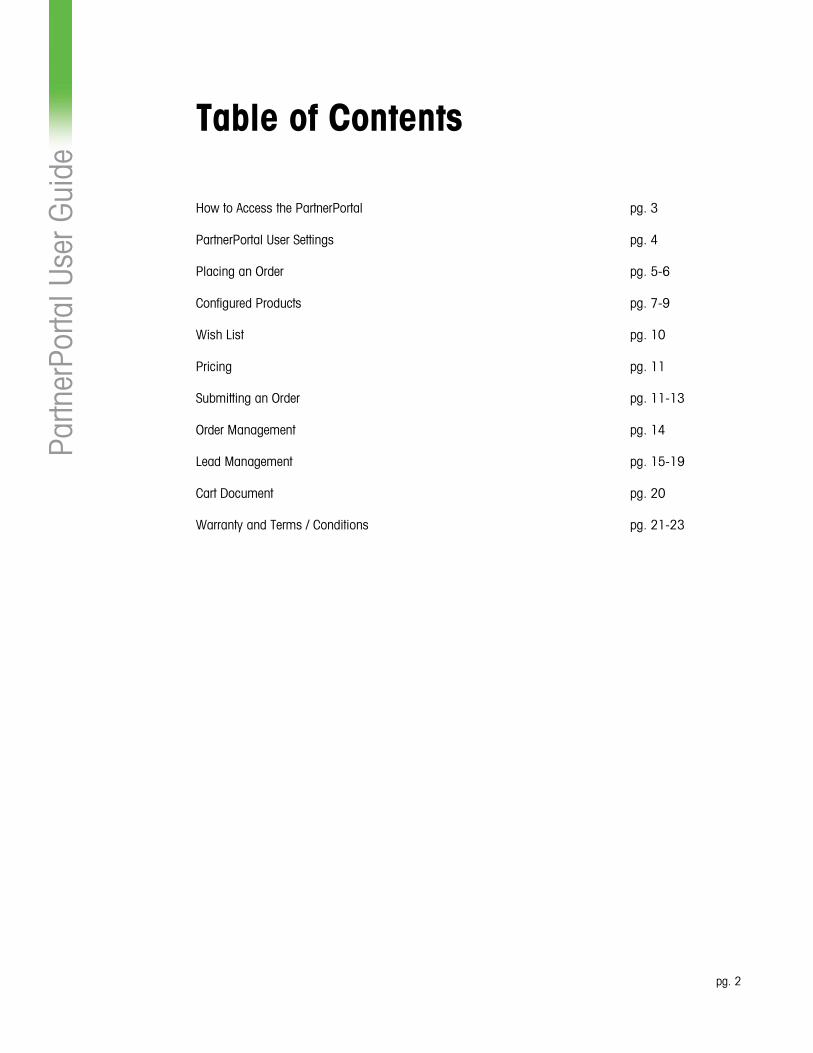
Table of Contents
How to Access the PartnerPortal pg. 3
PartnerPortal User Settings pg. 4
Placing an Order pg. 5-6
Configured Products pg. 7-9
Wish List pg. 10
Pricing pg. 11
Submitting an Order pg. 11-13
Order Management pg. 14
Lead Management pg. 15-19
Cart Document pg. 20
Warranty and Terms / Conditions pg. 21-23

Partner
Portal Use
r G
uid
e
pg. 3
How to Access the PartnerPortal
1. Visit the secure METTLER TOLEDO PartnerPortal website here: https://us-partner.store.mt.com
Prior to October 2018, the beta test site will be available here: https://beta-us-partner.store.mt.com
You can access the PartnerPortal using any computer, tablet, or mobile device with an Internet
connection. You may want to bookmark this site for easy access in the future.
2. Enter your user ID and password then click the Login button.
If you forget your password, select the "Forgot Password" option at the login screen and enter the
email address associated with your profile. You will receive an automated email with instructions
on how to reset your password.
If you are a new user, ask your organization's Service Manager or Office Manager to contact
METTLER TOLEDO at [email protected]. Once access has been granted, your username and
temporary password will be emailed to you.
After you log on, you will see the main PartnerPortal homepage.

Partner
Portal Use
r G
uid
e
pg. 4
PartnerPortal User Settings
1. Creating a New User or Deleting an Existing Profile
For users who are new to the PartnerPortal, have your organization's Service Manager
or Office Manager request a new user profile at [email protected]. Please provide
the access type the user should have.
For users who are no longer part of your company, have your organization's Service Manager or
Office Manager contact [email protected] and request the user account be deleted.
2. Account Settings
How do I change my account settings?
From any page, click the person icon displayed in
the upper right hand corner of the screen. Then,
click "My Profile." Here you can edit your profile
information, change your password or change
which account you are using on the store.
Shared Email Addresses
What if company employees all use the same generic e-mail address?
Each user account requires a unique email address.
3. Multiple Locations
Our company has multiple offices, how can I view all transactions or leads?
If your organization has multiple sales/service offices, you can request expanded access to view
transactions for multiple locations. However, only one location can be selected during each login
session. You will need to log out and log in again to select a different location. To enable expanded
access, place a request using the "Contact Us" button.
4. Managing Addresses/Payment Information
From any page, click person icon in upper right hand corner and click Address Book/Payment
Details. Here you can manage the shipping addresses and credit cards associated with your
account. For billing address, you will see all available options for your account from our system.
You cannot add a billing address online. Please contact us at 1-800-METTLER in order to add a
new address.

Partner
Portal Use
r G
uid
e
pg. 5
Placing an Order
How to place an order
1. Search by Product Number/Description
Enter the item number or description
in the Search box in the top right
hand corner
Select the item you want to purchase
Enter the quantity
Add the item to your cart
Go to cart for checkout or continue shopping
2. Search by Product Category
Select the Products drop-down at the
top of the page
Select the Product Category for the
item you wish to purchase
On the Product Category page on the
left hand side there are Filters which
allow a user to narrow the search
fields
Or you may scroll through the
list of products to find the item
you wish to purchase
Once you find the item, click
the item name to take you to
the Product Detail page
Enter the quantity
Click "Add to Cart"
Go to cart for checkout or
continue shopping

Partner
Portal Use
r G
uid
e
pg. 6
3. Quick Order
As a frequent and experienced user, you can speed up your
ordering by using our Quick Order functionality found on the
homepage and the checkout page.
Manual entry:
Enter item number and quantity separated by a number sign
(#), space, or comma
Press Enter to add the next item on a new line
Click 'Add to Cart'
Go to cart for checkout or continue shopping
Using an Excel File as source:
List the item numbers you want to add to cart on Column 1
and maintain respective quantities in Column 2
Copy and paste into Quick Order Entry
Click 'Add to Cart'
Go to cart for checkout or continue shopping

Partner
Portal Use
r G
uid
e
pg. 7
Configured Products
1. Customize your order
What are configured products?
Configured products are specific METTLER TOLEDO products that customers have the ability to
customize within their order. Configured products offered on the PartnerPortal include terminals and
compact bench scales, including but not limited to IND570, ICS689 Combi, and ICS685SG,
among others.
Ordering configured products involves the selection of a base product at a set cost, along with a
number of customizable parts at variable costs that the customer can select as part of their order.
For example, when purchasing an IND570 terminal, the customer can select their Base Model (at a
set cost), and select from among a variety of parts, including communication options (WLAN
Bluetooth, Ethernet Bluetooth, etc.), connectivity options (Analog Output, ControlNet, etc.), and
Power/Approval Options (120-240VAC No Line Cord, 24VDC No Line Cord, etc.), among others.
2. Looking up a configured product
Enter the Configured
Product number or
description in the Search
box
Select the item you want
to purchase (all
Configured Products will
show a green gear
replacing the Wish List
and Add to Cart icons)
Click the gear icon to
configure your product
3. Select the product configuration
On the left side of the Configuration page, you can configure your product by selecting your
country, Base Model, and additional variable parts. On the right side of the Configuration page, the
total price will update based on the Configuration selections.

Partner
Portal Use
r G
uid
e
pg. 8
Configuration selections:
Select Country Specific Configuration (ex: United States,
Of America)
Select Base Model
Select additional options
o In the IND570 example, additional selections include
Communication 1, Communication 2, Connectivity,
Application SW/Module, and Power/Approval Option
Total price:
The Total price box cannot be updated until all mandatory
fields under Configuration are updated. Once all mandatory
fields are updated:
Edit the product quantity
Click to add the configured product to your Wish List or
Add to Cart.
4. Smart Configuration Key
Once all mandatory fields under Configuration are updated, a unique Smart Configuration Key
(SCK) will be updated underneath the Total price box. The Smart Configuration Key can be used to
reorder products configured the same way in the future. It will be helpful to note the full name of
your SCK for future reorders.

Partner
Portal Use
r G
uid
e
pg. 9
Reorder with the Smart Configuration Key:
On the PartnerPortal Home page, enter your SCK into search bar titled, "Enter Smart
Configuration Key"
Click the green arrow to go directly to the Configuration page and add the configured product to
your cart
You can also reorder your configured product by adding the Smart Configuration Key to your cart from your Wish List or Order History. You can find additional information on the Wish List and Order History features on pages 10 and 14, respectively.
Note: The Smart Configuration Key cannot be used in the Quick Order box or the Search bar on the PartnerPortal Home page.

Partner
Portal Use
r G
uid
e
pg. 10
Wish List
1. How to create a Wish List
If you order the same product(s) for a customer
throughout the year, a Wish List can be created to store
your favorites to place on future orders.
Create a list:
Go to Lists icon the upper right hand corner
Select Wish List
Select Create New Wish List
Select List Type (Private or Shared meaning others
at your account can view it)
Enter List Name
Save
Adding products to a list:
Once the Wish List is created, go to Private/Shared List
Select the Wish List Name to add product(s)
Add products by entering the product(s) numbers and quantity in
the Quick Product Entry
Select the blue 'Add to Wishlist' button
You can also add products from the Product Detail pages by
clicking the blue List button and "Add to Wishlist"
Placing an order from a Wish List: Go to the List icon in the upper right hand corner and select
'Wish List'
Select the Wish List you wish to order
Click on the Add to Cart icon
Go to the Cart to complete the order

Partner
Portal Use
r G
uid
e
pg. 11
Pricing
1. Pricing
As a PartnerPortal user, how can I access account-specific pricing?
Once you have logged in, your pricing should reflect all static agreements and discounts
associated with your account.
Some limited-time promotions may require you to specify a campaign code or other information
when placing your order.
Questions concerning pricing should be directed to the appropriate Order Entry team.
Submitting an Order
1. Checkout
At checkout, what should I add to the ‘Your Reference
Number’ field?
This field is for your internal reference only, so you
may use a Purchase Order number (if paying by
purchase order), or Company Reference number (if
paying by credit card), etc.
2. Payment
What are my payment options?
Purchase Orders and Credit Cards are accepted through the PartnerPortal.
3. Quick Order
How do I use the Quick Order entry box?
For instructions on how to use the Quick Order entry box, click the gray "i" icon at the bottom of the
box or see answer 3 under Placing an Order.

Partner
Portal Use
r G
uid
e
pg. 12
4. Can I ship to a customer?
When checking out, you can change the delivery address of where the item is to be shipped. A list
of customers can be found by selecting the change button in the delivery address box. If the
customer is not found, you can enter a new one by selecting the Specify new Shipping Address.
When checking out, you have the option to choose your billing and shipping addresses. For billing
address, you will see all available options for your account from our system. You cannot add a
billing address online. Please contact us at 1-800-METTLER in order to add a new address.
Regarding shipping addresses, a list of customers/shipping addresses can be found by selecting
the Edit button in the delivery address box. If the address is not found, you can enter a new one by
selecting the Add New Address tab. You may also select whether or not to save the address to your
Address Book for future use.
5. Shipping Label Format
What fields print out on the shipping label?
The shipping label prints in the format as shown below. The only field which is not present on the
shipping label is Company Name 3. This field will only be shown on the order confirmation;
therefore, it should only be used for your internal reference.
Company Name 1
Company Name 2
Address Line 1
Address Line 2
Address Line 3
City, State Zip Code

Partner
Portal Use
r G
uid
e
pg. 13
6. Shipping Method
What shipping options are available?
Shipping options vary depending on product. Daily order cutoff times exist for each shipping
method (see next section for specifics).
Only one shipping method may be selected for an entire order of in-stock products. If you wish to
ship portions of your order using different methods, please submit separate orders.
See Terms and Conditions for complete details.
What are the daily cutoff times for each shipping method?
UPS:
6:00 PM EST for items shipping via ground: orders should be submitted no later than
5:45 PM EST
7:00 PM EST for items shipping via priority method (NDA, 2nd day, etc.): orders should be
submitted no later than 6:45 PM EST
FedEx:
3:00 PM EST for items shipping via ground: orders should be submitted no later than
2:45 PM EST
6:00 PM EST for items shipping via priority method (NDA, 2nd day, etc.): orders should be
submitted no later than 5:45 PM EST
LTL:
3:00 PM EST for same-day shipping: orders should be submitted no later than 2:45 PM
EST
"Request consolidated delivery": what does this mean?
"Request consolidated delivery" is an option in the Shipping Method box. When selected, this
notifies METTLER TOLEDO that you prefer all items to ship in the same delivery if possible. Please
note that this is not a guarantee of consolidated delivery. For items that are shipped from different
locations, it may not be possible to consolidate all packages, in which case you will receive
multiple deliveries.
7. Carrier Collect Numbers
Can I use my Carrier Account number?
You may store your collect account numbers for use at checkout. During the checkout process,
select "Collect" as the Delivery Payment and check the "Save for later use" box. Then your collect
number will be available each time you checkout.

Partner
Portal Use
r G
uid
e
pg. 14
Order Management
1. Order Confirmations
When/how will I receive my order confirmation?
You should receive an order confirmation shortly after placing your order. If you have not received a
confirmation within 1 business day, please call the appropriate Order Entry team.
2. Order History
How do I view my order history?
From any page, mouse over the list icon displayed in the upper right hand corner of the screen.
Then, click "Order History". Then click one of the tabs to see your open orders, orders for a given
time period, or to search for orders.
On the homepage, there is also an Order History box that allows you to jump to a specific order or
to look at orders by time period.
3. Tracking
How do I track current orders?
Locate your order in the order history (see above) and view the order details for tracking
information.
4. Order History / Transactions
How can I view transactions from multiple users within my company?
Order History reflects all transactions associated with your sales/service office.
Partner
Portal Use
r G
uid
e
pg. 15
Lead Management
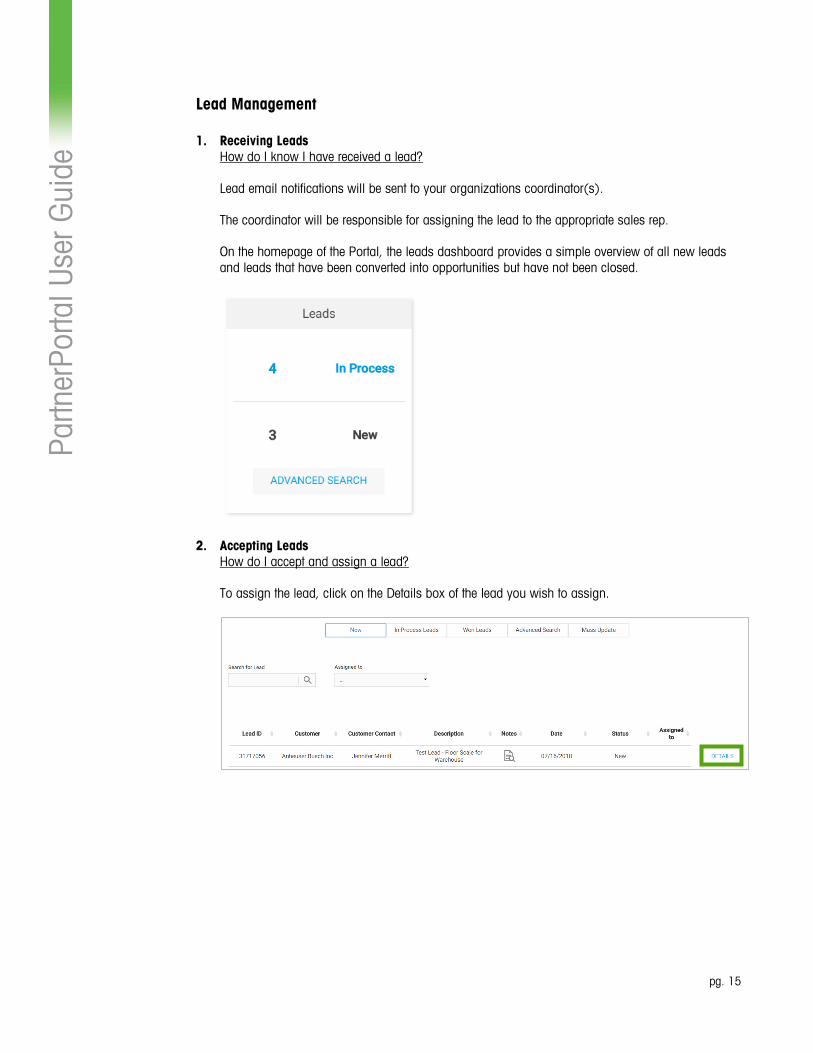
1. Receiving Leads
How do I know I have received a lead?
Lead email notifications will be sent to your organizations coordinator(s).
The coordinator will be responsible for assigning the lead to the appropriate sales rep.
On the homepage of the Portal, the leads dashboard provides a simple overview of all new leads
and leads that have been converted into opportunities but have not been closed.
2. Accepting Leads
How do I accept and assign a lead?
To assign the lead, click on the Details box of the lead you wish to assign.

Partner
Portal Use
r G
uid
e
pg. 16
Under "Select person", click the down arrow to select the appropriate sales rep (or coordinator)
the lead should be assigned to.
To send a new lead email notification to the sales rep, select the Send e-mail notification box.
Click the Assign box next to the sales rep's name.
The lead has now been assigned to the sales rep.
Once the lead is assigned, the coordinator or sales rep will need to accept or reject the lead. If the
lead is accepted, the coordinator or sales rep will need to complete all mandatory fields under the
Opportunity Details and select "Continue". This step must be completed in order to export the lead
information (see section on "CRM Tools").
Partner
Portal Use
r G
uid
e
pg. 17
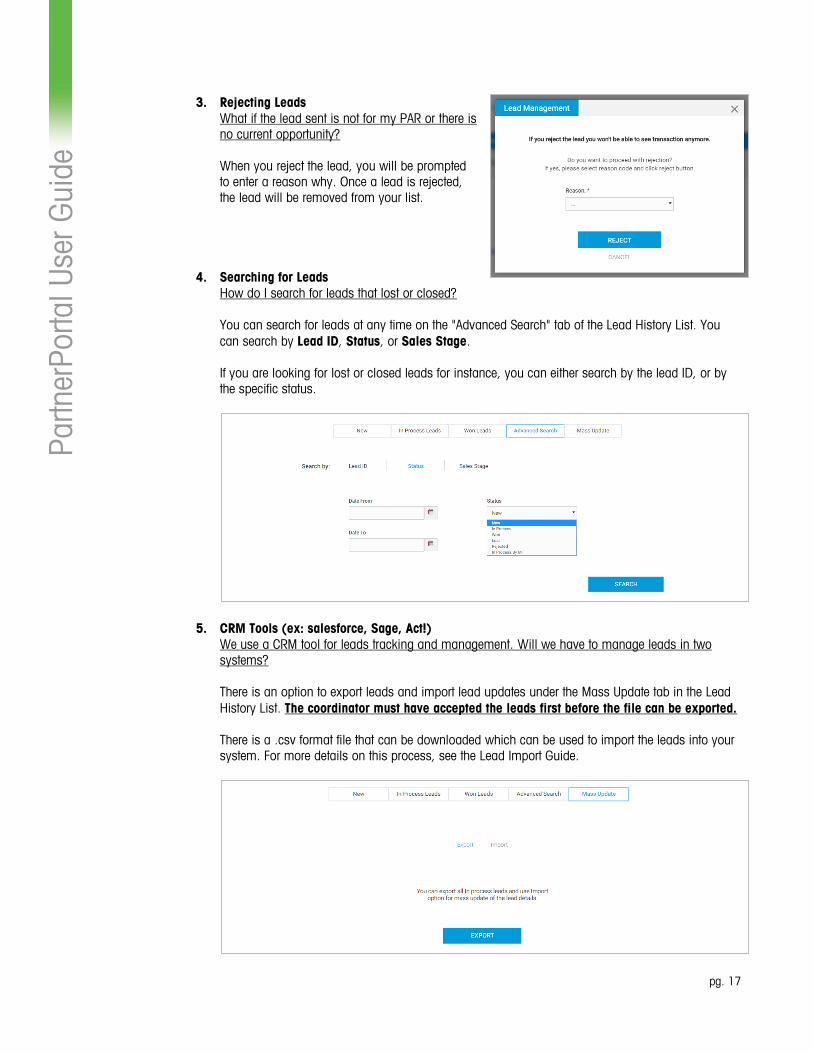
3. Rejecting Leads
What if the lead sent is not for my PAR or there is
no current opportunity?
When you reject the lead, you will be prompted
to enter a reason why. Once a lead is rejected,
the lead will be removed from your list.
4. Searching for Leads
How do I search for leads that lost or closed?
You can search for leads at any time on the "Advanced Search" tab of the Lead History List. You
can search by Lead ID, Status, or Sales Stage.
If you are looking for lost or closed leads for instance, you can either search by the lead ID, or by
the specific status.
5. CRM Tools (ex: salesforce, Sage, Act!)
We use a CRM tool for leads tracking and management. Will we have to manage leads in two
systems?
There is an option to export leads and import lead updates under the Mass Update tab in the Lead
History List. The coordinator must have accepted the leads first before the file can be exported.
There is a .csv format file that can be downloaded which can be used to import the leads into your
system. For more details on this process, see the Lead Import Guide.

Partner
Portal Use
r G
uid
e
pg. 18
6. Adding Product(s) to a lead
After a lead has been assigned to a Sales Rep and Accepted, you can add product(s) to a lead.
Under Opportunity Item block, click on "Add Products".
It will take you to the main page and an alert that "You are in the Lead Management Mode. Items
will be added to the selected opportunity only. Some actions are not available." There is also a
button to "EXIT" which will save your selected products and take you back to the opportunity.
Browse for products using the Product Menu or the Search box and find the product(s) you wish to
include in the lead. When ready to add a product to the lead, select the quantity for the product and
click on the blue funnel button next to the product.

Partner
Portal Use
r G
uid
e
pg. 19
A popup box with the product(s) added to the lead will appear on the screen. Repeat this process
for as many products as you'd like to add. When all product(s) have been added, click on the blue
"EXIT" button at the top of the screen. The product(s) will be included in the lead.
7. I need to close a lead (as won, lost, or if the lead is no longer active), how do I close it?
To close a lead in the PartnerPortal:
Go to the "In Process" leads and select the lead you need to close.
In the Sales Stage, select "Close Sale".
Verify the "Expected Sales Volume" is correct.
Scroll to the bottom of the lead to "Opportunity Options".
Click the radio dial next to the status you wish to select.
Select the reason from the corresponding Reason drop down box.
Click "Update Details" to close the lead.
*Note: Cancel the Opportunity should be used for leads that are now inactive – project stopped by
customer or stopped by MT.

Partner
Portal Use
r G
uid
e
pg. 20
Cart Document
1. Is there an option to create a Quote?
There is no option to create a Quote in the PartnerPortal.
There is an option to download a Word document with the products and standard pricing on the
Cart page. This information can be updated to include as part of a quote. Once all the products are
in the cart, go to the Cart page and click the gray download button in the bottom corner.
A Word document will open with the product description, material number, quantity and standard
price. The document also includes a picture of the product and product specifications.

Partner
Portal Use
r G
uid
e
pg. 21
Warranty and Terms/Conditions
1. Submitting Warranty Claims
How do I submit a warranty claim?
From the "My Account" menu, click the "Warranty Claims" box to view the online claim
submission form.
When the page loads, click the "NEW WARRANTY" button.
In the "GENERAL DATA" and "END-CUSTOMER INFORMATION" sections, fill in the boxes with
the related information. Zone selections are in 10-mile increments, and represent travel
incurred. Zones 1 – 20 are for standard vehicles and zones 21 – 40 are for heavy-duty test
vehicles.
*Note: Incurred travel for services is capped to zone 10. Special consideration of additional
travel will be allowed ONLY in the event that drive time and total mileage incurred is noted at
the time the claim is reviewed, or if management approval is obtained before the claim is
submitted.
In the "INFORMATION ABOUT THE PRODUCT UNDER WARRANTY" section, enter the requested
information of the serviced equipment. The MT order number is the sales order that the serviced
equipment/part was purchased on. If the claim is a part related failure, the serial number of the
equipment it comes out of should be referenced.

Partner
Portal Use
r G
uid
e
pg. 22
You are able to select "Service & Parts", "Service", and "Parts" warranty claims by clicking on
the "What service was provided?" box.
Fill out the "INFORMATION ABOUT THE PROVIDED WARRANTY SERVICE" and "SPARE PART
INFORMATION" with the requested information. "The Miscellaneous costs apply?" section is for
associated freight costs with the service, as well as any other related costs.
*Note: a new feature available is to fill in hourly increments in the "Repair Service (Hrs)"
section with exact time incurred. It is no longer necessary to round to the nearest hour.
Fill out the "SPARE PART INFORMATION" section, referencing any replacement parts used in the
service. The "MT Order No. of the Spart Part" section is the sales order that the replaced part
was purchased on. If more than one part is used, click "+ Add" to add a new part.
Attach all documentation related to the services performed by clicking on the "Select file" box.
*Note: only one file can be uploaded to the claim, with a maximum size of 2 megabytes. Your
claim will not successfully submit without attaching documentation related to the services
performed.
Click submit to complete the request. Once the site refreshes, a new warranty claim number
will appear on the page, and an email confirming the claim number will be sent to you.

Partner
Portal Use
r G
uid
e
pg. 23
2. Reference Numbers on Claims
When submitting a warranty claim, the number(s) that I entered for the serial number, product
number, or sales order number is not working—or I do not have this number. What do I do?
Contact [email protected] for assistance.
3. Warranty Terms and Conditions
Where can I view the warranty terms and conditions?
The terms and conditions can be found at the following website:
http://www.mt.com/us/en/home/site_content/legal/commercial_terms/US_ConditionsOfSale_RET_IN
D_LAB.html
Click on the related terms and conditions links, then scroll down to section 10 for information on
warranties.
*Note: Exceptions to the standard warranty may apply. Please see the Warranty Coverage form(s)
shipped with the purchased product for additional terms, conditions, and/or exclusions.
4. Rejected Claims
My claim has been rejected. Why?
Rejection reasons notes can be found in the warranty claim under Approval Comments. For
additional clarification, contact the warranty team at [email protected].
5. Returns and Credits
Why can't I receive credit through warranty for return of a defective product?
Product and parts are handled by order entry and have different requirements for crediting. To
request an out-of-box failure contact [email protected] or call 1-800-METTLER for
assistance.
6. Shipping Labels
Can I be issued a shipping label for return of defective parts?
Warranty does not issue return labels. The person or group initiating the claim will need to cover
the cost of return shipping upfront. However, credit can be requested for freight cost associated with
a claim/return.
7. General Warranty Questions
Who can I contact for general warranty questions?
All questions regarding warranty should be submitted to [email protected].