messenger user manual ver 2.01.0000 - cjis.chs.state.ma.us user manual ver 2.01.0061.pdf · ability...
TRANSCRIPT

OpenFox™ Messenger Guide
Version 2.01.0061
Computer Projects of Illinois, Inc. 475 Quadrangle Dr, Suite A
Bolingbrook, IL 60440 (630) 754-8820

OpenFox™ Messenger Guide
Pg. 2 Ver. 2.01.0061
* * * THIS PAGE LEFT IINTENTIIONALLY BLANK * * *

OpenFox™ Messenger Guide
Ver. 2.01.0061 Table of Contents Pg. 3
TABLE OF CONTENTS
CHAPTER 1: INTRODUCTION AND OVERVIEW .......................................................................... 7
1.1 OPENFOX™ MESSENGER DESCRIPTION ............................................................................................ 7 1.1.1 Interface to the OpenFox™ Message Switching System ......................................................... 8
1.2 OPENFOX™ DESKTOP MODULE ....................................................................................................... 8 1.2.1 Desktop Features .................................................................................................................... 8 1.2.2 Additional Disk Access ........................................................................................................... 8
1.3 DEFINITION OF TERMS .................................................................................................................... 10
CHAPTER 2: MESSENGER ARCHITECTURE .............................................................................. 15
2.1 MAILBOX WINDOW ........................................................................................................................ 15 2.1.1 Move Focus To ..................................................................................................................... 16
2.2 MAIL FOLDERS LIST ....................................................................................................................... 16 2.3 MESSAGE LIST ................................................................................................................................ 18
2.3.1 Message List Columns .......................................................................................................... 19 2.3.2 Hiding and Showing Columns .............................................................................................. 19 2.3.3 Message Sorting ................................................................................................................... 21 2.3.4 Column Ordering .................................................................................................................. 22 2.3.5 Single Message Selection ...................................................................................................... 22 2.3.6 Range Selection .................................................................................................................... 23 2.3.7 Multiple Message Selection .................................................................................................. 23
2.4 MESSAGE PREVIEW PANE ............................................................................................................... 24 2.4.1 Image Display ....................................................................................................................... 25 2.4.2 Message Text Search ............................................................................................................ 25 2.4.3 Code List Lookup .................................................................................................................. 27
2.5 QUICK QUERY BAR ......................................................................................................................... 29 2.6 TREE-BASED FORM ACCESS ........................................................................................................... 30 2.7 DISK USAGE MONITOR ................................................................................................................... 31 2.8 MENU AND TOOLBAR ACTIONS ...................................................................................................... 32 2.8.1 MESSAGE ACTIONS .................................................................................................................... 32 2.8.2 SELECTION ACTIONS .................................................................................................................. 34 2.8.3 QUICK QUERIES ......................................................................................................................... 35 2.8.4 SORT MESSAGES ........................................................................................................................ 36 2.8.5 VIEW COLUMNS ......................................................................................................................... 36 2.8.6 OPTIONS ..................................................................................................................................... 37 2.9 FORM ACCESS ................................................................................................................................ 38
2.9.1 Forms Menu .......................................................................................................................... 38 2.9.2 Tree-Based Form Menu ........................................................................................................ 39
CHAPTER 3 MESSENGER FEATURES .......................................................................................... 41
3.1 MESSAGE FLOW .............................................................................................................................. 41 3.1.1 Submitted Messages .............................................................................................................. 41 3.1.2 Responses ............................................................................................................................. 42 3.1.3 New Message Notification Window ...................................................................................... 42 3.1.4 Saving Messages ................................................................................................................... 43 3.1.5 Deleting Messages ................................................................................................................ 44 3.1.6 Automatic Message Delete ................................................................................................... 44
3.2 MESSAGE TYPES ............................................................................................................................. 45 3.2.1 Audible Alarms ..................................................................................................................... 45
3.3 ADVANCED MESSAGE ACTIONS ...................................................................................................... 45 3.3.1 Hit Confirmation Request ..................................................................................................... 46 3.3.2 Hit Confirmation Response ................................................................................................... 47
3.4 PRINTING ........................................................................................................................................ 48

OpenFox™ Messenger Guide
Pg. 4 Table of Contents Ver. 2.01.0061
3.4.1 Dispatch Printing ................................................................................................................. 49 3.4.2 Windows Printing ................................................................................................................. 52 3.4.3 Selective Printing .................................................................................................................. 53 3.4.4 Automated Printing ............................................................................................................... 53 3.4.3 Unattended Printing ............................................................................................................. 53
3.5 LOCAL MESSAGE SEARCH .............................................................................................................. 54 3.5.1 Search Scope......................................................................................................................... 55 3.5.2 General Options ................................................................................................................... 56 3.5.3 Logic Option ......................................................................................................................... 56 3.5.4 Search Criteria ..................................................................................................................... 57
CHAPTER 4: MESSENGER FORMS ................................................................................................ 59
4.1 FORM ARCHITECTURE ..................................................................................................................... 59 4.1.1 Form Title Bar ...................................................................................................................... 59 4.1.2 Header Information .............................................................................................................. 60 4.1.3 Message Body Fields ............................................................................................................ 60 4.1.4 Form Buttons ........................................................................................................................ 61 4.1.5 Store and Get Form Fields ................................................................................................... 61
4.2 FORM CACHING .............................................................................................................................. 62 4.2.1 Refresh Form Action ............................................................................................................. 62
4.3 FORM RESOURCES .......................................................................................................................... 64 4.3.1 Code Lists ............................................................................................................................. 64 4.3.2 Editable Codes ...................................................................................................................... 65 4.3.3 Code Categories ................................................................................................................... 66 4.3.4 Code List Search Window ..................................................................................................... 67 4.3.5 Scripts ................................................................................................................................... 69
4.4 TAB CONTROLS ............................................................................................................................... 70 4.5 FIELDS ............................................................................................................................................ 71
4.5.1 Rules ..................................................................................................................................... 71 4.5.2 Maximum & Minimum Length .............................................................................................. 72 4.5.3 Character Filters .................................................................................................................. 73 4.5.4 Tool Tips ............................................................................................................................... 73 4.5.5 Hot Key Navigation .............................................................................................................. 74 4.5.6 Edit Routines ........................................................................................................................ 74
4.6 IMAGE FORMS ................................................................................................................................. 75 4.6.1 Image Importer ..................................................................................................................... 75 4.6.2 Image Format Window ......................................................................................................... 76
4.7 HELP FILES ..................................................................................................................................... 79
CHAPTER 5: MESSENGER PREFERENCES .................................................................................. 81
5.1 USER MAILBOX............................................................................................................................... 81 5.1.1 User Mailbox - Mailbox ........................................................................................................ 81 5.1.2 User Mailbox - Layout .......................................................................................................... 83 5.1.3 User Mailbox - Window ........................................................................................................ 86 5.1.4 User Mailbox – Unread ........................................................................................................ 87 5.1.5 User Mailbox – Draft ........................................................................................................... 88 5.1.6 User Mailbox – Received ...................................................................................................... 89
5.2 USER FORMS ................................................................................................................................... 92 5.2.1 Favorite Forms .......................................................................................................................... 92 5.2.2 Opening Forms ..................................................................................................................... 95 5.2.3 Form Rules ........................................................................................................................... 96 5.2.4 Form Code Lists ................................................................................................................... 97 5.2.5 Form Advanced Settings ....................................................................................................... 98
5.3 USER GENERAL ..............................................................................................................................100 5.4 USER MESSAGE DISPLAY ...............................................................................................................101

OpenFox™ Messenger Guide
Ver. 2.01.0061 Table of Contents Pg. 5
5.4.1 General Options ..................................................................................................................101 5.4.2 Default Style Sheet ...............................................................................................................104 5.4.3 Custom Style Sheet ...............................................................................................................106
5.5 USER PRINTERS ..............................................................................................................................107 5.5.1 Printer List ...........................................................................................................................107 5.5.2 General Options ..................................................................................................................108 5.5.3 Image Capable Options .......................................................................................................109 5.5.4 Dot Matrix Options ..............................................................................................................110
5.6 TERMINAL MAILBOX OPTIONS .......................................................................................................111 5.7 TERMINAL QUICK QUERIES ...........................................................................................................112

OpenFox™ Messenger Guide
Pg. 6 Table of Contents Ver. 2.01.0061
* * * THIS PAGE LEFT IINTENTIIONALLY BLANK * * *

OpenFox™ Messenger Guide
Ver. 2.01.0061 Chapter 1: Introduction and Overview Pg. 7
Chapter 1: Introduction and Overview This chapter introduces OpenFox™ Messenger. It includes a general description of the software, how it works, and how to use it.
1.1 OpenFox™ Messenger Description Law enforcement systems continue to demand not only more information but different types of information. As more and more different data is made available to law enforcement, the need arises for a standard method of formatting that data. NLETS is leading the law enforcement community in the move to using XML data formats. The Joint Task Force on Rap Sheet Standardization, the American Association of Motor Vehicle Administrators, and others have been involved in designing XML-based standardized response formats. Along with XML formatted responses, law enforcement systems are demanding the ability to share images and other binary documents. NCIC 2000 supports the storage and retrieval of images associated to the Hot Files records stored in their databases. In addition, DMV images associated to Driver’s Licenses are becoming available for access by law enforcement agencies in more and more states. An image capable end user device is able to display the DMV photograph to the law enforcement officer in real-time. The requirement for new information sources, utilizing new internet technology tools for access, has dramatically broadened the scope of State and Federal Agency law enforcement systems. To support these new requirements, the computing systems and networks have become dramatically more complex. As networks have become more open, providing non traditional user’s access to non traditional data, security concerns have increased dramatically. The NCIC CJIS Security Policy is becoming more strict with regards to data protection and encryption as it adapts to this new environment. As a result of these trends, modern law enforcement workstation devices must be more sophisticated and have a richer feature set then traditional law enforcement clients. The CPI solution is named OpenFox™ Messenger. OpenFox™ Messenger is a web-based solution that provides the same functionality as a traditional law enforcement workstation device while fully supporting XML responses and images. OpenFox™ Messenger, in conjunction with other OpenFox™ Message Switching System products, provides an easy migration path to utilizing the newest XML response formats and binary images.

OpenFox™ Messenger Guide
Pg. 8 Chapter 1: Introduction and Overview Ver. 2.01.0061
1.1.1 Interface to the OpenFox™ Message Switching System OpenFox™ Messenger is primarily a graphical user interface to the OpenFox™ Message Switching System. Messenger provides rich graphical forms used to format and submit transactions. Messenger also provides a rich HTML capable message display pane that is able to render any type of HTML content, as found on the internet. OpenFox™ Messenger and the OpenFox™ Message Switch utilize XML in all traffic between the switch and client. All forms, menus, and messages are sent as fully formed XML messages. Following are some of the features of the OpenFox™ Messenger Client.
• Module of OpenFox™ Desktop • Supports XML message traffic • Supports embedded images and other binary objects • Provides a rich HTML message display • Flexible message management options • Support for Messenger Administrator users (these users are able to view all traffic
on a workstation, regardless of which user either sent or received the traffic)
1.2 OpenFox™ Desktop Module OpenFox™ Messenger is a Module of OpenFox™ Desktop. Messenger requires a valid Desktop installation in order to execute correctly. Messenger is fully integrated into the Desktop environment and takes full advantage of all the Desktop features available to Desktop Modules. For more information regarding OpenFox™ Desktop, please refer to the OpenFox™ Desktop Guide.
1.2.1 Desktop Features OpenFox™ Desktop provides a secure and reliable communications pathway to the OpenFox™ Message Switching System. Messenger takes full advantage of this feature. All Messenger traffic, including law enforcement transactions, form or resource requests, and more, passes through the Desktop’s FoxTalk™ communications session. For more information, please refer to the OpenFox™ Desktop Guide.
1.2.2 Additional Disk Access OpenFox™ Messenger requires additional workstation hard disk access above and beyond the access required by OpenFox™ Desktop. Messenger requires disk access for the workstation’s mail file, the local cache of forms and form resources, and the temporary storage of image files. However, Messenger only needs access to the /CPI directory provided by OpenFox™ Desktop.

OpenFox™ Messenger Guide
Ver. 2.01.0061 Chapter 1: Introduction and Overview Pg. 9
1.2.2.1 Mail File OpenFox™ Messenger stores the message traffic sent and received by a terminal in the Messenger mail files. The Messenger mail files are composed of two individual files: the mail index file and the mail data file. The mail index file contains some basic information about a message and an index into the main mail data file. The mail data file contains full copies of message traffic for the terminal. The mail data file is encrypted with the local encryption key stored in the workstation’s registered license file. Thus, the Messenger software is unable to read the mail data file until it has successfully connected to the OpenFox™ Message Switch. For more information on the registered license file, please refer to the OpenFox™ Desktop Guide. The Messenger mail index and mail data files are stored in the following locations.
Mail File Path File Name Messenger Mail Index /CPI/Messenger/Mail/ Folders.dat Messenger Mail Data /CPI/Messenger/Mail/ Mail.dat 1.2.2.2 Cache of Forms and Form Resources OpenFox™ Messenger maintains, through functionality provided by OpenFox™ Desktop, a local cache of all forms and form resources used by the user. The disk path and structure of the Messenger cache is explained in the below table.
Path Purpose
%DesktopCacheDir%/MESSENGER The base directory for all Messenger resources.
%DesktopCacheDir%/MESSENGER/codes A cache of Messenger code lists
%DesktopCacheDir%/MESSENGER/default Contains the Messenger header defaults resource
%DesktopCacheDir%/MESSENGER/form A cache of Messenger forms
%DesktopCacheDir%/MESSENGER/help Contains the table of contents and configuration files for the Messenger online help files
%DesktopCacheDir%/MESSENGER/install Contains the Messenger install settings resource
%DesktopCacheDir%/MESSENGER/menu Contains the Messenger form menu resource
%DesktopCacheDir%/MESSENGER/script A cache of Messenger form scripts
%DesktopCacheDir%/MESSENGER/spclCodes A cache of Messenger special codes (e.g. NCIC vehicle codes)
%DesktopCacheDir%/MESSENGER/style A cache of presentation and output XSLT style sheets
If a user is having trouble with downloading the new version of a form or other resource, then clearing the user’s cache may help. To clear the Messenger cache, the user must first exit OpenFox™ Desktop, delete the appropriate directory, and then re-launch OpenFox™ Desktop.
OpenFox™ Messenger Guide
Pg. 10 Chapter 1: Introduction and Overview Ver. 2.01.0061
1.2.2.3 Temporary Image Storage OpenFox™ Messenger also requires access to the local hard disk to temporarily store images being viewed in the Messenger message preview pane. Since the message preview pane displays HTML content, the images displayed in the preview pane must reside on the local disk. Messenger stores these images in the following directory. /CPI/Messenger/TempObjects When OpenFox™ Desktop is shut down, the contents of this directory are erased.
1.3 Definition of Terms Body – See “Message Body” Client Application – A client application is a software application that is intended for
distribution to multiple or remote computers. Client applications typically communicate to a main central computer or server.
Communications Session – A communications session is either a lasting connection
using the session layer of a network protocol or a lasting connection between a user (or user agent) and a peer, typically a server, usually involving the exchange of many packets between the user's computer and the server. A session is typically implemented as a layer in a network protocol (e.g., telnet or FTP).
Fixed-Width Font -- A font which displays glyphs using varying widths is a
proportional font while one with fixed width is a non-proportional (or monospace or fixed-width) font. Non-proportional fonts are considered better than proportional fonts for some purposes because their characters line up in nice, neat columns. Most non-electronic typewriters and text-only computer displays use only non-proportional fonts. Most computer programs which have a text-based interface, such as terminal emulators, are configured to use only non-proportional fonts.
Focus – see “Keyboard Focus” Graphical User Interface (GUI) – A graphical user interface is an interface for issuing
commands to a computer utilizing a pointing device, such as a mouse, that manipulates and activates graphical images on a display.
Header – see “Message Header”

OpenFox™ Messenger Guide
Ver. 2.01.0061 Chapter 1: Introduction and Overview Pg. 11
Highlight – The process of selecting an item from a list or tabular display. The selected item is often identified through highlighting. This term may be used in place of “Select”.
Hovering – The process of keeping a cursor, most often a mouse pointer, over a certain
area without clicking. Hyperlink – A hyperlink, or simply a link, is a reference in a hypertext document to
another document or other resource. As such it would be similar to a citation in literature. However, combined with a data network and suitable access protocol, it can be used to fetch the resource referenced. This can then be saved, viewed, or displayed as part of the referencing document.
Keyboard Focus – In computing, the focus is the component of the graphical user
interface which is currently selected. Text entered at the keyboard or pasted from a clipboard is sent to the component which currently has the focus. The concept is similar to a cursor in a text-based environment. However, when considering a graphical interface, there is also a mouse cursor involved. Moving the mouse will typically move the mouse cursor without changing the focus. The focus can usually be changed by clicking on a component that can receive focus with the mouse. Many desktops also allow the focus to be changed with the keyboard. By convention, the tab key is used to move the focus to the next focusable component and shift + tab to the previous one.
Lazy Initialization – In computer programming, lazy initialization is the tactic of
delaying the creation of an object, the calculation of a value, the loading of a remote resource, or some other expensive process until the first time it is needed. This approach replaces a long initial load-time with much shorter, less noticeable, delays during application execution.
MKE – Acronym for Message KEy. This NCIC term refers to the type of a law
enforcement transaction. Other data sources such as NLETS and in-state databases also use the term to designate the type of a transaction.
Message – Also may be referred to as a “Transaction”. Message in its most general
meaning is the object of communication. Depending on the context, the term may apply to both the information contents and its actual presentation. In computing, and more particularly in distributed communication, a message is a data item that is asynchronously sent from one process or thread or endpoint to another process or thread or endpoint.
Message Body – In communications and information science, the body or payload is the
data, such as a data field, block, or stream, being processed or transported. In law enforcement, this refers to the aggregation of data fields being sent from a source to a destination.

OpenFox™ Messenger Guide
Pg. 12 Chapter 1: Introduction and Overview Ver. 2.01.0061
Message Header – In information technology, Header refers to supplemental data placed at the beginning of a message being stored or transmitted, which contain information for the handling of the message. In law enforcement, a message header generally contains the sender, destination, MKE, and any other information related to the processing or routing of the message.
Mono-Spaced Font – A font which displays glyphs using varying widths is a
proportional font while one with fixed width is a non-proportional (or monospace or fixed-width) font. Non-proportional fonts are considered better than proportional fonts for some purposes because their characters line up in nice, neat columns. Most non-electronic typewriters and text-only computer displays use only non-proportional fonts. Most computer programs which have a text-based interface, such as terminal emulators, are configured to use only non-proportional fonts.
NCIC Special Characters – NCIC defines a set of “special characters” that may be
entered into a data field that are neither alphabetic nor numeric character. The standard NCIC set of special characters includes the following: ',', '$', '&', '-', ‘ ‘, '/', '*', '#', '(', ')', '+', ';', '%', '\\', ''', '@', '~', '!', '"', '^', '_', '`', '=', '{', '}', '<', '>', '?', ':', '[', ']', and '|'.
OpenFox™ Message Switch – The OpenFox™ Message Switch is the central
component of the OpenFox™ Message Switching System. The message switch provides centralized control of the flow of messages through an information sharing system.
OpenFox™ Message Switching System – The suite of OpenFox™ products that relate
to the flow of law enforcement and public safety messages in an information sharing system. This includes the OpenFox™ Message Switch, OpenFox™ client applications, OpenFox™ databases, and more.
Select – The process of selecting an item from a list or tabular display. The selected item
is often identified through highlighting. This term may be used in place of “Highlight”.
Server – A server is a computer software application that carries out some task (i.e.
provides a service) on behalf of yet another piece of software called a client. Over the years, the term has adapted to also mean the physical computer on which the server software runs
Terminal – A computer terminal is an electronic hardware device, almost always a
desktop microprocessor computer. It is used for entering data into, and displaying data from, a computing system. This term may be used interchangeably with the term “Workstation”.

OpenFox™ Messenger Guide
Ver. 2.01.0061 Chapter 1: Introduction and Overview Pg. 13
Terminal Mnemonic – In the law enforcement and public safety community, a terminal mnemonic is a unique name assigned to a particular terminal. This term may be used interchangeably with the term “Terminal ID”.
Terminal ID – In the law enforcement and public safety community, a terminal identifier
is a unique name assigned to a particular terminal. This term may be used interchangeably with the term “Terminal Mnemonic”.
Transaction – see “Message” Variable-Width Font – A font which displays glyphs using varying widths is a
proportional font while one with fixed width is a non-proportional (or monospace or fixed-width) font. Proportional fonts are generally considered nicer-looking and easier to read and are thus more commonly used type of font in professionally published printed material. For the same reason, they are typically used in GUI computer applications, such as word processors and web browsers.
Workstation – A computer workstation is an electronic hardware device, almost always
a desktop microprocessor computer. It is used for entering data into, and displaying data from, a computing system. This term may be used interchangeably with the term “Terminal”.

OpenFox™ Messenger Guide
Pg. 14 Chapter 1: Introduction and Overview Ver. 2.01.0061
* * * THIS PAGE LEFT INTENTIONALLY BLANK * * *

OpenFox™ Messenger Guide
Ver. 2.01.0061 Chapter 2: Messenger Architecture Pg. 15
Chapter 2: Messenger Architecture OpenFox™ Messenger provides a GUI interface for submitting transactions to the OpenFox™ Message Switch and for managing and viewing message responses. OpenFox™ Messenger provides GUI forms for all entry, modify, delete, cancel, query, and administrative message formats. Messenger provides an interface for managing and viewing message responses that is very similar to existing email client applications (e.g. Microsoft™ Outlook, Mozilla Thunderbird, etc.).
2.1 Mailbox Window The Mailbox Window is the main screen through which a user interacts with the Messenger software. This screen is presented to the user immediately after the user has completed a successful logon through OpenFox™ Desktop. The Mailbox Window provides the user with access to all messages stored on the local workstation through a familiar email style interface. Brand new in versions 2.01 and later is a major enhancement to OpenFox™ Messenger which allows the user to configure the layout of the mailbox window. This option allows the user to arrange the mailbox window components in a different fashion than the default. These options are available as a user preference settings. For more information, please refer to the chapter on Messenger user preferences. The main sections of the Messenger Mailbox Window are identified in the following screenshot.

OpenFox™ Messenger Guide
Pg. 16 Chapter 2: Messenger Architecture Ver. 2.01.0061
2.1.1 Move Focus To OpenFox™ Messenger provides accessible hot keys which allow the user to quickly jump focus to any one of the five main components of the Messenger Mailbox Window. The user may press one of these hot key combinations from any Messenger screen to quickly jump the keyboard focus to the corresponding mailbox window component. More information about these different components may be found below.
Mailbox Window Section Hot Key Access Tree-Based Form Menu Ctrl-O Mail Folder List Ctrl-L Message List Ctrl-M Message Preview Ctrl-K Quick Query Bar Ctrl-Q
2.2 Mail Folders List All messages that are either sent from or received by OpenFox™ Messenger are stored in one of the Messenger Mail Folders. These folders function like email folders in a traditional email client application. By default, the mail folders appear in the upper left portion of the Messenger mailbox window.

OpenFox™ Messenger Guide
Ver. 2.01.0061 Chapter 2: Messenger Architecture Pg. 17
The user may access any mail folder by simply clicking on the name of that folder. When the keyboard focus is within this control, the user may cycle through the mail folders by using the up arrow, down arrow, home, end, page up, and page down keys. The user may also navigate to a mail folder through Messenger’s Accessibility menu. This menu also provides hot key combinations that allow the user to quickly jump to a particular folder. These hot keys may be used from any Messenger screen. Folder Name Hot Key Access Purpose
Inbox Ctrl-I Holds a copy of each message received from the OpenFox™ Message Switch
Sent Ctrl-N Holds a copy of each transaction the user has submitted to the OpenFox™ Message Switch
Save Ctrl-A Provides a location where a user may save messages that he or she may need at a later time
Trash Ctrl-T Allows a user to double check messages before actually deleting them
Drafts Ctrl-D Holds messages that the user has chosen to save as a draft message
Search Ctrl-E Holds the results from searches of the local messages
When there are unread messages in a Messenger mail folder, the name of that folder is displayed in bold text with an indication of how many unread messages there are in the folder. If any of the messages in the folder have a different colored then Messenger will change the color of the folder name to represent the most important color. For example, if a folder contains unread hit confirmation requests, then the folder name will be green.

OpenFox™ Messenger Guide
Pg. 18 Chapter 2: Messenger Architecture Ver. 2.01.0061
The following screenshot shows the user “RYAN” has 2 unread messages in the Inbox folder and at least one of them is a hit confirmation request or response.
2.3 Message List When the user has selected a Messenger mail folder, the message list control appears in the upper right portion of the Messenger mailbox window. Please note that depending on how the user has configured their mailbox window layout, this control may appear in a different area of the mailbox window. This control lists all of the messages in the currently selected mail folder. If the user right-clicks on a message in this list, OpenFox™ Messenger will display the “Message Option” popup menu. For more information on these options, please refer to the section titled “Menu and Toolbar Actions”.

OpenFox™ Messenger Guide
Ver. 2.01.0061 Chapter 2: Messenger Architecture Pg. 19
2.3.1 Message List Columns The message list control displays information regarding each message in the currently selected mail folder. This information is broken up into several different columns. These columns are described in the following table. Column Name Description
MKE The MKE of a message is the type of transaction. For example an MKE of “EW” stands for “Enter Wanted Person”.
User This column displays the ID of the user that was logged into Messenger when a particular message was sent or received. Depending on the user’s authority, this column may or may not be present.
Source This column displays the system which sent the message. For example, the source of a message may be “NCIC” or “NLETS”.
Summary This column displays a brief description of the contents of the message.
Date This column displays the date and time at which a particular message was sent or received.
ID
The ID column may be used to associate response messages with the original transaction. For example, if the user runs a query which returns a response from five different databases, then the original inquiry message and all five responses will have identical ID’s.
Type
The type of a message may be one of the following: Sent – Message was sent from Messenger Response – Generic response message Error – Reject message from the message switch Hit – Positive hit response from a database
New This column indicates whether or not a particular message has been viewed by the user.
Size
This column contains a graphical representation of the size of this message. Smaller messages are indicated via an empty white box. Larger messages are represented by the box filling up with a blue color. The more of the box that is filled with blue, the larger the message.
2.3.2 Hiding and Showing Columns The user may choose which columns are shown and which columns are hidden from view. This may be very important for mailbox layout configurations which display the list of messages in a vertical orientation. In such layouts, the screen area allocated for the columns has more vertical space than horizontal space, and unless the user chooses to hide columns, the display will become cluttered.
OpenFox™ Messenger Guide
Pg. 20 Chapter 2: Messenger Architecture Ver. 2.01.0061
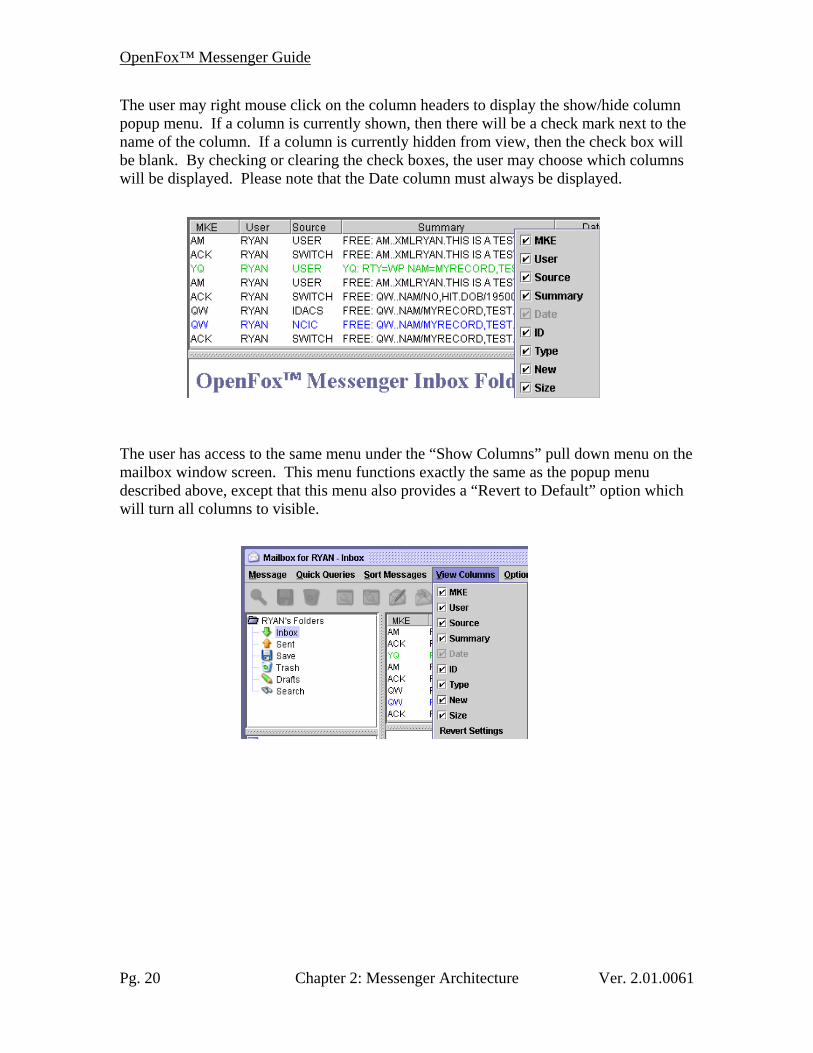
The user may right mouse click on the column headers to display the show/hide column popup menu. If a column is currently shown, then there will be a check mark next to the name of the column. If a column is currently hidden from view, then the check box will be blank. By checking or clearing the check boxes, the user may choose which columns will be displayed. Please note that the Date column must always be displayed. The user has access to the same menu under the “Show Columns” pull down menu on the mailbox window screen. This menu functions exactly the same as the popup menu described above, except that this menu also provides a “Revert to Default” option which will turn all columns to visible.

OpenFox™ Messenger Guide
Ver. 2.01.0061 Chapter 2: Messenger Architecture Pg. 21
2.3.3 Message Sorting The user may choose to order the messages in a particular mail folder by simply clicking on the heading of the desired column. The messages will then be sorted according to the values under the column on which the user clicked. That column will also show a small black arrow which indicates the direction, either ascending or descending, of the sort. Clicking on the same column again will reverse the direction of the search. The following screen shot shows the view after the user has chosen to order the messages by the Source column. The user also has access to the same functions under the “Sort Messages” pull down menu on the mailbox window. Choosing a column from this menu will order the messages in the current folder according to the values under that column. Choosing the same column by which the messages are currently sorted will simply reverse the order of the sort. The pull down menu also provides a option to revert the sort to the default setting. Additionally, this pull down menu allows the user to lock the sort. When sorting has been locked, the column used to order messages may not be changed until the sorting is unlocked. This feature can be very useful for those user that find themselves clicking on a column header unintentionally.

OpenFox™ Messenger Guide
Pg. 22 Chapter 2: Messenger Architecture Ver. 2.01.0061
2.3.4 Column Ordering The user may choose to rearrange the columns in the message list control. This is accomplished by clicking and dragging the column header to the desired location. The following screenshot is an example which shows the message list control while a user is dragging the “Date” column into a new location.
2.3.5 Single Message Selection Using the message list control, the user may browse through all the messages in the currently selected Messenger mail folder. When the user has messages highlighted, the user may perform one of the various message actions. Please see the later section, titled “Menu Actions” for more information. Versions 2.01 and later of OpenFox™ Messenger allow the user to view multiple messages in the message preview pane simultaneously. This is an enhancement over older versions of Messenger which only allowed the user to view one message at a time. For more information on displaying multiple messages, please see the following section on multiple message selection as well as the chapter on Messenger terminal preferences. The user may use the mouse to left-click on a particular message to highlight or select that particular message. When the keyboard focus is in the list of messages, the user may also use the up arrow, down arrow, page up, page down, home and end keys to navigate through the messages in the list.

OpenFox™ Messenger Guide
Ver. 2.01.0061 Chapter 2: Messenger Architecture Pg. 23
2.3.6 Range Selection The user may select a range of messages if he or she clicks on either the top or bottom message, presses and holds the Shift key, and clicks on the other message. Then, both messages and all messages in between will be highlighted. The user may also select a range of messages by using the keyboard. The user must first navigate to either the first or last message. Then the user presses and holds down the Shift key. The user may then navigate to a new message, and as the user navigates to new messages, the range will either grow or shrink.
2.3.7 Multiple Message Selection The user may highlight an arbitrary combination of messages by using the mouse. The user may highlight a particular message, then while holding down the Ctrl key, click on another message. That message will then be highlighted in addition to the first message. The user may repeat this process to choose which messages are highlighted. If the user holds down the Ctrl key and clicks on a message that has already been highlighted, then that message will no longer be highlighted. The user may also highlight any combination of messages via the keyboard. The user must first navigate to a particular message. Then the user presses and holds down the Ctrl key. The user may then navigate to a new message and, by pressing the space bar, may highlight the message. While the user holds down the Ctrl key, this process may be repeated for any number of messages. Similarly, pressing the space bar while on a message that has already been highlighted will cause the message to no longer be highlighted.

OpenFox™ Messenger Guide
Pg. 24 Chapter 2: Messenger Architecture Ver. 2.01.0061
2.4 Message Preview Pane When the user has selected messages in the message list control, those messages are displayed in the message preview pane. This control is located in the bottom right section of the Messenger mailbox window by default. The user may highlight text in the preview pane by clicking and dragging the mouse over the text. The user may then copy the text, so that it may be pasted elsewhere, by clicking the right mouse button.

OpenFox™ Messenger Guide
Ver. 2.01.0061 Chapter 2: Messenger Architecture Pg. 25
2.4.1 Image Display If a message contains an image, then OpenFox™ Messenger displays the image in-line with the rest of the message data. The user may choose to save the image to his or her local disk by choosing the "Export Images" option from the "Message" menu. For more information on this menu option, please refer to the following section titled "Menu and Toolbar Actions".
2.4.2 Message Text Search The user may perform a text search of the message(s) currently displayed in the message preview pane. This is performed by right mouse clicking in the message display area and choosing the “Find in Document” item. This option is also available via the “Message Action” menu. When this action is chosen, Messenger displays the message text search bar at the very bottom of the message preview pane. An example of this search bar is shown below.

OpenFox™ Messenger Guide
Pg. 26 Chapter 2: Messenger Architecture Ver. 2.01.0061
The user may enter search text into the “Find:” box. Please note that the search will ignore capitalization of the search terms and the text in the message contents. For example, if the user enters “test” into the find box, the search will match on “test”, “TEST”, and “Test”. If a match is found, then the message preview pane will highlight the match. The user may cycle between matches by clicking on the “Next” or “Previous” buttons on the search bar. If the user is one the last match and chooses the “Next” match, then the search bar will wrap to the beginning of the message(s). This is indicated one the search bar. If the text entered by the user does not appear within the contents of the displayed message(s), then the search bar will indicate this by changing the background color of the find box to red and by displaying a message. If the “Highlight” check box is selected, then Messenger will highlight all matches in the current message(s) with a yellow color. Below is an example of the highlight check box. The search bar will remain active until it is closed by clicking on the ‘X’ button on the left hand side of the bar. If the search bar is active, and the user navigates to a new message, then the search will be run against the new message. Thus, the user may use the search bar to perform an easy text search of messages in a folder by moving through the list of messages while the search bar is active.

OpenFox™ Messenger Guide
Ver. 2.01.0061 Chapter 2: Messenger Architecture Pg. 27
2.4.3 Code List Lookup The user may highlight an NCIC code value in the preview pane and select to look that code up against a code list. To perform this action, the user must first highlight the code value, the MFC field name, and the slash character in between them. If there are extra spaces or periods, these characters will be ignored, however it is important to not highlight any extra letters or digits. For example, the user has selected the text “SMT/SC R HAND”.
After selecting the MFC and code value, the user may press the F1 key, or may access the action from the right-click popup menu, or from the mailbox window’s options menu.
Messenger looks up the code’s text description and reports the translation to the user.

OpenFox™ Messenger Guide
Pg. 28 Chapter 2: Messenger Architecture Ver. 2.01.0061
Because the NCIC vehicle make, model, and style codes are dependent upon one another, the user must highlight the VMA field, the VMA and the VMO fields, or the VMA and the VMO and the VST fields when performing a look up for NCIC vehicle codes. For example, the below screen shows the user highlighting all three fields in an NCIC response.
After the user presses F1 on the keyboard, Messenger displays the translated code values.
Messenger will also perform VIN decoding through this same mechanism. Thus, a user may highlight a VIN in a message response, and press F1 to see the decoded information.

OpenFox™ Messenger Guide
Ver. 2.01.0061 Chapter 2: Messenger Architecture Pg. 29
2.5 Quick Query Bar The quick query bar is located at the bottom of the Messenger Mailbox Window. This control can be used to free form any single line transaction. When the user presses the Enter key, the text in the quick query bar will be sent into the message switch. The quick query bar also allows the user to send in quick or short format queries. This feature would allow a user, for example, to only type in a license plate number, and then, by pressing a special function key, send in a query vehicle (QV) to the message switch. The quick query formats available and the corresponding function keys may be different depending on your copy of OpenFox™ Messenger. A complete list of available quick query formats may be found under the mailbox window’s “Quick Query” menu. The below screen shot shows a user entering a wanted person quick query. After pressing a special function key, OpenFox™ Messenger parses out the full query wanted (QW) transaction and submits it into the switch. The quick query bar allows the user to enter any valid OpenFox Message Switch command. For more information on switch commands, please refer to the OpenFox System Administrator Guide. The quick query also provides a quick access to the Messenger transaction forms. If the user types "DQ", Messenger will open the NLETS driver's query (DQ) form. A user may enter the names of many forms, separated by a space, press Enter, and Messenger will open all the forms. The below screen shot shows a user opening the DQ, RQ, and QW forms. The quick query bar also maintains a history of the transactions and commands that have been run. By pressing the up arrow and down arrow keys, the user may browse backwards and forwards through the history.
OpenFox™ Messenger Guide
Pg. 30 Chapter 2: Messenger Architecture Ver. 2.01.0061
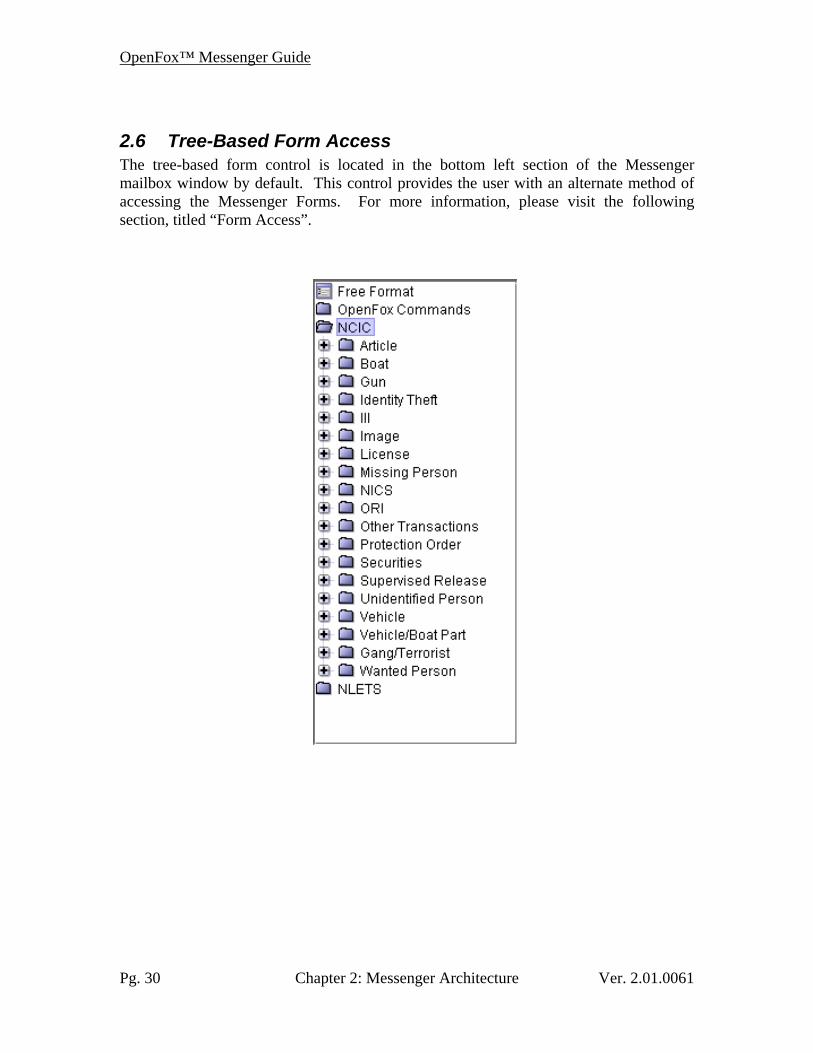
2.6 Tree-Based Form Access The tree-based form control is located in the bottom left section of the Messenger mailbox window by default. This control provides the user with an alternate method of accessing the Messenger Forms. For more information, please visit the following section, titled “Form Access”.

OpenFox™ Messenger Guide
Ver. 2.01.0061 Chapter 2: Messenger Architecture Pg. 31
2.7 Disk Usage Monitor OpenFox™ Messenger provides a disk usage monitor so that a user may observe the amount of reserved disk space that is currently being used by messages stored on the workstation. The disk usage monitor is displayed in the upper right section of the Messenger mailbox window. The user may determine the exact percentage of reserved disk space used by hovering the mouse over the disk usage monitor. As more of the disk space reserved for Messenger becomes filled, the disk usage monitor reflects this. When the reserved disk space is nearly completely filled, the disk usage monitor will change to a red color. If you are experiencing high disk usage, this may be indicative of a configuration problem. Please contact your supervisor. In typical configurations, Messenger will begin overwriting the oldest messages in your mail folders when the disk space becomes completely full.

OpenFox™ Messenger Guide
Pg. 32 Chapter 2: Messenger Architecture Ver. 2.01.0061
2.8 Menu and Toolbar Actions The Messenger mailbox window provides several menu actions to the user. Some of these actions are only available via a pull down menu, and some of these actions are also available on the mailbox window tool bar.
2.8.1 Message Actions These actions are located in the Messenger mailbox window’s “Message” pull down menu. This same menu is available by right mouse clicking on a message in the message list control.

OpenFox™ Messenger Guide
Ver. 2.01.0061 Chapter 2: Messenger Architecture Pg. 33
Many of the same actions are also available through the Messenger mailbox window’s toolbar control, which is directly under the menu bar. Some of the actions under this menu are “message actions”. These actions affect or are related to the whatever messages are currently selected or highlighted in the message list control. These actions either use the highlighted messages to perform some new function, or they affect the highlighted messages by moving them to a different folder, deleting the messages, etc. The message actions are explained in the below table.
Action Icon Hot Key Description Delete
Delete This action will move the selected message(s) into the “Trash” mail folder. If this action is performed on messages already in the “Trash” folder, then those messages will be permanently deleted.
Export
None This action will export the selected message(s) to one of the following formats: HTML (the HTML document displayed in the message preview pane), Text (plain text view of the message), or XML (the raw XML data of the message). This action may also be used to export any images embedded within a message.
Find in Document
Ctrl-F This action will activate the message preview page search bar. For more information, please see section 2.1.3.2
Find Messages
Ctrl+Shift-F This action displays the Search Local Messages dialog box. For more information about message searches, please see the section titled “Local Message Search” under “Messenger Features”.
Forward
Ctrl-B This action will display an administrative message form which may be used to forward a copy of a message or messages to another terminal.
Move
None This action allows the user to move the selected messages to any other mail folder.
Open in New Window
Alt-Enter
(The user may
change the shortcut via preferences)
This action will open a separate message view window and display the contents of the selected message(s).

OpenFox™ Messenger Guide
Pg. 34 Chapter 2: Messenger Architecture Ver. 2.01.0061
Action Icon Hot Key Description Open in Window
Ctrl-Enter
(The user may change the shortcut via preferences)
This action will display the contents of the selected message(s) in a separate message view window. If there is a message view window already open, then this action will reuse the open window.
Ctrl-P This action will print the selected message(s). For more information about printing, please see the section titled “Printing” under “Messenger Features”.
Rename
Ctrl-N This action allows the user to change the text that appears under the Summary column.
Reply
Ctrl-R This action will display an administrative message form which may be used to reply to the selected message.
Save
Ctrl-S This action will move the selected message(s) into the “Save” mail folder.
Start/Stop Auto Print
None This action will toggle whether automatic printing is turned on or off. For more information about auto printing, please see the section titled “Printing” under “Messenger Features”.
View Form
Enter
(The user may change the shortcut via preferences)
This action will attempt to display the form that was used to submit the selected message. If the selected message is a response, then this action will attempt to display the form that was used to submit the message which solicited the selected response. If the original message was submitted via the quick query bar or through a custom style sheet hyperlink, the message will be displayed in the quick query bar.
2.8.2 Selection Actions These actions also include selection actions which may be used to change what messages are currently highlighted or selected in the message list control. These actions do not change any messages. Instead, they only change what messages are selected. These selection actions are explained in detail in the following table.

OpenFox™ Messenger Guide
Ver. 2.01.0061 Chapter 2: Messenger Architecture Pg. 35
Action Icon Hot Key Description Clear Selection
Ctrl+Shift-C Clear Message Selection – This action will select or highlight none of the messages in the current mail folder.
Reverse Selection
Ctrl+Shift-R Reverse Message Selection – This action will change the set of selected or highlighted messages so that if a message was selected, it will not be unselected and if a message was not selected, it will now be selected.
Select All
Ctrl+Shift-A Select All Messages – This action will select or highlight all messages in the current mail folder.
Select Related Message(s)
Ctrl-G Clear Message Selection – This action will
select or highlight none of the messages in the current mail folder.
View Unread Message
Ctrl-U Clear Message Selection – This action will
select or highlight none of the messages in the current mail folder.
2.8.3 Quick Queries The actions under this menu may be used, in conjunction with the quick query bar, to submit a quick or short format message. For each quick query format, this menu will display a name and the special function key that executes the quick query. Also, if the user hovers the mouse cursor over a quick query, Messenger displays a reminder of the format for the quick query. The set of quick queries which are available is typically configured in an enterprise wide configuration file. However, it is possible to override this setting on individual terminals. Thus, if your agency wishes to have a different set of quick query formats available, it is possible to do so. For more information regarding changing the formats, please contact the Messenger purchasing agency. Please note that the items beneath your quick query menu may be different from those shown below. For more information regarding the exact format of the quick queries, please contact your supervisor.

OpenFox™ Messenger Guide
Pg. 36 Chapter 2: Messenger Architecture Ver. 2.01.0061
2.8.4 Sort Messages The actions under this menu may be used to change the order in which messages appear within the message list control. This menu provides a keyboard accessible method of sorting all messages within a specific mail folder. For more information about sorting messages, please refer to the earlier section “Message Sorting” under “Message List”.
2.8.5 View Columns The items under this menu may be used to change whether columns in the message list control are shown or are hidden from view. This menu provides a keyboard accessible method of changing this setting. For more information about hiding and showing columns, please refer to the earlier section “Hiding and Showing Columns” under “Message List”.
OpenFox™ Messenger Guide
Ver. 2.01.0061 Chapter 2: Messenger Architecture Pg. 37
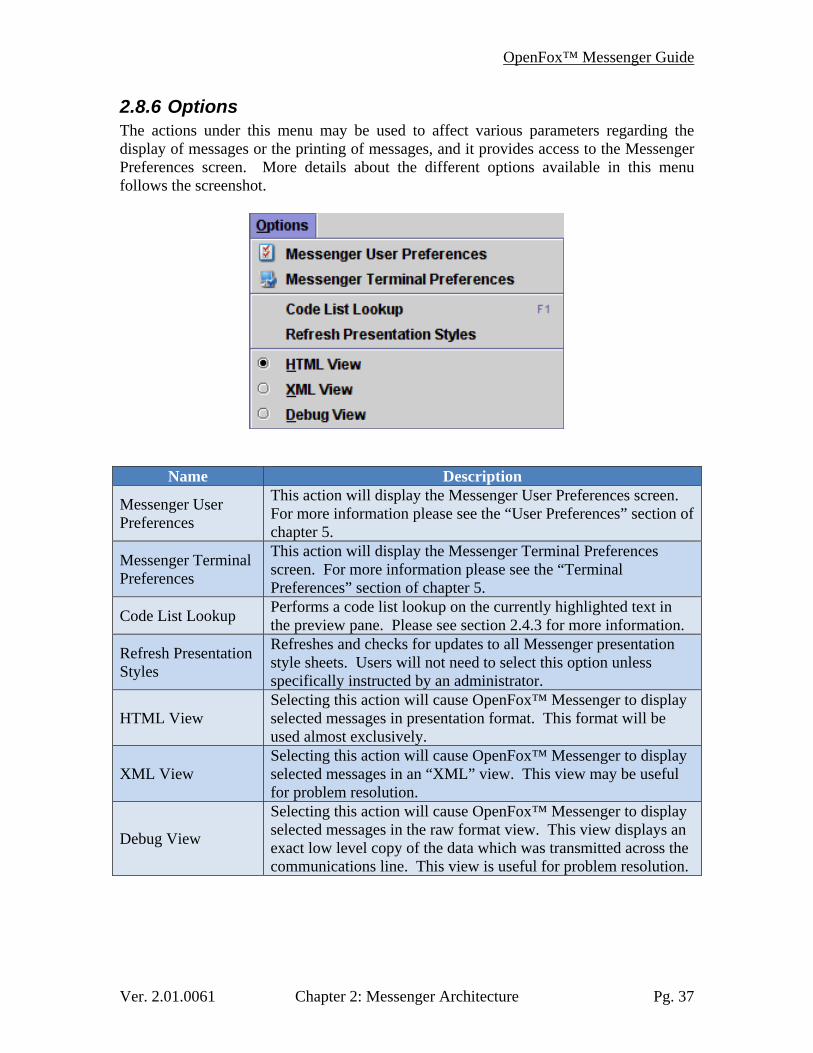
2.8.6 Options The actions under this menu may be used to affect various parameters regarding the display of messages or the printing of messages, and it provides access to the Messenger Preferences screen. More details about the different options available in this menu follows the screenshot.
Name Description
Messenger User Preferences
This action will display the Messenger User Preferences screen. For more information please see the “User Preferences” section of chapter 5.
Messenger Terminal Preferences
This action will display the Messenger Terminal Preferences screen. For more information please see the “Terminal Preferences” section of chapter 5.
Code List Lookup Performs a code list lookup on the currently highlighted text in the preview pane. Please see section 2.4.3 for more information.
Refresh Presentation Styles
Refreshes and checks for updates to all Messenger presentation style sheets. Users will not need to select this option unless specifically instructed by an administrator.
HTML View Selecting this action will cause OpenFox™ Messenger to display selected messages in presentation format. This format will be used almost exclusively.
XML View Selecting this action will cause OpenFox™ Messenger to display selected messages in an “XML” view. This view may be useful for problem resolution.
Debug View
Selecting this action will cause OpenFox™ Messenger to display selected messages in the raw format view. This view displays an exact low level copy of the data which was transmitted across the communications line. This view is useful for problem resolution.

OpenFox™ Messenger Guide
Pg. 38 Chapter 2: Messenger Architecture Ver. 2.01.0061
2.9 Form Access OpenFox™ Messenger provides users with access to the GUI transaction forms. If a particular user does not have the authority to open a form, then that form will not appear in the form access menu. Messenger allows a user to access the forms through two methods, the “Forms” menu or the Tree-Based form control. Both methods display the exact same information, and both methods provide access to the exact same forms. The user is free to choose which method to use. If the user has configured any favorite forms, these items will be displayed in both the pull down menu and the tree control. If there is a keyboard shortcut for opening a favorite form, then it will be displayed to the right of the form name. For more information regarding favorite forms, please refer to the chapter on user preferences.
2.9.1 Forms Menu When OpenFox™ Messenger is the currently active Desktop module the “Forms” menu is the left-most menu option in the common Desktop menu bar. For more information about Desktop, please refer to the OpenFox™ Desktop Guide. The user may navigate this pull down menu with either the mouse or the keyboard.

OpenFox™ Messenger Guide
Ver. 2.01.0061 Chapter 2: Messenger Architecture Pg. 39
2.9.2 Tree-Based Form Menu The tree-based form menu is located in the lower left portion of the Messenger Mailbox Window. The user may navigate this control with either the mouse or the keyboard. On the keyboard, the user may expand or collapse a folder of forms by pressing the Enter key.

OpenFox™ Messenger Guide
Pg. 40 Chapter 2: Messenger Architecture Ver. 2.01.0061
* * * THIS PAGE LEFT IINTENTIIONALLY BLANK * * *

OpenFox™ Messenger Guide
Ver. 2.01.0061 Chapter 3: Messenger Features Pg. 41
Chapter 3 Messenger Features This chapter explains the features present in OpenFox™ Messenger.
3.1 Message Flow OpenFox™ Messenger is a web-based graphical user interface to the OpenFox™ Message Switching System. The Messenger Mailbox Window is the screen through which all workstation messages are managed. Using OpenFox™ Messenger to manage workstation messages is very similar to using any standard email client application (e.g. Microsoft® Outlook, Mozilla Thunderbird, or web-based email).
3.1.1 Submitted Messages When the user submits a transaction through either one of the Messenger GUI Forms, from the quick query bar, or through some other means, an exact copy of that transaction will be stored in the user’s “Sent” mail folder. A user’s “Sent” mail folder displays a history of transactions submitted from the workstation.

OpenFox™ Messenger Guide
Pg. 42 Chapter 3: Messenger Features Ver. 2.01.0061
The user may perform the “view message” action to display a particular submitted message in a Messenger form or the quick query bar. If the user performs this action on a response message then OpenFox™ messenger will find the original submitted message that resulted in the response message. This original submitted message is displayed in either a Messenger form or the quick query bar. For more information regarding the “view message” action and other message actions, please refer to the earlier section, titled “Menu and Toolbar Actions” under “Messenger Architecture”.
3.1.2 Responses When OpenFox™ Messenger receives a message from the OpenFox™ Message Switching System the message is stored in the user’s “Inbox” mail folder. The message will be marked as “new” until the user views the message in the Messenger message preview pane. OpenFox™ Messenger notifies the user that there is a new message with an audible alarm and a new message notification window. For more information, please see the following section. The “Inbox” mail folder displays a record of messages received from the OpenFox™ Message Switching System.
3.1.3 New Message Notification Window When OpenFox™ Messenger receives a message from the OpenFox™ Message Switching System, it notifies the user by displaying a new message notification window. This window appears in the lower right corner of the workstation’s screen. This window will appear above all other top-level application windows. Thus, even if the user is working with a different full-screen application, he or she will still see the notification. The new message notification window informs the user of how many un-read messages are currently inside the “Inbox” mail folder. If any of these un-read messages are error or positive hit responses, the text color of the notification window changes. The user can immediately jump to the “Inbox” mail folder by clicking anywhere inside of the notification window. The new message notification window informs a user that there are three un-read messages (at least one is a positive hit response) in the “Inbox” mail folder.

OpenFox™ Messenger Guide
Ver. 2.01.0061 Chapter 3: Messenger Features Pg. 43
3.1.4 Saving Messages The user may choose to save specific messages to the “Save” mail folder by highlighting the appropriate messages and performing the “save message” action. This action may be performed by clicking on the appropriate icon in the mailbox window’s toolbar, or by selecting the “Save” option from the “Message” menu. The message is then moved into the “Save” folder.
For more information regarding the “save message” action and other message actions, please refer to the earlier section, titled “Menu and Toolbar Actions” under “Messenger Architecture”.
OpenFox™ Messenger Guide
Pg. 44 Chapter 3: Messenger Features Ver. 2.01.0061
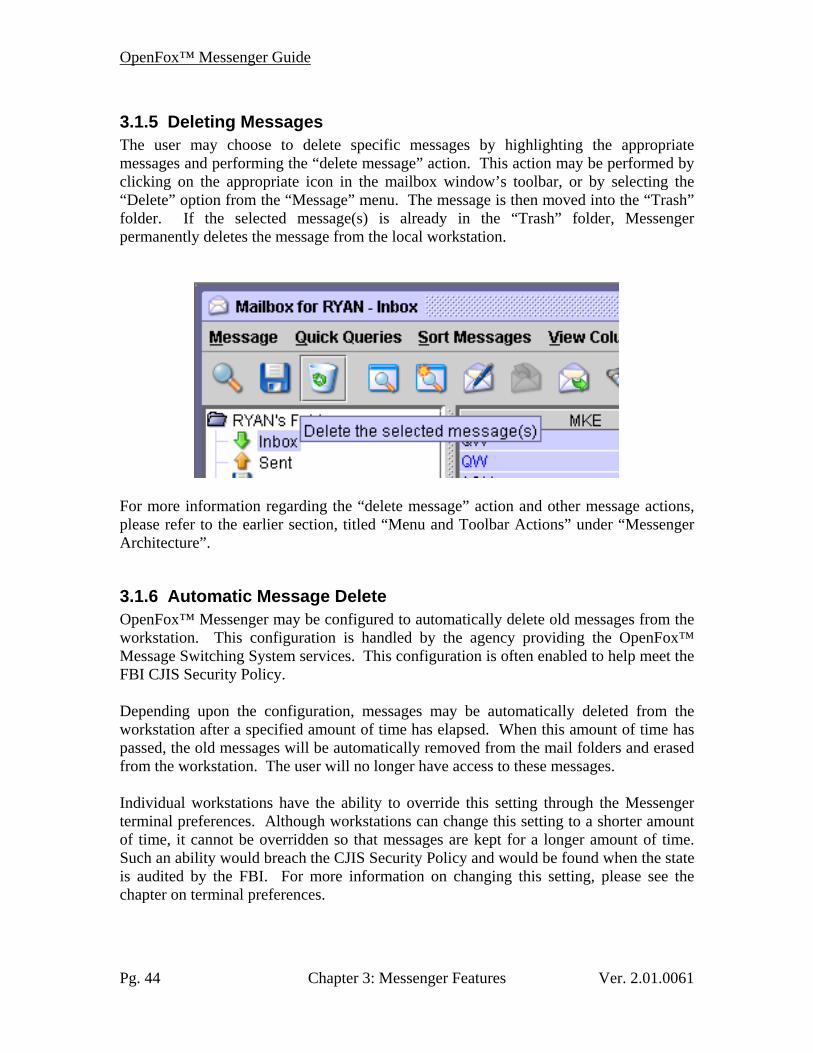
3.1.5 Deleting Messages The user may choose to delete specific messages by highlighting the appropriate messages and performing the “delete message” action. This action may be performed by clicking on the appropriate icon in the mailbox window’s toolbar, or by selecting the “Delete” option from the “Message” menu. The message is then moved into the “Trash” folder. If the selected message(s) is already in the “Trash” folder, Messenger permanently deletes the message from the local workstation.
For more information regarding the “delete message” action and other message actions, please refer to the earlier section, titled “Menu and Toolbar Actions” under “Messenger Architecture”.
3.1.6 Automatic Message Delete OpenFox™ Messenger may be configured to automatically delete old messages from the workstation. This configuration is handled by the agency providing the OpenFox™ Message Switching System services. This configuration is often enabled to help meet the FBI CJIS Security Policy. Depending upon the configuration, messages may be automatically deleted from the workstation after a specified amount of time has elapsed. When this amount of time has passed, the old messages will be automatically removed from the mail folders and erased from the workstation. The user will no longer have access to these messages. Individual workstations have the ability to override this setting through the Messenger terminal preferences. Although workstations can change this setting to a shorter amount of time, it cannot be overridden so that messages are kept for a longer amount of time. Such an ability would breach the CJIS Security Policy and would be found when the state is audited by the FBI. For more information on changing this setting, please see the chapter on terminal preferences.

OpenFox™ Messenger Guide
Ver. 2.01.0061 Chapter 3: Messenger Features Pg. 45
3.2 Message Types When a message is stored in one of the Messenger mail folders, it is assigned a message type. OpenFox™ Messenger classifies messages into four distinct types: Submitted Messages, Generic Responses, Positive Hit Responses, and Error Responses. Each of these different message types is identified by an icon representation and a different color text. These are listed in the table below.
Type Icon Sample Text
Submitted Message
KQ: NAM/MYRECORD, TEST.DOB/19500101
Generic Response
QW: NAM/MYRECORD, TEST.DOB/19500101
Positive Hit Response
QW: NAM/PUBLIC, JOHN.DOB/19500101
Hit Confirmation
YQ: LIC/ABC123.COU/ORANGE
Draft Message
QW: NAM/PUBLIC, JOHN.DOB/19500101
Error Response
QW: LIC/ABC123.COU/ORANGE
3.2.1 Audible Alarms OpenFox™ Messenger will play an audible alarm when a new message is received from the OpenFox™ Message Switching System. This audible alarm will identify the type of the message received by Messenger.
3.3 Advanced Message Actions OpenFox™ Messenger provides several advanced message actions. These advanced actions provide the user with the ability to easily spawn new NLETS hit confirmation request messages from an NCIC hit response and the ability to easily respond to hit confirmation requests that are received by the workstation. Additionally, this feature may be used with criminal history transactions or other state specific transactions. Please refer to your state technical contact for more information. Because these actions may only be performed on specific messages, they are not always available to the user through the “Message” menu in the Messenger mailbox window. When the user highlights a message against which he or she may perform an advanced action, Messenger provides the action at the top of the “Message” menu.

OpenFox™ Messenger Guide
Pg. 46 Chapter 3: Messenger Features Ver. 2.01.0061
3.3.1 Hit Confirmation Request The user may perform the hit confirmation request action on any of the following positive hit responses: wanted person, missing person, protection order, stolen vehicle, felony vehicle, stolen license plate, stolen gun, stolen article, stolen security, stolen boat, or stolen part. The user may choose the “Request Hit Confirmation” option from the “Message” menu.
OpenFox™ Messenger will parse the relevant data fields out of the NCIC response, automatically display an NLETS hit confirmation request form, and fill in the form fields.

OpenFox™ Messenger Guide
Ver. 2.01.0061 Chapter 3: Messenger Features Pg. 47
3.3.2 Hit Confirmation Response The user may perform the hit confirmation response action on a hit confirmation request message that he or she has received through Messenger. The user may choose the “Confirm this Hit” option from the “Message” menu.
OpenFox™ Messenger will parse the relevant data fields out of the NLETS request message, automatically display an NLETS hit confirmation response form, and fill in the form fields.
OpenFox™ Messenger Guide
Pg. 48 Chapter 3: Messenger Features Ver. 2.01.0061
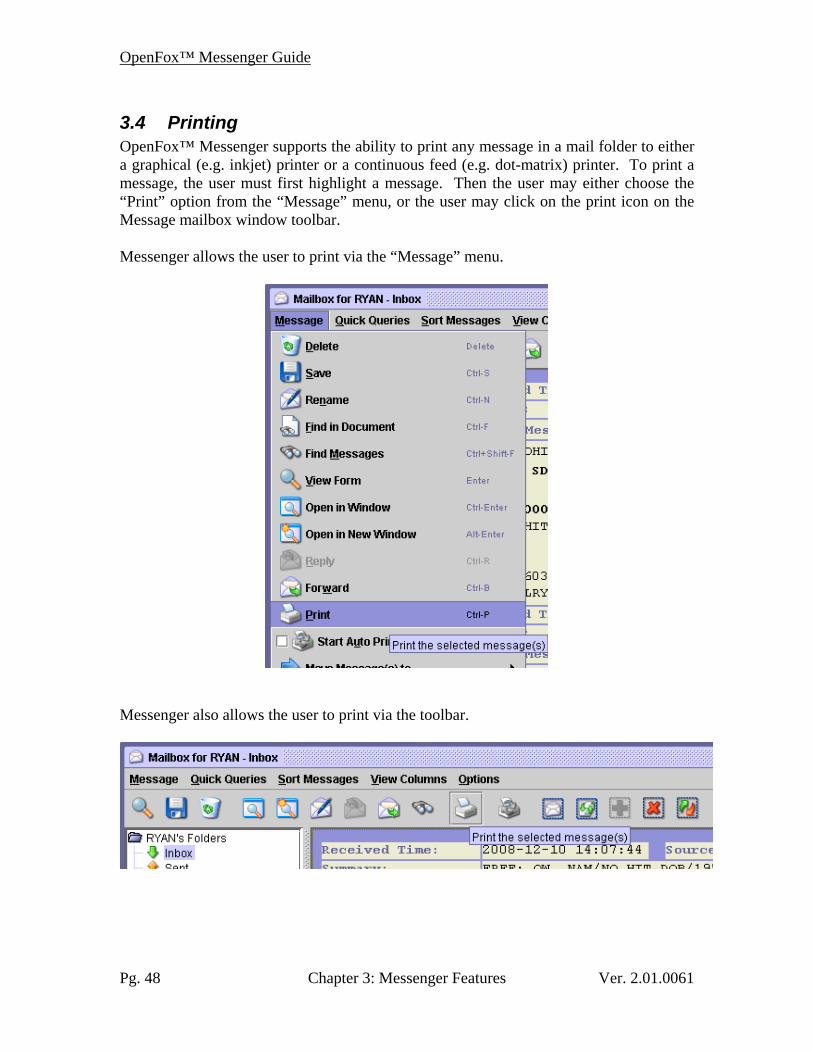
3.4 Printing OpenFox™ Messenger supports the ability to print any message in a mail folder to either a graphical (e.g. inkjet) printer or a continuous feed (e.g. dot-matrix) printer. To print a message, the user must first highlight a message. Then the user may either choose the “Print” option from the “Message” menu, or the user may click on the print icon on the Message mailbox window toolbar. Messenger allows the user to print via the “Message” menu.
Messenger also allows the user to print via the toolbar.

OpenFox™ Messenger Guide
Ver. 2.01.0061 Chapter 3: Messenger Features Pg. 49
3.4.1 Dispatch Printing Messenger may operate in one of two different printing modes: Windows Printing, and Dispatch Printing. The user may choose between these two modes in the Messenger printing preferences screen. For more information regarding this, please refer to the chapter on user preferences. When dispatch printing mode is enabled, then Messenger will use the settings under the Messenger printing preferences screen. Please see the chapter on user preferences to see how to access this screen. A typical configuration example of this screen is shown below.
This screen shows all the printers which are accessible from this terminal. In order for a printer to show up in this list, the terminal must be able to use the printer from other standard Windows software such as Microsoft Word. This screen allows the user to configure their printer settings the first time, and then the user will never have to touch the settings again, unless the user desires to change the configuration. In the above screen shot the “FXP 147” printer will be used for auto printing, and the “HP LaserJet 1020” printer will be used for selective printing. The name column displays the name of the printer. The type column indicates whether this printer is an image capable device (inkjet, deskjet, laser, etc), or a dot matrix style printer. The last two columns indicate which printer will be used for selective printing and which printer will be used for automated printing. For more information, please see the next few sections.

OpenFox™ Messenger Guide
Pg. 50 Chapter 3: Messenger Features Ver. 2.01.0061
The user may change the settings of a printer by highlighting the appropriate line, and then changing any of the options at the bottom of the screen. The “Type of Printer” allows the user to configure whether the printer is an image capable device or a dot matrix printer. Please note that it is very important to have this setting correct. If the user is printing to a dot matrix printer and sees all dots, or if the user is printing to an image capable printer and the text flows of the right hand side of the paper, then it is likely that the printer is setup as the wrong type. Please double check the “Type of Printer” and make sure that it is correct.
Pressing either the “Set Selective Printer” or the “Set Auto Printer” button will make the current printer used for either selective printing or for automated printing. As soon as the user presses the button, the printer list display will move the appropriate check to the selected line.
If the user is currently selecting an image capable printer, then the “Page Setup” button will allow the user to change some advanced printer options. When the button is selected, the below window will be displayed. The user may change the paper size, paper source tray, paper orientation, and page margin settings for this printer. Any changes are stored in the user’s preferences and never have to be touched again.

OpenFox™ Messenger Guide
Ver. 2.01.0061 Chapter 3: Messenger Features Pg. 51
Additionally, the user has the option of manually adjusting the font size used to print to image capable devices. This setting is controlled through the “Font Adjust” control. If the user enters a positive value in this field, then the font size will be made larger. If the user enters a negative value in this field, then the font size will be made smaller. Values farther away from zero will have a larger effect on the font size, and values closer to zero will have a smaller impact. Users may find it useful to experiment with this setting until they find a setting which works for the printer they wish to use.
When the user has selected a dot matrix printer, then he or she may adjust the number of extra line feeds that are printed following each print job. Many dot matrix printers have a “paper shield” that hides text which has just recently been printed. In order to see the text, it is necessary to move the paper feed up. Instead of doing this manually after every print job, Messenger allows the user to automatically scroll the paper by a number of blank lines. This setting is changed through the “Extra Line Feeds” control.
The printer list may display some printer lines with a grey background. These printers are called inactive printers. These are printers to which the user previously had access, but no longer does from the current workstation. This can happen when a printer is removed from service, or when the user moves to a different agency. Inactive printers are very common for trainers and auditors since they typically sign onto Messenger from many different locations, each of which has their own set of printers. The user may leave inactive printers alone because they will not affect the operation of the Messenger software. If access to an inactive printer is ever restored (by reinstalling the printer, or moving back to an old location), then the printer will become active and any print settings are still remembered. If the user wishes to remove inactive printers, then the user may select an inactive printer and press the “Delete” button. Also, the user may choose to remove all the inactive printers by pressing the “Clean” button.

OpenFox™ Messenger Guide
Pg. 52 Chapter 3: Messenger Features Ver. 2.01.0061
3.4.2 Windows Printing If the user chooses to disable dispatch printing, then Messenger will use print behavior similar to that used by other standard Windows software such as Microsoft Word. In this mode, the user must select a printer and print options the first time that they attempt to print. This applies to the first time that the user chooses to selectively print a message, and the first time that the user chooses to enable automated printing. If the user exits Messenger and re-launches the application, then the first time they print, they will have to reconfigure the print settings. The first time that a user chooses to print, Messenger will display the below dialog box. The user is free to choose a printer and any printer options from this dialog box. After the user has printed at least one message through the above procedure, he or she may simply choose the print option from the mailbox window’s toolbar to quickly print a new message using the same print settings. If the user wants to change some of the print options, then he or she must choose the print option from the “Message” menu, and Messenger will then display the print option dialog box.

OpenFox™ Messenger Guide
Ver. 2.01.0061 Chapter 3: Messenger Features Pg. 53
3.4.3 Selective Printing Messenger uses the selective printing settings when a user chooses to print the messages which are currently highlighted in the user’s list of mailbox messages. This is typically accomplished by selecting one or more messages in the message list and then performing the print action. For more information regarding message selection, please see section 2.3.
3.4.4 Automated Printing OpenFox™ Messenger supports the automated printing of messages as they are received by the workstation. The user may turn on this feature by either choosing the “Start Auto Print” option from the “Message” menu or by clicking on the “Auto Print” button on the mailbox window’s toolbar. Choosing either option after auto printing has been turned on will turn the feature off. If automated printing is enabled, then every message which is delivered to the workstation will be printed with no action by the user.
The process of configuring the automated print feature is very similar to the process of printing a specific message. If the user has chosen dispatch mode printing, then Messenger will use the settings defined in the Messenger printer preferences screen. If the user has not chosen dispatch mode printing, then Messenger will display the print chooser dialog box.
3.4.3 Unattended Printing OpenFox™ Messenger supports the unattended printing of message received by the workstation. This feature has typically been supported by generating a generic agency user ID. This user ID must be defined in the OpenFox™ Message Switching System as a normal user ID. However the user should be configured with no Police Authority levels, and thus the user would not be able to initiate any messages into the system. This will make the user ID exempt from any NCIC or state audits. The user ID and password should be made available to all the users at the agency. Additionally, the user should be configured to have a non-expiring password and to be multiple sign on capable. If a user is logging off Messenger and wants to enable unattended printing, then he or she would first log off, and then log on with the generic agency user ID and password. After logging on, please verify that the auto print feature is enabled. If the user wishes to lock the display, then this will not interfere with the printing in any fashion.

OpenFox™ Messenger Guide
Pg. 54 Chapter 3: Messenger Features Ver. 2.01.0061
3.5 Local Message Search OpenFox™ Messenger provides a local message search facility that enables operators or supervisors to search the message traffic history of a particular workstation. This search is limited to the traffic that has been either sent from or received by a particular workstation. A message must be located in one of the mailbox folders in order to be found by a local message search. This feature is not intended to be a search for historical workstation or agency traffic. For information regarding historical traffic searches, please refer to documentation for the OpenFox™ Message Switching System or OpenFox™ Archive and Retrieval. After a local message search completes, the results of the search are added to the user’s Search mail folder. The messages in the Search mail folder are merely references to the actual messages, not the actual messages themselves. If a message was in the user’s Inbox folder and was found by a search, then the message is still located in the Inbox folder. Thus, searching will not move messages from their original folders. This means that if a result message is deleted from the Search folder, the real message still exists in whatever folder it did before. The user has merely removed the reference to the message. The user may access the local message search window through the “Message” menu.
The user may also access the local message search window through the mailbox window’s toolbar.
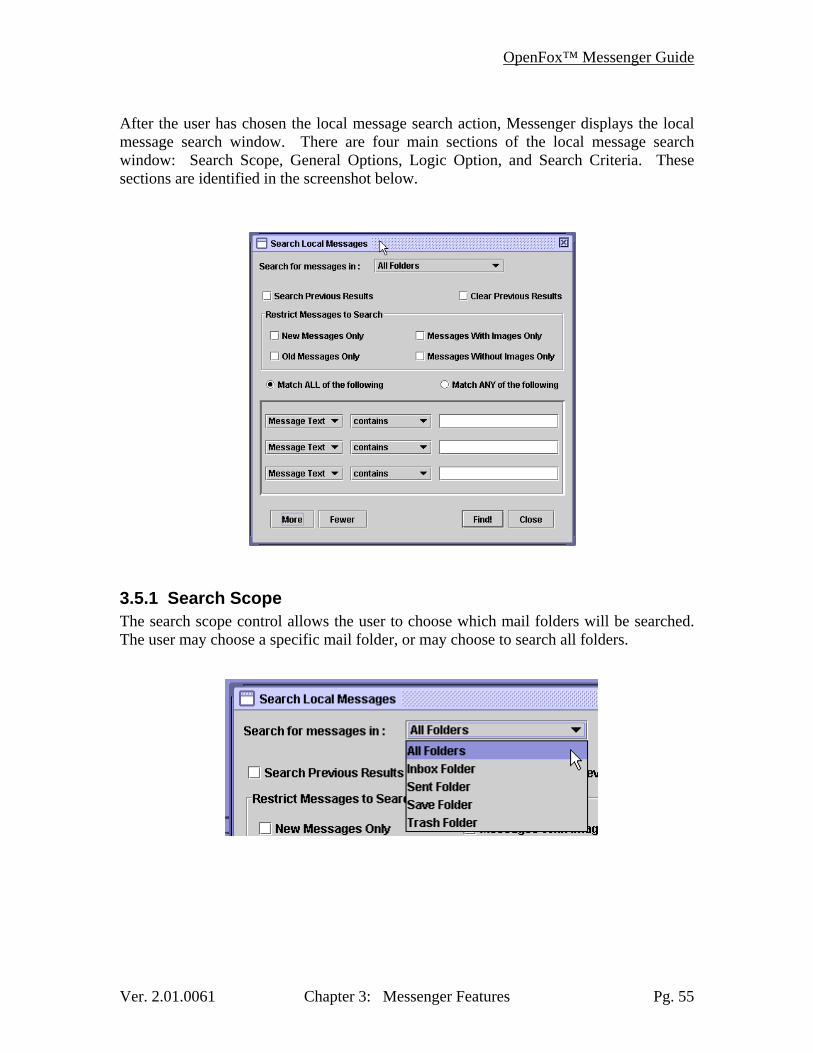
OpenFox™ Messenger Guide
Ver. 2.01.0061 Chapter 3: Messenger Features Pg. 55
After the user has chosen the local message search action, Messenger displays the local message search window. There are four main sections of the local message search window: Search Scope, General Options, Logic Option, and Search Criteria. These sections are identified in the screenshot below.
3.5.1 Search Scope The search scope control allows the user to choose which mail folders will be searched. The user may choose a specific mail folder, or may choose to search all folders.

OpenFox™ Messenger Guide
Pg. 56 Chapter 3: Messenger Features Ver. 2.01.0061
There are also two check boxes that allow the user to either search the results of a previous message search or to clear any results of previous searches. If the user checks the option to search the results of a previous search, the search scope drown down list and the other check box will become disabled.
3.5.2 General Options The local message search window provides a few general options that the user may configure to affect the search. These options allow the user to search only new messages, only messages viewed by the user, only messages with embedded images, or only message without embedded images. The below screenshot shows where these options are located.
3.5.3 Logic Option The user may choose whether the local message search should find messages that match all or any of the message search criteria. If the user selects the “Match ALL” option, Messenger performs an “AND” logic to the search criteria. If the user selects the “Match ANY” option, Messenger performs an “OR” logic to the search criteria.

OpenFox™ Messenger Guide
Ver. 2.01.0061 Chapter 3: Messenger Features Pg. 57
3.5.4 Search Criteria Most of the logic used in performing a local message search is specified in the search criteria panel on the local message search window. The user may specify any number of criteria by clicking the “More” and “Fewer” buttons. The below screenshot shows the message search criteria panel with three criteria. If the user were to perform this search, Messenger would find all positive hit responses received from NCIC on September 21, 2005. For each criterion in the search criteria panel, there are three basic components: criterion field, criterion condition, and criterion value. These components are identified in the screenshot below. Criterion Field The criterion field drop down list allows the user to pick a message field by which to search. The options available in the criterion condition and criterion value components may change depending on which field the user selects. Criterion Condition The criterion condition drop down list allows the user to pick a specific condition that must be satisfied. The options available in the criterion condition drop down may change depending on the field that is selected in the criterion field component. Criterion Value The criterion value field allows the user to specify the value against which to check the field of a message. This field may change depending on the field that is selected in the criterion field component. This field may even change to a drop down list for criterion fields which have a small set of possible values (e.g. message type).

OpenFox™ Messenger Guide
Pg. 58 Chapter 3: Messenger Features Ver. 2.01.0061
* * * THIS PAGE LEFT INTENTIONALLY BLANK * * *

OpenFox™ Messenger Guide
Ver. 2.01.0061 Chapter 4: Messenger Forms Pg. 59
Chapter 4: Messenger Forms OpenFox™ Messenger forms provide a graphical user interface that allows a user to submit law enforcement transactions to the OpenFox™ Message Switching System. All Messenger forms are generated from XML documents that are stored and maintained on the central site OpenFox™ Message Switch platform. These XML documents define both the visual layout of the components on the form as well as the format of the transaction submitted from the form. These form documents are cached on the local workstation to minimize form load time.
4.1 Form Architecture OpenFox™ Messenger forms are designed with a top to bottom workflow. The user begins entering message header information at the top of the form, progresses down through the message body fields, and then to the “Submit” button at the very bottom of the form. The user may freely move the keyboard focus around a Messenger form by left-clicking on any form control. Messenger forms are also completely navigable via the keyboard. The Tab key will move the focus along the form workflow. The user may also move the focus backwards along the workflow by holding down the Shift key and then pressing the Tab key.
4.1.1 Form Title Bar The form title bar is located at the very top of a Messenger form window. The form title bar identifies the form to the user. The title bar contains the form’s name and description. For example, the NLETS vehicle registration (RQ) form is named “RQ” and its description is “NLETS Vehicle Registration Query”.

OpenFox™ Messenger Guide
Pg. 60 Chapter 4: Messenger Forms Ver. 2.01.0061
4.1.2 Header Information Located at the top of Messenger forms is the header information template. This template allows the user to enter any data relating to the routing or processing of a message. This includes a list of possible MKEs or transaction types, message destination field(s), an ORI field, a control field, or an NCIC test message indicator. An example of the header information template from the RQ form is shown below.
4.1.3 Message Body Fields Located beneath the header information and above the form buttons are the message body fields. This area of a Messenger form allows the user to enter the actual message data. If the user is entering a wanted person record, then he or she would enter all the information regarding the subject, offense, associated vehicles, etc. into the message body fields. For more information on using the actual fields, please refer to either of the sections titled “Code Lists” or “Form Fields”. An example of the message body fields from an RQ form is shown below.

OpenFox™ Messenger Guide
Ver. 2.01.0061 Chapter 4: Messenger Forms Pg. 61
4.1.4 Form Buttons Located at the very bottom of a Messenger form are the form buttons. These buttons allow the user to either submit a transaction to the OpenFox™ Message Switching System, clear all body fields to their default values, or to close and dispose of the form. All Messenger forms have three buttons. The submit button will check all the data edit routines in the form and submit the transaction to the message switch. The clear button will clear all the form fields and restore the form to its original state. The close button will close the form and remove it from the user’s screen.
4.1.5 Store and Get Form Fields Messenger allows the user to copy the values of all the fields on one form and paste them into a different form. This can be very useful for users that typically run multiple queries on the same information. For example, if the user fills in the NAM, DOB, and VIN fields on one form, chooses the “Store Form Fields” action, opens a different form, and chooses the “Get Form Fields” action, then the values from the first form will be copied into the appropriate fields on the new form. The user may choose to manually perform these actions by choosing them from the form’s popup menu in the very upper left hand corner of the form. Additionally, there is a user preference that will automatically perform a “Store Form Fields” action when the user chooses to submit a form. For more information on this preference, please refer to the chapter on form user preferences.

OpenFox™ Messenger Guide
Pg. 62 Chapter 4: Messenger Forms Ver. 2.01.0061
4.2 Form Caching OpenFox™ Messenger uses what is called a “lazy” form caching policy. This means that no form will be loaded by Messenger until a user physically opens the form with the Messenger software. This approach ensures that, even if a user is authorized to use a form, that form will never be downloaded to the workstation unless the user actually uses the form. This same policy is used for form resources as well. For more information about form resources, please see the following section titled “Form Resources”. Once a form has been downloaded to the local workstation, Messenger will only download the form if there is a new version available on the OpenFox™ Message Switch. Messenger will check for updates to a form whenever the form is opened (through either the “Forms” menu or the tree-based form menu) and whenever the user performs the manual refresh form action. When either of these events occurs, Messenger will check the version of the form document and the versions of all the form resources referenced by the form. If there is a new form document or if there are any new form resources, those documents are downloaded to the workstation and the form is updated.
4.2.1 Refresh Form Action OpenFox™ Messenger forms provide the user with the ability to manually check for form or form resource updates. This option is available through the form system menu, which is located in the top left corner of the form. The user may click on the form icon, or press the F11 key, to access the form’s system menu.

OpenFox™ Messenger Guide
Ver. 2.01.0061 Chapter 4: Messenger Forms Pg. 63
Messenger will then communicate with the OpenFox™ Message Switch to determine if the form or any resources have been updated. If there are newer versions available, Messenger will automatically download them and then update the form. Otherwise, the user will be notified that there are no updates available to the form in question.

OpenFox™ Messenger Guide
Pg. 64 Chapter 4: Messenger Forms Ver. 2.01.0061
4.3 Form Resources OpenFox™ Messenger forms may reference other XML documents, which are know as form resources. Form resources may be the list of NCIC codes that appear in a drop down list on a Messenger form, or they may be interactive scripts that will make a field required or optional based upon data the user has entered into the form.
4.3.1 Code Lists Whenever a Messenger form contains a drop down list control, the contents of that control are stored and maintained in an XML document that is separate from the form XML document. Using this approach, Messenger is able to share one list of codes among various forms. Within a Messenger form, the user may select a particular code by either typing the code with the keyboard or by selecting the code out of the drop down list with the mouse. A drop down control in a form may either be editable (white color) or un-editable (grey color). An editable drop down list allows the user to enter a value that is not in the list of codes. An un-editable drop down list forces the user to pick a code that is in the code list. Un-editable (left) and editable (right) drop down lists When typing the code via keyboard, Messenger will attempt to guess what code the user is trying to select. The following example references the NCIC license plate type code list. The user is trying to type the code “PE” for a personalized or customized license plate.

OpenFox™ Messenger Guide
Ver. 2.01.0061 Chapter 4: Messenger Forms Pg. 65
When the user presses the P key, Messenger automatically guesses that the user is trying to select the “PC” code. If this is the code the user is trying to select, then the user may “tab” out of the field at this point. When the user presses the E key, Messenger then determines that the user has entered the “PE” code and displays that code in the drop down list. If the user accidentally mistypes a letter, he or she is able to undo this entry by pressing the Delete key.
4.3.2 Editable Codes Some code lists may contain what are known as editable codes. These codes only appear within editable drop down lists. Editable codes are different from normal codes in that they allow the user to modify a sub-section of their content. An example of an editable code is the Reason for Property Record Removal (RPP) NCIC codes. There are three codes that allow the user to submit a valid date: “HIT LOCAL YYYYMMDD”, “HIT STATE YYYYMMDD”, and “HIT NCIC YYYYMMDD”. Within OpenFox™ Messenger, when the user selects one of these three codes from the drop down list (or via keyboard), the “YYYYMMDD” portion (or editable portion) of the code will be automatically highlighted.

OpenFox™ Messenger Guide
Pg. 66 Chapter 4: Messenger Forms Ver. 2.01.0061
Thus, the user may immediately type a valid 8 character date, and this will only overwrite the editable portion of this code. The following screenshot shows the code after a user has entered the date.
4.3.3 Code Categories Some code lists may be organized into different categories. This is most often the case for lists with a great number of codes. The NCIC scar, mark, and tattoo (SMT) codes are one such code list. The codes are displayed in alphabetic order within each category, and each category is denoted by a horizontal line with the category name. An example of this is shown below. The user may also jump to the start of a specific code category by typing the name of the category into the control. For example, if a user types the word “TATTOOS” into the NCIC SMT list, Messenger automatically jumps to the start of the “Tattoo” category. If the user then presses the down arrow key, he or she will have immediate access to all tattoo codes.

OpenFox™ Messenger Guide
Ver. 2.01.0061 Chapter 4: Messenger Forms Pg. 67
4.3.4 Code List Search Window When the user is on a drop down list field, the user may choose to perform a text search of the codes by pressing Ctrl-F on the keyboard. Also, this action is accessible through right-clicking on the drop down list.
When the user chooses this item, Messenger will display the code list search window, which is shown below.
This window displays an alphabetical listing of all the codes’ verbose meanings. The user may scroll through this list to find the desired code. When a code is selected by highlighting the code and pressing OK, double left clicking a code, or by navigating to a code via the arrow keys and pressing Enter, the code list search window will close and Messenger will populate the field with the selected code value.

OpenFox™ Messenger Guide
Pg. 68 Chapter 4: Messenger Forms Ver. 2.01.0061
However, the real use of this window is provided through the Enter Search Text box, located at the top of the window. The user may type search terms into this box. As the user types search terms, Messenger will begin to eliminate those codes that do not match the search terms. Messenger will indicate where a code matches the search terms by highlighting the matching portions in yellow. For example, if the users searches for the terms “removed tattoo left arm” in the NCIC scars, marks, and tattoos code list, then Messenger will eliminate all but three codes, as shown below.
The user may then choose one of the terms, or the user may revise the search terms to find a different code.

OpenFox™ Messenger Guide
Ver. 2.01.0061 Chapter 4: Messenger Forms Pg. 69
4.3.5 Scripts Some Messenger forms may reference what are called form scripts. Form scripts are used to dynamically change some aspect of a form based upon what the user has selected in another part of the form. This process is transparent to the user. An example of interactive scripting may be found on the NCIC enter wanted person (EW) form. According to NCIC, the date of emancipation (DOE) field may not be filled in when \entering an adult warrant record. However, the DOE field becomes required when entering a juvenile warrant record. OpenFox™ Messenger accomplishes these rules in one EW form. Located in the top left corner of the EW form is a drop down list containing all the different MKEs that may be submitted from this form.
When an adult warrant type is selected, the DOE field is disabled an no data may be entered.

OpenFox™ Messenger Guide
Pg. 70 Chapter 4: Messenger Forms Ver. 2.01.0061
When a juvenile warrant type is selected, the DOE field is enabled and becomes required, as denoted by the red star.
4.4 Tab Controls Perhaps the most unique feature of OpenFox™ Messenger forms is the use of tab controls to implement mutually exclusive sets of transaction fields. Messenger forms mostly make use of tab controls on query transaction forms. Tab controls serve two purposes on Messenger forms. First they serve as a clear indication to users of what combinations of fields constitute a valid query transaction, and second, they serve to conserve real state on the screen. The user may switch between tabs by simply clicking on the appropriate tab. The user may also switch between tabs by using the arrow left and arrow right keys via the keyboard. An example of the NLETS driver’s license query (DQ) form is shown below.
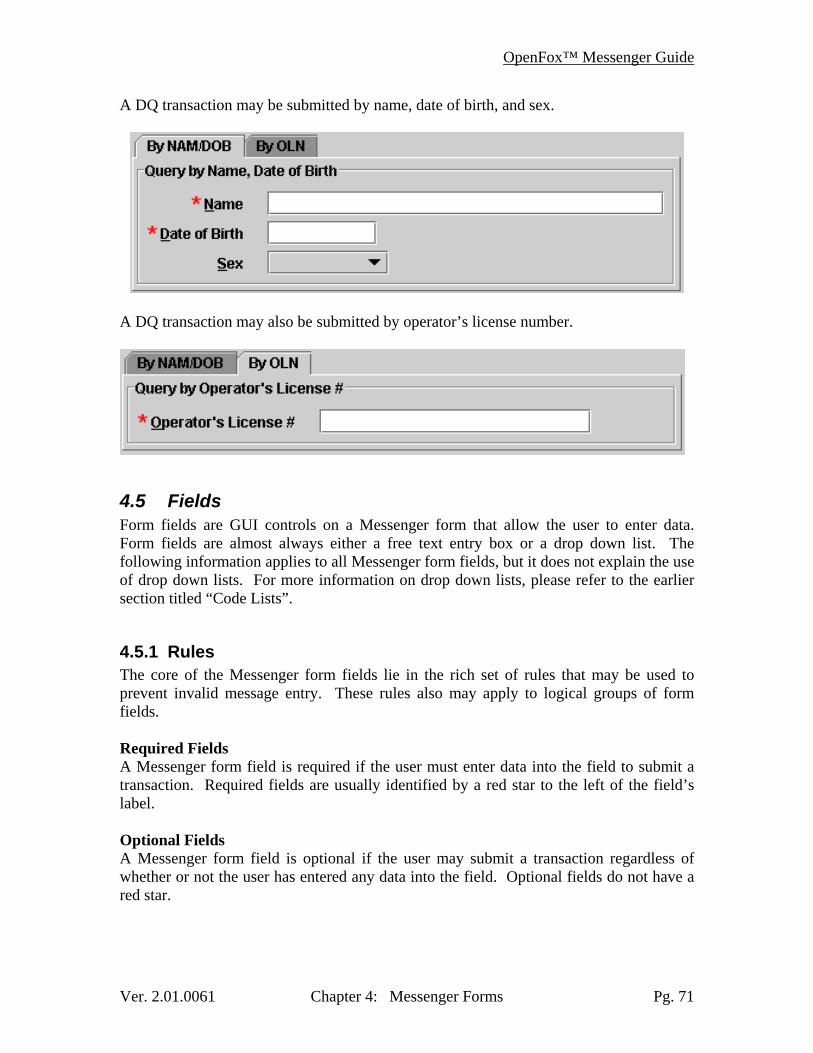
OpenFox™ Messenger Guide
Ver. 2.01.0061 Chapter 4: Messenger Forms Pg. 71
A DQ transaction may be submitted by name, date of birth, and sex.
A DQ transaction may also be submitted by operator’s license number.
4.5 Fields Form fields are GUI controls on a Messenger form that allow the user to enter data. Form fields are almost always either a free text entry box or a drop down list. The following information applies to all Messenger form fields, but it does not explain the use of drop down lists. For more information on drop down lists, please refer to the earlier section titled “Code Lists”.
4.5.1 Rules The core of the Messenger form fields lie in the rich set of rules that may be used to prevent invalid message entry. These rules also may apply to logical groups of form fields. Required Fields A Messenger form field is required if the user must enter data into the field to submit a transaction. Required fields are usually identified by a red star to the left of the field’s label. Optional Fields A Messenger form field is optional if the user may submit a transaction regardless of whether or not the user has entered any data into the field. Optional fields do not have a red star.

OpenFox™ Messenger Guide
Pg. 72 Chapter 4: Messenger Forms Ver. 2.01.0061
Conditional Fields A conditional Messenger form field is a field that is either required or optional depending on what other form fields the user has entered. Examples of Rule Violations In the example below, the user has forgotten to enter the required name field. The example below shows how conditional fields may be required. Conditional fields may also be mandatory blank, as shown in the example below.
4.5.2 Maximum & Minimum Length Messenger form fields may be configured with maximum and minimum lengths. The maximum length specifies the maximum number of characters a user may enter into a field. The minimum length specifies the minimum number of characters that a user must enter into a field, if he or she chooses to enter the field. When a user has already entered the maximum number of characters and attempts to enter additional characters to the field, Messenger will prevent any characters from being entered and sound a beep.

OpenFox™ Messenger Guide
Ver. 2.01.0061 Chapter 4: Messenger Forms Pg. 73
When a user has not entered the minimum number of characters into a field and tries to submit a transaction, Messenger informs the user with a popup window.
4.5.3 Character Filters Messenger form fields may be configured with character filter. Character filters restrict the set of characters that a user may enter into a field. When the user attempts to enter an invalid character into a field, Messenger will sound a beep and prevent the character from being entered. Form fields may be configured with any of the below character filters. Character Filter Explanation
Alphabetic Only upper case alphabetic characters (A-Z) Numeric Only the digits 0-9 Alpha-Numeric Upper case alphabetic characters (A-Z) or the digits 0-9 Alphabetic+ Upper case alphabetic characters or NCIC special characters Numeric+ The digits 0-9 or NCIC special characters
Alpha-Numeric+ Upper case alphabetic characters (A-Z), the digits 0-9, or NCIC special characters
Free The user is free to enter any English characters or punctuation
4.5.4 Tool Tips Messenger form fields may be configured with quick help tool tips. Tool tips are displayed when the user hovers the mouse cursor over a field. Messenger form field tool tips are used to provide quick data formatting information to the user. An example of the tool tip for the date of birth field is shown below.

OpenFox™ Messenger Guide
Pg. 74 Chapter 4: Messenger Forms Ver. 2.01.0061
4.5.5 Hot Key Navigation Most Messenger forms support hot keys that will quickly shift the keyboard focus to different fields. If a form field supports this feature, the field’s label will have one letter underlined. If the user holds down the Alt key and presses the underlined key, the keyboard focus will immediately shift to the field. For example, the hot keys on the DQ form are shown in the screenshot below. The user may shift focus to the name, date of birth, or sex fields by holding the Alt key and pressing N, D, or S, respectively.
4.5.6 Edit Routines Messenger form fields support basic data edits to prevent the user from entering invalid data. The forms make heavy use of this feature with date fields. For example, if the user enters a date of birth of “19500199” and tried to submit a transaction, Messenger will display the following popup error notification. At this point the user may choose to either correct the error, or to ignore the error and submit the transaction anyway. If the user clicks on the “Correct” button, Messenger will highlight the field in red and automatically move the keyboard focus into the field, as shown in the below screen shot.

OpenFox™ Messenger Guide
Ver. 2.01.0061 Chapter 4: Messenger Forms Pg. 75
4.6 Image Forms Messenger forms may be used to enter images into a federal or state database.
4.6.1 Image Importer If a Messenger form supports the submittal of images, it will contain the image importer control. The user may embed an image into a transaction through the use of this control. An example of this control from the NCIC enter image (EIM) form is shown below.
The image importer control provides the user with a button to import an image into the form and to format the image. When the user clicks on the “Import Image” button, Messenger displays a file browser that allows the user to navigate the contents of his or her computer and select an image file to import. Messenger supports the GIF, JPG, and PNG image formats. However, upon transaction submittal the image is converted to the JPG format, as specified by NCIC. After the user has selected a valid image file, a thumbnail of the image is displayed in the image importer control.
If the image is not formatted properly (e.g. the image is too large), Messenger will automatically display the “Image Format” window so that the user may correct the image and then submit a transaction.

OpenFox™ Messenger Guide
Pg. 76 Chapter 4: Messenger Forms Ver. 2.01.0061
4.6.2 Image Format Window The “Image Format” window is displayed when the user either clicks on the “Format Image” button or imports an image that is too large. This window allows the user to resize, crop, and manipulate the image. At the bottom of the window are two buttons that allow the user to either accept or cancel any changes made to the image. Cropping Rectangle The user may select a portion of the image to keep through the use of the cropping rectangle. The user may click and drag the rectangle over any part of the image. The cropping rectangle is identified on the form by white and black hash marks. The user may drag the rectangle around to different parts of the image and may even drag a corner or side of the rectangle.

OpenFox™ Messenger Guide
Ver. 2.01.0061 Chapter 4: Messenger Forms Pg. 77
If the imported image is larger than the maximum size allowed by the form, Messenger will automatically display a cropping rectangle in the center of the image. The user may not specify a cropping rectangle larger than the maximum image size. The user may specify an exact cropping rectangle (via keyboard only) or remove the cropping rectangle through the “Image Options” menu. Resize Image When the user chooses the “Resize Image” option from the “Image Options” menu, Messenger will display the resize image window. This window allows the user to either enlarge or shrink the image. The user may specify the size of the new image as either a percentage of the current image size or in an exact pixel resolution. If the user un-checks the “Maintain Aspect Ratio” option, the user is free to stretch or shrink the image vertically or horizontally.

OpenFox™ Messenger Guide
Pg. 78 Chapter 4: Messenger Forms Ver. 2.01.0061
Shrink and Enlarge Image The user may quickly enlarge or shrink the image by 10% by pressing one of the below buttons on the Format Image window toolbar. Pressing the plus button will make the image larger, and pressing the minus button will make the image smaller. Pressing the button with two arrows, will revert the image to its original size.
Mirror and Flip Image The user may choose to mirror or flip the image by pressing the appropriate button on the Format Image window toolbar. Pressing the arrow which points to the right will mirror the image, or flip the image horizontally. Pressing the down arrow will flip the image vertically.
Rotate Image The user may choose to rotate the image 90 degrees in either the clockwise or counter clockwise directions by pressing the appropriate button in the Format Image window toolbar. This option is useful for correcting an image taken from a camera which was turned sideways.
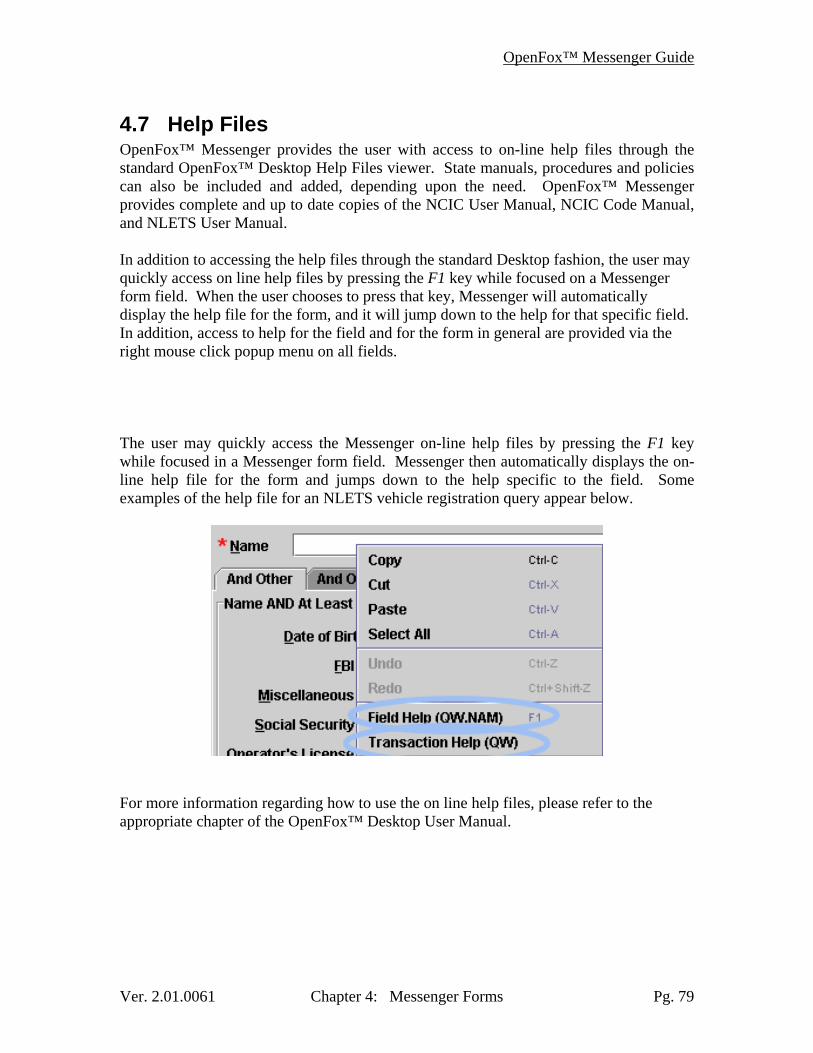
OpenFox™ Messenger Guide
Ver. 2.01.0061 Chapter 4: Messenger Forms Pg. 79
4.7 Help Files OpenFox™ Messenger provides the user with access to on-line help files through the standard OpenFox™ Desktop Help Files viewer. State manuals, procedures and policies can also be included and added, depending upon the need. OpenFox™ Messenger provides complete and up to date copies of the NCIC User Manual, NCIC Code Manual, and NLETS User Manual. In addition to accessing the help files through the standard Desktop fashion, the user may quickly access on line help files by pressing the F1 key while focused on a Messenger form field. When the user chooses to press that key, Messenger will automatically display the help file for the form, and it will jump down to the help for that specific field. In addition, access to help for the field and for the form in general are provided via the right mouse click popup menu on all fields. The user may quickly access the Messenger on-line help files by pressing the F1 key while focused in a Messenger form field. Messenger then automatically displays the on-line help file for the form and jumps down to the help specific to the field. Some examples of the help file for an NLETS vehicle registration query appear below.
For more information regarding how to use the on line help files, please refer to the appropriate chapter of the OpenFox™ Desktop User Manual.

OpenFox™ Messenger Guide
Pg. 80 Chapter 4: Messenger Forms Ver. 2.01.0061
* * * THIS PAGE LEFT IINTENTIIONALLY BLANK * * *

OpenFox™ Messenger Guide
Ver. 2.01.0061 Chapter 5: Messenger Preferences Pg. 81
Chapter 5: Messenger Preferences OpenFox™ Messenger has been designed from the ground up to be as configurable and adaptable as possible. The law enforcement environment employs a number of individuals which have varying tastes and that perform varying jobs. As a result of this diverse user base, it is not possible for Messenger to work in a fashion that pleases all users all the time. For this reason, Messenger has been designed to be flexible and to give users control over many aspects of how the software behaves. Messenger supports both user and terminal preferences. For more information regarding how to access preferences and the differences between user and terminal preferences, please refer to the appropriate section of the OpenFox™ Desktop User Manual. This chapter will describe each and every option available via the preferences screen.
5.1 User Mailbox These screens allow the user to change many aspects of the Messenger mailbox window and actions performed from this window.
5.1.1 User Mailbox - Mailbox
This tab allows the user to change many aspects of the Mailbox Window. Close Mailbox Window? If this option is selected, then there will be an ‘X’ button in the upper right hand corner of the mailbox window, and the user will be able to close the mailbox window. If a user keeps closing the mailbox window by accident, then it may help to turn this option off. That way, the user will not be able to accidentally close the mailbox window.

OpenFox™ Messenger Guide
Pg. 82 Chapter 5: Messenger Preferences Ver. 2.01.0061
Initially View Inbox If this option is selected, then Messenger will automatically direct the user to their inbox following a log on. If it is unselected then the user will initially see the welcome screen. Message Double Click This option allows the user to change what action is performed when they double left click a message in the message list control. By default, this will perform the “Open Form” action. However, the user may change this to perform an action to view the message in a separate window, to select related messages, or to view all related messages in a separate window. For more information regarding the differences between these actions, please refer to the section on message actions.
Mailbox Window Size If this option is selected, then the mailbox window will initially take up the entire Desktop area when a user logs on. Quick Query Bar This option is used to force the quick query bar to be available. Some states have chosen to disable the quick query bar, and this setting will override and force the quick query bar to be available.

OpenFox™ Messenger Guide
Ver. 2.01.0061 Chapter 5: Messenger Preferences Pg. 83
5.1.2 User Mailbox - Layout
This tab allows the user to change the arrangement of the various components of the mailbox window. This gives the user great flexibility as to where the list of messages control should appear in relation to the message preview pane and other controls. Any changes to these settings will not take effect until the user logs off and logs back onto Messenger. Hide Folders and/or Forms Tree Checking these boxes will hide the particular control from the mailbox window. The user may choose to hide these controls if they require more screen space for the message content and message list. If the user chooses to hide the mail folder list, then Messenger will provide additional folder buttons on the mailbox window toolbar. In absence of the list of mailbox folders, the user must click on a toolbar button (or use the keyboard shortcut) to view the different folders.

OpenFox™ Messenger Guide
Pg. 84 Chapter 5: Messenger Preferences Ver. 2.01.0061
Mailbox Window Layout The user may choose from one of the listed mailbox layouts. These layouts are described below. Standard Layout This is the layout used by standard email client software and is the default layout used by Messenger. In this layout, the list of mail folders is in the upper left hand corner, and the forms tree is in the lower left hand corner. The list of messages is in the upper right hand corner, and the message preview is in the lower right hand corner.
Side by Side Right This layout is the same as the standard layout, except that the message preview and message list controls are arranged side by side, with the list of messages on the right hand side.

OpenFox™ Messenger Guide
Ver. 2.01.0061 Chapter 5: Messenger Preferences Pg. 85
Side by Side Left This layout is the same as the side by side right layout, except that the list of messages is on the left hand side of the message preview.
All Left In this layout, the mailbox folders, forms tree, and list of messages are all on the left hand side of the screen. The mailbox folders are on top, the forms tree is in the middle, and the list of messages is at the bottom. The message preview pane occupies the entire right hand side of the window.

OpenFox™ Messenger Guide
Pg. 86 Chapter 5: Messenger Preferences Ver. 2.01.0061
All Right This layout is very similar to the all left layout, except that the mailbox folders, forms tree, and message list controls are all on the right hand side of the mailbox window.
5.1.3 User Mailbox - Window
This tab allows the user to change the behavior of messenger when a message is opened as a separate window.

OpenFox™ Messenger Guide
Ver. 2.01.0061 Chapter 5: Messenger Preferences Pg. 87
Maximized Popup Window If this option is selected, then when the user chooses to open a message in a separate window, that window will occupy the entire screen. If this option is not checked, then Messenger will use the next setting to determine how large the window should be. Popup Window Size If the “maximized popup window” option is not selected, then the size of the new window will be determined by this setting. This setting allows the user to specify the size of the window as a percentage of the total display. You may choose any value between twenty five percent (25%) and ninety five percent (95%). External Popup Window If this option is selected, then the separate window will not be constrained to the Desktop environment. The window will be treated as a native OS window, and thus may be dragged onto a completely separate physical monitor or display. This option can be useful for users that wish to spread Messenger out across multiple screens. If this option is not selected, then the separate window must remain within the bounds of Desktop, just like any Messenger for or the mailbox window.
5.1.4 User Mailbox – Unread
This tab allows the user to control which messages are marked as unread until the user views them. Sent Messages – Mark as Unread If this option is selected, then each newly submitted transaction will be marked as unread until the user views the message in the Sent folder.

OpenFox™ Messenger Guide
Pg. 88 Chapter 5: Messenger Preferences Ver. 2.01.0061
Acknowledgement Messages – Mark as Unread Many OpenFox™ Message Switches will return an acknowledgement message to the user after the user successfully submits a transaction to the switch. If this option is checked, then these acknowledgement messages will be marked as unread until the user views them. Otherwise, the messages will be delivered and will not be marked as unread. Draft Message – Mark as Unread If this option is selected, then when the user chooses to save a Messenger transaction form as a draft message, the draft message will be marked as unread, until the user views it.
5.1.5 User Mailbox – Draft
This tab allows the user to control the behavior of Messenger with regards to draft messages. Close Form? If this option is selected, then when the user saves a Messenger form as a draft message, Messenger will automatically close that form. Goto Drafts Folder? If this option is selected, then when the user saves a Messenger form as a draft message, Messenger will automatically take the user to the Drafts folder.

OpenFox™ Messenger Guide
Ver. 2.01.0061 Chapter 5: Messenger Preferences Pg. 89
Apply Form Rules? If this option is selected, then Messenger will apply all the normal form rules used when submitting a message, when the user saves a form as a draft message. Delete Draft Message? If this option is selected, then after a user opens a draft message into a form, and successfully submits the transaction, Messenger will delete the draft message. If this option is not selected, then Messenger will never delete a draft message unless the user chooses to explicitly delete the draft. Thus, if this option is not selected, the user may use the draft messages as message templates that contain a few commonly filled in fields. The user may continue to open forms directly from the drafts folder and submit the transactions. Prompt for a Summary If this option is selected, then when the user chooses to save a Messenger form as a draft message, Messenger will prompt the user to provide text for the Summary column. If this option is unselected, then Messenger will automatically generate a summary field based on the value of the form fields.
5.1.6 User Mailbox – Received
This tab allows the user to configure how Messenger behaves with regard to received messages.

OpenFox™ Messenger Guide
Pg. 90 Chapter 5: Messenger Preferences Ver. 2.01.0061
Go To Inbox Policy
This control allows the user to configure when Messenger automatically directs the user to the Inbox folder. The user may change Messenger to go to the Inbox folder whenever any message is delivered to the terminal. The user may choose to have Messenger never go to the Inbox folder automatically. Additionally the user may choose to only perform this action when Messenger receives a message that is either solicited (i.e. a response to a query) or marked unread (please refer to the User Mailbox – Unread preferences). Additionally, if Messenger is configured to go to the Inbox folder (either all the time, or only under certain conditions), the user may also choose to have Messenger automatically display the newly received messages. If this option is selected, then Messenger will automatically display solicited response messages that are a response to the last transaction submitted by the user. Technically, this is done by inspecting the value of the “ID” column for the new message. If the “id” matches the “id” of the last submitted transaction, then Messenger will automatically select the new message and display the message in the preview area. Messenger will continue to operate in this fashion until the user submits a new transaction, or chooses to manually change which messages are selected. For example, consider the case where the go to inbox policy is set to go to the Inbox for solicited, unread messages, and Messenger is configured to automatically select new responses. When the user submits a query (i.e. a QW), this query is assigned a new “id” value, 9677. The first message received in response is an ACK from the switch. This message contains the same “id” as the query, so it is selected. However, the ACK message is not initially marked as unread, so Messenger does not automatically direct the user to the inbox. Then, Messenger receives two responses, one from NCIC and one from the in-state hot files. Both of these messages contain the same “id” as the query, and both are marked as unread. Thus Messenger now directs the user to the Inbox folder. With no user action, the user sees all three messages displayed in the preview pane and is free to scroll up and down to view the messages.

OpenFox™ Messenger Guide
Ver. 2.01.0061 Chapter 5: Messenger Preferences Pg. 91
New Message Alert
This area allows the user to change what kind of alert is provided when Messenger receives a new message. The user may choose whether or not a sound is played, whether or not a popup notification window appears, and how long the popup window remains visible. Unread Message Reminder
This area allows the user to configure the unread message nag feature. This feature is intended to remind users that they are unread messages in their Inbox folder. The user is free to disable the nag reminder, or to change the amount of time that must elapse before being reminded. Also, the user may choose whether Messenger should play an audible alert for the reminder.

OpenFox™ Messenger Guide
Pg. 92 Chapter 5: Messenger Preferences Ver. 2.01.0061
5.2 User Forms This section allows the user to change many aspects of the Messenger transaction screen forms.
5.2.1 Favorite Forms
This tab allows the user to configure a list of favorite forms. These forms are listed at the very top or the very bottom of the forms list in both the pull down menu and the forms tree control. In addition, the user may configure keyboard shortcut combinations that will open one of their favorite forms. The list on the left hand side of the screen displays all of the user’s favorite forms. If a form has a keyboard shortcut associated with it, then that shortcut is displayed to the right of the form’s name. In the above screen shot, the Wanted Query form is opened by pressing Shift-F1, the Wanted Enter form is opened by pressing Shift-F2, and the Wanted Modify screen is opened by pressing Shift-F3. The list on the right hand side is very similar to the form tree control, except that the user cannot open a form by selecting an item from this list. Navigating the list of forms and expanding or collapsing folders is done in the same fashion as for the form tree.

OpenFox™ Messenger Guide
Ver. 2.01.0061 Chapter 5: Messenger Preferences Pg. 93
Adding a Favorite Form When the user has selected a form in the right hand box, then the button with the left arrow will be enabled. Pressing this button will add the form which is highlighted in the right hand list to the left hand list. If a form is selected in the right hand box and the left arrow button is not enabled, then the form is already present in the left hand box.
Removing a Favorite Form When the user has selected a form in the left hand box, then the button with the right arrow will be enabled. Pressing this button will remove the form from the list of favorite forms.
Moving a Favorite Form When the user has selected a form in the left hand box that can be moved up or down in the list of favorite forms, then the buttons with the up and/or down arrow will be enabled. Pressing either button will move the form either up or down one position in the list of favorite forms.

OpenFox™ Messenger Guide
Pg. 94 Chapter 5: Messenger Preferences Ver. 2.01.0061
Favorite Form Properties When the user has selected a form in the left hand box, then the user is also free to change the properties of the favorite form. The properties include the display name of the form and a keyboard shortcut to open the form. This information is displayed at the very bottom of the favorite forms window. On the far left hand side of the properties area, Messenger will display the name of the form with which this item is associated. This can be useful information if the name of the favorite form has been changed, or if the name is not specific enough to identify the form.
The display name of the form is displayed in the text box on the left hand side of the properties area. The user is free to change this text to anything that the user desires. Please note, that the user must press the Update button to save any changes to the display name.
The next three checkboxes allow the user to configure which modifier key must be held down as part of the keyboard shortcut to open the form. Although it is not required to select one of these checkboxes, it is highly recommended to select at least one key to avoid conflict with other keyboard combinations within the Messenger software.
The next drop down list allows the user to specify which key must be pressed, in conjuction with one of the above modifier keys, to open the favorite form. This list contains all the function keys, numeric keys, and alphabetic keys. If the user chooses a keyboard combination that is in conflict with another Messenger shortcut, then Messenger will display a popup box informing the user of the conflict.
Finally, the Update button is located on the far right hand side of the properties area. When changes are made to either the favorite form display name or to the keyboard shortcut used to access the form, the user must press the Update button to save these changes.

OpenFox™ Messenger Guide
Ver. 2.01.0061 Chapter 5: Messenger Preferences Pg. 95
5.2.2 Opening Forms
This tab allows the user to change the behavior of Messenger with regards to opening forms. These settings affect what happens when the user attempts to open a form that has already been opened. Either Messenger may simply direct the user to the form which has already been opened, or Messenger will open a new copy of that form. In the latter case, there would then be two copies of a form open at the same time. Reuse Forms from Menu If this option is checked then when the user opens a form from the pull down forms menu and that form is already open, Messenger will direct the user to the open form. Otherwise, a new copy of the form will be opened. This setting is also used when a user opens a favorite form by pressing the configured keyboard combination. Reuse Forms from Tree If this option is checked then when the user opens a form from the forms tree control and that form is already open, Messenger will direct the user to the open form. Otherwise, a new copy of the form will be opened.

OpenFox™ Messenger Guide
Pg. 96 Chapter 5: Messenger Preferences Ver. 2.01.0061
5.2.3 Form Rules
This tab allows the user to temporarily disable some of the error checking which Messenger performs on transaction forms. These settings are intended to be used only in situations where it is critical to submit a transaction to the message switch in a timely manner and a Messenger data edit is preventing the user from submitting the form. If the user encounters such a situation, it is highly recommended to revert the setting after successfully submitting the screen, and notifying the state technical contact. This will ensure that the bad data edit is corrected by support staff. Any changes to these settings will require the user to either refresh or close and re-open any forms which they currently have displayed. Disable Scripts Checking this option will disable all the interactive features of the Messenger forms. Turning off scripts will allow the user to enter data into a field that becomes disabled depending on the value of a different field. When scripts are turned off, all fields on a form will become available. Disable Filtering Checking this option will disable all character filters for the fields on a Messenger form. This will allow the user to enter any characters into a field on a form. This setting is most useful for situations where a form field is preventing the entry of a special character.

OpenFox™ Messenger Guide
Ver. 2.01.0061 Chapter 5: Messenger Preferences Pg. 97
Disable Lengths Checking this option will disable all maximum lengths for the fields on a Messenger form. This will allow the user to enter any number of characters into any form field.
5.2.4 Form Code Lists
This tab allows the user to change the behavior of drop down code lists within the Messenger forms. Force All Lists Editable Checking this option will force all drop down lists to allow the user to enter a code value that doesn’t exist in the drop down list. This setting is intended for use only in situations where it is critical to submit a transaction to the message switch and the necessary code value is missing from a drop down list. A user may enable this option, refresh the form, and enter the missing code value into the field. It is highly recommended that after submitting the transaction, the user clears this setting and notifies the state technical contact. This will ensure that the missing code value is added to the Messenger drop down list by support personnel. Download Lists This option allows the user to turn off the drop down code lists that are present in a Messenger transaction form. Changing this setting is most useful for users operating over an extremely slow communications line. If operators are very familiar with the code values and do not need the software to provide them with the list, then it may be appropriate to change this setting. There are three possible choices for this setting.
• Download All Lists – This setting will provide drop down lists for all fields which have a drop down list defined. This is the default setting.

OpenFox™ Messenger Guide
Pg. 98 Chapter 5: Messenger Preferences Ver. 2.01.0061
• Only Download MKE and ORI Lists – If a user decides to turn off code lists, then it is highly recommended that they choose this option. This option will only download a couple of the most important code lists.
• Download None – Using this setting will provide the user with no drop down lists. Only use this setting if the above setting is not acceptable.
5.2.5 Form Advanced Settings
This tab contains settings that are not appropriate for any of the other form setting tabs. Use Output Style Sheets Some Messenger transaction forms use XSLT output style sheets to change the format of the message before sending out over the wire. Most forms will not work without these output style sheets. This setting should only be changed if there is some technical difficulty with the output style sheets. Auto Tab on Forms If this setting is checked, then when an operator completely fills in a data field, Messenger will automatically move the keyboard focus to the next field. For example, after a user types all eight (8) characters in a date field, Messenger will automatically move focus to the next field. Thus, the user may continue typing in the new field without pressing the Tab key.

OpenFox™ Messenger Guide
Ver. 2.01.0061 Chapter 5: Messenger Preferences Pg. 99
Disable Tool Tips If this setting is checked, then Messenger will disable the “scroll over” popup help messages. These are the help messages which appear when the user hovers the mouse cursor over a field. Some users who are very familiar with the transaction screens may find these help messages unnecessary and may find that they interfere with using the form. In this case, these users may decide to turn off the popup help messages via this setting. Print in Landscape Messenger allows the user to print a transaction form. This results in a screen shot of the form being printed. If this option is checked, then Messenger will print the form in landscape mode. Otherwise, Messenger will print the form in portrait mode. Store Fields when Submit a Form If this option is checked, then when a user successfully submits a transaction form to the message switch, Messenger will automatically perform the Store Form Fields action. Thus, the user may go to a different form, perform the Get Form Fields action, and have all the values copied over from the old form to the new form. For more information regarding these actions, please see the chapter on Messenger forms. Store Header Fields This option controls whether message header fields are copied from one form to another when the user performs the Store Form Fields and Get Form Fields actions. In the vast majority of cases, this option should be turned off, because it will copy fields that should be different on different forms. Only check this option if you have been explicitly instructed to do so.
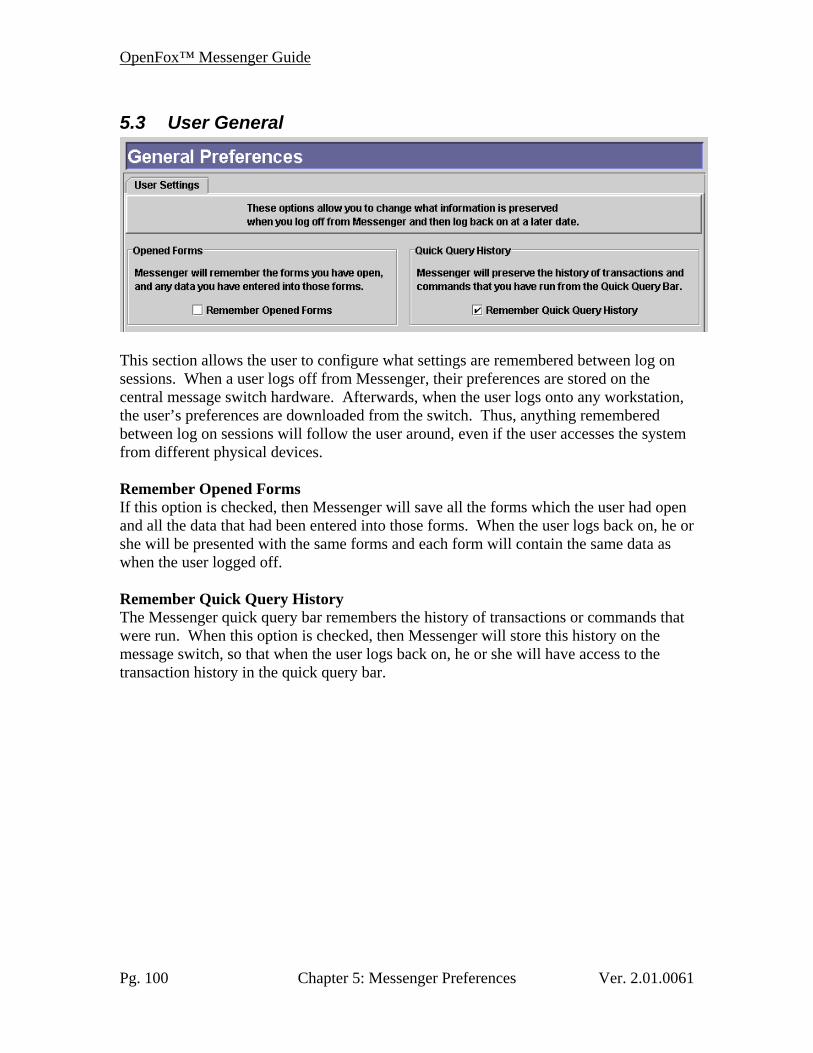
OpenFox™ Messenger Guide
Pg. 100 Chapter 5: Messenger Preferences Ver. 2.01.0061
5.3 User General
This section allows the user to configure what settings are remembered between log on sessions. When a user logs off from Messenger, their preferences are stored on the central message switch hardware. Afterwards, when the user logs onto any workstation, the user’s preferences are downloaded from the switch. Thus, anything remembered between log on sessions will follow the user around, even if the user accesses the system from different physical devices. Remember Opened Forms If this option is checked, then Messenger will save all the forms which the user had open and all the data that had been entered into those forms. When the user logs back on, he or she will be presented with the same forms and each form will contain the same data as when the user logged off. Remember Quick Query History The Messenger quick query bar remembers the history of transactions or commands that were run. When this option is checked, then Messenger will store this history on the message switch, so that when the user logs back on, he or she will have access to the transaction history in the quick query bar.

OpenFox™ Messenger Guide
Ver. 2.01.0061 Chapter 5: Messenger Preferences Pg. 101
5.4 User Message Display This section allows the user to configure aspects of how Messenger displays messages in the message preview area and any separate message view windows.
5.4.1 General Options
This tab contains settings that are applicable for both the default Messenger style sheet, which is used for normal text based responses, and custom style sheets, which are used for fully tagged XML responses delivered to Messenger. Show Header Info If this option is checked, then Messenger will display the header section of each message. The header section typically includes a line containing the date and ORI of the message, as well as a line for the summary field.
Header information displayed

OpenFox™ Messenger Guide
Pg. 102 Chapter 5: Messenger Preferences Ver. 2.01.0061
Header information hidden
Show Legacy Header This setting is only applicable in those states which have chosen to send the legacy message header information to a Messenger device. Please contact the state technical contact to determine if you have access to legacy header information. There are three different values that can be chosen for this setting.
• In Message Header – This option will display the legacy header as a line in the message header.
• In Message Body – This option will display the legacy header at the very beginning of the message text.
• Don’t Show – This option will hide the legacy header. Hide Date and ORI Checking this setting will hide the message header line which contains the date and ORI under the View Message Details section. Please note that if the user has chosen to turn off the Show Message Header setting, then this option will have no effect.
Date and ORI fields hidden
Hide Summary Checking this setting will hide the message header line which contains the summary field under the View Message Details section. Please note that if the user has chosen to turn off the Show Message Header setting, then this option will have no effect.
Summary field hidden

OpenFox™ Messenger Guide
Ver. 2.01.0061 Chapter 5: Messenger Preferences Pg. 103
Expand Message Details Checking this setting will expand the View Message Details section and show all the information normally hidden by this section when the user views a message. If this option is turned off, then Messenger will default to collapse the View Message Details section.
Message Details section expanded
Reverse Multiple Message Display Order If this option is not checked, then when the user highlights multiple messages in the message list control, those messages will be displayed in the message preview pane in the same top-to-bottom order in which they appear in the list of messages. If this option is turned on, then they will be displayed in the exact opposite order. This option is intended for use by users which wish to see the newest messages at the top of the Inbox folder, but want the newest messages to appear at the bottom of the message preview pane.
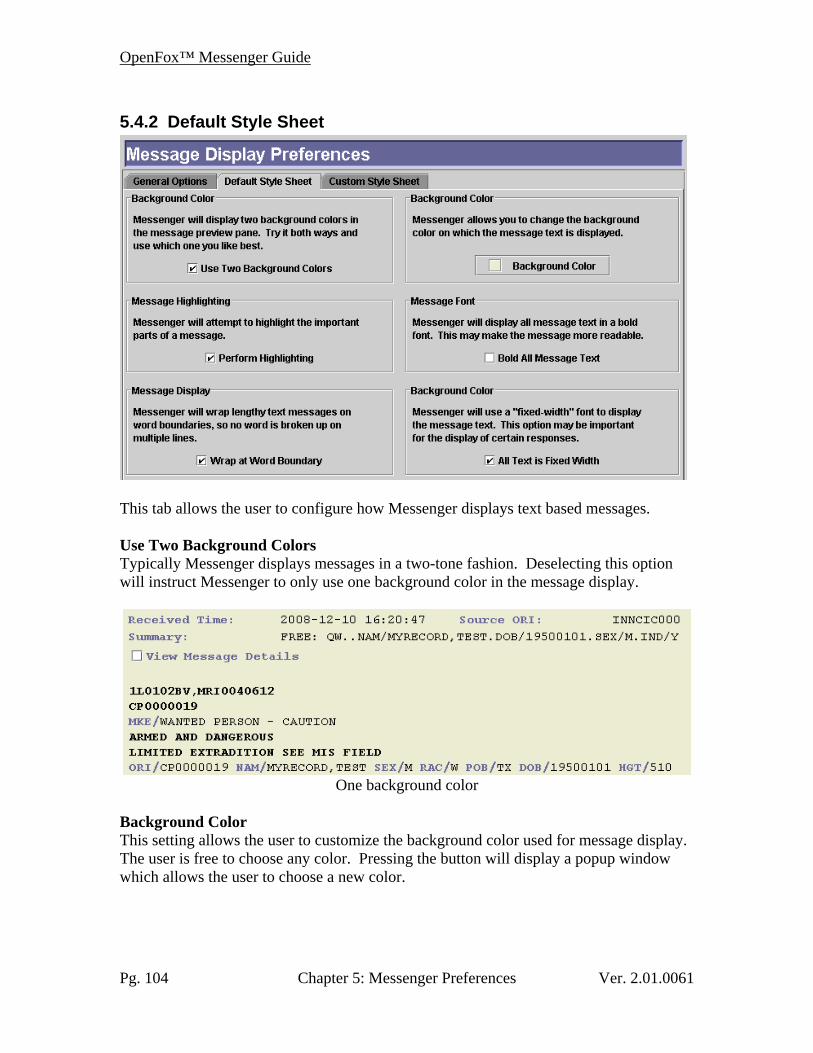
OpenFox™ Messenger Guide
Pg. 104 Chapter 5: Messenger Preferences Ver. 2.01.0061
5.4.2 Default Style Sheet
This tab allows the user to configure how Messenger displays text based messages. Use Two Background Colors Typically Messenger displays messages in a two-tone fashion. Deselecting this option will instruct Messenger to only use one background color in the message display.
One background color
Background Color This setting allows the user to customize the background color used for message display. The user is free to choose any color. Pressing the button will display a popup window which allows the user to choose a new color.

OpenFox™ Messenger Guide
Ver. 2.01.0061 Chapter 5: Messenger Preferences Pg. 105
Message Highlighting When this setting is checked, Messenger will attempt to “screen scrape” the message text and identify field tags and lines which are devoid of any fields. Portions of the message which are identified as field tags will be bolded and highlighted in a different color. Lines which are determined to be devoid of any fields will be displayed in bold text. Deselecting this option will disable this functionality.
Message highlighting turned off
Bold All Message Text Checking this option will cause Messenger to display all message text in a bold font. This may help with users who find it difficult to read the text on the message display. A bold font should make the text clear and easier to read.
Bold all message text
Wrap at Word Boundary OpenFox™ Messenger normally wraps lines of text which extend more than eighty (80) characters. If this option is selected, Messenger will attempt to only wrap text lines between two different words. If this option is cleared, then Messenger will ignore word boundaries and wrap text lines at exactly eighty (80) characters. All Text is Fixed Width By default, Messenger uses a fixed-width font to display message text. Clearing this setting will instruct Messenger to use a variable-width font for some message. Only change this setting if you have been explicitly instructed to do so.

OpenFox™ Messenger Guide
Pg. 106 Chapter 5: Messenger Preferences Ver. 2.01.0061
5.4.3 Custom Style Sheet
This tab allows the user to change how Messenger displays messages which contain fully tagged XML data. Use Custom Style Sheets Messages which contain fully tagged XML data typically require a different style sheet than the Messenger default style sheet, which is intended for use on text based messages. However, if there is some technical difficulty with a custom style sheet, then their usage may be disabled via this setting. Only change this setting if you have been explicitly instructed to do so. Code Look Up Certain custom style sheets may perform reverse code table look ups, so that the user is presented with the text meaning of an NCIC code rather than the basic code value. For example, instead of displaying “RTAT L ARM” for the scars, marks, and tattoos field, the custom style sheet may display “Removed Tattoo on Arm, left”. This feature is performed by a reverse look up against the NCIC SMT code list. If a user is very familiar with the NCIC codes, then he or she may find it more convenient to disable this particular feature and see only the raw code value.

OpenFox™ Messenger Guide
Ver. 2.01.0061 Chapter 5: Messenger Preferences Pg. 107
5.5 User Printers This section allows the user to configure aspects of how Messenger handles the printing of messages.
5.5.1 Printer List
This tab allows the user to configure their dispatch mode printer settings. For more information regarding this screen, please see the section on Messenger printing.

OpenFox™ Messenger Guide
Pg. 108 Chapter 5: Messenger Preferences Ver. 2.01.0061
5.5.2 General Options
This tab allows the user to change settings which apply to both image capable and dot matrix style printers. Dispatch Mode Printing When this option is checked, Messenger will use the settings configured on the Printer List tab. If this option is not checked, then Messenger will operate in Windows style print mode. For more information regarding the differences between these two printing modes, please see the chapter on Messenger printing. Auto Print on by Default When this checkbox is marked, automated printing will be turned on automatically when this user logs onto Messenger. Any messages that have been received at the terminal in between user logons will be printed as soon as the user logs on. If this item is checked, then a user should never have to turn automated printing on through the message actions. Auto Print when Display is Locked When this checkbox is marked and the user chooses to lock the OpenFox™ Desktop display, then any messages which are delivered to the terminal will be auto printed. This behavior will stop as soon as this user unlocks the display, or someone chooses to log the user off.

OpenFox™ Messenger Guide
Ver. 2.01.0061 Chapter 5: Messenger Preferences Pg. 109
5.5.3 Image Capable Options
This tab allows the user to change how messages are printed to image capable devices. Print Background If this option is selected, then Messenger will print the background color of a message. Leave this option turned off to conserve printer ink. Print Header If this option is checked, then Messenger will print message header information. For more regarding what information is present in the message header, please refer to the section on message display preferences. Message Details These checkboxes allow the user to specify when the Show Message Details information is printed. If the Always checkbox is marked, then every printed message will have the details section expanded. If the Never checkbox is marked, then every printed message will have the details section collapsed. If neither checkbox is marked, then a message will be printed as it appears on the screen. Print in Color Select this option to have Messenger print messages in color. Turn this option off to force Messenger to print in black and white.

OpenFox™ Messenger Guide
Pg. 110 Chapter 5: Messenger Preferences Ver. 2.01.0061
Print as Text Select this option to have Messenger print messages without any of the formatting that is typically present. If this option is turned on, then print outs from an image capable device will greatly resemble those printed on a dot matrix printer. Please note that selecting this option will not affect the printing of messages which contain images. If an image is present in the message, then the image will be printed regardless of whether this option is turned on or off. Separate Pages This setting is applied when the user chooses to print multiple messages at one time. If this option is turned off, then Messenger will attempt to print the messages onto as few a number of pages as possible. If this option is turned on, then Messenger will begin each message on a new page.
5.5.4 Dot Matrix Options
This tab gives the user control over how messages are printed to dot matrix, continuous feed style printers. Print Header If this option is checked, then Messenger will print the information contained in the message header. If this option is turned off, then Messenger will never print the message header. For more information regarding what information is contained within the message header, please see the section on message display preferences. Print Messages on Separate Pages When this option is turned on, Messenger will instruct the printer to scroll to the beginning of a new page for each message. If this option is turned off, then Messenger will print all messages in a continuous fashion, ignoring page breaks.

OpenFox™ Messenger Guide
Ver. 2.01.0061 Chapter 5: Messenger Preferences Pg. 111
5.6 Terminal Mailbox Options
This screen allows the enterprise mailbox settings to be overridden for a specific workstation. The settings on this screen are part of the terminal preferences as opposed to user preferences. Please refer to the OpenFox™ Desktop User Guide for more information regarding the differences between user and terminal preferences. In general, users should not alter these settings unless they have been explicitly instructed to do so by either CPI support personnel or by state technical contacts. Mailbox Size This setting allows a workstation to allocate more or less hard drive space for storing messages. The more space that is allocated to storing messages on the hard drive, the longer those messages will remain in Messenger before being overwritten by new messages. If a workstation constantly has a red disk usage icon, then it may be helpful to increase the hard drive space. Please note, that increasing this setting will also increase the memory requirements of Messenger. Changing this value may change the minimum and recommended system requirements. Message Life Timer This setting allows a workstation to override the enterprise automatic message deletion setting. Please note that a workstation may only change this time limit to a shorter amount of time. If a workstation attempts to configure a time period longer than that defined in the enterprise settings, Messenger will use the enterprise setting.
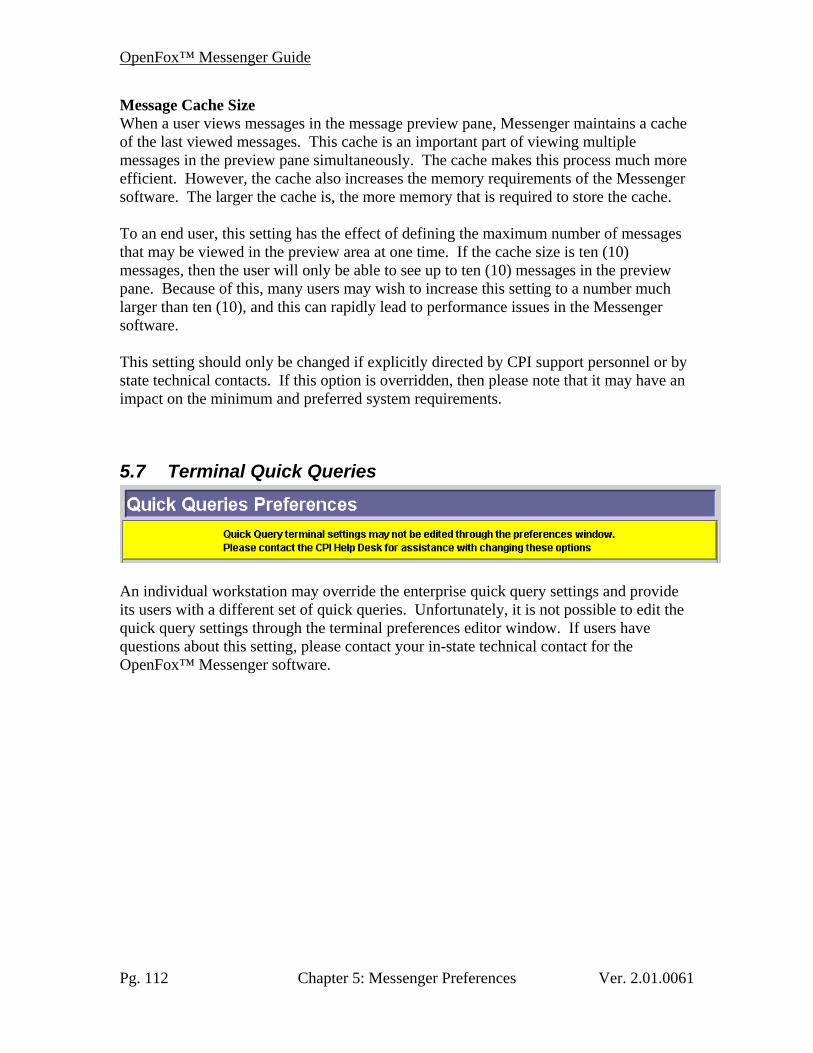
OpenFox™ Messenger Guide
Pg. 112 Chapter 5: Messenger Preferences Ver. 2.01.0061
Message Cache Size When a user views messages in the message preview pane, Messenger maintains a cache of the last viewed messages. This cache is an important part of viewing multiple messages in the preview pane simultaneously. The cache makes this process much more efficient. However, the cache also increases the memory requirements of the Messenger software. The larger the cache is, the more memory that is required to store the cache. To an end user, this setting has the effect of defining the maximum number of messages that may be viewed in the preview area at one time. If the cache size is ten (10) messages, then the user will only be able to see up to ten (10) messages in the preview pane. Because of this, many users may wish to increase this setting to a number much larger than ten (10), and this can rapidly lead to performance issues in the Messenger software. This setting should only be changed if explicitly directed by CPI support personnel or by state technical contacts. If this option is overridden, then please note that it may have an impact on the minimum and preferred system requirements.
5.7 Terminal Quick Queries
An individual workstation may override the enterprise quick query settings and provide its users with a different set of quick queries. Unfortunately, it is not possible to edit the quick query settings through the terminal preferences editor window. If users have questions about this setting, please contact your in-state technical contact for the OpenFox™ Messenger software.