merging artist systems - riedel communications · connect systems with different versions via fiber...
TRANSCRIPT

Merging Artist systems For Artist S, M, 32, 64, 128
Document reference 3.2 S. Franke
10/2012

© 2012 Riedel Communications GmbH & Co KG. Alle Rechte vorbehalten.
Dieses Handbuch ist urheberrechtlich geschützt. Das Kopieren, Vervielfältigen, Übersetzen oder Umsetzen in irgendein elektronisches Medium oder maschinell
lesbare Form im Ganzen oder in Teilen ohne vorherige schriftliche Genehmigung von Riedel ist nicht gestattet. Riedel übernimmt keine Gewähr für die Richtigkeit
des Inhalts dieses Handbuchs. Die Rechte an anderen in diesem Handbuch erwähnten Marken- und Produktnamen liegen bei ihren Inhabern und werden hiermit
anerkannt.
© 2012 Riedel Communications GmbH & Co KG. All rights reserved.
Under the copyright laws, this manual may not be copied, in whole or in part, without the written consent of Riedel. Every effort has been made to ensure that the
information in this manual is accurate. Riedel is not responsible for printing or clerical errors. All trademarks are the property of their respective owners.

Merging Artist Systems, Version 3.2
Page 3
Content
1 PREPARING THE SYSTEMS FOR MERGING ................................................................................................ 4 1.1 Requirements ......................................................................................................................................................... 4 1.2 Backup / preparation of the system configurations ........................................................................................ 4
1.2.1 Backup system configurations ......................................................................................................................... 4 1.2.2 Assign new configuration ID ............................................................................................................................. 5
1.3 Verifying the firmware of the systems ................................................................................................................ 6 1.4 Adjustment of the Node properties ..................................................................................................................... 7
1.4.1 IP address ............................................................................................................................................................ 7 1.4.2 Node address ...................................................................................................................................................... 7 1.4.3 Clock Master settings ........................................................................................................................................ 8 1.4.4 Trunk Controller settings ................................................................................................................................... 8
1.5 Establishing the fiber connections between the systems ............................................................................... 9
2 IMPORT SYSTEM CONFIGURATION(S) ....................................................................................................... 10 2.1 Import another configuration with a file .......................................................................................................... 10
2.1.1 Placing a Prefix ................................................................................................................................................. 11 2.1.2 Adjusting the Node addresses and reconnecting the fiber lines .............................................................. 12
2.2 Import another configuration from a connected system .............................................................................. 14
3 ADDING COMMANDS BETWEEN THE SYSTEMS ....................................................................................... 14
4 DISCONNECT SYSTEMS ............................................................................................................................... 15
Merging Artist Systems, Version 3.2
Page 4
1 PREPARING THE SYSTEMS FOR MERGING
1.1 Requirements
To merge different Artist systems together, check if the following requirements are fulfilled:
Check the fiber infrastructure of the systems. The connection points between the systems have to use
the same Fiber-transceivers types (Single- or Multimode; Data rate)
If you want to merge an older Artist M frame(s) with the first generation of CPU-cards (CPU128-F/HP)
installed to an Artist-S, -32, -64, or -128 network, the Artist M CPUs have to be hardware modified
with a “Jitter Patch” for a stable interconnection. This is not necessary if you are using CPU-128F-SD
CPU cards in your Artist M. If you are not sure about your Artist M CPUs version, please contact
When interconnecting Artist M and Artist G2 Frames, 2x SC<>LC fiber adapter cables are required
(Single-/Multimode, depending on your used hardware).
Artist S, Artist 32, Artist 64 and Artist 128 can be merged without any problems.
It is not possible to merge 2 or more configurations containing configured Master Control Room, or AV-Router Director add-
ons. The add-ons of the imported configuration will be disabled.
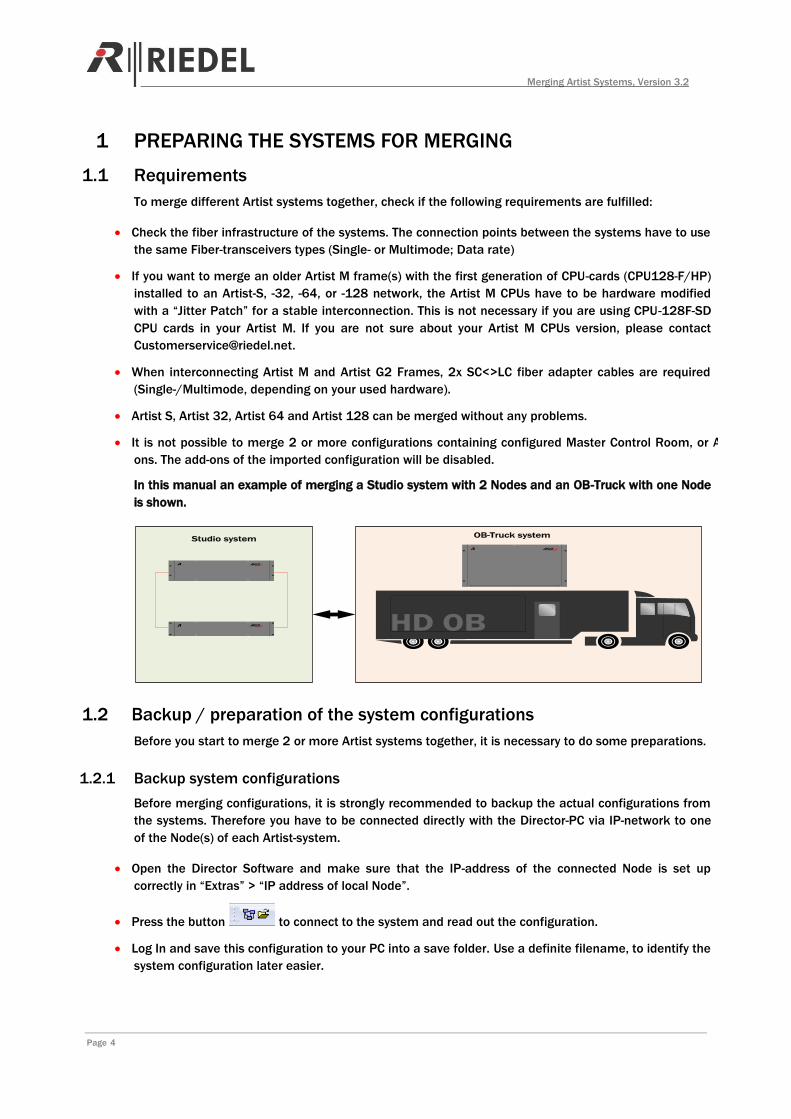
In this manual an example of merging a Studio system with 2 Nodes and an OB-Truck with one Node
is shown.
Studio systemOB-Truck system
1.2 Backup / preparation of the system configurations
Before you start to merge 2 or more Artist systems together, it is necessary to do some preparations.
1.2.1 Backup system configurations
Before merging configurations, it is strongly recommended to backup the actual configurations from
the systems. Therefore you have to be connected directly with the Director-PC via IP-network to one
of the Node(s) of each Artist-system.
Open the Director Software and make sure that the IP-address of the connected Node is set up
correctly in “Extras” > “IP address of local Node”.
Press the button to connect to the system and read out the configuration.
Log In and save this configuration to your PC into a save folder. Use a definite filename, to identify the
system configuration later easier.

Merging Artist Systems, Version 3.2
Page 5
Repeat these steps for all systems, you want to merge together.
Hint: For the following merging-procedure it is useful to save the configurations also on an USB-Stick.
1.2.2 Assign new configuration ID
When starting a complete new configuration the Director assigns an internal Configuration-ID to
every configuration.
So if you are using the same base-configuration file for example 2 nearly identically OB-Trucks, one
Configuration ID have to be changed before merging. This will avoid a collision of doubled IDs in the
configurations.
AAtttteennttiioonn:: IIff yyoouu aarree uussiinngg PPaarrttiiaall FFiilleess,, aallrreeaaddyy ccoonnffiigguurreedd ppaarrttiiaall ffiilleess wwiillll nnoott wwoorrkk aannyymmoorree!! TThheessee
PPaarrttiiaall FFiilleess aarree ffiixx ccoommbbiinneedd wwiitthh tthhee CCoonnffiigguurraattiioonn--IIDD ooff tthhee oorriiggiinn ffiillee.. SSoo iiff yyoouu cchhaannggee tthhee IIDD,, iitt iiss
nnoott ppoossssiibbllee ttoo llooaadd tthheessee PPaarrttiiaall FFiilleess aannyymmoorree!!
SSoo wwhheenn yyoouu ssttiillll wwaanntt ttoo uussee tthheessee PPaarrttiiaall FFiilleess iinn aa mmeerrggeedd ssyysstteemm,, yyoouu hhaavvee ttoo aassssiiggnn aa nneeww IIDD
oonnllyy ttoo tthhee ccoonnffiigguurraattiioonn((ss)) ooff tthhee ootthheerr ssyysstteemmss yyoouu wwaanntt ttoo mmeerrggee .. IItt iiss nnoott ppoossssiibbllee ttoo mmeerrggee 22 oorr
mmoorree ssyysstteemmss aanndd ssttiillll uussiinngg tthhee oorriiggiinnaall ppaarrttiiaall FFiilleess ooff aallll ssyysstteemmss ssiimmuullttaanneeoouussllyy!! FFoorr tthhiiss ssiittuuaattiioonn
tthhee PPaarrttiiaall FFiilleess nneeeeddss ttoo bbee ccrreeaatteedd nneeww..
So if you want to merge 2 systems based on the same configuration, it´s ok to assign a new
Configuration-ID to only one of the configurations. If you want to merge 3 systems, 2 system
configurations needs to get a new Web-ID, …correspondingly for 4 or more systems.
To assign a new Web-ID, you have to open a configuration (by file or reading out of the system). Now
press “Extras” > “Assign new Configuration-ID”
A confirmation window will appear with a warning that partial files belonging to this configuration will
not work anymore if you assign a new ID.
If you are not using partial files in this configuration you can now press “OK”
(In this example Studio+OB-Truck it is not necessary to change the Configuration ID, because the
systems are based on complete different configurations)

Merging Artist Systems, Version 3.2
Page 6
1.3 Verifying the firmware of the systems
When merging different systems together, it is necessary that all cards on all systems are running on
the same firmware version.
You can check the firmware versions in the “Online View” by pressing the button.
System #1 (Studio)
System #2 (OB-Truck)
If the systems you want to merge are running on different versions you have 2 possibilities:
Connect to every system and update the cards before merging
Connect systems with different versions via fiber together (make sure that they have different Node
addresses, see next chapter) and update the whole system directly from one position after
interconnect the systems.
Hint: Also Nodes running on different firmware will see each other to make updates possible.
Please refer the Director- or Update Guide for further information about updating.
Merging Artist Systems, Version 3.2
Page 7
1.4 Adjustment of the Node properties
Before connecting Nodes together, it is necessary to check the basic settings of every system. So
connect a PC to every system before merging and open the Online View
Hint: All following changes in the “Node Properties” window can also be made per Node in one step.
So change all the necessary settings and send the changes by pressing .
The Node will do a reboot.
1.4.1 IP address
Changing the IP addresses of the Nodes is in most scenarios not necessary. Only if the Nodes
connected to the IP-Network have the same IP-address and you also want to connect the LAN
infrastructure of the 2 Buildings/Trucks together. This will result in an IP-collision. So you have to
change the IP-address in the “Node Properties” > “Set IP address” of one system before to an unused
IP address in your network. DHCP is not supported.
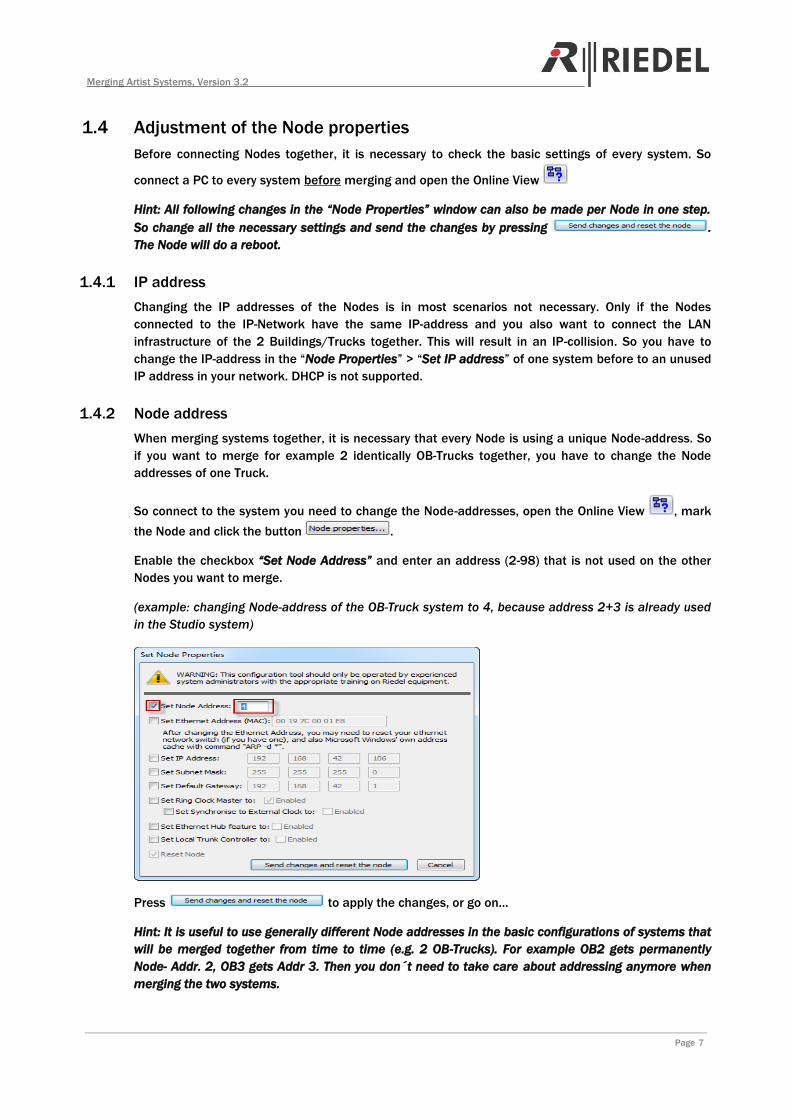
1.4.2 Node address
When merging systems together, it is necessary that every Node is using a unique Node-address. So
if you want to merge for example 2 identically OB-Trucks together, you have to change the Node
addresses of one Truck.
So connect to the system you need to change the Node-addresses, open the Online View , mark
the Node and click the button .
Enable the checkbox “Set Node Address” and enter an address (2-98) that is not used on the other
Nodes you want to merge.
(example: changing Node-address of the OB-Truck system to 4, because address 2+3 is already used
in the Studio system)
Press to apply the changes, or go on…
Hint: It is useful to use generally different Node addresses in the basic configurations of systems that
will be merged together from time to time (e.g. 2 OB-Trucks). For example OB2 gets permanently
Node- Addr. 2, OB3 gets Addr 3. Then you don´t need to take care about addressing anymore when
merging the two systems.

Merging Artist Systems, Version 3.2
Page 8
1.4.3 Clock Master settings
An Artist system needs one Node that is defined as Ring Clock Master (identifiably on the fast
blinking green CPU-LED on the active CPU). So when merging 2 or more systems together, you have
to make sure that only one Node is working as the Ring Clock Master.
Before connecting the systems together, you have to decide which system should be the master. So
switch off the Master Flag in the Node Properties on all the other systems (they will show a solid
green CPU LED).
If you are using digital audio connections like Madi or AES, the system have to be synched to the
external Audio clock (word clock). So select the Node with a Sync-Module to be the Ring Clock
Master. If both systems are using digital audio connections, it is necessary that the reference clock
signal of the Studio and the Truck are synchronized separately.
Enable the checkbox “Set Ring Clock Master To:” and disable the checkbox “Enabled”
(example: disable Ring Clock Master of OB-Truck system)
Press to apply the changes, or go on…
1.4.4 Trunk Controller settings
If you are using trunking, it is the same story like the master settings. Only 1 Node can be defined as
the local trunk controller. You have to disable all other Trunk Controller flags before merging the
systems. So enable the checkbox “Set Local Trunk Controller to:” and disable the checkbox “Enabled”.
HINT: Trunking can be used later without problems also in a merged system
(example: disable Trunk Controller of OB-Truck system)
Press to apply the changes. The Node will do a reboot.

Merging Artist Systems, Version 3.2
Page 9
1.5 Establishing the fiber connections between the systems
Now you can connect the systems together via fiber.
So open the Ring of system 1 and 2 (if these are multiple Node systems) and interconnect the
systems like shown in the drawing.
Make sure to use the correct type of fiber cable (Multimode or Singlemode)
Always connect Downstream to the Upstream
And TX to RX
Attention: When you want to interconnect Artist M and Artist G2 -Frames, please pay attention that
caused by different mechanics of the Artist M CPU rear cards the position of the Up- and Downstream
is reversed. Also you have to use 2x SC-LC duplex adapters.
Now connect a Director-PC to one of the Nodes.
If everything is set up correctly, you should now see all Nodes in the Online View.
Also double check if only one Node is set as Ring Clock Master and only one as Trunk Controller (if
Trunking is used).
Hint: One Node can also be Ring Clock Master and Trunk controller at the same time.

Merging Artist Systems, Version 3.2
Page 10
2 IMPORT SYSTEM CONFIGURATION(S)
Now the Hardware setup is completed, so it is time to merge the configurations together. There are 2
different possibilities to do that:
2.1 Import another configuration with a file
Open the original configuration file of one system in the Director Software (example: Studio)
Get the configuration file(s) of the other system(s) you want to merge, at best saved on an USB-Stick
before.
(In this example the configuration file of the OB-Truck)
To import this file to the existing configuration, go to “File” > “Import”
The Director will now ask you, if you want to save the actual opened configuration to a file before
importing. So it is up to you…
Now select the previous saved file of the other system (OB-Truck) from the USB-Stick
Merging Artist Systems, Version 3.2
Page 11
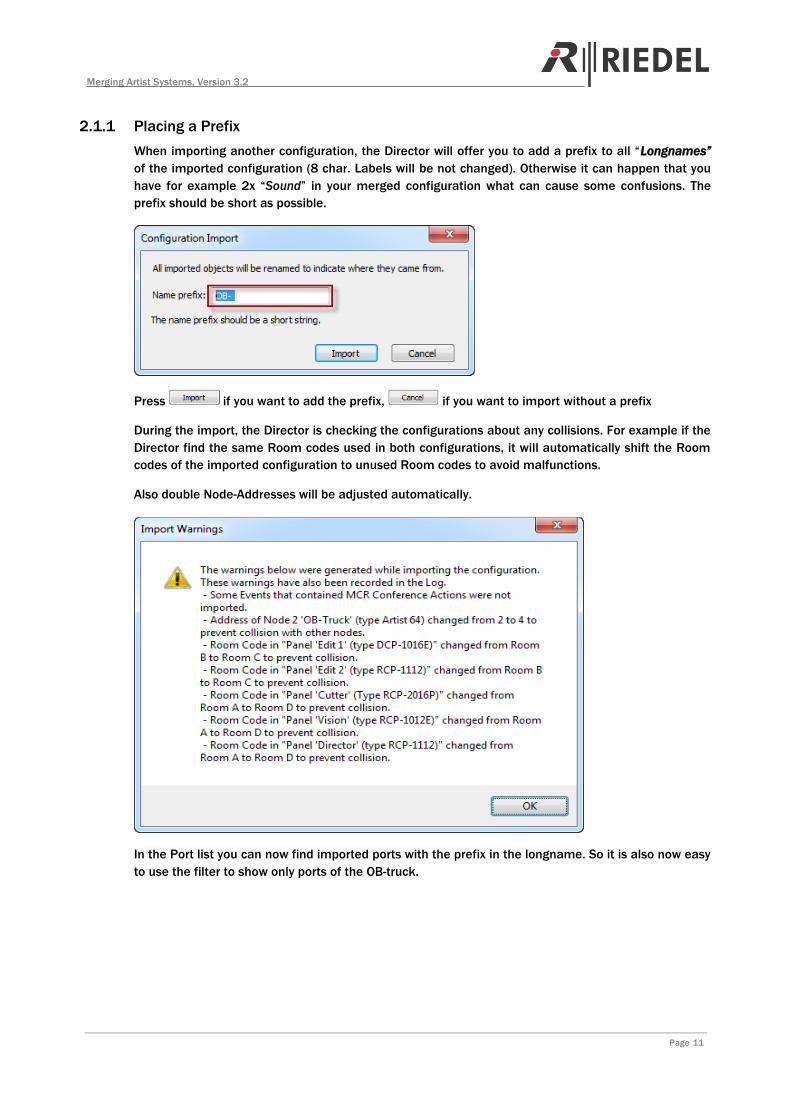
2.1.1 Placing a Prefix
When importing another configuration, the Director will offer you to add a prefix to all “Longnames”
of the imported configuration (8 char. Labels will be not changed). Otherwise it can happen that you
have for example 2x “Sound” in your merged configuration what can cause some confusions. The
prefix should be short as possible.
Press if you want to add the prefix, if you want to import without a prefix
During the import, the Director is checking the configurations about any collisions. For example if the
Director find the same Room codes used in both configurations, it will automatically shift the Room
codes of the imported configuration to unused Room codes to avoid malfunctions.
Also double Node-Addresses will be adjusted automatically.
In the Port list you can now find imported ports with the prefix in the longname. So it is also now easy
to use the filter to show only ports of the OB-truck.
Merging Artist Systems, Version 3.2
Page 12
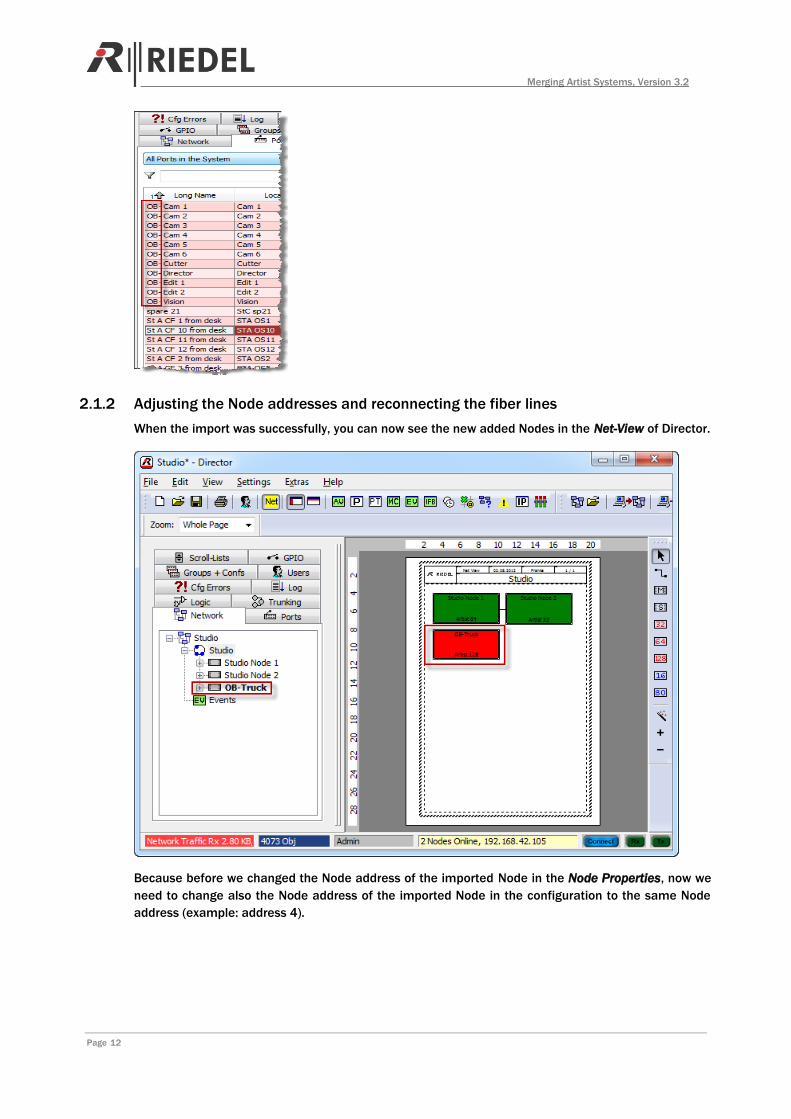
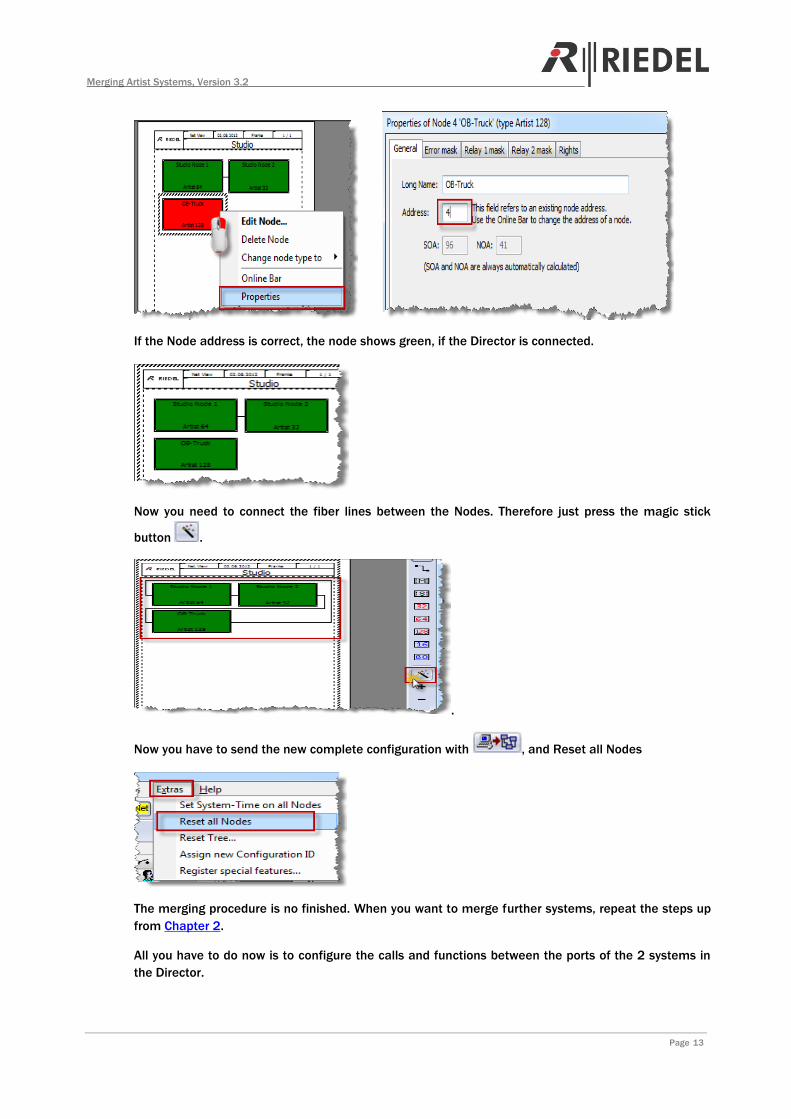
2.1.2 Adjusting the Node addresses and reconnecting the fiber lines
When the import was successfully, you can now see the new added Nodes in the Net-View of Director.
Because before we changed the Node address of the imported Node in the Node Properties, now we
need to change also the Node address of the imported Node in the configuration to the same Node
address (example: address 4).
Merging Artist Systems, Version 3.2
Page 13
If the Node address is correct, the node shows green, if the Director is connected.
Now you need to connect the fiber lines between the Nodes. Therefore just press the magic stick
button .
.
Now you have to send the new complete configuration with , and Reset all Nodes
The merging procedure is no finished. When you want to merge further systems, repeat the steps up
from Chapter 2.
All you have to do now is to configure the calls and functions between the ports of the 2 systems in
the Director.

Merging Artist Systems, Version 3.2
Page 14
2.2 Import another configuration from a connected system
Another way of importing the configuration file of a system you want to merge, is to read out the
configuration directly from the node instead of opening it from a USB drive (a working IP-connection
to this system is required).
Therefore you have to open the configuration of the first system (example: Studio) in the Director.
Then you have to connect the Director by changing the “IP-Address of local Node” in “Extras” directly
to the second system (example: OB-Truck) and activate “Import from Artist” in the “File”-menu.
The rest of the procedure is absolute identically with the ”Import from File” method.
3 ADDING COMMANDS BETWEEN THE SYSTEMS
Because the system is now one system and have only one big configuration, you now have to just
establish all the calls and functions between the Studio and the Truck ports in the standard way
within the Director Software.

Merging Artist Systems, Version 3.2
Page 15
4 DISCONNECT SYSTEMS
To disconnect merged systems, just:
Disconnect the fiber connections between the systems and close the Fiber rings on every system
Connect a Director PC to each system and set the Node Properties back to the original settings (Node
address, Ring Clock Master, etc.)
Load the backup configuration files you made before the merging process
Send the configurations to the systems and do a Node reset.

Merging Artist Systems, Version 3.2
Page 16
NOTES

Riedel Communications GmbH & Co. KG • Uellendahler Str. 353 • 42109 Wuppertal • Germany
Phone: +49 (0) 202 292-90 • Fax: +49 (0) 202 292-99 99 • [email protected]
Wuppertal • Beijing• Berlin • London • Los Angeles • Singapore • Sydney • Vienna • Zurich