merchant media – programming map software version … · some lists of product selections use...
TRANSCRIPT

MERCHANT MEDIA – PROGRAMMING MAP SOFTWARE VERSION 10.5.1
media_programming_10_5_1 Page 1 of 76 09/24/2012
CHEAT SHEET FOR PROGRAMMING
Price Page
1. By Tray 20 2. By Whole Machine 20 3. By Individual Selections 20
Data Recall Page
1. Non-Resettable Sales Data 03 1. Overall Totals 03 2. By Tray 04 3. By Product 04 4. Cash 05 5. Cashless 05 6. Bill Data 05 2. Resettable Sales Data 06 1. Overall Totals 06 2. By Tray 06 3. By Product 07 4. Cash 07 5. Cashless 08 6. Bill Data 08 7. Clear data 08 3. Events 09 1. Power Losses 09 2. Door Events History 09 3. Individual Events 10 4. Identification Numbers 10 5. Surevend Corrected 11 1. Machine / Tray Totals 11 2. By Product 11
Diagnostics Page 1. Screen data 12 2. Diagnostic Errors 12-14
Test Page
1. Test Vend 15 2. Coin Return Motor 15 3. Surround Lighting Test 15 4. Screen Test 16 5. Mag Teck Head Test 16 6. Surevend Calibration 16 7. Motor Test Summary 17 1. Home All Motors (machine) 17 2. Home All Motors (tray) 17 8. Detailed Motor Test 18 1. Home Selected Motor 18 9. Lighting Test 19
Product Configuration Page
1. Selection Configuration 21 1. Auto-Configuration 21 2. Set Up Selections 22 2. F.I.F.O. Set-Up 22 1. Add Groups 22 2. Delete Groups 23 3. Edit Groups 23 4. Group Mappings 24 3. Universal Product Codes 24 4. Shopping Cart Set-Up 25 1. Shopping Cart Size 25 2. Maximum Fund Amount 25 5. View Plan-O-Gram 25 6. Couple Motors 26 7. Surevend 26 1. Current State 26 2. Surevend Options 26 1. Option Surevend 26 2. Must Surevend 26 3. Anti-Jackpot Timer 27 4. Anti-Jackpot Trigger 27
Tech Tip Enable and Disable the O.K. button is now called Rapid Vend. It is located in Special Vend Modes.
Special Vend Modes Page
1. Free Vend 28 2. Winner Mode 28 1. Add A Group 28 2. Delete A Group 30 3. Edit A Group 30 4. Winner Selections 31 3. Combo Vends 31 1. Add New Group 31 2. Edit Groups 32 3. Custom Messages 32 4. Token Enable 32 5. Rapid Vend 33

MERCHANT MEDIA – PROGRAMMING MAP SOFTWARE VERSION 10.5.1
media_programming_10_5_1 Page 2 of 76 09/24/2012
Security Codes Page
1. Enter P.I.N. 52 2. Change Driver P.I.N. 52 3. Change Operator P.I.N. 52 1. Details For Driver P.I.N. 53 2. Details For Operator P.I.N. 54 3. Details For Engineers P.I.N. 54 4. Details For Manufacturers P.I.N. 55
Timed Events (info button) Page
1. Time Of Day Events 56 1. Price Adjust 56 2. Free-Vend 58 3. Inhibit 59 2. Back Up Events 61 3. Power Saving Events 62
Monetary Page
1. Coins In And Out 34 1. Pay Out Coins 34 2. Set Up Channels 35 2. Bill Validator 35 3. Coin Mechanism 35 4. Card Reader 36 5. Bill Acceptance 36 6. Declining Balance 36 7. Change W/O Purchase 37 SECOND SCREEN 2. Accept On Low Change 37 3. Low Change Message 38 4. Credit For Failed Vend 38 5. Card Re-Value 38
Tech Tip In system Settings, the refrigeration settings will not be shown when set to ambient.
System Settings Page
1. Machine Information 39 2. Time And Date 40 3. Language 41 4. D.T.S. (data transfer system) 42 1. DEX or DDCMP (printer) 42 2. Audit List 43 3. CA304 / CA308 Data Type 43 4. Data Reset After Transfer 43 5. Event Data Reset After Transfer 44 6. Reset Pass-code 44 5. Software Updates 44 6. Back-Up / Re-Store 45 7. Copy Configuration 45 1. Prepare Flash Drive 45 2. Create Configuration Clone 46 3. Install Configuration Clone 46 4. Remove Clone From Stick 46 8. Custom Configurations 46 9. Screen Brightness 47 SECOND SCREEN 2. L.E.D. Color 47 3. Idle Time-Out 47 4. Advertisements 48 5. Custom Messages 48 6. Configuration Version 49 7. Refrigeration Settings 49 1. Adjust Temperature 50 2. Temperature Units 50 3. Health Controls 50 4. Diagnostics Enable 51
Telemetry Page
1. Assign Unit 64 2. Ping Server 66 3. Get Network Status 67 4. Show Network configuration 67 5. Load Network Configuration 67 Integrated Wireless Radio Set-up 68 Telemetry – How It Works 72 Definitions Of Common Terms 74
Keypad Screens 75
Firmware Information (shopping cart)
1. Screen Of Firmware Information 76

MERCHANT MEDIA – PROGRAMMING MAP SOFTWARE VERSION 10.5.1
media_programming_10_5_1 Page 3 of 76 09/24/2012
1. DATA RECALL……………………………Press key 1 to bring up a list.
Pressing the 1 key brings up a list of the groups in this function.
Press the numeric keys to choose a group. Choosing a group will bring up the first screen in that group.
1. Non-Resettable Sales Data – Press the 1 key to bring up a screen
Pressing the 1 key will bring up a screen listing the sub-groups that contain the data in this group.
Press the numeric keys to choose a Sub-Group. Choosing a Sub-Group will bring up the first screen in that Sub-Group.
1. Overall Totals – press key 1 to bring up a table listing data.
Type of Data Dollar Value # of Vends
Sales $0.00 0
Discounts $0.00 0
Surcharge $0.00 0
Test Vend $0.00 0
Free Vend $0.00 0
Token Vend $0.00 0
# Key Functions
1. Non-Resettable Sales Data
2. Resettable Sales Data
3. Events
4. Identification Numbers
5. Surevend Corrected
# Key Sub-Groups
1. Over-All Totals
2. By Tray
3. By Product
4. Cash
5. Cashless
6. Bill Data

MERCHANT MEDIA – PROGRAMMING MAP SOFTWARE VERSION 10.5.1
media_programming_10_5_1 Page 4 of 76 09/24/2012
2. By Tray – press key 2 to bring up a screen listing all trays.
Press a numeric key to select a tray and bring up a table listing tray data as shown.
Type of Data Dollar Value # of Vends
Sales $0.00 0
Discounts $0.00 0
Surcharge $0.00 0
Test Vend $0.00 0
Free Vend $0.00 0
3. By Product – press key 3 to bring up a screen listing all trays
Press a numeric key to select a tray and you will bring up a screen listing the product selections on that tray. Press a numeric key to select an individual product selection and you will bring up a table listing dollar values and number of vends for that product.
Some lists of product selections use more than one screen. Press the top and bottom of the O.K. button to scroll to the desired product selection number.
This table includes a line to include the Price of the product set in the selection. The date and time of the last vend of the selected product is displayed below the table.
Last Vend Date / Time
# Key Tray #
1. Tray 1
2. Tray 2
3. Tray 3
4. Tray 4
5. Tray 5
6. Tray 6
7. Tray 7
# Key Tray #
1. Tray 1
2. Tray 2
3. Tray 3
4. Tray 4
5. Tray 5
6. Tray 6
7. Tray 7
# Key Selection #
1. 101
2. 103
3. 105
4. 107
5. 109
6. 111
7. ###
Type of Data Dollar Value # of Vends
Price $0.00 Not Listed
Sales $0.00 0
Discounts $0.00 0
Surcharge $0.00 0
Test Vend $0.00 0
Free Vend $0.00 0

MERCHANT MEDIA – PROGRAMMING MAP SOFTWARE VERSION 10.5.1
media_programming_10_5_1 Page 5 of 76 09/24/2012
4. Cash – Press key 4 to bring up a table listing Cash Data.
Press top and bottom of O.K. button to scroll thru entire list. It has multiple screens. The last line of data on the first screen is repeated as the first line of the second screen.
5. Cashless – Press key 5 to bring up a table listing Cashless Data.
Data Type Dollar Value # of Vends
Sales $0.00 0
Discounts $0.00 0
Surcharge $0.00 0
Revalue $0.00 0
6. Bill Data – Press key 6 to bring up a table listing Bill Data.
The contents of the recycler unit have been listed below the table.
Recycler Contents $0.00
Data Type Dollar Value # of Vends
Cash In $0.00 Not Listed
To Cash Box $0.00 Not Listed
To Tubes $0.00 Not Listed
Bills In $0.00 Not Listed
Dispensed $0.00 Not Listed
Manual dispensed $0.00 Not Listed
Sales $0.00 0
Discounts $0.00 0
Surcharge $0.00 0
Over Pay $0.00 0
Data Type Bills In Bills Out
One $0.00 $0.00
Two $0.00 Not Listed
Five $0.00 $0.00
Ten $0.00 Not Listed
Twenty $0.00 Not Listed
Fifty $0.00 Not Listed
Hundred $0.00 Not Listed

MERCHANT MEDIA – PROGRAMMING MAP SOFTWARE VERSION 10.5.1
media_programming_10_5_1 Page 6 of 76 09/24/2012
2. Resettable Sales Data – Press key 2 to bring up a list
Pressing the 2 key will bring up a list of the Sub-Groups contained within this group
Press the numeric keys to choose a Sub-Group. Choosing a Sub-Group will bring up the first screen in that Sub-Group.
1. Overall Totals – Press key 1 to bring up a table.
Type of Data Dollar Value # of Vends
Sales $0.00 0
Discounts $0.00 0
Surcharge $0.00 0
Test Vend $0.00 0
Free Vend $0.00 0
Token Vend $0.00 0
2. By Tray – Press key 2 to bring up a listing all trays.
Press a numeric key to select a tray and bring up a table listing tray data as shown.
Type of Data Dollar Value # of Vends
Sales $0.00 0
Discounts $0.00 0
Surcharge $0.00 0
Test Vend $0.00 0
Free Vend $0.00 0
# Key Sub-Groups
1. Over-All Totals
2. By Tray
3. By Product
4. Cash
5. Cashless
6. Bill Data
7. Clear Data
# Key Tray #
1. Tray 1
2. Tray 2
3. Tray 3
4. Tray 4
5. Tray 5
6. Tray 6
7. Tray 7

MERCHANT MEDIA – PROGRAMMING MAP SOFTWARE VERSION 10.5.1
media_programming_10_5_1 Page 7 of 76 09/24/2012
3. By Product – press key 3 to bring up a screen listing all trays
Press a numeric key to select a tray and you will bring up a screen listing the product selections on that tray. Press a numeric key to select an individual product selection and you will bring up a table listing dollar values and number of vends for that product.
Some lists of product selections use more than one screen. Press the top or bottom of the O.K. button to scroll to the screen with the desired product selection number.
This table includes a line to include the Price of the product set in the selection. The date and time of the last vend of the selected product is displayed below the table.
Last Vend Date / Time 4. Cash - Press key 4 to bring up a screen listing Cash Data.
NOTE – Press the top and bottom sections of O.K. button to scroll thru entire list. It has multiple screens. The last line of data on the first screen is repeated as the first line of the second screen.
# Key Tray #
1. Tray 1
2. Tray 2
3. Tray 3
4. Tray 4
5. Tray 5
6. Tray 6
7. Tray 7
# Key Selection #
1. 101
2. 103
3. 105
4. 107
5. 109
6. 111
7. ###
Type of Data Dollar Value # of Vends
Price $0.00 Not Listed
Sales $0.00 0
Discounts $0.00 0
Surcharge $0.00 0
Test Vend $0.00 0
Free Vend $0.00 0
Data Type Dollar Value # of Vends
Cash In $0.00 Not Listed
To Cash Box $0.00 Not Listed
To Tubes $0.00 Not Listed
Bills In $0.00 Not Listed
Dispensed $0.00 Not Listed
Manual dispensed $0.00 Not Listed
Sales $0.00 0
Discounts $0.00 0
Surcharge $0.00 0
Over Pay $0.00 0

MERCHANT MEDIA – PROGRAMMING MAP SOFTWARE VERSION 10.5.1
media_programming_10_5_1 Page 8 of 76 09/24/2012
5. Cashless – Press key 5 to bring up a screen listing Cashless Data.
Data Type Dollar Value # of Vends
Sales $0.00 0
Discounts $0.00 0
Surcharge $0.00 0
Revalue $0.00 0
6. Bill Data – Press key 6 to bring up a screen listing Bill Data.
NOTE – The recycler contents are listed in a window separately from the table. It lists only the Dollar Value.
Recycler Contents $0.00 7. Clear Data – Press key 7 to clear resettable data.
Pressing the 7 key will bring up a screen asking you if you are sure you want to clear the resettable data. Respond by pressing a numeric key. 1. Press the 1 key for YES 3. Press the 3 key for NO This is also the data that is cleared each time the machine successfully transmits a
DEX file.
Data Type Bills In Bills Out
One $0.00 $0.00
Two $0.00 Not Listed
Five $0.00 $0.00
Ten $0.00 Not Listed
Twenty $0.00 Not Listed
Fifty $0.00 Not Listed
Hundred $0.00 Not Listed

MERCHANT MEDIA – PROGRAMMING MAP SOFTWARE VERSION 10.5.1
media_programming_10_5_1 Page 9 of 76 09/24/2012
3. EVENTS – Press key 3 to bring up a screen
Pressing the 3 key will bring up a screen listing data about recorded events
The top portion of the screen allows you to access data listing multiple events for each type of event.
Press the numeric keys to bring up a list for each type of event.
1. Power losses – Press the 1 key to bring up a list. Pressing the 1 key will bring up a screen listing data about recorded power losses.
The data is recorded in order of occurrence and can be a valuable diagnostic tool to determine if a power outage is the cause of a reported problem. This is reported in the DEX as EA7 fields. Press the top and bottom sections of the O.K. button to scroll thru multiple screens.
2. Door Events History – Press the 2 key to bring up a list.
Pressing the 2 key will bring up a screen listing data about recorded door events. Press the top and bottom of the O.K. button to access multiple screens.
# Key Function
1. Power Losses
2. Door Events History
Duration Date Time
00 hours 00 minutes 00 Month 00:00
00 hours 00 minutes 00 Month 00:00
00 hours 00 minutes 00 Month 00:00
00 hours 00 minutes 00 Month 00:00
00 hours 00 minutes 00 Month 00:00
00 hours 00 minutes 00 Month 00:00
00 hours 00 minutes 00 Month 00:00
Event Type Date Time
Door Open 00 Month 00:00
Door Closed 00 Month 00:00
Door Open 00 Month 00:00
Door Closed 00 Month 00:00
Door Open 00 Month 00:00
Door Closed 00 Month 00:00

MERCHANT MEDIA – PROGRAMMING MAP SOFTWARE VERSION 10.5.1
media_programming_10_5_1 Page 10 of 76 09/24/2012
The bottom portion of the screen lists individual events in display windows.
The windows use more than one screen. Use the top and bottom of the O.K. button to scroll thru the entire list. The last window displayed on the first screen is repeated on the second screen. The Last Data Clear data would include both a manual clear and a successful DEX read.
4. Identification Numbers – Press the 4 key to bring up a screen.
Pressing the 4 key will bring up a screen listing the I.D. numbers for the devices listed.
The software version for the I/O board is also listed here.
Title of Data Type of Data Recorded
Last Data Clear
Date and time Performed (or not done)
Last Vend
Date, Time, Selection
Last Price Change
Date, Time
Last Price Change
Date, Time
Last Clock Set
Date and Time (or not done)
Component Serial Number (or not connected)
Bill Validator ABC000000
Card Reader Not Connected
Coin Mechanism ABC000000
I/O board Version 0222

MERCHANT MEDIA – PROGRAMMING MAP SOFTWARE VERSION 10.5.1
media_programming_10_5_1 Page 11 of 76 09/24/2012
5. Surevend Corrected – Press key 5 to bring up a screen.
Pressing the 5 key will bring up a screen allowing access to Sub-Groups of data. The top portion of the screen allows you access to data within the Sub-Groups.
Press the numeric keys to choose a Sub-Group.
Choosing a Sub-Group will bring up a screen listing the data within the Sub-Group.
1. Machine/Tray Totals – Press the 1 key to bring up a screen. Pressing the 1 key will bring up a screen listing the data for the whole machine as well as for each tray.
R stands for Resolved and NR stands for Not Resolved.
2. By Product – Press the 2 key to bring up a screen. Pressing the 2 key will bring up a tray list.
Press the numeric keys to choose a tray. Choosing a tray will bring up a screen listing all the selections possible for that tray. Not all the selections are used on every tray. Use the top and bottom sections of the O.K. button to scroll thru the entire list.
The bottom portion of the screen lists an individual event in a window.
Last Corrected Vend Date, Time, Selection (or no vend performed)
# Key Function
1. Machine/Tray Totals
2. By Product
Data Type R NR
Machine Total 000 000
Tray 1 000 000
Tray 2 000 000
Tray 3 000 000
Tray 4 000 000
Tray 5 000 000
Tray 6 000 000
Tray 7 000 000
# Key Tray #
1. Tray 1
2. Tray 2
3. Tray 3
4. Tray 4
5. Tray 5
6. Tray 6
7. Tray 7
Selection # R NR
101 000 000
102 000 000
103 000 000
104 000 000
105 000 000
106 000 000
107 000 000

MERCHANT MEDIA – PROGRAMMING MAP SOFTWARE VERSION 10.5.1
media_programming_10_5_1 Page 12 of 76 09/24/2012
2. DIAGNOSTICS……………..Press key 2 to bring up a screen.
Pressing the 2 key will bring up a screen listing the errors along with the time and date they occurred.
Type of Error Time Date
Use Exact Change 00:00 00:00
Surevend Blocked – Non - 00:00 00:00
Coin Tube 1 Empty 00:00 00:00
Coin Tube 2 Empty 00:00 00:00
Coin Tube 0 Empty 00:00 00:00
If necessary, use top and bottom of O.K. button to scroll thru multiple screens. This screen will automatically come up when the service mode is entered if errors currently exist. You may use the delete key to proceed into the service screens. Space left blank for list of: errors / causes / solutions

MERCHANT MEDIA – PROGRAMMING MAP SOFTWARE VERSION 10.5.1
media_programming_10_5_1 Page 13 of 76 09/24/2012
blank for errors

MERCHANT MEDIA – PROGRAMMING MAP SOFTWARE VERSION 10.5.1
media_programming_10_5_1 Page 14 of 76 09/24/2012
blank for errors

MERCHANT MEDIA – PROGRAMMING MAP SOFTWARE VERSION 10.5.1
media_programming_10_5_1 Page 15 of 76 09/24/2012
3. TEST……………….........................Press key 3 to bring up a screen.
Pressing the 3 key will bring up a screen listing the functions within the group.
Press the numeric keys to choose a function. Choosing a function will bring up the first screen within each function.
1. Test Vend – Pressing key 1 will bring up a screen.
Insert coins to increase credit amount. Pressing key 1 toggles the setting to choose Enable or Disable. Pressing 2 opens a window allowing you to enter a selection using the numeric keys. Press the 3 key to run the selected motor.
2. Coin Return Motor – Press key 2 to activate the test.
Pressing key 2 will run one cycle on the coin return motor. 3. Surround Lighting Test – Press the 3 key to enter the function.
Pressing the 3 key brings up a screen listing one option. Press the 1 key to perform the test. This will cause the surround lights to flash and change color.
# Key Test Function
1 Test Vend
2 Coin Return Motor
3 Surround Lighting Test
4 Screen Test
5 Mag Teck Head Test
6 Surevend Calibration
7 Motor Test Summary
8 Detailed Motor Test
9 Lighting Relay
# Key Action Result
Credit $0.00
Credit Card
Token
1. Surevend Enable / Disable
2. Select Product 101
Price $10.00
3. Start Vend

MERCHANT MEDIA – PROGRAMMING MAP SOFTWARE VERSION 10.5.1
media_programming_10_5_1 Page 16 of 76 09/24/2012
4. Screen Test – Press key 4 to enter the function.
Pressing key 4 will bring up a screen with four colored bands which get progressively brighter. The colors from top to bottom are Red, Green, Blue and White. 5. Mag Teck Head Test – Press key 5 to enter the function.
Pressing the 5 key will bring up a screen and the top portion is asking you to swipe your card. It also displays a record of , Good / Bad Swipes. 0 / 0 The bottom portion of the screen gives you “ Last Swipe Information “ listed as, Track 1…. Track 2…. Track 3…. 6. Surevend Calibration – Press key 6 to enter the function.
Number 1 is the sensor closest to the trays Number 9 is the sensor closest to the glass. Values of 4, 5, 6 are all good. Values going into the teens indicate a partial blockage. A value of 0 indicates a complete blockage or a bad sensor. Values that are changing could indicate trouble.
Sensor Value Value
1 0 1
2 0 1
3 0 1
4 0 1
5 0 1
6 0 1
7 0 1
8 0 1
9 0 1

MERCHANT MEDIA – PROGRAMMING MAP SOFTWARE VERSION 10.5.1
media_programming_10_5_1 Page 17 of 76 09/24/2012
7. Motor Test Summary – Press key 7 to bring up a screen.
Pressing key 7 brings up a screen in two sections.
The top section is a list describing the current condition of all the motors in the machine.
The bottom section of the screen allows for homing the motors in two ways.
Press the numeric keys to choose a function. Choosing a function will cause that function to be performed.
1. Home All Motors – Pressing the 1 key will home all the motors in the machine, beginning at the top left selection. If all motors are already homed, they will run one cycle each. Press the 1 key to cancel the function. 2. Home A Tray – Pressing the 2 key will bring up a screen listing all the trays.
Choosing a tray by pressing a numeric key will cause the machine to home all the motors on that tray. If all the motors on the tray are already homed, they will run one cycle each. Press the delete key and exit the screen in order to cancel the function.
Motor Condition Number
Present 0
Homed 0
Configured 0
Configured and Present 0
Configured but not Present 0
Errors 0
# Key Function
1 Home all Motors
2 Home a Tray
# Key Tray #
1. 1
2. 2
3. 3
4. 4
5. 5
6. 6
7. 7

MERCHANT MEDIA – PROGRAMMING MAP SOFTWARE VERSION 10.5.1
media_programming_10_5_1 Page 18 of 76 09/24/2012
8. Detailed Motor Test – Press the 8 key to bring up a screen.
Pressing the 8 key will bring up a tray list.
Press a numeric key to select a tray and you will bring up a screen listing the product selections on that tray. A code on the right side of the line will indicate some conditions involving the selection on that line.
“H” Indicates that a motor is homed. “X” Indicates the motor is present, but not configured. “F” Indicates the motor is a F.I.F.O. member. “C” Indicates the motor is coupled. “ERR” Indicates that an error is present for the motor. “W” Indicates the motor is a Winner Member, a Token Member or a Combo Member. “T” Indicates the motor is a Time Of Day Member Some lists of product selections use more than one screen. Press the top and bottom sections of the O.K. button to scroll to the screen with the desired selection number. Press a numeric key to select an individual product selection and you will bring up a screen detailing that selection. The selection detail screen is divided into three sections.
Press the 1 key to home the selected motor. If the motor is homed, it will run one cycle.
Existing Errors – A notice of an error that is present Motor Status – A summary of the selected motor’s condition.
This is an example only.
# Key Tray #
1. 1
2. 2
3. 3
4. 4
5. 5
6. 6
7. 7
# Key Selection # Status
1. 101 H
2. 103 X
3. 105 F
4. 107 C
5. 109 ERR
6. 111 W
7. ### T
# Key Description
1. Press 1 to home motor ###
Present
Homed
Configured
F.I.F.O. Member (or other group member)
None (or the error that is present for the selected motor)

MERCHANT MEDIA – PROGRAMMING MAP SOFTWARE VERSION 10.5.1
media_programming_10_5_1 Page 19 of 76 09/24/2012
9. Lighting Tray – Press the 9 key to bring up a screen.
Pressing the 9 key will bring up a screen with only one option. 1. Pressing the 1 key will cause the machine to toggle the cabinet lights on and off.

MERCHANT MEDIA – PROGRAMMING MAP SOFTWARE VERSION 10.5.1
media_programming_10_5_1 Page 20 of 76 09/24/2012
4. PRICE ……………………… Press the 4 key to bring up a pricing screen.
Pricing of selections can be accomplished in three ways with the pricing screen open.
1. BY TRAY Press a numeric key, (1 to 7) to select a Tray and a window will open allowing you to enter a new price. Press the numeric keys to enter a new price for all selections on the selected tray. Press the center section of the O.K. button to accept the new pricing. 2. BY WHOLE MACHINE
Press the numeric key, (8) to select Whole Machine, and a window will open allowing you to enter a new price. Press the numeric keys to enter a new price for all the selections in the machine. Press the center section of the O.K. button to accept the new pricing. 3. BY INDIVIDUAL SELECTION
Press the numeric key, (9) to select Individual Prices and a tray list will come up.
Press a numeric key to select a tray and you will bring up a screen listing the product selections on that tray. Some lists of product selections use more than one screen. Use the top and bottom sections of the O.K. button to scroll to the screen with the desired selection number.
Pressing a numeric key to choose a selection will open up a window allowing you to enter a new price. Press the numeric keys to enter a new price for the chosen selection. Press the center section of the O.K. button to accept the new price.
#Key To Select
1. Tray 1
2. Tray 2
3. Tray 3
4. Tray 4
5. Tray 5
6. Tray 6
7. Tray 7
8. Whole Machine
9. Individual Prices
# Key Tray #
1. Tray 1
2. Tray 2
3. Tray 3
4. Tray 4
5. Tray 5
6. Tray 6
7. Tray 7
# Key Selection #
1. 101
2. 103
3. 105
4. 107
5. 109
6. 111
7. ###

MERCHANT MEDIA – PROGRAMMING MAP SOFTWARE VERSION 10.5.1
media_programming_10_5_1 Page 21 of 76 09/24/2012
5. PRODUCT CONFIGURATION …Press key 5 to bring up a screen.
Pressing the 5 key brings up a screen listing .
Pressing a numeric key will bring up the first screen in the function selected.
1. Selection Configuration – Press key 1 to bring up a screen.
Pressing the 1 key will bring up a screen with two options.
Use a numeric key to choose one of the options. Choosing one of the selections will bring up a screen.
1. Pressing the 1 key brings up a screen prompting you to press the 1 key again to start the function.
When the sequence is complete a screen will prompt you to View Results by pressing the 1 key.
Pressing the 1 key will bring up a tray list. Use the numeric keys to choose a tray. . Choosing a tray will bring up a screen listing all the selections for that tray. Selections that have a check mark on the right are the ones that are currently configured. You can manually include or remove selections from the list using the numeric keys for the selection number to check or un-check that selection. Use the top and bottom of the O.K. button to scroll thru selection lists that use more than one screen.
# Key Function
1. Selection Configuration
2. F.I.F.O. Setup
3. Universal Product Code
4. Shopping Cart Setup
5. View Plan-O-Gram
6. Couple Motors
7. Surevend
# Key Function
1. Perform auto-configuration
2. Setup Selections
# Key Function
1. Start Auto-Configuration

MERCHANT MEDIA – PROGRAMMING MAP SOFTWARE VERSION 10.5.1
media_programming_10_5_1 Page 22 of 76 09/24/2012
2. Pressing the 2 key will bring up a tray list allowing you to configure selections. Use the numeric keys to choose a tray and a screen will come up listing all possible selections for that tray. Use the numeric key by the selection number to check or un-check that selection. Use the top and bottom sections of the O.K. button to scroll thru selection lists that use more than one screen. 2. F.I.F.O. Setup – Press the 2 key to bring up a screen.
This screen has only one option at this point.
Press the 1 key bring up a screen and enter the Add Groups Menu
The numeric key 1 is used to save a group of selections that will operate in F.I.F.O. mode. Included selections will be listed on the right side of the Create Group window. To create a group, use the numeric keys to select a tray. Selecting a tray will bring up a screen that will allow you to choose selections that will be included in the group.
Pressing the 1 key will include all selections on the tray in the group. A check will appear for each selection. Pressing the 2 key will remove all selections on the tray from the group. All checks for selections will disappear. Pressing a numeric key for an individual selection will include or remove that selections from the group. Checks will appear and disappear for the chosen selection. Some lists use more than one screen, use the top and bottom of the O.K. button to scroll to the desired selection.
# Key Function
1. Add Groups Menu
# Key Title Action
1. Create Group Nothing Selected
2. Tray 1 >
3. Tray 2 >
4. Tray 3 >
5. Tray 4 >
6. Tray 5 >
7. Tray 6 >
8. Tray 7 >
# Key Selection #
1. Set All
2. Clear All
3. 101
4. 103
5. 105
6. 107
7. 109
8. 111
9. ###
MERCHANT MEDIA – PROGRAMMING MAP SOFTWARE VERSION 10.5.1
media_programming_10_5_1 Page 23 of 76 09/24/2012
Once a group has been created, the original screen will
be expanded to include more functions for managing
the F.I.F.O. operations.
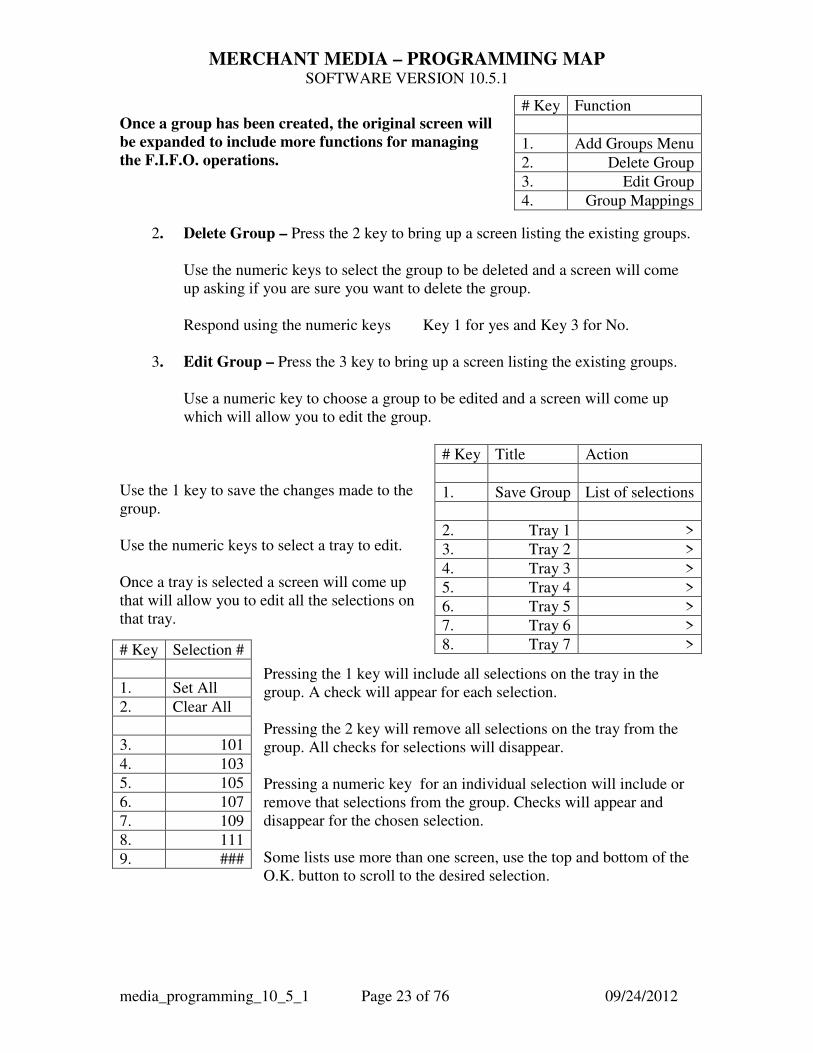
2. Delete Group – Press the 2 key to bring up a screen listing the existing groups. Use the numeric keys to select the group to be deleted and a screen will come up asking if you are sure you want to delete the group. Respond using the numeric keys Key 1 for yes and Key 3 for No. 3. Edit Group – Press the 3 key to bring up a screen listing the existing groups. Use a numeric key to choose a group to be edited and a screen will come up which will allow you to edit the group. Use the 1 key to save the changes made to the group. Use the numeric keys to select a tray to edit. Once a tray is selected a screen will come up that will allow you to edit all the selections on that tray.
Pressing the 1 key will include all selections on the tray in the group. A check will appear for each selection. Pressing the 2 key will remove all selections on the tray from the group. All checks for selections will disappear. Pressing a numeric key for an individual selection will include or remove that selections from the group. Checks will appear and disappear for the chosen selection. Some lists use more than one screen, use the top and bottom of the O.K. button to scroll to the desired selection.
# Key Function
1. Add Groups Menu
2. Delete Group
3. Edit Group
4. Group Mappings
# Key Title Action
1. Save Group List of selections
2. Tray 1 >
3. Tray 2 >
4. Tray 3 >
5. Tray 4 >
6. Tray 5 >
7. Tray 6 >
8. Tray 7 > # Key Selection #
1. Set All
2. Clear All
3. 101
4. 103
5. 105
6. 107
7. 109
8. 111
9. ###

MERCHANT MEDIA – PROGRAMMING MAP SOFTWARE VERSION 10.5.1
media_programming_10_5_1 Page 24 of 76 09/24/2012
Remember to return to the screen with “SAVE GROUP” assigned to the 1 key, using the delete button, and press the 1 key to save the changes you have made to the group. 4. F.I.F.O. Mappings – Press the 4 key to bring up a tray list. Use a numeric key to bring up a list of the selections on the selected tray. The selection list will tell you what group each selection is assigned to, or that it is unassigned. Some selection lists use more than one screen. Use the top and bottom of the O.K. button to scroll forward and backward thru the screens. 3. Universal Product Codes – Press the 3 key to bring up a list.
Pressing the 3 key will bring up a tray list. Press a numeric key to choose a tray. Choosing a tray will bring up a screen listing all the selections on that tray. The “Universal Product Code” will be listed on the same line as the selection. The code is the same as the selection number. Pressing the numeric key for a selection will open a window that will allow you to set another code number for that selection using the numeric keypad. You can use the “Information” button to change the group of characters entered by the keypad. You can use the “Shopping Cart” button to delete a character. Press the O.K. button to accept the changes to the code, or use the delete key to back out. Some selection lists use more than one screen. Use the top and bottom of the O.K. button to scroll forward and backward thru the screens.
# Key Tray #
1. Tray 1
2. Tray 2
3. Tray 3
4. Tray 4
5. Tray 5
6. Tray 6
7. Tray 7
# Key Tray #
1. Tray 1
2. Tray 2
3. Tray 3
4. Tray 4
5. Tray 5
6. Tray 6
7. Tray 7

MERCHANT MEDIA – PROGRAMMING MAP SOFTWARE VERSION 10.5.1
media_programming_10_5_1 Page 25 of 76 09/24/2012
4. Shopping Cart Setup – Press the 4 key to bring up a list.
Pressing the 4 key brings up a screen listing two options for setting up the shopping cart function. 1. Shopping Cart Size – Pressing the 1 key opens a window allowing you to set the maximum number of items to be placed in the shopping cart so they can be purchased in one transaction. Use the numeric keys to edit the number of items that may be placed in the cart. The maximum number of items that can be placed in the cart is eight. Use the O.K. button to accept the change. 2. Max Fund Amount – Pressing the 2 key opens a window allowing you to set the maximum value of items placed into the shopping cart. The recommended value should be calculated by multiplying the number of items allowed in the cart by the highest price set in the machine. Use the numeric keys to edit the value of the items. Use the O.K. button to accept the change. 5. View Plan-O-Gram – Press the 5 key to bring up a tray list.
Pressing the 5 key will bring up a tray list. Use the numeric keys to choose a tray. Choosing a tray will bring up a screen showing you the selections on the tray along with product codes and prices. Press the delete key to back out. Custom Plan-O-Grams can be downloaded into the machine from a memory stick.
# Key Tray #
1. Tray 1
2. Tray 2
3. Tray 3
4. Tray 4
5. Tray 5
6. Tray 6
7. Tray 7

MERCHANT MEDIA – PROGRAMMING MAP SOFTWARE VERSION 10.5.1
media_programming_10_5_1 Page 26 of 76 09/24/2012
6. Couple Motors – Press the 6 key to bring up a list
Pressing the 6 key will bring up a screen that is listing pairs of selections that can be paired. This list can use more than one screen. Use the top and bottom of the O.K. button to scroll thru the entire list. Use the numeric keys to check or un-check the motor pairs. Pairs that are checked are paired, unchecked pairs of motors are not operating together. 7. Surevend – Press the 6 key to bring up a screen
Pressing the 7 key will bring up a screen listing the four options you can set for Surevend operation. 1. Current state – Pressing the 1 key will allow you to toggle the current status Surevend function between ON and OFF. 2. Surevend Options – Pressing the 2 key will bring up a screen that allows you to select the way you want Surevend to function. There are two options. 1. Option Surevend – Use the 1 and 2 keys to move the check mark to the desired option. (With the option setting active, if Surevend stops working the machine will remain in service and the spiral will turn only once.) 2. Must Surevend – Use the 1 and 2 keys to move the check mark to the desired option. (With the Must setting active, if the Surevend stops working the machine will go out of service.) Once the desired option is checked, use center section of the O.K button to accept the option.

MERCHANT MEDIA – PROGRAMMING MAP SOFTWARE VERSION 10.5.1
media_programming_10_5_1 Page 27 of 76 09/24/2012
3. Anti Jackpot Timer – Pressing the 3 key will open a window that will allow you to change the Anti-default time. The default time setting is ten minutes. Use the numeric keys to enter a new Anti-Jackpot Time. Use the O.K. button to accept the new time. The Anti-Jackpot Timer is activated when a selection is made and the machine has turned the spiral three times without the Surevend function detecting that a product has been dropped. While the Anti Jackpot Timer is activated, the selection will not be available for purchase. After the time has expired, the selection will be available for purchase and the Surevend function will be in effect as before. 4. Anti-Jackpot Trigger – Pressing the 4 key will open a window that will allow you to change the number of additional attempts to deliver a product will be made if the first attempt fails. A failed attempt is determined by the Surevend function not detecting a product dropping into the delivery bin. The default setting is two. Use the numeric keys to enter a new number. Use the O.K. button to accept the new setting.
MERCHANT MEDIA – PROGRAMMING MAP SOFTWARE VERSION 10.5.1
media_programming_10_5_1 Page 28 of 76 09/24/2012
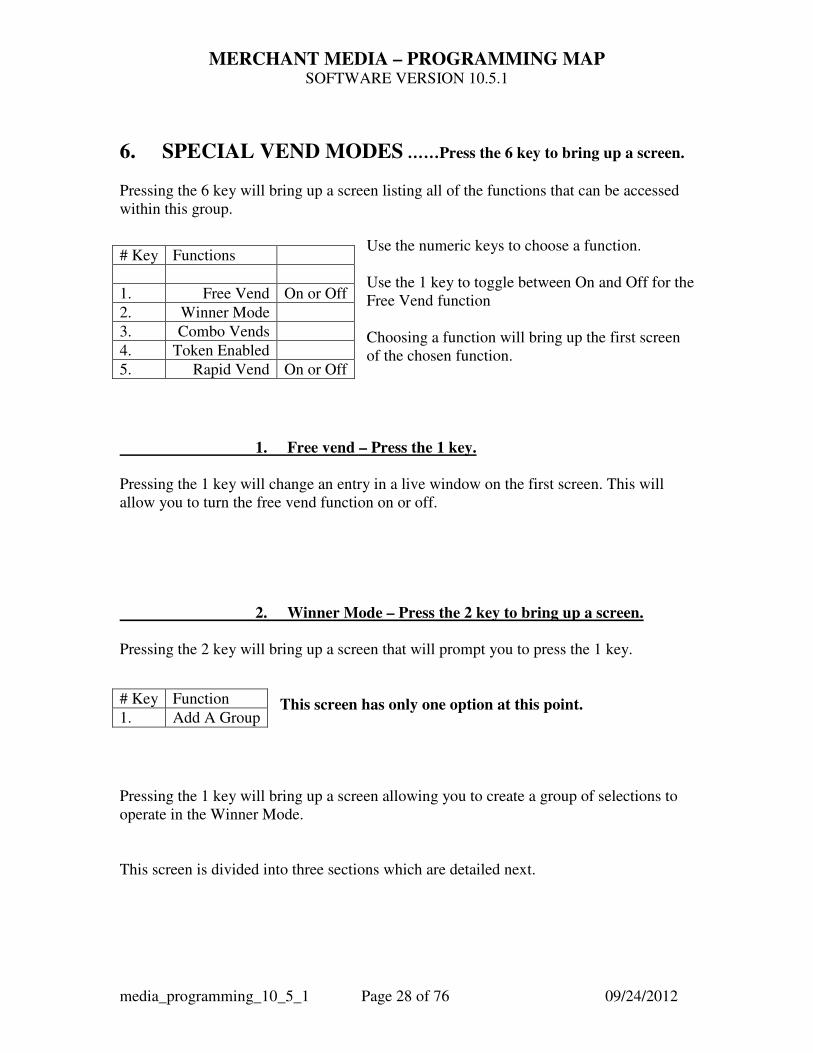
6. SPECIAL VEND MODES ……Press the 6 key to bring up a screen.
Pressing the 6 key will bring up a screen listing all of the functions that can be accessed within this group.
Use the numeric keys to choose a function. Use the 1 key to toggle between On and Off for the Free Vend function Choosing a function will bring up the first screen of the chosen function.
1. Free vend – Press the 1 key.
Pressing the 1 key will change an entry in a live window on the first screen. This will allow you to turn the free vend function on or off. 2. Winner Mode – Press the 2 key to bring up a screen.
Pressing the 2 key will bring up a screen that will prompt you to press the 1 key.
This screen has only one option at this point.
Pressing the 1 key will bring up a screen allowing you to create a group of selections to operate in the Winner Mode. This screen is divided into three sections which are detailed next.
# Key Functions
1. Free Vend On or Off
2. Winner Mode
3. Combo Vends
4. Token Enabled
5. Rapid Vend On or Off
# Key Function
1. Add A Group

MERCHANT MEDIA – PROGRAMMING MAP SOFTWARE VERSION 10.5.1
media_programming_10_5_1 Page 29 of 76 09/24/2012
Section 1.
Pressing the 1 key will add a new group to your list once you have created it. It is the Save button for
your choices.
Section 2.
Parameters Pressing the 2 key allows you to toggle the setting in a live window between Winner and Prize.
Pressing the 3 key allows you to determine how often a Winner vend happens, based on the number of times a product is purchased.
This window only appears if the Prize Setting
has been chosen with the 1 key.
Pressing the numeric key displayed will open a window allowing you to use the numeric keypad to enter the selection number for the product that will be given as a Prize in a winner vend. Section 3.
Use a numeric key to choose a tray. The key number will vary depending on your choice of Winner or Prize.
Choosing a tray will bring up a screen that will allow you to choose the selections you wish to have in your group. Use the 1 key to include all the selections on the tray in the group. Use the 2 key to remove all selections on the tray from the group.
Use the numeric keys to choose individual selections to be included or removed from the group. Some selection lists will use more than one screen. Use the top and bottom of the O.K. button to scroll to the desired selection. Use the delete button to leave one tray so that you can enter another. Selections can be chosen for a group from all trays. Once all your choices have been entered, You MUST return to section 1 of the screen
and use the 1 key to ADD A NEW WINNER GROUP. - This will save all your choices and create a group.
# Key Functions
1. Add New Winner Group
# Key Functions
2. Mode Winner or Prize
3. Frequency ###
#. Prize (Selection ###)
# Key Selection #
1. Set All
2. Clear All
3. 101
4. 103
5. 105
6. 107
7. 109
8. 111
9. ###
# Key Tray #
#. Tray 1
#. Tray 2
#. Tray 3
#. Tray 4
#. Tray 5
#. Tray 6
#. Tray 7

MERCHANT MEDIA – PROGRAMMING MAP SOFTWARE VERSION 10.5.1
media_programming_10_5_1 Page 30 of 76 09/24/2012
Once a group has been created, the original screen will be expanded to include more
functions for managing the Winner Mode function.
2. Delete Group – Press the 2 key to bring up a screen listing the existing groups. Use the numeric keys to select the group to be deleted and a screen will comeup asking if you are sure you want to delete the group. Respond using the numeric keys – The 1 key for YES and the 3 key for NO.
3. Edit Group – Press the 3 key to bring up a screen listing the existing groups. Use a numeric key to choose a group to be edited and a screen will come up which will allow you to edit the group. Use the 1 key to save the changes made to the group. It is the save button for your group.
Use the numeric keys to select a tray to edit. Once a tray is selected a screen will come up that will allow you to edit all the selections on that tray.
Pressing the 1 key will include all selections on the tray in the group. A check will appear for each selection. Pressing the 2 key will remove all selections on the tray from the group. All checks for selections will disappear. Pressing a numeric key for an individual selection will include or remove that selections from the group. Checks will appear and disappear for the chosen selection. Some lists use more than one screen, use the top and bottom of the
O.K. button to scroll to the desired selection. When you have finished Editing, you MUST return to the screen with “SAVE
GROUP” assigned to the 1 key and press the 1 key to save the changes you have
made to the group.
# Key Function
1. Add Group
2. Delete Group
3. Edit Group
4. Winner Selections
# Key Title Action
1. Save Group List of selections
2. Tray 1 >
3. Tray 2 >
4. Tray 3 >
5. Tray 4 >
6. Tray 5 >
7. Tray 6 >
8. Tray 7 >
# Key Selection #
1. Set All
2. Clear All
3. 101
4. 103
5. 105
6. 107
7. 109
8. 111
9. 113
MERCHANT MEDIA – PROGRAMMING MAP SOFTWARE VERSION 10.5.1
media_programming_10_5_1 Page 31 of 76 09/24/2012
4. Winner Selections – Press the 4 key to bring up a screen. Pressing the 4 key will bring up a screen listing all the trays.
Use a numeric key to choose a tray. Choosing a tray will bring up a list of the selections on that tray. The selection list will tell you what group each selection is assigned to, or that it is unassigned.
Some selection lists use more than one screen. Use the top and bottom of the O.K. button to scroll forward and backward thru the screens. 3. Combo Vends – Press the 3 key to bring up a screen.
Pressing the 3 key will bring up a screen listing two options.
Pressing the 1 key will toggle the setting in a live window between Value and Percent.
Pressing the 2 key will bring up a screen allowing you to create a new combo group.
Use the 1 key to save the changes made to the Combo. It is the save button for
your Combo.
Use the 8 key to create a custom message for the Combo. This option appears only when the Enable Custom Message option is set to Yes.
# Key Tray #
1. Tray 1
2. Tray 2
3. Tray 3
4. Tray 4
5. Tray 5
6. Tray 6
7. Tray 7
# Key Selection # Group #
1. 101 Group # 1
2. 102 Group # 1
3. 103 Group # 1
4. 104 Group # 2
5. 105 Group # 3
6. 106 Group # 4
7. 107 Not Assigned
# Key Function
1. Type Of Discount ( Value or Percent)
2. Add New Combo
# Key Function
1. Add New Combo
2. Number Of Groups In (2 or 3)
3. Discount Percentage
4. Discount All (Yes 0r No)
5. Edit Group 1 (0 Selected)
6. Edit Group 2 (0 Selected)
#. Enable Custom Message (Yes or No)
#. Message (appears only when enabled)

MERCHANT MEDIA – PROGRAMMING MAP SOFTWARE VERSION 10.5.1
media_programming_10_5_1 Page 32 of 76 09/24/2012
1. Pressing the 1 key will add the Combo once you have created it. If you do not use this key to SAVE YOUR WORK after you are done with all the other keys, your work will be lost. 2. Pressing the 2 key will toggle the active setting in the window between 2 and 3. If 3 is selected, an additional line will appear in your screen. It will have the title of “Edit Group 3” and show the number selected as do the other two groups. The numeric key below will also shift to reflect the additional line 3. Pressing the 3 key will open a window that will allow you to enter a percentage using the numeric keys. Press the O.K. button to accept the new number. 4. Pressing the 4 key will toggle the active setting in the window between Yes and No. 5. Pressing the numeric key to Edit a group will bring up a screen that will allow you to include or remove selections from the group. 6. Pressing the numeric key for “Enable Custom Message” will toggle the setting in the live window between Yes and No. When Yes is selected, an additional line will appear at the bottom of the screen titled “Message” 7. Pressing the numeric key for “Message” will bring up a screen allowing you to enter a custom message using the numeric keypad. 4. Token Enabled – Press the 4 key to bring up a screen.
Pressing the 4 key will bring up a tray list.
Use a numeric key to choose a tray. Choosing a tray will bring up a screen that will allow you to include or remove selections that will work with tokens and coupons. Tokens must also be enabled in the Money Menu under Bill Acceptance in order to work.
Your coin mechanism and/or bill validator must be tuned and/or configured to accept the token or coupon you are using.
# Key Tray #
1. Tray 1
2. Tray 2
3. Tray 3
4. Tray 4
5. Tray 5
6. Tray 6
7. Tray 7
# Key Selection #
1. Set All
2. Clear All
3. 101
4. 103
5. 105
6. 107
7. 109
8. 111
9. ###
MERCHANT MEDIA – PROGRAMMING MAP SOFTWARE VERSION 10.5.1
media_programming_10_5_1 Page 33 of 76 09/24/2012
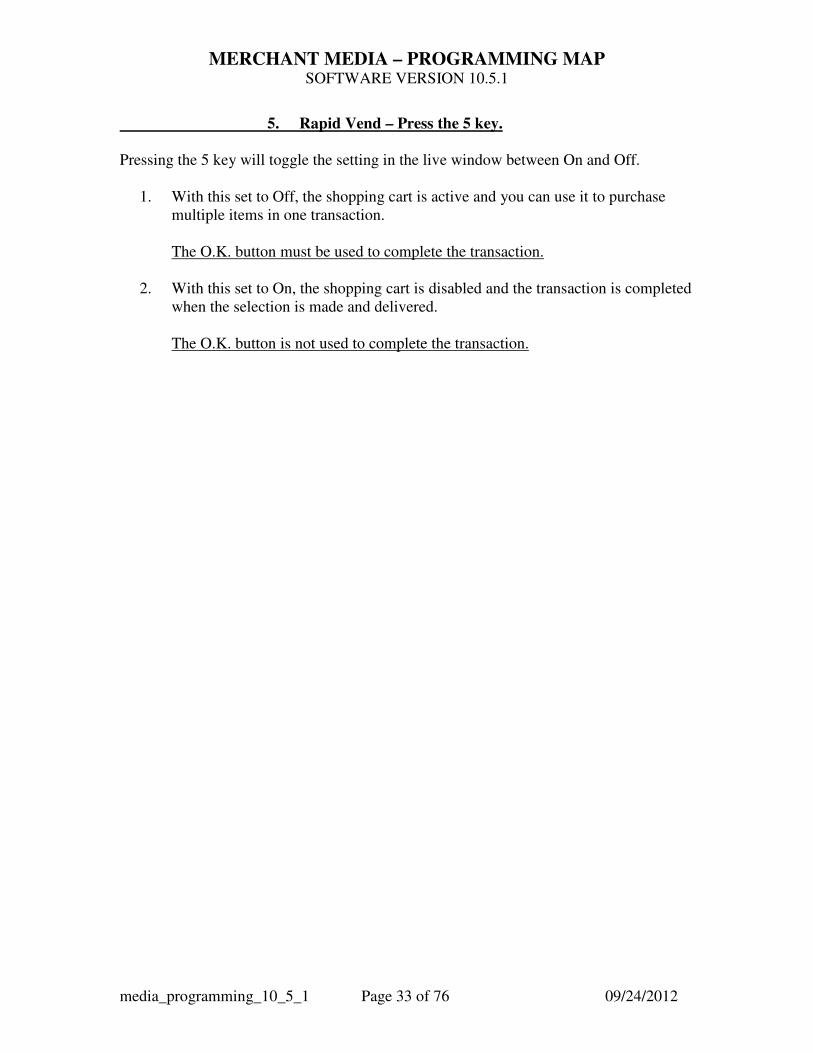
5. Rapid Vend – Press the 5 key.
Pressing the 5 key will toggle the setting in the live window between On and Off. 1. With this set to Off, the shopping cart is active and you can use it to purchase multiple items in one transaction. The O.K. button must be used to complete the transaction. 2. With this set to On, the shopping cart is disabled and the transaction is completed when the selection is made and delivered. The O.K. button is not used to complete the transaction.

MERCHANT MEDIA – PROGRAMMING MAP SOFTWARE VERSION 10.5.1
media_programming_10_5_1 Page 34 of 76 09/24/2012
7. MONETARY…………………….… Press the 7 key to bring up a screen.
Pressing the 7 key will bring up a screen listing all of the functions that can be accessed within this group.
Use the numeric keys to choose a function. Choosing a function will bring up the first screen for that function or toggle choices.
Bill Validator MDB Level 1 MDB Levels are listed outside the table.
Coin Mechanism MDB Level 3 Use the top and bottom sections of the O.K. button to scroll to the second screen. The last entry on the first screen is repeated on the second screen. Current settings are listed on the right side of the line.
1. Coins In And Out – Press the 1 key to bring up a screen.
Pressing the 1 key will bring up a screen divided into two sections. 1. The top section is a table listing the type of coin, the number of coins, and the value of the coins.
2. The bottom section of the screen allows you to pay out selected coins using the numeric keys. The bottom section uses a second screen. Use the top and bottom of the O.K. button to scroll thru the screens. The last entry on the first screen is repeated on the first line of the second screen.
# Key Function
1. Coins In And Out
2. Bill Validator
3. Coin Mechanism
4. Card Reader
5. Bill Acceptance
6. Declining Balance
7. Change Without Purchase
Second Screen
1. Change W/O Purchase (repeated)
2. Accept on Low Change
3. Credit For Failed Vend
4. Card Revalue
Coin Count Value
$ 0.05 0 $ 0.00
$ 0.10 0 $ 0.00
$ 0.25 0 $ 0.00
$ 1.00 0 $ 0.00
# Key Coin Type
1. $ 0.05
2. $ 0.10
3. $ 0.25
4. $ 1.00
Second Screen
1. $ 1.00
2. Set Up Channels

MERCHANT MEDIA – PROGRAMMING MAP SOFTWARE VERSION 10.5.1
media_programming_10_5_1 Page 35 of 76 09/24/2012
Pressing the 2 key from the second screen brings up another screen with only one option.
Pressing the 1 key will allow you to toggle the setting in the live window between On and Off.
The ON setting – Enables the Auto-detection feature for the machine. The OFF setting – brings up a screen allowing you to use the numeric keys to check and un-check the channels.
Use the 1 key to toggle the Auto-Detection feature between On and Off. Use the numeric keys to check and un-check the channels. The checked channels are active. The list uses more than one screen. Use the top and bottom of the O.K. button to scroll thru the list.
2. Bill Validator – Press the 2 key.
Pressing the 2 key will allow you to toggle the setting in the live window between MDB and No Bill Validator. The current setting is displayed at the right. 3. Coin Mechanism – Press the 3 key to bring up a screen.
Pressing the 3 key will bring up a screen allowing you to choose the type of coin mechanism being used.
Use the numeric keys to select the type of coin mechanism in the machine. The checked option is active. Use the center section of the O.K. button to accept any changes.
# Key Function
1. Auto-Detection
# Key Channel #
1. Auto-Detection (On or Off)
2. Channel 1
3. Channel 2
4. Channel 3
5. Channel 4
6. Channel 5
7. Channel 6
8. Channel 7
9. Channel 8
# Key Device Type
1. No Mech
2. MDB Mech
3. Exec Mech

MERCHANT MEDIA – PROGRAMMING MAP SOFTWARE VERSION 10.5.1
media_programming_10_5_1 Page 36 of 76 09/24/2012
4. Card Reader – Press the 4 key to bring up a screen.
Pressing the 4 key will bring up a screen allowing you to choose the card reader type being used.
Use the numeric keys to select the type of card reader being used in the machine. The checked option is active. Use the center section of the O.K. button to accept any changes.
5. Bill Acceptance – Press the 5 key to bring up a screen.
Pressing the 5 key will bring up a screen that allows you to select the types of bills to be accepted by the machine.
Use the numeric keys to check and un-check the type of bills that will be accepted by the machine. The checked bills will be accepted. The token line here must be checked for the token enabled feature in the Special Vend Modes to work.
6. Declining Balance – Press the 6 key.
Pressing the 6 key will change the setting in the live window between Yes and No. 1. When the YES setting is selected, a declining balance will be allowed. This means that when money is inserted and a purchase is made, the change will be held for a period of time so that a second purchase can be made without re-inserting the money. 2. When the NO setting is selected, a declining balance will not be allowed. The change will be returned without delay at the end of a successful purchase.
# Key Device Type
1. No Card Reader
2. MDB Card Reader
3. On Board Card Reader
# Key Type Of Bills
1. $ 1.00
2. $ 2.00
3. $ 5.00
4. $ 10.00
5. $ 20.00
6. Token

MERCHANT MEDIA – PROGRAMMING MAP SOFTWARE VERSION 10.5.1
media_programming_10_5_1 Page 37 of 76 09/24/2012
7. or 1. Change Without Purchase – Press the 7 or 1 key.
Pressing the 7 key, (or the 1 key from the second screen in the function list), will open a window that allows you to enter an amount using the numeric keys. 1. This amount is the maximum amount of change that will be returned by the machine without a purchase being made. A. If the amount set is $0.00 , a Forced Vend feature will be in effect, and no change will be returned without a purchase. B. The default setting is $ 0.25 , and allows the machine to return up to that amount, so if a credit is established which is higher than $ 0.25 , the customer would have to make a purchase. C. When a bill is accepted that is under the highest price in the machine it will be stacked allowing another bill to be accepted. Change will be returned only if the amount is set higher than the value of the bill. D. When a bill is accepted that is above the highest price in the machine it will be held in escrow but will be returned only if the amount is set higher than the value of the bill. Once the amount has been entered, use the center section of the O.K. button to accept the new amount. 2. Accept On Low Change – Press the 2 key.
Pressing the 2 key, from the second screen of the function list, will open a window allowing you to enter an amount using the numeric keys. 1. This amount is the maximum amount of money that will be accepted by the machine when the coin mechanism is low on coins and may not be able to make change for a purchase. 2. The default setting is $0.00 and setting an amount higher than that could cause the customer to be shortchanged. 3. Bill acceptance will not be allowed if there is less change than the value of the bill available to be returned. Once the amount has been entered, use the center section of the O.K. button to accept the new amount.

MERCHANT MEDIA – PROGRAMMING MAP SOFTWARE VERSION 10.5.1
media_programming_10_5_1 Page 38 of 76 09/24/2012
3. Low Change Message – Press the 3 key.
Pressing the 3 key, from the second screen of the function list, will open a window allowing you to enter an amount using the numeric keys. 1. This amount is the amount of change, that when reached, will cause a low change message to be displayed on the screen. Once the amount has been entered, use the center section of the O.K. button to accept the new amount. 4. Credit For Failed Vend – Press the 4 key.
Pressing the 4 key, from the second screen of the function list, will bring up a screen that allows you to set an option in the case of a failed vend.
Use the numeric keys to choose the action that will happen in the case of a failed vend. Return the credit to the customer. Hold the credit to allow another vend attempt.
5. Card Revalue – Press the 5 key.
Pressing the 5 key, from the second screen of the function screen, will toggle the setting in a live window between On and Off. 1. With the setting in the ON position, a card can be re-valued. 2. With the setting in the OFF position, a card cannot be re-valued.
# Key Action To Be Taken
1. Return Change
2. Hold Credit

MERCHANT MEDIA – PROGRAMMING MAP SOFTWARE VERSION 10.5.1
media_programming_10_5_1 Page 39 of 76 09/24/2012
8. SYSTEM SETTINGS………….Press the 8 key to bring up a screen.
Pressing the 8 key will bring up a screen that will allow you access to the functions in this group.
Use the numeric keys to choose a function. Choosing a function will bring up the first screen for that function or toggle choices. Use the top and bottom sections of the O.K. button to scroll to the second screen. The last entry on the first screen is repeated on the second screen. Current settings are listed on the right side of the line.
1. Machine Information – Press the 1 key to bring up a screen.
Pressing the 1 key will bring up a screen with the titles of two numbers.
Use a numeric key to choose a number to be entered. Choosing a number will open a window allowing you to enter the desired number using the numeric keypad.
Once the number has been entered, use the center section of the O.K. button to accept the entry.
# Keys Functions
1. Machine Information
2. Time And Date
3. Language
4. D.T.S. (data transfer system)
5. Software Updates
6. Back-up / Restore
7. Copy Configuration
8. Custom Configurations
9. Screen Brightness
Second Screen
1. Screen Brightness (repeated)
2. L.E.D. Color
3. Idle Time Out
4. Advertisements
5. Custom Messages
6. Configuration Version
# Key Number
1. Machine I.D. Number
2. Location I.D. Number

MERCHANT MEDIA – PROGRAMMING MAP SOFTWARE VERSION 10.5.1
media_programming_10_5_1 Page 40 of 76 09/24/2012
2. Time and Date – Press the 2 key to bring up a screen.
Pressing the 2 key will bring up a screen allowing you access to the various settings in the function.
Use the numeric keys to Choose a setting to be changed. Choosing a setting will bring up a screen allowing the setting to be altered. If the time or date is changed, the machine will re-boot on the next door closure.
1. Pressing the 1 key will bring up a screen listing the time zones by location.
The list has multiple screens, use the top and bottom section of the O.K. button to scroll thru the screens. Use the numeric keys to choose the Time Zone to be set. Use the center of the O.K. button to accept the chosen selection.
2. Pressing the 2 key will bring up a screen allowing you to select the format for displaying the time.
Use the numeric keys to Choose a format. The selected format will be checked. Use the center section of the O.K. button to accept the chosen Format.
# Keys Settings
1. Time Zones
2. Time Format
3. Hours And Minutes
4. Month / Day / Year
# Key Location
1. Alaska
2. Aleutian
3. Arizona
4. Central
5. Dublin
6. East Indiana
Second Screen
1. Eastern
2. Hawaii
3. Indiana – Starke
4. London
5. Michigan
6. Mountain
Third Screen
1. Pacific
2. Pacific – New
3. Samoa
# Key Format
1. Use 24 Hour (military)
2. Use AM / PM

MERCHANT MEDIA – PROGRAMMING MAP SOFTWARE VERSION 10.5.1
media_programming_10_5_1 Page 41 of 76 09/24/2012
3. Hours And Minutes – Pressing the 3 key will open a window allowing you to enter the hours and minutes using the numeric keys. A. If the AM /PM setting has been chosen, the Info button is used to switch between the AM and PM setting. Once the time has been set, use the center section of the O.K. button to accept the changes. 4. Date – Pressing the 4 key will open a window allowing you to enter the month, Day, and year using the numeric keys. Once the time has been set, use the center section of the O.K. button to accept the changes. 3. Language – Press the 3 key to bring up a screen.
Pressing the 3 key will bring up a screen with language options.
Use the numeric keys to choose a function. Choosing a function will bring up the first screen for that function or toggle choices.
1. Pressing the 1 key brings up a screen that says – Error in directory structure. Nothing to install. 2. Pressing the 2 key brings up a screen listing the languages.
Use the numeric keys to choose a language to be removed.
3. Pressing the 3 key brings up a screen listing the choices for applying languages to the service applications.
Use the numeric keys to choose an option. The chosen option will be checked. Use the center of the O.K. button to accept the option.
# Key Functions
1. Install Language
2. Remove Languages
3. Service Application
4. User Interface
# Key Languages
1. English
2. Nederlands
3. English
# Key Languages
1. English
2. Nederlands
3. English

MERCHANT MEDIA – PROGRAMMING MAP SOFTWARE VERSION 10.5.1
media_programming_10_5_1 Page 42 of 76 09/24/2012
4. Pressing the 4 key will bring up a screen listing two options.
Use the numeric keys to choose a function. Choosing a function will bring up the first screen for that function.
1. Pressing the 1 key will bring up a screen allowing you to select the language that is to be enabled in user interface applications. 2. Pressing the 2 key will bring up a screen allowing you to select the default language using the numeric keys. The selected language will be checked. Once the option is selected, use the center of the O.K. button to accept the changes. 4. D.T.S. (data transfer system) – Press the 4 key.
Pressing the 4 key will bring up a screen listing the functions in this group.
Use the numeric keys to choose a function. Choosing a function will bring up the first screen for that function, or toggle settings.
1. Pressing the 1 key will bring up a screen allowing you to choose the way the data Is transferred.
Use the numeric keys to choose a function. The selected option will be checked. Once the option is selected, use the center of the O.K. button to accept the changes.
In the U.S. the setting will most always be to DEX.
# Key Function
1. Enable Languages
2. Default Language
# Keys Functions
1. D.T.S. Standby Mode
2. D.T.S. Audit List
3. CA304 / CA308 Data Type
4. Data Reset On Transfer
5. Event Reset On Transfer
6. Passcode Reset
# Key Function
1. DDCMP
2. DEX

MERCHANT MEDIA – PROGRAMMING MAP SOFTWARE VERSION 10.5.1
media_programming_10_5_1 Page 43 of 76 09/24/2012
2. Pressing the 2 key will bring up a screen divided into two sections
Use the numeric keys to select an action. Selecting an action will cause all the items in the audit list to change status to active or in-active depending on the numeric key used.
D.T.S. Audit List
Use the numeric keys to change the status of individual lines. Checked lines are active This gives you the ability to shorten the DEX file. Do not remove items without checking with your DEX provider or manufacturer representative.
The list uses more than one screen. Use the top and bottom sections of the O.K. button to scroll thru the entire list. 3. Pressing the 3 key will bring up a screen allowing you to choose the way the data in these files will be displayed
Use the numeric keys to select an option. The Currency setting will display bills as a monetary value. The Numeric setting will display bills as the number of bills.
Once the option is selected, use the center of the O.K. button to accept the changes. 4. Pressing the 4 key will toggle the setting in a live window between RESET and NO. A. If the RESET setting is active, all the resettable data will be reset to zero upon successful completion of a transfer. B. If the NO setting is active, the resettable data will not be reset.
# Keys Action
1. Set All
2. Clear All
# Key Line Item
3. ID 1
4. ID 2
5. ID 3
6. ID 4
7. ID 5
8. VA 1
# Keys Displayed As
1. Currency
2. Numeric

MERCHANT MEDIA – PROGRAMMING MAP SOFTWARE VERSION 10.5.1
media_programming_10_5_1 Page 44 of 76 09/24/2012
5. Pressing the 5 key will toggle the setting in a live window between RESET and NO. A. If the RESET setting is active, all the event data will be reset upon successful completion of a transfer. B. If the NO setting is active, the event data will not be reset. 6. Pressing the 6 key will bring up a screen asking if you are sure you want to reset the passcode. Respond using the numeric keys. A. Use the 1 key to choose to reset. (nothing came up) B. Use the 3 key to choose not to reset. 5. Software Updates – Press the 5 key to bring up a screen.
Pressing the 5 key will bring up a screen with only one option.
Pressing the 1 key will choose the option. Choosing the option will bring up a screen prompting further action.
1. – If you have no memory stick installed in USB port 3 – A screen will come up stating that the flash stick was not found, Re-Plug the Stick and Re-Boot the Machine. 2. – If a memory stick is installed in USB port 3 – A screen will come up listing the files available on that stick that can be used for an Up-Grade.
Use a numeric key to choose the file to be used for the Up-Date. Use a numeric key to Start To Up-Date. This may take several minutes. When done, shut down the machine and re-start.
It is recommended that a backup copy always be made before Up-Dating software.
# Keys Action
1. Start To Update
# Keys Item / Action
1. 6wide_2619 (BIN)
2. custom_filename (BIN)
3. Start To Update

MERCHANT MEDIA – PROGRAMMING MAP SOFTWARE VERSION 10.5.1
media_programming_10_5_1 Page 45 of 76 09/24/2012
6. Back Up / Restore – Press the 6 key to bring up a screen.
Pressing the 6 key will bring up a screen listing the available options for this function. This function is used to create, save and re-store configuration settings within a machine.
Use the numeric keys to choose an option. Choosing an option will bring up a screen asking if you are sure you want to complete the action. Press the 1 key for YES, or the 3 key for NO.
1. Use the 1 key to make a new backup. They are listed by number. The new back-up will be a copy of the currently set prices, product codes, motor pairings and any other options you have set up in the currently loaded firmware. 2. Use a numeric key to choose the stored backup copy you wish to restore to. 3. Use a numeric key to restore the factory backup When the 1 key has been pressed to choose YES, the restore will begin. After it has been restored the lights will come back on and you are ready to test the machine to be sure it is set the way you want it. You do not have to re-boot the machine. When the 3 key has been pressed to choose NO, nothing will be changed or re-stored. 7. Copy Configuration – Press the 7 key to bring up a screen.
Pressing the 7 key will bring up a screen listing the available options for this function. This function is used to load a memory stick that can be used to copy the current configuration settings from a machine to other machines, making them all identical. If there is no USB flash drive plugged into USB port 1 on the control board, a screen will come up saying, no stick was detected, insert stick and re-boot the machine. Before attempting to copy a configuration you must create a folder named ATLAS on a USB flash drive using a computer. The USB flash drive will then need to be inserted into USB port 1 on the control board.
# Keys Options
1. Make New Backup
2. Backup #1
3. Restore Factory Backup

MERCHANT MEDIA – PROGRAMMING MAP SOFTWARE VERSION 10.5.1
media_programming_10_5_1 Page 46 of 76 09/24/2012
After preparing the flash stick and inserting it into USB port 1, pressing the 7 key will bring up a screen that has only one option at this point.
Pressing the 1 key will bring up a screen that allows you to load the memory stick. there are two options.
Pressing the 1 key will open a window that will allow you to give the clone a name using the numeric keys. The stick can contain more than one clone. Pressing the 2 key will save the clone to the memory stick using
the name you have given it.
Once the clone has been saved to the stick, the first screen will be expanded to include all the clones that are saved to the stick. Pressing a numeric key to choose a clone will bring up a screen with two options.
Pressing the 1 key will bring up a screen asking if you are sure you want to install the clone.
Pressing the 2 key will bring up a screen asking if you are sure you want to remove the clone from the stick. In both cases, respond by pressing a numeric key. A. Press the 1 key for YES – and the action will be carried out. B. Press the 3 key for NO – and the action will not be carried out. The screen will return to the previous choices. 8. Custom Configurations – Press 8 to bring up a screen.
Pressing the 8 key will bring up a screen that says “ Internal error. Folder not found.” More data is needed here!!!!
# key Function
1. Create Configuration Clone
# key Function
1. Name Clone
2. Make Clone
# key Function
1. Create Configuration Clone
2. Your name from 100003557
3. Another clone
# key Function
1. Install
2. Remove Clone From Stick

MERCHANT MEDIA – PROGRAMMING MAP SOFTWARE VERSION 10.5.1
media_programming_10_5_1 Page 47 of 76 09/24/2012
9. Screen Brightness – Press the 9 key to bring up a screen.
Pressing the 9 key will bring up a screen that has two options.
Pressing the 1 key will open a window that allows you to enter a new setting for the screen brightness. 79 is the default value. Use the numeric keys to enter a new value.
Pressing the 2 key will save the new value and return you to the Systems Settings Menu. This is the last function listed on the first menu screen, it is repeated as the first
listing on the second menu screen. Use the top and bottom sections of the O.K.
button to scroll thru the menu screens
2. L.E.D. Color – Press the 2 key from the second screen.
Pressing the 2 key, from the second menu screen, will bring up a screen listing the available options for setting the L.E.D. color.
Press the numeric key to check the desired color. The checked color will be the color used. Press the center section of the O.K. button to lock in your choice and the color of the L.E.D. ‘s will change and you will be returned to the menu.
3. Idle Time Out – Press the 3 key from the second screen.
Pressing the 3 key, from the second menu screen, will open a window allowing you to enter a new time using the numeric keys. Use the center of the O.K. button to lock in the new time. 30 seconds is the default time.
# key Function
1. Screen Brightness ( 79 )
2. Save screen brightness
# key Color
1. Blue
2. White
3. Red

MERCHANT MEDIA – PROGRAMMING MAP SOFTWARE VERSION 10.5.1
media_programming_10_5_1 Page 48 of 76 09/24/2012
4. Advertisements – Press the 4 key from the second screen.
Pressing the 4 key will bring up a screen listing five options.
Use the numeric keys to check or un-check the options. The checked options are active. The default setting is for all five to be checked.
More data is needed here!!!! 5. Custom Messages – Press the 5 key from the second screen.
Pressing the 5 key will bring up a screen listing the options for messages.
Press the numeric keys (1 or 3) to check or un-check the option to use the message. Press the numeric keys (2 or 4) to open a window allowing you to create your own message using the numeric keys. The (2 or 4) options only appear when the options to use the messages (1or 3) are checked.
# key Options
1. Selection
2. Generic
3. Combo Vend
4. Monetary Money
5. Monetary Cards
# key Function
1. Use Vending Screen Message
2. Vending Screen Message ( Message not Set)
3. Use Idle Screen Message
4. Idle Screen Message ( Message not Set)

MERCHANT MEDIA – PROGRAMMING MAP SOFTWARE VERSION 10.5.1
media_programming_10_5_1 Page 49 of 76 09/24/2012
6. Configuration Version – Press the 6 key. (second screen)
Pressing the 6 key, from the second menu screen, will bring up a screen listing the types of machine the vendor may function as. (Refrigeration settings)
Use the numeric keys to check only one of the options at a time. The checked option will be active. Press the center of the O.K. button to lock in the setting to be used.
1. Ambient Merchant – Is used when no refrigeration system is in operation. 2. Refrigerated – Is used when perishable food is being vended. The temperature range is 33 to 38 degrees Fahrenheit or (1 to 3 degrees Celsius). The health control features will be active. 3. European Control – Is used in Europe. Need more data here!!! 4. Non-Perishable – Is used when Non-Perishable items are being vended. The temperature range is 33 to45 degrees Fahrenheit or (1 to 7 degrees Celsius). The health control features will not be active. 5. Chilled Merchant – Is used when the items being vended need to be protected from melting in higher temperature environments. The temperature range is 49 to 69 degrees Fahrenheit or (9 to 21 degrees Celsius) Health control features will not be active. 7. Refrigeration settings – Press the 7 key. (second screen)
This heading only appears when a refrigeration system is in use. It will not be available when the ambient setting is active. Pressing the 7 key, from the second menu screen, will bring up options for controlling the temperature settings and health control settings, (when active). When the health control features are not in use the control options will not appear.
# key Function as
1. Ambient Merchant
2. Refrigerated
3. European Control
4. Non-Perishable
5. Chilled Merchant

MERCHANT MEDIA – PROGRAMMING MAP SOFTWARE VERSION 10.5.1
media_programming_10_5_1 Page 50 of 76 09/24/2012
When in a Refrigerated setting, pressing the 7 key will bring up a screen listing up to four options.
Press a numeric key to choose the desired option. Choosing the desired option will either bring up a screen or open a window to proceed.
1. Pressing the 1 key will open up a window allowing you to set a new temperature using the numeric keys. (within the allowable range) Use the center of the O.K. button to lock in the new setting. 2. Pressing the 2 key will bring up a screen with two options allowing you to choose the scale used for displaying the temperature. (Fahrenheit or Celsius)
Press the numeric keys to check the desired scale. Use the center section of the O.K. button to lock in your choice.
3. Pressing the 3 key will bring up a tray list. (This option only appears when the health control features are in use).
Use the numeric keys to choose a tray. Choosing a tray will bring up a screen allowing you to check the the selections, on that tray, that will be governed by the health control features. You do not need to save the checked selections before moving to another tray or out of the option completely.
# key Option
1. Adjust Temperature
2. Temperature Units
3. Health Control Menu
4. Diagnostics Enable
# key Scale
1. Celsius
2. Fahrenheit
# Key Tray #
1. Tray 1
2. Tray 2
3. Tray 3
4. Tray 4
5. Tray 5
6. Tray 6
7. Tray 7
# Key Selection #
1. Set All
2. Clear All
3. 101
4. 103
5. 105
6. 107
7. 109
8. 111
9. ###

MERCHANT MEDIA – PROGRAMMING MAP SOFTWARE VERSION 10.5.1
media_programming_10_5_1 Page 51 of 76 09/24/2012
4. Pressing the 4 key will bring up a screen listing the diagnostics options.
Use the numeric keys to toggle the settings in a live window between ON and OFF for each option. The default settings for these options have them set to the ON setting.
Need a fact check here!!!!! Current errors will be listed in the diagnostics screen that comes up at the beginning of the service mode. I/O version would also need to be correct for the machine to function with these modes activated. When tested here, the whole machine shut down when set to refrigerated with only the top tray enabled under health control and the out of order message listed “Ambient I/O Version” in small print. No refrigeration errors came up on the diagnostics screen.
# key Options
1. High Side Warnings
2. Low Side Warnings
3. High Side Errors
4. Low Side Errors

MERCHANT MEDIA – PROGRAMMING MAP SOFTWARE VERSION 10.5.1
media_programming_10_5_1 Page 52 of 76 09/24/2012
9. SECURITY CODES……………..Press the 9 key to bring up a screen.
Pressing the 9 key will bring up a screen listing the following options.
Use the numeric keys to choose an action. Choosing an action will bring up a screen or open a window that will allow you to complete the action.
1. Pressing the 1 key will bring up a screen asking you to enter the P.I.N. The default number is 3,3,3,3. This is the operator Personal Identification Number. Entering this number will bring up the service mode menu. 2. Pressing the 2 key will open a window that will allow you to change the driver P.I.N. The default number is 1,1,1,1. Use the numeric keys to enter a new number. Use the center section of the O.K. button to lock in the new number. 3. Pressing the 3 key will open a window that will allow you to change the operator P.I.N. Use the numeric keys to enter a new number. Use the center section of the O.K. button to lock in the new number.
# key Action
1. Enter P.I.N.
2. Change driver P.I.N.
3. Change Operator P.I.N.

MERCHANT MEDIA – PROGRAMMING MAP SOFTWARE VERSION 10.5.1
media_programming_10_5_1 Page 53 of 76 09/24/2012
Entering the driver P.I.N. of 1,1,1,1. will allow a driver limited access to the service mode functions.
Use the numeric keys to choose an option. Choosing an option will bring up the first screen for that option. Pressing the 4 key will home any motors that are not currently in the home position. ( did not work
for me, does an error need to be present ? ) 1. Pressing the 1 key will bring up a screen listing two options.
Use the numeric keys to choose an option. Choosing an option will bring up a screen listing data categories as described in the Data Recall section.
2. Pressing the 2 key will bring up a screen stating that this unit is currently un-assigned – please log in with a higher P.I.N. to assign this unit. More data needed here!!!!! 3. Pressing the 3 key will bring up a screen with two options.
Use the numeric keys to choose an option. Choosing an option will bring up the first screen for that option.
1. Pressing the 1 key will bring up a screen with three actions.
Use the numeric keys to choose an action. 1. Opens a window to enter a selection number to view data. 2. Moves back to the previous selection. 3. Moves forward to the next selection.
# key Functions
1. Data Recall
2. Telemetry
3. Plan-o-Gram Management
4. Home Un-Homed Motors
# key Action
1. Resettable Data
2. Non-Resettable Data
# key Options
1. Plan-O-Gram Audit
2. Edit Plan-O-Gram
# key Action
1. Selection code
2. Previous selection
3. Next Selection

MERCHANT MEDIA – PROGRAMMING MAP SOFTWARE VERSION 10.5.1
media_programming_10_5_1 Page 54 of 76 09/24/2012
When a selection number is entered, a screen will come up listing data about that selection. A. The name of the product, if defined. B. The Universal Product Code. C. The currently set price for the product. 2. Pressing the 2 key will bring up a screen with two actions
Pressing the 1 key will open a window allowing you to enter a selection number. Pressing the 2 key will open a window allowing you to enter a new Universal Product Code.
4. Pressing the 4 key will home all un-homed motors. (When ?) Entering an operator P.I.N. of 3,3,3,3. Will allow full access to all the operators functions in the service mode as detailed in these pages. Entering an Engineering code of 4,4,4,4. will bring up a screen similar to the operator service screen. Added options include In the TEST functions, # 3, A reliability test was inserted, shifting the other entries down. A keypad test function was added on the second screen. In the Special Vend mode, #6, A function called “ Trade Show Vend Bypass “ was added in the #5 position shifting other entries down. In the Security Codes Mode, #4, A Change Engineer P.I.N. function was added.
# key Action
1. Selection code
2. Universal Product Code

MERCHANT MEDIA – PROGRAMMING MAP SOFTWARE VERSION 10.5.1
media_programming_10_5_1 Page 55 of 76 09/24/2012
Entering a manufacturing code of 5,5,5,5. will bring up a screen used in the factory for set up and testing.
Use the numeric keys to choose an option. Choosing an option will bring up the first screen for that option.
Pressing the 1 key will bring up a screen with one option. 1. Clear All Databases Pressing the 2 key will bring up a screen with one option. 1. De-Bug Output (pressing the 1 key again will toggle the setting) Pressing the 3 key will bring up a screen with five options. #4 and #5 are added options. 4. Change Engineer P.I.N. 5. Change Manufacturer P.I.N. Pressing the 4 key will bring up a screen with Firm ware information. No Changes. Pressing the 5 key will bring up a screen listing the options and functions for factory set-up and testing.
Use the numeric keys to choose an option. Choosing an option will bring up the first screen for that option.
Pressing the 1 key will toggle forward to the next step in line 3. Use the delete key to move backwards thru the steps. Pressing the 2 key will bring up a diagnostics screen. Pressing the 3 key will activate the currently displayed test function.
# Key Function Title
1. Data Recall
2. System settings
3. Security Codes
4. Firmware Information
5. Factory Set Up
# Key Function Title
1. Next Step
2. Diagnostics
Configuration Version (machine type)
3. Version (toggles thru test titles)

MERCHANT MEDIA – PROGRAMMING MAP SOFTWARE VERSION 10.5.1
media_programming_10_5_1 Page 56 of 76 09/24/2012
I (Info Button) TIMED EVENTS..Press the info button to bring up a screen.
Pressing the information button, bottom left on the numeric keypad, will bring up a screen listing the timed events options.
Use the numeric keys to choose an option. Choosing an option will bring up the first screen for that option.
1. Pressing the 1 key will bring up the first screen for Time Of Day events.
Use the numeric keys to choose the type of event you wish to create. Choosing a type of event will bring up the first screen for that type of event.
1. Pressing the 1 key will bring up a screen listing options for Price Adjust.
Pressing the 1 key here will create an event and begin a list of saved events that can be set up as needed. Use the numeric keys to choose a created event to set up for use and another screen will come up allowing you to configure the event to fit your needs.
Press the 1 key to SAVE your settings or your work will be lost. Press the 2 key to REMOVE the event from memory. Press the 3 key to toggle the setting for the state of the event between ON and OFF. Press the 4 key to toggle the setting for the frequency of the event between DAILY and WEEKLY. Press the 5 key to open a window allowing you to use the numeric keypad to enter a time of day for the event to begin.
# key Options
1. Time Of Day Events
2. Back-Up Events
3. Power Saving Events
# key Action
1. Price Adjust
2. Free Vend
3. Inhibit
# key Entry
1. Create Event
2. Price Adjust #1
3. Price Adjust #2
# Key Action
1. Save This Event
2. Remove This Event
3. Enable State
4. Frequency
5. Event Start Time
6. Event Stop Time
7. Days Of Week
8. Price Adjust Type
9. Price Adjust Percentage
Second Screen
1. (repeat of line # 9)
2. Selections For Event

MERCHANT MEDIA – PROGRAMMING MAP SOFTWARE VERSION 10.5.1
media_programming_10_5_1 Page 57 of 76 09/24/2012
Press the 6 key to open a window allowing you to use the numeric keypad to enter a time of day for the event to end. Press the 7 key to bring up a screen allowing you to choose the days of the week when the event will be active. The checked days are active. A. Use the top and bottom of the O.K. button to scroll thru the screens. B. Use the 1 key to check all the days of the week at once. C. Use the 2 key to un-check all the days of the week at once. D. You do not need to save the choices here, just return to the set up menu for the event and proceed. Press the 8 key to bring up a screen that allows you to choose the type of price adjustment that is happening. Use the numeric keys to check one. Use the center of the O.K. button to lock in the choice. Press the 9 key to open a window that will allow you to enter percentage for the price adjustment using the numeric keypad. Use the Center section of the O.K. button to lock in the new percentage. Press the 2 key, from the second screen, to bring up a tray list.
Use the numeric keys to choose a tray. Choosing a tray will bring up a screen listing all the selections on that tray. Some selection lists will use more than one screen. Use the top and bottom of the O.K. button to scroll thru the entire list.
Use the numeric keys to check or un-check the selections as needed. Checked selections will be involved in the event. REMEMBER TO SAVE YOUR SETTINGS OR YOUR WORK WILL BE LOST !
# Key Day Of Week
1. Set All
2. Clear All
3. Monday
4. Tuesday
5. Wednesday
6. Thursday
7. Friday
Second Screen
8. Saturday
9. Sunday
# Key Adjustment Type
1. Discount
2. Surcharge
# Key Tray #
1. Tray 1
2. Tray 2
3. Tray 3
4. Tray 4
5. Tray 5
6. Tray 6
7. Tray 7
# Key Selection #
1. Set All
2. Clear All
3. 101
4. 103
5. 105
6. 107
7. 109
8. 111
9. ###

MERCHANT MEDIA – PROGRAMMING MAP SOFTWARE VERSION 10.5.1
media_programming_10_5_1 Page 58 of 76 09/24/2012
2. Pressing the 2 key will bring up a screen listing the options for Free Vend.
Pressing the 1 key here will create an event and begin a list of saved events that can be set up as needed. Use the numeric keys to choose a created event to set up for use and another screen will come up allowing you to configure the event to fit your needs.
Press the 1 key to SAVE your settings or your work will be lost. Press the 2 key to REMOVE the event from memory. Press the 3 key to toggle the setting for the state of the event between ON and OFF. Press the 4 key to toggle the setting for the frequency of the event between DAILY and WEEKLY. Press the 5 key to open a window allowing you to use the numeric keypad to enter a time of day for the event to begin. Press the 6 key to open a window allowing you to use the numeric keypad to enter a time of day for the event to end. Press the 7 key to bring up a screen allowing you to choose the days of the week when the event will be active. The checked days are active. A. Use the top and bottom of the O.K. button to scroll thru the screens. B. Use the 1 key to check all the days of the week at once. C. Use the 2 key to un-check all the days of the week at once. D. You do not need to save the choices here, just return to the set up menu for the event and proceed.
# key Entry
1. Create Event
2. Free Vend #1
3. Free Vend #2
# Key Action
1. Save This Event
2. Remove This Event
3. Enable State
4. Frequency
5. Event Start Time
6. Event Stop Time
7. Days Of Week
8. Selections For Event
# Key Day Of Week
1. Set All
2. Clear All
3. Monday
4. Tuesday
5. Wednesday
6. Thursday
7. Friday
Second Screen
8. Saturday
9. Sunday

MERCHANT MEDIA – PROGRAMMING MAP SOFTWARE VERSION 10.5.1
media_programming_10_5_1 Page 59 of 76 09/24/2012
Press the 8 key to bring up a tray list.
Use the numeric keys to choose a tray. Choosing a tray will bring up a screen listing all the selections on that tray. Some selection lists will use more than one screen. Use the top and bottom of the O.K. button to scroll thru the entire list.
Use the numeric keys to check or un-check the selections as needed. Checked selections will be involved in the event. REMEMBER TO SAVE YOUR SETTINGS OR YOUR WORK WILL BE LOST !
3. Pressing the 3 key will bring up a screen listing the options for Inhibit.
Pressing the 1 key here will create an event and begin a list of saved events that can be set up as needed. Use the numeric keys to choose a created event to set up for use and another screen will come up allowing you to configure the event to fit your needs.
Press the 1 key to SAVE your settings or your work will be lost. Press the 2 key to REMOVE the event from memory. Press the 3 key to toggle the setting for the state of the event between ON and OFF. Press the 4 key to toggle the setting for the frequency of the event between DAILY and WEEKLY. Press the 5 key to open a window allowing you to use the numeric keypad to enter a time of day for the event to begin.
# Key Tray #
1. Tray 1
2. Tray 2
3. Tray 3
4. Tray 4
5. Tray 5
6. Tray 6
7. Tray 7
# Key Selection #
1. Set All
2. Clear All
3. 101
4. 103
5. 105
6. 107
7. 109
8. 111
9. ###
# key Entry
1. Create Event
2. Inhibit #1
3. Inhibit #2
# Key Action
1. Save This Event
2. Remove This Event
3. Enable State
4. Frequency
5. Event Start Time
6. Event Stop Time
7. Days Of Week
8. Selections For Event

MERCHANT MEDIA – PROGRAMMING MAP SOFTWARE VERSION 10.5.1
media_programming_10_5_1 Page 60 of 76 09/24/2012
Press the 6 key to open a window allowing you to use the numeric keypad to enter a time of day for the event to end. Press the 7 key to bring up a screen allowing you to choose the days of the week when the event will be active. The checked days are active. A. Use the top and bottom of the O.K. button to scroll thru the screens. B. Use the 1 key to check all the days of the week at once. C. Use the 2 key to un-check all the days of the week at once. D. You do not need to save the choices here, just return to the set up menu for the event and proceed. Press the 8 key to bring up a tray list.
Use the numeric keys to choose a tray. Choosing a tray will bring up a screen listing all the selections on that tray. Some selection lists will use more than one screen. Use the top and bottom of the O.K. button to scroll thru the entire list.
Use the numeric keys to check or un-check the selections as needed. Checked selections will be involved in the event. REMEMBER TO SAVE YOUR SETTINGS OR YOUR WORK WILL BE LOST !
# Key Day Of Week
1. Set All
2. Clear All
3. Monday
4. Tuesday
5. Wednesday
6. Thursday
7. Friday
Second Screen
8. Saturday
9. Sunday
# Key Tray #
1. Tray 1
2. Tray 2
3. Tray 3
4. Tray 4
5. Tray 5
6. Tray 6
7. Tray 7
# Key Selection #
1. Set All
2. Clear All
3. 101
4. 103
5. 105
6. 107
7. 109
8. 111
9. ###

MERCHANT MEDIA – PROGRAMMING MAP SOFTWARE VERSION 10.5.1
media_programming_10_5_1 Page 61 of 76 09/24/2012
2. Pressing the 2 key will bring up the first screen for Back-Up Events.
Pressing the 2 key will bring up a screen allowing you to set up a timed back-up of events. Press the 1 key to SAVE your settings or your work will be lost. Press the 2 key to toggle the setting for the state of the event between ON and OFF. Press the 3 key to open a window allowing you to use the numeric keypad to enter a time of day for the event to begin. Press the 4 key to bring up a screen allowing you to choose the days of the week when the event will be active. The checked days are active. A. Use the top and bottom of the O.K. button to scroll thru the screens. B. Use the 1 key to check all the days of the week at once. C. Use the 2 key to un-check all the days of the week at once. D. You do not need to save the choices here, just return to the set up menu for the event and proceed. REMEMBER TO SAVE YOUR SETTINGS OR YOUR WORK WILL BE LOST !
# Key Action
1. Save This Event
2. Enable State
3. Event Start Time
4. Days Of Week
# Key Day Of Week
1. Set All
2. Clear All
3. Monday
4. Tuesday
5. Wednesday
6. Thursday
7. Friday
Second Screen
8. Saturday
9. Sunday
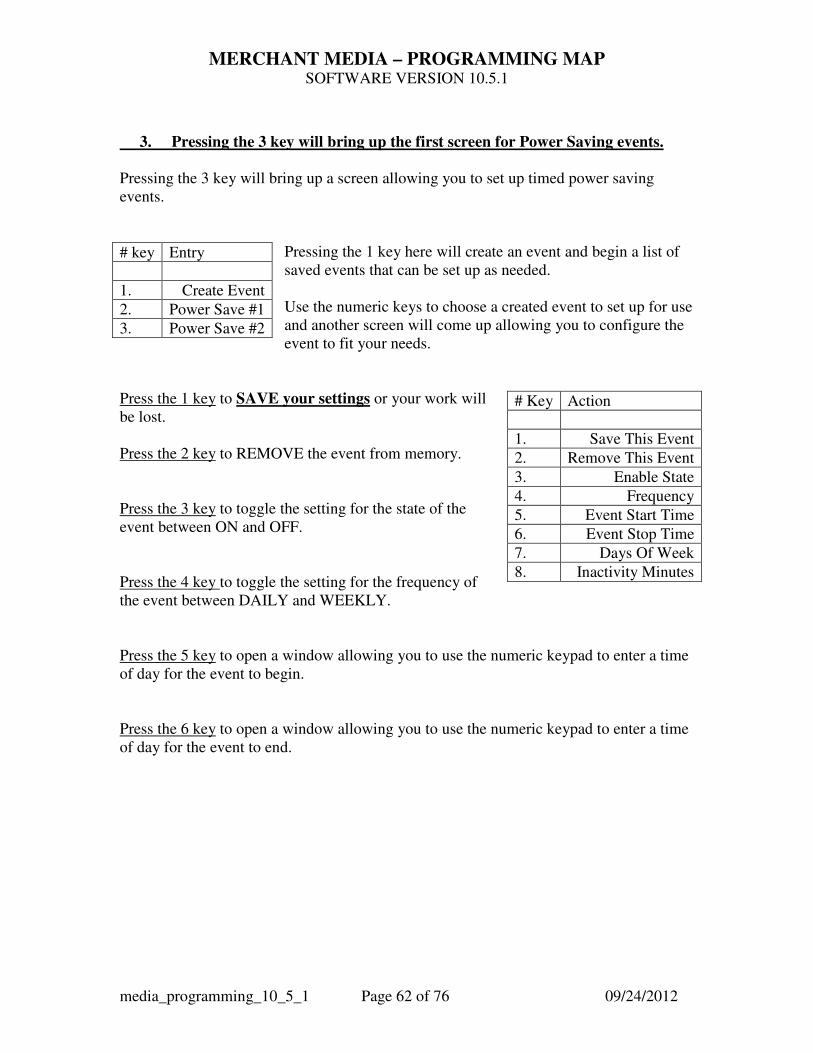
MERCHANT MEDIA – PROGRAMMING MAP SOFTWARE VERSION 10.5.1
media_programming_10_5_1 Page 62 of 76 09/24/2012
3. Pressing the 3 key will bring up the first screen for Power Saving events.
Pressing the 3 key will bring up a screen allowing you to set up timed power saving events.
Pressing the 1 key here will create an event and begin a list of saved events that can be set up as needed. Use the numeric keys to choose a created event to set up for use and another screen will come up allowing you to configure the event to fit your needs.
Press the 1 key to SAVE your settings or your work will be lost. Press the 2 key to REMOVE the event from memory. Press the 3 key to toggle the setting for the state of the event between ON and OFF. Press the 4 key to toggle the setting for the frequency of the event between DAILY and WEEKLY. Press the 5 key to open a window allowing you to use the numeric keypad to enter a time of day for the event to begin. Press the 6 key to open a window allowing you to use the numeric keypad to enter a time of day for the event to end.
# key Entry
1. Create Event
2. Power Save #1
3. Power Save #2
# Key Action
1. Save This Event
2. Remove This Event
3. Enable State
4. Frequency
5. Event Start Time
6. Event Stop Time
7. Days Of Week
8. Inactivity Minutes

MERCHANT MEDIA – PROGRAMMING MAP SOFTWARE VERSION 10.5.1
media_programming_10_5_1 Page 63 of 76 09/24/2012
Press the 7 key to bring up a screen allowing you to choose the days of the week when the event will be active. The checked days are active. A. Use the top and bottom of the O.K. button to scroll thru the screens. B. Use the 1 key to check all the days of the week at once. C. Use the 2 key to un-check all the days of the week at once. D. You do not need to save the choices here, just return to the set up menu for the event and proceed. Press the 8 key to open a window allowing you to enter a number for the inactivity minutes. The default setting is 600 minutes. REMEMBER TO SAVE YOUR SETTINGS OR YOUR WORK WILL BE LOST !
# Key Day Of Week
1. Set All
2. Clear All
3. Monday
4. Tuesday
5. Wednesday
6. Thursday
7. Friday
Second Screen
8. Saturday
9. Sunday
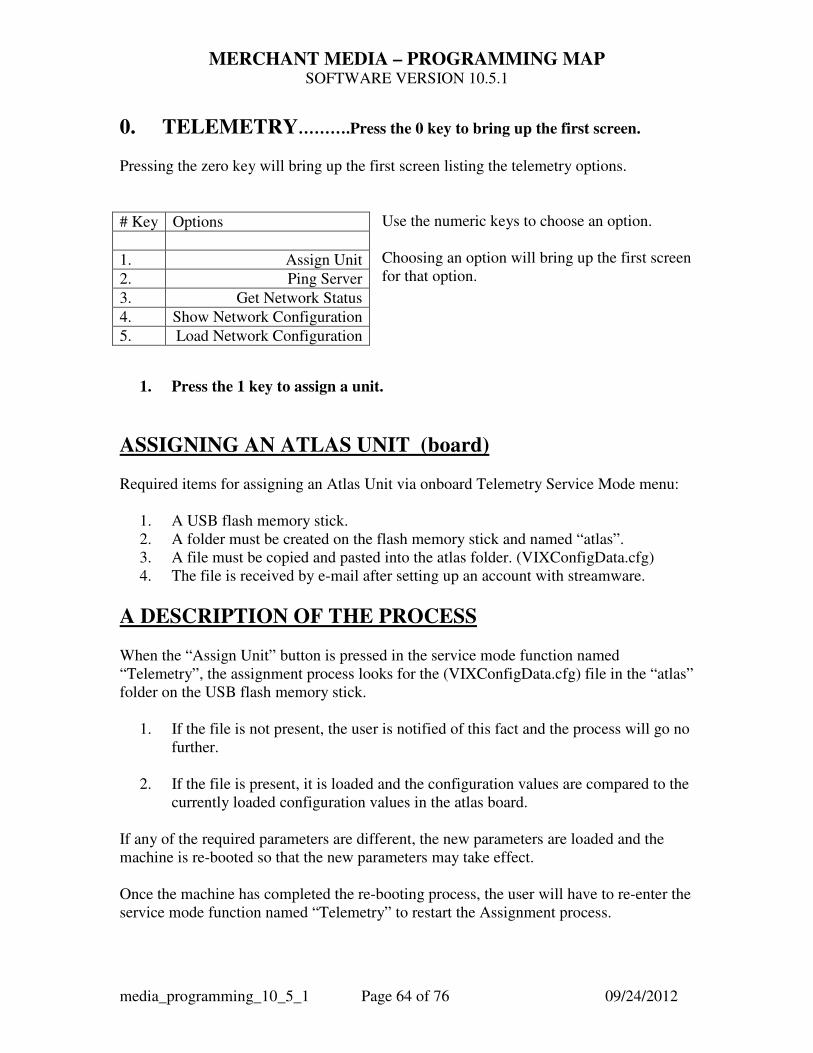
MERCHANT MEDIA – PROGRAMMING MAP SOFTWARE VERSION 10.5.1
media_programming_10_5_1 Page 64 of 76 09/24/2012
0. TELEMETRY……….Press the 0 key to bring up the first screen.
Pressing the zero key will bring up the first screen listing the telemetry options.
Use the numeric keys to choose an option. Choosing an option will bring up the first screen for that option.
1. Press the 1 key to assign a unit.
ASSIGNING AN ATLAS UNIT (board) Required items for assigning an Atlas Unit via onboard Telemetry Service Mode menu: 1. A USB flash memory stick. 2. A folder must be created on the flash memory stick and named “atlas”. 3. A file must be copied and pasted into the atlas folder. (VIXConfigData.cfg) 4. The file is received by e-mail after setting up an account with streamware.
A DESCRIPTION OF THE PROCESS When the “Assign Unit” button is pressed in the service mode function named “Telemetry”, the assignment process looks for the (VIXConfigData.cfg) file in the “atlas” folder on the USB flash memory stick. 1. If the file is not present, the user is notified of this fact and the process will go no further. 2. If the file is present, it is loaded and the configuration values are compared to the currently loaded configuration values in the atlas board. If any of the required parameters are different, the new parameters are loaded and the machine is re-booted so that the new parameters may take effect. Once the machine has completed the re-booting process, the user will have to re-enter the service mode function named “Telemetry” to restart the Assignment process.
# Key Options
1. Assign Unit
2. Ping Server
3. Get Network Status
4. Show Network Configuration
5. Load Network Configuration

MERCHANT MEDIA – PROGRAMMING MAP SOFTWARE VERSION 10.5.1
media_programming_10_5_1 Page 65 of 76 09/24/2012
With the new configuration values in place, and having re-entered the “Telemetry” service mode function, pressing the Assign Unit button will display the status and direct the user to press buttons to each step of the assignment process that follows. This will verify the customer identification and user entered fields to the server and finalize the assignment process. The process can be halted at each step if an error is encountered. Errors will be displayed to the user with as much detail as possible. In many cases, simply re-trying the current operation will successfully complete the operation, especially if the error was caused by a communications interruption. In order to re-try an operation, the user must press the back button at the top of the menu structure when the error status is displayed. Once the assignment has been completed, a “Re-boot to Complete Assignment” button will be displayed. Wait at least 2-3 minutes before continuing to be sure that the whole process is done.
Pressing the button causes the unit to re-boot and begin communicating with the DMS (Devise Management Server). In many cases the system will re-boot again after it gets the current time from the server. It sets it, and re-boots to complete the time reset process.
ASSIGN STEPS - A path for success 1. Insert a prepared USB flash memory stick into the USB port 3 on the atlas board. 2. Enter the service mode and press the button to go into the “Telemetry” menu. 3. Press the button to enter the “Assign Unit” function. 1. If the values in the new file on the stick are different than the current values in the board, the new values will be loaded into the board and the machine will be re-booted. 2. After the re-boot is complete, it will be necessary to re-enter the service mode, then re-enter the “Telemetry” menu. 3. From the “Telemetry” menu press the button to re-enter the “Assign Unit” function to resume the assignment process. 4. With the new configuration successfully loaded, a screen will come up displaying a “Verify Customer I.D.” button. Press this button to verify the customer ID with the server.

MERCHANT MEDIA – PROGRAMMING MAP SOFTWARE VERSION 10.5.1
media_programming_10_5_1 Page 66 of 76 09/24/2012
5. When the customer ID is verified successfully, a screen will come up displaying a “Set User Fields” button. Press this button to display the fields that need to have data entered by the user. 6. Each user field will have a button that will allow the user to enter or edit the data in that field. As of now, there is only one required field that must be filled in. Press the button for the field “Machine I.D.”. This will allow the user to enter the machine identification number for the machine being assigned. Note – when assigning a merchant media embedded onboard card reader for an existing Stream Ware Vend Max customer, you must use their machine/equipment asset number. Any other machine ID such as the machine serial number will cause the assign process to be invalid. 7. When the user has completed entering data into the fields, a “Validate Entries” button will appear. Pressing this button will send all the user fields to the server for validation. 8. When the user validation is successful, a “Finalize Assign” button will appear. Press this button to finalize the assignment process with the server. 9. When the finalization process is completed, a “Re-Boot To Completed Assign” button will appear. Press this button to re-start the machine, and the process will be complete. 2. Pressing the 2 key will cause the machine to attempt to ping the server.
If the machine is not able to do so, it will report “ failed “ More data is needed here !!!!

MERCHANT MEDIA – PROGRAMMING MAP SOFTWARE VERSION 10.5.1
media_programming_10_5_1 Page 67 of 76 09/24/2012
3. Press the 3 key to Get Network Status.
More data is needed here !!!!! Get Network Status Screen
4. Press the 4 key to Show network configuration data.
Show Network Configuration Screen
More data is needed here !!!!! 5. Press the 5 key to Load Network Configuration.
More data is needed here !!!!!
NODE TYPE : CLIENT
NETWORK FLAGS : (##)
LAST ERROR : (0)
ADAPTOR TYPE : NONE
NET TYPE : NO ADAPTOR
NOT APPLICABLE
IP : NOT APPLICABLE
URL : HTTP://STREAMWAREONLINE.COM: 8081/WANSERVICESB.ASMX
ESN : NOT APPLICABLE
Second Screen
ESN : NOT APPLICABLE (repeat)
SIM ID : NOT APPLICABLE
BT :
URL : HTTP//STREAMWAREONLINE.COM: 8081/WANSERVICESB.ASMX
GSM APN : ATTZ.CRANEMS.COM
GSM USER :
GSM PASSWORD :
ZIG BEE PAN ID : (0)
ZIG BEE NET KEY SEED : (0)

MERCHANT MEDIA – PROGRAMMING MAP SOFTWARE VERSION 10.5.1
media_programming_10_5_1 Page 68 of 76 09/24/2012
Merchant Media
Intergraded Wireless Radio Setup
Cashless / Remote DEX / Alerts 1. Heartland / Streamware Acct - Before installing the radio for intergraded wireless
function, you must establish an account with Heartland Payment Systems and Crane Streamware.
A. When the customer account is established, Crane Streamware will email the customer a configuration file for uploading and assigning the Merchant Media (MM).
2. On the MM, check/load the Control Board software. It should be version 10.3.x or
higher. 3. On the MM, check/set the current Time and Date. 4. Make sure the machine fully operates and vends product before proceeding. 5. On Control Board, make sure J27 has jumper across pins 2 &3. 6. On the MM, set cashless reader to “Onboard Reader”
A. In Service Mode, go into Monetary Menu. B. At Cashless Reader, select “Onboard Reader”
7. Radio Installation A. On the MM, turn OFF the power switch. B. Connect the USB cable between the Radio and USB1 on the Control board.
USB1 is located at top left of other two USB sockets facing the board. *** Very Important *** The Radio will only work in USB1, not USB2 or USB3.
C. Connect the antenna’s to the Radio D. Velcro the Radio assembly against the cover panel of the control board. E. On MM, turn ON the power switch. F. Within a couple of minutes the LED on the radio should flash or stay lit. G. Neatly route and tie wrap all the Radio cables in order to prevent from
catching/pinching when closing the monetary panel.
8. Downloading the customer configuration file on the memory stick A. Use a blank USB memory stick and plug it into your computer. B. When account and machine information is established by Heartland and
Streamware, they will email the following customer configuration file: “VixConfigData.cfp”.
C. Open up the computer drive where the USB memory stick is inserted. D. Create a new folder called “atlas” on your blank USB stick. E. Copy the emailed file “VixConfigData.cfp” and paste into the “atlas” folder.

MERCHANT MEDIA – PROGRAMMING MAP SOFTWARE VERSION 10.5.1
media_programming_10_5_1 Page 69 of 76 09/24/2012
9. Check Radio signal strength – A. In Service menu, press ‘0’ for “Telemetry”. B. Press line number for “Show Network Status” C. The first line should show Node Type: “Gateway”. If shows “Client”, radio is
not communicating with board. D. Check the RSSI parameter line on screen. If the signal strength is very low
(above -100 DB), you might consider switching to a different radio type (i.e., GSM vs. CDMA or vice-versa).
10. Assigning Telemetry:
A. Depress the Monetary Panel interlock switch and wait for security pin entry to appear on display. Enter four digit pin (factory default = 3333).
B. Insert USB stick into any open USB port on control board. C. At Service Menu screen, press the ‘O’ button for “Telemetry” D. In Telemetry screen, press #4 for “Assign Unit”
E. The Control Board should now update the customer information from the
memory stick. Once this is complete, the Merchant Media will reboot (reboot will take 5 -7 minutes.). (Note: Wait at lease 5 minutes to fully allow upload and reboot.)
F. The following screen should appear:
• Press 1 and enter the machine ID

MERCHANT MEDIA – PROGRAMMING MAP SOFTWARE VERSION 10.5.1
media_programming_10_5_1 Page 70 of 76 09/24/2012
The Machine ID Keypad will be similar to a text type phone that does not have a full keyboard.
Press i button to change the keypad character function from Numeric / Alpha:
Upper Case / Lower Case. Example machine ID 34585 (p= pause for .5 seconds):
Press i button twice. Press 3p 4p 5p 8p 5 then OK on the Keypad.
Example machine ID ABC123
Press i button once. Press 2p 22p 222p then i once. Then 1p 2p 3
then OK
G. Press button 2 to “Validate Entries”. This step will validate the Machine ID.
• Machine ID is validating user information
• Machine ID validated and assignment complete

MERCHANT MEDIA – PROGRAMMING MAP SOFTWARE VERSION 10.5.1
media_programming_10_5_1 Page 71 of 76 09/24/2012
H. Press button 1 to reboot machine and complete assignment process.
I. Upon reboot, remove USB memory stick. J. Test machine for wireless operation.
END

MERCHANT MEDIA – PROGRAMMING MAP SOFTWARE VERSION 10.5.1
media_programming_10_5_1 Page 72 of 76 09/24/2012
TELEMETRY

MERCHANT MEDIA – PROGRAMMING MAP SOFTWARE VERSION 10.5.1
media_programming_10_5_1 Page 73 of 76 09/24/2012

MERCHANT MEDIA – PROGRAMMING MAP SOFTWARE VERSION 10.5.1
media_programming_10_5_1 Page 74 of 76 09/24/2012

MERCHANT MEDIA – PROGRAMMING MAP SOFTWARE VERSION 10.5.1
media_programming_10_5_1 Page 75 of 76 09/24/2012
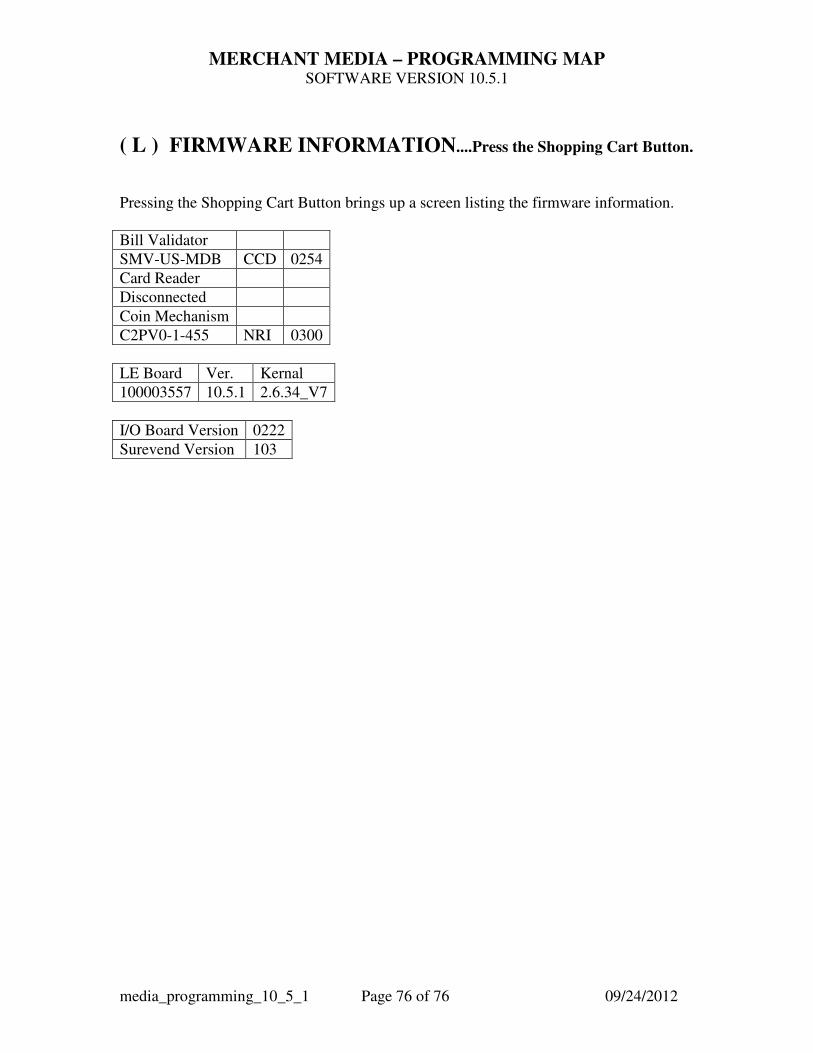
MERCHANT MEDIA – PROGRAMMING MAP SOFTWARE VERSION 10.5.1
media_programming_10_5_1 Page 76 of 76 09/24/2012
( L ) FIRMWARE INFORMATION....Press the Shopping Cart Button.
Pressing the Shopping Cart Button brings up a screen listing the firmware information.
LE Board Ver. Kernal
100003557 10.5.1 2.6.34_V7
I/O Board Version 0222
Surevend Version 103
Bill Validator
SMV-US-MDB CCD 0254
Card Reader
Disconnected
Coin Mechanism
C2PV0-1-455 NRI 0300