megasquirt plug and play toyota supra 1jz-gte /...
TRANSCRIPT
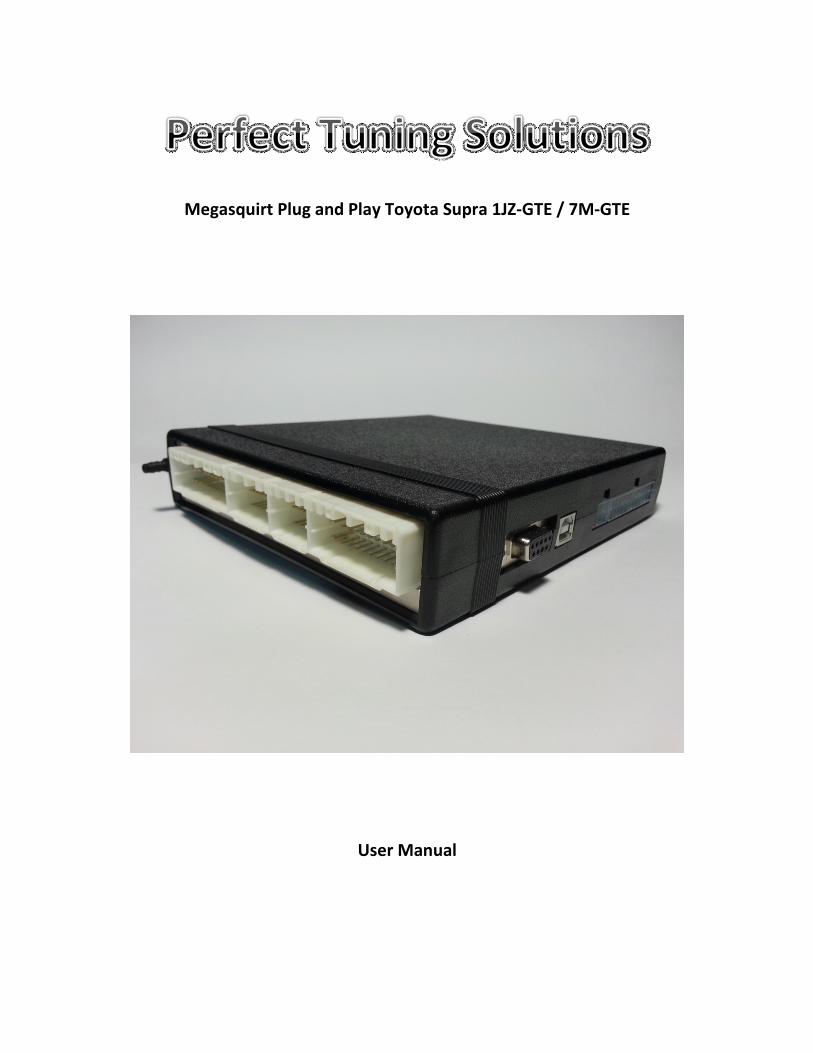
Megasquirt Plug and Play Toyota Supra 1JZ-GTE / 7M-GTE
User Manual
Perfect Tuning 2 August 2013
Table of content
Steps to install the Megasquirt Plug and Play ECU ....................................................................................... 4
1. Installation of TunerStudio and MegaLogViewer (for Windows, Mac and Linux) ............................ 4
Software on Google Play for Android devices ...................................................................................... 5
Software for Apple devices. .................................................................................................................. 5
2. Installation of the Megasquirt Plug and Play. ................................................................................... 6
For JZA70 Toyota Supra (JDM) with 1JZ-GTE engine only: ................................................................... 6
For 7M-GTE « 89+ model » only ........................................................................................................... 8
3. Power up the Megasquirt ................................................................................................................. 8
4. Connection to a Megasquirt with TunerStudio and a USB or serial cable. ....................................... 8
5. Calibrate the « TPS » (throttle position sensor) ................................................................................ 9
6. Calibrate the IAT (intake air temperature) and CLT (coolant temperature) ..................................... 9
7. Calibrate the Wideband .................................................................................................................... 9
8. *** IMPORTANT *** Check the timing ............................................................................................. 9
What to do if the engine don’t start ................................................................................................... 10
Connectors .................................................................................................................................................. 10
Expansion connector ............................................................................................................................... 10
Wideband connector .............................................................................................................................. 11
USB Connector ........................................................................................................................................ 12
Serial Connector ...................................................................................................................................... 12
Inputs and outputs ...................................................................................................................................... 13
List of inputs and outputs ....................................................................................................................... 13
Injectors outputs ..................................................................................................................................... 13
Ignition outputs ....................................................................................................................................... 14
Knock sensors inputs............................................................................................................................... 14
Internal Bluetooth module ......................................................................................................................... 14
How to change the Megasquirt engine configuration (1JZ-GTE or 7M-GTE) ............................................. 14
How to crimp a wire for the expansion or wideband connector ................................................................ 16
Megasquirt Plug and Play dimensions ........................................................................................................ 18
Contact ........................................................................................................................................................ 18
Accessories: ................................................................................................................................................. 19

Perfect Tuning 3 August 2013
Perfect Tuning 4 August 2013
All the documentation for the different versions of Megasquirt is present on www.msextra.com. There
is also a forum for technical support, discussions and suggestions. The MS3Pro user manual is also full
of information for the Megasquirt Plug and Play for 1JZ-GTE / 7M-GTE because this ECU is based on an
MS3Pro. http://www.diyautotune.com/downloads/ms3-pro/ms3pro_manual.pdf
Steps to install the Megasquirt Plug and Play ECU
1. Installation of TunerStudio and MegaLogViewer (for Windows, Mac and Linux)
- TunerStudio is the software created by EFI Analytics is used to configure all versions of the
Megasquirt. The software with basic functionalities is free. For advanced features like custom
dash boards, auto tuning and diagnostic you need to purchase the software on EFI Analytics
website: http://www.tunerstudio.com/. You can download directly TunerStudio at:
www.tunerstudio.com/index.php/downloads. When you connect your computer to a
Megasquirt for the first time with an USB cable, you may need to download the driver at:
http://www.ftdichip.com/Drivers/CDM/CDM20828_Setup.exe
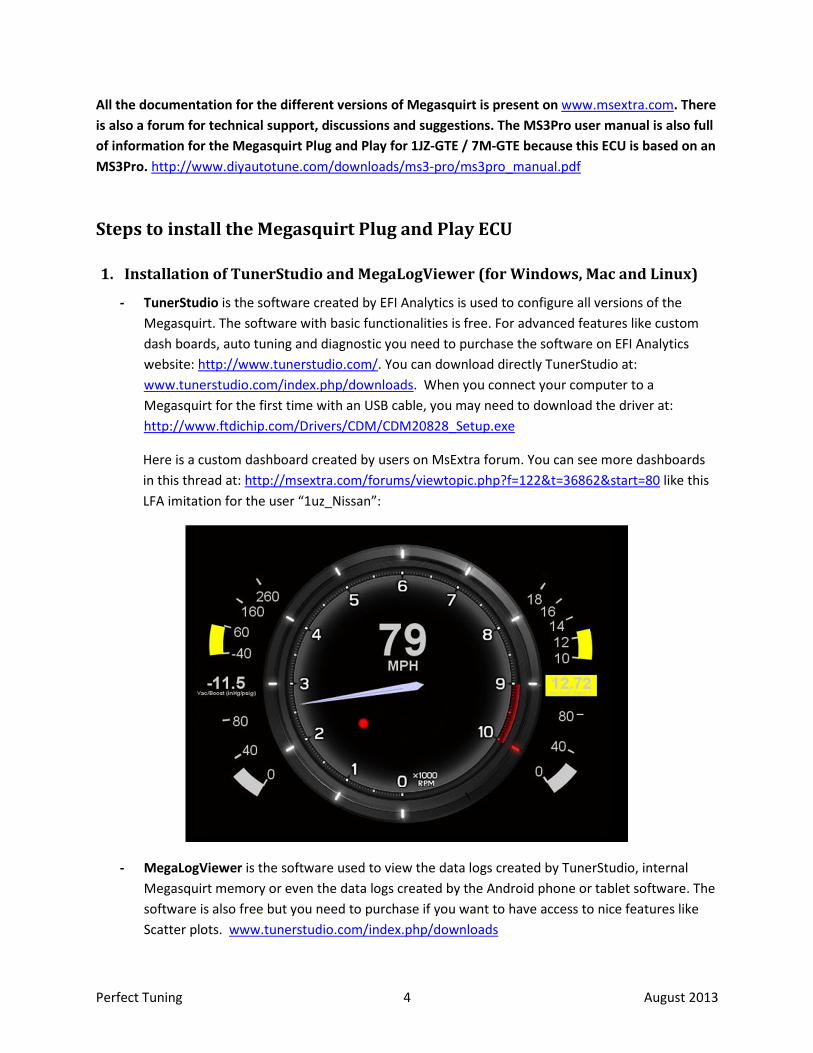
Here is a custom dashboard created by users on MsExtra forum. You can see more dashboards
in this thread at: http://msextra.com/forums/viewtopic.php?f=122&t=36862&start=80 like this
LFA imitation for the user “1uz_Nissan”:
- MegaLogViewer is the software used to view the data logs created by TunerStudio, internal
Megasquirt memory or even the data logs created by the Android phone or tablet software. The
software is also free but you need to purchase if you want to have access to nice features like
Scatter plots. www.tunerstudio.com/index.php/downloads
Perfect Tuning 5 August 2013
Software on Google Play for Android devices
1. Shadow Dash MS is the Android TunerStudio version. You can download it here :
https://play.google.com/store/apps/details?id=com.efiAnalytics.shadowdash for 9.99$
2. MsDroid is software used to see real time data and you can also tune your Megasquirt and the
software is completely free! You can make a donation if you like this software for the supported
cause. https://play.google.com/store/apps/details?id=com.msdroid If MsDroid shows a
connection error message goes to http://www.msextra.com/doc/ms3/files/release/ and
downloads your Megasquirt software version (by default 1.2.3) and extract the ms3pro.ini file to
the MsDroid/ini folder on your Android device.
Software for Apple devices.
3. MobiSquirt is available for IPhone but with limitations. The Bluetooth connection is not
supported and you need a WIFI adapter. For more information please visit www.mobisquirt.org
Perfect Tuning 6 August 2013
2. Installation of the Megasquirt Plug and Play.
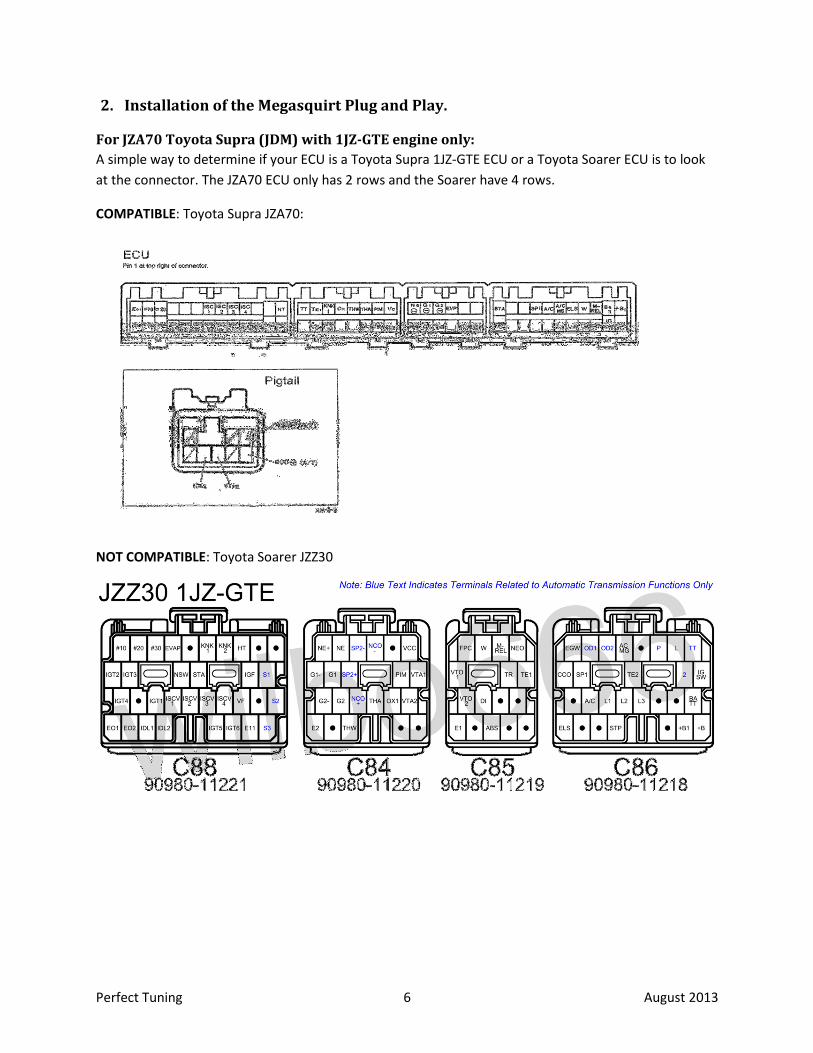
For JZA70 Toyota Supra (JDM) with 1JZ-GTE engine only:
A simple way to determine if your ECU is a Toyota Supra 1JZ-GTE ECU or a Toyota Soarer ECU is to look
at the connector. The JZA70 ECU only has 2 rows and the Soarer have 4 rows.
COMPATIBLE: Toyota Supra JZA70:
NOT COMPATIBLE: Toyota Soarer JZZ30
Perfect Tuning 7 August 2013
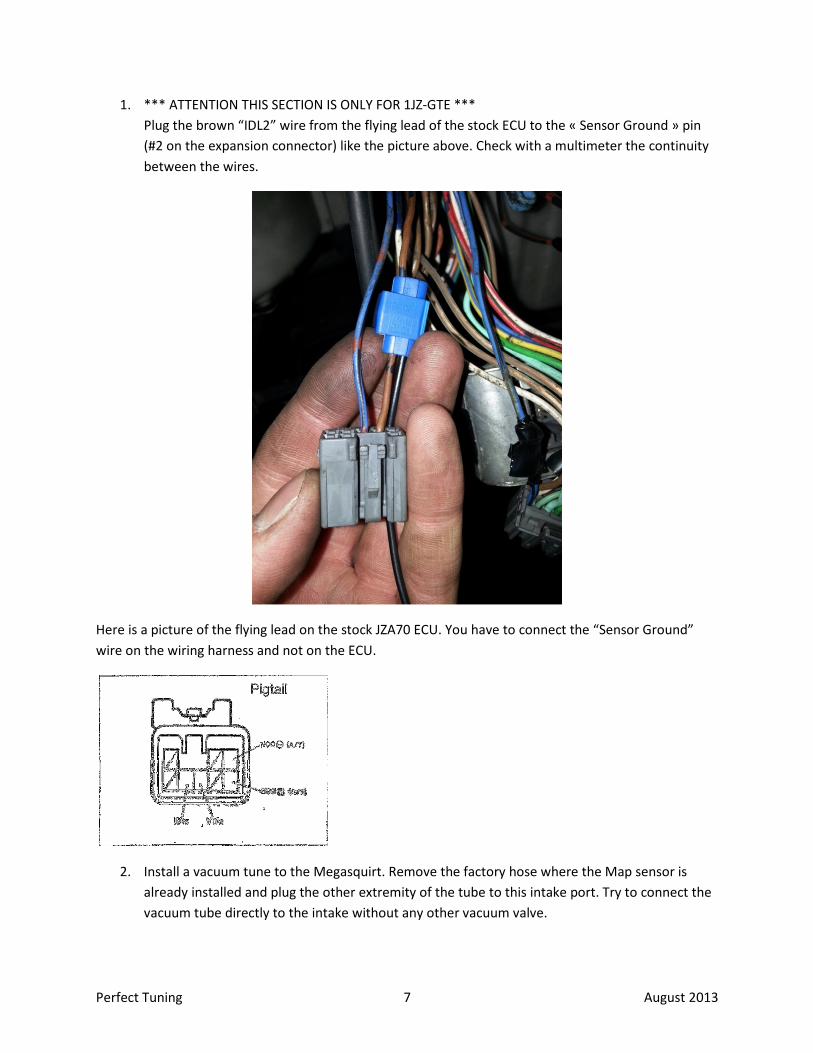
1. *** ATTENTION THIS SECTION IS ONLY FOR 1JZ-GTE ***
Plug the brown “IDL2” wire from the flying lead of the stock ECU to the « Sensor Ground » pin
(#2 on the expansion connector) like the picture above. Check with a multimeter the continuity
between the wires.
Here is a picture of the flying lead on the stock JZA70 ECU. You have to connect the “Sensor Ground”
wire on the wiring harness and not on the ECU.
2. Install a vacuum tune to the Megasquirt. Remove the factory hose where the Map sensor is
already installed and plug the other extremity of the tube to this intake port. Try to connect the
vacuum tube directly to the intake without any other vacuum valve.

Perfect Tuning 8 August 2013
For 7M-GTE « 89+ model » only
The Megasquirt work with 89+ Toyota Supra with 7M-GTE engine only (gray stock ECU connector). The
« 88- model» with the yellow ECU connector is not supported.
1. You have to install a vacuum tube to the Megasquirt. Connect the vacuum tube to the port
behind the intake manifold near the firewall. Ideally try to only plug the Megasquirt to this port.
2. If you want to remove the MAF sensor (because the Megasquirt won’t use it by default) you
have to install another intake temperature sensor because there is one integrated in the MAF
sensor.
3. Power up the Megasquirt
Put the key on when the ECU is connected and listen if you can hear the fuel pump running for around 3
seconds then turn off. This indicates that the Megasquirt is functional.
4. Connection to a Megasquirt with TunerStudio and a USB or serial cable.
You have to install in first the driver for the Megasquirt if it’s not done automatically. You can download
it on the FTDI website www.ftdi.com or directly at: http://www.ftdichip.com/Drivers/VCP.htm. If you
are using a USB to serial adapter, please refer to the manufacturer website for the drivers.
1. Plug the USB cable to the Megasquirt and your computer
2. Open TunerStudio.
3. Press on File, Project, New Project
4. Give a project name.
5. Put the key at the ON position to power up the Megasquirt and click on « Detect ». TunerStudio
will detect automatically the Megasquirt. If this step fails, put key off and try again.
6. Press on « Next »
7. The next window let you choose between the units you want to use (Fahrenheit or Celsius).
Leave the other options by default and press « Next »
8. The next window is to connect TunerStudio to the Megasquirt. Be sure to select the right port.
The baud rate will always be at 115 200.
9. Choose the desired dashboard. You can create custom dashboard with a paid version of
TunerStudio.
10. Apply on finish. You are now connected in real time to your Megasquirt.
If TunerStudio don’t detect the Megasquirt and the key is “ON”, the USB cable is connected, and the
right driver is installed with the right port selected in TunerStudio, try to power cycle the Megasquirt
(turn off, turn on) and try again.
For more information please visit: http://msextra.com/doc/ms3/serial_setup.html and
http://msextra.com/doc/ms3/tunerstudio_setup.html.
Perfect Tuning 9 August 2013
5. Calibrate the « TPS » (throttle position sensor)
You have to put the key on, the connect TunerStudio to the Megasquirt. Go to Tools, Calibrate TPS.
Press on « Get Current » for the « closed throttle ADC count » without touching the gas pedal and do
the same thing with the « Full throttle ADC count » while pressing at the maximum value of the gas
pedal.
6. Calibrate the IAT (intake air temperature) and CLT (coolant temperature)
Please note that when this dialog box open, the previous value is never loaded because this information
is save in a data table and there is no way to know which sensor you chose previously.
To calibrate the sensors, you have to connect TunerStudio to the Megasquirt then go to Tools, Calibrate
Thermistor Tables. Select Air Temperature Sensor for Sensor Table and 3 Point Therm Generator then in
Common Sensor Values, select you sensor. Press on « Write to Controller ». Do that again for the other
sensor.
7. Calibrate the Wideband
Please note that when this dialog box open, the previous value is never loaded because this information
is save in a data table and there is no way to know which sensor you chose previously.
If you use a wideband and this is suggested, you need to connect to the Megasquirt with TunerStudio,
select Tools, Calibrate AFR. Select your wideband sensor in the list or select Custom Linear WB and enter
the values manually with the manufacturer specifications.
It’s normal to have sometimes a small offset between the wideband gauge and the TunerStudio gauge.
One recommended thing to do is to ground the wideband sensor on the wideband connector of the
Megasquirt.
8. *** IMPORTANT *** Check the timing
This step is very crucial especially for the 7M-GTE engine because the timing is based from the CPS (cam
position sensor) signals and the CPS can move. This step is here to ensure that the timing of the
Megasquirt is synchronized with the engine. If you don’t perform this step, you can damage or destroy
you engine.
Connect the Megasquirt with TunerStudio then go to « Ignition Settings » and in the field« Fixed
Advanced », select « Fixed timing ». Enter the value 10 at the « Timing for Fixed Advance » field.
On a 1JZ-GTE, you need to remove cylinder 1 coil on plug, install a spark plug wire between the coil and
the spark plug and connect the timing light there. If you connect the timing light directly to the green
wire at the factory igniter plug, timing can be wrong.
Perfect Tuning 10 August 2013
Start the engine with fixed timing at 10 degrees. Check with a timing light if the timing is right. If not,
you need to adjust “Tooth #1 Angle”. Then, rev the engine and ensure that the timing stay at 10
degrees. If the timing drift, you can play with the setting “Spark Hardware Latency”. Something around
120 usec should be good.
Other info here: http://www.diyautotune.com/tech_articles/base_timing_how_to.htm
What to do if the engine don’t start
To prevent flooding the engine, it’s possible to press on the gas pedal at the maximum when you turn
the key on and during cranking. This activates the flood clear mode and completely stops gas injection.
You can also edit the “Required fuel” to 0 in Basic/Load Settings, Engine and Sequential settings. This will
completely disable gas injection at all time. Please note that the 7M-GTE have a cold start injector that is
not driven by the Megasquirt. This will inject a small quantity of gas and it’s not possible to stop it from
the ECU. You have to disconnect the cold start injector to disable it.
1. Ensure that the “crank » and « cam » synchronization is good. The Synced indication in
TunerStudio will turn green while cranking.
2. Ensure that the spark plugs are firing and you can check the timing while cranking.
3. If the engine seems to want to start, you can try to press slightly on the accelerator pedal to see
if it helps. If the engine start this mean that fine tuning is required for startups.
Connectors
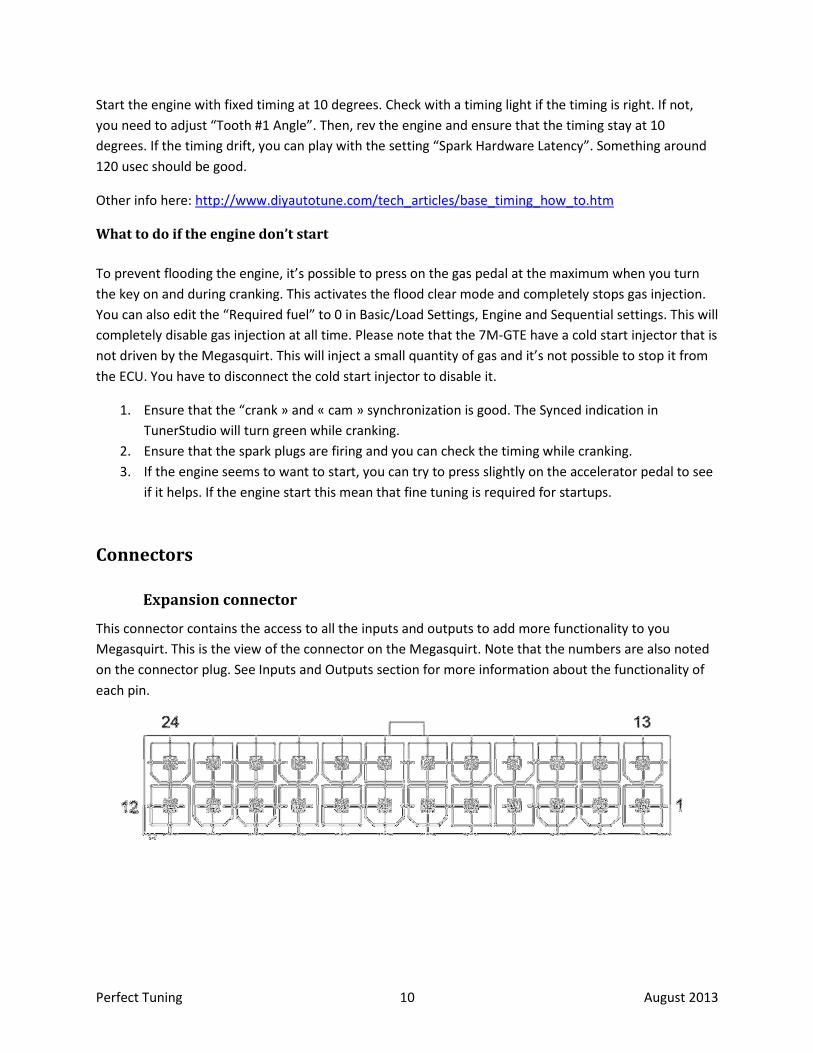
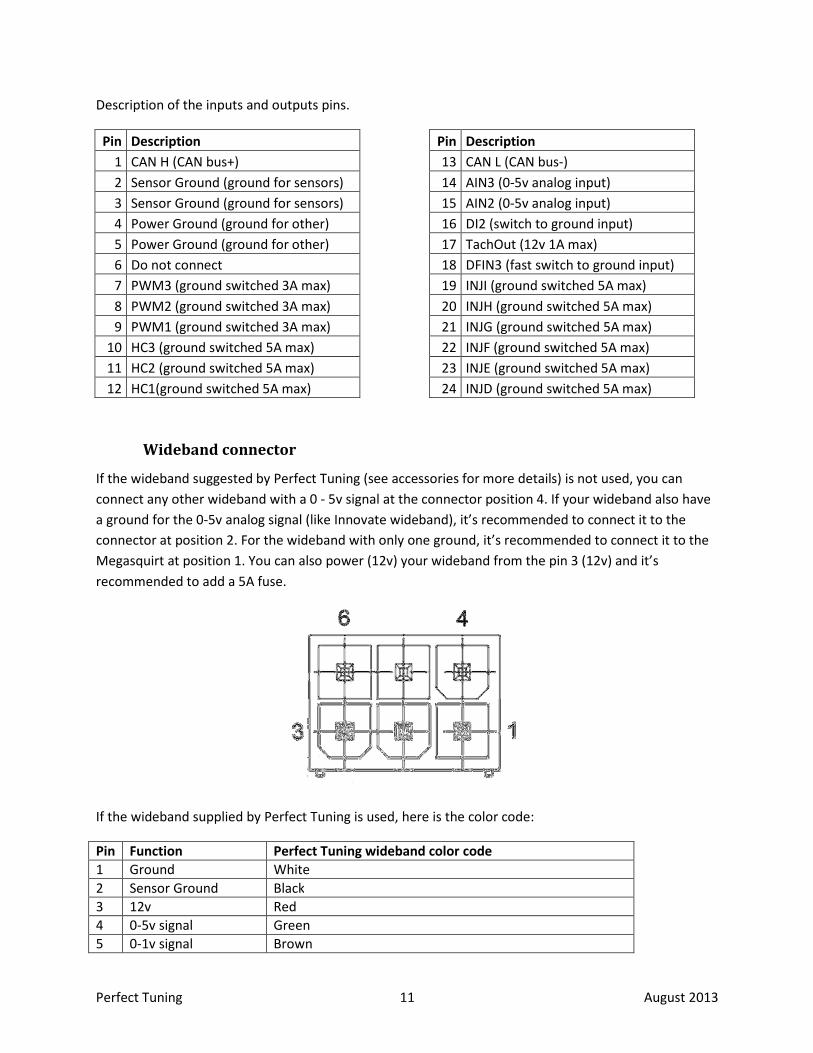
Expansion connector
This connector contains the access to all the inputs and outputs to add more functionality to you
Megasquirt. This is the view of the connector on the Megasquirt. Note that the numbers are also noted
on the connector plug. See Inputs and Outputs section for more information about the functionality of
each pin.
Perfect Tuning 11 August 2013
Description of the inputs and outputs pins.
Pin Description
1 CAN H (CAN bus+)
2 Sensor Ground (ground for sensors)
3 Sensor Ground (ground for sensors)
4 Power Ground (ground for other)
5 Power Ground (ground for other)
6 Do not connect
7 PWM3 (ground switched 3A max)
8 PWM2 (ground switched 3A max)
9 PWM1 (ground switched 3A max)
10 HC3 (ground switched 5A max)
11 HC2 (ground switched 5A max)
12 HC1(ground switched 5A max)
Pin Description
13 CAN L (CAN bus-)
14 AIN3 (0-5v analog input)
15 AIN2 (0-5v analog input)
16 DI2 (switch to ground input)
17 TachOut (12v 1A max)
18 DFIN3 (fast switch to ground input)
19 INJI (ground switched 5A max)
20 INJH (ground switched 5A max)
21 INJG (ground switched 5A max)
22 INJF (ground switched 5A max)
23 INJE (ground switched 5A max)
24 INJD (ground switched 5A max)
Wideband connector
If the wideband suggested by Perfect Tuning (see accessories for more details) is not used, you can
connect any other wideband with a 0 - 5v signal at the connector position 4. If your wideband also have
a ground for the 0-5v analog signal (like Innovate wideband), it’s recommended to connect it to the
connector at position 2. For the wideband with only one ground, it’s recommended to connect it to the
Megasquirt at position 1. You can also power (12v) your wideband from the pin 3 (12v) and it’s
recommended to add a 5A fuse.
If the wideband supplied by Perfect Tuning is used, here is the color code:
Pin Function Perfect Tuning wideband color code
1 Ground White
2 Sensor Ground Black
3 12v Red
4 0-5v signal Green
5 0-1v signal Brown
Perfect Tuning 12 August 2013
6 NC No Connection
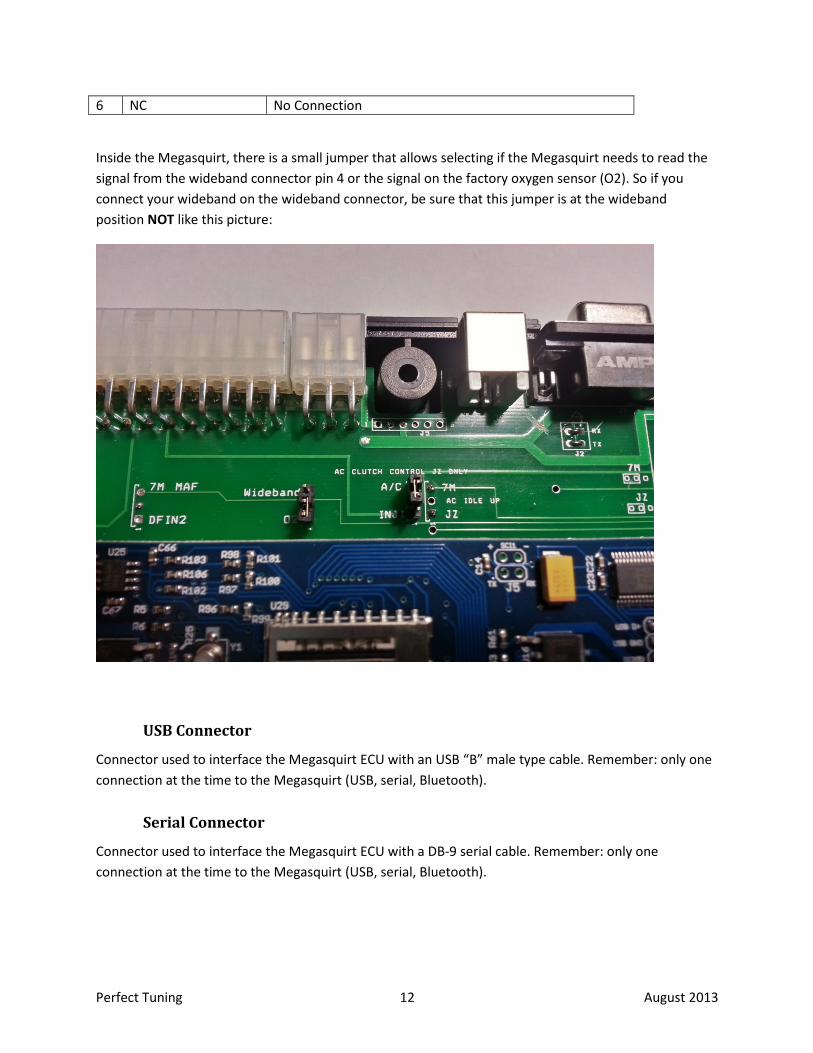
Inside the Megasquirt, there is a small jumper that allows selecting if the Megasquirt needs to read the
signal from the wideband connector pin 4 or the signal on the factory oxygen sensor (O2). So if you
connect your wideband on the wideband connector, be sure that this jumper is at the wideband
position NOT like this picture:
USB Connector
Connector used to interface the Megasquirt ECU with an USB “B” male type cable. Remember: only one
connection at the time to the Megasquirt (USB, serial, Bluetooth).
Serial Connector
Connector used to interface the Megasquirt ECU with a DB-9 serial cable. Remember: only one
connection at the time to the Megasquirt (USB, serial, Bluetooth).
Perfect Tuning 13 August 2013
Inputs and outputs
List of inputs and outputs
Here are all the inputs and outputs for the Megasquirt that you will use in TunerStudio settings.
I/O Megasquirt Module pin name Location in the Megasquirt Plug and Play
Input Digital Switched In 1 Factory ECU connector pin NSW
Input Digital Switched In 2 Expansion connector pin 16
Input Digital Switched In 3 Factory ECU connector pin TE1
Input Digital Switched 12v In Factory ECU connector pin A/C (7M-GTE only)
Input Analog Input 1 Barometric sensor inside Megasquirt.
Input Analog Input 2 Expansion connector pin 15
Input Analog Input 3 Expansion connector pin 14
Input Digital Frequency In 1 Factory ECU connector pin SPD (Speed sensor)
Input Digital Frequency In 2 Factory ECU connector pin A/C (1JZ-GTE only)
Input Digital Frequency In 3 Expansion connector pin 18
Output TachOut Expansion connector pin 17
Output PWM 1 Expansion connector pin 9
Output PWM 2 Expansion connector pin 8
Output PWM 3 Expansion connector pin 7
Output High current output 1 Expansion connector pin 12
Output High current output 2 Expansion connector pin 11
Output High current output 3 Expansion connector pin 10
Output Injector D Expansion connector pin 24
Output Injector E Expansion connector pin 23
Output Injector F Expansion connector pin 22
Output Injector G Expansion connector pin 21
Output Injector H Expansion connector pin 20
Output Injector I Expansion connector pin 19 OR Factory ECU
connector pin ACMG (1JZ-GTE only) depending the
jumper position inside the Megasquirt.
Output Injector J Factory ECU connector pin CEL (Check Engine light)
Output IAC1A Factory ECU connector « ISCV valve »
Output IAC1B Factory ECU connector « ISCV valve »
Output IAC2A Factory ECU connector « ISCV valve »
Output IAC2B Factory ECU connector « ISCV valve »
Other CANH Expansion connector pin 1
Other CANL Expansion connector pin 13
Injectors outputs
Megasquirt Plug and Play ECU can only drive high impedance injectors with a maximum of 5 amperes
per channel with thermal shutdown protection. If you are running low impedance injectors, you can use

Perfect Tuning 14 August 2013
a resistor box (contact Perfect Tuning) or peak and hold driver board. Unused injector outputs may be
used as general purpose outputs.
Ignition outputs
Megasquirt Plug and Play ECU use 5v logic level to drive an external ignition module or logic level coil
packs. Do not connect ignition outputs directly to the negative terminal of an ignition coil. This will
damage the Megasquirt. We recommend the 6 channel igniter module (see Accessories) to drive directly
coils. Maximum current is 200mA per channel. Unused ignition outputs may be used as general purpose
outputs.
Knock sensors inputs
The factory knock sensors are connected to the Megasquirt. To try this option, you need to configure it
in Ignition Settings, Knock Sensor Settings, Knock Control and set Input type to « Enabled » and Input
type to « Internal ». This feature should be used for safety and not for tuning. Here is the resonance
frequency of each engine (useful in the other window settings):
7mgte bore = 83mm and resonance frequency = 6.9 kHz
1jz bore = 86mm and resonance frequency = 6.7 kHz
For more information, refer to this page: http://www.msextra.com/doc/ms3/ignition-
settings.html#knock
Internal Bluetooth module
This Megasquirt Plug and Play has an internal Bluetooth module inside for wireless communication with
the Megasquirt. Note that in every situations, only one connection to the Megasquirt can be made at
the same time (1 device, with serial, USB or Bluetooth). To use the Bluetooth module, you need to pair
with the module called MS3PNP and enter the password 1234. When you are connected to the
Bluetooth module, you can use it to communicate with the Megasquirt.
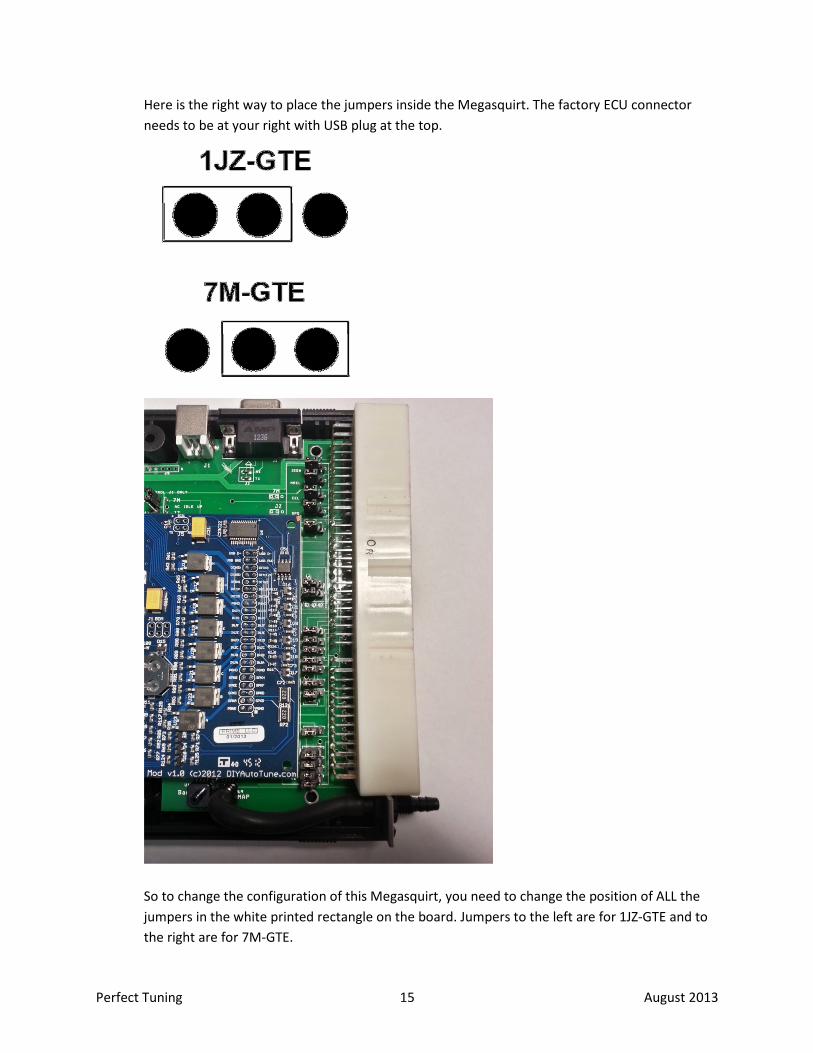
How to change the Megasquirt engine configuration (1JZ-GTE or 7M-GTE)
*** IMPORTANT : NEVER CONNECT A MEGASQUIRT CONFIGURED TO RUN WITH 1JZ-GTE ENGINE ON
A 7M-GTE ENGINE WITHOUT RE-CONFIGURE IT. YOU NEED TO OPEN THE MEGASQUIRT FIRST AND
CHANGE THE JUMPERS POSITION. ***
1. Disconnect the Megasquirt from everything.
2. Open Megasquirt box
3. *** ON THE MEGASQUIRT HARDWARE REVISION 1 THERE IS AN ERROR ON THE PRINTING OF
THE PCB CIRCUIT THAT INDICATES INCORRECTLY THE JUMPER POSITION. ***
Perfect Tuning 15 August 2013
Here is the right way to place the jumpers inside the Megasquirt. The factory ECU connector
needs to be at your right with USB plug at the top.
So to change the configuration of this Megasquirt, you need to change the position of ALL the
jumpers in the white printed rectangle on the board. Jumpers to the left are for 1JZ-GTE and to
the right are for 7M-GTE.
Perfect Tuning 16 August 2013
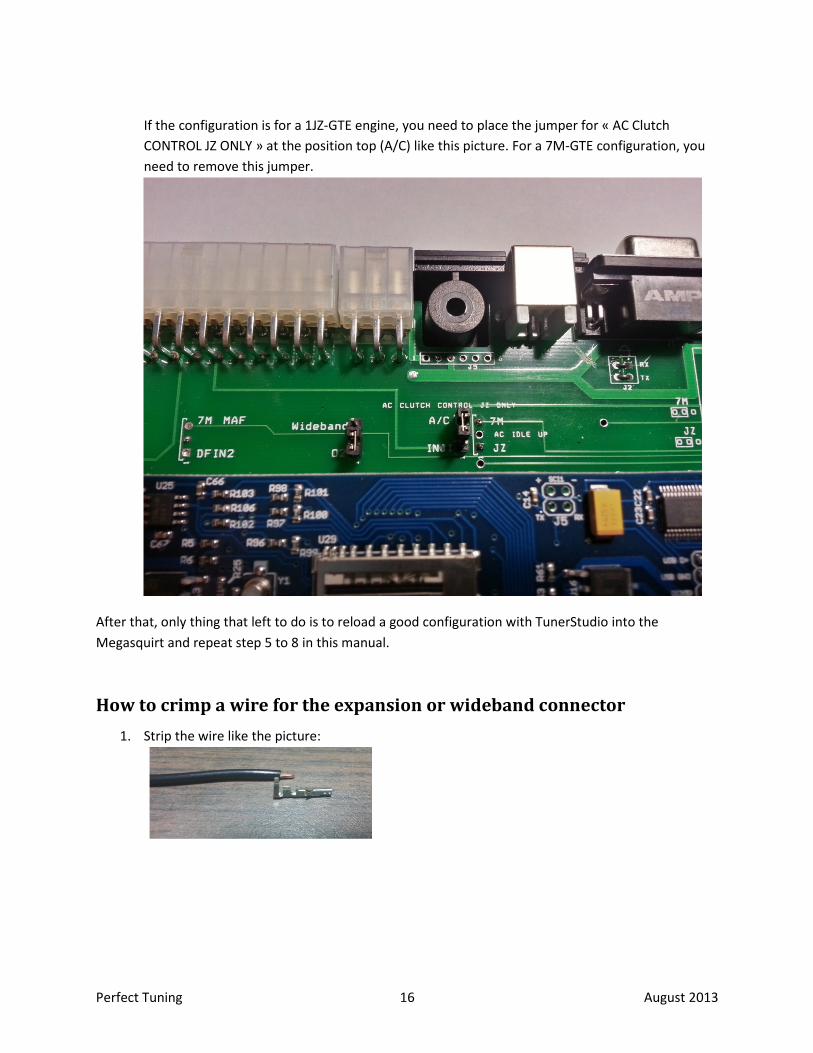
If the configuration is for a 1JZ-GTE engine, you need to place the jumper for « AC Clutch
CONTROL JZ ONLY » at the position top (A/C) like this picture. For a 7M-GTE configuration, you
need to remove this jumper.
After that, only thing that left to do is to reload a good configuration with TunerStudio into the
Megasquirt and repeat step 5 to 8 in this manual.
How to crimp a wire for the expansion or wideband connector
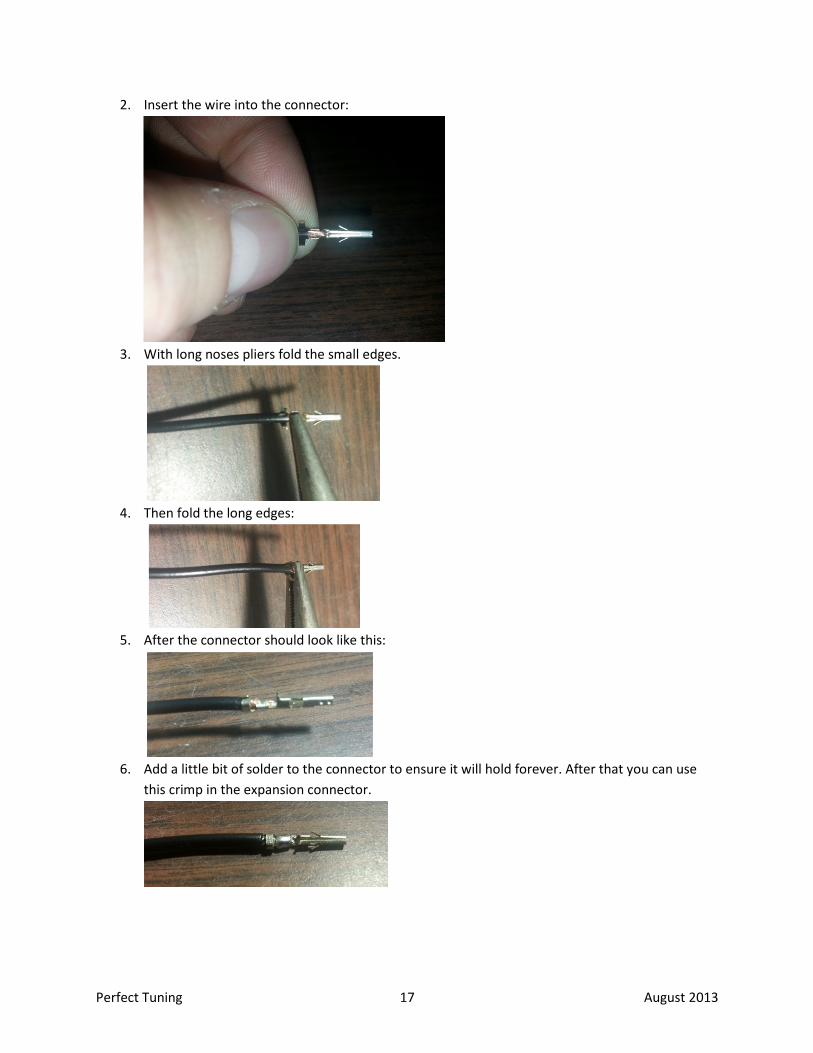
1. Strip the wire like the picture:
Perfect Tuning 17 August 2013
2. Insert the wire into the connector:
3. With long noses pliers fold the small edges.
4. Then fold the long edges:
5. After the connector should look like this:
6. Add a little bit of solder to the connector to ensure it will hold forever. After that you can use
this crimp in the expansion connector.

Perfect Tuning 18 August 2013
Megasquirt Plug and Play dimensions
185mm X 159mm X 38mm (7 ¼ x 6 ¼ x 1 ½ inches)
Contact
If you have any issues, or questions, you can take a look on www.msextra.com or contact me at
[email protected]. I can give remote desktop and phone support. Just contact me by email first.
Perfect Tuning 19 August 2013
Accessories:
- Wideband sensor (AFR 10:1 to 20:1) with a direct connection to the Megasquirt. Without gauge.
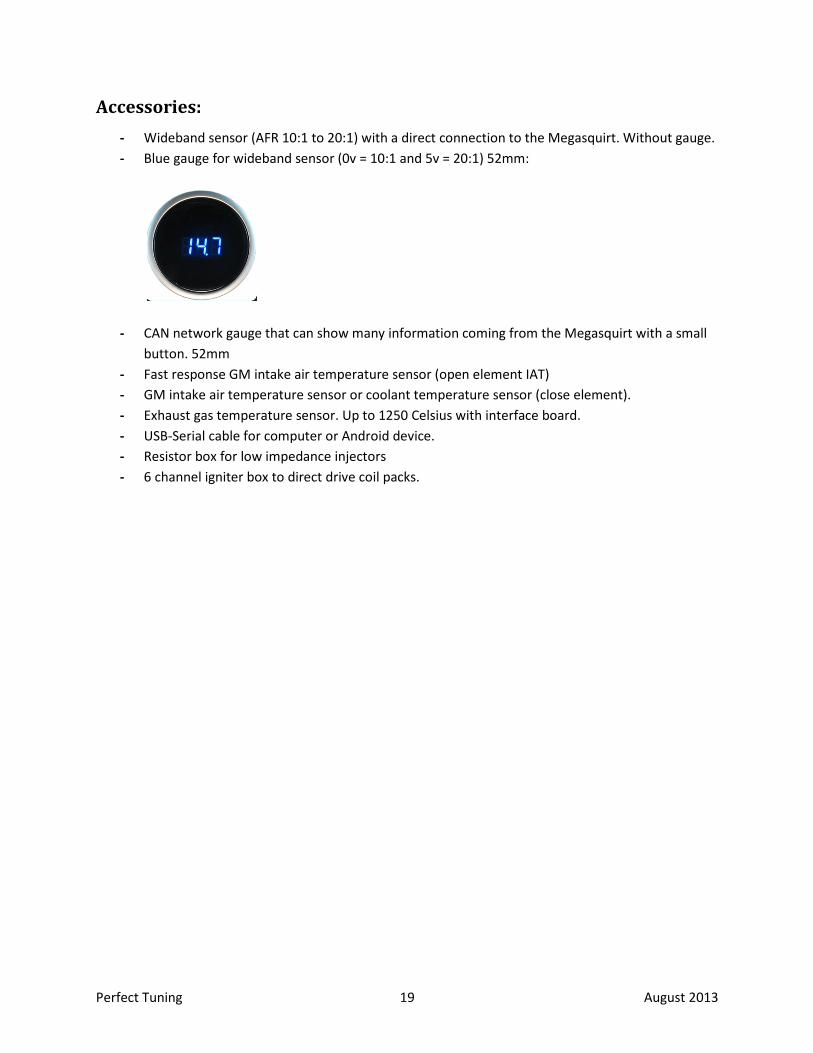
- Blue gauge for wideband sensor (0v = 10:1 and 5v = 20:1) 52mm:
- CAN network gauge that can show many information coming from the Megasquirt with a small
button. 52mm
- Fast response GM intake air temperature sensor (open element IAT)
- GM intake air temperature sensor or coolant temperature sensor (close element).
- Exhaust gas temperature sensor. Up to 1250 Celsius with interface board.
- USB-Serial cable for computer or Android device.
- Resistor box for low impedance injectors
- 6 channel igniter box to direct drive coil packs.