meet manager 5.0 instructions - …files.leagueathletics.com/text/documents/9719/64796.pdf · meet...
TRANSCRIPT

MEET MANAGER 5.0 INSTRUCTIONS

-2015 CAL Meet Manager 5.0 Instructionsver03 Revision Date: 04/5/2015 Page 2 of 37
TABLE OF CONTENTS
RESTORING A CAL MEET TEMPLATE 3 MEET MOBILE 6 PRE-MEET CHECKLIST 7 MEET SET-UP 8 Changing the Number of Lanes for your Pool 9 IMPORTING MEET ENTRIES 11 SEEDING THE MEET 14 HEET SHEETS 16 Timer Sheets 17 ADDING SWIMMERS BEFORE MEET STARTS 18 Adding a Swimmer Already Registered with CAL 18 Editing Swimmer Entires Before/During Meet 20
EDITING SWIMMER LANE ASSIGNMENT 21 BEFORE/DURING MEET
Changing/Adjust Relay entries 22 RUNNING THE DOLPHIN SYSTEM 24 SCORE AND EVENT 29 DOUBLE DUALS 30 UPLOADING TO WEBSITE 32
Create the Backup File 32 Create a Most Improved Times Report 33 Load Results on the Website 34
SYSTEM REQUIREMENTS 37

-2015 CAL Meet Manager 5.0 Instructionsver03 Revision Date: 04/5/2015 Page 3 of 37
RESTORING A CAL MEET TEMPLATE Throughout the swim season, the Meet Templates will be updated for various reasons; updated CAL records, problem correction, and others. Each time any these templates are updated; they will be posted on CAL’s website. Periodically check the website for these updates and use the most current template for each meet.
o Here is the LINK to the section that contains the weekly templates. o Remember which folder this file is saved in. Recommend saving to
a jump-drive
Open Meet Manager. From the File menu, select “Restore”
The Restore popup will appear. Select “Unzip, copy database to a selected
folder, and open this new database”. Check the “Rename database” and enter the name of your meet (Away Team “at” Home Team). Select OK.
-2015 CAL Meet Manager 5.0 Instructionsver03 Revision Date: 04/5/2015 Page 4 of 37
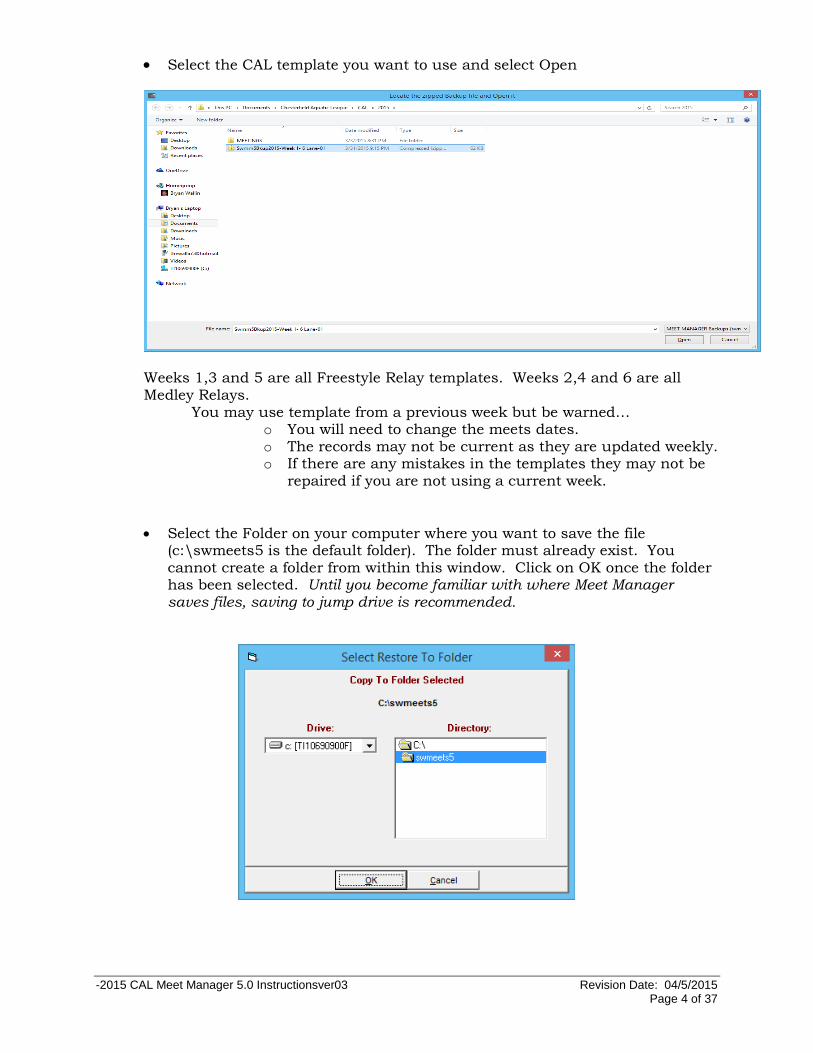
Select the CAL template you want to use and select Open
Weeks 1,3 and 5 are all Freestyle Relay templates. Weeks 2,4 and 6 are all Medley Relays.
You may use template from a previous week but be warned… o You will need to change the meets dates. o The records may not be current as they are updated weekly. o If there are any mistakes in the templates they may not be
repaired if you are not using a current week.
Select the Folder on your computer where you want to save the file (c:\swmeets5 is the default folder). The folder must already exist. You cannot create a folder from within this window. Click on OK once the folder has been selected. Until you become familiar with where Meet Manager saves files, saving to jump drive is recommended.

-2015 CAL Meet Manager 5.0 Instructionsver03 Revision Date: 04/5/2015 Page 5 of 37
This popup is more for information, but it does give you a chance to cancel if you have made a mistake. If all looks correct, select OK.
When Meet Manager has completed the restore, you will get this popup. Select OK to continue.
At this point you have successfully created a new meet in Meet Manager (and the file is open) with all of the default settings from the CAL template. Now you must customize the meet to fit your pool. NOTE: The meet is opened and renamed by your choice on page 3 in the Restore A CAL Meet Template. If you don’t rename your meet it will be saved as Away at Home, which is the meet name in the set-up. If you don’t rename the file as mentioned you may over write another meet.

-2015 CAL Meet Manager 5.0 Instructionsver03 Revision Date: 04/5/2015 Page 6 of 37
MEET MOBILE
If you are interested in publishing your results on Meet Mobile be careful. Meet Mobile needs a
wifi connection in order to upload from your laptop. You are also using an interface when you
use your Dolphin Timing System. If you don’t have a strong wifi signal, Meet Mobile can lock
up your computer looking for a signal which could interfere with bring times in or even worse
your times could be lost. We recommend chosing the Not interested in publishing Meet Mobile
for this meet.
If you want to attempt to publish your results. Under the Publish tab-select Include combine
under Team scoring option. Then go back to Setting select Full Meet Data, View Contract to
Agree and initial it, then Confirm at the bottom of the main page. If after setting up Meet
Mobile, you decide not use it during the meet goto the RUN page Meet Mobile Tab and Disable

-2015 CAL Meet Manager 5.0 Instructionsver03 Revision Date: 04/5/2015 Page 7 of 37
PRE-MEET CHECK LIST Meet Manger has a Check List Menu on the right side of the main page. You can use this to take you to the sections referred to in this user guide, but the instructions are going to be done using the tabs horizontally on top of the page.
The Pre-Meet Check List can help you goto some of the functions needed to set up a meet
however most of what’s listed is already set up in the templates.
What needs to be checked prior to each meet is
Meet Set-up
Printer Set-up-Will allow you to automatically print to any printer on your computer
Timing Set-up-set up for Colorado Timing Systems Dolphin All of the other functions are already preset in the template you’ve downloaded. Also, if you want to hide the check list you can click the button at the bottom. If you wish to turn it back on goto the Help menu and it is the last choice.

-2015 CAL Meet Manager 5.0 Instructionsver03 Revision Date: 04/5/2015 Page 8 of 37
MEET SETUP
Select Set-up from the top tool bar (or in the Check List) and then select Meet Set-up.
There are several things to change on this popup.
First, change the name of the swim meet from Away Team at Home Team to the team competing. Please use the same format ex. Queensmill at Meadowbrook
Next, change the location name to the Home Team.
You may need to change the Start Date and the End Date to the date of the meet. Current templates should be updated and available online
Age-Up Date: May 31 of the current year
Leave: ID Format, Base Country, Class, Timer Connected to this Computer, Meet Type, Meet Style and DQ Codes alone.
Change: “Course” area to match your pool: SC Meters for a meter pool, Yards for a yard pool, LC Meters will not be used.
Select OK when all of the information is correct.

-2015 CAL Meet Manager 5.0 Instructionsver03 Revision Date: 04/5/2015 Page 9 of 37
Changing the Number of Lanes for Your Pool
If you are running a meet at a 5 or 8 lane pool, each event must be changed from a 6 lane pool. This can be accomplished by globally changing the number of lanes in the pool. Helpful Notes:
1. Changing the number of lanes to swim must be completed
prior to seeding the meet. Events that have been seeded will not be corrected nor re-seeded.
2. It is also recommended that you do this prior to importing entries. You may notice swimmers being seeded incorrectly.
From the Main menu, select Set-up then Options.

-2015 CAL Meet Manager 5.0 Instructionsver03 Revision Date: 04/5/2015 Page 10 of 37
From the Global Tab, Select on “Change number of lanes for all Final Rounds to:” and enter the number of lanes you wish to swim into the data entry field just to the right. Select OK when finished.
This popup will appear informing you that you are about to change all final rounds that have not been seeded yet from a 6-lane pool to a 5-lane pool.
Select Yes.
When the operation is complete, this popup will appear. Select OK. Now close the “Global Changes” popup by selecting Close. Now you are ready to Import the Entries by team.

-2015 CAL Meet Manager 5.0 Instructionsver03 Revision Date: 04/5/2015 Page 11 of 37
IMPORTING MEET ENTRIES
From the File menu, select Import, then Entries
Select one team at a time to import.(Directions in Team Manager Manual) It does not matter which team you import first. But don’t forget to import both teams. Select the file (team) and then select Open.
-2015 CAL Meet Manager 5.0 Instructionsver03 Revision Date: 04/5/2015 Page 12 of 37
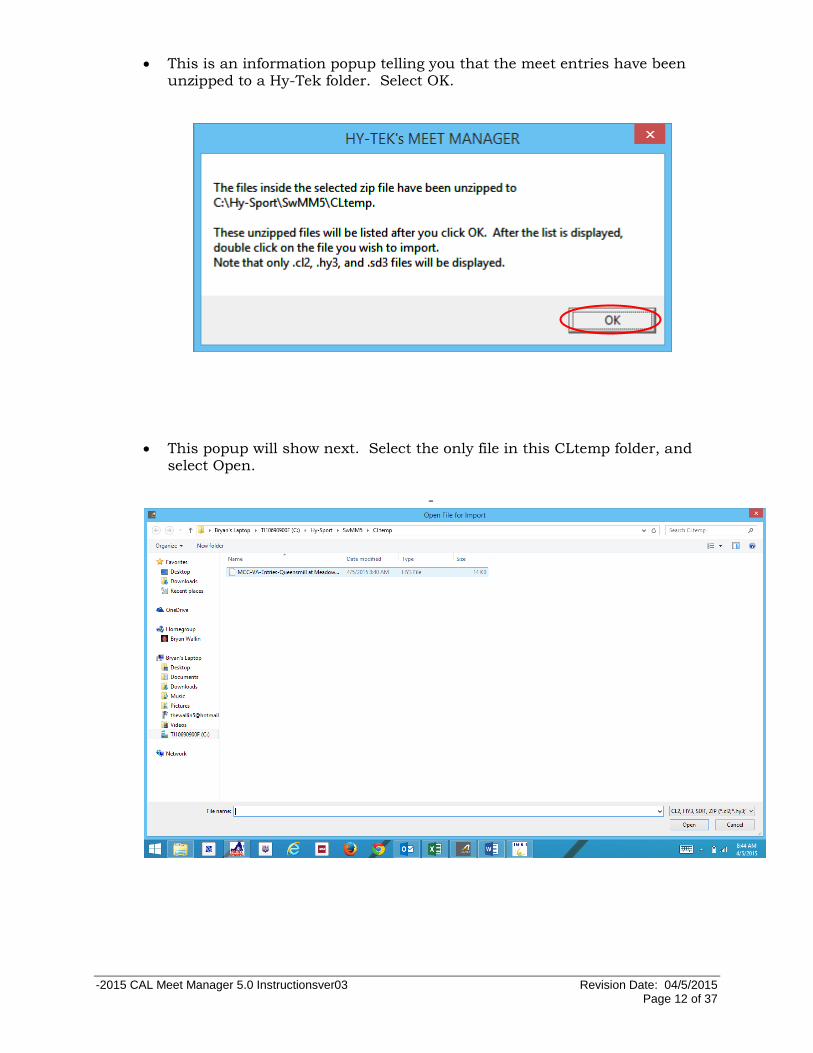
This is an information popup telling you that the meet entries have been unzipped to a Hy-Tek folder. Select OK.
This popup will show next. Select the only file in this CLtemp folder, and select Open.
-

-2015 CAL Meet Manager 5.0 Instructionsver03 Revision Date: 04/5/2015 Page 13 of 37
Another information popup. Select OK.
Make sure that only these three boxes are checked, then select OK.
.
When the import has completed, this popup will appear. This tells you how many Teams, Athletes, Entries, and Relays were imported. Select OK.
Follow these same instructions for the second team.

-2015 CAL Meet Manager 5.0 Instructionsver03 Revision Date: 04/5/2015 Page 14 of 37
SEEDING THE MEET
At this point, you now have a Meet Manager file set up for your meet with both teams and athletes entered with all of the swimmers in their events.
Select Seeding from the top menu.
This Seeding the Meet screen will display. Select “Select All” from the left side of the screen, then “Start Seeding”. If you wish to seed relays check the note following these instructions before continuing.

-2015 CAL Meet Manager 5.0 Instructionsver03 Revision Date: 04/5/2015 Page 15 of 37
When the seeding is complete, this popup will appear informing you how many events were seeded. NOTE: The relays are defaulted to Manual Seeding. If your relays are imported and you wish to seed them along
with the individual events just check off the manual button on all of
the relay tabs and continue with the Start Seeding.
Congratulations, you are now ready to print heat sheets and run the meet!

-2015 CAL Meet Manager 5.0 Instructionsver03 Revision Date: 04/5/2015 Page 16 of 37
HEAT SHEETS
Select Reports from the top tool bar, and then select Meet Program.
The Meet Program window will appear. There are several selections to customize your heat sheets. Play around with the different selections to see which ones you want to use. When you select Create Report, it doesn’t send it to the printer. You get a view of the report first, then you can send it to the printer. Keep in mind, only the events that have been “Seeded” will print.

-2015 CAL Meet Manager 5.0 Instructionsver03 Revision Date: 04/5/2015 Page 17 of 37
TIMER SHEETS
You will now want to print you Timer Sheets. This is also done from the Report section under the main menu. Then goto Lane Timer Sheets
` The easiest way to print your Timer Sheets so you may sort them by cutting the
page in half.
Make sure your Format is set for 2 Events or Lanes per Page. Sort by Event then Lane.
Your Parameters should be Lane 1 and 2, then 3 ,4 and then 5,6 and so on.
Sort By Lane then Event

-2015 CAL Meet Manager 5.0 Instructionsver03 Revision Date: 04/5/2015 Page 18 of 37
ADDING SWIMMERS BEFORE MEET STARTS
It is possible that on the night of the meet, you may be presented with swimmer entries for swimmers who have not been registered in the meet from Team Manager data you imported earlier. These
swimmers must be added to the Meet Manager database before you seed the Meet. Before doing so, obtain a copy of the Top Times report and enter data on the swimmer exactly as it appears on the
report. Failure to exactly copy the name and USS ID number will result in problems when integrating meet results back into Team
Manager.
Adding a Swimmer already Registered with CAL
1. To add the swimmer BEFORE the meet starts, select Athletes from the
Top Menu Bar for Meet Manager.
a. To add the swimmer DURING the meet, while in Run the Meet, select Athletes from the Menu Bar for Meet Manager. The following
screen will appear:
2. Click on Add Athletes at the top of the column of buttons on the left of
the screen. The following screen will appear:
-2015 CAL Meet Manager 5.0 Instructionsver03 Revision Date: 04/5/2015 Page 19 of 37
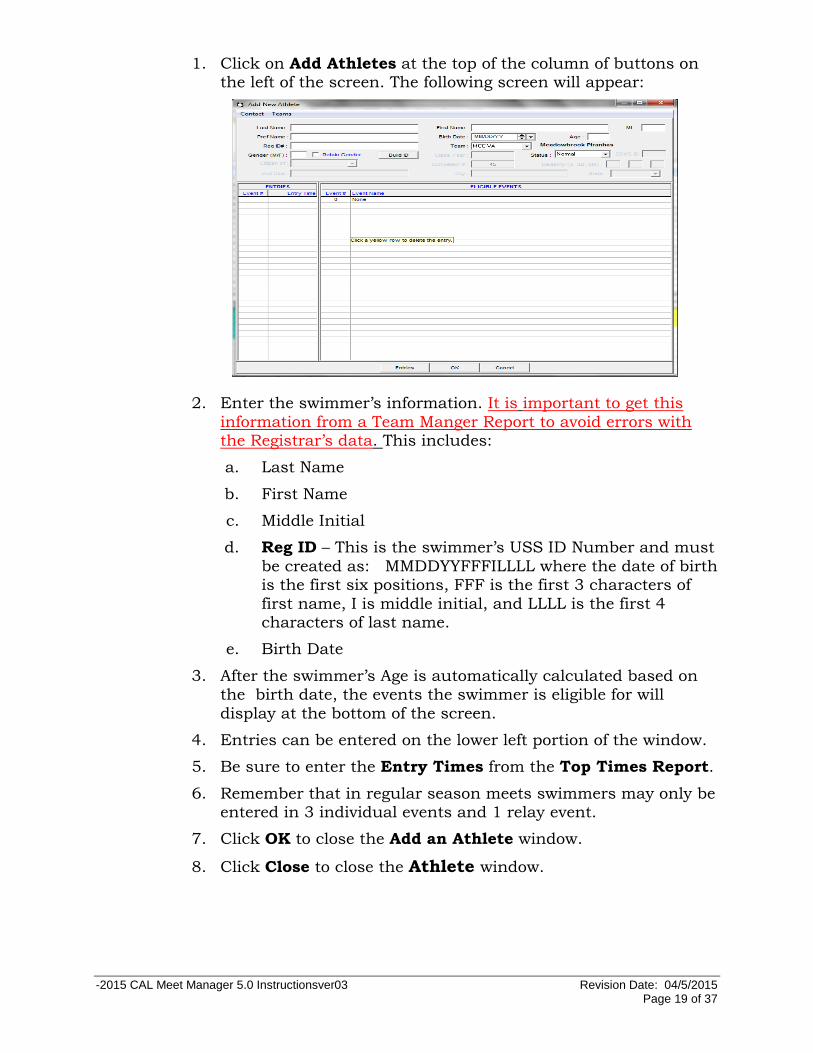
1. Click on Add Athletes at the top of the column of buttons on the left of the screen. The following screen will appear:
2. Enter the swimmer’s information. It is important to get this
information from a Team Manger Report to avoid errors with the Registrar’s data. This includes:
a. Last Name
b. First Name
c. Middle Initial
d. Reg ID – This is the swimmer’s USS ID Number and must
be created as: MMDDYYFFFILLLL where the date of birth is the first six positions, FFF is the first 3 characters of
first name, I is middle initial, and LLLL is the first 4 characters of last name.
e. Birth Date
3. After the swimmer’s Age is automatically calculated based on the birth date, the events the swimmer is eligible for will
display at the bottom of the screen.
4. Entries can be entered on the lower left portion of the window.
5. Be sure to enter the Entry Times from the Top Times Report.
6. Remember that in regular season meets swimmers may only be entered in 3 individual events and 1 relay event.
7. Click OK to close the Add an Athlete window.
8. Click Close to close the Athlete window.

-2015 CAL Meet Manager 5.0 Instructionsver03 Revision Date: 04/5/2015 Page 20 of 37
Editing Swimmers Entries Before/During the Meet
1. To edit swimmer entries before the meet starts, select Athletes
from the Menu Bar of Meet Manager. The Athlete window will
display.
2. To edit swimmer entries during the meet, select Run the Meet
/ Athletes from the Menu Bar of Meet Manager. The Athlete window will display.
3. Click on the first letter of the swimmer’s last name at the top of
the window. If necessary, click the down arrow at the right beside the names until you see the swimmer entry you wish to edit.
4. Click on the swimmer’s name. The events the swimmer is eligible for are shown and the events the swimmer is entered
into are highlighted.
5. Change the swimmer’s entries by clicking on the check box. Be sure to enter the Entry Times from a Top Times Report.
Remember that in regular season meets swimmers may only be entered in 3 individual events and 1 relay event.
Click Close to close the Athlete window

-2015 CAL Meet Manager 5.0 Instructionsver03 Revision Date: 04/5/2015 Page 21 of 37
EDITING SWIMMER LANE ASSIGNMENT BEFORE/DURING MEET
1. To edit a swimmer’s entry after an event has started while in the
Run the Meet window from the Menu Bar of the Meet Manager.
2. From the middle of the Run the Meet window, select Adjust or press F8.
3. Click on Show Eligible Athletes in the left button column.
4. To add a swimmer to an already completed or scored event, drag-and-drop the Athlete name at the bottom of the window into any open lane. Make sure to press Save
5. If there is no open lane, click Add Heat. Additional open lanes will be added.
6. Drag-and-drop the Athlete name at the bottom of the window to
the first open lane.
7. Click on Save.
8. Return to entering results. Keep in mind that you now may have more than one heat in some events.

-2015 CAL Meet Manager 5.0 Instructionsver03 Revision Date: 04/5/2015 Page 22 of 37
Changing/Adjust Relay Entries
As relay events are highlighted for result entry, an additional Event
Management section box to show relay swimmer names will become available
.
You may find it easier to go through the cards once to verify relay
swimmer names and then again to enter the result times.
When keying results for a relay:
1. In the Run the Meet wind
a. Now, highlight the relay event, press Ctrl-R on the keyboard or select Rel Names in the Event Management section.

-2015 CAL Meet Manager 5.0 Instructionsver03 Revision Date: 04/5/2015 Page 23 of 37
2. The Relay Names screen shows all relay entries for that event.
3. Highlight each relay team in the right center section and verify that
the swimmer names shown in the upper right section match the swimmers on the card. Swimmers may be removed from the relay
team by double clicking on their name.
4. A Swimmers position may be moved within the relay by clicking and dragging it to the desired position. This will swap places with
the swimmer now in that position.
5. Swimmers may be added to a relay by double clicking their name
in the left Eligible Athletes section. They will be added to the first open position in the relay.
6. A swimmer may also be added to a relay by clicking and dragging the name
from the Eligible Athlete section on the left to the relay position desired. The swimmer now in that position will be removed from the relay.
7. When all swimmer entry and position adjustments have been made, click Close
to go back to the Run The Meet screen.
8. If any Relay Team has been scratched and you wish to avoid having it display
as a No-Show on reports, you may press F8 or click on Adjust. At this Preview screen you may double click on any team you wish to remove from the event. Click Accept to accept changes and return to result entries.
---

-2015 CAL Meet Manager 5.0 Instructionsver03 Revision Date: 04/5/2015 Page 24 of 37
RUNNING THE DOLPHIN SYSTEM The CTS Dolphin is a wireless stopwatch timing system available for 6 to 10 lanes with up to three watches per lane. The CTS Dolphin hardware interfaces directly to MEET MANAGER and operates in either Stand Alone Mode or Backup Mode. CAL uses the Stand Alone Mode.
Stand Alone Mode In this mode, Meet Manager treats the Dolphin system as the primary times using stop watches. But instead of collecting Lane/Timer Sheets or Entry Cards and keying the
watch times into Meet Manager, you simply press one key from the run menu and Meet Manager imports all of the lane watch times directly into your Meet Manager database for you to review, edit, and/or accept.
CTS Dolphin Software Set-up You must install the Dolphin software using the CD provided by Colorado Time Systems. This CD will install the program onto you hard drive and install a USB driver.
Hardware Requirements The Dolphin system has a wireless base unit which connects to the Hy-Tek computer through a USB port. With the Hy-Tek computer turned on and with the Dolphin software already installed, plug in the Dolphin base unit’s USB cable.
Meet Manager Setup for Stand Alone Dolphin System
Click on Set-Up from the Main Menu Bar and then choose Timing Console INTERFACE.

-2015 CAL Meet Manager 5.0 Instructionsver03 Revision Date: 04/5/2015 Page 25 of 37
Now click on the Colorado Time Systems Dolphin radio button on the left side and then OK.
Operation First, plug in the wireless base unit’s USB cable. Start the Dolphin software. On each wireless watch and the wireless starter unit, press and hold the Reset button to turn them on. If the system is operating correctly, the Dolphin software should have a green light on each lane that has a wireless watch assigned to it. Minimize the Dolphin software. Start Meet Manager. If Meet Manager was already running, you can start the Dolphin software from within Meet Manager by going to Run / Interfaces / Timer(CTSD) Pool 1/ Start Dolphin.exe.

-2015 CAL Meet Manager 5.0 Instructionsver03 Revision Date: 04/5/2015 Page 26 of 37
To time a race, when the Colorado starter sounds to start the swimmers, the Dolphin wireless watches start timing. This starts all of the wireless watches. The timers only need to stop their watch when the swimmer hits the finish. When all watches have been stopped, the wireless starter unit should be stopped. As soon as the wireless start unit’s reset button is pushed, the Dolphin software writes a result file to the “c:\CTSDolphin” folder on the computer and the next race can be started. From the Run Menu in Meet Manager, click on Get Times and a list of Dolphin results files for the current Data Set will be displayed with the most recent file at the top. Select the result file and Meet Manager will read the data into the proper lanes, putting the times into the backup columns for the heat. If the backup columns are not showing in the Run menu, press Ctrl-B. If there is one watch for a given lane, that time will also be place in the result column. If there are 3 watch times for a given lane, the middle time will be placed in the result column. If there are two watches for a given lane, the average will be computed and will be placed in the result column. The average is computed based on the rule choice selected in Run / Preferences /Backup Times. Please note that if there is 0.3 or more seconds difference between the two watch
times, the average result time will NOT be computed and a yellow line will show for this lane. This means you must decide whether to throw out one of the watch times if you determine one of them is way off. If you are OK with the two times, then click Ctrl-K to display the watch averaging menu and it will compute the average for you and place it in the result column. If one of the times is no good, delete it and use Ctrl-K, or simply type in the time for the one good watch.
If you are keeping track of races by Race Number, you can use the Race # button instead of the Get Times button. This button increments itself by 1 automatically and

-2015 CAL Meet Manager 5.0 Instructionsver03 Revision Date: 04/5/2015 Page 27 of 37
searches the data set of results for a matching race number. This is the quickest way to get results if you are keeping up with the race numbers.
How to Select a Data Set for your Meet A Data Set is a set of results for a given meet or session of a meet. Each time a race is completed, the Dolphin system creates a result file in “c:\CTSDolphin” and this file has the extension “.do3”. The first 3 characters of the file name are numbers from 001 to 999. These three character numbers define the Data Set number. So when you select a data set, you are selecting a data set of results based on the first three characters of the result file. The last 4 characters of each result file has a number from 0001 to 9999 and this is the Race Number. Each file within a data set has a unique race number. Every time the Dolphin software is started, it starts a new data set by scanning the files in “c:\CTSDolphin” to figure
out what the highest data set number is and resets the race number back to 0001. To select a Data Set, click on Run / Interface / Timer and click on Select Data Set stored from CTSD. The INTERFACE will display a window with the date and time and the number of races that have been stored for the current data set the Meet Manager is pointing to. Remember, you could be running a three day meet and the INTERFACE must know what “data set of meet data” you want to access.
Click on Next Meet or Previous Meet buttons to select the appropriate data set. Because there is a date and time shown for when the first file in the data set was created, you can usually figure out which data set to select
If new Data Sets with a new data set number have been added since starting MeetManager, you can click Update Data Set and all data sets will be refreshed for selection. Once you’ve found the correct Data Set you can begin drawing times in with the Get Times Tab

-2015 CAL Meet Manager 5.0 Instructionsver03 Revision Date: 04/5/2015 Page 28 of 37
Check and make sure these times match up with the first event and you should be able to draw all the times in race number sequential order for the remainder of the meet.

-2015 CAL Meet Manager 5.0 Instructionsver03 Revision Date: 04/5/2015 Page 29 of 37
SCORE AN EVENT
1. After entering all results for an event, click on Score Event in the middle of the Events Management window. A report showing the
scored event results will preview as shown below:
2. Click on the printer icon at the top of the screen. When the print dialog box appears, verify that the number of copies is set to 2 and
click OK.
3. Verify that the event results print satisfactorily.
4. Click the X in the upper left of the preview screen to close it.

-2015 CAL Meet Manager 5.0 Instructionsver03 Revision Date: 04/5/2015 Page 30 of 37
DOUBLE DUALS
If your team is running a double duel, 3 or more teams swimming each other, this is the easiest way to set the meet up and score it in Meet Manager.
Importing More Than One Team Simply repeat the process that was done in IMPORTING MEET ENTRIES on page 8 until the desired number of teams is entered. Seed the meet and print the necessary paperwork just as if you were running a regular meet. DO NOT PRINT RIBBONS DURING THE MEET-
The meet will need to be separated after the last event. When the last event is swam, verified and scored ****MAKE A BACKUP OF THE ORIGINAL MEET**** Recommend using a portable storage devise.
Rename the meet to match two of the participating teams. Example if MCC,QM,BHP swim a double duel then rename the meets to match the two teams that competed against each other this night. Save As: QM at MCC, then Save As BHP vs QM, then Save As BHP at MCC. Note just because 3 teams are swimming at the same pool doesn’t mean they are all swimming against each this night. Double check your schedule to insure which teams were actually competing against one another.

-2015 CAL Meet Manager 5.0 Instructionsver03 Revision Date: 04/5/2015 Page 31 of 37
After the meets have been renamed simply go back to the first renamed meet (QM at MCC) and the Teams header remove the extra team(BHP)
. Then go back to the Run screen and on the TOP tab press Re-score. This will rescore the entire meet. If you press the Re-score in the middle of the screen it will only rescore the event highlighted.
Print Ribbons, make a backup of this meet and repeat the process with the next meet.

-2015 CAL Meet Manager 5.0 Instructionsver03 Revision Date: 04/5/2015 Page 32 of 37
UPLOADING TO WEBSITE Following each meet the home team needs to enter results on the CAL website. To do so, you will need the Meet Manager back-up file, you will need to create a “Meet Results” report saved as a flat HTML file, and you will need to create a Most Improved Times Report
Create the Backup file
Select File:Backup
Save the meet results as a flat html, in Meet Manager:
o Select Reports
o Select Meet Results
o Select all events
o In the column/format area under report type select flat html
o Select create report
o Rename the result the title of your meet and save.

-2015 CAL Meet Manager 5.0 Instructionsver03 Revision Date: 04/5/2015 Page 33 of 37
Create a Most Improved Times Report
Select File/Export then Generic Data in MS Access
Under Export Type, make sure that “Athletes/Teams/Entries/Results” is
checked and leave the other criteria as is and press OK
Open the Most Improved Excel File (found on the CAL website)-LINK
o Click on the Most Improved Tab (directly above Winners) and find the file
you saved for your meet and select it
o Select OK when the box stating “Select the Most Improved Tag to view and
print results” appears
o Click on “GoTo Most Improved” tab
o Save the file as name of your meet “Visiting Team vs. Home Team”
Remember the suggestion before about saving on a jump drive

-2015 CAL Meet Manager 5.0 Instructionsver03 Revision Date: 04/5/2015 Page 34 of 37
Load Results onto the website:
Log-in to website
o Under “Teams” select your team page
o Select “Results”
o Click on the yellow/orange box that is located beside the meet (when curser
is over the box it should state Enter/Edit Results)

-2015 CAL Meet Manager 5.0 Instructionsver03 Revision Date: 04/5/2015 Page 35 of 37
Under “Enter Game Results” enter your name, phone number and email
address and then enter the points for each team in the appropriate box
o In the Event Comments section, write “Results” then hit enter twice
and write “Meet Back-up” then hit enter twice and write “Most
Improved Times”
Place your curser over “Results” to highlight it and then click on the
Link button (looks like the a chain link
In the “Link” box, click on Browse Server

-2015 CAL Meet Manager 5.0 Instructionsver03 Revision Date: 04/5/2015 Page 36 of 37
o At the top of the page click on “Link to File”
o Under File Directory, click on the Folder with the current
year(2015) – and then the corresponding week Results file-
(Week 1)
o Under Upload Files, click on Browse and find the HTML file
you saved
o Click on “Upload”
o In the “Link” box select “Target” and then from the drop down
menu under Target select “New Window” then select OK
Highlight “Meet Back-up” and repeat the above steps, but select the
meet backup file instead of the html file.
Highlight “Most Improved Times” and the above steps but select the
most improved times file.
Directly below the “comments” section click on Submit

-2015 CAL Meet Manager 5.0 Instructionsver03 Revision Date: 04/5/2015 Page 37 of 37
SYSTEM REQUIREMENTS Hardware:
o Minimum: Any 500 MHZ Pentium, Celeron, or AMD class computer or faster with 1 GB RAM.
o Recommended: Any 1 GHZ Pentium, Celeron, or AMD class computer or faster with 2 GB RAM.
o Any Macintosh computer that will run Microsoft's Windows XP, or Windows Vista using Hardware or Software Emulation. Click on Running Hy-Tek on Your Mac for detail information.
Software: Microsoft's Windows XP, Windows Vista, Windows 7, or Windows 8.
Printer: Any Windows supported printer. Dot-matrix printers are not recommended for reports.
Resolution: Any monitor size is supported but an 800 x 600 monitor resolution or higher is required
If you have any questions or suggestions to improve this Handbook please contact Bryan Wallin [email protected]