mediadent release notes 11 · 2018-04-10 · odontogram, new clear all unsaved chart data icon...
TRANSCRIPT
Greenway MediaDent / Version 11.10
MediaDent Release Notes 11.10
121 Greenway Blvd.
Carrollton, GA 30117
866-242-3805
www.greenwayhealth.com
Confidential
This document and the information it contains are the confidential information of Greenway Health. Neither this document nor the information it contains may be disclosed to any third party or reproduced, in whole or in part, without the express prior written consent of Greenway.
Greenway reserves the right to change, without notice, product offerings, product specifications and the information in this document. This document supersedes any prior document containing similar subject matter with regard to the descriptions of features and functionality of product offerings. You may receive supplements to this document based on changes that may occur in the product. This document may not be reproduced in any form without prior written permission from Greenway.
©2015 Greenway Health, LLC. All rights reserved. Greenway, the Greenway logo, and <Product> are registered trademarks or trademarks of Greenway Health, LLC., or its affiliated entities. All other trademarks are the property of their respective owners.
For more information about Greenway, please contact us on the Web at
www.greenwayhealth.com
To provide feedback or request changes to a document, send an e-mail to [email protected]. In your message, be sure to include the title and date of the document (listed above).
3 | MediaDent Release Notes 11.10 Not for distribution except to authorized persons © Greenway Health, LLC. All rights reserved. Confidential and proprietary. Last Modified: 7/20/16
Table of Contents Revision History ................................................................................................................................ 5
1 | Appointment Center .............................................................................................................. 6
Appointment Book, Modify Hours by Specific Date ....................................................................................................... 6 Appointment Properties, Lab Work Tab Added ............................................................................................................. 6 Details at a Glance, Appointment Notes/Special Indicators Added............................................................................... 7 Medical Alerts, Save and Close Icon Added ................................................................................................................... 7 Patient Communication Changes .................................................................................................................................. 8
2 | Chart ..................................................................................................................................... 9
Chart Name Changes ..................................................................................................................................................... 9 Chart Navigation Tree/Search Function Updated ....................................................................................................... 10 Odontogram, New Clear All Unsaved Chart Data Icon ................................................................................................ 11 Odontogram, Select/Deselect Options Added for Maxillary/Mandibular Sections ..................................................... 11 New Lab Work Tab ...................................................................................................................................................... 12 Perio Charting, Automatic Prompting to Subsequent Fields After Entering Perio Values ........................................... 12 Perio Charting, New All Bleeding Indicator.................................................................................................................. 13 Refresh Option ............................................................................................................................................................. 14 Tools/Materials, Changes to Select Procedures Prompt .............................................................................................. 14 Tooth Info, Custom Sort Order for Tooth Column ........................................................................................................ 14 Tooth Info, Treatment Plan Workflow Changes .......................................................................................................... 15
3 | System Files ......................................................................................................................... 16
Practice Information, Renamed Lock Progress Note Option ....................................................................................... 16
4 | New Security Mode.............................................................................................................. 17
5 | Updated Progress Notes Functionality .................................................................................. 18
Progress Notes Configuration and Setup ......................................................................................... 18
Edit and View Tabs ...................................................................................................................................................... 18 Templates/Macros Tab ................................................................................................................................................ 19
Macros .................................................................................................................................................................. 19 Templates ............................................................................................................................................................. 21
Form Fields .................................................................................................................................................................. 24
Insert Fields .......................................................................................................................................................... 24 Input Fields ........................................................................................................................................................... 26
Auto Notes Tab ............................................................................................................................................................ 27
Progress/Treatment Notes Updates in Chart ................................................................................... 29
Menu Ribbon ............................................................................................................................................................... 29 Note Lock Indicator Bar ............................................................................................................................................... 32 Mark as Reviewed/Locked Indicator ........................................................................................................................... 32
Updates to Locked/Reviewed Status .................................................................................................................... 32
Compare Versions ........................................................................................................................................................ 33 Imaging – View/Drag and Drop ................................................................................................................................... 34 Status Bar .................................................................................................................................................................... 35 Reporting Tab .............................................................................................................................................................. 35
User Access to Updated Progress Notes ........................................................................................... 36
6 | MediaDent Support for Prime Suite (Phase I) ....................................................................... 37

4 | MediaDent Release Notes 11.10 Not for distribution except to authorized persons © Greenway Health, LLC. All rights reserved. Confidential and proprietary. Last Modified: 7/20/16
Prime Suite to MediaDent Workflow ............................................................................................... 37
System Administration: Resource Mapping ..................................................................................... 38

5 | MediaDent Release Notes 11.10 Not for distribution except to authorized persons © Greenway Health, LLC. All rights reserved. Confidential and proprietary. Last Modified: 7/20/16
Revision History
7/20/16
Updated information in Appointment Book, Modify Hours by Specific Date (V1110-38) to clarify hour-blocking rules.
Updated information in the Updated Progress Notes section regarding template additions and macros.
Draft status removed.

6 | MediaDent Release Notes 11.10 Not for distribution except to authorized persons © Greenway Health, LLC. All rights reserved. Confidential and proprietary. Last Modified: 7/20/16
1 | Appointment Center
Appointment Book, Modify Hours by Specific Date Project #V1110-38
Hour blocking configured in the Modify Hours by Specific Date screen under Scheduling Control Information in System Files is now supported in the new Appointment Center.
Configuration is location/book-specific.
Multi-day views
Any location/book with specific modified hours set up will hard block those areas that do not fall within the modified hours.
If the start time and the end time are the same, the day is considered closed and all times will be hard blocked.
Single day view
Any location/book with specific modified hours the appointment book will adjust the start and end time accordingly and only display those hours.
If the start time and the end time are the same, the day is considered closed and that day will display with no grid.
Appointment Properties, Lab Work Tab Added Project #V1110-61
A Lab Work tab has been added to the Appointment Properties window that mirrors the Lab Work tab in Chart
This tab enables the user to add lab work from appointments without navigating to Chart or accessing additional screens. Any data entered or modified on this tab will be reflected on the patient’s main Lab Work table in Chart.
To link the appointment in context to a specific lab case simply check the corresponding “Link to Appt.” check box.

7 | MediaDent Release Notes 11.10 Not for distribution except to authorized persons © Greenway Health, LLC. All rights reserved. Confidential and proprietary. Last Modified: 7/20/16
Details at a Glance, Appointment Notes/Special Indicators Added Project #V1110-95
Special Indicators and Appointment Notes fields have been added to the Details at a Glance window in the Appointment Center.
The Special Indicators field displays the same information as in Appointment Properties.
The Appointment Notes field displays Yes or No depending on whether notes are present.
The new Appointment Notes field replaces the Appointment Book note configuration options on the Note Admin tab; which will be removed from the configuration screen in Practice Information.
Medical Alerts, Save and Close Icon Added Project #V1110-52
A Save and Close icon has been added to the main Medical Alerts window that enables the user to save any data added or modified on the window and close the window automatically.
8 | MediaDent Release Notes 11.10 Not for distribution except to authorized persons © Greenway Health, LLC. All rights reserved. Confidential and proprietary. Last Modified: 7/20/16
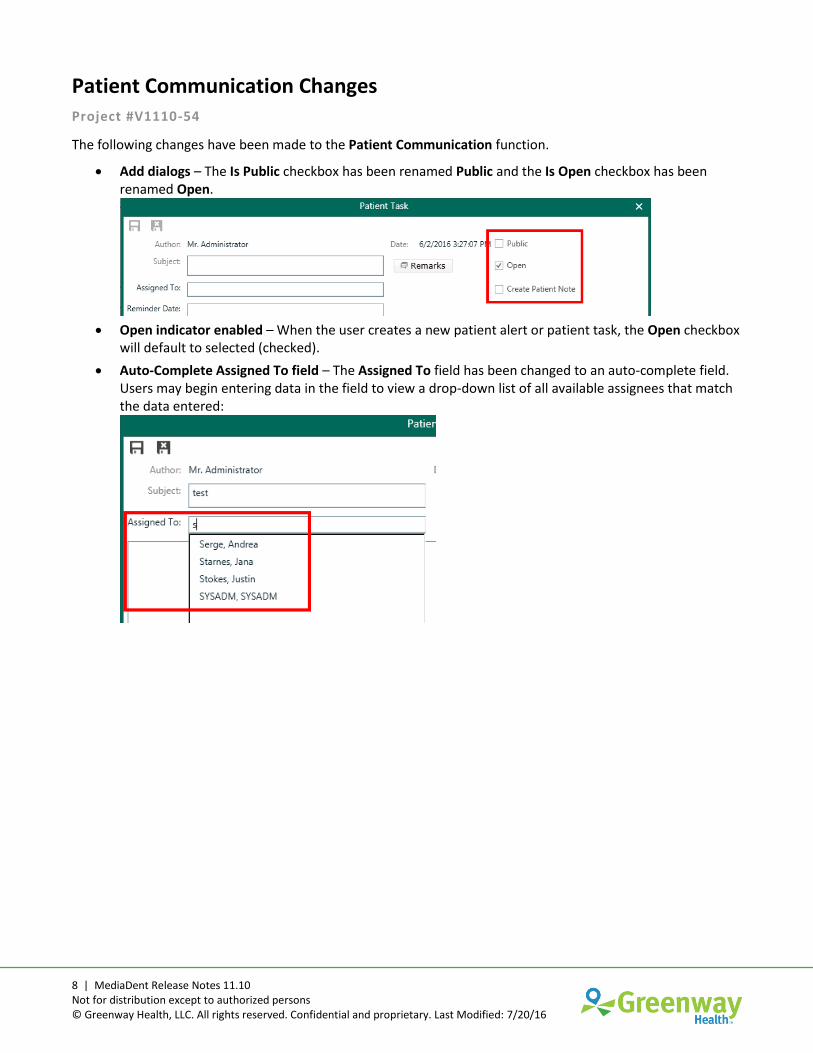
Patient Communication Changes Project #V1110-54
The following changes have been made to the Patient Communication function.
Add dialogs – The Is Public checkbox has been renamed Public and the Is Open checkbox has been renamed Open.
Open indicator enabled – When the user creates a new patient alert or patient task, the Open checkbox will default to selected (checked).
Auto-Complete Assigned To field – The Assigned To field has been changed to an auto-complete field. Users may begin entering data in the field to view a drop-down list of all available assignees that match the data entered:

9 | MediaDent Release Notes 11.10 Not for distribution except to authorized persons © Greenway Health, LLC. All rights reserved. Confidential and proprietary. Last Modified: 7/20/16
2 | Chart
Chart Name Changes Project #V1110-47
The following entities have been renamed:
The Charting module (and all labels and pop-ups referencing the module) has been renamed Chart.
The Charting tab related to the Odontogram (and its associated node in the chart tree) will remain “Charting.”
The Patient Lab Case icon (and all labels and pop-ups referencing the icon) has been renamed Lab Work in the Charting and Appointment Center modules.
When this icon is selected, the system will navigate to the Lab Work tab in Chart for the patient.

10 | MediaDent Release Notes 11.10 Not for distribution except to authorized persons © Greenway Health, LLC. All rights reserved. Confidential and proprietary. Last Modified: 7/20/16
Chart Navigation Tree/Search Function Updated Project #V1110-99
The Chart navigation tree has been updated. Patient data has been moved to the top of the tree, with the specific chart nodes below.
A new Date of Service field displays the appointment date if an appointment/visit is in context.
A Guarantor field has been added to the patient data section. If the guarantor is Self, then Self will display in the field. Any other guarantor listed should display the full name in the field.
The Search field has been updated to mirror the search field in the Appointment Center. Entering a search name will display a drop-down list of all patients who match the entered criteria. You may scroll to select the appropriate patient from the search list.

11 | MediaDent Release Notes 11.10 Not for distribution except to authorized persons © Greenway Health, LLC. All rights reserved. Confidential and proprietary. Last Modified: 7/20/16
Odontogram, New Clear All Unsaved Chart Data Icon Project #V1110-31
A Clear All Unsaved Chart Data icon has been added to the actions toolbar on the Odontogram.
This icon will only be enabled if unsaved chart data exists for a patient. When clicked, all unsaved data will be removed from the patient’s chart.
Odontogram, Select/Deselect Options Added for Maxillary/Mandibular Sections Project #V1110-31
Users may now single-click the blue Maxillary and Mandibular bars in the Odontogram to select or deselect all maxillary/mandibular teeth at once.
When all maxillary/mandibular teeth are selected, any tools/materials/pathologies entered will be documented on all of the selected teeth.

12 | MediaDent Release Notes 11.10 Not for distribution except to authorized persons © Greenway Health, LLC. All rights reserved. Confidential and proprietary. Last Modified: 7/20/16
New Lab Work Tab Project #V1110-26
The Lab Work screen on the Patients tab in Practice Navigator has been moved to a new Lab Work tab on the Chart task list.
The top row on the Lab Work tab will be blank, enabling you to add a new lab. Once the new lab is saved, it will move to a lower row and reset the top row to blank again.
A Link to Appt column has been added that indicates the specific lab has been linked to a selected appointment.
Perio Charting, Automatic Prompting to Subsequent Fields After Entering Perio Values Project #V1110-7
When entering single-digit perio values in a chart on the Perio tab in Chart while in Keyboard mode, users do not have to press the Enter key to move to the next value field. Once a perio value is entered, the chart will automatically move to the next value field.
Note - This function is only present for single-digit values in Keyboard mode. (Single-digit is the default setting for Keyboard entry.) Users must press the asterisk key (*) to enter a double-digit value in Keyboard mode.

13 | MediaDent Release Notes 11.10 Not for distribution except to authorized persons © Greenway Health, LLC. All rights reserved. Confidential and proprietary. Last Modified: 7/20/16
Perio Charting, New All Bleeding Indicator Project #V1110-200
An All Bleeding button has been added to the Perio tab that enables users to document all areas of the mouth on the perio chart as bleeding.
Clicking the All Bleeding button will display all BL (bleeding) sections on the chart in red. Users may click the red diamond indicator for each section (Facial, Lingual, Maxillary, Mandibular) to document/not document bleeding for the specific section.
14 | MediaDent Release Notes 11.10 Not for distribution except to authorized persons © Greenway Health, LLC. All rights reserved. Confidential and proprietary. Last Modified: 7/20/16
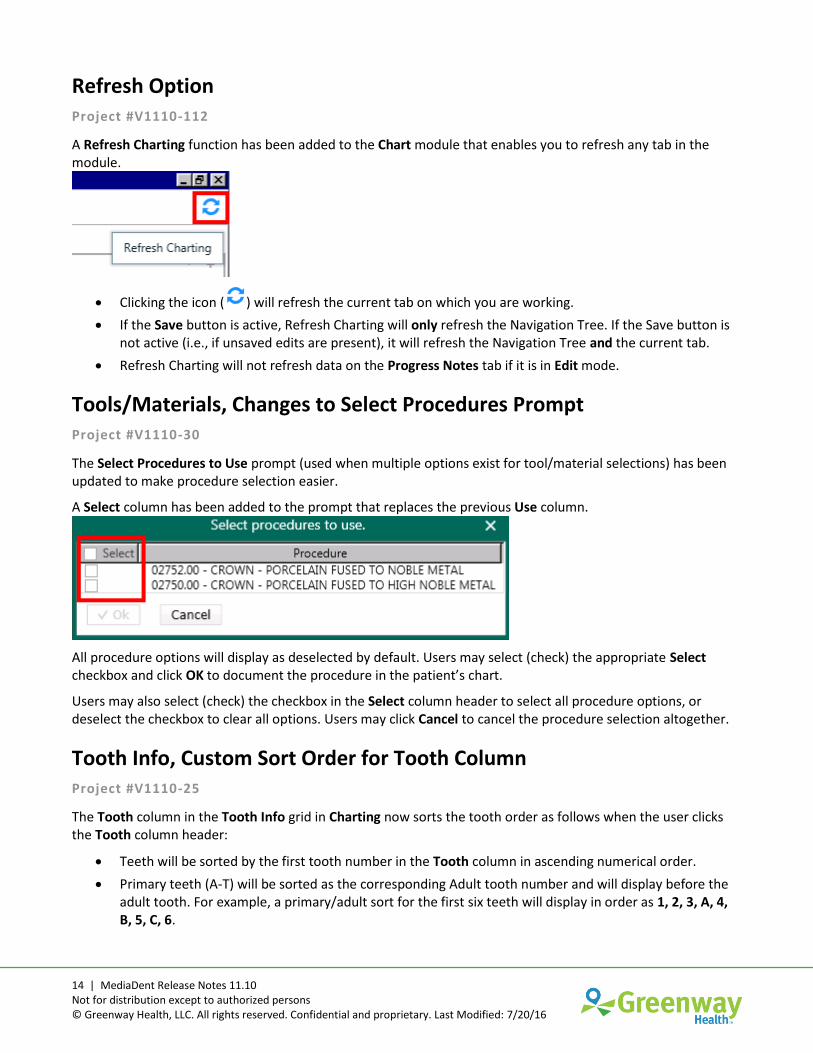
Refresh Option Project #V1110-112
A Refresh Charting function has been added to the Chart module that enables you to refresh any tab in the module.
Clicking the icon ( ) will refresh the current tab on which you are working.
If the Save button is active, Refresh Charting will only refresh the Navigation Tree. If the Save button is not active (i.e., if unsaved edits are present), it will refresh the Navigation Tree and the current tab.
Refresh Charting will not refresh data on the Progress Notes tab if it is in Edit mode.
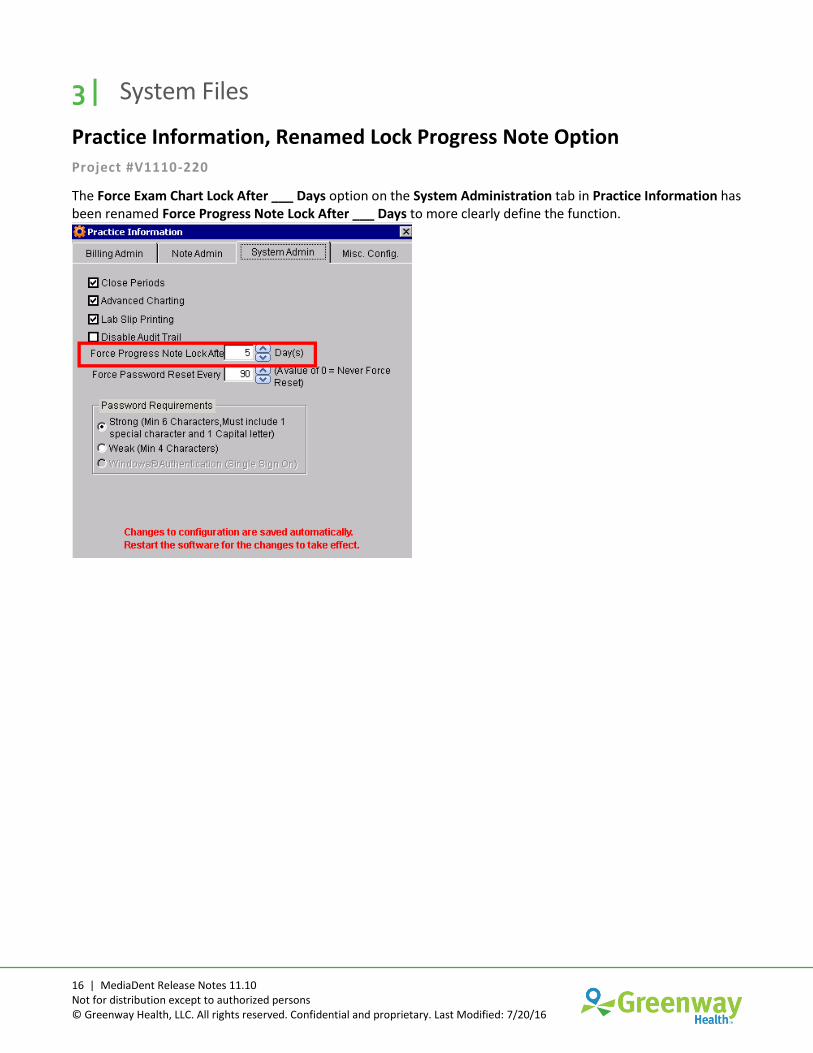
Tools/Materials, Changes to Select Procedures Prompt Project #V1110-30
The Select Procedures to Use prompt (used when multiple options exist for tool/material selections) has been updated to make procedure selection easier.
A Select column has been added to the prompt that replaces the previous Use column.
All procedure options will display as deselected by default. Users may select (check) the appropriate Select checkbox and click OK to document the procedure in the patient’s chart.
Users may also select (check) the checkbox in the Select column header to select all procedure options, or deselect the checkbox to clear all options. Users may click Cancel to cancel the procedure selection altogether.
Tooth Info, Custom Sort Order for Tooth Column Project #V1110-25
The Tooth column in the Tooth Info grid in Charting now sorts the tooth order as follows when the user clicks the Tooth column header:
Teeth will be sorted by the first tooth number in the Tooth column in ascending numerical order.
Primary teeth (A-T) will be sorted as the corresponding Adult tooth number and will display before the adult tooth. For example, a primary/adult sort for the first six teeth will display in order as 1, 2, 3, A, 4, B, 5, C, 6.

15 | MediaDent Release Notes 11.10 Not for distribution except to authorized persons © Greenway Health, LLC. All rights reserved. Confidential and proprietary. Last Modified: 7/20/16
Tooth Info, Treatment Plan Workflow Changes Project #V1110-2
The following change has been made to the Treatment Plans workflow in Chart.
If a user changes an Existing work item to a Planned or Completed state on a current (same-day) item entered in the Plan, the appropriate procedure codes will also update the Tooth Info grid as governed by current validation rules.
16 | MediaDent Release Notes 11.10 Not for distribution except to authorized persons © Greenway Health, LLC. All rights reserved. Confidential and proprietary. Last Modified: 7/20/16
3 | System Files
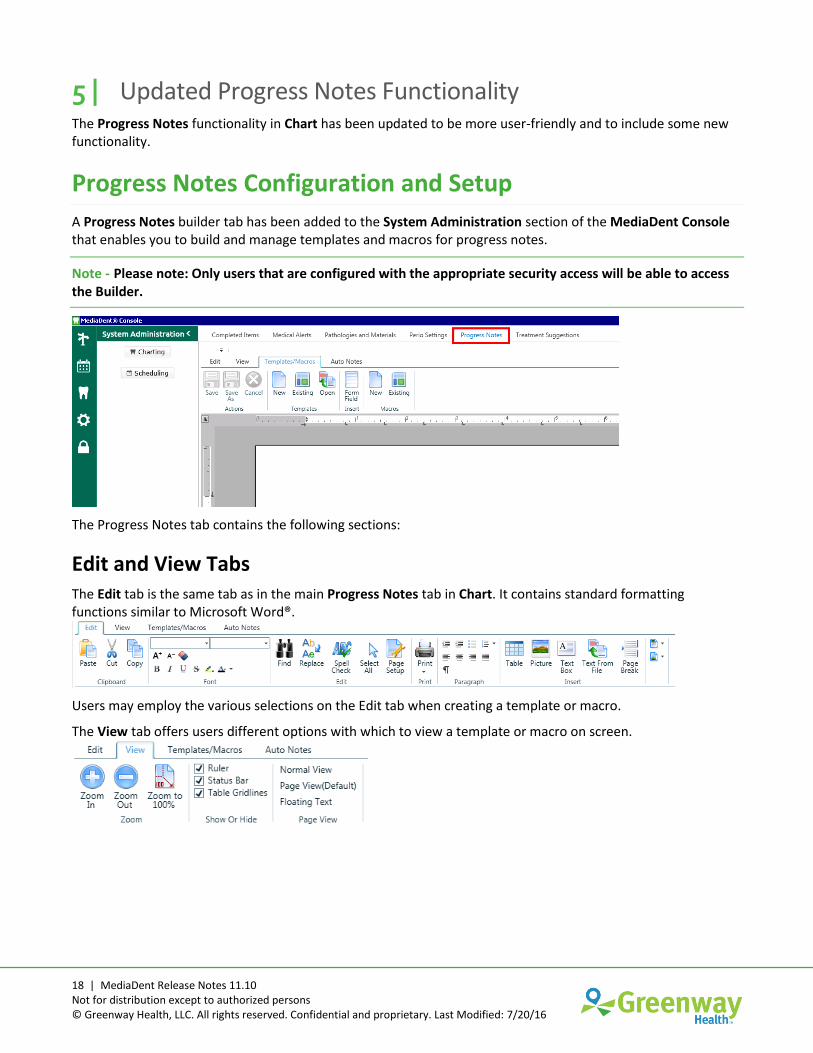
Practice Information, Renamed Lock Progress Note Option Project #V1110-220
The Force Exam Chart Lock After ___ Days option on the System Administration tab in Practice Information has been renamed Force Progress Note Lock After ___ Days to more clearly define the function.

17 | MediaDent Release Notes 11.10 Not for distribution except to authorized persons © Greenway Health, LLC. All rights reserved. Confidential and proprietary. Last Modified: 7/20/16
4 | New Security Mode Project #V1110-57
A Security mode has been added to the MediaDent Console that enables administrators to configure user access to certain functions within Progress Notes.
Note - Only users with the Administrator role in User Properties will have access to this mode; it will be disabled for non-administrator users.
The Security mode is access via the lock icon on the Navigation bar in MediaDent Console.
Clicking the icon displays the Security window.
To configure user access to the appropriate functions:
1. Click the User Level Configuration button in the Security task list.
2. On the User Security Config tab, select the appropriate User from the drop-down list.
3. To grant user access to a function, select the appropriate access feature in the Denied list and drag the feature name to the Allowed list.
4. To revoke access to a feature, select the appropriate access feature in the Allowed list and drag the feature name to the Denied list.
5. Click Save Changes to save the user’s access configuration.
18 | MediaDent Release Notes 11.10 Not for distribution except to authorized persons © Greenway Health, LLC. All rights reserved. Confidential and proprietary. Last Modified: 7/20/16
5 | Updated Progress Notes Functionality The Progress Notes functionality in Chart has been updated to be more user-friendly and to include some new functionality.
Progress Notes Configuration and Setup
A Progress Notes builder tab has been added to the System Administration section of the MediaDent Console that enables you to build and manage templates and macros for progress notes.
Note - Please note: Only users that are configured with the appropriate security access will be able to access the Builder.
The Progress Notes tab contains the following sections:
Edit and View Tabs The Edit tab is the same tab as in the main Progress Notes tab in Chart. It contains standard formatting functions similar to Microsoft Word®.
Users may employ the various selections on the Edit tab when creating a template or macro.
The View tab offers users different options with which to view a template or macro on screen.

19 | MediaDent Release Notes 11.10 Not for distribution except to authorized persons © Greenway Health, LLC. All rights reserved. Confidential and proprietary. Last Modified: 7/20/16
Templates/Macros Tab The Templates/Macros tab enables you to create and manage progress note templates and macros.
By default, when a user enters the Progress Notes builder, no mode is selected. The two available modes are Macro and Template mode (see below). Once the user selects the macro or template icon in the ribbon, a green bar will display indicating which mode the user is in. Certain icons in the ribbon will disable based on the mode selected.
Macros
Paragraph Remarks in the previous version of MediaDent have been renamed Macros.
All previously created paragraph remarks have been imported into the updated Progress Notes functionality as macros. You may access and use all existing macros as per usual in progress notes.
To create a new macro:
1. Click New in the Macros section of the Templates/Macros menu ribbon.
A green Currently editing macro: New Macro bar indicates that you are currently working with macros.
Note - While in Macro mode, all functions in Template mode will be disabled.
2. Enter any appropriate text for the macro on screen.
3. Form fields are now able to be added to a macro.

20 | MediaDent Release Notes 11.10 Not for distribution except to authorized persons © Greenway Health, LLC. All rights reserved. Confidential and proprietary. Last Modified: 7/20/16
To insert a form field that will pull specific chart information into the macro, click Form Field in the menu ribbon. A Form Field dialog box displays.
4. Select the appropriate form field Type from the drop-down list. Based on your selection, certain formatting options will display in the Form Field dialog box.
5. Make the appropriate selections and click OK to insert the form field placeholder into the macro.
Note - The placeholder will display in black text if data exists that will be pulled into the progress note. If no data exists for a specific form field, the placeholder will display in red text.
6. Repeat Steps 2–5 to add additional text/form fields to the macro.
7. When you are done creating the macro, click Save As. A Save As dialog box displays.
8. Enter an appropriate Macro Name and click the Save icon ( ).

21 | MediaDent Release Notes 11.10 Not for distribution except to authorized persons © Greenway Health, LLC. All rights reserved. Confidential and proprietary. Last Modified: 7/20/16
9. To access the new macro (or any other macro), click Existing in the Macros section. A Select Macro dialog box displays.
10. Double-click the appropriate macro name from the list to open the macro.
11. You may make any appropriate edits and click Save to save your changes.
12. To delete a macro from the list, click the Delete button ( ) for the appropriate macro on the Select Macro dialog box. The macro will be permanently deleted.
Templates
To create a new template:
1. Click New in the Templates section of the Templates/Macros menu ribbon.
A green Currently editing template: New Template bar indicates that you are currently working with templates.

22 | MediaDent Release Notes 11.10 Not for distribution except to authorized persons © Greenway Health, LLC. All rights reserved. Confidential and proprietary. Last Modified: 7/20/16
Note - While in Template mode, all functions in Macro mode will be disabled.
2. Enter any appropriate text for the template on screen.
3. To insert a form field that will pull specific chart information into the template, click Form Field in the menu ribbon. A Form Field dialog box displays.
4. Select the appropriate form field Type from the drop-down list. Based on your selection, certain formatting options will display in the Form Field dialog box.
Note - Please see the Form Fields section below for more information on the expanded form fields function.
5. Make the appropriate selections and click OK to insert the form field placeholder into the template.
6. Repeat Steps 2–5 to add additional text/form fields to the template.
7. When you are done creating the template, click Save As. A Save As dialog box displays.
8. Enter an appropriate Template Name.
9. To set the template as the default template for progress notes, select (check) the Set as Default checkbox.
Note - Only one default template can be defined per practice.
10. Click the Save icon ( ).

23 | MediaDent Release Notes 11.10 Not for distribution except to authorized persons © Greenway Health, LLC. All rights reserved. Confidential and proprietary. Last Modified: 7/20/16
11. To access the new template (or any other macro), click Existing in the Templates section. A Select Template dialog box displays.
12. Double-click the appropriate template name from the list to open the template.
13. You may make any appropriate edits and click Save to save your changes.
14. To set a template as the default for the practice, select (check) the Set as Practice Default checkbox on the Select Template dialog box. The selected template will become the default.
15. To import a template from an external drive, click Open in the Templates section of the menu ribbon. An Open dialog box displays.
Browse to and select the appropriate template and click Open. The template will display on screen for editing and saving.
16. To delete a template from the list, click the Delete button ( ) for the appropriate template on the Select Template dialog box. The template will be permanently deleted.

24 | MediaDent Release Notes 11.10 Not for distribution except to authorized persons © Greenway Health, LLC. All rights reserved. Confidential and proprietary. Last Modified: 7/20/16
Form Fields New form fields have been added to the existing list of form fields available for macros and templates.
Insert Fields
Insert fields will load the appropriate date from the patient’s chart into a progress note when such data exists.
NEW FIELDS: PATIENT DATA
The Patient Data form field enables you to add demographic form fields to a macro or template in the builder to save the user from manually entering the data.
1. Select Patient Data from the Type drop-down list in the Form Field dialog box in the builder, and then select the appropriate Data Item and Format to display in the macro/template. A placeholder for the item displays.
2. You may select the Patient Data type multiple times to add multiple data items.
The placeholder will display in black text if data exists that will be pulled into the progress note. If no data exists for a specific form field, the placeholder will display in red text.
NEW FIELDS: EXISTING WORK / COMPLETED WORK / PLANNED WORK
The Existing Work, Completed Work, and Planned Work form fields will insert the appropriate data from the Existing, Completed, and Planned tabs in Chart as configured.

25 | MediaDent Release Notes 11.10 Not for distribution except to authorized persons © Greenway Health, LLC. All rights reserved. Confidential and proprietary. Last Modified: 7/20/16
To configure the fields:
1. In a macro or template, click Form Field in the Templates/Macros toolbar and select the appropriate form field (Existing Work, Completed Work, Planned Work) from the Type drop-down list.
2. Select (check) the Include Auto Notes checkbox to insert any auto notes along with the form field data.
Caution - You MUST have the Include Auto Notes checkbox selected for a Work type in order to ensure that any existing auto notes for procedures/materials/pathologies display in the correct place in a progress note. For example, if you do not select the Include Auto Notes checkbox for the Planned Work type, and the user adds a procedure/material that includes auto notes, the auto notes will not display because there is no indication of which data type the notes are associated to. Please see the Auto Notes Tab section below for information on configuring auto notes.
3. Select (check) the Include All Chart Items checkbox to insert all existing data for that data type. If this is not selected, only the data for the current visit will pull to the progress note.
4. Click OK to insert the field placeholder.
Data will display in the progress note with the ADA code, tooth number, surfaces, and auto notes as in the following example:
If no data exists for a specific form field, the form field placeholder will display in red text.
26 | MediaDent Release Notes 11.10 Not for distribution except to authorized persons © Greenway Health, LLC. All rights reserved. Confidential and proprietary. Last Modified: 7/20/16
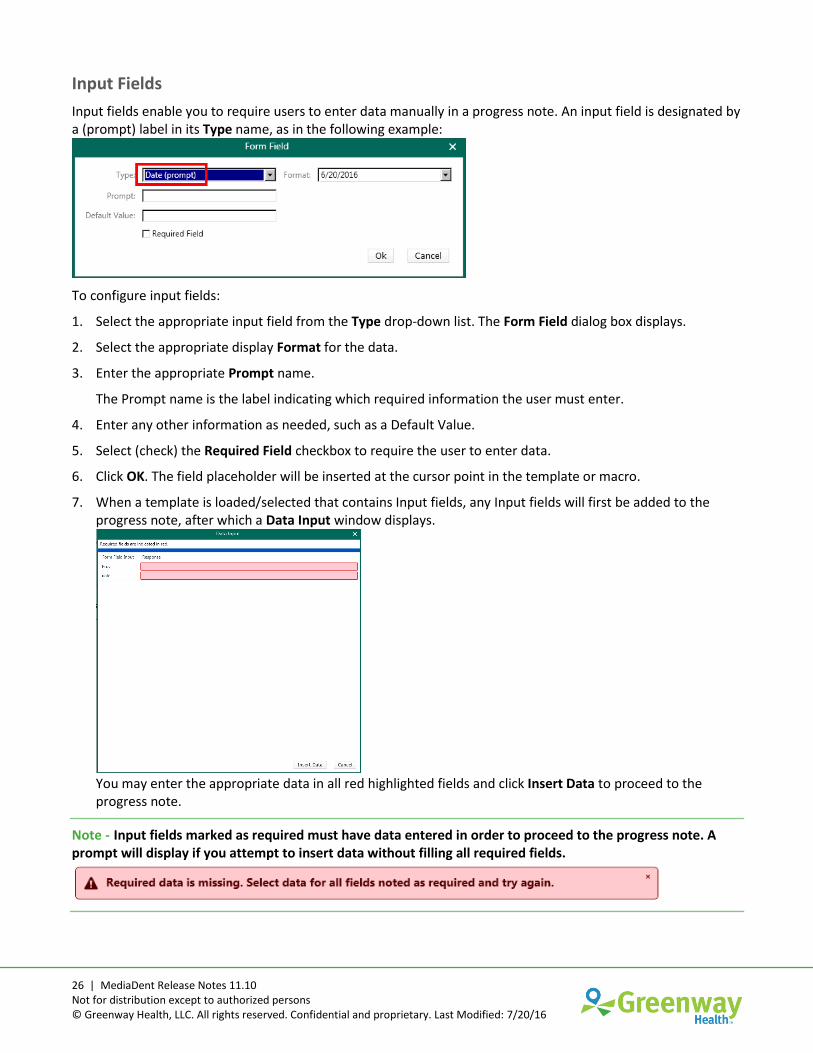
Input Fields
Input fields enable you to require users to enter data manually in a progress note. An input field is designated by a (prompt) label in its Type name, as in the following example:
To configure input fields:
1. Select the appropriate input field from the Type drop-down list. The Form Field dialog box displays.
2. Select the appropriate display Format for the data.
3. Enter the appropriate Prompt name.
The Prompt name is the label indicating which required information the user must enter.
4. Enter any other information as needed, such as a Default Value.
5. Select (check) the Required Field checkbox to require the user to enter data.
6. Click OK. The field placeholder will be inserted at the cursor point in the template or macro.
7. When a template is loaded/selected that contains Input fields, any Input fields will first be added to the progress note, after which a Data Input window displays.
You may enter the appropriate data in all red highlighted fields and click Insert Data to proceed to the progress note.
Note - Input fields marked as required must have data entered in order to proceed to the progress note. A prompt will display if you attempt to insert data without filling all required fields.

27 | MediaDent Release Notes 11.10 Not for distribution except to authorized persons © Greenway Health, LLC. All rights reserved. Confidential and proprietary. Last Modified: 7/20/16
You may also click the Data Input icon in the Progress/Treatment Notes toolbar to display the Data Input dialog box and enter the appropriate data.
Auto Notes Tab The Auto Notes tab houses all auto notes information from System Files > Fee Schedules > Procedures. This tab enables you to add notation and macro information to standard procedures, pathologies, and materials in the system in a single-location, easier format.
Note - Please note: The ability to define auto notes within Fee Schedules has been removed and moved to this area of System Administration.
The Procedures tab will pull procedures associated to the Main Practice Fee Schedule only.
To add an auto note:
1. Select the appropriate category tab (Procedures, Pathologies, or Materials).
2. Select the appropriate record to which you want to add an auto note. A blank note displays.

28 | MediaDent Release Notes 11.10 Not for distribution except to authorized persons © Greenway Health, LLC. All rights reserved. Confidential and proprietary. Last Modified: 7/20/16
3. Enter the appropriate text information.
4. To insert a macro into an auto-note, click the Macros drop-down list in the Auto Notes menu ribbon and select the name of the appropriate macro. The macro information will be inserted into the auto note.
5. Click Save to save the auto note. A checkmark will display in the Note column on the appropriate tab to indicate that an auto note exists for the item.
6. To delete an auto note from an item, select the item and click Delete in the menu ribbon. A confirmation message displays.
Click Yes to delete the note, or No to cancel deletion.
Note - Configuring auto notes for procedures, pathologies, or materials means that if a procedure/pathology/material is documented for a visit and it has auto notes configured, that it will automatically pull that data to the note ONLY if configured to do so within the appropriate form field. Please see the Form Fields section above for more information.

29 | MediaDent Release Notes 11.10 Not for distribution except to authorized persons © Greenway Health, LLC. All rights reserved. Confidential and proprietary. Last Modified: 7/20/16
Progress/Treatment Notes Updates in Chart
The following changes have been made to the Progress/Treatment Notes tab in Chart.
Templates can no longer be added to an active progress note; doing so will remove the current information and replace it with the new template. To accomplish this workflow, use macros instead.
Macros replace Charting Remarks and may contain all elements that exist in a template.
Menu Ribbon
New… – Renamed from New Progress Note. You may select the type of note from the drop-down list as per normal.
Spell Check – Real-time spell check is available. A red jagged line will display under any misspelled word in the progress note. You may right-click on the misspelled word to view a list of standard spell check functions similar to in Microsoft Word®.

30 | MediaDent Release Notes 11.10 Not for distribution except to authorized persons © Greenway Health, LLC. All rights reserved. Confidential and proprietary. Last Modified: 7/20/16
Delete – (new function) You may delete a progress note while in edit mode by clicking the Delete icon in the toolbar and confirming the deletion by clicking Yes on the confirmation prompt.
You may only delete progress notes under the following conditions (all conditions must apply):
If the logged in user has appropriate security access
If the progress note has not been locked
If the progress note has not been marked as reviewed
If the progress note is in Edit mode
Progress Note Recovery – (new function) Progress/treatment notes are now automatically saved in timed intervals similar to Microsoft Word® documents. If the system becomes nonresponsive or the data connection is lost, you may click the Progress Note Recovery button to recover the last auto-saved progress note.
In addition, if auto-recovery documents are present, a prompt will display in front of the Tasks window when you log in the MediaDent listing the auto recovery documents available.
You may select a specific note to complete immediately, or use the Progress Note Recovery icon to view the recovery items later.

31 | MediaDent Release Notes 11.10 Not for distribution except to authorized persons © Greenway Health, LLC. All rights reserved. Confidential and proprietary. Last Modified: 7/20/16
Recent Templates – (new function) Displays a drop-down list of the last 10 templates accessed for easy selection.
Odontogram – Renamed from Patient Chart. Inserts a snapshot of the current odontogram into the progress note.
Macros – Renamed from Paragraph Remarks. You may select the appropriate macro to insert into the progress note.
Misc. Data – (new function) You may insert standard information from the patient’s chart into the progress note by selecting the appropriate item.
Data Input – (new function) You may click this button to display the Data Input dialog box and enter any data in the appropriate input fields in a single location.
Note - The Auto Notes icon on the main Progress/Treatment Notes tab in Chart has been removed. All auto notes functionality now resides on the Auto Notes tab.
eSignatures – Includes the Patient and Provider Signature Block, Provider Signature Block, and Patient Signature Block functions.
Misc. – Includes the Mark As Reviewed and Lock Progress Note functions.
32 | MediaDent Release Notes 11.10 Not for distribution except to authorized persons © Greenway Health, LLC. All rights reserved. Confidential and proprietary. Last Modified: 7/20/16
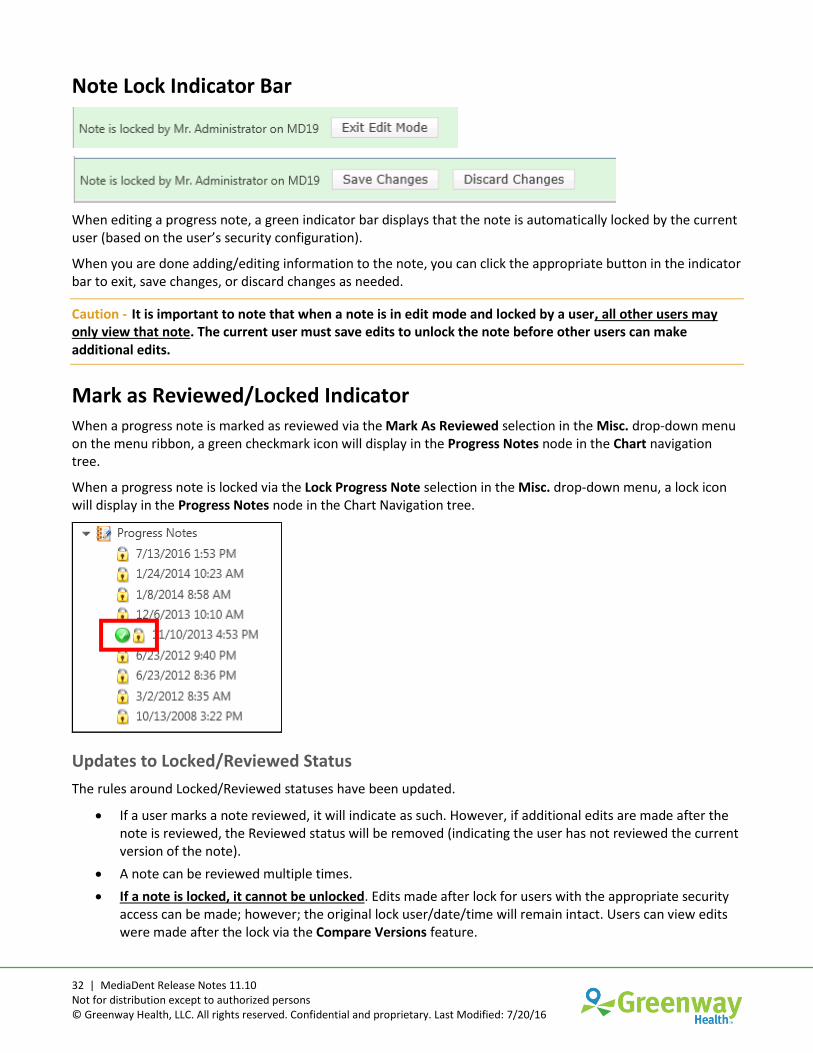
Note Lock Indicator Bar
When editing a progress note, a green indicator bar displays that the note is automatically locked by the current user (based on the user’s security configuration).
When you are done adding/editing information to the note, you can click the appropriate button in the indicator bar to exit, save changes, or discard changes as needed.
Caution - It is important to note that when a note is in edit mode and locked by a user, all other users may only view that note. The current user must save edits to unlock the note before other users can make additional edits.
Mark as Reviewed/Locked Indicator When a progress note is marked as reviewed via the Mark As Reviewed selection in the Misc. drop-down menu on the menu ribbon, a green checkmark icon will display in the Progress Notes node in the Chart navigation tree.
When a progress note is locked via the Lock Progress Note selection in the Misc. drop-down menu, a lock icon will display in the Progress Notes node in the Chart Navigation tree.
Updates to Locked/Reviewed Status
The rules around Locked/Reviewed statuses have been updated.
If a user marks a note reviewed, it will indicate as such. However, if additional edits are made after the note is reviewed, the Reviewed status will be removed (indicating the user has not reviewed the current version of the note).
A note can be reviewed multiple times.
If a note is locked, it cannot be unlocked. Edits made after lock for users with the appropriate security access can be made; however; the original lock user/date/time will remain intact. Users can view edits were made after the lock via the Compare Versions feature.
33 | MediaDent Release Notes 11.10 Not for distribution except to authorized persons © Greenway Health, LLC. All rights reserved. Confidential and proprietary. Last Modified: 7/20/16
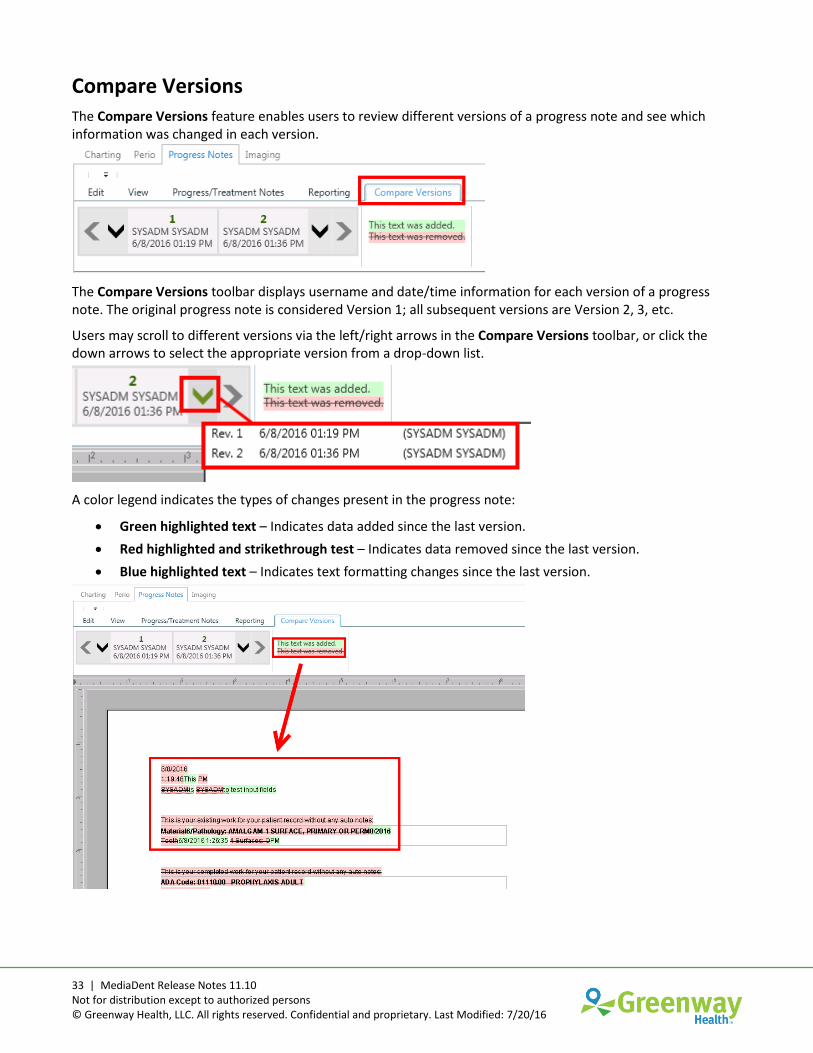
Compare Versions The Compare Versions feature enables users to review different versions of a progress note and see which information was changed in each version.
The Compare Versions toolbar displays username and date/time information for each version of a progress note. The original progress note is considered Version 1; all subsequent versions are Version 2, 3, etc.
Users may scroll to different versions via the left/right arrows in the Compare Versions toolbar, or click the down arrows to select the appropriate version from a drop-down list.
A color legend indicates the types of changes present in the progress note:
Green highlighted text – Indicates data added since the last version.
Red highlighted and strikethrough test – Indicates data removed since the last version.
Blue highlighted text – Indicates text formatting changes since the last version.

34 | MediaDent Release Notes 11.10 Not for distribution except to authorized persons © Greenway Health, LLC. All rights reserved. Confidential and proprietary. Last Modified: 7/20/16
Imaging – View/Drag and Drop While in Edit mode, users may preview images directly from the Image Libraries node and insert the images directly into a progress note via drag-and-drop.
Double-clicking an image file in the Image Libraries node will display a preview of the image in a pop-up window.
You may hold down the mouse button and drag the image into the progress note. The image will be inserted at the current cursor point.

35 | MediaDent Release Notes 11.10 Not for distribution except to authorized persons © Greenway Health, LLC. All rights reserved. Confidential and proprietary. Last Modified: 7/20/16
Status Bar
A status bar has been added to the bottom of the main Progress/Treatment Notes screen that details the status of the note. The following information is available for viewing:
Created – Date/time the initial save is done and the note is created
Last Modified – Date/time the last modifications take place
Reviewed – Date/time the note is marked as reviewed
Locked – Date/time the note is Locked (either manually or auto)
Reporting Tab
The Reporting tab enables you to generate reports on one or more progress notes. You may select the appropriate report(s) in the Actions list and click Generate Report to create the report. (Multiple records may be selected by pressing the CTRL key and selecting the appropriate records.)
You may print the report by clicking Print in the Reporting menu ribbon and selecting the appropriate printer.
You may email the report by clicking Email in the Reporting menu ribbon and encrypting the report via the Encryption Password dialog box. Enter an appropriate encryption password and click OK.

36 | MediaDent Release Notes 11.10 Not for distribution except to authorized persons © Greenway Health, LLC. All rights reserved. Confidential and proprietary. Last Modified: 7/20/16
Once the password is set, a Compose Email Message dialog box displays. Enter the appropriate information and click Send Email.
All reports selected may be previewed in the main window on the Reporting screen. If multiple reports are selected, you may scroll down to view each report in sequence.
User Access to Updated Progress Notes
Existing user access to the updated Progress Notes functionality is as follows:
Users have access to this function…
If they have this access level in User Administration…
Progress Note Administration Level 5
Create/Edit Notes Level 3 or higher
Edit after Lock Level 1 or higher
Delete Notes Level 3 or higher
Review Notes Level 5
Lock Notes Level 5
Reporting Level 1 or higher
37 | MediaDent Release Notes 11.10 Not for distribution except to authorized persons © Greenway Health, LLC. All rights reserved. Confidential and proprietary. Last Modified: 7/20/16
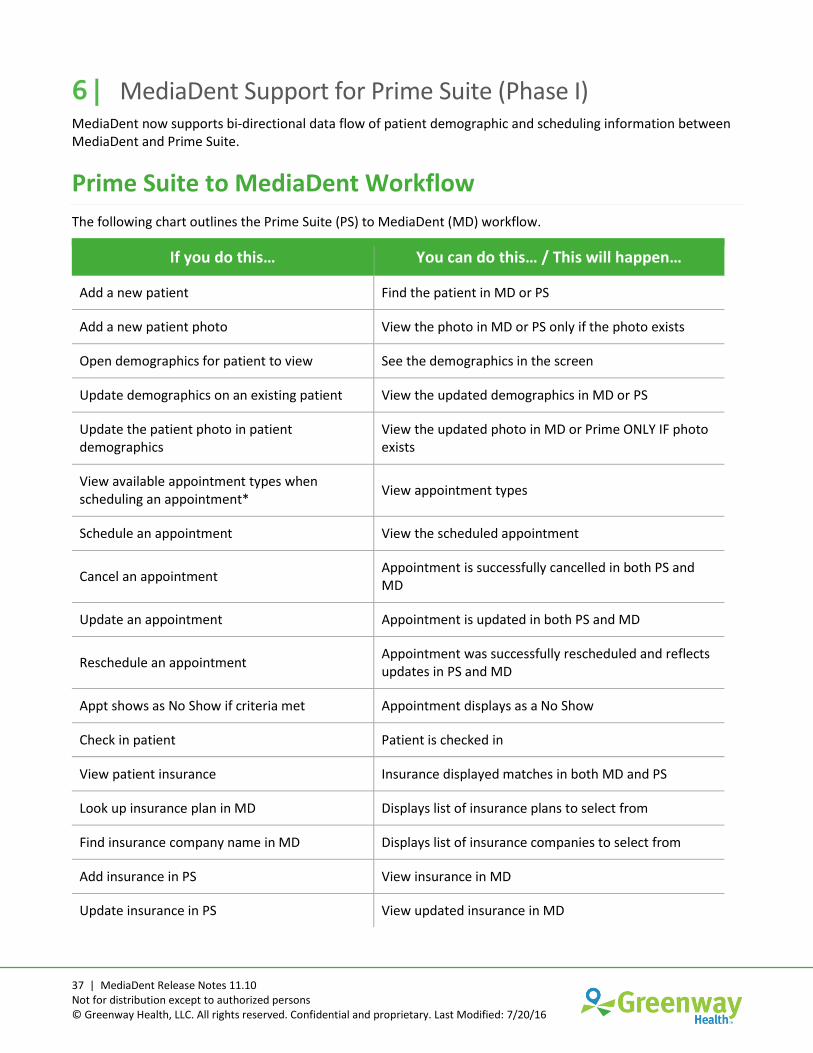
6 | MediaDent Support for Prime Suite (Phase I) MediaDent now supports bi-directional data flow of patient demographic and scheduling information between MediaDent and Prime Suite.
Prime Suite to MediaDent Workflow
The following chart outlines the Prime Suite (PS) to MediaDent (MD) workflow.
If you do this… You can do this… / This will happen…
Add a new patient Find the patient in MD or PS
Add a new patient photo View the photo in MD or PS only if the photo exists
Open demographics for patient to view See the demographics in the screen
Update demographics on an existing patient View the updated demographics in MD or PS
Update the patient photo in patient demographics
View the updated photo in MD or Prime ONLY IF photo exists
View available appointment types when scheduling an appointment*
View appointment types
Schedule an appointment View the scheduled appointment
Cancel an appointment Appointment is successfully cancelled in both PS and MD
Update an appointment Appointment is updated in both PS and MD
Reschedule an appointment Appointment was successfully rescheduled and reflects updates in PS and MD
Appt shows as No Show if criteria met Appointment displays as a No Show
Check in patient Patient is checked in
View patient insurance Insurance displayed matches in both MD and PS
Look up insurance plan in MD Displays list of insurance plans to select from
Find insurance company name in MD Displays list of insurance companies to select from
Add insurance in PS View insurance in MD
Update insurance in PS View updated insurance in MD
38 | MediaDent Release Notes 11.10 Not for distribution except to authorized persons © Greenway Health, LLC. All rights reserved. Confidential and proprietary. Last Modified: 7/20/16
Note - Please note that the workflows outlined above are valid only for demographic and scheduling transactions between MediaDent and Prime Suite. Entering charges must be done manually in Prime Suite; no charges transaction information will flow between the two systems. (This is scheduled for Phase II.)
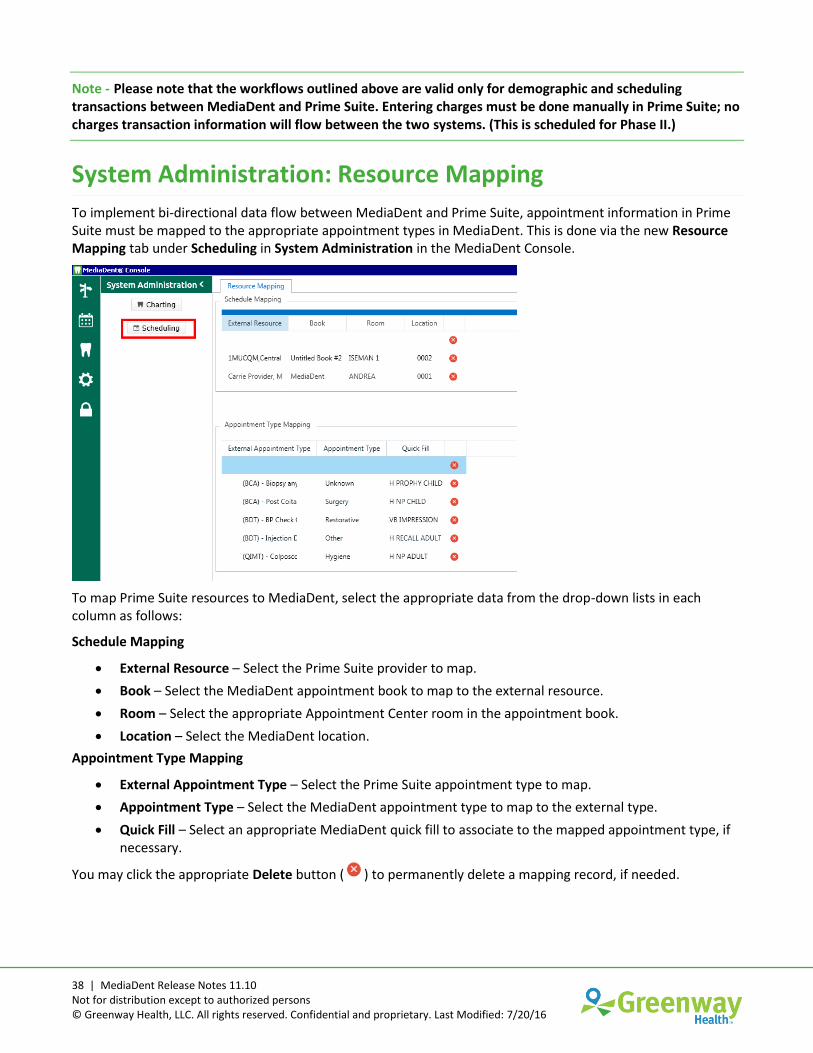
System Administration: Resource Mapping
To implement bi-directional data flow between MediaDent and Prime Suite, appointment information in Prime Suite must be mapped to the appropriate appointment types in MediaDent. This is done via the new Resource Mapping tab under Scheduling in System Administration in the MediaDent Console.
To map Prime Suite resources to MediaDent, select the appropriate data from the drop-down lists in each column as follows:
Schedule Mapping
External Resource – Select the Prime Suite provider to map.
Book – Select the MediaDent appointment book to map to the external resource.
Room – Select the appropriate Appointment Center room in the appointment book.
Location – Select the MediaDent location.
Appointment Type Mapping
External Appointment Type – Select the Prime Suite appointment type to map.
Appointment Type – Select the MediaDent appointment type to map to the external type.
Quick Fill – Select an appropriate MediaDent quick fill to associate to the mapped appointment type, if necessary.
You may click the appropriate Delete button ( ) to permanently delete a mapping record, if needed.