media composer 5 changes/additions for 4th edition … · affect your editing workfl ow. the smart...
TRANSCRIPT
1
Media Composer 5 was a fairly major Avid software release, complete with many useful tools, both operationally and functionally. As you can imagine, some of these changes you will notice in the form of new tools and menu items, whereas others function more as background operations, allow-ing you greater fl exibility and control while you edit. In this guide, we ’ ll focus primarily on the operational changes in the form of several of the most common interface alterations:
● Interface Changes ❍ Smart Tool ❍ Link Toggle Selection ❍ Track Control Panel ❍ Stereo and Mono Audio Changes ● Other Useful Information ❍ A note about ScriptSync
Interface Changes
Smart Tool
We ’ ll spend the most amount of time discussing the Smart Tool, since it has the potential to greatly affect your editing workfl ow.
The Smart Tool is a group of buttons that you can turn on and off, together or separately, depending on the types of tactile control you ’ d like to have while working in the Timeline.
Media Composer 5 Changes/Additions for 4th Edition Readers
CH001.indd 1CH001.indd 1 2/9/2011 1:25:33 PM2/9/2011 1:25:33 PM

2
Media Composer 5 Changes/Additions for 4th Edition Readers
These buttons primarily control Segment Mode functions (which were previously located at the bottom of the Timeline as separate, nonjoinable buttons) and Trim Mode functions (which never previously had buttons associated with these operations). Now each of these buttons is grouped together inside a tool for which you can join (or unjoin) the functionality of each as you like.
Some people, especially those coming from a more mouse-centric editing application, really enjoy the “ grab-what-you-need ” functionality of the Smart Tool. Others, espe-cially seasoned Avid editors used to more keyboard-centric editing, might fi nd it more useful to disable the Smart Tool functionality and rely on classic techniques.
Let ’ s take a look at each button in the Smart Tool.
Smart Tool Segment Mode Tools Chances are you ’ ve already been using the Segment Mode buttons extensively to move segments around in the Timeline. These buttons have changed location and have a slight change in function-ality, but their primary use is basically the same. Let ’ s take a look.
Segment Mode (Lift/Overwrite)
Lift/Overwrite Segment Mode works just as it has in previous versions of Media Composer. You simply click on the button to enable it, then click and drag to lift your segment, and then overwrite it in a new location. As before, when you lift the segment, it leaves blank fi ller in its place. Again, this button is great for moving sound, titles, and occasional video around in the Timeline.
Segment Mode (Extract/Splice)
Extract/Splice Segment Mode also works as it has in previous versions of Media Composer. You simply click on the button to enable it, then click and drag to extract your segment, and then splice it in a new location. This is a great tool to change the order of shots around in the Timeline.
Combining Segment Mode Functionality Via the Smart Tool
So what ’ s so new and different about these tools in Media Composer 5? Well, because they are now integrated into the Smart Tool, you can link their functionality together. That is, depending on where your cursor is within the Timeline track, the tool functions either as the Lift Overwrite Segment Mode or the Extract/Splice Segment Mode tool. Let ’ s take a look:
To link the functionality of Lift/Overwrite Segment Mode and Extract/Splice Segment Mode:
1. Select both the Lift/Overwrite Segment Mode and the Extract/Splice Segment Mode in the Smart Tool.
Figure 2
Figure 3
Figure 4
Figure 1
CH001.indd 2CH001.indd 2 2/9/2011 1:25:33 PM2/9/2011 1:25:33 PM
3
Media Composer 5 Changes/Additions for 4th Edition Readers
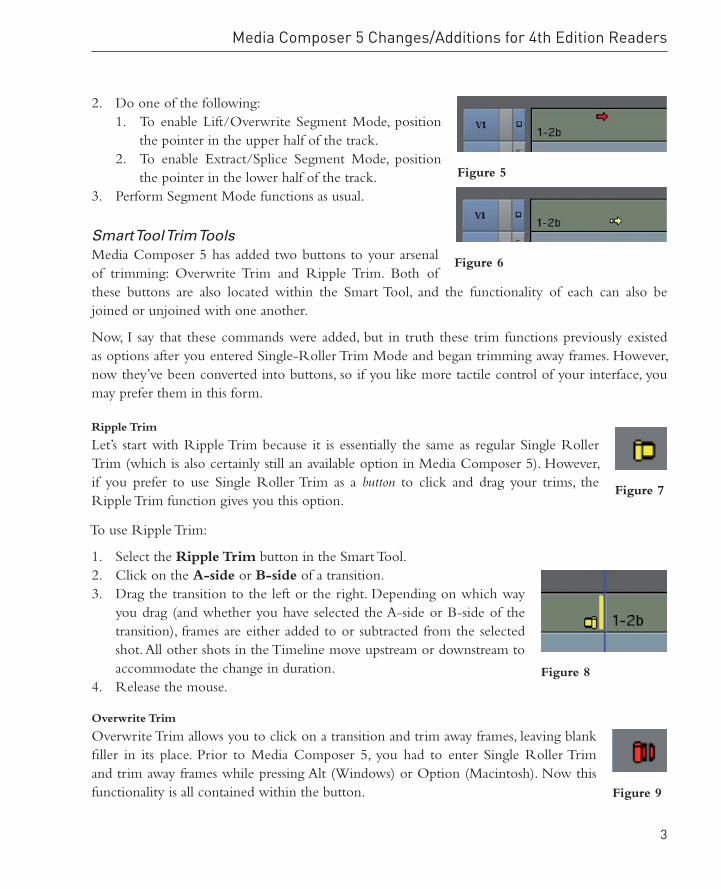
2. Do one of the following: 1. To enable Lift/Overwrite Segment Mode, position
the pointer in the upper half of the track. 2. To enable Extract/Splice Segment Mode, position
the pointer in the lower half of the track. 3. Perform Segment Mode functions as usual.
Smart Tool Trim Tools Media Composer 5 has added two buttons to your arsenal of trimming: Overwrite Trim and Ripple Trim. Both of these buttons are also located within the Smart Tool, and the functionality of each can also be joined or unjoined with one another.
Now, I say that these commands were added, but in truth these trim functions previously existed as options after you entered Single-Roller Trim Mode and began trimming away frames. However, now they ’ ve been converted into buttons, so if you like more tactile control of your interface, you may prefer them in this form.
Ripple Trim
Let ’ s start with Ripple Trim because it is essentially the same as regular Single Roller Trim (which is also certainly still an available option in Media Composer 5). However, if you prefer to use Single Roller Trim as a button to click and drag your trims, the Ripple Trim function gives you this option.
To use Ripple Trim:
1. Select the Ripple Trim button in the Smart Tool. 2. Click on the A-side or B-side of a transition. 3. Drag the transition to the left or the right. Depending on which way
you drag (and whether you have selected the A-side or B-side of the transition), frames are either added to or subtracted from the selected shot. All other shots in the Timeline move upstream or downstream to accommodate the change in duration.
4. Release the mouse.
Overwrite Trim
Overwrite Trim allows you to click on a transition and trim away frames, leaving blank fi ller in its place. Prior to Media Composer 5, you had to enter Single Roller Trim and trim away frames while pressing Alt (Windows) or Option (Macintosh). Now this functionality is all contained within the button.
Figure 5
Figure 6
Figure 7
Figure 8
Figure 9
CH001.indd 3CH001.indd 3 2/9/2011 1:25:33 PM2/9/2011 1:25:33 PM

4
Media Composer 5 Changes/Additions for 4th Edition Readers
To use Overwrite Trim:
1. Select the Overwrite Trim button in the Smart Tool. 2. Click on the A-side or B-side of a transition. 3. Drag the transition as a reductive trim in which you trim away frames.
If you selected the A-side of the transition, you would drag to the left; if you selected the B-side of the transition, you would drag to the right.
4. Release the mouse. The Trim is performed, and blank fi ller is left in place of the trimmed frames.
Dual Roller Trim If you click in the center of a transition using either Ripple Trim or Overwrite Trim (instead of clicking on the A-side or the B-side), the button functions as Dual Roller Trim.
Combining Trim Mode Functionality Via the Smart Tool
As with Segment Mode, you can join Overwrite Trim and Ripple Trim together in functionality, depending on where in the track you place your cursor.
To link the functionality of Overwrite Trim and Ripple Trim:
1. Select both the Overwrite Trim and Ripple Trim buttons in the Smart Tool.
2. Do one of the following: ● To enable Overwrite Trim, position the pointer in
the upper half of the track. ● To enable Ripple Trim, position the pointer in
the lower half of the track. 3. Perform Trim Mode functions as usual.
Combining All Modes Via the Smart Tool
As you can imagine, if you would like to combine all four functions — both Segment Modes and both Trim Modes — you simply enable all four buttons.
Then, whenever your cursor is in the upper or lower part of a segment, the appropriate Segment Mode is applied, and whenever your cursor is at the upper or lower part of a transition, the appropriate Trim Mode is applied.
Keyframe Tool The fi nal button located in the Smart Tool is the Keyframe button.
Figure 10
Figure 10a
Figure 11 Figure 12 Figure 13
Figure 14
CH001.indd 4CH001.indd 4 2/9/2011 1:25:34 PM2/9/2011 1:25:34 PM

5
Media Composer 5 Changes/Additions for 4th Edition Readers
You need to select this button any time you want to keyframe your audio gain in the Timeline (otherwise known as rubber-banding). Previous to Media Composer 5, you could simply drag the audio keyframes up and down to change the audio gain, but now you must fi rst enable this button.
To keyframe audio gain in the Timeline:
1. From the Timeline Fast Menu, select Audio Data � Auto Gain . (This can also be performed via the Track Control Panel, which you will learn about later in this guide.)
2. Apply keyframes in your Timeline where you want the audio to ramp up or down. 3. Make sure that the Keyframe button is enabled in the Smart Tool. 4. Drag the keyframes up or down as needed.
Figure 15
Disabling the Smart Tool Functionality As you know, in previous versions of Media Composer, you could disable Segment Mode by click-ing in the Timecode track. In Media Composer 5, however, the default settings dictate that buttons within the Smart Tool can only be disabled by reclicking on them within the Smart Tool.
That can get a bit tedious, so fortunately you can change your settings so that all Smart Tool but-tons can be disabled by clicking in the Timecode track or the ruler (which is above the Timeline).
Figure 17
Figure 16
CH001.indd 5CH001.indd 5 2/9/2011 1:25:34 PM2/9/2011 1:25:34 PM
6
Media Composer 5 Changes/Additions for 4th Edition Readers
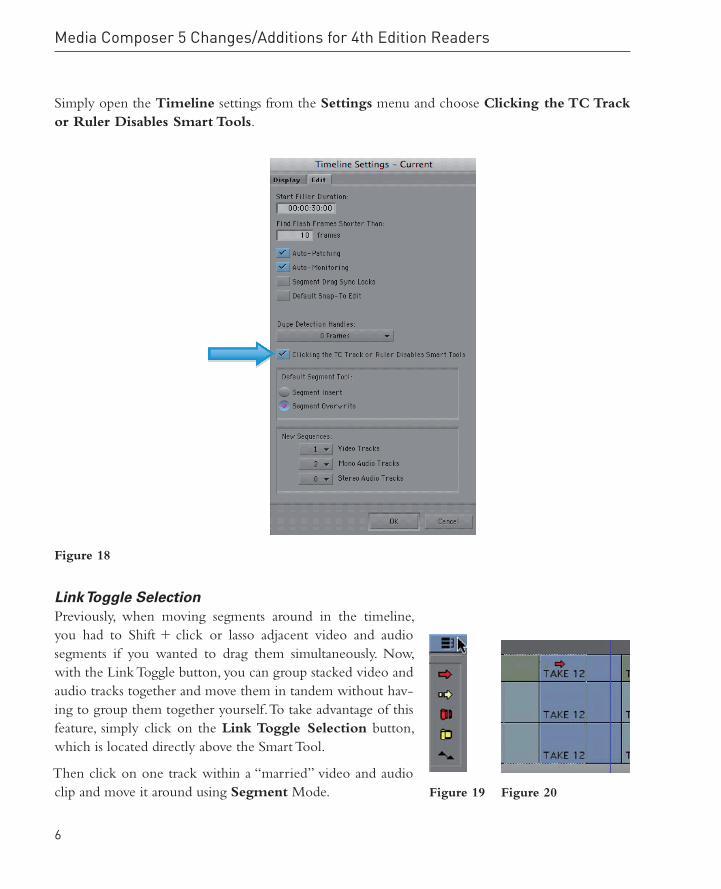
Simply open the Timeline settings from the Settings menu and choose Clicking the TC Track or Ruler Disables Smart Tools .
Link Toggle Selection
Previously, when moving segments around in the timeline, you had to Shift � click or lasso adjacent video and audio segments if you wanted to drag them simultaneously. Now, with the Link Toggle button, you can group stacked video and audio tracks together and move them in tandem without hav-ing to group them together yourself. To take advantage of this feature, simply click on the Link Toggle Selection button, which is located directly above the Smart Tool.
Then click on one track within a “ married ” video and audio clip and move it around using Segment Mode. Figure 19 Figure 20
Figure 18
CH001.indd 6CH001.indd 6 2/9/2011 1:25:35 PM2/9/2011 1:25:35 PM

7
Media Composer 5 Changes/Additions for 4th Edition Readers
Track Control Panel
You can now add a useful set of tools to your Timeline that can help you while editing your audio. These tools, which were previously only available within the Timeline Fast menu, can now be dis-played as part of the Track Control Panel.
Here is a list of the audio tools that are now available via the Track Control Panel:
● Audio waveform toggle ● Clip Gain ● Auto Gain ● Auto Pan ● Audio Power On/Off toggle
To show the Track Control Panel, you can select it from the Timeline Fast Menu.
You can also just toggle the small arrow to the right of the Timecode display to show or hide the Track Control Panel .
Once you enable the Track Control Panel, the panel appears to the right of the audio track selectors.
Let ’ s go through the Track Control Panel ’ s functionality, button-by-button.
Waveform Toggle The fi rst button on the left is the waveform toggle, which allows you to show or hide the audio waveform. For this to work, you fi rst need to select Audio Data � Allow Per Track Selection from the Timeline Fast Menu. This will allow you to show the waveform of each track independently of the rest.
Figure 21
Figure 22
Figure 23
Figure 24
CH001.indd 7CH001.indd 7 2/9/2011 1:25:35 PM2/9/2011 1:25:35 PM
8
Media Composer 5 Changes/Additions for 4th Edition Readers
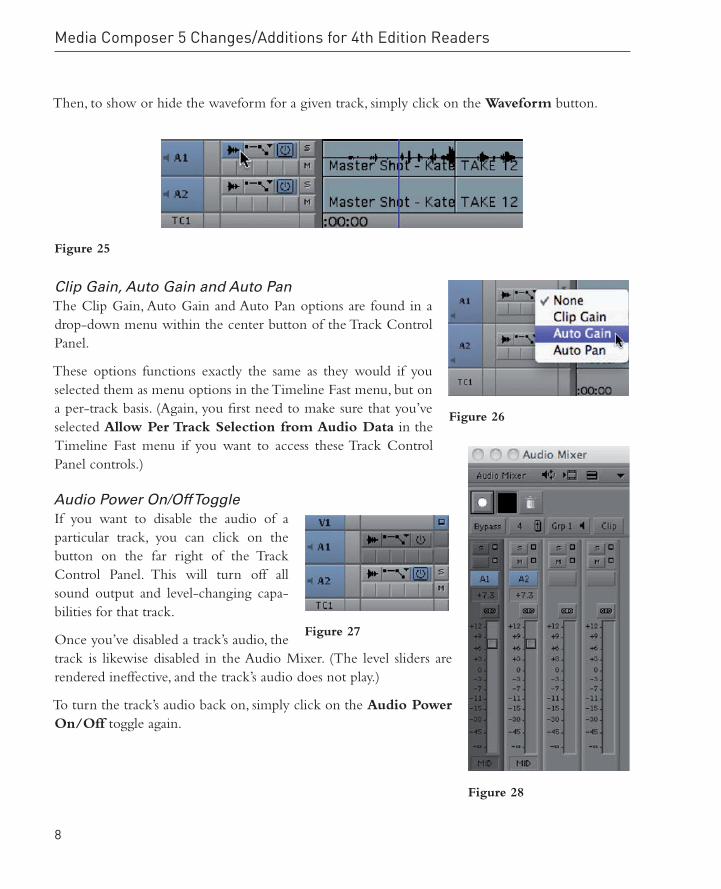
Then, to show or hide the waveform for a given track, simply click on the Waveform button.
Clip Gain, Auto Gain and Auto Pan The Clip Gain, Auto Gain and Auto Pan options are found in a drop-down menu within the center button of the Track Control Panel.
These options functions exactly the same as they would if you selected them as menu options in the Timeline Fast menu, but on a per-track basis. (Again, you fi rst need to make sure that you ’ ve selected Allow Per Track Selection from Audio Data in the Timeline Fast menu if you want to access these Track Control Panel controls.)
Audio Power On/Off Toggle If you want to disable the audio of a particular track, you can click on the button on the far right of the Track Control Panel. This will turn off all sound output and level-changing capa-bilities for that track.
Once you ’ ve disabled a track ’ s audio, the track is likewise disabled in the Audio Mixer. (The level sliders are rendered ineffective, and the track ’ s audio does not play.)
To turn the track ’ s audio back on, simply click on the Audio Power On/Off toggle again.
Figure 26
Figure 27
Figure 28
Figure 25
CH001.indd 8CH001.indd 8 2/9/2011 1:25:36 PM2/9/2011 1:25:36 PM

9
Media Composer 5 Changes/Additions for 4th Edition Readers
Stereo and Mono Audio Changes
Now when you add audio tracks, you can choose between working with mono (one) or stereo (a grouped pair of left- and right-panned tracks). To choose which you ’ d like to add, you can select the appropriate option from the Clip Menu or use the applicable keyboard shortcuts ( CMD � U for Mono Tracks, CMD � Shift � U for Stereo Tracks).
Other Useful Information
ScriptSync Not Automatically Included
Unfortunately, due to licensing issues, ScriptSync is no longer included free with every new instal-lation of Media Composer 5. However, if you are upgrading from a previous version of Media Composer, you will still have ScriptSync. And if you want ScriptSync functionality for Media Composer 5, you can purchase the option for $ 1,000.
Figure 29
Figure 30
CH001.indd 9CH001.indd 9 2/9/2011 1:25:37 PM2/9/2011 1:25:37 PM