measuring small leaves mask your multispeq? if the leaves that you are measuring do not completely...
TRANSCRIPT

Measuring small leavesMasking your MultispeQ can allow you to measure leaves
that may otherwise be too small.

Why mask your multispeQ?If the leaves that you are measuring do not completely cover the light guide, you will not be able to take absorbance measurements unless you mask the light guide to reduce the aperture of measurements.

Measuring chlorophyll fluorescence with a mask
• Chlorophyll fluorescence parameters are self referencing, so we can measure Phi2, PhiNPQ, and PhiNO on small leaves with or without a mask.
• However, it appears that the results are more consistent between unmasked (blue) and a mask on the bottom clamp only (yellow) compared to masking both light guides (green).
•More detailed results are available here.

Measuring absorbance with a mask
• Relative chlorophyll content can be measured using masked MultispeQ’s, but only if they are recalibrated after the mask has been fitted over the light guide.
• However, even when recalibrated it is hard to get accurate results if using masks over both light guides (green).
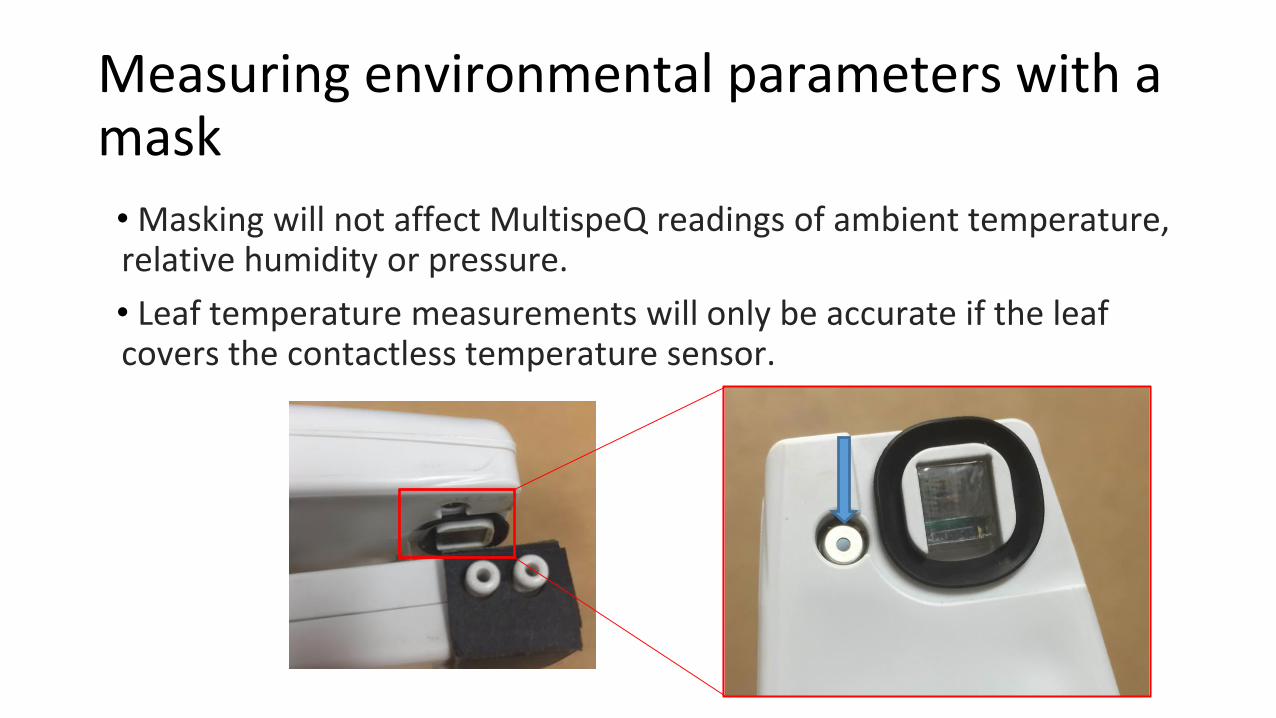
Measuring environmental parameters with a mask
• Masking will not affect MultispeQ readings of ambient temperature, relative humidity or pressure.
• Leaf temperature measurements will only be accurate if the leaf covers the contactless temperature sensor.

Properly Fitting a Mask to the MultispeQ
Masks can be cut out using a laser cutter or manually

Laser printing the mask from a PDF file
The PDF is formatted so it will be properly cut with a laser printer. You will need
black construction paper.
Here are the settings we use for our laser printer:
• 5 mA
• Outside lines and circles: 80% Power and 2 Repeats
• Inside lines: 50% Power and 1 Repeat
Hole for air channels
Hole for air channels
Hole for light guide
Note: Settings may be differ by laser cutter and paper type

Manually cutting out the mask
If a laser printer is not available, the mask can be cut out of black construction
paper and a leather hole punch like this one can be substituted to create the holes
for the air channels and light guide.
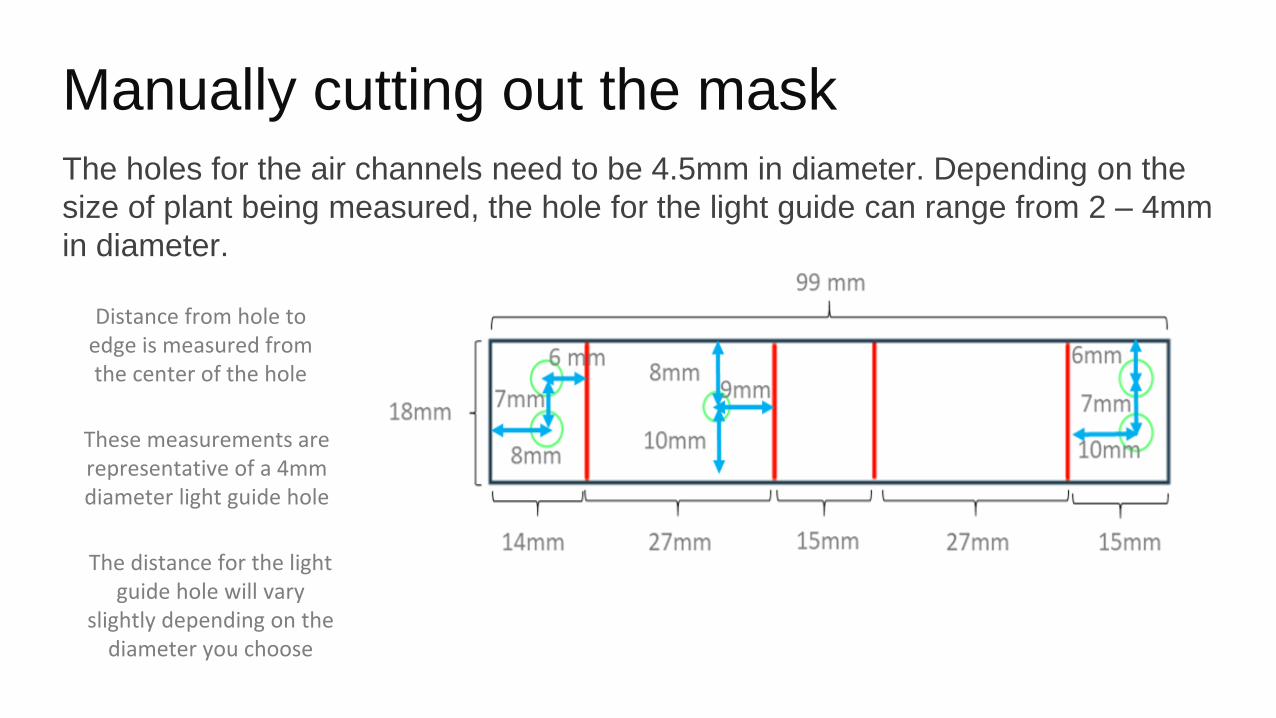
Manually cutting out the mask
The holes for the air channels need to be 4.5mm in diameter. Depending on the
size of plant being measured, the hole for the light guide can range from 2 – 4mm
in diameter.
Distance from hole to edge is measured from the center of the hole
The distance for the light guide hole will vary
slightly depending on the diameter you choose
These measurements are representative of a 4mm diameter light guide hole

Applying the maskStep 1. Pre-fold the perforated creases of the mask.
Step 2. Notice one set of double holes lays closer to the edge of the mask. Insert this set of holes over the air channels.
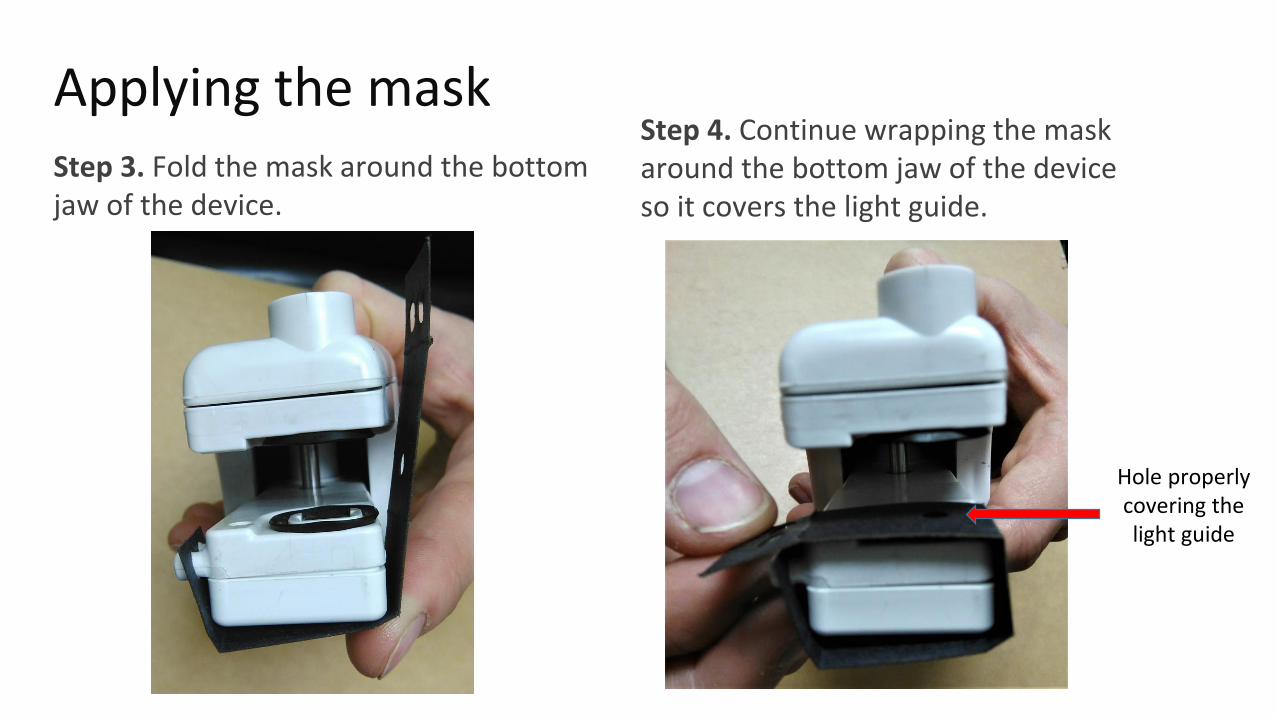
Applying the maskStep 3. Fold the mask around the bottom jaw of the device.
Step 4. Continue wrapping the mask around the bottom jaw of the device so it covers the light guide.
Hole properly covering the light guide

Applying the maskStep 5. Fold the end of the mask over the air channels. This will secure it onto the device.

Applying the mask
Step 6 (Optional).We recommend adding clear tape along the folds of the mask to increase longevity and stability on the MultispeQ.
**Be sure the tape is not covering the air channels or light guide**

Using your masked MultispeQRecalibrating the MultispeQ and choosing the correct protocol

Recalibrating your MultispeQ
**Your MultispeQ should be recalibrated every time a mask is applied or removed**
Step 1. Open the PhotosynQ desktop app.
Step 2. On the left side of the screen, select settings.
Step 3. Connect the MultispeQdevice with a MicroUSB cable. Select the connect function.

Recalibrating your MultispeQ
Step 4. Once you have connected to your MultispeQ, select Projects from the left side bar.Step 5. Enter “SPAD Recalibration” in the search bar. You will need to run both projects: MultipseQ V1.0 Recalibration (A) and MultipseQ V1.0 Recalibration (B)

Recalibrating your MultispeQ
Step 6. Select MultispeQ v1.0 SPAD Recalibration (A) and then select make contribution. You will need SPAD Recalibration Cards (shipped in the box with your MultispeQ) to complete the on screen prompts.
Step 7. At the top of the screen, select Save To Device.

Recalibrating your MultispeQ
•Step 8. Select MultispeQ v1.0 SPAD Recalibration (B) and follow steps 6-7, making sure to enter the value on the front of the SPAD Recalibration Cards envelope. To confirm a quality calibration, check your spad3 r2 value, it should be near 1

Choosing the correct protocol
Make sure the correct protocol is selected when creating your project.You will have to select Advanced underneath the protocol box and search for MultispeQ v1.0 Leaf Photosynthesis (Masked).

Now you are ready to use your masked MultispeQ!