measuring guidelines - home blinds of america · divides window vertically to match window design...
TRANSCRIPT

Table of ContentsTable of ContentsTable of ContentsTable of Contents Page Page Page Page
1. Panel AnatomyPanel AnatomyPanel AnatomyPanel Anatomy 1111
2. Basic MeasuringBasic MeasuringBasic MeasuringBasic Measuring 2222
3. Mounting OptionsMounting OptionsMounting OptionsMounting Options 2222
4. General Frame CategoriesGeneral Frame CategoriesGeneral Frame CategoriesGeneral Frame Categories 4444
• Frame Decision TreeFrame Decision TreeFrame Decision TreeFrame Decision Tree
• Number of SidesNumber of SidesNumber of SidesNumber of Sides
5. Measuring forMeasuring forMeasuring forMeasuring for 7777
• Different FramesDifferent FramesDifferent FramesDifferent Frames
• Direct MountDirect MountDirect MountDirect Mount
• SSSStandard Deductiontandard Deductiontandard Deductiontandard Deduction
• Café ShutterCafé ShutterCafé ShutterCafé Shutter
• Corner WindowCorner WindowCorner WindowCorner Window
• Bay WindowBay WindowBay WindowBay Window
• T PostT PostT PostT Post
• Other Window SituationOther Window SituationOther Window SituationOther Window Situation
Measuring Guidelines
Disclaimer: Norman International, Co. reserves all rights on updating or modification of any contents within this documentation without prior notification.

Panel Anatomy
1
Basic Measuring
2
Mounting Options Inside Mount (IM)
• Shutters will fit inside a window opening. — There must be enough unobstructed depth on the mounting surface inside
the window opening.
• For IM, please provide the SMALLEST height and width measurement among the three.
Outside Mount (OM)
• Shutters will fit outside a window opening. — There must be sufficient flat mounting surface around the window opening.
• For OM, please provide the LARGEST height and width measurement among the three.
Tip: When there is enough flat mounting surface, Outside Mount is generally a preferred
method as it is more forgiving and less challenging compare to Inside Mount.
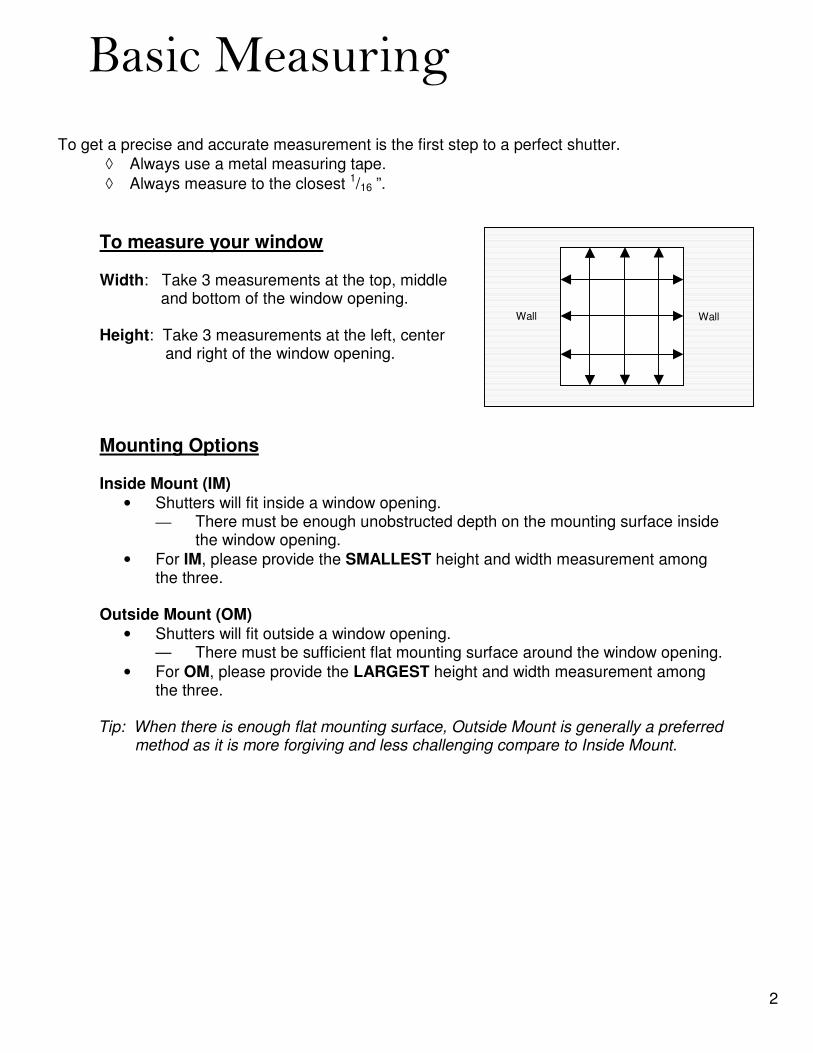
Wall Wall
To measure your window Width: Take 3 measurements at the top, middle and bottom of the window opening. Height: Take 3 measurements at the left, center and right of the window opening.
To get a precise and accurate measurement is the first step to a perfect shutter.
◊ Always use a metal measuring tape.
◊ Always measure to the closest 1/16 ”.
Basic Measuring
3
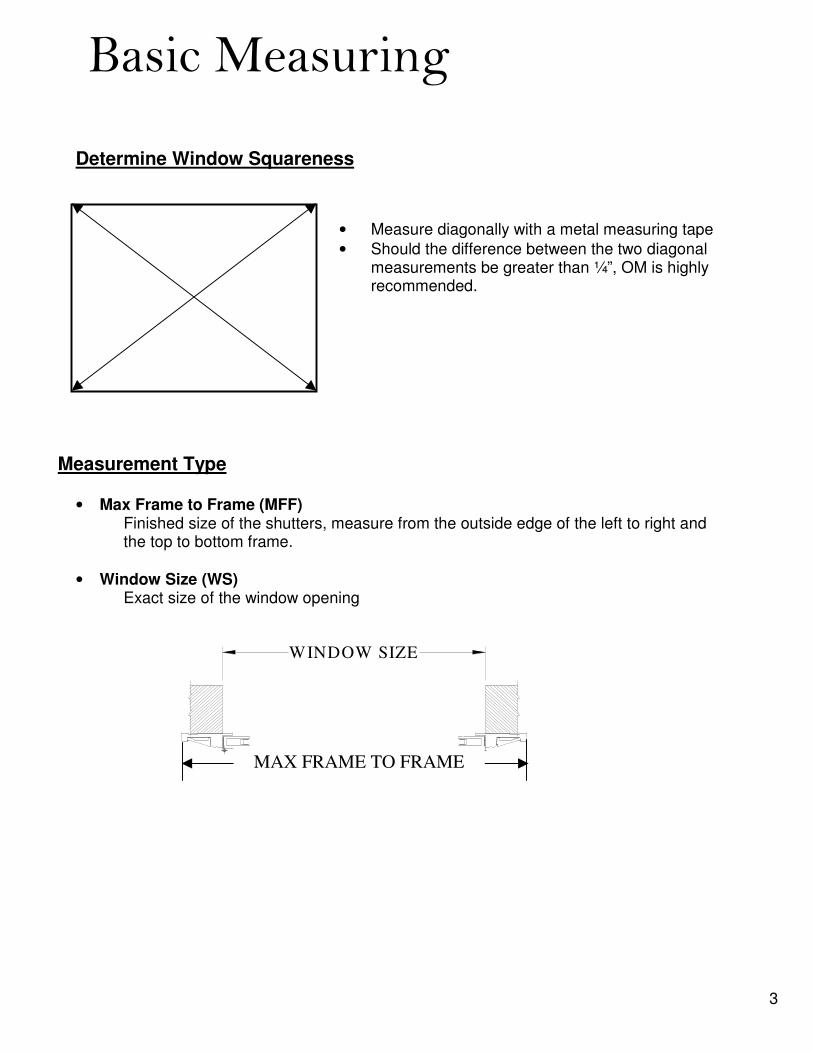
• Measure diagonally with a metal measuring tape
• Should the difference between the two diagonal measurements be greater than ¼”, OM is highly recommended.
Determine Window Squareness
• Max Frame to Frame (MFF) Finished size of the shutters, measure from the outside edge of the left to right and
the top to bottom frame.
• Window Size (WS) Exact size of the window opening
Shown in Deco Frame
WINDOW SIZE
MAX FRAME TO FRAME
Measurement Type

General Frame Categories
4
L Frame Deco Frame Z Frame Hang Strip
Sill Frame Designer Sill Cap Corner Post T Post
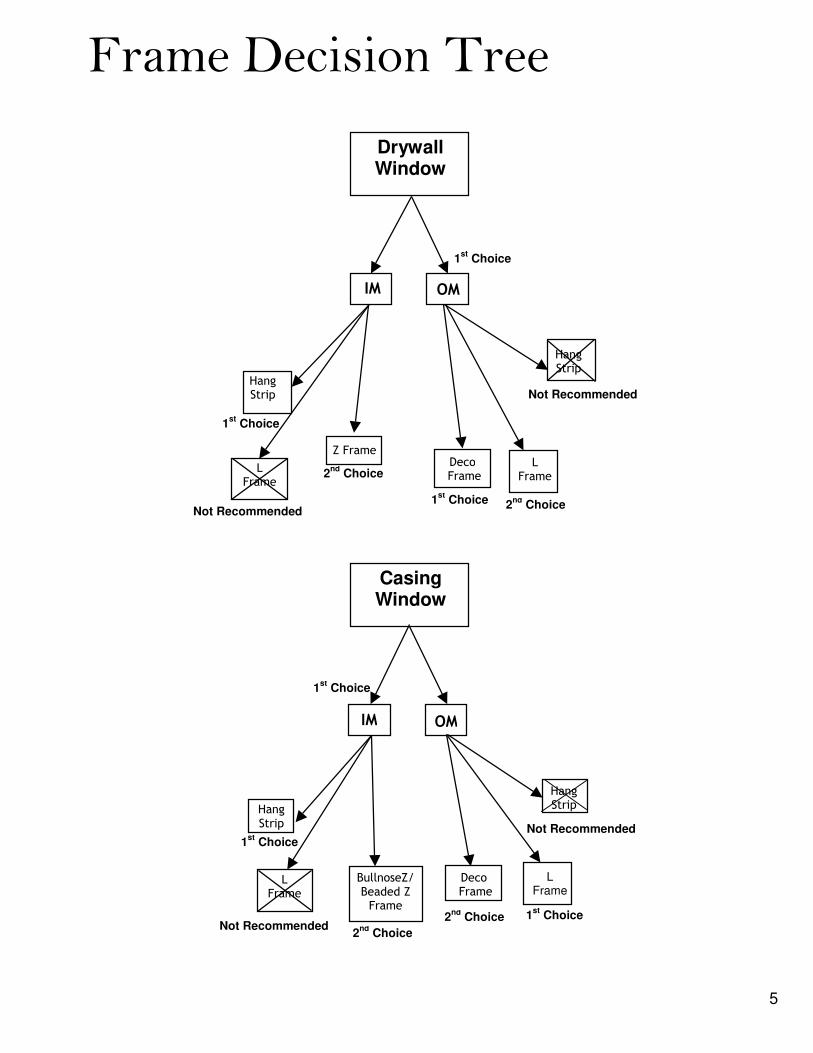
Frame Decision Tree
5
Not Recommended
Drywall Window
IM
OM
Hang Strip
Z Frame
L Frame
Deco Frame
L Frame
2nd
Choice
1st
Choice
1st
Choice
Hang Strip
1st
Choice
2nd
Choice
Casing Window
IM
BullnoseZ/ Beaded Z Frame
L Frame
Deco Frame
L Frame
Not Recommended 1
st Choice
2nd
Choice
1st
Choice
OM
Hang Strip
2nd
Choice
Hang Strip
1st
Choice
Not Recommended
Not Recommended
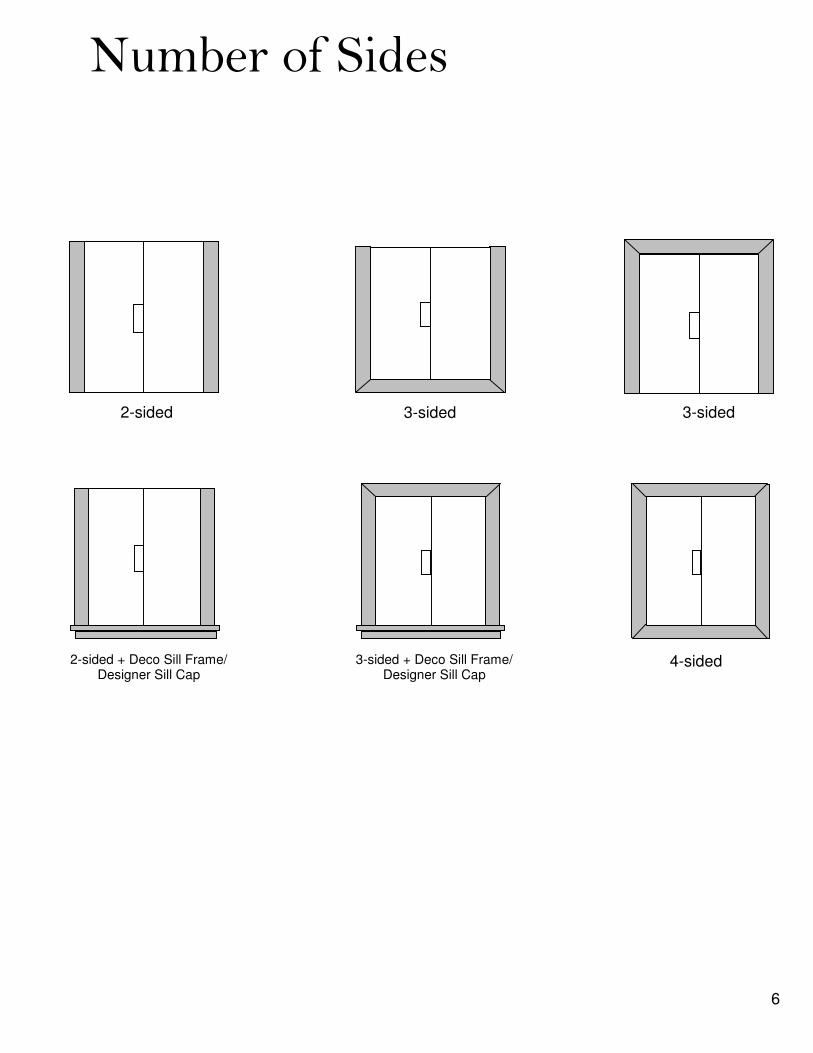
Number of Sides
6
2-sided
2-sided + Deco Sill Frame/ Designer Sill Cap
3-sided 3-sided
4-sided 3-sided + Deco Sill Frame/ Designer Sill Cap
Measuring For Different Frames
7
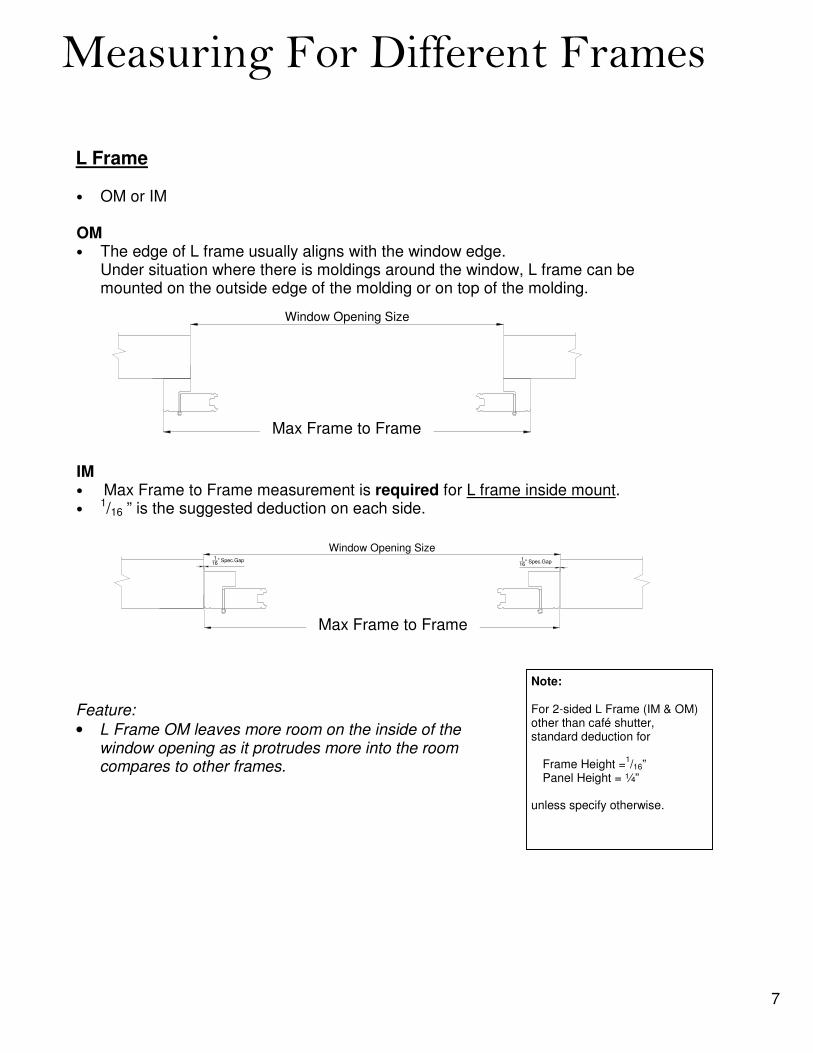
L Frame • OM or IM OM • The edge of L frame usually aligns with the window edge.
Under situation where there is moldings around the window, L frame can be mounted on the outside edge of the molding or on top of the molding.
IM • Max Frame to Frame measurement is required for L frame inside mount. •
1/16 ” is the suggested deduction on each side. Feature:
• L Frame OM leaves more room on the inside of the window opening as it protrudes more into the room compares to other frames.
Note: For 2-sided L Frame (IM & OM) other than café shutter, standard deduction for
Frame Height =
1/16”
Panel Height = ¼”
unless specify otherwise.
Window Opening Size
Mam Frame to Frame SizeMax Frame to Frame
116
" Spec.Gap 116
" Spec.Gap
Window Opening Size
Mam Frame to Frame SizeMax Frame to Frame
Measuring For Different Frames
8
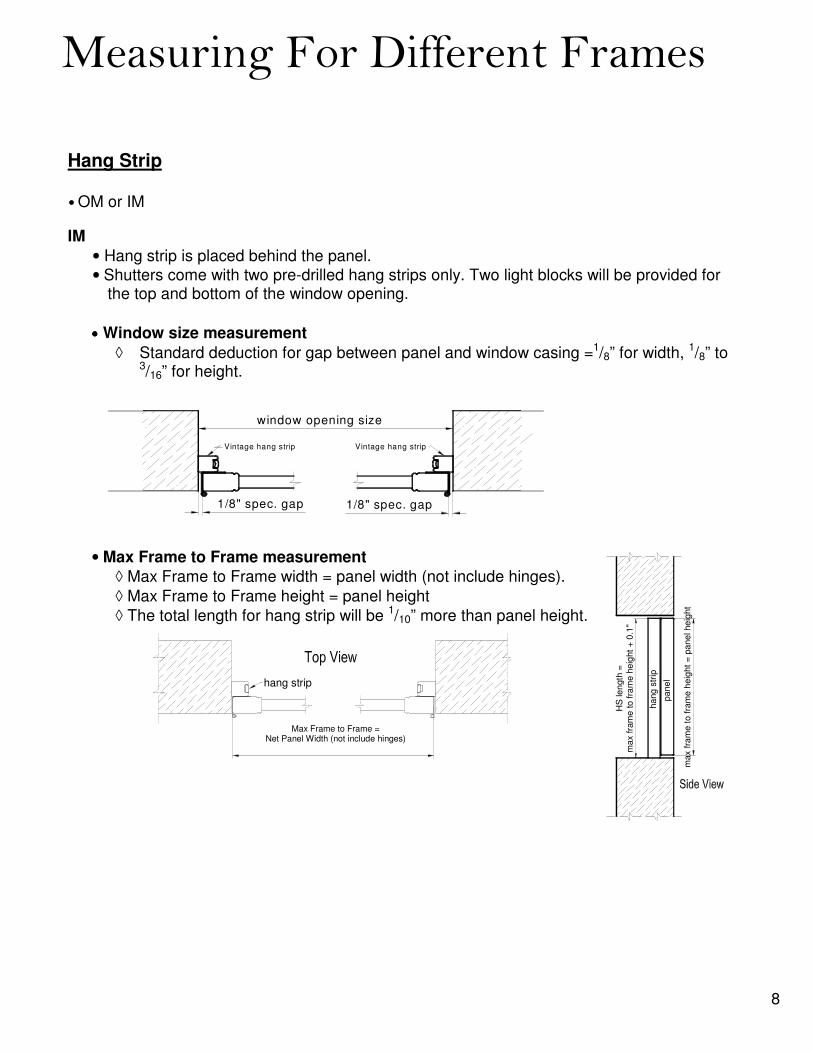
Hang Strip • OM or IM
IM
• Hang strip is placed behind the panel.
• Shutters come with two pre-drilled hang strips only. Two light blocks will be provided for the top and bottom of the window opening.
•••• Window size measurement
◊ Standard deduction for gap between panel and window casing =1/8” for width, 1/8” to 3/16” for height.
• Max Frame to Frame measurement
◊ Max Frame to Frame width = panel width (not include hinges).
◊ Max Frame to Frame height = panel height ◊ The total length for hang strip will be 1/10” more than panel height.
window opening size
1/8" spec. gap
Vintage hang strip
1/8" spec. gap
Vintage hang strip
HS
le
ngth
=
ma
x f
ram
e t
o fra
me h
eig
ht
+ 0
.1"
max f
ram
e t
o f
ram
e h
eig
ht
= p
ane
l he
ight
ha
ng
str
ip
pa
ne
lhang strip
Max Frame to Frame size = Net Panel Width(No include hinges)
Max Frame to Frame = Net Panel Width (not include hinges)

Measuring For Different Frames
9
Hang Strip OM • Hang strip is placed on the side of the panel • Panel is ½ ” wider than the window opening on both left and right side
Feature:
• An innovative frame design for easier installation. Hang strip comes with pre-drilled holes and can be installed with screws that will be hidden under the inserts.
Hang strip OM; beside the panels (shown in Vintage Hang Strip)
window opening size
1/2" 1/2"
Max Frame to Frame
Note: For 2-sided Hang Strip (OM) other than café shutter, standard deduction for
Frame Height =
1/16”
Panel Height = ¼”
unless specify otherwise.

Measuring For Different Frames
10
Measuring For Different Frames
Deco Frame
• OM only
• Must have enough flat surface around the window opening for frame installation. Max. Frame to Frame
Window Size
Feature:
• Deco frame can help to hide an imperfect window.
• The elegant frame profile adds a decorative touch to an ordinary window.
• An innovative frame design for easier and touch-up free installation. Deco frame comes with pre-drilled holes and can be installed with screws that will be hidden under the inserts.
Note: For 2-sided Deco Frame (OM) other than café shutter, standard deduction for
Frame Height =
1/16”
Panel Height = ¼”
unless specify otherwise.
Feature: • Z frame is less protruding into the room.
• It can help to hide an imperfect window.
• The elegant frame profile adds a decorative touch to an ordinary window.
Z Frame • IM only • Standard deduction =1/16” (all sides for window size)
Max Frame to Frame Size
116
"Spec.Gap 116
" Spec.Gap
Window Opening SizeNote: For 2-sided Z Frame (IM) other than café shutter, standard deduction for
Frame Height =
1/16”
Panel Height = ¼”
unless specify otherwise.
11
Measuring For Different Frames
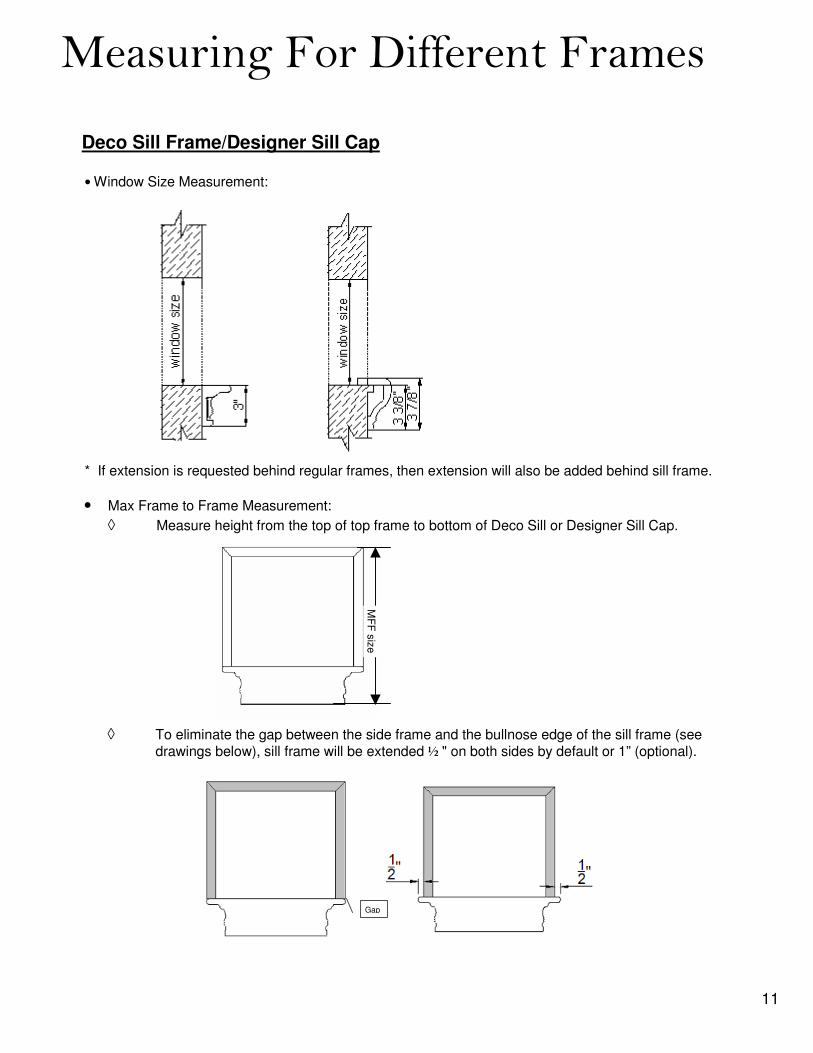
• Window Size Measurement:
* If extension is requested behind regular frames, then extension will also be added behind sill frame.
• Max Frame to Frame Measurement:
◊ Measure height from the top of top frame to bottom of Deco Sill or Designer Sill Cap.
Deco Sill Frame/Designer Sill Cap
MF
F s
ize
Gap
◊ To eliminate the gap between the side frame and the bullnose edge of the sill frame (see drawings below), sill frame will be extended ½ " on both sides by default or 1” (optional).
0224 12
Measuring For Different Frames
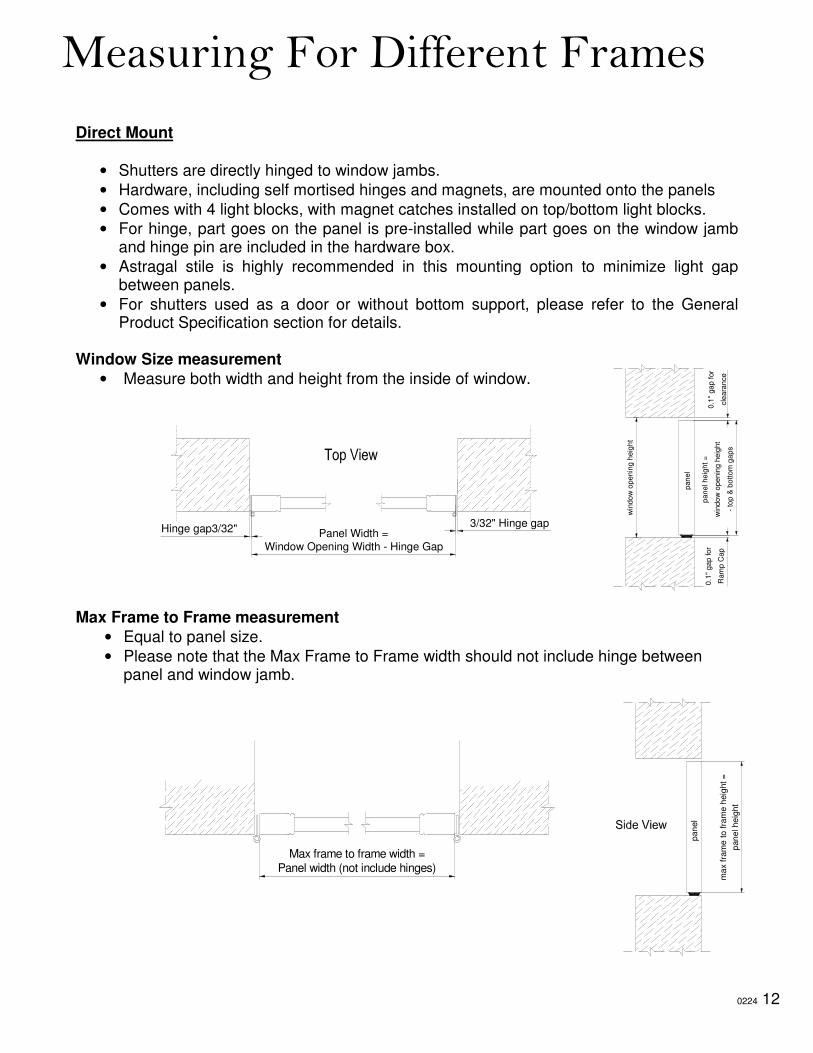
Direct Mount
• Shutters are directly hinged to window jambs.
• Hardware, including self mortised hinges and magnets, are mounted onto the panels
• Comes with 4 light blocks, with magnet catches installed on top/bottom light blocks.
• For hinge, part goes on the panel is pre-installed while part goes on the window jamb and hinge pin are included in the hardware box.
• Astragal stile is highly recommended in this mounting option to minimize light gap between panels.
• For shutters used as a door or without bottom support, please refer to the General Product Specification section for details.
Window Size measurement
• Measure both width and height from the inside of window. Max Frame to Frame measurement
• Equal to panel size.
• Please note that the Max Frame to Frame width should not include hinge between panel and window jamb.
Panel Width = Window Opening Width - Hinge Gap
Hinge gap3/32"3/32" Hinge gap
Max frame to frame width =
Panel width (not include hinges)
win
do
w o
pe
nin
g h
eig
ht
0.1
" g
ap
fo
r
Ram
p C
ap
0.1
" ga
p f
or
cle
ara
nce
pan
el
pa
nel he
igh
t =
win
do
w o
pe
nin
g h
eig
ht
- t
op
& b
ott
om
ga
ps
ma
x f
ram
e to
fra
me h
eig
ht =
pan
el he
igh
t
pan
el
13
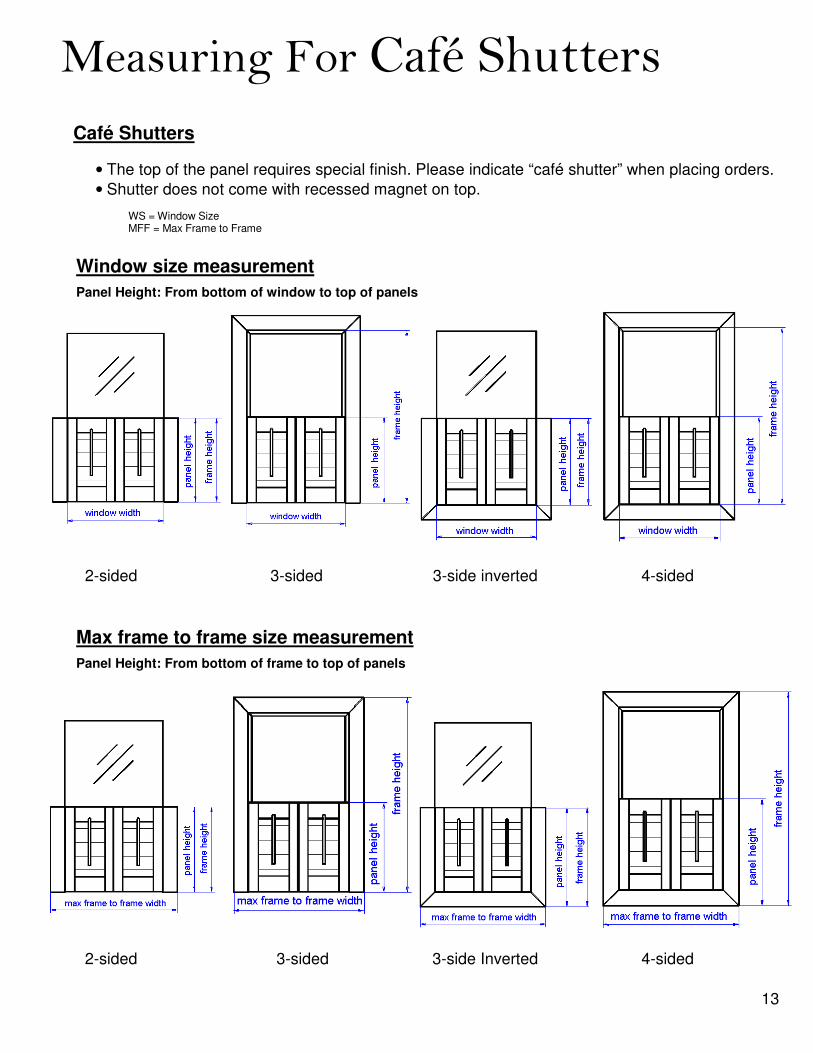
Measuring For Café Shutters
Café Shutters
• The top of the panel requires special finish. Please indicate “café shutter” when placing orders.
• Shutter does not come with recessed magnet on top.
WS = Window Size MFF = Max Frame to Frame
2-sided 3-sided 4-sided
3-side Inverted 2-sided
Window size measurement
Panel Height: From bottom of window to top of panels
Max frame to frame size measurement
Panel Height: From bottom of frame to top of panels
3-side inverted
3-sided 4-sided
14
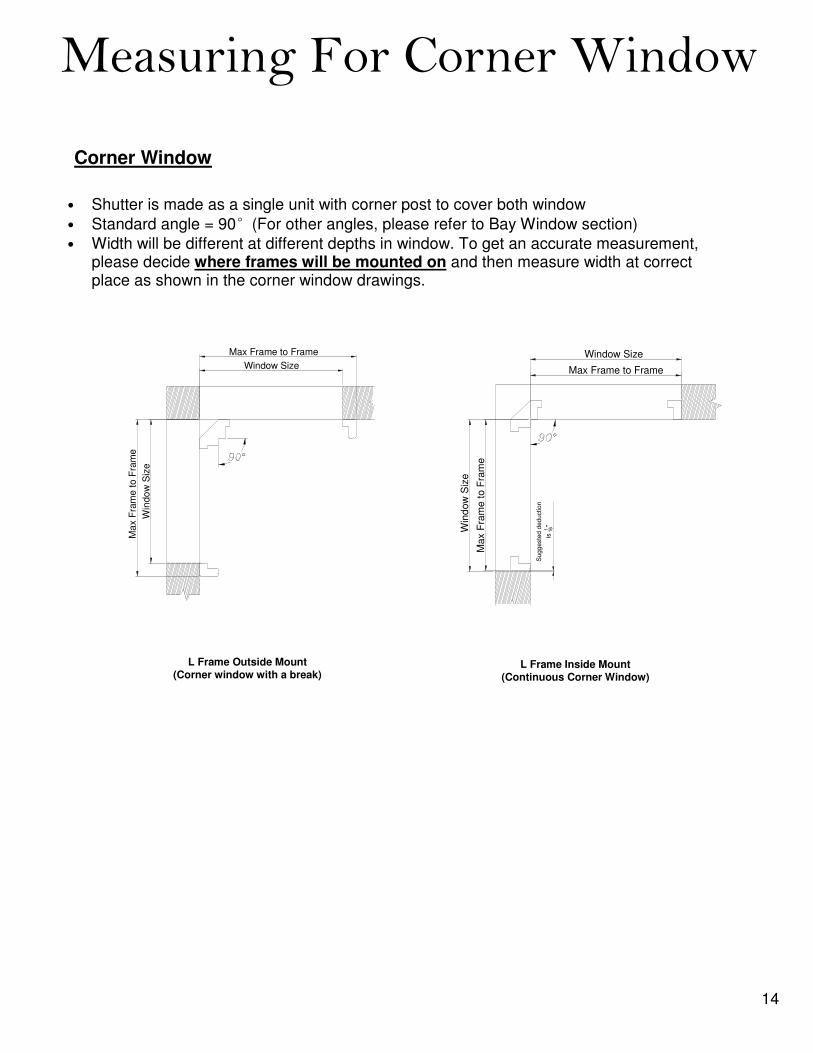
Measuring For Corner Window
• Shutter is made as a single unit with corner post to cover both window
• Standard angle = 90°(For other angles, please refer to Bay Window section)
• Width will be different at different depths in window. To get an accurate measurement, please decide where frames will be mounted on and then measure width at correct place as shown in the corner window drawings.
Corner Window
L Frame Inside Mount (Continuous Corner Window)
L Frame Outside Mount (Corner window with a break)
Ma
x F
ram
e to
Fra
me
Win
do
w S
ize
Max Frame to Frame
Window Size
Sugg
este
d d
eduction
is 1 1
6"
Max F
ram
e to F
ram
e
Win
dow
Siz
e
Max Frame to Frame
Window Size
15
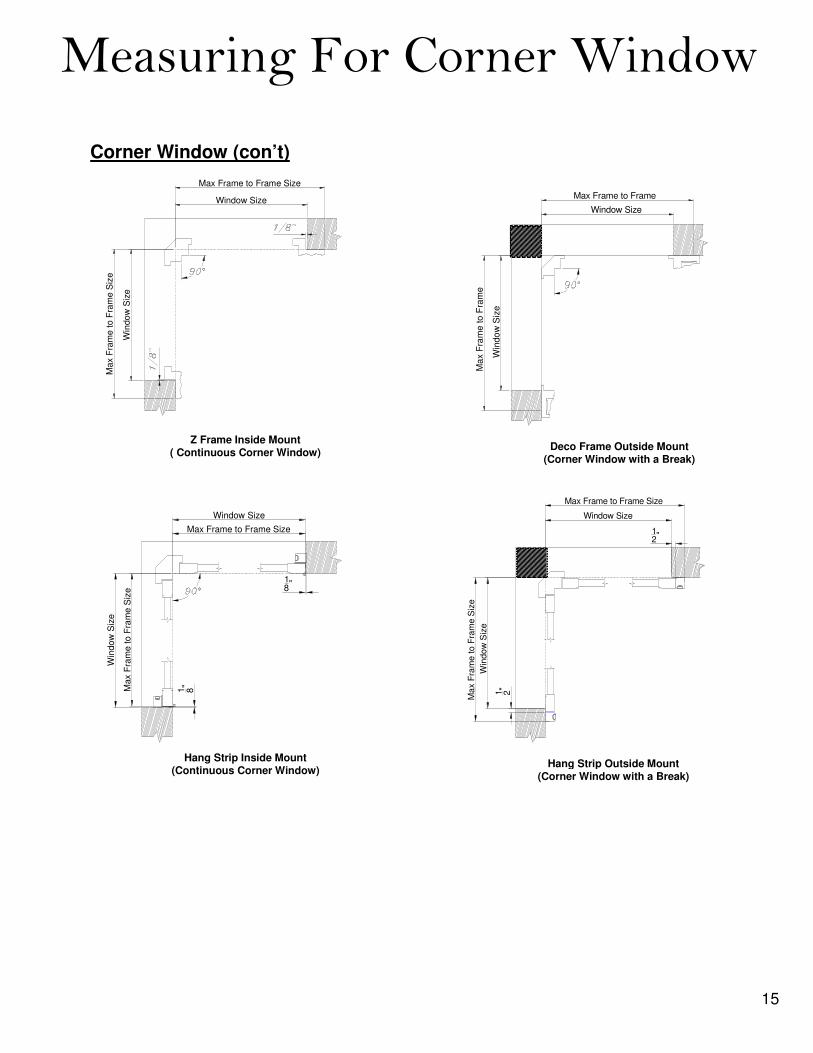
Measuring For Corner Window
Max F
ram
e to F
ram
e S
ize
Win
dow
Siz
e
Max Frame to Frame Size
Window Size
18"
1 8"
Hang Strip Inside Mount (Continuous Corner Window)
Z Frame Inside Mount ( Continuous Corner Window)
Window Size
Ma
x F
ram
e t
o F
ram
e S
ize
Win
do
w S
ize
Max Frame to Frame Size
Hang Strip Outside Mount (Corner Window with a Break)
12"
1 2"
Win
do
w S
ize
Ma
x F
ram
e to
Fra
me S
ize
Window Size
Max Frame to Frame Size
Deco Frame Outside Mount (Corner Window with a Break)
Window Size
Max Frame to Frame
Ma
x F
ram
e to
Fra
me
Win
do
w S
ize
Corner Window (con’t)

16
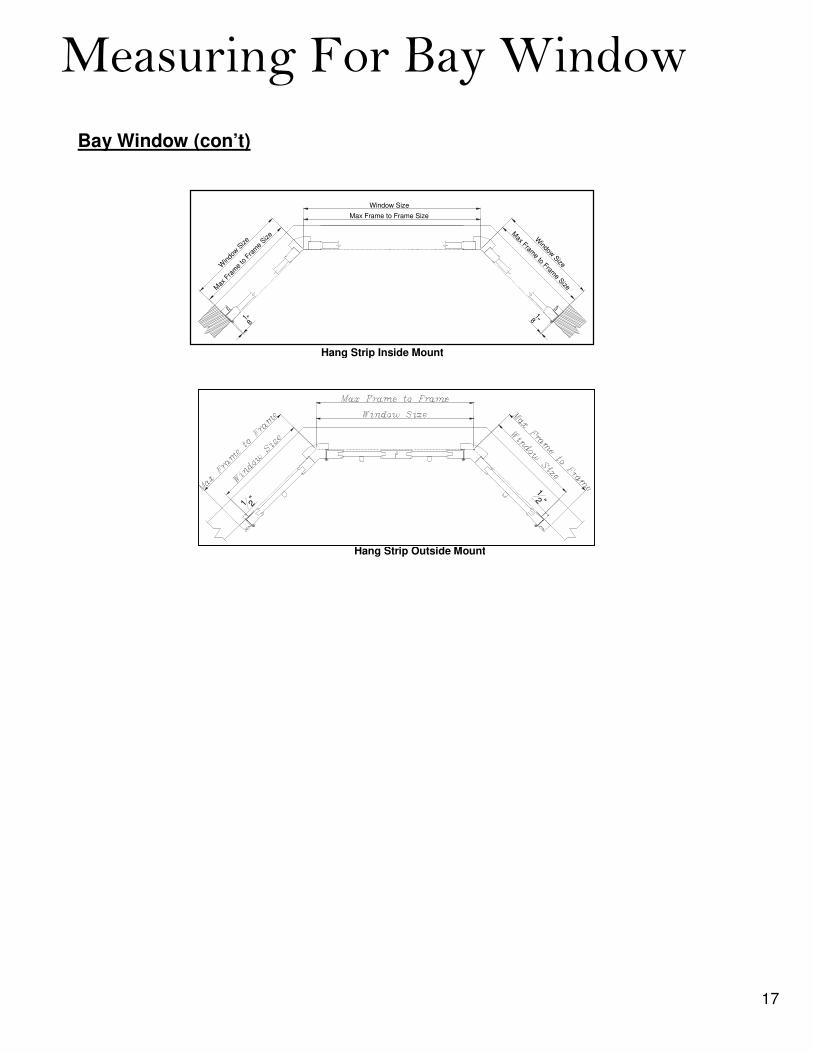
Measuring For Bay Window
• Shutter is made as a single unit with bay post to cover both window
• Standard angle = 135°(Custom angle is available)
• Width will be different at different depths in window. To get an accurate measurement, please decide where frames will be mounted on and then measure width at correct place as shown following diagrams.
Bay Window
Max Frame to Frame
Glass
L Frame Outside Mount
Deco Frame Outside Mount
Glass
Max Frame to FrameMa x F r a m e t o F r a m e
Z Frame Inside Mount
Max
Fra
me
to F
ram
e Siz
e
Windo
w S
ize
Max Frame to Frame Size
Window Size
Window
Size
Max Fram
e to Frame Size
L Frame Inside Mount
Max Frame to Frame
Max Fram
e to FrameM
ax F
ram
e to
Fra
me
17
Measuring For Bay Window
Hang Strip Inside Mount
1 2"
12 "
Hang Strip Outside Mount
Window Size
Max Frame to Frame Size
18 "
Max Fram
e to Frame Size
Window
SizeWin
dow S
ize
Max
Fra
me
to F
ram
e Siz
e
18"
Bay Window (con’t)
18
Measuring For T Post
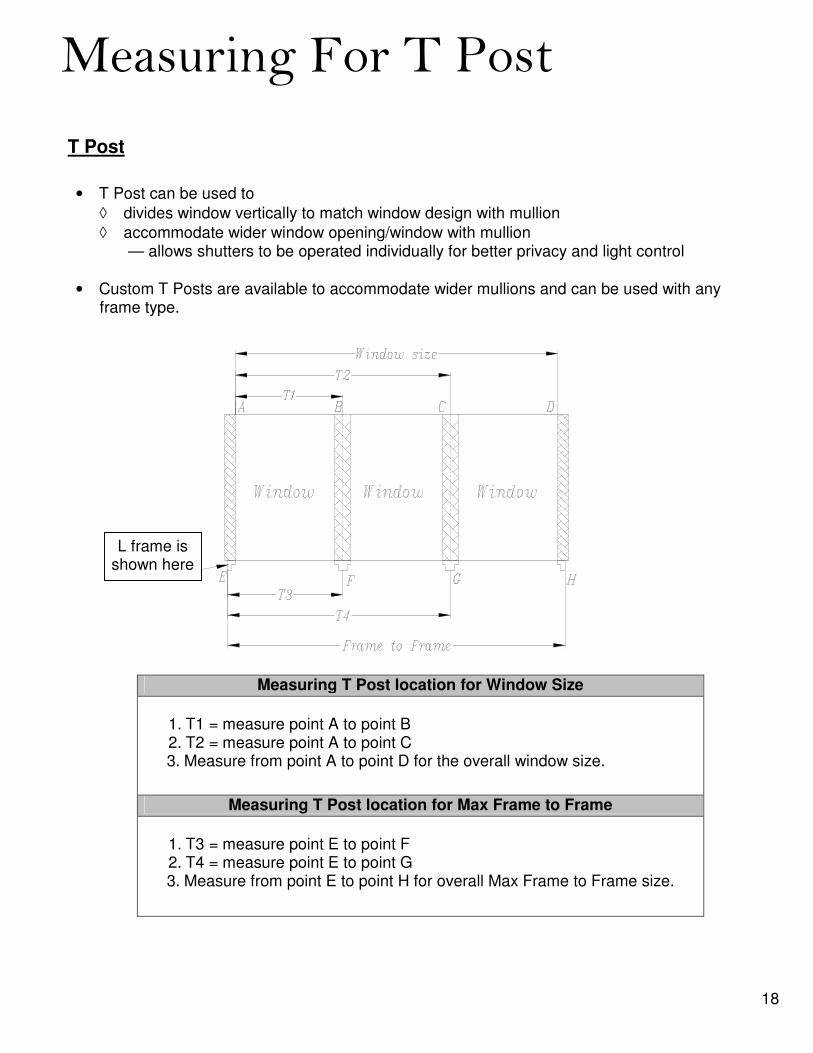
• T Post can be used to
◊ divides window vertically to match window design with mullion
◊ accommodate wider window opening/window with mullion — allows shutters to be operated individually for better privacy and light control
• Custom T Posts are available to accommodate wider mullions and can be used with any frame type.
T Post
L frame is shown here
Measuring T Post location for Window Size
1. T1 = measure point A to point B
2. T2 = measure point A to point C
3. Measure from point A to point D for the overall window size.
Measuring T Post location for Max Frame to Frame
1. T3 = measure point E to point F
2. T4 = measure point E to point G
3. Measure from point E to point H for overall Max Frame to Frame size.

19
Measuring For T Post
T Post for Hang Strip OM
• Window size measurement: ◊ T Post is notched in order to fit into the window opening. T Post front face is
flushed with hang strip front face.
• Max Frame to Frame measurement: ◊ T Post will not be notched as the distance of the hang strip from the window
edge cannot be determined.
1 2"
1 2"
1 34"
1 2"
1 2"
12"
1 2"
12"
12
"
20
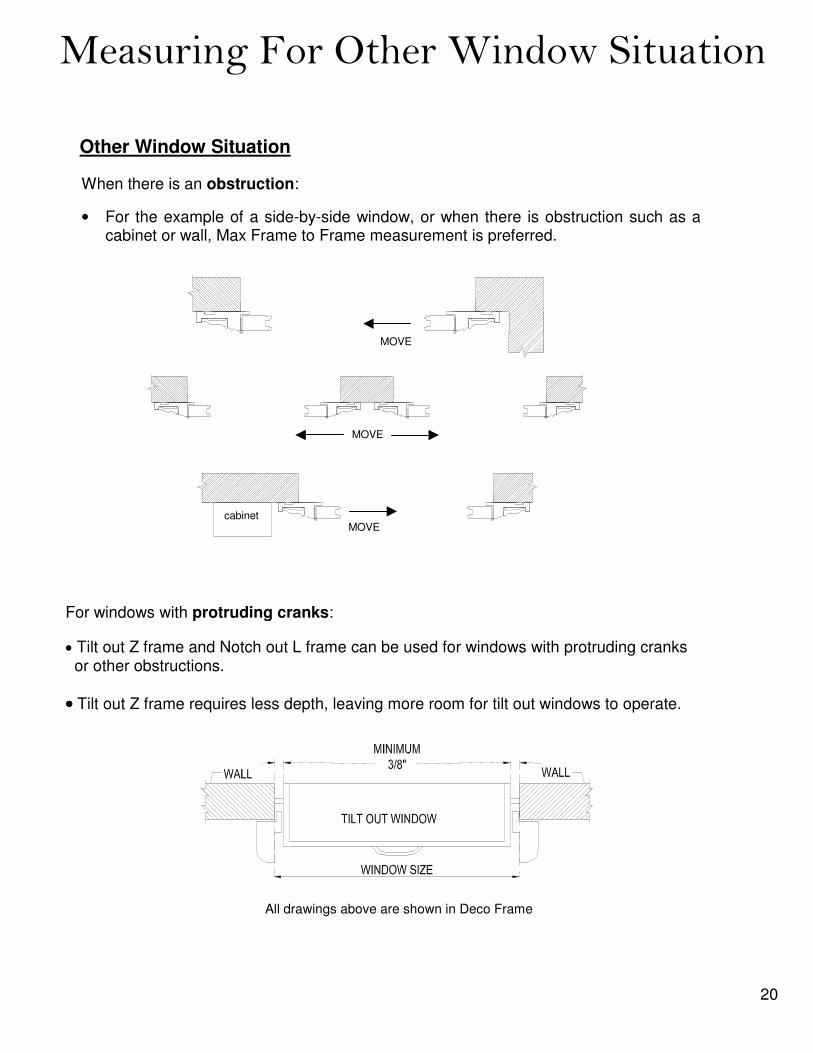
When there is an obstruction:
• For the example of a side-by-side window, or when there is obstruction such as a cabinet or wall, Max Frame to Frame measurement is preferred.
Other Window Situation
MOVE
MOVE
cabinet MOVE
All drawings above are shown in Deco Frame
For windows with protruding cranks:
•••• Tilt out Z frame and Notch out L frame can be used for windows with protruding cranks or other obstructions.
•••• Tilt out Z frame requires less depth, leaving more room for tilt out windows to operate.
Measuring For Other Window Situation

1021
Measuring For Other Window Situation
Other Window Situation
When there is a bullnose wall:
◊ Place frame on the flat part of the wall (where the curve ends) for both OM and IM width as shown below.
◊ Please provide the smallest measurement for IM.
*** Please measure from the point where bullnose ends and flat wall begins.
For windows with molding, casing or trim:
◊ Frame can be placed on the molding or beside the molding (see drawing below).
◊ Please provide Max Frame to Frame measurement.
Max Frame to Frame
Max Frame to Frame
Drawings are shown in L frame